Это первая статья в серии, где я буду документировать мой опыт написания веб-приложения на Python, используя микрофреймворк Flask.
Здесь список всех статей в серии:
Часть 1: Привет, Мир!
Часть 2: Шаблоны
Часть 3: Формы
Часть 4: База данных
Часть 5: Вход пользователей
Часть 6: Страница профиля и аватары
Часть 7: Unit-тестирование
Часть 8: Подписчики, контакты и друзья
Часть 9: Пагинация
Часть 10: Полнотекстовый поиск
Часть 11: Поддержка e-mail
Часть 12: Реконструкция
Часть 13: Дата и время
Часть 14: I18n and L10n
Часть 15: Ajax
Часть 16: Отладка, тестирование и профилирование
Часть 17: Развертывание на Linux (даже на Raspberry Pi!)
Часть 18: Развертывание на Heroku Cloud
Моя предыстория
Я разработчик ПО с двузначным числом лет опыта разработки комплексных приложений на нескольких языках. Впервые я познакомился с Python для создания привязок к C++ библиотеке на работе. Вдобавок к Python, я писал веб-приложения на PHP, Ruby, Smalltalk и, верите вы или нет, еще на С++. Из всего этого, я нахожу комбинацию Python/Flask самой гибкой.
Приложение
Приложение, которое я собираюсь разрабатывать как часть этого руководства, является сервером микроблогов, и я решил назвать его microblog. Довольно креативно, я знаю.
Во время нашего прогресса я затрону следующие темы:
- Управление пользователями, включая управление входами, сессиями, ролями пользователя, профилями и пользовательскими аватарами
- Управление базой данных, включая миграцию
- Поддержка форм, включая валидацию полей
- Пагинация длинных списков элементов
- Полнотекстовый поиск
- E-mail уведомления пользователей
- HTML шаблоны
- Поддержка нескольких языков
- Кеширование и другая оптимизация производительности
- Методы отладки для серверов разработки и продакшна
- Установка на продакшн сервер
Как видите, я весьма значительно берусь за все это. Надеюсь, что это приложение, когда я его закончу, станет чем-то вроде шаблона для написания других веб-приложений.
Требования
Если ваш компьютер поддерживает Python 2.6/2.7, то все, вероятно, пойдет хорошо. Приложение из руководства должно нормально работать на Windows, OS X и Linux.
Это руководство подразумевает, что вы знакомы с окном терминала (командной консолью в случае Windows), и вы знаете основные команды для работы с файлами вашей ОС. Если это не так, то перед тем как продолжить, я рекомендую вам ознакомиться с тем, как создавать директории, копировать файлы и т.д., используя консоль.
Наконец, вы должны чувствовать себя свободно в написании кода на Python. Знакомство с модулями и пакетами этого языка также не помешает.
Установка Flask
Ну что ж, приступим!
Если у вас еще не установлен Python 2.7, то берем его отсюда.
Теперь нам нужно установить Flask и несколько расширений, которые мы будем использовать. Я предпочитаю создание виртуального окружения, где все это будет установлено таким образом, что ваша основная установка Python затронута не будет. В качестве бонуса, вам не нужен будет root доступ для установки таким способом.
Итак, открываем терминал, выбираем место, где будет ваше приложение, и создаем новую папку, в которой оно будет содержаться. Назовем эту папку microblog.
Далее скачиваем virtualenv.py и кладем его внутрь новой папки.
Чтобы создать новое окружение введите следующую команду:
python virtualenv.py flask
Эта команда создаст полноценное окружение Python внутри папки flask
Виртуальные окружения могут быть активированы и деактивированы по желанию. Активированное окружение добавляет путь своей папки bin в path системы, например, когда вы вызываете интерпретатор python, то получаете версию текущего окружения, а не системную. Лично я никогда не любил это свойство, поэтому ни разу не активировал ни одно из моих окружений, вместо этого я просто вызывал тот интерпретатор, который хотел, печатая его путь.
Прим. пер.: Перед тем как вы начнете вводить команды, хочу отметить, что в комментариях к девятой части отметится баг в flask-whooshalchemy, исправленную версию можнонужно скачать отсюда (репозиторий автора)
Если вы пользователь Linux, OS x или Cygwin, установите flask и расширения, вводя следующие команды одну за одной:
Список команд
flask/bin/pip install flask==0.9
flask/bin/pip install flask-login
flask/bin/pip install flask-openid
flask/bin/pip install flask-mail
flask/bin/pip install sqlalchemy==0.7.9
flask/bin/pip install flask-sqlalchemy==0.16
flask/bin/pip install sqlalchemy-migrate
flask/bin/pip install flask-whooshalchemy==0.54a
flask/bin/pip install flask-wtf==0.8.4
flask/bin/pip install pytz==2013b
flask/bin/pip install flask-babel==0.8
flask/bin/pip install flup
Если же вы пользователь Windows, то команды слегка отличаются:
Список команд
flaskScriptspip install flask==0.9
flaskScriptspip install flask-login
flaskScriptspip install flask-openid
flaskScriptspip install sqlalchemy==0.7.9
flaskScriptspip install flask-sqlalchemy==0.16
flaskScriptspip install sqlalchemy-migrate
flaskScriptspip install flask-whooshalchemy==0.54a
flaskScriptspip install flask-wtf==0.8.4
flaskScriptspip install pytz==2013b
flaskScriptspip install flask-babel==0.8
flaskScriptspip install flup
Эти команды скачают и установят все пакеты, которые мы будем использовать в нашем приложении.
Учтите, что мы собираемся использовать Flask 0.9, а не последнюю версию. Flask 0.10 не было довольно долго и некоторые расширения не готовы для работы с данной версией. Также есть несколько несовместимостей между пакетами и последней версией pip, которые решены использованием конкретных версий для установки.
Windows пользователей ждет еще один шаг. Наблюдательный читаель заметит, что в списке команд для Windows отсутствует flask-mail. Это расширение не устанавливается чисто на Windows, поэтому мы пойдем обходным путем:
flaskScriptspip install --no-deps lamson chardet flask-mail
Я не буду вдаваться в подробности, поэтому если вы хотите узнать больше, прочтите документацию к flask-mail.
Если установка всех пакетов прошла успешно, вы можете удалить virtualenv.py, поскольку файл нам больше не понадобится.
«Hello, World!» в Flask
Теперь у вас есть подпапка flask, в вашей папке microblog, содержащая интерпретатор Python и фреймворк Flask с расширениями, которые мы будем использовать в этом приложении. Настало время написать наше первое веб-приложение!
После того как вы переместились папку microblog, давайте создадим основную структуру папок для нашего приложения:
mkdir app
mkdir app/static
mkdir app/templates
mkdir tmp
В папку app мы поместим само наше приложение. Подпапка static нужна для хранения статики, такой как картинки, javascript файлы и таблицы стилей. Подпапка templates, очевидно, предназначена для хранения наших шаблонов.
Давайте начнем с создания простого скрипта инициализации нашего пакета app (файл app/__init__.py)
from flask import Flask

app = Flask(__name__)
from app import views
Скрипт выше просто создает объект приложения (наследуя Flask), затем импортирует модуль представлений, который мы еще не написали.
Представления — это обработчики, которые отвечают на запросы веб-браузера. Представления в Flask пишутся как Python функции. Каждая функция представления сопоставляется с одним или несколькими запросами URL.
Напишем нашу первую функцию представления (файл app/views.py)
from app import app

@app.route('/')
@app.route('/index')
def index():
    return "Hello, World!"
Это весьма простое представление, которое просто возвращает строку для отображения в пользовательском браузере. Два декоратора route создают привязку адресов / и /index к этой функции.
Последним шагом для получения полностью работающего веб-приложения будет создание скрипта, который стартует веб-сервер нашего приложения. Давайте назовем скрипт run.py и положим его в корневой каталог (microblog/):
#!flask/bin/python
from app import app
app.run(debug = True)
Скрипт просто импортирует переменную app из нашего пакета app и вызывает метод run для того, чтобы запустить сервер. Помните, что переменная app — экземпляр класса Flask, мы создали его выше.
Для запуска вашего приложения просто запустите скрипт. На OS X, Linux и Cygwin вам следует пометить файл исполняемым перед тем как вы сможете его запустить.
chmod a+x run.py
Тогда скрипт может быть вызван просто:
./run.py
В Windows процесс немного отличается. Нет необходимости помечать файл исполняемым. Вместо этого вам нужно запустить скрипт как аргумент интерпретатора Python:
flask/Scripts/python run.py
После старта сервер будет прослушивать порт 5000, ожидая соединений. Теперь откроем браузер и введем следующий URL в адресную строку:
Или же вы можете использовать эту ссылку:
http://localhost:5000/index
Теперь вы увидели маршрутизацию в действии? Первый URL привязан к /, в то время как второй к /index. Оба маршрута ассоциированы с нашей функцией представления, поэтому они дают одинаковый результат. Если вы введете любой другой маршрут, то получите ошибку, так как только эти два были привязаны к функции представления.
Когда вы закончите играть с сервером вы можете просто нажать Ctrl-C, чтобы остановить его.
И этим я хочу закончить первую часть этого руководства.
Те из вас, кто поленился печатать, могут скачать код из этого руководства ниже:
Скачать microblog-0.1.zip.
Обратите внимание, что вам нужно установить Flask, чтобы запустить приложение из архива выше.
Что дальше
В следующей части серии мы изменим наше маленькое приложение для использования HTML шаблонов.
Надеюсь увидимся в следующей части.
Мигель
Есть масса вариантов запустить собственный веб-сервер, обрабатывающий поступающие от пользователей HTTP запросы, и возвращающий результат в их браузеры. В данном примере мы рассмотрим создание такого сервера при помощи Python.
Также нам потребуется Flask – специальный инструмент, с помощью которого можно создавать сайты на Python. Это микрофреймворк, имеющий встроенный веб-сервер. Будем предполагать, что вы работаете под Linux-системой, поэтому команды для Windows в рамках этой статьи рассматривать не будем, при желании вы сами сможете найти аналоги. Вообще, если вам нужен качественный ресурс для конкретных целей (особенно коммерческих), то стоит заказать создание сайта у профессионалов. Они разработают для вас уникальный дизайн, продумают структуру, спланируют продвижение и т. д. Мы же рассматриваем просто азы создания веб-сервера.
Устанавливаем нужные библиотеки
Предположим, что Python, pip и virtualenv у вас уже установлены и настроены, соответствующие статьи есть на сайте. Теперь перейдет к загрузке Flask:
pip install flask
Если вам больше нравится использовать виртуальные окружениями, то зайдите в его директорию и уже там выполните следующую команду:
source venv/bin/activate
Для проверки правильности установки, можно создать файлик server.py, в котором будет такое содержимое:
from flask import Flask
app = Flask(__name__)
@app.route("/")
def hello():
    return "Hello World!"
if __name__ == "__main__":
    app.run()
Для его выполнения воспользуйтесь командой:
python server.py
Изначально для работы Flask используется порт 5000. Заходим в браузере на следующий адрес — http://localhost:5000. Если вы увидите такую фразу «Hello World!», значит все сделано правильно.
С помощью Flask можно делать немало интересных штук, к примеру, осуществлять обработку GET и POST параметров.
Теперь нам нужно переработать скрипт так, чтобы он смог принять имя пользователя, а затем вывел приветствие на экране:
from flask import Flask
app = Flask(__name__)
@app.route("/", methods=['GET'])
def index(username):
    return "Hello, %s!" % username
if __name__ == "__main__":
    app.run(host='0.0.0.0', port=4567)
Мы указали, что теперь для работы скрипта будет использоваться порт 4567. Также он будет через адресную строку принимать имя от пользователя. Открываем в браузере следующий адрес: http://localhost:4567/yourname. Ответ должен быть таким: «Hello, yourname». Этим подтверждается успешная работа сервера, он вернул нужную нам строку.
Настройка прокси
Если вы хотите, чтобы вашим сайтом могли пользоваться и другие люди, вам понадобится внешний IP адрес. Разбираетесь в этом или имеете VPS? Тогда у вас не возникнет проблем с этим. Но если это для вас что-то новенькое, то прибегнем к более легкому, но не особо универсальному способу – воспользуемся прокси сервером.
Для этого нам понадобится бесплатная программка ngrok. Он занимается поддержкой постоянного соединения и доставлением вам всех данных, полученных от других людей. Запускаем ее при помощи следующей команды, в параметре указав любой незанятый порт:
./ngrok http 4567
Ответ должен состоять из нескольких строк, а среди них должно быть что-то такое:
Forwarding http://7e9ea9dc.ngrok.io -> 127.0.0.1:4567
Вот именно это и есть тот самый адрес, перейдя по которому люди будут оказываться на вашем сайте. На этом запуск простейшего веб-сервера можно считать закаченным.
I have a project to do for after create a webpage that display the latest weather from my CSV file.
I would like some details how to do it (don’t really get the http://flask.pocoo.org/docs/installation/#installation installation setup)
Can anyone mind explain me how to do it simply?
Thanks.
I’m running on Windows 7, with the Windows Powershell.
![]()
Santosh Kumar
25.7k19 gold badges67 silver badges115 bronze badges
asked Jul 29, 2013 at 6:24
![]()
0
Install pip as described here: How do I install pip on Windows?
Then do
pip install flask
That installation tutorial is a bit misleading, it refers to actually running it in a production environment.
![]()
answered Jul 29, 2013 at 6:33
![]()
Uku LoskitUku Loskit
40.2k9 gold badges89 silver badges92 bronze badges
0
First install flask using pip,
pip install Flask
* If pip is not installed then install pip
Then copy below program (hello.py)
from flask import Flask
app = Flask(__name__)

@app.route("/")
def hello():
    return "Hello World!"

if __name__ == "__main__":
    app.run()
Now, run the program
python hello.py
Running on http://127.0.0.1:5000/ (Press CTRL+C to quit)
Just copy paste the above address line in your browser.
Reference: http://flask.pocoo.org/
answered Feb 27, 2017 at 12:42
![]()
imbondimbond
1,9601 gold badge19 silver badges22 bronze badges
1
Assuming you are a PyCharm User, its pretty easy to install Flask
This will help users without shell pip access also.
- Open Settings(Ctrl+Alt+s) >>
- Goto Project Interpreter>>
- Double click pip>> Search for flask
- Select and click Install Package ( Check Install to site users if intending to use Flask for this project alone
Done!!!
Cases in which flask is not shown in pip:
Open Manage Repository>>
Add(+) >> Add this following url
https://www.palletsprojects.com/p/flask/
Now back to pip, it will show related packages of flask,
- select flask>>
- install package>>
Voila!!!
answered Jun 20, 2018 at 4:42
![]()
Follow as in the url
This is how i do :
1) create an app.py in Sublime Text or Pycharm, or whatever the ide, and in that app.py have this code
from flask import Flask

app = Flask(__name__)

@app.route('/')
def helloWorld():
    return'<h1>Hello!</h1>'
This is a very basic program to printout a hello , to test flask is working.I would advise to create app.py in a new folder, then locate where the folder is on command prompt
enter image description here
type in these line of codes on command prompt
>py -m venv env
>envScriptsactivate
>pip install flask
Then
>set FLASK_APP=app.py
>flask run
Then press enter all will work
The name of my file is app.py, give the relevant name as per your file in code line
set FLASK_APP=app.py
Also if your python path is not set, in windows python is in AppData folder its hidden, so first have to view it and set the correct path under environment variables. This is how you reach environment variables
Control panel ->> system and security ->> system ->> advanced system setting
Then in system properties you get environment variables
answered Sep 27, 2019 at 1:52
![]()
On Windows, installation of easy_install is a little bit trickier, but still quite easy. The easiest way to do it is to download the distribute_setup.py file and run it. The easiest way to run the file is to open your downloads folder and double-click on the file.
Next, add the easy_install command and other Python scripts to the command search path, by adding your Python installation’s Scripts folder to the PATH environment variable. To do that, right-click on the “Computer” icon on the Desktop or in the Start menu, and choose “Properties”. Then click on “Advanced System settings” (in Windows XP, click on the “Advanced” tab instead). Then click on the “Environment variables” button. Finally, double-click on the “Path” variable in the “System variables” section, and add the path of your Python interpreter’s Scripts folder. Be sure to delimit it from existing values with a semicolon. Assuming you are using Python 2.7 on the default path, add the following value:
;C:Python27Scripts
And you are done! To check that it worked, open the Command Prompt and execute easy_install. If you have User Account Control enabled on Windows Vista or Windows 7, it should prompt you for administrator privileges.
Now that you have easy_install, you can use it to install pip:
easy_install pip
answered May 3, 2015 at 9:23
![]()
PriyanshPriyansh
1,12311 silver badges27 bronze badges
First: I assumed you already have Python 2.7 or 3.4 installed.
1: In the Control Panel, open the System option (alternately, you can right-click on My Computer and select Properties). Select the “Advanced system settings” link.
-
In the System Properties dialog, click “Environment Variables”.
-
In the Environment Variables dialog, click the New button underneath the “System variables” section.
-
if someone is there that above is not working, then kindly append to your PATH with the C:Python27 then it should surely work. C:Python27Scripts
-
Run this command (Windows cmd terminal): pip install virtualenv
-
If you already have pip, you can upgrade them by running:
pip install —upgrade pip setuptools
-
Create your project. Then, run virtualenv flask
answered Mar 25, 2018 at 20:56
![]()
Ansi Ansi
111 bronze badge
1
heres a step by step procedure (assuming you’ve already installed python):
- first install chocolatey:
open terminal (Run as Administrator) and type in the command line:
C:/> @powershell -NoProfile -ExecutionPolicy Bypass -Command «iex ((new-object net.webclient).DownloadString(‘https://chocolatey.org/install.ps1’))» && SET PATH=%PATH%;%ALLUSERSPROFILE%chocolateybin
it will take some time to get chocolatey installed on your machine. sit back n relax…
-
now install pip. type in terminal
cinst easy.install pip -
now type in terminal:
pip install flask
YOU’RE DONE !!!
Tested on Win 8.1 with Python 2.7
answered Sep 16, 2015 at 17:34
![]()
Anum SherazAnum Sheraz
2,1111 gold badge27 silver badges48 bronze badges
I have windows 10 and pythonv3.5. @uku answer is correct. however, problem I was facing is that where are python scripts which are to be added in environment variable. So I found out that we need to add
C:Users\AppDataLocalProgramsPythonPython35Scripts
above location as environment variable. If it still doesnot work search for python in C Drive then find out script locations.
answered Aug 29, 2017 at 17:25
![]()
If You are using windows then go to python installation path like.
D:Python37Scripts>pip install Flask
it take some movement to download the package.
answered Apr 3, 2019 at 10:42
![]()
you are a PyCharm User, its good easy to install Flask
First open the pycharm press
Open Settings(Ctrl+Alt+s)
Goto Project Interpreter
Double click pip>>
search bar (top of page) you search the flask and click install package
such Cases in which flask is not shown in pip: Open Manage Repository>> Add(+) >> Add this following url
https://www.palletsprojects.com/p/flask/
Now back to pip, it will show related packages of flask,
select flask>>
install package
answered Aug 24, 2019 at 8:30
![]()
Быстрый старт
Рвётесь в бой? Эта страница даёт хорошее введение в Flask. Предполагается, что
вы уже имеете установленный Flask. Если это не так, обратитесь к секции
Инсталляция.
Минимальное приложение
Минимальное приложение Flask выглядит примерно так:
from flask import Flask
app = Flask(__name__)

@app.route('/')
def hello_world():
    return 'Hello World!'

if __name__ == '__main__':
    app.run()
Просто сохраните его под именем наподобие hello.py и запустите с помощью
вашего интерпретатора Python. Только, пожалуйста, не давайте приложению
имя flask.py, так как это вызовет конфликт с самим Flask.
$ python hello.py
 * Running on http://127.0.0.1:5000/
Проследовав по ссылке http://127.0.0.1:5000/
вы увидите ваше приветствие миру.
Итак, что же делает этот код?
- Сначала мы импортировали класс
Flask. Экземпляр этого
класса и будет вашим WSGI-приложением. - Далее мы создаём экземпляр этого класса. Первый аргумент — это имя модуля
или пакета приложения. Если вы используете единственный модуль (как в
этом примере), вам следует использовать __name__, потому что в
зависимости от того, запущен ли код как приложение, или был импортирован
как модуль, это имя будет разным ('__main__'или актуальное имя
импортированного модуля соответственно). Это нужно, чтобы Flask знал,
где искать шаблоны, статические файлы и прочее. Для дополнительной
информации, смотрите документациюFlask. - Далее, мы используем декоратор
route(), чтобы сказать
Flask, какой из URL должен запускать нашу функцию. - Функция, которой дано имя, используемое также для генерации URL-адресов
для этой конкретной функции, возвращает сообщение, которое мы хотим
отобразить в браузере пользователя. - Наконец, для запуска локального сервера с нашим приложением, мы используем
функциюrun(). Благодаря конструкции
if __name__ == '__main__'можно быть уверенным, что сервер запустится
только при непосредственном вызове скрипта из интерпретатора Python, а не
при его импортировании в качестве модуля.
Для остановки сервера, нажмите Ctrl+C.
Публично доступный сервер
Если вы запустите сервер, вы заметите, что он доступен только с вашего
собственного компьютера, а не с какого-либо другого в сети. Так сделано
по умолчанию, потому что в режиме отладки пользователь приложения может
выполнить код на Python на вашем компьютере.
Если у вас отключена опция debug или вы доверяете пользователям в сети,
вы можете сделать сервер публично доступным, просто изменив вызов метода
run() таким вот образом:
Это укажет вашей операционной системе, чтобы она слушала сеть со всех
публичных IP-адресов.
Режим отладки
Метод run() чудесно подходит для запуска локального
сервера для разработки, но вы будете должны перезапускать его всякий раз
при изменении вашего кода. Это не очень здорово, и Flask здесь может
облегчить жизнь. Если вы включаете поддержку отладки, сервер перезагрузит
сам себя при изменении кода, кроме того, если что-то пойдёт не так, это
обеспечит вас полезным отладчиком.
Существует два способа включить отладку. Или установите флаг в объекте
приложения:
app.debug = True
app.run()
Или передайте его как параметр при запуске:
Оба метода вызовут одинаковый эффект.
Внимание.
Несмотря на то, что интерактивный отладчик не работает в многопоточных
окружениях (что делает его практически неспособным к использованию на
реальных рабочих серверах), тем не менее, он позволяет выполнение
произвольного кода. Это делает его главной угрозой безопасности, и поэтому
он никогда не должен использоваться на реальных «боевых» серверах.
Снимок экрана с отладчиком в действии:

Предполагаете использовать другой отладчик? Тогда смотрите Работа с отладчиками.
Маршрутизация
Современные веб-приложения используют «красивые» URL. Это помогает людям
запомнить эти URL, это особенно удобно для приложений, используемых с
мобильных устройств с более медленным сетевым соединением. Если
пользователь может перейти сразу на желаемую страницу, без предварительного
посещения начальной страницы, он с большей вероятностью вернётся на эту
страницу и в следующий раз.
Как вы увидели ранее, декоратор route() используется для
привязки функции к URL. Вот простейшие примеры:
@app.route('/')
def index():
    return 'Index Page'

@app.route('/hello')
def hello():
    return 'Hello World'
Но это еще не все! Вы можете сделать определенные части URL динамически
меняющимися и задействовать в функции несколько правил.
Правила для переменной части
Чтобы добавлять к адресу URL переменные части, можно эти особые части
выделить как <variable_name>. Затем подобные части передаются в вашу
функцию в качестве аргумента — в виде ключевого слова. Также может быть
использован конвертер — с помощью задания правила следующего вида
<converter:variable_name>. Вот несколько интересных примеров
@app.route('/user/<username>')
def show_user_profile(username):
    # показать профиль данного пользователя
    return 'User %s' % username

@app.route('/post/<int:post_id>')
def show_post(post_id):
    # вывести сообщение с данным id, id - целое число
    return 'Post %d' % post_id
Существуют следующие конвертеры:
| int | принимаются целочисленные значения |
| float | как и int, только значения с плавающей точкой |
| path | подобно поведению по умолчанию, но допускаются слэши |
Уникальные URL / Перенаправления
Правила для URL, работающие в Flask, основаны на модуле маршрутизации
Werkzeug. Этот модуль реализован в соответствие с идеей обеспечения
красивых и уникальных URL-адресов на основе исторически попавшего в
обиход — из поведения Apache и более ранних HTTP серверов.
Возьмём два правила:
@app.route('/projects/')
def projects():
    return 'The project page'

@app.route('/about')
def about():
    return 'The about page'
Хоть они и выглядят довольно похожими, есть разница в использовании слэша
в определении URL. В первом случае, канонический URL имеет завершающую
часть projects со слэшем в конце. В этом смысле он похож на папку в
файловой системе. В данном случае, при доступе к URL без слэша, Flask
перенаправит к каноническому URL с завершающим слэшем.
Однако, во втором случае, URL определен без косой черты — как путь к файлу
на UNIX-подобных системах. Доступ к URL с завершающей косой чертой будет
приводить к появлению ошибки 404 «Not Found».
Такое поведение позволяет продолжить работать с относительными URL, даже
если в конце строки URL пропущен слэш — в соответствии с тем, как работают
Apache и другие сервера. Кроме того, URL-адреса останутся уникальными, что
поможет поисковым системам избежать повторной переиндексации страницы.
Построение (генерация) URL
Раз Flask может искать соответствия в URL, может ли он их генерировать?
Конечно, да. Для построения URL для специфической функции, вы можете
использовать функцию url_for(). В качестве первого аргумента
она принимает имя функции, кроме того она принимает ряд именованных
аргументов, каждый из которых соответствует переменной части правила для
URL. Неизвестные переменные части добавляются к URL в качестве параметров
запроса. Вот некоторые примеры:
>>> from flask import Flask, url_for
>>> app = Flask(__name__)
>>> @app.route('/')
... def index(): pass
...
>>> @app.route('/login')
... def login(): pass
...
>>> @app.route('/user/<username>')
... def profile(username): pass
...
>>> with app.test_request_context():
...  print url_for('index')
...  print url_for('login')
...  print url_for('login', next='/')
...  print url_for('profile', username='John Doe')
...
/
/login
/login?next=/
/user/John%20Doe
(Здесь также использован метод test_request_context(),
который будет объяснён ниже. Он просит Flask вести себя так, как будто
он обрабатывает запрос, даже если мы взаимодействуем с ним через оболочку
Python. Взгляните на нижеследующее объяснение. Локальные объекты контекста (context locals).
Зачем Вам может потребоваться формировать URL-ы с помощью функции их обращения
url_for() вместо того, чтобы жёстко задать их в ваших шаблонах?
Для этого есть три веские причины:
1. По сравнению с жёстким заданием URL внутри кода обратный порядок часто
является более наглядным. Более того, он позволяет менять URL за один
шаг, и забыть про необходимость изменять URL повсюду.
2. Построение URL будет прозрачно для вас осуществлять экранирование
специальных символов и данных Unicode, так что вам не придётся отдельно
иметь с ними дела.
3. Если ваше приложение размещено не в корневой папке URL root (а, скажем,
в /myapplication вместо /), данную ситуацию нужным для вас образом
обработает функция url_for().
Методы HTTP
HTTP (протокол, на котором общаются веб-приложения) может использовать
различные методы для доступа к URL-адресам. По умолчанию, route
отвечает лишь на запросы типа GET, но это можно изменить, снабдив
декоратор route() аргументом methods. Вот
некоторые примеры:
from flask import request

@app.route('/login', methods=['GET', 'POST'])
def login():
    if request.method == 'POST':
        do_the_login()
    else:
        show_the_login_form()
Если присутствует метод GET, то автоматически будет добавлен и HEAD.
Вам не придётся иметь с ним дело. Также, при этом можно быть уверенным,
что запросы HEAD будут обработаны в соответствии с требованиями
HTTP RFC (документ с описанием протокола HTTP), так что вам не
требуется ничего знать об этой части спецификации HTTP. Кроме того,
начиная с Flask версии 0.6, для вас будет автоматически реализован
метод OPTIONS автоматически.
Не имеете понятия, что такое метод HTTP? Не беспокойтесь, здесь
приводится быстрое введение в методы HTTP, и почему они важны:
HTTP-метод (также часто называемый командой) сообщает серверу, что
хочет сделать клиент с запрашиваемой страницей. Очень распространены
Следующие методы:
- GET
- Браузер говорит серверу, чтобы он просто получил информацию,
хранимую на этой странице, и отослал её. Возможно, это самый
распространённый метод. - HEAD
- Браузер просит сервер получить информацию, но его интересует только
заголовки, а не содержимое страницы. Приложение предполагает
обработать их так же, как если бы был получен запрос GET, но без
доставки фактического содержимого. В Flask, вам вовсе не требуется
иметь дело с этим методом, так как нижележащая библиотека Werkzeug
сделает всё за вас. - POST
- Браузер говорит серверу, что он хочет сообщить этому URL некоторую
новую информацию, и что сервер должен убедиться, что данные сохранены
и сохранены в единожды. Обычно, аналогичным образом происходит
передача из HTML форм на сервер данных. - PUT
- Похоже на POST, только сервер может вызвать процедуру сохранения
несколько раз, перезаписывая старые значения более одного раза.
Здесь вы можете спросить, зачем это нужно, и есть несколько веских
причин, чтобы делать это подобным образом. Предположим, во время
передачи произошла потеря соединения: в этой ситуации система между
браузером и сервером, ничего не нарушая, может совершенно спокойно
получить запрос во второй раз. С POST такое было бы невозможно,
потому что он может быть вызван только один раз. - DELETE
- Удалить информацию, расположенную в указанном месте.
- OPTIONS
- Обеспечивает быстрый способ выяснения клиентом поддерживаемых для
данного URL методов. Начиная с Flask 0.6, это работает для вас
автоматически.
Теперь самое интересное: в HTML 4 и XHTML1, единственными методами,
которыми форма может отправить серверу данные, являются GET и POST.
Но для JavaScript и будущих стандартов HTML вы также можете использовать
и другие методы. Кроме того, в последнее время HTTP стал довольно
популярным, и теперь браузеры уже не единственные клиенты, использующие
HTTP. Например, его используют многие системы контроля версий.
Статические файлы
Динамические веб-приложения также нуждаются и в статических файлах.
Обычно, именно из них берутся файлы CSS и JavaScript. В идеале ваш
веб-сервер уже сконфигурирован так, чтобы обслуживать их для вас,
однако в ходе разработке это также может делать и сам Flask. Просто
создайте внутри вашего пакета или модуля папку с названием static,
и она будет доступна из приложения как /static.
Чтобы сформировать для статических файлов URL, используйте специальное
окончание 'static':
url_for('static', filename='style.css')
Этот файл должен храниться в файловой системе как static/style.css.
Визуализация шаблонов
Генерация HTML из Python — невесёлое и на самом деле довольно сложное
занятие, так как вам необходимо самостоятельно заботиться о
безопасности приложения, производя для HTML обработку специальных
последовательностей (escaping). Поэтому внутри Flask уже автоматически
преднастроен шаблонизатор Jinja2.
Для визуализации шаблона вы можете использовать метод
render_template(). Всё, что вам необходимо — это указать
имя шаблона, а также переменные в виде именованных аргументов, которые
вы хотите передать движку обработки шаблонов:
from flask import render_template

@app.route('/hello/')
@app.route('/hello/<name>')
def hello(name=None):
    return render_template('hello.html', name=name)
Flask будет искать шаблоны в папке templates. Поэтому, если ваше
приложение выполнено в виде модуля, эта папка будет рядом с модулем, а
если в виде пакета, она будет внутри вашего пакета:
Первый случай — модуль:
/application.py
/templates
    /hello.html
Второй случай — пакет:
/application
    /__init__.py
    /templates
        /hello.html
При работе с шаблонами вы можете использовать всю мощь Jinja2. За
дополнительной информацией обратитесь к официальной Документации по
шаблонам Jinja2
Вот пример шаблона:
<!doctype html>
<title>Hello from Flask</title>
{% if name %}
  <h1>Hello {{ name }}!</h1>
{% else %}
  <h1>Hello World!</h1>
{% endif %}
Также, внутри шаблонов вы имеете доступ к объектам
request, session и
g [1], а также к функции
get_flashed_messages().
Шаблоны особенно полезны при использовании наследования. Если вам
интересно, как это работает, обратитесь к документации по заготовкам
Template Inheritance. Проще говоря, наследование шаблонов позволяет
разместить определённые элементы (такие, как заголовки, элементы навигации
и «подвал» страницы) на каждой странице.
Автоматическая обработка специальных (escape-) последовательностей
(escaping) включена по умолчанию, поэтому если name содержит HTML, он
будет экранирован автоматически. Если вы можете доверять переменной и
знаете, что в ней будет безопасный HTML (например, потому что он пришёл
из модуля конвертирования разметки wiki в HTML), вы можете пометить её
в шаблоне, как безопасную — с использованием класса
Markup или фильтра |safe. За дополнительными
примерами обратитесь к документации по Jinja2.
Вот основные возможности по работе с классом Markup:
>>> from flask import Markup >>> Markup('<strong>Hello %s!</strong>') % '<blink>hacker</blink>' Markup(u'<strong>Hello <blink>hacker</blink>!</strong>') >>> Markup.escape('<blink>hacker</blink>') Markup(u'<blink>hacker</blink>') >>> Markup('<em>Marked up</em> » HTML').striptags() u'Marked up xbb HTML'
Изменено в версии 0.5: Автоматическая обработка escape-последовательностей больше не
активирована для всех шаблонов. Вот расширения шаблонов, которые
активизируют автообработку: .html, .htm, .xml, .xhtml.
Шаблоны, загруженные из строк, не будут обрабатывать специальные
последовательности.
| [1] | Затрудняетесь понять, что это за объект — g? Это то,в чём вы можете хранить информацию для ваших собственных нужд, для дополнительной информации смотрите документацию на этот объект ( g) и sqlite3. |
Доступ к данным запроса
Для веб-приложений важно, чтобы они реагировали на данные, которые
клиент отправляет серверу. В Flask эта информация предоставляется
глобальным объектом request. Если у вас есть некоторый
опыт по работе с Python, вас может удивить, как этот объект может быть
глобальным, и как Flask при этом умудрился остаться ориентированным
на многопоточное выполнение.
Локальные объекты контекста (context locals)
Информация от инсайдера
Прочтите этот раздел, если вы хотите понять, как это работает, и как
вы можете реализовать тесты с локальными переменными контекста. Если
вам это неважно, просто пропустите его.
Некоторые объекты в Flask являются глобальными, но необычного типа. Эти
объекты фактически являются прокси (посредниками) к объектам, локальным
для конкретного контекста. Труднопроизносимо. Но на самом деле довольно
легко понять.
Представьте себе контекст, обрабатывающий поток. Приходит запрос, и
веб-сервер решает породить новый поток (или нечто иное — базовый объект
может иметь дело с системой параллельного выполнения не на базе потоков).
Когда Flask начинает осуществлять свою внутреннюю обработку запроса, он
выясняет, что текущий поток является активным контекстом и связывает
текущее приложение и окружение WSGI с этим контекстом (потоком). Он
делает это с умом — так, что одно приложение может, не ломаясь,
вызывать другое приложение.
Итак, что это означает для вас? В принципе, вы можете полностью
игнорировать, что это так, если вы не делаете чего-либо вроде тестирования
модулей. Вы заметите, что код, зависящий от объекта запроса, неожиданно
будет работать неправильно, так как отсутствует объект запроса. Решением
является самостоятельное создание объекта запроса и его привязка к
контексту. Простейшим решением для тестирования модулей является
использование менеджера контекстов
test_request_context(). В сочетании с оператором with
этот менеджер свяжет тестовый запрос так, что вы сможете с ним
взаимодействовать. Вот пример:
from flask import request

with app.test_request_context('/hello', method='POST'):
    # теперь, и до конца блока with, вы можете что-либо делать
    # с контекстом, например, вызывать простые assert-ы:
    assert request.path == '/hello'
    assert request.method == 'POST'
Другая возможность — это передача целого окружения WSGI методу
request_context() method:
from flask import request

with app.request_context(environ):
    assert request.method == 'POST'
Объект запроса
Объект запроса документирован в секции API, мы не будем рассматривать его
здесь подробно (смотри request). Вот широкий взгляд
на некоторые наиболее распространённые операции. Прежде всего, вам
необходимо импортировать его из модуля flask:
from flask import request
В настоящее время метод запроса доступен через использование атрибута
method. Для доступа к данным формы (данным, которые
передаются в запросах типа POST или PUT), вы можете использовать
атрибут form. Вот полноценный пример работы с
двумя упомянутыми выше атрибутами:
@app.route('/login', methods=['POST', 'GET'])
def login():
    error = None
    if request.method == 'POST':
        if valid_login(request.form['username'],
                       request.form['password']):
            return log_the_user_in(request.form['username'])
        else:
            error = 'Invalid username/password'
    # следущий код выполняется при методе запроса GET
    # или при признании полномочий недействительными
    return render_template('login.html', error=error)
Что произойдёт, если ключ, указанный в атрибуте form, не существует?
В этом случае будет возбуждена специальная ошибка KeyError. Вы
можете перехватить её подобно стандартной KeyError, но если вы этого
не сделаете, вместо этого будет показана страница с ошибкой HTTP 400 Bad
Request. Так что во многих ситуациях вам не придётся иметь дело с этой
проблемой.
Для доступа к параметрам, представленным в URL (?ключ=значение), вы
можете использовать атрибут args:
searchword = request.args.get('key', '')
Мы рекомендуем доступ к параметрам внутри URL через get или через
перехват KeyError, так как пользователь может изменить URL, а
предъявление ему страницы с ошибкой 400 bad request не является
дружественным.
За полным списком методов и атрибутов объекта запроса, обратитесь к
следующей документации: request.
Загрузка файлов на сервер
В Flask обработка загружаемых на сервер файлов является несложным занятием.
Просто убедитесь, что вы в вашей HTML-форме не забыли установить атрибут
enctype="multipart/form-data", в противном случае браузер вообще
не передаст файл.
Загруженные на сервер файлы сохраняются в памяти или во временной папке
внутри файловой системы. Вы можете получить к ним доступ, через атрибут
объекта запроса files. Каждый загруженный файл
сохраняется в этом словаре. Он ведёт себя так же, как стандартный
объект Python file, однако он также имеет метод
save(), который вам позволяет
сохранить данный файл внутрь файловой системы сервера. Вот простой пример,
показывающий, как это работает:
from flask import request

@app.route('/upload', methods=['GET', 'POST'])
def upload_file():
    if request.method == 'POST':
        f = request.files['the_file']
        f.save('/var/www/uploads/uploaded_file.txt')
    ...
Если вы хотите до загрузки файла в приложение узнать, как он назван
на стороне клиента, вы можете просмотреть атрибут
filename. Однако, имейте в
виду, что данному значению никогда не стоит доверять, потому что оно может
быть подделано. Если вы хотите использовать имя файла на клиентской стороне
для сохранения файла на сервере, пропустите его через функцию
secure_filename(), которой вас снабдил Werkzeug:
from flask import request
from werkzeug import secure_filename

@app.route('/upload', methods=['GET', 'POST'])
def upload_file():
    if request.method == 'POST':
        f = request.files['the_file']
        f.save('/var/www/uploads/' + secure_filename(f.filename))
    ...
Некоторые более удачные примеры можно найти в разделе заготовок:
Загрузка файлов.
Cookies
Для доступа к cookies можно использовать атрибут
cookies. Для установки cookies можно использовать
метод объектов ответа set_cookie. Атрибут
объектов запроса cookies — это словарь со всеми
cookies, которые передаёт клиент. Если вы хотите использовать сессии,
то не используйте cookies напрямую, вместо этого используйте во Flask
Сессии, который при работе с cookies даст вам некоторую
дополнительную безопасность.
Чтение cookies:
from flask import request

@app.route('/')
def index():
    username = request.cookies.get('username')
    # Чтобы не получить в случае отсутствия cookie ошибку KeyError
    # используйте cookies.get(key) вместо cookies[key]
Сохранение cookies:
from flask import make_response

@app.route('/')
def index():
    resp = make_response(render_template(...))
    resp.set_cookie('username', 'the username')
    return resp
Заметьте, что cookies устанавливаются в объектах ответа. Так как
вы обычно просто возвращаете строки из функций представления, Flask
конвертирует их для вас в объекты ответа. Если вы это хотите
сделать явно, то можете использовать функцию,
make_response(), затем изменив её.
Иногда вы можете захотеть установить cookie в точке, где объект ответа
ещё не существует. Это можно сделать, используя заготовку
deferred-callbacks.
Также об этом можно почитать здесь: Об ответах.
Ошибки и перенаправления
Чтобы перенаправить пользователя в иную конечную точку, используйте
функцию redirect(); для того, чтобы преждевременно прервать
запрос с кодом ошибки, используйте функцию abort() function:
from flask import abort, redirect, url_for

@app.route('/')
def index():
    return redirect(url_for('login'))

@app.route('/login')
def login():
    abort(401)
    this_is_never_executed()
Это довольно бессмысленный пример, потому что пользователь будет
перенаправлен с индексной страницы на страницу, на которую у него нет
доступа (401 означает отказ в доступе), однако он показывает, как это
работает.
По умолчанию, для каждого кода ошибки отображается чёрно-белая страница
с ошибкой. Если вы хотите видоизменить страницу с ошибкой, то можете
использовать декоратор errorhandler():
from flask import render_template

@app.errorhandler(404)
def page_not_found(error):
    return render_template('page_not_found.html'), 404
Обратите внимание на 404 после вызова render_template().
Это сообщит Flask, что код статуса для этой страницы должен быть 404,
что означает «не найдено». По умолчанию предполагается код «200»,
который означает «всё прошло хорошо».
Об ответах
Возвращаемое из функции представления значение автоматически
для вас конвертируется вас в объект ответа. Если возвращаемое
значение является строкой, оно конвертируется в объект ответа
в строку в виде тела ответа, код статуса 200 OK и в mimetype
со значением text/html. Логика, которую применяет Flask
для конвертации возвращаемых значений в объекты ответа следующая:
- Если возвращается объект ответа корректного типа, он прямо
возвращается из представления. - Если это строка, создаётся объект ответа с этими же данными и
параметрами по умолчанию. - Если возвращается кортеж, его элементы могут предоставлять
дополнительную информацию. Такие кортежи должны соответствовать
форме(ответ, статус, заголовки),
кортеж должен содержать хотя бы один из перечисленных элементов.
Значение статус заменит код статуса, а элемент заголовки может
быть или списком или словарём с дополнительными значениями заголовка. - Если ничего из перечисленного не совпало, Flask предполагает,
что возвращаемое значение — это допустимая WSGI-заявка, и
конвертирует его в объект ответа.
Если вы хотите в результате ответа заполучить объект внутри
представления, то можете использовать функцию make_response().
Представим, что вы имеете подобное представление:
@app.errorhandler(404)
def not_found(error):
    return render_template('error.html'), 404
Вам надо всего лишь обернуть возвращаемое выражение функцией
make_response() и получить объект ответа для
его модификации, а затем вернуть его:
@app.errorhandler(404)
def not_found(error):
    resp = make_response(render_template('error.html'), 404)
    resp.headers['X-Something'] = 'A value'
    return resp
Сессии
В дополнение к объекту ответа есть ещё один объект, называемый
session, который позволяет вам сохранять от одного запроса
к другому информацию, специфичную для пользователя. Это реализовано для
вас поверх cookies, при этом используется криптографическая подпись этих
cookie. Это означает, что пользователь может посмотреть на содержимое
cookie, но не может ничего в ней изменить, если он конечно не знает
значение секретного ключа, использованного для создания подписи.
В случае использования сессий вам необходимо установить значение этого
секретного ключа. Вот как работают сессии:
from flask import Flask, session, redirect, url_for, escape, request

app = Flask(__name__)

@app.route('/')
def index():
    if 'username' in session:
        return 'Logged in as %s' % escape(session['username'])
    return 'You are not logged in'

@app.route('/login', methods=['GET', 'POST'])
def login():
    if request.method == 'POST':
        session['username'] = request.form['username']
        return redirect(url_for('index'))
    return '''
        <form action="" method="post">
            <p><input type=text name=username>
            <p><input type=submit value=Login>
        </form>
    '''

@app.route('/logout')
def logout():
    # удалить из сессии имя пользователя, если оно там есть
    session.pop('username', None)
    return redirect(url_for('index'))

# set the secret key.  keep this really secret:
app.secret_key = 'A0Zr98j/3yX R~XHH!jmN]LWX/,?RT'
Упомянутая escape() осуществляет для вас обработку
специальных последовательностей (escaping), что необходимо, если
вы не используете движок шаблонов (как в этом примере).
Как генерировать хорошие секретные ключи
Проблемой случайных значений является то, что трудно сказать, что
действительно является является случайным. А секретный ключ
должен быть настолько случайным, насколько это возможно.
У вашей операционной системы есть способы для генерации достаточно
случайных значений на базе криптографического случайного генератора,
который может быть использован для получения таких ключей:
>>> import os
>>> os.urandom(24)
'xfd{Hxe5<x95xf9xe3x96.5xd1x01O<!xd5xa2xa0x9fR"xa1xa8'
Просто возьмите, скопируйте/вставьте это в ваш код, вот и готово.
Замечание о сессиях на базе cookie: Flask возьмёт значения, которые вы
помещаете в объект сессии, и сериализует их в cookie. Если вы обнаружили
какие-либо значения, которые не сохраняются между запросами, а cookies
реально включены, а никаких ясных сообщений об ошибках не было, проверьте
размер cookie в ответах вашей страницы и сравните с размером,
поддерживаемым веб-браузером.
Message Flashing
Хорошие приложения и интерфейсы пользователя дают обратную связь. Если
пользователь не получает достаточной обратной связи, вскоре он может начать
ненавидеть приложение. При помощи системы всплывающих сообщений Flask
предоставляет пользователю по-настоящему простой способ обратной связи.
Система всплывающих сообщений обычно делает возможным записать сообщение в
конце запроса и получить к нему доступ во время обработки следующего и
только следующего запроса. Обычно эти сообщения используются в шаблонах
макетов страниц, которые его и отображают.
Чтобы вызвать всплывающие сообщения, используйте метод flash(),
чтобы заполучить сообщения, можно использовать метод, также доступный для
шаблонов — get_flashed_messages(). Полный
пример приведён в разделе Всплывающие сообщения.
Ведение журналов
Добавлено в версии 0.3.
Иногда может возникнуть ситуация, в которой вы имеете дело с данными,
которые должны быть корректными, но в действительности это не так.
К примеру, у вас может быть некий код клиентской стороны, который
посылает HTTP-запрос к серверу, однако он очевидным образом неверен.
Это может произойти из-за манипуляции пользователя с данными, или
из-за неудачной работы клиентского кода. В большинстве случаев
ответом, адекватным ситуации будет 400 Bad Request, но иногда,
когда надо, чтобы код продолжал работать, это не годится.
Вы по-прежнему хотите иметь журнал того, что пошло не так. Вот где
могут пригодиться объекты создания журнала logger. Начиная с Flask
0.3, инструмент для журналирования уже настроен для использования.
Вот некоторые примеры вызовов функции журналирования:
app.logger.debug('Значение для отладки')
app.logger.warning('Предупреждение: (%d яблок)', 42)
app.logger.error('Ошибка')
Прилагаемый logger это стандартный класс
журналирования Logger, так что за подробностями
вы можете обратиться к официальной документации по журналированию.
Как зацепиться (hooking) к промежуточному слою WSGI
Если вы хотите добавить в ваше приложение слой промежуточного, или
связующего для WSGI программного обеспечения (middleware), вы можете
обернуть внутреннее WSGI-приложение. К примеру, если вы хотите
использовать одно из middleware из пакета Werkzeug для обхода известных
багов в lighttpd, вы можете сделать это подобным образом:
from werkzeug.contrib.fixers import LighttpdCGIRootFix
app.wsgi_app = LighttpdCGIRootFix(app.wsgi_app)
Quickstart
Eager to get started? This page gives a good introduction to Flask.
Follow :doc:`installation` to set up a project and install Flask first.
A Minimal Application
A minimal Flask application looks something like this:
from flask import Flask

app = Flask(__name__)

@app.route("/")
def hello_world():
    return "<p>Hello, World!</p>"
So what did that code do?
- First we imported the :class:`~flask.Flask` class. An instance of
this class will be our WSGI application. - Next we create an instance of this class. The first argument is the
name of the application’s module or package.__name__is a
convenient shortcut for this that is appropriate for most cases.
This is needed so that Flask knows where to look for resources such
as templates and static files. - We then use the :meth:`~flask.Flask.route` decorator to tell Flask
what URL should trigger our function. - The function returns the message we want to display in the user’s
browser. The default content type is HTML, so HTML in the string
will be rendered by the browser.
Save it as :file:`hello.py` or something similar. Make sure to not call
your application :file:`flask.py` because this would conflict with Flask
itself.
To run the application, use the flask command or
python -m flask. You need to tell the Flask where your application
is with the --app option.
$ flask --app hello run
 * Serving Flask app 'hello'
 * Running on http://127.0.0.1:5000 (Press CTRL+C to quit)
Application Discovery Behavior
As a shortcut, if the file is named app.py or wsgi.py, you
don’t have to use --app. See :doc:`/cli` for more details.
This launches a very simple builtin server, which is good enough for
testing but probably not what you want to use in production. For
deployment options see :doc:`deploying/index`.
Now head over to http://127.0.0.1:5000/, and you should see your hello
world greeting.
If another program is already using port 5000, you’ll see
OSError: [Errno 98] or OSError: [WinError 10013] when the
server tries to start. See :ref:`address-already-in-use` for how to
handle that.
Externally Visible Server
If you run the server you will notice that the server is only accessible
from your own computer, not from any other in the network. This is the
default because in debugging mode a user of the application can execute
arbitrary Python code on your computer.
If you have the debugger disabled or trust the users on your network,
you can make the server publicly available simply by adding
--host=0.0.0.0 to the command line:
$ flask run --host=0.0.0.0
This tells your operating system to listen on all public IPs.
Debug Mode
The flask run command can do more than just start the development
server. By enabling debug mode, the server will automatically reload if
code changes, and will show an interactive debugger in the browser if an
error occurs during a request.

Warning
The debugger allows executing arbitrary Python code from the
browser. It is protected by a pin, but still represents a major
security risk. Do not run the development server or debugger in a
production environment.
To enable debug mode, use the --debug option.
$ flask --app hello run --debug
 * Serving Flask app 'hello'
 * Debug mode: on
 * Running on http://127.0.0.1:5000 (Press CTRL+C to quit)
 * Restarting with stat
 * Debugger is active!
 * Debugger PIN: nnn-nnn-nnn
See also:
- :doc:`/server` and :doc:`/cli` for information about running in debug mode.
- :doc:`/debugging` for information about using the built-in debugger
and other debuggers. - :doc:`/logging` and :doc:`/errorhandling` to log errors and display
nice error pages.
HTML Escaping
When returning HTML (the default response type in Flask), any
user-provided values rendered in the output must be escaped to protect
from injection attacks. HTML templates rendered with Jinja, introduced
later, will do this automatically.
:func:`~markupsafe.escape`, shown here, can be used manually. It is
omitted in most examples for brevity, but you should always be aware of
how you’re using untrusted data.
from markupsafe import escape

@app.route("/<name>")
def hello(name):
    return f"Hello, {escape(name)}!"
If a user managed to submit the name <script>alert("bad")</script>,
escaping causes it to be rendered as text, rather than running the
script in the user’s browser.
<name> in the route captures a value from the URL and passes it to
the view function. These variable rules are explained below.
Routing
Modern web applications use meaningful URLs to help users. Users are more
likely to like a page and come back if the page uses a meaningful URL they can
remember and use to directly visit a page.
Use the :meth:`~flask.Flask.route` decorator to bind a function to a URL.
@app.route('/')
def index():
    return 'Index Page'

@app.route('/hello')
def hello():
    return 'Hello, World'
You can do more! You can make parts of the URL dynamic and attach multiple
rules to a function.
Variable Rules
You can add variable sections to a URL by marking sections with
<variable_name>. Your function then receives the <variable_name>
as a keyword argument. Optionally, you can use a converter to specify the type
of the argument like <converter:variable_name>.
from markupsafe import escape

@app.route('/user/<username>')
def show_user_profile(username):
    # show the user profile for that user
    return f'User {escape(username)}'

@app.route('/post/<int:post_id>')
def show_post(post_id):
    # show the post with the given id, the id is an integer
    return f'Post {post_id}'

@app.route('/path/<path:subpath>')
def show_subpath(subpath):
    # show the subpath after /path/
    return f'Subpath {escape(subpath)}'
Converter types:
string |
(default) accepts any text without a slash |
int |
accepts positive integers |
float |
accepts positive floating point values |
path |
like string but also accepts slashes |
uuid |
accepts UUID strings |
Unique URLs / Redirection Behavior
The following two rules differ in their use of a trailing slash.
@app.route('/projects/')
def projects():
    return 'The project page'

@app.route('/about')
def about():
    return 'The about page'
The canonical URL for the projects endpoint has a trailing slash.
It’s similar to a folder in a file system. If you access the URL without
a trailing slash (/projects), Flask redirects you to the canonical URL
with the trailing slash (/projects/).
The canonical URL for the about endpoint does not have a trailing
slash. It’s similar to the pathname of a file. Accessing the URL with a
trailing slash (/about/) produces a 404 «Not Found» error. This helps
keep URLs unique for these resources, which helps search engines avoid
indexing the same page twice.
URL Building
To build a URL to a specific function, use the :func:`~flask.url_for` function.
It accepts the name of the function as its first argument and any number of
keyword arguments, each corresponding to a variable part of the URL rule.
Unknown variable parts are appended to the URL as query parameters.
Why would you want to build URLs using the URL reversing function
:func:`~flask.url_for` instead of hard-coding them into your templates?
- Reversing is often more descriptive than hard-coding the URLs.
- You can change your URLs in one go instead of needing to remember to
manually change hard-coded URLs. - URL building handles escaping of special characters transparently.
- The generated paths are always absolute, avoiding unexpected behavior
of relative paths in browsers. - If your application is placed outside the URL root, for example, in
/myapplicationinstead of/, :func:`~flask.url_for` properly
handles that for you.
For example, here we use the :meth:`~flask.Flask.test_request_context` method
to try out :func:`~flask.url_for`. :meth:`~flask.Flask.test_request_context`
tells Flask to behave as though it’s handling a request even while we use a
Python shell. See :ref:`context-locals`.
from flask import url_for

@app.route('/')
def index():
    return 'index'

@app.route('/login')
def login():
    return 'login'

@app.route('/user/<username>')
def profile(username):
    return f'{username}'s profile'

with app.test_request_context():
    print(url_for('index'))
    print(url_for('login'))
    print(url_for('login', next='/'))
    print(url_for('profile', username='John Doe'))
/
/login
/login?next=/
/user/John%20Doe
HTTP Methods
Web applications use different HTTP methods when accessing URLs. You should
familiarize yourself with the HTTP methods as you work with Flask. By default,
a route only answers to GET requests. You can use the methods argument
of the :meth:`~flask.Flask.route` decorator to handle different HTTP methods.
from flask import request

@app.route('/login', methods=['GET', 'POST'])
def login():
    if request.method == 'POST':
        return do_the_login()
    else:
        return show_the_login_form()
The example above keeps all methods for the route within one function,
which can be useful if each part uses some common data.
You can also separate views for different methods into different
functions. Flask provides a shortcut for decorating such routes with
:meth:`~flask.Flask.get`, :meth:`~flask.Flask.post`, etc. for each
common HTTP method.
@app.get('/login')
def login_get():
    return show_the_login_form()

@app.post('/login')
def login_post():
    return do_the_login()
If GET is present, Flask automatically adds support for the HEAD method
and handles HEAD requests according to the HTTP RFC. Likewise,
OPTIONS is automatically implemented for you.
Static Files
Dynamic web applications also need static files. That’s usually where
the CSS and JavaScript files are coming from. Ideally your web server is
configured to serve them for you, but during development Flask can do that
as well. Just create a folder called :file:`static` in your package or next to
your module and it will be available at /static on the application.
To generate URLs for static files, use the special 'static' endpoint name:
url_for('static', filename='style.css')
The file has to be stored on the filesystem as :file:`static/style.css`.
Rendering Templates
Generating HTML from within Python is not fun, and actually pretty
cumbersome because you have to do the HTML escaping on your own to keep
the application secure. Because of that Flask configures the Jinja2 template engine for you automatically.
Templates can be used to generate any type of text file. For web applications, you’ll
primarily be generating HTML pages, but you can also generate markdown, plain text for
emails, and anything else.
For a reference to HTML, CSS, and other web APIs, use the MDN Web Docs.
To render a template you can use the :func:`~flask.render_template`
method. All you have to do is provide the name of the template and the
variables you want to pass to the template engine as keyword arguments.
Here’s a simple example of how to render a template:
from flask import render_template

@app.route('/hello/')
@app.route('/hello/<name>')
def hello(name=None):
    return render_template('hello.html', name=name)
Flask will look for templates in the :file:`templates` folder. So if your
application is a module, this folder is next to that module, if it’s a
package it’s actually inside your package:
Case 1: a module:
/application.py
/templates
    /hello.html
Case 2: a package:
/application
    /__init__.py
    /templates
        /hello.html
For templates you can use the full power of Jinja2 templates. Head over
to the official Jinja2 Template Documentation for more information.
Here is an example template:
<!doctype html>
<title>Hello from Flask</title>
{% if name %}
  <h1>Hello {{ name }}!</h1>
{% else %}
  <h1>Hello, World!</h1>
{% endif %}
Inside templates you also have access to the :data:`~flask.Flask.config`,
:class:`~flask.request`, :class:`~flask.session` and :class:`~flask.g` [1] objects
as well as the :func:`~flask.url_for` and :func:`~flask.get_flashed_messages` functions.
Templates are especially useful if inheritance is used. If you want to
know how that works, see :doc:`patterns/templateinheritance`. Basically
template inheritance makes it possible to keep certain elements on each
page (like header, navigation and footer).
Automatic escaping is enabled, so if name contains HTML it will be escaped
automatically. If you can trust a variable and you know that it will be
safe HTML (for example because it came from a module that converts wiki
markup to HTML) you can mark it as safe by using the
:class:`~markupsafe.Markup` class or by using the |safe filter in the
template. Head over to the Jinja 2 documentation for more examples.
Here is a basic introduction to how the :class:`~markupsafe.Markup` class works:
>>> from markupsafe import Markup
>>> Markup('<strong>Hello %s!</strong>') % '<blink>hacker</blink>'
Markup('<strong>Hello <blink>hacker</blink>!</strong>')
>>> Markup.escape('<blink>hacker</blink>')
Markup('<blink>hacker</blink>')
>>> Markup('<em>Marked up</em> » HTML').striptags()
'Marked up » HTML'
.. versionchanged:: 0.5

   Autoescaping is no longer enabled for all templates.  The following
   extensions for templates trigger autoescaping: ``.html``, ``.htm``,
   ``.xml``, ``.xhtml``.  Templates loaded from a string will have
   autoescaping disabled.
| [1] | Unsure what that :class:`~flask.g` object is? It’s something in which you can store information for your own needs. See the documentation for :class:`flask.g` and :doc:`patterns/sqlite3`. |
Accessing Request Data
For web applications it’s crucial to react to the data a client sends to
the server. In Flask this information is provided by the global
:class:`~flask.request` object. If you have some experience with Python
you might be wondering how that object can be global and how Flask
manages to still be threadsafe. The answer is context locals:
Context Locals
Insider Information
If you want to understand how that works and how you can implement
tests with context locals, read this section, otherwise just skip it.
Certain objects in Flask are global objects, but not of the usual kind.
These objects are actually proxies to objects that are local to a specific
context. What a mouthful. But that is actually quite easy to understand.
Imagine the context being the handling thread. A request comes in and the
web server decides to spawn a new thread (or something else, the
underlying object is capable of dealing with concurrency systems other
than threads). When Flask starts its internal request handling it
figures out that the current thread is the active context and binds the
current application and the WSGI environments to that context (thread).
It does that in an intelligent way so that one application can invoke another
application without breaking.
So what does this mean to you? Basically you can completely ignore that
this is the case unless you are doing something like unit testing. You
will notice that code which depends on a request object will suddenly break
because there is no request object. The solution is creating a request
object yourself and binding it to the context. The easiest solution for
unit testing is to use the :meth:`~flask.Flask.test_request_context`
context manager. In combination with the with statement it will bind a
test request so that you can interact with it. Here is an example:
from flask import request

with app.test_request_context('/hello', method='POST'):
    # now you can do something with the request until the
    # end of the with block, such as basic assertions:
    assert request.path == '/hello'
    assert request.method == 'POST'
The other possibility is passing a whole WSGI environment to the
:meth:`~flask.Flask.request_context` method:
with app.request_context(environ):
    assert request.method == 'POST'
The Request Object
The request object is documented in the API section and we will not cover
it here in detail (see :class:`~flask.Request`). Here is a broad overview of
some of the most common operations. First of all you have to import it from
the flask module:
from flask import request
The current request method is available by using the
:attr:`~flask.Request.method` attribute. To access form data (data
transmitted in a POST or PUT request) you can use the
:attr:`~flask.Request.form` attribute. Here is a full example of the two
attributes mentioned above:
@app.route('/login', methods=['POST', 'GET'])
def login():
    error = None
    if request.method == 'POST':
        if valid_login(request.form['username'],
                       request.form['password']):
            return log_the_user_in(request.form['username'])
        else:
            error = 'Invalid username/password'
    # the code below is executed if the request method
    # was GET or the credentials were invalid
    return render_template('login.html', error=error)
What happens if the key does not exist in the form attribute? In that
case a special :exc:`KeyError` is raised. You can catch it like a
standard :exc:`KeyError` but if you don’t do that, a HTTP 400 Bad Request
error page is shown instead. So for many situations you don’t have to
deal with that problem.
To access parameters submitted in the URL (?key=value) you can use the
:attr:`~flask.Request.args` attribute:
searchword = request.args.get('key', '')
We recommend accessing URL parameters with get or by catching the
:exc:`KeyError` because users might change the URL and presenting them a 400
bad request page in that case is not user friendly.
For a full list of methods and attributes of the request object, head over
to the :class:`~flask.Request` documentation.
File Uploads
You can handle uploaded files with Flask easily. Just make sure not to
forget to set the enctype="multipart/form-data" attribute on your HTML
form, otherwise the browser will not transmit your files at all.
Uploaded files are stored in memory or at a temporary location on the
filesystem. You can access those files by looking at the
:attr:`~flask.request.files` attribute on the request object. Each
uploaded file is stored in that dictionary. It behaves just like a
standard Python :class:`file` object, but it also has a
:meth:`~werkzeug.datastructures.FileStorage.save` method that
allows you to store that file on the filesystem of the server.
Here is a simple example showing how that works:
from flask import request

@app.route('/upload', methods=['GET', 'POST'])
def upload_file():
    if request.method == 'POST':
        f = request.files['the_file']
        f.save('/var/www/uploads/uploaded_file.txt')
    ...
If you want to know how the file was named on the client before it was
uploaded to your application, you can access the
:attr:`~werkzeug.datastructures.FileStorage.filename` attribute.
However please keep in mind that this value can be forged
so never ever trust that value. If you want to use the filename
of the client to store the file on the server, pass it through the
:func:`~werkzeug.utils.secure_filename` function that
Werkzeug provides for you:
from werkzeug.utils import secure_filename

@app.route('/upload', methods=['GET', 'POST'])
def upload_file():
    if request.method == 'POST':
        file = request.files['the_file']
        file.save(f"/var/www/uploads/{secure_filename(file.filename)}")
    ...
For some better examples, see :doc:`patterns/fileuploads`.
Cookies
To access cookies you can use the :attr:`~flask.Request.cookies`
attribute. To set cookies you can use the
:attr:`~flask.Response.set_cookie` method of response objects. The
:attr:`~flask.Request.cookies` attribute of request objects is a
dictionary with all the cookies the client transmits. If you want to use
sessions, do not use the cookies directly but instead use the
:ref:`sessions` in Flask that add some security on top of cookies for you.
Reading cookies:
from flask import request

@app.route('/')
def index():
    username = request.cookies.get('username')
    # use cookies.get(key) instead of cookies[key] to not get a
    # KeyError if the cookie is missing.
Storing cookies:
from flask import make_response

@app.route('/')
def index():
    resp = make_response(render_template(...))
    resp.set_cookie('username', 'the username')
    return resp
Note that cookies are set on response objects. Since you normally
just return strings from the view functions Flask will convert them into
response objects for you. If you explicitly want to do that you can use
the :meth:`~flask.make_response` function and then modify it.
Sometimes you might want to set a cookie at a point where the response
object does not exist yet. This is possible by utilizing the
:doc:`patterns/deferredcallbacks` pattern.
For this also see :ref:`about-responses`.
Redirects and Errors
To redirect a user to another endpoint, use the :func:`~flask.redirect`
function; to abort a request early with an error code, use the
:func:`~flask.abort` function:
from flask import abort, redirect, url_for

@app.route('/')
def index():
    return redirect(url_for('login'))

@app.route('/login')
def login():
    abort(401)
    this_is_never_executed()
This is a rather pointless example because a user will be redirected from
the index to a page they cannot access (401 means access denied) but it
shows how that works.
By default a black and white error page is shown for each error code. If
you want to customize the error page, you can use the
:meth:`~flask.Flask.errorhandler` decorator:
from flask import render_template

@app.errorhandler(404)
def page_not_found(error):
    return render_template('page_not_found.html'), 404
Note the 404 after the :func:`~flask.render_template` call. This
tells Flask that the status code of that page should be 404 which means
not found. By default 200 is assumed which translates to: all went well.
See :doc:`errorhandling` for more details.
About Responses
The return value from a view function is automatically converted into
a response object for you. If the return value is a string it’s
converted into a response object with the string as response body, a
200 OK status code and a :mimetype:`text/html` mimetype. If the
return value is a dict or list, :func:`jsonify` is called to produce a
response. The logic that Flask applies to converting return values into
response objects is as follows:
- If a response object of the correct type is returned it’s directly
returned from the view. - If it’s a string, a response object is created with that data and
the default parameters. - If it’s an iterator or generator returning strings or bytes, it is
treated as a streaming response. - If it’s a dict or list, a response object is created using
:func:`~flask.json.jsonify`. - If a tuple is returned the items in the tuple can provide extra
information. Such tuples have to be in the form
(response, status),(response, headers), or
(response, status, headers). Thestatusvalue will override
the status code andheaderscan be a list or dictionary of
additional header values. - If none of that works, Flask will assume the return value is a
valid WSGI application and convert that into a response object.
If you want to get hold of the resulting response object inside the view
you can use the :func:`~flask.make_response` function.
Imagine you have a view like this:
from flask import render_template

@app.errorhandler(404)
def not_found(error):
    return render_template('error.html'), 404
You just need to wrap the return expression with
:func:`~flask.make_response` and get the response object to modify it, then
return it:
from flask import make_response

@app.errorhandler(404)
def not_found(error):
    resp = make_response(render_template('error.html'), 404)
    resp.headers['X-Something'] = 'A value'
    return resp
APIs with JSON
A common response format when writing an API is JSON. It’s easy to get
started writing such an API with Flask. If you return a dict or
list from a view, it will be converted to a JSON response.
@app.route("/me")
def me_api():
    user = get_current_user()
    return {
        "username": user.username,
        "theme": user.theme,
        "image": url_for("user_image", filename=user.image),
    }

@app.route("/users")
def users_api():
    users = get_all_users()
    return [user.to_json() for user in users]
This is a shortcut to passing the data to the
:func:`~flask.json.jsonify` function, which will serialize any supported
JSON data type. That means that all the data in the dict or list must be
JSON serializable.
For complex types such as database models, you’ll want to use a
serialization library to convert the data to valid JSON types first.
There are many serialization libraries and Flask API extensions
maintained by the community that support more complex applications.
Sessions
In addition to the request object there is also a second object called
:class:`~flask.session` which allows you to store information specific to a
user from one request to the next. This is implemented on top of cookies
for you and signs the cookies cryptographically. What this means is that
the user could look at the contents of your cookie but not modify it,
unless they know the secret key used for signing.
In order to use sessions you have to set a secret key. Here is how
sessions work:
from flask import session

# Set the secret key to some random bytes. Keep this really secret!
app.secret_key = b'_5#y2L"F4Q8znxec]/'

@app.route('/')
def index():
    if 'username' in session:
        return f'Logged in as {session["username"]}'
    return 'You are not logged in'

@app.route('/login', methods=['GET', 'POST'])
def login():
    if request.method == 'POST':
        session['username'] = request.form['username']
        return redirect(url_for('index'))
    return '''
        <form method="post">
            <p><input type=text name=username>
            <p><input type=submit value=Login>
        </form>
    '''

@app.route('/logout')
def logout():
    # remove the username from the session if it's there
    session.pop('username', None)
    return redirect(url_for('index'))
How to generate good secret keys
A secret key should be as random as possible. Your operating system has
ways to generate pretty random data based on a cryptographic random
generator. Use the following command to quickly generate a value for
:attr:`Flask.secret_key` (or :data:`SECRET_KEY`):
$ python -c 'import secrets; print(secrets.token_hex())'
'192b9bdd22ab9ed4d12e236c78afcb9a393ec15f71bbf5dc987d54727823bcbf'
A note on cookie-based sessions: Flask will take the values you put into the
session object and serialize them into a cookie. If you are finding some
values do not persist across requests, cookies are indeed enabled, and you are
not getting a clear error message, check the size of the cookie in your page
responses compared to the size supported by web browsers.
Besides the default client-side based sessions, if you want to handle
sessions on the server-side instead, there are several
Flask extensions that support this.
Message Flashing
Good applications and user interfaces are all about feedback. If the user
does not get enough feedback they will probably end up hating the
application. Flask provides a really simple way to give feedback to a
user with the flashing system. The flashing system basically makes it
possible to record a message at the end of a request and access it on the next
(and only the next) request. This is usually combined with a layout
template to expose the message.
To flash a message use the :func:`~flask.flash` method, to get hold of the
messages you can use :func:`~flask.get_flashed_messages` which is also
available in the templates. See :doc:`patterns/flashing` for a full
example.
Logging
.. versionadded:: 0.3
Sometimes you might be in a situation where you deal with data that
should be correct, but actually is not. For example you may have
some client-side code that sends an HTTP request to the server
but it’s obviously malformed. This might be caused by a user tampering
with the data, or the client code failing. Most of the time it’s okay
to reply with 400 Bad Request in that situation, but sometimes
that won’t do and the code has to continue working.
You may still want to log that something fishy happened. This is where
loggers come in handy. As of Flask 0.3 a logger is preconfigured for you
to use.
Here are some example log calls:
app.logger.debug('A value for debugging')
app.logger.warning('A warning occurred (%d apples)', 42)
app.logger.error('An error occurred')
The attached :attr:`~flask.Flask.logger` is a standard logging
:class:`~logging.Logger`, so head over to the official :mod:`logging`
docs for more information.
See :doc:`errorhandling`.
Hooking in WSGI Middleware
To add WSGI middleware to your Flask application, wrap the application’s
wsgi_app attribute. For example, to apply Werkzeug’s
:class:`~werkzeug.middleware.proxy_fix.ProxyFix` middleware for running
behind Nginx:
from werkzeug.middleware.proxy_fix import ProxyFix
app.wsgi_app = ProxyFix(app.wsgi_app)
Wrapping app.wsgi_app instead of app means that app still
points at your Flask application, not at the middleware, so you can
continue to use and configure app directly.
Using Flask Extensions
Extensions are packages that help you accomplish common tasks. For
example, Flask-SQLAlchemy provides SQLAlchemy support that makes it simple
and easy to use with Flask.
For more on Flask extensions, see :doc:`extensions`.
Deploying to a Web Server
Ready to deploy your new Flask app? See :doc:`deploying/index`.
Flask is a lightweight Python framework for web applications that provides the basics for URL routing and page rendering.
Flask is called a «micro» framework because it doesn’t directly provide features like form validation, database abstraction, authentication, and so on. Such features are instead provided by special Python packages called Flask extensions. The extensions integrate seamlessly with Flask so that they appear as if they were part of Flask itself. For example, Flask doesn’t provide a page template engine, but installing Flask includes the Jinja templating engine by default. For convenience, we typically speak of these defaults as part of Flask.
In this Flask tutorial, you create a simple Flask app with three pages that use a common base template. Along the way, you experience a number of features of Visual Studio Code including using the terminal, the editor, the debugger, code snippets, and more.
The completed code project for this Flask tutorial can be found on GitHub: python-sample-vscode-flask-tutorial.
If you have any problems, you can search for answers or ask a question on the Python extension Discussions Q&A.
Prerequisites
To successfully complete this Flask tutorial, you must do the following (which are the same steps as in the general Python tutorial):
-
Install the Python extension.
-
Install a version of Python 3 (for which this tutorial is written). Options include:
- (All operating systems) A download from python.org; typically use the Download button that appears first on the page.
- (Linux) The built-in Python 3 installation works well, but to install other Python packages you must run
sudo apt install python3-pipin the terminal. - (macOS) An installation through Homebrew on macOS using
brew install python3. - (All operating systems) A download from Anaconda (for data science purposes).
-
On Windows, make sure the location of your Python interpreter is included in your PATH environment variable. You can check the location by running
pathat the command prompt. If the Python interpreter’s folder isn’t included, open Windows Settings, search for «environment», select Edit environment variables for your account, then edit the Path variable to include that folder.
Create a project environment for the Flask tutorial
In this section, you will create a virtual environment in which Flask is installed. Using a virtual environment avoids installing Flask into a global Python environment and gives you exact control over the libraries used in an application.
-
On your file system, create a folder for this tutorial, such as
hello_flask. -
Open this folder in VS Code by navigating to the folder in a terminal and running
code ., or by running VS Code and using the File > Open Folder command. -
In VS Code, open the Command Palette (View > Command Palette or (⇧⌘P (Windows, Linux Ctrl+Shift+P))). Then select the Python: Create Environment command to create a virtual environment in your workspace. Select
venvand then the Python environment you want to use to create it.Note: If you want to create an environment manually, or run into error in the environment creation process, visit the Environments page.

-
After your virtual environment creation has been completed, run Terminal: Create New Terminal (⌃⇧` (Windows, Linux Ctrl+Shift+`))) from the Command Palette, which creates a terminal and automatically activates the virtual environment by running its activation script.
Note: On Windows, if your default terminal type is PowerShell, you may see an error that it cannot run activate.ps1 because running scripts is disabled on the system. The error provides a link for information on how to allow scripts. Otherwise, use Terminal: Select Default Shell to set «Command Prompt» or «Git Bash» as your default instead.
-
Install Flask in the virtual environment by running the following command in the VS Code Terminal:
python -m pip install flask
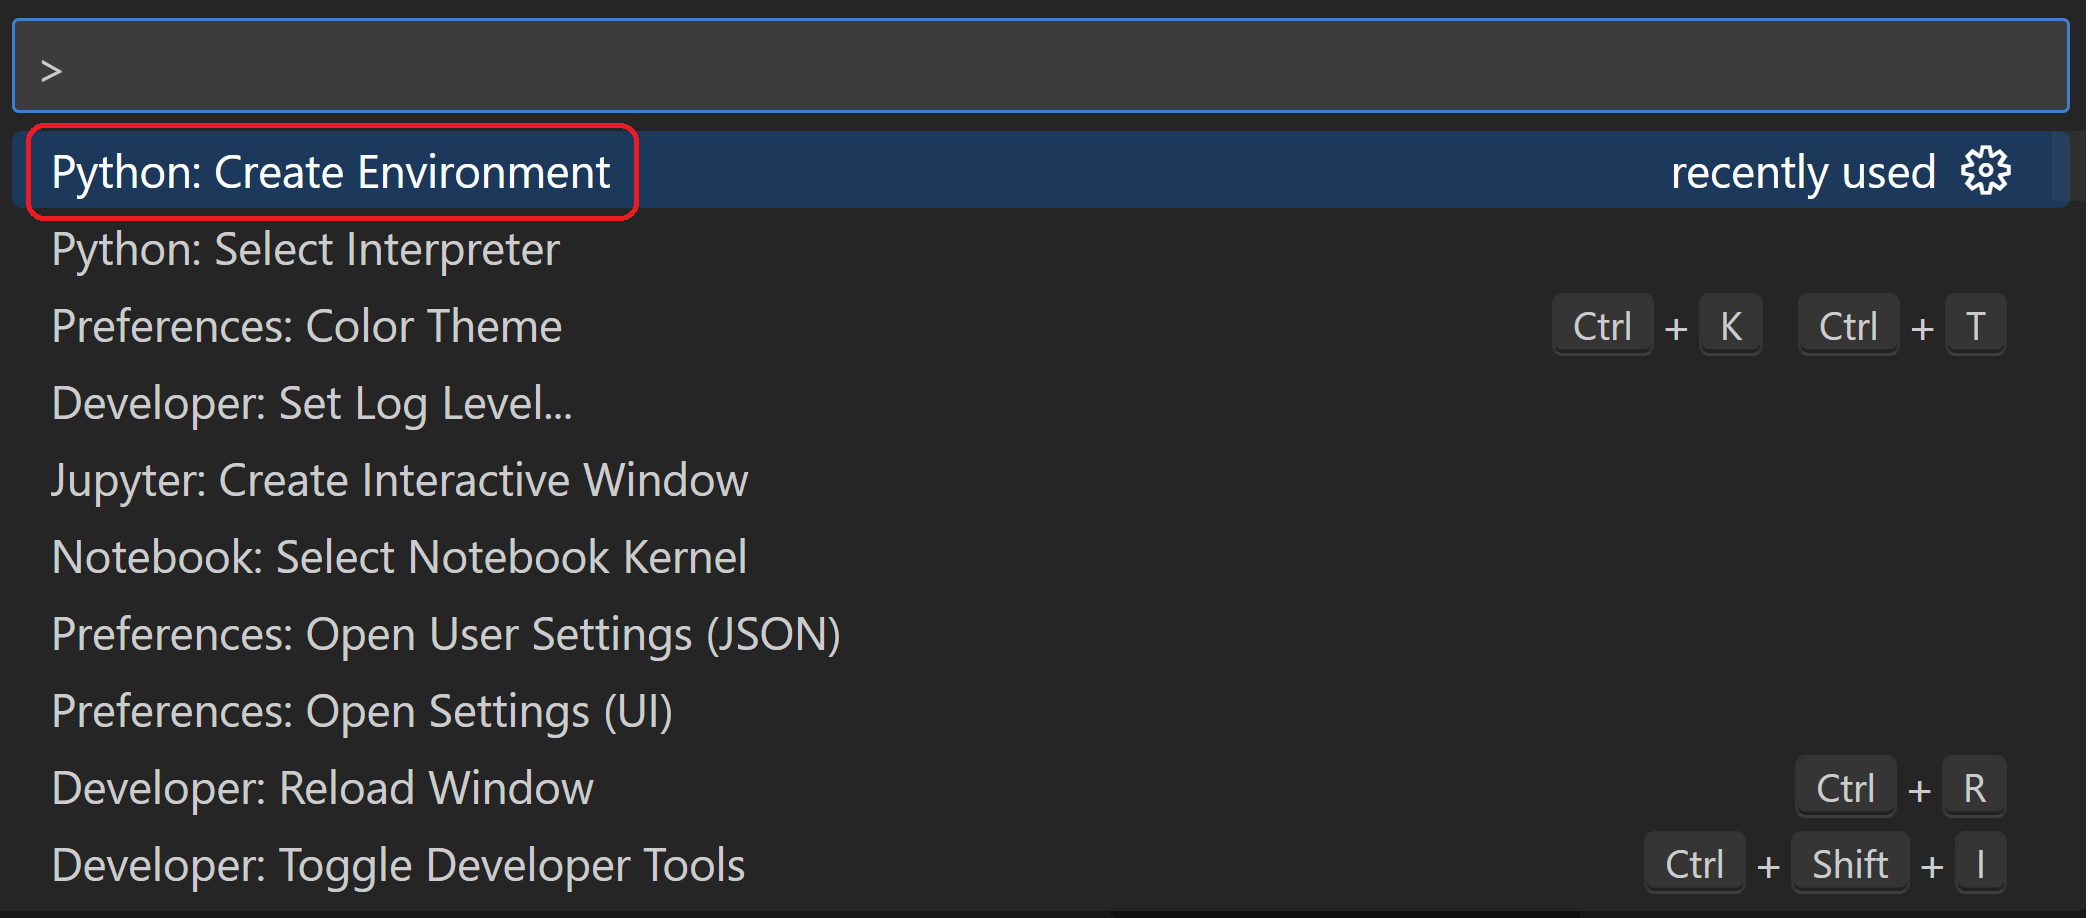
You now have a self-contained environment ready for writing Flask code. VS Code activates the environment automatically when you use Terminal: Create New Terminal. If you open a separate command prompt or terminal, activate the environment by running source .venv/bin/activate (Linux/macOS) or .venvScriptsActivate.ps1 (Windows). You know the environment is activated when the command prompt shows (.venv) at the beginning.
Create and run a minimal Flask app
-
In VS Code, create a new file in your project folder named
app.pyusing either File > New from the menu, pressing Ctrl+N, or using the new file icon in the Explorer View (shown below). -
In
app.py, add code to import Flask and create an instance of the Flask object. If you type the code below (instead of using copy-paste), you can observe VS Code’s IntelliSense and auto-completions:from flask import Flask app = Flask(__name__) -
Also in
app.py, add a function that returns content, in this case a simple string, and use Flask’sapp.routedecorator to map the URL route/to that function:@app.route("/") def home(): return "Hello, Flask!"Tip: You can use multiple decorators on the same function, one per line, depending on how many different routes you want to map to the same function.
-
Save the
app.pyfile (⌘S (Windows, Linux Ctrl+S)). -
In the Integrated Terminal, run the app by entering
python -m flask run, which runs the Flask development server. The development server looks forapp.pyby default. When you run Flask, you should see output similar to the following:(.venv) D:py\hello_flask>python -m flask run * Environment: production WARNING: Do not use the development server in a production environment. Use a production WSGI server instead. * Debug mode: off * Running on http://127.0.0.1:5000/ (Press CTRL+C to quit)If you see an error that the Flask module cannot be found, make sure you’ve run
python -m pip install flaskin your virtual environment as described at the end of the previous section.Also, if you want to run the development server on a different IP address or port, use the host and port command-line arguments, as with
--host=0.0.0.0 --port=80. -
To open your default browser to the rendered page, Ctrl+click the
http://127.0.0.1:5000/URL in the terminal. -
Observe that when you visit a URL like /, a message appears in the debug terminal showing the HTTP request:
127.0.0.1 - - [11/Jul/2018 08:40:15] "GET / HTTP/1.1" 200 - -
Stop the app by using Ctrl+C in the terminal.
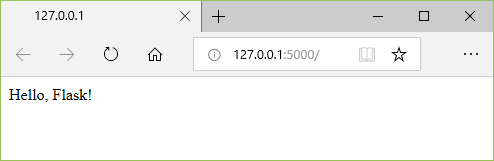
Tip: If you want to use a different filename than
app.py, such asprogram.py, define an environment variable named FLASK_APP and set its value to your chosen file. Flask’s development server then uses the value of FLASK_APP instead of the default fileapp.py. For more information, see Flask command line interface.
Run the app in the debugger
Debugging gives you the opportunity to pause a running program on a particular line of code. When a program is paused, you can examine variables, run code in the Debug Console panel, and otherwise take advantage of the features described on Debugging. Running the debugger also automatically saves any modified files before the debugging session begins.
Before you begin: Make sure you’ve stopped the running app at the end of the last section by using Ctrl+C in the terminal. If you leave the app running in one terminal, it continues to own the port. As a result, when you run the app in the debugger using the same port, the original running app handles all the requests and you won’t see any activity in the app being debugged and the program won’t stop at breakpoints. In other words, if the debugger doesn’t seem to be working, make sure that no other instance of the app is still running.
-
Replace the contents of
app.pywith the following code, which adds a second route and function that you can step through in the debugger:import re from datetime import datetime from flask import Flask app = Flask(__name__) @app.route("/") def home(): return "Hello, Flask!" @app.route("/hello/<name>") def hello_there(name): now = datetime.now() formatted_now = now.strftime("%A, %d %B, %Y at %X") # Filter the name argument to letters only using regular expressions. URL arguments # can contain arbitrary text, so we restrict to safe characters only. match_object = re.match("[a-zA-Z]+", name) if match_object: clean_name = match_object.group(0) else: clean_name = "Friend" content = "Hello there, " + clean_name + "! It's " + formatted_now return contentThe decorator used for the new URL route,
/hello/<name>, defines an endpoint /hello/ that can accept any additional value. The identifier inside<and>in the route defines a variable that is passed to the function and can be used in your code.URL routes are case-sensitive. For example, the route
/hello/<name>is distinct from/Hello/<name>. If you want the same function to handle both, use decorators for each variant.As described in the code comments, always filter arbitrary user-provided information to avoid various attacks on your app. In this case, the code filters the name argument to contain only letters, which avoids injection of control characters, HTML, and so forth. (When you use templates in the next section, Flask does automatic filtering and you won’t need this code.)
-
Set a breakpoint at the first line of code in the
hello_therefunction (now = datetime.now()) by doing any one of the following:- With the cursor on that line, press F9, or,
- With the cursor on that line, select the Run > Toggle Breakpoint menu command, or,
- Click directly in the margin to the left of the line number (a faded red dot appears when hovering there).
The breakpoint appears as a red dot in the left margin:
-
Switch to the Run and Debug view in VS Code (using the left-side activity bar or ⇧⌘D (Windows, Linux Ctrl+Shift+D)). You may see the message «To customize Run and Debug create a launch.json file». This means that you don’t yet have a
launch.jsonfile containing debug configurations. VS Code can create that for you if you click on the create a launch.json file link: -
Select the link and VS Code will prompt for a debug configuration. Select Flask from the dropdown and VS Code will populate a new
launch.jsonfile with a Flask run configuration. Thelaunch.jsonfile contains a number of debugging configurations, each of which is a separate JSON object within theconfigurationarray. -
Scroll down to and examine the configuration, which is named «Python: Flask». This configuration contains
"module": "flask",, which tells VS Code to run Python with-m flaskwhen it starts the debugger. It also defines the FLASK_APP environment variable in theenvproperty to identify the startup file, which isapp.pyby default, but allows you to easily specify a different file. If you want to change the host and/or port, you can use theargsarray.{ "name": "Python: Flask", "type": "python", "request": "launch", "module": "flask", "env": { "FLASK_APP": "app.py", "FLASK_DEBUG": "1" }, "args": [ "run", "--no-debugger", "--no-reload" ], "jinja": true, "justMyCode": true },Note: If the
enventry in your configuration contains"FLASK_APP": "${workspaceFolder}/app.py", change it to"FLASK_APP": "app.py"as shown above. Otherwise you may encounter error messages like «Cannot import module C» where C is the drive letter where your project folder resides.Note: Once
launch.jsonis created, an Add Configuration button appears in the editor. That button displays a list of additional configurations to add to the beginning of the configuration list. (The Run > Add Configuration menu command does the same action.). -
Save
launch.json(⌘S (Windows, Linux Ctrl+S)). In the debug configuration dropdown list select the Python: Flask configuration. -
Start the debugger by selecting the Run > Start Debugging menu command, or selecting the green Start Debugging arrow next to the list (F5):
Observe that the status bar changes color to indicate debugging:
A debugging toolbar (shown below) also appears in VS Code containing commands in the following order: Pause (or Continue, F5), Step Over (F10), Step Into (F11), Step Out (⇧F11 (Windows, Linux Shift+F11)), Restart (⇧⌘F5 (Windows, Linux Ctrl+Shift+F5)), and Stop (⇧F5 (Windows, Linux Shift+F5)). See VS Code debugging for a description of each command.
-
Output appears in a «Python Debug Console» terminal. Ctrl+click the
http://127.0.0.1:5000/link in that terminal to open a browser to that URL. In the browser’s address bar, navigate tohttp://127.0.0.1:5000/hello/VSCode. Before the page renders, VS Code pauses the program at the breakpoint you set. The small yellow arrow on the breakpoint indicates that it’s the next line of code to run. -
Use Step Over to run the
now = datetime.now()statement. -
On the left side of the VS Code window, you see a Variables pane that shows local variables, such as
now, as well as arguments, such asname. Below that are panes for Watch, Call Stack, and Breakpoints (see VS Code debugging for details). In the Locals section, try expanding different values. You can also double-click values (or use Enter (Windows, Linux F2)) to modify them. Changing variables such asnow, however, can break the program. Developers typically make changes only to correct values when the code didn’t produce the right value to begin with. -
When a program is paused, the Debug Console panel (which is different from the «Python Debug Console» in the Terminal panel) lets you experiment with expressions and try out bits of code using the current state of the program. For example, once you’ve stepped over the line
now = datetime.now(), you might experiment with different date/time formats. In the editor, select the code that readsnow.strftime("%A, %d %B, %Y at %X"), then right-click and select Evaluate in Debug Console to send that code to the debug console, where it runs:now.strftime("%A, %d %B, %Y at %X") 'Wednesday, 31 October, 2018 at 18:13:39'Tip: The Debug Console also shows exceptions from within the app that may not appear in the terminal. For example, if you see a «Paused on exception» message in the Call Stack area of Run and Debug view, switch to the Debug Console to see the exception message.
-
Copy that line into the > prompt at the bottom of the debug console, and try changing the formatting:
now.strftime("%a, %d %B, %Y at %X") 'Wed, 31 October, 2018 at 18:13:39' now.strftime("%a, %d %b, %Y at %X") 'Wed, 31 Oct, 2018 at 18:13:39' now.strftime("%a, %d %b, %y at %X") 'Wed, 31 Oct, 18 at 18:13:39' -
Step through a few more lines of code, if you’d like, then select Continue (F5) to let the program run. The browser window shows the result:
-
Change the line in the code to use different datetime format, for example
now.strftime("%a, %d %b, %y at %X"), and then save the file. The Flask server will automatically reload, which means the changes will be applied without the need to restart the debugger. Refresh the page on the browser to see the update. -
Close the browser and stop the debugger when you’re finished. To stop the debugger, use the Stop toolbar button (the red square) or the Run > Stop Debugging command (⇧F5 (Windows, Linux Shift+F5)).
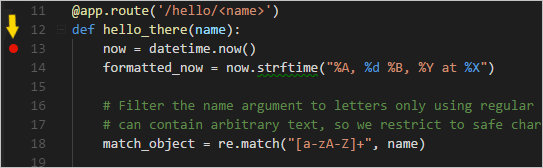


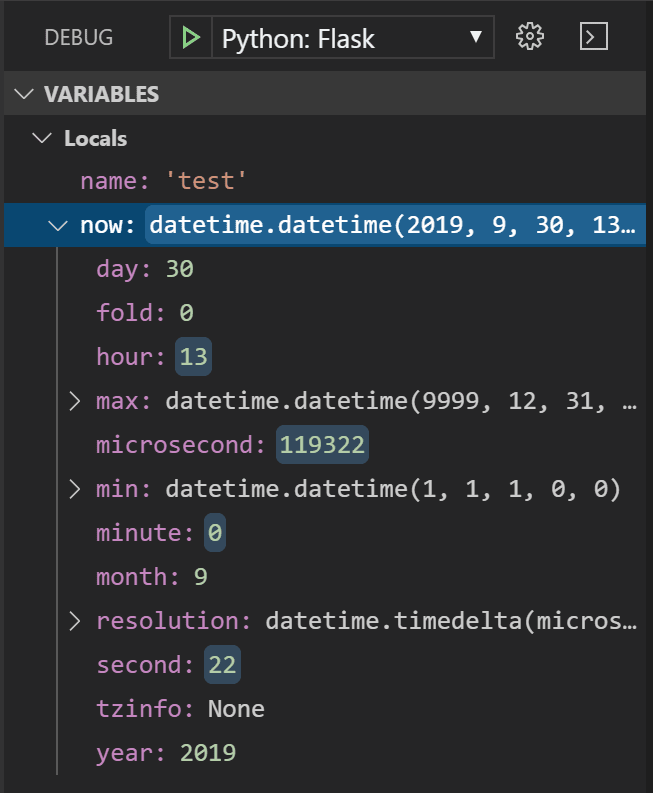

Tip: To make it easier to repeatedly navigate to a specific URL like
http://127.0.0.1:5000/hello/VSCode, output that URL using a
Go to Definition and Peek Definition commands
During your work with Flask or any other library, you may want to examine the code in those libraries themselves. VS Code provides two convenient commands that navigate directly to the definitions of classes and other objects in any code:
-
Go to Definition jumps from your code into the code that defines an object. For example, in
app.py, right-click on theFlaskclass (in the lineapp = Flask(__name__)) and select Go to Definition (or use F12), which navigates to the class definition in the Flask library. -
Peek Definition (⌥F12 (Windows Alt+F12, Linux Ctrl+Shift+F10), also on the right-click context menu), is similar, but displays the class definition directly in the editor (making space in the editor window to avoid obscuring any code). Press Escape to close the Peek window or use the x in the upper right corner.
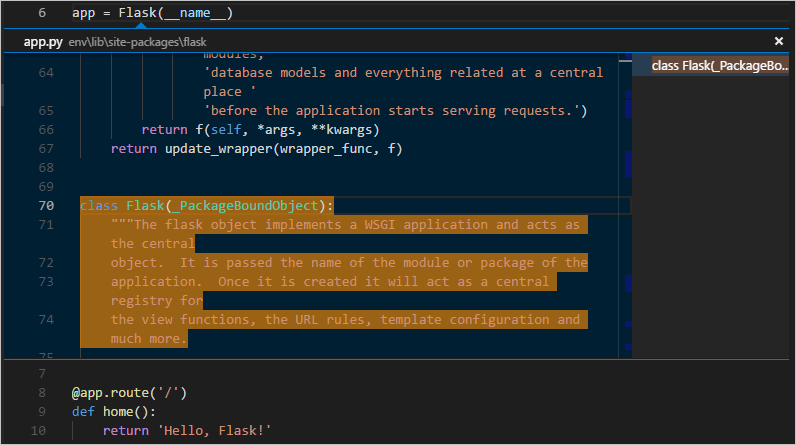
Use a template to render a page
The app you’ve created so far in this tutorial generates only plain text web pages from Python code. Although it’s possible to generate HTML directly in code, developers avoid such a practice because it opens the app to cross-site scripting (XSS) attacks. In the hello_there function of this tutorial, for example, one might think to format the output in code with something like content = "<h1>Hello there, " + clean_name + "!</h1>", where the result in content is given directly to a browser. This opening allows an attacker to place malicious HTML, including JavaScript code, in the URL that ends up in clean_name and thus ends up being run in the browser.
A much better practice is to keep HTML out of your code entirely by using templates, so that your code is concerned only with data values and not with rendering.
- A template is an HTML file that contains placeholders for values that the code provides at run time. The templating engine takes care of making the substitutions when rendering the page. The code, therefore, concerns itself only with data values and the template concerns itself only with markup.
- The default templating engine for Flask is Jinja, which is installed automatically when you install Flask. This engine provides flexible options including automatic escaping (to prevent XSS attacks) and template inheritance. With inheritance, you can define a base page with common markup and then build upon that base with page-specific additions.
In this section, you create a single page using a template. In the sections that follow, you configure the app to serve static files, and then create multiple pages to the app that each contains a nav bar from a base template.
-
Inside the
hello_flaskfolder, create a folder namedtemplates, which is where Flask looks for templates by default. -
In the
templatesfolder, create a file namedhello_there.htmlwith the contents below. This template contains two placeholders named «name» and «date», which are delineated by pairs of curly braces,{{and}}. As you can see, you can also include formatting code in the template directly:<!DOCTYPE html> <html> <head> <meta charset="utf-8" /> <title>Hello, Flask</title> </head> <body> {%if name %} <strong>Hello there, {{ name }}!</strong> It's {{ date.strftime("%A, %d %B, %Y at %X") }}. {% else %} What's your name? Provide it after /hello/ in the URL. {% endif %} </body> </html>Tip: Flask developers often use the flask-babel extension for date formatting, rather than
strftime, as flask-babel takes locales and timezones into consideration. -
In
app.py, import Flask’srender_templatefunction near the top of the file:from flask import render_template -
Also in
app.py, modify thehello_therefunction to userender_templateto load a template and apply the named values (and add a route to recognize the case without a name).render_templateassumes that the first argument is relative to thetemplatesfolder. Typically, developers name the templates the same as the functions that use them, but matching names are not required because you always refer to the exact filename in your code.@app.route("/hello/") @app.route("/hello/<name>") def hello_there(name = None): return render_template( "hello_there.html", name=name, date=datetime.now() )You can see that the code is now much simpler, and concerned only with data values, because the markup and formatting is all contained in the template.
-
Start the program (inside or outside of the debugger, using ⌃F5 (Windows, Linux Ctrl+F5)), navigate to a /hello/name URL, and observe the results.
-
Also try navigating to a /hello/name URL using a name like
<a%20value%20that%20could%20be%20HTML>to see Flask’s automatic escaping at work. The «name» value shows up as plain text in the browser rather than as rendering an actual element.
Serve static files
Static files are of two types. First are those files like stylesheets to which a page template can just refer directly. Such files can live in any folder in the app, but are commonly placed within a static folder.
The second type are those that you want to address in code, such as when you want to implement an API endpoint that returns a static file. For this purpose, the Flask object contains a built-in method, send_static_file, which generates a response with a static file contained within the app’s static folder.
The following sections demonstrate both types of static files.
Refer to static files in a template
-
In the
hello_flaskfolder, create a folder namedstatic. -
Within the
staticfolder, create a file namedsite.csswith the following contents. After entering this code, also observe the syntax highlighting that VS Code provides for CSS files, including a color preview:.message { font-weight: 600; color: blue; } -
In
templates/hello_there.html, add the following line before the</head>tag, which creates a reference to the stylesheet.<link rel="stylesheet" type="text/css" href="{{ url_for('static', filename='site.css')}}" />Flask’s url_for tag that is used here, creates the appropriate path to the file. Because it can accept variables as arguments,
url_forallows you to programmatically control the generated path, if desired. -
Also in
templates/hello_there.html, replace the contents<body>element with the following markup that uses themessagestyle instead of a<strong>tag (and also displays a message if you just use a hello/ URL without a name):{%if name %} <span class="message">Hello there, {{ name }}!</span> It's {{ date.strftime("%A, %d %B, %Y at %X") }}. {% else %} <span class="message">What's your name? Provide it after /hello/ in the URL.</span> {% endif %} -
Run the app, navigate to a /hello/name URL, and observe that the message renders in blue. Stop the app when you’re done.
Serve a static file from code
-
In the
staticfolder, create a JSON data file nameddata.jsonwith the following contents (which are meaningless sample data):{ "01": { "note": "This data is very simple because we're demonstrating only the mechanism." } } -
In
app.py, add a function with the route /api/data that returns the static data file using thesend_static_filemethod:@app.route("/api/data") def get_data(): return app.send_static_file("data.json") -
Run the app and navigate to the /api/data endpoint to see that the static file is returned. Stop the app when you’re done.
Create multiple templates that extend a base template
Because most web apps have more than one page, and because those pages typically share many common elements, developers separate those common elements into a base page template that other page templates can then extend (this is also called template inheritance.)
Also, because you’ll likely create many pages that extend the same template, it’s helpful to create a code snippet in VS Code with which you can quickly initialize new page templates. A snippet helps you avoid tedious and error-prone copy-paste operations.
The following sections walk through different parts of this process.
Create a base page template and styles
A base page template in Flask contains all the shared parts of a set of pages, including references to CSS files, script files, and so forth. Base templates also define one or more block tags that other templates that extend the base are expected to override. A block tag is delineated by {% block <name> %} and {% endblock %} in both the base template and extended templates.
The following steps demonstrate creating a base template.
-
In the
templatesfolder, create a file namedlayout.htmlwith the contents below, which contains blocks named «title» and «content». As you can see, the markup defines a simple nav bar structure with links to Home, About, and Contact pages, which you will create in a later section. Each link again uses Flask’surl_fortag to generate a link at runtime for the matching route.<!DOCTYPE html> <html> <head> <meta charset="utf-8" /> <title>{% block title %}{% endblock %}</title> <link rel="stylesheet" type="text/css" href="{{ url_for('static', filename='site.css')}}" /> </head> <body> <div class="navbar"> <a href="{{ url_for('home') }}" class="navbar-brand">Home</a> <a href="{{ url_for('about') }}" class="navbar-item">About</a> <a href="{{ url_for('contact') }}" class="navbar-item">Contact</a> </div> <div class="body-content"> {% block content %} {% endblock %} <hr/> <footer> <p>© 2018</p> </footer> </div> </body> </html> -
Add the following styles to
static/site.css, below the existing «message» style, and save the file. Note that this walkthrough doesn’t attempt to demonstrate responsive design; these styles simply generate a reasonably interesting result..navbar { background-color: lightslategray; font-size: 1em; font-family: 'Trebuchet MS', 'Lucida Sans Unicode', 'Lucida Grande', 'Lucida Sans', Arial, sans-serif; color: white; padding: 8px 5px 8px 5px; } .navbar a { text-decoration: none; color: inherit; } .navbar-brand { font-size: 1.2em; font-weight: 600; } .navbar-item { font-variant: small-caps; margin-left: 30px; } .body-content { padding: 5px; font-family:'Segoe UI', Tahoma, Geneva, Verdana, sans-serif; }
You can run the app at this point, but because you haven’t made use of the base template anywhere and haven’t changed any code files, the result is the same as the previous step. Complete the remaining sections to see the final effect.
Create a code snippet
Because the three pages you create in the next section extend layout.html, it saves time to create a code snippet to initialize a new template file with the appropriate reference to the base template. A code snippet provides a consistent piece of code from a single source, which avoids errors that can creep in when using copy-paste from existing code.
-
In VS Code, select File (Code on macOS) > Preferences > Configure User Snippets.
-
In the list that appears, select html. The option may appear as «html.json» in the Existing Snippets section of the list if you’ve created snippets previously.
-
After VS Code opens
html.json, add the following entry within the existing curly braces (the explanatory comments, not shown here, describe details such as how the$0line indicates where VS Code places the cursor after inserting a snippet):"Flask Tutorial: template extending layout.html": { "prefix": "flextlayout", "body": [ "{% extends "layout.html" %}", "{% block title %}", "$0", "{% endblock %}", "{% block content %}", "{% endblock %}" ], "description": "Boilerplate template that extends layout.html" }, -
Save the
html.jsonfile (⌘S (Windows, Linux Ctrl+S)). -
Now, whenever you start typing the snippet’s prefix, such as
flext, VS Code provides the snippet as an autocomplete option, as shown in the next section. You can also use the Insert Snippet command to choose a snippet from a menu.
For more information on code snippets in general, refer to Creating snippets.
Use the code snippet to add pages
With the code snippet in place, you can quickly create templates for the Home, About, and Contact pages.
-
In the
templatesfolder, create a new file namedhome.html, Then start typingflextto see the snippet appear as a completion:When you select the completion, the snippet’s code appears with the cursor on the snippet’s insertion point:
-
At the insertion point in the «title» block, write
Home, and in the «content» block, write<p>Home page for the Visual Studio Code Flask tutorial.</p>, then save the file. These lines are the only unique parts of the extended page template: -
In the
templatesfolder, createabout.html, use the snippet to insert the boilerplate markup, insertAbout usand<p>About page for the Visual Studio Code Flask tutorial.</p>in the «title» and «content» blocks, respectively, then save the file. -
Repeat the previous step to create
templates/contact.htmlusingContact usand<p>Contact page for the Visual Studio Code Flask tutorial.</p>in the two content blocks. -
In
app.py, add functions for the /about/ and /contact/ routes that refer to their respective page templates. Also modify thehomefunction to use thehome.htmltemplate.# Replace the existing home function with the one below @app.route("/") def home(): return render_template("home.html") # New functions @app.route("/about/") def about(): return render_template("about.html") @app.route("/contact/") def contact(): return render_template("contact.html")


Run the app
With all the page templates in place, save app.py, run the app, and open a browser to see the results. Navigate between the pages to verify that the page templates are properly extending the base template.

Note: If you’re not seeing the latest changes, you might need to do a hard refresh on the page to avoid seeing a cached file.
Optional activities
The following sections describe additional steps that you might find helpful in your work with Python and Visual Studio Code.
Create a requirements.txt file for the environment
When you share your app code through source control or some other means, it doesn’t make sense to copy all the files in a virtual environment because recipients can always recreate the environment themselves.
Accordingly, developers typically omit the virtual environment folder from source control and instead describe the app’s dependencies using a requirements.txt file.
Although you can create the file by hand, you can also use the pip freeze command to generate the file based on the exact libraries installed in the activated environment:
-
With your chosen environment selected using the Python: Select Interpreter command, run the Terminal: Create New Terminal command (⌃⇧` (Windows, Linux Ctrl+Shift+`))) to open a terminal with that environment activated.
-
In the terminal, run
pip freeze > requirements.txtto create therequirements.txtfile in your project folder.
Anyone (or any build server) that receives a copy of the project needs only to run the pip install -r requirements.txt command to reinstall the packages in the original environment. (The recipient still needs to create their own virtual environment, however.)
Note:
pip freezelists all the Python packages you have installed in the current environment, including packages you aren’t currently using. The command also lists packages with exact version numbers, which you might want to convert to ranges for more flexibility in the future. For more information, see Requirements Files in the pip command documentation.
Refactor the project to support further development
Throughout this Flask tutorial, all the app code is contained in a single app.py file. To allow for further development and to separate concerns, it’s helpful to refactor the pieces of app.py into separate files.
-
In your project folder, create a folder for the app, such as
hello_app, to separate its files from other project-level files likerequirements.txtand the.vscodefolder where VS Code stores settings and debug configuration files. -
Move the
staticandtemplatesfolders intohello_app, because these folders certainly contain app code. -
In the
hello_appfolder, create a file namedviews.pythat contains the routings and the view functions:from flask import Flask from flask import render_template from datetime import datetime from . import app @app.route("/") def home(): return render_template("home.html") @app.route("/about/") def about(): return render_template("about.html") @app.route("/contact/") def contact(): return render_template("contact.html") @app.route("/hello/") @app.route("/hello/<name>") def hello_there(name = None): return render_template( "hello_there.html", name=name, date=datetime.now() ) @app.route("/api/data") def get_data(): return app.send_static_file("data.json") -
In the
hello_appfolder, create a file__init__.pywith the following contents:import flask app = flask.Flask(__name__) -
In the
hello_appfolder, create a filewebapp.pywith the following contents:# Entry point for the application. from . import app # For application discovery by the 'flask' command. from . import views # For import side-effects of setting up routes. -
Open the debug configuration file
launch.jsonand update theenvproperty as follows to point to the startup object:"env": { "FLASK_APP": "hello_app.webapp" }, -
Delete the original
app.pyfile in the project root, as its contents have been moved into other app files. -
Your project’s structure should now be similar to the following:
-
Run the app in the debugger again to make sure everything works. To run the app outside of the VS Code debugger, use the following steps from a terminal:
- Set an environment variable for
FLASK_APP. On Linux and macOS, useexport set FLASK_APP=webapp; on Windows useset FLASK_APP=webapp. - Navigate into the
hello_appfolder, then launch the program usingpython -m flask run.
- Set an environment variable for

Create a container for a Flask app using the Docker extension
The Docker extension makes it easy to build, manage, and deploy containerized applications from Visual Studio Code. If you’re interested in learning how to create a Python container for the Flask app developed in this tutorial, check out the Python in a container tutorial, which will walk you through how to:
- Create a
Dockerfilefile describing a simple Python container. - Build, run, and verify the functionality of a Flask app.
- Debug the app running in a container.
If you have any problems, you can search for answers or ask a question on the Python extension Discussions Q&A.
Next steps
Congratulations on completing this walkthrough of working with Flask in Visual Studio Code!
The completed code project from this tutorial can be found on GitHub: python-sample-vscode-flask-tutorial.
Because this tutorial has only scratched the surface of page templates, refer to the Jinja2 documentation for more information about templates. The Template Designer Documentation contains all the details on the template language. You might also want to review the official Flask tutorial as well as the documentation for Flask extensions.
To try your app on a production website, check out the tutorial Deploy Python apps to Azure App Service using Docker Containers. Azure also offers a standard container, App Service on Linux, to which you deploy web apps from within VS Code.
You may also want to review the following articles in the VS Code docs that are relevant to Python:
- Editing Python code
- Linting
- Managing Python environments
- Debugging Python
- Testing
01/20/2023
Что такое веб микро-фреймворк Flask.
Модуль Flask представляет собой микро-фреймворк, но слово «микро» не означает, что веб-приложение, построенное на Flask, должно помещаться в один файл с кодом на Python, хотя, это не запрещено. Или Flask испытывает недостаток в функциональности. Нет, приставка «микро» означает, что Flask придерживаться простого, но расширяемого ядра. Это означает, что Flask не решает за программиста что и как ему делать. При проектировании веб-приложений на Flask программист все решения принимает сам: например, какие паттерны использовать, какую базу данных подключить, использовать ли ORM или работать на чистом SQL. Flask не содержит больших слоев абстракции и по этому быстр. В общем Flask — это всё, что нужно, и ничего лишнего.
Фреймворк Flask поддерживает много расширений для добавления различной функциональности, которые обеспечивают интеграцию с базами данных, валидацию форм, различные технологии аутентификации и так далее. Flask имеет множество параметров конфигурации с разумными значениями по умолчанию, и мало предварительных соглашений. По соглашениям Flask, шаблоны и статические файлы хранятся в поддиректориях внутри дерева исходных кодов Python, с названиями templates и static соответственно, а в качестве движка шаблонов рекомендовано использовать модуль Jinja2. Эти соглашения изменяемы, но изменять их не стоит, особенно тем, кто только начинает знакомится с Flask.
Содержание.
- Установка веб-фреймворка Flask в виртуальное окружение;
- Минимальное веб-приложение на Flask;
- Режим отладки веб-приложения Flask;
- Экранирование HTML;
- URL маршрутизация в веб-приложении Flask;
- Правила для переменной части URL-адреса;
- Уникальные URL-адреса;
- Автоматическое построение (генерация) URL-адресов;
- HTTP методы (GET, POST и т.д.) URL-адреса во Flask;
- Подключение статических файлов CSS и JavaScript;
- Использование шаблонизатора Jinja2 в приложении Flask;
- Локальные переменные контекста запроса;
- Доступ к данным запроса во Flask;
- Загрузка файлов на сервер;
- Установка и получение файлов cookie во Flask;
- Перенаправление/редиректы во Flask;
- Вызов страницы с HTTP-ошибкой 404, 500 и т. д. во Flask;
- Ответ сервера во Flask;
- Создание API с JSON во Flask;
- Сессии/сеансы во Flask;
- Ведение журнала во Flask, встроенный logger.
Установка веб-фреймворка Flask в виртуальное окружение.
Веб-фреймворк Flask зависит от двух внешних библиотек — это Werkzeug и Jinja2. Библиотека Werkzeug — это инструментарий для WSGI — стандартного интерфейса Python между веб-приложениями и различными серверами и предназначен как для разработки, так и развёртывания. Модуль Jinja2 занимается обработкой и визуализацией шаблонов с HTML.
Что бы установить Flask в виртуальное окружение, необходимо выполнить следующие инструкции в терминале вашей системе.
# создаем виртуальное окружение, если его нет
$ python3 -m venv .venv --prompt VirtualEnv
# активируем виртуальное окружение
$ source .venv/bin/activate
# ставим веб-фреймворк Flask
(VirtualEnv):~$ python3 -m pip install -U Flask
Минимальное веб-приложение на Flask.
Как говорилось ранее, фреймворк Flask очень гибкий и не запрещает размещение всего веб-приложения в одном файле, и может выглядеть примерно следующим образом:
# mini-flask.py
from flask import Flask
app = Flask(__name__)

@app.route('/')
def index():
    return """<html><body>
        <h1>Главная страница.</h1>
        <h3><a href="/hello/">Страница приветствия...</a></h3>
        </body></html>"""

@app.route('/hello/')
def hello():
    return """<html><body>
        <h1>Привет Flask!</h1>
        <h3><a href="/"><= назад</a></h3>
        </body></html>"""

if __name__ == '__main__':
    app.run()
Код выше сохраним в файл с именем mini-flask.py и запустим с помощью Python в виртуальном окружении, куда ранее устанавливался пакет Flask. Внимание! никогда не давайте имя файлу flask.py или директории с веб-приложением (если оно большое), это вызовет конфликт с установленным пакетом Flask.
Далее запускаем файл с кодом минимального приложения.
# активируем виртуальное окружение
# если оно не активировано
$ source .venv/bin/activate
Теперь запускаем файл `mini-flask.py`
(VirtualEnv):~$ python mini-flask.py
* Serving Flask app "mini-flask" (lazy loading)
 * Environment: production
   WARNING: This is a development server.
   Do not use it in a production deployment.
   Use a production WSGI server instead.
 * Debug mode: off
 * Running on http://127.0.0.1:5000/ (Press CTRL+C to quit)
Если используется Flask 2.0 и выше, то приложение можно запустить следующим образом:
# запуск в Bash Linux
$ export FLASK_APP=mini-flask
$ flask run
 * Running on http://127.0.0.1:5000/
...
# запуск в CMD Windows
> set FLASK_APP=hello
> flask run
 * Running on http://127.0.0.1:5000/

# запуск в Windows Powershell
> $env:FLASK_APP = "hello"
> flask run
 * Running on http://127.0.0.1:5000/
Теперь откройте в браузере ссылку http://127.0.0.1:5000/, что бы увидеть работу минимального приложения.
: (это необходимо понять)
- Сначала импортируется из пакета
flaskклассFlask, который отвечает за всё будущее приложение, состоит ли оно из одного файла или множества файлов, расположенных в папке с веб-приложением (в этом случае импорт и создание экземпляра WSGI-приложения будет происходить в файле__init__.py). - Далее создается экземпляр будущего веб-приложением
app = Flask(__name__). Первый аргумент конструктора классаFlask— это имя модуля (один файл) или пакета (директория с несколькими модулями). Этот аргумент, сообщает Flask, где искать шаблоны, статические файлы и т.д. Следовательно, если приложение поместилось в один файл, то в качестве аргумента следует использовать__name__, т.к. в зависимости от того, запущен ли файл с кодом как самостоятельное приложение, или был импортирован как модуль, это имя будет разным ('__main__'или имя импортированного модуля). - Затем, используется декоратор
@app.route('/')и@app.route('/hello/'), чтобы указать Flask, что для URL-адреса сайта/должна запускаться функцияindex(), а для/hello/—hello(). Декорированные таким образом функции, в свою очередь, должны возвращать HTML код отображаемой страницы. Имя декорированной функции, в дальнейшем, можно использовать для автоматического построения URL-адресов для этой конкретной функции. Другими словами, не составлять URL-адрес вручную для страницы, а например написатьflask.url_for('hello'), что сгенерирует строку с URL-адресом/hello/(очень помогает, когда URL многоуровневые). - Наконец, для запуска локального сервера с веб-приложением, используется метод экземпляра приложения
app.run(). Благодаря конструкцииif __name__ == '__main__', сервер запустится только при непосредственном вызове скрипта из интерпретатора Python, а не при его импортировании в качестве модуля.
Как видно из информации, которую выводит сервер отладки при запуске веб-приложения (см. выше), для его остановки, необходимо нажать комбинацию клавиш Ctrl+C.
:
При запуске сервера веб-приложения можно заметить, что он доступен только с локального адреса 127.0.0.1. Такое поведение установлено по умолчанию, т.к. в режиме отладки debug, сторонний пользователь может выполнить нежелательный код Python на компьютере с запущенным приложением. Если вы доверяете пользователям (например локальной сети), то можно сделать сервер c веб-приложением публично доступным, для этого необходимо изменить вызов метода app.run() следующим образом: app.run(host='0.0.0.0'). Это укажет операционной системе, чтобы она слушала все публичные IP-адреса, подключенной к компьютеру сети.
Если используется Flask 2.0 и выше, то сделать приложение общедоступным можно просто добавив --host=0.0.0.0 в командную строку:
$ flask run --host=0.0.0.0
Режим отладки веб-приложения Flask.
Метод app.run() как нельзя лучше подходит для запуска локального сервера разработки, но при каждом изменении кода, его необходимо перезапускать, что очень напрягает. Но если включить режим отладки debug, то при каждом изменении кода сервер разработки будет перезагружать сам себя, кроме того, если что-то пойдёт не так, режим debug обеспечит полезным отладчиком.
:
# через атрибут экземпляра приложения
app.debug = True
app.run()

# через аргумент метода `.run()`
app.run(debug=True)
Через FLASK_ENV (Если используется Flask 1.1 и выше)
$ export FLASK_ENV=development
$ flask run
Внимание! Включенный интерактивный отладчик позволяет выполнение произвольного кода Python. Это делает его главной угрозой безопасности, и следовательно режим debug никогда не должен использоваться на «боевых» серверах.
Экранирование HTML.
При возврате HTML (тип ответа по умолчанию во Flask) любые предоставленные пользователем значения, отображаемые в выходных данных, должны быть экранированы для защиты от атак с использованием инъекций. HTML-шаблоны, созданные с помощью Jinja2 сделают это автоматически.
Функцию escape(), показанную здесь, можно использовать вручную. В большинстве примеров она опущена для краткости, но всегда необходимо знать и понимать, как используются ненадежные данные.
from markupsafe import escape

@app.route("/<name>")
def hello(name):
    return f"Hello, {escape(name)}!"
Если пользователю удалось отправить в качестве name HTML код <script>alert('bad')</script>, то экранирование приводит к тому, что он отображается как текст, а не запускается как сценарий в браузере пользователя.
URL маршрутизация в веб-приложении Flask.
Ранее говорилось, что для привязки функции к URL-адресу используется декоратор @app.route(). Но это еще не все, можно сделать определенные части URL динамически меняющимися, при этом задействовать несколько правил.
Правила для переменной части URL-адреса.
Для составления динамически меняющихся URL-адресов, необходимо изменяемые части адреса выделять как <variable_name>. Затем эти части передаются в функцию, в виде аргумента с именем variable_name. Также в изменяемых частях может быть использован конвертер, который задает правила следующего вида <converter:variable_name>.
:
from markupsafe import escape

@app.route('/user/<username>')
def show_user_profile(username):
    # выведет имя профиля пользователя `username`
    return f'Пользователь: {username}'

@app.route('/post/<int:post_id>')
def show_post(post_id):
    # выведет страницу с данным `post_id` (целое число
    return f'Post {post_id}'

@app.route('/path/<path:subpath>')
def show_subpath(subpath):
    # выведет subpath после /path/
    return f'Subpath {escape(subpath)}'
:
int: принимаются целочисленные значения;float: принимаются значения с плавающей точкой;path: принимает строки (как по умолчанию), но также принимает слеши;uuid: принимает строки UUID.
Уникальные URL-адреса (301 redirect).
Следующие два правила различаются использованием косой черты в конце URL-адреса.
@app.route('/projects/')
def projects():
    return 'The project page'

@app.route('/about')
def about():
    return 'The about page'
В первом случае, канонический URL-адрес /projects/ имеет завершающую косую черту (/ в конце адреса), что похоже на папку в файловой системе. Если обратится к URL-адресу без косой черты в конце, то Flask перенаправляет с кодом ответа сервера 301 на канонический URL-адрес с завершающей косой чертой.
Во втором случае, канонический URL-адрес /about не имеет косой черты в конце. Доступ к URL-адресу с косой чертой в конце приведет к ошибке 404 «Not Found«.
Такое поведение Flask помогает сохранить уникальность URL-адресов для этих ресурсов, что помогает поисковым системам избегать двойной индексации одной и той же страницы.
Автоматическое построение (генерация) URL-адресов.
Автоматическое создать URL-адрес для декорированных @app.route() функций, используйте функцию flask.url_for(). В качестве первого аргумента flask.url_for() принимает имя декорированной функции и любое количество ключевых аргументов, каждый из которых соответствует изменяемой части URL-адреса. Если дополнительно указываются переменные, которые отсутствует в изменяемых частях URL-адреса, то все они добавляются к URL в качестве параметров запроса.
>>> from flask import Flask, url_for
>>> app = Flask(__name__)
>>> @app.route('/')
... def index(): pass
...
>>> @app.route('/login')
... def login(): pass
...
>>> @app.route('/user/<username>')
... def profile(username): pass
...
>>> with app.test_request_context():
...     print(url_for('index'))
...     print(url_for('login'))
...     # переменной `next` нет в маршруте `/login`
...     print(url_for('login', next='then'))
...     print(url_for('profile', username='admin'))
...
# /
# /login
# /login?next=then
# /user/admin
В примере использован метод app.test_request_context(), который заставляет Flask вести себя так, как будто он обрабатывает запрос, даже при взаимодействии с ним через интерпретатор Python.
Зачем строить URL-адреса с помощью flask.url_for(), ведь их можно составить при помощи переменных в шаблонах?
- Использование
flask.url_for()часто более понятно (первый аргумент — функция, которая отвечает за страницу), чем жесткое кодирование URL-адресов. - Можно изменить URL-адреса за один раз, вместо ручного поиска и изменения жестко закодированных URL-адресов.
- Автоматическое построение URL-адресов прозрачно обрабатывает экранирование специальных символов и данных Unicode.
- Сгенерированные пути URL-адреса всегда абсолютны, что позволяет избежать неожиданного поведения относительных путей в браузерах.
- Если приложение размещено за пределами корневого URL-адреса
/, например в/myapplication, то функцияflask.url_for()обработает все правильно.
HTTP методы (GET, POST и т.д.) URL-адреса во Flask.
Веб-приложения могут использовать разные HTTP методы при доступе к URL-адресу. Необходимо иметь базовое понимание HTTP методов при работе с Flask. По умолчанию маршрут URL-адреса отвечает только на GET-запросы. Для обработки URL-адреса другим методом или несколькими HTTP-методами необходимо использовать аргумент methods декоратора @app.route().
from flask import request

@app.route('/login', methods=['GET', 'POST'])
def login():
    if request.method == 'POST':
        # обработать форму
        do_the_login()
    else:
        # отобразить форму
        show_the_login_form()
Если присутствует HTTP-метод GET, то Flask автоматически добавляет поддержку HTTP-метода HEAD и обрабатывает запросы HEAD в соответствии с HTTP RFC. Аналогичным образом, автоматически реализуется HTTP-метод OPTIONS.
Быстрое введение в HTTP-методы.
HTTP-метод сообщает серверу, что хочет сделать клиент с запрашиваемой страницей.
GET: клиент сообщает серверу, что он получил информацию, хранимую на этой странице и отобразил/обработал её. Это самый распространённый HTTP-метод.HEAD: клиент запрашивает у сервера информацию только о заголовках страницы для установки или обработкиcookiesи т.д., без ее содержимого. В Flask, не требуется иметь дело с этим методом, так как нижележащая библиотекаWerkzeugсделает всё сама.POST: клиент сообщает серверу, что он хочет передать этому URL какую-то новую информацию, при сервер должен обработать и сохранить эти данные. Обычно, методомPOSTпередаются данные пользовательских форм на сервер.PUT: HTTP-метод похож наPOST, только сервер может вызвать процедуру сохранения несколько раз, перезаписывая старые значения более одного раза. Другими словами, веб-приложение, ориентируясь на методPUTудаляет старую запись и записывает новую, при этом она доступна по тому же URL.DELETE: удаляет информацию, расположенную в указанном месте.OPTIONSобеспечивает быстрый способ выяснения клиентом поддерживаемых для данного URL методов. Это HTTP-метод запускается автоматически.
Подключение статических файлов CSS и JavaScript.
Динамическим веб-приложениям также нужны статические файлы — это CSS и JavaScript файлы. Веб-сервер Flask настроен на их обслуживание в директории static. Во время разработки нужно создать папку с именем static в пакете с веб-приложением или рядом с приложением-модулем (приложение состоит из одного файла), и она будет доступна в приложении по URL /static.
Чтобы сгенерировать URL-адреса для статических файлов, необходимо использовать специальное имя конечной точки 'static':
# в коде Python
url_for('static', filename='style.css')

# в шаблонах Jinja2
<link rel="stylesheet" href="{{ url_for('static', filename='style.css') }}">
Файл должен храниться в файловой системе как static/style.css.
Использование шаблонизатора Jinja2 в приложении Flask.
Генерировать HTML из Python — это неправильно и довольно громоздко, плюс ко всему этому встает необходимость самостоятельно выполнять экранирование HTML, чтобы обеспечить безопасность приложения. Что бы избежать всего этого фреймворк Flask автоматически настраивает шаблонизатор Jinja2.
Для визуализации шаблона используется функция flask.render_template(). Все, что нужно сделать, это указать имя подключаемого шаблона и передать переменные (как словарь или как ключевые аргументы) в подключенный шаблон. Вот простой пример того, как визуализировать шаблон:
from flask import render_template

@app.route('/hello/')
@app.route('/hello/<name>')
def hello(name=None):
    return render_template('hello.html', name=name)
Flask будет искать шаблоны в папке с шаблонами templates. Итак, если приложение является модулем (веб-приложение поместилось в один файл), то папка templates находится рядом с этим модулем (файлом), если это пакет, то templates находится внутри пакета (директории с веб-приложением):
Случай 1: приложение-модуль.
/application.py
/static
    /style.css
/templates
    /hello.html
Случай 2: приложение-пакет.
/application
    /__init__.py
    /hello.py
    /static
        /style.css
    /templates
        /hello.html
В шаблонах используйте всю мощь движка Jinja2. Для получения дополнительной информации перейдите к документации по Jinja2.
Вот пример шаблона:
<!doctype html>
<html lang="ru">
<head>
<link rel="stylesheet" href="{{ url_for('static', filename='style.css') }}">
<title>Привет из Flask</title>
</head>
<body>
{% if name %}
  <h1>Привет {{ name }}!</h1>
{% else %}
  <h1>Привет, Flask!</h1>
{% endif %}
</body>
</html>
Движок Jinja2 особенно полезен при использовании наследования шаблонов. В основном, наследование шаблонов позволяет указать определенные элементы в базовом шаблоне, а потом переопределить их в дочерних шаблонах на каждой странице (например, заголовок, блок навигации, нижний колонтитул и т.д.).
В шаблонах включено автоматическое экранирование, следовательно, если переменная содержит HTML, то содержимое будет экранировано автоматически. Если вы доверяете содержимому переменной и знаете, что это будет безопасный HTML (например, он сгенерирован кодом веб-приложения), то можно пометить его как безопасный, используя класс flask.Markup или фильтр шаблона {{ var | safe }}.
Базовое введение в то, как работает класс Markup:
>>> from markupsafe import Markup >>> Markup('<strong>Hello %s!</strong>') % '<blink>hacker</blink>' # Markup('<strong>Hello <blink>hacker</blink>!</strong>') >>> Markup.escape('<blink>hacker</blink>') # Markup('<blink>hacker</blink>') >>> Markup('<em>Marked up</em> » HTML').striptags() # 'Marked up » HTML'
Локальные переменные контекста запроса.
Данные, которые клиент отправляет на сервер передаются в глобальном объекте request. Этот объект фактически является прокси для объектов, которые в свою очередь являются локальными для определенного контекста, немного запутанно, но это легко понять.
Представьте, что контекст является потоком обработки. Приходит запрос, и веб-сервер решает создать новый поток или что-то еще, т.к. базовый объект может работать с системами, отличными от потоков. Когда Flask начинает обработку внутреннего запроса, он определяет, является ли текущий поток активным контекстом, и связывает текущее приложение и среду WSGI с этим контекстом (потоком). Он делает это так, что одно приложение может вызывать другое приложение без прерывания работы.
Что это значит? По сути, это можно полностью игнорировать, если только не используется модульное тестирование. Код, зависящий от объекта запроса, сломается из-за отсутствия объекта запроса. Решение состоит в том, чтобы самостоятельно создать объект запроса и привязать его к контексту. Самым простым решением для модульного тестирования является использование диспетчера контекста app.test_request_context(). В сочетании с оператором with он связывает тестовый запрос для взаимодействия с ним. Вот пример:
from flask import request

with app.test_request_context('/hello', method='POST'):
    # теперь можно что-то делать с запросом до конца
    # блока `with`, например:
    assert request.path == '/hello'
    assert request.method == 'POST'
Другая возможность передать среду WSGI методу app.request_context():
with app.request_context(environ):
    assert request.method == 'POST'
Доступ к данным запроса во Flask.
Здесь не будет рассматриваться подробно объект запроса flask.Request, а рассмотрим некоторые из наиболее распространенных операций. Прежде всего, необходимо импортировать его из модуля flask.
Текущий HTTP-метод запроса к серверу будет доступен с помощью атрибута request.method. Для доступа к данным формы (передаваемым в запросах POST или PUT) используйте атрибут request.form, представляющий собой словарь, ключи которого имеют значения name HTML-тэгов <input> в форме (например <input name="username">).
from flask import request

@app.route('/login', methods=['POST', 'GET'])
def login():
    error = None
    if request.method == 'POST':
        if valid_login(request.form['username'],
                       request.form['password']):
            return log_the_user_in(request.form['username'])
        else:
            error = 'Неверное имя пользователя или пароль'
    # код ниже выполнится, если метод запроса был GET
    # или учетные данные были недействительными
    return render_template('login.html', error=error)
Что произойдет, если атрибута формы не существует? В этом случае возникает особая ошибка KeyError. Ее можно поймать как стандартную ошибку KeyError, но если этого не сделать, то будет показана страница с ошибкой
HTTP 400 Bad Request
. Так что во многих ситуациях не придется сталкиваться с этой проблемой.
Для доступа к параметрам, представленным в URL-адресе как ?key=value, можно использовать атрибут request.args:
searchword = request.args.get('key', '')
Так как request.args представляет собой словароподобный объект Python, то рекомендуется обращаться к параметрам URL-адреса с помощью метода словаря dict.get() (как показано выше) или путем перехвата KeyError и выдачи собственной страницы с ошибкой
HTTP 404 Not Found
. Ведь пользователи могут изменить URL-адрес, а автоматически созданная Flask станица ошибки
HTTP 400 Bad Request
неудобна для пользователя.
Полный список методов и атрибутов объекта запроса можно найти в документации по flask.Request.
Загрузка файлов на сервер.
Можно легко обрабатывать загруженные файлы с помощью Flask, при этом необходима установка атрибута enctype='multipart/form-data' в HTML-форме, иначе браузер вообще не будет передавать файлы.
Загруженные файлы хранятся в памяти или во временном каталоге файловой системы. Получить доступ к файлам, можно при помощи атрибута request.files объекта запроса. Каждый загруженный файл хранится в этом словаре. Он ведет себя так же, как стандартный файловый объект Python, но также имеет метод fp.save(), который позволяет сохранять файл в указанном месте файловой системе. Простой пример, как это работает:
from flask import request

@app.route('/upload', methods=['GET', 'POST'])
def upload_file():
    if request.method == 'POST':
        fp = request.files['file_key']
        fp.save('/var/www/uploads/uploaded_file.txt')
Если необходимо знать, как изначально назывался файл, до того, как он был загружен, то можно получить доступ к атрибуту имени файла fp.filename. Имейте в виду, что это значение может быть подделано, следовательно доверять этому значению нельзя. Если необходимо использовать изначальное имя файла для его хранения на сервере, то лучше получить его через функцию werkzeug.utils.secure_filename(), которую предоставляет пакет Werkzeug:
from werkzeug.utils import secure_filename

@app.route('/upload', methods=['GET', 'POST'])
def upload_file():
    if request.method == 'POST':
        fp = request.files['file_key']
        fp.save(f"/var/www/uploads/{secure_filename(fp.filename)}")
Установка и получение файлов cookie во Flask.
Для доступа к файлам cookie можно использовать атрибут request.cookie. Чтобы установить файлы cookie, можно использовать метод response.set_cookie() объекта ответа. Атрибут cookie объектов запроса Request представляет собой словарь со всеми файлами cookie, передаваемыми клиентом. Если нужно использовать сессии/сеансы, то не используйте cookie напрямую, а вместо этого используйте встроенные сессии Sessions во Flask, которые повышают безопасность файлов cookie.
from flask import request

@app.route('/')
def index():
    # Используйте `request.cookies.get(key)` вместо `cookies[key]`,
    # чтобы не получать `KeyError`, если cookie отсутствует.
    username = request.cookies.get('username')
from flask import make_response

@app.route('/')
def index():
    response = make_response(render_template(...))
    response.set_cookie('username', 'the username')
    return response
, что файлы cookie устанавливаются для объектов Responses. Поскольку вы обычно просто возвращаете строки из функций просмотра, Flask преобразует их для вас в объекты ответа. Если вы явно хотите сделать это, вы можете использовать функцию make_response (), а затем изменить ее.
Иногда вам может потребоваться установить cookie в точке, где объект ответа еще не существует. Это возможно с помощью шаблона обратных вызовов отложенного запроса.
Дополнительно смотрите ниже подраздел «Ответ сервера во Flask».
Перенаправление/редиректы во Flask.
Чтобы перенаправить пользователя на другую страницу сайта, используйте функцию flask.redirect(). Чтобы преждевременно прервать запрос с установленным кодом ошибки, используйте функцию flask.abort():
from flask import abort, redirect, url_for

@app.route('/')
def index():
    return redirect(url_for('login'))

@app.route('/login')
def login():
    abort(401)
    # эта функция никогда не исполнится
    this_is_never_executed()
Бессмысленный пример, так как пользователь будет перенаправлен с главной страницы на страницу, к которой он не может получить доступ (код HTTP 401 означает отказ в доступе), но этот пример показывает, как это работает.
Вызов страницы с HTTP-ошибкой 404, 500 и т. д. во Flask.
По умолчанию для каждого кода ошибки (в примере выше строка с abort(401)) отображается стандартная страница ошибки. Если необходимо настроить собственную страницу с ошибкой, то можно использовать декоратор @app.errorhandler():
from flask import render_template

@app.errorhandler(404)
# кастомная страница с ошибкой
def page_not_found(error):
    return render_template('page_not_found.html'), 404
Обратите внимание на 404 после вызова flask.render_template(). Это сообщает Flask, что код состояния этой страницы должен быть 404 (обязательно нужно указать). По умолчанию функция будет возвращать код 200, что означает: все прошло хорошо.
Ответ сервера во Flask.
Возвращаемое значение из функции представления, автоматически преобразуется в объект ответа сервера. Если возвращаемое значение является строкой, то оно преобразуется в объект ответа со строкой в качестве тела ответа, кодом состояния 200 OK и mimetype text/html. Если возвращаемое значение — словарь dict, то для получения ответа вызывается flask.jsonify(). Логика, которую Flask применяет для преобразования возвращаемых значений в объекты ответа, выглядит следующим образом:
- Если возвращается объект ответа правильного типа, то он возвращается непосредственно из функции представления.
- Если это строка, то создается объект ответа с этими данными и параметрами по умолчанию.
- Если это
dict, то объект ответа создается с помощьюflask.jsonify(). - Если возвращается кортеж, то элементы в кортеже предоставляют дополнительную информацию. Такие кортежи должны выглядеть следующим образом
(response, status),(response, headers)или(response, status, headers). Значение кортежаstatusбудет иметь приоритет над кодом статуса сервера, а заголовкиheadersмогут быть списком или словарем дополнительных значений заголовков.
Если ничего из этого не сработает, то Flask будет считать, что возвращаемое значение является допустимым приложением WSGI, и преобразует его в объект ответа.
Если необходимо получить объект response внутри функции представления, то можно использовать функцию flask.make_response().
Представьте, что есть такая функция-представление:
from flask import render_template

@app.errorhandler(404)
def not_found(error):
    return render_template('error.html'), 404
Для получения объекта response, нужно обернуть возвращаемое выражение с помощью flask.make_response(), далее можно его изменить, а затем вернуть его:
from flask import make_response

@app.errorhandler(404)
def not_found(error):
    # получение объекта `response`
    resp = make_response(render_template('error.html'), 404)
    # добавление заголовков к объекту `response`
    resp.headers['X-Something'] = 'A value'
    return resp
Создание API с JSON во Flask.
Распространенным форматом ответа при написании API является JSON. Начать писать такой API с помощью Flask несложно. Если возвращать словарь dict из функции-представления, то он будет преобразован в ответ JSON.
@app.route("/me")
def me_api():
    user = get_current_user()
    return {
        "username": user.username,
        "theme": user.theme,
        "image": url_for("user_image", filename=user.image),
    }
В зависимости от дизайна API можно создавать ответы JSON для типов, отличных от словаря dict. В этом случае используйте функцию flask.jsonify(), которая сериализует любой поддерживаемый тип данных JSON. Или используйте расширения сообщества Flask, которые поддерживают более сложные приложения.
from flask import jsonify

@app.route("/users")
def users_api():
    users = get_all_users()
    return jsonify([user.to_json() for user in users])
Сессии/сеансы во Flask.
В дополнение к объекту flask.request существует также второй объект flask.session, называемый сеансом/сессией, который позволяет хранить информацию, которая будет передаваться от одного запроса к другому. Сессии реализованы поверх файлов cookie, при этом cookie криптографически подписываются. Это означает, что пользователь может просматривать содержимое файла cookie, но не зная секретного ключа изменить его не сможет.
Чтобы использовать сессии/сеансы, необходимо установить секретный ключ, при помощи которого будут подписываться сессионные cookie.
from flask import session

# установим секретный ключ для подписи. Держите это в секрете!
app.secret_key = b'_5#y2L"F4Q8znxec]/'

@app.route('/')
def index():
    if 'username' in session:
        return f'Вошел как {session["username"]}'
    return 'Вы не авторизованы'

@app.route('/login', methods=['GET', 'POST'])
def login():
    if request.method == 'POST':
        session['username'] = request.form['username']
        return redirect(url_for('index'))
    return '''
        <form method="post">
            <p><input type=text name=username>
            <p><input type=submit value=Login>
        </form>
    '''

@app.route('/logout')
def logout():
    # удаляем имя пользователя из сеанса, если оно есть
    session.pop('username', None)
    return redirect(url_for('index'))
Как сгенерировать хорошие секретные ключи?
Секретный ключ должен быть как можно более случайным. В операционной системе есть способы cгенерировать случайные данные на основе криптографического генератора случайных чисел. Используйте функцию os.urandom(), чтобы быстро сгенерировать значение для Flask.secret_key или app.config['SECRET_KEY']). Например:
$ python -c 'import os; print(os.urandom(16))'
b'x00x1bx1f:xadx08s>x84xf5xd2Q?}axef'
*
Примечание о сеансах на основе файлов cookie
:
Flask принимает значения, которые вводятся в объект сессии/сеанса, и преобразует их в файл cookie. Если вдруг обнаружите, что некоторые значения не сохраняются в запросах (четкой ошибки не будет), то необходимо проверить в настройках Вашего браузера, что файлы cookie действительно включены. Также проверьте размер cookie в ответах страницы, он должен быть меньше размера, поддерживаемым веб-браузерами.
Помимо клиентских сеансов/сессий встроенных в Flask, есть несколько расширений, которые добавляют возможность обрабатывать сеансы на стороне сервера.
Ведение журнала во Flask.
Flask использует стандартный модуль logging для ведение журнала. Сообщения в приложении Flask регистрируются с помощью app.logger, имя которого совпадает с именем app.name. Этот регистратор также может использоваться для регистрации собственных сообщений.
@app.route('/login', methods=['POST'])
def login():
    user = get_user(request.form['username'])

    if user.check_password(request.form['password']):
        login_user(user)
        app.logger.info('%s успешно вошел в систему', user.username)
        return redirect(url_for('index'))
    else:
        app.logger.info('%s не удалось войти в систему', user.username)
        abort(401)
Еще несколько примеров вызовов журнала:
app.logger.debug('A value for debugging')
app.logger.warning('A warning occurred (%d apples)', 42)
app.logger.error('An error occurred')
Встроенный app.logger является стандартным регистратором ведения журнала, поэтому для получения дополнительной информации смотрите документацию модуля logging.