Всем привет друзья! В этот очередной урок я расскажу вам подробную инструкцию по установке и настройке локального сервера mamp. Из него вы узнаете не только то, как установить, но и как пользоваться локальной средой для разработки веб сайтов и интернет магазинов.
Честно сказать, я перепробовал множество вариантов – от установки Denwer на свой компьютер, до Open Server. Если вы хотите пользоваться ими, то переходите по ссылкам и изучайте на здоровье 🙂
Для новичков мы отдельно прописали большое руководство о том, как установить WordPress на сайт несколькими способами
Я остановил свой выбор на MAMP и нисколько не жалею. Объясню причины:
- Он прост в использовании и легко настраивается
- В нем нет ничего лишнего, только самые основные настройки (чтобы не сбивать пользователя и не усложнять ему жизнь)
- Он БЕСПЛАТЕН
- И много другого.
Содержание:
- Начало работы с MAMP
- Инструкция по установке WordPress на сервер MAMP
- Как перенести сайт WordPress с MAMP на выделенный хостинг?
Содержание
- 1 Начало работы с MAMP
- 2 Инструкция по установке WordPress на сервер MAMP
- 3 Как перенести сайт WordPress с MAMP на выделенный хостинг?
- 3.1 Рекомендую ознакомиться с этими статьями:
Ну что ж, теперь перейдем от слов к делу. В первую очередь вам нужно скачать с официального сайта дистрибутив сервера MAMP. Доступен он по этому адресу — https://www.mamp.info/en/downloads/
Не пугайтесь, что он на английском я вам все объясню и вашей школьной практики будет вполне достаточно, ну а если сомневаетесь, то переводчик от Google вам в помощь.
Доступен MAMP в двух версиях – для Windows и для MAC. Так как я использую первую операционку, то буду рассказывать на ее примере.
Нажимаем на оранжевую кнопку Download (Скачать) и начнем процесс загрузки. Он весит 236 Mb. Запаситесь терпением 🙂

После загрузки кликайте на иконку установочного пакета, после чего вы запустите процесс распаковки и установки mamp на свой компьютер.
![]()
Потом нажимаете постоянно далее. Там немного шагов, все как и при обычной установке программ на ваш компьютер, MAMP здесь не исключение.
Ок. После всех успешных действий вы увидите диалоговое окно в котором вы можете и будете запускать локальный сервер. Выглядит он так:

Особого внимания здесь заслуживает ссылка с шестеренкой и надписью Preferences (Настройки и привилегии).
Как вы уже знаете, то локальный сервер использует порт 80, его также использует и программа Скайп (Skype). И как это обычно бывает между ними возникает конфликт, в результате чего локальный сервер mamp может не запуститься. В этом нам и поможет данная опция Preferences.

И здесь мы встречаем не такое уж и большое количество вкладок. По умолчанию на первой должна стоять галочка в поле Start Servers when starting MAMP (Запускать сервера когда запускается MAMP). Т.е вы нажали на кнопку Старт (Запуск сервера) и автоматически запускаются все мощности локального сервера. Тут вроде бы все очевидно и так 🙂
Теперь вторая важная вкладка, которая нам необходима для разрешения конфликта между Скайпом – Ports (Порты).

Должно стоять так: порт Апач – 80, MySql порт – 3306. Если и это не помогает, тогда нажимаете на кнопку Set Mamp ports to default (Установить порты по умолчанию), т.е сам локальный сервер выберет необходимые. У меня все подействовало, так что должно подействовать и у вас.
Далее вкладка PHP:

Ничего не меняем оставляем как есть.
Следующая таба – Web Server:

Здесь прописывается путь корня, в который будут помещаться наши будущие сайты – htdocs. Не советую менять, он выставлен по умолчанию. Все ваши проекты будут складываться здесь. Чуть дальше я объясню как это сделать.
Последняя вкладка о самом сервере – About MAMP:

Указывается версия и разработчики (не информативная часть, хотя для кого как).
Теперь после проведенных настроект MAMP мы запускаем наш сервер и делаем это, как вы уже успели догадаться, нажав на ссылку START

В случае успеха у вас должны загореться два пункта зеленым цветом – Apache и MySql. Отлично! Ваш сервер работает. Теперь зайдем на стартовую страницу, нажав на ссылку Open Start page. Вас перебросит в браузер и откроется вот такая вкладка:

Здесь выложен только фрагмент. Он нам и нужен. Здесь вы в адресной строке увидите ваш локальный путь по которому будете обращаться к файлам сайта –
localhost/MAMP
Далее идет навигационное меню. В нем нас будет интересовать только один раздел Tools (Инструментарий). Именно здесь расположена ссылка для доступа в phpMyAdmin. Есть две версии – обычная и облегченная phpLiteAdmin. Я пользуюсь первой.

Здесь будут храниться все ваши базы данных – будь то если вы пишите сайт на php с нуля или используете движки Joomla или WordPress или любые другие. Давайте нажмем и посмотрим на интерфейс работы с базами данных:

Если вы еще не знаете, то в левой части располагаются сами базы данных с таблицами в них, а справа – их содержимое.
Другой раздел стартовой страницы MAMP – Phpinfo. Перейдя в него вы можете посмотреть версию php и другую информацию о конфигурации сервера.

В этом выпуске я использую PHP версию 5.6.8 (свежая на текущий момент записи).
Теперь перейдем к очень важному шагу.
Инструкция по установке WordPress на сервер MAMP
Да, я знал, что вы ждали именно этого шага. Получайте 🙂 Сейчас все досконально объясню.
Первым делом перейдите в сам сервер MAMP по следующему пути:

В этой папке мы с вами создаем тестовый проект – я назову Smarticle.ru. Т.е по сути мы с вами создаем обычную папку (для пущей ясности).

Все очень хорошо! Двигаемся дальше. Теперь идем на официальный сайт WordPress и скачиваем оттуда самую последнюю свежую версию – wordpress.org
Вы скачаете архив, который нужно будет распаковать, чтобы он у вас был вот такого вида:

Простой комбинацией ctrl+C копируем и переносим в нашу созданную папку – Smarticle.ru
С этим шагом все просто, распинаться не буду.
Теперь немножко вашего внимания, ибо могут у большинства пользователей возникнуть или сложности или ошибки. Нам нужно создать базу данных и связать ее с сайтом WordPress.
Для этого снова заходим в phpMyAdmin (вы уже знаете как) и нажимаем на Databases (Базы данных).

Здесь мы создадим новую базу данных куда будут записываться все таблицы и вся информация (контент и прочее). Называйте ее понятно для вас латинскими буквами. Я назову просто – Smart_db. Следующее поле Collation (Кодировка). Можете не присваивать. У меня нормально работает или же можете установить
utf8_general_ci

И нажимаете кнопку Create (Создать). Автоматически данная база данных отобразится в левой части экрана. Вот таким образом:

Теперь давайте подскажем CMS WordPress эту базу. Для этого в браузерной строке вводите следующий путь:
Вы вводите свое название папки с сайтом.
В результате у вас должна появиться страница с началом установки вордпресса на локальный сервер MAMP. Вот так:

Обязательно выберите русский язык и нажмите на кнопку «Продолжить». Далее нас приветствует WordPress с инструкцией по установке, мы нажимаем «Вперед».

На следующем экране внимательно вводите следующую информацию:
- Имя базы данных – ваше созданное имя (в моем случае smart_db);
- Имя пользователя – root;
- Пароль – root;
- Сервер базы данных – localhost (не меняем, оставляем так);
- Префикс таблиц – ничего не трогаем.
В итоге получится нечто такое:

Нажимаем на кнопку «Отправить» и видим, что Вордпресс одобряет и просит запустить установку.

Заключительный момент – осталось придумать название сайта, задать имя входа и пароль, адрес почты.
- Название сайта – Бизнес Блог Макса Метелева
- Имя пользователя – admin
- Пароль – ваш пароль (не забудьте повторить)
- Адрес почты – ваша почта
И нажимаете – Установить WordPress

Далее входим в админку и работаем с сайтом:

Как перенести сайт WordPress с MAMP на выделенный хостинг?
Теперь давайте разберем такую ситуацию, когда вы уже закончили создавать сайт на локальном хостинге и вам его вместе со всеми таблицами базы данных нужно перенести на ваш платный выделенный хостинг. Рекомендую к прочтению статью – 7 причин, по которым стоит сменить вашего хостинг провайдера.
Есть один нюанс – если вы используете платный хостинг, то при установке он задает имя базы данных, согласно имени вашего аккаунта. Конечно можно сразу же создать базу с нужным именем, но если вы еще не определились какого хостера выбрать, то могут возникнуть некоторые неясности. В начале нам нужно установить WordPress на нашем уже выделенном хостинге и выбрать домен или поддомен для него. Переходите по ссылкам и прочитайте как это можно сделать. Все просто как дважды два. Не буду останавливаться на этом шаге.
А вот с созданием базы данных я все-таки поясню. Заходим в наш аккаунт (я использую SWEB) и переходим в раздел Базы MySql

В появившемся окне создадим новую.

Как видите, имя автоматически присваивается как
smarticlru_ (это префикс) и далее предлагается придумать название. Мы ограничены 5 символами. Выбор невелик – можем задать имя что-то навроде
smarticlru_newdb
Затем придумаваете пароль – лучше надежный и сложный (запишите, чтобы на забыть).

Нажимаем «Создать».
Теперь она у нас отразится в общем списке. Далее нам необходимо перейти по иконке с названием pma (phpMyAdmin)
")
Затем вы снова вводите пароль, который задали в момент создания.

И мы чудесным образом оказываемся в полюбившейся Вам интерфейсе пхпмайадмин 🙂
Сейчас самое интересное – нам нужно сохранить у себя на компьютере базу данных с локального сервера, чтобы потом ее импортировать в новую на выделенном сервере. Для этого идем в phpMyAdmin MAMP выбираем нашу базу –
smart_db и переходим по ссылке Export (Выгрузка)
 с локального сервера MAMP")
Затем выбираете метод – или быстрый или обычный (отображает все опции). Я всегда выбираю второй вариант. Вот так:

По умолчанию все таблицы уже выделены. Все, что вам нужно будет сделать это нажать на кнопку «Go» в самом внизу страницы и получить копию вашей базы данных на свой компьютер.

Очень хорошо. Базу скопировали давайте теперь поменяем все урлы вида
http://localhost/smarticle.ru/ на нормальный урл
https://smarticle.ru
Берем любой редактор кода (я пользуюсь SubLime Text 2) открываем в нем нашу базу данных и нажимаем комбинацию ctrl+F (найти все) и сделаем замену всех урлов на нужные и затем сохраним таблицу.

Снова возвращаемся к выделенному платному хостинг аккаунту и перейдем в phpMyAdmin . На этом шаге нам нужно нажать на кнопку ИМПОРТ (загрузить).

Выбираем файл базы на компьютере и нажимаем на кнопку Ок.

Все здорово! Импорт прошел успешно. Теперь, что Вордпресс уже на вашем платном хостинге увидел базу данных, вам необходимо сделать изменения в конфигурационном файле
wp—config.php Открываем его и прописываем следующее:

Имя пользователя и имя базы данных у вас должны совпадать!
Сохраняете изменения и теперь при обращении уже к новому сайту без локальной привязки у вас должно все прекрасно работать. В скором времени для лучшей наглядности запишу видео урок. На этом статью заканчиваю. Спасибо за внимание, терпение. Не забывайте нажимать на социальные кнопки и подписывать на новые выпуски статей умного блога! До новых встреч, пока.
Задача на сегодня — сделать так, чтобы вы могли запускать собственные сайты на своём компьютере. В частности, чтобы вы могли локально установить «Вордпресс», потыкать его, поучиться его настраивать и, может быть, сделать заготовку для собственного сайта в будущем.
Вообще для разработки и тестирования сайтов чаще всего нужен такой набор софта:
- база данных, чтобы сайт там мог хранить свои данные;
- веб-сервер, который будет отвечать на запросы и отдавать готовые страницы;
- скриптовый язык для обработки и сборки страниц, обычно это PHP.
Даже для установки Вордпресса мы использовали сервер в интернете, а не домашний компьютер, потому на сервере уже есть весь нужный софт, а на домашнем компьютере — нет. Сегодня мы это исправим.
Что такое MAMP
MAMP — это комплект софта, который устанавливается из одного пакета, сам настраивается и превращает ваш компьютер в локальный сервер для разработки и тестирования сайтов. В одном пакете уже собрано и настроено всё необходимое, как в комплексном обеде. Распаковывай и пользуйся.
MAMP — это аббревиатура:
- Mac OS или Macintosh — операционная система, на которой будет работать софт;
- Apache — веб-сервер;
- MySQL — база данных;
- PHP — скриптовый язык для работы сайта.
Такие сборки правильно называть AMP, без указания операционной системы. Но MAMP-проект оказался настолько удачным решением, в том числе и с версией для Windows, что теперь это сокращение стало стандартом и все понимают, о чём идёт речь.
Где скачать
Чтобы скачать MAMP, зайдите на страницу загрузок и выберите свой вариант:
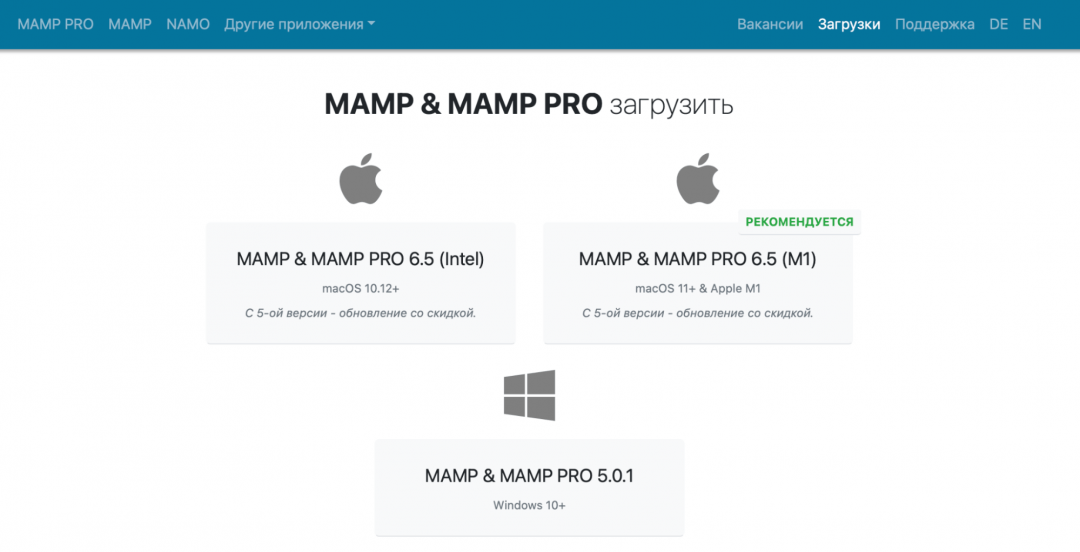
Если у вас Линукс, то, скорее всего, скачивать ничего не нужно — MySQL, PHP и Apache идут в комплекте с большинством дистрибутивов.
Как установить
После скачивания запускаем файл и ждём, пока всё установится на компьютер. Если не нужна про-версия и дополнительный софт, эти галочки можно снять:

После установки достаточно запустить только программу MAMP, а она уже сама запустит всё остальное. Зелёные кружочки справа означают, что сейчас работает веб-сервер и база данных, а облачный сервис — нет (да и он нам не нужен сейчас):

Проверим, что всё заработало как нужно: наберём в адресной строке браузера localhost/MAMP и нажмём энтер:

Открылась страница MAMP — это значит, что всё работает как нужно.
Как использовать
Чтобы проверить MAMP в деле, установим и запустим Вордпресс у себя на компьютере. Для этого нужно пройти три принципиальных этапа:
- Залить файлы Вордпресса на сайт.
- Создать для Вордпресса базу данных.
- Запустить установку Вордпресса.
Теперь подробнее:
Заливаем файлы
1. Скачиваем последнюю версию Вордпресса.
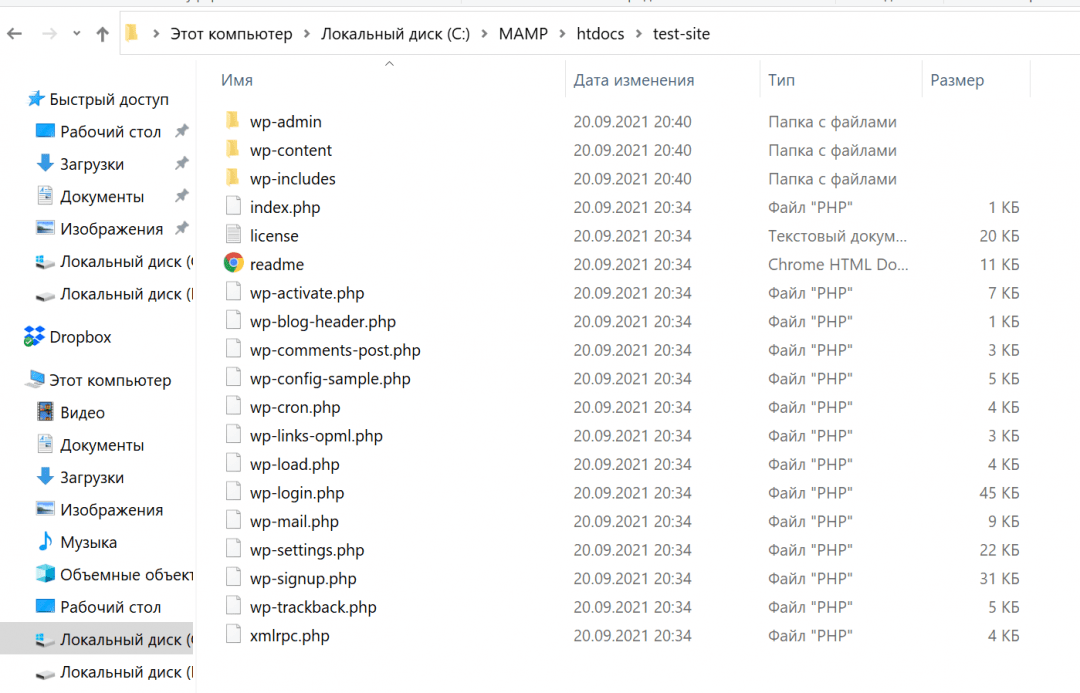
2. Внутри папки, куда мы установили MAMP, находим папку htdocs и в ней создаём папку test-site (имя может быть любым).

3. Распаковываем Вордпресс, заходим в папку wordpress и копируем её содержимое в нашу папку test-site (или как вы её назвали).
Создаём базу данных
4. Заходим в браузере на localhost/MAMP и запускаем PHP My Admin — программу для управления сервером и базой данных.
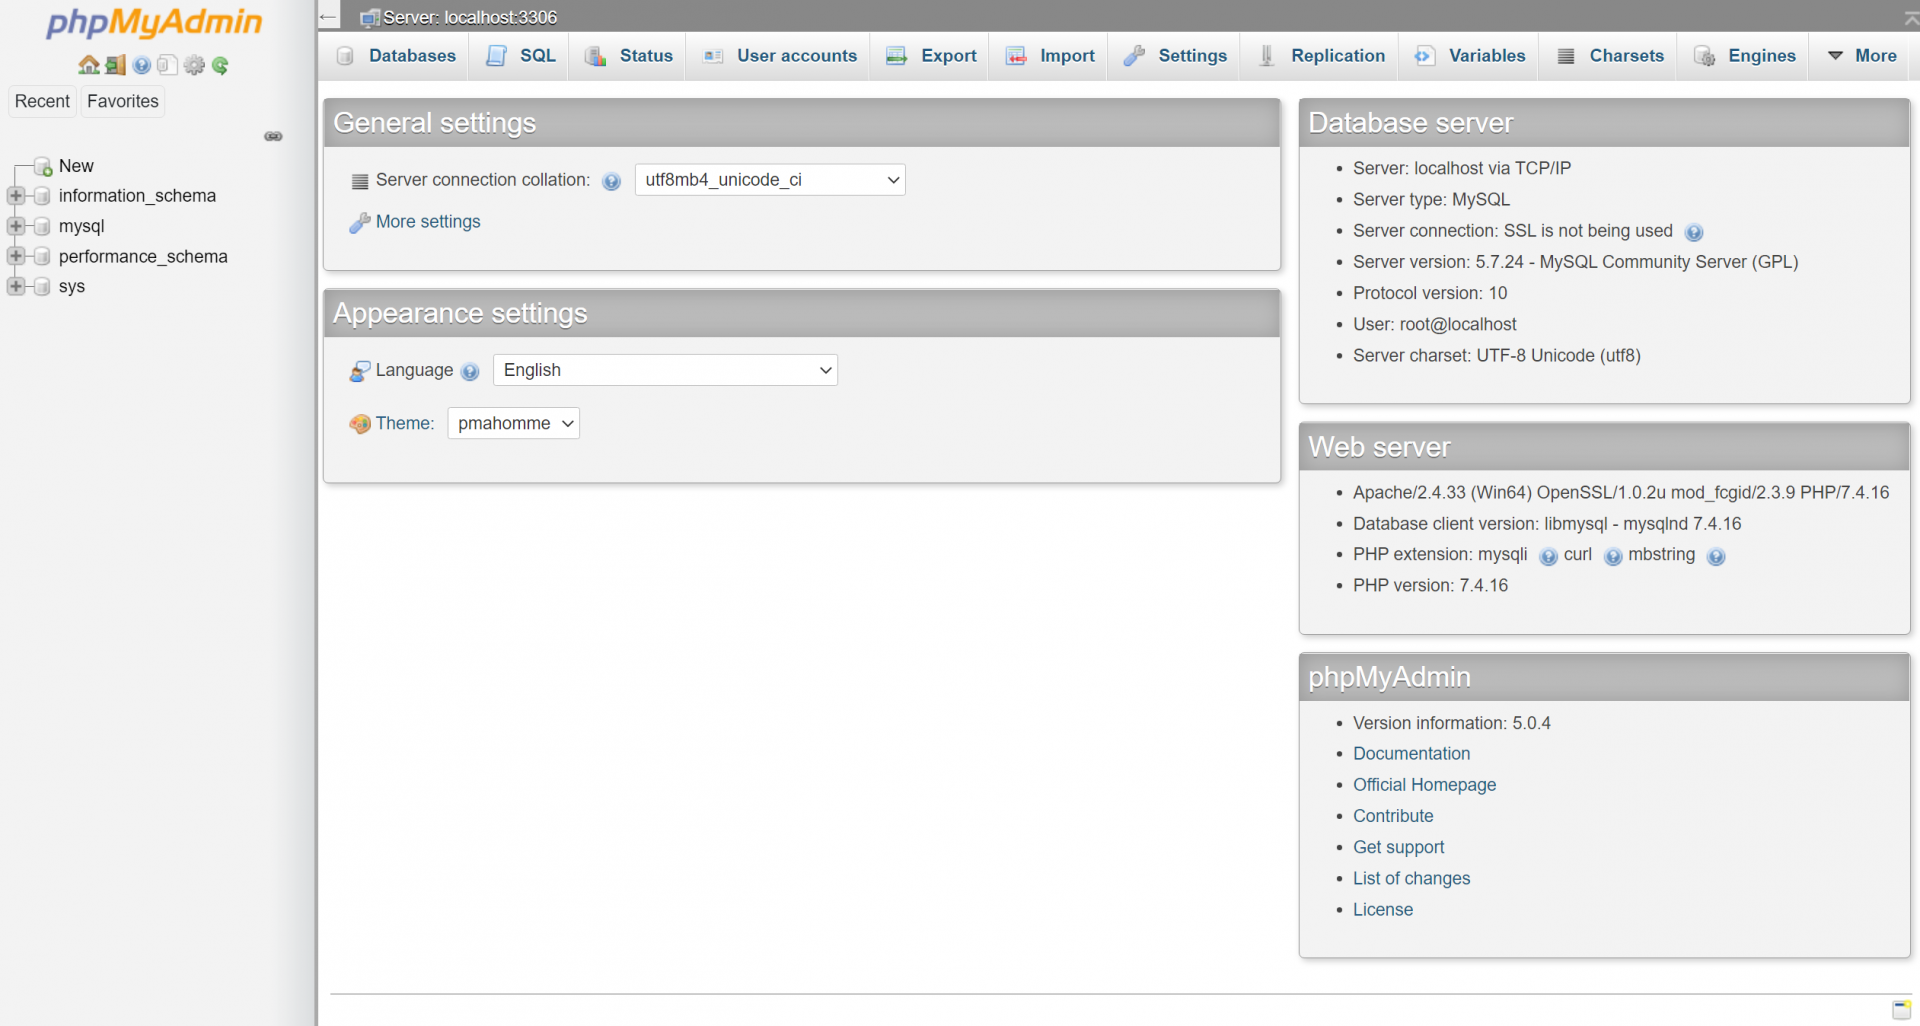
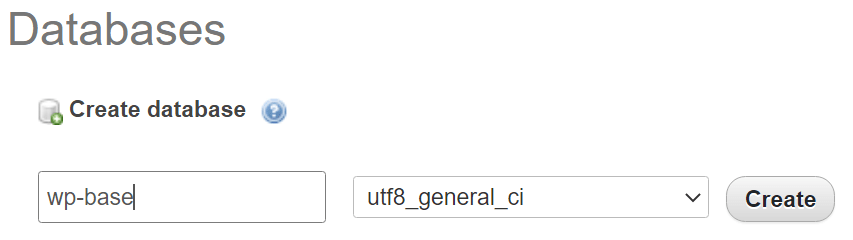
5. Выбираем вкладку Databases, находим раздел Create Database и пишем название нашей новой базы для Вордпресса — пусть это будет wp-base.
Запускаем установку
6. Набираем в браузере localhost/test-site/wp-admin/setup-config.php и нажимаем энтер — появляется стандартная установка Вордпресса:

7. Вводим имя базы, которую мы недавно создали, и логин с паролем от неё. По умолчанию оба параметра — root:

8. Запускаем установку:

Дальше перед нами появляется стандартная установка Вордпресса, про которую мы уже подробно рассказывали в другой статье:

Что дальше
Дальше — изучайте Вордпресс, становитесь администратором по Вордпрессу и выбирайте комплектацию вашего нового «Эскалейда». Там надо в предзаказ становиться, машины сейчас долго везут.
Вёрстка:
Кирилл Климентьев
Computer Science
How To Install MAMP On Windows 10 | Change The MAMP Server Ports
![]()
Published on February 14, 2019
MAMP stands for Macintosh, Apache, MySQL, and PHP. It is an easy to use application. You can install on your MacOS and Windows. It is particularly best suited for WordPress to run locally on your computer.
In this tutorial you will learn step-by-step to how to Install MAMP on Windows 10 and how to change MAMP server ports.
- Follow these steps to install MAMP on Windows 10:
Step 1:
- Go to MAMP official Website https://www.mamp.info/en/
- Click Free Download.

- Click the Windows version.- It is available for Windows 7, 8.1 & 10.

- Run the Setup.
- It will show you a window, “Do you want to allow this app to make changes to your PC?” Click Yes.

- In the next step, tick the both checkboxes.
- Click Next.

- Select, I accept the agreement.
- Click Next.

- Select the path.
- By default, it chooses the C:/ drive, but it is not a good practice to install on C:/ drive because if Windows gets corrupt or stops work, you will lose your data as well.

- Click Next.

- Click Next.

- Click Next.

- Click Install.

- It will take 5 to 10 minutes.

- Click Finish.

- You can see that both MAMP & MAMP PRO have been installed.

Step 2:
- Click The MAMP.
- It is showing me an error, “APACHE needs open port 80 which is already used by System”.
- It means that port 80 is being used by some other application like Skype or IIS or WAMP etc.
- Click Setup new port.

- Click MAMP.
- Click Preferences.

- Click Ports.
- Click Set MAMP ports to default.
- Click OK.

- You can see the ports have been changed.
- Click OK.

- Windows will issue an alert window.
- Give Access to Apache HTTP Server.

- Tick Private Networks only.
- Click Allow access.

- Close the MAMP.
- Since the ports have been changed, we need to run the MAMP Server again.

- When you restart MAMP it might tell you again that, “APACHE needs open port ‘8888’, which is already used by httpd”.
- Now click Use next free port.

- Now it is suggesting port: 8889.
- Click Yes.
- By default localhost is accessed by http://localhost/MAMP/
- Now the port has been changed, so it would be accessed like http://localhost:8889/MAMP/

- Now Windows will ask permission for mysqld.
- Tick private networks.
- Click Allow access.

- You can see both Apache Server & MySQL Server are running.

- Now Everything is done.
- Click Open WebStartPage.

You might get this rubbish information when you open localhost like this, “N���
5.6.34-log�
���^l&s4GJ|�ÿ÷�€����������QbvLXW*jZejd�mysql_native_password�!��ÿ„#08S01Got packets out of order”

- It shows this raw information because it failed to make connection with MySQL database because of port no.
- Now, click MAMP.
- Click Preferences.

- Click Ports.
- Change the MYSQL port no to 3306.
- Click OK.

- Now, refresh the browser or click the Open WebStart page again.

- That’s it, you’re done. MAMP has been installed successfully.
- You can see all the details in this page.

Step 3: Access The Root Directory
- MAMPhtdocs is the root directory where you will put or create files.
- Create new folder, test.
- Create a html file, index.html. Don’t forget to remove .txt extension.
- On Windows, click View, tick File name extensions. It will display the extensions of files.

- Open with notepad and type something like, “<h1> Hi, Thanks Meer’s World </h1>.
- My path looks like F:MAMPhtdocstest.

- Now run this on localhost.
- The URL would be: http://localhost:8889/test/

- If you like this post don’t forget to share this post with other people. Share your feedback in the comments section below.
Recommended Posts
- How To Install & Configure XAMPP On Windows 10 – Step By Step | For Beginners
- How To Change The XAMPP Server Port In Windows 10 | XAMPP Apache Server Port | Fix Apache Port Error
- How To Install WordPress On MAMP Server In Windows 10 – Step By Step | Install WordPress On Localhost
- How To Install EasyPHP Devserver On Windows 10 – Step By Step | Show Databases On phpMyAdmin In EasyPHP
![]()
Meer Basit
Meer Basit is the founder of Meer’s World. He’s been running the show since launching the blog back in 2018. By background he is a computer scientist. Primarily, he creates content around blogging (WordPress, Blogger, Tumblr), SEO, affiliate programs, earn-online, reviews, eCommerce, & technology. He has got years of professional experience in web programming, computer programming, databases, data warehousing, & transcription. In general, he likes traveling, gardening, watching movies, is a passionate cricketer, creative writer, and a GSD lover.
![]()
More in Computer Science
-


ArtificialIntelligence
Artificial Intelligence And future Of Jobs | Impacts Of AI On Jobs
Artificial Intelligence is the field of computer science, also called machine intelligence. It enables machines to…
-
Computer Science
How To Install EasyPHP Devserver On Windows 10 | Show Databases On phpMyAdmin
EasyPHP Devserver allows you to fit your needs and allows you to setup a local server….
-
Computer Science
How To Install WordPress On MAMP Server In Windows 10
Do you want to install WordPress on MAMP Server in Windows 10? You’re in the right…
-
Computer Science
How To Change The XAMPP Server Port In Windows 10 | Apache Server Port
The XAMPP is a free and open-source cross-platform web server solution stack package developed by Apache…
-
Computer Science
How To Set Root Password In phpMyAdmin On XAMPP Server
Do you want to set root password in phpMyAdmin? You’re in the right place. In this…


Having a local staging environment available is essential for WordPress developers. MAMP is a popular solution, but some common issues can prevent the platform from running properly.
Fortunately, MAMP users have found fairly simple go-to solutions to these problems, which you can use to get your local stack up and working again. Often, all it takes is a few clicks.
In this article, we’ll review what MAMP is, why it’s useful, and how to find its error logs. Then we’ll walk you through five common resolutions to MAMP not starting. Let’s get right to it!
An Introduction to MAMP
MAMP is one of several popular local development platforms. It turns your computer into a server environment that can host websites while you work on them:
MAMP uses Apache, MySQL, and PHP, making it highly compatible with WordPress. There is a free version available, or you can pay for a proprietary version that includes installers and other features to help you get your first site set up quickly and improve your workflow.
Like all sites hosted locally, your MAMP development or test website will not be publicly available. This enables you to build or test features freely, without worrying about it affecting your front-facing User Experience (UX). It also prevents visitors from stumbling upon your half-completed site.
Plus, local development doesn’t require an internet connection, so you can work from anywhere. Local sites also tend to load faster, which may improve your productivity somewhat. Once you’re finished building or making changes to your site, you can migrate it to a live server.
We’ve covered how to install MAMP in a previous post. At this stage, we’ll assume that you’ve already been using it but have run into a problem.
How to Check Your MAMP Error Logs
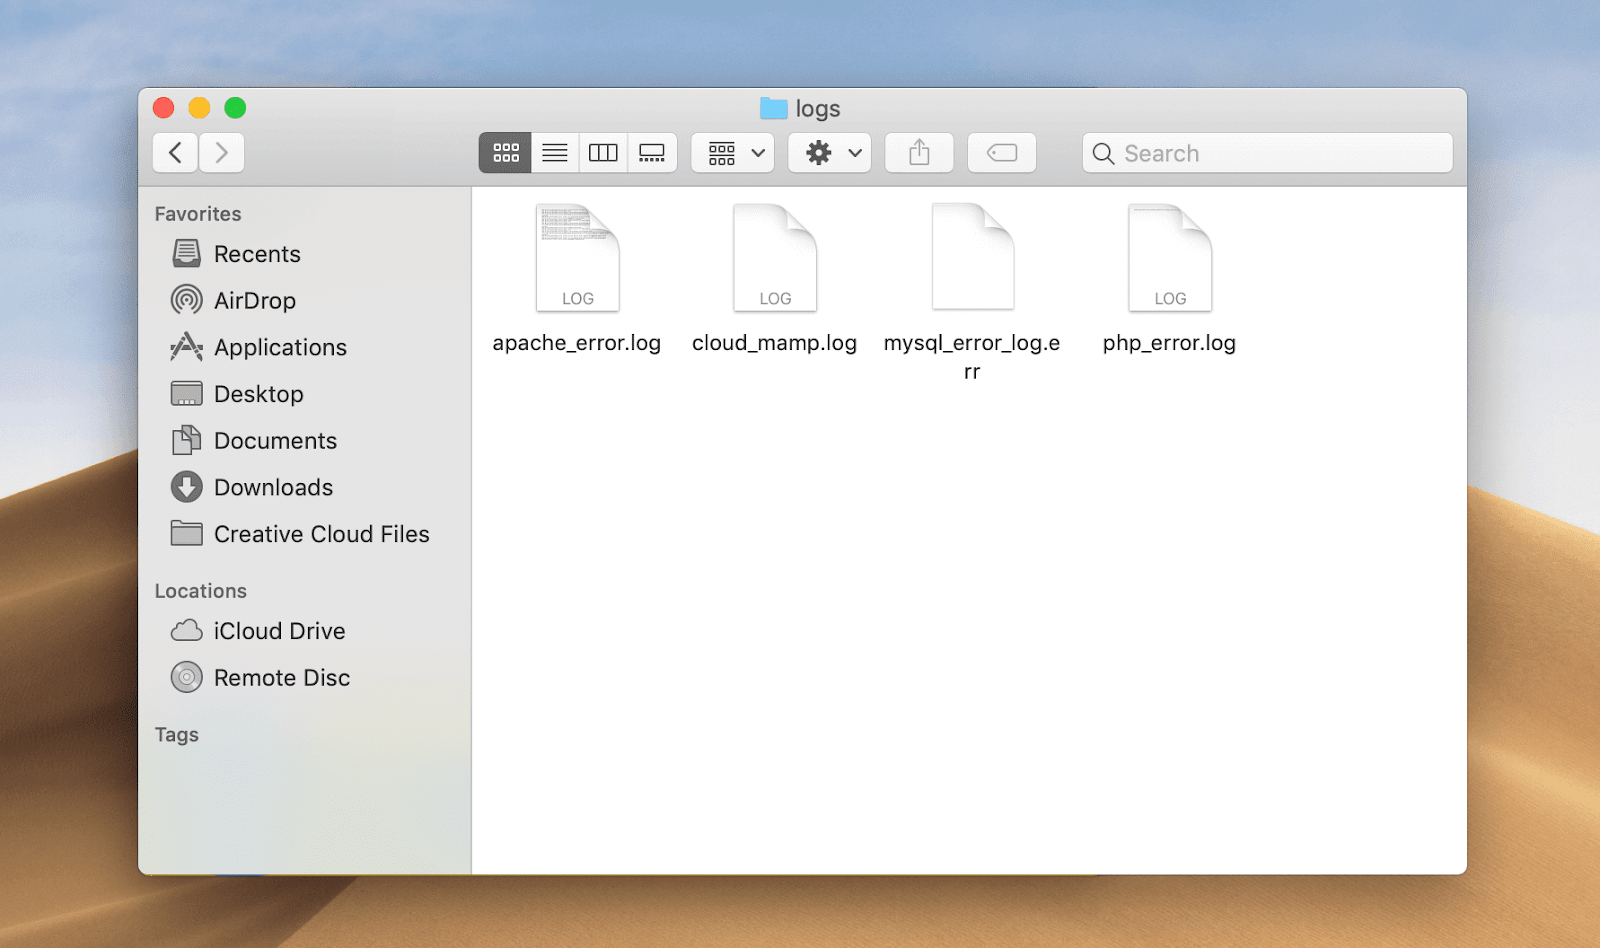
Finding your MAMP error logs is quite simple. Just navigate to the folder where your installation is saved and open the logs folder. You should see files for your Apache, MySQL, and PHP error logs:
If you’re experiencing problems with MAMP not starting, this should be your first step. Check the logs to see if there are any messages related to the problem and whether they provide specific steps you can take to resolve it. This is much faster than trial and error troubleshooting.
What to Do If MAMP Is Not Starting (5 Top Solutions)
Some common issues MAMP users run into include Apache not starting and MySQL not starting. Either problem will keep the platform from running, making it impossible for you to access your local site. Here are some top solutions that should help you resolve both roadblocks, so you can get back to work.
1. Restore Your Document Root Folder
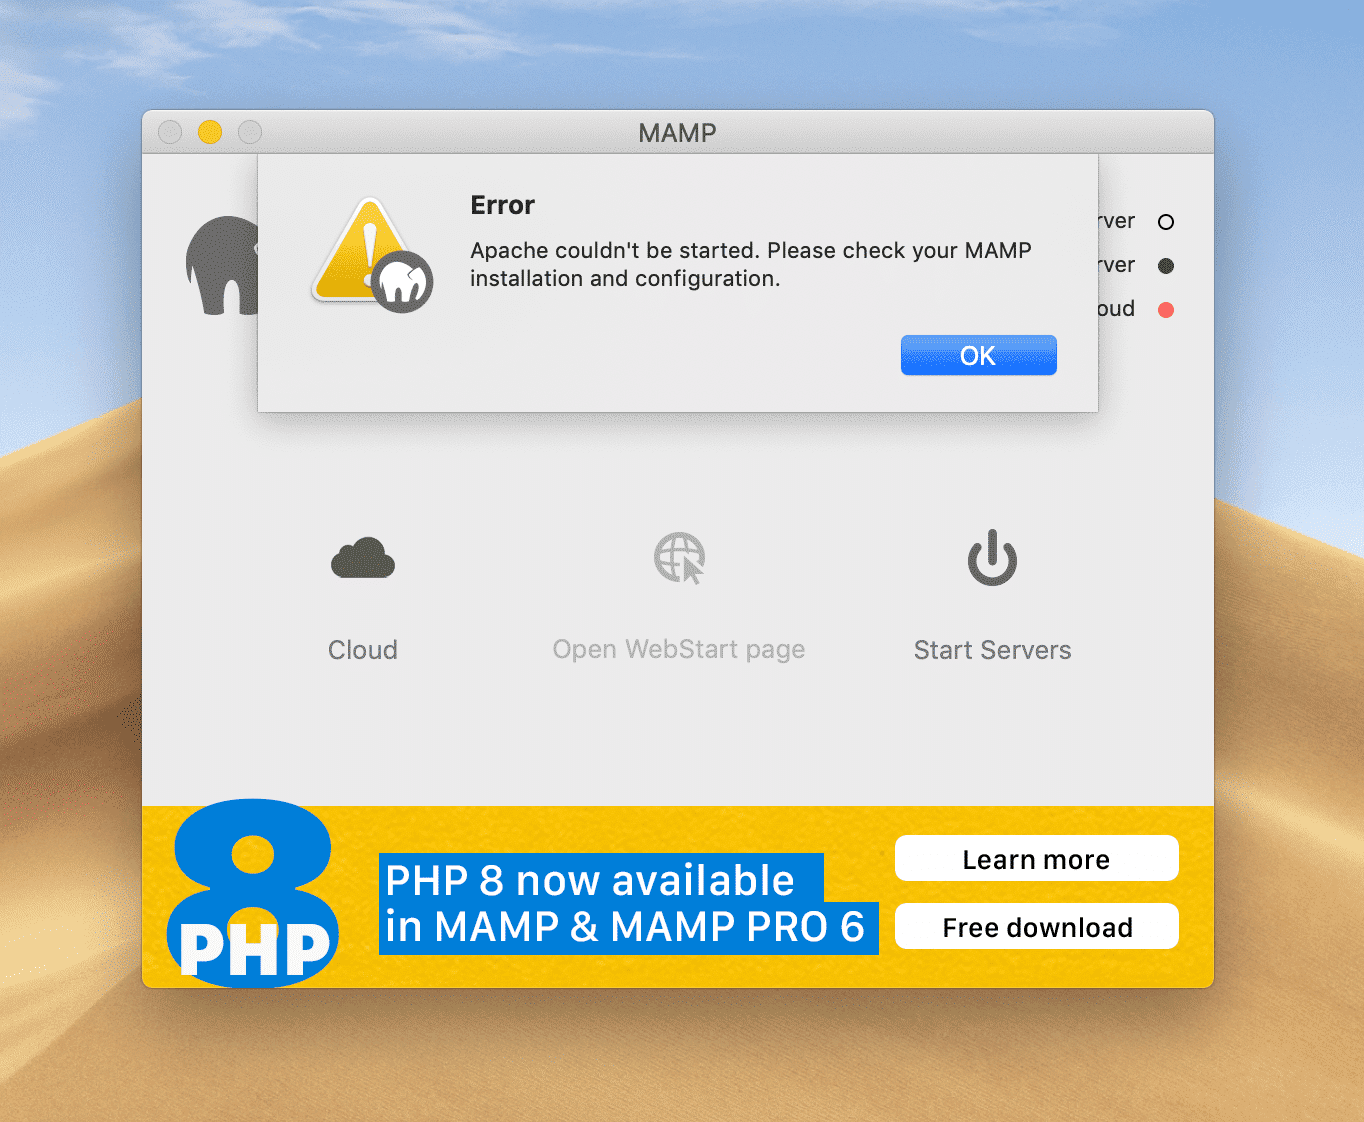
Your MAMP installation’s document root is where your virtual host’s HTML, PHP, and image files are stored. Suppose you have purposefully or accidentally changed or deleted your document root folder. In that case, you may see an error message reading “Apache couldn’t be started. Please check your MAMP installation and configuration” when you try to launch your server:
To fix this, you simply need to restore your document root folder or tell MAMP where you’ve moved it. This process varies depending on whether you’re using a Mac or Windows machine, in that the file paths might be slightly different. However, you should be able to follow the steps below on either Operating System (OS).
By default, the MAMP document root is located at Applications/MAMP/htdocs on macOS, or C:MAMPhtdocs on Windows. If you know where your new document root folder is, you can open your MAMP configuration file by navigating to Applications (or C:) > MAMP > conf > apache > httpd.conf, and then replacing the default path with the new one.
Once you open httpd.conf, search for mentions of “DocumentRoot” and replace the default path everywhere. Save the file, then stop and restart MAMP.
Alternatively, you can select your new document root via the MAMP control panel. Open the Preferences window and select the Web Server tab:
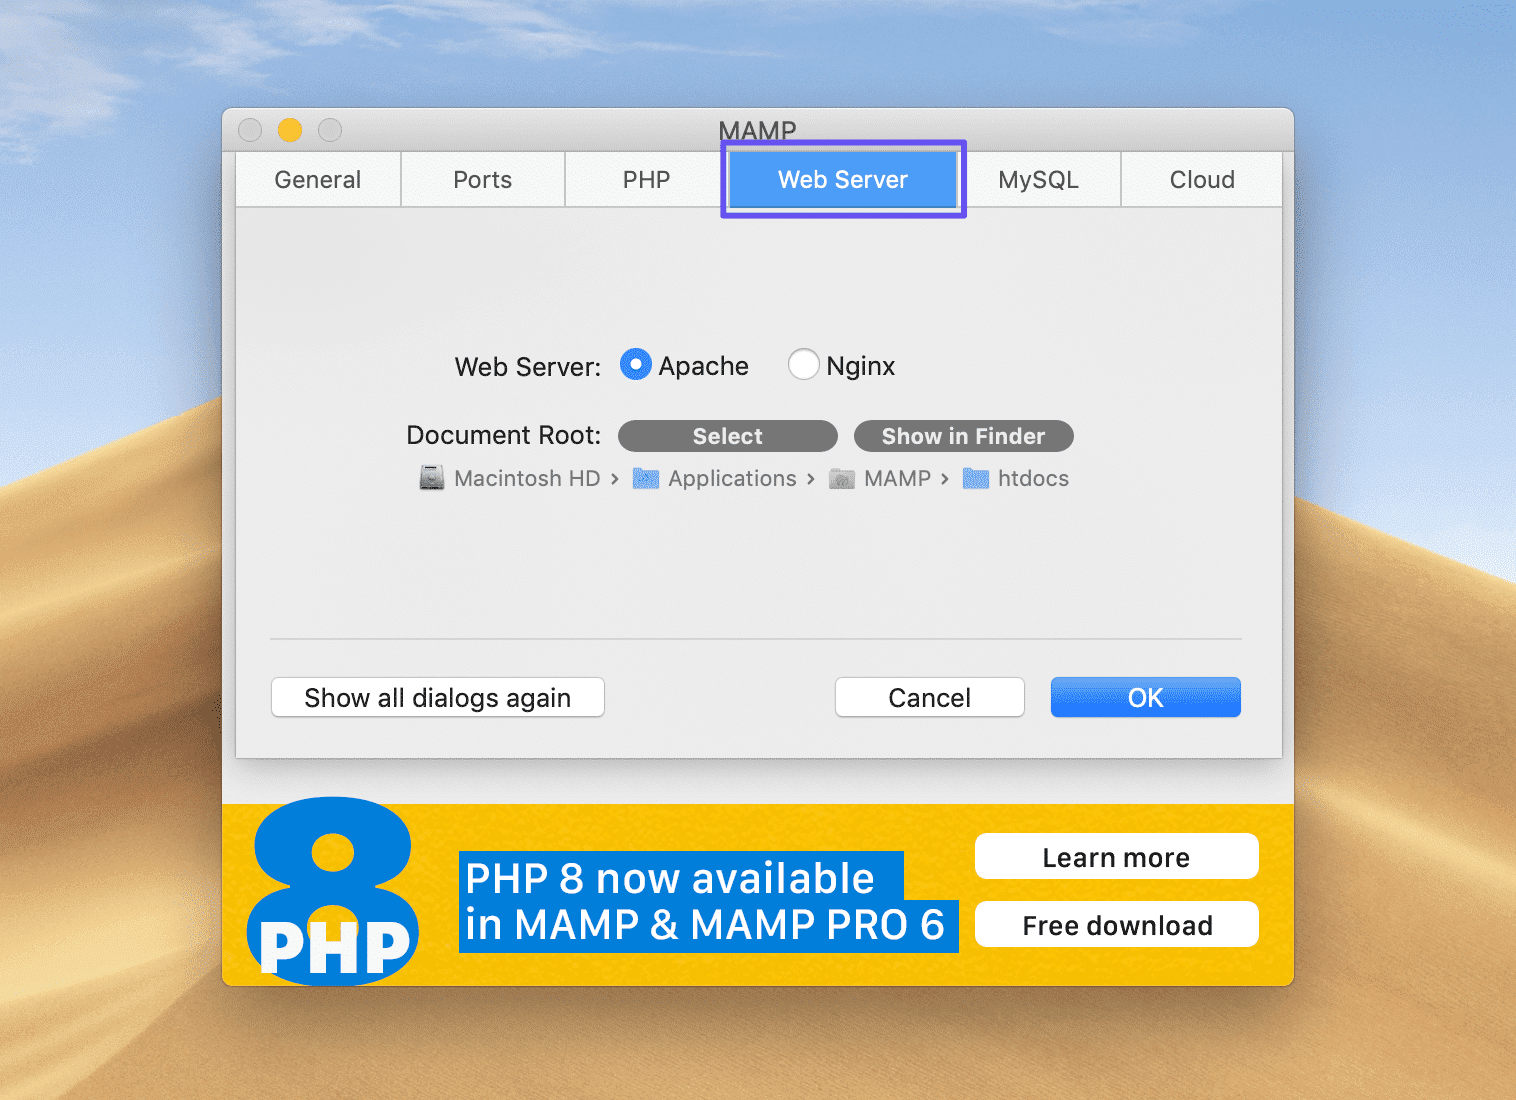
Make sure Apache is selected. Then, click on the Select button next to Document Root. This will open a Finder window, where you can choose the folder you want to use as the document root.
Click on Select once you’ve chosen the correct folder, then select OK in the MAMP Preferences window:
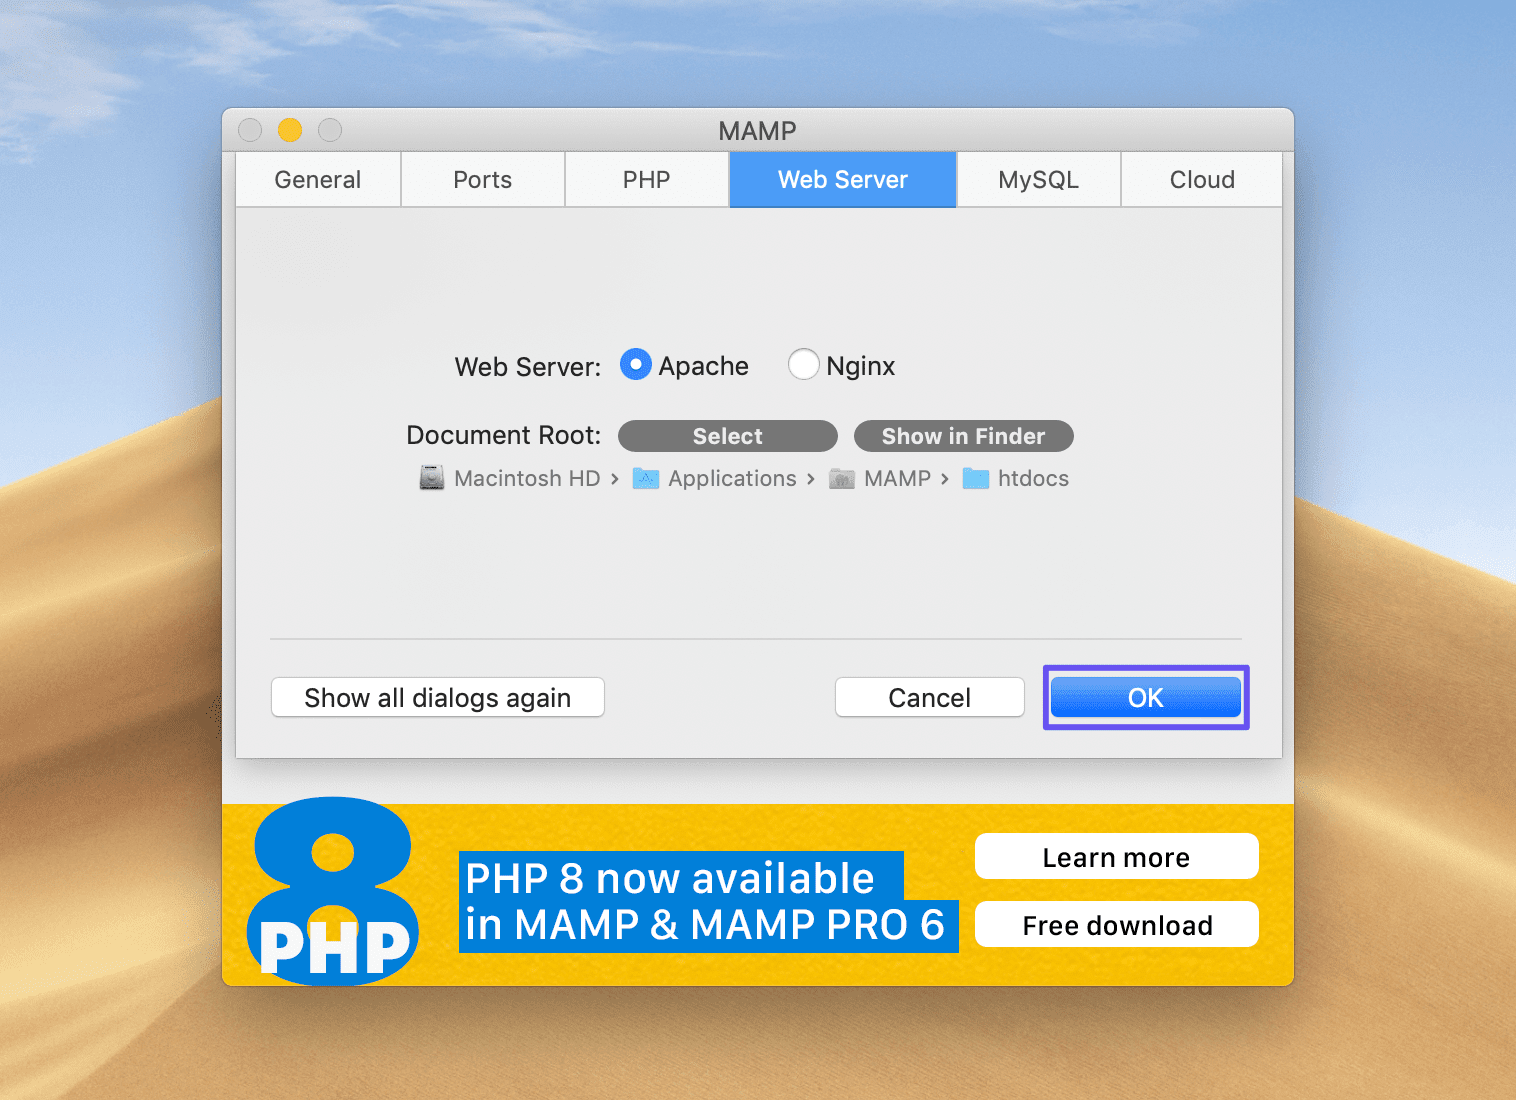
This will reset your document root and automatically restart MAMP. Apache should then be able to start.
2. Change Your Listening Port
By default, MAMP runs Apache on port 8888. If this port is in use by another application, Apache won’t be able to start.
To fix this problem, you can either quit the application preventing Apache from connecting to port 8888, or change the listening port in your MAMP configuration file.
If you want to discover which app is blocking the port, you can use the command line to do so. The command you need to enter will vary depending on your OS:
- macOS:
sudo lsof -nP -iTCP:$PORT | grep LISTEN - Windows:
netstat -ab | more
These should return a list of Process Identifiers (PIDs) and the ports they’re running on. You can terminate the process that is running on the port you need in order to start MAMP by using one of the following:
- macOS:
sudo kill -9 <PID> - Windows:
taskkill /F /PID pid_number
When performing the above commands, make sure to substitute placeholders such as $PORT, <PID>, and pid_number with the appropriate values.
If you want to change the listening port in your MAMP configuration file, you can do so by opening your httpd.conf file and changing all mentions of “port 8888” to “port 8000” (or another alternative). Save the file, then restart Apache.
Additionally, you can change the Apache port in Preferences > Ports:
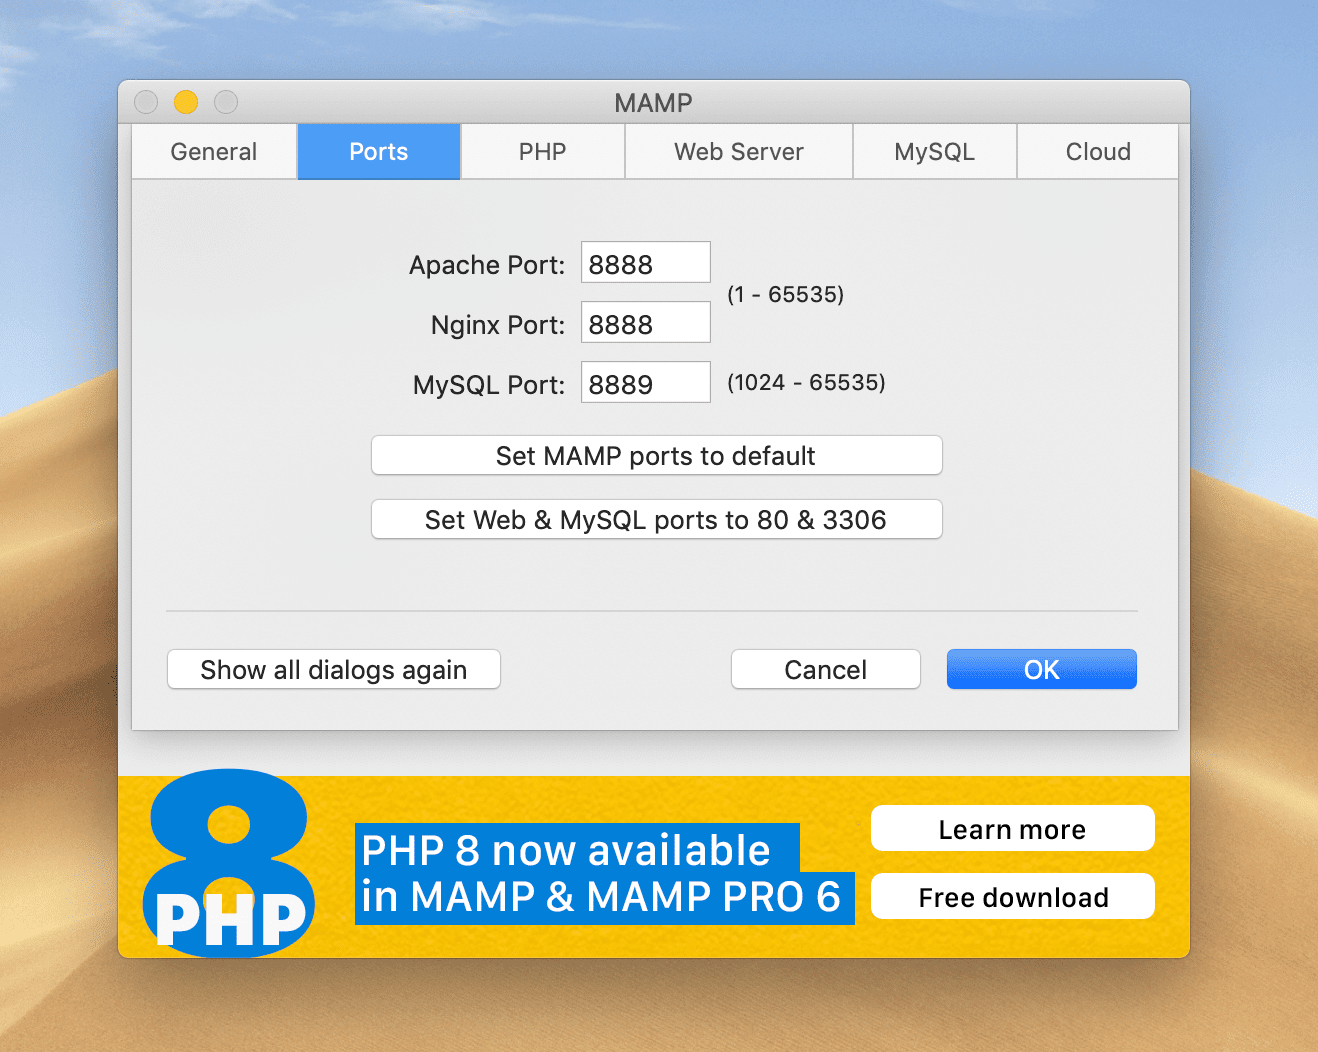
Click on OK to save your changes.
3. Kill All MySQL Processes and Restart MAMP
If your MAMP problems are due to MySQL rather than Apache, there are a few go-to fixes you can try. The issue is usually due to another MySQL service running on the same port.
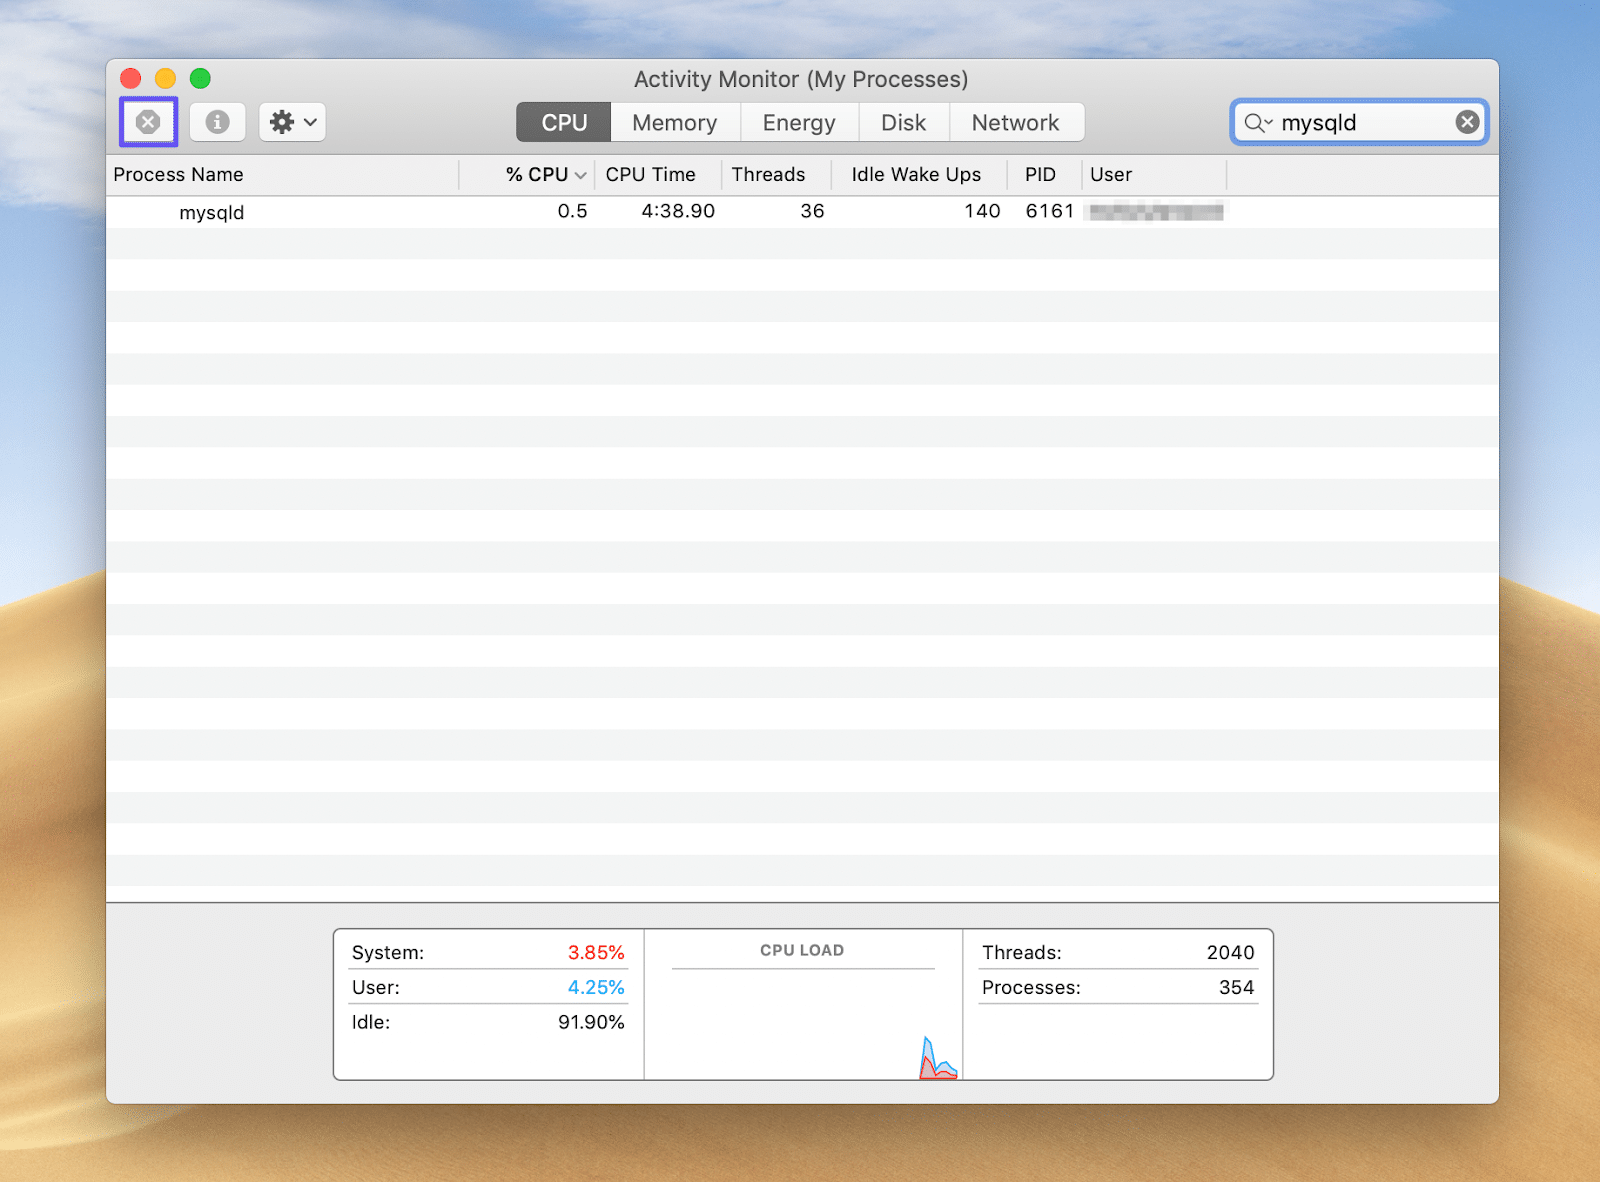
The easiest solution is to kill all MySQL processes and restart MAMP. On macOS, you can do this using the Activity Monitor, which you’ll find in the Utilities folder on your computer.
Search for “mysqld”, select any processes that are running, and then quit them by clicking on the X button in the top-left corner of the window:
Windows users will need to open the Resource Monitor from the Start menu:
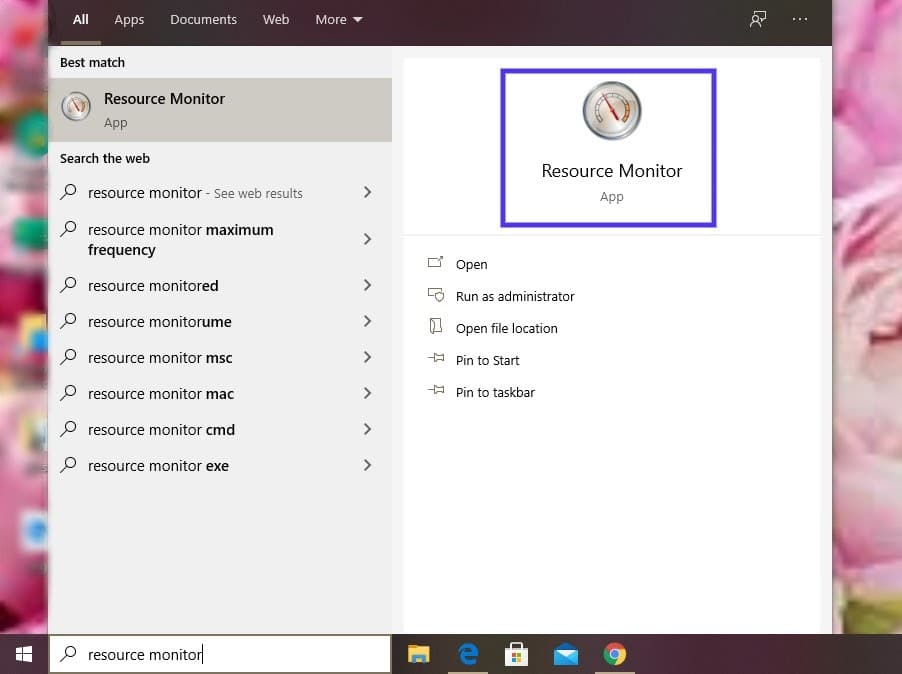
Search for the mysqld.exe file, right-click on it, and select End Process. Once you’ve quit all MySQL processes on your computer, stop and restart MAMP.
4. Clear Your MySQL Logs
If killing all the active MySQL processes on your computer doesn’t enable MySQL to start, you can try deleting your MySQL log files. These are stored in your MAMP db/mysql57 directory:
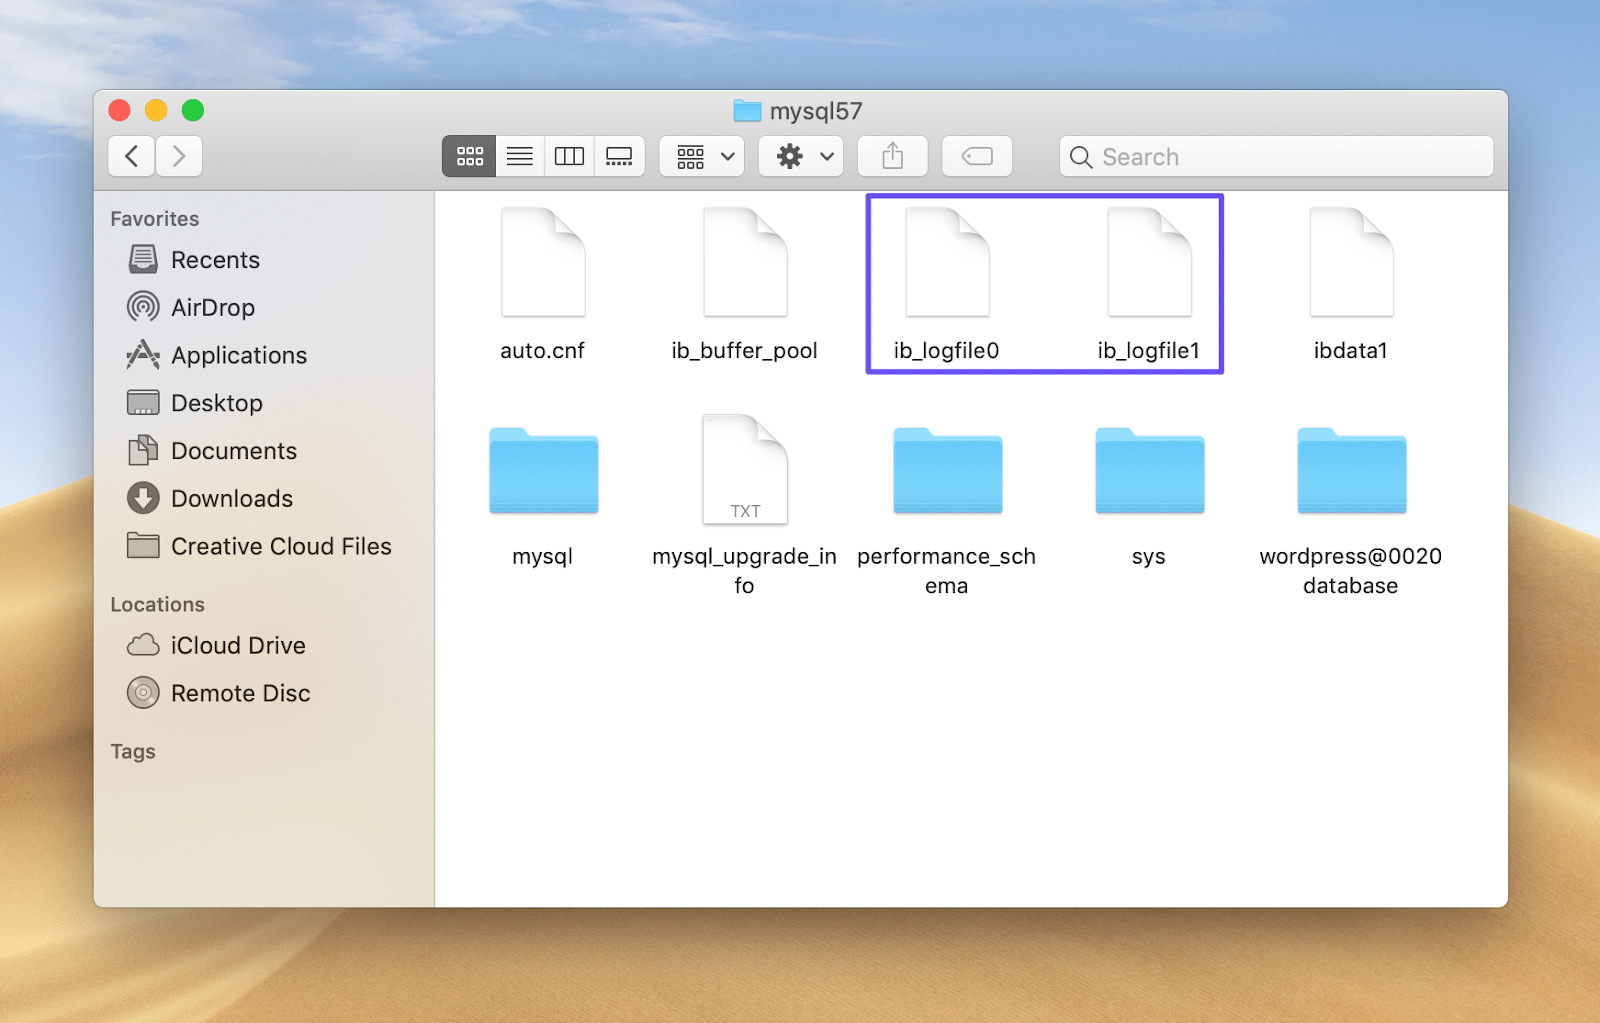
They should be named ib_logfile0, ib_logfile1, etc. Back up the log files, then delete them and restart MAMP. The log files will automatically regenerate when they’re needed again.
5. Delete the mysql.sock.lock File
MAMP must write Process Identifiers (PIDs) for active processes to a mysql.sock.lock file. If this task fails, the file is left behind instead of being deleted once the process completes.
This will prevent MySQL from starting up, as it treats an empty mysql.sock.lock file the same as one that contains a running PID. To fix this, you’ll need to delete the file manually.
Navigate to your MAMP files (Applications/MAMP on Mac or C:MAMP on Windows) and look for the tmp folder. Then select the mysql folder, search for the mysql.sock.lock file, and delete it. As with the log files, a new mysql.sock.lock file will automatically be created when it’s needed next.
Summary
MAMP is one of the local development solutions for many WordPress professionals and hobbyists (note: it’s not the only one). However, some issues may arise that will prevent your server from starting, and ultimately delay your workflow.
In this article, we walked you through five possible solutions if Apache or MySQL won’t start:
- Restore your document root folder.
- Change your listening port.
- Kill all MySQL processes and restart MAMP.
- Clear your MySQL logs.
- Delete the mysql.sock.lock file.
Get all your applications, databases and WordPress sites online and under one roof. Our feature-packed, high-performance cloud platform includes:
- Easy setup and management in the MyKinsta dashboard
- 24/7 expert support
- The best Google Cloud Platform hardware and network, powered by Kubernetes for maximum scalability
- An enterprise-level Cloudflare integration for speed and security
- Global audience reach with up to 35 data centers and 275+ PoPs worldwide
Test it yourself with $20 off your first month of Application Hosting or Database Hosting. Explore our plans or talk to sales to find your best fit.
Having a local staging environment available is essential for WordPress developers. MAMP is a popular solution, but some common issues can prevent the platform from running properly.
Fortunately, MAMP users have found fairly simple go-to solutions to these problems, which you can use to get your local stack up and working again. Often, all it takes is a few clicks.
In this article, we’ll review what MAMP is, why it’s useful, and how to find its error logs. Then we’ll walk you through five common resolutions to MAMP not starting. Let’s get right to it!
An Introduction to MAMP
MAMP is one of several popular local development platforms. It turns your computer into a server environment that can host websites while you work on them:
MAMP uses Apache, MySQL, and PHP, making it highly compatible with WordPress. There is a free version available, or you can pay for a proprietary version that includes installers and other features to help you get your first site set up quickly and improve your workflow.
Like all sites hosted locally, your MAMP development or test website will not be publicly available. This enables you to build or test features freely, without worrying about it affecting your front-facing User Experience (UX). It also prevents visitors from stumbling upon your half-completed site.
Plus, local development doesn’t require an internet connection, so you can work from anywhere. Local sites also tend to load faster, which may improve your productivity somewhat. Once you’re finished building or making changes to your site, you can migrate it to a live server.
We’ve covered how to install MAMP in a previous post. At this stage, we’ll assume that you’ve already been using it but have run into a problem.
How to Check Your MAMP Error Logs
Finding your MAMP error logs is quite simple. Just navigate to the folder where your installation is saved and open the logs folder. You should see files for your Apache, MySQL, and PHP error logs:
If you’re experiencing problems with MAMP not starting, this should be your first step. Check the logs to see if there are any messages related to the problem and whether they provide specific steps you can take to resolve it. This is much faster than trial and error troubleshooting.
What to Do If MAMP Is Not Starting (5 Top Solutions)
Some common issues MAMP users run into include Apache not starting and MySQL not starting. Either problem will keep the platform from running, making it impossible for you to access your local site. Here are some top solutions that should help you resolve both roadblocks, so you can get back to work.
1. Restore Your Document Root Folder
Your MAMP installation’s document root is where your virtual host’s HTML, PHP, and image files are stored. Suppose you have purposefully or accidentally changed or deleted your document root folder. In that case, you may see an error message reading “Apache couldn’t be started. Please check your MAMP installation and configuration” when you try to launch your server:
To fix this, you simply need to restore your document root folder or tell MAMP where you’ve moved it. This process varies depending on whether you’re using a Mac or Windows machine, in that the file paths might be slightly different. However, you should be able to follow the steps below on either Operating System (OS).
By default, the MAMP document root is located at Applications/MAMP/htdocs on macOS, or C:MAMPhtdocs on Windows. If you know where your new document root folder is, you can open your MAMP configuration file by navigating to Applications (or C:) > MAMP > conf > apache > httpd.conf, and then replacing the default path with the new one.
Once you open httpd.conf, search for mentions of “DocumentRoot” and replace the default path everywhere. Save the file, then stop and restart MAMP.
Alternatively, you can select your new document root via the MAMP control panel. Open the Preferences window and select the Web Server tab:
Make sure Apache is selected. Then, click on the Select button next to Document Root. This will open a Finder window, where you can choose the folder you want to use as the document root.
Click on Select once you’ve chosen the correct folder, then select OK in the MAMP Preferences window:
This will reset your document root and automatically restart MAMP. Apache should then be able to start.
2. Change Your Listening Port
By default, MAMP runs Apache on port 8888. If this port is in use by another application, Apache won’t be able to start.
To fix this problem, you can either quit the application preventing Apache from connecting to port 8888, or change the listening port in your MAMP configuration file.
If you want to discover which app is blocking the port, you can use the command line to do so. The command you need to enter will vary depending on your OS:
- macOS:
sudo lsof -nP -iTCP:$PORT | grep LISTEN - Windows:
netstat -ab | more
These should return a list of Process Identifiers (PIDs) and the ports they’re running on. You can terminate the process that is running on the port you need in order to start MAMP by using one of the following:
- macOS:
sudo kill -9 <PID> - Windows:
taskkill /F /PID pid_number
When performing the above commands, make sure to substitute placeholders such as $PORT, <PID>, and pid_number with the appropriate values.
If you want to change the listening port in your MAMP configuration file, you can do so by opening your httpd.conf file and changing all mentions of “port 8888” to “port 8000” (or another alternative). Save the file, then restart Apache.
Additionally, you can change the Apache port in Preferences > Ports:
Click on OK to save your changes.
3. Kill All MySQL Processes and Restart MAMP
If your MAMP problems are due to MySQL rather than Apache, there are a few go-to fixes you can try. The issue is usually due to another MySQL service running on the same port.
The easiest solution is to kill all MySQL processes and restart MAMP. On macOS, you can do this using the Activity Monitor, which you’ll find in the Utilities folder on your computer.
Search for “mysqld”, select any processes that are running, and then quit them by clicking on the X button in the top-left corner of the window:
Windows users will need to open the Resource Monitor from the Start menu:
Search for the mysqld.exe file, right-click on it, and select End Process. Once you’ve quit all MySQL processes on your computer, stop and restart MAMP.
4. Clear Your MySQL Logs
If killing all the active MySQL processes on your computer doesn’t enable MySQL to start, you can try deleting your MySQL log files. These are stored in your MAMP db/mysql57 directory:
They should be named ib_logfile0, ib_logfile1, etc. Back up the log files, then delete them and restart MAMP. The log files will automatically regenerate when they’re needed again.
5. Delete the mysql.sock.lock File
MAMP must write Process Identifiers (PIDs) for active processes to a mysql.sock.lock file. If this task fails, the file is left behind instead of being deleted once the process completes.
This will prevent MySQL from starting up, as it treats an empty mysql.sock.lock file the same as one that contains a running PID. To fix this, you’ll need to delete the file manually.
Navigate to your MAMP files (Applications/MAMP on Mac or C:MAMP on Windows) and look for the tmp folder. Then select the mysql folder, search for the mysql.sock.lock file, and delete it. As with the log files, a new mysql.sock.lock file will automatically be created when it’s needed next.
Summary
MAMP is one of the local development solutions for many WordPress professionals and hobbyists (note: it’s not the only one). However, some issues may arise that will prevent your server from starting, and ultimately delay your workflow.
In this article, we walked you through five possible solutions if Apache or MySQL won’t start:
- Restore your document root folder.
- Change your listening port.
- Kill all MySQL processes and restart MAMP.
- Clear your MySQL logs.
- Delete the mysql.sock.lock file.
Get all your applications, databases and WordPress sites online and under one roof. Our feature-packed, high-performance cloud platform includes:
- Easy setup and management in the MyKinsta dashboard
- 24/7 expert support
- The best Google Cloud Platform hardware and network, powered by Kubernetes for maximum scalability
- An enterprise-level Cloudflare integration for speed and security
- Global audience reach with up to 35 data centers and 275+ PoPs worldwide
Test it yourself with $20 off your first month of Application Hosting or Database Hosting. Explore our plans or talk to sales to find your best fit.
У вас есть идея для классного сайта, план по её реализации, но при этом вам хочется распахнуть двери перед посетителями, только когда всё будет по-настоящему закончено и испытано? Нет ничего проще, ведь веб-сервер для сайта можно запустить прямо на своём компьютере, а покупку хостинга отложить до полной готовности проекта.
Сегодня мы поговорим о локальном веб-сервере, доступном как для Windows, так и для OS X. При этом его ключевая особенность — наличие простого и понятного интерфейса. Чтобы запустить сервер, не нужно быть бородатым администратором. Достаточно лишь вдумчиво прочитать инструкцию, и вы легко оживите локальную версию сайта.
Итак, встречайте MAMP и MAMP PRO. Первый — бесплатный, но с урезанными возможностями, которых всё равно хватит для большинства ваших потребностей. Второй — платный, он обойдётся в 4 000 рублей. Если после прочтения решитесь загрузить MAMP или купить MAMP PRO, добро пожаловать на сайт разработчика.
Сначала давайте поговорим о бесплатной версии MAMP, потому что именно с неё проще всего начать знакомство с локальным веб-сервером. Сразу после установки вы получите работоспособный веб-сервер с Apache, MySQL и PHP.
После запуска MAMP вы увидите простое меню из наиболее востребованных опций. Можно запустить или остановить веб-сервер, перейти на главную страницу веб-интерфейса или изменить какие-либо настройки. Настроить можно порты для Apache и MySQL, выбрать версию PHP и указать корневую папку вашего проекта. В целом даже с настройками по умолчанию можно начинать работать.
Возможностей по настройке MAMP PRO несравненно больше. Более того, MAMP PRO является надстройкой бесплатного MAMP, поэтому может быть установлен в любой момент без вреда для вашего текущего проекта. Если почувствовали, что бесплатная версия не даёт вам развернуться, то переезд не доставит хлопот.
Теперь быстро пройдёмся по отличиям MAMP PRO.
Разработчики делают ставку на дополнительную безопасность и рекомендуют запускать веб-сервер в MAMP PRO под записью www/mysql. Это особенно актуально в том случае, если компьютер постоянно подключён к интернету. Также полная версия позволяет включать или отключать отдельные модули Apache.
Дополнительные параметры MySQL также направлены на безопасность. Можно задать или изменить основной пароль MySQL, а также ограничить доступ к вашей базе извне. Также и для Apache, и для MySQL доступны логи ошибок, что может быть полезно. Примечательно, что в MAMP PRO полностью русифицирован интерфейс phpMyAdmin, а вот бесплатная версия этим похвастаться не может.
Есть у полной версии веб-сервера и поддержка Dynamic DNS. Можно сопоставить имя сайта и ваш текущий IP-адрес. Кроме того, имеется поддержка провайдеров dyndns.com и easydns.com. Достаточно иметь учётную запись у одного из них, чтобы воспользоваться поддержкой Dynamic DNS.
MAMP PRO позволит настроить отправку писем с вашего локального веб-сервера, если возникнет такая необходимость.
Платная версия отличается также возможностью создавать неограниченное количество хостов, прилагая минимум усилий. Иными словами, вы можете одновременно запустить несколько сайтов. Бесплатный MAMP ограничен всего одним.
MAMP и MAMP PRO — это наиболее дружелюбные решения в сфере локальных веб-серверов. Понятный интерфейс и подробная документация позволят быстро разобраться во всех тонкостях. Необходимость в дорогостоящей платной версии может возникнуть, если ваша работа над сайтом или несколькими ресурсами выходит за рамки простого любопытства. Это серьёзный инструмент для веб-разработчиков.
MAMP →
MAMP PRO →
— Advertisement —
Hi! Today we’re going to talk a little about MAMP. This is an application pack that allows you to set up a web server. Indeed, it includes Apache, MySQL, and PHP installed and configured by default. Additionally, it is possible to use Nginx as a server. In addition to using various forms of web acceleration such as APC and eAccelerator. On the other hand, this local server environment was oriented to Mac systems. However, a Windows version is also provided. On the other hand, perhaps the most interesting thing is that its installation is independent. That is, it does not interfere with any other local web server you may have installed. Consequently, you can use it together with Xampp or Lamp for example. So today we’ll see how to install and configure MAMP in Windows 10.
How to download and install MAMP in Windows 10
This local server environment offers a free version and a paid PRO version. The paid version allows you to separate the projects you have worked on, as well as display settings such as Joomla, Drupal, or WordPress. However, the free version is complete enough to mount the local web server. Well, to download it please go to the download section of the website. Once there, select the version for Windows which at this moment is 4.2.0. After the download is complete, please start installing it as any Windows program.

From now on you should only look at a couple of aspects of the installation. In the first place, the wizard offers two additional features. These elements are not indispensable for the operation of MAMP. So I personally recommend not to install it for the time being. Please don’t check both boxes.

The other aspect that you should take care of is to locate the environment installation folder at the root of the hard disk.

After a few moments, the installation will be complete.

Launching and configuring MAMP.
After the installation is completed, it is time to launch the server for the first time. Please remember to authorize access through the Windows Firewall. Then start the app from the shortcut or the start menu. You’ll immediately see the MAMP command center. It is configured to start the servers at the time of launching the application. In effect, you can see a green light indicating that the servers are running successfully.

After starting the services, you can check the installation by clicking on the Open WebStart page. Or alternatively you can access the following address in your browser: http://localhost/MAMP

You can manage MySQL by clicking on phpMyAdmin

It is also possible to set up a Virtual Guest. To do this just click on My Website. The sample website will be displayed immediately.

Setting up basic aspects of MAMP
MAMP has a basic but very complete configuration center. It is possible to customize aspects such as the type of server to use. Or the location of the projects.

You can also set the assigned port for each of the services.

You can also switch between the versions of PHP installed.

Conclusion
Finally, we have seen how to install and configure MAMP in Windows 10 This local web server environment is very light and easy to install. It is also an alternative to other popular services such as Xampp and Lamp. Besides, its installation does not interfere with any local server previously installed. I hope it will be useful for your future web projects. See you later!
MAMP — это бесплатное приложение, используемое для установки серверной среды на локальном компьютере Mac на базе OS X или Windows. Он принадлежит компании appsolute GmbH. Первоначально MAMP означает «Macintosh Apache MySQL и PHP». Но недавно была выпущена версия MAMP для пользователей Windows с тем же именем, но с другой аббревиатурой «My Apache MySQL and PHP».
MAMP распространяется бесплатно под лицензией GNU General Public License.
Системные Требования
Для запуска MAMP у вас должны быть следующие системные требования:
Для OS X:
- Apple OS X 10.6.6 или новее
- Mac с 64-битным процессором Intel x84
Для Windows:
- Windows 7/8 / 8.1 с минимум 1 ГБ оперативной памяти
- .NET Framework 4.0
Установка
MAMP можно скачать с веб-сайт и устанавливается на ваш ПК или Mac, как и любое другое приложение. Установщик содержит как MAMP, так и трейловую версию MAMP Pro, которую вы можете выбрать или проигнорировать во время установки.
Папка MAMP обязательно должна быть внутри «заявка»Каталог OS X для работы локального сайта. Так что вы не можете вынести его наружу »заявкаПапка. В Windows MAMP будет установлен под «C: / MAMP ».
Для установки MAMP на ПК или Mac требуется учетная запись пользователя с правами администратора.
Конфигурация
MAMP состоит из трех основных компонентов:
- Сервер Apache
- Сервер MySQL и
- PHP.
Первоначальный экран MAMP будет выглядеть, как показано ниже, а параметр «Настройки…» используется для настройки базовой конфигурации, такой как сервер, порт, версия PHP и параметры запуска / остановки. Обратитесь к нашей отдельной статье о том, как настроить MAMP и установить WordPress на локальный Mac.

После завершения настройки вы можете создать базу данных, используя «phpMyAdmin»Инструмент доступен в«Веб-страница».
Последний шаг — установить необходимую CMS, например WordPress, и подключить базу данных. После завершения установки CMS и подключения к базе данных вы можете запустить MAMP и открыть панель администратора вашего сайта localhost. Затем содержимое localhost можно передать в живую среду с помощью FTP.
Доступ к Localhost
После того, как все настроено, к вашему localhost можно будет получить доступ через URL-адрес «http: // localhost». Иногда вам может потребоваться добавить порт в конце, например «http: // localhost: 8080». Когда вы используете значение «Порт Apache» как 80, вам каждый раз нужно вводить пароль администратора для запуска / остановки локального сервера.

Установить порты для локального сервера MAMP
Доступ к локальной базе данных можно получить, используя URL-адрес «http: // localhost: phpmyadmin».
MAMP Pro
MAMP Pro — это платная версия бесплатного MAMP для OS X со следующими дополнительными функциями:
- Настроить неограниченное количество виртуальных хостов.
- Установка WordPress, Joomla, Drupal и webEdition в один клик.
- Используйте Dyn-DNS или динамический DNS, чтобы обеспечить доступ к вашей локальной работе через Интернет.
- Протестируйте свои сценарии с почтовым сервером, используя почтовые клиенты по умолчанию на Mac и ПК.

MAMP и MAMP Pro
Пользователи могут обновить версию MAMP 2.0 до версии 3.0 за 29 долларов, а новый пакет 3.0 стоит 59 долларов.
MAMP и MAMP Pro загружаются с их сайта в виде одного установочного файла. Бесплатная версия является обязательным требованием для профессиональной версии. Версия Pro будет обновлена до бесплатной.
0