Windows PowerShell – это оболочка командной строки и язык сценариев, разработанный специально для системного администрирования. Его аналог в Linux называется Bash Scripting. Основанная на .NET Framework, Windows PowerShell помогает ИТ-специалистам контролировать и автоматизировать администрирование операционной системы Windows и приложений, работающих в среде Windows Server.
Команды Windows PowerShell, называемые командлетами , позволяют управлять компьютерами из командной строки. Поставщики Windows PowerShell позволяют получать доступ к хранилищам данных, таким как реестр и хранилище сертификатов, так же легко, как и к файловой системе.
Кроме того, Windows PowerShell имеет расширенный синтаксический анализатор выражений и полностью разработанный язык сценариев. Таким образом, простыми словами вы можете выполнить все задачи, которые вы делаете с графическим интерфейсом и многое другое.
Значок PowerShell можно найти на панели задач и в меню «Пуск». Просто нажав на значок, он откроется.
![]()
Чтобы открыть его, просто нажмите значок, а затем откроется следующий экран, и это означает, что PowerShell готов к работе.

Последняя версия PowerShell – 5.0, и для проверки того, что установлено на нашем сервере, мы вводим следующую команду – : $ PSVersionTable, как показано на следующем снимке экрана, и с экрана мы также знаем, что у нас есть PSVersion 4.0

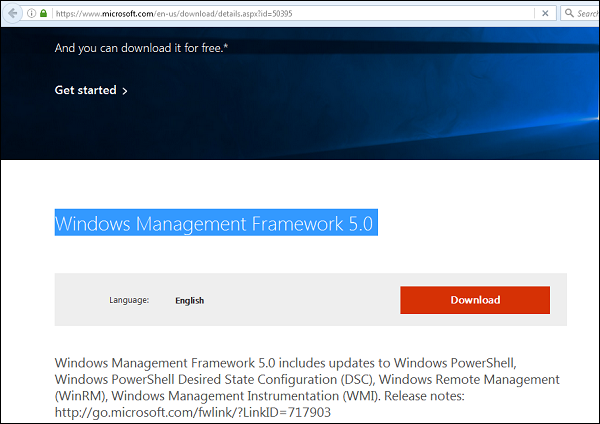
Чтобы обновить до последней версии, где есть больше командлетов, мы должны загрузить Windows Management Framework 5.0 по следующей ссылке – https://www.microsoft.com/en-us/download/details.aspx?id=50395 и установить ее. ,
PowerShell ISE
Интегрированная среда сценариев Windows PowerShell (ISE) является хост-приложением для Windows PowerShell. В Windows PowerShell ISE вы можете запускать команды и писать, тестировать и отлаживать сценарии в одном графическом пользовательском интерфейсе на основе Windows с многострочным редактированием, завершением табуляции, окрашиванием синтаксиса, выборочным выполнением, контекстно-зависимой справкой и поддержкой прав на языки.
Вы можете использовать пункты меню и сочетания клавиш для выполнения многих тех же задач, которые вы выполняете в консоли Windows PowerShell. Например, при отладке сценария в Windows PowerShell ISE для установки точки останова строки в скрипте щелкните правой кнопкой мыши строку кода и выберите « Переключить точку останова» .
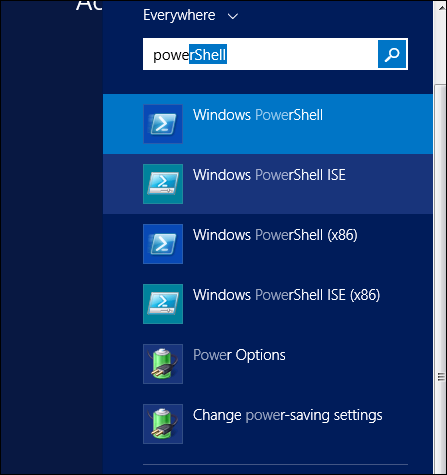
Чтобы открыть его, просто зайдите в Пуск – Поиск, а затем введите – PowerShell, как показано на следующем снимке экрана.
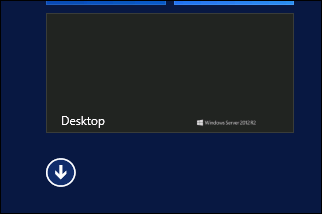
Затем нажмите на Windows PowerShell ISE. Или нажмите стрелку вниз, как показано на следующем снимке экрана.
В нем будут перечислены все приложения, установленные на сервере, а затем щелкните Windows PowerShell ISE.

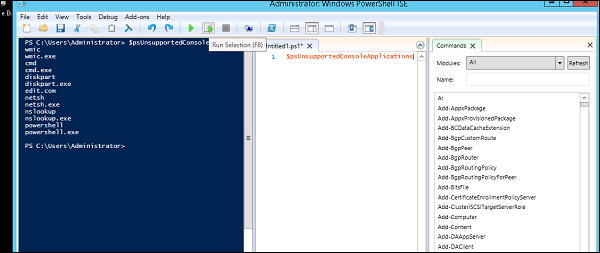
Следующая таблица будет открыта –

Он состоит из трех разделов, включая: консоль PowerShell с номером 1, затем файл сценариев № 2, а третий – это командный модуль, в котором вы можете найти модуль.
При создании скрипта вы можете запустить напрямую и увидеть результат, как в следующем примере –
Основные команды PowerShell
Существует много команд PowerShell, и очень трудно ввести все эти команды в этом учебном пособии. Мы сосредоточимся на некоторых из наиболее важных, а также основных команд PowerShell.
Первый шаг – перейти к команде Get-Help, которая объясняет, как дать команду и ее параметр.
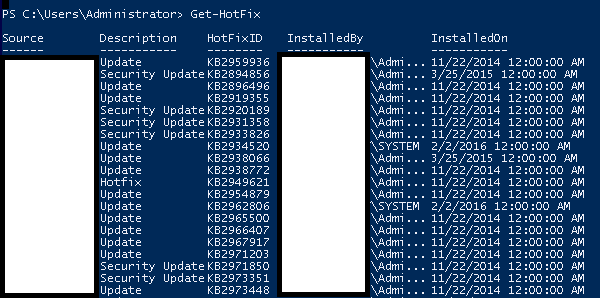
Чтобы получить список обновлений –
| description | ms.date | title |
|---|---|---|
|
This article explains the ways of starting various versions of PowerShell. |
10/22/2021 |
Starting Windows PowerShell |
Starting Windows PowerShell
Windows PowerShell is a scripting engine .DLL that’s embedded into multiple hosts. The most common
hosts you’ll start are the interactive command-line powershell.exe and the Interactive Scripting
Environment powershell_ise.exe.
To start Windows PowerShell on Windows Server 2012 R2, Windows 8.1, Windows Server
2012, and Windows 8, see
Common Management Tasks and Navigation in Windows.
PowerShell has renamed binary
PowerShell version 6 and higher uses .NET Core. Supported versions are available on Windows, macOS,
and Linux.
Beginning in PowerShell 6, the PowerShell binary was renamed pwsh.exe for Windows and pwsh for
macOS and Linux. You can start PowerShell preview versions using pwsh-preview. For more
information, see About pwsh.
To find cmdlet reference and installation documentation for PowerShell 7, use the following links:
| Document | Link |
|---|---|
| Cmdlet reference | PowerShell Module Browser |
| Windows installation | Installing PowerShell on Windows |
| macOS installation | Installing PowerShell on macOS |
| Linux installation | Installing PowerShell on Linux |
To view content for other PowerShell versions, see How to use the PowerShell documentation.
How to Start Windows PowerShell on Earlier Versions of Windows
This section explains how to start Windows PowerShell and Windows PowerShell Integrated Scripting
Environment (ISE) on Windows 7, Windows Server 2008 R2, and Windows Server 2008. It
also explains how to enable the optional feature for Windows PowerShell ISE in Windows PowerShell
2.0 on Windows Server 2008 R2 and Windows Server 2008.
Use any of the following methods to start the installed version of Windows PowerShell 3.0, or
Windows PowerShell 4.0, where applicable.
From the Start Menu
- Click Start, type PowerShell, and then click Windows PowerShell.
- From the Start menu, click Start, click All Programs, click Accessories, click the
Windows PowerShell folder, and then click Windows PowerShell.
At the Command Prompt
In cmd.exe, Windows PowerShell, or Windows PowerShell ISE, to start Windows PowerShell, type:
You can also use the parameters of the powershell.exe program to customize the session. For more
information, see
PowerShell.exe Command-Line Help.
With Administrative privileges (Run as administrator)
Click Start, type PowerShell, right-click Windows PowerShell, and then click Run as
administrator.
How to Start Windows PowerShell ISE on Earlier Releases of Windows
Use any of the following methods to start Windows PowerShell ISE.
From the Start Menu
- Click Start, type ISE, and then click Windows PowerShell ISE.
- From the Start menu, click Start, click All Programs, click Accessories, click the
Windows PowerShell folder, and then click Windows PowerShell ISE.
At the Command Prompt
In cmd.exe, Windows PowerShell, or Windows PowerShell ISE, to start Windows PowerShell, type:
or
With Administrative privileges (Run as administrator)
Click Start, type ISE, right-click Windows PowerShell ISE, and then click Run as
administrator.
How to Enable Windows PowerShell ISE on Earlier Releases of Windows
In Windows PowerShell 4.0 and Windows PowerShell 3.0, Windows PowerShell ISE is enabled by default
on all versions of Windows. If it isn’t already enabled, Windows Management Framework 4.0 or Windows
Management Framework 3.0 enables it.
In Windows PowerShell 2.0, Windows PowerShell ISE is enabled by default on Windows 7. However, on
Windows Server 2008 R2 and Windows Server 2008, it’s an optional feature.
To enable Windows PowerShell ISE in Windows PowerShell 2.0 on Windows Server 2008 R2 or Windows
Server 2008, use the following procedure.
To enable Windows PowerShell Integrated Scripting Environment (ISE)
- Start Server Manager.
- Click Features and then click Add Features.
- In Select Features, click Windows PowerShell Integrated Scripting Environment (ISE).
Starting the 32-Bit Version of Windows PowerShell
When you install Windows PowerShell on a 64-bit computer, Windows PowerShell (x86), a 32-bit
version of Windows PowerShell is installed in addition to the 64-bit version. When you run Windows
PowerShell, the 64-bit version runs by default.
However, you might occasionally need to run Windows PowerShell (x86), such as when you’re using
a module that requires the 32-bit version or when you’re connecting remotely to a 32-bit computer.
To start a 32-bit version of Windows PowerShell, use any of the following procedures.
In Windows Server 2012 R2
- On the Start screen, type Windows PowerShell (x86). Click the Windows PowerShell x86
tile. - In Server Manager, from the Tools menu, select Windows PowerShell (x86).
- On the desktop, move the cursor to the upper right corner, click Search, type PowerShell
x86 and then click Windows PowerShell (x86). - Via command line, enter:
%SystemRoot%SysWOW64WindowsPowerShellv1.0powershell.exe
In Windows Server 2012
- On the Start screen, type PowerShell and then click Windows PowerShell (x86).
- In Server Manager, from the Tools menu, select Windows PowerShell (x86).
- On the desktop, move the cursor to the upper right corner, click Search, type PowerShell
and then click Windows PowerShell (x86). - Via command line, enter:
%SystemRoot%SysWOW64WindowsPowerShellv1.0powershell.exe
In Windows 8.1
- On the Start screen, type Windows PowerShell (x86). Click the Windows PowerShell x86
tile. - If you’re running
Remote Server Administration Tools for Windows
8.1, you can also open Windows PowerShell x86 from the Server ManagerTools menu. Select
Windows PowerShell (x86). - On the desktop, move the cursor to the upper right corner, click Search, type PowerShell
x86 and then click Windows PowerShell (x86). - Via command line, enter:
%SystemRoot%SysWOW64WindowsPowerShellv1.0powershell.exe
In Windows 8
- On the Start screen, move the cursor to the upper right corner, click Settings, click
Tiles, and then move the Show Administrative Tools slider to Yes. Then, type
PowerShell and click Windows PowerShell (x86). - If you’re running
Remote Server Administration Tools for
Windows 8, you can also open Windows PowerShell x86 from the Server ManagerTools menu. Select
Windows PowerShell (x86). - On the Start screen or the desktop, type PowerShell (x86) and then click Windows
PowerShell (x86). - Via command line, enter:
%SystemRoot%SysWOW64WindowsPowerShellv1.0powershell.exe
Table of Contents
- Introduction
- IP address and related settings (default gateway, DNS servers)
- Hostname
- Option 1
- Option 2
- Join computer to domain
- Creation of OU:
- Creation of computer account for server:
- Joining server to domain:
- Enable Remote Powershell
- WinRM Quick Configuration
- Enable Remote Desktop
- Enable Remote Desktop
- Enable Windows Firewall rules
- Conclusion
Introduction
Besides configuration through the
GUI, Windows Server 2012 can be configured with a variety of command line tools:
- netsh for the IP address, default gateway and DNS
server - netdom renamecomputer for the hostname
- netdom join for joining the server to a domain
Of course, Microsoft now recommends the use of PowerShell so I wanted to configure a fresh install of Windows Server 2012 using this
tool.
When it came to enabling the Remote Desktop or setting Windows Firewall rules, the rather complex process seemed to confirm the idea that, in some cases, the GUI is the better tool. For example, setting time and date is achieved much more efficiently by
entering control timedate.cpl and adjusting settings in the resulting window. Likewise for regional settings, in which case we can use
control intl.cpl.
Given the new Windows Server 2012 GUI, however, I find it is often just as easy to type commands, rather than clicking multiple times to reach the appropriate icon in the Control Panel.
So, I’ve used PowerShell as illustrated in the paragraphs that follow to configure…
- IP address (IPv4 and IPv6)
- Hostname
- Domain join
- Remote Powershell
- Remote Desktop (RDP)
- Firewall setting adjustments for Remote Desktop
IP address and related settings (default gateway, DNS servers)
 Note |
|---|
| I’ve sometimes analyzed in some detail certain aspects of the addressing process. If you are most interested in the cmdlets themselves, please concentrate on the commands in bold. |
First, I want to see the name of the network adapter (or «network card») and the general IP status quo.
As we can see below, using the PowerShell cmdlets in question, the name of the network adapter is «Ethernet» (rather than «Local Area Connection» as in previous versions of Windows).
Even before manual configuration of IP settings, some IP addresses, notably IPv6, have been assigned automatically. We also have an IPv4 and IPv6 loopback address, respectively
127.0.0.1 and ::1
Since the output of some of the commands can be quite lengthy, I’ve used the format-list cmdlet to limit the output to values that I find most useful.
PS C:>
Get-NetAdapter | fl name,interfacedescription,macaddress,linkspeed
name : Ethernet
interfacedescription : Intel(R) 82574L Gigabit Network Connection
MacAddress : 00-0C-29-06-55-CE
LinkSpeed : 1 Gbps
PS C:>
Get-NetIPAddress | fl ipaddress,interfacealias,addressfamily,addressstate
ipaddress : fe80::1fe:23d7:24dc:1847%12
interfacealias : Ethernet
AddressFamily : IPv6
AddressState : Preferred
ipaddress : fd00::de17:18f7:578f:48ca
interfacealias : Ethernet
AddressFamily : IPv6
AddressState : Preferred
ipaddress : fe80::5efe:169.254.24.71%19
interfacealias : Local Area Connection* 11
AddressFamily : IPv6
AddressState : Deprecated
ipaddress : ::1
interfacealias : Loopback Pseudo-Interface 1
AddressFamily : IPv6
AddressState : Preferred
ipaddress : 169.254.24.71
interfacealias : Ethernet
AddressFamily : IPv4
AddressState : Preferred
ipaddress : 127.0.0.1
interfacealias : Loopback Pseudo-Interface 1
AddressFamily : IPv4
AddressState : Preferred
IPCONFIG is still useful — and less verbose:
PS C:> ipconfig
Windows IP Configuration
Ethernet adapter Ethernet:
Connection-specific DNS Suffix . :
IPv6 Address. . . . . . . . . . . : fd00::de17:18f7:578f:48ca
Link-local IPv6 Address . . . . . : fe80::1fe:23d7:24dc:1847%12
Autoconfiguration IPv4 Address. . : 169.254.24.71
Subnet Mask . . . . . . . . . . . : 255.255.0.0
Default Gateway . . . . . . . . . :
Tunnel adapter Local Area Connection* 11:
Media State . . . . . . . . . . . : Media disconnected
Connection-specific DNS Suffix . :
Now we will configure an IPv4 address — this is roughly the equivalent of the
netsh int ipv4 set address command.
PS C:> New-NetIPAddress -InterfaceAlias «Ethernet» -IPAddress 10.1.1.12 -PrefixLength 8 -DefaultGateway 10.1.1.2
IPAddress : 10.1.1.12
InterfaceIndex : 12
InterfaceAlias : Ethernet
AddressFamily : IPv4
Type : Unicast
PrefixLength : 8
PrefixOrigin : Manual
SuffixOrigin : Manual
AddressState : Tentative
…
IPAddress : 10.1.1.12
InterfaceIndex : 12
InterfaceAlias : Ethernet
AddressFamily : IPv4
Type : Unicast
PrefixLength : 8
PrefixOrigin : Manual
SuffixOrigin : Manual
AddressState : Invalid
…
PS C:> Get-NetIPAddress | where { $_.IPAddress -eq «10.1.1.12» } | fl
IPAddress : 10.1.1.12
InterfaceIndex : 12
InterfaceAlias : Ethernet
AddressFamily : IPv4
Type : Unicast
PrefixLength : 8
PrefixOrigin : Manual
SuffixOrigin : Manual
AddressState : Preferred
…
Note that the state of the address changes. In the output that displayed automatically after the execution of the New-NetIPAddress, it is first «Tentative» and then (for some reason?) «Invalid» but finally «Preferred» — after verification with the cmdlet
Get-NetIPAddress.
Here we configure the DNS server:
PS C:> Set-DnsClientServerAddress «Ethernet» -ServerAddresses 10.1.1.10
So what’s changed? Now, instead of the 169.254.24.71 address, we have «10.1.1.12».
PS C:> Get-NetIPAddress | fl ipaddress,interfacealias,addressfamily,addressstate
[snip]
ipaddress : ::1
interfacealias : Loopback Pseudo-Interface 1
AddressFamily : IPv6
AddressState : Preferred
ipaddress : 10.1.1.12
interfacealias : Ethernet
AddressFamily : IPv4
AddressState : Preferred
ipaddress : 127.0.0.1
interfacealias : Loopback Pseudo-Interface 1
AddressFamily : IPv4
AddressState : Preferred
Now we’ll configure an IPv6 address. Unlike the IPv4 address, that replaced the APIPA address (169.254.x.x), the manually assigned IPv6 address can coexist with the IPv6 link local address (and others).
PS C:> New-NetIPAddress -InterfaceAlias «Ethernet» -IPAddress fd00::12
IPAddress : fd00::12
InterfaceIndex : 12
InterfaceAlias : Ethernet
AddressFamily : IPv6
Type : Unicast
PrefixLength : 128
PrefixOrigin : Manual
SuffixOrigin : Manual
AddressState : Tentative
ValidLifetime : Infinite ([TimeSpan]::MaxValue)
PreferredLifetime : Infinite ([TimeSpan]::MaxValue)
SkipAsSource : False
PolicyStore : ActiveStore
IPAddress : fd00::12
InterfaceIndex : 12
InterfaceAlias : Ethernet
AddressFamily : IPv6
Type : Unicast
PrefixLength : 128
PrefixOrigin : Manual
SuffixOrigin : Manual
AddressState : Invalid
ValidLifetime : Infinite ([TimeSpan]::MaxValue)
PreferredLifetime : Infinite ([TimeSpan]::MaxValue)
SkipAsSource : False
PolicyStore : PersistentStore
Once again, as for the IPv4 address, the status of the address goes from «Tentative» to «Invalid» to «Preferred» (see below).
PS C:> Get-NetIPAddress | where { $_.IPAddress -eq «fd00::12» } | fl
IPAddress : fd00::12
InterfaceIndex : 12
InterfaceAlias : Ethernet
AddressFamily : IPv6
Type : Unicast
PrefixLength : 128
PrefixOrigin : Manual
SuffixOrigin : Manual
AddressState : Preferred
ValidLifetime : Infinite ([TimeSpan]::MaxValue)
PreferredLifetime : Infinite ([TimeSpan]::MaxValue)
SkipAsSource : False
PolicyStore : ActiveStore
We can use the following commands to verify the status of our network adapters:
PS C:> ipconfig /all
Windows IP Configuration
Host Name . . . . . . . . . . . . : WIN-6CSB0KQ27BN
Primary Dns Suffix . . . . . . . :
Node Type . . . . . . . . . . . . : Hybrid
IP Routing Enabled. . . . . . . . : No
WINS Proxy Enabled. . . . . . . . : No
Ethernet adapter Ethernet:
Connection-specific DNS Suffix . :
Description . . . . . . . . . . . : Intel(R) 82574L Gigabit Network Connection
Physical Address. . . . . . . . . : 00-0C-29-06-55-CE
DHCP Enabled. . . . . . . . . . . : No
Autoconfiguration Enabled . . . . : Yes
IPv6 Address. . . . . . . . . . . : fd00::12(Preferred)
IPv6 Address. . . . . . . . . . . : fd00::f0a7:570b:489b:a320(Preferred)
Lease Obtained. . . . . . . . . . : Wednesday, November 6, 2013 8:16:55 PM
Lease Expires . . . . . . . . . . : Thursday, November 21, 2013 6:58:10 AM
Link-local IPv6 Address . . . . . : fe80::1fe:23d7:24dc:1847%12(Preferred)
IPv4 Address. . . . . . . . . . . : 10.1.1.12(Preferred)
Subnet Mask . . . . . . . . . . . : 255.0.0.0
Default Gateway . . . . . . . . . : 10.1.1.2
DHCPv6 IAID . . . . . . . . . . . : 251661353
DHCPv6 Client DUID. . . . . . . . : 00-01-00-01-1A-0C-C5-57-00-0C-29-06-55-CE
DNS Servers . . . . . . . . . . . : 10.1.1.10
NetBIOS over Tcpip. . . . . . . . : Enabled
PS C:> Get-NetIPAddress | fl IPAddress,SuffixOrigin,AddresState
IPAddress : fe80::1fe:23d7:24dc:1847%12
SuffixOrigin : Link
IPAddress : fd00::7f64:7932:81f9:dc56
SuffixOrigin : Dhcp
IPAddress : fd00::12
SuffixOrigin : Manual
IPAddress : fe80::5efe:10.1.1.12%13
SuffixOrigin : Link
IPAddress : ::1
SuffixOrigin : WellKnown
IPAddress : 10.1.1.12
SuffixOrigin : Manual
IPAddress : 127.0.0.1
SuffixOrigin : WellKnown
PS C:> Get-DnsClientServerAddress | fl interfacealias,ServerAddresses
interfacealias : Ethernet
ServerAddresses : {10.1.1.10}
interfacealias : Ethernet
ServerAddresses : {fd00::10}
[snip]
Hostname
The netdom renamecomputer command requires the designation of the current name of the computer. After experimenting with the first option below, I discovered that Powershell allows us to rename the computer without indicating the current
name.
In either case, the cmdlet is Rename-Computer.
Option 1
PS C:> $oldname = hostname
PS C:> $oldname
WIN-6CSB0KQ27BN
PS C:> Rename-Computer -NewName SVR-00X -ComputerName $oldname
WARNING: The changes will take effect after you restart the computer WIN-6CSB0KQ27BN.
PS C:> Restart-Computer
Option 2
PS C:>Rename-Computer -NewName SVR-004 -force -restart
Note: There are parameters that allow us to perform the operation using specific credentials, local or domain:
-DomainCredential
-LocalCredential
Otherwise, the credentials of the user performing the operation are used by default.
The -force parameter eliminates the confirmation prompt.
The -restart parameter restarts the computer automatically.
Join computer to domain
Note: the command assumes that the computer account and organizational unit in question have already been created in Active Directory.
Creation of OU:
PS C:> New-ADOrganizationalUnit «Servers»
By default, the OU is created at the domain root. If that is where we want to create the OU, no further parameters are necessary.
Creation of computer account for server:
PS C:> New-ADComputer SVR-004 -Path «OU=Servers,DC=machlinkit,DC=biz»
Joining server to domain:
PS C:> Add-Computer -DomainName machlinkit.biz -restart
Note: if logged on with credentials that allow joining a computer to the domain, it is not necessary to enter them.
Enable Remote Powershell
In fact, there is not much to do here.
On Windows 2012, remote access via PowerShell is enabled by default.
In this case, we want to be able to execute Powershell commands on member server
SVR-004 from domain controller DC-001.
We can run the following command on previous operating systems, Windows 2008 R2 in particular, or use it to enable PS remoting on a machine where it was disabled:
PS C:> Enable-PSRemoting -force
WinRM is already set up to receive requests on this computer.
WinRM is already set up for remote management on this computer.
PS C:>
Since the function is already enabled, we have the output shown above.
Note: if necessary, we would run this command on
SVR-004 — the target computer.
——————————————————————————————
Note: the -force parameter eliminates the rather verbose confirmation that we would otherwise see. I’ll post that output here since it does describe what the command accomplishes:
PS C:> Enable-PSRemoting
WinRM Quick Configuration
Running command «Set-WSManQuickConfig» to enable remote management of this computer by using the Windows Remote
Management (WinRM) service.
This includes:
1. Starting or restarting (if already started) the WinRM service
2. Setting the WinRM service startup type to Automatic
3. Creating a listener to accept requests on any IP address
4. Enabling Windows Firewall inbound rule exceptions for WS-Management traffic (for http only).
Do you want to continue?
[Y] Yes [A] Yes to All [N] No [L] No to All [S] Suspend [?] Help (default is «Y»): A
WinRM is already set up to receive requests on this computer.
WinRM has been updated for remote management.
Configured LocalAccountTokenFilterPolicy to grant administrative rights remotely to local users.
Confirm
Are you sure you want to perform this action?
Performing operation «Set-PSSessionConfiguration» on Target «Name: microsoft.powershell SDDL:
O:NSG:BAD:P(A;;GA;;;BA)(A;;GA;;;RM)S:P(AU;FA;GA;;;WD)(AU;SA;GXGW;;;WD). This will allow selected users to remotely run Windows PowerShell commands on this computer».
[Y] Yes [A] Yes to All [N] No [L] No to All [S] Suspend [?] Help (default is «Y»): A
———————————————————————————————————
From DC-001 we can first test the WinRM service on SVR-004: is it running? responding to requests?
PS C:> Test-WsMan SVR-004
wsmid :
http://schemas.dmtf.org/wbem/wsman/identity/1/wsmanidentity.xsd
ProtocolVersion : http://schemas.dmtf.org/wbem/wsman/1/wsman.xsd
ProductVendor : Microsoft Corporation
ProductVersion : OS: 0.0.0 SP: 0.0 Stack: 3.0
To verify (one step further), I’ll stop and later start the WinRM service.
Right now it is on.
PS C:> Get-Service WinRM | fl
Name : WinRM
DisplayName : Windows Remote Management (WS-Management)
Status : Running
DependentServices : {}
[snip]
PS C:> Stop-Service WinRM
We try Test-WsMan again… this time, failure:
PS C:> Test-Wsman SVR-004
test-wsman : <f:WSManFault xmlns:f=»http://schemas.microsoft.com/wbem/wsman/1/wsmanfault» Code=»2150859046″ Machine=»DC-001.machlinkit.biz»><f:Message>WinRM cannot complete
the operation. Verify that the specified computer name is valid, that the computer is accessible over the network, and that a firewall exception for the WinRM service is enabled and allows access from this computer. By default, the WinRM firewall exception
for public profiles limits access to remote computers within the same local subnet. </f:Message></f:WSManFault>
If I enable the WinRM on SVR-004 (with Start-Service), the test succeeds once again.
Now I’ll start a remote Powershell session on SVR-004 from DC-001 and execute some basic file system commands.
PS C:> Enter-PSSession -ComputerName SVR-004
[snip]
[SVR-004]: PS C:>
[SVR-004]: PS C:> gci
Directory: C:
Mode LastWriteTime Length Name
—- ————- —— —-
d—- 7/26/2012 3:44 AM PerfLogs
d-r— 11/6/2013 8:14 PM Program Files
d—- 7/26/2012 4:04 AM Program Files (x86)
d—- 11/13/2013 4:50 PM TeamDocuments
d-r— 11/13/2013 5:12 PM Users
d—- 11/6/2013 10:45 PM Windows
[SVR-004]: PS C:> sl .TeamDocuments
[SVR-004]: PS C:TeamDocuments> New-Item -Name NewFile1.txt -Type File
[snip]
We can also execute a single command on the remote computer using the Invoke-Command cmdlet as shown below. First we need to exit from the current session.
[SVR-004]: PS C:TeamDocuments> Exit
PS C:>
PS C:> Invoke-Command SVR-004 -ScriptBlock {gci C:TeamDocuments}
Directory: C:TeamDocuments
Mode LastWriteTime Length Name PSComputerName
—- ————- —— —- —————
-a— 11/13/2013 5:13 PM 0 NewFile.txt SVR-004
-a— 11/13/2013 5:13 PM 0 NewFile1.txt SVR-004
Note that in both cases, I am able to omit the parameter -ComputerName because it is a positional parameter and do not need to use the -Credential parameter because I am using a domain administrator account that has complete access to both machines.
Note (once again) that «Windows Remote Management» is enabled by default in Windows 2012. It was not necessary for me to adjust firewall settings.
Enable Remote Desktop
This is where I find Powershell to be most lacking. There is not a simple cmdlet that performs the two necessary operations that must be accomplished to enable remote desktop:
-
Enable Remote Desktop itself
-
Configure Windows Firewall in consequence.
In my opinion, the simplest — or least complicated way — to achieve this is to manipulate the registry settings that govern Remote Desktop with the Set-ItemProperty cmdlet and then the firewall rules with the Enable-NetFirewallRule cmdlet.
I found an alternate method that uses WMI to manipulate the Remote Desktop setting as well. I will post this alternative at the end (of this already very long post).
***
The parameter that governs Remote Desktop is «fDenyTSConnections» and can be found in the Windows registry in the location below. I will limit the output with the format-list cmdlet.
PS C:> Get-ItemProperty -Path ‘HKLM:SYSTEMCurrentControlSetControlTerminal Server’ -Name fDenyTSConnections | fl fDenyTSConnections
fDenyTSConnections : 1
Since the parameters are apparently both positional (meaning they can be omitted), we can abbreviate as follows:
PS C:> Get-ItemProperty ‘HKLM:SYSTEMCurrentControlSetControlTerminal Server’ fDenyTSConnections | fl fDenyTSConnections
fDenyTSConnections : 1
The value «1» indicates that Terminal Connections (or Remote Desktop connections) are indeed denied. We will need to change this.
We also need to manage user authentication (enable it or not). It is more secure (thus generally preferable) to enable it. However, older versions of Windows (XP,2003) may not be able to connect this way.
PS C:> Get-ItemProperty ‘HKLM:SYSTEMCurrentControlSetControlTerminal ServerWinStationsRDP-Tcp’ UserAuthentication | fl UserAuthentication
UserAuthentication : 1
So, Remote Desktop is disabled and User Authentication is enabled. The latter, of course, has no effect, since the former is not enabled.
Now let’s look at the status of the Windows Firewall, concerning Remote Desktop access.
PS C:> Get-NetFirewallRule | where {$_.Name -like «*Desktop*»} | fl Name,Enabled,Profile,Direction
Name : RemoteDesktop-UserMode-In-TCP
Enabled : False
Profile : Public
Direction : Inbound
Name : RemoteDesktop-UserMode-In-UDP
Enabled : False
Profile : Public
Direction : Inbound
This only applies to the Public profile which has no effect on the Domain (or Private) profile which interests me.
Let’s try this:
PS C:> Get-NetFirewallRule -DisplayGroup «Remote Desktop» | fl Name,Enabled,Profile,Direction
Name : RemoteDesktop-UserMode-In-TCP
Enabled : False
Profile : Public
Direction : Inbound
Name : RemoteDesktop-UserMode-In-UDP
Enabled : False
Profile : Public
Direction : Inbound
Name : {12954380-D013-432D-A2A1-646FC09BB918}
Enabled : False
Profile : Domain, Private
Direction : Inbound
Name : {9CD18D97-6B13-4463-BA5E-A2794D7237E9}
Enabled : False
Profile : Domain, Private
Direction : Inbound
For some reason, in the Powershell output, the name of the firewall rule is a long GUID. I’ll deal with that in a moment…
Enable Remote Desktop
OK, that is the status quo. Now let’s enable remote desktop with this cmdlet:
PS C:> Set-ItemProperty ‘HKLM:SYSTEMCurrentControlSetControlTerminal Server’ fDenyTSConnections -value 0
This is the result:
PS C:> Get-ItemProperty ‘HKLM:SYSTEMCurrentControlSetControlTerminal Server’ fDenyTSConnections | fl fDenyTSConnections
fDenyTSConnections : 0
User Authentication is at «1» (enabled) already and we will leave it as that because all clients likely to connect to the Windows 2012 servers are running Windows Vista / Server 2008 or above.
Enable Windows Firewall rules
I found — but am not satisfied — with the following command since it enables Remote Desktop in the Public profile. Although one could argue that it does not matter if we are behind a perimeter firewall anyway.
PS C:> Enable-NetFirewallRule -DisplayGroup «Remote Desktop»
PS C:> Get-NetFirewallRule -DisplayGroup «Remote Desktop» | fl Name,Enabled,Profile,Direction
Name : RemoteDesktop-UserMode-In-TCP
Enabled : True
Profile : Public
Direction : Inbound
Name : RemoteDesktop-UserMode-In-UDP
Enabled : True
Profile : Public
Direction : Inbound
Name : {12954380-D013-432D-A2A1-646FC09BB918}
Enabled : True
Profile : Domain, Private
Direction : Inbound
Although more complex, the command that follows (Enable-NetFirewallRule) provides exactly what I prefer.
I first test to see what rules the following cmdlet will produce…
PS C:> Get-NetFirewallRule | where {$_.DisplayGroup -eq «Remote Desktop» -and $_.Profile -match «Domain»} | fl Name,DisplayGroup,Profile,Enabled
Name : {12954380-D013-432D-A2A1-646FC09BB918}
DisplayGroup : Remote Desktop
Profile : Domain, Private
Enabled : False
Name : {9CD18D97-6B13-4463-BA5E-A2794D7237E9}
DisplayGroup : Remote Desktop
Profile : Domain, Private
Enabled : False
And then pipeline the result to the Enable-NetFirewallRule cmdlet. This allows Remote Desktop access. I will refrain from lengthening this post any longer by posting the result.
PS C:> Get-NetFirewallRule | where {$_.DisplayGroup -eq «Remote Desktop» -and $_.Profile -match «Domain»} |
Enable-NetFirewallRule
To open the Remote Desktop tool from the command line, we can simply type (and then press Enter):
mstsc.exe
And then provide necessary credentials.
***
Alternate method of enabling Remote Desktop using the Get-WMIObject cmdlet with the SetAllowTsConnections method:
PS C:> (Get-WmiObject -Class «Win32_TerminalServiceSetting» -NameSpace rootcimv2terminalservices).AllowTsConnections
0
PS C:> (Get-WmiObject -Class «Win32_TerminalServiceSetting» -NameSpace rootcimv2terminalservices).SetAllowTsConnections(1)
[snip]
Here we have allowed TsConnections by setting the value to «1».
The result:
PS C:> (Get-WmiObject -Class «Win32_TerminalServiceSetting» -NameSpace rootcimv2terminalservices).AllowTsConnections 1
Conclusion
This was a useful though time-consuming adventure with PowerShell but if you have the «Full» install of Windows Server 2012, as opposed to the Server Core install, and want to configure (among others) Remote Desktop, just use the GUI.

Welcome to Powershell
Windows PowerShell is an amazingly powerful tool to help you with common windows administrative tasks. If you are comfortable with one of the myriads of scripting languages available today, Powershell will be easy for you to learn while also providing the benefits of command-line administration. Microsoft is pushing Powershell to the forefront of its management products. You’ll witness this in any new Microsoft product shipping today. Some tasks require Powershell exclusively in order to configure. So not only is Powershell fun and flexible, it is going to be required knowledge moving forward. This collection will help you Install and Configure Windows Servers, Modify an Installation, Configure Server Core, Install Active Directory Domain Controllers, Automate Active Directory User Accounts, Control Groups, Group Policy, Hyper-V, and Configure Local Storage. This is a great skill to have for Microsoft System Administrators.
First, get some help
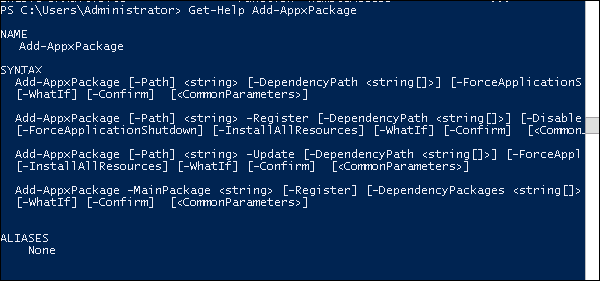
Get-Help
What better place to start than with the command that will show how to get help with the commands. Get-Help can be used with any command. Maybe you’re curious how the Add-Computer command works. Simply type Get-Help -Name Add-Computer into Powershell, hit enter, and be rewarded with command details such as Name, Synopsis, Syntax, Description, Related Links, and Remarks.
Now that you know how to get help, let’s dig into the nitty-gritty. Powershell commands follow the syntax of Verb – Noun which is known as a cmdlet or command let.
Add a Feature
Install -WindowsFeature You can deploy a feature to remote computer using the –computer flag, as in: Install -WindowsFeature -Computer
Add Migration Tools
Install -WindowsFeature Migration
Switch from Full to Core
Uninstall-WindowsFeature Server-Gui-Mgmt-Infra, Server-Gui-Shell –Restart (Also using –Remove actually removes the underlying binaries)
Switch from Core to Full
Install-WindowsFeature Server-Gui-Mgmt-Infra,Server-Gui-Shell –Restart
Switch from Full to Core Using DISM (not actually PowerShell)
Dism /online /disable-feature /featurename:ServerCore-FullServer
Install Minimal Server Interface from Core
Install-WindowsFeature Server-Gui-Mgmt-Infra
Install Minimal Server Interface from Full
Uninstall-WindowsFeature Server-Gui-Shell (Note: you can add the –WhatIf flag to see other dependent components that might also be uninstalled)
Features on Demand
Simply use Unintall-Windows Feature and include the -Remove flag to remove the binaries. To perform this on a remote computer, include -Computer
Configure IP Address
New-NetIPAddress -IPAddress 10.10.10.73 -InterfaceAlias "Ethernet" -DefaultGateway 10.10.10.1 -PrefixLength 24
Configure DNS address
Set-DnsClientServerAddress -InterfaceAlias "Ethernet" -ServerAddresses 10.10.10.70, 10.10.10.1
Join Computer to Domain
Add-Computer -DomainName vegibit.com
Installing Active Directory Binaries
Install-WindowsFeature –name AD-Domain-Services
Installing New Forest
Install-ADDSForest
Installing New Domain
Install-ADDSDomain
Installing Additional Domain Controller
Install-ADDSDomainController
Uninstall Active Directory Binaries
Uninstall-WindowsFeature –name AD-Domain-Services
Uninstall Domain Controller
Uninstall-ADDSDomainController Enable Active Directory Recycle Bin Enable-ADOptionalFeature –Identity ‘CN=Recycle Bin Feature,CN=Optional Features,CN=Directory Service,CN=Windows NT,CN=Services,CN=Configuration,DC=vegibit,DC=com’ –Scope ForestOrConfigurationSet –Target ‘vegibit.com’
Create new users
New-ADUser
Create Groups
New-ADGroup -Name bostonAdmins -SamAccountName bostonAdmins -GroupCategory Security -GroupScope Global -DisplayName bostonAdmins -Path "OU=User Accounts,ou=boston Admins,ou=boston,ou=Massachusetts,dc=vegibit,dc=com" -Description "boston Administrators"
Add Members to Group
add-adgroupmember bostonAdmins bostonAdmin01,bostonAdmin02
Advertise IPv6 on interface
set-NetIPInterface -InterfaceAlias "Ethernet 2" -AddressFamily IPv6 -Advertising Enabled
Configure Network Route for ISATAP Interface
New-NetRoute -InterfaceIndex 13 -DestinationPrefix 2001:ABCD:/64 -Publish Yes
Enable Resource Metering for Hyper-V
Get-VM -Computername | Enable-VMResourceMetering
View Resource Metering for a Specific Guest
Get -VM -ComputerName -Name | Measure -VM
Change Measurement Interval (default 1:00)
Set -vmhost –computername – ResourceMetering SaveInterval HH :MM :SS
Obtain all VMS Metering Data
Get -VM -ComputerName | Measure -VM
Obtain Specific Guest Metering Data
Get -VM -ComputerName -Name | Measure -VM
Show Storage Pools
Get -StoragePool
Show Virtual Disks
Get -VirtualDisk Repair Virtual Disk Repair -VirtualDisk
Show Unhealthy Physical Disks
Get -PhysicalDisk | Where{$_.HealthStatus –ne “Healthy”}
Remove Physical Disk from Storage Pool
Reset -PhysicalDisk
List Physical Disks Used for Virtual Disks
Get -VirtualDisk | Get -PhysicalDisk
Add a Physical Disk to Storage Pool
Add -PhysicalDisk
Thank you for reading Install and Configure Windows Server 2012 with Windows Powershell – If you found this post helpful, Please do share using the buttons below!
Как нет двух одинаковых операционных систем Windows, так и нет двух одинаковых версий оболочки Windows PowerShell. Шаги, которые нужно предпринять для запуска оболочки PowerShell 2.0 в системе Windows 8 (http://windowsitpro.com/windows-client/windows-8) заметно отличаются от действий, необходимых для запуска версии PowerShell 3.0 на сервере Windows Server 2008. При этом обилие документации по оболочке PowerShell может усложнить поиск точных сведений о том, что именно следует сделать для настройки определенной версии PowerShell в конкретной операционной системе
.
Я попытаюсь упростить информацию о системных требованиях, разделив ее в соответствии с используемой операционной системой. Точнее, я затрону те операционные системы, в которых могут быть запущены обе версии оболочки PowerShell (2.0 и 3.0): Windows 8, Windows 7, Windows Server 2012, Windows Server 2008 R2 и Server 2008. Для каждой операционной системы я подробно расскажу о запуске обеих версий PowerShell, а также среды разработки PowerShell Integrated Scripting Environment (ISE). Иногда отличий между операционными системами с точки зрения запуска оболочки PowerShell будет немного, но даже в этих случаях я постараюсь четко их обозначить, чтобы вы ясно понимали, как развернуть оболочку PowerShell в своем окружении.
Windows 8
Если вы уже используете систему Windows 8, вам повезло. Ядро PowerShell 3.0 и среда ISE в ней установлены и активированы. Вы можете запустить любое из этих двух решений, как и любое другое приложение, из меню Start, с рабочего стола или из командной строки Windows. Оболочка PowerShell 3.0 готова к запуску и ждет только вашего решения использовать ее.
К сожалению, сказанное не распространяется на оболочку PowerShell 2.0. Хотя ядро PowerShell 2.0 является частью пакета, то есть установлено в системе Windows 8, необходимо сначала активировать компонент Microsoft. NET Framework 3.5. И на то есть причина. Так как ядро PowerShell 2.0 скомпилировано в среде Common Language Runtime (CLR) 2.0, ему требуется платформа. NET версии 3.5 или ниже (назад к. NET 2.0). Оболочке PowerShell 3.0 необходимы версии. NET 4.0 или. NET 4.5, каждая из которых построена на основе CLR 4.0. В системе Windows 8 компоненты. NET 4.5 установлены и активированы по умолчанию, и именно по этой причине вы можете задействовать оболочку PowerShell 3.0 без предварительной настройки.
Если вам необходима возможность использовать как версию PowerShell 3.0, так и версию PowerShell 2.0, вы должны сначала активировать компонент. NET Framework 3.5 (включает версии. NET 2.0 и 3.0) в окне Windows Features. Это шаг активирует платформу.NET 3.5 и позволяет запускать версию PowerShell 2.0 наравне с PowerShell 3.0. Однако вы не найдете пункт меню Start, запускающий оболочку PowerShell 2.0. Для запуска потребуется выполнить следующую команду из командной строки системы Windows или оболочки PowerShell:
powershell -version 2
После запуска этой команды все последующие команды, запущенные в рамках текущей сессии, будут обработаны ядром PowerShell 2.0. Однако имейте в виду, что оболочка PowerShell 3.0 обратно совместима с командами, провайдерами, сценариями, модулями и привязками из версии PowerShell 2.0. Поэтому единственный случай, когда вам может понадобиться использовать ядро PowerShell 2.0, это если вы хотите проверить совместимость сценария или основной программы, написанной специально для оболочки PowerShell 2.0 и среды CLR 2.0.
Также будьте готовы к тому, что вы не сможете запустить среду PowerShell 2.0 ISE, если установлена оболочка PowerShell 3.0. При таких условиях вам удастся запустить версию PowerShell 2.0 только из командной оболочки. Однако вы можете использовать среду PowerShell 3.0 ISE для создания сценария, и потом запустить созданный сценарий в оболочке PowerShell 2.0 для проверки совместимости. Может быть это и не оптимальное, но все же решение.
Windows Server 2012
Если говорить об оболочке PowerShell, то система Server 2012 во многом похожа на Windows 8. По умолчанию установлены, активированы и готовы к использованию ядро и среда ISE версии PowerShell 3.0. Вы можете запустить их из меню Start, с рабочего стола или из командной строки Windows. Кроме того, вы можете запустить оболочку PowerShell 3.0 из окна Server Manager.
Однако для работы оболочки PowerShell 2.0 требуется немного другой подход к подготовке системы, чем при работе с Windows 8. Для начала вы должны добавить компонент. NET 3.5, а не просто включить его. Для этого используйте функцию Add roles and Features в окне диспетчера сервера, чтобы добавить в систему компонент. NET Framework 3.5 (включающий версии 2.0 и 3.0). Чтобы получить доступ к этому компоненту, выберите тип установки Role based или Feature based, когда попадете на страницу выбора типа установки.
Следующий шаг в подготовке к PowerShell 2.0 — это добавление актуального ядра. Снова используйте функцию Add Roles and Features в окне Server Manager, выберите тип установки Role-based или Feature-based и компонент Windows PowerShell 2.0 Engine.
После того как вы добавили возможности пакета. NET 3.5 и ядра PowerShell 2.0, вы сможете запустить ядро PowerShell 2.0. Для этого введите следующую команду в командной строке Windows или PowerShell:
powershell -version 2
Windows 7
В отличие от систем Windows 8 и Server 2012, в состав системы Windows 7 не входят предустановленные ядро PowerShell 3.0 Engine и среда ISE. Наоборот, в состав Windows 7 входят установленные, активированные и готовые к запуску ядро PowerShell и редактор ISE версии 2.0.
Имейте в виду, что если вы щелкаете правой кнопкой мыши на значке PowerShell в меню Start и выбираете пункт Properties, то в строке Target может быть прописана версия v1.0, как показано на приведенном экране. Однако при этом оболочка PowerShell остается работоспособной и вы можете проверить данное утверждение, открыв окно PowerShell и запустив команду Get-Host.
 |
| Экран. Свойства PowerShell |
Вы можете запустить оболочку PowerShell или редактор ISE из меню Start или командной строки. Чтобы запустить оболочку PowerShell 2.0 с помощью командной строки, введите команду:
powershell
Чтобы запустить редактор PowerShell 2.0 ISE из командной строки, введите команду:
powershell_ise
Система Windows 7 поддерживает использование версии PowerShell 3.0, но для ее запуска вам нужно будет выполнить несколько шагов.
- Установите пакет обновления Windows 7 SP1 (http://www.microsoft.com/en-us/download/details.aspx?id=5842), если еще не сделали этого.
- Выполните полную установку компонентов. NET 4.0 (http://www.microsoft.com/en-us/download/details.aspx?id=17851) или. NET 4.5(http://www.microsoft.com/en-us/download/details.aspx?id=30653).
- Удалите все предыдущие сборки Windows Management Framework (WMF) 3.0.
- Установите последнюю сборку WMF 3.0 (http://www.microsoft.com/en-us/download/details.aspx?id=34595).
Вдобавок к ядру PowerShell 3.0 и среде ISE пакет WMF 3.0 включает и другие компоненты, необходимые для запуска оболочки PowerShell 3.0.
- WS-Management 3.0. Этот компонент поддерживает работу службы Windows Remote Management (WinRM) и протокола WSMan, которые делают возможным использование компонентов PowerShell, связанных с дистанционным управлением.
- Windows Management Instrumentation (WMI) 3.0. Этот компонент поддерживает функции, которым необходим инструментарий WMI, например команды Common Information Model (CIM).
Установка пакетов. NET и WMF представляет собой интуитивно понятные процессы, но убедитесь, что вы прочитали все инструкции на странице загрузки, перед тем как установить пакеты в своей системе. Еще одна важная деталь заключается в том, что пакет WMF несовместим с некоторыми приложениями:
- Microsoft System Center 2012 Configuration Manager;
- Microsoft System Center 2012 Virtual Machine Manager;
- Microsoft Exchange Server 2012;
- Microsoft Exchange Server 2007;
- Microsoft SharePoint 2010;
- Windows Small Business Server 2011;
- Windows Small Business Server 2008.
Если в вашей системе были установлены приложения из приведенного списка, вам не следует устанавливать пакет WMF 3.0, а следовательно обновление до версии PowerShell 3.0 становится невыполнимой задачей (если только вы не найдете обходной путь).
Однако если рассматривать вариант, в котором вы сможете выполнить установку пакета WMF 3.0, то оболочка PowerShell 3.0 и среда ISE будут готовы к запуску, как только закончится установка. В системе Windows 7 запуск ядра PowerShell выполняется точно так же как запуск оболочки PowerShell и редактора ISE версии 2.0 (то есть из меню Start или из командной строки). Если вы хотите запустить ядро оболочки PowerShell 2.0, введите в командную строку следующую команду:
powershell -version 2
Однако имейте в виду, что после установки пакета WMF 3.0 вы сможете получить доступ к ядру оболочки PowerShell 2.0 только через эту команду. Кроме того, вы больше не сможете использовать редактор PowerShell ISE и запускать ядро PowerShell 2.0 из оболочки PowerShell 3.0. Вам придется задействовать командную оболочку PowerShell, чтобы выполнять операции версии 2.0. Однако, как и при работе с системами Windows 8 и Server 2012, вы сможете использовать редактор PowerShell 3.0 ISE, чтобы создавать свои сценарии и запускать их на ядре PowerShell 2.0 для проверки совместимости.
Windows Server 2008 R2
Система Server 2008 R2 очень похожа на Windows 7 с точки зрения настройки PowerShell. По умолчанию ядро PowerShell 2.0 и редактор ISE установлены в системе. Однако, в отличие от системы Windows 7, на платформе Server 2008 R2 активировано ядро, но не среда ISE. Вам придется установить ее вручную при помощи функции Add Features в окне Server Manager, позволяющей добавить компонент Windows PowerShell Integrated Scripting Environment (ISE). Как только этот компонент будет добавлен, вы сможете запускать и оболочку PowerShell 2.0, и ISE, точно так же, как в системе Windows 7 (с помощью меню Start или командной строки).
Процесс обновления оболочки PowerShell 2.0 до версии Powershell 3.0 похож на процесс обновления в системе Windows 7. Вы устанавливаете пакет обновления SP1, загружаете компоненты. NET 4.0 или. NET 4.5, удаляете все предыдущие сборки WMF 3.0 и устанавливаете самую последнюю сборку WMF 3.0, соблюдая все предосторожности, описанные в разделе, посвященном системе Windows 7. Однако если вы хотите использовать редактор РоwerShell 3.0 ISE после обновления, вы должны быть уверены, что редактор PowerShell 2.0 ISE был активирован до установки пакета WMF 3.0.
После установки пакета WMF 3.0 вы сможете запустить ядро PowerShell 3.0 и редактор ISE, точно так же, как вы запускали их в системе Windows 7 (то есть с помощью меню Start или командной строки). Чтобы получить доступ к ядру PowerShell 2.0, нужно ввести следующую команду в командной строке системы Windows или оболочки PowerShell:
powershell -version 2
Windows Server 2008
Когда дело дойдет до настройки PowerShell, вы увидите, что платформа Windows Server 2008 действительно отличается от других систем. Эта операционная система не включает в себя предустановленных компонентов PowerShell 2.0 или PowerShell 3.0. В результате вам придется проделать больше работы, чтобы запустить какую-либо из этих версий в своей системе.
Если вы хотите установить ядро PowerShell 2.0 и редактор ISE на компьютер с системой Server 2008, сначала придется удалить все предыдущие версии служб PowerShell или WinRM. Затем, вам нужно установить пакет WMF Core (http://support.microsoft.com/kb/968929/en-us), включающий в себя ядро PowerShell 2.0, среду ISE, а также пакет WinRM 2.0. Теперь вы сможете запускать компоненты PowerShell точно так же, как вы запускали их в системах Windows 7 или Server 2008 R2.
Процесс установки ядра PowerShell 3.0 и ISE не так прост и требует дополнительных шагов.
- Установите пакет обновления Server 2008 SP2 (http://www.microsoft.com/en-us/download/details.aspx?id=16468), если он еще не был установлен.
- Установите пакет WMF Core (http://support.microsoft.com/kb/968929/en-us), если он еще не был установлен. Наличие компонента WMF Core — это предварительное условие для установки пакета WMF 3.0 на компьютерах с системой Server 2008.
- Полностью установите компоненты. NET 4.0 (http://www.microsoft.com/en-us/download/details.aspx?id=17851) или. NET 4.5 (http://www.microsoft.com/en-us/download/details.aspx?id=30653).
- Установите компонент Extended Protection for Authentication (http://support.microsoft.com/kb/968389). Этот компонент защищает вашу систему от возможных атак и позволяет использовать параметр UseSSL при создании удаленной сессии.
- Удалите все предыдущие сборки WMF 3.0.
- Установите самую последнюю сборку WMF 3.0 (http://www.microsoft.com/en-us/download/details.aspx?id=34595).
После завершения процесса установки вы можете обратиться к ядру PowerShell и редактору ISE, как при запуске в системах Windows 7 или Server 2008 R2 (то есть из меню Start или командной строки). Вы можете получить доступ к ядру PowerShell 2.0 так же, как и в других системах, с помощью следующей команды в командной строке системы Windows или оболочки PowerShell:
powershell -version 2
Игра в PowerShell
Установка PowerShell может быть похожа на игру «в наперстки» — вам нужно угадать, где спрятан шарик. Если вы точно знаете, какую версию PowerShell и в какой операционной системе хотите использовать, весь вопрос заключается лишь в выборе правильного набора инструкций.
Помните, что вы можете запустить ядро PowerShell 3.0 и среду ISE в любой из перечисленных здесь операционных систем. С версией PowerShell 3.0 вы не только получаете несколько важных новых команд, но и такие компоненты как Windows PowerShell Web Access, интеграцию с моделью Common Information Model (CIM), отключенные сессии и поддержку для Windows Workflow Foundation. Редактор PowerShell 3.0 ISE был значительно расширен с добавлением поддержки таких технологий как IntelliSense, автоматическое сохранение, копирование блока, сопоставление с эталоном и раскрывающиеся-закрывающиеся разделы. И самое главное, что вы по-прежнему можете получить доступ к ядру PowerShell 2.0.
Даже если вы решили работать только с версией PowerShell 2.0, вы все равно должны убедиться в том, что работаете с правильной версией PowerShell и что она запускается в нужной вам системе. В связи с этим у вас должна быть вся необходимая информация для настройки окружения PowerShell 2.0.
Windows PowerShell is a command-line shell and scripting language designed especially for system administration. It’s analogue in Linux is called as Bash Scripting. Built on the .NET Framework, Windows PowerShell helps IT professionals to control and automate the administration of the Windows operating system and applications that run on Windows Server environment.
Windows PowerShell commands, called cmdlets, let you manage the computers from the command line. Windows PowerShell providers let you access data stores, such as the Registry and Certificate Store, as easily as you access the file system.
In addition, Windows PowerShell has a rich expression parser and a fully developed scripting language. So in simple words you can complete all the tasks that you do with GUI and much more.
PowerShell Icon can be found in the task bar and in the start menu. Just by clicking on the icon, it will open.
![]()
To open it, just click on the icon and then the following screen will open and it means that PowerShell is ready for you to work on.
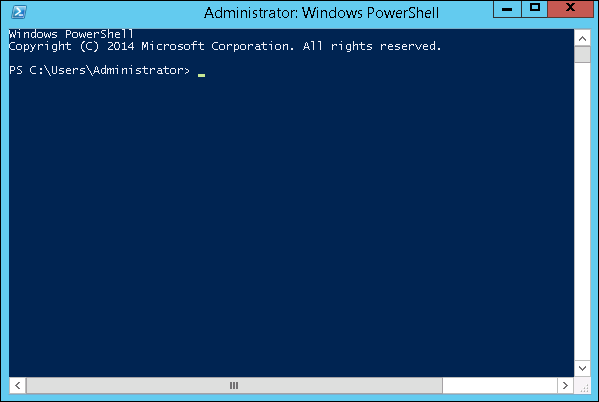
The latest version of PowerShell is 5.0 and to check what is installed in our server we type the following command – :$PSVersionTable as shown in the following screenshot and from the screen we also know that we have PSVersion 4.0
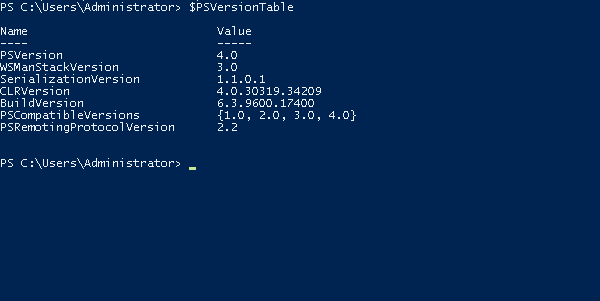
To update with the latest version where it has more Cmdlets we have to download Windows Management Framework 5.0 from the following link − https://www.microsoft.com/en-us/download/details.aspx?id=50395 and install it.

PowerShell ISE
The Windows PowerShell Integrated Scripting Environment (ISE) is a host application for Windows PowerShell. In Windows PowerShell ISE, you can run commands and write, test, and debug scripts in a single Windows-based graphic user interface with multiline editing, tab completion, syntax coloring, selective execution, context-sensitive help, and support for right-to-left languages.
You can use menu items and keyboard shortcuts to perform many of the same tasks that you would perform in the Windows PowerShell console. For example, when you debug a script in the Windows PowerShell ISE, to set a line breakpoint in a script, right-click the line of code, and then click Toggle Breakpoint.
To open it you just go to Start – Search and then Type – PowerShell as shown in the following screenshot.

Then click on Windows PowerShell ISE. Or click on the downward Arrow as shown in the following screenshot.

It will list all the applications installed on the server and then click on Windows PowerShell ISE.

The following table will be open −
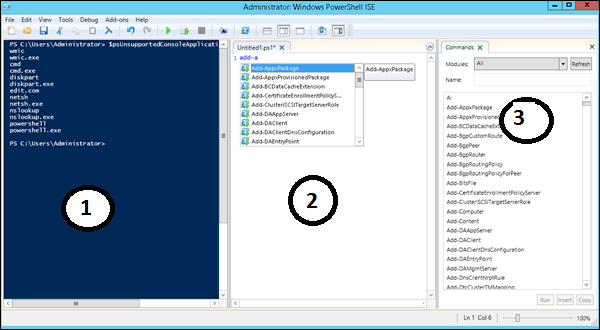
It has three sections, which include – The PowerShell Console with number 1, then Scripting File number 2 and the third is the Command Module where you can find the module.
While creating the script you can run directly and see the result like the following example −

PowerShell Basic Commands
There are a lot of PowerShell commands and it is very difficult to put in all these commands in this tutorial, we will focus on some of the most important as well as basic commands of PowerShell.
The first step is to go to the Get-Help command which gives you an explanation about how to give a command and its parameter.

To get the list of Updates −
- Get-HotFix and to install a hot fix as follows
- Get-HotFix -id kb2741530