Содержание
- Установка QEMU
- Команды QEMU
- Основные
- Дополнительные
- Установка операционной системы в QEMU
- Запуск в QEMU образов LiveCD
- Qemu Manager
- Вопросы и ответы

Эмулятор QEMU является кроссплатформенным приложением, доступным в том числе для 32- и 64-битной версии Windows.
Скачать QEMU с официального сайта
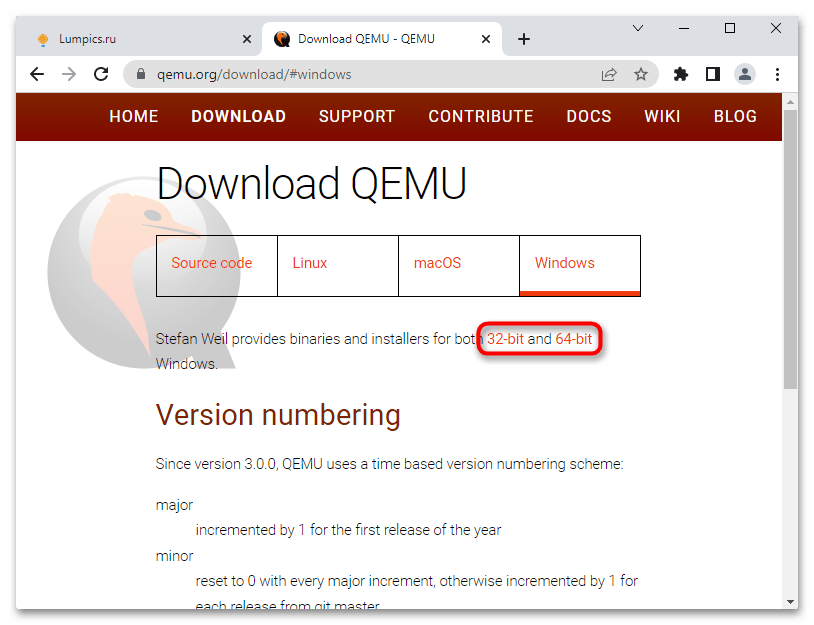
- Откройте официальную страницу разработчика и выберите приложение нужной вам разрядности.
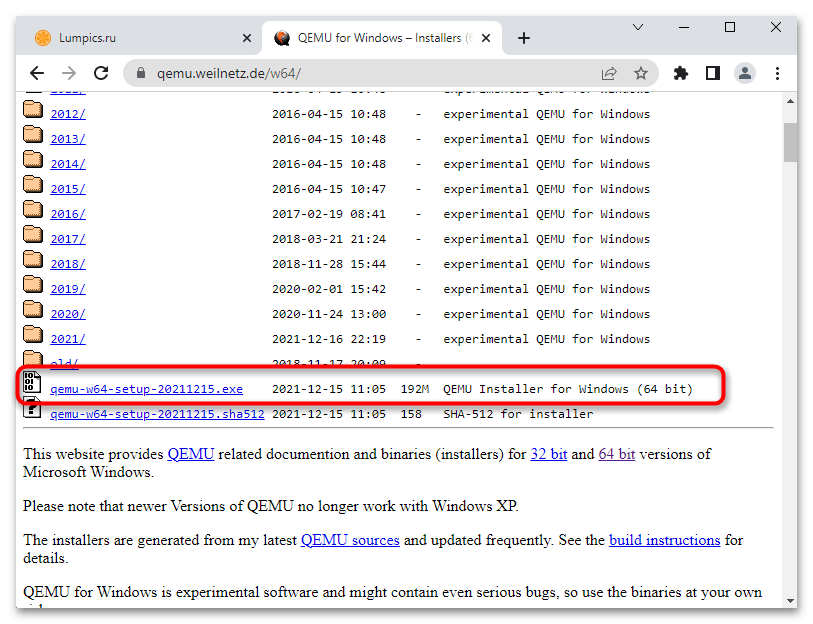
- Скачайте актуальную (последнюю) версию эмулятора.
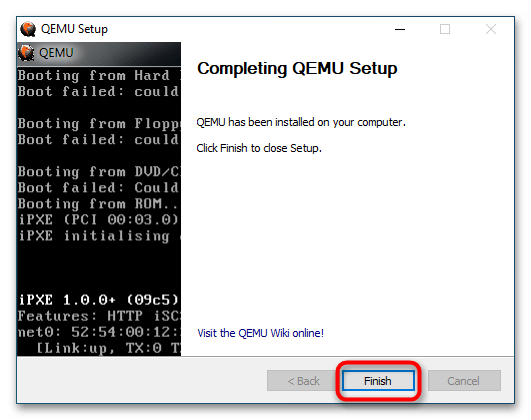
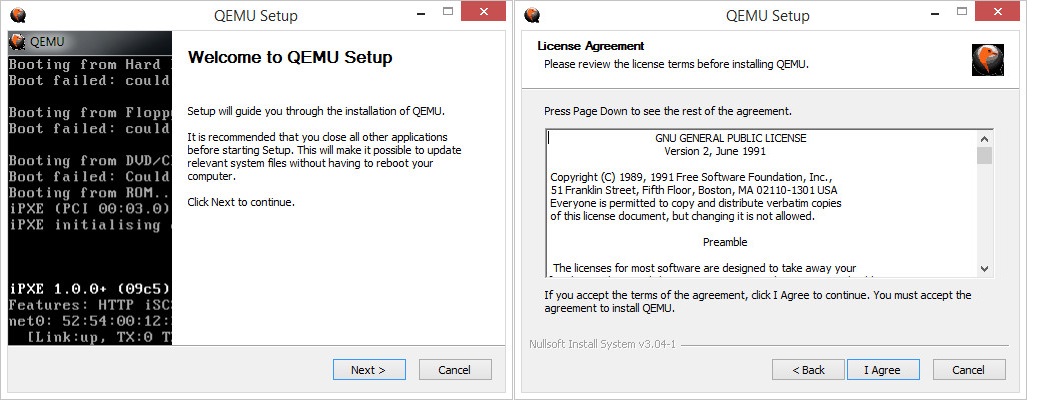
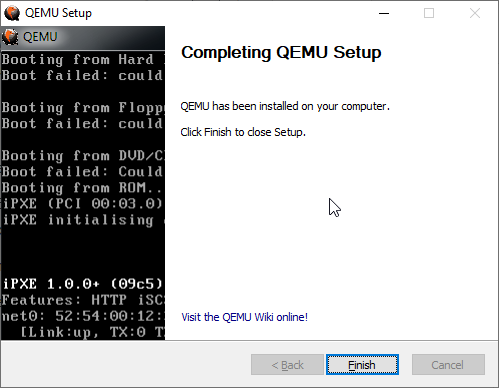
- Запустите исполняемый файл программы и проследуйте указаниям мастера-установщика. В ходе установки вам будет предложено выбрать язык (русский отсутствует), принять условия лицензии, выбрать компоненты и путь установки. Все настройки оставьте по умолчанию, по завершении процедуры инсталляции нажмите кнопку «Finish».
Команды QEMU
QEMU является консольным приложением, то есть для работы с ним вам придется использовать «Командную строку» и вводимые вручную текстовые команды. Команд и параметров много, но для начала достаточно выучить самые главные.
Основные
qemu-system-архитектура— определяет архитектуру эмулируемого устройства. Одноименные исполняемые файлы располагаются в папке установки эмулятора.qemu-img create— команда создает файл в формате IMG, являющийся виртуальным диском, на который производится установка системы. В качестве аргумента передается произвольное имя IMG-контейнера.-hdaи-hdb— параметр подключает созданный виртуальный жесткий диск, название которого передается в качестве аргумента.-m— задает объем оперативной памяти, выделяемый эмулируемому устройству.-boot— задает ресурс, с которого выполняется загрузка операционной системы. Имя ресурса должно соответствовать названию виртуального жесткого диска (без указания расширения).cdrom— эмулирует дисковод, используется для установки операционных систем и запуска LiveCD, то есть портативных ОС. В качестве аргумента передается путь к образу ISO.
Дополнительные
-usb— активирует поддержку USB.-smp— эмулирует мультипроцессорную архитектуру.-full-screen— запускает виртуальную машину в полноэкранном режиме.cpu— задает тип процессора.-k— задает раскладку клавиатуры по умолчанию.-soundhw— подключает аудиокарту.usbdevice— подключает устройства USB.
Установка операционной системы в QEMU
Предположим, вы хотите эмулировать компьютер с интеловским процессором и операционной системой Windows XP.
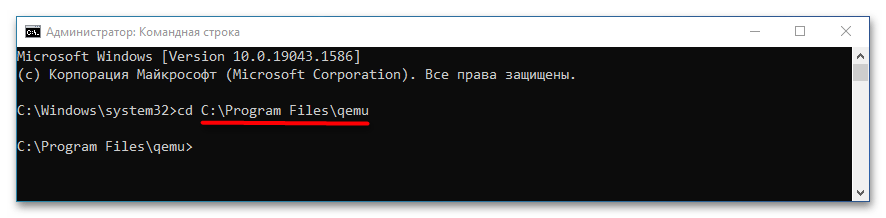
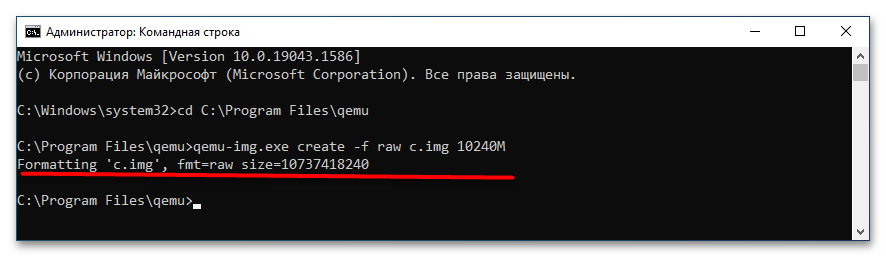
- Запустите классическую «Командную строку» и перейдите в расположение установки QEMU, для чего выполните команду
cd C:Program Filesqemu. Если эмулятор устанавливался в другую папку, после cd укажите путь к ней. - Создайте виртуальный жесткий диск, на который станет устанавливаться операционная система. Для этого выполните команду
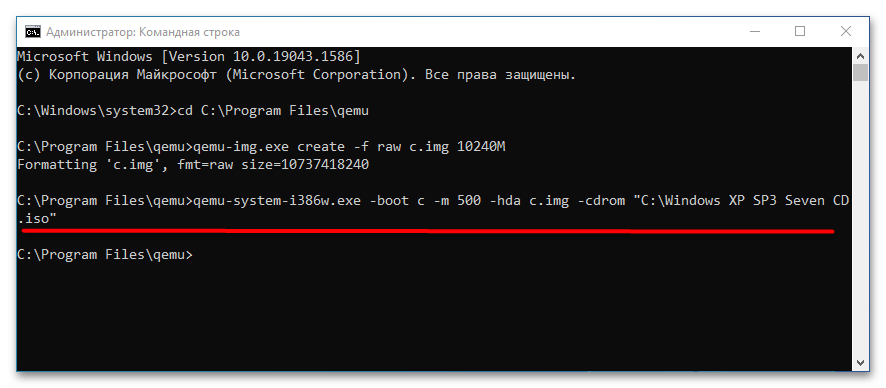
qemu-img.exe create -f raw c.img 10240M, где c.img — название виртуального диска, а 10240 — его размер в мегабайтах. Размер диска-контейнера должен соответствовать требованиям запускаемой/устанавливаемой операционной системы. - Запустите установку дистрибутива операционной системы командой
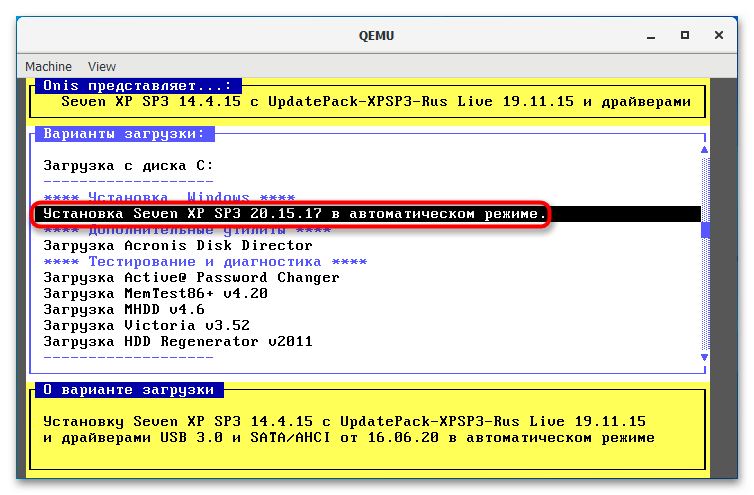
qemu-system-i386w.exe -boot c -m 512 -hda c.img -cdrom "C:Windows XP SP3 Seven CD.iso". -i386w в данном примере указывает, что виртуальная машина эмулирует архитектуру х86, -boot указывает загрузку с диска с названием «c», -m 512 выделяет виртуальной машине 512 МБ оперативной памяти, -hda c.img указывает, что система будет устанавливаться в файл-контейнер «c.img». Наконец, содержимое прямых кавычек после параметра –cdrom представляет собой путь к установочному образу. - В открывшемся окне QEMU выберите с помощью клавиш-стрелок вниз-вверх нужный пункт, в данном примере это установка операционной системы. Выполните традиционную процедуру установки системы на виртуальный жесткий диск.
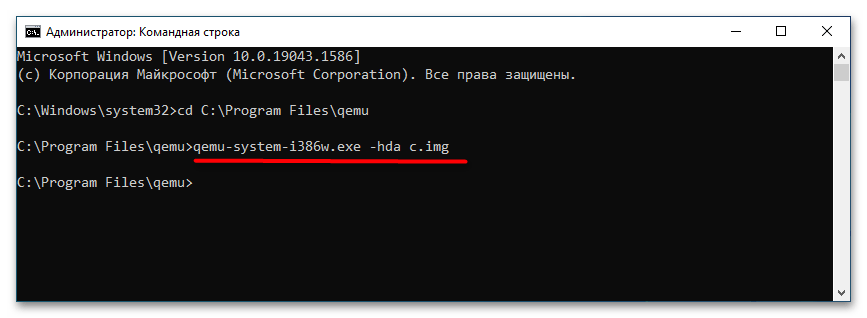
- По завершении установки системы вы сможете запускать последнюю командой
qemu-system-i386w.exe -hda c.img.
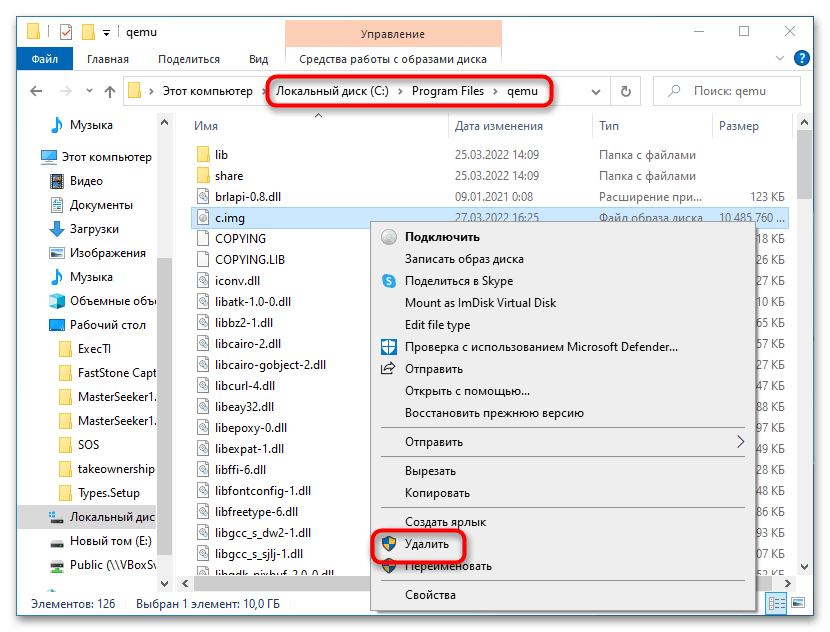
Если виртуальная система станет вам не нужна, удалите IMG-диск, на который она была установлена. По умолчанию файл диска IMG располагается в папке установки QEMU.
Запуск в QEMU образов LiveCD
Процедура запуска портативных операционных систем в QEMU намного проще, чтобы запустить в эмуляторе LiveCD, сформируйте и выполните команду следующего вида, заблаговременно перейдя в «Командной строке» в папку инсталляции эмулятора:
qemu-system-архитектура.exe -m 1024 -cdrom "путь к образу LiveCD"
Поскольку портативная ОС может загружаться в оперативную память, в предварительном создании виртуального диска нет необходимости.

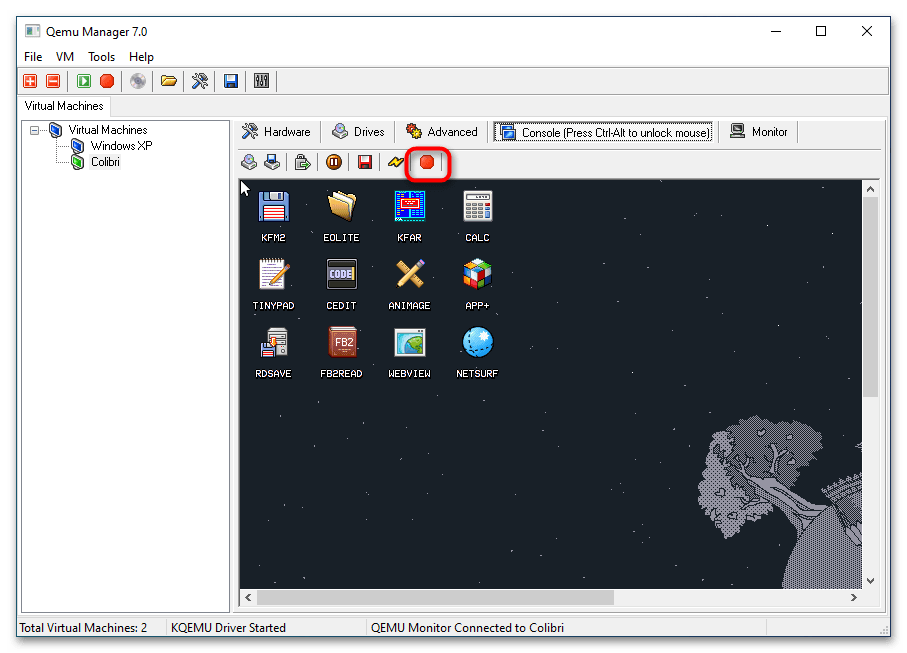
Qemu Manager
Если вы не имеете навыков работы со штатной программой «Командная строка», можете попробовать воспользоваться приложением Qemu Manager — графическую оболочкой для эмулятора Qemu. Ниже прилагается краткая инструкция по использованию приложения.
- Скачайте, установите и запустите Qemu Manager. В открывшемся окне настроек по умолчанию нажмите «Save & Finish».
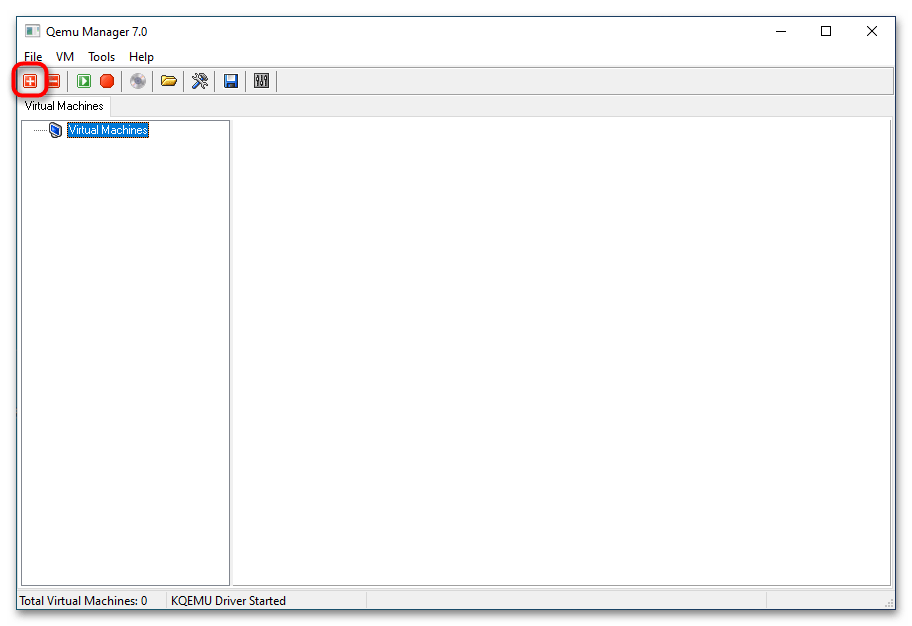
- В основном окне менеджера нажмите кнопку «+», чтобы приступить к созданию новой виртуальной машины (дальше VM).
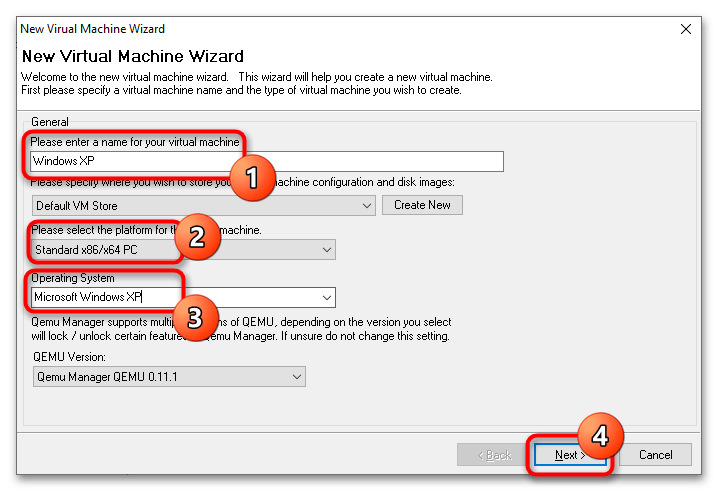
- В поле «Please enter a name for your virtual machine» введите произвольное название VM, в меню «Please select the platform for the virtual machine» укажите архитектуру VM, а из выпадающего списка «Operating System» выберите операционную систему.
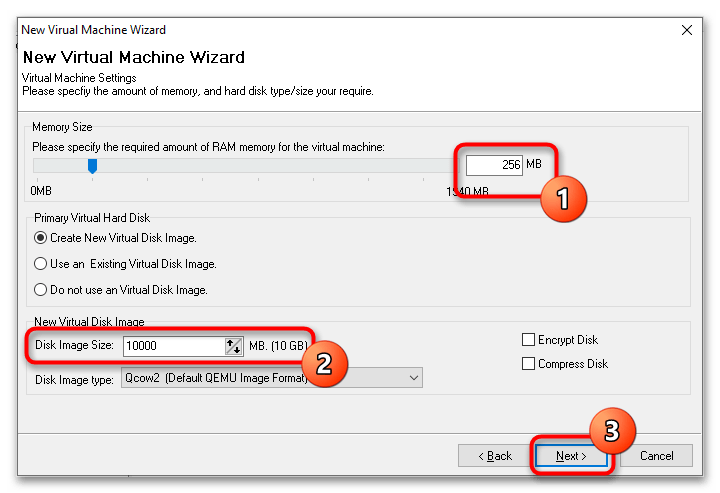
- Выделите с помощью ползунка «Memory Size» требуемый для VM объем оперативной памяти, а в меню «Disk Image Size» укажите размер виртуального диска. Если вы запускаете LiveCD, в настройках «Primary Virtual Hard Disk» следует выбрать опцию «Do not use an Virtual Disk Image».
- В следующем окне нажмите кнопку «Finish».
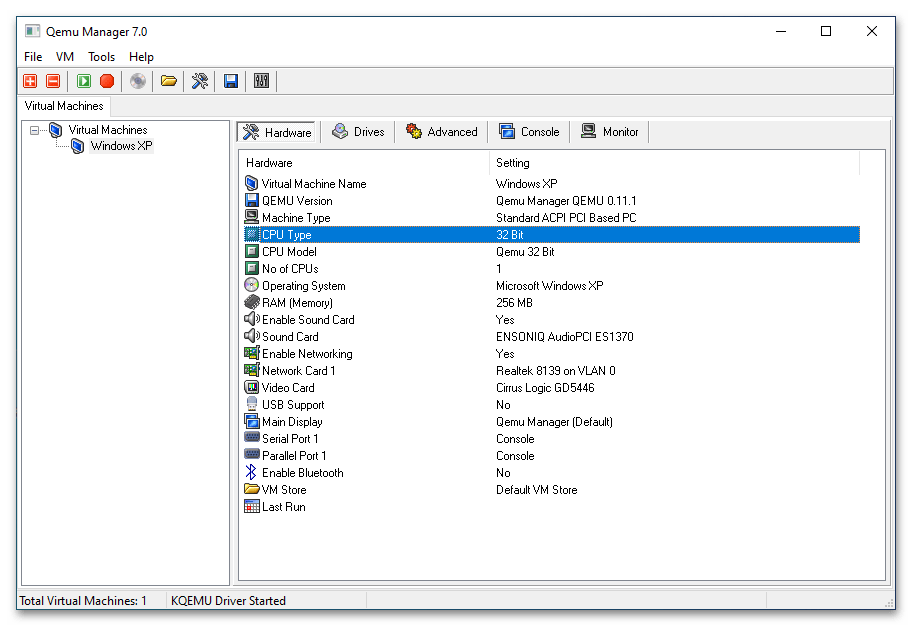
- В результате в основном окне менеджера появится новая виртуальная машина с конфигурацией по умолчанию. При желании вы можете отредактировать параметры VM: например, изменить архитектуру процессора, выделяемый объем памяти, включить поддержку USB, создать и подключить новый виртуальный жесткий диск и так далее.
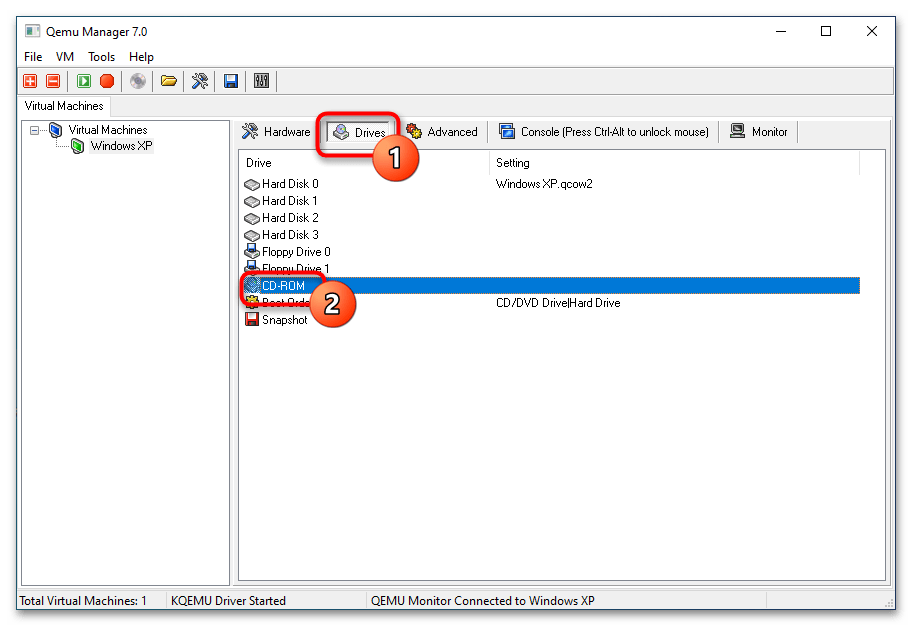
- Переключитесь на вкладку «Drives» и двойным кликом откройте настройку «CD-ROM».
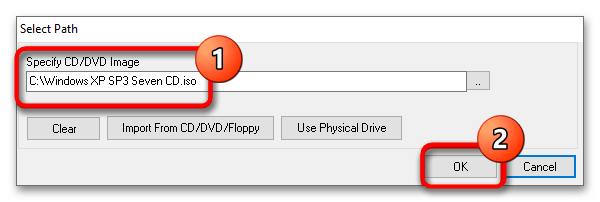
- Укажите путь к установочному образу операционной системы или дистрибутиву LiveCD и сохраните настройки.
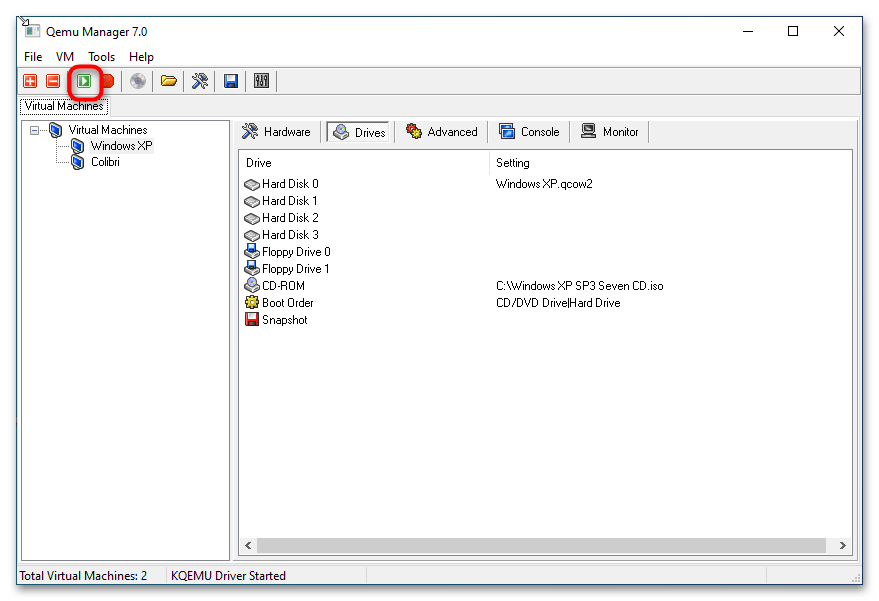
- Запустите виртуальную машину нажатием кнопки «Launch Selected VM». По умолчанию Qemu Manager захватывает мышку, так что она становится недоступной для хостовой операционной системы. Чтобы освободить курсор, нажмите комбинацию клавиш Ctrl + Alt.
- Чтобы завершить работу VM, нажмите кнопку «Quit Qemu».


Несмотря на отсутствие поддержки русского языка, Qemu Manager существенно упрощает работу с платформой Qemu. К сожалению, в настоящее время разработка данной программы прекращена, официальный сайт разработчика недоступен, но приложение по-прежнему доступно для скачивания из свободных источников.
Еще статьи по данной теме:
Помогла ли Вам статья?
Виртуализация — наиболее доступный способ запустить на одном ПК вторую операционную систему, не устанавливая ее непосредственно на жесткий диск. Вместо этого вторая ОС устанавливается на диск виртуальный, представленный специальным файлом-контейнером, созданным в гипервизоре — программе, позволяющей эмулировать работу гостевой системы в системе хостовой. Наибольшей популярностью среди домашних юзеров пользуются гипервизоры VirtualBox и VMware с мощным функционалом и наглядным GUI.
Но есть и другие, в чём-то даже более гибкие и продуктивные решения хотя и куда менее удобные в использовании. Например, QEMU — бесплатная программа с открытым исходным кодом, предназначенная для эмуляции программного обеспечения и операционных систем. Инструмент использует аппаратную виртуализацию, поддерживая два режима работы:
• Полная эмуляция — данный режим применяется для запуска операционных систем, в его рамках QEMU эмулирует физическое устройство со всеми его компонентами, встроенными и периферийными.
• Эмуляция пользовательского режима — дает возможность запускать программы, созданные для конкретной архитектуры на другой архитектуре, например, приложения ARM в x86. Режим доступен только в хостовой системе Linux.
QEMU поддерживается эмуляция архитектуры x86, ARM, MIPS, PowerPC, m68k, Alpha, SPARC, SH-4, CRISv2, MicroBlaze и это более солидный список, чем у того же Виртуалбокс.
Как установить QEMU в Windows
Скачать установочный файл эмулятора можно с официального сайта www.qemu.org/download/#windows,
есть редакции 32-битные и 64-битные, версию выбираем последнюю.

Устанавливается QEMU как обычная программа в папку Program Filesqemu, но можно выбрать и другое расположение.
Установку выполняем с параметрами по умолчанию, ничего менять не нужно, просто жмем в окне мастера «Next».
Виртуализация операционных систем в QEMU
В отличие от VirtualBox и подобных гипервизоров, QEMU не имеет графического интерфейса, работа с ней ведется через командную строку. Команд и параметров для создания и управления виртуальными машинами много, но для начала вам нужно знать хотя бы эти шесть.
• qemu-system — задает архитектуру виртуальной машины.
• qemu-img create — создает файл виртуального IMG-диска, на который будет устанавливаться операционная система.
• -m — выделяет виртуальной ОС указанный объем оперативной памяти.
• -hda — подключает созданный виртуальный диск.
• -boot IMG — указывает, что загрузка должна производиться с виртуального диска, вместо IMG следует указать имя IMG-файла.
• cdrom — содержит путь к установочному образу ISO, эмулирует дисковод.
Примечание: для запуска операционных систем, работающих в режиме LiveCD достаточно будет трех команд/параметров — первой, третьей и шестой.
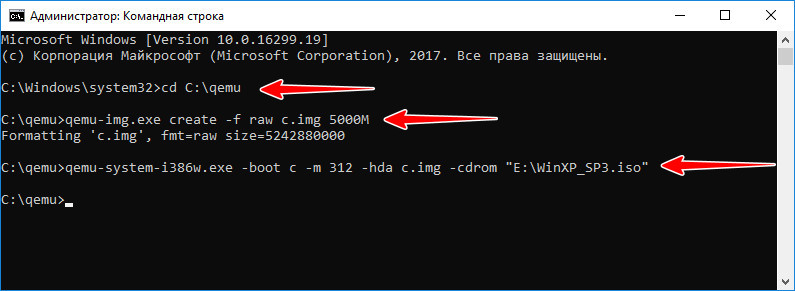
Чтобы вам стало всё немного понятнее, установим и запустим с помощью QEMU какую-нибудь операционную систему. Для примера мы выбрали Windows XP, так как она легкая и занимает на диске мало места. QEMU у нас уже установлен, открываем командную строку, переходим в каталог установки и создаем виртуальный жесткий диск следующей командой:
qemu-img.exe create -f raw c.img 5000M
Файл qemu-img.exe в эмуляторе отвечает за создание IMG-образов, с — это название образа, 5000 — размер виртуального диска в мегабайтах. По умолчанию образ будет создан в папке QEMU.
Теперь сформируем следующую команду:
qemu-system-i386w.exe -boot c -m 350 -hda c.img -cdrom «E:WinXP_SP3.iso»
Исполняемый файл в начале команды отвечает за создание виртуальной машины с архитектурой х86, -boot с ключом -с сообщает, что грузиться она будет с диска, в значение параметра -hda подставляем созданный образ, а в качестве значения параметра –cdrom указываем путь к дистрибутиву Windows.
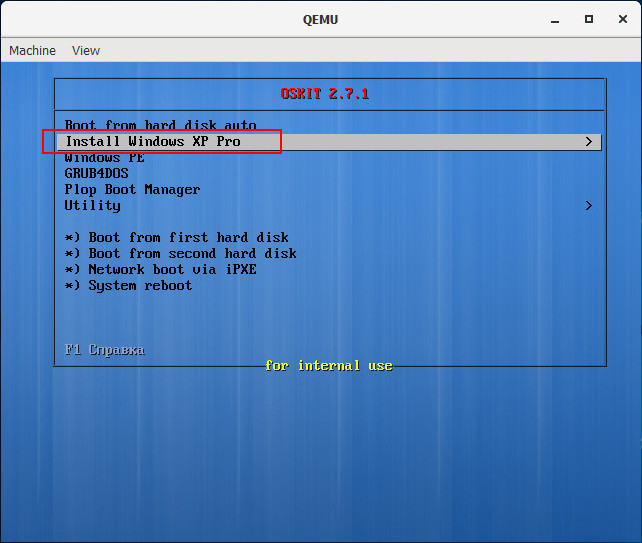
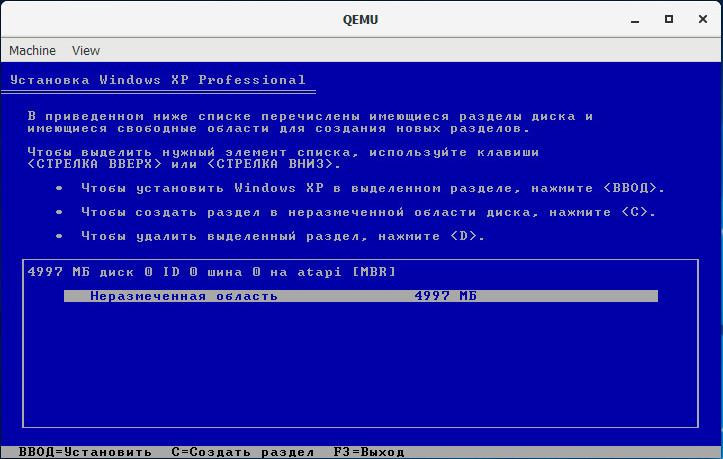
После выполнения команды появляется окошко QEMU с загрузочным меню, в котором мы выбираем установку на диск.
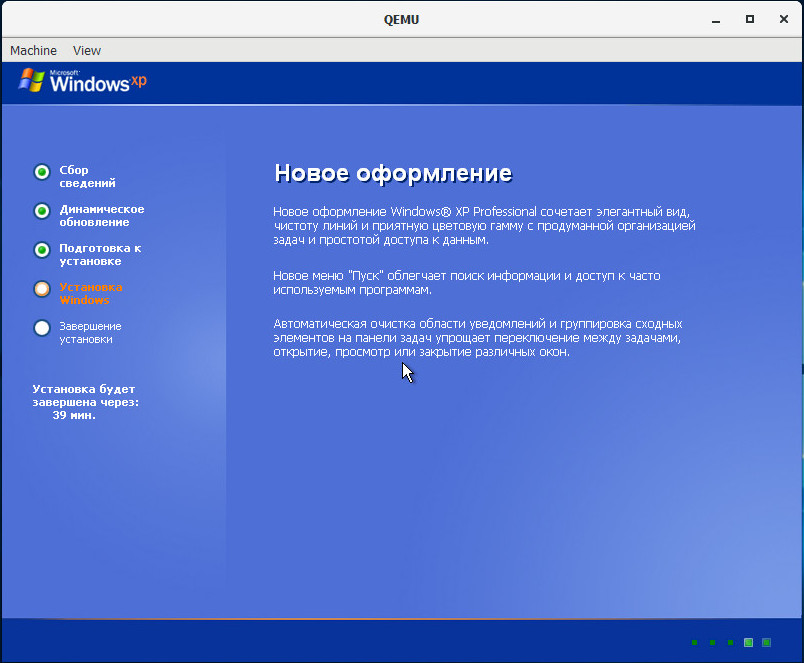
Далее проходим все этапы установки операционной системы вплоть до локальных настроек и загрузки рабочего стола.

Чтобы запустить закрытую виртуальную машину, выполните команду qemu-system-i386w.exe -hda name.img, где name — название вашего виртуального диска, чтобы удалить ставшую ненужной VM, просто удалите из каталога установки QEMU созданный IMG-образ.
Управлять QEMU можно с помощью клавиатуры и мыши, для переключения между эмулятором и хостовой машиной используйте комбинацию Ctrl+Alt+G. Запущенная с минимальными настройками ОС не будет иметь доступа к аудио- и сетевой карте, не будет также возможности обмена файлами между виртуальной и хостовой системами.
Нельзя сказать, что QEMU лучше или хуже VirtualBox либо VMware, это альтернативное средство виртуализации, имеющие как свои плюсы, так и минусы. QEMU менее удобен, требует знания документации и демонстрирует весьма небольшую производительность. Для ускорения работы в Windows требуется установка и настройка Диспетчера аппаратного ускорения HAXM, в Linux – подключение загружаемого модуля ядра KVM. С другой стороны, инструмент позволяет эмулировать работу устройств на базе разных архитектур, не поддерживаемые популярными гипервизорами.
![]() Загрузка…
Загрузка…
![]()
Recently I had an assignment that asked us to use Qemu. It took me some trouble to get it running on Windows so I thought I could document it here in case I need it in the future. It would be nice if this helps someone, too!
- Download Qemu and .iso
- Add Qemu path to environment variables settings
- Create an image
- Starting the VM
- Some problems you might encounter
1. Download Qemu and .iso
Click here to download Qemu and download your desired .iso file. After installing Qemu, open Windows Powershell and type qemu-img. Now you might see that it does not recognize the command. This takes us to number 2.
2. Add Qemu path to environment variables settings
Copy the Qemu path (should be C:Program Filesqemu if you didn’t change anything) and open environment variables settings by Right click on "This PC" -> Properties -> Advanced system settings -> Environment Variables.
Click on path once and click «Edit…». Click «New» and paste the Qemu path.
Here’s the youtube video that taught me how to do this. Otherwise, I’d stuck here forever :P.
3. Create an image
Now you can create an image by typing qemu-img create -f qcow2 [name].qcow2 30G.

4. Starting the VM
When starting the VM, you would want to use an accelerator, or else it is going to take a lot of time installing the OS. It took me more than an hour to install Ubuntu 16.04 without the accelerator.
For Windows, there are two options: HAXM and whpx. Note that HAXM can only be used on Windows Enterprise/Pro/Education so I’m not going to introduce it here. Although I did get it working for whatever reason and after a Windows update, it just stopped working.🤔
Go to Windows Features and tick Windows Hypervisor Platform. After that, restart the computer and type this command in the powershell (in the directory where the image and .iso resides): qemu-system-x86_64 -accel whpx -hda .[name].qcow2 -m 512 -net nic,model=virtio -net user -cdrom .[name].iso -vga std -boot strict=on. It should start up and you can proceed to install the OS.
The second time you start up the machine you don’t need to type -cdrom anymore. Just qemu-system-x86_64 -accel whpx -hda .[name].qcow2 -m 512 -net nic,model=virtio -net user -vga std -boot strict=on should do it.

5. Some problems you might encounter
-
You might get stuck when rebooting after installing the OS
My friend and I both encountered the problem and we both used Ubuntu 16.04 for the VM. Just close the window and restart it and it should work fine. Pretty sure this is not best practice, though. -
You can’t seem to do migration using whpx
I got this error when trying to do migration. I found this Github code and I think it has something to do with whpx. I’m not sure how to resolve this. My TA simply allowed me to do migration on the server.

-
Untick
Windows Hypervisor Platformwhen using VirtualBox
You might get an error from VirtualBox when starting the machine if you keep it ticked. Remember to untick it.
All DEV content is created by the community!
Hey, if you’re landing here for the first time, you should know that this website is a global community of folks who blog about their experiences to help folks like you out.
Sign up now if you’re curious. It’s free!
Do you want to use QEMU for Windows? This post from MiniTool shows you how to download and install the QEMU software on Windows. It also shows you how to use QEMU on Windows to create an Ubuntu VM.
What Is QEMU
QEMU, short for Quick Emulator, is a free open-source hosted virtual machine manager that can execute hardware virtualization. With the help of KVM (Kernel-based Virtual Machine), QEMU can offer fast running speed. Therefore, it develops fast and is going to replace VirtualBox and VMware on Linux.
Tip: On Linux, with the help of quickgui, QEMU can create some macOS, Windows, and Linux virtual machines without downloading the ISO files manually. Please refer to this post: How to Install macOS and Windows 11 Virtual Machines on Ubuntu.
However, on Windows, the advantages of QEMU are not significant, because the KVM technology is not applicable on the Windows host machine. In addition, the quickgui is also not available to Windows. But QEMU develops fast and many people still want to use this VM software on Windows.
QEMU for Windows Download and Install
1. Download QEMU for Windows
To use QEMU for Windows, you should download and install it first. Please refer to the following QEMU download guide:
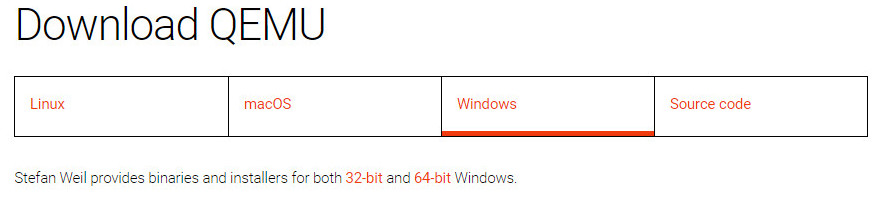
Step 1: Go to the official QEMU website (https://www.qemu.org). Click the Download button at the top section. You will go to the QEMU download page.
Step 2: Click the Windows tab to get the QEMU Windows version. Click 32-bit or 64-bit according to what OS you are running (for me, I click the 64-bit because my OS is 64-bit).
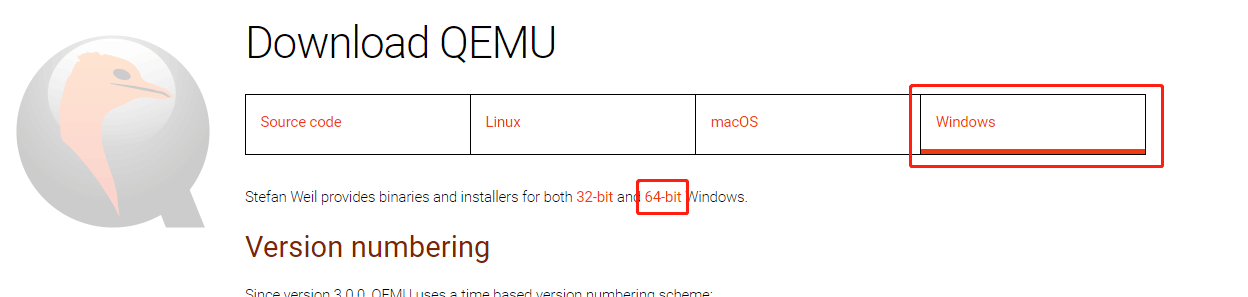
Step 3: On the new page, click the .exe file to download it. This file is the installer file.

2. Install QEMU for Windows
After the installer file is downloaded, you can double-click it to run directly. Before doing that, I recommend you to create a partition separately for it. For any virtual machine software, I will recommend you create a separate partition to store the software and the VM files so that you can manage them better.
To create a separate partition, you can use the shrink feature in the Windows Disk Management tool. But this tool can’t help you move the location of partitions, so I recommend you to use MiniTool Partition Wizard.
If the free space of one partition is not enough, you can move/resize another partition to get more unallocated space and then gather the unallocated space together to create one partition. Here is the guide:
Free Download
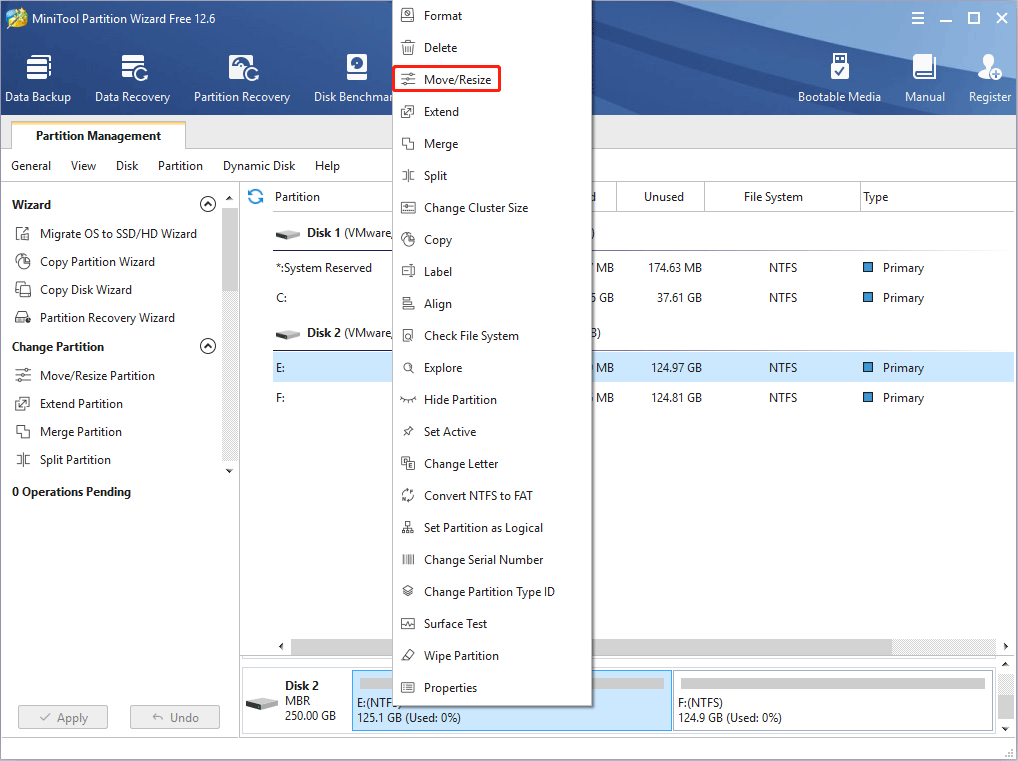
Step 1: Launch MiniTool Partition Wizard and go to its main interface. Right-click a partition and choose Move/Resize.
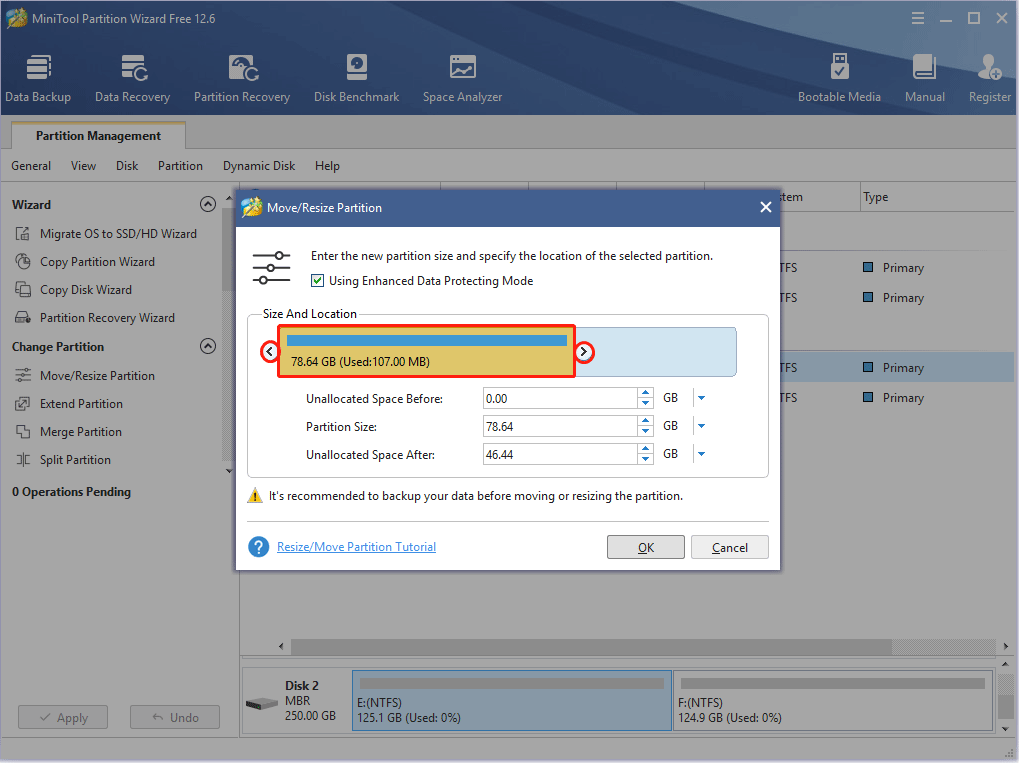
Step 2: Drag the two arrows on the two sides of the partition to shrink the partition, and then drag the block to move the location of the partition. Then, click the OK button. In this way, you can get unallocated space.
Step 3: Right-click the unallocated space and choose the Create button.

Step 4: Set parameters for the new partition. You can keep all of them to the default value if you don’t have specific demands. Then, click the OK button.

Step 5: Click the Apply button to execute pending operations.

How to Merge Unallocated Space in Windows 10 for a Large Drive
After the new partition is created, you can then double-click the QEMU installer file to install this VM software. You just need to follow the on-screen instructions to complete the installation.
Tip: When you are asked to choose the install location, please choose the newly-created partition (taking E drive as an example).

How to Use QEMU on Windows
After installing the QEMU Windows version, you may want to know how to use QEMU to create a virtual machine. Here are 2 ways and the 2nd way is better.
Way 1. Create a Virtual Machine Using Commands
QEMU doesn’t come with a GUI. If you don’t install a GUI manually, you need to use commands to run QEMU. Here is the guide on how to use QEMU on Windows to create a VM via commands (taking Ubuntu as an example).
Step 1: Download the Ubuntu ISO file from the official website.
Step 2: Add QEMU path into Environment Variables.
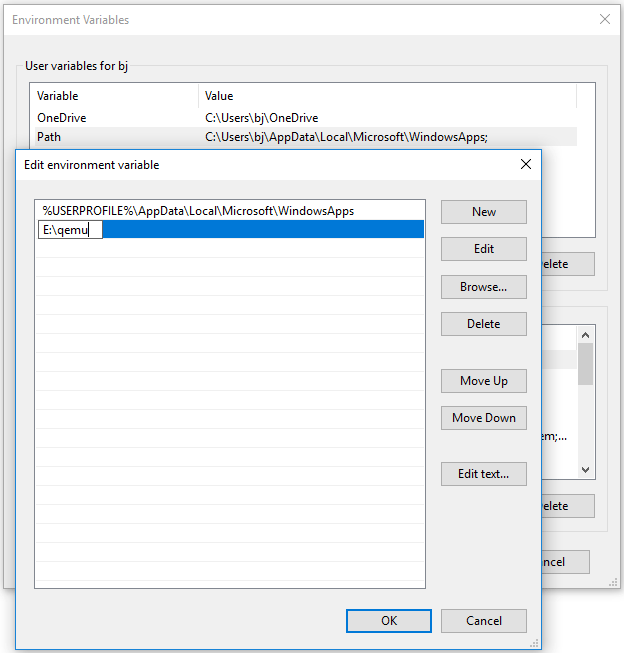
- Open File Explorer, go to the QEMU installation location, and then copy the path (E:qemu).
- Right-click This PC / Computer, choose Properties, and then click Advanced system settings.
- Under the Advanced tab, click Environment Variables.
- In the User variables box, double-click the Path variable, click New, and then paste the QEMU path.
- Click the OK button to save changes, and then click the OK button again to save and exit the Environment Variables
Tip:
1. If you use Windows 7, the adding process may be a little different.
2. If there is no Path variable under the User box, you can create one, or you can add the QEMU path into the System variables.
Step 3: Run Command Prompt as administrator and then execute the following commands.
- E: (this will open the e drive where QEMU is installed).
- cd qemu (this will open the qemu folder).
- qemu-img create -f qcow2 ubuntu20.img 30G (this will create a virtual hard drive of 30GB).
- qemu-system-x86_64.exe -m 1G -smp 2 -boot order=dc -hda ubuntu20.img -cdrom “e:ubuntu-20.04.3-desktop-amd64.iso” (this will run Ubuntu using CD/ROM).
Tip:
1. If you want to install other VMs (macOS, ARMs, etc.), the qemu-system may vary greatly.
2. The above commands are not perfect. If you have better commands, you can run them.
3. The QEMU installation path and the location of the Ubuntu ISO file in the above commands should be changed accordingly.
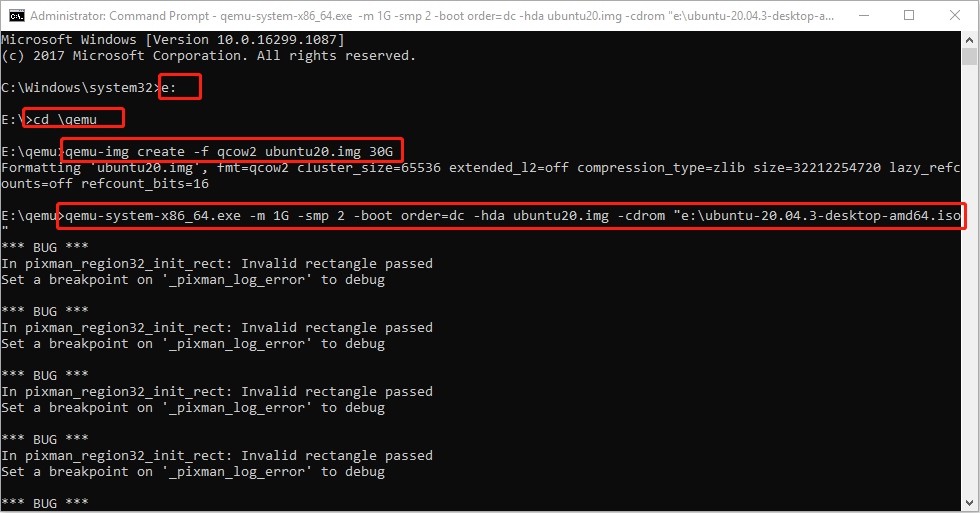
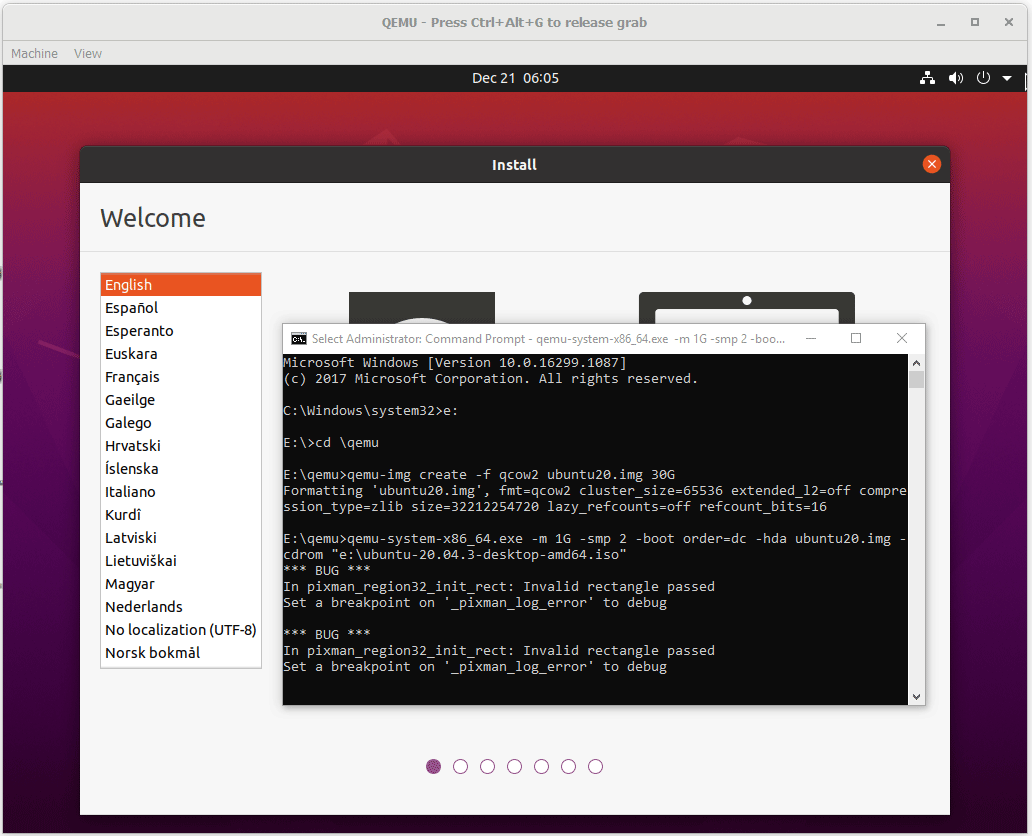
Step 4: Go through the Ubuntu installation process. Although there may be many bugs, I launch Ubuntu 20 successfully and then just need to complete the installation process.
How to Install Linux (Ubuntu) on Windows 10 [Ultimate Guide 2022]
Way 2. Create a Virtual Machine Using QtEmu
As you can see, creating a VM using QEMU via commands is a tough job. You need to search for various tutorials online. In addition, once errors occur, you may have no idea how to solve them. Therefore, I recommend you to use QtEmu, an open-source GUI for QEMU Windows.
How to use QEMU on Windows via QtEmu? Here is the guide:
Step 1: Download the Ubuntu ISO file and QtEmu. The QtEmu official website is https://qtemu.org and the QtEmu source is placed on https://gitlab.com/qtemu/gui. Go to the GitLab source page, scroll down to find the Downloads section, and click the first link to download the QtEmu installer.

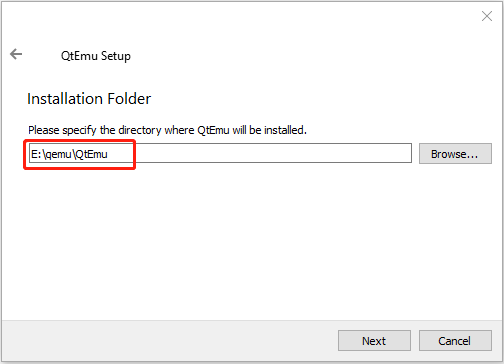
Step 2: Double-click the QtEmu installer file and go through the installation process. When you are asked to specify the installation location (where to create the QtEmu folder), please install the QtEmu under the QEMU folder. For me, I type: E:qemuQtEmu.
Step 3: After QtEmu is installed, go to E:qemuQtEmu. Right-click the qtemu.exe file and choose Send to > Desktop (create shortcut). Then, create a folder named VMs under the E drive to store all VM files to be created.
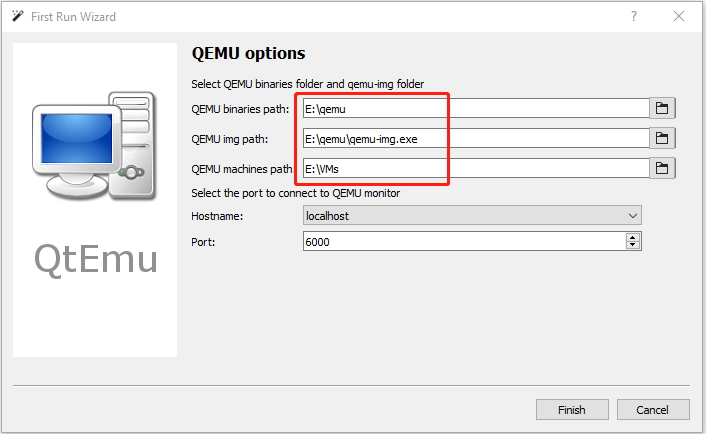
Step 4: Double-click the QtEmu shortcut to launch this software. In the QEMU options window, please set QEMU binaries path to E:qemu, set QEMU img path to E:qemu, and set QEMU machines path to E:VMs. Then, click the Finish button.
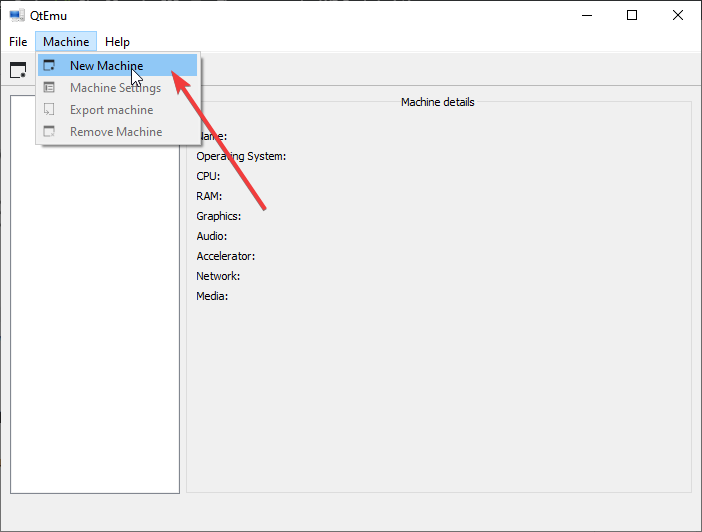
Step 5: Click Machine > New Machine. Then, give a name to the new machine (Ubuntu20), choose OS type (GNU/Linux), choose OS version (Ubuntu), and then click Next.
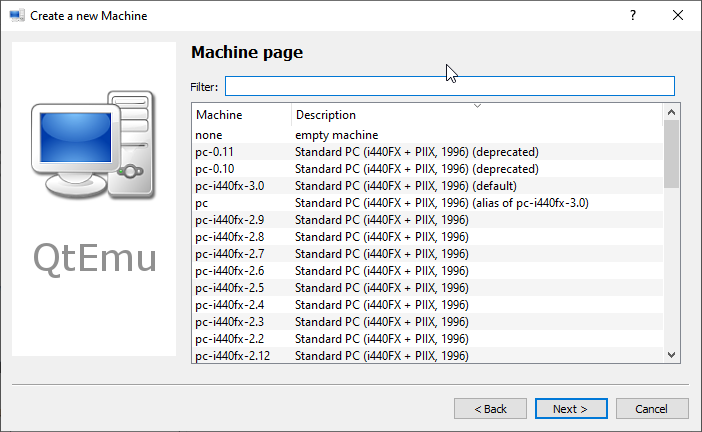
Step 6: On the Filter page, if you don’t need to specify certain motherboard chipsets, you can click the Next button directly to skip this step.
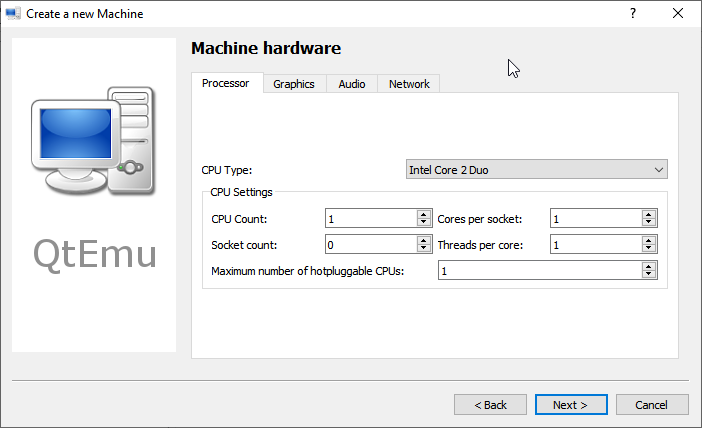
Step 7: Select a correct CPU Type, and set CPU, Graphics, Audio, and Network parameters. If all is OK, click the Next button.
Tip: The Ubuntu 20 version requires a 64-bit CPU. If you choose a 32-bit CPU, the VM may not boot.
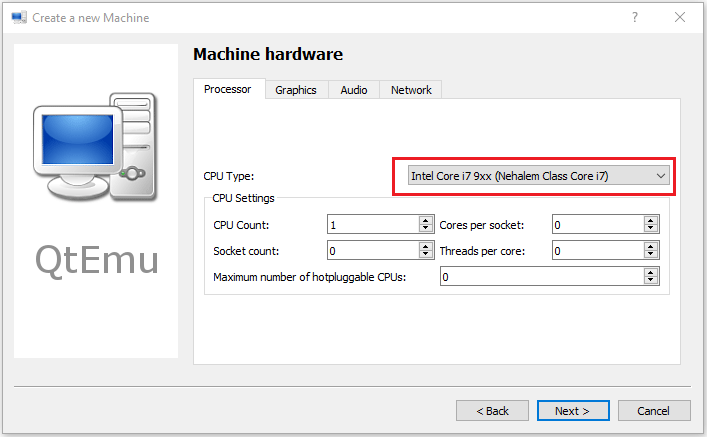
What Is the Difference Between 32 Bit and 64 Bit (x86 vs x64)
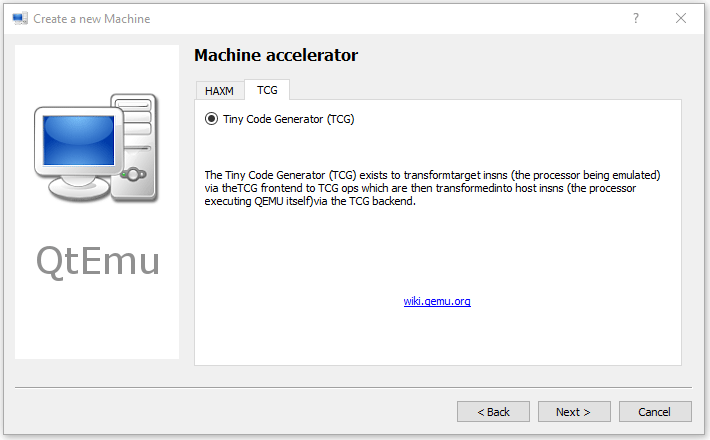
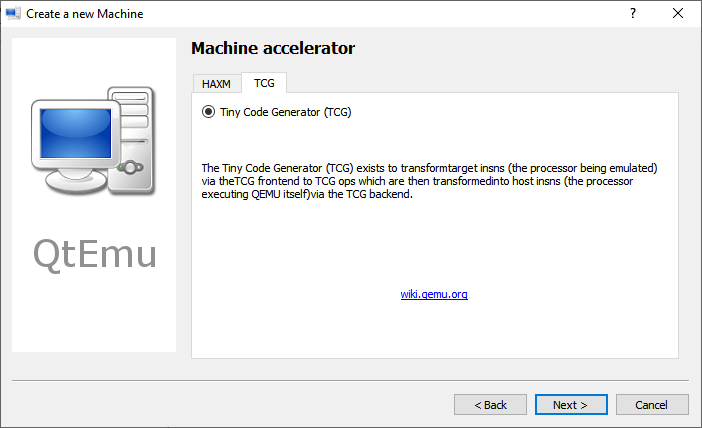
Step 8: Select the machine accelerator. HAXM is chosen by default. However, some computers may not support this technology. Therefore, I recommend you uncheck HAXM and then choose TCG instead. Then, click Next.
Tip: Some people report that nothing happens when they play the VM. The culprit is likely to be the HAXM. To ensure the VM can work on most PCs, TCG is recommended.
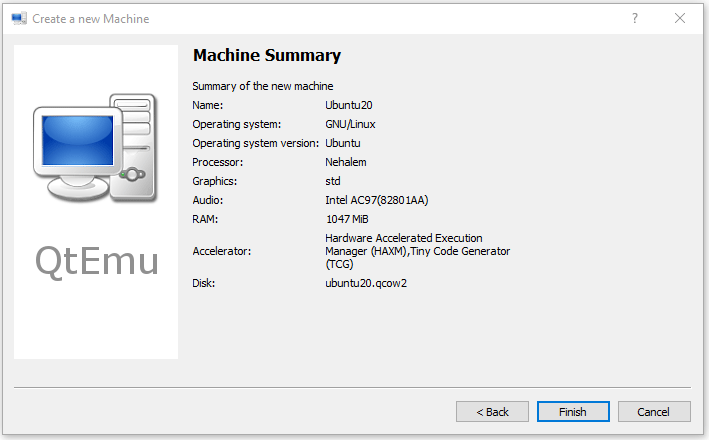
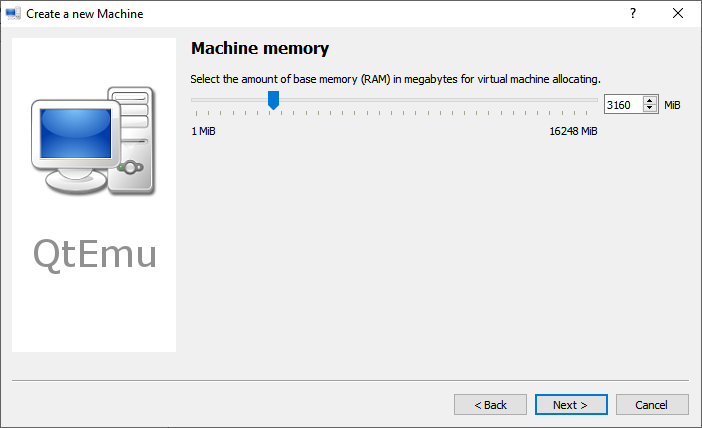
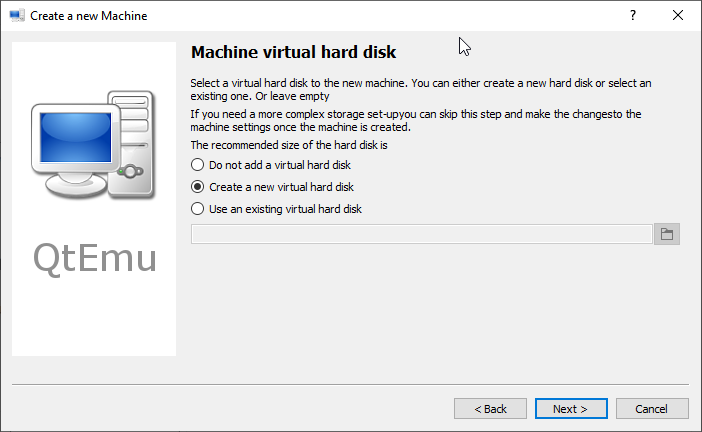
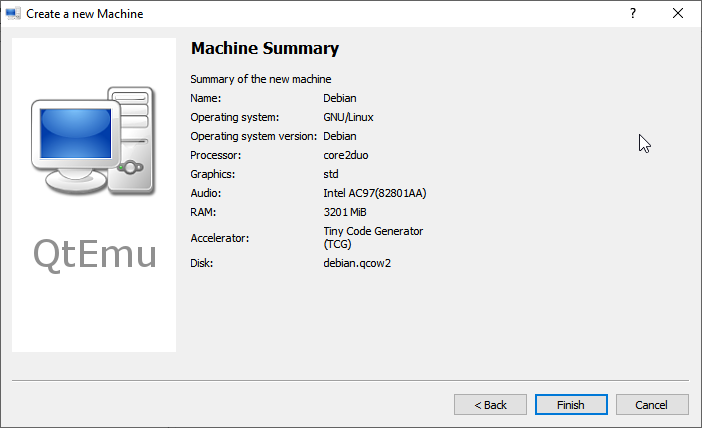
Step 9: Follow the on-screen wizard to set memory size, create a new virtual hard disk, set disk size and type, and then check the VM summary.
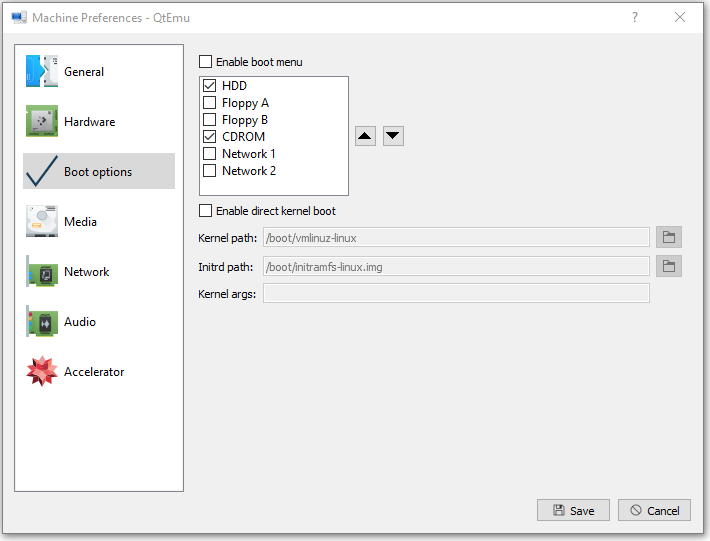
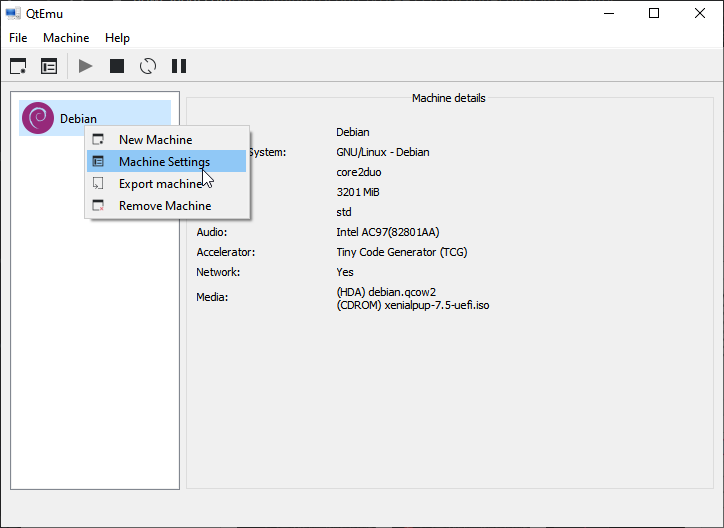
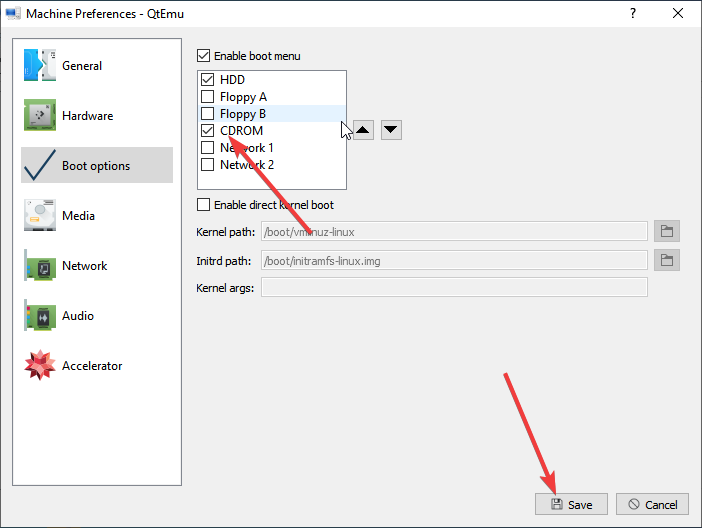
Step 10: Right-click on the newly-created VM and choose Machine Settings. Go to the Boot options tab, and tick CDROM.
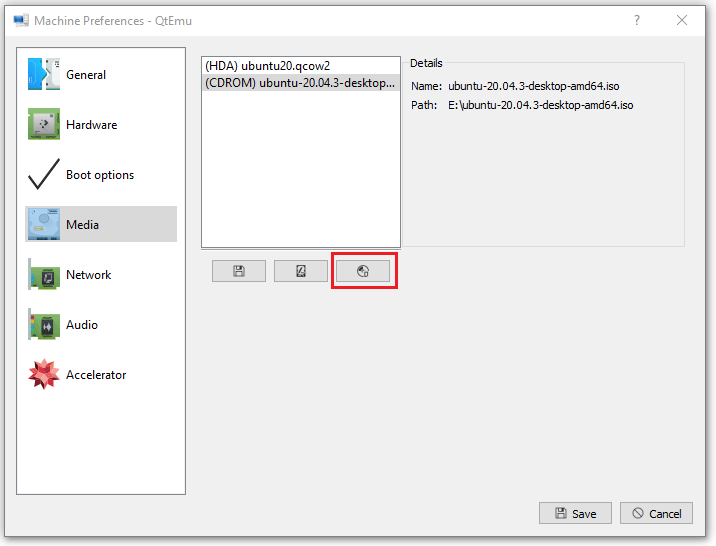
Step 11: Go to the Media tab, click the disc icon, and select the Ubuntu ISO file. Then, click Save.
Step 12: Select the VM and then click the Play icon. Then, you may need to go through the Ubuntu installation process. After the installation process is completed, you can enjoy the VM.
Best Virtual Machine for Windows, Linux, and Mac Systems
Here is a post talking about how to download, install, and use QEMU on Windows. If you are interested in this software, this post may help you.Click to Tweet
Bottom Line
Is this post helpful to you? Do you have other ideas about how to run QEMU on Windows? Please leave a comment in the following zone for sharing. In addition, if you have difficulty in moving or resizing partitions, please feel free to contact us via [email protected]. We will get back to you as soon as possible.
Qemu is open-source software for virtualization on Windows 10/8/7, Linux, and macOS but with a command-line interface, lightweight, and low hardware requirements.
QEMU stands for “Quick Emulator” and is the standard tool for virtualization and CPU emulation under Linux, Windows, and macOS. On Linux systems, QEMU uses the functions of the Linux kernel for virtualization (KVM- Kernel Virtual Machine), which are not available under Windows.
Thus, the binaries of Qemu’s ported version for Windows by Stefan Weil couldn’t provide the performance as it gives on Linux OS with KVM. Thus VirtualBox or Vmware player will be the best alternative options; still, if you want to try then here in this Qemu tutorial, we will let know the way to download, install and use Qemu on Windows 10 or 7 using its GUI VM manager Qtemu, an open-source software.
Qemu installation on Windows 10 with Qtemu GUI
Step 1: Download Qemu for Windows
From the official website of the Qemu, we can download it easily even the source code. Visit it and click on the Windows tab, it will take you to another page https://qemu.weilnetz.de to download 32 bit or 64 bit of this virtualization platform. Here we are getting the 64 bit.
Step 2: Install Qemu
Now, like any other Windows 10/7 software, just double click on the downloaded setup of Qemu and follow the installation wizard.
- Accept the suggested language setting, by default it will be English. Select the “OK” button.
- Press the NEXT button.
- Confirm the usual license terms (GNU General Public License) with “Accept“.
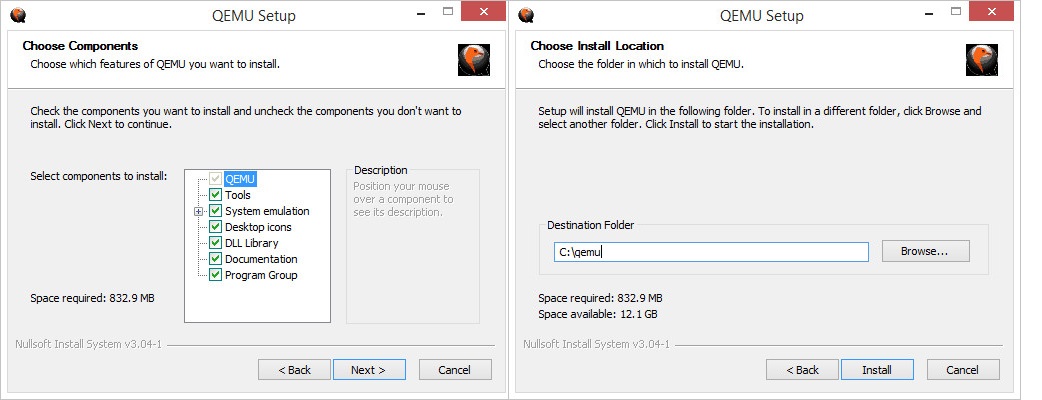
- All modules required for QEMU have already been selected in the “Select components” dialogue. Confirm with “Next”.
- Check the suggested destination folder and go to “Install“.
- Click on “Finish” to complete the setup of QEMU.
Step 3: Install GUI for QEMU on Windows 10
As we know the QEMU uses the command line to create virtual machines by default. But it would be not feasible for standard computer users using CLI to manage virtual machines, thus we install another open-source application to provide a Graphical user interface (GUI) to QEMU. This program is known as Qtemu which is a fork of a dead project available at https://qtemu.org.
Here are the links to download an active Qtemu project for Windows 10/8/7 available on Gitlab.
Windows x86_64 installer
If you don’t want to install it, go for the portable version.
Windows x86_64 portable
Gitlab Page Link of the project.
Step 4: Setup QEMU manager Qtemu GUI
After the installation of Qtemu run it from the Windows Start menu.
- In the first column “QEMU binaries path” copy-paste this: C:Program Filesqemu Or enter the path where you have installed the QEMU.
- For the second column enter the path of the Qemu-img file that is: C:Program Filesqemuqemu-img.exe
- Now create a folder anywhere on your computer where you want to save the virtual machines created by QEMU. And click on the folder icon given in the front of the third column to select that particular folder.
Note: You can change this configuration any time from the Qtemu Settings.

After that click on the Finish button.
Step 5: Create a Virtual machine
Now, from Qemu GUI manager Qtemu, simply click on Machine and select New Machine.
Leave the Machine which is meant to select some particular motherboard chipset.
Configure the Virtual Machine hardware, select the CPU type such as Core 2 Duo, Base, or any CPU that Qemu would be able to emulate on your system whereas setting the CPU count, cores, Thread as shown below screenshot.
By Default, the HAXM- Hardware Accelerated Execution will be selected in the Qtemu but in case the HAXM is not supported by your system or not available, thus uncheck it and check TCG- Tiny Code Generator.
Set the amount of RAM you want to assign to your VM.

Step 6: Set bootable medium CD/DVD
Now, everything is ready, we have created a Virtual machine, its time to set a bootable medium to CD; so that our ISO file could be used while booting the QEMU VM.
For that right-click on the created VM on the QTEMU interface and select Machine Settings.
There select the Boot options from the right-side panel and after that check the “Enable boot menu” and then the CD ROM option following the Save button.
Step 7: Insert ISO file in QEMU via Qtemu GUI
Under the Machine settings, go to the Media menu and click on the CD icon. This will open the Windows file explorer, navigate to the ISO file of the OS with which you want to boot in QEMU, and click on the Save button.

Step 8: Boot Qemu Virtual Machine via GUI
Now, on the main interface of the Qtemu GUI, select the created VM and click on the start button. This will open the boot screen.
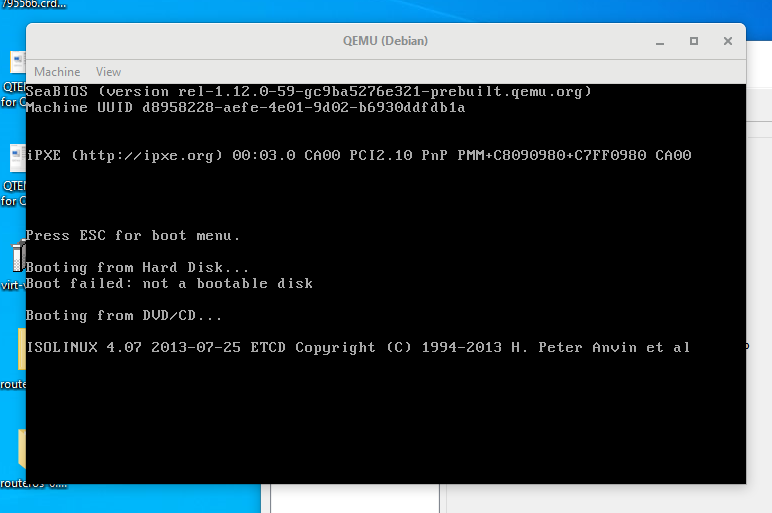
Wait for a few minutes depending upon the OS distribution you are using, it will show the LIVE screen of the same. However, I tried to boot and install Windows 10 on Qemu using the GUI but it was quite sluggish and slow.
Verdict:
Although the CLI can be used to create and manage a Virtual machine on Windows 10 using the QEMU, with the Qtemu GUI tool it becomes quite easy, however, in my case it worked well with Lightweight Linux Distros but for Windows guest VMs quite slow and low performance. I recommend using VirtualBox instead. Yet, if someone wants to experience Qemu on Windows 10 this is the easiest possible way. Still, be cautious with Qtemu hardware configuration because slight here and there will not let you boot the VM.
 Виртуальная машина (далее ВМ) QEMU для Windows XP, Vista, 7, 8, 8.1, 10 (32-бит и 64-бит) — бесплатная программа эмуляции вычислительной системы в составе программно-аппаратного комплекса для симуляции в среде настольного ПК или удаленного сервера. Результатом работы КУЭМЬЮ является виртуальный компьютер с одним или несколькими процессорами (SMP), чипсетом, памятью, жесткими дисками, прочим периферийным компьютерным оборудованием, например, таким как видео, аудио, сетевые и другие адаптеры, поддерживающий различные архитектуры, операционные системы, сервисное и прикладное программное обеспечение. Поддерживаются компьютерные интерфейсы PCI, VGA, IDE, CD-ROM, PS/2, PCI UHCI, USB и другие.
Из возможных альтернатив, например, таких как Oracle VM VirtualBox, Virtual PC, Bochs, Wine, VMware Workstation и пр., рекомендуем бесплатно скачать QEMU для Windows 10, 8.1, 8, 7, Vista, XP (32-bit и 64-bit) по прямым ссылкам с сайта https://programswindows.ru для создания ВМ методом эмуляции. На официальном сайте программы найдутся исходные тексты, бинарные сборки, готовые образы систем и множество другой полезной информации.
ВМ как основа
Виртуализация — это предоставление некоторых вычислительных ресурсов с целью обеспечения определенных логически изолированных процессов, которые выполняются на конкретном физическом ресурсе. Под данным термином обычно понимается виртуализация программно-аппаратной платформы. Для конкретного оборудования виртуализирующая программа является гипервизором. Гостевые системы разворачиваются на базе гипервизора и могут ориентироваться на ту же архитектуру центрального процессора, или могут быть различными (например, гостевая система PowerPC работает на x86 платформе). Ячейкой вычислительных ресурсов, используемых для протекания определенных процессов, является так или иначе сконфигурированная ВМ (виртуальная машина с установленным и настроенным под определенные задачи программным обеспечением).
Сегодня в основном используются три метода. В случае полной виртуализации гипервизор отделяет физическое оборудование от гостевой системы. При паравиртуализации реализуется API прикладных программ гипервизора, используемый гостевой OS. Такой софт использует метод эмуляции, когда гостевая система симулируется посредством точной имитации аппаратной среды. Рекомендуем скачать бесплатно QEMU для Windows, Android, Mac OS X, Linux (Debian и Ubuntu), FreeBSD и использовать наиболее практичный из способов применения ВМ. Эта технология стала популярной не только среди профессионалов-системщиков, но и в среде продвинутых домашних пользователей. Данная страница сайта https://programswindows.ru будет полезна всем, кого интересует информация: как создать ВМ на своем компьютере, как эмулировать гостевую операционную систему на машине-хосте, как установить виртуальную машину на сервер, как правильно произвести запуск виртуальной машины, а также тем, кого интересуют облачное хранение данных и облачные вычисления. Здесь можно последнюю версию QEMU скачать бесплатно для Виндовс, не покидая сайт https://programswindows.ru без регистрации и СМС.
Виртуализация методом эмуляции
Чтобы обеспечить режим эмуляции, динамический транслятор QEMU, исполняя, позволяет переводить инструкции гостевого процессора в инструкции хостового. Это решение не только интересно и эффективно, но и позволяет обеспечить переносимость. Посредством тонкой настройки симулированной машины можно реализовать ряд скрытых функциональных возможностей, причем некоторые из них следует включать в процессе установки. Многие системные администраторы и продвинутые IT-специалисты в своих отзывах и комментариях рекомендуют рядовым пользователям, перед тем как скачать QEMU бесплатно и инсталлировать на свой компьютер, ознакомиться с документацией к КЕМИ.
Программа способна работать в двух режимах эмуляции: пользовательском и системном. В пользовательском режиме производится динамическая конвертация инструкций процессора и конвертирование системных вызовов. Второй режим эмулирует программно-аппаратный комплекс полностью.
Установка и запуск QEMU под Windows

Мало просто бесплатно скачать виртуальную машину и инсталлировать на свой компьютер, проблемой может стать создание виртуальной машины или ошибки. Часто встречаются вопросы такого плана: не получилось открыть виртуальную машину, не удалось открыть сессию, установка виртуальной машины прошла не корректно, не получается создать сервер виртуальных машин, не корректно работает виртуализация серверов.
Установку и запуск под Windows проведем на примере OS Win 64-bit. Во первых, нужно виртуальную машину для Windows QEMU скачать бесплатно не покидая сайт https://programswindows.ru без регистрации и SMS по одной из ссылок на этой странице в предпоследнем абзаце на светло зеленом фоне. Далее устанавливаем программу, например, в C:/qemu — и не стоит сразу искать на рабочем столе ярлык для запуска. Прежде следует создать образ жесткого диска, на котором будут работать гостевые ОС. Для этого набираем на клавиатуре Win+R >> cmd >> Enter и попадаем в консоль (cmd) куда копипастим две строки:
1. cd C:/qemu
2. qemu-img create xp.img 4096M
В результате видим: Formating ‘xp.img’, fmt=raw, size=4194304 kB. В папке программы проверяем размер образа, который должен быть заданного размера, а не нулевого. После этого запускаем саму машину командой с указанием загрузочного диска и примерно такими параметрами:
qemu-system-x86_64.exe -L . -boot c -m 800 -hda //./PhysicalDrive1 —hdb C:/Qemu/XP.img
… и приступаем к работе. Эмуляция другого компьютера сходна с началом эксплуатации сегодня купленного компа или ноута без предустановленной OS. Для начала нужно установить операционную систему и все необходимое программное обеспечение.
Бесплатно скачать QEMU для Windows x86, x64
| Обновление от: | 09.03.2019 |
| Последняя версия: | 4.2.0 |
| Синонимы: | куэмью, кэмью, кэму, кему, кьеми, кьему |
| Операционная система: | Windows 10, 8.1, 8, 7, Vista, XP (32-бит и 64-бит), другие ОС |
| Размеры файлов: | 120,0 МБ, 129,0 МБ |
| Скачать бесплатно: | QEMU 32-BIT |
| Скачать бесплатно: | QEMU 64-BIT |
Бесплатные программы скачать бесплатно
Сейчас Вы находитесь на странице «Бесплатная программа QEMU — виртуальная машина для Виндовс» сайта «Программы для Виндовс». Спасибо, что посетили раздел посвященный программам виртуализации.