Протокол Simple Network Management Protocol (SNMP) используется для мониторинга, оповещения о событиях и управления устройствами в сети. Протокол состоит из набора стандартов по управления сетью, в том числе протокол прикладного уровня (Application Layer protocol), схемы базы данных и набор объектов данных. SNMP может получать различную информацию (время аптайма, счетчики производительности, параметры устройств и т.д.) от любых сетевых устройств: коммутаторов, серверов, маршрутизаторов или простых компьютеров, на которых установлен агент SNMP.
В Windows 10 служба SNMP доступна в виде отдельного компонента Windows и по умолчанию не устанавливается. Рассмотрим, как установить и настроить SNMP в Windows 10.
- Установка службы SNMP в WIndows 10
- Настройка службы SNMP в Windows 10
Содержание:
Установка службы SNMP в WIndows 10
Вы можете проверить, установлена ли в вашей системе служба SNMP с помощью PowerShell командлета Get-Service:
Get-Service -Name snmp*
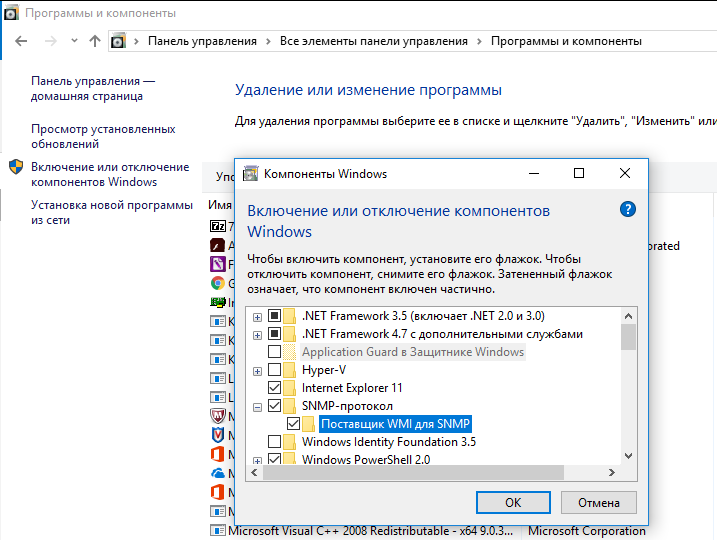
Вы можете установить службу SNMP через панель управления. Перейдите в Панель управленияВсе элементы панели управленияПрограммы и компоненты Включение или отключение компонентов Windows).
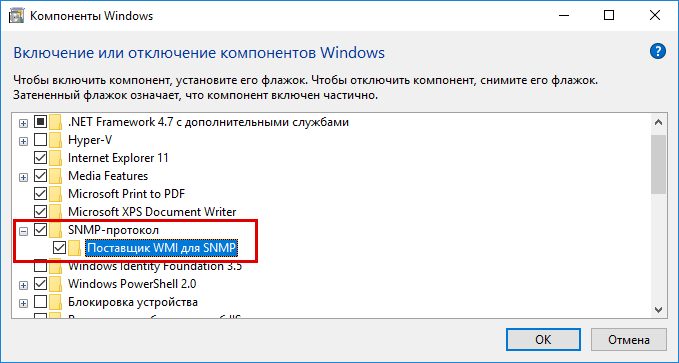
В списке компонентов выберите Simple Network Management Protocol (SNMP)/протокол, и WMI SNMP Provider / Поставщик WMI для SNMP (обеспечивает доступ к информации SNMP через интерфейсы Windows Management Instrumentation) и нажмите Ок.
Также вы можете установить службы SNMP из командной строки PowerShell:
Enable-WindowsOptionalFeature -online -FeatureName SNMP
Настройка службы SNMP в Windows 10
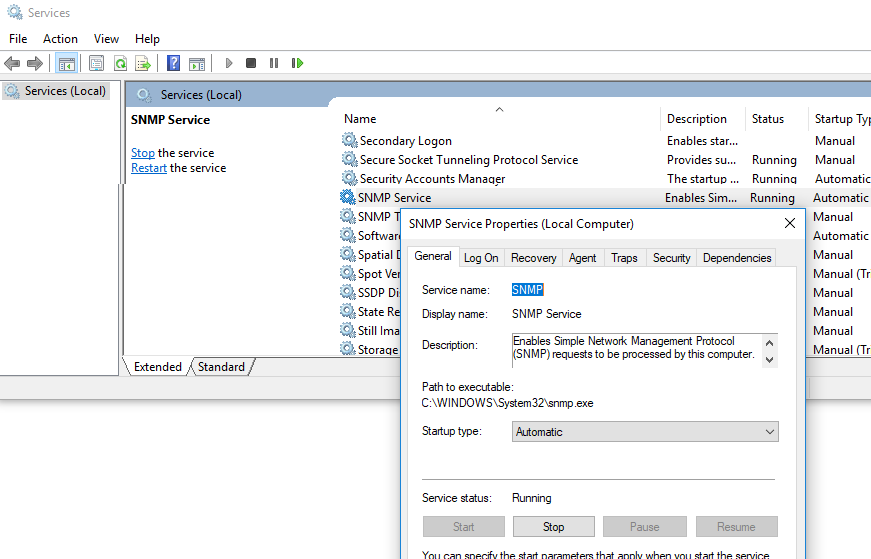
После установки службы SNMP должны запустится автоматически. Откройте консоль управления Services (services.msc). В списке службы должны появится две новые службы:
- SNMP Service – это основная служба SNMP агента, которая отслеживают активность и отправляет информацию;
- SNMP Trap — получает сообщения ловушки (trap messages) от локальных или удаленных агентов SNMP, и пересылает сообщения в управляющие программы SNMP, которые работают на этом компьютере.
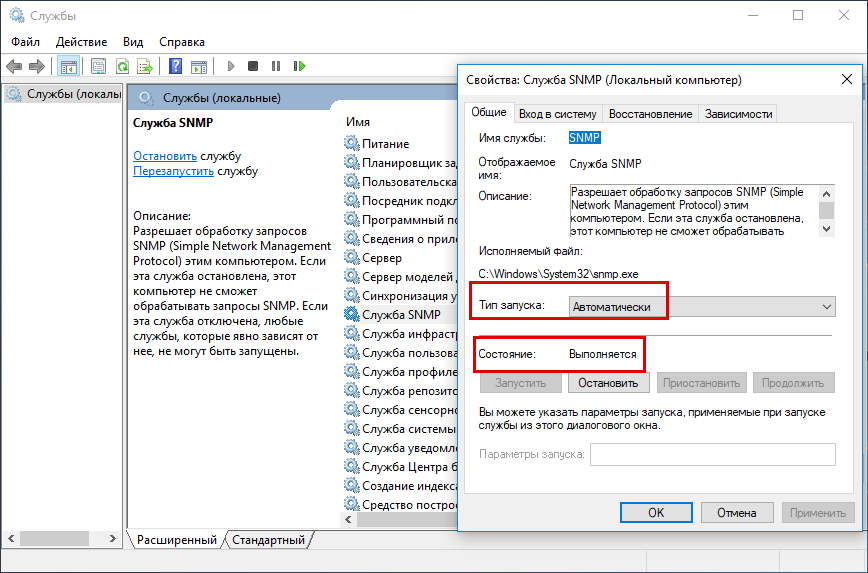
Откройте свойства службы SNMP. Если она остановлена, запустите ее, нажав кнопку Start и измените тип запуска (Startup type) на автоматический.
Перейдите на вкладку Agent. Заполните поля contact и location (здесь вы можете указать контактное имя пользователя и местоположение компьютера), и выберите список сервисов, данные которых нужно собирать и отправить устройству мониторинга.
Доступны следующие типы сервисов:
- Physical
- Applications
- Internet
- End-to-end
- Datalink and subnetwork

Перейдите на вкладку Security. Здесь вы можете настроить различные параметры безопасности для различных серверов SNMP.
В списке Accepted community names перечислены имена сообществ, чьи SNMP узлы проходят аутентификацию для отправки SNMP-запросов на этот компьютер.
Community — это имя, которое обладает такими же функциями, как логин и пароль.
Нажмите кнопку Добавить и укажите имя Community и один из пяти уровней доступа (None, Notify, READ ONLY, READ WRITE, READ CREATE). READ WRITE – это максимальный уровень доступа, при которых сервер управления SNMP может вносить изменения в систему. В системах мониторинга обычно достаточно выбрать READ ONLY, при этом сервер мониторинга может только опрашивать систему, но не вносить изменения.
В нашем примере мы добавили комьюнити public с разрешениями READ ONLY.
Далее добавьте список серверов системы мониторинга (по DNS имени или по IP адресам), от которых вы хотите разрешить получать SNMP пакеты.

Совет. Вы можете выбрать опцию ‘Принимать пакеты SNMP от любого узла’/Accept SNMP packages from these hosts, но это не безопасно.
Сохраните изменения и перезапустите службу SNMP.
На этом настройка службы SNMP в Windows 10 по сути завершена. Если вам нужно включить SNMP сразу на множестве компьютеров, вы можете удаленно установить и настроить службы с помощью PowerShell или GPO.
SNMP (Simple Network Management Protocol) is a classic protocol for monitoring and collecting information about network devices (servers, network hardware, workstations, printers, etc.). SNMP is quite a lightweight and fast protocol, it uses UDP ports 161 and 162 to transfer data. In this article, we’ll show how to install and configure SNMP service on Windows Server 2022/2019 and Windows 10/11.
Contents:
- How to Install SNMP Service on Windows Server 2022/2019?
- Installing SNMP Agent on Windows Server Core
- Enabling SNMP Service in Windows 10/11
- How to Configure SNMP Service on Windows?
How to Install SNMP Service on Windows Server 2022/2019?
In Windows Server, you can install the SNMP service using Server Manager. Select Add roles and features -> Features. Click SNMP Service (if needed, also check SNMP WMI Providers).
The SNMP WMI Provider allows you to query an SNMP device via WMI.
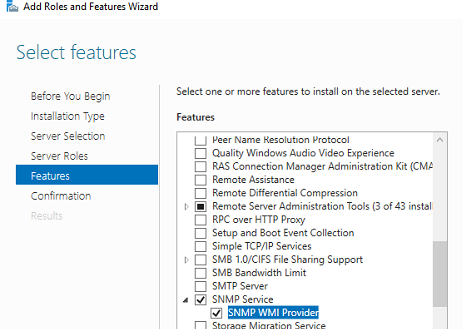
Click Next -> Install and wait till the installation is over.
Installing SNMP Agent on Windows Server Core
In Windows Server Core, you can install SNMP using the Windows Admin Center web interface or PowerShell.
If you are using the Windows Admin Center, connect to your Windows Server host, and select Roles and Features -> SNMP Service.

Since there is no graphical interface on Windows Server Core and the Server Core host can be managed from the command prompt, you can install the SNMP service using PowerShell.
You can use the Install-WindowsFeature PowerShell cmdlet to install roles and features on Windows Server.
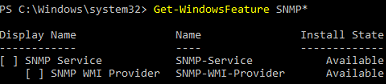
Check that the SNMP service is not installed:
Get-WindowsFeature SNMP*
Install the SNMP role and WMI provider:
Install-WindowsFeature SNMP-Service,SNMP-WMI-Provider -IncludeManagementTools
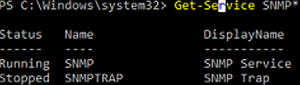
Make sure that SNMP services are running:
Get-Service SNMP*
In our example, the SNMP service is running, and SNMPTRAP is stopped.
Enabling SNMP Service in Windows 10/11
You can use the SNMP service not only on Windows Server but also on Windows 10 and 11 desktops. In Windows 10/11, the SNMP service is a part of the Features on Demand (like RSAT or OpenSSH).
You can install SNMP via the Settings panel. Go to Apps -> Optional features -> Add an optional feature -> View features.
Select Simple Network Management Protocol (SNMP) and WMI SNMP Provider in the list of available components. To start the installation, click Next (you will need an Internet connection to Microsoft servers).
To install the SNMP service using PowerShell, run the command below:
Add-WindowsCapability -Online -Name SNMP.Client~~~~0.0.1.0
To install the SNMP service offline (without an internet connection), download the Windows 10/11 Features on Demand ISO image from your account on the Volume Licensing Service Center (VLSC) website.
To install SNMP from the ISO image offline, use this command:
Add-WindowsCapability -Online -Name SNMP.Client~~~~0.0.1.0 -LimitAccess -Source \munfs01DistrWin11FoD
How to Configure SNMP Service on Windows?
You can configure the SNMP service options with the services.msc console. Find the SNMP Service in the list and open its properties.
Note that the SNMP service has some additional tabs:
- Agent
- Traps
- Security
The Agent tab contains basic information about the device (administrator contact information, location). Here you can also select the type of information that the device can send when polling via SNMP.
In earlier SNMP protocol versions (SNMP 1 and SNMP 2), a community string is used for authentication. In the Security tab, you can create multiple connection strings.
You can select one of five available access levels for the community:
- READ ONLY — allows getting information from a device
- READ WRITE —get information and edit a device configuration
- NOTIFY — allows receiving SNMP traps
- READ CREATE – to read data, change, and create objects
- NONE
You can create multiple community strings. To do it, enter a name and select the permissions. To monitor the server state, the READ ONLY privilege is enough.
In the Accept SNMP packets from these hosts list, you can enter the names or IP addresses of the hosts allowed to query the device. If you don’t want to use the allowed device list, leave Accept SNMP packets from any hosts here.
The Traps tab allows setting the list of the hosts to which the SNMP agent should send SNMP traps. An SNMP Trap is a broadcast UDP packet used for asynchronous notification of the manager (for example, a notification about a critical event).
Remember to create rules allowing inbound and outbound traffic for SNMP queries and traps in your Windows Defender Firewall. You can enable firewall rules with PowerShell.
There are several predefined rules for SNMP traffic in Microsoft Defender Firewall:
Get-NetFirewallrule -DisplayName *snmp* |ft
- SNMPTRAP-In-UDP
- SNMPTRAP-In-UDP-NoScope
- SNMP-Out-UDP
- SNMP-In-UDP-NoScope
- SNMP-Out-UDP-NoScope
- SNMP-In-UDP
You can enable all rules or just a specific one:
Get-NetFirewallrule -DisplayName *snmp* | Enable-NetFirewallRule

Get-NetFirewallrule SNMP-Out-UDP | Disable-NetFirewallRule

There is the SNMP Trap in the list of Windows services. It is used to receive messages from other SNMP agents and forward them to SNMP servers (usually it is a monitoring system querying devices using via, for example, PRTG or Zabbix).
If you configure SNMP on Windows Server Core, you won’t be able to use the SNMP service GUI to set its settings. You will have to make changes to the registry using PowerShell instead. SNMP service settings are located under the registry key HKEY_LOCAL_MACHINESYSTEMCurrentControlSetServicesSNMPParameters.
The following commands will set the agent description:
New-ItemProperty -Path "HKLM:SYSTEMCurrentControlSetservicesSNMPParametersRFC1156Agent" -Name "sysContact" -Value "admin@woshub.com" -PropertyType REG_SZ

New-ItemProperty -Path "HKLM:SYSTEMCurrentControlSetservicesSNMPParametersRFC1156Agent" -Name "sysLocation" -Value "MUN_DCn2" -PropertyType REG_SZ
You will have to create a separate key with the community name under HKLMSYSTEMCurrentControlSetservicesSNMPParametersTrapConfiguration for each SNMP trap.
New-Item -Path "HKLM:SYSTEMCurrentControlSetservicesSNMPParametersTrapConfigurationpublic1"
Set the community permissions:
New-ItemProperty -Path "HKLM:SYSTEMCurrentControlSetServicesSNMPParametersValidCommunities" -Name "public1" -Value 4 -PropertyType DWord
Possible values:
- 1 — NONE
- 2 — NOTIFY
- 4 — READ ONLY
- 8 — READ WRITE
- 16 — READ CREATE
For each community, you can set a list of hosts they are allowed to accept queries from:
New-ItemProperty -Path "HKLM:SYSTEMCurrentControlSetServicesSNMPParametersPermittedManagers" -Name "1" -Value "mun-mon1.woshub.com" -PropertyType REG_SZ
Restart your SNMP service to apply new settings from the registry:
Get-Service SNMP|Restart Service
If you want to deploy the SNMP service settings to multiple Windows computers/servers in your domain, use Group Policy Preferences to modify the registry.
To make sure if SNMP is working, use the snmpwalk tool (available in any Linux distro):
# snmpwalk -v 2c -c public1 -O e 192.168.12.200
In this example, we have polled our Windows host using SNMPv2.
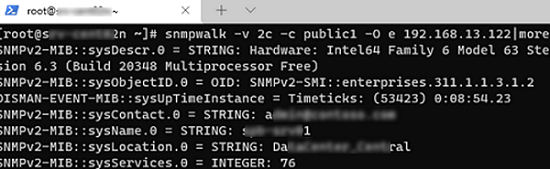
The tool has returned basic host information (syscontact, sysname, syslocation) and a lot of data on the Windows server state.
Simple Network Management Protocol or SNMP is used for monitoring, event notification, and network device management on corporate networks. The protocol consists of a set of network management standards, including the Application Layer protocol, database schemas, and a set of data objects. SNMP can receive various types of information (uptime, performance counters, device parameters, etc.) from any network device. SNMP can receive information from switches, servers, routers, or computers on which the SNMP agent is installed. In Windows 10 and Windows 11, the SNMP service is available as a separate Windows feature and it’s not installed by default.
Installing SNMP Service on Windows 11
In previous versions of Windows (Win 8.1, 7, or 10 RTM), it was possible to install the Windows SNMP service via Control Panel > Add Program and Features applet or using the DISM command:
dism /online /enable-feature /featureName:WMISnmpProvider
However, on Windows 11, when you run this command, you get an error:
Error: 0x800f080c
Feature name WMISnmpProvider is unknown.
A Windows feature name was not recognized.
Use the /Get-Features option to find the name of the feature in the image and try the command again. A Windows feature name was not recognized.

Also, Microsoft deprecated SNMP from Control Panel > Add Program and Features applet.
On Windows 11, you can still install the SNMP client and WMI SNMP Provider services, however, Microsoft has changed the install ways.
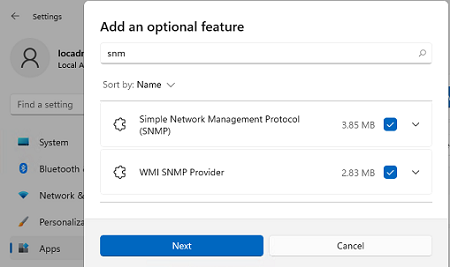
The SNMP service in Windows 11 can be installed via the Settings app:
- Right-click Start > Settings > Apps > Optional Features > Add an optional feature > View features;

- Type SNMP in the search field and select Simple Network Management Protocol (SNMP) and WMI SNMP Provider (optional) to install;

- Click Next > Install;
- To install the components, your computer must be connected to the network with Internet access. If the computer is offline, an error will appear when installing the SNMP feature.


You can also install the SNMP service on Windows 11 using PowerShell:
- Open Windows Terminal as an administrator;
- Check if the SNMP service is not installed (State=NotPresent):
Get-WindowsCapability -Online -Name "*SNMP*"|select name,DisplayName,State

- To install the SNMP service, run the command:
Add-WindowsCapability -Online -Name “SNMP.Client~~~~0.0.1.0“
- In order to install WMI SNMP Provider, run the command:
Add-WindowsCapability -Online -Name "WMI-SNMP-Provider.Client~~~~0.0.1.0"
- Wait for the installation to finish and check the installation state again using the Get-WindowsCapability cmdlet. The state is Installed if these Windows features are installed correctly.

These PowerShell commands also require an Internet connection to download the SNMP service components from Microsoft servers.
If the error Add-WindowsCapability failed error. Error code = 0x800f0954 appears when you try to install Windows Optional features, most likely, your computer is configured to receive Windows updates from an internal WSUS server (Windows Server Update Services). The computer is trying to get SNMP binaries from the WSUS server instead of the Microsoft Update servers.
You can temporarily bypass WSUS and download Windows feature files directly from Microsoft Update servers using the following commands:
Set-ItemProperty -Path HKLM:SOFTWAREPoliciesMicrosoftWindowsWindowsUpdateAU -Name UseWUServer 0
Restart Windows Update service:
netsh winhttp reset policy
Restart-Service wuaserv
Install SNMP on Windows 11 using the PowerShell Add-WindowsCapability cmdlet or using the Settings app. Then target your Windows Update client back to the WSUS Server:
Set-ItemProperty -Path HKLM:SOFTWAREPoliciesMicrosoftWindowsWindowsUpdateAU -Name UseWUServer 1

Restart-Service wuaserv
You can check if the SNMP service is installed on your Windows 10 by using the PowerShell Get-Service cmdlet:
Get-Service -Name snmp*
Most likely, the service has not been installed yet.
You can install the SNMP service via the Control Panel. Go to the Control Panel > Programs and Features > Turn Windows features on or off. In the list of Windows features, select Simple Network Management Protocol (SNMP) and the WMI SNMP Provider (provides access to the SNMP information via the Windows Management Instrumentation interfaces), and click OK.

You can also install the SNMP service using PowerShell:
Enable-WindowsOptionalFeature -online -FeatureName SNMP
This command can help you to install the SNMP service on Windows 10 in 1803 builds or earlier. Starting from Windows 10 1809 Microsoft changed the way to deploy SNMP service on desktop OSs.
How to Enable SNMP Service in Windows 10 1803 and Newer?
In Windows 10 1803 and later (1809, 1903,1909, 2004), the SNMP service is considered deprecated and is not listed in the Windows features in the Control Panel list.

Microsoft plans to completely remove the SNMP service in the next Windows builds because of the security risks associated with this protocol. Instead of SNMP, it is recommended to use the Common Information Model (CIM), which is supported by Windows Remote Management. On the current builds of Windows 10, the SNMP service is hidden.
The SNMP service is now missing from the Windows 10 image and can only be installed as Feature On Demand (FoD).
Tip. You can install the SNMP service on a disconnected environment (without Internet access) using the FoD ISO image. You can download the FOD media from your Volume License Servicing Center (VLSC).
If your computer has a direct Internet connection, you can install the SNMP service components online from Microsoft servers. To do this, open the elevated PowerShell console and run the command:
Add-WindowsCapability -Online -Name "SNMP.Client~~~~0.0.1.0"

You can also use DISM to install the SNMP service:
DISM /online /add-capability /capabilityname:SNMP.Client~~~~0.0.1.0
After that, you can verify if the SNMP service is installed:
Get-WindowsCapability -Online -Name "SNMP*"

Name : SNMP.Client~~~~0.0.1.0
State : Installed
DisplayName : Simple Network Management Protocol (SNMP)
Description : This feature includes Simple Network Management Protocol agents that monitor the activity in network devices and reports it to the network console workstation
DownloadSize : 595304
InstallSize : 1128133
To disable the SNMP service, use the PowerShell command:
Remove-WindowsCapability -Online -Name "SNMP.Client~~~~0.0.1.0"
You can also install the SNMP service through the Optional Features graphical interface.
Go to the Settings > Apps > Apps & Features > Manage optional feature > Add Feature. Select the following features in the list: Simple Network Management Protocol (SNMP) and WMI SNMP Provider (to get all SNMP service configuration tabs).

After that, the SNMP service will appear in the services.msc console.
If when performing the Add-WindowsCapability command you received the “Add-WindowsCapability failed error. Error code = 0x800f0954”, most likely your computer receives Windows updates not from Microsoft Update servers but the internal WSUS server. To make the SNMP service receive installation files from Microsoft servers, you need to temporarily bypass the WSUS.
To do this, run the command:
reg add "HKEY_LOCAL_MACHINESoftwarePoliciesMicrosoftWindowsWindowsUpdateAU" /v UseWUServer /t REG_DWORD /d 0 /f
After that, restart the Windows Update service:
netshh winhttp reset proxy

net stop wuauserv

net start wuauserv
Now try to install the SNMP service with the Add-WindowsCapability command. If all goes well, return the initial wusuaserv service registry parameter pointing to the WSUS server. Run the command:
reg add "HKEY_LOCAL_MACHINESoftwarePoliciesMicrosoftWindowsWindowsUpdateAU" /v UseWUServer /t REG_DWORD /d 1 /f
And restart the Windows Update Service.
Configure SNMP on Windows 10 Computer
After the installation, SNMP services should start automatically. Open the Services management console (services.msc). Two new services should appear in the service list:
- SNMP Service — this is the primary SNMP agent service, that tracks activity and sends information;
- SNMP Trap — receives trap messages from local or remote SNMP agents, and forwards messages to the SNMP management software that is being run on that computer.
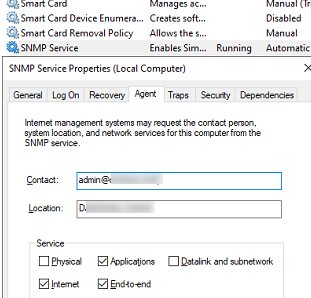
Open the properties of the SNMP Service. If it is stopped, restart it by pressing the Start button and then changing the startup type to Automatic.

Click the Agent tab. Fill in the Contact and Location fields (you can specify the user’s contact name and computer location). Then select the list of services from which you want to collect data and send it to the monitoring device. There are five service-based options:
- Physical;
- Applications;
- Internet;
- End-to-end;
- Datalink and subnetwork.

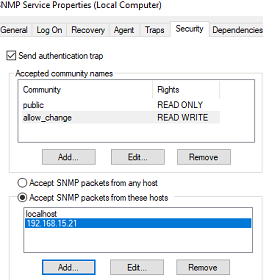
Click the Security tab. Here you can configure various security settings for different SNMP servers.
The list of Accepted community names contains the names of the communities whose SNMP hosts are authenticated to send SNMP requests to this computer. The community name has the same functions like login and password.
Click the Add button and specify the Community Name and one of the five access levels (None, Notify, READ ONLY, READ WRITE, READ CREATE). READ WRITE is the maximum access level at which the SNMP management server can make changes on the system. For monitoring systems, it is usually enough to select READ ONLY (the monitoring server can only poll the system, but not make changes). In our example, we added a community name public with READ ONLY permissions.
Add a list of monitoring servers (hostnames or IP addresses) to the Accept SNMP packets from these hosts from which you want to accept SNMP packets. This could be your monitoring system, for example, Zabbix, Nagios, Icinga, OpenNMS, PRTG, and Microsoft System Center Operations Manager (SCOM).

Tip. You can select the Accept SNMP packets from any host option. In this mode, the SNMP agent accepts packets from any host without IP restrictions. This option is not recommended for use on public computers. This is not safe.
Save the changes and restart the SNMP service.
Hint. To make your Windows host receive and send SNMP queries and traps, you need to open SNMP ports in Windows Defender Firewall with Advanced Security. SNMP uses UDP as a transport protocol. Two ports are used: UDP 161 (SNMP) and UDP 162 (SNMPTRAP). You can open inbound and outbound SNMP ports in Windows Firewall using the following commands:
netsh advfirewall firewall add rule name="SNMP UDP Port 161 In" dir=in action=allow protocol=UDP localport=161

netsh advfirewall firewall add rule name="SNMP UDP Port 161 Out" dir=out action=allow protocol=UDP localport=161

netsh advfirewall firewall add rule name="SNMPTRAP UDP Port 162 In" dir=in action=allow protocol=UDP localport=162

netsh advfirewall firewall add rule name=" SNMPTRAP UDP Port 162 Out" dir=out action=allow protocol=UDP localport=162
Configuring SNMP Settings via Group Policy
Several GPO parameters will help you configure SNMP parameters centrally. These parameters are located in the GPO editor (gpedit.msc or gpmc.msc) under Computer Configuration > Policies > Administrative Templates definitions > Network > SNMP.
Three SNMP policy parameters are available:
- Specify communities — allows you to set a list of communities for the SNMP service;
- Specify permitted managers — allows you to specify a list of permitted hosts that can send SNMP queries to the agent on this computer;
- Specify traps for public community — allows you to set up trap configuration for the Simple Network Management Protocol.

Another way to configure SNMP parameters is through the registry. These parameters are set in the following section of the Registry Editor (regedit.exe) HKEY_LOCAL_MACHINESYSTEMCurrentControlSetservicesSNMPParameters.
You can configure SNMP parameters as needed on a reference computer, upload them to a reg file, and deploy them to servers/computers via GPO (Computer Configuration > Preferences > Windows Settings > Registry).

You can use SNMP and SNMP Traps to monitor different metrics of your Windows device (uptime, CPU usage, RAM, storage, network traffic). Currently, only SNMP v1 and SNMP v2c are supported in the Windows SNMP service. These protocols are not encrypted. It means that an attacker can intercept all your SNMP data and view it in plain text. Windows 10 and 11 do not support SNMP v3 which is an encrypted and more secure protocol.
This completes the SNMP service configuration in Windows. If you need to enable SNMP on multiple computers or servers, you can remotely install and configure SNMP service using PowerShell or Group Policy.
- About
- Latest Posts

I enjoy technology and developing websites. Since 2012 I’m running a few of my own websites, and share useful content on gadgets, PC administration and website promotion.
На первый взгляд задача «включение SNMP на Windows» не должна быть сложной.
Как включить SNMP на Windows и как ее настроить будем разбираться по пунктам.
Способ №1 Включение SNMP в Windows.
Стандартным, идеальным для пользователя считается следующий способ, он работает в Windows 7 и некоторых сборках Windows 10:
1. Заходим в Панель Управления.
2. Находим меню «Установка и удаление программ» или «Программы и компоненты».
3. В открывшемся окне слева в списке переходим по ссылке «Включение или отключение компонентов Windows».
4. В списке «Компоненты Windows» ищем строчку «Компонент SNMP» и отмечаем галочкой — Нажимаем «ОК».
5. Осталось перейти в Службы (Панель управления — Администрирование — Службы) где выбираем среди всех служб «Служба SNMP» и запускаем.
Способ №2 Включение и настройка SNMP в Windows 10.
Если первый способ не увенчался успехом, то второй нам поможет:
1. Для начала нам нужно будет в меню Пуск найти и запустить WindowsPowerShell «ЗАПУСК ОТ ИМЕНИ АДМИНИСТРАТОРА»!!!.
2. Вводим команду для проверки доступности SNMP — службы :
Get-WindowsCapability -Online -Name "SNMP*"
Вывод команды будет следующим:
Name: SNMP.Client~~~~0.0.1.0
State: NotPresent
DisplayName: SNMP-протокол.
Как видим в строке состояния указано, что SNMP-протокол не представлен.
P.S. Бывали случае, когда в строке состояния указано Installed, но все равно службы SNMP нет. В этом случае все равно переходим к следующему 3 пункту.
3. Устанавливаем службу SNMP командой:
Add-WindowsCapability -Online -Name "SNMP.Client~~~~0.0.1.0"
Видим процесс установки и получаем ответ:
Path:
Online: True
RestartNeeded: False
4. Снова проверим состояние службы SNMP командой из пункта 2:
Get-WindowsCapability -Online -Name "SNMP*"
Вывод команды:
Name: SNMP.Client~~~~0.0.1.0
State: Installed
DisplayName: SNMP-протокол.
5. Обязательно перезагружаем компьютер.
После запуска переходим в Службы и находим «Служба SNMP».
Заходим в свойства службы SNMP. Если состояние службы остановлена, нужно запустить ее кнопкой «Запустить» и в меню «Тип запуска» выбираем «Автоматически».
Способ 3. Как установить SNMP на Windows Server.
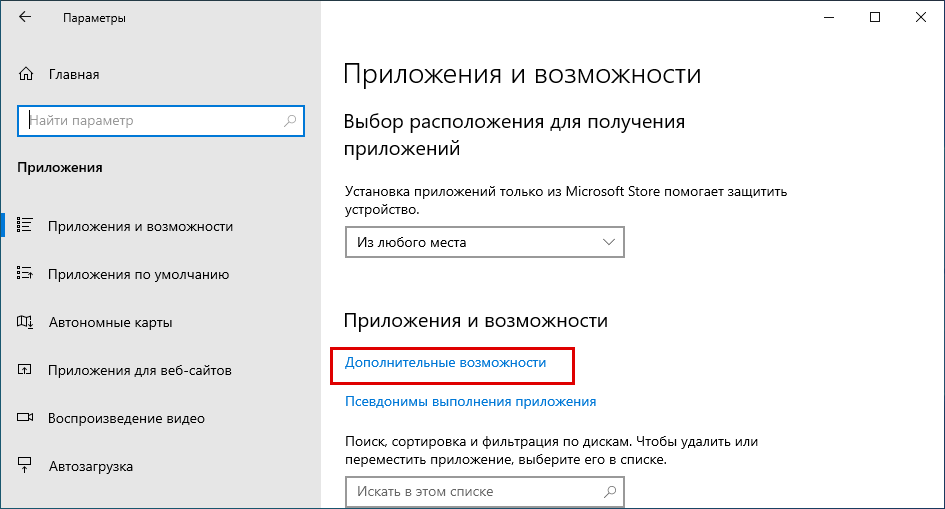
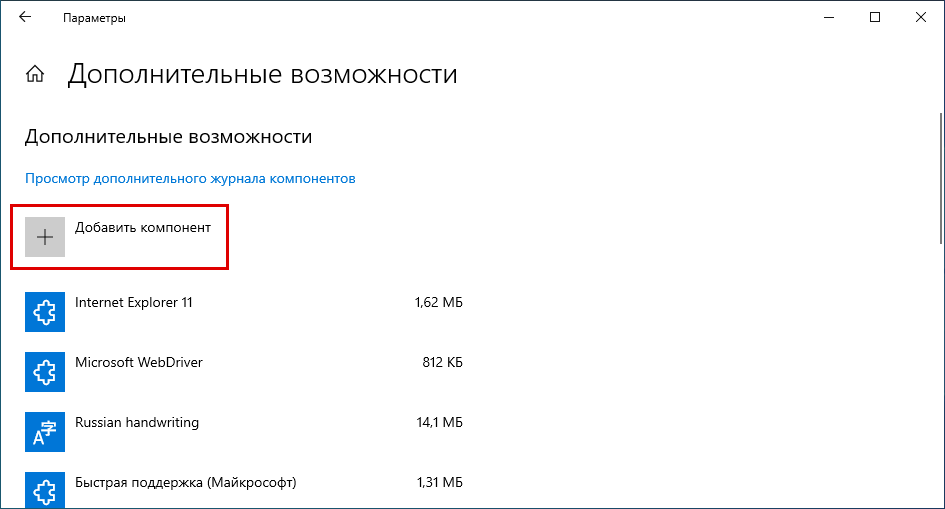
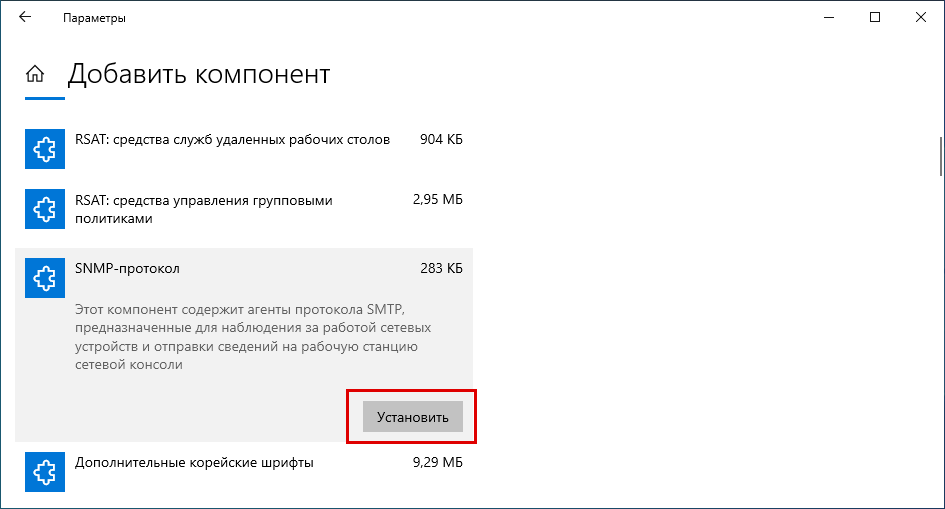
1. Включить SNMP можно в «Параметры» — раздел «Приложения и возможности»- ссылка «Дополнительные возможности».
2. В окне «Дополнительные возможности» нажимаем «Добавить компонент» и выбираем в списке «SNMP-протокол» — Установить.
3. Перезагружаем систему.
Как настроить SNMP в Windows.
Необходимо найти службу «Служба SNMP» и открыть свойства службы.
— На вкладке «Безопасность» установим флажок «Посылать ловушку проверки подлинности».
— Нажмем кнопку «Добавить» для настройки «SNMP Community».
— Выбираем уровень доступа (None, Notify, READ ONLY, READ WRITE, READ CREATE). Для мониторинга состояния сервера достаточно выбрать Read Only.
— По-умолчанию community чаще всего указывается public для уровня READ ONLY или private для Read Write.
— Ниже есть пункт «Принимать пакеты SNMP от любого узла» и «Принимать пакеты SNMP от следующих узлов». Здесь вы можете указать конкретный адрес вашего сервера мониторинга, который будет собирать данные или оставить 1 вариант, если вы хотите, что бы не было ограничений по ip-адресу.
— Сохраняем изменения и перезапускаем службу SNMP.
Обновив Windows 10 до сборки 1809 или выше, вы можете столкнуться с проблемами управления подключенными к локальной сети устройствами. Это не баг, просто начиная с версии 1809, в Windows 10 разработчиками отключен SNMP — сетевой протокол, используемый для мониторинга и управления различными сетевыми устройствами, начиная от коммутаторов и заканчивая клиентскими компьютерами.
Сам компонент SNMP, тем не менее, присутствует в системе, и вы без особых усилий можете его включить, причем разными способами.
Проверить, задействован ли он в Windows 10 очень просто, для этого нужно открыть оснастку «Компоненты Windows» и посмотреть, установлена ли галочка в чекбоксе SNMP-протокол.
Если да, открываем оснастку управления службами, находим там службу SNMP и убеждаемся, что она запущена.
Если служба неактивна, запускаем ее и устанавливаем тип запуска «Автоматически».
Если вы работаете в Windows 10 1903, включить SNMP можно в Параметрах через раздел «Приложения и возможности». Откройте его, нажмите ссылку «Дополнительные возможности».
А затем «Добавить компонент».
В открывшемся списке найдите SNMP-протокол, кликните по нему и нажмите появившуюся кнопку «Установить».
Настройки должны вступить в силу сразу, но не исключено, что понадобится перезагрузка компьютера.
![]() Загрузка…
Загрузка…