Command Line Shell For SQLite
1. Getting Started
The SQLite project provides a simple command-line program named
sqlite3 (or sqlite3.exe on Windows)
that allows the user to manually enter and execute SQL
statements against an SQLite database or against a
ZIP archive. This document provides a brief
introduction on how to use the sqlite3 program.
Start the sqlite3 program by typing «sqlite3» at the
command prompt, optionally followed
by the name of the file that holds the SQLite database
(or ZIP archive). If the named
file does not exist, a new database file with the given name will be
created automatically. If no database file is specified on the
command-line, a temporary database is created and automatically deleted when
the «sqlite3» program exits.
On startup, the sqlite3 program will show a brief banner
message then prompt you to enter SQL. Type in SQL statements (terminated
by a semicolon), press «Enter» and the SQL will be executed.
For example, to create a new SQLite database named «ex1»
with a single table named «tbl1», you might do this:
$ sqlite3 ex1
SQLite version 3.36.0 2021-06-18 18:36:39
Enter ".help" for usage hints.
sqlite> create table tbl1(one text, two int);
sqlite> insert into tbl1 values('hello!',10);
sqlite> insert into tbl1 values('goodbye', 20);
sqlite> select * from tbl1;
hello!|10
goodbye|20
sqlite>
Terminate the sqlite3 program by typing your system
End-Of-File character (usually a Control-D). Use the interrupt
character (usually a Control-C) to stop a long-running SQL statement.
Make sure you type a semicolon at the end of each SQL command!
The sqlite3 program looks for a semicolon to know when your SQL command is
complete. If you omit the semicolon, sqlite3 will give you a
continuation prompt and wait for you to enter more text to
complete the SQL command. This feature allows you to
enter SQL commands that span multiple lines. For example:
sqlite> CREATE TABLE tbl2 (
   ...>   f1 varchar(30) primary key,
   ...>   f2 text,
   ...>   f3 real
   ...> );
sqlite>
2. Double-click Startup On Windows
Windows users can double-click on the sqlite3.exe icon to cause
the command-line shell to pop-up a terminal window running SQLite. However,
because double-clicking starts the sqlite3.exe without command-line arguments,
no database file will have been specified, so SQLite will use a temporary
database that is deleted when the session exits.
To use a persistent disk file as the database, enter the «.open» command
immediately after the terminal window starts up:
SQLite version 3.36.0 2021-06-18 18:36:39
Enter ".help" for usage hints.
Connected to a transient in-memory database.
Use ".open FILENAME" to reopen on a persistent database.
sqlite> .open ex1.db
sqlite>
The example above causes the database file named «ex1.db» to be opened
and used. The «ex1.db» file is created if it does not previously exist.
You might want to
use a full pathname to ensure that the file is in the directory that you
think it is in. Use forward-slashes as the directory separator character.
In other words use «c:/work/ex1.db», not «c:workex1.db».
Alternatively, you can create a new database using the default temporary
storage, then save that database into a disk file using the «.save» command:
SQLite version 3.36.0 2021-06-18 18:36:39
Enter ".help" for usage hints.
Connected to a transient in-memory database.
Use ".open FILENAME" to reopen on a persistent database.
sqlite> ... many SQL commands omitted ...
sqlite> .save ex1.db
sqlite>
Be careful when using the «.save» command as it will overwrite any
preexisting database files having the same name without prompting for
confirmation. As with the «.open» command, you might want to use a
full pathname with forward-slash directory separators to avoid ambiguity.
3. Special commands to sqlite3 (dot-commands)
Most of the time, sqlite3 just reads lines of input and passes them
on to the SQLite library for execution.
But input lines that begin with a dot («.»)
are intercepted and interpreted by the sqlite3 program itself.
These «dot commands» are typically used to change the output format
of queries, or to execute certain prepackaged query statements.
There were originally just a few dot commands, but over the years
many new features have accumulated so that today there are over 60.
For a listing of the available dot commands, you can enter «.help» with
no arguments. Or enter «.help TOPIC» for detailed information about TOPIC.
The list of available dot-commands follows:
sqlite> .help
.archive ...             Manage SQL archives
.auth ON|OFF             Show authorizer callbacks
.backup ?DB? FILE        Backup DB (default "main") to FILE
.bail on|off             Stop after hitting an error.  Default OFF
.binary on|off           Turn binary output on or off.  Default OFF
.cd DIRECTORY            Change the working directory to DIRECTORY
.changes on|off          Show number of rows changed by SQL
.check GLOB              Fail if output since .testcase does not match
.clone NEWDB             Clone data into NEWDB from the existing database
.connection [close] [#]  Open or close an auxiliary database connection
.databases               List names and files of attached databases
.dbconfig ?op? ?val?     List or change sqlite3_db_config() options
.dbinfo ?DB?             Show status information about the database
.dump ?OBJECTS?          Render database content as SQL
.echo on|off             Turn command echo on or off
.eqp on|off|full|...     Enable or disable automatic EXPLAIN QUERY PLAN
.excel                   Display the output of next command in spreadsheet
.exit ?CODE?             Exit this program with return-code CODE
.expert                  EXPERIMENTAL. Suggest indexes for queries
.explain ?on|off|auto?   Change the EXPLAIN formatting mode.  Default: auto
.filectrl CMD ...        Run various sqlite3_file_control() operations
.fullschema ?--indent?   Show schema and the content of sqlite_stat tables
.headers on|off          Turn display of headers on or off
.help ?-all? ?PATTERN?   Show help text for PATTERN
.import FILE TABLE       Import data from FILE into TABLE
.imposter INDEX TABLE    Create imposter table TABLE on index INDEX
.indexes ?TABLE?         Show names of indexes
.limit ?LIMIT? ?VAL?     Display or change the value of an SQLITE_LIMIT
.lint OPTIONS            Report potential schema issues.
.load FILE ?ENTRY?       Load an extension library
.log FILE|off            Turn logging on or off.  FILE can be stderr/stdout
.mode MODE ?TABLE?       Set output mode
.nonce STRING            Disable safe mode for one command if the nonce matches
.nullvalue STRING        Use STRING in place of NULL values
.once ?OPTIONS? ?FILE?   Output for the next SQL command only to FILE
.open ?OPTIONS? ?FILE?   Close existing database and reopen FILE
.output ?FILE?           Send output to FILE or stdout if FILE is omitted
.parameter CMD ...       Manage SQL parameter bindings
.print STRING...         Print literal STRING
.progress N              Invoke progress handler after every N opcodes
.prompt MAIN CONTINUE    Replace the standard prompts
.quit                    Exit this program
.read FILE               Read input from FILE
.recover                 Recover as much data as possible from corrupt db.
.restore ?DB? FILE       Restore content of DB (default "main") from FILE
.save FILE               Write in-memory database into FILE
.scanstats on|off        Turn sqlite3_stmt_scanstatus() metrics on or off
.schema ?PATTERN?        Show the CREATE statements matching PATTERN
.selftest ?OPTIONS?      Run tests defined in the SELFTEST table
.separator COL ?ROW?     Change the column and row separators
.session ?NAME? CMD ...  Create or control sessions
.sha3sum ...             Compute a SHA3 hash of database content
.shell CMD ARGS...       Run CMD ARGS... in a system shell
.show                    Show the current values for various settings
.stats ?ARG?             Show stats or turn stats on or off
.system CMD ARGS...      Run CMD ARGS... in a system shell
.tables ?TABLE?          List names of tables matching LIKE pattern TABLE
.testcase NAME           Begin redirecting output to 'testcase-out.txt'
.testctrl CMD ...        Run various sqlite3_test_control() operations
.timeout MS              Try opening locked tables for MS milliseconds
.timer on|off            Turn SQL timer on or off
.trace ?OPTIONS?         Output each SQL statement as it is run
.vfsinfo ?AUX?           Information about the top-level VFS
.vfslist                 List all available VFSes
.vfsname ?AUX?           Print the name of the VFS stack
.width NUM1 NUM2 ...     Set minimum column widths for columnar output
sqlite>
4. Rules for «dot-commands», SQL and More
4.1. Line Structure
The CLI’s input is parsed into a sequence consisting of:
- SQL statements;
- dot-commands; or
- CLI comments
SQL statements are free-form, and can be spread across multiple lines,
with whitespace or SQL comments embedded anywhere.
They are terminated by either a ‘;’ character at the end of an input line,
or a ‘/’ character or the word «go» on a line by itself.
When not at the end of an input line, the ‘;’ character
acts to separate SQL statements.
Trailing whitespace is ignored for purposes of termination.
A dot-command has a more restrictive structure:
- It must begin with its «.» at the left margin
with no preceding whitespace. - It must be entirely contained on a single input line.
- It cannot occur in the middle of an ordinary SQL
statement. In other words, it cannot occur at a
continuation prompt. - There is no comment syntax for dot-commands.
The CLI also accepts whole-line comments that
begin with a ‘#’ character and extend to the end of the line.
There can be no with whitespace prior to the ‘#’.
4.2. Dot-command arguments
The arguments passed to dot-commands are parsed from the command tail,
per these rules:
- The trailing newline and any other trailing whitespace is discarded;
- Whitespace immediately following the dot-command name, or any argument
input end bound is discarded; - An argument input begins with any non-whitespace character;
- An argument input ends with a character which
depends upon its leading character thusly: - for a leading single-quote (‘), a single-quote acts
as the end delimiter; - for a leading double-quote («), an unescaped double-quote
acts as the end delimiter; - for any other leading character, the end delimiter is
any whitespace; and - the command tail end acts as the end delimiter for any argument;
- Within a double-quoted argument input, a backslash-escaped double-quote
is part of the argument rather than its terminating quote; - Within a double-quoted argument, traditional C-string literal, backslash
escape sequence translation is done; and - Argument input delimiters (the bounding quotes or whitespace)
are discarded to yield the passed argument.
4.3. Dot-command execution
The dot-commands
are interpreted by the sqlite3.exe command-line program, not by
SQLite itself. So none of the dot-commands will work as an argument
to SQLite interfaces such as sqlite3_prepare() or sqlite3_exec().
5. Changing Output Formats
The sqlite3 program is able to show the results of a query
in 14 different output formats:
- ascii
- box
- csv
- column
- html
- insert
- json
- line
- list
- markdown
- quote
- table
- tabs
- tcl
You can use the «.mode» dot command to switch between these output
formats.
The default output mode is «list». In
list mode, each row of a query result is written on one line of
output and each column within that row is separated by a specific
separator string. The default separator is a pipe symbol («|»).
List mode is especially useful when you are going to send the output
of a query to another program (such as AWK) for additional processing.
sqlite> .mode list
sqlite> select * from tbl1;
hello!|10
goodbye|20
sqlite>
Type «.mode» with no arguments to show the current mode:
sqlite> .mode
current output mode: list
sqlite>
Use the «.separator» dot command to change the separator.
For example, to change the separator to a comma and
a space, you could do this:
sqlite> .separator ", "
sqlite> select * from tbl1;
hello!, 10
goodbye, 20
sqlite>
The next «.mode» command might reset the «.separator» back to some
default value (depending on its arguments).
So you will likely need to repeat the «.separator» command whenever you
change modes if you want to continue using a non-standard separator.
In «quote» mode, the output is formatted as SQL literals. Strings are
enclosed in single-quotes and internal single-quotes are escaped by doubling.
Blobs are displayed in hexadecimal blob literal notation (Ex: x’abcd’).
Numbers are displayed as ASCII text and NULL values are shown as «NULL».
All columns are separated from each other by a comma (or whatever alternative
character is selected using «.separator»).
sqlite> .mode quote
sqlite> select * from tbl1;
'hello!',10
'goodbye',20
sqlite>
In «line» mode, each column in a row of the database
is shown on a line by itself. Each line consists of the column
name, an equal sign and the column data. Successive records are
separated by a blank line. Here is an example of line mode
output:
sqlite> .mode line
sqlite> select * from tbl1;
one = hello!
two = 10

one = goodbye
two = 20
sqlite>
In column mode, each record is shown on a separate line with the
data aligned in columns. For example:
sqlite> .mode column
sqlite> select * from tbl1;
one       two
--------  ---
hello!    10
goodbye   20
sqlite>
In «column» mode (and also in «box», «table», and «markdown» modes)
the width of columns adjusts automatically. But you can override this,
providing a speicified width for each column using the «.width» command.
The arguments to «.width» are integers which are the number of
characters to devote to each column. Negative numbers mean right-justify.
Thus:
sqlite> .width 12 -6
sqlite> select * from tbl1;
one              two
------------  ------
hello!            10
goodbye           20
sqlite>
A width of 0 means the column width is chosen automatically.
Unspecified column widths become zero. Hence, the command
«.width» with no arguments resets all column widths to zero and
hence causes all column widths to be determined automatically.
The «column» mode is a tabular output format. Other
tabular output formats are «box», «markdown», and «table»:
sqlite> .width
sqlite> .mode markdown
sqlite> select * from tbl1;
|   one   | two |
|---------|-----|
| hello!  | 10  |
| goodbye | 20  |
sqlite> .mode table
sqlite> select * from tbl1;
+---------+-----+
|   one   | two |
+---------+-----+
| hello!  | 10  |
| goodbye | 20  |
+---------+-----+
sqlite> .mode box
sqlite> select * from tbl1;
┌─────────┬─────┐
│   one   │ two │
├─────────┼─────┤
│ hello!  │ 10  │
│ goodbye │ 20  │
└─────────┴─────┘
sqlite>
The columnar modes accept some addition options to control formatting.
The «—wrap N» option (where N is an integer) causes columns
to wrap text that is longer than N characters. Wrapping is disabled if
N is zero.
sqlite> insert into tbl1 values('The quick fox jumps over a lazy brown dog.',90);
sqlite> .mode box --wrap 30
sqlite> select * from tbl1 where two>50;
┌────────────────────────────────┬─────┐
│              one               │ two │
├────────────────────────────────┼─────┤
│ The quick fox jumps over a laz │ 90  │
│ y brown dog.                   │     │
└────────────────────────────────┴─────┘
sqlite>
Wrapping happens after exactly N characters,
which might be in the middle of a word.
To wrap at a word boundary, add the «—wordwrap on» option
(or just «-ww» for short):
sqlite> .mode box --wrap 30 -ww
sqlite> select * from tbl1 where two>50;
┌─────────────────────────────┬─────┐
│             one             │ two │
├─────────────────────────────┼─────┤
│ The quick fox jumps over a  │ 90  │
│ lazy brown dog.             │     │
└─────────────────────────────┴─────┘
sqlite>
The «—quote» option causes the results in each column to be
quoted like an SQL literal, as in the «quote» mode. See the on-line
help for additional options.
The command «.mode box —wrap 60 —quote» is so useful for general-purpose
database queries that it is given its own alias. Instead of typing out
that whole 27-character command, you can just say «.mode qbox».
Another useful output mode is «insert». In insert mode, the output
is formatted to look like SQL INSERT statements. Use insert
mode to generate text that can later be used to input data into a
different database.
When specifying insert mode, you have to give an extra argument
which is the name of the table to be inserted into. For example:
sqlite> .mode insert new_table
sqlite> select * from tbl1 where two<50;
INSERT INTO "new_table" VALUES('hello',10);
INSERT INTO "new_table" VALUES('goodbye',20);
sqlite>
Other output modes include «csv», «json», and «tcl». Try these
yourself to see what they do.
6. Querying the database schema
The sqlite3 program provides several convenience commands that
are useful for looking at the schema of the database. There is
nothing that these commands do that cannot be done by some other
means. These commands are provided purely as a shortcut.
For example, to see a list of the tables in the database, you
can enter «.tables».
sqlite> .tables
tbl1 tbl2
sqlite>
The «.tables» command is similar to setting list mode then
executing the following query:
SELECT name FROM sqlite_schema
WHERE type IN ('table','view') AND name NOT LIKE 'sqlite_%'
ORDER BY 1
But the «.tables» command does more. It queries the sqlite_schema table
for all attached databases, not just the primary database. And it arranges
its output into neat columns.
The «.indexes» command works in a similar way to list all of
the indexes. If the «.indexes» command is given an argument which is
the name of a table, then it shows just indexes on that table.
The «.schema» command shows the complete schema for the database,
or for a single table if an optional tablename argument is provided:
sqlite> .schema
create table tbl1(one varchar(10), two smallint)
CREATE TABLE tbl2 (
  f1 varchar(30) primary key,
  f2 text,
  f3 real
);
sqlite> .schema tbl2
CREATE TABLE tbl2 (
  f1 varchar(30) primary key,
  f2 text,
  f3 real
);
sqlite>
The «.schema» command is roughly the same as setting
list mode, then entering the following query:
SELECT sql FROM sqlite_schema
ORDER BY tbl_name, type DESC, name
As with «.tables», the «.schema» command shows the schema for
all attached databases. If you only want to see the schema for
a single database (perhaps «main») then you can add an argument
to «.schema» to restrict its output:
The «.schema» command can be augmented with the «—indent» option,
in which case it tries to reformat the various CREATE statements of
the schema so that they are more easily readable by humans.
The «.databases» command shows a list of all databases open in
the current connection. There will always be at least 2. The first
one is «main», the original database opened. The second is «temp»,
the database used for temporary tables. There may be additional
databases listed for databases attached using the ATTACH statement.
The first output column is the name the database is attached with,
and the second result column is the filename of the external file.
There may be a third result column which will be either «‘r/o'» or
«‘r/w'» depending on whether the database file is read-only or read-write.
And there might be a fourth result column showing the result of
sqlite3_txn_state() for that database file.
The «.fullschema» dot-command works like the «.schema» command in
that it displays the entire database schema. But «.fullschema» also
includes dumps of the statistics tables «sqlite_stat1», «sqlite_stat3»,
and «sqlite_stat4», if they exist. The «.fullschema» command normally
provides all of the information needed to exactly recreate a query
plan for a specific query. When reporting suspected problems with
the SQLite query planner to the SQLite development team, developers
are requested to provide the complete «.fullschema» output as part
of the trouble report. Note that the sqlite_stat3 and sqlite_stat4
tables contain samples of index entries and so might contain sensitive
data, so do not send the «.fullschema» output of a proprietary database
over a public channel.
7. Opening Database Files
The «.open» command opens a new database connection, after first closing the
previously opened database command. In its simplest form, the «.open» command merely
invokes sqlite3_open() on the file named as its argument. Use the name «:memory:»
to open a new in-memory database that disappears when the CLI exits or when the
«.open» command is run again.
If the —new option is included with «.open», then the database is reset prior
to being opened. Any prior data is destroyed. This is a destructive overwrite of
prior data and no confirmation is requested, so use this option carefully.
The —readonly option opens the database in read-only mode. Write will be
prohibited.
The —deserialize option causes the entire content of the on-disk file to be
read into memory and then opened as an in-memory database using the
sqlite3_deserialize() interface. This will, of course, require a lot of memory
if you have a large database. Also, any changes you make to the database will not
be saved back to disk unless you explicitly save them using the «.save» or «.backup»
commands.
The —append option causes the SQLite database to be appended to an existing
file rather than working as a stand-alone file. See the
appendvfs extension for
more information.
The —zip option causes the specified input file to be interpreted as a ZIP archive
instead of as an SQLite database file.
The —hexdb option causes the database content to be to be read from subsequent
lines of input in a hex format, rather than from a separate file on disk.
The «dbtotxt» command-line tool can be used to generate
the appropriate text for a database. The —hexdb option is intended for use by the
SQLite developers for testing purposes. We do not know of any use cases for this
option outside of internal SQLite testing and development.
8. Redirecting I/O
8.1. Writing results to a file
By default, sqlite3 sends query results to standard output. You
can change this using the «.output» and «.once» commands. Just put
the name of an output file as an argument to .output and all subsequent
query results will be written to that file. Or use the .once command
instead of .output and output will only be redirected for the single next
command before reverting to the console. Use .output with no arguments to
begin writing to standard output again. For example:
sqlite> .mode list
sqlite> .separator |
sqlite> .output test_file_1.txt
sqlite> select * from tbl1;
sqlite> .exit
$ cat test_file_1.txt
hello|10
goodbye|20
$
If the first character of the «.output» or «.once» filename is a pipe
symbol («|») then the remaining characters are treated as a command and the
output is sent to that command. This makes it easy to pipe the results
of a query into some other process. For example, the
«open -f» command on a Mac opens a text editor to display the content that
it reads from standard input. So to see the results of a query
in a text editor, one could type:
sqlite> .once | open -f
sqlite> SELECT * FROM bigTable;
If the «.output» or «.once» commands have an argument of «-e» then
output is collected into a temporary file and the system text editor is
invoked on that text file. Thus, the command «.once -e» achieves the
same result as «.once ‘|open -f'» but with the benefit of being portable
across all systems.
If the «.output» or «.once» commands have a «-x» argument, that causes
them to accumulate output as Comma-Separated-Values (CSV) in a temporary
file, then invoke the default system utility for viewing CSV files
(usually a spreadsheet program) on the result. This is a quick way of
sending the result of a query to a spreadsheet for easy viewing:
sqlite> .once -x
sqlite> SELECT * FROM bigTable;
The «.excel» command is an alias for «.once -x». It does exactly the same
thing.
8.2. Reading SQL from a file
In interactive mode, sqlite3 reads input text (either SQL statements
or dot-commands) from the keyboard. You can also redirect input from
a file when you launch sqlite3, of course, but then you do not have the
ability to interact with the program. Sometimes it is useful to run an
SQL script contained in a file entering other commands from the command-line.
For this, the «.read» dot-command is provided.
The «.read» command takes a single argument which is (usually) the name
of a file from which to read input text.
sqlite> .read myscript.sql
The «.read» command temporarily stops reading from the keyboard and instead
takes its input from the file named. Upon reaching the end of the file,
input reverts back to the keyboard. The script file may contain dot-commands,
just like ordinary interactive input.
If the argument to «.read» begins with the «|» character, then instead of
opening the argument as a file, it runs the argument (without the leading «|»)
as a command, then uses the output of that command as its input. Thus, if you
have a script that generates SQL, you can execute that SQL directly using
a command similar to the following:
sqlite> .read |myscript.bat
8.3. File I/O Functions
The command-line shell adds two application-defined SQL functions that
facilitate reading content from a file into a table column, and writing the
content of a column into a file, respectively.
The readfile(X) SQL function reads the entire content of the file named
X and returns that content as a BLOB. This can be used to load content into
a table. For example:
sqlite> CREATE TABLE images(name TEXT, type TEXT, img BLOB);
sqlite> INSERT INTO images(name,type,img)
   ...>   VALUES('icon','jpeg',readfile('icon.jpg'));
The writefile(X,Y) SQL function write the blob Y into the file named X
and returns the number of bytes written. Use this function to extract
the content of a single table column into a file. For example:
sqlite> SELECT writefile('icon.jpg',img) FROM images WHERE name='icon';
Note that the readfile(X) and writefile(X,Y) functions are extension
functions and are not built into the core SQLite library. These routines
are available as a loadable extension in the
ext/misc/fileio.c
source file in the SQLite source code repositories.
8.4. The edit() SQL function
The CLI has another built-in SQL function named edit(). Edit() takes
one or two arguments. The first argument is a value — often a large
multi-line string to be edited. The second argument is the invocation
for a text editor. (It may include options to affect the editor’s
behavior.) If the second argument is omitted, the VISUAL environment
variable is used. The edit() function writes its first argument into a
temporary file, invokes the editor on the temporary file, rereads the file
back into memory after the editor is done, then returns the edited text.
The edit() function can be used to make changes to large text
values. For example:
sqlite> UPDATE docs SET body=edit(body) WHERE name='report-15';
In this example, the content of the docs.body field for the entry where
docs.name is «report-15» will be sent to the editor. After the editor returns,
the result will be written back into the docs.body field.
The default operation of edit() is to invoke a text editor. But by using
an alternative edit program in the second argument, you can also get it to edit
images or other non-text resources. For example, if you want to modify a JPEG
image that happens to be stored in a field of a table, you could run:
sqlite> UPDATE pics SET img=edit(img,'gimp') WHERE id='pic-1542';
The edit program can also be used as a viewer, by simply ignoring the
return value. For example, to merely look at the image above, you might run:
sqlite> SELECT length(edit(img,'gimp')) WHERE id='pic-1542';
8.5. Importing files as CSV or other formats
Use the «.import» command to import CSV (comma separated value)
or similarly delimited data into an SQLite table.
The «.import» command takes two arguments which are the
source from which data is to be read and the name of the
SQLite table into which the data is to be inserted. The source argument
is the name of a file to be read or, if it begins with a «|» character,
it specifies a command which will be run to produce the input data.
Note that it may be important to set the «mode» before running the
«.import» command. This is prudent to prevent the command-line shell
from trying to interpret the input file text as some format other than
how the file is structured. If the —csv or —ascii options are used,
they control import input delimiters. Otherwise, the delimiters are
those in effect for the current output mode.
To import into a table not in the «main» schema, the —schema option
may be used to specify that the table is in some other schema. This can
be useful for ATTACH’ed databases or to import into a TEMP table.
When .import is run, its treatment of the first input row depends
upon whether the target table already exists. If it does not exist,
the table is automatically created and the content of the first input
row is used to set the name of all the columns in the table. In this
case, the table data content is taken from the second and subsequent
input rows. If the target table already exists, every row of the
input, including the first, is taken to be actual data content. If
the input file contains an initial row of column labels, you can make
the .import command skip that initial row using the «—skip 1» option.
Here is an example usage, loading a pre-existing temporary table
from a CSV file which has column names in its first row:
sqlite> .import --csv --skip 1 --schema temp C:/work/somedata.csv tab1
While reading input data in modes other than ‘ascii’, «.import»
interprets input as records composed of fields according to the RFC 4180
specification with this exception: The input record and field separators
are as set by the mode or by use of the .separator command. Fields are
always subject to quote removal to reverse quoting done per RFC 4180,
except in ascii mode.
To import data with arbitrary delimiters and no quoting,
first set ascii mode («.mode ascii»), then set the field
and record delimiters using the «.separators» command. This
will suppress dequoting. Upon «.import», the data will be split
into fields and records according to the delimiters so specified.
8.6. Export to CSV
To export an SQLite table (or part of a table) as CSV, simply set
the «mode» to «csv» and then run a query to extract the desired rows
of the table. The output will formatted as CSV per RFC 4180.
sqlite> .headers on
sqlite> .mode csv
sqlite> .once c:/work/dataout.csv
sqlite> SELECT * FROM tab1;
sqlite> .system c:/work/dataout.csv
In the example above, the «.headers on» line causes column labels to
be printed as the first row of output. This means that the first row of
the resulting CSV file will contain column labels. If column labels are
not desired, set «.headers off» instead. (The «.headers off» setting is
the default and can be omitted if the headers have not been previously
turned on.)
The line «.once FILENAME» causes all query output to go into
the named file instead of being printed on the console. In the example
above, that line causes the CSV content to be written into a file named
«C:/work/dataout.csv».
The final line of the example (the «.system c:/work/dataout.csv»)
has the same effect as double-clicking on the c:/work/dataout.csv file
in windows. This will typically bring up a spreadsheet program to display
the CSV file.
That command only works as written on Windows.
The equivalent line on a Mac would be:
sqlite> .system open dataout.csv
On Linux and other unix systems you will need to enter something like:
sqlite> .system xdg-open dataout.csv
8.6.1. Export to Excel
To simplify export to a spreadsheet, the CLI provides the
«.excel» command which captures the output of a single query and sends
that output to the default spreadsheet program on the host computer.
Use it like this:
sqlite> .excel
sqlite> SELECT * FROM tab;
The command above writes the output of the query as CSV into a temporary
file, invokes the default handler for CSV files (usually the preferred
spreadsheet program such as Excel or LibreOffice), then deletes the
temporary file. This is essentially a short-hand method of doing
the sequence of «.csv», «.once», and «.system» commands described above.
The «.excel» command is really an alias for «.once -x». The -x option
to .once causes it to writes results as CSV into a temporary file that
is named with a «.csv» suffix, then invoke the systems default handler
for CSV files.
There is also a «.once -e» command which works similarly, except that
it names the temporary file with a «.txt» suffix so that the default
text editor for the system will be invoked, instead of the default
spreadsheet.
8.6.2. Export to TSV (tab separated values)
Exporting to pure TSV, without any field quoting, can be done by
entering «.mode tabs» before running a query. However, the output
will not be read correctly in tabs mode by the «.import» command
if it contains doublequote characters. To get TSV quoted per
RFC 4180 so that it can be input in tabs mode with «.import»,
first enter «.mode csv», then enter ‘.separator «t»‘
before running a query.
9. Accessing ZIP Archives As Database Files
In addition to reading and writing SQLite database files,
the sqlite3 program will also read and write ZIP archives.
Simply specify a ZIP archive filename in place of an SQLite database
filename on the initial command line, or in the «.open» command,
and sqlite3 will automatically detect that the file is a
ZIP archive instead of an SQLite database and will open it as such.
This works regardless of file suffix. So you can open JAR, DOCX,
and ODP files and any other file format that is really a ZIP
archive and SQLite will read it for you.
A ZIP archive appears to be a database containing a single table
with the following schema:
CREATE TABLE zip(
  name,     // Name of the file
  mode,     // Unix-style file permissions
  mtime,    // Timestamp, seconds since 1970
  sz,       // File size after decompression
  rawdata,  // Raw compressed file data
  data,     // Uncompressed file content
  method    // ZIP compression method code
);
So, for example, if you wanted to see the compression efficiency
(expressed as the size of the compressed content relative to the
original uncompressed file size) for all files in the ZIP archive,
sorted from most compressed to least compressed, you could run a
query like this:
sqlite> SELECT name, (100.0*length(rawdata))/sz FROM zip ORDER BY 2;
Or using file I/O functions, you can extract elements of the
ZIP archive:
sqlite> SELECT writefile(name,content) FROM zip
   ...> WHERE name LIKE 'docProps/%';
9.1. How ZIP archive access is implemented
The command-line shell uses the Zipfile virtual table to
access ZIP archives. You can see this by running the «.schema»
command when a ZIP archive is open:
sqlite> .schema
CREATE VIRTUAL TABLE zip USING zipfile('document.docx')
/* zip(name,mode,mtime,sz,rawdata,data,method) */;
When opening a file, if the command-line client discovers that the
file is ZIP archive instead of an SQLite database, it actually opens
an in-memory database and then in that in-memory database it creates
an instance of the Zipfile virtual table that is attached to the
ZIP archive.
The special processing for opening ZIP archives is a trick of the
command-line shell, not the core SQLite library. So if you want to
open a ZIP archive as a database in your application, you will need to
activate the Zipfile virtual table module then run an appropriate
CREATE VIRTUAL TABLE statement.
10. Converting An Entire Database To A Text File
Use the «.dump» command to convert the entire contents of a
database into a single UTF-8 text file. This file can be converted
back into a database by piping it back into sqlite3.
A good way to make an archival copy of a database is this:
$ sqlite3 ex1 .dump | gzip -c >ex1.dump.gz
This generates a file named ex1.dump.gz that contains everything
you need to reconstruct the database at a later time, or on another
machine. To reconstruct the database, just type:
$ zcat ex1.dump.gz | sqlite3 ex2
The text format is pure SQL so you
can also use the .dump command to export an SQLite database
into other popular SQL database engines. Like this:
$ createdb ex2
$ sqlite3 ex1 .dump | psql ex2
11. Recover Data From a Corrupted Database
Like the «.dump» command, «.recover» attempts to convert the entire
contents of a database file to text. The difference is that instead of
reading data using the normal SQL database interface, «.recover»
attempts to reassemble the database based on data extracted directly from
as many database pages as possible. If the database is corrupt, «.recover»
is usually able to recover data from all uncorrupted parts of the database,
whereas «.dump» stops when the first sign of corruption is encountered.
If the «.recover» command recovers one or more rows that it cannot
attribute to any database table, the output script creates a «lost_and_found»
table to store the orphaned rows. The schema of the lost_and_found
table is as follows:
CREATE TABLE lost_and_found(
    rootpgno INTEGER,             -- root page of tree pgno is a part of
    pgno INTEGER,                 -- page number row was found on
    nfield INTEGER,               -- number of fields in row
    id INTEGER,                   -- value of rowid field, or NULL
    c0, c1, c2, c3...             -- columns for fields of row
);
The «lost_and_found» table contains one row for each orphaned row recovered
from the database. Additionally, there is one row for each recovered index
entry that cannot be attributed to any SQL index. This is because, in an
SQLite database, the same format is used to store SQL index entries and
WITHOUT ROWID table entries.
| Column | Contents |
|---|---|
| rootpgno | Even though it may not be possible to attribute the row to a specific database table, it may be part of a tree structure within the database file. In this case, the root page number of that tree structure is stored in this column. Or, if the page the row was found on is not part of a tree structure, this column stores a copy of the value in column «pgno» — the page number of the page the row was found on. In many, although not all, cases, all rows in the lost_and_found table with the same value in this column belong to the same table. |
| pgno | The page number of the page on which this row was found. |
| nfield | The number of fields in this row. |
| id | If the row comes from a WITHOUT ROWID table, this column contains NULL. Otherwise, it contains the 64-bit integer rowid value for the row. |
| c0, c1, c2… | The values for each column of the row are stored in these columns. The «.recover» command creates the lost_and_found table with as many columns as required by the longest orphaned row. |
If the recovered database schema already contains a table named
«lost_and_found», the «.recover» command uses the name «lost_and_found0». If
the name «lost_and_found0» is also already taken, «lost_and_found1», and so
on. The default name «lost_and_found» may be overridden by invoking «.recover»
with the —lost-and-found switch. For example, to have the output script call
the table «orphaned_rows»:
sqlite> .recover --lost-and-found orphaned_rows
12. Loading Extensions
You can add new custom application-defined SQL functions,
collating sequences, virtual tables, and VFSes to the command-line
shell at run-time using the «.load» command. First, build the
extension as a DLL or shared library (as described in the
Run-Time Loadable Extensions document) then type:
sqlite> .load /path/to/my_extension
Note that SQLite automatically adds the appropriate extension suffix
(«.dll» on windows, «.dylib» on Mac, «.so» on most other unixes) to the
extension filename. It is generally a good idea to specify the full
pathname of the extension.
SQLite computes the entry point for the extension based on the extension
filename. To override this choice, simply add the name of the extension
as a second argument to the «.load» command.
Source code for several useful extensions can be found in the
ext/misc
subdirectory of the SQLite source tree. You can use these extensions
as-is, or as a basis for creating your own custom extensions to address
your own particular needs.
13. Cryptographic Hashes Of Database Content
The «.sha3sum» dot-command computes a
SHA3 hash of the content
of the database. To be clear, the hash is computed over the database content,
not its representation on disk. This means, for example, that a VACUUM
or similar data-preserving transformation does not change the hash.
The «.sha3sum» command supports options «—sha3-224», «—sha3-256»,
«—sha3-384», and «—sha3-512» to define which variety of SHA3 to use
for the hash. The default is SHA3-256.
The database schema (in the sqlite_schema table) is not normally
included in the hash, but can be added by the «—schema» option.
The «.sha3sum» command takes a single optional argument which is a
LIKE pattern. If this option is present, only tables whose names match
the LIKE pattern will be hashed.
The «.sha3sum» command is implemented with the help of the
extension function «sha3_query()»
that is included with the command-line shell.
14. Database Content Self-Tests
The «.selftest» command attempts to verify that a database is
intact and is not corrupt.
The .selftest command looks for a table in schema named «selftest»
and defined as follows:
CREATE TABLE selftest(
  tno INTEGER PRIMARY KEY,  -- Test number
  op TEXT,                  -- 'run' or 'memo'
  cmd TEXT,                 -- SQL command to run, or text of "memo"
  ans TEXT                  -- Expected result of the SQL command
);
The .selftest command reads the rows of the selftest table in
selftest.tno order.
For each ‘memo’ row, it writes the text in ‘cmd’ to the output. For
each ‘run’ row, it runs the ‘cmd’ text as SQL and compares the result
to the value in ‘ans’, and shows an error message if the results differ.
If there is no selftest table, the «.selftest» command runs
PRAGMA integrity_check.
The «.selftest —init» command creates the selftest table if it
does not already exists, then appends entries that check the SHA3
hash of the content of all tables. Subsequent runs of «.selftest»
will verify that the database has not been changed in any way. To
generate tests to verify that a subset of the tables is unchanged,
simply run «.selftest —init» then DELETE the selftest rows that
refer to tables that are not constant.
15. SQLite Archive Support
The «.archive» dot-command and the «-A» command-line option
provide built-in support for the
SQLite Archive format. The interface is similar to
that of the «tar» command on unix systems. Each invocation of the «.ar»
command must specify a single command option. The following commands
are available for «.archive»:
| Option | Long Option | Purpose |
|---|---|---|
| -c | —create | Create a new archive containing specified files. |
| -x | —extract | Extract specified files from archive. |
| -i | —insert | Add files to existing archive. |
| -r | —remove | Remove files from the archive. |
| -t | —list | List the files in the archive. |
| -u | —update | Add files to existing archive if they have changed. |
As well as the command option, each invocation of «.ar» may specify
one or more modifier options. Some modifier options require an argument,
some do not. The following modifier options are available:
| Option | Long Option | Purpose |
|---|---|---|
| -v | —verbose | List each file as it is processed. |
| -f FILE | —file FILE | If specified, use file FILE as the archive. Otherwise, assume that the current «main» database is the archive to be operated on. |
| -a FILE | —append FILE | Like —file, use file FILE as the archive, but open the file using the apndvfs VFS so that the archive will be appended to the end of FILE if FILE already exists. |
| -C DIR | —directory DIR | If specified, interpret all relative paths as relative to DIR, instead of the current working directory. |
| -g | —glob | Use glob(Y,X) to match arguments against names in the archive. |
| -n | —dryrun | Show the SQL that would be run to carry out the archive operation, but do not actually change anything. |
| — | — | All subsequent command line words are command arguments, not options. |
For command-line usage, add the short style command-line options immediately
following the «-A», without an intervening space. All subsequent arguments
are considered to be part of the .archive command. For example, the following
commands are equivalent:
sqlite3 new_archive.db -Acv file1 file2 file3
sqlite3 new_archive.db ".ar -cv file1 file2 file3"
Long and short style options may be mixed. For example, the following are
equivalent:
-- Two ways to create a new archive named "new_archive.db" containing
-- files "file1", "file2" and "file3".
.ar -c --file new_archive.db file1 file2 file3
.ar -f new_archive.db --create file1 file2 file3
Alternatively, the first argument following to «.ar» may be the concatenation
of the short form of all required options (without the «-» characters). In
this case arguments for options requiring them are read from the command line
next, and any remaining words are considered command arguments. For example:
-- Create a new archive "new_archive.db" containing files "file1" and
-- "file2" from directory "dir1".
.ar cCf dir1 new_archive.db file1 file2 file3
15.1. SQLite Archive Create Command
Create a new archive, overwriting any existing archive (either in the current
«main» db or in the file specified by a —file option). Each argument following
the options is a file to add to the archive. Directories are imported
recursively. See above for examples.
15.2. SQLite Archive Extract Command
Extract files from the archive (either to the current working directory or
to the directory specified by a —directory option).
Files or directories whose names match the arguments,
as affected by the —glob option, are extracted.
Or, if no arguments follow the options, all files and directories are extracted.
Any specified directories are extracted recursively. It is an error if any
specified names or match patterns cannot be found in the archive.
-- Extract all files from the archive in the current "main" db to the
-- current working directory. List files as they are extracted.
.ar --extract --verbose

-- Extract file "file1" from archive "ar.db" to directory "dir1".
.ar fCx ar.db dir1 file1

-- Extract files with ".h" extension to directory "headers".
.ar -gCx headers *.h
15.3. SQLite Archive List Command
List the contents of the archive. If no arguments are specified, then all
files are listed. Otherwise, only those which match the arguments,
as affected by the —glob option, are listed. Currently,
the —verbose option does not change the behaviour of this command. That may
change in the future.
-- List contents of archive in current "main" db..
.ar --list
15.4. SQLite Archive Insert And Update Commands
The —update and —insert commands work like —create command, except that
they do not delete the current archive before commencing. New versions of
files silently replace existing files with the same names, but otherwise
the initial contents of the archive (if any) remain intact.
For the —insert command, all files listed are inserted into the archive.
For the —update command, files are only inserted if they do not previously
exist in the archive, or if their «mtime» or «mode» is different from what
is currently in the archive.
Compatibility node: Prior to SQLite version 3.28.0 (2019-04-16) only
the —update option was supported but that option worked like —insert in that
it always reinserted every file regardless of whether or not it had changed.
15.5. SQLite Archive Remove Command
The —remove command deletes files and directories which match the
provided arguments (if any) as affected by the —glob option.
It is an error to provide arguments which match nothing in the archive.
15.6. Operations On ZIP Archives
If FILE is a ZIP archive rather than an SQLite Archive, the «.archive»
command and the «-A» command-line option still work. This is accomplished
using of the zipfile extension.
Hence, the following commands are roughly equivalent,
differing only in output formatting:
| Traditional Command | Equivalent sqlite3.exe Command |
|---|---|
| unzip archive.zip | sqlite3 -Axf archive.zip |
| unzip -l archive.zip | sqlite3 -Atvf archive.zip |
| zip -r archive2.zip dir | sqlite3 -Acf archive2.zip dir |
15.7. SQL Used To Implement SQLite Archive Operations
The various SQLite Archive Archive commands are implemented using SQL statements.
Application developers can easily add SQLite Archive Archive reading and writing
support to their own projects by running the appropriate SQL.
To see what SQL statements are used to implement an SQLite Archive
operation, add the —dryrun or -n option. This causes the SQL to be
displayed but inhibits the execution of the SQL.
The SQL statements used to implement SQLite Archive operations make use of
various loadable extensions. These extensions are all available in
the SQLite source tree in the
ext/misc/ subfolder.
The extensions needed for full SQLite Archive support include:
-
fileio.c —
This extension adds SQL functions readfile() and writefile() for
reading and writing content from files on disk. The fileio.c
extension also includes fsdir() table-valued function for listing
the contents of a directory and the lsmode() function for converting
numeric st_mode integers from the stat() system call into human-readable
strings after the fashion of the «ls -l» command. -
sqlar.c —
This extension adds the sqlar_compress() and sqlar_uncompress()
functions that are needed to compress and uncompress file content
as it is inserted and extracted from an SQLite Archive. -
zipfile.c —
This extension implements the «zipfile(FILE)» table-valued function
which is used to read ZIP archives. This extension is only needed
when reading ZIP archives instead of SQLite archives. -
appendvfs.c —
This extension implements a new VFS that allows an SQLite database
to be appended to some other file, such as an executable. This
extension is only needed if the —append option to the .archive
command is used.
16. SQL Parameters
SQLite allows bound parameters to appear in an SQL statement anywhere
that a literal value is allowed. The values for these parameters are set
using the sqlite3_bind_…() family of APIs.
Parameters can be either named or unnamed. An unnamed parameter is a single
question mark («?»). Named parameters are a «?» followed immediately by a number
(ex: «?15» or «?123») or one of the characters «$», «:», or «@» followed by an
alphanumeric name (ex: «$var1», «:xyz», «@bingo»).
This command-line shell leaves unnamed parameters unbound, meaning that they
will have a value of an SQL NULL, but named parameters might be assigned values.
If there exists a TEMP table named «sqlite_parameters» with a schema like this:
CREATE TEMP TABLE sqlite_parameters(
  key TEXT PRIMARY KEY,
  value
) WITHOUT ROWID;
And if there is an entry in that table where the key column exactly matches
the name of parameter (including the initial «?», «$», «:», or «@» character)
then the parameter is assigned the value of the value column. If no entry exists,
the parameter defaults to NULL.
The «.parameter» command exists to simplify managing this table. The
«.parameter init» command (often abbreviated as just «.param init») creates
the temp.sqlite_parameters table if it does not already exist. The «.param list»
command shows all entries in the temp.sqlite_parameters table. The «.param clear»
command drops the temp.sqlite_parameters table. The «.param set KEY VALUE» and
«.param unset KEY» commands create or delete entries from the
temp.sqlite_parameters table.
The VALUE passed to «.param set KEY VALUE» can be either a SQL literal
or any other SQL expression or query which can be evaluated to yield a value.
This allows values of differing types to be set.
If such evaluation fails, the provided VALUE is instead quoted and inserted
as text.
Because such initial evaluation may or may not fail depending upon
the VALUE content, the reliable way to get a text value is to enclose it
with single-quotes protected from the above-described command-tail parsing.
For example, (unless one intends a value of -1365):
.parameter init
.parameter set @phoneNumber "'202-456-1111'"
Note that the double-quotes serve to protect the single-quotes
and ensure that the quoted text is parsed as one argument.
The temp.sqlite_parameters table only provides values for parameters in the
command-line shell. The temp.sqlite_parameter table has no effect on queries
that are run directly using the SQLite C-language API. Individual applications
are expected to implement their own parameter binding. You can search for
«sqlite_parameters» in the
command-line shell source code
to see how the command-line shell does parameter binding, and use that as
a hint for how to implement it yourself.
17. Index Recommendations (SQLite Expert)
Note: This command is experimental. It may be removed or the
interface modified in incompatible ways at some point in the future.
For most non-trivial SQL databases, the key to performance is creating
the right SQL indexes. In this context «the right SQL indexes» means those
that cause the queries that an application needs to optimize run fast. The
«.expert» command can assist with this by proposing indexes that might
assist with specific queries, were they present in the database.
The «.expert» command is issued first, followed by the SQL query
on a separate line. For example, consider the following session:
sqlite> CREATE TABLE x1(a, b, c);                  -- Create table in database
sqlite> .expert
sqlite> SELECT * FROM x1 WHERE a=? AND b>?;        -- Analyze this SELECT
CREATE INDEX x1_idx_000123a7 ON x1(a, b);

0|0|0|SEARCH TABLE x1 USING INDEX x1_idx_000123a7 (a=? AND b>?)

sqlite> CREATE INDEX x1ab ON x1(a, b);             -- Create the recommended index
sqlite> .expert
sqlite> SELECT * FROM x1 WHERE a=? AND b>?;        -- Re-analyze the same SELECT
(no new indexes)

0|0|0|SEARCH TABLE x1 USING INDEX x1ab (a=? AND b>?)
In the above, the user creates the database schema (a single table — «x1»),
and then uses the «.expert» command to analyze a query, in this case
«SELECT * FROM x1 WHERE a=? AND b>?». The shell tool recommends that the
user create a new index (index «x1_idx_000123a7») and outputs the plan
that the query would use in EXPLAIN QUERY PLAN format. The user then creates
an index with an equivalent schema and runs the analysis on the same query
again. This time the shell tool does not recommend any new indexes, and
outputs the plan that SQLite will use for the query given the existing
indexes.
The «.expert» command accepts the following options:
| Option | Purpose |
|---|---|
| ‑‑verbose | If present, output a more verbose report for each query analyzed. |
| ‑‑sample PERCENT | This parameter defaults to 0, causing the «.expert» command to recommend indexes based on the query and database schema alone. This is similar to the way the SQLite query planner selects indexes for queries if the user has not run the ANALYZE command on the database to generate data distribution statistics.
If this option is passed a non-zero argument, the «.expert» command
For small databases and modern CPUs, there is usually no reason not |
The functionality described in this section may be integrated into other
applications or tools using the
SQLite expert extension code.
A database schema which incorporate SQL custom functions made available
via the extension load mechanism may need special provision to work with
the .expert feature. Because the feature uses additional connections to
implement its functionality, those custom functions must be made available
to those additional connections. This can be done by means of the extension
load/usage options described at
Automatically Load Statically Linked Extensions
and
Persistent Loadable Extensions.
18. Working With Multiple Database Connections
Beginning with version 3.37.0 (2021-11-27), the CLI has the ability to
hold multiple database connections open at once. Only one database connection
is active at a time. The inactive connections are still open but are idle.
Use the «.connection» dot-command (often abbreviated as just «.conn») to see a
list of database connections and an indication of which one is currently active.
Each database connection is identified by an integer between 0 and 9. (There
can be at most 10 simultaneously open connections.) Change to another database
connection, creating it if it does not already exist, by typing the «.conn»
command followed by its number. Close a database connection by typing
«.conn close N» where N is the connection number.
Though the underlying SQLite database connections are completely independent
of one another, many of the CLI settings, such as the output format, are
shared across all database connections. Thus, changing the output mode in
one connection will change it in them all. On the other hand, some
dot-commands such as .open only affect the current connection.
19. Miscellaneous Extension Features
The CLI is built with several SQLite extensions that are not
included with the SQLite library. A few add features
not described in the preceding sections, namely:
- the UINT collating sequence which treats
unsigned integers embedded in text according to
their value, along with other text, for ordering; - decimal arithmetic as provided by the decimal extension;
- the generate_series() table-valued function; and
- support for POSIX extended regular expressions
bound to the REGEXP operator.
20. Other Dot Commands
There are many other dot-commands available in the command-line
shell. See the «.help» command for a complete list for any particular
version and build of SQLite.
21. Using sqlite3 in a shell script
One way to use sqlite3 in a shell script is to use «echo» or
«cat» to generate a sequence of commands in a file, then invoke sqlite3
while redirecting input from the generated command file. This
works fine and is appropriate in many circumstances. But as
an added convenience, sqlite3 allows a single SQL command to be
entered on the command line as a second argument after the
database name. When the sqlite3 program is launched with two
arguments, the second argument is passed to the SQLite library
for processing, the query results are printed on standard output
in list mode, and the program exits. This mechanism is designed
to make sqlite3 easy to use in conjunction with programs like
«awk». For example:
$ sqlite3 ex1 'select * from tbl1'
>  | awk '{printf "<tr><td>%s<td>%sn",$1,$2 }'
<tr><td>hello<td>10
<tr><td>goodbye<td>20
$
22. Marking The End Of An SQL Statement
SQLite commands are normally terminated by a semicolon. In the CLI
you can also use the word «GO» (case-insensitive) or a slash character
«/» on a line by itself to end a command. These are used by SQL Server
and Oracle, respectively, and are supported by the SQLite CLI for
compatibility. These won’t work in sqlite3_exec(),
because the CLI translates these inputs into a semicolon before passing
them down into the SQLite core.
23. Command-line Options
There are many command-line options available to the CLI. Use the —help
command-line option to see a list:
$ sqlite3 --help
Usage: ./sqlite3 [OPTIONS] FILENAME [SQL]
FILENAME is the name of an SQLite database. A new database is created
if the file does not previously exist.
OPTIONS include:
   -A ARGS...           run ".archive ARGS" and exit
   -append              append the database to the end of the file
   -ascii               set output mode to 'ascii'
   -bail                stop after hitting an error
   -batch               force batch I/O
   -box                 set output mode to 'box'
   -column              set output mode to 'column'
   -cmd COMMAND         run "COMMAND" before reading stdin
   -csv                 set output mode to 'csv'
   -deserialize         open the database using sqlite3_deserialize()
   -echo                print commands before execution
   -init FILENAME       read/process named file
   -[no]header          turn headers on or off
   -help                show this message
   -html                set output mode to HTML
   -interactive         force interactive I/O
   -json                set output mode to 'json'
   -line                set output mode to 'line'
   -list                set output mode to 'list'
   -lookaside SIZE N    use N entries of SZ bytes for lookaside memory
   -markdown            set output mode to 'markdown'
   -maxsize N           maximum size for a --deserialize database
   -memtrace            trace all memory allocations and deallocations
   -mmap N              default mmap size set to N
   -newline SEP         set output row separator. Default: 'n'
   -nofollow            refuse to open symbolic links to database files
   -nonce STRING        set the safe-mode escape nonce
   -nullvalue TEXT      set text string for NULL values. Default ''
   -pagecache SIZE N    use N slots of SZ bytes each for page cache memory
   -quote               set output mode to 'quote'
   -readonly            open the database read-only
   -safe                enable safe-mode
   -separator SEP       set output column separator. Default: '|'
   -stats               print memory stats before each finalize
   -table               set output mode to 'table'
   -tabs                set output mode to 'tabs'
   -version             show SQLite version
   -vfs NAME            use NAME as the default VFS
   -zip                 open the file as a ZIP Archive
The CLI is flexible regarding command-line option formatting.
Either one or two leading «-» characters are permitted.
Thus «-box» and «—box» mean the same thing.
Command-line options are processed from left to right.
Hence a «—box» option will override a prior «—quote» option.
Most of the command-line options are self-explanatory, but a few merit additional
discussion below.
23.1. The —safe command-line option
The —safe command-line option attempts to disable all features of the CLI that
might cause any changes to the host computer other than changes to the specific database
file named on the command-line. The idea is that if you receive a large SQL script
from an unknown or untrusted source, you can run that script to see what it does without
risking an exploit by using the —safe option. The —safe option disables (among other
things):
- The .open command, unless the —hexdb option is used or the filename is «:memory:».
This prevents the script from reading or writing any database files not named on
the original command-line. - The ATTACH SQL command.
- SQL functions that have potentially harmful side-effects, such as
edit(), fts3_tokenizer(), load_extension(), readfile() and writefile(). - The .archive command.
- The .backup and .save commands.
- The .import command.
- The .load command.
- The .log command.
- The .shell and .system commands.
- The .excel, .once and .output commands.
- Other commands that can have deleterious side effects.
Basically, any feature of the CLI that reads or writes from a file on disk other
than the main database file is disabled.
23.1.1. Bypassing —safe restrictions for specific commands
If the «—nonce NONCE» option is also included on the command-line, for some
large and arbitrary NONCE string, then the «.nonce NONCE» command (with the
same large nonce string) will permit the next SQL statement or dot-command
to bypass the —safe restrictions.
Suppose you want to run a suspicious script and the script requires one or
two of the features that —safe normally disables. For example, suppose it
needs to ATTACH one additional database. Or suppose the script needs to load
a specific extension. This can be accomplished by preceding the (carefully
audited) ATTACH statement or the «.load» command with an appropriate «.nonce»
command and supplying the same nonce value using the «—nonce» command-line
option. Those specific commands will then be allowed to execute normally,
but all other unsafe commands will still be restricted.
The use of «.nonce» is dangerous in the sense that a mistake can allow a
hostile script to damage your system. Therefore, use «.nonce» carefully,
sparingly, and as a last resort when there are no other ways to get a
script to run under —safe mode.
24. Compiling the sqlite3 program from sources
To compile the command-line shell on unix systems and on Windows with MinGW,
the usual configure-make command works:
The configure-make works whether you are building from the canonical sources
from the source tree, or from an amalgamated bundle. There are few
dependencies. When building from canonical sources, a working
tclsh is required.
If using an amalgamation bundle, all the preprocessing work normally
done by tclsh will have already been carried out and only normal build
tools are required.
A working zlib compression library is
needed in order for the .archive command to operate.
On Windows with MSVC, use nmake with the Makefile.msc:
For correct operation of the .archive command, make a copy of the
zlib source code into the compat/zlib subdirectory
of the source tree and compile this way:
nmake /f Makefile.msc USE_ZLIB=1
24.1. Do-It-Yourself Builds
The source code to the sqlite3 command line interface is in a single
file named «shell.c». The shell.c source file is generated from other
sources, but most of the code for shell.c can be found in
src/shell.c.in.
(Regenerate shell.c by typing «make shell.c» from the canonical source tree.)
Compile the shell.c file (together
with the sqlite3 library source code) to generate
the executable. For example:
gcc -o sqlite3 shell.c sqlite3.c -ldl -lpthread -lz -lm
The following additional compile-time options are recommended in order to
provide a full-featured command-line shell:
- -DSQLITE_THREADSAFE=0
- -DSQLITE_ENABLE_EXPLAIN_COMMENTS
- -DSQLITE_HAVE_ZLIB
- -DSQLITE_INTROSPECTION_PRAGMAS
- -DSQLITE_ENABLE_UNKNOWN_SQL_FUNCTION
- -DSQLITE_ENABLE_STMTVTAB
- -DSQLITE_ENABLE_DBPAGE_VTAB
- -DSQLITE_ENABLE_DBSTAT_VTAB
- -DSQLITE_ENABLE_OFFSET_SQL_FUNC
- -DSQLITE_ENABLE_JSON1
- -DSQLITE_ENABLE_RTREE
- -DSQLITE_ENABLE_FTS4
- -DSQLITE_ENABLE_FTS5
This page last modified on 2022-12-27 16:51:24 UTC
Привет, посетитель сайта ZametkiNaPolyah.ru! Продолжаем рубрику реляционные базы данных и начинаем новый раздел библиотека SQLite. Давайте установим SQLite3 на наш компьютер. В принципе, установка SQLite — довольно простая и ошибиться здесь трудно. Я буду рассматривать установку SQLite3 на Windows 7. Замечу, что процесс установки SQLite на ОС семейства Windows одинаков.
Помните я уже писал о том, что SQLite3 — это два файла: библиотека и шелл? Вся установка заключается в том, чтобы распаковать архивы с этими двумя файлами.
Где скачать SQLite3
Рассмотрим процесс установки библиотеки SQLite на компьютер под управлением Windows 7. Хочу отметить, что SQLite3 – кросс платформенное приложение и работает одинаково на любой операционной системе.
Первый шаг, который нам нужно сделать – скачать SQLite3. Скачать SQLite3 можно на официальном сайте компании.
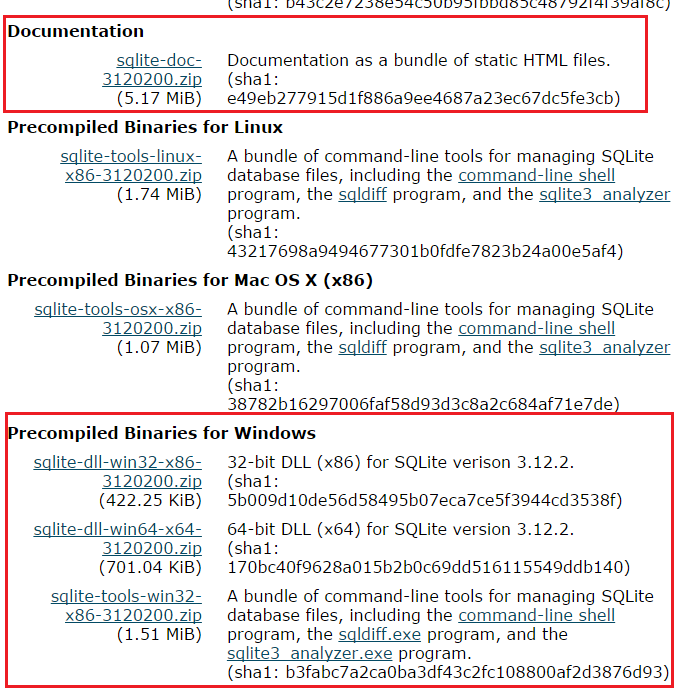
Со страницы Download нам необходимо скачать три архива:
- Архив с документацией sqlite— doc-3120200.zip. Документация очень помогает, когда нет доступа к интернету.
- Sqlite— tools— win32- x86-3120200.zip – это набор утилит для работы и администрирования с базами данных под управлением SQLite
- И на выбор скачиваем sqlite— dll— win64- x64-3120200 или же sqlite— dll— win32- x86-3120200. Выбор зависит от разрядности вашего процессора и операционной системы. Обратите внимание, что х86 можно установить на 64-ех битные системы и всё будет работать, но никак не наоборот.
Установка SQLite на Windows 7
Установим SQLite на компьютер: нам необходимо создать рабочую папку для библиотеки SQLite3.
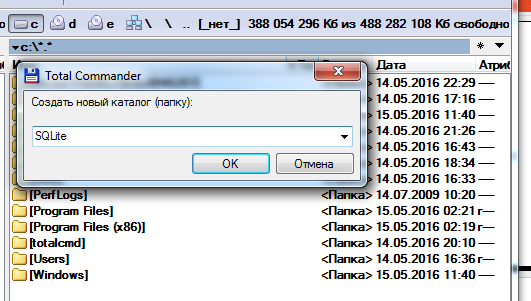
Я буду устанавливать SQLite3 на диск C, поэтому в корне диска С создаю папку с названием SQLite.
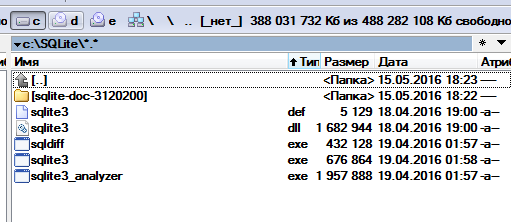
В эту папку распаковываю три архива, которые скачал ранее. На самом деле мы уже установили библиотеку SQLite3 на компьютер. Всё, установка SQLite3 завершена.
Запуск библиотеки SQLite3
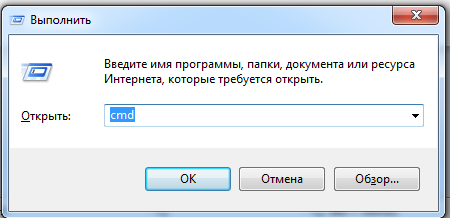
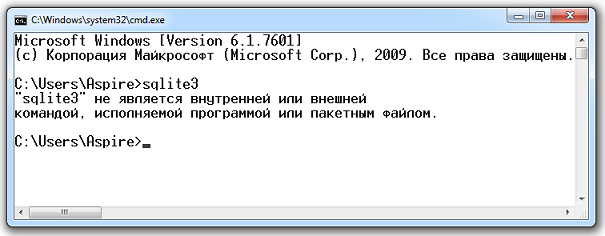
На самом деле, неправильно говорить: запуск SQLite, мы запускаем шелл, через который будем работать с библиотекой. Давайте попробуем ее запустить, для этого нажмем сочетание клавиш:Win+R. Запустится приложение «Выполнить». При помощи приложения «Выполнить» запускаем командную строку командой cmd.
В командной строке набираем sqlite3. Команда sqlite3 служит для запуска оболочки, через которую мы можем работать с базами данных. Но, к сожалению, оболочка не запустилась. А мы получили вот такое предупреждение: «sqlite3» не является внутренней или внешней командой, исполняемой программой или пакетным файлом.
Для решения этой проблемы у нас есть два варианта:
- Мы можем перейти в папку, где находится файл sqlite.exe при помощи команды: cd c:SQLite. После чего шелл библиотеки SQLite3 можно запустить.
- Мы можем добавить путь к файлу sqlite.exe в системную переменную PATH, тогда мы сможем запускать нашу консоль из любой папки на компьютере. Делается это так: нажимаем правой кнопкой мыши на «Компьютер» -> выбираем пункт «Свойства» -> «Дополнительные параметры системы» -> «Переменные среды». В разделе системные переменные находим PATH (если ее еще нет, то создаем) и нажимаем «Изменить». Обратите внимание: переменные разделяются символом точка с запятой. Поэтому ставим точку с запятой после последней переменной и добавляем свою. В моё случае: C:SQLite. Именно в этой папке у меня находится файл sqlite3.exe.
И последнее, что мы сделаем: создадим рабочую среду для библиотеки SQLite3. Всё дело в том, что библиотека SQLite3 создает файл с базой данных именной в той папке, откуда запущен шелл, поэтому я внутри папки C:SQLite, создам еще две: C:SQLiteExample DB и C:SQLiteWorld DB, сюда я положу демонстрационный файл world.db3. База данных World – демонстрационная.
Возможно, эти записи вам покажутся интересными
SQLite — это библиотека, написанная на языке C, которая обеспечивает работу с SQL. Данный инструмент относится к Реляционным системам управления базами данных. Большинство баз данных SQL работает по схеме клиент/сервер. Возьмём к примеру MySQL. В процессе работы данные берутся с MySQL сервера, и отправляются в качестве ответа на запрос. В случае использования SQLite, данные будут браться непосредственно с диска, т.е. не будет необходимости обращаться к серверу.

Установка
Мы будем взаимодействовать с базой данных через интерфейс командной строки sqlite3 (CLI) в Linux. Работа с sqlite3 CLI в MAC OS и Windows осуществляется таким же образом, однако я рекомендую вам потратить 5 минут на установку виртуальной машины, чтобы не захламлять свой компьютер лишним софтом.
Для установки sqlite3 на Linux выполняем команду:
sudo apt-get install sqlite3 libsqlite3-dev
В результате на вашей машине будет установлен sqlite3. Для установки данного инструмента на других ОС следуйте инструкциям. Для запуска sqlite выполняем команду sqlite3 в консоли. Результат должен быть таким:

Во второй строчке указана подсказка о том, что для получения справки необходимо выполнить команду .help. Давайте сделаем это. В результате мы увидим Мета Команды и их описание.
Мета Команды
Мета Команды — предназначены для формирования таблиц и других административных операций. Все они оканчиваются точкой. Пройдёмся по списку команд, которые могут пригодиться:
| Команда | Описание |
| .show | Показывает текущие настройки заданных параметров |
| .databases | Показывает название баз данных и файлов |
| .quit | Выход из sqlite3 |
| .tables | Показывает текущие таблицы |
| .schema | Отражает структуру таблицы |
| .header | Отобразить или скрыть шапку таблицы |
| .mode | Выбор режима отображения данных таблицы |
| .dump | Сделать копию базы данных в текстовом формате |
Стандартные команды
Теперь давайте пройдёмся по списку стандартных команд sqlite3, которые предназначены для взаимодействия с базой данных. Стандартные команды могут быть классифицированы по трём группам:
- Язык описания данных DDL: команды для создания таблицы, изменения и удаления баз данных, таблиц и прочего.
-
- CREATE
- ALTER
- DROP
- Язык управления данными DML: позволяют пользователю манипулировать данными (добавлять/изменять/удалять).
-
- INSERT
- UPDATE
- DELETE
- Язык запросов DQL: позволяет осуществлять выборку данных.
-
- SELECT
Заметка: SQLite так же поддерживает и множество других команд, список которых можно найти тут. Поскольку данный урок предназначен для начинающих, мы ограничимся перечисленным набором команд.
Файлы баз данных SQLite являются кроссплатформенными. Они могут располагаться на различного рода устройствах.
Далее знакомство с sqlite3 будет осуществляться на базе данных, предназначенной для хранения комментариев. Для публикации комментария пользователю необходимо будет добавить следующие данные:
- Имя
- Сайт
- Комментарий
Из всех этих полей только адрес сайта может быть пустым. Так же можем ввести колонку для нумерации комментриев. Назовём её post_id.
Теперь давайте определимся с типами данных для каждой из колонок:
| Атрибут | Тип данных |
| post_id | INTEGER |
| name | TEXT |
| TEXT | |
| website_url | TEXT |
| comment | TEXT |
Тут вы сможете найти все типы данных, поддерживаемые в SQLite3.
Так же следует отметить, в SQLite3 данные, вставляемые в колонку могут отличаться от указанного типа. В MySQL такое не пройдёт.
Теперь давайте создадим базу данных. Если вы ещё находитесь в интерфейсе sqlite3, то наберите команду .quit для выхода. Теперь вводим:
sqlite3 comment_section.db
В результате, в текущем каталоге у нас появится файл comment_section.db.
Заметка: если не указать название файла, sqlite3 создаст временную базу данных.
Создание таблицы
Для хранения комментариев нам необходимо создать таблицу. Назовём её comments. Выполняем команду:
CREATE TABLE comments (
    post_id INTEGER NOT NULL PRIMARY KEY AUTOINCREMENT,
    name TEXT NOT NULL,
    email TEXT NOT NULL,
    website_url TEXT NULL,
    comment TEXT NOT NULL );
NOT NULL обеспечит уверенность, что ячейка не будет содержать пустое значение. PRIMARY KEY и AUTOINCREMENT расширяют возможности поля post_id.
Чтобы убедиться в том, что таблица была создана, выполняем мета команду .tables. В результате видим нашу таблицу comments.

Заметка: Для получения структуры таблицы наберите .schema comments
Теперь можем внести данные в таблицу.
ВСТАВКА СТРОК
Предположим, что нам необходим внести следующую запись:
Name    : Shivam Mamgain
Email   : xyz@gmail.com
Website : shivammg.blogspot.com
Comment : Great tutorial for beginners.
Для вставки воспользуемся командой INSERT.
INSERT INTO comments ( name, email, website_url, comment )
VALUES ( 'Shivam Mamgain', 'xyz@gmail.com',
'shivammg.blogspot.com', 'Great tutorial for beginners.' );
Указывать значение для post_id не нужно т.к. оно сформируется автоматически благодаря настройке AUTOINCREMENT.
Чтобы набить руку можете вставить ещё несколько строк.
ВЫБОРКА
Для выборки данных воспользуемся командой SELECT.
SELECT post_id, name, email, website_url, comment
FROM comments;
Этот же запрос может выглядеть так:
В результате из таблицы будут извлечены все строки. Результат может выглядеть без разграничения по колонкам и без заголовка. Чтобы это исправить выполняем:
.show

Для отображения шапки введите .headers ON.
Для отображения колонок выполните команду .mode column.
Выполняем SELECT запрос ещё раз.

Заметка: вид отображения можно изменить, воспользовавшись мета командой .mode.
ОБНОВЛЕНИЕ
Предположим, что поле email для пользователя ‘Shivam Mamgain’ необходимо изменить на ‘zyx@email.com’. Выполняем следующую команду:
UPDATE comments
SET email = 'zyx@email.com'
WHERE name = 'Shivam Mamgain';
В результате запись будет изменена.
Заметка: Значение в колонке name может быть не уникально, так что в результате работы команды может быть затронуто более одной строки. Для всех пользователей, где значение name = ‘Shivam Mamgain’, поле email будет изменено на ‘zyx@email.com’. Для изменения какой-то конкретной строки следует её отследить по полю post_id. Мы его определили как PRIMARY KEY, что обеспечивает уникальность значения.
УДАЛЕНИЕ
Для выполнения команды DELETE нужно так же указать условие.
К примеру нам необходимо удалить комментарий с post_id = 9. Выполняем команду:
DELETE FROM comments
WHERE post_id = 9;
Для удаления комментариев пользователей ‘Bart Simpson’ и ‘Homer Simpson’ выполним:
DELETE FROM comments
WHERE name = 'Bart Simpson' OR name = 'Homer Simpson';
ИЗМЕНЕНИ СТРУКТУРЫ
Для добавления новой колонки следует использовать команду ALTER. К примеру введём поле username. Выполняем команду:
ALTER TABLE comments
ADD COLUMN username TEXT;
Данная команда создаст новое текстовое поле в таблице comments. Для всех сток в качестве значения будет выставлено NULL.
Так же мы можем использовать команду ALTER для переименования таблицы comments на Coms.
ALTER TABLE comments
RENAME TO Coms;
УДАЛЕНИЕ
Для удаление нашей таблицы выполните следующую команду:
Заключение
SQLite3 даёт множество преимуществ в отличии от других СУБД. Множество фрэймворков таких как Django, Ruby on Rails и web2py по умолчанию используют SQLite3. Многие браузеры используют данный инструмент для хранения локальных данных. Так же она используется в качестве хранилища данных таких ОС как Android и Windows Phone 8.
Для работы с SQLite3 можно воспользоваться и программами с графическим интерфейсом. К примеру: DB Browser for SQLite и SQLiteStudio. Для тренировки работы с SQL можете поиграть с SQL Fiddle.
Данный урок может помочь стартовать с SQLite3. Для взаимодействия с данным СУБД в PHP можем воспользоваться расширением PDO.
Оболочка командной строки для SQLite
1.Начало работы
Проект SQLite предоставляет простую программу командной строки с именем sqlite3 (или sqlite3.exe в Windows), которая позволяет пользователю вручную вводить и выполнять операторы SQL для базы данных SQLite или для архива ZIP . В этом документе содержится краткое введение в использование программы sqlite3 .
Запустите программу sqlite3 , введя «sqlite3» в командной строке, а затем, при необходимости, имя файла, содержащего базу данных SQLite (или ZIP-архив ). Если именованный файл не существует, новый файл базы данных с заданным именем будет создан автоматически. Если в командной строке не указан файл базы данных, создается временная база данных, которая автоматически удаляется при выходе из программы sqlite3.
При запуске программа sqlite3 покажет краткое баннерное сообщение, а затем предложит вам ввести SQL. Введите операторы SQL (заканчивающиеся точкой с запятой), нажмите «Enter», и SQL будет выполнен.
Например,чтобы создать новую базу данных SQLite с именем «ex1» и одной таблицей с именем «tbl1»,вы можете сделать это:
$ sqlite3 ex1
SQLite version 3.36.0 2021-06-18 18:36:39
Enter ".help" for usage hints.
sqlite> create table tbl1(one text, two int);
sqlite> insert into tbl1 values('hello!',10);
sqlite> insert into tbl1 values('goodbye', 20);
sqlite> select * from tbl1;
hello!|10
goodbye|20
sqlite>
Завершите программу sqlite3,набрав в системе символ End-Of-File (обычно это Controll-D).Используйте символ прерывания (обычно Controll-C)для остановки долгосрочного SQL-оператора.
Обязательно вводите точку с запятой в конце каждой команды SQL! Программа sqlite3 ищет точку с запятой,чтобы понять,когда ваша SQL-команда завершена.Если вы опустите точку с запятой,sqlite3 выдаст вам приглашение к продолжению и будет ждать,пока вы введете еще текст для завершения SQL-команды.Эта функция позволяет вводить SQL-команды,занимающие несколько строк.Например:
sqlite> CREATE TABLE tbl2 (
   ...>   f1 varchar(30) primary key,
   ...>   f2 text,
   ...>   f3 real
   ...> );
sqlite>
2.Дважды щелкните Startup On Windows
Пользователи Windows могут дважды щелкнуть значок sqlite3.exe, чтобы оболочка командной строки открыла окно терминала с запущенным SQLite. Однако, поскольку двойной щелчок запускает sqlite3.exe без аргументов командной строки, файл базы данных не будет указан, поэтому SQLite будет использовать временную базу данных, которая удаляется при выходе из сеанса. Чтобы использовать файл постоянного диска в качестве базы данных, введите команду «.open» сразу после запуска окна терминала:
SQLite version 3.36.0 2021-06-18 18:36:39
Enter ".help" for usage hints.
Connected to a transient in-memory database.
Use ".open FILENAME" to reopen on a persistent database.
sqlite> .open ex1.db
sqlite>
В приведенном выше примере открывается и используется файл БД с именем «ex1.db».Файл «ex1.db» создается,если он ранее не существовал.Возможно,вы захотите использовать полное имя,чтобы убедиться,что файл находится в каталоге,в котором,как вы думаете,он находится.Используйте прямые косые черты в качестве символа разделителя каталогов.Другими словами,используйте «c:/work/ex1.db»,а не «c:workex1.db».
Кроме того,вы можете создать новую БД,используя временное хранилище по умолчанию,а затем сохранить эту БД в файл на диске с помощью команды «.save»:
SQLite version 3.36.0 2021-06-18 18:36:39
Enter ".help" for usage hints.
Connected to a transient in-memory database.
Use ".open FILENAME" to reopen on a persistent database.
sqlite> ... many SQL commands omitted ...
sqlite> .save ex1.db
sqlite>
Будьте осторожны при использовании команды «.save»,так как она перезапишет все существующие файлы БД с таким же именем без запроса подтверждения.Как и в случае с командой «.open»,во избежание двусмысленности можно использовать полное имя пути с разделителями каталогов forward-slash.
3.Специальные команды sqlite3 (точечные команды)
Большую часть времени sqlite3 просто читает строки ввода и передает их библиотеке SQLite для выполнения.Но строки ввода,начинающиеся с точки («.»),перехватываются и интерпретируются самой программой sqlite3.Эти «команды с точкой» обычно используются для изменения формата вывода запросов или для выполнения определенных готовых операторов запросов.Изначально было всего несколько точечных команд,но с годами накопилось множество новых возможностей,так что сегодня их более 60.
Для списка доступных точечных команд можно ввести «.help» без аргументов.Или введите «.help TOPIC» для получения подробной информации о TOPIC.Далее следует список доступных точечных команд:
sqlite> .help
.archive ...             Manage SQL archives
.auth ON|OFF             Show authorizer callbacks
.backup ?DB? FILE        Backup DB (default "main") to FILE
.bail on|off             Stop after hitting an error.  Default OFF
.binary on|off           Turn binary output on or off.  Default OFF
.cd DIRECTORY            Change the working directory to DIRECTORY
.changes on|off          Show number of rows changed by SQL
.check GLOB              Fail if output since .testcase does not match
.clone NEWDB             Clone data into NEWDB from the existing database
.connection [close] [#]  Open or close an auxiliary database connection
.databases               List names and files of attached databases
.dbconfig ?op? ?val?     List or change sqlite3_db_config() options
.dbinfo ?DB?             Show status information about the database
.dump ?OBJECTS?          Render database content as SQL
.echo on|off             Turn command echo on or off
.eqp on|off|full|...     Enable or disable automatic EXPLAIN QUERY PLAN
.excel                   Display the output of next command in spreadsheet
.exit ?CODE?             Exit this program with return-code CODE
.expert                  EXPERIMENTAL. Suggest indexes for queries
.explain ?on|off|auto?   Change the EXPLAIN formatting mode.  Default: auto
.filectrl CMD ...        Run various sqlite3_file_control() operations
.fullschema ?
.headers on|off          Turn display of headers on or off
.help ?-all? ?PATTERN?   Show help text for PATTERN
.import FILE TABLE       Import data from FILE into TABLE
.imposter INDEX TABLE    Create imposter table TABLE on index INDEX
.indexes ?TABLE?         Show names of indexes
.limit ?LIMIT? ?VAL?     Display or change the value of an SQLITE_LIMIT
.lint OPTIONS            Report potential schema issues.
.load FILE ?ENTRY?       Load an extension library
.log FILE|off            Turn logging on or off.  FILE can be stderr/stdout
.mode MODE ?TABLE?       Set output mode
.nonce STRING            Disable safe mode for one command if the nonce matches
.nullvalue STRING        Use STRING in place of NULL values
.once ?OPTIONS? ?FILE?   Output for the next SQL command only to FILE
.open ?OPTIONS? ?FILE?   Close existing database and reopen FILE
.output ?FILE?           Send output to FILE or stdout if FILE is omitted
.parameter CMD ...       Manage SQL parameter bindings
.print STRING...         Print literal STRING
.progress N              Invoke progress handler after every N opcodes
.prompt MAIN CONTINUE    Replace the standard prompts
.quit                    Exit this program
.read FILE               Read input from FILE
.recover                 Recover as much data as possible from corrupt db.
.restore ?DB? FILE       Restore content of DB (default "main") from FILE
.save FILE               Write in-memory database into FILE
.scanstats on|off        Turn sqlite3_stmt_scanstatus() metrics on or off
.schema ?PATTERN?        Show the CREATE statements matching PATTERN
.selftest ?OPTIONS?      Run tests defined in the SELFTEST table
.separator COL ?ROW?     Change the column and row separators
.session ?NAME? CMD ...  Create or control sessions
.sha3sum ...             Compute a SHA3 hash of database content
.shell CMD ARGS...       Run CMD ARGS... in a system shell
.show                    Show the current values for various settings
.stats ?ARG?             Show stats or turn stats on or off
.system CMD ARGS...      Run CMD ARGS... in a system shell
.tables ?TABLE?          List names of tables matching LIKE pattern TABLE
.testcase NAME           Begin redirecting output to 'testcase-out.txt'
.testctrl CMD ...        Run various sqlite3_test_control() operations
.timeout MS              Try opening locked tables for MS milliseconds
.timer on|off            Turn SQL timer on or off
.trace ?OPTIONS?         Output each SQL statement as it is run
.vfsinfo ?AUX?           Information about the top-level VFS
.vfslist                 List all available VFSes
.vfsname ?AUX?           Print the name of the VFS stack
.width NUM1 NUM2 ...     Set minimum column widths for columnar output
sqlite>
4.Правила для «точечных команд»,SQL и многое другое
4.1.Структура линии
Входные данные CLI разбираются на последовательность,состоящую из:
- SQL statements;
- dot-commands; or
- CLI comments
Операторы SQL имеют свободную форму и могут располагаться на нескольких строках,в любом месте могут быть вставлены пробелы или комментарии SQL.Они завершаются либо символом ‘;’ в конце строки ввода,либо символом ‘/’ или словом «go» в отдельной строке.Если символ ‘;’ не находится в конце строки ввода,он служит для разделения операторов SQL.Пробельные символы в конце строки игнорируются для целей завершения.
Точечная команда имеет более строгую структуру:
- Он должен начинаться с «.» на левом поле без предшествующего пробела.
- Он должен полностью содержаться в одной строке ввода.
- Он не может возникнуть в середине обычного оператора SQL.Другими словами,он не может возникнуть в подсказке продолжения.
- Синтаксис комментариев для точечных команд отсутствует.
CLI также принимает комментарии на всю строку,которые начинаются с символа ‘#’ и продолжаются до конца строки.Перед символом ‘#’ не может быть пробелов.
4.2.Аргументы точечных команд
Аргументы,передаваемые dot-командам,анализируются из хвоста команды в соответствии с этими правилами:
- Последующая новая строка и любые другие пробельные символы отбрасываются;
- Пробел,следующий сразу за именем команды с точкой,или любая конечная граница ввода аргумента отбрасывается;
- Ввод аргумента начинается с любого символа,не являющегося пробелом;
- Ввод аргумента заканчивается символом,который зависит от его ведущего символа,таким образом:
- для ведущей одинарной кавычки (‘),одинарная кавычка действует как разделитель конца;
- для ведущей двойной кавычки («»),неэкранированная двойная кавычка действует как разделитель конца;
- для любого другого ведущего символа разделителем конца является любой пробел;и
- конец хвоста команды действует как разделитель конца для любого аргумента;
4.3.Выполнение точечных команд
Точечные команды интерпретируются программой командной строки sqlite3.exe, а не самим SQLite. Таким образом, ни одна из точечных команд не будет работать в качестве аргумента для интерфейсов SQLite, таких как sqlite3_prepare() или sqlite3_exec() .
5.Изменение форматов вывода
Программа sqlite3 способна отображать результаты запроса в 14 различных форматах вывода:
- ascii
- box
- csv
- column
- html
- insert
- json
- line
- list
- markdown
- quote
- table
- tabs
- tcl
Вы можете использовать точечную команду «.mode» для переключения между этими форматами вывода.По умолчанию используется режим вывода «список».В режиме списка каждая строка результата запроса записывается в одну строку,а каждый столбец в этой строке разделяется определенной строкой-разделителем.По умолчанию разделителем является символ трубы («|»).Режим списка особенно полезен,когда вы собираетесь отправить результат запроса в другую программу (например,AWK)для дополнительной обработки.
sqlite> .mode list
sqlite> select * from tbl1;
hello!|10
goodbye|20
sqlite>
Введите «.mode» без аргументов,чтобы показать текущий режим:
sqlite> .mode
current output mode: list
sqlite>
Для изменения разделителя используйте точечную команду «.разделитель».Например,чтобы изменить разделитель на запятую и пробел,можно сделать это:
sqlite> .separator ", "
sqlite> select * from tbl1;
hello!, 10
goodbye, 20
sqlite>
Следующая команда «.mode» может вернуть «.separator» к значению по умолчанию (в зависимости от ее аргументов).Поэтому вам,скорее всего,придется повторять команду «.separator» при каждом изменении режима,если вы хотите продолжать использовать нестандартный разделитель.
В режиме «кавычки» вывод форматируется как SQL-литералы.Строки заключены в одинарные кавычки,а внутренние одинарные кавычки экранированы удвоением.Капли выводятся в шестнадцатеричной блочной литературной нотации (Ex:x’abcd’).Цифры отображаются в виде ASCII текста,а NULL значения отображаются в виде «NULL».Все столбцы отделены друг от друга запятой (или любым другим альтернативным символом,выбранным с помощью «.разделителя»).
sqlite> .mode quote
sqlite> select * from tbl1;
'hello!',10
'goodbye',20
sqlite>
В режиме «строка» каждый столбец в строке БД отображается на строке сам по себе.Каждая строка состоит из названия столбца,знака равенства и данных столбца.Последующие записи разделены пустой строкой.Приведем пример вывода в «строчном» режиме:
sqlite> .mode line
sqlite> select * from tbl1;
one = hello!
two = 10

one = goodbye
two = 20
sqlite>
В режиме столбцов каждая запись отображается отдельной строкой с данными,выровненными по столбцам.Например:
sqlite> .mode column
sqlite> select * from tbl1;
one       two

hello!    10
goodbye   20
sqlite>
В режиме «колонки» (а также в режимах «box»,»table» и «markdown»)ширина колонок настраивается автоматически.Но это можно отменить,задав определенную ширину для каждой колонки с помощью команды «.width».Аргументами команды «.width» являются целые числа,которые представляют собой количество символов,отводимых для каждой колонки.Отрицательные числа означают выравнивание вправо.Таким образом:
sqlite> .width 12 -6
sqlite> select * from tbl1;
one              two

hello!            10
goodbye           20
sqlite>
Ширина 0 означает,что ширина столбца выбирается автоматически.Неуказанная ширина столбцов становится равной нулю.Следовательно,команда «.width» без аргументов обнуляет ширину всех столбцов и,таким образом,приводит к тому,что ширина всех столбцов определяется автоматически.
Режим «колонка»-это формат табличного вывода.Другие форматы табличного вывода-«box»,»markdown» и «table»:
sqlite> .width
sqlite> .mode markdown
sqlite> select * from tbl1;
|   one   | two |
|
| hello!  | 10  |
| goodbye | 20  |
sqlite> .mode table
sqlite> select * from tbl1;
+
|   one   | two |
+
| hello!  | 10  |
| goodbye | 20  |
+
sqlite> .mode box
sqlite> select * from tbl1;
┌─────────┬─────┐
│   one   │ two │
├─────────┼─────┤
│ hello!  │ 10  │
│ goodbye │ 20  │
└─────────┴─────┘
sqlite>
Колоночные режимы принимают некоторые дополнительные опции для управления форматированием.Опция «—wrapNвариант (гдеNцелое число)заставляет колонки обернуть текст,длина которого превышает N символов.Обертывание отключено,если N равно нулю.
sqlite> insert into tbl1 values('The quick fox jumps over a lazy brown dog.',99);
sqlite> .mode box
sqlite> select * from tbl1 where two>50;
┌────────────────────────────────┬─────┐
│              one               │ two │
├────────────────────────────────┼─────┤
│ The quick fox jumps over a laz │ 90  │
│ y brown dog.                   │     │
└────────────────────────────────┴─────┘
sqlite>
Обертывание происходит ровно послеNсимволов,которые могут находиться в середине слова.Чтобы обернуть на границе слова,добавьте опцию «—wordwrap on» (или просто «-www» для краткости):
sqlite> .mode box
sqlite> select * from tbl1 where two>50;
┌─────────────────────────────┬─────┐
│             one             │ two │
├─────────────────────────────┼─────┤
│ The quick fox jumps over a  │ 90  │
│ lazy brown dog.             │     │
└─────────────────────────────┴─────┘
sqlite>
Опция «—quote» заставляет результаты в каждом столбце заключать в кавычки как SQL литерал,как в режиме «quote».Дополнительные опции см.в интерактивной справке.
Команда «.mode box —wrap 60 —quote» настолько полезна для запросов к базе данных общего назначения,что ей присвоен собственный псевдоним.Вместо того чтобы набирать всю эту команду из 27 символов,вы можете просто сказать «.mode qbox».
Другим полезным режимом вывода является «вставка».В режиме вставки вывод форматируется как SQL INSERT операторы.Используйте режим вставки для генерации текста,который впоследствии может быть использован для ввода данных в другую базу данных.
При указании режима вставки необходимо указать дополнительный аргумент-имя таблицы,в которую будет вставлена таблица.Например:
sqlite> .mode insert new_table
sqlite> select * from tbl1 where two<50;
INSERT INTO "new_table" VALUES('hello',10);
INSERT INTO "new_table" VALUES('goodbye',20);
sqlite>
Другие режимы вывода включают «csv»,»json» и «tcl».Попробуйте их самостоятельно,чтобы увидеть,что они делают.
6.Запрос схемы базы данных
Программа sqlite3 предоставляет несколько удобных команд,которые полезны для просмотра схемы БД.В этих командах нет ничего такого,что нельзя было бы сделать какими-либо другими способами.Эти команды предоставляются исключительно в виде ярлыка.
Например,чтобы увидеть список таблиц в БД,можно ввести «.таблицы».
sqlite> .tables
tbl1 tbl2
sqlite>
Команда «.tables» аналогична установке режима списка,после чего выполняется следующий запрос:
SELECT name FROM sqlite_schema
WHERE type IN ('table','view') AND name NOT LIKE 'sqlite_%'
ORDER BY 1
Но команда «.tables» делает больше. Он запрашивает таблицу sqlite_schema для всех подключенных баз данных, а не только для первичной базы данных. И он размещает свой вывод в аккуратных столбцах.
Команда «.индексы» работает аналогичным образом,чтобы перечислить все индексы.Если команде «.индексы» задан аргумент,который является именем таблицы,то она показывает только индексы на этой таблице.
Команда «.schema» показывает полную схему для БД или для одной таблицы,если указан необязательный аргумент «tablename»:
sqlite> .schema
create table tbl1(one varchar(10), two smallint)
CREATE TABLE tbl2 (
  f1 varchar(30) primary key,
  f2 text,
  f3 real
);
sqlite> .schema tbl2
CREATE TABLE tbl2 (
  f1 varchar(30) primary key,
  f2 text,
  f3 real
);
sqlite>
Команда «.schema» приблизительно аналогична режиму задания списка,после чего вводится следующий запрос:
SELECT sql FROM sqlite_schema
ORDER BY tbl_name, type DESC, name
Как и в случае с «.tables», команда «.schema» показывает схему для всех подключенных баз данных. Если вы хотите увидеть схему только для одной базы данных (возможно, «основной»), вы можете добавить аргумент в «.schema», чтобы ограничить ее вывод:
sqlite> .schema main.*
Команда «.schema» может быть дополнена опцией «—indent»,в этом случае она пытается переформатировать различные CREATE утверждения схемы так,чтобы они были более легко читаемы людьми.
Команда «.databases» показывает список всех баз данных, открытых в текущем соединении. Их всегда будет как минимум 2. Первый — «главный», исходная база открыта. Второй — «temp», база данных, используемая для временных таблиц. Могут быть дополнительные базы данных, перечисленные для баз данных, присоединенных с помощью оператора ATTACH. Первый столбец вывода — это имя, к которому подключена база данных, а второй столбец результата — это имя файла внешнего файла. Может быть третий столбец результатов, который будет либо «r/o», либо «r/w» в зависимости от того, доступен ли файл базы данных только для чтения или для чтения и записи. И может быть четвертый столбец результатов, показывающий результат sqlite3_txn_state() для этого файла базы данных.
sqlite> .databases
Точка-команда «.fulllschema» работает как команда «.schema» в том,что она отображает всю схему БД.Но «.fullschema» включает также дамп таблицы статистики «sqlite_stat1″,»sqlite_stat3» и «sqlite_stat4»,если они существуют.Команда «.fullschema» обычно предоставляет всю информацию,необходимую для точного воссоздания плана запроса для конкретного запроса.При сообщении о подозрительных проблемах с планировщиком запросов SQLite команде разработчиков SQLite,разработчикам предлагается предоставить полный вывод «.fulllschema» как часть отчета о проблеме.Обратите внимание,что таблицы sqlite_stat3 и sqlite_stat4 содержат образцы индексных записей и поэтому могут содержать конфиденциальные данные,поэтому не посылайте вывод «.fulllschema» проприетарной базы данных по публичному каналу.
7.Открытие файлов базы данных
Команда «.open» открывает новое соединение с базой данных после закрытия ранее открытой команды базы данных. В своей простейшей форме команда «.open» просто вызывает sqlite3_open() для файла, указанного в качестве ее аргумента. Используйте имя «:memory:», чтобы открыть новую базу данных в памяти, которая исчезает при выходе из CLI или при повторном запуске команды «.open».
Если опция —new включена в «.open»,то перед открытием база данных обнуляется.Все предыдущие данные уничтожаются.Это разрушительная перезапись предыдущих данных,и подтверждение не запрашивается,поэтому используйте эту опцию осторожно.
Опция —readonly открывает базу данных в режиме только для чтения.Запись будет запрещена.
Опция —deserialize заставляет все содержимое файла на диске считываться в память, а затем открываться как база данных в памяти с использованием интерфейса sqlite3_deserialize() . Это, конечно, потребует много памяти, если у вас большая база данных. Кроме того, любые изменения, внесенные вами в базу данных, не будут сохранены обратно на диск, если вы явно не сохраните их с помощью команд «.save» или «.backup».
Опция —append заставляет базу данных SQLite добавляться к существующему файлу, а не работать как отдельный файл. См . расширение appendvfs для получения дополнительной информации.
Опция —zip заставляет указанный входной файл интерпретироваться как ZIP-архив,а не как файл базы данных SQLite.
Опция —hexdb заставляет считывать содержимое базы данных из последующих строк ввода в шестнадцатеричном формате,а не из отдельного файла на диске.Инструмент командной строки «dbtotxt» может быть использован для генерации соответствующего текста для базы данных.Опция —hexdb предназначена для использования разработчиками SQLite в целях тестирования.Мы не знаем случаев использования этой опции за пределами внутреннего тестирования и разработки SQLite.
8.Перенаправление ввода/вывода
8.1.Запись результатов в файл
По умолчанию sqlite3 отправляет результаты запроса в стандартный вывод.Вы можете изменить это с помощью команд «.output» и «.once».Просто поместите имя выходного файла в качестве аргумента в .output и все последующие результаты запроса будут записаны в этот файл.Или используйте команду .once вместо .output,и результаты будут перенаправлены только на одну следующую команду перед возвращением в консоль.Используйте .output без аргументов,чтобы снова начать запись в стандартный вывод.Например:
sqlite> .mode list
sqlite> .separator |
sqlite> .output test_file_1.txt
sqlite> select * from tbl1;
sqlite> .exit
$ cat test_file_1.txt
hello|10
goodbye|20
$
Если первый символ имени файла «.output» или «.once» является символом трубы («|»),то остальные символы рассматриваются как команда,и выходные данные отправляются в эту команду.Это облегчает передачу результатов запроса в какой-то другой процесс.Например,команда «open -f» на Mac открывает текстовый редактор для отображения содержимого,которое он читает со стандартного входа.Таким образом,чтобы увидеть результаты запроса в текстовом редакторе,можно набирать текст:
sqlite> .once | open -f
sqlite> SELECT * FROM bigTable;
Если команды «.output» или «.once» имеют аргумент «-e»,то вывод собирается во временный файл и в этом текстовом файле вызывается системный текстовый редактор.Таким образом,команда «.once -e» достигает того же результата,что и «.once ‘|open -f'»,но с пользой переносится на все системы.
Если команды «.output» или «.once» имеют аргумент «-x»,который заставляет их накапливать вывод в виде Comma-разделенных значений (CSV)во временном файле,то вызовите системную утилиту по умолчанию для просмотра CSV-файлов (обычно это программа для работы с электронными таблицами)на результат.Это быстрый способ отправки результата запроса в электронную таблицу для удобства просмотра:
sqlite> .once -x
sqlite> SELECT * FROM bigTable;
Команда «.excel»-это псевдоним для «.once -x».Она делает точно то же самое.
8.2.Чтение SQL из файла
В интерактивном режиме sqlite3 считывает вводимый текст (операторы SQL или точечные команды ) с клавиатуры. Вы также можете перенаправить ввод из файла при запуске sqlite3, конечно, но тогда у вас нет возможности взаимодействовать с программой. Иногда полезно запустить сценарий SQL, содержащийся в файле, вводя другие команды из командной строки. Для этого предусмотрена точечная команда «.read».
Команда «.read» принимает единственный аргумент,который (обычно)является именем файла,из которого нужно прочитать входной текст.
sqlite> .read myscript.sql
Команда «.read» временно прекращает чтение с клавиатуры и вместо этого берет данные из названного файла.По достижении конца файла ввод возвращается к клавиатуре.Файл сценария может содержать команды с точками,как и обычный интерактивный ввод.
Если аргумент «.read» начинается с символа «|»,то вместо того,чтобы открыть аргумент как файл,он запускает аргумент (без ведущего «|»)как команду,а затем использует вывод этой команды в качестве входа.Таким образом,если у вас есть сценарий,который генерирует SQL,вы можете выполнить этот SQL напрямую,используя команду,подобную следующей:
sqlite> .read |myscript.bat
8.3.Функции ввода/вывода файлов
Оболочка командной строки добавляет две определяемые приложением функции SQL, которые облегчают чтение содержимого из файла в столбец таблицы и запись содержимого столбца в файл соответственно.
SQL-функция readfile(X)читает все содержимое файла с именем X и возвращает это содержимое в виде BLOB.Это может быть использовано для загрузки содержимого в таблицу.Например:
sqlite> CREATE TABLE images(name TEXT, type TEXT, img BLOB);
sqlite> INSERT INTO images(name,type,img)
   ...>   VALUES('icon','jpeg',readfile('icon.jpg'));
SQL функция writeefile(X,Y)записывает блок Y в файл с именем X и возвращает количество записанных байт.Используйте эту функцию для извлечения содержимого одного столбца таблицы в файл.Например:
sqlite> SELECT writefile('icon.jpg',img) FROM images WHERE name='icon';
Обратите внимание, что функции readfile (X) и writefile (X, Y) являются функциями расширения и не встроены в базовую библиотеку SQLite. Эти процедуры доступны в виде загружаемых расширений в исходном файле ext / misc / fileio.c в репозиториях исходного кода SQLite .
8.4.SQL-функция edit()
В CLI есть еще одна встроенная функция SQL под названием edit().Edit()принимает один или два аргумента.Первым аргументом является значение-часто большая многострочная строка,которую нужно отредактировать.Второй аргумент-это вызов текстового редактора.(Он может включать опции,влияющие на поведение редактора).Если второй аргумент опущен,используется переменная окружения VISUAL.Функция edit()записывает свой первый аргумент во временный файл,вызывает редактор на временном файле,перечитывает файл обратно в память после завершения работы редактора и возвращает отредактированный текст.
Функция edit()может быть использована для внесения изменений в большие текстовые значения.Например:
sqlite> UPDATE docs SET body=edit(body) WHERE name='report-15';
В данном примере содержимое поля docs.body для записи,где docs.name-это «report-15»,будет отправлено в редактор.После возврата редактора результат будет записан обратно в поле docs.body.
Операция по умолчанию функции edit()заключается в вызове текстового редактора.Но,используя альтернативную программу редактирования во втором аргументе,вы также можете заставить ее редактировать изображения или другие нетекстовые ресурсы.Например,если вы хотите изменить JPEG-изображение,которое случайно хранится в поле таблицы,вы можете запустить его:
sqlite> UPDATE pics SET img=edit(img,'gimp') WHERE id='pic-1542';
Программа редактирования также может быть использована в качестве программы просмотра,просто игнорируя возвращаемое значение.Например,чтобы просто посмотреть на изображение выше,можно запустить программу:
sqlite> SELECT length(edit(img,'gimp')) WHERE id='pic-1542';
8.5.Импорт файлов в формате CSV или других форматах
Используйте команду «.import» для импорта CSV (значение,разделенное запятыми)или аналогичных разделенных данных в таблицу SQLite.Команда «.import» принимает два аргумента-источник,из которого будут считываться данные,и имя таблицы SQLite,в которую будут вставлены данные.Аргумент источника-это имя файла для чтения или,если он начинается с символа «|»,он указывает команду,которая будет запущена для получения входных данных.
Обратите внимание,что может быть важно установить «режим» перед выполнением команды «.import».Это необходимо для того,чтобы предотвратить попытки командной строки интерпретировать текст входного файла как формат,отличный от структуры файла.Если используются опции —csv или —ascii,они управляют разделителями входных данных импорта.В противном случае разделителями будут те,которые действуют в текущем режиме вывода.
Для импорта в таблицу,не входящую в «основную» схему,можно использовать опцию —schema,чтобы указать,что таблица находится в какой-то другой схеме.Это может быть полезно для баз данных ATTACH’ed или для импорта в таблицу TEMP.
При запуске .import обработка первой строки ввода зависит от того,существует ли уже целевая таблица.Если она не существует,таблица создается автоматически,и содержимое первой строки ввода используется для задания имен всех столбцов таблицы.В этом случае содержимое данных таблицы берется из второй и последующих строк ввода.Если целевая таблица уже существует,то каждая строка ввода,включая первую,принимается за фактическое содержимое данных.Если входной файл содержит начальную строку меток столбцов,вы можете заставить команду .import пропустить эту начальную строку с помощью опции «—skip 1».
Вот пример использования:загрузка уже существующей временной таблицы из CSV-файла,в первой строке которой есть имена столбцов:
sqlite> .import --csv --skip 1 --schema temp C:/work/somedata.csv tab1
8.6.Экспорт в CSV
Чтобы экспортировать таблицу SQLite (или часть таблицы)в формате CSV,просто установите «режим» в «csv»,а затем выполните запрос на извлечение нужных строк таблицы.
sqlite> .headers on
sqlite> .mode csv
sqlite> .once c:/work/dataout.csv
sqlite> SELECT * FROM tab1;
sqlite> .system c:/work/dataout.csv
В приведенном выше примере строка «.headers on» заставляет метки столбцов печататься в качестве первой строки вывода.Это означает,что первая строка результирующего CSV-файла будет содержать метки столбцов.Если метки столбцов не нужны,вместо этого установите «.headers off».(Настройка «.headers off» используется по умолчанию и может быть опущена,если заголовки не были включены ранее).
Строка «…один разFILENAME«заставляет весь вывод запроса идти в указанный файл, а не выводить его на консоль. В приведенном выше примере эта строка вызывает запись содержимого CSV в файл с именем» C: /work/dataout.csv «.
Последняя строка примера («.system c:/work/dataout.csv»)имеет тот же эффект,что и двойной щелчок на файле c:/work/dataout.csv в окнах.Обычно это вызовет программу электронной таблицы для отображения CSV-файла.
Эта команда работает только так,как написано в Windows.Эквивалентная строка на Mac:
sqlite> .system open dataout.csv
На Linux и других unix-системах Вам нужно будет ввести что-то вроде:
sqlite> .system xdg-open dataout.csv
8.6.1.Экспорт в Excel
Для упрощения экспорта в электронную таблицу CLI предоставляет команду «.excel»,которая захватывает выходные данные одного запроса и отправляет их в программу электронной таблицы по умолчанию на хост-компьютере.Используйте ее таким образом:
sqlite> .excel
sqlite> SELECT * FROM tab;
Команда выше записывает вывод запроса в виде CSV во временный файл,вызывает обработчик по умолчанию для CSV-файлов (обычно это предпочтительная программа для работы с таблицами,например,Excel или LibreOffice),затем удаляет временный файл.По сути,это краткосрочный метод выполнения последовательности команд «.csv»,».once» и «.system»,описанный выше.
Команда «.excel» на самом деле является псевдонимом для «.once -x».Опция -x в .once приводит к записи результатов в виде CSV во временный файл,который называется суффиксом «.csv»,а затем вызывает системный обработчик по умолчанию для CSV-файлов.
Также существует команда «.once -e»,которая работает аналогичным образом,за исключением того,что она называет временный файл суффиксом «.txt» таким образом,что вместо стандартной электронной таблицы будет вызван текстовый редактор по умолчанию для системы.
9.Доступ к ZIP-архивам как к файлам базы данных
Помимо чтения и записи файлов базы данных SQLite, программа sqlite3 также читает и записывает ZIP-архивы. Просто укажите имя файла ZIP-архива вместо имени файла базы данных SQLite в начальной командной строке или в команде «.open», и sqlite3 автоматически определит, что файл является ZIP-архивом, а не базой данных SQLite, и откроет его как такой. Это работает независимо от суффикса файла. Таким образом, вы можете открывать файлы JAR, DOCX и ODP, а также файлы любого другого формата, которые на самом деле являются ZIP-архивом, и SQLite прочитает их за вас.
Архив ZIP представляется как база данных,содержащая одну таблицу со следующей схемой:
CREATE TABLE zip(
  name,
  mode,
  mtime,
  sz,
  rawdata,
  data,
  method
);
Так,например,если вы хотите увидеть эффективность сжатия (выраженную как размер сжатого содержимого относительно исходного размера несжатого файла)для всех файлов в архиве ZIP,отсортированных от наиболее сжатого к наименее сжатому,вы можете выполнить следующий запрос:
sqlite> SELECT name, (100.0*length(rawdata))/sz FROM zip ORDER BY 2;
Или, используя функции файлового ввода-вывода , вы можете извлечь элементы ZIP-архива:
sqlite> SELECT writefile(name,content) FROM zip
   ...> WHERE name LIKE 'docProps/%';
9.1.Как реализован доступ к архиву ZIP
Оболочка командной строки использует виртуальную таблицу Zipfile для доступа к архивам ZIP. В этом можно убедиться, выполнив команду «.schema» при открытом ZIP-архиве:
sqlite> .schema
CREATE VIRTUAL TABLE zip USING zipfile('document.docx')
;
Если при открытии файла клиент командной строки обнаруживает, что файл представляет собой ZIP-архив, а не базу данных SQLite, он фактически открывает базу данных в памяти, а затем в этой базе данных в памяти создает экземпляр виртуальной таблицы Zipfile, которая прилагается к ZIP-архиву.
Специальная обработка для открытия ZIP-архивов — это уловка оболочки командной строки, а не основной библиотеки SQLite. Поэтому, если вы хотите открыть ZIP-архив в качестве базы данных в своем приложении, вам нужно будет активировать модуль виртуальной таблицы Zipfile, а затем выполнить соответствующий оператор CREATE VIRTUAL TABLE .
10.Преобразование всей базы данных в текстовый файл
Используйте команду «.dump», чтобы преобразовать все содержимое базы данных в один текстовый файл UTF-8. Этот файл можно преобразовать обратно в базу данных, передав его обратно в sqlite3 .
Хороший способ сделать архивную копию базы данных-это сделать это:
$ sqlite3 ex1 .dump | gzip -c >ex1.dump.gz
В результате будет создан файл с именем ex1.dump.gz , содержащий все необходимое для восстановления базы данных позже или на другом компьютере. Чтобы восстановить базу данных, просто введите:
$ zcat ex1.dump.gz | sqlite3 ex2
Текстовый формат является чистым SQL,поэтому вы также можете использовать команду .dump для экспорта базы данных SQLite в другие популярные движки баз данных SQL.Вот так:
$ createdb ex2
$ sqlite3 ex1 .dump | psql ex2
11.Восстановление данных из поврежденной базы данных
Подобно команде «.dump»,».recover» пытается преобразовать все содержимое файла базы данных в текст.Разница в том,что вместо чтения данных с помощью обычного интерфейса базы данных SQL,».recover» пытается собрать базу данных на основе данных,извлеченных непосредственно из как можно большего количества страниц базы данных.Если база данных повреждена,».recover»,как правило,может восстановить данные из всех поврежденных частей базы данных,тогда как «.dump» останавливается при первом же признаке повреждения.
Если команда «.восстановить» восстанавливает одну или несколько строк,которые она не может атрибутировать ни к одной из таблиц БД,то выходной скрипт создает таблицу «lost_and_found» для хранения осиротевших строк.Схема таблицы lost_and_found выглядит следующим образом:
CREATE TABLE lost_and_found(
    rootpgno INTEGER,
    pgno INTEGER,
    nfield INTEGER,
    id INTEGER,
    c0, c1, c2, c3...
);
Таблица «lost_and_found» содержит по одной строке для каждой осиротевшей строки,восстановленной из БД.Кроме того,для каждой восстановленной записи индекса есть одна строка,которая не может быть отнесена ни к одному SQL-индексу.Это связано с тем,что в базе данных SQLite используется один и тот же формат для хранения записей индекса SQL и записей таблицы БЕЗ РОУИДА.
| Column | Contents |
|---|---|
| rootpgno | Несмотря на то,что атрибуция строки к определенной таблице БД может быть невозможна,она может быть частью древовидной структуры в файле БД.В этом случае в данной колонке хранится номер корневой страницы этой древовидной структуры.Или,если страница,на которой была найдена строка,не является частью древовидной структуры,в данной колонке хранится копия значения в колонке «pgno»-номер страницы,на которой была найдена строка.Во многих,хотя и не во всех случаях,случаях все строки в таблице lost_and_found с одинаковым значением в этой колонке принадлежат одной и той же таблице. |
| pgno | Номер страницы,на которой была найдена эта строка. |
| nfield | Количество полей в этой строке. |
| id | Если строка берется из таблицы БЕЗ КОЛИЧЕСТВА,то этот столбец содержит NULL.В противном случае она содержит 64-битное целое значение rowid для строки. |
| c0, c1, c2… | В этих столбцах хранятся значения для каждого столбца строки.Команда «.восстановить» создает таблицу lost_and_found с таким количеством столбцов,которое требуется для самой длинной осиротевшей строки. |
Если восстановленная схема БД уже содержит таблицу с именем «lost_and_found»,то команда «.recovery» использует имя «lost_and_found0».Если имя «lost_and_found0″ также уже взято,»lost_and_found1» и т.п.Имя по умолчанию «lost_and_found» можно переопределить,вызвав «.recovery» с помощью переключателя —lost-and-found.Например,чтобы выходной скрипт вызвал таблицу «orphaned_rows»:
sqlite> .recover --lost-and-found orphaned_rows
12.Загрузка удлинителей
Вы можете добавить новые пользовательские функции SQL, определяемые приложением , последовательности сортировки , виртуальные таблицы и VFS в оболочку командной строки во время выполнения с помощью команды «.load». Сначала создайте расширение как DLL или общую библиотеку (как описано в документе «Загружаемые расширения во время выполнения» ), затем введите:
sqlite> .load /path/to/my_extension
Обратите внимание,что SQLite автоматически добавляет соответствующий суффикс расширения («.dll» в окнах,».dylib» в Mac,».so» в большинстве других unix)к имени файла расширения.Обычно рекомендуется указывать полное имя расширения.
SQLite вычисляет точку входа для расширения на основе имени файла расширения.Чтобы переопределить этот выбор,просто добавьте имя расширения в качестве второго аргумента в команду «.load».
Исходный код нескольких полезных расширений можно найти в подкаталоге ext / misc дерева исходных текстов SQLite. Вы можете использовать эти расширения как есть или в качестве основы для создания ваших собственных расширений для удовлетворения ваших конкретных потребностей.
13.Криптографические разрывы содержимого базы данных
Точка-команда «.sha3sum» вычисляет SHA3- хэш содержимого базы данных. Чтобы было ясно, хеш вычисляется по содержимому базы данных, а не по ее представлению на диске. Это означает, например, что VACUUM или подобное преобразование с сохранением данных не изменяет хэш.
Команда «.sha3sum» поддерживает опции «—sha3-224″,»—sha3-256″,»—sha3-384″ и «—sha3-512» для определения,какой вариант SHA3 использовать для хэша.По умолчанию используется SHA3-256.
Схема базы данных (в таблице sqlite_schema ) обычно не включается в хэш, но может быть добавлена с помощью параметра «—schema».
Команда «.sha3sum» принимает один необязательный аргумент, который является шаблоном LIKE . Если эта опция присутствует, хешироваться будут только те таблицы, имена которых соответствуют шаблону LIKE .
Команда «.sha3sum» реализована с помощью функции расширения «sha3_query ()», которая включена в оболочку командной строки.
14.Самотесты содержимого базы данных
Команда «.selftest» пытается проверить,что БД не повреждена и не повреждена.Команда «.selftest» ищет таблицу в схеме под названием «selftest» и определяется следующим образом:
CREATE TABLE selftest(
  tno INTEGER PRIMARY KEY,
  op TEXT,
  cmd TEXT,
  ans TEXT
);
Команда .selftest читает строки таблицы selftest в порядке selftest.tno.Для каждой строки ‘memo’ она записывает текст в ‘cmd’.Для каждой строки ‘run’ она запускает текст ‘cmd’ в виде SQL и сравнивает результат со значением в ‘ans’,а также выводит сообщение об ошибке,если результаты отличаются.
Если таблицы самопроверки нет, команда «.selftest» запускает PRAGMA Integrity_check .
Команда «.selftest —init» создает таблицу самопроверки, если она еще не существует, а затем добавляет записи, проверяющие хэш SHA3 содержимого всех таблиц. Последующие запуски «.selftest» подтвердят, что база данных не была изменена каким-либо образом. Чтобы сгенерировать тесты для проверки того, что подмножество таблиц не изменилось, просто запустите «.selftest —init», а затем УДАЛИТЕ строки самопроверки , которые ссылаются на непостоянные таблицы.
15.Поддержка архива SQLite
Точка-команда «.archive» и параметр командной строки «-A» обеспечивают встроенную поддержку формата архива SQLite . Интерфейс аналогичен интерфейсу команды tar в системах unix. Каждый вызов команды «.ar» должен указывать единственный параметр команды. Для «.archive» доступны следующие команды:
| Option | Long Option | Purpose |
|---|---|---|
| -c | —create | Создайте новый архив,содержащий указанные файлы. |
| -x | —extract | Извлечь указанные файлы из архива. |
| -i | —insert | Добавить файлы в существующий архив. |
| -r | —remove | Удалить файлы из архива. |
| -t | —list | Перечислите файлы в архиве. |
| -u | —update | Добавьте файлы в существующий архив, если они изменились. |
Так же как и опция команды,каждый вызов «.ar» может указывать одну или несколько опций модификатора.Некоторые опции модификаторов требуют аргумента,некоторые нет.Доступны следующие опции модификаторов:
| Option | Long Option | Purpose |
|---|---|---|
| -v | —verbose | Перечислите каждый файл в процессе обработки. |
| -f FILE | —file FILE | Если указано,используйте в качестве архива файл FILE.В противном случае предположим,что текущей «главной» БД является архив,с которым необходимо работать. |
| -a FILE | —append FILE | Как и —file, используйте файл FILE в качестве архива, но откройте файл с помощью apndvfs VFS, чтобы архив был добавлен в конец FILE, если FILE уже существует. |
| -C DIR | —directory DIR | Если указано,интерпретируйте все относительные пути как относительные к DIR,а не к текущей рабочей директории. |
| -g | —glob | Используйте glob( Y , X ) для сопоставления аргументов с именами в архиве. |
| -n | —dryrun | Покажите SQL,который будет запущен для выполнения операции архивации,но на самом деле ничего не меняйте. |
| — | — | Все последующие слова командной строки являются аргументами команд,а не опциями. |
Для использования в командной строке добавьте опции короткой командной строки сразу после «-A»,без промежутка времени.Все последующие аргументы считаются частью команды .archive.Например,следующие команды эквивалентны:
sqlite3 new_archive.db -Acv file1 file2 file3
sqlite3 new_archive.db ".ar -cv file1 file2 file3"
Длинные и короткие варианты стиля могут быть смешанными.Например,следующие варианты эквивалентны:
.ar -c
.ar -f new_archive.db
В качестве альтернативы первым аргументом после «.ar» может быть конкатенация короткой формы всех требуемых опций (без символов «-«).В этом случае аргументы требуемых опций читаются из следующей командной строки,а любые оставшиеся слова считаются командными аргументами.Например:
-- Create a new archive "new_archive.db" containing files "file1" and
-- "file2" from directory "dir1".
.ar cCf dir1 new_archive.db file1 file2 file3
15.1.Команда создания архива SQLite
Создать новый архив,перезаписав любой существующий архив (либо в текущем «основном» db,либо в файле,заданном опцией —file).Каждый аргумент,следующий за опцией,является файлом для добавления в архив.Каталоги импортируются рекурсивно.См.примеры выше.
15.2.Команда извлечения архива SQLite
Извлечение файлов из архива (либо в текущий рабочий каталог,либо в каталог,указанный опцией —directory).Извлекаются файлы или каталоги,имена которых совпадают с аргументами,на которые влияет опция —glob.Или,если за опциями не следует никаких аргументов,извлекаются все файлы и каталоги.Любые указанные каталоги извлекаются рекурсивно.Если указанные имена или шаблоны совпадений не могут быть найдены в архиве,это будет ошибкой.
-- Extract all files from the archive in the current "main" db to the
-- current working directory. List files as they are extracted.
.ar --extract --verbose

-- Extract file "file1" from archive "ar.db" to directory "dir1".
.ar fCx ar.db dir1 file1

-- Extract files with ".h" extension to directory "headers".
.ar -gCx headers *.h
15.3.Команда SQLite Archive List
Вывести список содержимого архива.Если аргументы не указаны,то перечисляются все файлы.В противном случае будут перечислены только те,которые соответствуют аргументам,на которые влияет опция —glob.В настоящее время опция —verbose не изменяет поведение этой команды.Это может измениться в будущем.
.ar
15.4.Команды вставки и обновления архива SQLite
Команды —update и —insert работают как команда —creatate,за исключением того,что они не удаляют текущий архив перед началом работы.Новые версии файлов беззвучно заменяют существующие файлы на те же имена,но в противном случае исходное содержимое архива (если таковое имеется)остается нетронутым.
Для команды —insert все перечисленные файлы вставляются в архив.Для команды —update файлы вставляются только в том случае,если они ранее не существовали в архиве,или если их «mtime» или «mode» отличается от того,что находится в архиве в данный момент.
Узел совместимости:До версии SQLite 3.28.0 (2019-04-16)поддерживалась только опция —update,но эта опция работала как —insert в том,что она всегда переустанавливала каждый файл,независимо от того,изменился он или нет.
15.5.Команда удаления архива SQLite
Команда —remove удаляет файлы и каталоги,которые соответствуют предоставленным аргументам (если они есть),на которые влияет опция —glob.Ошибкой является предоставление аргументов,которые ничему не соответствуют в архиве.
15.6.Операции над архивами ZIP
Если ФАЙЛ является ZIP-архивом, а не архивом SQLite, команда «.archive» и параметр командной строки «-A» по-прежнему работают. Это достигается с помощью расширения zipfile . Следовательно, следующие команды примерно эквивалентны, различаются только форматированием вывода:
| Traditional Command | Эквивалентный sqlite3.exe Команда |
|---|---|
| unzip archive.zip | sqlite3 -Axf архив.zip |
| распаковать -l архив.zip | sqlite3 -Atvf архив.zip |
| zip -r archive2.zip you | sqlite3 -Acf архив2.zip пират |
15.7.SQL,используемый для реализации операций архивирования SQLite
Различные команды SQLite Archive Archive реализуются с помощью операторов SQL.Разработчики приложения могут легко добавить поддержку чтения и записи SQLite Archive Archive в свои собственные проекты,запустив соответствующий SQL.
Чтобы посмотреть,какие SQL-операторы используются для реализации операции SQLite Archive,добавьте опцию —dryrun или -n.Это приводит к тому,что SQL отображается,но тормозит выполнение SQL.
Операторы SQL, используемые для реализации операций с архивом SQLite, используют различные загружаемые расширения . Все эти расширения доступны в дереве исходных текстов SQLite в подпапке ext / misc / . Расширения, необходимые для полной поддержки архива SQLite, включают:
-
fileio.c — это расширение добавляет функции SQL readfile() и writefile() для чтения и записи содержимого из файлов на диске. Расширение fileio.c также включает табличную функцию fsdir() для вывода списка содержимого каталога и функцию lsmode() для преобразования числовых целых чисел st_mode из системного вызова stat() в удобочитаемые строки по образцу » лс -л» команда.
-
sqlar.c — это расширение добавляет функции sqlar_compress() и sqlar_uncompress(), необходимые для сжатия и распаковки содержимого файла при его вставке и извлечении из архива SQLite.
-
zipfile.c — это расширение реализует табличную функцию «zipfile(FILE)», которая используется для чтения ZIP-архивов. Это расширение необходимо только при чтении ZIP-архивов вместо архивов SQLite.
-
appendvfs.c — это расширение реализует новую VFS , которая позволяет добавлять базу данных SQLite к другому файлу, например к исполняемому файлу. Это расширение необходимо только в том случае, если используется параметр —append для команды .archive.
16.Параметры SQL
SQLite позволяет связанным параметрам появляться в операторе SQL везде, где разрешено буквальное значение. Значения этих параметров задаются с помощью семейства API-интерфейсов sqlite3_bind_…() .
Параметры могут быть как именованными,так и безымянными.Безымянный параметр является одним вопросительным знаком («?»).Именованные параметры-это «?»,за которым сразу же следует цифра (например:»?15″ или «?123»)или один из символов «$»,»:» или «@»,за которым следует буквенно-цифровое имя (например:»$var1″,»:xyz»,»@bingo»).
Эта оболочка командной строки оставляет безымянные параметры не связанными,что означает,что они будут иметь значение SQL NULL,но именованным параметрам могут быть присвоены значения.Если существует таблица TEMP с именем «sqlite_parameters»,то есть такая схема:
CREATE TEMP TABLE sqlite_parameters(
  key TEXT PRIMARY KEY,
  value
) WITHOUT ROWID;
И если в таблице есть запись,в которой столбец ключа точно совпадает с именем параметра (включая начальный символ «?»,»$»,»:» или «@»),то параметру присваивается значение столбца значения.Если запись отсутствует,то по умолчанию параметру присваивается значение NULL.
Команда «.параметр» существует для упрощения управления этой таблицей.Команда «.параметр init» (часто сокращенно просто «.параметр init»)создает таблицу temp.sqlite_parameters,если она еще не существует.Команда «.параметр init» показывает все записи в таблице temp.sqlite_parameters.Команда «.param clear» выводит таблицу temp.sqlite_parameters.Команды «.параметр set KEY VALUE» и «.параметр unset KEY» создают или удаляют записи из таблицы temp.sqlite_parameters.
VALUE,переданный в «.param set KEY VALUE»,может быть либо SQL литералом,либо любым другим SQL выражением или запросом,который может быть оценен для получения значения.Это позволяет задавать значения различных типов.Если такая оценка не удается,предоставленное значение VALUE берется в кавычки и вставляется как текст.Поскольку такая первоначальная оценка может быть неудачной или нет в зависимости от содержимого VALUE,надежный способ получить текстовое значение-заключить его в одинарные кавычки,защищенные от описанного выше разбора хвоста команды.Например (если только вы не хотите получить значение -1365):
.parameter init
.parameter set @phoneNumber "'202-456-1111'"
Обратите внимание,что двойные кавычки служат для защиты одинарных кавычек и гарантируют,что цитируемый текст будет разобран как один аргумент.
Таблица temp.sqlite_parameters предоставляет значения только для параметров в оболочке командной строки. Таблица temp.sqlite_parameter не влияет на запросы, которые выполняются напрямую с помощью SQLite C-language API. Ожидается, что отдельные приложения будут реализовывать свои собственные привязки параметров. Вы можете найти «sqlite_parameters» в исходном коде оболочки командной строки, чтобы увидеть, как оболочка командной строки выполняет привязку параметров, и использовать это как подсказку о том, как реализовать это самостоятельно.
17.Рекомендации по индексу (эксперт SQLite)
Примечание. Это экспериментальная команда. Он может быть удален или интерфейс может быть изменен несовместимым образом в какой-то момент в будущем.
Для большинства нетривиальных баз данных SQL ключом к производительности является создание правильных индексов SQL.В данном контексте «правильные SQL-индексы» означают те,которые вызывают запросы,которые необходимо оптимизировать для быстрой работы приложения.Команда «.эксперт» может помочь в этом,предлагая индексы,которые могли бы помочь с конкретными запросами,если бы они присутствовали в БД.
Сначала выдается команда «.эксперт»,а затем SQL-запрос в отдельной строке.Например,рассмотрим следующую сессию:
sqlite> CREATE TABLE x1(a, b, c);
sqlite> .expert
sqlite> SELECT * FROM x1 WHERE a=? AND b>?;
CREATE INDEX x1_idx_000123a7 ON x1(a, b);

0|0|0|SEARCH TABLE x1 USING INDEX x1_idx_000123a7 (a=? AND b>?)

sqlite> CREATE INDEX x1ab ON x1(a, b);
sqlite> .expert
sqlite> SELECT * FROM x1 WHERE a=? AND b>?;
(no new indexes)

0|0|0|SEARCH TABLE x1 USING INDEX x1ab (a=? AND b>?)
В приведенном выше примере пользователь создает схему базы данных (одна таблица — «x1»), а затем использует команду «.expert» для анализа запроса, в данном случае «SELECT * FROM x1 WHERE a =? AND b>? «. Инструмент оболочки рекомендует пользователю создать новый индекс (индекс «x1_idx_000123a7») и вывести план, который будет использовать запрос, в формате EXPLAIN QUERY PLAN . Затем пользователь создает индекс с эквивалентной схемой и снова запускает анализ того же запроса. На этот раз инструмент оболочки не рекомендует никаких новых индексов и выводит план, который SQLite будет использовать для запроса с учетом существующих индексов.
Команда «.эксперт» принимает следующие варианты:
| Option | Purpose |
|---|---|
| ‑‑verbose | Если он присутствует,выводите более подробный отчет по каждому проанализированному запросу. |
| ‑‑sample PERCENT | По умолчанию этот параметр равен 0, поэтому команда «.expert» рекомендует индексы только на основе запроса и схемы базы данных. Это похоже на то, как планировщик запросов SQLite выбирает индексы для запросов, если пользователь не выполнил команду ANALYZE в базе данных для создания статистики распределения данных.
Если этот параметр передан ненулевым аргументом,то команда «.эксперт» генерирует аналогичную статистику распределения данных по всем рассматриваемым индексам на основе PERCENT процентов строк,хранящихся в настоящее время в каждой таблице БД.Для БД с необычными распределениями данных это может привести к улучшению рекомендаций по индексам,особенно если приложение намерено запустить ANALYZE. Для небольших баз данных и современных процессоров,как правило,нет причин не сдавать «-образец 100».Однако сбор статистики распределения данных может быть дорогостоящим для больших таблиц баз данных.Если операция слишком медленная,попробуйте передать меньшее значение для опции «-образца». |
Функциональность, описанная в этом разделе, может быть интегрирована в другие приложения или инструменты с помощью кода расширения эксперта SQLite .
Схема базы данных, которая включает пользовательские функции SQL, доступные через механизм загрузки расширений, может нуждаться в специальных условиях для работы с функцией .expert. Поскольку функция использует дополнительные подключения для реализации своей функциональности, эти пользовательские функции должны быть доступны для этих дополнительных подключений. Это можно сделать с помощью параметров загрузки/использования расширений, описанных в разделах Автоматическая загрузка статически связанных расширений и Постоянно загружаемых расширений .
18.Работа с несколькими подключениями к базе данных
Начиная с версии 3.37.0 (2021-11-27), интерфейс командной строки может удерживать открытыми несколько подключений к базе данных одновременно. Одновременно активно только одно соединение с базой данных. Неактивные соединения все еще открыты, но бездействуют.
Используйте точечную команду «.connection» (часто сокращенно «.conn»)для просмотра списка соединений с базой данных и указания того,какое из них в данный момент активно.Каждое соединение с базой данных идентифицируется целым числом от 0 до 9.(Одновременно может быть открыто не более 10 соединений).Переход к другому соединению базы данных,создав его,если оно еще не существует,осуществляется командой «.conn»,за которой следует его номер.Закройте соединение с базой данных,набрав команду «.conn close N»,где N-номер соединения.
Хотя базовые подключения к базе данных SQLite полностью независимы друг от друга, многие параметры CLI, такие как формат вывода, являются общими для всех подключений к базе данных. Таким образом, изменение режима вывода в одном соединении изменит его во всех них. С другой стороны, некоторые точечные команды , такие как .open , влияют только на текущее соединение.
19.Различные функции расширения
В CLI встроено несколько расширений SQLite,которые не входят в библиотеку SQLite.Некоторые из них добавляют возможности,не описанные в предыдущих разделах,а именно:
- последовательность свертки UINT,которая обрабатывает беззнаковые целые числа,встроенные в текст,в соответствии с их значением,вместе с другим текстом для упорядочивания;
- десятичная арифметика в соответствии с десятичным расширением ;
- табличная функция generate_series( ) ; а также
- поддержка расширенных регулярных выражений POSIX, связанных с оператором REGEXP .
20.Другие точечные команды
В оболочке командной строки доступно множество других точечных команд.Полный список для любой конкретной версии и сборки SQLite см.в команде «.help».
21.Использование sqlite3 в сценарии оболочки
Один из способов использования sqlite3 в скрипте оболочки-использовать «echo» или «cat» для генерации последовательности команд в файле,а затем вызывать sqlite3 при перенаправлении входных данных из сгенерированного командного файла.Это прекрасно работает и подходит во многих случаях.Но в качестве дополнительного удобства sqlite3 позволяет ввести в командную строку одну SQL-команду в качестве второго аргумента после имени БД.При запуске программы sqlite3 с двумя аргументами второй аргумент передается на обработку в библиотеку SQLite,результаты запроса выводятся на стандартный вывод в режиме списка,и программа завершает работу.Данный механизм предназначен для того,чтобы сделать sqlite3 простым в использовании совместно с программами типа «awk».Например:
$ sqlite3 ex1 'select * from tbl1'
>  | awk '{printf "<tr><td>%s<td>%sn",$1,$2 }'
<tr><td>hello<td>10
<tr><td>goodbye<td>20
$
22.Отметка конца SQL-запроса
Команды SQLite обычно заканчиваются точкой с запятой. В интерфейсе командной строки вы также можете использовать слово «GO» (без учета регистра) или символ косой черты «/» в отдельной строке для завершения команды. Они используются SQL Server и Oracle соответственно и поддерживаются интерфейсом командной строки SQLite для совместимости. Они не будут работать в sqlite3_exec() , потому что CLI переводит эти входные данные в точку с запятой, прежде чем передать их в ядро SQLite.
23.Параметры командной строки
В CLI доступно множество опций командной строки.Для просмотра списка используйте параметр командной строки —help:
$ sqlite3
Usage: ./sqlite3 [OPTIONS] FILENAME [SQL]
FILENAME is the name of an SQLite database. A new database is created
if the file does not previously exist.
OPTIONS include:
   -A ARGS...           run ".archive ARGS" and exit
   -append              append the database to the end of the file
   -ascii               set output mode to 'ascii'
   -bail                stop after hitting an error
   -batch               force batch I/O
   -box                 set output mode to 'box'
   -column              set output mode to 'column'
   -cmd COMMAND         run "COMMAND" before reading stdin
   -csv                 set output mode to 'csv'
   -deserialize         open the database using sqlite3_deserialize()
   -echo                print commands before execution
   -init FILENAME       read/process named file
   -[no]header          turn headers on or off
   -help                show this message
   -html                set output mode to HTML
   -interactive         force interactive I/O
   -json                set output mode to 'json'
   -line                set output mode to 'line'
   -list                set output mode to 'list'
   -lookaside SIZE N    use N entries of SZ bytes for lookaside memory
   -markdown            set output mode to 'markdown'
   -maxsize N           maximum size for a
   -memtrace            trace all memory allocations and deallocations
   -mmap N              default mmap size set to N
   -newline SEP         set output row separator. Default: 'n'
   -nofollow            refuse to open symbolic links to database files
   -nonce STRING        set the safe-mode escape nonce
   -nullvalue TEXT      set text string for NULL values. Default ''
   -pagecache SIZE N    use N slots of SZ bytes each for page cache memory
   -quote               set output mode to 'quote'
   -readonly            open the database read-only
   -safe                enable safe-mode
   -separator SEP       set output column separator. Default: '|'
   -stats               print memory stats before each finalize
   -table               set output mode to 'table'
   -tabs                set output mode to 'tabs'
   -version             show SQLite version
   -vfs NAME            use NAME as the default VFS
   -zip                 open the file as a ZIP Archive
CLI гибко подходит к форматированию опций командной строки.Разрешается использовать либо один,либо два ведущих символа «-«.Таким образом,»-box» и «—box» означают одно и то же.Опции командной строки обрабатываются слева направо.Таким образом,опция «—box» отменяет предыдущую опцию «—quote».
Большинство опций командной строки не требуют пояснений,но некоторые из них заслуживают дополнительного обсуждения ниже.
23.1.Опция командной строки —safe
Опция командной строки —safe пытается отключить все функции CLI,которые могут вызвать какие-либо изменения на хост-компьютере,кроме изменений в конкретном файле базы данных,указанном в командной строке.Идея заключается в том,что если вы получите большой SQL-скрипт из неизвестного или ненадежного источника,вы можете запустить этот скрипт,чтобы посмотреть,что он делает,не подвергаясь риску эксплойта,используя опцию —safe.Опция —safe отключает (среди прочего):
- Команда .open , если не используется параметр —hexdb или имя файла не «:memory:». Это не позволяет сценарию читать или записывать любые файлы базы данных, имена которых не указаны в исходной командной строке.
- SQL-команда ПРИСОЕДИНИТЬ .
- SQL-функции,которые имеют потенциально опасные побочные эффекты,такие как edit(),fts3_tokenizer(),load_extension(),readfile()и writefile().
- Команда .archive .
- Команды .backup и .save.
- Команда .import .
- Команда .load .
- Команда .log.
- Команды .shell и .system.
- Команды .excel,.once и .output.
- Другие команды,которые могут иметь пагубные побочные эффекты.
В принципе,любая функция CLI,которая читает или записывает из файла на диске,отличного от основного файла базы данных,отключена.
23.1.1.Обход ограничений —safe для определенных команд
Если в командную строку также включена опция «—nonce NONCE» для некоторой большой и произвольной строки NONCE,то команда «.nonce NONCE» (с такой же большой строкой nonce)позволит следующему оператору SQL или команде dot обойти ограничения —safe.
Предположим,вы хотите запустить подозрительный скрипт,а он требует одну или две функции,которые —safe обычно отключает.Например,предположим,ему нужно подключить одну дополнительную базу данных.Или,предположим,сценарию нужно загрузить определенное расширение.Этого можно добиться,предваряя (тщательно проверяемый)оператор ATTACH или команду «.load» соответствующей командой «.nonce» и предоставляя то же значение nonce с помощью опции командной строки «—nonce».Этим конкретным командам будет разрешено нормальное выполнение,но все остальные небезопасные команды будут по-прежнему ограничены.
Использование «.nonce» опасно в том смысле,что ошибка может позволить враждебному скрипту повредить вашу систему.Поэтому используйте «.nonce» осторожно,экономно и в крайнем случае,когда нет других способов заставить скрипт работать в режиме —safe.
24.Компиляция программы sqlite3 из исходных текстов
Для компиляции оболочки командной строки на unix-системах и в Windows с помощью MinGW работает обычная команда configure-make:
sh configure; make
Настройка-создание работает независимо от того, строите ли вы канонические исходники из исходного дерева или из объединенного пакета. Зависимостей немного. При сборке из канонических исходников требуется работающий tclsh . При использовании пакета объединения вся работа по предварительной обработке, обычно выполняемая tclsh, уже будет выполнена, и потребуются только обычные инструменты сборки.
Для работы команды .archive необходима рабочая библиотека сжатия zlib .
На Windows с MSVC используйте nmake с Makefile.msc:
nmake /f Makefile.msc
Для правильной работы команды .archive сделайте копию исходного кода zlib в подкаталог compat / zlib дерева исходных текстов и скомпилируйте следующим образом:
nmake /f Makefile.msc USE_ZLIB=1
24.1.Самодельные конструкции
Исходный код интерфейса командной строки sqlite3 находится в одном файле с именем «shell.c». Исходный файл shell.c создается из других источников, но большую часть кода для shell.c можно найти в src / shell.c.in . (Восстановите shell.c, набрав «make shell.c» из канонического исходного дерева.) Скомпилируйте файл shell.c (вместе с исходным кодом библиотеки sqlite3 ), чтобы сгенерировать исполняемый файл. Например:
gcc -o sqlite3 shell.c sqlite3.c -ldl -lpthread -lz -lm
Для обеспечения полнофункциональной оболочки командной строки рекомендуются следующие дополнительные опции времени компиляции:
- -DSQLITE_THREADSAFE=0
- -DSQLITE_ENABLE_EXPLAIN_COMMENTS
- -DSQLITE_HAVE_ZLIB
- -DSQLITE_INTROSPECTION_PRAGMAS
- -DSQLITE_ENABLE_UNKNOWN_SQL_FUNCTION
- -DSQLITE_ENABLE_STMTVTAB
- -DSQLITE_ENABLE_DBPAGE_VTAB
- -DSQLITE_ENABLE_DBSTAT_VTAB
- -DSQLITE_ENABLE_OFFSET_SQL_FUNC
- -DSQLITE_ENABLE_JSON1
- -DSQLITE_ENABLE_RTREE
- -DSQLITE_ENABLE_FTS4
- -DSQLITE_ENABLE_FTS5
SQLite
3.40
-
Введение в интерфейс SQLite C/C++
Следующие два объекта и восемь методов составляют основные элементы интерфейса SQLite:sqlite3 Объект подключения к базе данных.
-
Контрольная сумма VFS Shim
Расширение VFS с контрольной суммой-это шим,который добавляет 8 байт в конец каждой страницы в базе данных SQLite.
-
кодекс поведения
Из-за опасений,высказанных читателями,этот документ был удален.
-
Этический кодекс
Этот документ первоначально назывался «Кодекс поведения» и был создан для заполнения полей «регистрация поставщиков» форм, представляемых разработчикам SQLite.
 When one is developing in .NET with Visual Studio and other Microsoft tools, it is easy to lose sight of alternative solutions to common problems. MS does a competent job of creating a tightly integrated development tool chain, where available MS products (both free and paid) offer reasonable default choices which generally get the job done.
Given this, .NET devs often fail to explore outside this arena, or try on alternate solutions which might acquit themselves equally as well, or better, to the problem at hand. Also, of course, there is always a learning curve to new choices, and we often choose the familiar out of simple expediency.
Image by shinichi | Some Rights Reserved
- Getting Started — Using SQLite on Windows
- Open a New Database and Create Some Tables from the SQLite3 Console
- Entering SQL in the SQLite Console
- Formatting the Console Output
- Change the Display Mode for the SQLite Console
- Executing Script Files from the SQLite Console Using the .Read Command
- Wrap Multiple Actions in Transactions for Instant Performance Boost
- GUI-Based Tools
- Additional Resources and Items of Interest
Some Background
SQLite is an awesome, open source, cross-platform, freely available file-based relational database. Database files created on Windows will move seamlessly to OSX or Linux OSes. The tools (in particular the SQLite3 Command Line CLI we examine here) work the same from one environment to the next.
It is also not new. If you have been around for a while, you doubtless know SQLite has been in active and open development for well over a decade, and is widely used in many different scenarios and operating environments. In fact, SQLite.org estimates that SQLite is in fact the most widely deployed SQL database solution in the world. Their most recent figures (albeit from 2006) would indicate that there are over 500 million deployments of SQLite (this number is no doubt higher by now).
SQLite documentation is also widely regarded as above average in completeness and usability, providing both new and experienced users a well-developed canonical resource for learning and troubleshooting.
SQLite was originally designed by D. Richard Hipp in 2000 for the U.S. Navy, with the goal of allowing SQLite-based programs to function without installing a database management system, and without requiring a system administrator (from Wikipedia). These design requirements result in, as the SQLite site describes it, «a software library that implements a self-contained, serverless, zero-configuration, transactional SQL database engine.»
Until recently, I had not spent much time with SQLite. However, in developing the Biggy project, we decided that the core supported database systems would be cross-platform and open source. We wanted both a full-on client/server option, as well as a file-based relational database option. For our file-based relational database we chose SQLite, after exploring other alternatives.
In fitting SQLite into the Biggy workflow, I got to the chance to familiarize myself with SQLite, its strengths, some weaknesses, some peculiarities to watch for, and some tips and tricks for getting the most out of the product.
In this post, we will get familiar with the basics of using the database in a Windows environment. Next post, we will explore integration with .NET development, and Visual Studio. But, learn the hard way first always say, so… let’s get our command line on.
Getting Started — Using SQLite on Windows
Before we look at using SQLite in Visual Studio, let’s walk through the basics of using SQLite in a Windows environment outside the IDE.
First, download the pre-compiled binaries from the SQLite Downloads page. At a minimum, you will want the binaries for the Win32 x86 SQLite DLL, and for the SQLite x86 Command Shell. Unzip the contents of the files in a folder named C:SQLite3 (or whatever other location suits your needs). Then add C:SQLite3 to your PATH variable so that you can invoke the SQLite Command Shell right from the Windows console.
In your new directory C:SQLite3, you should now have the following items:
- sqlite3.def
- sqlite3.dll
- sqlite3.exe
If we run the sqlite3.exe, we are greeted with a Console Application designed to allow us to work with SQLite databases.
The SQLite Console
The command prompt is easy to use. Text entered without the «.» qualifier will be treated as SQL (and succeed or fail accordingly). There are a set of commands preceded with the «.» qualified which are application commands. An example is shown in the console window above, where we are instructed to use the .open command to open a database file.
The complete list of SQLite console commands is beyond the scope of this article, but we will walk through a list of the most useful ones here.
Open a New Database and Create Some Tables from the SQLite3 Console
The SQLite3 Console will open in the current directory (or in the directory in which the .exe is found, if you double-click in the GUI). Let’s start by opening a new Windows terminal (which should generally open in our home directory), create a new sub-directory named sqlite_data, and navigating into that folder:
Create a new Directory and Navigate Into the New Directory
C:UsersJohn> mkdir sqlite_databases
C:UsersJohn> cd sqlite_databases
Next, let’s try on that .open command. Open sqlite3 and open a new database in the directory we just created
Open SQlite3.exe and Open a New Database File:
C:UsersJohnsqlite_databases>sqlite3
sqlite> .open test.sqlite
Your console output should now look like this:
Console Output after Opening SQLite3 and Creating a New Database File:

Next, let’s create a few tables to play with.
Entering SQL in the SQLite Console
Recall that plain text entered without the «.» qualifier will be interpreted by the SQLite console as SQL. There are a few additional things to bear in mind:
- SQL text may span multiple lines — the enter key will not cause the text following the prompt to execute until it is ended with a semi-colon.
- You can create multi-line SQL statements simply by hitting the Enter key without ending the statement with a semi-colon.
- SQLite uses either square brackets or double-quotes as delimiters for object names, in cases where the literal column name would not be allowed. For example,
Last Namewould NOT be a valid column name, but will work as[Last Name]. Likewise, the keywordGroupis not allowed as a column name, but"Group"will work. - SQLite is not case-sensitive. Unlike some other databases (most notably Postgresql), casing in both the SQL syntax, and in object names, is ignored.
So, with that said, let’s create a table or two. We will keep this really basic, since we are interested in how the console works, more so that a SQLite SQL syntax tutorial.
Create a Table in a Single-Line Statement:

Above, we just kept typing our whole SQL statement, and allowed the console to wrap the text when it needed to (that lovely Windows console, with its under-developed display characteristics…). Kinda ugly and hard to read. Let’s try a multi-line statement.
Create a Table Using a Multi-Line Statement:

Aside from the ugliness that is the Windows Console, that’s a little more readable.
Now let’s add a few records.
Insert Records into Test Database:

Notice how the case of my SQL doesn’t matter in the above? And, yes, as a matter of fact, that IS a syntax error in the midst of things there. I accidentally used an angle bracket instead of a paren…
So now, we have added a little data. Let’s read it back:
Select Data from Users Table:

Here we see that for unrelated reasons (ahem… I closed the wrong window…), I had to exit the application, and then go back in. However, once I opened our test.sqlite database, I was able to enter a standard SELECT statement, and return the data.
See that ...>? That was the result of me forgetting to add the semi-colon at the end of my SELECT statement. If you do that (and you WILL…), simply add a semi-colon on the continued line, and the statement will execute (remember, until SQLite3 sees a semi-colon, it will continue to interpret text input as more SQL).
Formatting the Console Output
We can tell SQLite3 how we would like our data displayed. For example, we may prefer to see a more tabular display, with columns and headers. To accomplish this, we use a few of those application commands, prefixed with a period.
Change the Display Mode for the SQLite Console
We can use the following two commands to change the display mode and use columns and headers in our console output:
Use Column Display Mode with Headers in SQLite3
sqlite> .mode column
sqlite> .headers on
If we run our SELECT statement again, the output looks like this:
Console Output Using Columns and Headers:

Executing Script Files from the SQLite Console Using the .Read Command
Of course, typing in SQL in the console can become painful. While it is fine for quick-and-diry queries and maintenance tasks, doing a lot of work is better accomplished by scripting out what you need in a text file, and then executing that from the Console.
To see this in action, we will download my personal favorite test database, the Chinook database. Chinook has a database script for most of the popular database platforms, providing a handy way to use the same data set for evaluating multiple platforms (among other things). Download the Chinook Database, extract the .zip file, and locate the Chinook_Sqlite_AutoIncrementPKs.sql file. To keep things simple, drop a copy of it into your sqlite_databases folder, so it is in the current directory. Then, also to keep out typing down, rename the file you just moved to simply «Chinook.sql«.
We can execute SQL scripts using the SQLite .read command. To illustrate, we will read in the Chinook database.
You will notice a couple things when we do this. First, the console may show an error (which you can see in the image below), but the script is still running — errors are logged out to the console.
Second, executing this script in its current form is SLOOOOWWWW. This is due to a peculiarity with SQLite we will address momentarily, but was not addressed by the creators of the Chinook Database script.
Execute SQL Script from the SQLite Console Using the .Read Command
sqlite> .read Chinook.sql
The script may run for a good number of minutes, so go grab a cup of coffee or something. your computer has not seized up. The Console will return when the script is finished (really, this took about 10 minutes on my machine, but we’re going to fix that…
<Coffeee Brake . . .>
Ok. Now that the script has finished running, let’s use the .tables command to see a list of the tables in our database. If everything worked as we expect, we should see our own users and groups tables, as well as a bunch of new ones populated with Chinook data.
List Tables Using the .Tables Command:
sqlite> .tables
We should see something like this:
Console Output from .Tables Command:

Now, why the hell did it take so long to run that script??!!
Wrap Multiple Actions in Transactions for Instant Performance Boost
SQLite is inherently transaction-based. Meaning, unless you specify otherwise, each statement will be treated as an individual transaction, which must succeed, or be rolled back.
Transactions are a key feature of relational databases, and critical in the big scheme of things. However, individually, transactions add significant performance overhead, and when we are inserting (or updating, or otherwise modifying) thousands of records in multiple tables, treating each insert as an individual transaction slows things WAAAAYYYY DOWWN.
This is a known issue with SQLite. I say «issue» because, despite the fact that the implementation is intentional, the solution to «why are inserts on SQLite so slow» in not immediately obvious, and the internet is stuffed with variations on this question.
Similarly, the Chinook Database implementation neglects this important detail, and the many inserts used to populate Chinook data are treated as individual transactions, and thus run really slow.
Here is the fix:
If we go through the Chinook.sql script and place a BEGIN; statement before the inserts for each table, and a COMMIT; statement at the end of the INSERTs for each table, we will see several orders magnitude better performance from this script.
We can skip wrapping the DROP and CREATE table statements in transactions for our purposes here. As an example, open the file in your favorite text editor, go through and find the beginning of the INSERTs for the Genre table. Add a BEGIN; and COMMIT; clause like so:
Wrap Table Inserts in Transactions:
BEGIN;
INSERT INTO [Genre] ([Name]) VALUES ('Rock');
INSERT INTO [Genre] ([Name]) VALUES ('Jazz');
... Etc ...
INSERT INTO [Genre] ([Name]) VALUES ('Alternative');
INSERT INTO [Genre] ([Name]) VALUES ('Classical');
INSERT INTO [Genre] ([Name]) VALUES ('Opera');
COMMIT;
Now scroll on down, and do the same for each table. When you are done, let’s create a dedicated Chinook database to try it out.
Open the Windows Console, navigate back to sqlite_databases directory, run sqlite3, and open a new database named chinook.db. Then use .read to execute the chinook.sql script again:
Read Chinook Script into Chinook.db:
C:UsersJohn>cd sqlite_databases
C:UsersJohnsqlite_databases>sqlite3
sqlite> .open chinook.db
sqlite> .read chinook.sql
Next, use the .tables command again to see that all the tables were created. The console output should look like this:
Console Output from Execution after Wrapping Table Inserts in Transactions:

We see there is still a little error bugaboo at Line 1 (most likely due to some unicode issue at the beginning of the file — welcome to the world of scripts). However, we can see if our data imported fairly easily:
Select Artists from the Chinook Artists Table:

GUI-Based Tools
We’ve covered enough here that we can explore what SQLite has to offer from the Windows console, and become familiar with this fantastic little database. Of course, there are other tools available to work with SQLite databases, including a terrific multi-platform GUI-based interface, SQLiteBrowser, which is a very competent management interface for SQLite databases.
As mentioned previously, the documentation available at SQL.org is first-rate, and there are a host of other resources out there as well.
SQLite is a handy, mature, highly performant database which is easy to use, and works on all the major OS platforms. Database files created on a Windows machine can move seamlessly between OSX and *Nix OSes, as can most of the tools designed to work with them.
I like to start everything with the most fundamental tools available, and then once I have developed a solid understanding of the system, move on up to more advanced tools. Take some time and get to know SQLite from the basic CLI interface. You won’t regret it.
Additional Resources and Items of Interest
- Command Line Shell for SQLite — Reference at SQLite.org
- SQLite Syntax — Reference at SQLite.org
- Database Browser for SQLite
- Adding and Editing PATH Environment Variables in Windows
- C#: Using Reflection and Custom Attributes to Map Object Properties
CodeProject
My name is John Atten, and my username on many of my online accounts is xivSolutions. I am Fascinated by all things technology and software development. I work mostly with C#, Javascript/Node.js, Various flavors of databases, and anything else I find interesting. I am always looking for new information, and value your feedback (especially where I got something wrong!)
When one is developing in .NET with Visual Studio and other Microsoft tools, it is easy to lose sight of alternative solutions to common problems. MS does a competent job of creating a tightly integrated development tool chain, where available MS products (both free and paid) offer reasonable default choices which generally get the job done.
Given this, .NET devs often fail to explore outside this arena, or try on alternate solutions which might acquit themselves equally as well, or better, to the problem at hand. Also, of course, there is always a learning curve to new choices, and we often choose the familiar out of simple expediency.
Image by shinichi | Some Rights Reserved
- Getting Started — Using SQLite on Windows
- Open a New Database and Create Some Tables from the SQLite3 Console
- Entering SQL in the SQLite Console
- Formatting the Console Output
- Change the Display Mode for the SQLite Console
- Executing Script Files from the SQLite Console Using the .Read Command
- Wrap Multiple Actions in Transactions for Instant Performance Boost
- GUI-Based Tools
- Additional Resources and Items of Interest
Some Background
SQLite is an awesome, open source, cross-platform, freely available file-based relational database. Database files created on Windows will move seamlessly to OSX or Linux OSes. The tools (in particular the SQLite3 Command Line CLI we examine here) work the same from one environment to the next.
It is also not new. If you have been around for a while, you doubtless know SQLite has been in active and open development for well over a decade, and is widely used in many different scenarios and operating environments. In fact, SQLite.org estimates that SQLite is in fact the most widely deployed SQL database solution in the world. Their most recent figures (albeit from 2006) would indicate that there are over 500 million deployments of SQLite (this number is no doubt higher by now).
SQLite documentation is also widely regarded as above average in completeness and usability, providing both new and experienced users a well-developed canonical resource for learning and troubleshooting.
SQLite was originally designed by D. Richard Hipp in 2000 for the U.S. Navy, with the goal of allowing SQLite-based programs to function without installing a database management system, and without requiring a system administrator (from Wikipedia). These design requirements result in, as the SQLite site describes it, «a software library that implements a self-contained, serverless, zero-configuration, transactional SQL database engine.»
Until recently, I had not spent much time with SQLite. However, in developing the Biggy project, we decided that the core supported database systems would be cross-platform and open source. We wanted both a full-on client/server option, as well as a file-based relational database option. For our file-based relational database we chose SQLite, after exploring other alternatives.
In fitting SQLite into the Biggy workflow, I got to the chance to familiarize myself with SQLite, its strengths, some weaknesses, some peculiarities to watch for, and some tips and tricks for getting the most out of the product.
In this post, we will get familiar with the basics of using the database in a Windows environment. Next post, we will explore integration with .NET development, and Visual Studio. But, learn the hard way first always say, so… let’s get our command line on.
Getting Started — Using SQLite on Windows
Before we look at using SQLite in Visual Studio, let’s walk through the basics of using SQLite in a Windows environment outside the IDE.
First, download the pre-compiled binaries from the SQLite Downloads page. At a minimum, you will want the binaries for the Win32 x86 SQLite DLL, and for the SQLite x86 Command Shell. Unzip the contents of the files in a folder named C:SQLite3 (or whatever other location suits your needs). Then add C:SQLite3 to your PATH variable so that you can invoke the SQLite Command Shell right from the Windows console.
In your new directory C:SQLite3, you should now have the following items:
- sqlite3.def
- sqlite3.dll
- sqlite3.exe
If we run the sqlite3.exe, we are greeted with a Console Application designed to allow us to work with SQLite databases.
The SQLite Console
The command prompt is easy to use. Text entered without the «.» qualifier will be treated as SQL (and succeed or fail accordingly). There are a set of commands preceded with the «.» qualified which are application commands. An example is shown in the console window above, where we are instructed to use the .open command to open a database file.
The complete list of SQLite console commands is beyond the scope of this article, but we will walk through a list of the most useful ones here.
Open a New Database and Create Some Tables from the SQLite3 Console
The SQLite3 Console will open in the current directory (or in the directory in which the .exe is found, if you double-click in the GUI). Let’s start by opening a new Windows terminal (which should generally open in our home directory), create a new sub-directory named sqlite_data, and navigating into that folder:
Create a new Directory and Navigate Into the New Directory
C:UsersJohn> mkdir sqlite_databases
C:UsersJohn> cd sqlite_databases
Next, let’s try on that .open command. Open sqlite3 and open a new database in the directory we just created
Open SQlite3.exe and Open a New Database File:
C:UsersJohnsqlite_databases>sqlite3
sqlite> .open test.sqlite
Your console output should now look like this:
Console Output after Opening SQLite3 and Creating a New Database File:
Next, let’s create a few tables to play with.
Entering SQL in the SQLite Console
Recall that plain text entered without the «.» qualifier will be interpreted by the SQLite console as SQL. There are a few additional things to bear in mind:
- SQL text may span multiple lines — the enter key will not cause the text following the prompt to execute until it is ended with a semi-colon.
- You can create multi-line SQL statements simply by hitting the Enter key without ending the statement with a semi-colon.
- SQLite uses either square brackets or double-quotes as delimiters for object names, in cases where the literal column name would not be allowed. For example,
Last Namewould NOT be a valid column name, but will work as[Last Name]. Likewise, the keywordGroupis not allowed as a column name, but"Group"will work. - SQLite is not case-sensitive. Unlike some other databases (most notably Postgresql), casing in both the SQL syntax, and in object names, is ignored.
So, with that said, let’s create a table or two. We will keep this really basic, since we are interested in how the console works, more so that a SQLite SQL syntax tutorial.
Create a Table in a Single-Line Statement:
Above, we just kept typing our whole SQL statement, and allowed the console to wrap the text when it needed to (that lovely Windows console, with its under-developed display characteristics…). Kinda ugly and hard to read. Let’s try a multi-line statement.
Create a Table Using a Multi-Line Statement:
Aside from the ugliness that is the Windows Console, that’s a little more readable.
Now let’s add a few records.
Insert Records into Test Database:
Notice how the case of my SQL doesn’t matter in the above? And, yes, as a matter of fact, that IS a syntax error in the midst of things there. I accidentally used an angle bracket instead of a paren…
So now, we have added a little data. Let’s read it back:
Select Data from Users Table:
Here we see that for unrelated reasons (ahem… I closed the wrong window…), I had to exit the application, and then go back in. However, once I opened our test.sqlite database, I was able to enter a standard SELECT statement, and return the data.
See that ...>? That was the result of me forgetting to add the semi-colon at the end of my SELECT statement. If you do that (and you WILL…), simply add a semi-colon on the continued line, and the statement will execute (remember, until SQLite3 sees a semi-colon, it will continue to interpret text input as more SQL).
Formatting the Console Output
We can tell SQLite3 how we would like our data displayed. For example, we may prefer to see a more tabular display, with columns and headers. To accomplish this, we use a few of those application commands, prefixed with a period.
Change the Display Mode for the SQLite Console
We can use the following two commands to change the display mode and use columns and headers in our console output:
Use Column Display Mode with Headers in SQLite3
sqlite> .mode column
sqlite> .headers on
If we run our SELECT statement again, the output looks like this:
Console Output Using Columns and Headers:
Executing Script Files from the SQLite Console Using the .Read Command
Of course, typing in SQL in the console can become painful. While it is fine for quick-and-diry queries and maintenance tasks, doing a lot of work is better accomplished by scripting out what you need in a text file, and then executing that from the Console.
To see this in action, we will download my personal favorite test database, the Chinook database. Chinook has a database script for most of the popular database platforms, providing a handy way to use the same data set for evaluating multiple platforms (among other things). Download the Chinook Database, extract the .zip file, and locate the Chinook_Sqlite_AutoIncrementPKs.sql file. To keep things simple, drop a copy of it into your sqlite_databases folder, so it is in the current directory. Then, also to keep out typing down, rename the file you just moved to simply «Chinook.sql«.
We can execute SQL scripts using the SQLite .read command. To illustrate, we will read in the Chinook database.
You will notice a couple things when we do this. First, the console may show an error (which you can see in the image below), but the script is still running — errors are logged out to the console.
Second, executing this script in its current form is SLOOOOWWWW. This is due to a peculiarity with SQLite we will address momentarily, but was not addressed by the creators of the Chinook Database script.
Execute SQL Script from the SQLite Console Using the .Read Command
sqlite> .read Chinook.sql
The script may run for a good number of minutes, so go grab a cup of coffee or something. your computer has not seized up. The Console will return when the script is finished (really, this took about 10 minutes on my machine, but we’re going to fix that…
<Coffeee Brake . . .>
Ok. Now that the script has finished running, let’s use the .tables command to see a list of the tables in our database. If everything worked as we expect, we should see our own users and groups tables, as well as a bunch of new ones populated with Chinook data.
List Tables Using the .Tables Command:
sqlite> .tables
We should see something like this:
Console Output from .Tables Command:
Now, why the hell did it take so long to run that script??!!
Wrap Multiple Actions in Transactions for Instant Performance Boost
SQLite is inherently transaction-based. Meaning, unless you specify otherwise, each statement will be treated as an individual transaction, which must succeed, or be rolled back.
Transactions are a key feature of relational databases, and critical in the big scheme of things. However, individually, transactions add significant performance overhead, and when we are inserting (or updating, or otherwise modifying) thousands of records in multiple tables, treating each insert as an individual transaction slows things WAAAAYYYY DOWWN.
This is a known issue with SQLite. I say «issue» because, despite the fact that the implementation is intentional, the solution to «why are inserts on SQLite so slow» in not immediately obvious, and the internet is stuffed with variations on this question.
Similarly, the Chinook Database implementation neglects this important detail, and the many inserts used to populate Chinook data are treated as individual transactions, and thus run really slow.
Here is the fix:
If we go through the Chinook.sql script and place a BEGIN; statement before the inserts for each table, and a COMMIT; statement at the end of the INSERTs for each table, we will see several orders magnitude better performance from this script.
We can skip wrapping the DROP and CREATE table statements in transactions for our purposes here. As an example, open the file in your favorite text editor, go through and find the beginning of the INSERTs for the Genre table. Add a BEGIN; and COMMIT; clause like so:
Wrap Table Inserts in Transactions:
BEGIN;
INSERT INTO [Genre] ([Name]) VALUES ('Rock');
INSERT INTO [Genre] ([Name]) VALUES ('Jazz');
... Etc ...
INSERT INTO [Genre] ([Name]) VALUES ('Alternative');
INSERT INTO [Genre] ([Name]) VALUES ('Classical');
INSERT INTO [Genre] ([Name]) VALUES ('Opera');
COMMIT;
Now scroll on down, and do the same for each table. When you are done, let’s create a dedicated Chinook database to try it out.
Open the Windows Console, navigate back to sqlite_databases directory, run sqlite3, and open a new database named chinook.db. Then use .read to execute the chinook.sql script again:
Read Chinook Script into Chinook.db:
C:UsersJohn>cd sqlite_databases
C:UsersJohnsqlite_databases>sqlite3
sqlite> .open chinook.db
sqlite> .read chinook.sql
Next, use the .tables command again to see that all the tables were created. The console output should look like this:
Console Output from Execution after Wrapping Table Inserts in Transactions:
We see there is still a little error bugaboo at Line 1 (most likely due to some unicode issue at the beginning of the file — welcome to the world of scripts). However, we can see if our data imported fairly easily:
Select Artists from the Chinook Artists Table:
GUI-Based Tools
We’ve covered enough here that we can explore what SQLite has to offer from the Windows console, and become familiar with this fantastic little database. Of course, there are other tools available to work with SQLite databases, including a terrific multi-platform GUI-based interface, SQLiteBrowser, which is a very competent management interface for SQLite databases.
As mentioned previously, the documentation available at SQL.org is first-rate, and there are a host of other resources out there as well.
SQLite is a handy, mature, highly performant database which is easy to use, and works on all the major OS platforms. Database files created on a Windows machine can move seamlessly between OSX and *Nix OSes, as can most of the tools designed to work with them.
I like to start everything with the most fundamental tools available, and then once I have developed a solid understanding of the system, move on up to more advanced tools. Take some time and get to know SQLite from the basic CLI interface. You won’t regret it.
Additional Resources and Items of Interest
- Command Line Shell for SQLite — Reference at SQLite.org
- SQLite Syntax — Reference at SQLite.org
- Database Browser for SQLite
- Adding and Editing PATH Environment Variables in Windows
- C#: Using Reflection and Custom Attributes to Map Object Properties
CodeProject
My name is John Atten, and my username on many of my online accounts is xivSolutions. I am Fascinated by all things technology and software development. I work mostly with C#, Javascript/Node.js, Various flavors of databases, and anything else I find interesting. I am always looking for new information, and value your feedback (especially where I got something wrong!)

SQLite — это C- библиотека, реализующая движок базы данных SQL. Все данные хранятся в одном файле. Программы, использующие библиотеку SQLite, могут обращаться к базе данных с помощью языка SQL без работающего выделенного процесса СУБД. Это означает, что одновременные запросы (или параллельные пользователи) должны блокировать файл для безопасного изменения БД. Данный пункт очень важен, поскольку непосредственно затрагивает сферу применения SQLite — если в основном используется чтение данных, тогда никаких проблем нет, но если необходимо делать большое количество одновременных обновлений, то приложение будет тратить больше времени на синхронизацию блокировки файлов, чем делать настоящую работу.
Возможности SQLite:
Способ подключения к базе данных SQLite во всех языках практически одинаков. Все они требуют для этого выполнить два шага: во-первых, включить в код библиотеку SQLite (предоставляющую универсальные функции подключения), и во-вторых, подключиться к базе данных и запомнить это подключение для дальнейшего использования. В PHP для этого служит библиотека php-sqlite.
Debian, Ubuntu
apt install sqlite3
Типы данных SQLite: INTEGER, REAL, TEXT, BLOB, NULL.
SQLite не имеют классов, предназначенных для хранения дат и/или времени. Вместо этого, встроенные функции даты и времени в SQLite способны работать с датами и временем, сохраненными в виде значений TEXT, REAL и INTEGER в следующих форматах:
В приложениях следует выбирать, в каком из этих форматов хранить даты и время, а затем можно свободно конвертировать из одного формата в другой с помощью встроенных функций даты и времени.
Утилита sqlite3 — консоль управления базой SQLite.
Запуск.
$ sqlite3 db.sqlite
SQLite version 3.7.9 2011-11-01 00:52:41
Enter ".help" for instructions
Enter SQL statements terminated with a ";"
sqlite>
Вывести известные команды наберите .help
Последнее обновление: 26.11.2021
Для работы с SQLite разработчики данной СУБД предоставляют консольный клиент sqlite3. Рассмотрим вкратце, как с ним работать.
Прежде всего нам надо загрузить sqlite3. Для этого перейдем на страницу https://www.sqlite.org/download.html.
Название необходимого нам пакета начинается с sqlite-tools. И на странице загрузки мы можем найти версии для Windows, Linux, MacOS:
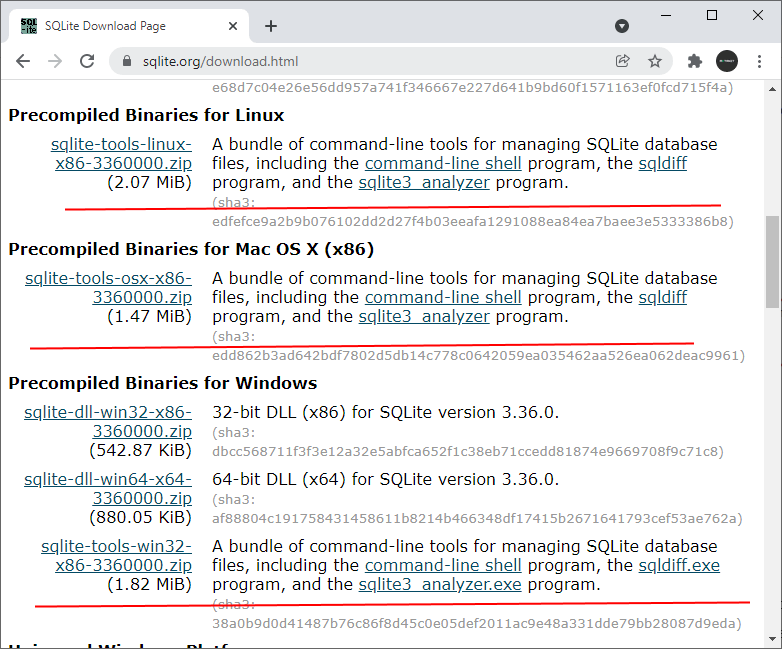
Загрузим нужную нам версию и распакуем ее.

В распакованной папке мы сможем найти три утилиты, из которых файл с названием sqlite3 и представляет собственно
консольную оболочку для работы с бд SQLite. Запустим ее:
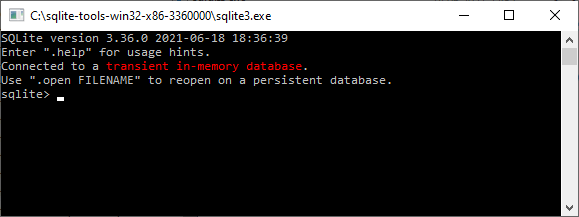
Открытие базы данных
Для открытия базы данных необходимо ввести команду .open, после которой указывается путь к базе данных. Например,
В данном случае будет открыта база данных под названием «test.db’, которая находится в той же папке, что и консольная утилита. Если базы данных не существует,
то она создается.
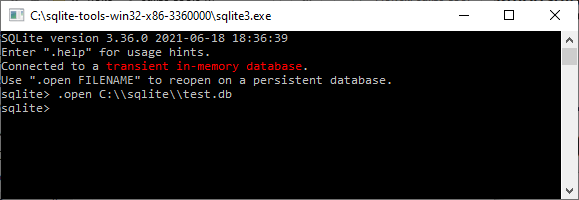
Также можно передать абсолютный путь:
sqlite>.open C:\sqlite\test.db
После открытия мы сможем работать с этой бд.
Создание таблицы
Для создания таблицы после открытия базы данных необходимо ввести команды CREATE TABLE, после которой указываются название таблицы и спецификация ее столбцов:
sqlite>create table users(name text, age integer);
В данном случае создается таблица users, в которой два столбца: столбец name, который имеет тип text, и столбец age, который имеет
тип integer
Обратите внимание, что команда завершается точкой с запятой. И все команды SQL должны завершаться точкой с запятой, благодаря чему sqlite может идентифицировать,
что выполняется sql-команда.
Операции с данными
Для добавления данных применяется команда INSERT INTO. Например, добавим в таблицу users одну строку:
sqlite>insert into users values ('Tom', 37);
Теперь получим ранее добавленны данные. Для этого используем команду SELECT:
sqlite>select * from users;
И sqlite выведет нам все данные из таблицы users:
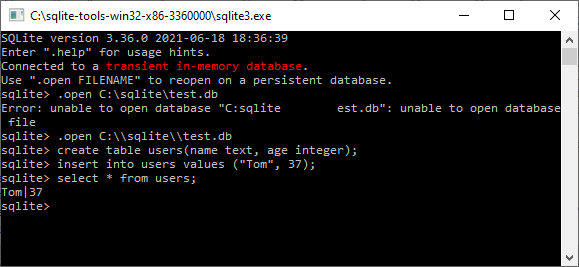
The documentation states that there is a command-line shell for sqlite3:
To start the sqlite3 program, just type «sqlite3″ followed by the name the file that holds the SQLite database.»
When I try this, in the Windows Command Prompt I get the error message:
‘sqlite3’ is not recognized as an internal or external command,
operable program or batch file.
Windows explorer reveals several ‘Sqlite3″ folders in various places:
backends(C:/Python26/Lib/site-packages/django/db)
Lib(C:/Python26)
backends(C:/Django-1.1.1/Django-1.1.1/build/lib/django/db
backends(C:/Django-1.1.1/Django-1.1.1/django/db)
How do I access the shell, can anyone help?
![]()
Gino Mempin
23k27 gold badges91 silver badges120 bronze badges
asked Dec 10, 2009 at 17:33
![]()
Download sqlite3 binary for windows here. Unzip it and put it somewhere in your path.
answered Dec 10, 2009 at 17:35
![]()
TrentTrent
13k4 gold badges38 silver badges36 bronze badges
2
That’s the error message you get if you try to run any executable that’s not in your current directory or in the path.
To correct the problem, find the SQLite executable (SQLITE3.EXE), and run it from the directory in which it resides, or add SQLITE3.EXE to your PATH environment variable.
answered Dec 10, 2009 at 17:35
![]()
Robert HarveyRobert Harvey
176k47 gold badges333 silver badges496 bronze badges
You have to properly set your PATH environment variable to include one of the locations where sqlite3.exe resides. Usually SQLite seems to set that environment variable upon install but the list of paths where you found it indicates that it just came as a library for various other applications. Therefore it’s not too surprising that the path isn’t set.
answered Dec 10, 2009 at 17:35
![]()
JoeyJoey
339k83 gold badges680 silver badges679 bronze badges
I have sqlite3 on my machine, and as others have mentioned it must be located within a folder specified by your PATH environment variable. Since I use it a lot, I threw it in windowssystem32, which is where I place a lot of utilities like pstools.
answered Dec 10, 2009 at 17:38
![]()
whatsisnamewhatsisname
5,7742 gold badges20 silver badges27 bronze badges