
Для некоторых айтишных задач требуется поднять tftp-сервер, который обычно предназначен только для простой передачи файлов между устройствами. TFTP изначально так и разрабатывался, чтобы быть простым. Прочитать о его работе можно на Wikipedia.
Мне понадобился сервер tftp для того, чтобы слить настройки с уже настроенного коммутатора Cisco и при необходимости залить его обратно.
Для справки: tftp – это протокол передачи данных, который работает на транспортном протоколе UDP на порту 69. Особой безопасности не предоставляет. Используется для загрузки бездисковых систем (нужен для загрузки первоначального загрузчика) и для обновления прошивок аппаратных sip-телефонов Cisco.
Этот протокол чувствителен к фрагментации сетевого пакета. Если фрагментация есть, то файл может передаваться не до конца. Чтобы проверить делятся пакеты или нет, нужно выставить правильное MTU. На Windows это можно сделать программой TCP Optimizer. Подробнее о программе и настройке MTU здесь.
Есть две версии приложения:
tftpd32— для 32-битной системы windows;tftpd64— для 32-битной системы соответственно.
Данный tftp-сервер можно установить как для старой Windows XP, так и для современной Windows 10. На серверные ОС (Windows 2012 r2, Windows 2016 и др.), tftpd64 и tftpd32 встают тоже без проблем.
Порт tftp сервера по умолчанию — 69/UDP. Если подключение проходит через маршрутизатор, не забываем открыть 69 порт UDP протокола.
Установка tftpd32 сервера на Windows
Для таких простых целей я выбрал замечательное приложение tftpd32/tftpd64. Найти его можно здесь.
Для того, чтобы развернуть tftp-сервер на своем рабочем месте необходимо:
- Загрузить нужный дистрибутив отсюда. Стоит обратить внимание, что дистрибутивы различаются по типу запуска: как службу (service edition) и как приложение (standard edition) и также по битности ОС. Для себя я выбрал пакет tftpd64 service edition (installer)
- После загрузки, устанавливаем загруженный дистрибутив, не изменяя абсолютно никаких параметров.
- Если Вы загрузили, как и я, дистрибутив с запуском в качестве службы, то стоит вручную запустить службу или просто перезапустить компьютер.
- Дальнейшей настройки этот сервер не требует, но для подстраховки все настройки должны выглядеть так как изображено на скрине:

Всё! Теперь можно подключаться к tftp и копировать файлы. У операционной системы Windows XP tftp-клиент установлен по умолчанию, а у Windows 7/8/10 его необходимо доставить через компоненты системы.
Как проверить работу сервера tftpd32?
Для того, чтобы передать файл необходимо открыть cmd.exe и выполнить команду:
tftp 192.168.1.10 GET имя_файла.txtДля того, чтобы получить файл с tftp-сервера, есть команда:
tftp 192.168.1.10 PUT имя_файла.txtИспользовать tftpd32/tftpd64 для каких-то постоянных задач не рекомендуется, так как у него практически нет никакой защиты от несанкционированного подключений к серверу. Да, можно ограничить доступ к нему только определенным IP-адресам, но та легкость, с которой можно подменить IP-адрес, позволяет сказать, что это не относится к сетевой безопасности вообще.
Включать сервер tftp с таким «уровнем безопасности» можно только на короткое время, для выполнения каких-то сервисных работ, а лучше вообще делать это в изолированной сети.
Теги: cisco
и сеть
Комментарии
Сервер TFTP предназначен для управления загрузкой бездисковых ПК (рабочих станций), но также эффективен для передачи файлов между удаленными системами. Этот упрощенный протокол передачи файлов очень прост в использовании.
Содержание
- 1 Альтернатива домашней сети
- 2 Настройка сервера TFTP
- 3 Как пользоваться TFTP сетью
- 4 Конфигурация клиента TFTP
- 5 Настройка брандмауэра
- 6 Как передавать файлы в сети TFTP
Альтернатива домашней сети
Домашняя группа Windows была удобным инструментом для обмена файлами по сети. Но была исключена с обновлением Windows 10 до версии 1803. Для замены можно использовать TFTP-сервер, который интуитивный в настройке, достаточно надежный и позволяет передавать данные на быстрой скорости.
Перед настройкой сервера TFTP нужно выполнить следующие действия:
- Войдите в систему под учетной записью администратора.
- Загрузите установщик TFTP-сервера компании SolarWinds. После распакуйте загруженный zip архив в любое место на диске и установите программу, следуя инструкциям на экране.
- Чтобы разрешить удаленный доступ к серверу, нужно переадресовать UDP-порт 69 на IP адрес домашней сети. Но, если удаленное подключение не требуется, то переназначать порты не нужно.
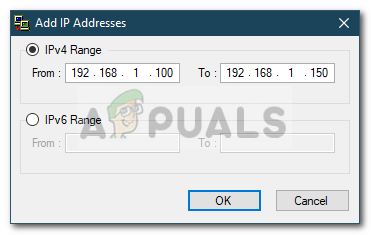
Если разрешили доступ к TFTP-серверу за пределами локальной сети дома, офиса и другого места, проверьте, что статический или динамический IP добавлен в диапазон адресов. По умолчанию на сервере разрешены все IP адреса для передачи и получения файлов, а также перенаправление портов. Можно ограничить диапазон IP, чтобы разрешить только несколько адресов.
Для настройки сервера следуйте инструкции:
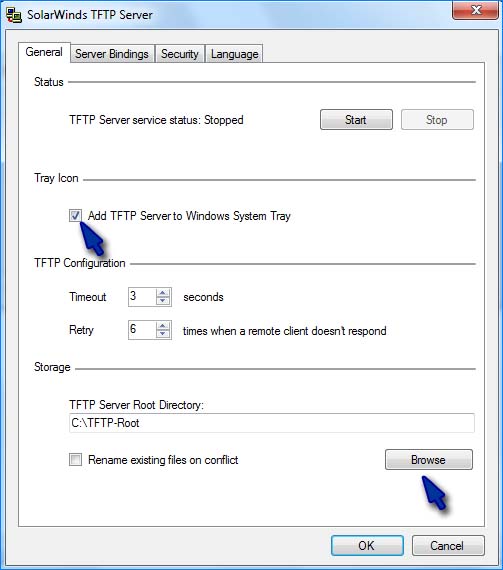
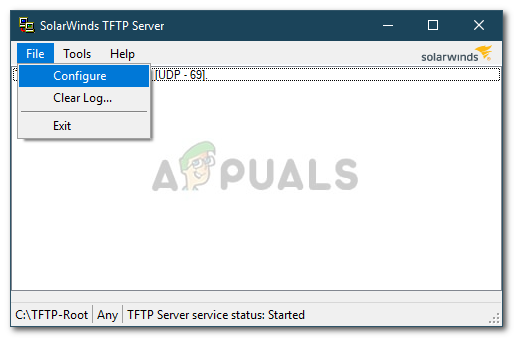
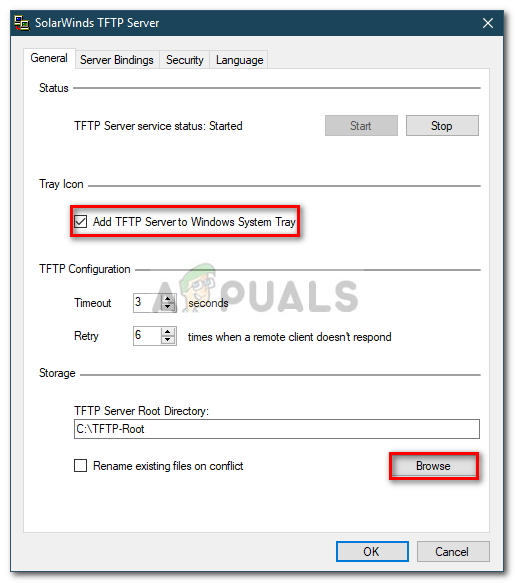
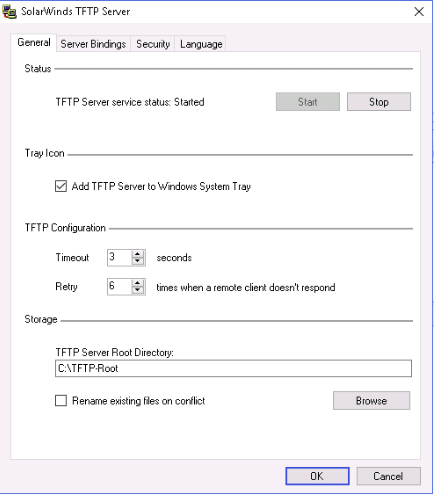
- После запуска утилиты SolarWinds TFTP Server, перейдите в File — Configure. Для отображения иконки в правом нижнем углу на панели задач отметьте флажком поле «Добавить сервер в системный трей Windows».

- Выберите корневой каталог сервера. В нем будут храниться все отправленные и принятые файлы. Чтобы передать файлы, их нужно будет скопировать в этот каталог.
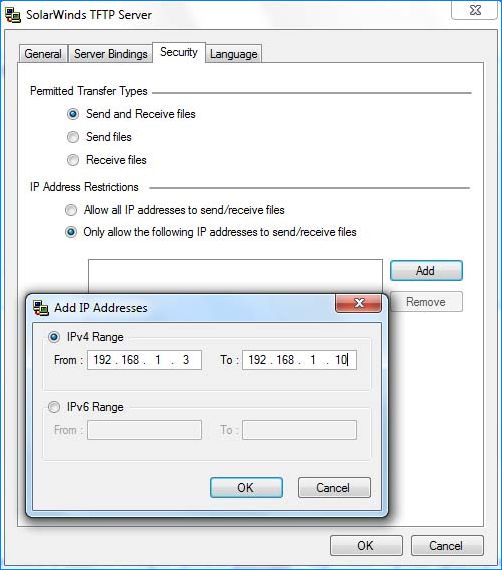
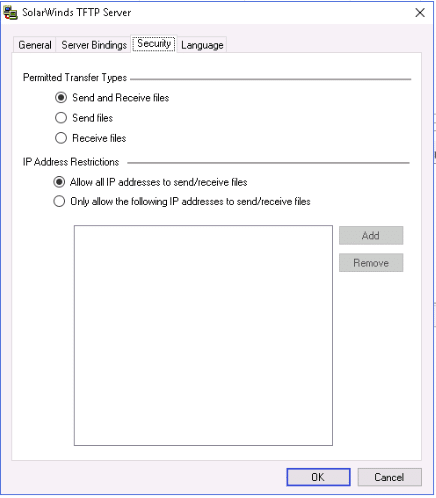
- Перейдите на вкладку Безопасность, чтобы ввести некоторые ограничения. Здесь можно включить прием или передачу, разрешить определенный диапазон IP или только один адрес.

- После нажмите на ОК, чтобы сохранить настройки, и закрыть окно конфигурации.
Как пользоваться TFTP сетью
Если нужен доступ из устройств за пределами сети, потребуется переадресация порта 69. Поскольку экраны настроек разных моделей маршрутизаторов отличаются, предлагаем вам базовое представление.
- Нужно войти в панель конфигурации роутера с адресной строки браузера и ввести логин и пароль, которые указаны в инструкции к устройству.
- Откройте расширенные настройки и найдите NAT или Port Forward.
- Сделайте новую запись и перенаправьте UDP порт 69 на ipv4-адрес.
Если не собираетесь передавать файлы из компьютеров за пределами вашей домашней сети, процедуру с перенаправлением портов можно пропустить.
Конфигурация клиента TFTP
Перейдем к установке клиента на удаленном или локальном компьютере.
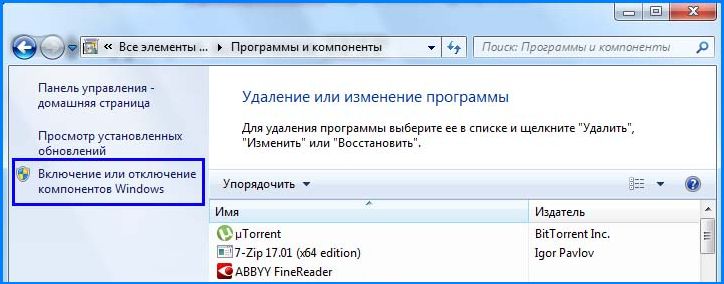
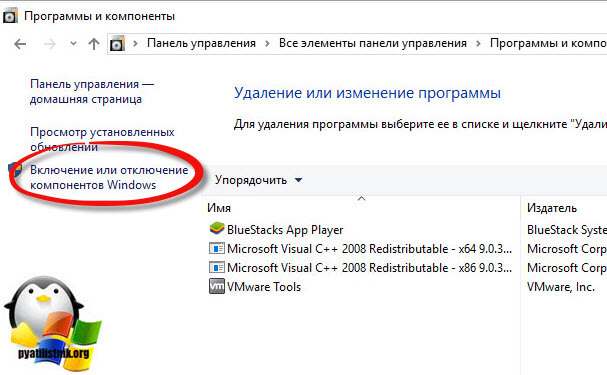
- Откройте панель управления и перейдите в раздел «Программы и компоненты».
- С левой стороны экрана кликните на пункт «Включить или выключить компоненты Windows».

- Найдите в списке клиента TFTP и установите флажок. Подтвердите изменения на ОК.

Помните, что установку клиента нужно произвести на компьютере, на котором не запущен сервер TFTP.
Настройка брандмауэра
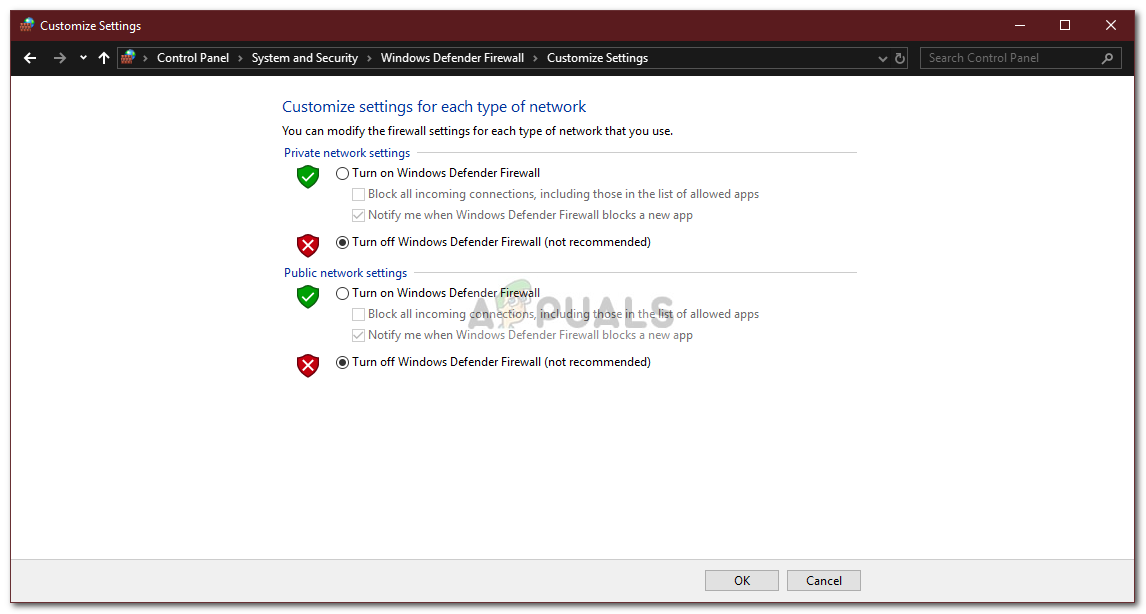
После установки клиента нужно либо отключить Брандмауэр Windows, либо добавить исключение для соединений TFTP.
- Откройте панель управления, измените просмотр на крупные значки и выберите Брандмауэр Windows.
- С левой стороны нажмите на кнопку «Включение или выключение брандмауэра Windows».
Переключите флажки в двух секциях в положение «Отключить».
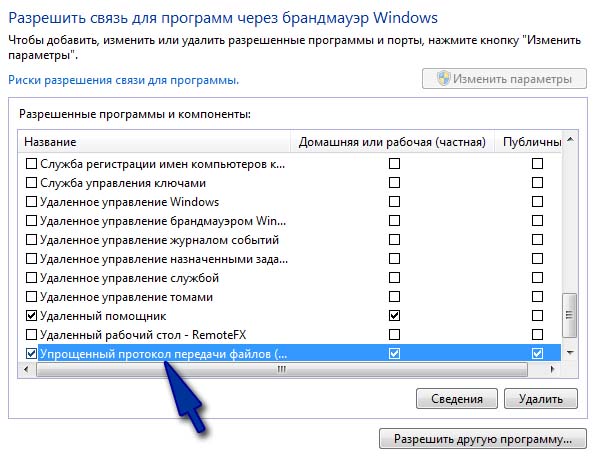
- Если не хотите полностью отключать эту функцию защиты, можно добавить исключение для соединений TFTP. Для этого вернитесь в предыдущее окно и выберите «Разрешить запуск программы или компонента через брандмауэр».
- Нажмите на кнопку «Разрешить другую программу», затем на «Обзор». Найдите и добавьте исполняющий файл TFTP.exe, который находится в каталоге WindowsSystem32.

- Установите флажки в полях «частная» и «публичные» и нажмите на ОК.

Как передавать файлы в сети TFTP
После установки клиента и перенаправления порта перейдем к передаче файлов. Убедитесь, что сервер запущен, затем следуйте инструкциям:
Нажмите Win + R, в диалоговом окне наберите cmd для вызова командной строки. Перенесите или скопируйте файлы, которые хотите передать, в корневой каталог сервера.
Для отправки файлов нужно использовать параметр PUT, при получении GET. Синтаксис команды выглядит следующим образом:
Tftp -i [server IP address] [GET или PUT] [путь к файлу]
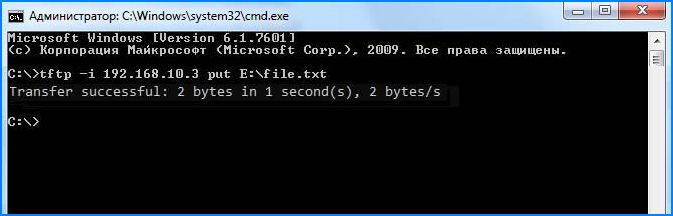
Например, для передачи используйте команду:
Tftp -i 192.168.10.3 put E:file.txt 
Если хотите получить файл, то команда будет выглядеть:
Tftp -i 192.168.10.3 get file.txt
Если хотите переслать на удаленное устройство за пределами сети, нужно указать публичный IP-адрес в командной строке, а затем порт. Примером может быть:
Tftp -i 39.43.126.2:69 put E:file.txt
When transferring files across a network then TFTP is a good solution due to its ease of use and easy configuration.
TFTP, or Trivial File Transport Protocol, is a way of sending and receiving files over the internet. It is especially useful in situations where the remote computer that is receiving the file is unmanned.
This makes sending files very easy and does not require human intervention on the other end if configured correctly. The downside is that the protocol is not secure. (If security is a concern then you should look at transfer methods that use encryption.)
If you do a lot of file transfers over your home or business network, then TFTP is a good way to go.
In order to demonstrate this method of file copying and transferring, we will be using a free TFTP tool provided by SolarWinds TFTP. It is a quick and easy way to get the job done, so we will be downloading it from here.
Best of all is that this app is free, so using it will certainly not break the bank. Let’s get started.
![]()
After you download, install the package on your PC and lets get started with the configure.
Before We Begin:
There are a couple of things that we need to do before we can get started. This is all very easy to do so don’t let these steps scare you off. The whole process should only take a few minutes and is very simple to get done. You will therefore need:
- Access to the Administrator account:
This is easy to do. If you are the only person using your computer then the chances that you are the administrator of your account is pretty high. - Download and Install SolarWinds TFTP Server:
In order to use the SolarWinds TFTP Server we will obviously need to download and install it to the computer. The download link can be found above in the intro section. - You will need Port Forwarding for External Connections:
If you are planning on using remote connections with your TFTP server then you will need to use port forwarding. UDP Port 69 is the port type and port number that you will need to use. It will need to point to the IP address of your server on your network from your router in order to allow users from outside of the network. If you only need internal connections, then don’t worry about this step as it is not needed.
Now we can get started with the rest of the setup!
What Kind of Connection Do You Need to Configure?
For external connections you will need to ensure that you configure the security settings appropriately in the application. You can select which IP addresses can send and receive files to help specify which valid hosts can transfer and receive.
Basic TFTP Server Setup
These steps will guide you through the setup process of SolarWinds TFTP Server. This will help you get the ball rolling and allow you to eventually make transfers across multiple networks possible.
- Open the SolarWinds TFTP application
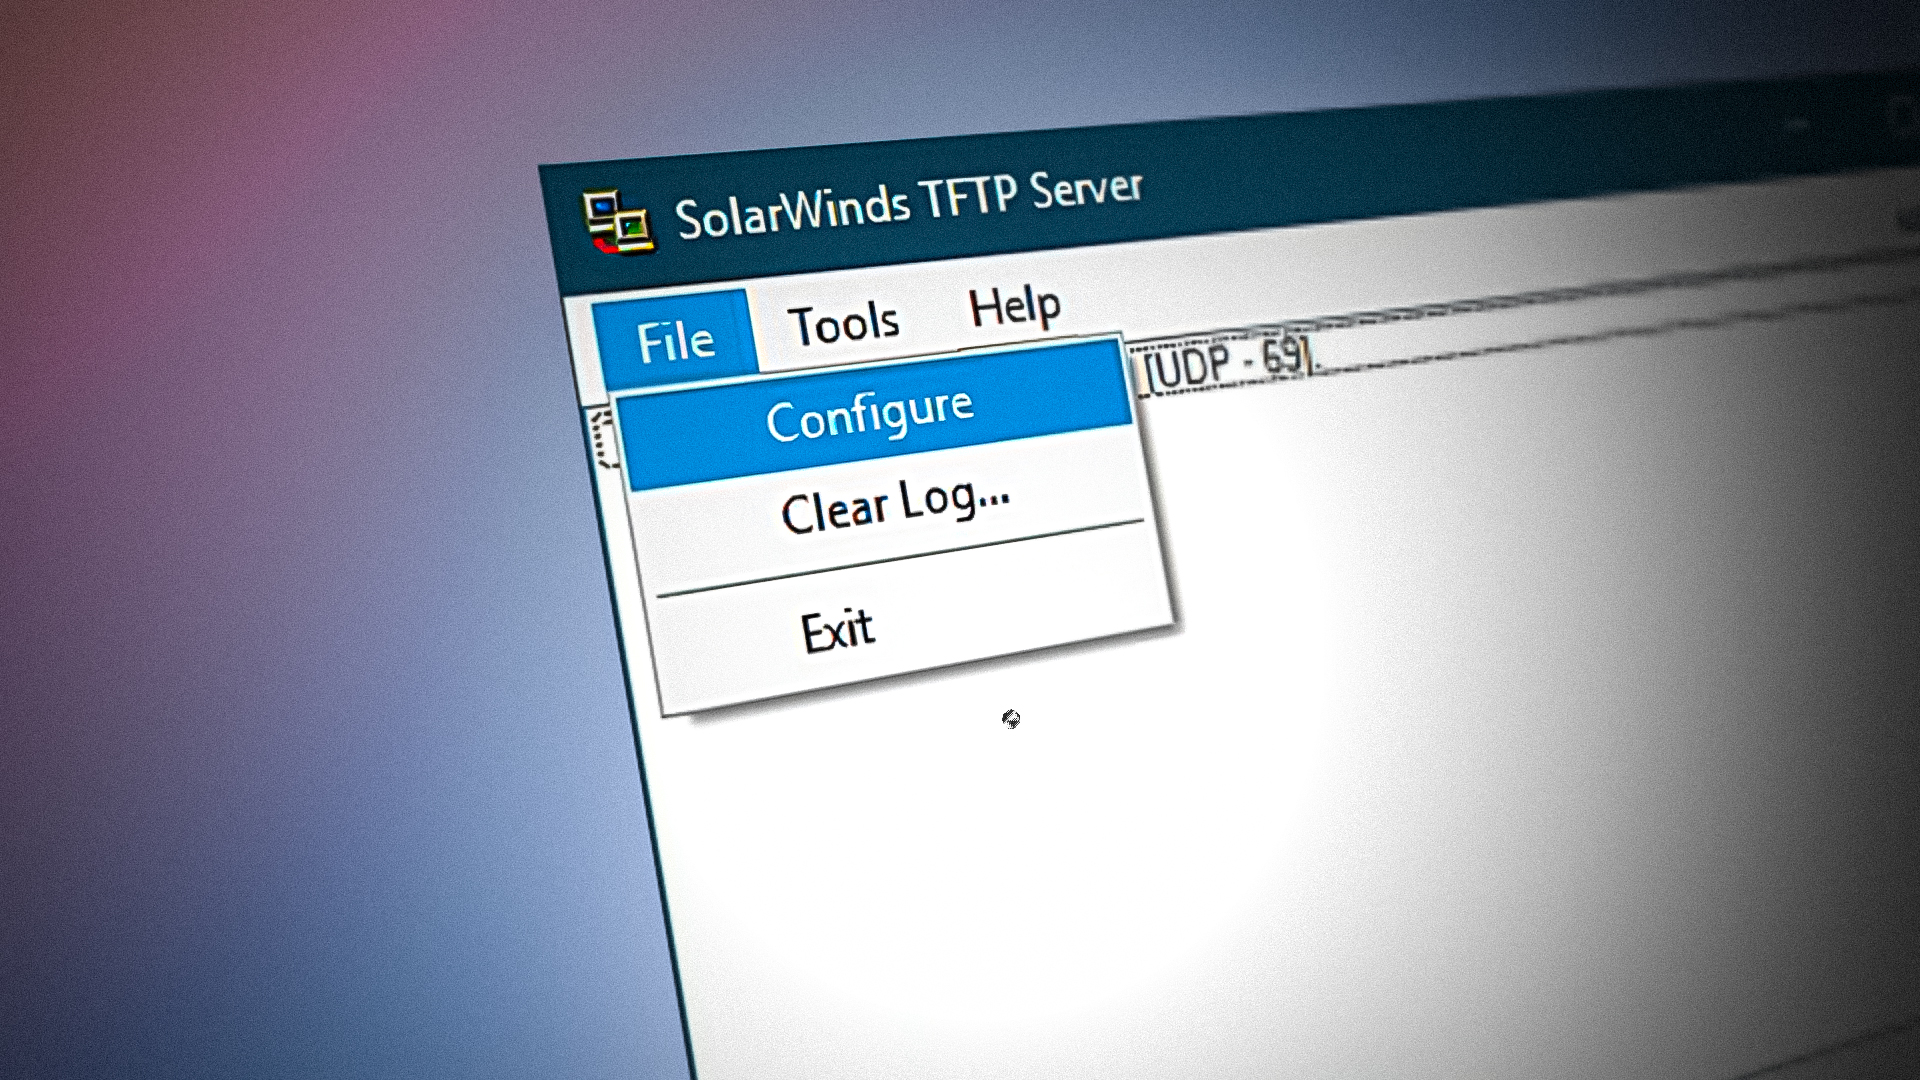
- Next, click file -> configure.
- Choose the correct settings as highlighted in the following screen capture labelled 1, 2 and 3.
- 1 Shows the status of the TFTP service, 2 allows you to set the icon to appear in the taskbar and 3 is where the files will be stored by default. You can choose a different location if you want. We will be leaving ours as the default location but feel free to make any changes if you need to. A popular choice for example is the Downloads folder.

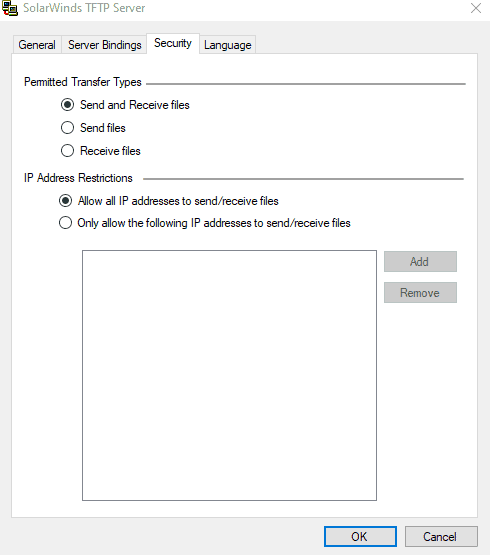
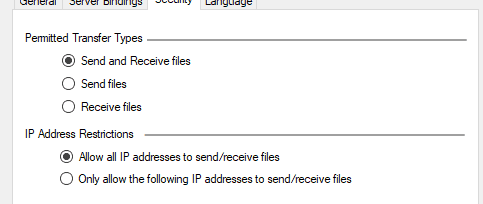
- The next step is locking down some security items. To do that, we need to go to the, you guessed it, security tab within the SolarWinds TFTP Server.
- This part is pretty self explanatory, but definitely worth looking into. We need to set the actions that we want this computer to be able to complete. If you are setting up permissions for a file server, then you might not want everyone to have access to send files to it, and instead you might only want it to server files and have them downloadable. If that is the case then you will want to choose send files. If you want to do both then select Send and Receive files.
- You can further lock down the security of your TFTP server by specifying which IP addresses are allowed to transfer files. You can do this by selecting a range of both IPv4 and IPv6 IP addresses. Our example uses IPv4 and allows 10 IP addresses to send and receive files across the network.
- We enter the range and then set the changes by clicking the OK button. Easy.
We have now configured our TFTP server in just a few simple clicks.
The Fun Part: Actually Utilizing Our New TFTP Server
The setup was pretty straight forward, and using the application is just as easy. Let’s go through the steps to make using our TFTP server a reality.
Port Forwarding Steps
This part is optional because you might not want to access your files from outside the network. This is understandable, especially because TFTP is not designed to be a secure protocol, just a convenient one. However, you can add mappings to port 69 in your router by either finding the NAT or Port Forwarding sections of your router. Each manufacturer is different, so be sure to consult your user manual when attempting to make changes to your router. If in doubt then contact your manufacturer’s support and see if they can assist you with the changes.
For everyone else, lets carry on with our tutorial!
Installing a suitable TFTP Client for Windows
The easiest way to continue is to use the default Windows TFTP that comes with the Operating System. To access it and install it onto our computer we need to do the following:
- Open the start menu and search for the control panel.
- Find Programs and Features and then click on Turn Windows features on or off.
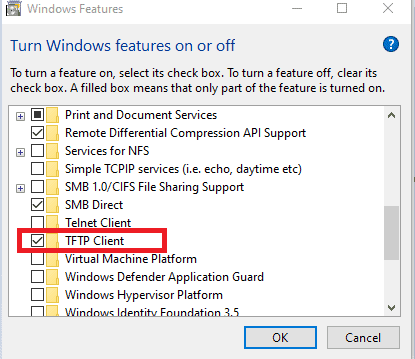
- Find the TFTP client and click on the tick box so that the tick is visible.

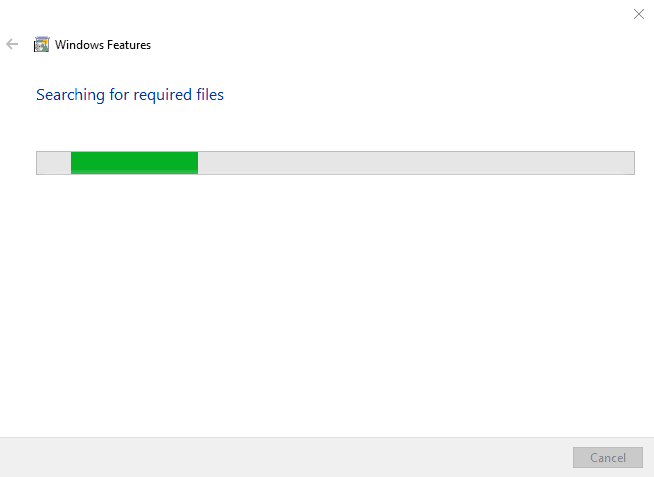
- Next, Click on OK to install the client.

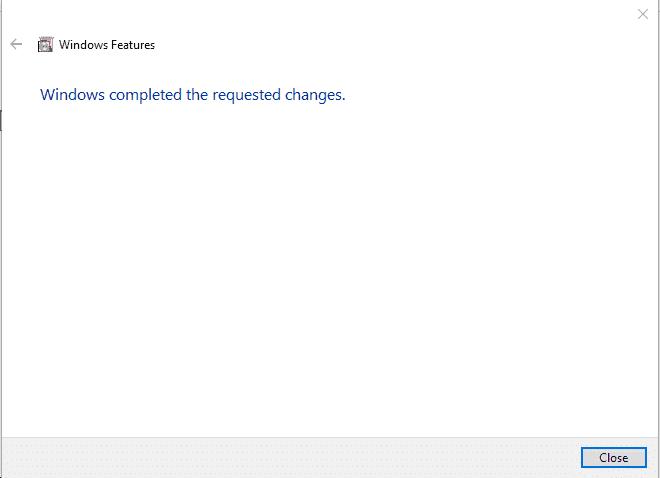
- Once finished, you have installed the client.

Important to note that this is the computer without the TFTP server application running, also known as the client PC.
Allow TFTP with a Firewall Configuration Change
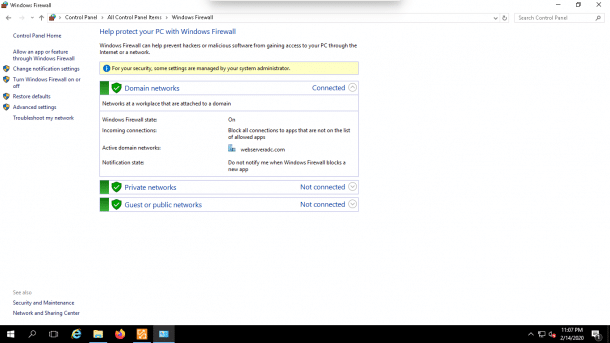
There are 2 approaches to getting this right. The first and easiest way is to disable your Windows Firewall. This might be OK in a home setup where you trust all of your devices on the network, or in a corporate environment where management is conducted by the IT department. If you are not willing to do this, then we can create specific rules in our Windows firewall to allow traffic through.
- Click on the start menu and type in Control Panel, then click on that icon when it appears.
- Click on Windows Defender Firewall.
- Next, click on Turn Windows Defender on or off.
- Tick the boxes as seen below and then click ok

- You have now turned off you firewall.
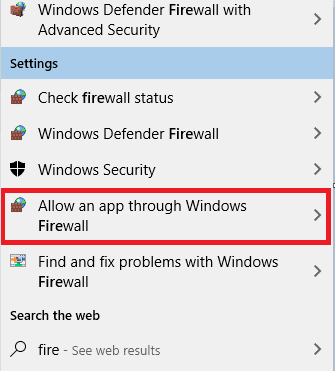
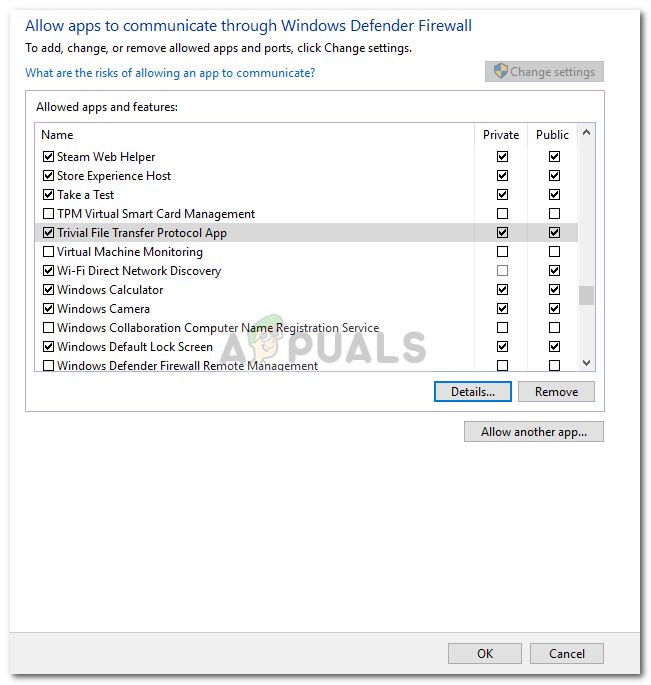
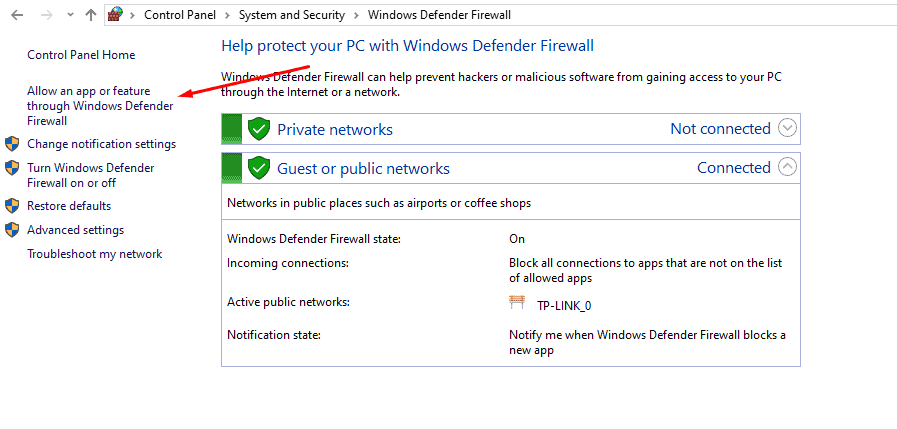
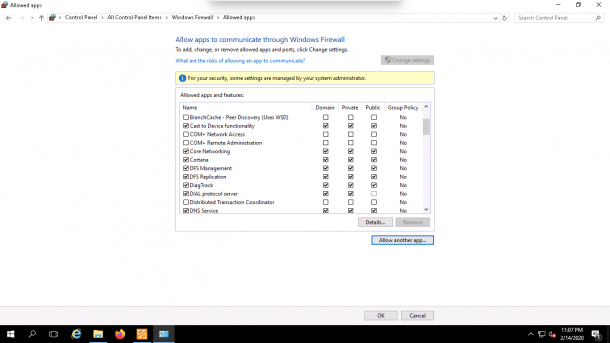
- If you don’t feel comfortable turning off Windows Firewall we create an exception instead. To do this, we must click on Allow an app or feature through Windows Defender Firewall’ in the Windows Firewall settings.

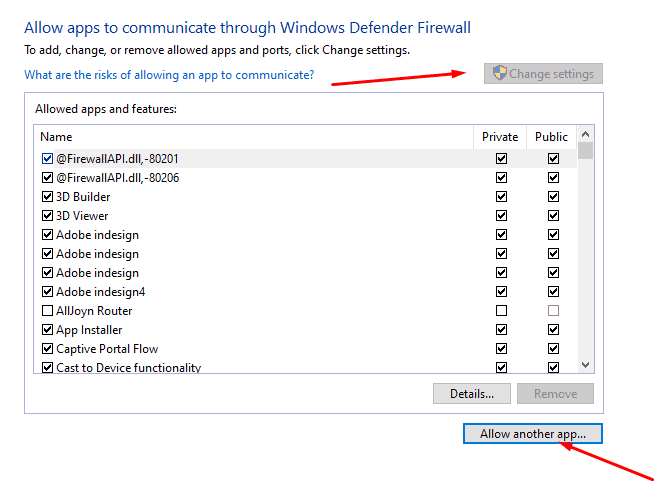
- Click on the Change settings button to add a program.
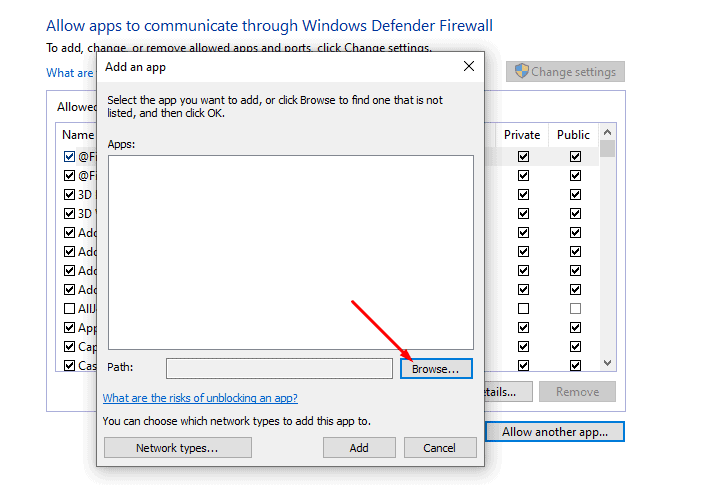
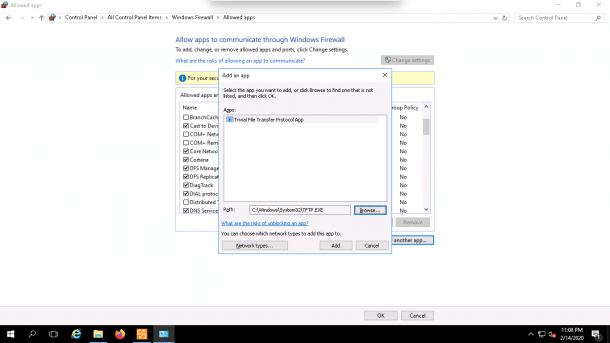
- Next you must click on Allow another appand then hit Browse.
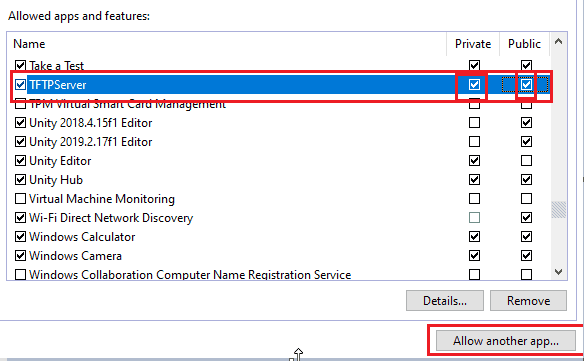
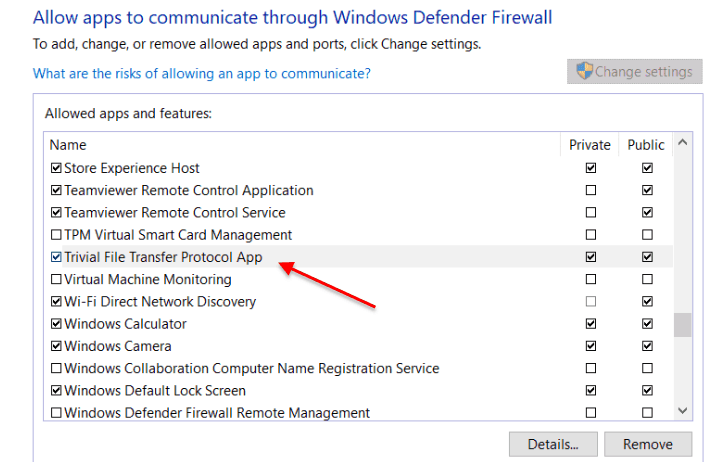
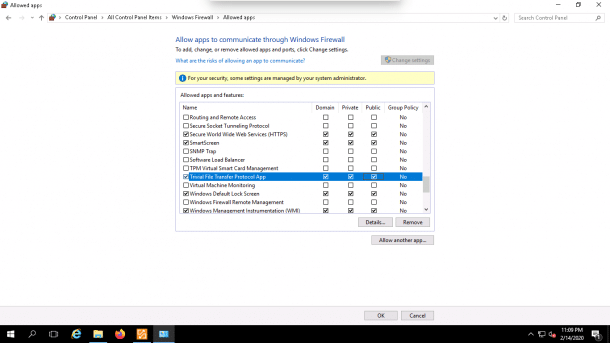
- Select exein the Windows system32 directory and also TFTPServer in the SolarWinds folder inside Program Files x86.
- Click open and it has been added.
- Tick the boxes called Privateand To finish, click ok.

Transferring Files using TFTP
Let us now do some local tests with the following commands.
- Press the windows key or click on the start menu
- Type cmd and press enter
- You will see a black cmd terminal in front of you. This is where we will type in our commands.
- Change directories to the path where your files are stored for sending and receiving. Let us now send a file. To do this, we use the ‘put’ command.
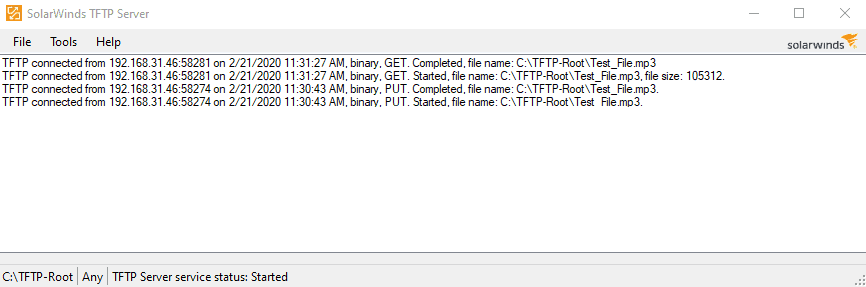
tftp -i 192.168.31.46 put “Test_File”.mp3
![]()
- If you want to receive a file, then the command we will use is called ‘get’.
tftp -i 192.168.31.46 get “Test_File”.mp3
![]()
We can look at our TFTP Server logs that display when we open our server app and we are greeted with the following records:
Conclusion
Transferring files by using TFTP is easy, fun and free. By leveraging the free TFTP server from SolarWinds, we can turn any ordinary PC into a file server with remote access capabilities.
This is useful for many reasons, and we hope that the tutorial will help you to get the correct access levels set for your own specific needs. Be sure to download the app from above so that you can follow along with this tutorial.
Better yet, check out SolarWinds and look at the multitude of monitoring, troubleshooting and control software that they have on offer. You are bound to find the right tool for the job, regardless of what you are trying to achieve!
Happy file transferring, and we’ll see you next time.
TFTP Server FAQs
What is difference between FTP and TFTP?
FTP is the File Transfer Protocol – the original file transfer system for the internet. TFTP is the Trivial File Transfer Protocol. This is a lightweight service that is usually used on private networks for moving small files to devices. Both systems can be used to either send or fetch a file and neither system includes security features, such as data encryption. As such, neither of these systems should be used to send files to remote devices outside a private network – user SFTP or FTPS instead.
Why do we use TFTP?
The Trivial File Transfer Protocol (TFTP) is fast and feature-free. It does not include authentication procedures, which means it can be integrated into task automation scripts without the need to store passwords but that also means that it shouldn’t e used to move sensitive data. The access security of private networks provides sufficient protection to make TFTP safe to use. However, even in this location, the protocol isn’t a good option for data movements. TFTP is good for moving configuration files to devices and for gathering log files from endpoints on a network to a central location.
Does TFTP use UDP or TCP?
The Trivial File Transfer Protocol (TFTP) is a lightweight file transfer system and as such, can be considered to be a stripped-down version of the File Transfer Protocol (FTP). The lack of features in TFTP makes it quick and also easy to deploy from a script. TFTP lacks authentication and session features, which are hallmarks of UDP. TFTP connections are initially made to port 69. However, continued communication for a transfer is switched to a random ephemeral port – some TFTP implementations choose to use the same ephemeral port number for all of their transactions.
На чтение 6 мин. Просмотров 149 Опубликовано 02.05.2021
TFTP-сервер в основном используется для передачи файлов между системами, подключенными по сети. TFTP, также известный как Trivial File Transfer Protocol, представляет собой служебную программу в Интернете, которую можно использовать для отправки или получения файла из удаленной системы. Протокол очень простой и не обеспечивает должной защиты передаваемых файлов.
Мы все знаем домашнюю группу Windows , которая позволяет вам обмениваться файлами через сеть без особых препятствий. Однако он был удален из Windows 10 в обновлении v1803, из-за чего требуются другие разрешения. Быстрый обходной путь – использовать TFTP-сервер, его просто и легко настроить. В этой статье мы будем использовать TFTP-сервер SolarWinds ( скачать здесь ), который довольно прост в использовании и позволяет передавать файлы с надежностью и на высокой скорости по сети. Мы также рекомендуем использовать SolarWinds TFTP Server, поскольку это специализированная компания, специально разрабатывающая программное обеспечение и решения для крупных организаций, которые помогают управлять сетями, системами и ИТ-инфраструктурой.
Содержание
- Предварительные требования:
- Удаленный доступ или локальный доступ
- Настройка сервера TFTP
- Использование TFTP-сервера
- Установка клиента TFTP
- Настройка брандмауэра для разрешения TFTP
- Передача файлов с помощью TFTP
Предварительные требования:
Прежде чем мы углубимся в суть статьи и покажем вам, как настроить свой TFTP-сервер, есть определенные вещи, которые вам потребуются. Вот что вам нужно –
- Учетная запись администратора: Если вы не используете учетную запись администратора, вы не сможете настройте TFTP-сервер в вашей системе. Поэтому убедитесь, что вы вошли в систему как администратор.
- TFTP-сервер SolarWinds: для настройки TFTP-сервера вам необходимо загрузить Утилита TFTP Server от SolarWinds. Вы можете скачать его здесь . После того, как вы загрузили файл .zip, распакуйте его на рабочий стол и затем просто выполните прямую установку.
- Перенаправление портов: чтобы разрешить удаленный доступ к На вашем TFTP-сервере вам необходимо будет перенаправить UDP-порт 69 на IP-адрес вашей сети с вашего маршрутизатора, чтобы пользователи, находящиеся за пределами вашей сети, могли получить доступ к серверу. Однако, если удаленное соединение не требуется, вам не нужно перенаправлять порты.
После того, как вы выполнили все требования, вы готовы к настройке сервера. .
Удаленный доступ или локальный доступ
Если вы решили разрешить доступ к TFTP-серверу из-за пределов вашей локальной сети, например из дома или офиса, или из любого другого места, вам необходимо убедиться, что вы используете статический IP-адрес или ваш динамический IP-адрес добавлен в белый список, по умолчанию сервер TFTP позволяет всем IP-адресам отправлять и получать файлы вместе с переадресацией портов. Вы можете добавить диапазон IP-адресов, чтобы разрешить использование нескольких IP-адресов, или сокращенный диапазон, чтобы разрешить использование только одного устройства. 
Конфигурация IP для Solarwinds TFTP
Настройка сервера TFTP
Чтобы настройте сервер, следуя приведенным инструкциям:
- Прежде всего, запустите утилиту SolarWinds TFTP Server , перейдя в Start Menu и выполните поиск TFTP Server .
- После загрузки нажмите File и затем выберите Настроить .

- Теперь, если вам нужен сервер чтобы отобразить его в панели задач Windows, нажмите « Добавить сервер TFTP в панель задач Windows ».
- После этого вам нужно будет выбрать Корневой каталог сервера . Здесь будут сохранены все полученные файлы. Кроме того, если вы хотите отправить несколько файлов, вам придется сначала скопировать файлы в этот каталог. Нажмите Просмотрите и выберите нужное местоположение.
- Затем перейдите на вкладку Безопасность , чтобы применить некоторые ограничения.
- Если вы только хотите чтобы отправить файлы, нажмите Отправить файлы . Если вы хотите получать только файлы, нажмите Получить файлы . Если вы хотите сделать и то, и другое, убедитесь, что установлен флажок « Файлы для отправки и получения ».
- Благодаря утилите SolarWinds TFTP Server вы можете добавить дополнительную безопасность, разрешив определенному IP-адресу отправлять и получать файлы. Если вы хотите сделать это, установите флажок « Разрешить отправку/получение файлов только следующему IP-адресу », а затем нажмите Добавить .
- Введите диапазон IP-адресов и нажмите OK .
- Наконец, нажмите OK , чтобы закрыть окно конфигурации.


Вот и все, вы успешно настроили и настроили свой TFTP-сервер.
Использование TFTP-сервера
Сейчас Если вы настроили сервер TFTP, вам может быть интересно, как отправлять или получать файлы с помощью сервера TFTP. Не волнуйтесь, мы собираемся проиллюстрировать процедуру здесь.
Переадресация портов – Чтобы начать, вам сначала нужно перенаправить номер порта 69, если вы хотите, чтобы системы за пределами сети имели к нему доступ. Перенаправление портов обычно отличается для разных прошивок, поэтому мы не можем охватить их все. Однако, чтобы дать вам базовое представление, вам нужно будет получить доступ к панели управления вашего маршрутизатора, перейти к расширенной настройке и найти NAT или переадресацию портов. Там просто сделайте новую запись и перенаправьте UDP-порт 69 на свой IPv4-адрес.
Обратите внимание, что если вы не собираетесь передавать файлы удаленно, вам не нужно перенаправлять какие-либо порты.
Установка клиента TFTP
Следующим шагом будет установка клиента TFTP в удаленной или локальной системе. Чтобы установить TFTP-клиент, выполните следующие действия:
- Перейдите в меню «Пуск» и откройте Панель управления
- Перейдите к Программы и функции , а затем в левой части нажмите ‘ Включить или выключить функции Windows ‘.
- Прокрутите вниз и найдите TFTP Client . Установите флажок.
- Нажмите OK , чтобы установить клиент.
- Подождите, пока он завершится.

Помните, что это должно быть в системе, в которой не запущен сервер.
Настройка брандмауэра для разрешения TFTP
После установки клиента TFTP в вашей системе вам придется либо выключить брандмауэр Windows, либо добавить исключение для соединений TFTP. Вот как это сделать:
- Перейдите в меню “Пуск” и откройте Панель управления .
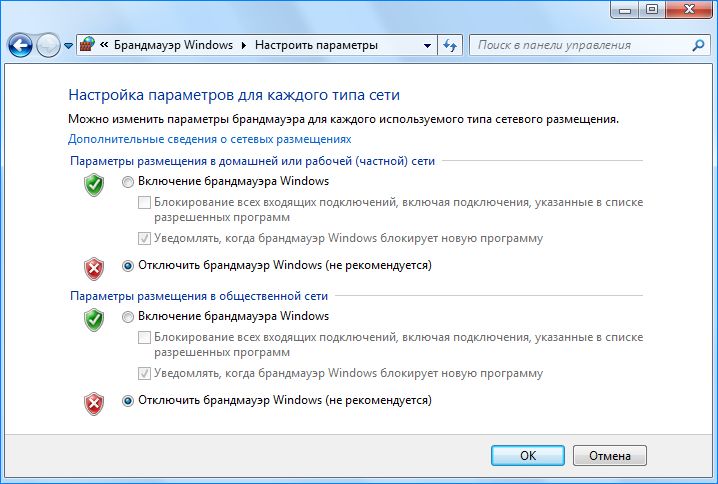
- Измените Просмотр по на Большие значки , а затем выберите Брандмауэр Защитника Windows .
- Чтобы выключить брандмауэр Защитника Windows, нажмите « Включить или выключить Защитник Windows ».
- Установите флажок « Отключите брандмауэр Защитника Windows ‘в обоих настройках и нажмите ОК.
- Если вы не хотите отключать брандмауэр Windows, вы можете просто добавить исключение для соединений TFTP. Для этого нажмите « Разрешить приложение или функцию через брандмауэр Защитника Windows » в окне настроек брандмауэра Windows.
- Нажмите « Изменить». settings ‘, чтобы иметь возможность добавить исключение.
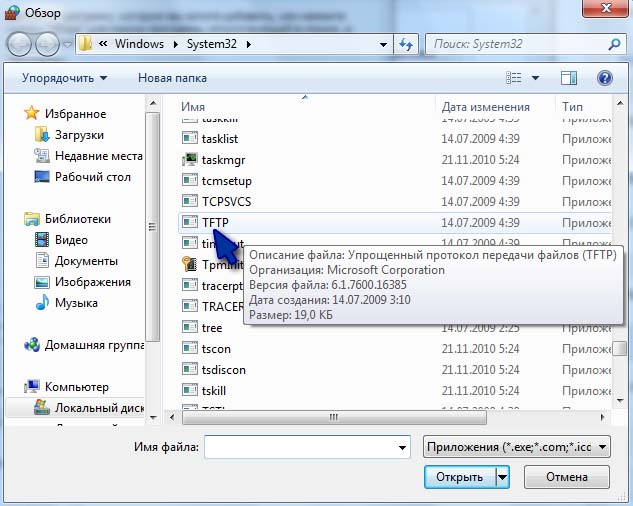
- Теперь нажмите Разрешить другое приложение , а затем нажмите Обзор .
- Найдите TFTP.exe в каталоге Windows system32. Выберите его и нажмите “Открыть”.
- Установите флажки Private и Public , а затем нажмите OK


Передача файлов с помощью TFTP
Наконец, после установки клиента TFTP и перенаправления порта UDP 69 вы готовы передавать файлы удаленно или локально. Для этого убедитесь, что сервер запущен, и следуйте приведенным инструкциям:
- Нажмите Windows Key + R , чтобы открыть Выполнить .
- Введите « cmd », чтобы открыть командную строку.
- Перед передачей файлы, убедитесь, что файлы, которые вы хотите отправить, находятся в корневом каталоге сервера .
- Теперь, если вы хотите получить файл, вы должны необходимо использовать параметр GET . Если вы хотите отправить файл, вам просто нужно использовать параметр PUT . Команда выглядит следующим образом:
Tftp -i [IP-адрес сервера] [GET или PUT] [путь к файлу]
- Примером может быть следующий:
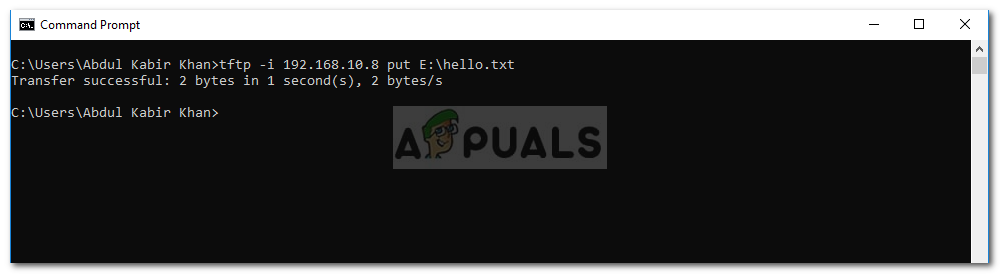
Tftp -i 192.168.10.8 поместите E: hello.txt
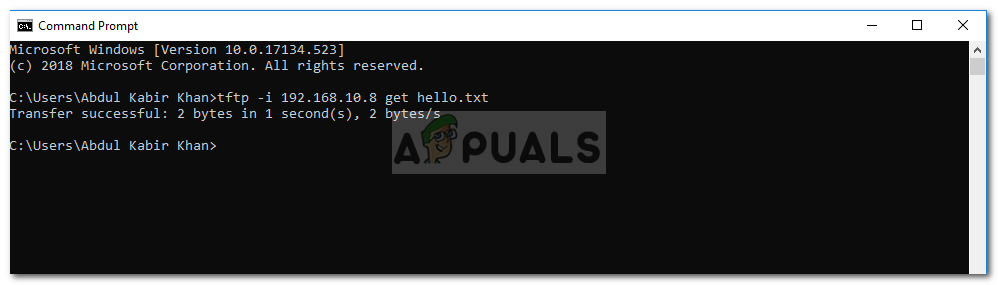
- Если вы хотите получить файл, команда будет выглядеть следующим образом:
Tftp -i 192.168.10.8 get hello.txt


Примечание:
Если вы хотите передавать файлы удаленно, вы необходимо указать общедоступный IP-адрес в командной строке, за которым следует порт. Пример:
Tftp -i 39.43.126.2:69 поместите E: hello.txt
A TFTP Server is basically used to transfer files between systems that are connected over a network. TFTP, also known as Trivial File Transfer Protocol, is an internet software utility that you can use to send or receive a file from a remote system. The protocol is very basic and doesn’t provide much security to the files that are being transferred.
We all know the Windows Homegroup that lets you share files over a network without any great hurdle. However, it has been removed from Windows 10 in the v1803 update due to which alternate resolutions are required. A quick workaround would be to use a TFTP Server, it’s simple and easy to set up. In this article, we’ll be using the SolarWinds TFTP Server (download here) which is pretty easy to use and it lets you transfer files with reliability and at a fast speed over a network. We also recommend using SolarWinds TFTP Server since they are a specialist company, specifically developing softwares and solutions for large organisations to help manage there networks, systems and IT infrastructure.
Prerequisites:
Before we get into the essence of the article and show you how to set up your TFTP server, there are certain things that you will be requiring. Here’s what you need —
- Administrator account: If you are not using an administrator account, you will not be to set up a TFTP Server on your system. Therefore, please make sure you are logged in as an administrator.
- SolarWinds TFTP Server: In order to set up a TFTP server, you will have to download the TFTP Server utility from SolarWinds. You can download it from here. Once you have downloaded the .zip file, extract it to your Desktop and then just go through the straight forward installation.
- Port Forwarding: To allow remote access to your TFTP server you will need to forward UDP Port 69 to the IP address on your network from your router in order to allow users from outside your network access the server. However, if remote connection is not needed, then you do not need to forward ports.
Once you have met all the requirements, you are ready to setup the server.
Remote Access or Local Access
If you have decided to allow access to the TFTP server from outside your local network such as your Home or Office or anywhere else, you will need to ensure that you use a Static IP or have your Dynamic IP added to the white list, by default the TFTP server allows All IP Address to send and receive files along with Port Forwarded. You can add IP Range to allow multiple IPs or a shortened range to allow one device only as well.
IP Configuration for Solarwinds TFTP
Setting up the TFTP Server
To setup the server, please follow the given instructions:
- First of all, run the SolarWinds TFTP Server utility by going to the Start Menu and searching for TFTP Server.
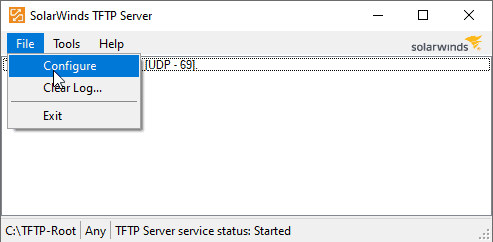
- Once it loads up, click on File and then select Configure.

SolarWinds TFTP Server File Menu - Now, if you want the server to appear in the Windows System Tray, click the ‘Add TFTP Server to Windows System Tray’.
- Afterward, you will have to choose the Server Root Directory. This is where all the received files will be saved. Also, if you want to send over some files, you will have to copy the files to this directory first. Click on Browse and choose a location of your choice.

Changing the Server Root Directory - Next, switch to the Security tab to apply some restrictions.
- If you only want to send files, click Send files. If you only want to receive files, click Receive files. In case you want to do both, make sure the ‘Send and Receive files’ box is checked.

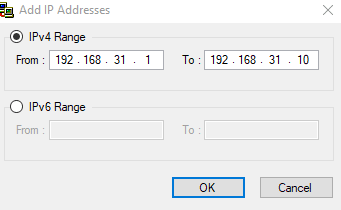
Selecting Transfer Types - Thanks to the SolarWinds TFTP Server utility, you can add in some extra security by allowing certain IP address to send and receive files. If you wish to do this, check the ‘Only allow the following IP address to send/receive files’ and then click Add.
- Enter the range of the IP addresses and click OK.

Allowed Range of IP Addresses - Finally, click OK to close the configuration window.
That is it, you have successfully configured and setup your TFTP Server.
Using the TFTP Server
Now that you have setup a TFTP server, you might be wondering how to send or receive files using the TFTP server. Don’t worry, we are going to illustrate the procedure here.
Port Forward – To start it off, you will first have to make sure to forward the port number 69 if you want systems outside the network to access it. Port forwarding is usually different for different firmware, therefore, we can’t cover them all. However, to give you the basic insight, you will have to access your router’s control panel, go to Advanced Setup and locate NAT or Port Forward. There, just make a new entry and forward the UDP port 69 on your ipv4 address.
Please note that if you don’t intend to transfer files remotely, you do not have to forward any ports.
Installing TFTP Client
The next step would be to install the TFTP Client on the remote or local system. To install the TFTP client, do the following:
- Go to the Start Menu and open up the Control Panel.
- Navigate to Programs and features and then on the left-hand side, click ‘Turn Windows features on or off’.
- Scroll down and locate TFTP Client. Check the box.

Installing TFTP Client - Click OK to install the client.
- Wait for it to complete.

Remember that this has to be on the system which isn’t running the server.
Configuring Firewall to Allow TFTP
After you have installed the TFTP client on your system, you will either have to turn off Windows Firewall or add an exception for the TFTP connections. Here’s how to do it:
- Go to the Start Menu and open up the Control Panel.
- Change the View by to Large Icons and then select Windows Defender Firewall.
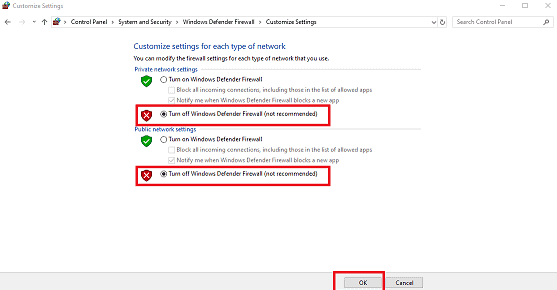
- To turn off Windows Defender Firewall, click on ‘Turn Windows Defender on or off’.
- Check the ‘Turn off Windows Defender Firewall’ under both the settings and click OK.

Turning off Windows Defender Firewall - If you don’t want to turn off Windows Firewall, you can just add an exception for the TFTP connections. To do this, click on ‘Allow an app or feature through Windows Defender Firewall’ on the Windows Firewall settings window.
- Click ‘Change settings’ to be able to add an exception.
- Now, click on Allow another app and then hit Browse.
- Search for TFTP.exe in the Windows system32 directory. Select it and click Open.
- Check both the Private and Public boxes and then click OK.

Allowing TFTP Through Firewall
Transferring Files using TFTP
Finally, after installing the TFTP client and forwarding UDP port 69, you are ready to transfer files remotely or locally. To do this, make sure the server is running and then follow the given instructions:
- Press Windows Key + R to open Run.
- Type in ‘cmd’ to open up the command prompt.
- Before you transfer the files, make sure that the files that you want to send are in the Server Root Directory.
- Now, if you want to receive a file, you will have to use the GET parameter. In case you want to send a file, you will just have to use the PUT parameter. The command goes as follows:
Tftp -i [server IP address] [GET or PUT] [path of file]
- An example would be the following:
Tftp -i 192.168.10.8 put E:hello.txt

Sending a File Using TFTP - If you want to receive a file, then the command will go as follows:
Tftp -i 192.168.10.8 get hello.txt
Note:
If you want to transfer files remotely, you will have to specify the public IP address in the command prompt followed by the port. An example would be:
Tftp -i 39.43.126.2:69 put E:hello.txt

Kamil Anwar
Kamil is a certified MCITP, CCNA (W), CCNA (S) and a former British Computer Society Member with over 9 years of experience Configuring, Deploying and Managing Switches, Firewalls and Domain Controllers also an old-school still active on FreeNode.
In this article, we will examine how to install a TFTP server using SolarWinds TFTP Server to transfer files on a Windows PC.

How to Configure TFTP Server on PC
TFTP (Trivial File Transfer Protocol) performs the file/data transfer operation. However, we can say that it is a non-secure protocol when compared with the FTP protocol.
In our previous article, we gave information about TFTP. In this article, we’ll build a TFTP server to PC with SolarWinds.
As you know, the TFTP protocol structure divides into two as Server and Client. You can run a server by installing the 3rd software on a laptop or desktop computer that you are using.
You do not need a physical server for the server. You can install SolarWinds software on a simple computer and create a file server.
What is TFTP Server?
It listens to the UDP 69 port on the network and provides file-based services to clients. Typically, it is used to install software on Cisco or any branded Router. It is not recommended to use the TFTP in an environment where your security is more important.
FTP or another protocol can be used instead of TFTP. You can also test this protocol by setting up a server temporarily on the local network to better understand this protocol.
How to Setup SolarWinds TFTP Server
First, download the SolarWinds Server by clicking the button below. Then, create a new virtual machine on the VMware or VirtualBox virtualization program and install a clean Windows 10 on it.
After you have completed the necessary steps, follow the steps below to set up the file server.
SolarWinds Download
Step 1
Configure the network settings for the VMware virtual machine as Bridged.

Step 2
You can also configure VMnet0 as a bridge in VMware Virtual Network Editor.

Step 3
Run the Windows 10 virtual machine.

Step 4
Copy the SolarWinds TFTP Server program that you downloaded on your computer to the Win10 virtual machine and run the installation file as an administrator.

Step 5
In the SolarWinds setup window, click the Next button.

Step 6
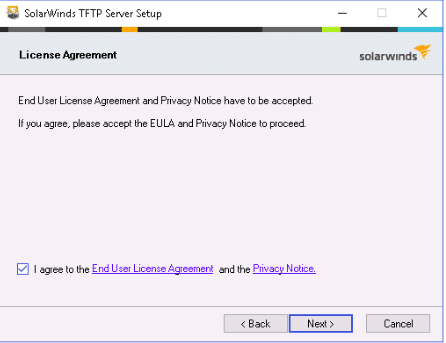
Accept the SolarWinds license agreement and click on the Next button.

Step 7
Click on the Next button again.

Step 8
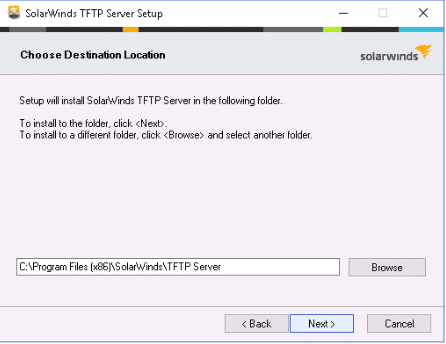
Leave the destination location as default and click on Next.

Step 9
Click the Install button to install SolarWinds software.

Step 10
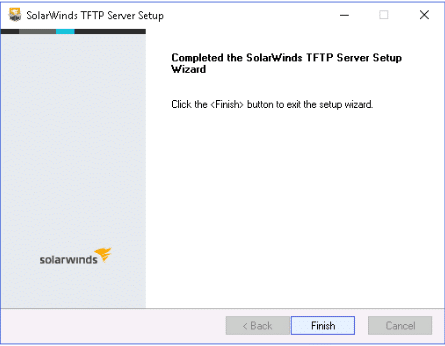
Click on the Finish button in the InstallShield window.

Step 11
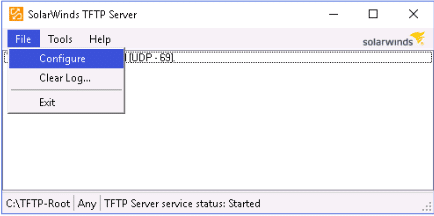
Open the SolarWinds program, and then click on the File menu.

Step 12
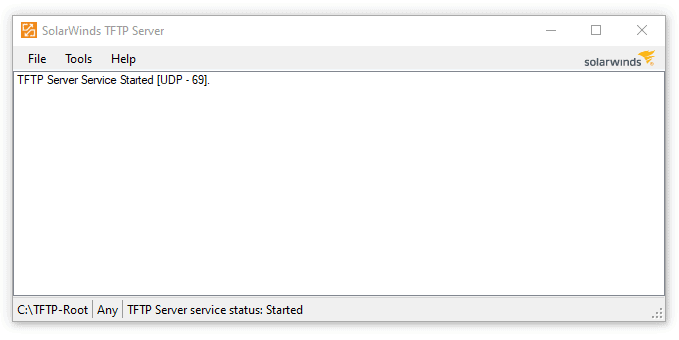
As you can see, the service is not working right now. Click the Start button to start the TFTP service.

Step 13
You can change the storage location of the server.

Step 14
After you start the service, the TFTP-Root folder is created on the C: drive.

Step 15
Create 2 text documents in the TFTP-Root folder.

Step 16
After installing TFTP Server, you must configure your Host machine as TFTP Client.
To enable TFTP Client, go to Control Panel / All Control Panel and click “Turn on Windows Features on or off” in the Programs and Features window.

Step 17
There is more than one service in the window that opens. When you scroll down, you will see the TFTP Client service. After activating the TFTP Client service, click OK.

Step 18
Click the Close button in the Windows Features.

Step 19
After you press Windows Key + R on your Host, the Run window will open. In the Windows Run window, type CMD and press the Enter key.
At the CMD command prompt, execute the “TFTP” command. You can review whether the TFTP Client service is running.

Step 20
In this step, use the command “tftp -i 192.168.1.102 get 1.txt” at the CMD command prompt to transfer the text document that you created on the TFTP Server to the desktop location of the Host.
tftp -i 192.168.1.102 get 1.txt

Step 21
You have successfully copied 1.txt from the server!

Step 22
Open the 1.txt text document you transferred and write something inside and save the file. If the text document is Read-Only, you can change it from the file properties.

Step 23
To send the text document that you have edited on your host computer to the server, follow the command “tftp -i 192.168.1.102 put 1.txt” at the CMD command prompt.
tftp -i 192.168.1.102 put 1.txt

Step 24
File transfer completed successfully.

Step 25
Open the file 1.txt in the TFTP-Root folder and check the change.

Step 26
After you have successfully configured the software, you can review the log files of the file transfer you made.

Video
Final Word
In this article, we have installed and configured SolarWinds software, the best program to use TFTP Server in a network structure. And finally, we’ve reviewed how to transfer a file to the server after installing the TFTP Client on the Host computer. Thanks for following us!
Related Articles
♦ How to Disable Windows Defender in Windows 10
♦ How to Use Sysprep in Windows 10
♦ What is FTP Protocol in Networking?
♦ How to Find WiFi Password on Windows PC
♦ How to Use SSH on Windows 10
Network admins use TFTP Servers every day to transfer images, configuration files, firmware, etc. to their networking devices.
TFTP is simple on its own and does not need any sophisticated messaging to work.
Of course, having no overhead is terrific, but there is a downside; it does not provide any encryption and authentication mechanisms.
Although TFTP has no built-in security, network admins use it for simple and fast file transfers within LANs.

And best of all, it can be used for remote connections by hardening its security with the right server/client software.
In this step-by-step tutorial, you’ll learn how to set up and configure TFTP on Windows 10.
We’ll learn how TFTP works, and how to set it up on the client and server.
Let’s get started!
What is TFTP?
TFTP (Trivial File Transfer Protocol) is a simple file transferring mechanism developed as a “lighter” version of FTP.
It attempts to over-simplify and downsize the functionality of FTP.
Instead of using the full TCP implementation, TFTP relies on the connectionless and simple UDP transport over port 69.
TFTP only allows unidirectional file transferring.
It provides zero control and has low overhead.
The original idea of creating TFTP was to provide booting for disk-less computers or workstations that didn’t have enough memory or disk.
These disk-less workstations usually do not have access to the full TCP/IP stack, so they need to obtain configuration information such as DHCP or BOOTP from another server.
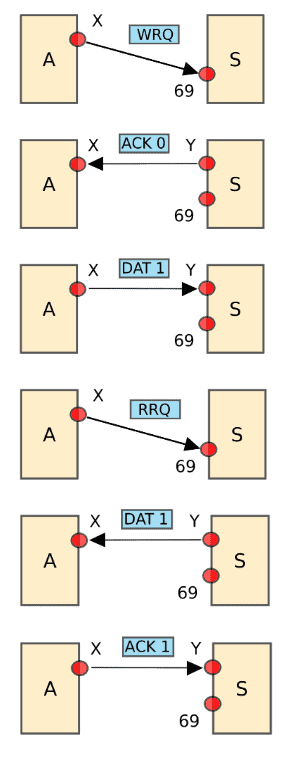
TFTP uses a client/server communication model.
As as you can see from the message exchange below, the TFTP server sends a block of data and waits for the acknowledgment before sending the next one.
A host sends a Request to Write (WRQ), the server responds with an Acknowledgement (ACK), so the host sends data.
The host can also send a Request to Read (RRQ) then the server sends the data and waits for an acknowledgment.
Today TFTP is commonly used for transferring configuration files and firmware images from and to networking devices.
It is also used for network booting by diskless nodes that need booting from the LAN.
TFTP is very easy to implement and use.
But it is not a secured transfer method.
It does not provide a login or access control mechanism, so it is more common in LANs.
Preparing your TFTP Environment
A TFTP server is a must-have piece of software in every network admin’s toolkit.
Cisco, Huawei, Netgear, and many more network appliances use TFTP for upgrading, backing-up, and saving configuration files and firmware.
Fortunately, you can set up and configure a TFTP server on your Windows 10 machine. You’ll need the following post if you’re looking for a TFTP client for Windows 7
SolarWinds Free TFTP Server is lightweight and compatible with Windows 10.
It is a standalone free tool use for fast and easy network file transfers.
Download TFTP Server Free!
Prerequisites Before We Start
When setting up your TFTP server for the first time, consider the following requirements:
- Download the Free TFTP Server To start, you’ll need to get the software. Download SolarWinds Free TFTP Server from its official site. The software is 100% free.
- Have Admin Rights Setting a TFTP server requires an administrator account.
- Have a Root Folder Ready In the end, the idea of using TFTP is to transfer files. Since you are configuring a TFTP server, you’ll need to have a folder storing all transferable files, such as OS firmware, configuration files, DCHP, etc.
- Port forwarding TFTP clients might be able to access the server within the local network area without any issues, so if you don’t need remote file transfers, skip the port forwarding. But if TFTP clients are located across the WAN, they need their traffic to be forwarded to the correct destination. Port Forwarding is a setting in the local router that redirects requests from IP address and port number from WAN to another service on the LAN. To allow TFTP requests from remote TFTP clients into your LAN, you will need to log into the router and forward the UDP port 69 to the IP address of your server.
- Configuring Port Forwarding This varies from router to router. Generally, most routers have it under Advanced Setup > NAT > Port Forward. Make a new entry on the list as Port (69) > UDP > IP Address (your IP)
- Allow local firewall rules The local firewall might block TFTP file transfers. To allow the TFTP client to successfully request data to the TFTP server, avoid any firewall that might be blocking the connection. If possible, configure the firewall inbound/outbound rules to allow TFTP traffic. In the same way, make sure that there are no local firewalls or routers with ACLs blocking the TFTP connection.
Setting up a TFTP Server on Windows 10
So, now you have the TFTP environment ready.
You downloaded the TFTP server software, have admin rights on the server, have the root folder with all files, made the right configurations on the local router, and you are sure that nothing is blocking your TFTP connection.
Let’s go ahead and install the TFTP server:
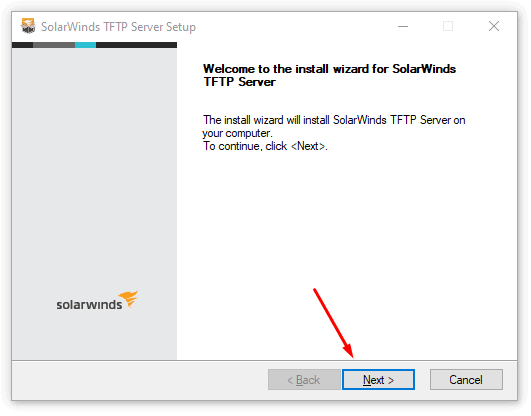
- Unpack the zip drive downloaded from the SolarWinds TFTP server and open the executable file. The SolarWinds TFTP Wizard will open, click on “Next”.
Download Free!

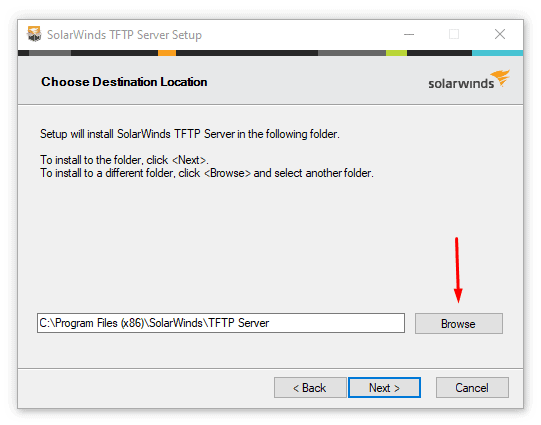
- Click “Browse” to choose a destination location.

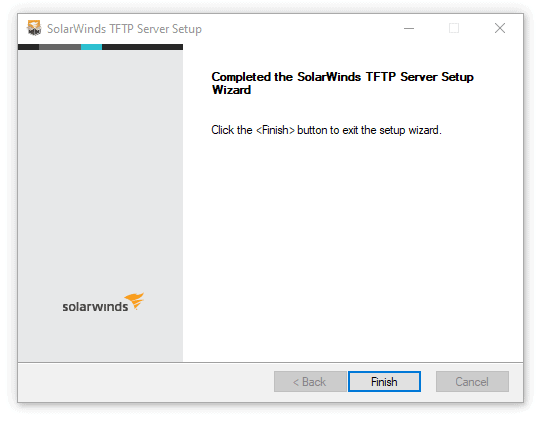
- Once the SolarWinds TFTP Server Setup finishes, click “Finish”.

- Open the SolarWinds TFTP Server. The console should look something like this…

Configuring Security
TFTP is known for its lack of security. It does not have any encryption mechanism and does not support any client/server authentication methods.
Without encryption and authentication, a hacker could easily spoof the TFTP server and compromise the authenticity of critical files such as routing configuration and DCHP.
But despite that lack of security, TFTP is still the preferred method for quick and easy file sharing on networking devices.
Having no encryption and authentication makes TFTP fast and without much overhead.
Still, some TFTP server software can provide some features that guarantee a certain level of security.
For example:
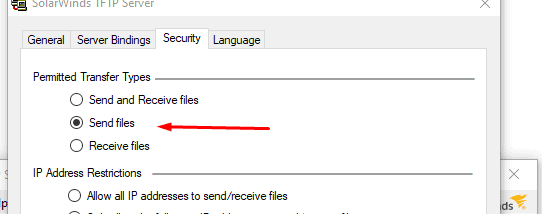
- Restrict the use of the server to a certain range or single IP addresses.
- Permit or restrict certain types of file transfers. For example, only send, receive, or both.
To configure IP address restriction and file transfer types in the Solarwinds TFTP server
- Go to File > Configure.
- Go to the Security tab.

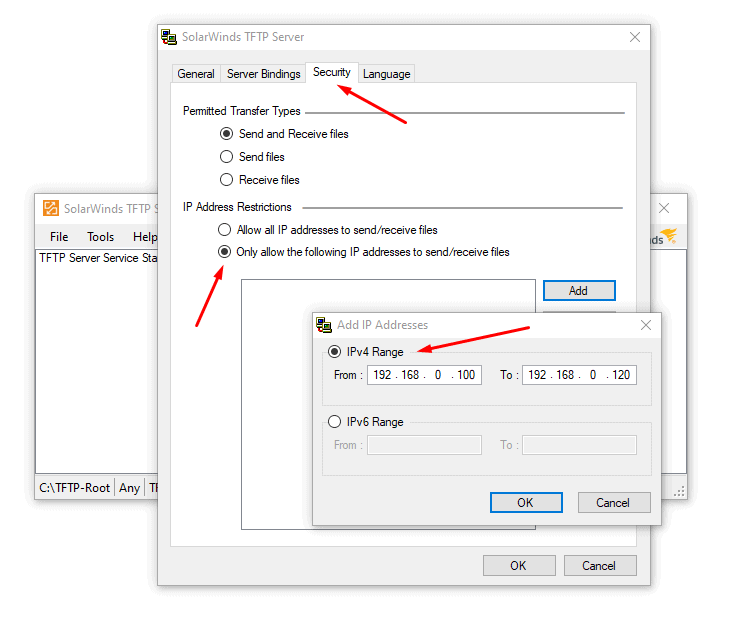
- By default, SolarWinds TFTP Server will allow all IP addresses to send/receive files. But you may also want to restrict the access to the TFTP server to specific IP addresses. If you want to restrict the server to a few networking devices, go ahead and click on “Only allow the following IP addresses to send/receive files,” then click on “Add”.
- In the following screen, you can define the IP address or range of addresses. For example, we are restricting access to sending/receiving files to the devices with IP from 192.68.0.100 to 192.168.0.120.

- In the same Security tab, you can also restrict transfer types. When you restrict IP addresses and transfer types, your security can be dramatically improved. For example, you may only want to allow sending files to a specific router.

- Click Ok.

Binding the Server to Specific IP addresses, Subnet, or interfaces
The tool we’re using also comes with “Server Bindings,” which is another fantastic feature that can improve security.
Server Bindings is similar to restricting IP addresses, except that you can customize this restriction based on your local TFTP server network interfaces.
If your server has more than one interface, you can customize its connectivity based on “source IP” or “subnet.” In other words, you can limit the number of available interfaces that the TFTP server is listening to.
By default, the TFTP server will process the requests from clients received from any network interface
- If you want to customize the server’s bindings, for example, allow an entire subnet (from an interface) and allow a single IP on another, go to File > Configure > Server Bindings, and click on “Use custom server binding.”
- You also have the option to bind to all addresses in
 the list that you provided or go through the list in descending order. Once, you finished, click “OK
 the list that you provided or go through the list in descending order. Once, you finished, click “OK
Configuring the TFTP Server
First, let’s make sure that the service has started.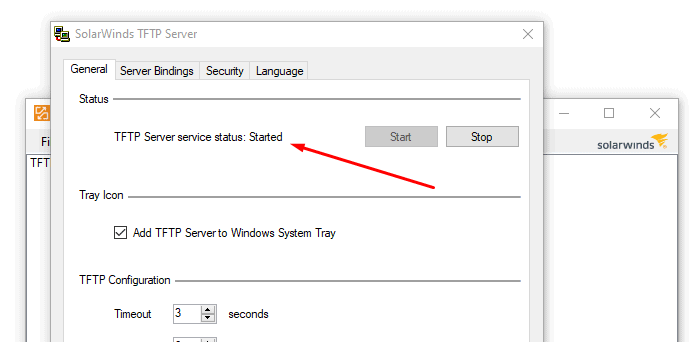
If you find the following message: “TFP Server service status: stopped,” try clicking the “Start” button to start the TFTP service in the server application and wait a couple of seconds.
If it goes “stopped” again, try the following.
- Go to Windows services. Open Windows search bar and type “services”. Or type the Win+R keys to open the Run application and type “services.msc”. Make sure to run “services.msc” as an administrator.
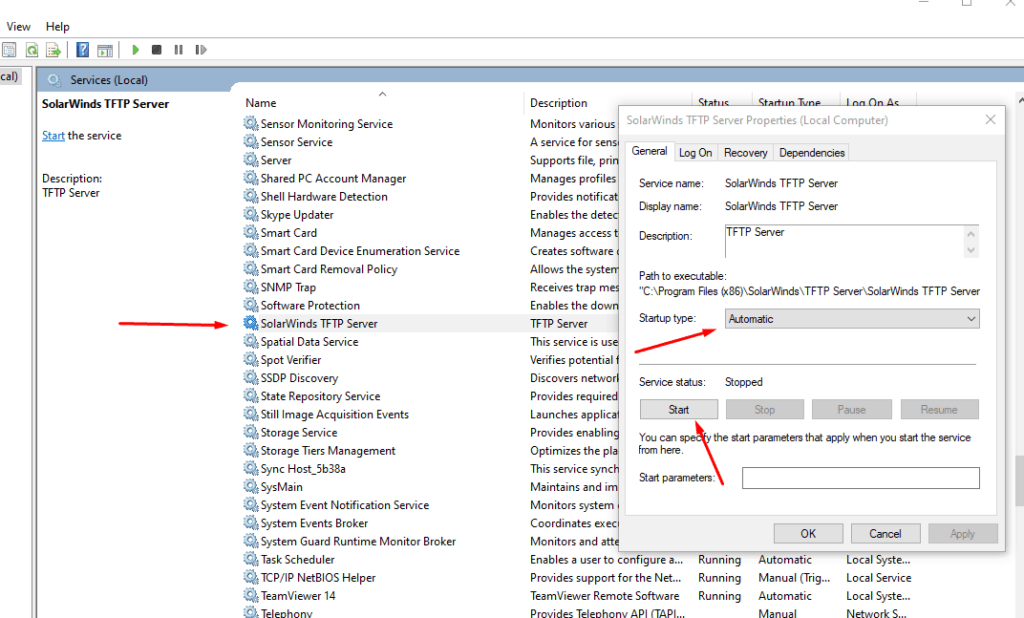
- Find the service “SolarWinds TFTP Server” and double-click it. Make sure that its Startup Type is “Automatic” and if you see the Service status: Stopped, click the “Start” button.

- If you still see the service “Stopped,” disable any Antivirus or Firewall and test again. One of these applications might be blocking communication through port 69.
Configuring Other Parameters
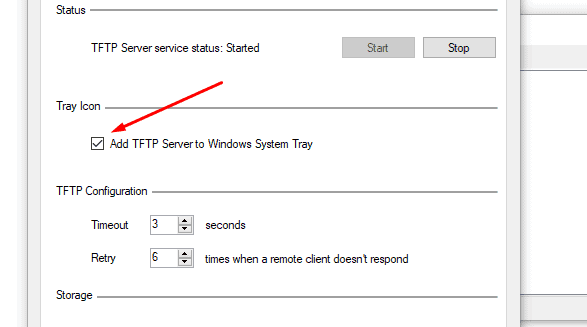
- A useful setting for easier access to the application is to enable “Add TFTP Server to Windows System Tray”.

- You can leave Timeout and Retry options, with their default settings unless you are testing the TFTP environment
- TFTP timeout: This is the TFTP session timeout in seconds.
- Retry: The number of times, the server will retry to transmit a packet when the TFTP client doesn’t respond.
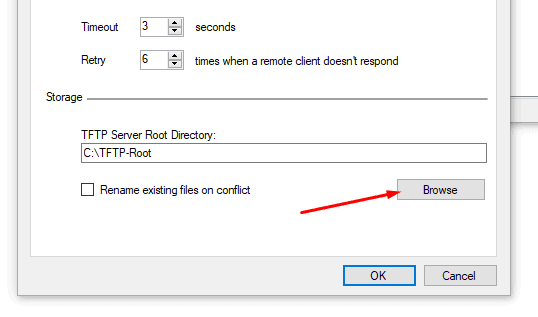
- Finally, let’s set up the “TFTP Server Root Directory”. This is the folder where all your files received from other devices will be stored, or where you will store the files that will be sent to other devices.
- Go to “Storage” > “Browse”. Choose a new folder or leave the “C:TFTP-Root” folder created by default.
- Click on “Ok”.

Setting up the TFTP Client
The TFTP Client depends on the successful installation and configuration of the TFTP server. The client is probably the one that you will be using the most.
The only task you might need to do with the server is to update the shared files and input/remove some IPs.
When using the TFTP server, don’t forget about the following settings (already mentioned).
- The TFTP server service has to be up and the application is running.
- Configure the right TFTP folder.
- Make sure no Firewall and Antivirus is blocking the application and connection.
- If you are file sharing to a remote location, don’t forget about port forwarding.
- Make sure all your TFTP clients can reach your TFTP server.
From the TFTP client
Most networking devices already have TFTP enabled. For example, to transfer a Cisco Switch image from the server to the device, you would have to specify the IP address of the TFTP server on the client (Cisco Switch).
As you can see from the screenshot below, this switch does not have any configuration or image filename.
It does have a default address and a TFTP address. So to receive these missing files, you can use the IOS command “copy tftp startup-config [ip address of the TFTP server]”.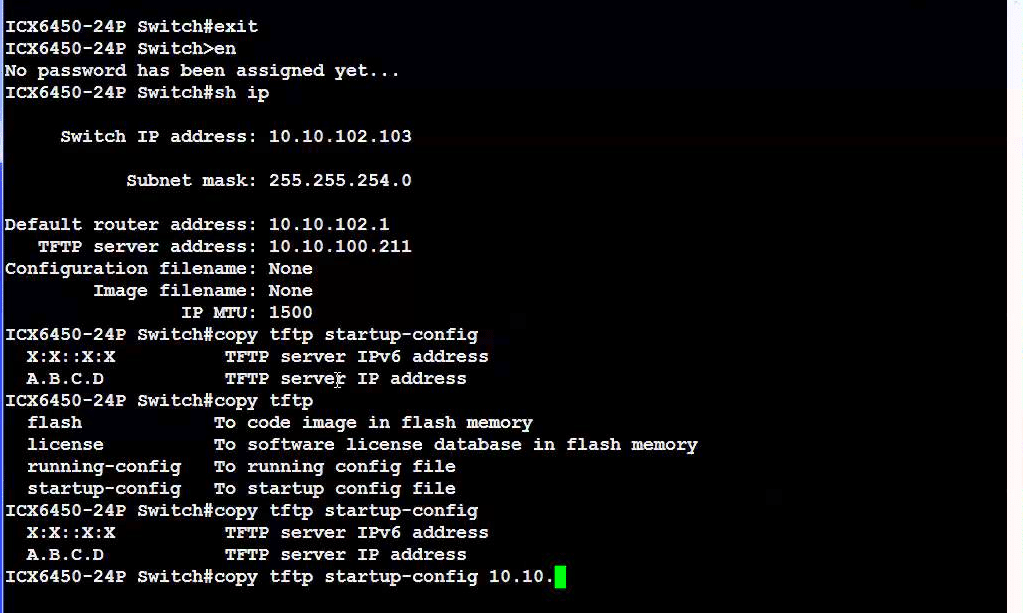
Another example, from a Huawei Switch (screenshot below).
The first line (TFTP get) downloads the files from the TFTP Server (192.168.0.2) to the switch.
The second line (TFTP put) uploads the files from the switch device to the TFTP server.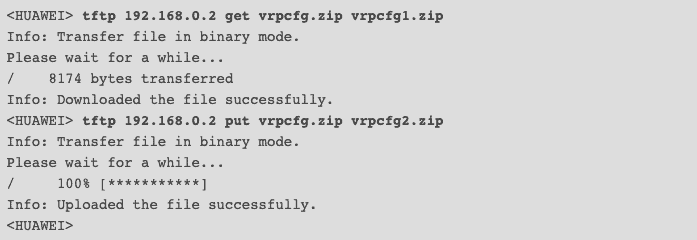
But networking devices are not the only ones that can run TFTP clients. You can also run the client on a Windows system.
Install TFTP Client on Windows 10
Fortunately, most Windows versions (servers and workstations) come with the TFTP client feature built-in, you only have to enable it.
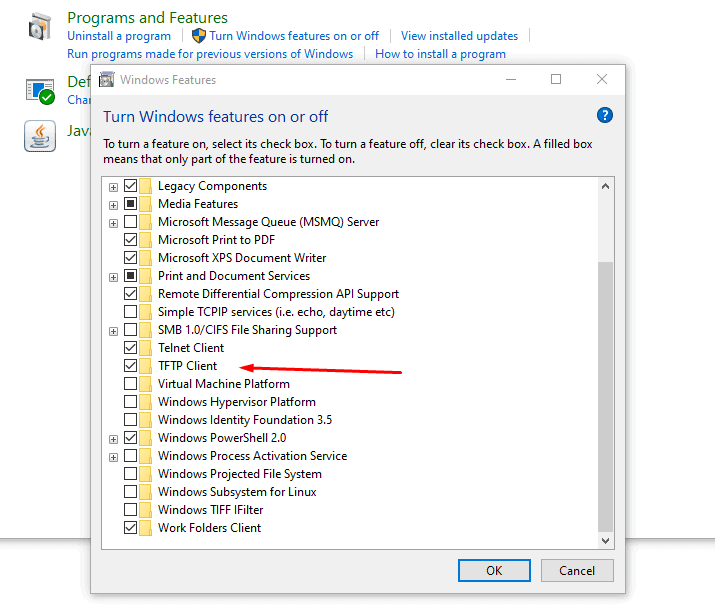
- Go to Windows Start and search for “Control Panel” then click on “Programs”

- Open Turn Windows features on or off.

- From the Windows Features list, find the TFTP Client feature and turn it on. Wait for the installation to complete and click “Ok”.

TFTP is considered an unsafe protocol, so Windows does not allow it by default. You will have to either turn off the Windows firewall (which is not recommended) or add an exception on the Firewall for the TFTP Client.
Let’s open the Windows Firewall and configure the rules and exceptions to allow TFTP.
- Open the Windows Start menu and type “Firewall” > open the “Windows Defender Firewall with Advanced Security,” and run it as an Administrator.
- Make sure that the firewall is enabled, and click on “Allow an app or feature through Windows Defender Firewall”.

- Click on “Change Settings,” then “Allow another app”.

- Click on “Browse” and find the TFTP.exe from the System32 folder and click on Open. Then click on “Add”.

- You can now, find the application on the Windows Defender Firewall, enable both Private and Public.

Transferring Files with TFTP
Now that you enabled the native TFTP client in Windows, you can use it to transfer files between the TFTP server.
As mentioned before, make sure that the files are present in the root folder and that the client and server can reach each other.
The TFTP client runs through the command line interface. The command sytax is:
tftp [-i] [<Host>] [{get | put}] <Source> [<Destination>]
Where:
- s
- – i : Transfer in binary mode [also called octect]. If you don’t specify this parameter, the transfer goes in ASCII mode, which is a regular text file transfer.
- Host: Specifies the local/remote computer (server).
- Put: transfers the source file [on the local computer] to the file on the destination [remote computer]. Use this command to send a file.
- Get: Downloads [transfers] the file from the destination remote computer to the local computer. Use this command to receive a file.
- Source: Specifies the source file [with the path] to transfer.
- Destination: specifies the destination file [with the path] to get.
An example of using the TFTP command on Windows 10:
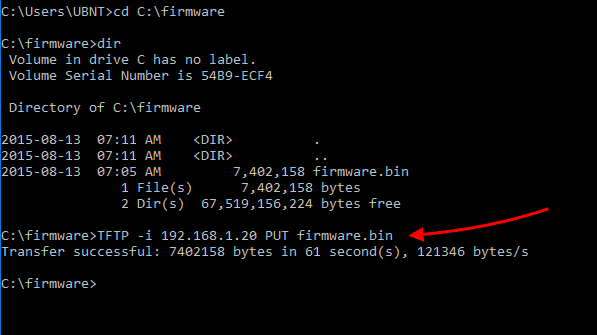
In this example, we will upload a firmware image file [.bin] to the TFTP server [192.168.1.20]. We will use the TFTP client in Windows and transfer the file using binary mode.
- Let’s open the Windows command prompt. Open the Windows search and type “cmd,” or press the Win + R > Open the Run and type “cmd”.
- Go to the directory where the firmware is stored (or specify the entire path).
- Type the command TFTP -i 192.168.1.20 PUT firmware.bin

Final Words
TFTP is a terrific and often misunderstood transferring method.
Although it has a bad reputation for its lack of security, it doesn’t have much overhead, making it a reliable, quick, and easy transferring mechanism.
You can use it in enclosed LANs or WANs, where speed reigns over security.
Setting up a TFTP server on Windows 10 is straightforward. Just download the SolarWinds Free TFTP Server and configure it, as shown in this tutorial.
If your TFTP client is a networking device, it will likely have the TFTP service already enabled. But if you want to transfer files to a Windows 10 workstation, you can enable the TFTP built-in feature.
We hope that this tutorial was informative.
Please comment if you have any questions about the setup and configuration of the TFTP on your Windows 10.
Setup & Configure TFTP On Windows 10 FAQs
What is TFTP?
TFTP stands for Trivial File Transfer Protocol. It is a simple file transfer protocol used for transferring files between devices on a network. It is commonly used in network devices such as routers, switches, and servers.
How do I use TFTP in Windows 10?
To use TFTP in Windows 10, you can use a TFTP client such as SolarWinds TFTP Server or TFTPD32. These programs will allow you to transfer files to and from a device using the TFTP protocol. You can also use the built-in «tftp» command in Command Prompt to transfer files.
Can I use TFTP to transfer files between two Windows 10 computers?
Yes, you can use TFTP to transfer files between two Windows 10 computers by using a TFTP client on both computers. You will need to configure the IP address and directory settings on the TFTP client to ensure that the files are transferred properly.
Is TFTP a secure protocol?
No, TFTP is not a secure protocol as it does not provide any encryption or authentication. It is recommended to use more secure protocols such as SFTP or SCP for transferring sensitive files.
How do I troubleshoot TFTP errors in Windows 10?
To troubleshoot TFTP errors in Windows 10, you can check the TFTP client settings to ensure they are correct. You can also check the firewall settings on the computer to ensure that TFTP traffic is not being blocked. Additionally, you can check the event logs on both computers for any error messages that may indicate the source of the problem.
Are there any alternatives to TFTP for file transfer?
Yes, alternatives to TFTP include FTP (File Transfer Protocol), SFTP (Secure File Transfer Protocol), and SCP (Secure Copy Protocol). These protocols provide more security and advanced features than TFTP.
Обновлено 12.06.2017

Все добрый день, сегодня я вам хочу рассказать, как включить tftp windows 10 redstone. Мы поговорим, зачем вообще нужен этот tftp клиент и где его можно применить. Данная статья будет полезна начинающим сетевым инженерам и системным администраторам, которые по каким-то причинам еще не успели познакомиться с данной сетевой технологией и не используют ее в своей практике, потратьте 5 минут на ее изучение и вы поймете, что она вам сэкономит потом часы.
Tftp в windows 10 redstone
И так, tftp это простейший протокол обмена данных, чаще всего используется для обновления прошивок на сетевых устройствах Juniper или Cisco, это как пример. Прошивка кладется на некую шару работающую по протоколу tftp и вы с помощью клиента забираете ее. Вот как это выглядит схематично.

Установка telnet windows 10 redstone
И так продолжаем наше изучение десятки, в прошлый раз я вам рассказывал, как раздать вай фай с ноутбука виндовс 10, двигаемся дальше. Для того, чтобы установить tftp клиент в данной операционной системе, есть три способа.
- Графический метод
Щелкаем правым кликом по кнопки пуск и из контекстного меню выбираем пункт панель управления.
Теперь в пункте просмотр вы выставляете крупные значки и переходите в пункт «Программы и компоненты».
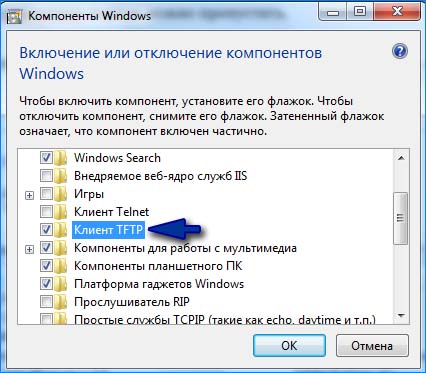
Далее переходим в пункт «Включить или отключить компоненты Windows» именно тут мы с вами произведем установку tftp для windows 10 redstone.
В открывшемся окне вы видите какие компоненты можно включить и тем самым доставить в систему, выбираем «Клиент TFTP».
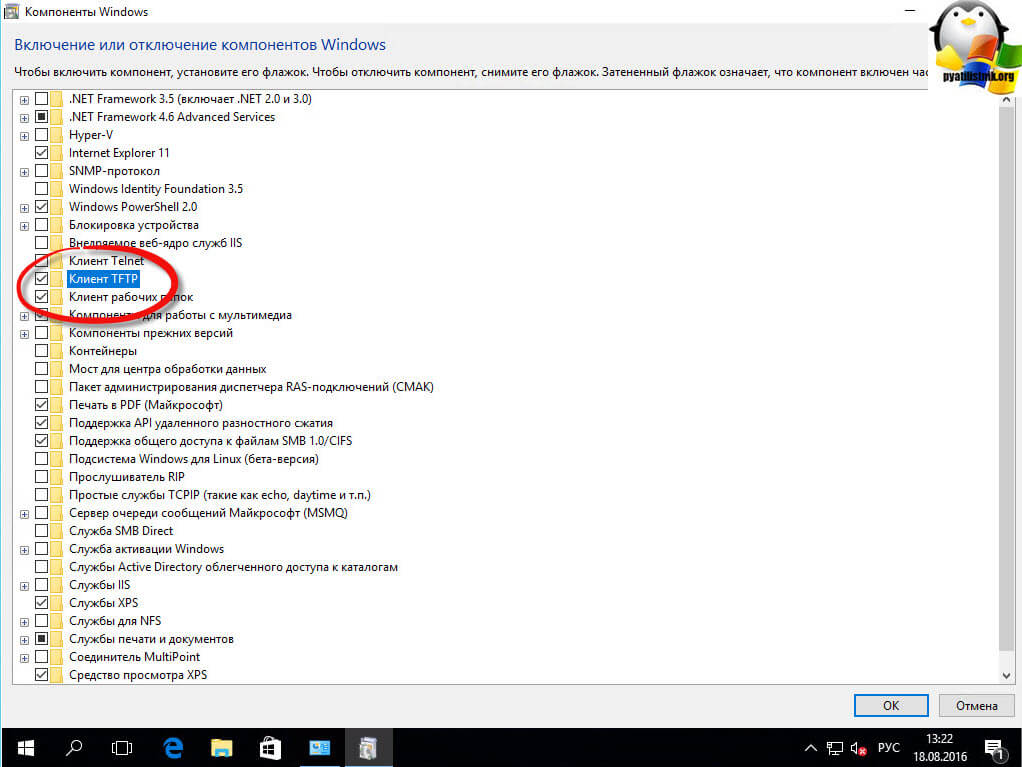
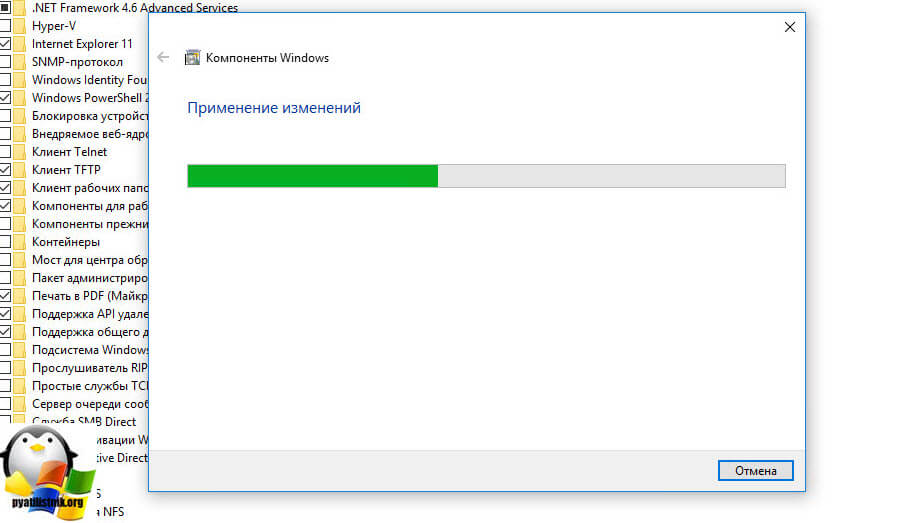
Начнется установка tftp в windows 10 redstone.
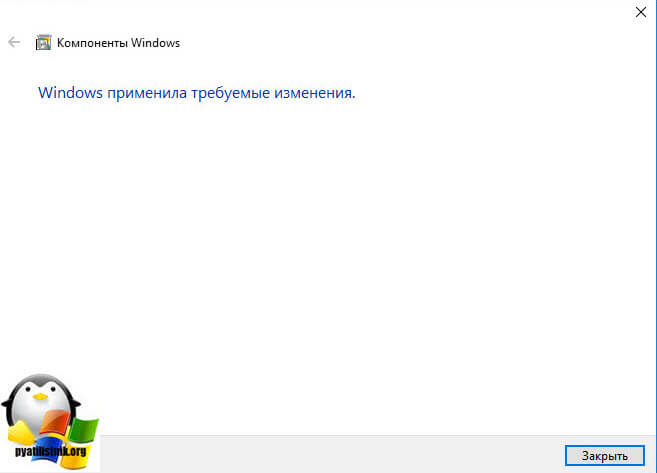
Через пару секунд вы увидите, что компонент установлен в операционную систему.
- С помощью утилиты DISM
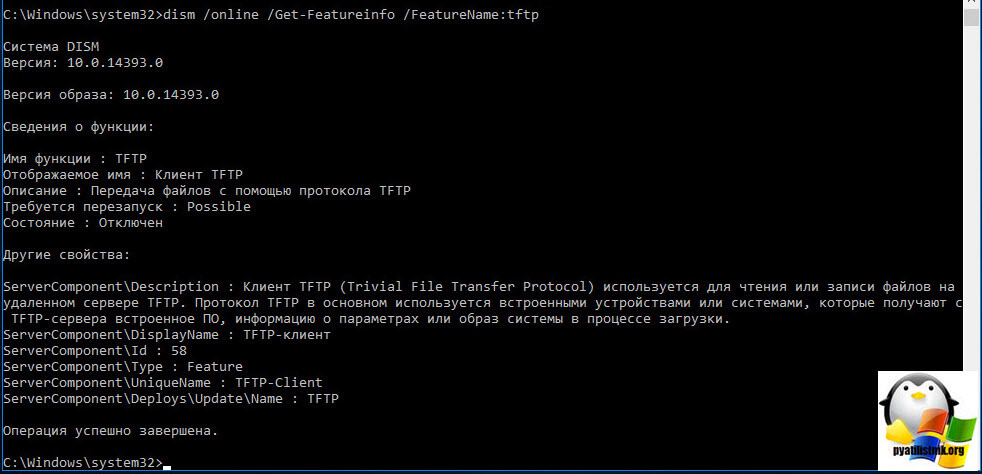
Да старая и добрая утилита DISM так же может помочь в нашей задаче, открываете командную строку от имени администратора и пишите вот такую команду
Dism /online /Get-FeatureInfo /FeatureName:TFTP
Вы увидите текущий статус данного компонента.
Ну и вводим команду для установки tftp клиента в десятке
Dism /online /enable-feature /FeatureName:TFTP /all
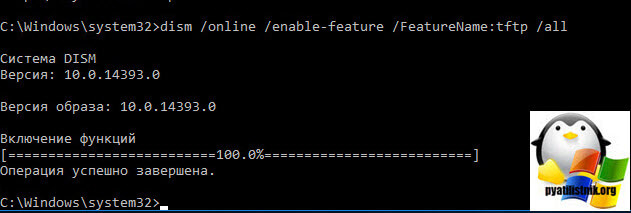
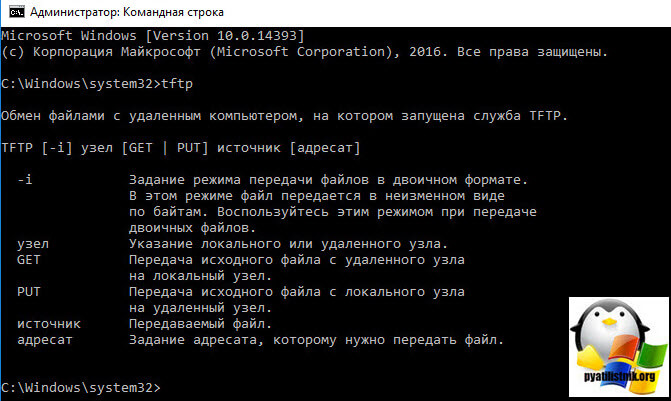
В итоге, теперь если ввести в командной строке tftp, то вы получите справку по данной команде.
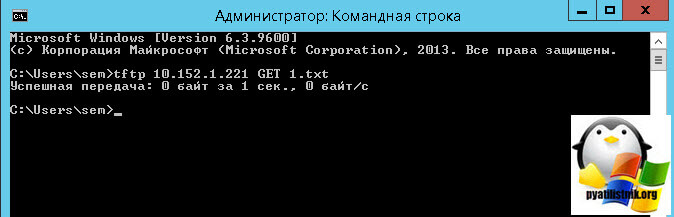
Давайте теперь установим TFTP сервер. для проверки. Я вам уже рассказывал про tftpd64 service edition. Я положил на свой сервер файл 1.txt и его я хочу передать по tftp. Открываем командную строку в Windows 10 redstone и вводим команду.
tftp 10.152.1.221 GET 1.txt
10.152.1.221 это ip адрес сервера.
В итоге вы увидите, что файл скачался. Скачивается он по умолчанию в тут директорию из которой запускается команда tftp. В данном случае C:userssem.
Можно посмотреть логи на сервере tftpd64 service edition.

TFTP stands for “Trivial File Transfer Protocol” is a simple and lightweight protocol for transferring files over the network.
TFTP runs on UDP port 69 and does not use any security during the file transfer, thus its really only good for transferring files within your LAN. It is commonly used in the place where security is not important and it has limited features compared to other file transfer protocols (FTP/FTPS/SCP).
Generally, TFTP is used to boot operating systems over the network. CISCO devices also use the TFTP protocol to store configuration files and images and move them to and from switches, routers and firewalls.
It is very useful for electronics circuit boards and microprocessors to download firmware into the chipset and its also used for transferring boot files and updating NVRAM. It does not provide authentication and no command structure like FTP, SFTP and SCP.
TFTP cannot list directory and there is no error recovery like TCP and nor does it allow you to delete or rename files.
TFTP is used for its simplicity as it is specifically designed to read and write files without establishing a connection between the client and the server.
It is very useful for thin clients, terminals and disk-less workstations with no room to install their own operating systems.
TFTP protocol also allows the network clients to automatically obtain the IP address of the TFTP server thus making TFTP not only easy to implement but also provide a better way for file transfers.
However, sending or receiving sensitive files via the TFTP without authentication or encryption is very risky.
In this tutorial, we’ll learn how to setup a TFTP server and a TFTP Client on Windows a system and also learn how to configure your Firewall to allow file transfer between the TFTP server and the TFTP client.
Install TFTP Server Windows
First, you will need to download the SolarWinds TFTP server from their download page:
https://www.solarwinds.com/free-tools/free-tftp-server/

Once downloaded, extract the downloaded file and double click on the installer to start the installation, you should see the following screen:
Click on the Next button.
You will be redirected to the License agreement page as shown below:
Accept the License agreement and click on the Next button.
You will be asked to provide the location of the TFTP server as shown below:
Click on the Next button to continue with the default location.
You should see the following page:
Click on the Finish button to complete the installation.
After installing the TFTP server, you will need to configure it.
You can follow the below steps to configure the TFTP server:
Configure TFTP Server
1. Open the TFTP Server from the Start Menu as shown below:
2. Click on the File => Configure button as seen in the above Screenshot.
You should see the following screen:
3. As seen in the screenshot above, Select the TFTP Server Root Directory field and provide the TFTP root directory, then click on the Security tab.
You should see the following screen:
4. In the Permitted Transfer Types section, check the box “Send and Receive files” and “Allow All IP address to send/receive Files” and click on the OK button to finish the configuration.
Once you are finished, you can proceed to the next step.
Install TFTP Client
At this point, the TFTP server is installed and configured.
Now, you will need to install a TFTP Client on the Client computer.
You can install the TFTP Client on the client computer by following the below steps:
1. Click on the Start Menu and click on Control Panel.
2. Click on the Programs and Features => Turn Windows features on or off. This will open the Windows Features dialog box.
3. Scroll down until you see the TFTP Client check box and CHECK it as shown below:
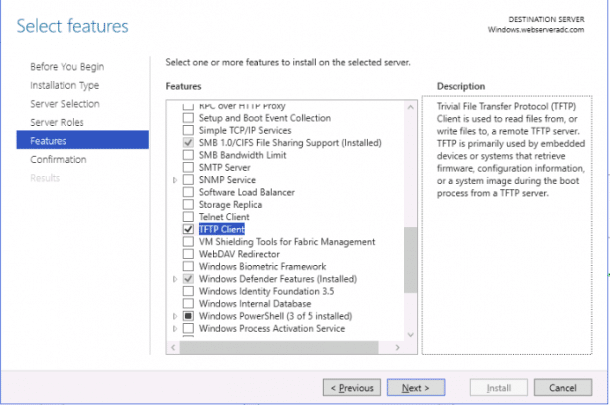
4. Click on the OK button to start the installation process of the TFTP client.
This process will take some time to finish the installation. Once you are finished, you can proceed to the next step.
Configuring Firewall to Allow TFTP
Before using the TFTP client, you will need to turn off the Windows Firewall or configure the Firewall to allow the inbound/outbound transfer of files using the TFTP client.
You can follow the below steps to add an exception for the TFTP connections:
1. Go to the Start Menu and open the Control Panel as shown below:
2. Click on the Windows Firewall to open the firewall as shown below:
3. In the left-pane, click on the “Allow an app or feature through Windows Firewall“.
You should see the following page:
4. Click on the Allow an app or feature through Windows Firewall at the bottom. You should see the following page:
5. Click on the Browse button and specify the TFTP.EXE path and click on the Add button.
You should see the following page:
6. You should see that the Trivial File Transfer Protocol App should be highlighted.
7. Now, click on the OK button to finish the process.
At this point, your client computer is configured to allow PUT and GET command against your TFTP server.
Transfer File with TFTP Client
You are now ready to transfer file using the TFTP client.
Go to the TFTP client computer, open the command line interface and run the following command:
tftp
You should see all the options available with tftp command in the following page:
If you want to send a file to the TFTP server, use the following syntax:
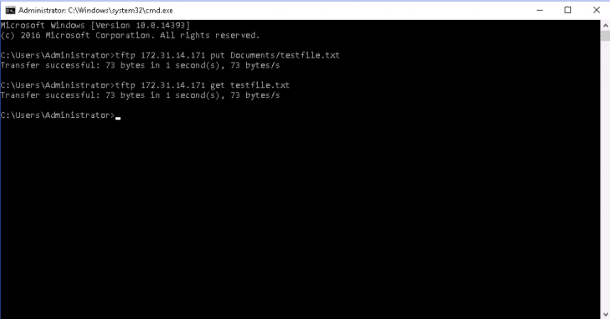
tftp your-tftpserver-ip put location-of-the-file
For example, to send the file named testfile.txt located in Documents directory to the TFTP server run the following command:
tftp 172.31.14.171 put Documents/testfile.txt
Once the file transfers successfully, you should see the following output:
Transfer successful: 73 bytes in 1 second(s), 73 bytes/s
If you want to transfer file from the TFTP server to your local computer, use the following syntax:
tftp your-tftpserver-ip get location-of-the-file
For example, transfer the file named testfile.txt from the TFTP server to your local computer run the following command:
tftp 172.31.14.171 get testfile.txt
Once the file transfers successfully, you should see the following output:
Transfer successful: 73 bytes in 1 second(s), 73 bytes/s
Example Screen:
You can also transfer the files over the internet using the Public IP address of the TFTP server – Please remember, there is not encryption or any security when sending over the Internet!
Conclusion
In the above guide, we’ve learned how to install and configure the TFTP server and Client on Windows system.
You can now easily transfer files to and from your TFTP server for FREE.
Please Feel free to ask us any questions below in the comments, we’ll try to answer them immediately!
TFTP – упрощённый протокол передачи данных (о чём и свидетельствует первая буква аббревиатуры протокола, Trivial), характеризующийся простотой реализации и имеющий ряд ограничений, главное из которых – отсутствие аутентификации. По этой причине он не столь распространён, как FTP, но существует немало примеров, когда его использование оказывается более предпочтительным.

Например, в закрытой локальной сети для загрузки операционной системы на рабочие станции, из соображений безопасности или по другим причинам не содержащие собственного жёсткого диска. И хотя здесь имеются кое-какие риски, их можно компенсировать фильтрацией по IP-адресу с использованием транспортного протокола UDP.
Как установить TFTP-сервер на Windows
Протокол Trivial FTP, как вы уже знаете, является очень простым в реализации, и если говорить о низкоуровневой передаче файлов, при условии отсутствия жёстких требований по безопасности, то он был и остаётся весьма востребованным.
Кроме загрузки ОС на рабочие станции, он широко используется для загрузки и модификации конфигураций множества встроенных устройств, являющихся частью домашних сетей и системы «Умный дом».

В частности, этот протокол нередко можно встретить на маршрутизаторах, в мобильных телефонах, в популярных медиа-стримерах. Он используется для передачи единичных файлов на относительно небольшие расстояния. А вот в глобальных сетях, том же интернете, использование TFTP недопустимо из-за низкой защищённости. Там царствует FTP, а если требуются повышенные требования к безопасности, то SFTP.
Если при помощи FTP, требующего ввода логина/пароля, можно осуществлять целый спектр операций с файлами (передача в обоих направлениях, переименование, удаление, просмотр), то в TFTP вы можете файлы только скачивать, и только по одному. Зато здесь используется стек UDP, отличающийся простотой кода, в отличие от распространённого, но достаточно сложного TCP/IP.

У протокола TFTP низкая функциональность компенсируется надёжностью, поэтому серверная часть кода протокола занимает на диске или в памяти очень мало места, что делает его идеальным кандидатом для использования во встроенных устройствах, у которых дефицит памяти – привычное явление.
Итак, если суммировать, для чего нужен клиент TFTP, то можно утверждать, что главное преимущество протокола – простота реализации его клиентской части.
ВНИМАНИЕ. Протокол не предусматривает наличие учётных записей пользователей, поэтому всегда существует риск подключения к TFTP серверу или клиенту других лиц, в том числе и со злонамеренными целями. Поэтому использовать его нужно, если сеть защищена другим способом, например, файерволом.
Хотя TFTP-сервер чаще всего можно встретить в ОС Linux, существует немало решений, предназначенных для Windows и даже для macOS (TFTPD32/64, haneWIN, WhatsUp, WinAGents и др.).

Рассмотрим процедуру установки TFTP-сервера на примере весьма популярной утилиты TFTPD32, созданной на условиях открытого исходного кода. Кроме собственно TFTP-сервера, она включает и другие серверные протоколы (DHCP, DNS, SNTP) и позволяет управлять пулом IP-адресов. Разумеется, ситуации, когда требуется наличие всех перечисленных функций, сложно придумать даже теоретически, но дополнение TFTP одной из них вполне может оказаться полезным.
При скачивании программы можно выбрать portable-версию, если не хотите возиться с инсталляцией.

При запуске утилиты нужно будет указать пару параметров:
- каталог, куда будут скачиваться файлы (дефолтный путь – место установки программы);
- IP-адрес сервера, на который нужно будет обращаться клиентам.

Для выполнения простейших операций этого будет достаточно. Но в ряде случаев потребуется дополнительная настройка программы.

Если требуется использование DHCP сервера, например, для выдачи динамических айпишников в пределах малой сети, необходимо зайти в раздел Setting и выбрать вкладку DHCP.

Здесь нам нужно указать:
- исходный IP адрес (получаемый на маршрутизаторе);
- диапазон выдаваемых клиентам адресов;
- указание шлюза сети не является обязательным;
- четвёртый параметр – маска подсети.
Подтверждаем внесение изменений нажатием ОК.

Поскольку в основе TFTP лежит использование транспортного протокола нижнего уровня UDP, в котором установление соединения не предусмотрено, задача эмуляции соединения становится прерогативой внешнего протокола, в нашем случае – TFTP. Проблема в том, что межсетевые экраны в большинстве случаев не умеют идентифицировать соединения, инициированные протоколом TFTP, так что этот тип трафика он пропускать не в состоянии.

Но если TFTP-сервер располагается в пределах защищённой сети, а клиентские устройства – перед файерволом, то проблем быть не должно, но потребуется внесение изменений в настройки файервола:
- нужно добавить правило транспортировки пакетов данных из внешнего айпишника на адрес сервера TFTP, указанный в конфигурации программы (через порт 69 TFTP сервера);
- разрешить перенаправление трафика из внутренней сети на внешний IP-адрес.


В большинстве маршрутизаторов при передаче данных с более защищённой сети в менее защищённую проблем не возникает, но, когда требуется выполнить противоположную задачу, как раз и потребуется выполнение перечисленных выше действий.


Проблема в том, что не все сетевые роутеры/маршрутизаторы позволяют выполнить такие настройки. Но многие из них оснащены функцией просмотра трафика, направляемого с использованием протокола TFTP, при этом они в состоянии динамически изменять таблицу трансляции, позволяя пропускать пакеты извне, идущие в локальную сеть. Так, чтобы настроить файервол маршрутизатора Cisco PIX, необходимо выполнить команду fixup protocol tftp.


Существует альтернативный способ решения проблемы: можно обязать сервер TFTP задействовать порт 69 в двух направлениях, не только для приема запросов, идущих от клиентов, но и для пересылки им ответов. Тогда файервол сможет корректно обрабатывать оба типа запросов, руководствуясь записями, имеющимися в таблице трансляций.


Так, чтобы настроить WinAGents TFTP Server подобным образом, необходимо в настройках программы установить галочку напротив опции Enable firewall support.

Проверка работоспособности TFTP сервера
Чтобы проверить, работает ли TFTP сервер, необходимо просто выполнить копирование файла с сервера на клиентское оборудование.
Для этого нужно запустить консоль на клиенте, а затем выполнить команду tftp 192.168.1.35 GET <имя копируемого файла>. Если всё настроено правильно, после паузы, во время которой и происходит передача данных, указанный файл должен появиться на клиентском оборудовании.

Отметим, что копирование будет производиться в каталог, в котором запускалась консоль, если в настройках программы не указан другой путь. Но не все утилиты имеют такие настройки. Например, если вы используете WinAGents TFTP Server, вам нужно будет выполнить последовательно две команды:
- cd <путь назначения>;
- tftp168.1.35 GET <имя копируемого файла>.
В этом случае копирование будет производиться в указанную вами директорию.
В утилите TFTPD32 копирование будет выглядеть несколько иначе. На клиентской машине следует запустить приложение, открыть в нём вкладку TFTPClient, а затем указать IP-адрес сервера, а затем имя файла, который мы намереваемся скачать. Сохранить его можно и под другим именем, указав его в соответствующей строке настроек. Завершив все приготовления, жмём кнопку GET и дожидаемся результатов операции.

Как видим, использование TFTP сервера не ставит перед пользователем неразрешимых задач, за исключением случаев, когда требуется доступ за пределы локальной сети. Но для этих случаев существуют другие, более защищённые и безопасные сетевые протоколы.