Настройка эмуляции Gravis Ultrasound
Для начала необходимо скачать все файлы, которые потребуются нам для настройки Gravis Ultrasound под DOSBox:
Подготовка
- Скачиваем официальный драйвер: GUS Driver v4.10 и обновление v4.11[1].
- Скачиваем альтернативный набор сэмплов для драйвера: Pro Patches Lite v1.60
- Скачиваем обновление для патча: Update Pro Patches Lite v1.61
- Скачиваем фикс для обновления: FIX Pro Patches Lite v1.61
- Скачиваем утилиту для инициализации и загрузки инструментов в память:loadpats.exe и patches.ini
Установка драйвера GUS для DOS
- В конфиге DOSBoxа включаем эмуляцию Gravis Ultrasound (GUS). См. Dosbox.conf#.5Bgus.5D.
- Распаковываем в папку на жёсткий диск официальный драйвер и устанавливаем его в C:ULTRASND, запустив «INSTALL.EXE». [2]
- Распаковываем обновление для драйвера и так же устанавливаем.
- В конфиге DOSBoxa, в секции [autoexec], добавляем: SET PATH=%PATH%;C:ULTRASND
- Распаковываем loadpats.zip и patches.zip’ в папку C:ULTRASND.
- В разделе [autoexec] прописываем запуск loadpats.exe.
Установка «Pro Patches Lite»
- Распаковываем куда-нибудь патч, переименовываем эту папку в «PATCHES» и помещаем её в корень смонтированного диска «C».
- Распаковываем обновление для патча и кидаем файлы в папку «PATCHES» с заменой.
- Распаковываем фикс и тоже кидаем все файлы в папку «PATCHES» с заменой.
- Создаём в корне смонтированного диска «C» пустой файл «autoexec.bat».
- Добавляем в секцию [autoexec] конфига DOSBoxa строку: SET PROPATS=C:PATCHES
- Заходим в папку «PATCHES», запускаем «INSTALL.EXE», жмём «Y» и инсталлируем.
- По окончании установки жмём «CTRL+F9» и перезапускаем DOSBox.
- Для более тонкой настройки звучания запускаем «PATMENU.EXE» и настраиваем. [3]
Примечание: Использование неоригинальных драйверов и патчей может ухудшать совместимость с играми.
Установка Windows 95/98 в DOSBox
В качестве примера работы с DOSBox и, в частности, работы с образами дисков в нем приведем руководство по установке Windows 9x в DOSBox.
Инструкция по установке windows 9x в DOSBox 0.73 (официальная сборка)
Для этого понадобится: дистрибутив Windows95/98, образ загрузочной дискеты с FDISK.EXE и FORMAT.EXE, утилиты bximage и WinImage.
- Утилитой bximage создать фиксированный образ жесткого диска на 504mb. [4][5][6]
- В dosbox.conf:
в разделе [cpu] сменить cputype=auto на cputype=pentium_slow; [7]
в разделе [autoexec] прописать команды монтирования созданного образа жесткого диска и загрузки с образа загрузочной дискеты. [8] - Запустить DOSBox. После загрузки с образа загрузочной дискеты создать раздел на образе жесткого диска (FDISK.EXE) и отформатировать его под fat [4] (FORMAT.EXE. Команда FORMAT C:). Закрыть DOSBox.
- На только что отформатированный образ жесткого диска перенести с помощью WinImage дистрибутив Windows. [9]
- Смонтировать отформатированный образ жесткого диска как C. [10]
- Запустить DOSBox. После загрузки с образа загрузочной дискеты запустить инсталлятор Windows (setup.exe) и начать установку ОС. [11]
- После того как на стадии «перезагрузка компьютера» DOSBox закроется, прописать загрузку DOSBox с диска C. [12]
Инструкция по установке windows 9x в DOSBox SVN Daum
Вам понадобится: сама сборка DOSBox SVN Daum (версия не младше 5.21.2012), образ CD с дистрибутивом win 9x, образ загрузочной дискеты с драйвером сд-рома.
- Запустите DOSBox, и в командной строке наберите imgmake с:image.img -t hd_2gig. [13] Закройте DOSBox.
- В dosbox.conf:
в разделе [dosbox] установите machine=svga_s3, vmemsize=4, memsize=128;
в разделе [cpu] установите core=dynamic, cputype=pentium, cycles=max, isapnpbios=false;
в разделах [ide, primary], [ide, secondary], [ide, tertiary], [ide, quaternary] установите enable=true;
в разделе [autoexec] пропишите команды монтирования образа загрузочной дискеты, только что созданного образа жесткого диска и образа CD с дистрибутивом win 9x с ключами подключающими их к ide слотам, и загрузки с образа дискеты. [14] - Запустите DOSBox. После того как он загрузится с загрузочной дискеты, перейдите на виртуальный сд-ром и запустите инсталятор windows начав установку ОС.
- После того как по завершению установке DOSBox перезапустится — закройте DOSBox, и в dosbox.conf, в разделе [autoexec] измените команду загрузки с диска a на загрузку с диска c.
Примечания
- ↑ Так как gus_411up на официальном сайте пока битый, то может быть полезной тема на vogons
- ↑ Если GUS Driver v4.11 отказывается устанавливаться из-за конфликта порта, временно отключите в конфиге DOSBoxa эмуляцию Sound Blaster, включая FM-синтез.
- ↑ Если в некоторых играх хрипит музыка, запустите «PATMENU.EXE» и поиграйтесь с настройками. Для устранения хрипов в игре «Z» помогает настройка 4,5,6,B,C секций.
- ↑ 4,0 4,1 DOSBox не поддерживает динамические образы и более 1024 цилиндров (что в bximage = 504mb), а также работает только с fat.
- ↑
bximage v1.32 — Утилита для создания виртуальных жестких дисков и дискет, формата «.img», входит в состав эмулятора Bochs (Также в архиве пустой образ на 504mb, отформатированный под fat).Работа с утилитой:
- Выбрать создание образа жесткого диска «hd» (по умолчанию) или дискеты «fd».
- Выбрать тип образа жесткого диска, фиксированный «flat» (по умолчанию) или динамический «growing».
- Ввести размер жесткого диска в мегабайтах.
- Ввести имя файла образа («c.img» по умолчанию).
- Ввести подтверждение на создание образа «yes» («no» по умолчанию).
- Запомнить количество цилиндров «cylinders».
- ↑
Также, образ жесткого диска для DOSBox размером в 2гб можно создать при помощи сборки HAL9000’s. Для этого в окне запущенного HAL9000’s наберите команду imgmake c:harddisk_2gb.img -t hd_2gig (образ будет создан на реальном диске C). Структура этого образа будет выглядеть так 512,63,64,1023. - ↑ С «auto» глючит драйвер «S3 Trio32/64 PCI», не устанавливается DirectX, после загрузки Win98SE завершается с ошибкой explorer.exe и ещё несколько компонентов
- ↑
imgmount 2 "путь к директорииобраз жесткого диска.img" -size 512,63,16,ХХХ -t hdd -fs none
BOOT "путь к директорииобраз загрузочной дискеты.IMG"
(2 = master, 3 = slave. В место ХХХ вписать количество цилиндров)
- ↑
При загрузке сторонней ОС под DOSBox 0.73 будут доступны только образы жестких дисков и дискет. К примеру, если вы используете следующие команды:imgmount c "c.img" -size 512,63,16,1024 -t hdd -fs fat imgmount f "d.img" -size 512,63,16,1024 -t hdd -fs fat imgmount d "Gold Soft 7.iso" -t iso -fs iso mount e "l:" -t cdrom -usecd 0 mount y "DOS-Games" BOOT "DOS622_1.IMG" "DOS622_2.IMG" "DOS622_3.IMG" -l c
Смонтируются 2 образа жестких дисков, образ CD, CD-ROM, директория, 3 образа дискет (которые можно переключать с помощью CTRL+F4) и произойдет загрузка с диска «C». Но, после загрузки ОС будут доступны только образы жестких дисков (как «C» и «D») и дискет (как «a»).
Поэтому для переноса файлов на образ жесткого диска используем WinImage. - ↑ В настройке DOSBox`а после [autoexec] заменить команду:
imgmount 2 "путь к директорииобраз жесткого диска.img" -size 512,63,16,ХХХ -t hdd -fs none
на:
imgmount c "путь к директорииобраз жесткого диска.img" -size 512,63,16,ХХХ -t hdd -fs fat
(Вместо ХХХ вписать количество цилиндров).
- ↑ Если запустить setup во встроенном ДОСе, повиснет скандиск, а если его пропустить (setup.exe /is), установочные файлы будут копироваться с ошибками.
- ↑ Для этого в настройке DOSBox’а (пункт [autoexec]) заменить команду:
BOOT "путь к директорииобраз загрузочной дискеты.IMG"
на:
BOOT -l c
- ↑ На диске c: вашего компьютера будет создан пустой образ жёсткого диска размером в 2Гб с файловой системой fat.
- ↑ Пример команд:
imgmount a "c:Boot.ima"
imgmount c "c:image.img" -t hdd -fs fat -ide 1m
imgmount d "c:win98se.iso" -fs iso -ide 2m
boot -l a
См. также
- Тестирование игр, работающих в Windows 98, запущенной в DOSBox
Installing Microsoft Windows 98 in DOSBox-X

Table of Contents
- Installing Microsoft Windows 98 in DOSBox-X
-
Overview
- Windows editions this guide applies to
- External links
- DOSBox-X config file
- General installation Notes
- Dynamic vs Normal core
- Creating a Harddisk image
-
Installation Method 1: Boot from CD-ROM image
- Requirements
- Starting the installation
- Transfer Windows 98 install files to your HDD image
-
Installation Method 2
- Requirements
- Starting the installation
- Copying the contents of the CD-ROM
- Running SETUP.EXE
- Booting Windows 98 after installation
- Steps to take after installation
- Mounting CD or Diskette images
-
Enabling networking
- Enabling NE2000 in your DOSBox-X config file
- Setting up NE2000 networking in Windows 98
-
Emulated video adapter and video mode
- VESA driver
- Emulated sound card
- Enabling General MIDI
-
Enabling printing
- Print to PostScript
- Epson emulation
-
3dfx Voodoo
- Glide pass-through
- Hard Disk Read-ahead optimization
- Host Folder mounts
- Known limitations
- Outstanding issues
Overview
This guide will give a general description of installing Windows 98 in DOSBox-X, in addition to addressing some common issues.
Windows editions this guide applies to
-
Windows 98 (RTM; Original release) — Retail Full
-
Windows 98 (RTM; Original release) — OEM Full
-
Windows 98 Second Edition (98SE) — Retail Full
-
Windows 98 Second Edition (98SE) — OEM Full
|
Note |
Windows 98 or 98SE Upgrade editions have additional requirements and are not covered by this guide. |
If you don’t know which Windows 98 edition to install, we recommend that you install Windows 98SE.
DOSBox-X config file
You first need to create a DOSBox-X config file.
[sdl]
autolock=true

[dosbox]
title=Windows 98
memsize=128


vmemsize=8
vesa modelist width limit=0
vesa modelist height limit=0

[dos]
ver=7.1
hard drive data rate limit=0
floppy drive data rate limit=0

[cpu]
cputype=pentium_mmx
core=normal

[sblaster]
sbtype=sb16vibra

[fdc, primary]
int13fakev86io=true

[ide, primary]
int13fakeio=true
int13fakev86io=true

[ide, secondary]
int13fakeio=true
int13fakev86io=true
cd-rom insertion delay=4000

[render]
scaler=none

[autoexec]
Copy the above config and save it as win98.conf
|
Note |
You can increase the allocated RAM up to the Windows 98 maximum of 512MB by setting memsize=512.Larger values may be possible with tweaks but are not covered here. |
General installation Notes
-
Some parts of the installation can take a considerable amount of time.
You may be able to speed this up considerably (depending on the host CPU) by using the DOSBox-X Turbo mode, which can be enabled from the drop-down menu bar by selecting «CPU» followed by «Turbo (Fast Forward)».
This turbo mode is not like the old Turbo button on retro PCs, but functions more like a fast-forward, and therefore should not be used when interacting with the guest OS.
Starting with DOSBox-X 0.83.21 the turbo mode is automatically disabled the moment a key is pressed, to prevent spurious keypresses to be registered causing undesirable effects. -
When creating your HDD image with
IMGMAKE, instead of specifying a custom size, you can choose a pre-defined template. The pre-defined HDD templates can be seen by runningIMGMAKEwithout arguments.
Dynamic vs Normal core
Starting with DOSBox-X 0.83.10 the dynamic_x86 core, which should perform much better, has been sufficiently enhanced that it can now be used for most use-cases with Windows 98.
However, for now we still recommend that you do the installation of Windows 98 using core=normal until issue #2215 is resolved.
But after the installation is finished you should be able to change to core=dynamic_x86.
Should you run into problems such as application crashes or a Windows 98 blue-screen that cannot be reproduced with core=normal, please report the problem on the DOSBox-X Git issues page.
Creating a Harddisk image
|
Note |
In addition to the below DOSBox-X command line utility, starting with DOSBox-X 0.83.9 it is possible to create harddisk images from the DOSBox-X menu. Go to the «DOS» menu and select «Create blank disk image…». This option allows for various common harddisk types to be created, for less common types you need to use the command line utility. |
-
Diskette (floppy) images are always created as FAT12.
-
If your reported DOS version is 7.1 or higher, then harddisk images up to 512MB will use FAT16 by default.
-
Larger size harddisk images will use FAT32 by default (larger than 2GB can only be created as FAT32).
Alternatively, you can use the -fat option to instruct IMGMAKE to create a certain FAT type (assuming that is possible for the harddisk size).
First you need to start DOSBox-X from the command-line, using your newly created win98.conf.
This assumes that dosbox-x is in your path and win98.conf is in your current directory.
dosbox-x -conf win98.conf
Then in DOSBox-X you need to create a new harddisk image file with IMGMAKE.
This example uses an 8GB hard disk image with a single FAT32 formatted partition.
Technically the FAT32 filesystem is capable of supporting partitions up to 2TB, but the generic IDE driver in Windows 98 cannot handle volumes greater than 128GB.
Larger partition sizes may be possible with 3rd party drivers but are not covered here.
In later Windows versions, starting with Windows 2000, Microsoft won’t let you format a volume bigger than 32GB with FAT32 using its built-in formatting tool, this was presumably to push migrations to NTFS and later exFAT.
|
Note |
Creating a 128GB volume will cause a «SU0650 Out of Memory» warning during install, you can however continue the installation. |
IMGMAKE hdd.img -t hd_8gig
Or if you want to create a larger disk, you can create a custom type.
This is an example of a 16GB (16*1024=16384 MB) disk, which due to its size, will be formatted as FAT32.
IMGMAKE hdd.img -t hd -size 16384
Installation Method 1: Boot from CD-ROM image
Starting with Windows 98, it is possible to boot directly from the CD-ROM, as long as you have the «OEM Full» edition, in which case no separate bootdisk is needed.
This installation method allows both FAT16 (up to 2GB) and FAT32 volumes, which can be up to 128GB for Windows 98.
Requirements
-
DOSBox-X 0.83.10 or later, these instructions will NOT work with other DOSBox forks.
-
Windows 98 OEM Full edition CD-ROM image (named «Win98.iso» in the example below).
Getting this image file is outside the scope of this guide.
Starting the installation
This assumes you have already started DOSBox-X with the win98.conf config file and created your harddisk image.
First mount the harddisk image you created earlier:
Now let’s boot from the CD-ROM and start the installation.
IMGMOUNT D Win98.iso
IMGMOUNT A -bootcd D
BOOT A:
|
Note |
If the second IMGMOUNT command gives an error «El Torito CD-ROM boot record not found«, your CD-ROM image is not bootable, and you will have to use either a different installation method or a different Windows 98 CD-ROM image.
|
You will first get a Startup menu, where you need to select «Boot from CD-ROM».
At this point it should format the harddisk and the installation process should start.
When the Windows installer reboots, and your back at the DOSBox-X Z:> prompt.
Close DOSBox-X and edit your win98.conf config file, and add the following lines in the [autoexec] section at the end of the file:
IMGMOUNT C hdd.img
IMGMOUNT D Win98.iso
BOOT C:
Now start DOSBox-X as follows to continue the installation process:
dosbox-x -conf win98.conf
Transfer Windows 98 install files to your HDD image
This is an optional step. It is to prevent Windows from asking for the CD-ROM whenever it needs additional files.
Boot Windows 98 with the CD-ROM image mounted. In Windows 98, copy the WIN98 directory and its contents from the CD-ROM to your C: drive.
You can copy it to any directory you want, but we assume here that you copied it to C:WIN98
Once the files are copied, start REGEDIT and navigate to HKEY_LOCAL_MACHINESoftwareMicrosoftWindowsCurrentVersionSetup and change SourcePath= to the location where you copied the files. e.g., SourcePath=C:WIN98
In the case of Windows 98SE, copying the entire directory will require roughly 174MB of diskspace.
The WIN98OLS and WIN98TOUR sub-directories can however be skipped which will save roughly 54MB, bringing the total to roughly 120MB.
Installation Method 2
This method will start the installation from DOSBox-X and does not require a bootable CD-ROM image.
Requirements
-
DOSBox-X 0.83.10 or later, these instructions will NOT work with other DOSBox forks.
-
Windows 98 CD-ROM image (named «Win98.iso» in the example below).
Getting this image file is outside the scope of this guide.
Starting the installation
This assumes you have already started DOSBox-X with the win98.conf config file and created your harddisk image.
First mount the harddisk image you created earlier:
You will also need to mount the Windows 98 CD-ROM. There are a few ways of doing so, but this guide assumes you have a ISO image.
If you have a copy of the Windows 98 CD-ROM as an ISO (or a cue/bin pair), you can mount it as follows:
Copying the contents of the CD-ROM
While not strictly necessary, as it is possible to run SETUP.EXE directly from the CD-ROM (if you have the CD-ROM automatically mounted in your [autoexec] section of the config file).
It is recommended to copy the installation files (contents of the WIN98 directory on the CD-ROM) to your HDD image, as it will prevent Windows 98 from asking for the CD-ROM when it needs additional files later.
XCOPY D:WIN98 C:WIN98 /I /E
The files in the above example are copied to the C:WIN98 directory.
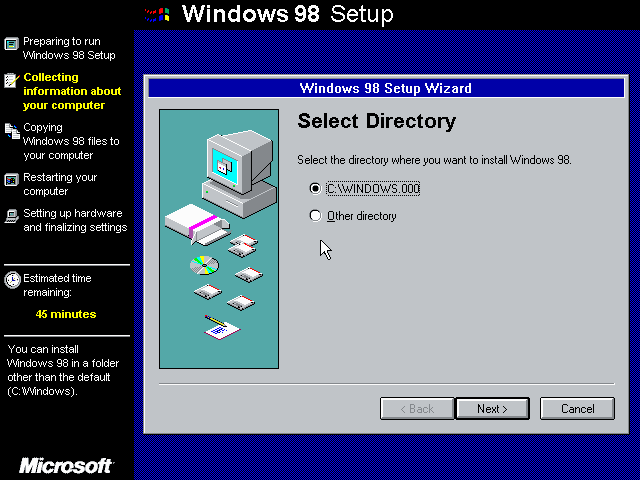
You may want to use C:WINDOWSOPTIONSCABS instead, as that is the directory that OEM installs normally use.
But if you do, be aware that the installer will attempt to install into C:WINDOWS.000 as C:WINDOWS already exists.

If you get the above screen during SETUP, select «Other directory» to change it back to C:WINDOWS
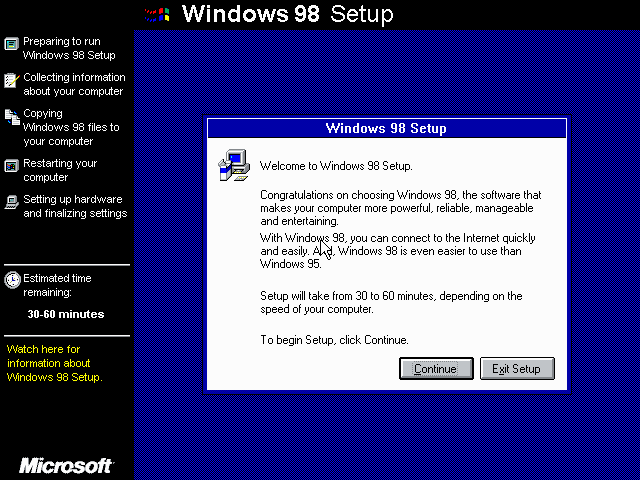
Running SETUP.EXE
You can now run SETUP.EXE.

Now run through the installation process.
The actual steps will not be covered in this guide but are pretty self-explanatory and detailed guides on the Windows 98 install process can be found online such as YouTube.
When the installer reboots DOSBox-X, and you’re back at the DOSBox-X Z: prompt, type EXIT.
Now edit your win98.conf config file.
At the end of the file, in the [autoexec] section, add the following two lines:
IMGMOUNT C hdd.img
BOOT C:
Save the config file, and at the command-prompt of your host PC you can type the below command to continue with the next phase of the installation process.
This is also the command you use, after the installation is finished, to start Windows 98 in DOSBox-X.
dosbox-x -conf win98.conf
Booting Windows 98 after installation
After the installation is finished, you can start Windows 98 from the command-prompt of your host PC, with the following command:
dosbox-x -conf win98.conf
You can optionally create a shortcut on your desktop to start Windows 98 directly.
Steps to take after installation
Once Windows 98 is installed, here is some additional software you may want to install or update:
-
Install Microsoft .NET framework version 1.0, 1.1 and 2.0
-
Install Visual C++ 2005 runtime
-
Update to Internet Explorer 6.0 (rarely needed)
-
Update to DCOM 4.71.1015.0
-
Update to DirectX 9.0c
-
Install Windows Installer 2.0
-
Install WinG 1.0 (needed by just a few games, and those games typically include it)
-
Install GDI+ redistributable
-
Install Adobe Acrobat Reader 6.0
-
Install/Update to Adobe Flash Player 9.0.47.0
-
Install Apple Quicktime 6.5.2
Mounting CD or Diskette images
DOSBox-X supports mounting CD and diskette (floppy) images, and making those available to an OS booted in DOSBox-X.
But only if the image files are specified before starting real DOS or Windows 9x.
The option to load image files from the menu bar becomes unavailable the moment you boot DOS or Win9x in DOSBox-X.
This is a known limitation that hopefully will be resolved in the near future.
For now, you can work around it, by specifying multiple image files with the IMGMOUNT command as such:
IMGMOUNT A disk1.img disk2.img disk3.img
IMGMOUNT D cd1.iso cd2.iso cd3.iso
You can then swap between disk images with the swap option from the menu.
Enabling networking
To enable networking, you first need to enable NE2000 adapter emulation in your win98.conf config file and select an appropriate back-end for the NE2000 emulation.
Enabling NE2000 in your DOSBox-X config file
Starting with DOSBox-X 0.83.12 there are two different back-ends to the NE2000 adapter emulation.
The default is backend=auto, which implies backend=slirp if SLIRP support is available, otherwise backend=pcap is implied if PCAP support is available.
backend=pcap
The PCAP back-end uses something called «Promiscuous mode».
This has the advantage that DOSBox-X can support various legacy network protocols, such as IPX and NetBIOS Frames (aka NetBEUI) in addition to TCP/IP.
This mode not only allows communication between DOSBox-X instances on the same network, but also with legacy PCs on the same network.
However, for this to work DOSBox-X needs to have very low-level access to your real network adapter.
In some cases, this is not possible, such as:
-
Network Adapter or Driver not supporting Promiscuous mode (most wireless adapters fall into this category).
-
Your Ethernet switch not allowing multiple MAC addresses on a single port or doing any kind of MAC address whitelisting.
-
Sandboxed versions of DOSBox-X (e.g., Flatpak) not allowing the required low-level access.
To enable NE2000 emulation with the pcap back-end, add the following to your win98.conf config file:
[ne2000]
ne2000=true
nicirq=10
backend=pcap

[ethernet, pcap]
realnic=list
The list value for realnic= will need to be replaced by a value representing your actual network adapter.
See Guide: Setting up networking in DOSBox-X for more information.
backend=slirp
Unlike the PCAP back-end, the SLIRP back-end does not require Promiscuous mode.
As such it will work with wireless adapters, and it will work in most sandboxed environments.
But obviously, it has its own limitations.
-
It is not supported in all platforms, such as Windows Visual Studio builds.
-
It only supports the TCP/IP protocol (other protocols must be TCP/IP encapsulated).
-
It is effectively behind a NAT (Network Address Translation) gateway, meaning that you can communicate outbound, but no systems on the LAN can instantiate a new connection to it. Which means that two DOSBox-X instances on the same LAN using
backend=slirpcannot communicate with each other.
To enable NE2000 emulation with the slirp back-end, add the following to your win98.conf config file:
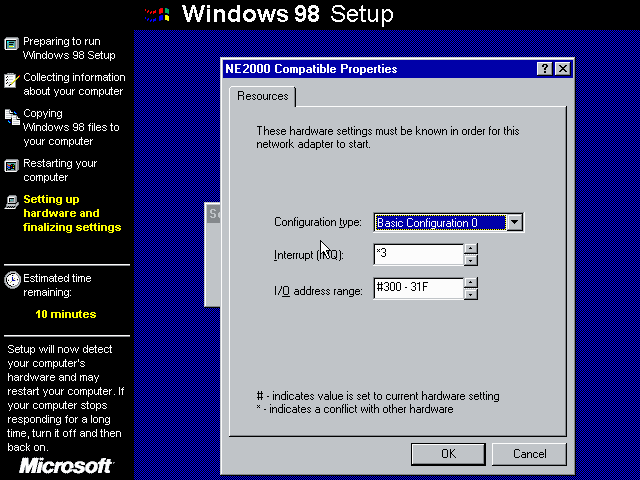
[ne2000]
ne2000=true
nicirq=10
backend=slirp
Setting up NE2000 networking in Windows 98
If you enabled NE2000 support in the DOSBox-X config file, Windows 98 should detect it during installation, and you should get a screen like the following.

Change the Interrupt (IRQ) to 10 to match the nicirq= value set in your win98.conf file.
If Windows 98 did not detect the adapter during installation, or you enabled NE2000 emulation after you did the installation.
Go to «Start», «Settings» and «Control Panel» and double-click on «Add New Hardware», and let the wizard detect hardware.
It should find the emulated Novell NE2000 adapter and install the drivers.
|
Note |
By default, TCP/IP will try to get its network configuration over DHCP, if you need to manually specify the settings you can do so, in «Control Panel», double-click «Network». Once it opens, highlight «TCP/IP», and click the «Properties» button to modify the TCP/IP settings. |
|
Note |
In the Network settings, there will also be a «Dial-Up Adapter» listed, which you can safely remove. |
|
Note |
If you don’t want the Windows logon dialog on startup, and don’t care for file and printer sharing, you can remove the «Client for Microsoft Networks» component from the Network configuration settings (although, it will complain that «Your network is not complete», which you can ignore). |
|
Note |
If you want to share files between Windows 98 and Windows 10 on the network, have a look at this blog: SMB File Sharing between Win10 and Win98, but apparently this fails with the latest Win10 builds 2004 and 20H2. |
Emulated video adapter and video mode
The default video adapter that DOSBox-X emulates is the S3 Trio64, which is the best emulated video adapter that DOSBox-X offers, with the widest range of resolutions and colour depths.
In addition, this video adapter is supported out-of-the-box in Windows 98, simplifying the installation process.
The available video modes with the S3 Trio64 driver are:
-
4-bit colour (16): 640×480
-
8-bit colour (256): 640×480, 800×600, 1024×768, 1152×864, 1280×1024 and 1600×1200
-
16-bit colour (65536): 640×480, 800×600 and 1024×768
-
32-bit colour (16.7M): 640×480 and 800×600
A few enhancements have been made to the emulated S3 Trio64, compared to a real S3 Trio64:
-
No real S3 Trio64 was ever produced with more than 4MB video memory, under DOSBox-X you can optionally configure 8MB.
-
The real cards never supported wide-screen resolutions, wide-screen VESA modes can optionally be enabled in DOSBox-X.
However, these enhancements cannot be used in Windows 98 with the S3 video driver due to driver limitations.
There is no updated S3 Trio64 video driver available for Windows 98 (not even via installing DirectX 9c).
As such you will be limited to the above video modes with this driver.
VESA driver
First add the following lines to your DOSBox-X config file in the section:
allow high definition vesa modes=true
allow unusual vesa modes=true
allow low resolution vesa modes=false
Download and extract the latest VBEMP driver package and install the driver from the 032MB directory.
With these settings modes up to 1920×1080 in 32bit colour, or 1920×1440 in 16bit colour are possible.
|
Note |
Using the VBEMP driver does have a negative graphics performance impact, which when measured in WinBench96 Graphics WinMark, can be a reduction of up to 59%. |
Emulated sound card
The emulated sound card used in this guide is the SB16 Vibra, instead of the default SB16.
This is simply because the SB16 Vibra is an ISA PnP card, and therefore automatically detected by Windows.
There is no other real advantage of using the emulated SB16 Vibra over the SB16.
Both Windows 98 and 98SE include SB16 driver version 4.37.00.1998.
An optional driver update to 4.38.14 is available on the VOGONS Vintage Driver Library.
|
Note |
One often heard complaint of the real SB16 Vibra is its CQM synthesis, which was used as a low-cost replacement of the OPL3 chip found on earlier cards. However, DOSBox-X does not really emulate the CQM, instead it uses the same OPL3 emulation as for the regular SB16 model. Therefore, the CQM sound quality issues with the real SB16 Vibra do not apply to DOSBox-X. |
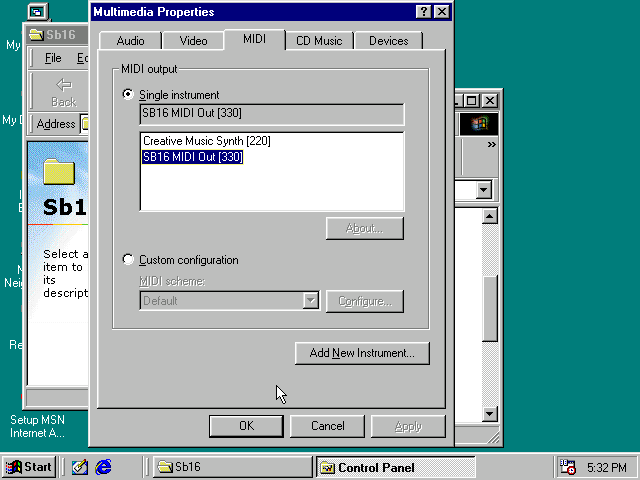
Enabling General MIDI
If you have a working DOSBox-X General MIDI setup, either emulated or real, you can use that in Windows 98.
Go to «Start», «Settings» and open «Control Panel», and then double-click on «Multimedia Properties».
Now on the «MIDI» tab, change the «Single instrument» option to «SB16 MIDI Out [330]», and click OK to close the window.
Enabling printing
Print to PostScript
For the best print quality, you will want to print to a PostScript printer in Windows 98.
First, set up your DOSBox-X config to print to a file as such:
[dosbox]
captures=capture

[parallel]
parallel1=file timeout=2000
Next in Windows 98, select any PostScript printer such as the «QMS ColorScript 100 Model 30», during printer setup connected to LPT1.
Once the printer is installed, open the printers properties, and on the «Details» tab click on the «Spool Settings…» button.
In the «Spool Settings», you must select «Print directly to the printer» and click OK.
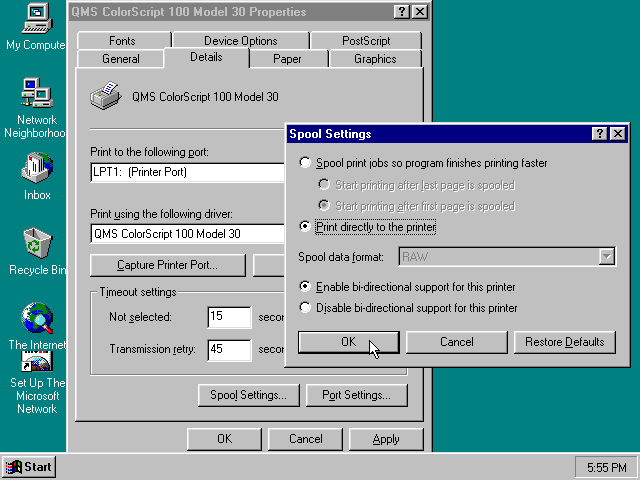
|
Warning |
Failing to change the spool setting, when printing to a file, will result in corrupted PostScript files! |
|
Note |
If two files end up being generated instead of just one for a printjob, you will want to revert the above spool setting. And perhaps try changing the spool setting to «Start printing after last page is spooled». |
When you print, a .prt file in your captures= directory will be created, which despite the extension, is actually a PostScript file.
On Linux and macOS, PostScript files are natively supported and can be viewed and printed.
On a Windows host, it is necessary to install a separate PostScript viewer such as GSview.
Epson emulation
As an alternative, you can use the integrated Epson printer emulation, but the output quality will be significantly less compared to PostScript.
First, set up your DOSBox-X config to emulate an Epson printer as such:
[parallel]
parallel1=printer

[printer]
printer=true
printoutput=ps
multipage=true
timeout=2000
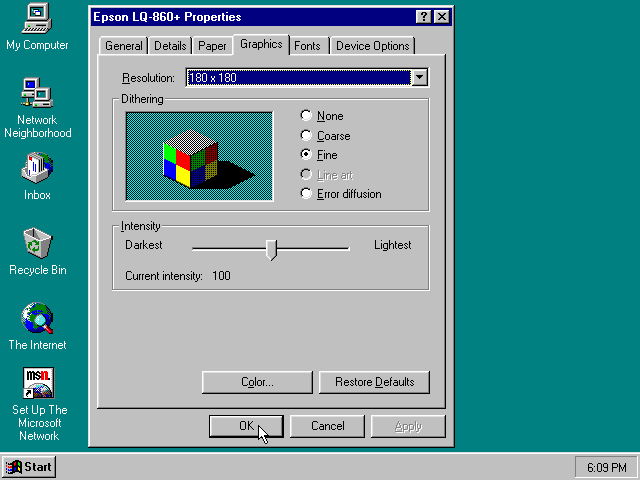
Next in Windows 98, select any Epson dot-matrix printer, such as the «Epson LQ-860+» option during printer setup connected to LPT1
|
Warning |
Make sure that you do not configure the Epson printer driver for a graphics resolution other than 180×180, or the output will be corrupted. |
When you print, a PostScript file with the .ps extension will be created in your current working directory.
The emulated Epson printer settings can be adjusted as documented on the above linked wiki printing guide.
3dfx Voodoo
The emulated 3dfx Voodoo PCI device is enabled by default in DOSBox-X, and both Windows 98 and 98SE include a driver and will automatically detect it.
Windows 98SE includes a driver dated 4-23-1999. There is a 3.01.00 update available.
After the update it will show a date of 4-29-1999.
If for some reason you do not want 3dfx Voodoo emulation, it can be disabled by adding the following lines to your DOSBox-X config:
[voodoo]
voodoo_card=false
Glide pass-through
Starting with DOSBox-X 0.83.10 it is possible to use glide pass-through with Windows 98.
There are however a few points you need to be aware of.
-
The DOSBox-X and glide-wrapper installed on the host need to be the same architecture.
So, if you’re using a 64bit DOSBox-X, you need to use a 64-bit glide-wrapper. -
The Linux SDL2 DOSBox-X does not work with OpenGlide, this is a limitation of OpenGlide (see OpenGlide issue #20).
The work-around is to use the SDL1 DOSBox-X instead.
You need to set the following DOSBox-X config option:
You will also need a specially patched GLIDE2X.DLL which you can place in either the C:WindowsSystem directory of Windows 98, or in the game directory.
But be aware that some games come with their own GLIDE2X.DLL, which typically gets installed in the game directory.
If so, you will have to remove this DLL file for glide pass-through to work.
Hard Disk Read-ahead optimization
In «System Properties», select the «Performance» tab, and click the «File System…» button.
A separate «File System Properties» window will open.
On the «Hard Disk» tab you can specify the Read-ahead optimization.
Based on benchmark results (WinBench 96), it seems that setting this to «None» gives the best performance in combination with DOSBox-X, although the difference is marginal.
This is no doubt because the host system is better at caching then the Windows 98 cache function.
Host Folder mounts
Starting with DOSBox-X 2022.08.0, there is optional support to dynamically convert a host folder mount to an emulated FAT harddisk for use when you need to boot a guest OS, such as Windows 98.
This can be accomplished in one of two ways. Either when you issue the boot command, you add the option -convertfat. e.g. boot c: -convertfat.
Or by setting the following option in your DOSBox-X config file:
[sdl]
convertdrivefat = true
When you now boot from a real image file, it will attempt to convert ALL folder mounts at the time of booting to emulated FAT Harddisks.
|
Note |
You cannot boot from such an emulated FAT harddisk. You will still need some other bootable image file to actually boot a guest OS. |
|
Note |
This conversion is dynamic, effectively creating an emulated FAT harddisk out of a folder mount. This converted FAT harddisk is not automatically stored permanently. You can however, store it as a permanent image file that you can later mount with IMGMOUNT, using the «Drive» > «drive letter» > «Save to disk image» option from the menus.Please see the «Creating harddisk images from folder mounts» section in the Guide: Managing image files in DOSBox-X for more information. |
|
Note |
There is currently no support for creating emulated CD-ROM or Floppy drives out of folder mounts with this method. Any CD-ROM or Floppy folder mounts will also be converted to harddisk folder mounts, and may not actually work for the intended purpose. |
One thing to note, is that there is no way to specify the FAT type to use for the conversion.
The FAT type will be automatically selected based on the aggregate size of files in the folder, plus 250MiB (this can be adjusted with the convert fat free space option in the DOSBox-X config file).
If the total space of files + 250MiB does not exceed 2GiB, it will convert it into a FAT16 disk. Otherwise, it will become a FAT32, which in turn will require a guest OS with FAT32 support.
Alternatively, you can also make the emulated FAT drive read-only by using the -convertfatro option with the boot command. Or by setting convert fat free space=0 option in the DOSBox-X config file.
Known limitations
-
If you intend at any point to use a Floppy or CD during your usage of Windows 98, you must attach a floppy and/or CD image before starting Windows 98.
You can load a different CD or Floppy image, once you booted Windows 95, but if a floppy or CD is not present when starting Windows 98 the drive is simply missing, and you cannot add it without rebooting the guest OS. -
When mounting a CD-ROM image using
imgmount, before booting Windows 95, you may have to specify the IDE device to attach it to for it to work properly in Windows 95. e.g.imgmount d game_cd.iso -ide 2mto make the CD-ROM drive appear as the master device on the secondary IDE controller.
Outstanding issues
-
Resolve «Drive A is using MS-DOS compatibility mode file system»
Table of Contents
- Installing Microsoft Windows 98 in DOSBox-X
- Overview
- Windows editions this guide applies to
- External links
- DOSBox-X config file
- General installation Notes
- Dynamic vs Normal core
- Creating a Harddisk image
- Installation Method 1: Boot from CD-ROM image
- Requirements
- Starting the installation
- Transfer Windows 98 install files to your HDD image
- Installation Method 2
- Requirements
- Starting the installation
- Copying the contents of the CD-ROM
- Running SETUP.EXE
- Booting Windows 98 after installation
- Steps to take after installation
- Mounting CD or Diskette images
- Enabling networking
- Enabling NE2000 in your DOSBox-X config file
- Setting up NE2000 networking in Windows 98
- Emulated video adapter and video mode
- VESA driver
- Emulated sound card
- Enabling General MIDI
- Enabling printing
- Print to PostScript
- Epson emulation
- 3dfx Voodoo
- Glide pass-through
- Hard Disk Read-ahead optimization
- Host Folder mounts
- Known limitations
- Outstanding issues
Overview
This guide will give a general description of installing Windows 98 in DOSBox-X, in addition to addressing some common issues.
Windows editions this guide applies to
-
Windows 98 (RTM; Original release) — Retail Full
-
Windows 98 (RTM; Original release) — OEM Full
-
Windows 98 Second Edition (98SE) — Retail Full
-
Windows 98 Second Edition (98SE) — OEM Full
|
Note |
Windows 98 or 98SE Upgrade editions have additional requirements and are not covered by this guide. |
If you don’t know which Windows 98 edition to install, we recommend that you install Windows 98SE.
DOSBox-X config file
You first need to create a DOSBox-X config file.
[sdl]
autolock=true

[dosbox]
title=Windows 98
memsize=128


vmemsize=8
vesa modelist width limit=0
vesa modelist height limit=0

[dos]
ver=7.1
hard drive data rate limit=0
floppy drive data rate limit=0

[cpu]
cputype=pentium_mmx
core=normal

[sblaster]
sbtype=sb16vibra

[fdc, primary]
int13fakev86io=true

[ide, primary]
int13fakeio=true
int13fakev86io=true

[ide, secondary]
int13fakeio=true
int13fakev86io=true
cd-rom insertion delay=4000

[render]
scaler=none

[autoexec]
Copy the above config and save it as win98.conf
|
Note |
You can increase the allocated RAM up to the Windows 98 maximum of 512MB by setting memsize=512.Larger values may be possible with tweaks but are not covered here. |
General installation Notes
-
Some parts of the installation can take a considerable amount of time.
You may be able to speed this up considerably (depending on the host CPU) by using the DOSBox-X Turbo mode, which can be enabled from the drop-down menu bar by selecting «CPU» followed by «Turbo (Fast Forward)».
This turbo mode is not like the old Turbo button on retro PCs, but functions more like a fast-forward, and therefore should not be used when interacting with the guest OS.
Starting with DOSBox-X 0.83.21 the turbo mode is automatically disabled the moment a key is pressed, to prevent spurious keypresses to be registered causing undesirable effects. -
When creating your HDD image with
IMGMAKE, instead of specifying a custom size, you can choose a pre-defined template. The pre-defined HDD templates can be seen by runningIMGMAKEwithout arguments.
Dynamic vs Normal core
Starting with DOSBox-X 0.83.10 the dynamic_x86 core, which should perform much better, has been sufficiently enhanced that it can now be used for most use-cases with Windows 98.
However, for now we still recommend that you do the installation of Windows 98 using core=normal until issue #2215 is resolved.
But after the installation is finished you should be able to change to core=dynamic_x86.
Should you run into problems such as application crashes or a Windows 98 blue-screen that cannot be reproduced with core=normal, please report the problem on the DOSBox-X Git issues page.
Creating a Harddisk image
|
Note |
In addition to the below DOSBox-X command line utility, starting with DOSBox-X 0.83.9 it is possible to create harddisk images from the DOSBox-X menu. Go to the «DOS» menu and select «Create blank disk image…». This option allows for various common harddisk types to be created, for less common types you need to use the command line utility. |
-
Diskette (floppy) images are always created as FAT12.
-
If your reported DOS version is 7.1 or higher, then harddisk images up to 512MB will use FAT16 by default.
-
Larger size harddisk images will use FAT32 by default (larger than 2GB can only be created as FAT32).
Alternatively, you can use the -fat option to instruct IMGMAKE to create a certain FAT type (assuming that is possible for the harddisk size).
First you need to start DOSBox-X from the command-line, using your newly created win98.conf.
This assumes that dosbox-x is in your path and win98.conf is in your current directory.
dosbox-x -conf win98.confThen in DOSBox-X you need to create a new harddisk image file with IMGMAKE.
This example uses an 8GB hard disk image with a single FAT32 formatted partition.
Technically the FAT32 filesystem is capable of supporting partitions up to 2TB, but the generic IDE driver in Windows 98 cannot handle volumes greater than 128GB.
Larger partition sizes may be possible with 3rd party drivers but are not covered here.
In later Windows versions, starting with Windows 2000, Microsoft won’t let you format a volume bigger than 32GB with FAT32 using its built-in formatting tool, this was presumably to push migrations to NTFS and later exFAT.
|
Note |
Creating a 128GB volume will cause a «SU0650 Out of Memory» warning during install, you can however continue the installation. |
IMGMAKE hdd.img -t hd_8gigOr if you want to create a larger disk, you can create a custom type.
This is an example of a 16GB (16*1024=16384 MB) disk, which due to its size, will be formatted as FAT32.
IMGMAKE hdd.img -t hd -size 16384Installation Method 1: Boot from CD-ROM image
Starting with Windows 98, it is possible to boot directly from the CD-ROM, as long as you have the «OEM Full» edition, in which case no separate bootdisk is needed.
This installation method allows both FAT16 (up to 2GB) and FAT32 volumes, which can be up to 128GB for Windows 98.
Requirements
-
DOSBox-X 0.83.10 or later, these instructions will NOT work with other DOSBox forks.
-
Windows 98 OEM Full edition CD-ROM image (named «Win98.iso» in the example below).
Getting this image file is outside the scope of this guide.
Starting the installation
This assumes you have already started DOSBox-X with the win98.conf config file and created your harddisk image.
First mount the harddisk image you created earlier:
Now let’s boot from the CD-ROM and start the installation.
IMGMOUNT D Win98.iso
IMGMOUNT A -bootcd D
BOOT A:|
Note |
If the second IMGMOUNT command gives an error «El Torito CD-ROM boot record not found«, your CD-ROM image is not bootable, and you will have to use either a different installation method or a different Windows 98 CD-ROM image.
|
You will first get a Startup menu, where you need to select «Boot from CD-ROM».
At this point it should format the harddisk and the installation process should start.
When the Windows installer reboots, and your back at the DOSBox-X Z:> prompt.
Close DOSBox-X and edit your win98.conf config file, and add the following lines in the [autoexec] section at the end of the file:
IMGMOUNT C hdd.img
IMGMOUNT D Win98.iso
BOOT C:
Now start DOSBox-X as follows to continue the installation process:
dosbox-x -conf win98.confTransfer Windows 98 install files to your HDD image
This is an optional step. It is to prevent Windows from asking for the CD-ROM whenever it needs additional files.
Boot Windows 98 with the CD-ROM image mounted. In Windows 98, copy the WIN98 directory and its contents from the CD-ROM to your C: drive.
You can copy it to any directory you want, but we assume here that you copied it to C:WIN98
Once the files are copied, start REGEDIT and navigate to HKEY_LOCAL_MACHINESoftwareMicrosoftWindowsCurrentVersionSetup and change SourcePath= to the location where you copied the files. e.g., SourcePath=C:WIN98
In the case of Windows 98SE, copying the entire directory will require roughly 174MB of diskspace.
The WIN98OLS and WIN98TOUR sub-directories can however be skipped which will save roughly 54MB, bringing the total to roughly 120MB.
Installation Method 2
This method will start the installation from DOSBox-X and does not require a bootable CD-ROM image.
Requirements
-
DOSBox-X 0.83.10 or later, these instructions will NOT work with other DOSBox forks.
-
Windows 98 CD-ROM image (named «Win98.iso» in the example below).
Getting this image file is outside the scope of this guide.
Starting the installation
This assumes you have already started DOSBox-X with the win98.conf config file and created your harddisk image.
First mount the harddisk image you created earlier:
You will also need to mount the Windows 98 CD-ROM. There are a few ways of doing so, but this guide assumes you have a ISO image.
If you have a copy of the Windows 98 CD-ROM as an ISO (or a cue/bin pair), you can mount it as follows:
Copying the contents of the CD-ROM
While not strictly necessary, as it is possible to run SETUP.EXE directly from the CD-ROM (if you have the CD-ROM automatically mounted in your [autoexec] section of the config file).
It is recommended to copy the installation files (contents of the WIN98 directory on the CD-ROM) to your HDD image, as it will prevent Windows 98 from asking for the CD-ROM when it needs additional files later.
XCOPY D:WIN98 C:WIN98 /I /EThe files in the above example are copied to the C:WIN98 directory.
You may want to use C:WINDOWSOPTIONSCABS instead, as that is the directory that OEM installs normally use.
But if you do, be aware that the installer will attempt to install into C:WINDOWS.000 as C:WINDOWS already exists.
If you get the above screen during SETUP, select «Other directory» to change it back to C:WINDOWS
Running SETUP.EXE
You can now run SETUP.EXE.
Now run through the installation process.
The actual steps will not be covered in this guide but are pretty self-explanatory and detailed guides on the Windows 98 install process can be found online such as YouTube.
When the installer reboots DOSBox-X, and you’re back at the DOSBox-X Z: prompt, type EXIT.
Now edit your win98.conf config file.
At the end of the file, in the [autoexec] section, add the following two lines:
IMGMOUNT C hdd.img
BOOT C:
Save the config file, and at the command-prompt of your host PC you can type the below command to continue with the next phase of the installation process.
This is also the command you use, after the installation is finished, to start Windows 98 in DOSBox-X.
dosbox-x -conf win98.confBooting Windows 98 after installation
After the installation is finished, you can start Windows 98 from the command-prompt of your host PC, with the following command:
dosbox-x -conf win98.confYou can optionally create a shortcut on your desktop to start Windows 98 directly.
Steps to take after installation
Once Windows 98 is installed, here is some additional software you may want to install or update:
-
Install Microsoft .NET framework version 1.0, 1.1 and 2.0
-
Install Visual C++ 2005 runtime
-
Update to Internet Explorer 6.0 (rarely needed)
-
Update to DCOM 4.71.1015.0
-
Update to DirectX 9.0c
-
Install Windows Installer 2.0
-
Install WinG 1.0 (needed by just a few games, and those games typically include it)
-
Install GDI+ redistributable
-
Install Adobe Acrobat Reader 6.0
-
Install/Update to Adobe Flash Player 9.0.47.0
-
Install Apple Quicktime 6.5.2
Mounting CD or Diskette images
DOSBox-X supports mounting CD and diskette (floppy) images, and making those available to an OS booted in DOSBox-X.
But only if the image files are specified before starting real DOS or Windows 9x.
The option to load image files from the menu bar becomes unavailable the moment you boot DOS or Win9x in DOSBox-X.
This is a known limitation that hopefully will be resolved in the near future.
For now, you can work around it, by specifying multiple image files with the IMGMOUNT command as such:
IMGMOUNT A disk1.img disk2.img disk3.img
IMGMOUNT D cd1.iso cd2.iso cd3.iso
You can then swap between disk images with the swap option from the menu.
Enabling networking
To enable networking, you first need to enable NE2000 adapter emulation in your win98.conf config file and select an appropriate back-end for the NE2000 emulation.
Enabling NE2000 in your DOSBox-X config file
Starting with DOSBox-X 0.83.12 there are two different back-ends to the NE2000 adapter emulation.
The default is backend=auto, which implies backend=slirp if SLIRP support is available, otherwise backend=pcap is implied if PCAP support is available.
backend=pcap
The PCAP back-end uses something called «Promiscuous mode».
This has the advantage that DOSBox-X can support various legacy network protocols, such as IPX and NetBIOS Frames (aka NetBEUI) in addition to TCP/IP.
This mode not only allows communication between DOSBox-X instances on the same network, but also with legacy PCs on the same network.
However, for this to work DOSBox-X needs to have very low-level access to your real network adapter.
In some cases, this is not possible, such as:
-
Network Adapter or Driver not supporting Promiscuous mode (most wireless adapters fall into this category).
-
Your Ethernet switch not allowing multiple MAC addresses on a single port or doing any kind of MAC address whitelisting.
-
Sandboxed versions of DOSBox-X (e.g., Flatpak) not allowing the required low-level access.
To enable NE2000 emulation with the pcap back-end, add the following to your win98.conf config file:
[ne2000]
ne2000=true
nicirq=10
backend=pcap

[ethernet, pcap]
realnic=list
The list value for realnic= will need to be replaced by a value representing your actual network adapter.
See Guide: Setting up networking in DOSBox-X for more information.
backend=slirp
Unlike the PCAP back-end, the SLIRP back-end does not require Promiscuous mode.
As such it will work with wireless adapters, and it will work in most sandboxed environments.
But obviously, it has its own limitations.
-
It is not supported in all platforms, such as Windows Visual Studio builds.
-
It only supports the TCP/IP protocol (other protocols must be TCP/IP encapsulated).
-
It is effectively behind a NAT (Network Address Translation) gateway, meaning that you can communicate outbound, but no systems on the LAN can instantiate a new connection to it. Which means that two DOSBox-X instances on the same LAN using
backend=slirpcannot communicate with each other.
To enable NE2000 emulation with the slirp back-end, add the following to your win98.conf config file:
[ne2000]
ne2000=true
nicirq=10
backend=slirp
Setting up NE2000 networking in Windows 98
If you enabled NE2000 support in the DOSBox-X config file, Windows 98 should detect it during installation, and you should get a screen like the following.
Change the Interrupt (IRQ) to 10 to match the nicirq= value set in your win98.conf file.
If Windows 98 did not detect the adapter during installation, or you enabled NE2000 emulation after you did the installation.
Go to «Start», «Settings» and «Control Panel» and double-click on «Add New Hardware», and let the wizard detect hardware.
It should find the emulated Novell NE2000 adapter and install the drivers.
|
Note |
By default, TCP/IP will try to get its network configuration over DHCP, if you need to manually specify the settings you can do so, in «Control Panel», double-click «Network». Once it opens, highlight «TCP/IP», and click the «Properties» button to modify the TCP/IP settings. |
|
Note |
In the Network settings, there will also be a «Dial-Up Adapter» listed, which you can safely remove. |
|
Note |
If you don’t want the Windows logon dialog on startup, and don’t care for file and printer sharing, you can remove the «Client for Microsoft Networks» component from the Network configuration settings (although, it will complain that «Your network is not complete», which you can ignore). |
|
Note |
If you want to share files between Windows 98 and Windows 10 on the network, have a look at this blog: SMB File Sharing between Win10 and Win98, but apparently this fails with the latest Win10 builds 2004 and 20H2. |
Emulated video adapter and video mode
The default video adapter that DOSBox-X emulates is the S3 Trio64, which is the best emulated video adapter that DOSBox-X offers, with the widest range of resolutions and colour depths.
In addition, this video adapter is supported out-of-the-box in Windows 98, simplifying the installation process.
The available video modes with the S3 Trio64 driver are:
-
4-bit colour (16): 640×480
-
8-bit colour (256): 640×480, 800×600, 1024×768, 1152×864, 1280×1024 and 1600×1200
-
16-bit colour (65536): 640×480, 800×600 and 1024×768
-
32-bit colour (16.7M): 640×480 and 800×600
A few enhancements have been made to the emulated S3 Trio64, compared to a real S3 Trio64:
-
No real S3 Trio64 was ever produced with more than 4MB video memory, under DOSBox-X you can optionally configure 8MB.
-
The real cards never supported wide-screen resolutions, wide-screen VESA modes can optionally be enabled in DOSBox-X.
However, these enhancements cannot be used in Windows 98 with the S3 video driver due to driver limitations.
There is no updated S3 Trio64 video driver available for Windows 98 (not even via installing DirectX 9c).
As such you will be limited to the above video modes with this driver.
VESA driver
First add the following lines to your DOSBox-X config file in the section:
allow high definition vesa modes=true
allow unusual vesa modes=true
allow low resolution vesa modes=false
Download and extract the latest VBEMP driver package and install the driver from the 032MB directory.
With these settings modes up to 1920×1080 in 32bit colour, or 1920×1440 in 16bit colour are possible.
|
Note |
Using the VBEMP driver does have a negative graphics performance impact, which when measured in WinBench96 Graphics WinMark, can be a reduction of up to 59%. |
Emulated sound card
The emulated sound card used in this guide is the SB16 Vibra, instead of the default SB16.
This is simply because the SB16 Vibra is an ISA PnP card, and therefore automatically detected by Windows.
There is no other real advantage of using the emulated SB16 Vibra over the SB16.
Both Windows 98 and 98SE include SB16 driver version 4.37.00.1998.
An optional driver update to 4.38.14 is available on the VOGONS Vintage Driver Library.
|
Note |
One often heard complaint of the real SB16 Vibra is its CQM synthesis, which was used as a low-cost replacement of the OPL3 chip found on earlier cards. However, DOSBox-X does not really emulate the CQM, instead it uses the same OPL3 emulation as for the regular SB16 model. Therefore, the CQM sound quality issues with the real SB16 Vibra do not apply to DOSBox-X. |
Enabling General MIDI
If you have a working DOSBox-X General MIDI setup, either emulated or real, you can use that in Windows 98.
Go to «Start», «Settings» and open «Control Panel», and then double-click on «Multimedia Properties».
Now on the «MIDI» tab, change the «Single instrument» option to «SB16 MIDI Out [330]», and click OK to close the window.

Enabling printing
Print to PostScript
For the best print quality, you will want to print to a PostScript printer in Windows 98.
First, set up your DOSBox-X config to print to a file as such:
[dosbox]
captures=capture

[parallel]
parallel1=file timeout=2000
Next in Windows 98, select any PostScript printer such as the «QMS ColorScript 100 Model 30», during printer setup connected to LPT1.
Once the printer is installed, open the printers properties, and on the «Details» tab click on the «Spool Settings…» button.
In the «Spool Settings», you must select «Print directly to the printer» and click OK.

|
Warning |
Failing to change the spool setting, when printing to a file, will result in corrupted PostScript files! |
|
Note |
If two files end up being generated instead of just one for a printjob, you will want to revert the above spool setting. And perhaps try changing the spool setting to «Start printing after last page is spooled». |
When you print, a .prt file in your captures= directory will be created, which despite the extension, is actually a PostScript file.
On Linux and macOS, PostScript files are natively supported and can be viewed and printed.
On a Windows host, it is necessary to install a separate PostScript viewer such as GSview.
Epson emulation
As an alternative, you can use the integrated Epson printer emulation, but the output quality will be significantly less compared to PostScript.
First, set up your DOSBox-X config to emulate an Epson printer as such:
[parallel]
parallel1=printer

[printer]
printer=true
printoutput=ps
multipage=true
timeout=2000
Next in Windows 98, select any Epson dot-matrix printer, such as the «Epson LQ-860+» option during printer setup connected to LPT1
|
Warning |
Make sure that you do not configure the Epson printer driver for a graphics resolution other than 180×180, or the output will be corrupted. |

When you print, a PostScript file with the .ps extension will be created in your current working directory.
The emulated Epson printer settings can be adjusted as documented on the above linked wiki printing guide.
3dfx Voodoo
The emulated 3dfx Voodoo PCI device is enabled by default in DOSBox-X, and both Windows 98 and 98SE include a driver and will automatically detect it.
Windows 98SE includes a driver dated 4-23-1999. There is a 3.01.00 update available.
After the update it will show a date of 4-29-1999.
If for some reason you do not want 3dfx Voodoo emulation, it can be disabled by adding the following lines to your DOSBox-X config:
[voodoo]
voodoo_card=false
Glide pass-through
Starting with DOSBox-X 0.83.10 it is possible to use glide pass-through with Windows 98.
There are however a few points you need to be aware of.
-
The DOSBox-X and glide-wrapper installed on the host need to be the same architecture.
So, if you’re using a 64bit DOSBox-X, you need to use a 64-bit glide-wrapper. -
The Linux SDL2 DOSBox-X does not work with OpenGlide, this is a limitation of OpenGlide (see OpenGlide issue #20).
The work-around is to use the SDL1 DOSBox-X instead.
You need to set the following DOSBox-X config option:
You will also need a specially patched GLIDE2X.DLL which you can place in either the C:WindowsSystem directory of Windows 98, or in the game directory.
But be aware that some games come with their own GLIDE2X.DLL, which typically gets installed in the game directory.
If so, you will have to remove this DLL file for glide pass-through to work.
Hard Disk Read-ahead optimization
In «System Properties», select the «Performance» tab, and click the «File System…» button.
A separate «File System Properties» window will open.
On the «Hard Disk» tab you can specify the Read-ahead optimization.
Based on benchmark results (WinBench 96), it seems that setting this to «None» gives the best performance in combination with DOSBox-X, although the difference is marginal.
This is no doubt because the host system is better at caching then the Windows 98 cache function.
Host Folder mounts
Starting with DOSBox-X 2022.08.0, there is optional support to dynamically convert a host folder mount to an emulated FAT harddisk for use when you need to boot a guest OS, such as Windows 98.
This can be accomplished in one of two ways. Either when you issue the boot command, you add the option -convertfat. e.g. boot c: -convertfat.
Or by setting the following option in your DOSBox-X config file:
[sdl]
convertdrivefat = true
When you now boot from a real image file, it will attempt to convert ALL folder mounts at the time of booting to emulated FAT Harddisks.
|
Note |
You cannot boot from such an emulated FAT harddisk. You will still need some other bootable image file to actually boot a guest OS. |
|
Note |
This conversion is dynamic, effectively creating an emulated FAT harddisk out of a folder mount. This converted FAT harddisk is not automatically stored permanently. You can however, store it as a permanent image file that you can later mount with IMGMOUNT, using the «Drive» > «drive letter» > «Save to disk image» option from the menus.Please see the «Creating harddisk images from folder mounts» section in the Guide: Managing image files in DOSBox-X for more information. |
|
Note |
There is currently no support for creating emulated CD-ROM or Floppy drives out of folder mounts with this method. Any CD-ROM or Floppy folder mounts will also be converted to harddisk folder mounts, and may not actually work for the intended purpose. |
One thing to note, is that there is no way to specify the FAT type to use for the conversion.
The FAT type will be automatically selected based on the aggregate size of files in the folder, plus 250MiB (this can be adjusted with the convert fat free space option in the DOSBox-X config file).
If the total space of files + 250MiB does not exceed 2GiB, it will convert it into a FAT16 disk. Otherwise, it will become a FAT32, which in turn will require a guest OS with FAT32 support.
Alternatively, you can also make the emulated FAT drive read-only by using the -convertfatro option with the boot command. Or by setting convert fat free space=0 option in the DOSBox-X config file.
Known limitations
-
If you intend at any point to use a Floppy or CD during your usage of Windows 98, you must attach a floppy and/or CD image before starting Windows 98.
You can load a different CD or Floppy image, once you booted Windows 95, but if a floppy or CD is not present when starting Windows 98 the drive is simply missing, and you cannot add it without rebooting the guest OS. -
When mounting a CD-ROM image using
imgmount, before booting Windows 95, you may have to specify the IDE device to attach it to for it to work properly in Windows 95. e.g.imgmount d game_cd.iso -ide 2mto make the CD-ROM drive appear as the master device on the secondary IDE controller.
Outstanding issues
-
Resolve «Drive A is using MS-DOS compatibility mode file system»
| Жанр | Образование |
| Рейтинг | 3,6 |
| Установки | 100 000–500 000 |
| Разработчик | GEMESYS Software |
| Русский язык | нет |
| Оценок | 982 |
| Версия | 0.7.5.5 |
| Размер apk | 3.3 MB |
Группа ВКонтакте
Приложение dosbox turbo – самый быстрый оптимизированный и функциональный эмулятор. Если Вы любитель ретро-игр, то Вам следует обязательно скачать dosbox, который позволит запускать старые игрушки с ПК прямо на Андроид-устройстве.
Особенности и возможности программы
Современное оборудование не всегда совместимо со старыми играми. Программы, написанные в золотой для ПК период – MS-DOS (1я ОС для ПК, получившая широкое распространение) – совершенно не соответствуют требованиям современных ОС.
Чтобы старые игры запускались наравне с новыми, был создан эмулятор досбокс турбо. Современные портативные устройства на базе android отличаются высокой производительностью, поэтому программа позволяет запустить игру прямо на планшете или телефоне.
Для нормального функционирования приложению потребуется доступ к SD накопителю и как минимум 50 Мб свободной памяти. Программа по умолчанию воспринимает карту памяти, как диск С, поэтому DOS-игру следует сбрасывать именно туда. Чтобы лучше ориентироваться по файловой системе, рекомендуется дополнительно установить файловый менеджер.
Процесс игры полностью оптимизирован для Андроид-устройств:
- присутствует возможность работать с физическими джостиком, мышкой и клавиатурой;
- эмуляция тачпада;
- наложенные на экран виртуальные кнопки (стрелки клавиатуры или джостика) позволяют удобно управлять процессом игры;
- присутствует возможность масштабирования;
- кнопки регулировки громкости на портативном устройстве можно перенастроить на кнопки управления игрой: джостика или мыши;
- поддержка звуковых эффектов;
- возможность управления игрой при помощи комбинации клавиш;
- возможность выбрать удобное отображение экрана: вертикальное или горизонтальное без перезапуска программ и многое другое.

Простейший и безопасный путь, дающий возможность использовать Windows-программы на Android-устройствах, это установка соответствующих программных эмуляторов. В данном случае не подразумевается внесение каких-либо значительных изменений в предустановленную операционную систему, речь идёт только о запуске Windows на Android. Существует несколько эмуляторов, которые позволяют запустить в режиме эмуляции операционные системы линейки Windows 9х и Windows XP. Каждый из них имеет свои преимущества и свои недостатки. Общим остаётся следующее – ни один из эмуляторов не поддерживает подключение к Интернету и сетевые протоколы, но все они позволяют запускать большинство привычных программ (в основном стандартных), и играть в полюбившиеся игры (как правило, самые простые).
Рассмотрим подробнее наиболее популярные эмуляторы:
Эмулятор QEMU
Данный эмулятор позволяет запускать одну из операционных систем линейки Windows 9х на Android.
Установка (все упоминаемые файлы есть ):
- Скачать в Интернете файл SDLapp.apk (около 1,4 Мб) и установить на устройство. Данный файл представляет собой эмулятор QEMU для Android.
- Скачать архив SDL.zip (содержит прошивку BIOS, драйвера видеокарт и др. устройств). Скачанный архив распаковать в корневой каталог sdcard (с помощью WinRar, WinZip или аналогичной программы).
- Скачать образ *.img операционной системы (Windows 9х) или создать его с помощью Nero или подобной её программы (при наличии дистрибутива).
- Файл *.img скопировать на устройство в папку SDL.
- Запустить программу.
Неопытным пользователям рекомендуется запускать Windows 95, запуск 98-го на Android-устройствах сопряжён с некоторыми трудностями. В Windows 9х имеется экранная клавиатура, правый или левый клик мыши имитируется кнопками громкости. Выполнить двойной клик бывает затруднительно, намного проще выделить необходимое и нажать клавишу «Меню». Клавиша «Меню» заменяет нажатие на «Enter», а клавиша «Назад» — «Esc». Курсор останавливается там, куда его перетащили.
Тестирование показывает, что на Android заметно быстрее остальных продуктов этой линейки запускается Windows 95. Скорость его работы соответствует производительности компьютеров того времени, хотя многие программы с ним не запускается.
Все необходимые программы необходимо поместить в образ диска D, это можно сделать следующим образом:
- Скачать Qemu_HDD.rar (RAR-архив, содержащий нулевые образы дисков разного размера).
- Скачать программу и установить WinImage. Выбрать образ необходимого размера и с её помощью поместить в него нужные файлы.
- Переименовать образ в D.img и скопировать на устройство в папку SDL.
- В sdl.conf прописать следующую строку: /sdl -L . -m 128 -boot c -hda C.img -hdb D.img -usb -usbdevice tablet.
- Перезагрузить устройство, запустить Windows и запустить программу с D:.
Недостатки:
- Нечётко срабатывают клики (тапы).
- Отсутствует поддержка сети и интернет.
- Слабое разрешение экрана.
- Отсутствует звук.
- Неправильно отображается время.
- Прекращена техническая поддержка продукта.
Достоинства:
- Скорость работы значительно выше, чем у других эмуляторов
Эмулятор BOCHS
Считается лучшим эмулятором. Отсутствует большинство недостатков QEMU, нет проблем с мышью, выше стабильность работы. В принципе, позволяет запустить Windows любой версии, но скорость его работы делает бессмысленным запуск мощных операционных систем. Впрочем, имеются облегченные дистрибутивы, использование которых позволяет осуществлять запуск Windows XP за приемлемый период времени.
Установка
- Скачать и установить на устройство Bochs2_5_1.apk (около 1,2 Мб) и архив SDL_for_BOCHS.zip (содержит прошивку BIOS, драйвера видеокарт и др. устройств).
- Распаковать на устройство в папку SDL, заранее создав её в корневом каталоге sdcard.
- Скачать образ (*.img) операционной системы или создать его с помощью Nero или подобной её программы (при наличии дистрибутива).
- Файл *.img скопировать на устройство в папку «SDL».
- Запустить программу.
Мышь и все клавиши работают аналогично варианту с QEMU, с той разницей, что чётко срабатывает двойной клик.
Запуск игр и программ осуществляется способом, описанным для QEMU. Есть только одно отличие, вместо файла sdl.conf, необходимо редактировать bochsrc.txt (находится в папке SDL), в котором нужно найти строку #ata0-slave: type=disk, path=»d.img и убрать «#».
Имеется второй, более простой вариант запуска приложений, без создания образа. BOCHS поддерживает доступ к накопителю Android-устройств. Для включения этой функции, необходимо в bochsrc.txt написать следующую строку: ata0-slave: type=disk, mode=vvfat, path=/sdcard/HDD, journal=vvfat.redolog, а в корневом каталоге sdcard создать папку HDD.
Недостатки:
- Медленно работает.
- Отсутствует поддержка сети.
Достоинства:
- Высокая стабильность.
- Улучшена эмуляция мыши.
- Поддерживается эмуляция звуковой карты.
- Возможен запуск практически всех версий Windows.
- Осуществляется техническая поддержка программы.
Эмулятор aDOSBox
Данный эмулятор будет интересен любителям старых игр под DOS. Помимо запуска DOS, для чего, собственно говоря, он и создан, позволяет осуществить и запуск Windows 9х.
Установка:
- Скачать aDosBox_v0.2.5.apk (примерно 1.8 Мб) и установить на устройство.
- Скачать архив
Большие поклонники Windows, просидев на операционной системе долгие годы, пытаются и современные смартфоны на научить запускать программы и игры, написанные для десктопной ОС. Некоторых хватает на несколько дней, другие же прикладывают все усилия, чтобы увидеть заветное приветствие на экране своего смартфона. Но нужна ли вообще Windows с ее софтом на Android-девайсе? Не проще ли найти аналог нужной программы, разработанной специально для «зеленого робота»? Как бы то ни было, мы расскажем вам о способах запуска Windows на Андроид, а нужно ли – решайте сами.
Достоинства и недостатки
Положительным моментом является то, что программа позволяет воспользоваться целым спектром возможностей ОС DOS на своей платформе: работать с файлами, программами, запускать различные DOS приложения, например блокнот и др. офисные, дефрагментацию, а также полноценные игры, такие как Daggerfall, Death Gate, Arcticfox, Galaxian и пр.
К недостаткам следует отнести то, что для полноценного использования приложения потребуются хотя бы небольшие знания ОС DOS.
Играть в большинство DOS игр сегодня не просто, и дело не только в устаревшей графике. Современному пользователю портативных гаджетов будет довольно сложно разобраться в игровых задачах, средствах (игровая обстановка, окружающие предметы и пр.), а также в способах реализации игровых действий. Поэтому приложение будет актуальным для тех, кто хочет окунуться в ностальгию и действительно интересуется ретро-играми. Но даже, если вы не знакомы с программами эпохи DOS, наверняка, вам станет интересно, насколько большой прорыв произошел в игровой индустрии за последние четверть века. Эмулятор dosbox для android поможет оценить эту впечатляющую разницу: от простых графических форм до сложнейших деталей с высококачественным уровнем физической и графической симуляции. Если вы уже пользовались приложением, оставьте свои впечатления ниже в комментариях.
Как запустить DOS и Windows игры на Android
Как запустить на Android эмулятор операционной системы DOS чтобы поиграть в старенькие компьютерные игры? Ну для начала надо ясен пень поставить этот самый эмулятор. В Playstore их несколько, есть платные, есть бесплатные. Сначала мое внимание привлек бесплатный gDosBox, однако в описании я увидел как авторы рассыпаются в благодарностях авторам другого эмулятора aDosBox, поэтому решил ставить его. Устанавливаем aDosBox. Пробуем запустить – все заработало. Вводим команду для перехода на диск c:. Да-да, лапками с клавиатуры вводим c: и нажимаем Enter. Только так. Теперь выполняем команду dir чтобы получить список файлов. Как мы видим, эмулятор смотрит на встроенную карту памяти. Что ж, создаем на ней директорию dos куда закидываем какую-нибудь старую досявую игрушку, ну например Battle Bugs. Да кстати, для работы с файлами на компьютере я использую Far Manager. Бояться его не нужно. Несмотря на неказистый внешний вид, хотя лично мне нравится, он очень удобный. Двухпанельные файловые менеджеры – это вообще лучшее что случилось с компьютерами за последние 30 лет, а вовсе не пидорские картинки. Переписав игры, возвращаемся в DosBox, переходим в директорию с игрой вот такой командой. Я знаю что запускной файл игры называется bugs.exe. Вводим и нажимаем Enter. Игра запустилась, и я даже дошел до ввода секретного слова из бумажного описания к игре – да, именно так раньше игры защищали от взлома. Во-первых, к играм в комплекте шли бумажные инструкции. Представляете? И это было эффективно – игру-то ты переписал, но инструкцию же не будешь ксерить. Вот игра и требовала ввести какое-нибудь слово или символ, напечатанный на одной из страниц такой инструкции. DOS игры в эмуляторе работают. Но то DOS, а Diablo – нужен виндоус. Давайте попробуем запустить в эмуляторе старенький Windows, скачав образ Windows 98 Lite. Кладем файл w98.img в корень встроенной флешки вашего девайса. Теперь его надо как-то запустить. Вот по этому пути aDosBox хранит конфигурационный файл. Переходим в эту папку и делаем резервную копию этого самого файла. Теперь полностью меняем содержимое файла на вот это вот, сохраняем, и перезапускаем DosBox.
[sdl] output=surface priority=higher [render] frameskip=1 [cpu] core=dynamic cycles=2100 [dosbox] memsize=16 [mixer] nosound=true [joystick] joysticktype=none [dos] xms=true ems=true umb=true keyboardlayout=none [ipx] ipx=false [autoexec] mount e /sdcard e: imgmount c e:win98.img -t hdd -fs fat boot -l c
Если вы всё сделали правильно, то сразу после запуска DosBox начнется загрузка Win98. Загрузившись, можно понастальгировать. В общем-то, только ностальгировать и остается – для игр понадобится еще DirectX поставить и дров целую кучу, да и ограничения эмулятора aDosBox все равно не дадут поиграть с приемлемой скоростью. Так что побаловались, можно всё стирать. Единственный эмулятор, который сносно потянет и винду и игры – это DosBox Turbo. Turbo означает что он примерно на 30% быстрее обычного. К сожалению он платный, и его придется купить. Установили, запускаем. Вроде работает. Теперь нам надо прикрутить образ с Windows и образ с игрой, в данном случае с Diablo. Качаем специальную быструю сборку Win95 и образ с первой Diablo. Перебрасываем это все в корень флешки девайса. В моем случае файлов получилось два – w95.img с образом виндуза и d.img c образом Диябло. На этот раз мы не будем ковыряться в настроечном файле. Но как-то же нам надо все это запустить, поэтому создаем на компьютере текстовый файл w95.bat . Если кто не знает, batch – это командный файл, что-то типа скрипта. Пример такого файла выглядит вот так. @echo off imgmount d c:w95.img -t hdd -fs fat -size 512,63,16,600 imgmount e c:HDD_2Gb.img -t hdd -fs fat -size 512,63,64,1023 BOOT -l c Echo отключает отображение содержимого файла при запуске. Вторая строчка монтирует образ с виндузом. Здесь ничего менять не надо. А вот следующая строчка – монтирует 2-х гигабайтный образ диска, указав правильную геометрию для 2 гигового образа. Не вдаваясь в подробности, значения параметров геометрии для образов популярных объемов такие. 256MB image: -size 512,63,16,520 300MB image: -size 512,63,16,600 512MB image: -size 512,63,32,520 1GB image: -size 512,63,64,520 2GB image: -size 512,63,64,1023 Мой образ с диябло называется d.img и занимает 1 гиг, значит в третьей строчке я меняю название файла образа на d.img и прописываю значения геометрии для 1 гигового диска. Последняя строчка загружает Виндоуз. @echo off imgmount d c:w95.img -t hdd -fs fat -size 512,63,16,600 imgmount e c:d.img -t hdd -fs fat -size 512,63,64,520 BOOT -l c Переписываем этот файл на флешку рядом с нашими образами. Заходим в DosBox Turbo. Его надо поднастроить. Чтобы попасть в меню, надо провести пальцем по экрану сверху вниз. В настройках включаем 3dfx и поддержку ISA PnP, а также выставляем значения процессора, ядра и циклов согласно тому, что нам советует автор сборки. Перезагружаем DosBox. Теперь пробуем запустить наш батник, набрав win95.bat Ага! Это проверка на внимательность. Я не только неправильно написал название файла – win95.bat вместо w95.bat, но еще и положил их не туда. Как говорит вот эта строчка, DosBox монтирует диск c: не из корня флешки, а из поддиректории Download. Что ж, перекидываем наши три файла в эту директорию, и вновь пробуем набрать w95.bat . Образы монтируются, и начинается загрузка Win95. В процессе может вылезти масса разных окошков, где нужно будет нажать OK, либо выставить время, или даже вот такое окошко. Везде отвечайте по ситуации, пока Windows наконец не загрузится. Загрузилась. Выбираем мой компьютер, выбираем там диск D: куда мы подмонтировали Diablo, заходим в директорию с игрой. Поскольку в Microsoft в 95 пидорасы уже работали, они по какой-то причине решили скрывать расширения файлов. А у нас тут два с виду одинаковых файла hellfire, только вот первый запускной, а второй – иконка. Кликаем на первый. Запускается Diablo. Запустилась. Сейчас я попробую показать вам как идет игра. У меня старенький уже планшет на Tegra 3, c разрешением FullHD. Давайте посмотрим. Со звуком да, есть небольшие лаги – мне честно говоря лень разбираться. Что же касается самой игры, то имейте в виду что я писал видео с помощью очень прожорливой программы для записи экрана Android, но быстродействие все равно сносное. Если же отключить записывалку, то игра идет вообще без каких-либо лагов. Если разобраться со звуком – можно играть. Еще есть какой-то менеджер, но я его даже не смотрел – лично мне руками проще, удобнее, понятнее, да и хоть какое-то развитие, а не сплошные пидорские картинки. Поэтому вы можете самостоятельно разобраться со звуком, менеджером, а также с виртуальным джойстиком для эмуляции. Все приведенные в видео ссылки и куски кода вы найдете в тексте инструкции на моем сайте по ссылке в описании. Удачи.
Установка эмулятора Windows
Для конкретизации инструкции рассмотрим процесс установки определенного эмулятора. На сегодняшний день эмулятор BOCHS считается лучшим и самым работоспособным из всего, что представлено на просторах интернета. Главные его достоинства, в отличие от других эмуляторов:
- стабильная и правильная работа мыши;
- наличие звука (большая редкость для эмулятора);
- может запустить практически любую операционную систему Windows, в том числе и XP;
- наличие технической поддержки от команды разработчиков;
- общая стабильная работа системы.
Чтобы через этот эмулятор запустить Windows XP, следует воспользоваться облегченным дистрибутивом. В противном случае могут быть проблемы со временем загрузки системы.
Для начала необходимо скачать установочный файл. Внимательно отнеситесь к сайту, с которого собираетесь скачивать дистрибутив. Для установки необходимы: Bochs2_5_1.apk и zip-архив SDL_for_BOCHS.zip. В архиве должна лежать прошивка BIOS и основные драйверы. Далее открываем корневой каталог sdcard. и вручную создаем в нем папку SDL. Загружаем образ необходимой нам операционной системы, в данном случае Windows XP с разрешением.img, и перетаскиваем его в папку SDL, созданную ранее. Сам файл нужно переименовать в c.img. Теперь запускаем Bochs2_5_1.apk и устанавливаем программу. Осталось только запустить.
Кнопки и мышка работают так же, как и при наличии оригинальной операционной системы Windows XP (на некоторых эмуляторах есть проблемы с двойным щелчком мыши). Сразу следует быть готовыми к тому, что эмулятор всегда работает медленнее оригинала.
Содержание
- DOSBox для знатоков
- Содержание
- Настройка эмуляции Gravis Ultrasound
- Подготовка
- Установка драйвера GUS для DOS
- Установка «Pro Patches Lite»
- Установка Windows 95/98 в DOSBox
- Инструкция по установке windows 9x в DOSBox 0.73 (официальная сборка)
- Инструкция по установке windows 9x в DOSBox SVN Daum
- Примечания
- Dosbox turbo запуск windows
- DOSBox для чайников. Инструкция по запуску классических игр под Windows
- Шаг 1. Установка DOSBox
- Шаг 2. Дополнительные инструменты
- Шаг 3. Предварительная настройка
- Шаг 4. Устанавливаем, играем
DOSBox для знатоков
Содержание
Настройка эмуляции Gravis Ultrasound
Для начала необходимо скачать все файлы, которые потребуются нам для настройки Gravis Ultrasound под DOSBox:
Подготовка
- Скачиваем официальный драйвер: GUS Driver v4.10 и обновление v4.11[1] .
- Скачиваем альтернативный набор сэмплов для драйвера: Pro Patches Lite v1.60
- Скачиваем обновление для патча: Update Pro Patches Lite v1.61
- Скачиваем фикс для обновления: FIX Pro Patches Lite v1.61
- Скачиваем утилиту для инициализации и загрузки инструментов в память:loadpats.exe и patches.ini
Установка драйвера GUS для DOS
- В конфиге DOSBoxа включаем эмуляцию Gravis Ultrasound (GUS). См. Dosbox.conf#.5Bgus.5D.
- Распаковываем в папку на жёсткий диск официальный драйвер и устанавливаем его в C:ULTRASND, запустив «INSTALL.EXE». [2]
- Распаковываем обновление для драйвера и так же устанавливаем.
- В конфиге DOSBoxa, в секции [autoexec], добавляем: SET PATH=%PATH%;C:ULTRASND
- Распаковываем loadpats.zip и patches.zip’ в папку C:ULTRASND.
- В разделе [autoexec] прописываем запуск loadpats.exe.
Установка «Pro Patches Lite»
- Распаковываем куда-нибудь патч, переименовываем эту папку в «PATCHES» и помещаем её в корень смонтированного диска «C».
- Распаковываем обновление для патча и кидаем файлы в папку «PATCHES» с заменой.
- Распаковываем фикс и тоже кидаем все файлы в папку «PATCHES» с заменой.
- Создаём в корне смонтированного диска «C» пустой файл «autoexec.bat».
- Добавляем в секцию [autoexec] конфига DOSBoxa строку: SET PROPATS=C:PATCHES
- Заходим в папку «PATCHES», запускаем «INSTALL.EXE», жмём «Y» и инсталлируем.
- По окончании установки жмём «CTRL+F9» и перезапускаем DOSBox.
- Для более тонкой настройки звучания запускаем «PATMENU.EXE» и настраиваем. [3]
Примечание: Использование неоригинальных драйверов и патчей может ухудшать совместимость с играми.
Установка Windows 95/98 в DOSBox
В качестве примера работы с DOSBox и, в частности, работы с образами дисков в нем приведем руководство по установке Windows 9x в DOSBox.
Инструкция по установке windows 9x в DOSBox 0.73 (официальная сборка)
- Утилитой bximage создать фиксированный образ жесткого диска на 504mb. [4][5][6]
- В dosbox.conf:
в разделе [cpu] сменить cputype=auto на cputype=pentium_slow; [7]
в разделе [autoexec] прописать команды монтирования созданного образа жесткого диска и загрузки с образа загрузочной дискеты. [8] - Запустить DOSBox. После загрузки с образа загрузочной дискеты создать раздел на образе жесткого диска (FDISK.EXE) и отформатировать его под fat [4] (FORMAT.EXE. Команда FORMAT C:). Закрыть DOSBox.
- На только что отформатированный образ жесткого диска перенести с помощью WinImage дистрибутив Windows. [9]
- Смонтировать отформатированный образ жесткого диска как C. [10]
- Запустить DOSBox. После загрузки с образа загрузочной дискеты запустить инсталлятор Windows (setup.exe) и начать установку ОС. [11]
- После того как на стадии «перезагрузка компьютера» DOSBox закроется, прописать загрузку DOSBox с диска C. [12]
Инструкция по установке windows 9x в DOSBox SVN Daum
Вам понадобится: сама сборка DOSBox SVN Daum (версия не младше 5.21.2012), образ CD с дистрибутивом win 9x, образ загрузочной дискеты с драйвером сд-рома.
- Запустите DOSBox, и в командной строке наберите imgmake с:image.img -t hd_2gig. [13] Закройте DOSBox.
- В dosbox.conf:
в разделе [dosbox] установите machine=svga_s3, vmemsize=4, memsize=128;
в разделе [cpu] установите core=dynamic, cputype=pentium, cycles=max, isapnpbios=false;
в разделах [ide, primary], [ide, secondary], [ide, tertiary], [ide, quaternary] установите enable=true;
в разделе [autoexec] пропишите команды монтирования образа загрузочной дискеты, только что созданного образа жесткого диска и образа CD с дистрибутивом win 9x с ключами подключающими их к ide слотам, и загрузки с образа дискеты. [14] - Запустите DOSBox. После того как он загрузится с загрузочной дискеты, перейдите на виртуальный сд-ром и запустите инсталятор windows начав установку ОС.
- После того как по завершению установке DOSBox перезапустится — закройте DOSBox, и в dosbox.conf, в разделе [autoexec] измените команду загрузки с диска a на загрузку с диска c.
Примечания
- ↑ Так как gus_411up на официальном сайте пока битый, то может быть полезной тема на vogons
- ↑ Если GUS Driver v4.11 отказывается устанавливаться из-за конфликта порта, временно отключите в конфиге DOSBoxa эмуляцию Sound Blaster, включая FM-синтез.
- ↑ Если в некоторых играх хрипит музыка, запустите «PATMENU.EXE» и поиграйтесь с настройками. Для устранения хрипов в игре «Z» помогает настройка 4,5,6,B,C секций.
- ↑ 4,04,1 DOSBox не поддерживает динамические образы и более 1024 цилиндров (что в bximage = 504mb), а также работает только с fat.
- ↑bximage v1.32 — Утилита для создания виртуальных жестких дисков и дискет, формата «.img», входит в состав эмулятора Bochs (Также в архиве пустой образ на 504mb, отформатированный под fat). Работа с утилитой:
- Выбрать создание образа жесткого диска «hd» (по умолчанию) или дискеты «fd».
- Выбрать тип образа жесткого диска, фиксированный «flat» (по умолчанию) или динамический «growing».
- Ввести размер жесткого диска в мегабайтах.
- Ввести имя файла образа («c.img» по умолчанию).
- Ввести подтверждение на создание образа «yes» («no» по умолчанию).
- Запомнить количество цилиндров «cylinders».
- ↑ Также, образ жесткого диска для DOSBox размером в 2гб можно создать при помощи сборки HAL9000’s. Для этого в окне запущенного HAL9000’s наберите команду imgmake c:harddisk_2gb.img -t hd_2gig (образ будет создан на реальном диске C). Структура этого образа будет выглядеть так 512,63,64,1023.
- ↑ С «auto» глючит драйвер «S3 Trio32/64 PCI», не устанавливается DirectX, после загрузки Win98SE завершается с ошибкой explorer.exe и ещё несколько компонентов
- ↑
(2 = master, 3 = slave. В место ХХХ вписать количество цилиндров)
↑ При загрузке сторонней ОС под DOSBox 0.73 будут доступны только образы жестких дисков и дискет. К примеру, если вы используете следующие команды:
Смонтируются 2 образа жестких дисков, образ CD, CD-ROM, директория, 3 образа дискет (которые можно переключать с помощью CTRL+F4) и произойдет загрузка с диска «C». Но, после загрузки ОС будут доступны только образы жестких дисков (как «C» и «D») и дискет (как «a»). Поэтому для переноса файлов на образ жесткого диска используем WinImage.
↑ В настройке DOSBox`а после [autoexec] заменить команду:
(Вместо ХХХ вписать количество цилиндров).
- ↑ Если запустить setup во встроенном ДОСе, повиснет скандиск, а если его пропустить (setup.exe /is), установочные файлы будут копироваться с ошибками.
- ↑ Для этого в настройке DOSBox’а (пункт [autoexec]) заменить команду:
- ↑ На диске c: вашего компьютера будет создан пустой образ жёсткого диска размером в 2Гб с файловой системой fat.
- ↑ Пример команд:
Dosbox turbo запуск windows

Краткое описание:
Оптимизированный порт последнего эмулятора DOSBox v0.74 для Android.
Описание (перевод с маркета):
Оптимизированный порт последниего эмулятора DOSBox v0.74 для Android. Это САМЫЙ БЫСТРЫЙ DosBox эмулятор на рынке! Быстрай запуск старых DOS игр, с полной поддержкой мышки, клавиатуры, звука и эмуляцией аналогового джойстика.
ПРИМЕЧАНИЕ: Как и любому эмулятору DOS, приложению необходим доступ к SDCARD и большое количество свободной памяти для запуска. Ваш телефон должен иметь по крайней мере 50 + МБ свободной памяти для правильного запуска DosBox. Скопируйте старые игры DOS на вашей SD-карту и начинайте играть!
ОСОБЕННОСТИ:
— Полное отслеживание пальцев и указателей, используйте DOS приложения интуитивно на сенсорном экране! (экспериментальная функция).
— Поддержка жестов.
— Поддержка смартфонов и планшетов.
— Поддержка DPAD и входа оптического трекпада.
— Поддержка Honeycomb и ICS (Android 3.2 и 4.0)
— Высокооптимизированный порт самой последней версии DosBox. Дополнительные усовершенствования для современных телефонов ARM7.
— Виртуальный режим эмуляции мыши, с левой и правой кнопками мышки!
— Возможность переназначения клавиш регулировки громкости на кнопки мышки или кнопки джойстика.
— Эмуляция виртуального Multi-Touch аналогового джойстика!
— Полная поддержка звука!
— Полная поддержка любого метода ввода на Android (используйте любую клавиатуру с Android Market)
— Быстрый!
— Эмуляция комбинаций специальных клавиш.
— Переключение между портретным или альбомным режимами без перезапуска программы!
— Быстрый и HQ режимы масштабирования по умолчанию.
— Поддержка внешних USB / Bluetooth мышки и джойстика [Android 3.1 +]
— Поддержка правой кнопкой мышки на трекпаде и мышки. [Android 4.0 +]
— Полная поддержка клафиатуры и сенсора ASUS Transformer.
версия: 2.1.20a DosBox Turbo (Пост Alex0047 #38501644)
версия: 2.1.20 DosBox Turbo (Пост #37753616)
версия: 2.1.19 DosBox Turbo (Пост #36445309)
версия: 2.1.17a DosBox Turbo (Пост #34625519)
версия: 2.1.15 DosBox Turbo (Пост #32689041)
версия: 2.1.13 от zealot01 DosBox Turbo (Пост #31497714)
версия: 2.1.14 DosBox Turbo (Пост #31815247)
версия: 2.1.13 DosBox Turbo (Пост #31115992)
версия: 2.1.11 DosBox Turbo (Пост #27465251)
версия: 2.1.8 DosBox Turbo (Пост #25914120)
версия: 2.1.6 DosBox Turbo (Пост #25444072)
версия: 2.1.2 //4pda.ru/forum/dl/post/2817455/DosBoxTurbo_2_1_2_crk.apk
версия: 2.0.7 //4pda.ru/forum/dl/post/2646922/DosBoxTurbo_2_0_7.apk
версия: 2.0.4 //4pda.ru/forum/dl/post/2582166/DosBox_Turbo__2.0.4.apk
версия: 1.5.5 //4pda.ru/forum/dl/post/2343395/DosboxTurbo_1_5_5_crk.apk
версия: 1.5.1 //4pda.ru/forum/dl/post/2195967/Dosbox_Turbo-v1.5.1_Crk.apk
версия: 1.5.0 //4pda.ru/forum/dl/post/2115369/DosBox+Turbo-1.5.0-Crk.apk
версия: 1.4.2 //4pda.ru/forum/dl/post/1764274/DosBoxTurbo1.4.2_free.apk
версия: 1.4.1 //4pda.ru/forum/dl/post/1726041/DosBox_Turbo_1.4.1.apk DosBox_Manager_1.0.apk ( 350,37 КБ )
версия: 1.4.0 //4pda.ru/forum/dl/post/1696588/DBT_v1.4.0_apkmania.com.apk
версия: 1.3.8 //4pda.ru/forum/dl/post/1670757/dosbox_1.3.8.apk
версия: 1.3.3DosBoxTurbo_v1.3.3.apk ( 2,05 МБ )
версия: 1.3.0DosBox_Turbo_1.3.0.apk ( 2,04 МБ )
версия: 1.2.1DosBox_Turbo_1.2.1.apk ( 2,05 МБ )
дополнительно к программе (от того же разработчика):
DosBox Manager/ launcher 2.1.9: DosBox Turbo (Пост #27465251)
GamePad — геймпад и клавиатура для DosBox Turbo
Новая версия геймпада
DOSBox для чайников. Инструкция по запуску классических игр под Windows
Примечание. Эта инструкция предназначена для пользователей Windows.
Шаг 1. Установка DOSBox
1. Заходим на сайт www.dosbox.com, переходим в раздел Download, находим версию для Windows (Win32 installer), скачиваем её. Скачивание происходит через сервис SourceForge, на котором располагаются многие проекты с открытым исходным кодом.
Примечание: На момент написания обзора актуальная версия эмулятора — 0.74-3. Номер версии меньше единицы не означает, что эмулятор — не законченный проект. DOSBox уже давно работает стабильно и используется, в том числе, для запуска старых игр в Steam и других онлайн-магазинах.
Но ничто не бывает идеальным, и разработчики находят и исправляют ошибки в приложении, так что время от времени следует обновлять DOSBox на своем ПК. Просто установите новую версию эмулятора поверх старой. При необходимости измените файл конфигурации (шаг 3, пункт 7).
2. Запускаем инсталлятор, устанавливаем эмулятор. Инсталлятор создает иконку на рабочем столе, а также добавляет DOSBox в меню «Пуск». Если вы запустите DOSBox сразу после установки, то увидите командную строку.
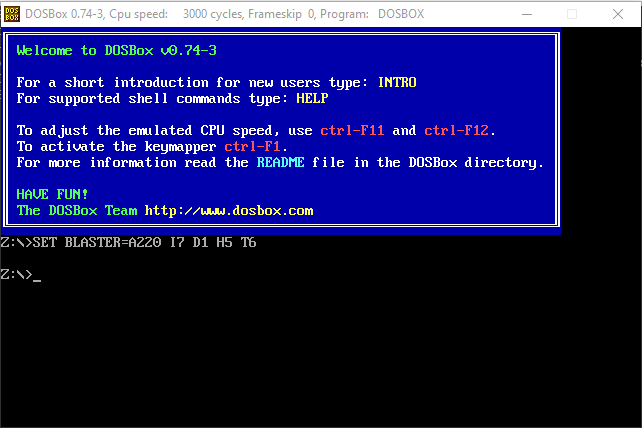
3. Закройте эмулятор, если вы его запустили. Всю настройку будем производить в Windows.
Шаг 2. Дополнительные инструменты
1. На странице DOSBox размещены также ссылки на различные графические оболочки для эмулятора. Вы можете воспользоваться одной из них. В этом случае читать этот гайд вам не потребуется, но, возможно, придется искать гайд по выбранному вами приложению. Мы предлагаем воспользоваться другим способом работы с DOSBox.
2. Так как планируется самостоятельная установка игр и приложений для MS-DOS, а также их дальнейшая настройка, лучше всего будет «вернуться» в 90-е и создать программную среду, максимально схожую с той, что была в те времена. Драйвера мыши, дополнительной памяти, привода компакт дисков и т. п. нам не потребуются. Все это включено в состав эмулятора. Но для комфортной работы в DOS потребуется файловый менеджер.
3. В качестве файлового менеджера лучше всего воспользоваться известным DOS Navigator, разработанного компанией RitLabs. Версию 1.51 можно скачать с сайта компании, или воспользоваться OpenSource версией, которая доступна на сайте www.dnosp.com (версия DOS/Real Mode).
4. Если у вас отсутствует физический привод компакт-дисков, то DOSBox может подключать их образы без использования сторонних программ (в форматах iso и cue). Или можно воспользоваться любым другим эмулятором приводов CD, в том числе встроенного в Windows 10.
Примечание. При использовании сторонних программ, образы дисков в виртуальном приводе придется менять только при выключенном DOSBox.
Шаг 3. Предварительная настройка
1. Теперь нужно настроить структуру каталогов на жестком диске. В любом удобном месте с помощью проводника Windows необходимо создать каталог DOS (вы можете назвать его иначе, но в этом случае не забудьте изменить команды, которые будете прописывать в конфигурационные файлы). Проще всего его создать в корневом каталоге диска C.
2. В каталоге DOS создайте подкаталоги DN, GAMES, IMAGES.
3. В каталог DN распакуйте из архива DOS Navigator.
4. В каталоге IMAGES разместите снятые образы дисков приобретенных игр. Если игры не требуют установки, то просто скопируйте их файлы в свой каталог в папке GAMES.
5. Самое время настроить DOSBox. Откройте меню «Пуск» и в группе DOSBox запустите DOSBox Options. В Блокноте Windows откроется текстовый конфигурационный файл, и туда нужно будет внести некоторые изменения.
6. Настройки по умолчанию адекватны большинству конфигураций ПК, так что трогать их не стоит. Разве что можно включить полноэкранный режим при запуске. Для этого нужно поменять строку
Но лучше включать полноэкранный режим после запуска кнопками Alt+Enter.
7. В конце файла конфигурации найдите раздел
и скопируйте под эту строку этот код:
Если вы меняли пути расположения каталога DOS, то измените путь на правильный в первой строчке.
Если вы не используете эмулятор привода компакт-дисков, а предпочитаете пользоваться встроенными средствами DOSBox, то строчку
замените на такую:
где C:DOSIMAGES — путь в Windows, где хранятся ваши образы дисков, а disk1.iso, disk2.iso и т. д. — имена файлов образов, которые вы хотите подключить к виртуальной машине. Переключение между дисками в DOSBox осуществляется клавишами Ctrl+F4.
Примечание. Будьте внимательнее при написании имен файлов и путей. Особое внимание обращайте на расширение файлов iso или img. Ошибка в написании приведет к тому, что команда при запуске DOSBox выполнена не будет, и ни один из образов не будет подключен.
Закройте Блокнот, сохраните файл.
Шаг 4. Устанавливаем, играем
1. Смонтируйте на виртуальный привод нужный вам образ диска или вставьте диск в дисковод, если не используете средства DOSBox и если это требуется для установки или самой игры.
2. Запустите DOSBox. Вы попадете в DOS Navigator. Если вы не знакомы с двухпанельными файловыми менеджерами 90-х, то это не беда.
- Alt+F1 и Alt+F2 — выбор диска на левой и правой панели, соответственно.
- Tab — переключение между панелями.
- Кнопки со стрелками на клавиатуре — перемещение курсора.
- Enter — войти в каталог или запустить приложение. DOS Navigator подсвечивает исполняемые файлы и выводит их в начале списка.
- Alt+X — выйти из приложения (автоматически закроется DOSBox).
- Alt+F9 — играть в лучший тетрис на ПК.
3. Если игра требует установки, то установите её с диска D. В DOS установочная программа, как правило, имеет название файла INSTALL.EXE, в отличие от SETUP.EXE в Windows. Установку производите в каталог C:GAMES виртуальной DOS-машины.
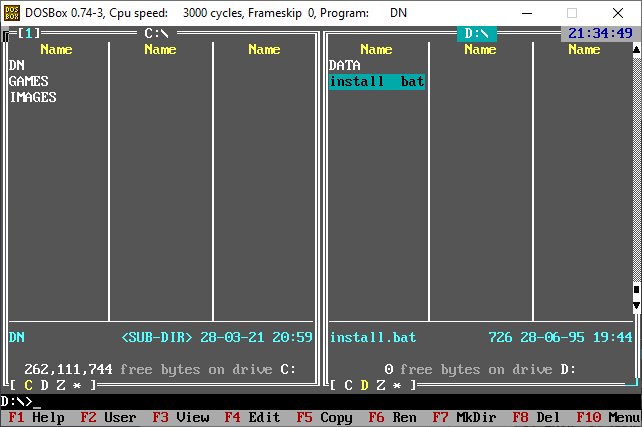
4. После установки нужно настроить звук. Обычно установочная программа предложит это сделать сразу после копирования файлов. Если это не произошло, перейдите в каталог установленной игры, и запустите программу настройки звука (обычно она имеет название SETUP.EXE или SETSOUND.EXE). Настройки необходимо выбрать для драйвера digital audio и драйвера midi audio.
5. DOSBox эмулирует звуковую карту Sound Blaster 16, поэтому при выборе звуковой карты выбирайте эту модель. Если её в списке нет, то можно выбрать обычный Sound Blaster или Pro. Как правило, программы настройки автоматически подбирают правильные параметры карты. Если этого не произошло, их можно ввести в программе настройки вручную:
Эти параметры прописаны в файле конфигурации DOSBox.
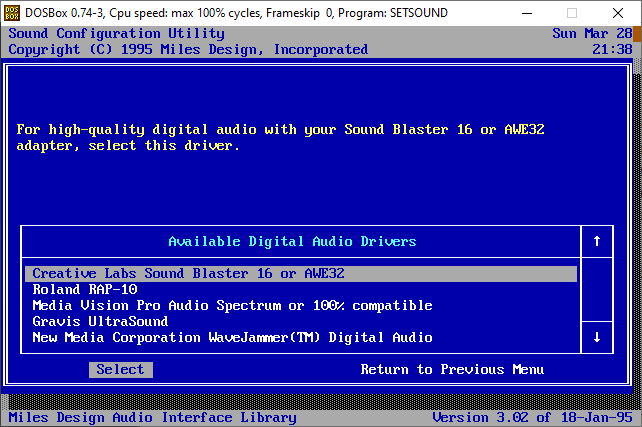
6. Найдите в интернете патч с последней версией. При необходимости, обновите игру до последней версии.
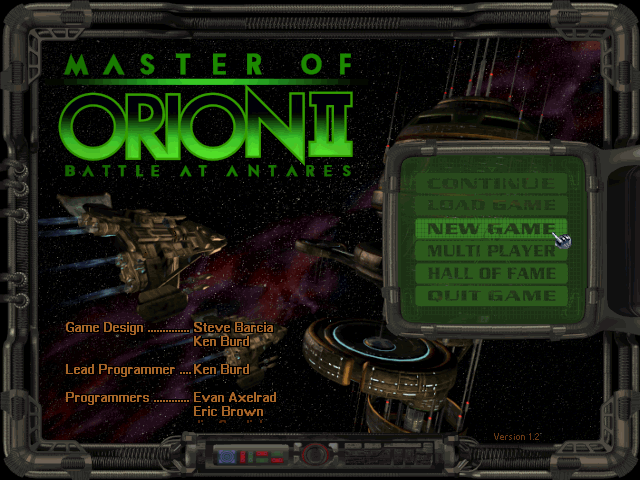
7. Все готово! Добро пожаловать в 90-е! Запускайте.
В этой инструкции вы найдете несколько простых шагов по установке и настройке DOSBox — эмулятора ПК под управлением старенькой операционной системы MS DOS. Обычно DOSBox включен в комплект поставки игры при её покупке в Steam или GOG. Но если у вас остались старые игры, которые хочется запустить, а сделать это в Windows 10 уже не получается, то настройте эмулятор самостоятельно.

Примечание. Эта инструкция предназначена для пользователей Windows.
Шаг 1. Установка DOSBox
1. Заходим на сайт www.dosbox.com, переходим в раздел Download, находим версию для Windows (Win32 installer), скачиваем её. Скачивание происходит через сервис SourceForge, на котором располагаются многие проекты с открытым исходным кодом.
Примечание: На момент написания обзора актуальная версия эмулятора — 0.74-3. Номер версии меньше единицы не означает, что эмулятор — не законченный проект. DOSBox уже давно работает стабильно и используется, в том числе, для запуска старых игр в Steam и других онлайн-магазинах.
Но ничто не бывает идеальным, и разработчики находят и исправляют ошибки в приложении, так что время от времени следует обновлять DOSBox на своем ПК. Просто установите новую версию эмулятора поверх старой. При необходимости измените файл конфигурации (шаг 3, пункт 7).
2. Запускаем инсталлятор, устанавливаем эмулятор. Инсталлятор создает иконку на рабочем столе, а также добавляет DOSBox в меню «Пуск». Если вы запустите DOSBox сразу после установки, то увидите командную строку.
3. Закройте эмулятор, если вы его запустили. Всю настройку будем производить в Windows.
Шаг 2. Дополнительные инструменты
1. На странице DOSBox размещены также ссылки на различные графические оболочки для эмулятора. Вы можете воспользоваться одной из них. В этом случае читать этот гайд вам не потребуется, но, возможно, придется искать гайд по выбранному вами приложению. Мы предлагаем воспользоваться другим способом работы с DOSBox.
2. Так как планируется самостоятельная установка игр и приложений для MS-DOS, а также их дальнейшая настройка, лучше всего будет «вернуться» в 90-е и создать программную среду, максимально схожую с той, что была в те времена. Драйвера мыши, дополнительной памяти, привода компакт дисков и т. п. нам не потребуются. Все это включено в состав эмулятора. Но для комфортной работы в DOS потребуется файловый менеджер.
3. В качестве файлового менеджера лучше всего воспользоваться известным DOS Navigator, разработанного компанией RitLabs. Версию 1.51 можно скачать с сайта компании, или воспользоваться OpenSource версией, которая доступна на сайте www.dnosp.com (версия DOS/Real Mode).
4. Если у вас отсутствует физический привод компакт-дисков, то DOSBox может подключать их образы без использования сторонних программ (в форматах iso и cue). Или можно воспользоваться любым другим эмулятором приводов CD, в том числе встроенного в Windows 10.
Примечание. При использовании сторонних программ, образы дисков в виртуальном приводе придется менять только при выключенном DOSBox.
Шаг 3. Предварительная настройка
1. Теперь нужно настроить структуру каталогов на жестком диске. В любом удобном месте с помощью проводника Windows необходимо создать каталог DOS (вы можете назвать его иначе, но в этом случае не забудьте изменить команды, которые будете прописывать в конфигурационные файлы). Проще всего его создать в корневом каталоге диска C.
C:DOS
2. В каталоге DOS создайте подкаталоги DN, GAMES, IMAGES.
C:DOSDN
C:DOSGAMES
C:DOSIMAGES
3. В каталог DN распакуйте из архива DOS Navigator.
4. В каталоге IMAGES разместите снятые образы дисков приобретенных игр. Если игры не требуют установки, то просто скопируйте их файлы в свой каталог в папке GAMES.
5. Самое время настроить DOSBox. Откройте меню «Пуск» и в группе DOSBox запустите DOSBox Options. В Блокноте Windows откроется текстовый конфигурационный файл, и туда нужно будет внести некоторые изменения.
6. Настройки по умолчанию адекватны большинству конфигураций ПК, так что трогать их не стоит. Разве что можно включить полноэкранный режим при запуске. Для этого нужно поменять строку
fullscreen=false
на
fullscreen=true
Но лучше включать полноэкранный режим после запуска кнопками Alt+Enter.
7. В конце файла конфигурации найдите раздел
[autoexec]
и скопируйте под эту строку этот код:
mount C C:DOS
# Указан путь к физическому или виртуальному приводу CD имеющий в Windows обозначение D:
# Замените путь к приводу, если он имеет другое обозначение
mount D D: -t cdrom
C:
cls
C:DNdn.com
exit
Если вы меняли пути расположения каталога DOS, то измените путь на правильный в первой строчке.
Если вы не используете эмулятор привода компакт-дисков, а предпочитаете пользоваться встроенными средствами DOSBox, то строчку
mount D D: -t cdrom
замените на такую:
imgmount D C:DOSIMAGESdisk1.iso C:DOSIMAGESdisk2.iso ... -t cdrom
где C:DOSIMAGES — путь в Windows, где хранятся ваши образы дисков, а disk1.iso, disk2.iso и т. д. — имена файлов образов, которые вы хотите подключить к виртуальной машине. Переключение между дисками в DOSBox осуществляется клавишами Ctrl+F4.
Примечание. Будьте внимательнее при написании имен файлов и путей. Особое внимание обращайте на расширение файлов iso или img. Ошибка в написании приведет к тому, что команда при запуске DOSBox выполнена не будет, и ни один из образов не будет подключен.
Закройте Блокнот, сохраните файл.
Шаг 4. Устанавливаем, играем
1. Смонтируйте на виртуальный привод нужный вам образ диска или вставьте диск в дисковод, если не используете средства DOSBox и если это требуется для установки или самой игры.
2. Запустите DOSBox. Вы попадете в DOS Navigator. Если вы не знакомы с двухпанельными файловыми менеджерами 90-х, то это не беда.
- Alt+F1 и Alt+F2 — выбор диска на левой и правой панели, соответственно.
- Tab — переключение между панелями.
- Кнопки со стрелками на клавиатуре — перемещение курсора.
- Enter — войти в каталог или запустить приложение. DOS Navigator подсвечивает исполняемые файлы и выводит их в начале списка.
- Alt+X — выйти из приложения (автоматически закроется DOSBox).
- Alt+F9 — играть в лучший тетрис на ПК.
3. Если игра требует установки, то установите её с диска D. В DOS установочная программа, как правило, имеет название файла INSTALL.EXE, в отличие от SETUP.EXE в Windows. Установку производите в каталог C:GAMES виртуальной DOS-машины.
4. После установки нужно настроить звук. Обычно установочная программа предложит это сделать сразу после копирования файлов. Если это не произошло, перейдите в каталог установленной игры, и запустите программу настройки звука (обычно она имеет название SETUP.EXE или SETSOUND.EXE). Настройки необходимо выбрать для драйвера digital audio и драйвера midi audio.
5. DOSBox эмулирует звуковую карту Sound Blaster 16, поэтому при выборе звуковой карты выбирайте эту модель. Если её в списке нет, то можно выбрать обычный Sound Blaster или Pro. Как правило, программы настройки автоматически подбирают правильные параметры карты. Если этого не произошло, их можно ввести в программе настройки вручную:
I/O ADRESS=220
IRQ=7
DMA=1
Эти параметры прописаны в файле конфигурации DOSBox.
6. Найдите в интернете патч с последней версией. При необходимости, обновите игру до последней версии.
7. Все готово! Добро пожаловать в 90-е! Запускайте.
Сейчас на главной
DOSBox as a project generally targets games, and as such its built-in DOS implements only the subset of DOS used by games, which is mostly memory management (including XMS and EMS memory), high-level file system access (files and directories, not disk sectors, aside from the occasional PC booter) and process spawning. Other than that, games typically need access to sound, video and network hardware, with which DOS itself has little involvement. Windows 9x, on the other hand, requires a much larger and deeper API/ABI surface of DOS to function, some of which is very poorly documented and understood. As such Windows 9x is much more intimately tied to the version of MS-DOS it came with, unlike Windows 3.x, which can run pretty well even on DR DOS, despite Microsoft’s best intentions. It is for this reason that you need to install Windows 95 on a disk image and tell DOSBox to boot from it: so that the bundled version of MS-DOS is available to Windows, which provides the necessary interface.0 But then, because it was designed to run on real hardware and expects to read and write disk sectors directly, it will not be able to access directory mounts, which are normally provided by DOSBox.
And even with the right version of MS-DOS, DOSBox doesn’t emulate PC hardware with the necessary fidelity to allow Windows to run reliably, though an unofficial guide to make it work has been written. A fork, DOSBox-X, explicitly targets general DOS software and Windows 95, and provides much more stable hardware emulation. There is a thread on vogons.org detailing the improvements included in that fork. With the upstream DOSBox, I barely managed to run Windows 95 in Safe Mode (from a disk image), and even then it froze basically at first opportunity upon moving the mouse.
But what happens if you ignore all the above advice and attempt to start Windows from within DOSBox’s built-in DOS? When I followed the steps in the question, DOSBox exited and put this message in the log:
Exit to error: DOS:Illegal 0x33 Call 7
DOSBox terminates when it sees the guest attempt to invoke interrupt 0x21, service 0x3307. Here’s what Ralf Brown’s has to say about this call:
INT 21 — Windows95 — SET/CLEAR DOS_FLAG
- AX = 3307h
- DL = subfunction
- 00h clear bit 5 of «DOS_FLAG»
- 01h set bit 5 of «DOS_FLAG»
Return: ???
What is it supposed to do? I have no idea. RBIL has no idea. I presume DOSBox developers have no idea either, so they did not implement it. (There is actually a patch in the development branch which at least stops DOSBox from entirely exiting, but it is not part of any release yet.) Suppose, however, that it’s not actually very important: I can have a TSR turn it into a dummy call that does nothing. Is Windows 95 going to work then?
Windows 9x relies on MS-DOS to locate the Registry file. There is an actual dedicated system call for it. DOSBox, of course, does not implement it, triggering the error above. But that is also easily patched by a TSR, which can have it return a fixed path to SYSTEM.DAT. Will that make Windows work?
This informs us of the failure to start up the I/O Supervisor, which is basically Windows 9x’s disk driver layer. Despite the relatively reassuring error message, it is pretty crucial component, without which Windows will not be able to run. Getting it to work will be much harder than a quick-and-dirty one-off TSR: one will probably have to implement a substantial amount of DOS’s disk services, not just calls that provide high-level access to files and directories.
If we also intercept calls to interrupt 0x2f service 0x4a17 to capture the text that Windows tries to direct to BOOTLOG.TXT, we see this:
VTD stands for the Virtual Timer Device: this is a driver managing the system clock, and is also required to get Windows running. This driver fails to start because it depends on the underlying DOS providing the little-known CLOCK$ character device. Though somewhat obscure and rarely used, this device should be relatively easy to implement. DOSBox however doesn’t, since games make no use of it: if they ever need to read the system clock, interrupt 0x21 services 0x2a and 0x2c are just enough for their purposes.
None of those functionality gaps are inherently insurmountable (though getting IOS to work may be harder than the rest), but since they fall outside DOSBox’s scope, you should not expect DOSBox to cover them any time soon; upstream DOSBox developers are known to reject patches that don’t address problems with a specific DOS game (not general software, game). These issues are most probably not the only ones that prevent running Windows 95 under DOSBox’s DOS: they were just the ones easiest to discover. DOSBox is just the wrong DOS, and the wrong box.
0 It is also this bundled version of MS-DOS which produces the ‘Starting Windows 95…’ message, not the WIN.COM loader itself, as is implied by the question.