Статья посвящена особенностям управления виртуальными машинами Hyper-V из консоли PowerShell. Мы рассмотрим создание виртуальных коммутаторов и виртуальных машин, изменение настроек ВМ и управление ими. Вы сможете использовать рассмотренные команды для ручного управления своими ВМ или в PowerShell скриптах для автоматизации различных задачей.
Содержание:
- Установка роли Hyper-V в Windows Server и Windows 10
- Создаем виртуальный коммутатор Hyper-V с помощью PowerShell
- Создание и изменение настроек виртуальной машины Hyper-V с помощью PowerShell
- Используем PowerShell для управления виртуальными машинами Hyper-V
Установка роли Hyper-V в Windows Server и Windows 10
Для установки роли Hyper-V хост должен иметь процессор, поддерживающий виртуализацию со SLAT. В Windows Server для установки роли Hyper-V используется команда:
Install-WindowsFeature -Name Hyper-V -IncludeManagementTools -Restart
В десктопных редакциях (Windows 10 и 11) роль Hyper-V устанавливается так:
Enable-WindowsOptionalFeature -Online -FeatureName Microsoft-Hyper-V –All
Для управления хостом Hyper-V на компьютере должен быть установлен модуль Hyper-V. Полный список команд в модуле (зависит от версии Windows) можно вывести так:
Get-Command -Module hyper-v
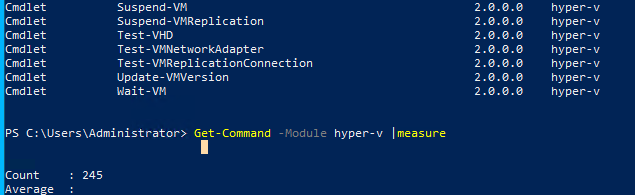
В Windows Server 2022 в модуле Hyper-V доступно 245 командлетов.
Вывести полный список настроек хоста Hyper-V можно с помощью команды:
Get-VMHost|fl *
Чтобы вывести только информацию о количестве доступных ядер и RAM:
Get-VMHost| select LogicalProcessorCount, MemoryCapacity

Чтобы изменить настройки хоста Hyper-V используется командлет Set-VMHost. Следующая команда изменит пути по-умолчанию для хранения виртуальных дисков и конфигурационных файлов ВМ:
Set-VMHost -VirtualMachinePath D:VM -VirtualHardDiskPath 'D:VMVHD'
Создаем виртуальный коммутатор Hyper-V с помощью PowerShell
Прежде всего на сервере Hyper-V нужно создать виртуальный коммутатор. Виртуальные машины смогут получать доступ к сети только через виртуальный коммутатор.
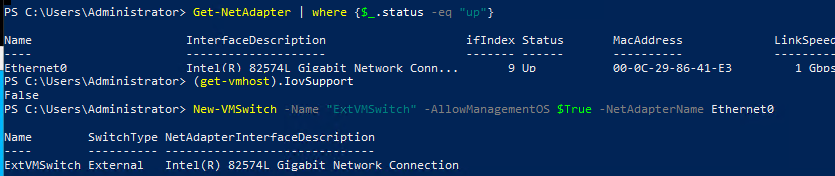
Выведем список доступных физических адаптеров на хосте Hyper-V:
Get-NetAdapter | where {$_.status -eq "up"}
Если ваш сервер поддерживает SR-IOV (Single-Root Input/Output (I/O) Virtualization), обратите внимание, что нужно включать эту опцию во время создания коммутатора. Включить SR-IOV для существующего vSwitch нельзя. Более подробно это описано в статье Включаем поддержку SR-IOV для виртуальных машин Hyper-V.
Создайте виртуальный внешний коммутатор:
New-VMSwitch -Name "ExtVMSwitch" -AllowManagementOS $True -NetAdapterName Ethernet0 -SwitchType External
Создание и изменение настроек виртуальной машины Hyper-V с помощью PowerShell
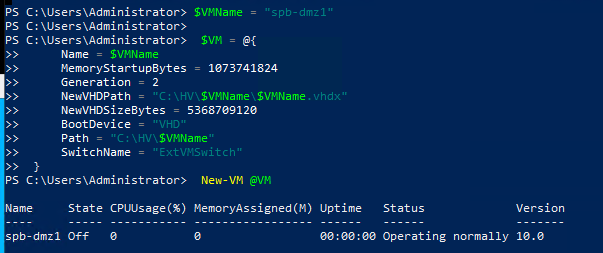
Для создания новой виртуальной машины используется командлет New-VM. В этом примере мы создадим новую ВМ второго поколения с 1 ГБ RAM и vhdx диском размером 5 Гб.
$VMName = "spb-dmz2"
$VM = @{
Name = $VMName
MemoryStartupBytes = 1Gb
Generation = 2
NewVHDPath = "C:HV$VMName$VMName.vhdx"
NewVHDSizeBytes = 5Gb
BootDevice = "VHD"
Path = "C:HV$VMName"
SwitchName = "ExtVMSwitch"
}
New-VM @VM
Рассмотрим команды, которые можно использовать для изменения настроек виртуальных машин.
Увеличить размер RAM для ВМ:
Get-VM -Name spb-dmz1| Set-VMMemory -StartupBytes 2Gb
Изменить количество vCPU:
Set-VMProcessor spb-dmz1 -Count 2
Разрешить автозапуск для виртуальной машину Hyper-V:
Get-VM –VMname spb-dmz1 | Set-VM –AutomaticStartAction Start
Чтобы подключить дополнительный виртуальный диск в ВМ, нужно сначала создать его:
New-VHD -Path 'C:VMtest1.vhdx' -SizeBytes 2GB
А затем подключить к ВМ:
Add-VMHardDiskDrive -VMName spb-dmz1 -Path 'C:VMtest1.vhdx'
Используем PowerShell для управления виртуальными машинами Hyper-V
Вывести список виртуальных машин на хосте Hyper-V:
Get-VM

Команда вернула список ВМ с несколькими базовыми характеристиками. Чтобы вывести все свойства ВМ, выполните:
Get-VM -Name spb-dmz1 | fl *
Вывести только включенные ВМ:
Get-VM | where {$_.State -eq 'Running'}
Запустить виртуальную машину:
Start-VM -Name spb-app01
Запустить все выключенные виртуальные машины:
Get-VM | where {$_.State -eq 'Off'} | Start-VM
Выключить ВМ (корректное выключение через гостевую ОС):
Stop-VM -Name spb-app01
Чтобы выключить ВМ по питанию используется ключ TurnOff:
Stop-VM -Name spb-app01 –TurnOff
Зависшие ВМ можно выключить так.
Подключить ISO файл в виртуальное CD/DVD устройство:
Set-VMDvdDrive -VMName spb-app01 -Path c:isoWinSrv2022.iso
Чтобы перенести все файлы ВМ на лету на другой диск, используйте команду:
Move-VMStorage spb-app01 -DestinationStoragePath D:VMspb-app01
Увеличить или сжать виртуальный диск можно с помощью команды Resize-VHD:
Resize-VHD -Path 'C:VMfs01.vhdx' -SizeBytes 50Gb
Создать чекпоинт (снапшот) указанной ВМ:
Get-VM -Name spb-app01| Checkpoint-VM -SnapshotName "before install patch"
Вывести список доступных чекпоинтов:

Вернуть состояние ВМ из предыдущему чекпоинту:
Restore-VMCheckpoint -Name "before install patch" -VMName spb-app01 -Confirm:$false
Удалить снапшот:
Remove-VMCheckpoint -VMName spb-app01 -Name "before install patch"
Экспорт, импорт и клонирование ВМ описаны подробно в статье по ссылке:
Export-VM -Name spb-app01 -Path 'C:VHDexport' -CaptureLiveState CaptureCrashConsistentState
Получить IP адреса гостевых ОС виртуальных машин:
Get-VM | Select -ExpandProperty NetworkAdapters | Select VMName, IPAddresses, Status
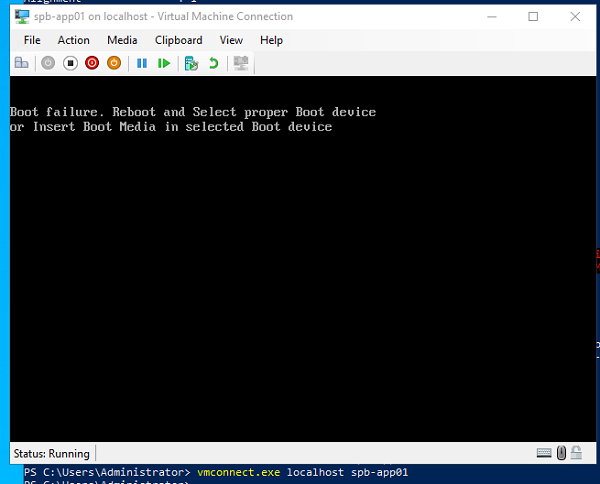
Подключиться к консоли определенной виртуальной машины:
vmconnect.exe localhost spb-app01
Для подключения PowerShell сессией напрямую к гостевым ОС виртуальных машин через шину vmbus можно использовать PowerShell Direct (доступен для гостевых ОС Windows Server 2016, Windows 10 и новее). Можно использовать командлеты Invoke-Command (для запуска скриптов) и Enter-PSSession (для входа в интерактивную PowerShell сессию):
Invoke-Command -VMName spb-app01 -ScriptBlock {Get-Process}
Enter-PSSession -VMName spb-app01
Для копирования файлов с хоста Hyper-V в виртуальную машину через PowerShell Direct используйте:
$PSSession1 = New-PSSession --VMName spb-app01 -Credential (Get-Credential)
Copy-Item -ToSession $PSSession1 -Path C:isowin10.iso -Destination D:ISO
Вы можете использовать PowerShell для локального или удаленного управления виртуальными машинами на хостах Hyper-V (как на Windows Server в режимах Full GUI или Core, так и на Free Windows Hyper-V Server, или Windows 10) как отдельно, так и в дополнении к графическим средствам управления Hyper-V Manager и Windows Admin Center.
In this first post of my series about managing Hyper-V with PowerShell I will outline how to install Hyper-V Server and the Hyper-V role with PowerShell.
Contents
- Install Hyper-V on a server
- Install Hyper-V on Windows
- Author
- Recent Posts

Surender Kumar has more than twelve years of experience in server and network administration. His fields of interest are Windows Servers, Active Directory, PowerShell, web servers, networking, Linux, virtualization, and penetration testing. He loves writing for his blog.
Latest posts by Surender Kumar (see all)
- Extending LVM space in Ubuntu — Thu, Feb 2 2023
- Backup in Proxmox VE — Thu, Jan 26 2023
- Snapshots in Proxmox VE — Wed, Jan 25 2023
Every administrator who is not new to the virtualization world has heard about Hyper-V. It is a type 1 (or bare metal) hypervisor from Microsoft that allows the user to create and run virtual machines on a server or computer. For those who don’t know about type 1 and type 2 hypervisors, let me briefly explain both:
- Type 1—A type 1 hypervisor acts like a low-footprint operating system and runs directly on top of the host computer’s hardware. This is why it is also known as a bare metal or native Common examples of type 1 hypervisors are VMware ESXi, Citrix XenServer, and Microsoft Hyper-V. This type of hypervisor is generally used for production-ready virtualization, such as data centers.
- Type 2—A type 2 hypervisor runs as a software layer on an operating system, like other computer programs. It is also known as a «hosted» hypervisor. Common examples of type 2 hypervisors are VMware Player, Oracle VirtualBox, and Parallels Desktop. The type 2 hypervisor allows an end user to run virtual machines on a personal computer, so this type of hypervisor is generally used for training, development, and research.
Many admins are still confused as to whether Hyper-V is a type 1 or type 2 hypervisor. Since it appears to be running on top of the operating system itself, most people think it is a type 2 hypervisor, but in reality, it’s not. Let me tell you why.
When you install or enable the Hyper-V role or feature on a system, the original operating system is converted into a virtual machine, and a layer of Hyper-V hypervisor is added under it. This is why your system is restarted when you install the Hyper-V role or feature. After restart, the original Windows operating system starts working as a virtual machine on top of the Hyper-V hypervisor. In a nutshell, Hyper-V acts as a type 1 or bare metal hypervisor under the hood.
In this article, I will cover how you can manage Hyper-V completely using PowerShell. There are some tools you can use to manage Hyper-V servers using the GUI, but this guide is for the admins who love doing things with PowerShell rather than using the GUI tools.
Hyper-V is available for both server and client operating systems. In server operating systems (Windows Server 2016, Server 2019, Server 2022), it is available as a server role, and on Windows client operating systems (Windows 10 or Windows 11), it is available as an optional feature. Microsoft likes to differentiate between them as Hyper-V on Server and Hyper-V on Windows. So, from here on in, we’ll use the official naming scheme. To install the Hyper-V role or feature, you need to use different PowerShell commands depending upon the operating system type.
Install Hyper-V on a server
To install Hyper-V on Server, you can use the following command in an elevated PowerShell session:
Install-WindowsFeature -Name Hyper-V -IncludeAllSubFeature -IncludeManagementTools

Install Hyper V on Server using PowerShell
This command installs Hyper-V, including all the features and management tools on the Windows Server operating system. If you are trying to install the role on a remote server, you can specify the server name using the -ComputerName parameter. You can also use the -Restart parameter to restart the server automatically to complete the installation.
Install Hyper-V on Windows
To install Hyper-V on Windows, you can use the following command in an elevated PowerShell session:
Enable-WindowsOptionalFeature -Online -FeatureName Microsoft-Hyper-V-All -All

Install Hyper V on Windows using PowerShell
This command enables the specified optional Hyper-V Windows feature, including all dependencies and management tools. It prompts you to restart the system to complete the installation, where you can type «Y» to reboot straight away or «N» to manually reboot later. To suppress this reboot prompt, use the -NoRestart parameter.
Subscribe to 4sysops newsletter!
In my next article I will explain how to create a virtual Hyper-V switch with PowerShell.
Microsoft’s Hyper-V hypervisor is an extremely powerful enterprise-ready hypervisor that has grown and matured in recent Windows Server versions. Hyper-V contains relative feature parity with other hypervisors on the market and allows businesses to maintain alignment with current Windows Server technologies they are already using on-premises and in the cloud.
One of the powerful features offered by Hyper-V is management with PowerShell. PowerShell is a relatively straightforward scripting language built on top of .NET. Utilizing .NET framework provides a fully object-oriented underlay that makes the language extremely robust. Combining Hyper-V and PowerShell features allows IT administrators to have the features and capabilities needed to configure, manage, and administer their Hyper-V environment. This post will feature the top 10 PowerShell commands for Hyper-V, why they are useful, and how to use them.
What is PowerShell?
For those who have not heard of or used Microsoft PowerShell, it is an object-oriented scripting language built on top of .NET framework. In the case of PowerShell Core, .NET Core is the underlying object-oriented language. PowerShell provides a very “human-readable” verb-noun construct that is relatively intuitive and easy to learn, even for beginners.
Even outside the Microsoft ecosystem, most solutions today provide PowerShell integration to provide easy automation and configuration. PowerShell’s command-line capabilities provide quick and easy ways to accomplish many tasks and actions in a much more efficient and effortless way than using the GUI-based counterparts.
Why Use PowerShell with Hyper-V?
Managing, configuring, and administering Windows Server Hyper-V on a day-to-day basis includes performing many different tasks. Like other hypervisors, Hyper-V provides the ability to carry out needed tasks in GUI tools that can be used with Hyper-V. What are the GUI tools that administrators typically make use of with Hyper-V? These include:
- Hyper-V Manager – Managing individual Hyper-V hosts, creating virtual switches
- Failover Cluster Administrator – The Failover Cluster Administrator tool is used to manage Windows Server Failover Clusters with the Hyper-V clustered role
- System Center Virtual Machine Manager (SCVMM) – Built on top of Microsoft System Center, SCVMM provides the “Cadillac” of features for managing Hyper-V clusters using GUI tools.
- Windows Admin Center – The newest GUI tool on the block. It provides robust GUI management of Hyper-V and Windows Failover Clusters. Certain management capabilities are not yet available in Windows Admin Center.
Outside of the GUI tools mentioned above, Microsoft has provided Hyper-V PowerShell cmdlets that allow interacting with Hyper-V hosts, clusters, and virtual machines with ease. PowerShell provides a quick and easy way to do many common tasks and activities from the command line instead of using GUI tools for the same purpose. Also, PowerShell provides a powerful way to automate your Hyper-V configurations. Using PowerShell, configurations and settings changes can be made consistently and accurately across many Hyper-V hosts simultaneously. You can perform management operations on multiple Hyper-V virtual machines and enforce configuration management to ensure the environment’s desired state.
While the Hyper-V GUI tools are valuable and useful for one-off management activities, effective and proficient Hyper-V administrators should be familiar with PowerShell commands for Hyper-V. These take managing and configuring Hyper-V environments to the next level of consistency and efficiency.
Installing Hyper-V PowerShell Cmdlets
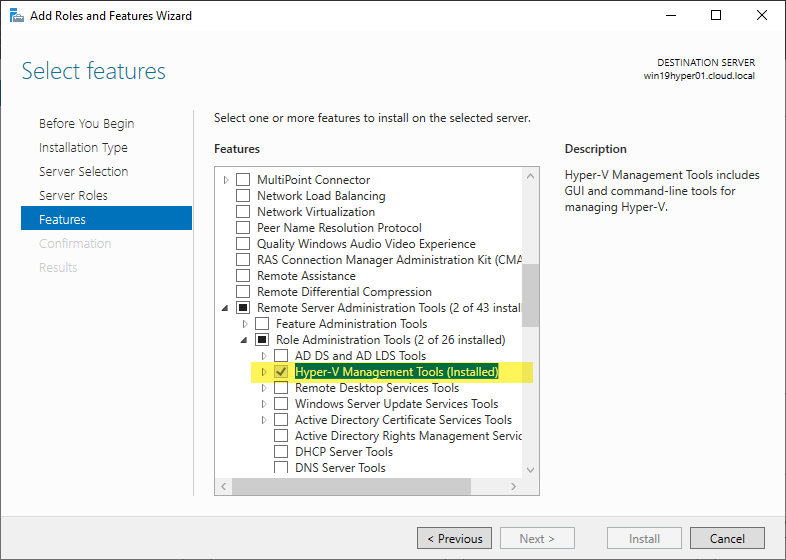
How do you take advantage of Microsoft Hyper-V PowerShell commands? As with most PowerShell functionality, these are available by way of a PowerShell module. When you install the Windows Server Hyper-V Role, you want to make sure to also enable the Remote Server Administration Tools > Role Administration Tools > Hyper-V Management Tools.
As part of the Hyper-V Management tools that include Hyper-V Manager, you also get the Hyper-V PowerShell module installed to interact with your Hyper-V environment by using PowerShell. If you use Server Manager to install the Hyper-V Role, the Hyper-V Management Tools are found under the Features installation in the path mentioned above.
Installing the Hyper-V Management Tools including the PowerShell module
If you install the Windows Server Hyper-V Role using PowerShell, you will want to use the following cmdlet to install both the Role as well as the Management Tools.
Install-WindowsFeature -Name Hyper-V -ComputerName <computer_name> -IncludeManagementTools -Restart
If you are installing on the Hyper-V server itself, you can omit the -Computername parameter:
Install-WindowsFeature -Name Hyper-V -IncludeManagementTools -Restart
How do I run a PowerShell command?
Now that you have Hyper-V installed on a host and have the Hyper-V Management Tools installed, how do you run a PowerShell command? Microsoft has made this easy in recent versions of Microsoft Windows with easy access to the PowerShell command prompt. Windows PowerShell has been included natively in Windows versions since Windows 7 and Windows Server 2008.
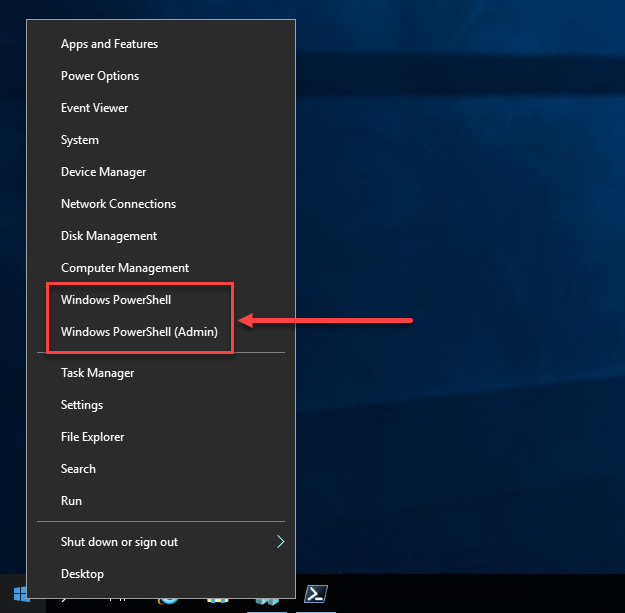
The Windows PowerShell prompt is easily accessible in modern variants of Windows. Below is Windows Server 2019. When you right-click on the Windows button, you get the option for Windows PowerShell and Windows PowerShell (Admin). Launching either of these options will launch the PowerShell environment for interacting with Hyper-V PowerShell cmdlets.
Windows PowerShell in Windows Server 2019
There is another option for running PowerShell and interacting with Hyper-V cmdlets. PowerShell Core is the newest version of PowerShell. It is not embedded by default in Windows operating systems like Windows PowerShell and is a cross-platform variant that can also run on Linux and macOS. It will provide the newest functionality and capabilities moving forward.
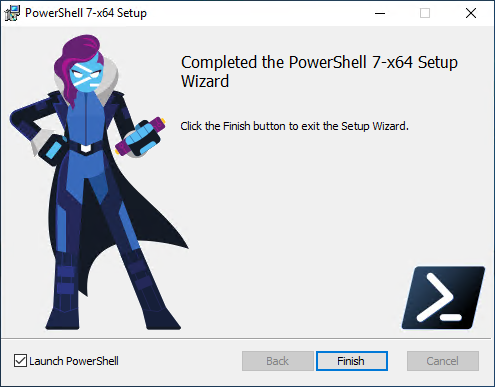
Installing PowerShell Core
You can use either platform to interact with Hyper-V PowerShell modules. Below is an example of running the same Hyper-V Get-VM cmdlet using either Windows PowerShell or PowerShell Core on the same server returns the same results. The PowerShell Core prompt has a black background and displays PowerShell 7.1.1. Windows PowerShell has a blue background.
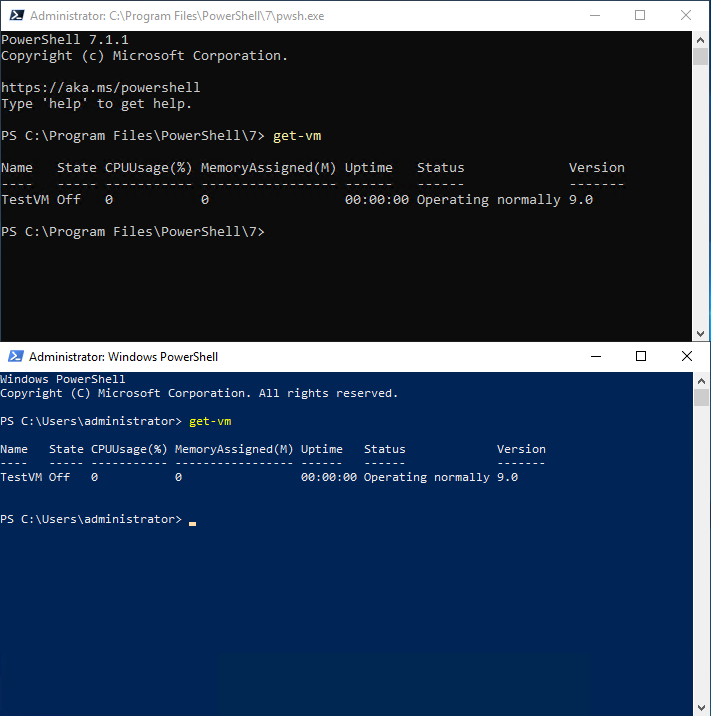
Comparing PowerShell Core with Windows PowerShell
PowerShell provides a tremendously powerful way to manage, configure, and automate Hyper-V environments. Using PowerShell for Hyper-V need not be intimidating or complicated. Often, it starts by merely learning a few PowerShell commands in the form of Hyper-V cmdlets that allow performing actions in the Hyper-V environment. Let’s start with the top 10 PowerShell commands for Hyper-V to begin forming the knowledge required to interact with Microsoft Hyper-V using PowerShell.
The top 10 PowerShell commands for Hyper-V include:
- Get-Help
- Get-VM
- Get-VMHost
- New-VM
- Start-VM
- Stop-VM
- Checkpoint-VM
- Measure-VM
- Export-VM
- New-VHD
We will look at each of the above PowerShell commands for Hyper-V to see what they are used for, how they are used, and other details regarding the cmdlets.
1. Get-Help
The Get-Help PowerShell cmdlet is not a specific Hyper-V PowerShell cmdlet. However, it is one that you need to be familiar with when working with Hyper-V or any other solution by way of PowerShell. The Get-Help cmdlet intuitively provides “help” to allow you to understand what a particular PowerShell cmdlet does, its syntax, and examples of how to use it. If you forget what a certain Hyper-V cmdlet does, you can use the Get-Help cmdlet to gather information about the cmdlet in question.
When you first run Get-Help on a server in a PowerShell session, it will ask you to run the Update-Help cmdlet.

Running Update-Help to ensure the most current version of get-help is installed
Below is some of the output of the Get-Help cmdlet as displayed in the PowerShell environment.
GET-HELP
The Get-Help cmdlet displays help at the command line from content in help files on your computer. Without help files, Get-Help displays basic help about cmdlets and functions. You can also use Get-Help to display online help for cmdlets and functions.
To get help for a cmdlet, type:
Get-Help <cmdlet-name>
To get online help, type:
Get-Help <cmdlet-name> -Online
The titles of conceptual topics begin with “About_”.
To get help for a concept or language element, type:
Get-Help About_<topic-name>
To search for a word or phrase in all help files, type:
Get-Help <search-term>
For more information about the Get-Help cmdlet, type:
Get-Help Get-Help -Online
EXAMPLES:
Get-Help Get-Process: Displays help about the Get-Process cmdlet.
Get-Help Get-Process -Online: Opens online help for the Get-Process cmdlet.
Help Get-Process: Displays help about Get-Process one page at a time.
Get-Process -? : Displays help about the Get-Process cmdlet.
Get-Help About_Modules: Displays help about Windows PowerShell modules.
Get-Help remoting: Searches the help topics for the word “remoting.”
2. Get-VM
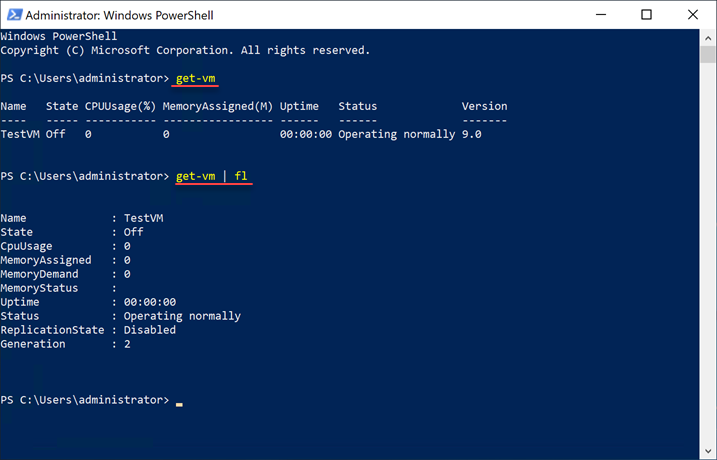
One of the most basic and needed Hyper-V cmdlets that Hyper-V administrators will use daily as a top PowerShell command for Hyper-V is the Get-VM cmdlet. The Hyper-V hypervisor runs virtual machines. You use virtual machines in the environment to run workloads that house services, applications, and APIs. Getting information about your Hyper-V virtual machines in PowerShell allows working with the virtual machines on your Hyper-V hosts. The Get-VM PowerShell cmdlet does just that.
Below, running the Get-VM cmdlet returns the VM running on a Hyper-V host. You see information such as:
- Name, State, CPU Usage, Memory Assigned, Uptime, Status, and Version
- Using the | fl pipe, you see a bit more information, including the Memory Demand, Memory Status, VM generation, and Replication State.
Output from running the Get-Help command on Get-VM shows the following.
NAME
Get-VM
SYNOPSIS
Gets the virtual machines from one or more Hyper-V hosts.
SYNTAX
Get-VM [[-Name] <String[]>] [-CimSession <CimSession[]>] [-ComputerName <String[]>] [-Credential <PSCredential[]>][<CommonParameters>]
Get-VM [[-Id] <Guid>] [-CimSession <CimSession[]>] [-ComputerName <String[]>] [-Credential <PSCredential[]>][<CommonParameters>]
Get-VM [-ClusterObject] <PSObject> [<CommonParameters>]
DESCRIPTION
The Get-VM cmdlet gets the virtual machines from one or more Hyper-V hosts
3. Get-VMHost
One of the basic requirements of managing a Hyper-V environment is getting information about your Hyper-V host. The Get-VMHost cmdlet is useful to get high-level information regarding the hardware and other features of your Hyper-V host. Just running the Get-VMHost cmdlet will return minimal information.

Get-VMHost cmdlet general information about the Hyper-V host
Below, using the Format-List or | fl pipe with the Get-VMHost cmdlet provides much more information returned regarding the Hyper-V host.
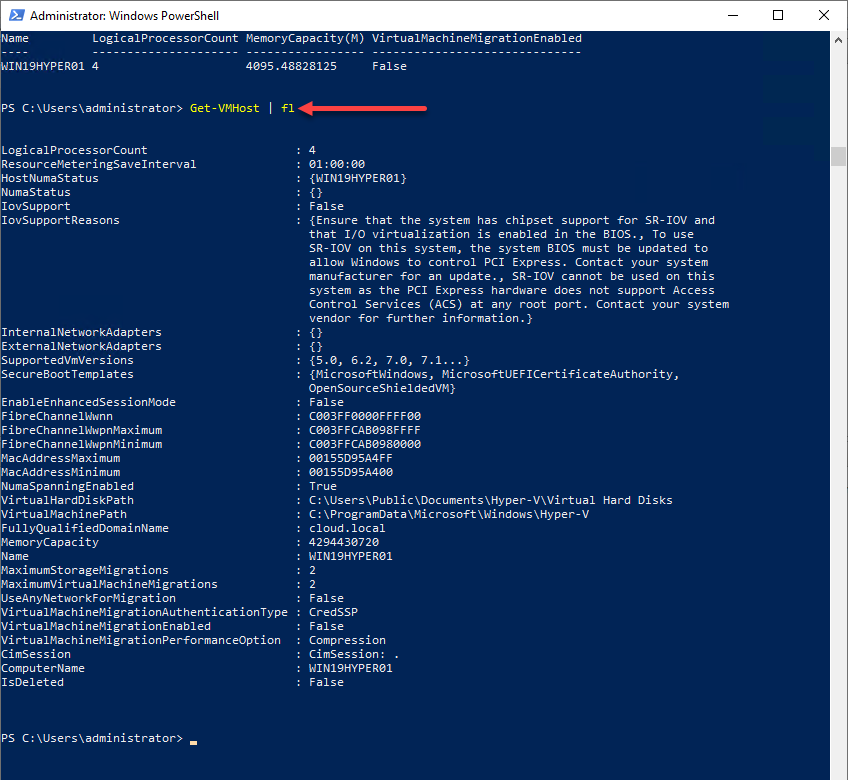
Get-VMHost with the Format-list pipe
NAME
Get-VMHost
SYNOPSIS
Gets a Hyper-V host.
SYNTAX
Get-VMHost [-CimSession] <CimSession[]> [<CommonParameters>]
Get-VMHost [[-ComputerName] <String[]>] [[-Credential] <PSCredential[]>] [<CommonParameters>]
DESCRIPTION
The Get-VMHost cmdlet gets a Hyper-V host.
4. New-VM
When working with Hyper-V, one of the tasks that administrators will be tasked with is created new Hyper-V virtual machines. It can be accomplished through the GUI tools mentioned earlier. However, a simple and straightforward way to create new virtual machines is to use the New-VM PowerShell cmdlet.
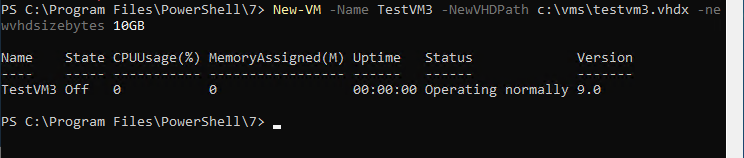
New-VM cmdlet creating a new Hyper-V virtual machine
With the New-VM cmdlet, you can create a new Hyper-V virtual machine and customize many aspects of the virtual machine in the process of creating it. Below is the output of the Get-Help New-VM cmdlet.
NAME
New-VM
SYNOPSIS
Creates a new virtual machine.
SYNTAX
New-VM [[-Name] <String>] [[-MemoryStartupBytes] <Int64>] [[-Generation] {1 | 2}] [-AsJob][-BootDevice {Floppy | CD | IDE | LegacyNetworkAdapter | NetworkAdapter | VHD}] [-CimSession <CimSession[]>] [-ComputerName <String[]>] [-Confirm] [-Credential <PSCredential[]>] [-Experimental][-Force] -NewVHDPath <String> -NewVHDSizeBytes <UInt64> [-Path <String>] [-Prerelease] [-SwitchName <String>] [-Version <Version>] [-WhatIf] [<CommonParameters>]
New-VM [[-Name] <String>] [[-MemoryStartupBytes] <Int64>] [[-Generation] {1 | 2}] [-AsJob][-BootDevice {Floppy | CD | IDE | LegacyNetworkAdapter | NetworkAdapter | VHD}] [-CimSession <CimSession[]>] [-ComputerName <String[]>] [-Confirm] [-Credential <PSCredential[]>] [-Experimental][-Force] [-NoVHD] [-Path <String>] [-Prerelease] [-SwitchName <String>] [-Version <Version>][-WhatIf] [<CommonParameters>]
New-VM [[-Name] <String>] [[-MemoryStartupBytes] <Int64>] [[-Generation] {1 | 2}] [-AsJob][-BootDevice {Floppy | CD | IDE | LegacyNetworkAdapter | NetworkAdapter | VHD}] [-CimSession <CimSession[]>] [-ComputerName <String[]>] [-Confirm] [-Credential <PSCredential[]>] [-Experimental][-Force] [-Path <String>] [-Prerelease] [-SwitchName <String>] -VHDPath <String> [-Version <Version>][-WhatIf] [<CommonParameters>]
5. Start-VM
Performing power operations on Hyper-V virtual machines is a crucial task involved with day-to-day Hyper-V administration activities. It includes powering on virtual machines either through a scripting process or using ad-hoc operations. The Start-VM cmdlet is the Hyper-V PowerShell command used to power on a Hyper-V virtual machine and allows it to boot.
Examples of the Start-VM cmdlet:
- Start-VM -Name TestVM3 – Starts the specific VM “TestVM3”
- Start-VM -Name Win* – This cmdlet syntax starts all VMs that start “Win”
NAME
Start-VM
SYNOPSIS
Starts a virtual machine.
SYNTAX
Start-VM [-Name] <String[]> [-AsJob] [-CimSession <CimSession[]>] [-ComputerName <String[]>][-Confirm] [-Credential <PSCredential[]>] [-Passthru] [-WhatIf] [<CommonParameters>]
Start-VM [-VM] <VirtualMachine[]> [-AsJob] [-Confirm] [-Passthru] [-WhatIf] [<CommonParameters>]
DESCRIPTION
The Start-VM cmdlet starts a virtual machine.
6. Stop-VM
As we have discussed above, the Start-VM cmdlet allows starting a Hyper-V virtual machine. The counterpart to starting or booting up a Hyper-V virtual machine is stopping the VM. To do this, you use the Stop-VM Hyper-V cmdlet. An important point to note is that the Stop-VM cmdlet has a few parameters that control whether the operating system’s shutdown is graceful or is not graceful. An ungraceful shutdown is similar to pulling the power plug on a physical server. Using the Stop-VM cmdlet covers a wide range of scenarios that provides granular control over how VMs are powered down.
With the Stop-VM cmdlet, graceful operating system shutdown depends on Hyper-V Integration Services being installed in the guest operating system. Hyper-V Integration Services provide enhancements and integration between Hyper-V and the guest operating system. It is required for actions such as graceful operating system shutdown signalling.
There are three examples to note with the Stop-VM cmdlet covering the range of virtual machine shutdown scenarios.
- Stop-VM -Name TestVM – When using the Stop-VM cmdlet with the name of the VM
- Stop-VM -Name VM1 -Force – Using the Force parameter invokes the five minute grace period to allow the operating system to save application data before shutdown gracefully. After the five minutes have elapsed, the VM is forcefully shutdown.
- Stop-VM -Name TestVM -TurnOff – This performs an ungraceful shutdown of the virtual machine similar to pulling the “power cable.”
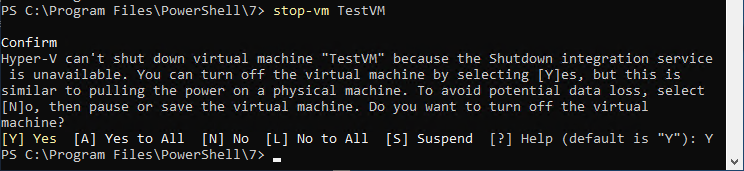
Stop-VM and message regarding Integration Services
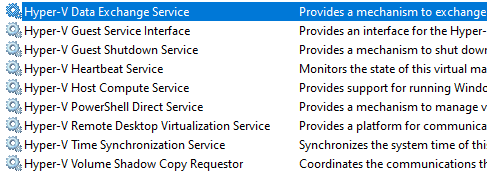
Integration services installed in Windows 10
NAME
Stop-VM
SYNOPSIS
Shuts down, turns off, or saves a virtual machine.
SYNTAX
Stop-VM [-Name] <String[]> [-AsJob] [-CimSession <CimSession[]>] [-ComputerName <String[]>]
[-Confirm] [-Credential <PSCredential[]>] [-Force] [-Passthru] [-Save] [-TurnOff] [-WhatIf]
[<CommonParameters>]
Stop-VM [-VM] <VirtualMachine[]> [-AsJob] [-Confirm] [-Force] [-Passthru] [-Save] [-TurnOff] [-WhatIf] [<CommonParameters>]
DESCRIPTION
The Stop-VM cmdlet shuts down, turns off, or saves a virtual machine.
7. Checkpoint-VM
One of the Hyper-V virtual machine features that has provided a paradigm shift in IT administrators’ capabilities is the Checkpoint mechanism. What is a checkpoint? In the early days of Hyper-V before Windows Server 2012 R2, checkpoints were called snapshots. Microsoft transitioned from the term snapshots to using the term checkpoints at that time. You can think of a Hyper-V checkpoint as a “picture” of the operating system and data at a particular point in time. Checkpoints allow creating an ad-hoc point in time “snapshot” of a server used for quick, short-term rollbacks. A prevalent use case for Checkpoints is for creating a rollback before installing software, driver updates, Windows Updates, or any other change made to the server that may introduce issues.
Microsoft Hyper-V has two types of checkpoints available for creation. These include the standard and production checkpoint. What is the difference?
- Standard – Standard checkpoints capture data, memory state, and hardware configuration settings for the Hyper-V virtual machine. Microsoft recommends this checkpoint type for test and development scenarios that need recreating. This type of checkpoint restores the server exactly when the checkpoint was created, including the memory state.
- Production – Production checkpoints are images of the production server. Microsoft supports these types of checkpoints for production use as they use VSS backup technology inside the guest to create the checkpoint and not the saved state method used in the standard checkpoint.
Examples of the CheckPoint-VM cmdlet:
- Checkpoint-VM -Name TestVM -SnapshotName BeforeUpdates
- Get-VM Test-VM Hyper1 | Checkpoint-VM
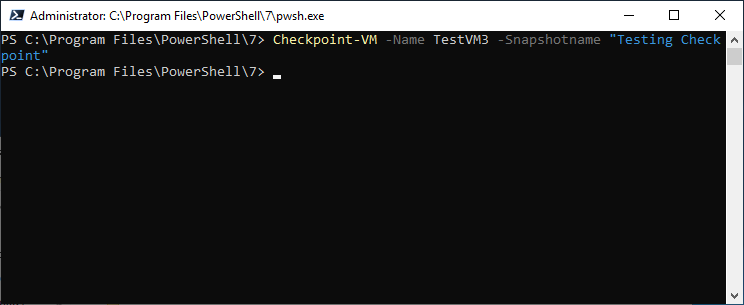
Creating a Checkpoint on a Hyper-V VM named TestVM3
The output of the Get-Help Checkpoint-VM cmdlet:
NAME
Checkpoint-VM
SYNOPSIS
Creates a checkpoint of a virtual machine.
SYNTAX
Checkpoint-VM [-Name] <String[]> [[-SnapshotName] <String>] [-AsJob] [-CimSession <CimSession[]>][-ComputerName <String[]>] [-Confirm] [-Credential <PSCredential[]>] [-Passthru] [-WhatIf][<CommonParameters>]
Checkpoint-VM [-VM] <VirtualMachine[]> [[-SnapshotName] <String>] [-AsJob] [-Confirm] [-Passthru][-WhatIf] [<CommonParameters>]
DESCRIPTION
The Checkpoint-VM cmdlet creates a checkpoint of a virtual machine. Note: In Windows Server 2012 R2, virtual machine snapshots were renamed to virtual machine checkpoints. For clarity, this document will refer to virtual machine snapshots as checkpoints.
8. Measure-VM
Collecting performance and other vitals from production virtual machines running on top of a hypervisor help provide key performance metrics for the applications, services, and other resources housed inside the VM. The Measure-VM Hyper-V cmdlet includes information on processor usage, memory usage, network traffic, and disk capacity running in Hyper-V.
It is essential to note the Measure-VM cmdlet relies on enabling resource metering for the Hyper-V virtual machine. You can allow Measure-VM resource metering using the Enable-VMResourceMetering.
NAME
Measure-VM
SYNOPSIS
Reports resource utilization data for one or more virtual machines.
SYNTAX
Measure-VM [-Name] <String[]> [-CimSession <CimSession[]>] [-ComputerName <String[]>] [-Credential <PSCredential[]>] [<CommonParameters>]
Measure-VM [-VM] <VirtualMachine[]> [<CommonParameters>]
DESCRIPTION
The Measure-VM cmdlet reports data on processor usage, memory usage, network traffic, and disk capacity for one or more virtual machines.
Note: Data is available for reporting through the Measure-VM cmdlet only after resource metering is enabled for a virtual machine.
The report has the following fields:
— ComputerName: The name of the virtual machine host.
— VMId: The unique identifier of the virtual machine.
— VMName: The friendly name of the virtual machine.
— HardDiskMetrics: Information about the performance and throughput of the storage subsystem.
— MeteringDuration: The duration over which resource utilization data is being reported.
— AverageProcessorUsage: The average processor usage, in megahertz, of the virtual machine over the period reported in the MeteringDuration field.
— AverageMemoryUsage: The average memory usage, in megabytes, of the virtual machine over the period reported in the MeteringDuration field.
— MaximumMemoryUsage: The maximum memory usage, in megabytes, of the virtual machine over the period reported in the MeteringDuration field.
— MinimumMemoryUsage: The minimum memory usage, in megabytes, of the virtual machine over the time period reported in the MeteringDuration field.
— TotalDiskAllocation: The maximum disk capacity, in megabytes, allocated to the virtual machine over the time period reported in the MeteringDuration field. For more information, see the ‘Notes’ following the field descriptions.
— NetworkMeteredTrafficReport: An array whose elements report the traffic through each NetworkAdapterAcl on the virtual machine or machines over the time period reported in the MeteringDuration field. Each array element has the following properties:
— NetworkAdapter: The virtual machine network adapter object on which the NetworkAdapterAcl has been configured.
— LocalAddress: for an inbound packet, the destination IP address in the packet header; for an outbound packet, the source IP address in the packet header.
— RemoteAddress: for an inbound packet, the source IP address in the packet header; for an outbound packet, the destination IP address in the packet header.
— Direction: the direction of the network traffic to which the ACL applies. Allowed values are Inbound, Outbound, or Both.
— TotalTraffic: the amount of network traffic, in megabytes, through the NetworkAdapterAcl.
Notes:
— The disk capacity allocated to the virtual machine is reported as the sum of two totals – the total storage capacity of all attached virtual hard disks, and the total amount of physical storage consumed by the virtual machine’s snapshots.
— If the virtual machine has more than one virtual hard disk, then the TotalDiskAllocation property displays the sum of disk capacity allocated to all virtual hard disks.
— Resource utilization is not reported for disks attached through a virtual Fiber Channel connection or network adapters configured to use single-root I/O virtualization (SR-IOV).
— If the virtual machine is configured with static memory rather than Dynamic Memory, then AverageMemoryUsage, MinimumMemoryUsage, and MaxiumumMemoryUsage metrics equals the memory amount configured for the virtual machine.
The default display of a resource pool resource utilization report includes the following columns:
— VMName: The name of the virtual machine.
— AvgCPU(Mhz): The average processor usage, in megahertz, of the virtual machine.
— TotalDisk(M): The average disk usage, in megabytes, of the virtual machine. For more information, see the ‘Notes’ following the field descriptions.
— NetworkInbound(M): Total incoming network traffic, in megabytes, to the virtual machine.
— NetworkOutbound(M): Total outgoing network traffic, in megabytes, from the virtual machine.
9. Export-VM
There will always be the need to export a Hyper-V VM to move the files to another environment or for other reasons. The Export-VM cmdlet allows a Hyper-V administrator to export a virtual machine to disk, including the virtual machine’s configuration, virtual disks, and checkpoints. The process will create three subfolders under the parent export folder housing the exported virtual machine’s various elements.
Examples of running the Export-VM cmdlet include
- Export-VM -Name TestVM -Path D:VMexports
- Get-VM TestVM | Export-VM -Path D: VMexports
- Export-VM -Name TestVM -Path D:VMexports -AsJob – The “AsJob” parameter will allow the export to run as a non-interactive job which is helpful since the export
 Using Export-VM for a VM to a specific folder
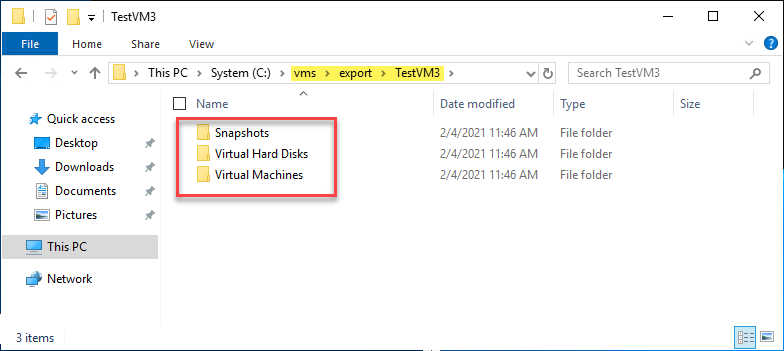
Navigating to the exported VM folder and various subfolders
The output from Get-Help Export-VM includes:
NAME
Export-VM
SYNOPSIS
Exports a virtual machine to disk.
SYNTAX
Export-VM [-Name] <String[]> [-Path] <String> [-AsJob] [-CaptureLiveState {CaptureCrashConsistentState | CaptureSavedState | CaptureDataConsistentState}] [-CimSession <CimSession[]>] [-ComputerName <String[]>][-Confirm] [-Credential <PSCredential[]>] [-Passthru] [-WhatIf] [<CommonParameters>]
Export-VM [-VM] <VirtualMachine[]> [-Path] <String> [-AsJob] [-CaptureLiveState {CaptureCrashConsistentState | CaptureSavedState | CaptureDataConsistentState}] [-Confirm] [-Passthru] [-WhatIf] [<CommonParameters>]
DESCRIPTION
The Export-VM cmdlet exports a virtual machine to disk. This cmdlet creates a folder at a specified location having three subfolders: Snapshots, Virtual Hard Disks, and Virtual Machines. The Snapshots and Virtual Hard Disks folders contain the snapshots of and virtual hard disks of the specified virtual machine respectively. The Virtual Machines folder contains the configuration XML of the specified virtual machine.
10. New-VHD
The final entry on the top 10 PowerShell commands for Hyper-V relates to creating virtual disks for Hyper-V virtual machines. When creating a Hyper-V virtual machine using Hyper-V Manager as an example does not give any options to customize the creation of the Hyper-V virtual machine hard disk type. By default, Hyper-V creates new virtual machine disks as dynamically expanding or thin-provisioned disks. If you want to create a VM with a fixed disk format or thick-provisioned, you have to use the new disk creation wizard in Hyper-V Manager, which is cumbersome.
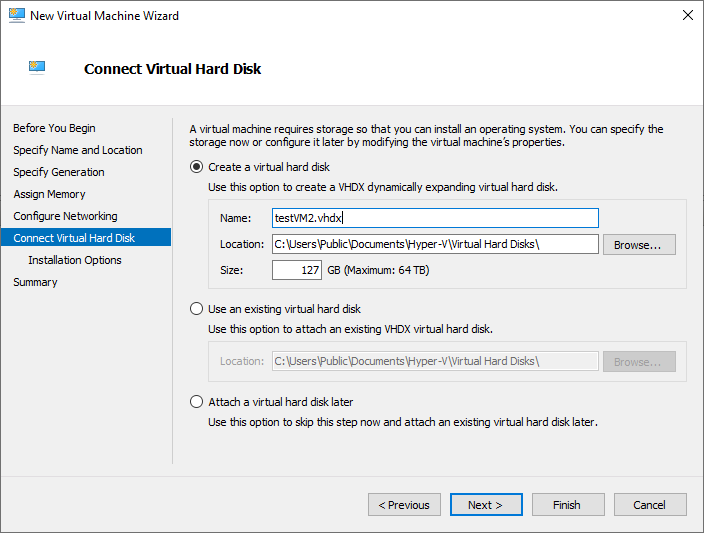
Disk options when creating a new Hyper-V virtual machine in Hyper-V Manager
The New-VHD Hyper-V PowerShell cmdlet provides the ability to create Hyper-V virtual disks with the desired options easily. It can create one or more new virtual hard disks in either the VHD or newer VHDX format and can create disks as Fixed Disk size.
Examples of using the NewVHD cmdlet include:
- New-VHD -Path c:win2019.vhdx -SizeBytes 80GB – This is an example of a dynamic hard disk created as a VHDX type disk.
- New-VHD -ParentPath c:win10.vhdx -Path c:Diff.vhdx -Differencing – An example of creating a differencing hard disk with the parent disk path
- New-VHD -Path C:fixeddisk.vhd -Fixed -SourceDisk 3 -SizeBytes 1TB – A fixed VHD disk populated with the disk identified by the number 3
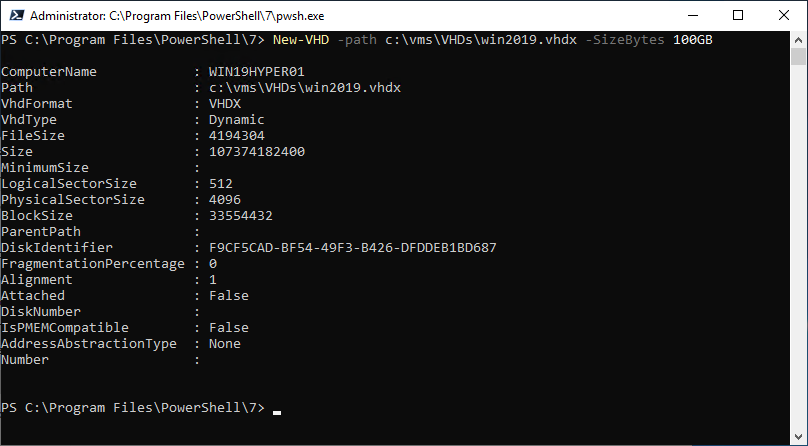
Creating a new VHDX file in a directory using New-VHD
The output from Get-Help New-VHD:
NAME
New-VHD
SYNOPSIS
Creates one or more new virtual hard disks.
SYNTAX
New-VHD [-Path] <String[]> [-ParentPath] <String> [[-SizeBytes] <UInt64>] [-AsJob] [-BlockSizeBytes <UInt32>]
[-CimSession <CimSession[]>] [-ComputerName <String[]>] [-Confirm] [-Credential <PSCredential[]>]
[-Differencing] [-PhysicalSectorSizeBytes {512 | 4096}] [-WhatIf] [<CommonParameters>]
New-VHD [-Path] <String[]> [-SizeBytes] <UInt64> [-AsJob] [-BlockSizeBytes <UInt32>] [-CimSession
<CimSession[]>] [-ComputerName <String[]>] [-Confirm] [-Credential <PSCredential[]>] [-Dynamic]
[-LogicalSectorSizeBytes {512 | 4096}] [-PhysicalSectorSizeBytes {512 | 4096}] [-WhatIf] [<CommonParameters>]
New-VHD [-Path] <String[]> [-AsJob] [-BlockSizeBytes <UInt32>] [-CimSession <CimSession[]>] [-ComputerName
<String[]>] [-Confirm] [-Credential <PSCredential[]>] -Dynamic -SourceDisk <UInt32> [-WhatIf] [<CommonParameters>]
New-VHD [-Path] <String[]> [-SizeBytes] <UInt64> [-AsJob] [-BlockSizeBytes <UInt32>] [-CimSession <CimSession[]>] [-ComputerName <String[]>] [-Confirm] [-Credential <PSCredential[]>] -Fixed [-LogicalSectorSizeBytes {512 | 4096}] [-PhysicalSectorSizeBytes {512 | 4096}] [-WhatIf] [<CommonParameters>]
New-VHD [-Path] <String[]> [-AsJob] [-BlockSizeBytes <UInt32>] [-CimSession <CimSession[]>] [-ComputerName
<String[]>] [-Confirm] [-Credential <PSCredential[]>] -Fixed -SourceDisk <UInt32> [-WhatIf] [<CommonParameters>]
DESCRIPTION
The New-VHD cmdlet creates one or more new virtual hard disks in either VHD format or the newer VHDX format. The file name extension you specify determines the format.
Wrapping Up
PowerShell provides an extremely robust and easy to understand scripting language that provides organizations with powerful cmdlets to interact with Microsoft Windows Server Hyper-V environments. PowerShell commands for Hyper-V are easy to consume. These are installed with the management tools with Hyper-V and are instantly accessible from the Windows PowerShell prompt.
PowerShell Core is the newer PowerShell version built on top of .NET Core and is a cross-platform solution that can be used in Windows, Linux, and macOS. PowerShell Core is the newer PowerShell version moving forward, however, it is not installed in Windows by default. It is a free download from the official PowerShell Core GitHub site and can be installed and used to interact with Hyper-V cmdlets the same as Windows PowerShell.
The top 10 PowerShell commands for Hyper-V include cmdlets covering a wide range of administrative tasks and capabilities that allow Hyper-V administrators to streamline configuration, management, and other duties. While not all-inclusive, they represent many of the command management tasks needed from day-to-day. These also allow effectively automating Hyper-V environments by way of PowerShell scripts that can be scheduled or triggered by certain actions. PowerShell scripts can also be used for configuration management and remediating configuration drift in the Hyper-V environment.
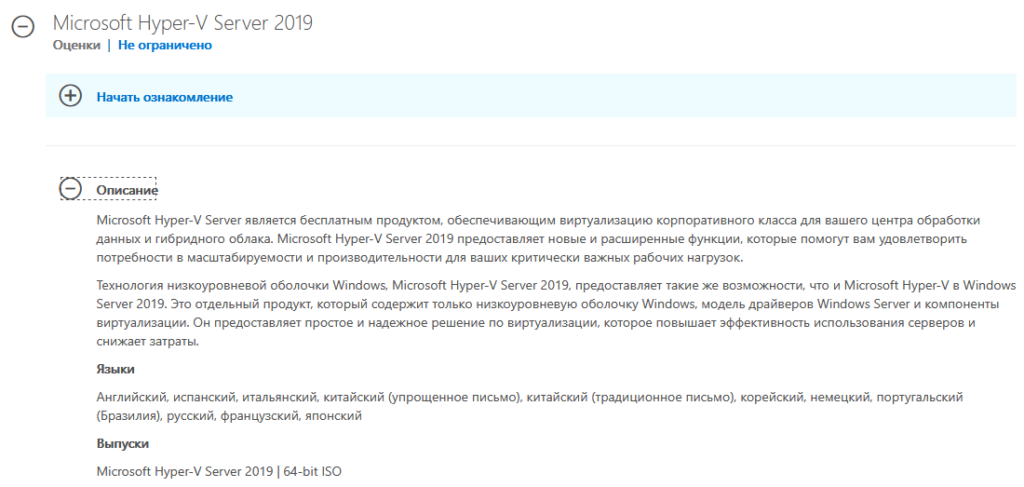
Как бы не ругали пользователи Windows 10 но это самая популярная ОС. Серверные ОС Windows Server также не имеют аналогов. Это что касается относительной простоты настройки и дружелюбности к пользователю. Каждый меня поймет кто хоть когда то пытался соорудить нечто подобное Active Directory на Linux. Это небольшое отступление. Но сегодня я хочу рассказать насколько проста установка и настройка Microsoft Hyper-V Server 2019. Это бесплатный гипервизор от Microsoft.
Я долго сравнивал разные бесплатные гипервизоры (Proxmox, VMWare). Мне хотелось чтобы была возможность управлять сервером через WEB и консоль. Рассматривал Proxmox, но совсем не тривиальная настройка меня остановила.
Про Microsoft Hyper-V Server я знал, но в нем не было WEB интерфейса для управления. Хотя подкупал RDP доступ, Hype-V Manager и возможность использовать Powershell со всем его огромным функционалом.
Буквально на днях узнал о существовании WEB консоли для управления WIndows серверами Windows Admin Center. Этот факт подтолкнул меня к установке бесплатного гипервизора от Microsoft последней версии.
Установка Microsoft Hyper-V Server 2019
Перед началом установки необходимо проверить в BIOS что аппаратная виртуализация включена. У Intel — Intel VT (VT-x и VT-d), AMD — AMD-V. Скачать Hyper-V Server 2019 можно с сайта Microsoft. Обычно я использую английскую версию серверного софта для исключения различных проблем с локализацией.
Скачанный ISO файл необходимо записать на USB Flash. Для этих целей я использую Rufus. Используйте накопитель с минимальным объемом не менее 4 Гб.
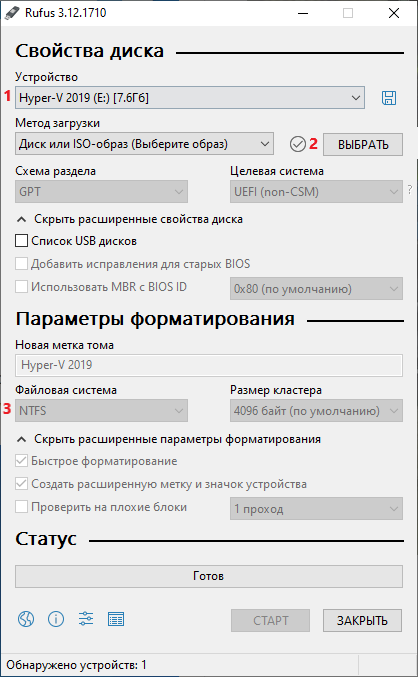
- Устройство: выбрать ваш Flash накопитель
- Метод загрузки: Диск или ISO нажать кнопку ВЫБРАТЬ и указать ISO образ Hyper-V 2019
- Файловая система: NTFS
Нажать СТАРТ и дождаться окончания записи образа на Flash накопитель.
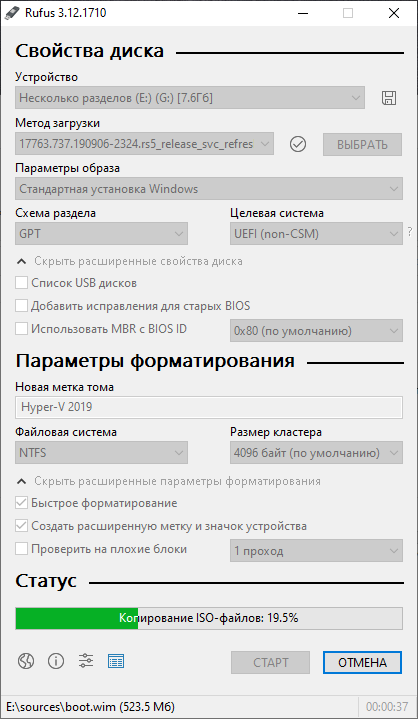
После окончания записи на флешку можно приступить к установке системы.
Установка системы проста как любой Windows, на этом заострять внимание я не буду.
Настройка Microsoft Hyper-V Server 2019
Пройдя авторизацию в Hyper-V Server возникнет окошко Server Configuration с основными настройками сервера. Для использования каждого пункта нажимаем соответствующую цифру и далее Enter.
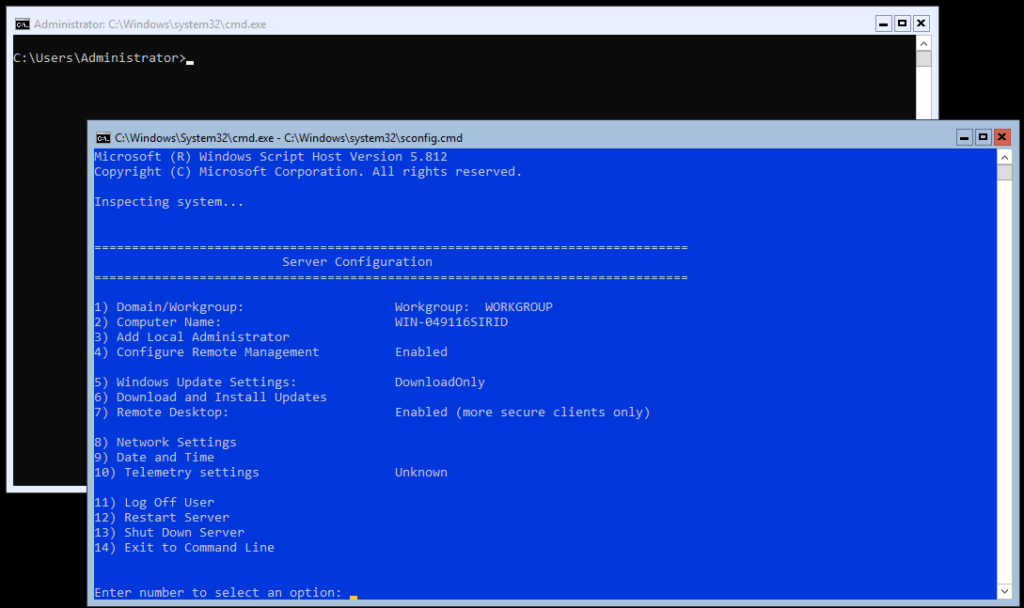
- Domain/Workgroup — добавить сервер в рабочую группу либо домен. По умолчанию используется рабочая группа WORKGROUP
- Computer Name — имя компьютера. Можно оставить автоматически присвоенное либо изменить на свое.
- Add Local Administrator — добавить локального администратора. Позволяет добавить нескольких локальных администраторов. По умолчанию включен только один администратор с логином Administrator
- Configure Remote Management — настройка разрешений удаленного управления сервером для подключения с помощью Powershell, WEB консоли и т.д.
- Windows Update Settings — установка обновлений Windows. Возможные варианты: Automatic — полностью автоматически, DownloadOnly — только скачать, Manual — ручной режим.
- Download and Install Updates — скачать и установить обновления. Непосредственный запуск установки обновлений.
- Remote Desktop — удаленный доступ к рабочему столу. Необходимо включить для удаленного доступа по RDP. Можно использовать RDP with NLA и RDP any. RDP with NLA для использования на клиентах Windows XP SP3 и выше, более безопасный и быстрый вариант. RDP any для использования на любых клиентах Windows, Linux, Android и т.д.
- Network Settings — доступ к настройкам сетевой карты. Изменить IP, маску, DNS и т.д.
- Date and Time — открывает окошко настройки времени с возможностью изменить сервер синхронизации
- Telemetry settings — сбор сведений телеметрии. Для выбора есть Security, Basic, Enhanced, Full.
- Log Off User — выйти из текущей сессии
- Restart Server — перезагрузить сервер
- Shut Down Server — выключить сервер
- Exit to Command Line — закрыть текущее окно настроек и оставить активным только окно командной строки.
Проведем первоначальные настройки сервера с помощью консоли Server Configuration
Изменим имя компьютера на WHS19. Включим удаленное управление Remote Management и Remote Desktop. Windows Update Settings я оставляю в изначальном состоянии DownloadOnly. Меняю часовой пояс на свой и настройки телеметрии ставлю Secutiry. Сетевые настройки приходят по DHCP (не забываем сделать резервацию) или вручную. После измененных настроек рекомендую перезагрузить сервер.
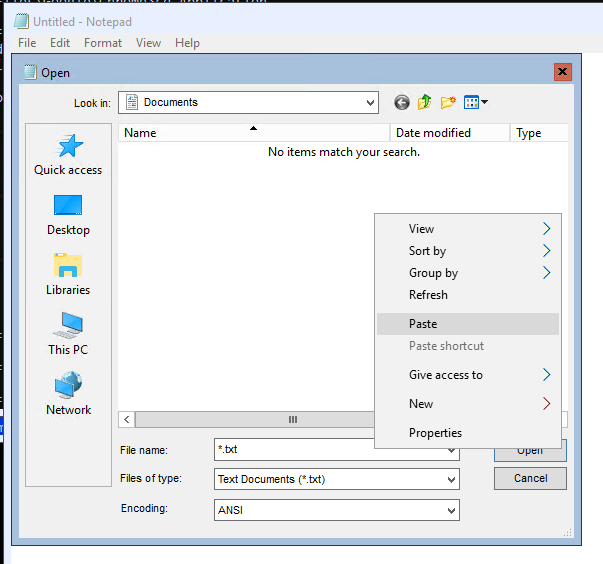
Если по чистой случайности вы закрыли оба окна (консоль cmd и Server Configuration) можно воспользоваться сочетанием клавиш Ctrl+Shift+Esc и вызвать диспетчер задач.
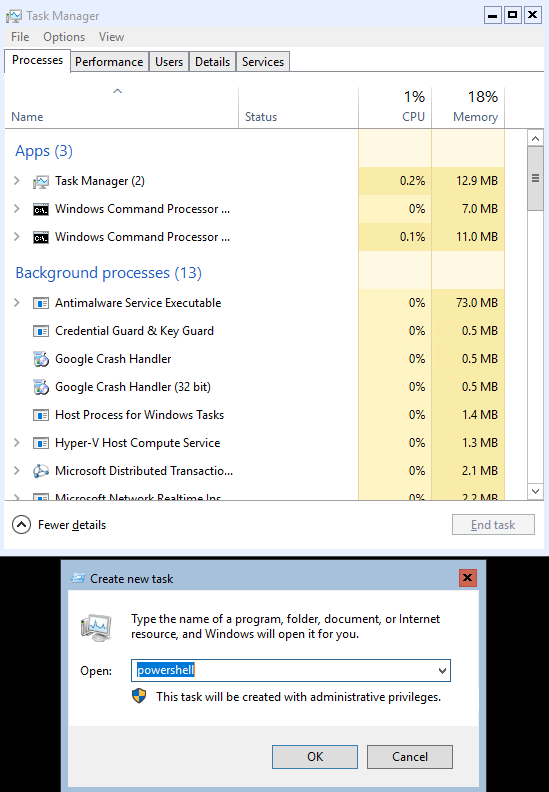
В диспетчере задач меню File — Run new task можно запустить cmd, powershell и любое приложение установленное в системе. Небольшой лайфхак: как быстро скопировать файл со своей машины на сервер Hyper-V Core. Заходим на сервер по RDP, запускаем блокнот. В блокноте нажимает File — Open. На своем компьютере выбираем нужный файл и копируем его в буфер обмена. На сервере в открытом окне блокнота нажимаем правой кнопкой и выбираем вставить. Файл скопируется в текущее место открытое в блокноте.
Настройка дисков
В моём сервере установлено 3 диска. На одном диске установлена система, два других под виртуальные машины и резервные копии. Запустим Powershell из консоли cmd.
Получим список дисков установленных в сервере
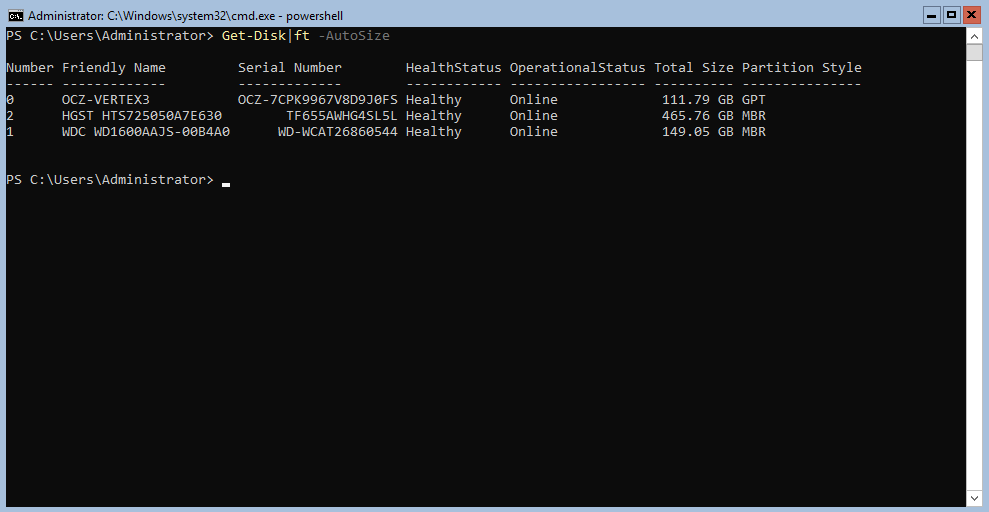
В моем случае система установлена на диск 0 — OCZ-VERTEX3. Диск 1 WDC WD1600AAJS я буду использовать под виртуальные машины. И самый емкий из установленных диск 2 HGST HTS725050A7E630 использую под резервные копии. Подготовим диски.
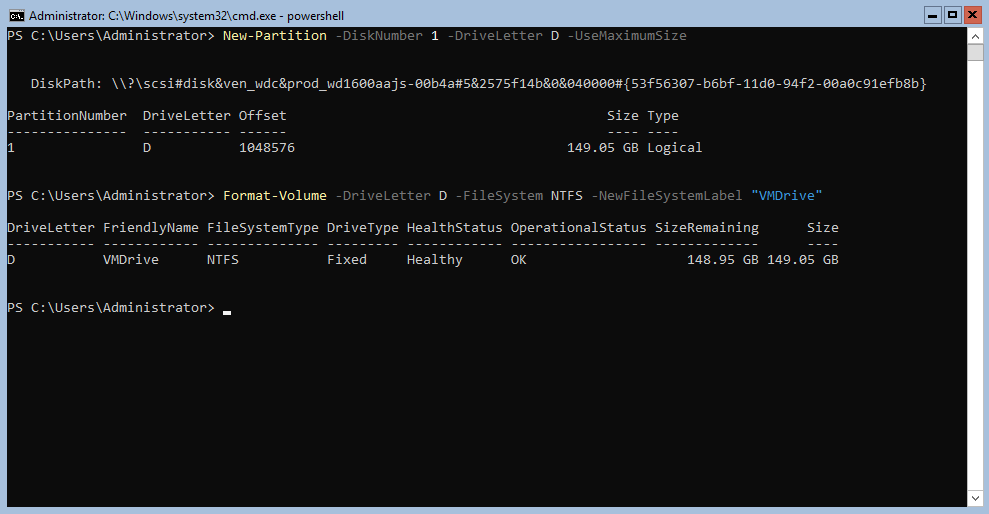
Создадим новый раздел на диске и присвоим ему букву D.
New-Partition -DiskNumber 1 -DriveLetter D –UseMaximumSize
Отформатируем диск под файловую систему NTFS
Format-Volume -DriveLetter D -FileSystem NTFS -NewFileSystemLabel "VMDrive"
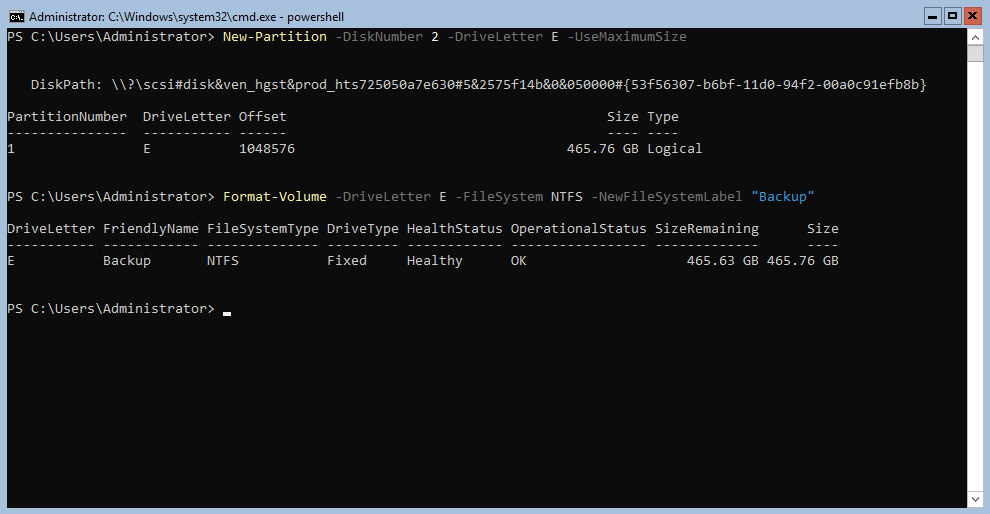
Создаем новый раздел на диске HGST для резервных копий и присвоим диску букву E
New-Partition -DiskNumber 2 -DriveLetter E –UseMaximumSize
Форматируем диск E
Format-Volume -DriveLetter E -FileSystem NTFS -NewFileSystemLabel "Backup"
Место хранения виртуальных машин
По умолчанию система сохраняет новые виртуальные машины на диск C. Изменим путь сохранения на диск D
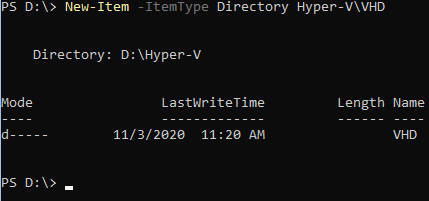
Создаем папку для хранения виртуальных машин и дисков
New-Item -ItemType Directory D:Hyper-VVHD
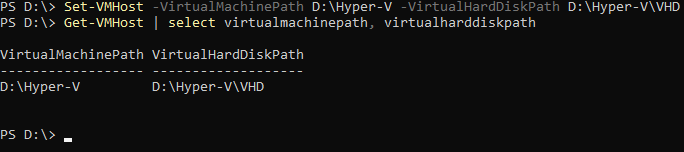
Укажем системе куда сохранять настройки и диски виртуальных машин
Set-VMHost -VirtualMachinePath D:Hyper-V -VirtualHardDiskPath D:Hyper-VVHD
Проверим что все получилось
Get-VMHost | select virtualmachinepath, virtualharddiskpath
Настройка виртуального коммутатора Hyper-V
Нам необходимо создать виртуальный коммутатор который будет связан с сетевой картой сервера Hyper-V. Он будет получать сетевые адреса также по DHCP как и остальные физические машины в сети.
Проверим поддерживает ли наша сетевая карта технологию SR-IOV (Single Root Input/Output Virtualization). Данная технология виртуализации предоставляет виртуальным машинам прямой доступ к части аппаратных возможностей сетевой карты.
Если данная технология поддерживается, необходимо ее включить командлетом Enable-NetAdapterSriov. После создания виртуального коммутатора включить данную технологию уже не получится.
Получим список всех сетевых адаптеров установленных в системе.

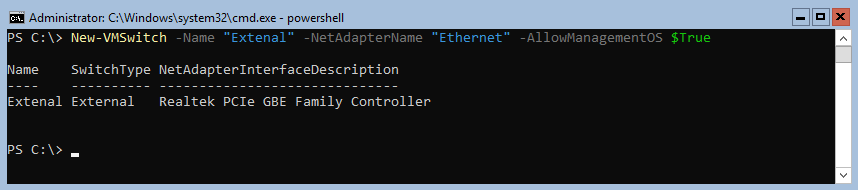
Создадим новый виртуальный коммутатор с именем External. Он будет использоваться как внешний сетевой адаптер получающий адреса по DHCP. При создании включим функцию совместного использования виртуального коммутатора и сетевой карты с виртуальной машиной.
New-VMSwitch -Name "External" -NetAdapterName "Ethernet" -AllowManagementOS $True
Просмотреть детальную информацию по сетевым настройкам можно так
Get-NetIPConfiguration –Detailed
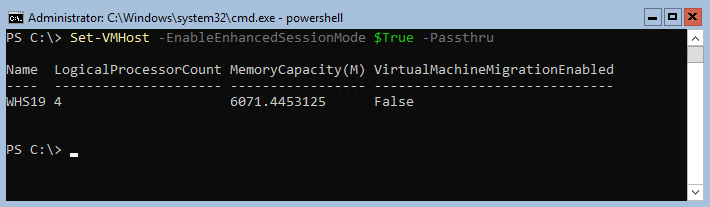
Enhanced Session Mode
Включение функции Enhanced Session Mode позволит подключиться к консоли виртуальной машины используя RDP соединение. С той лишь разницей что подключение будет не к самой виртуальной машине а через средства интеграции гипервизора. Данный метод позволяет подключаться к виртуальной машине даже с отсутствующей сетевой картой. Для себя я вижу удобство именно в подключении к виртуальным машинам с изолированной сетью. Нет необходимости запускать консоль Hyper-V, все можно сделать через RDP.
Основные преимущества Enhanced Session Mode
- можно выбрать произвольное разрешение экрана
- использование локальных принтеров
- перенаправление USB устройств
- подключение дисков
- общий буфера обмена
- работа с аудиоустройствами
- проброс смарт-карт
- поддержка остальных plug-and-play устройств
Включим данный режим сразу для всего сервера
Set-VMHost -EnableEnhancedSessionMode $True -Passthru
Удаленное управление Microsoft Hyper-V Server 2019
Удаленное управление Hyper-V сервером доступно многими средствами. Среди них консоль Hyper-V Manager, Powershell, Windows Admin Center, MMC. Для удаленного управления сервером Hyper-V необходимо произвести настройки на сервере и на каждом клиенте с которого будет подключение. Настройку клиента буду проводить на Windows 10 Pro (минимально необходимая версия).
Если сервер используется в сети с доменом, то необходимо добавить запись типа A в DNS сервер (обычно это контроллер домена). В случае рабочей группы просто добавляем имя сервера Hyper-V в файл C:WindowsSystem32driversetchosts. В моем случае запись будет выглядеть так:
Вначале идет IP адрес сервера: 172.16.169.49 далее через пробел имя WHS19. В случае использования файла hosts не забываем добавлять запись на каждой машине используемой для управления сервером.
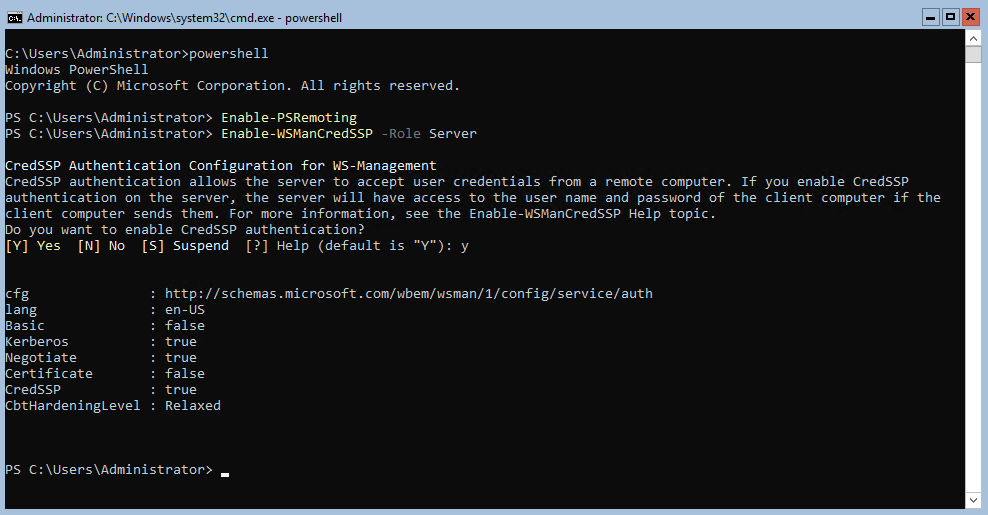
На сервере Hyper-V запустим Powershell и выполним командлет для разрешения удаленного подключения
По умолчанию данный командлет открывает доступ только из доменной и приватной сети. Разрешим доступ также из публичной сети.
Enable-PSRemoting -SkipNetworkProfileCheck -Force
Включаем поддержку проверки подлинности CredSSP на стороне сервера
Enable-WSManCredSSP -Role Server
Проверим что на сервере открыт порт WinRM
Test-NetConnection -ComputerName WHS19 -Port 5985

В выводе командлета поле TcpTestSucceeded должно иметь статус True.
Добавим в межсетевой экран правило разрешающее подключаться с любых IP адресов
Set-NetFirewallRule -Name "WinRM-HTTP-In-TCP-Public" -RemoteAddress Any
Список правил межсетевого экрана касаемо WinRM можно посмотреть с помощью командлета Get-NetFirewallRule
Get-NetFirewallRule -DisplayName "Windows Remote*" |where {$_.Enabled -eq $True}|ft displayname, Description

Добавим еще одно разрешающее правило для доступа с помощью оснасток MMC
Enable-NetFirewallRule -DisplayGroup "Remote Administration"
На данном этапе с настройкой сервера мы закончили переходим к настройке клиента.
Настройка клиента Windows 10
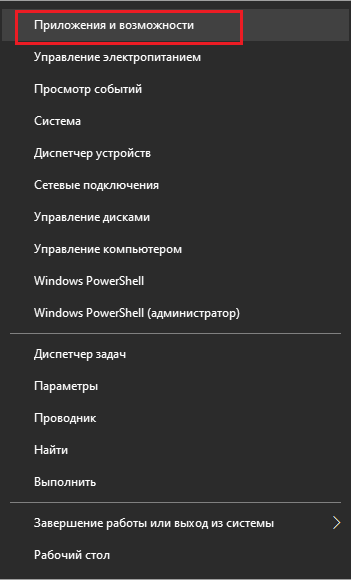
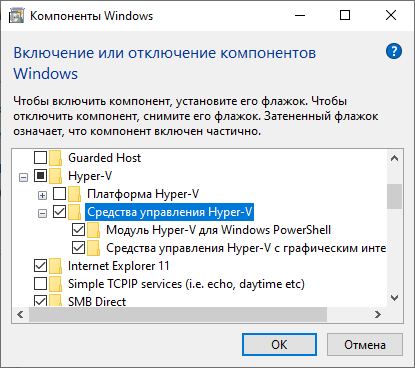
Если вы следовали четко по инструкции то прописали имя компьютера в соответствии с его адресом в файле hosts либо на DNS сервере. Следующим этапом убедимся что на компьютере установлена консоль управления Hyper-V Management. Если её нет, давайте установим.
Нажимаем правой кнопкой мыши на Пуск -> Приложения и возможности -> Программы и компоненты -> Включение или отключение компонентов Windows -> Hyper-V -> Средства управления Hyper-V

Далее запускаем Powershell с правами администратора и выполняем все действия по ним.
Включим возможность удаленного подключения
Добавим сервер Hyper-V в доверенные узлы на локальном ПК
Set-Item WSMan:localhostClientTrustedHosts -Value "WHS19"
Проверим что все получилось
Get-Item WSMan:localhostClientTrustedHosts

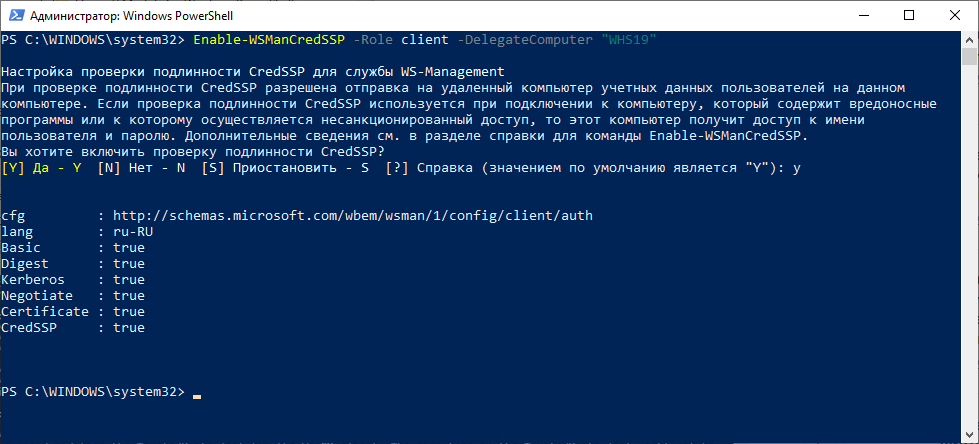
Настройка проверки подлинности CredSSP для службы WS-Management
Enable-WSManCredSSP -Role client -DelegateComputer "WHS19"
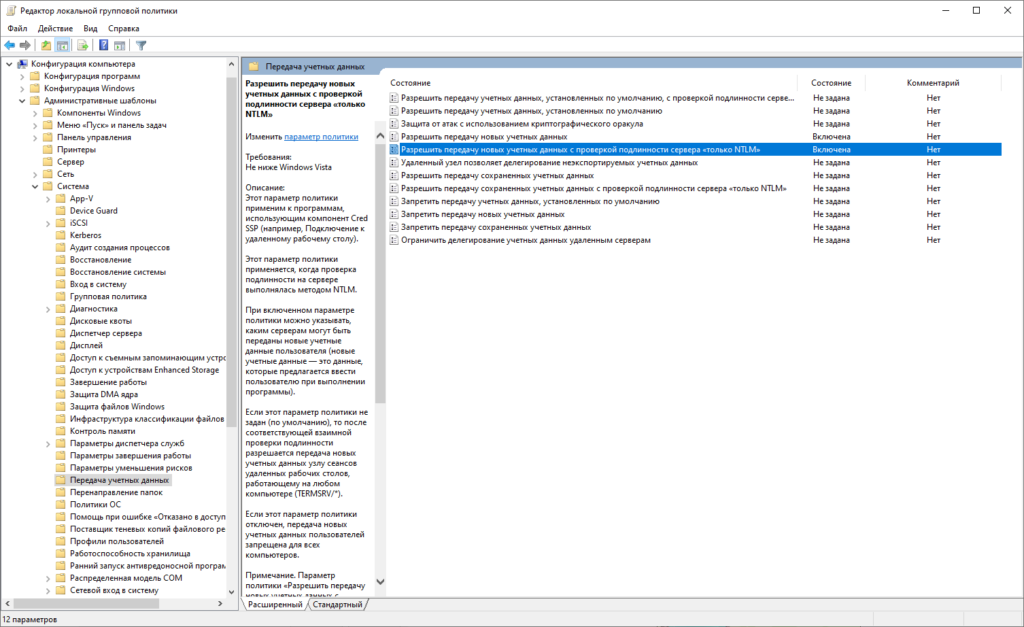
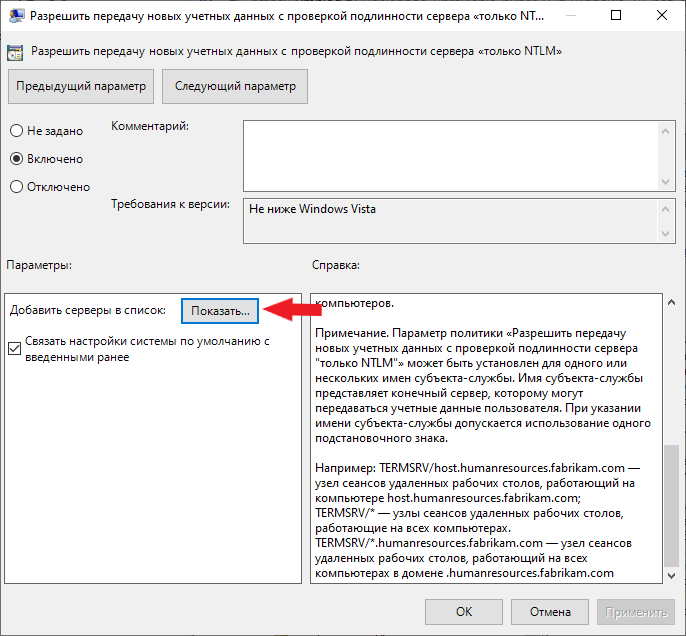
Отредактируем локальную групповую политику. Нажимаем правой кнопкой мыши Пуск -> Выполнить запускаем cmd и далее gpedit. В русской версии: Конфигурация компьютера -> Административные шаблоны -> Система -> Передача данных -> Разрешить передачу новых учетных данных с проверкой подлинности сервера «только NTLM». В английской версии: Computer Configuration -> Administrative Template -> System -> Credentials Delegation -> Allow delegating fresh credentials with NTLM-only server authentication. Включаем данную политику и добавляем сервер Hyper-V в список разрешенных.
Настройка клиента закончена. Пробуем подключится к серверу используя Hyper-V Manager.
Подключение к серверу с помощью Hyper-v Manager
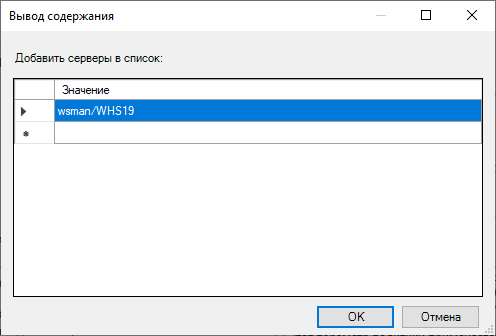
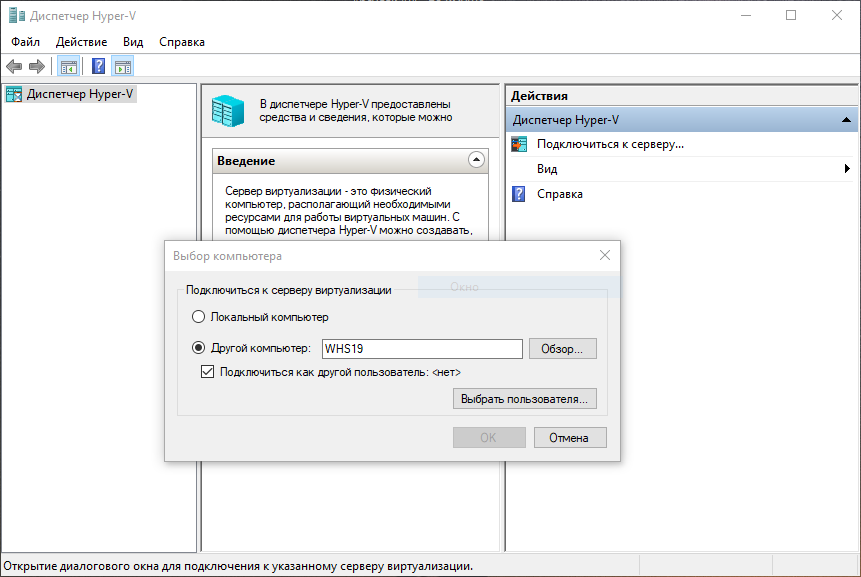
Запустим Hyper-V Manager (он же Диспетчер Hyper-V). Нажимаем Подключиться к серверу. В открытом окне выбираем поле Другой компьютер пишем имя нашего сервера: WHS19. Ставим галочку Подключиться как другой пользователь.
Нажимаем кнопку Выбрать пользователя
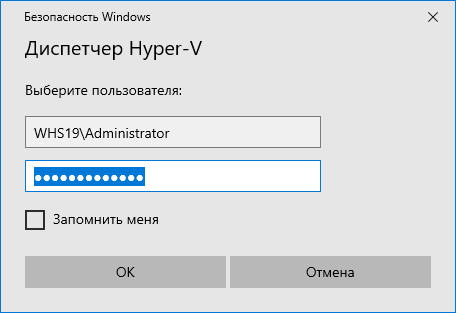
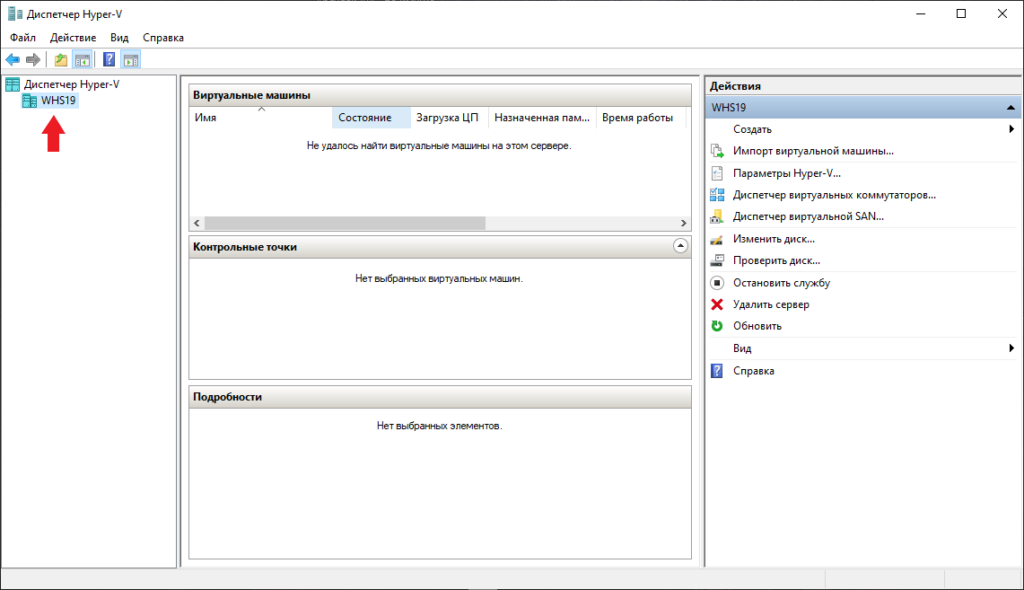
Внимательно заполняем логин и пароль для входа на сервер Hyper-V. Обязательно в поле имя пользователя вначале пишем имя компьютера затем имя пользователя. В нашем случае WHS19Administrator. Нажимаем OK. Все готово, теперь можно управлять сервером Hyper-V 2019 из удобной консоли.
Подключение к серверу с помощью Windows Admin Center
Для использования Windows Admin Center необходимо его скачать. Скопируем скачанный файл на сервер Hyper-V. Я скопировал файл WindowsAdminCenter2009.msi по пути C:UsersAdministrator. Переходим в открытую консоль cmd или powershell и запускаем установку.
msiexec /i C:UsersAdministratorWindowsAdminCenter2009.msi /qn /L*v log.txt SME_PORT=9010 SSL_CERTIFICATE_OPTION=generate
Данная команда запустит скрытую установку Windows Admin Center. Журналирование установки идет в файл log.txt, порт для подключения я использую 9010 (можно указать любой свободный). Сертификат создается автоматически. Дожидаемся окончания установки и можем пробовать подключаться.
Из любого браузера открываем сайт https://whs19:9010 вводим учетные данные от сервера и попадаем в консоль управления сервером Windows Admin Center.
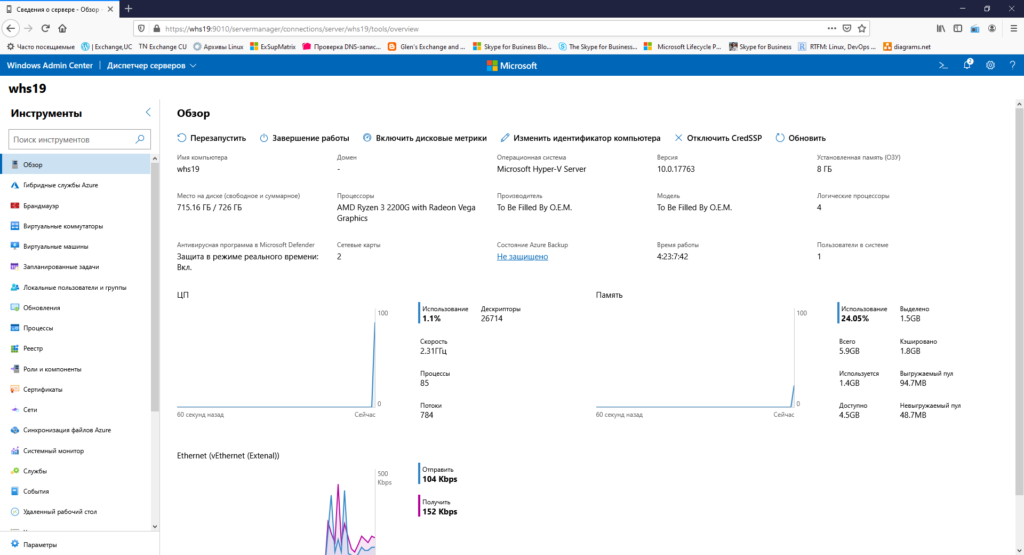
В консоли Windows Admin Center можно следить за загрузкой сервера через удобные графики расположенные на одной странице. Можно быстро выключить, перезагрузить, переименовать сервер. Большой набор функций доступен изначально, также есть воможность расширения за счет дополнительных плагинов.
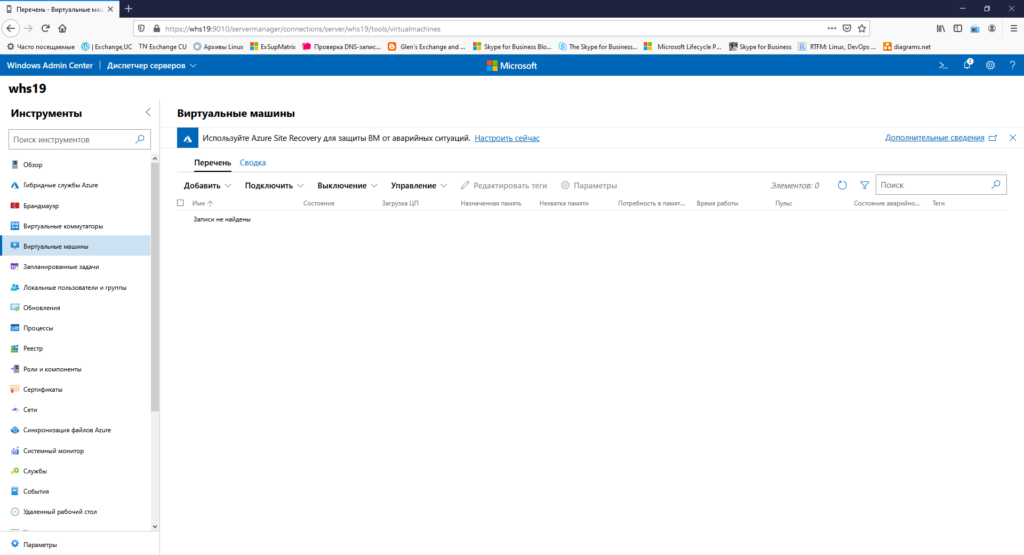
Можно создавать/удалять/управлять виртуальными машинами. Очень удобно прямо из браузера без необходимости запуска других консолей.
Резюмируя хочу сказать что WAC интересный инструмент для быстрой настройки/доступа к серверу. Хотя конечно не без недостатков. Мне лично не нравится то что просмотр логов идет сплошным текстом без выделения по цвету (warning, error и т.д.). В общем смотрите, изучайте, пользуйтесь.
Подключаться к серверу можно и с консоли mmc и с powershell. В общем большой набор инструментов для управления сервером. Установка и настройка Microsoft Hyper-V Server 2019 в целом почти идентична с версией сервера 2016. Можно использовать данную статью как мануал для старой версии.
Хотите отблагодарить автора статьи? Это даст ему дополнительный стимул к написанию новых статей.
Running virtual machines on your desktop or notebook and be extremely powerful, to test and develop applications or just run an isolated environment. If you just need a quick disposable Windows 10 environment, I recommend that you have a quick look at the Windows 10 feature called Windows Sandbox. Since Windows 8 you can run Hyper-V on your desktop, laptop or Windows tablet and it can virtualize Windows as well as Linux virtual machines. To install or enable Hyper-V on your Windows 10 machine, you just need to have the following requirements:
- Windows 10 Enterprise, Professional, or Education (Home does not have the Hyper-V feature included)
- 64-bit processor with Second Level Address Translation (SLAT)
- CPU support for VM Monitor Mode Extension (VT-c on Intel CPU’s)
- Minimum of 4 GB memory
The easiest way to enable Hyper-V on Windows 10 is to run the following PowerShell command as an administrator. If you want to install it using the GUI, you can also install the Hyper-V feature in the Windows 10 Control Panel.
Enable-WindowsOptionalFeature -Online -FeatureName:Microsoft-Hyper-V -All
or you can use the following CMD DISM command:
DISM /Online /Enable-Feature /All /FeatureName:Microsoft-Hyper-V
If you are looking for installing Hyper-V on Windows Server, check the following blog post: Install Hyper-V on Windows Server using PowerShell. If you want to know more about Hyper-V on Windows 10, check the Microsoft Docs. If you have any questions feel free to leave a comment.
Hyper-V is also used in many other features within Windows. For example in Windows Defender Application Guard, Docker or Windows Sandbox.
Tags: Enable Hyper-V, Hyper-V, Hyper-V Windows 10, Hypervisor, install, Install Hyper-V, Install Hyper-V Windows 10, Microsoft, PowerShell, Virtualization, Windows, Windows 10, Windows Hyper-V Last modified: July 18, 2019
About the Author / Thomas Maurer

Thomas works as a Senior Cloud Advocate at Microsoft. He engages with the community and customers around the world to share his knowledge and collect feedback to improve the Azure cloud platform. Prior joining the Azure engineering team, Thomas was a Lead Architect and Microsoft MVP, to help architect, implement and promote Microsoft cloud technology.
If you want to know more about Thomas, check out his blog: www.thomasmaurer.ch and Twitter: www.twitter.com/thomasmaurer
Because it is important with maintaining Virtual Machine environments to be able to repeat routine tasks completely accurately, Windows PowerShell has grown in importance for the job. Now you can manage the Hyper-V environment via PowerShell without needing to use the Hyper-V Manager console. It opens up many opportunities for automation.
The series so far:
- Hyper-V and PowerShell: The Basics
- Hyper-V and PowerShell: Shielded Virtual Machines
Introduction
Hyper-V is Microsoft’s hypervisor that lets you run multiple virtual machines on a single physical host. Microsoft introduced Hyper-V in Windows Server 2008. Today, there are several ways to manage Hyper-V hosts:
- Hyper-V manager: This is the default tool used to manage Hyper-V. This tool also manages remote hosts. It allows you to manage virtual machines, but also the network configuration and all Hyper-V settings.
- System Center Virtual Machine Manager: This tool is part of the Microsoft System Center products. VMM centrally manages one or more Hyper-V hosts. It provides advanced Hyper-V administration and you can also manage VMware hosts by integrating your VMware vCenter.
- Windows PowerShell: To simplify the management, it is possible to use the Hyper-V PowerShell module to configure and work with your virtual machines. With PowerShell, you can accomplish most of the tasks that you can accomplish with the GUI.
PowerShell and Hyper-V
Why use PowerShell to manage Hyper-V? Of course, you can use the GUI to perform most of the actions that we will describe in this article. However, PowerShell has several advantages. It allows you to automate the tasks and gives you more flexibility. In some cases, you have no option to using PowerShell because Microsoft does not automatically include all the features of Hyper-V in the GUI.
The first step is to install Hyper-V on your Windows machine. Remember that it is possible to install Hyper-V not just on a Windows server, but also on Windows 10. Use this command to install it on Windows Server:
|
PS > Install-WindowsFeature -Name Hyper-V -IncludeManagementTools -Restart |
Make sure that you include the -IncludeManagementTools parameter. This will install the Hyper-V Manager console and the Windows PowerShell module for Hyper-V.
Use this command to activate the role on Windows 10:
|
PS > Enable-WindowsOptionalFeature -Online -FeatureName Microsoft-Hyper-V -All |
By Installing Hyper-V on Windows 10, you can use your own machine to test, and become familiar with, Hyper-V without any additional cost. All you need is a Windows machine with enough memory and processor to work comfortably.
Now you can use the Get-Command cmdlet to check if the PowerShell Hyper-V module is available:
|
1 2 3 4 5 6 7 8 9 10 11 12 13 14 15 16 17 18 19 20 21 22 |
PS > get-command -module Hyper-V CommandType Name Version Source —————— —— ———— ——— Cmdlet Add-VMAssignableDevice 2.0.0.0 Hyper-V Cmdlet Add-VMDvdDrive 2.0.0.0 Hyper-V Cmdlet Add-VMFibreChannelHba 2.0.0.0 Hyper-V Cmdlet Add-VMGpuPartitionAdapter 2.0.0.0 Hyper-V Cmdlet Add-VMGroupMember 2.0.0.0 Hyper-V Cmdlet Add-VMHardDiskDrive 2.0.0.0 Hyper-V Cmdlet Add-VMHostAssignableDevice 2.0.0.0 Hyper-V Cmdlet Add-VMKeyStorageDrive 2.0.0.0 Hyper-V Cmdlet Add-VMMigrationNetwork 2.0.0.0 Hyper-V Cmdlet Add-VMNetworkAdapter 2.0.0.0 Hyper-V Cmdlet Add-VMNetworkAdapterAcl 2.0.0.0 Hyper-V Cmdlet Add-VMNetworkAdapterExtendedAcl 2.0.0.0 Hyper-V Cmdlet Add-VMNetworkAdapterRoutingDomainMapping 2.0.0.0 Hyper-V Cmdlet Add-VMRemoteFx3dVideoAdapter 2.0.0.0 Hyper-V Cmdlet Add-VMScsiController 2.0.0.0 Hyper-V … PS > get-command -module Hyper-V | Out-GridView |
To make it easier to search for commands, pipe the output to the Out-GridView cmdlet. It also pays to update the help files before you begin with Hyper-V and PowerShell.
|
PS > Update-Help -Module Hyper-V |
Ok, let’s explore how you can automate many of your Hyper-V maintenance tasks with PowerShell.
Configuring Hyper-V Host
Although you have installed Hyper-V on your machine, it is not yet completely configured and adapted to your environment. Firstly, let us see the characteristics of our Host with the Get-VMHost cmdlet, not to be confused with Get-VM cmdlet which displays the VMs that are running on the host. I will come back to the latter command in the next section:
|
PS > Get-VMHost Name LogicalProcessorCount MemoryCapacity(M) VirtualMachineMigrationEnabled —— ——————————— ————————— ——————————————— DESKTOP-CAKCHQH 4 3975.2734375 False PS > Get-VMHost | Select * |
Most cmdlets do not display all the available properties. To change this, we must add the Select-Object cmdlet and then add the wildcard *.
What are these properties?
- The name of the server (In my case it is my Windows 10 laptop),
- The number of logical processors it has,
- The amount of memory,
- And finally, whether the live migration is enabled.
This cmdlet accepts the -ComputerName parameter to query a remote host.
Note that the virtual switches are not included in the previous result. To display them, you must use the Get-VMSwitch cmdlet. You will find that this command returns no result, which is normal.
The communication between the Hyper-V host and its VMs is based on the concept of the VMSwitch. Here is a very simple diagram:
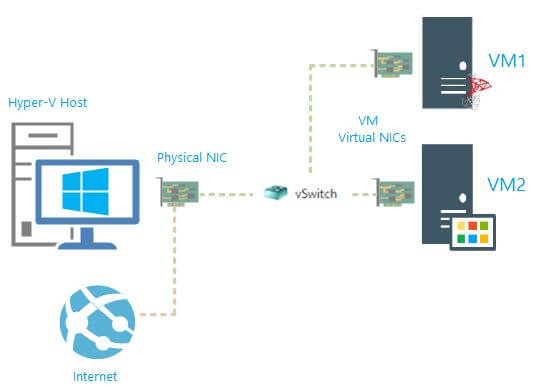
Figure 1 – Hyper-V Virtual Switch
When a VMSwitch is linked to a Physical Network Adapter, then VMs will use this VMSwitch to be connected to the network; so we must identify which one will be used via the Get-NetAdapter cmdlet:
|
PS > Get-NetAdapter Name InterfaceDescription ifIndex Status MacAddress LinkSpeed —— —————————— ———— ——— ————— ————— Ethernet Realtek PCIe GBE Family Controller 6 Up 54-63-ED-4D-74-70 1 Gbps Wi-Fi Qualcomm Atheros AR9485WB-EG Wireles... 12 Disconnected 08-9E-2E-C4-2F-A4 0 bps |
In the example, the adapter is called “Ethernet”. You can use the New-VMSwitch cmdlet to create a new virtual switch using Windows PowerShell. In my case, the following command is used to create a VMSwitch named “My Virtual Switch” that is assigned to the physical network adapter named “Ethernet”:
|
PS > New-VMSwitch -Name «My Virtual Switch» -NetAdapterName «Ethernet» Name SwitchType NetAdapterInterfaceDescription —— ————— ——————————————— My Virtual Switch External Realtek PCIe GBE Family Controller |
For help with the syntax of this cmdlet, use the Get-Help New-VMSwitch command.
Creating VMs
We have configured the essentials for using our host. Here’s how to deploy a virtual machine. The first thing is to list the virtual machines already running on the host. For this, use the Get-VM cmdlet, which does exactly what its name implies:
|
PS > Get-VM Name State CPUUsage(%) MemoryAssigned(M) Uptime Status —— ——— —————— ————————— ——— ——— prodIIStest Off 0 0 00:00:00 Operating normally Test02 Running 0 4096 79.03:30:33 Operating normally VMWEB01 Running 0 4096 9.23:57:25 Operating normally |
This PowerShell cmdlet returns an object, so if you need more information about a VM, add the -Name parameter and you can pipe the previous cmdlets output to the Format-List cmdlet:
|
1 2 3 4 5 6 7 8 9 10 11 12 13 14 15 16 17 18 19 20 21 22 23 |
PS > Get-VM -Name VMWEB01 | Format-List * VMName : VMWEB01 VMId : c52a5b53-844b-4d49-9c96-f85801c34a95 Id : c52a5b53-844b-4d49-9c96-f85801c34a95 Name : VMWEB01 State : Running IntegrationServicesState : Up to date OperationalStatus : {Ok} PrimaryOperationalStatus : Ok SecondaryOperationalStatus : StatusDescriptions : {Operating normally} PrimaryStatusDescription : Operating normally SecondaryStatusDescription : Status : Operating normally Heartbeat : OkApplicationsHealthy ReplicationState : Disabled ReplicationHealth : NotApplicable ReplicationMode : None CPUUsage : 0 MemoryAssigned : 4294967296 … |
You then get a set of very interesting properties. The output was truncated but here are some examples of the most commonly used properties:
- IntegrationServicesState: Allows you to verify whether the Integration Services are installed. For those using VMware, this is the equivalent of VMware Tools.
- Generation: Displays the version of the virtual machine (1 or 2)
- State / Status / OperationalStatus: Several properties allow to precisely verify the health of the virtual machine.
- Uptime: Execution time of the VM
- MemoryAssigned: Memory assigned to the virtual machine
- Path: Where the *.VHDX files are located
- ProcessorCount: The number of processors assigned to the virtual machine
For PowerShell One-Liners, you can easily get these properties for all your VMs:
|
PS > Get-VM | where {$_.state -eq ‘running’} | sort Uptime | select Name,Uptime,ProcessorCount,@{N=«MemoryMB»;E={$_.MemoryAssigned/1MB}},Status,Generation,Path,IntegrationServicesState | Format-Table –AutoSize Name Uptime ProcessorCount MemoryMB Status Generation Path IntegrationServicesState —— ——— ——————— ———— ————————— ————— —— ———————————— VMWEB01 10.00:46:01 2 4096 Operating normally 1 D:VMVMWEB01 Up to date Test02 79.04:19:09 2 4096 Operating normally 1 D:VMTESTTest02 Up to date |
Let us now see the next administration task that you will use: Create your first VM. We use several parameters:
- Name: corresponds to the name of the VM
- MemoryStartupBytes: corresponds to the amount of memory allocated
- SwitchName: corresponds to the VMSwitch name previously created
- NewVHDPath: corresponds to the location where the VHDX file will be stored (This file corresponds to the VMDK file for VMware)
- NewVHDSizeBytes: corresponds to the VHDX file size
|
PS > New-VM -Name «VMTest» -MemoryStartupBytes 1GB ` -SwitchName «My Virtual Switch» ` -NewVHDPath «C:usersNicolasDocumentsHyper-vVMTest.vhdx» ` -NewVHDSizeBytes 20GB Name State CPUUsage(%) MemoryAssigned(M) Uptime Status Version —— ——— —————— ————————— ——— ——— ———— VMTest Off 0 0 00:00:00 Operating normally 8.0 |
The machine is created and is stopped. Some actions can only be made after the creation of the VM, such as increasing the number of processors, increasing memory. Here are some basic actions that will be helpful for your daily tasks:
Create a second disk
|
1 2 3 4 5 6 7 8 9 10 11 12 13 14 15 16 17 18 19 |
PS > New—VHD —Path «C:usersNicolasDocumentsHyper—vVirtual Hard DisksVMTest2.vhdx« —SizeBytes 10GB —Fixed ComputerName : DESKTOP—CAKCHQH Path : C:usersNicolasDocumentsHyper—vVirtual Hard DisksVMTest2.vhdx VhdFormat : VHDX VhdType : Fixed FileSize : 10741612544 Size : 10737418240 MinimumSize : LogicalSectorSize : 512 PhysicalSectorSize : 4096 BlockSize : 0 ParentPath : DiskIdentifier : 43046EE3—656D—454A—A273—3B3B34DEF1D7 FragmentationPercentage : 0 Alignment : 1 Attached : False DiskNumber : Number : |
The file is created, all that remains is to attach it to our VM:
|
PS > Add-VMHardDiskDrive -VMName VMTest -Path «C:usersNicolasDocumentsHyper-vVirtual Hard DisksVMTest2.vhdx» |
PowerShell does not return us any information. So how to know if the disc is actually attached? Well, simply run the following command:
|
PS > (Get-VM –VMName VMTest | Select-Object VMId | Get-VHD).Path C:usersNicolasDocumentsHyper-vVMTest.vhdx C:usersNicolasDocumentsHyper-vVirtual Hard DisksVMTest2.vhdx |
Increase the number of processors
|
PS > Set-VMProcessor «VMTest» -Count 2 |
Increase the memory
|
PS > Set-VMMemory «VMTest» -DynamicMemoryEnabled $true -MaximumBytes 1GB |
To check if previous actions were applied, you can of course use the Hyper-V console:
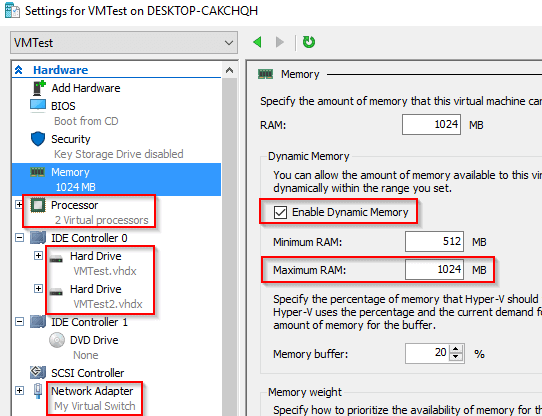
Figure 2 – VM settings from Hyper-V GUI
Working With VMs
Ok, let us summarize the steps made so far:
- Installing the Hyper-V role
- Configuring the Network
- Creating a VM
- Configuring the VM
The next step is to start and shut down our VMs. The following cmdlets are very easy to use, so let us first see an example:
|
PS > Start-VM -name VMTest |
Stopping the machine is done via the Stop-VM cmdlet. This action makes the machine stop through the operating system. For those using VMware, this is equivalent of the “Guest Shutdown” option.
You may get the following error message:
PS > Stop-VM -name VMTest
Stop-VM : The virtual machine is locked. An interactive shutdown cannot proceed while the virtual machine is locked.
At line:1 char:1
+ Stop-VM -name VMTest
+ ~~~~~~~~~~~~~~~~~~~~~~~~~
    + CategoryInfo          : NotSpecified: (Microsoft.HyperV.PowerShell.ShutdownTask:ShutdownTask) [Stop-VM], Virtual
   izationOperationFailedException
    + FullyQualifiedErrorId :
Unspecified,Microsoft.HyperV.PowerShell.Commands.StopVMCommand
This means that the machine is in use by another process. To work around this, the -force parameter can be used:
|
PS > Stop-VM -name VMTest -Force |
Note: the -TurnOff parameter can also be used. This is the equivalent of “PowerOff” via VMware.
More information is available here: https://technet.microsoft.com/fr-fr/library/hh848468.aspx
Let us finish by touching on the Hyper-V ‘checkpoints’ concept. Checkpoints are not considered as backups, but you will still find them to be very useful. Indeed, they are regularly used before performing an action on a VM such as an update, by saving the state of the virtual machine. In this way, it is very easy to roll back to the previous state if the update fails. The official term is “Checkpoint” but cmdlets also uses the term “Snapshot” that is well known to any VMware sysadmin.
To create a checkpoint, select the virtual machine using the Get-VM cmdlet and pipe this to the Checkpoint-VM cmdlet. Use the –SnapshotName parameter to give a name. The complete command looks like the following:
|
PS > Get-VM -Name VMTest | Checkpoint-VM -SnapshotName “Before Upgrade” |
You can easily view the checkpoints with the Get-VMCheckpoint cmdlet and remove them with Remove-VMCheckpoint:
|
PS > Remove-VMCheckpoint -VMName VMTest -Name «Before Upgrade» |
To Go Further
The Hyper-V console is limited because it only allows you to work on a single VM at a time, unlike PowerShell which you can use to interact with multiple machines simultaneously. So, you can easily create scripts to automate tasks. Consider the following example where you want to configure all your VMs with 4 processors:
|
PS > Get-VM | select name, processorcount Name ProcessorCount —— ——————— test 1 VMTest 2 PS > Get-VM | Set-VMProcessor -Count 4 PS > Get-VM | select name, processorcount Name ProcessorCount —— ——————— test 4 VMTest 4 |
Another example for creating a Checkpoint on all your VMs at once:
|
PS > Get-VM | Checkpoint-VM -SnapshotName «Weekly Checkpoint» PS > Get-VM | Get-VMCheckpoint VMName Name SnapshotType CreationTime ParentSnapshotName ——— —— —————— —————— ————————— test Weekly Checkpoint Standard 30.10.2016 20:12:40 VMTest Weekly Checkpoint Standard 30.10.2016 20:12:42 |
Finally, you will be able to plan an export of your VMS in a regular manner to backup them. Save the following lines in “ExportVM.ps1” file:
|
# Backup Folder $Backup = «C:Backup» # Get VMs Name $VMs = Get-VM | select name # Delete Backup Folder and create it again if((Test-Path -Path $Backup)){ Remove-Item $Backup -force -recurse -erroraction:SilentlyContinue } else { New-Item $Backup -type directory } # Export all the VMs foreach ($VM in $VMs) { Export-VM -Name $VM.Name -Path $Backup } |
All that remains to do is to schedule this script to be triggered at the frequency you need:
|
PS > $trigger = New—JobTrigger —Weekly —DaysOfWeek Sunday —WeeksInterval 2 —At 12:00AM $options = New—ScheduledJobOption —RunElevated Register—ScheduledJob —Name «Weekly VM Export« —FilePath C:ScriptsExportVM.ps1 —Trigger $trigger —ScheduledJobOption $options Id Name JobTriggers Command Enabled — —- ———— ——- ——- 1 Weekly VM Ex... 1 C:ScriptsExportVM.ps1 True |
Conclusion
We have described the basic cmdlets to manage Hyper-V environment. PowerShell will help you to automate various repetitive tasks such as configuring Hyper-V in either a standalone host or Hyper-V cluster, provisioning a virtual machine or managing Checkpoints.
Each example used in this guide can be applied in bulk mode to automate the management of your environment. If you want to read more about working with Hyper-V using PowerShell, you can start with this article: https://technet.microsoft.com/en-us/library/hh848559.aspx. To learn more about a particular PowerShell command use, Get-Help.
Finally, if you want to go even further in the management and automation of Hyper-V with PowerShell, I advise you to study the new “PowerShell Desired State Configuration” feature. Indeed, DSC provides a resource named xHyper-V that will allow you to completely automate Hyper-V management. For this, I redirect you to the following article about DSC resources: https://www.simple-talk.com/sysadmin/powershell/powershell-desired-state-configuration-dsc-resources/