Если у вас есть образ (точная копия операционной системы), то в случае выхода из строя операционной системы, вы легко и быстро восстановите данные системного раздела с помощью встроенного в Windows 10 компонента «Резервное копирование и восстановление». Ошибочные транзакции больше не будут стоить вам денег и драгоценных часов, которые вы раньше тратили на восстановление системы. Вам больше не придется посещать форумы или искать специалиста среди своих друзей или знакомых.
Чтобы иметь возможность восстановить систему, используя созданный образ операционной системы встроенным компонентом Windows 10 «Резервное копирование и восстановление», потребуется диск восстановления системы, созданный встроенным компонентом Windows 10 «Резервное копирование и восстановление». На диске есть все необходимые средства восстановления системы, с помощью которых можно восстановить систему в случае серьезных ошибок или устранить неполадки компьютера, даже если он не запускается. Но от вас потребуется некоторый уровень подготовки. Тем не менее оно того стоит.
Вы должны знать, что такое BIOS компьютера, в котором имеется встроенная утилита Setup. Утилита предназначена для первоначальной настройки компьютера. В ней потребуется изменить приоритет загрузки, то есть выставить загрузку с привода CD/DVD. Вход в утилиту Setup выполняется сразу после включения компьютера во время загрузки компьютера путем нажатия определенной клавиши или комбинации клавиш – это может быть Del, F1, Ctrl+Alt+Esc, Ctrl+Esc, могут быть другие комбинации клавиш. Это зависит от версии BIOS. Как правило, требуемая клавиша или комбинация клавиш отображается сразу после включения компьютера в нижней части монитора.
При нажатии нужной клавиши или комбинации клавиш при загрузке компьютера откроется меню утилиты Setup.
Если вы раньше самостоятельно устанавливали операционную систему предыдущих редакций Windows, то для вас открыть утилиту Setup и изменить приоритет загрузки, большого труда не составит. Если не делали этого, то первый раз лучше обратиться к специалисту.
Однако, большинство системных плат имеют селектор загрузки, которое можно открыть, нажав определенную клавишу или сочетание клавиш, например, F11 (F8, F10, F12), зависит от версии BIOS. Меню загрузки позволяет выбрать устройство для загрузки из списка загрузочных устройств, не изменяя настройки BIOS. Определить клавишу или сочетание клавиш можно во время загрузки, когда идет тестирование оборудования.
При нажатии нужной клавиши или комбинации клавиш при загрузке компьютера откроется селектор загрузки. Предварительно нужно вставить диск восстановления системы в привод CD/DVD.
Выберите из списка устройств – привод CD/DVD. Нажмите клавишу Enter. При появлении уведомления «Press any key to boot from CD or DVD», что означает «Нажмите любую клавишу для загрузки с CD или DVD», выполните это действие. Откроется стартовая страница.
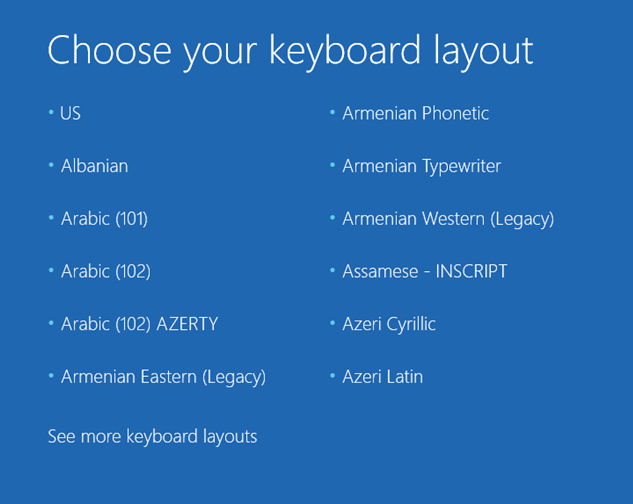
Выберите раскладку клавиатуры — Русская.
В новом окне выбора действия выберите «Поиск и устранения неисправностей».
В дополнительных параметрах выберите «Восстановление образа системы».
Далее выберите целевую операционную систему — Windows 10.
По умолчанию система предложит использовать последний доступный образ системы. Но вы можете выбрать другой образ для восстановления системы, установив переключатель в положение «Выберите образ системы». Нажмите «Далее».
В окне дополнительных параметров восстановления ничего делать не нужно, если восстановление системы происходит на том же компьютере, на котором создавался образ. Нажмите «Далее».
Подготовка к восстановлению системы закончена. Нажмите «Готово».
Имейте в виду, что все данные на восстанавливаемых дисках будут заменены данными из образа системы. Храните свои данные отдельно от операционной системы и приложений! Иначе в случае серьезных сбоев в системе все ваши данные, добавленные после создания образа в системный раздел, будут утеряны! Нажмите «Да».
Компьютер восстановлен и будет автоматически перезагружен. После автоматической перезагрузки компьютера вы получите реанимированную операционную систему.
-
Partition Wizard
-
Partition Magic
- [Solved] “PC Stuck at the ‘Choose Your Keyboard Layout’ Screen”
By Vicky | Follow |
Last Updated July 08, 2021
Plenty of guys has been bothered by the issue: Windows 10 upgrade stuck at “Choose your keyboard layout” screen and felt helpless. This post from MiniTool Partition Wizard shows how to fix “Choose your keyboard layout”. Start reading.
Windows 10 Stuck at “Choose Your Keyboard Layout”
Stuck at «choose your keyboard layout» in Automatic Repair. Not a recent upgrade:
Hi. I’ve seen many people report this issue in the past after first upgrading to Win 10. I’ve been running Win10 on my PC for years now and it only recently started. The first time everything was fine after a couple of power offs. Now though, it is persisting and goes straight to the repair screen without the ability to access bios or anything else.answers.microsoft.com
The “Change your keyboard layout” screen pop up when people upgrade to Windows 10 from older versions of the OS. However, lots of people reported that Windows 10 upgrade stuck at “Choose your keyboard layout” screen. Why does the issue happen? Go on reading.
When Windows 10 upgrade is stuck at «Choose your keyboard layout» screen, it first signifies that your keyboard or mouse is unless. Aside from the reason, the others reasons include corrupted Windows 10 upgrade files and corrupted Universal Serial Bus controllers (USB) drivers. So, based on these reasons, here are some suggestions for fixing “Choose Your Keyboard Layout”:
Solutions to Fix «Choose Your Keyboard Layout»
- Check your keyboard and mouse
- Restore boot configuration
- Update drivers
- Install fresh updates
- Reinstall Windows 10
# Check Your Keyboard and Mouse
First of all, connect your keyboard or mouse to another computer or laptop and use them to see if they work fine. If they are working, it means the issue: Window 10 upgrade stuck at «Choose your keyboard layout» screen is caused by other reasons, and you need to try the following solutions.
# Restore Boot Configuration
This solution needs to be done in Windows Recovery Environment. So, create Windows 10 Installation media and boot your computer through it. Once your computer boots, perform the following operations:
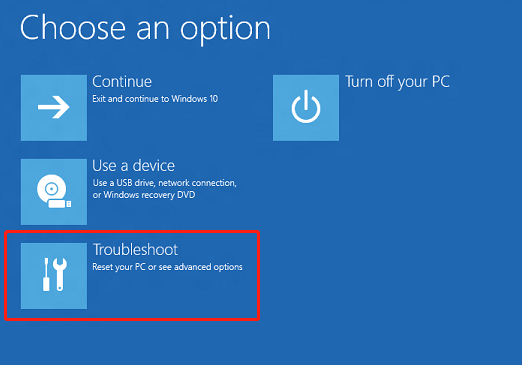
Step 1: Select the Recovery Menu option on the Choose an option screen and then choose the Troubleshoot option.
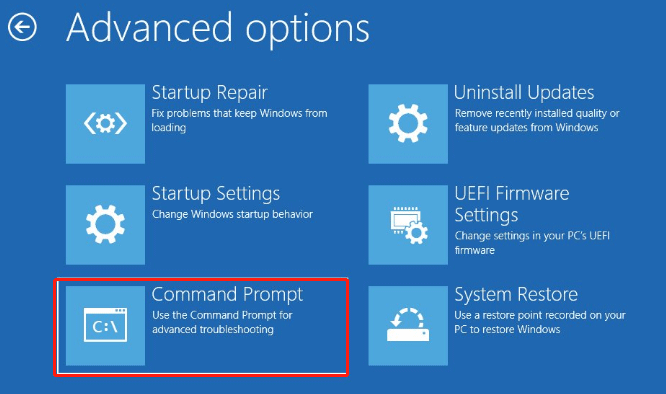
Step 2: Now choose the Command Prompt option under Advanced Options.
Step 3: Once the Command Prompt window opens, type the following commands one by one and hit the Enter key after each.
chkdsk c: /f
bootrec /fixmbr
bootrec /fixboot
bootrec /rebuildbcd
bcdboot c:windows /s c:
Step 4: Once done, close Command Prompt and reboot your computer.
Does the solution fix the issue “Change your keyboard layout”? If not, please carry out the next solution.
# Update Drivers
Now try updating drivers. Here are the steps:
Step 1: Enable Safe Mode with networking.
Step 2: Right-click the Start icon in the bottom-left corner of your desktop screen and then choose the Device Manager option from the menu.
Step 3: Expand all categories, and see if any driver is marked with a yellow exclamation.
If yes, it indicates that there is an issue with the device such as a missing driver or the driver is not installed incorrectly. To remove the yellow exclamation, proceed to carry out the following steps. If there is no yellow exclamation, please update all Universal Serial Bus controllers through the following steps.
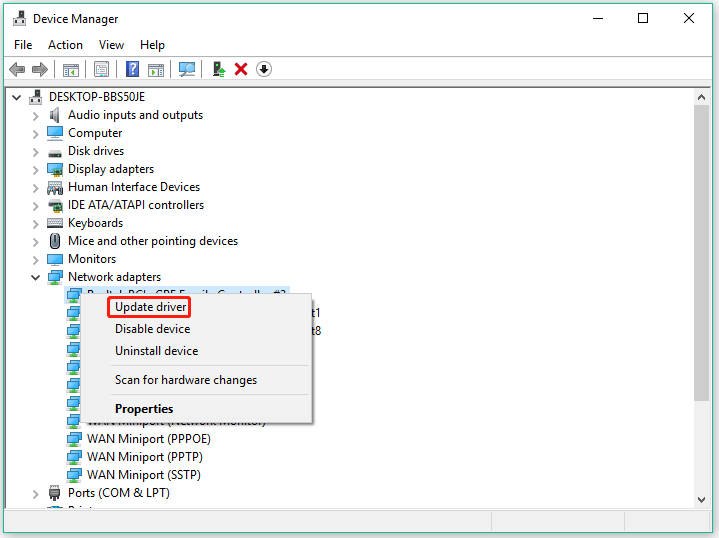
Step 4: Right-click the device with a yellow exclamation and choose the Update driver option.
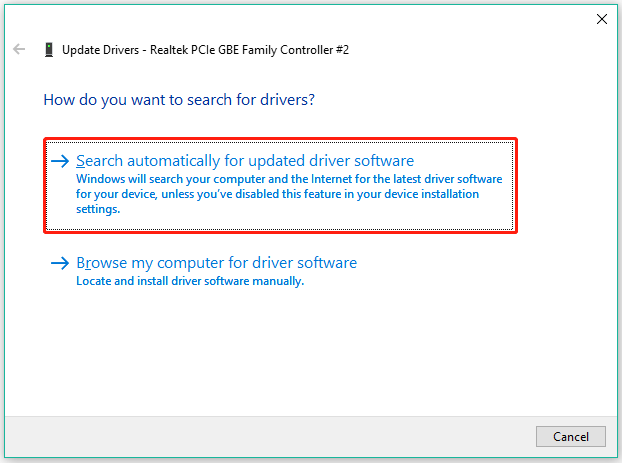
Step 5: Choose the Search automatically for updated driver software option.
Step 6: Follow the on-screen instructions to complete this updating.
After updating these drivers, see if the issue — Windows 10 upgrade stuck at “Choose your keyboard layout” screen — persists.
# Install Fresh Updates
Installing fresh updates could fix “Windows 10 Choose your keyboard layout”.
Note: If you still can access the desktop, you can run Windows Update services to install fresh updates for Windows 10. If not, please enable Safe Mode with networking and then finish the installation.
Here are the steps to install fresh updates for Windows 10 through Windows Update services:
Step 1: Press Windows + I to access Windows Settings.
Step 2: On the Windows Settings window, select the Update & security setting.
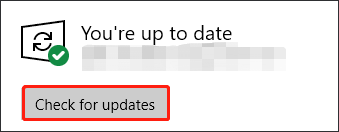
Step 3: Click the Check for updates button to let Windows scan for the fresh updates and install them if found.
Step 4: During the installation, see if Windows will be stuck in the “Change your keyboard layout” screen again.
# Reinstall Windows 10
Does the “Change your keyboard layout” issue still appear? If it disappears, that’s great! If it still besets you, please try the ultimate solution — reinstall Windows 10.
The detailed guide of Windows 10 reinstallation is included in the following article:
Well, that’s all about how to fix “Choose your keyboard layout”. Hope the aforementioned solutions are helpful in your case.
About The Author
Position: Columnist
Vicky is a website editor who has been writing tech articles since she was graduated from university. Most of her articles talk about Windows PC and hard disk issues. Some of her articles also touch on YouTube usage and issues.
During her spare time, she likes to spend time reading, watching videos, and sitting on her Yoga mat to relax.
-
Partition Wizard
-
Partition Magic
- [Solved] “PC Stuck at the ‘Choose Your Keyboard Layout’ Screen”
By Vicky | Follow |
Last Updated July 08, 2021
Plenty of guys has been bothered by the issue: Windows 10 upgrade stuck at “Choose your keyboard layout” screen and felt helpless. This post from MiniTool Partition Wizard shows how to fix “Choose your keyboard layout”. Start reading.
Windows 10 Stuck at “Choose Your Keyboard Layout”
Stuck at «choose your keyboard layout» in Automatic Repair. Not a recent upgrade:
Hi. I’ve seen many people report this issue in the past after first upgrading to Win 10. I’ve been running Win10 on my PC for years now and it only recently started. The first time everything was fine after a couple of power offs. Now though, it is persisting and goes straight to the repair screen without the ability to access bios or anything else.answers.microsoft.com
The “Change your keyboard layout” screen pop up when people upgrade to Windows 10 from older versions of the OS. However, lots of people reported that Windows 10 upgrade stuck at “Choose your keyboard layout” screen. Why does the issue happen? Go on reading.
When Windows 10 upgrade is stuck at «Choose your keyboard layout» screen, it first signifies that your keyboard or mouse is unless. Aside from the reason, the others reasons include corrupted Windows 10 upgrade files and corrupted Universal Serial Bus controllers (USB) drivers. So, based on these reasons, here are some suggestions for fixing “Choose Your Keyboard Layout”:
Solutions to Fix «Choose Your Keyboard Layout»
- Check your keyboard and mouse
- Restore boot configuration
- Update drivers
- Install fresh updates
- Reinstall Windows 10
# Check Your Keyboard and Mouse
First of all, connect your keyboard or mouse to another computer or laptop and use them to see if they work fine. If they are working, it means the issue: Window 10 upgrade stuck at «Choose your keyboard layout» screen is caused by other reasons, and you need to try the following solutions.
# Restore Boot Configuration
This solution needs to be done in Windows Recovery Environment. So, create Windows 10 Installation media and boot your computer through it. Once your computer boots, perform the following operations:
Step 1: Select the Recovery Menu option on the Choose an option screen and then choose the Troubleshoot option.
Step 2: Now choose the Command Prompt option under Advanced Options.
Step 3: Once the Command Prompt window opens, type the following commands one by one and hit the Enter key after each.
chkdsk c: /f
bootrec /fixmbr
bootrec /fixboot
bootrec /rebuildbcd
bcdboot c:windows /s c:
Step 4: Once done, close Command Prompt and reboot your computer.
Does the solution fix the issue “Change your keyboard layout”? If not, please carry out the next solution.
# Update Drivers
Now try updating drivers. Here are the steps:
Step 1: Enable Safe Mode with networking.
Step 2: Right-click the Start icon in the bottom-left corner of your desktop screen and then choose the Device Manager option from the menu.
Step 3: Expand all categories, and see if any driver is marked with a yellow exclamation.
If yes, it indicates that there is an issue with the device such as a missing driver or the driver is not installed incorrectly. To remove the yellow exclamation, proceed to carry out the following steps. If there is no yellow exclamation, please update all Universal Serial Bus controllers through the following steps.
Step 4: Right-click the device with a yellow exclamation and choose the Update driver option.
Step 5: Choose the Search automatically for updated driver software option.
Step 6: Follow the on-screen instructions to complete this updating.
After updating these drivers, see if the issue — Windows 10 upgrade stuck at “Choose your keyboard layout” screen — persists.
# Install Fresh Updates
Installing fresh updates could fix “Windows 10 Choose your keyboard layout”.
Note: If you still can access the desktop, you can run Windows Update services to install fresh updates for Windows 10. If not, please enable Safe Mode with networking and then finish the installation.
Here are the steps to install fresh updates for Windows 10 through Windows Update services:
Step 1: Press Windows + I to access Windows Settings.
Step 2: On the Windows Settings window, select the Update & security setting.
Step 3: Click the Check for updates button to let Windows scan for the fresh updates and install them if found.
Step 4: During the installation, see if Windows will be stuck in the “Change your keyboard layout” screen again.
# Reinstall Windows 10
Does the “Change your keyboard layout” issue still appear? If it disappears, that’s great! If it still besets you, please try the ultimate solution — reinstall Windows 10.
The detailed guide of Windows 10 reinstallation is included in the following article:
Well, that’s all about how to fix “Choose your keyboard layout”. Hope the aforementioned solutions are helpful in your case.
About The Author
Position: Columnist
Vicky is a website editor who has been writing tech articles since she was graduated from university. Most of her articles talk about Windows PC and hard disk issues. Some of her articles also touch on YouTube usage and issues.
During her spare time, she likes to spend time reading, watching videos, and sitting on her Yoga mat to relax.
Выберите раскладку клавиатуры для ввода пароля при восстановлении системы из точки восстановления с использованием учетной записи
Win10. Не указана англиканская США
меняя высокий сдвиг, переключайтесь на латинский алфавит, но пароль неверный, пароль проверенный правильный
До свидания!
Попробуйте изменить пароль своей учетной записи Microsoft на цифровой пароль, например 90-33-34! а затем введите его в эту форму.
Удачи тебе! __
Если мой ответ был вам полезен, отметьте его как ответ.
Отказ от ответственности: ответ может содержать ссылки на сайты, отличные от сайтов Microsoft. Вы следуете любым советам таких сайтов на свой страх и риск.
Источник: https://answers.microsoft.com/ru-ru/windows/forum/all/select/b657a44a-301f-47fc-834b-9dbeeeb69ea6
Skip to content
На чтение 2 мин. Просмотров 1.2k. Опубликовано 03.09.2019
Некоторым пользователям было трудно работать со своими ПК с Windows 10 после перезагрузки системы. А именно, кажется, что после выбора раскладки клавиатуры возникает ошибка, как только система сбрасывает настройки по умолчанию. Он просто говорит Что-то пошло не так , и они не могут успешно загрузиться в Windows 10 и застрять в цикле загрузки.
Один пользователь поделился этой проблемой в Интернете на специальном форуме Microsoft.
Я только что купил подержанный Lenovo T460 и переустановил Windows 10, чтобы я мог использовать его с «чистого листа». Процесс восстановления системы прошел гладко (я выбрал вариант: восстановление без сохранения данных). Однако теперь, когда восстановление системы завершается, я должен выбрать раскладку клавиатуры, после того, как я выбрал предпочитаемую раскладку клавиатуры, я получаю сообщение: «Что-то пошло не так, но вы можете попробовать снова». После того, как я нажал кнопку «повторить попытку», я получил ту же ошибку.
Чтобы это исправить, выполните следующие действия.
Содержание
- Как пройти мимо Выберите раскладку клавиатуры?
- 1. Попробуйте загрузиться в безопасном режиме и установите все драйверы
- 2. Используйте Startup repair
- 3. Переустановите Windows 10
Как пройти мимо Выберите раскладку клавиатуры?
1. Попробуйте загрузиться в безопасном режиме и установите все драйверы
- Перезагрузите компьютер 3 раза, чтобы вызвать меню Восстановление Windows .
-
Выберите Устранение неполадок .
- Откройте Дополнительные параметры .
- Выберите параметры запуска и нажмите Перезагрузить .
- После перезагрузки компьютера выберите Безопасный режим с сетевым подключением .
- Нажмите правой кнопкой мыши Пуск и откройте Диспетчер устройств .
- Установите все отсутствующие драйверы и перезагрузите компьютер.
2. Используйте Startup repair
- Перезагрузите компьютер 3 раза, чтобы открыть меню Восстановление Windows .
- Выберите Устранение неполадок .
- Выберите Дополнительные параметры .
-
Нажмите Восстановление при загрузке и следуйте инструкциям.
3. Переустановите Windows 10
- Сделайте резервную копию ваших данных, этот процесс уничтожит все данные с вашего системного диска.
- Создайте загрузочный USB-диск Windows 10 , выполнив действия, описанные в этой статье.
- Загрузиться с USB.
- Нажмите Shift + F10, чтобы открыть командную строку в начальном окне.
- В командной строке введите следующие команды и нажмите Enter после каждого:
-
DISKPART
- СПИСОК ДИСКОВ
- ВЫБЕРИТЕ ДИСК 0 (при условии, что диск 0 – это диск, на который вы хотите установить Windows 10)
- ЧИСТАЯ
- КОНВЕРТ ГПТ
- ВЫХОД
После этого снова загрузитесь с загрузочного USB-диска и переустановите Windows 10.
Мы надеемся, что эти решения помогли вам устранить ошибку Что-то пошло не так после выбора раскладки клавиатуры.
Несколько раз на компьютерах разных пользователей сталкивался с тем, что на экране входа в Windows (экране приветствия) по-умолчанию используется русская раскладка клавиатуры, при этом имя и пароль пользователей, как правило, набирается в английской раскладке. Поэтому каждый раз перед набором пароля этим несчастным приходится переключать раскладку клавиатуры с русской на английскую (Alt+Shift), что конкретно напрягает.
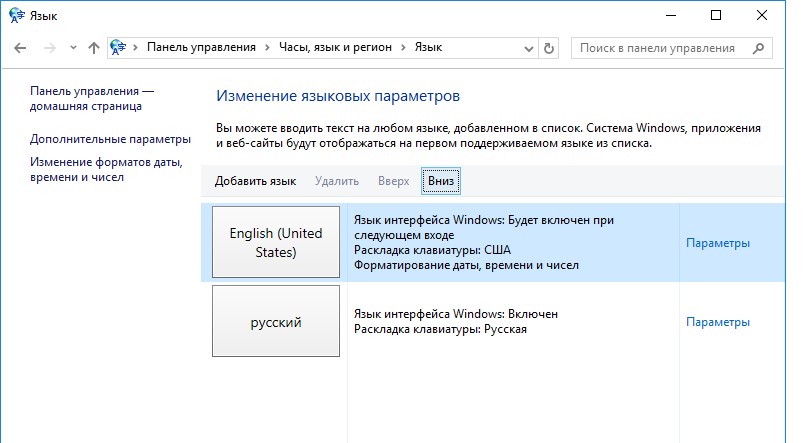
Хотя изменить раскладку клавиатуры при входе в Windows на английскую совсем не трудно. Для этого перейдите в Панель управления -> Часы, язык и регион ->Язык. Убедитесь, что в списке языков системе присутствуют русский и English. С помощью кнопки переместите английский язык вверх списка.
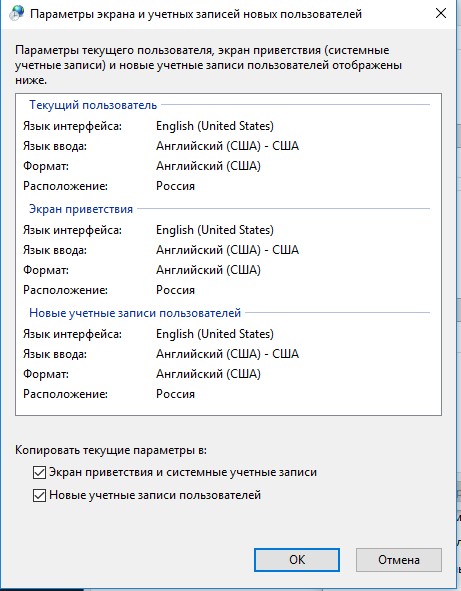
Нажмите на ссылку Применить языковые параметры к экрану приветствия, системным учетным записям и новые учетным записям пользователей.

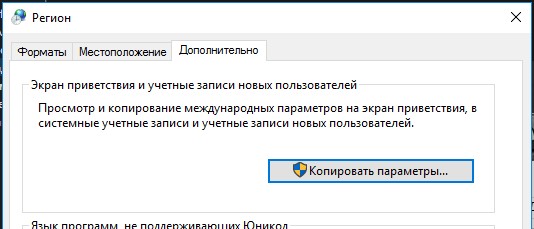
Копировать текущие параметры в:
- Экран приветствия и системные учетные записи
- Новые учетные записи пользователей.
Примените изменения и перезагрузите Windows.
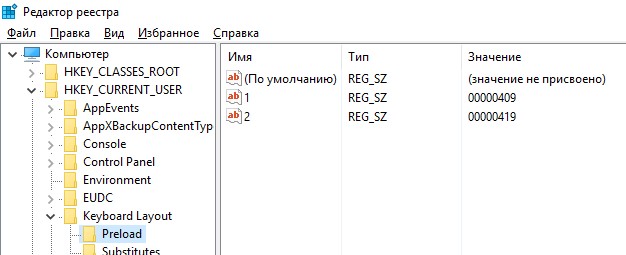
В Windows 7 и ранее для смены раскладки по умолчанию на экране входа в Windows можно было воспользоваться модификацией реестра. Для этого, в ветке HKEY_CURRENT_USERKeyboard LayoutPreload нужно создать/изменить два REG_SZ параметра
- 1 – со значением 00000409 (английский язык)
- 2 — со значением 00000419 (русский язык)
Чтобы отключить это поведение, нужно включить групповую политику Disallow copying of user input methods to the system account for sign-in в разделе Computer configuration -> Administrative Templates ->System ->Locale Services.

В Windows Server Core изменить тип раскладки по-умолчанию на английский можно воспользоваться такой командой:
Set-WinDefaultInputMethodOverride "0409:00000409"


