Из этой статьи вы узнаете про ещё один компонент безопасности операционной системы Windows, а именно про дескрипторы безопасности.
Дескрипторы безопасности
Выше мы смотрели на механизмы которые позволяют точно идентифицировать объекты. И эти объекты, после идентификации, могут выполнять какие-то действия в системе. Если провести аналогию с реальным миром, то SID и Уровень целостности должны быть записаны в вашем паспорте (маркере доступа). Вы пытаетесь зайти на какой-то секретный объект и охранник проверяет ваш паспорт (маркер доступа) и свой список (дескриптор безопасности) тех кто может заходить на этот объект. Получается, маркеры доступа должны быть у тех, кто хочет что-то сделать. А дескрипторы безопасности нужны тем объектам с которыми хотят что-то сделать.
Дескриптор безопасности — это информация, связанная с объектом, которая определяет, кто и какие действия с объектом может выполнять.
В дескриптор безопасности входят:
- Номер версии модели монитора безопасности SRM.
- Дополнительные флаги.
- SID владельца объекта.
- Избирательный список управления доступом — DACL. Это список, кто и какой доступ имеет к объекту.
- Системный список управления доступом — SACL. Это список операций которые должны регистрироваться в журнале аудита безопасности.
ACL состоит из субъектов доступа (кто может обращаться к объекту) и набора прав для каждого субъекта (писать, читать, исполнять). DACL — указывает какой доступ имеет определенный субъект к этому объекту. SACL — указывает какие события нужно заносить в журнал аудита безопасности.
Практика
Давайте посмотрим дескриптор безопасности какого-нибудь процесса. Заметьте, дескриптор безопасности процесса определяет кто может что-то сделать с этим процессом, а не то что может сделать сам процесс. Посмотреть на дескриптор безопасности можно из Process Explorer. Я выбираю любой процесс svhost (процесс какой-то службы), открываю его свойства. Затем перехожу на вкладку “Securuty” и внизу нажимаю кнопку “Permision“:

В примере выше к этому процессу имеют доступ только локальные администраторы. При этом читать и писать в процесс они не могут, но имеют “Особые разрешения“.
Если погрузиться дальше, нажимаем кнопку “Дополнительно“, далее два раза щелкаем по группе “Администраторы“, и в открывшемся окне нажимаем ссылку “Отображение дополнительных разрешений“. Вы увидите такую ACE запись (записи в ACL называются ACE):

То есть Администраторы могут запрашивать информацию о процессе.
Вот еще некоторые сведения о DACL:
- Владельцы объекта имеют возможность редактировать DACL записи. То есть могут дать себе полные права, или дать права к этому файлу другому пользователю.
- Запрещающие правила ACL всегда имеют приоритет над разрешающими.
Если открыть свойства файла или папки, перейти на вкладку “Безопасность“, а затем нажать кнопку “Дополнительно“. И перейти на вкладку “Действующие права доступа“, то можно выбрать пользователя и проверить его права доступа к этому файлу или каталогу:

Динамическое управление доступом (DAC)
В дополнение к перечисленному выше стоит упомянуть ещё одну технологию – динамическое управление доступом.
Механизм избирательного управления доступом, описанный выше был еще с первой версии Windows NT. Но начиная с Windows 8 и Server 2012 появилось динамическое управление доступом (DAC). Оно рассчитано на домен.
Суть в том что в маркер доступа стало возможно добавлять различные атрибуты учетных записей домена. Например город в котором работает сотрудник.
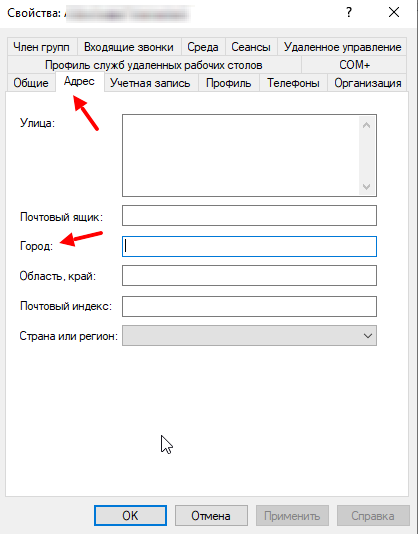
Дополнительно к этому на файлы и каталоги стало возможно навешивать различные теги.
Благодаря расширению маркера доступа и тегам, DAC позволяет настраивать гибкие правила. Например, можно настроить такое поведение, чтобы сотрудник из Москвы мог прочитать файлы только с определённым тегом.
DAC не заменяет DACL, а лишь дополняет его. Так что если DACL запрещало доступ к файлу, то с помощью DAC открыть доступ мы не сможем. Получится лишь ограничить доступ ещё сильнее, оставив доступ только у тех, кому он действительно нужен.
Вот ещё примеры действий, которые можно совершить используя DAC:
- дать доступ пользователю к файлу только с определенного компьютера, при этом с других компьютеров у него не будет доступа;
- открыть доступ к файлу сотруднику, если у него соответствующая должность;
- дать доступ пользователю из определённого города, к файлу с определённым тегом.
Конфигурация DAC определяется в Active Directory и распространяется через групповые политики. Для этого был расширен протокол Kerberos. Подробнее про DAC может посмотреть в этом видео.
Вернуться к оглавлению
Сводка

Имя статьи
Дескрипторы безопасности и управление доступом
Описание
Из этой статьи вы узнаете про ещё один компонент безопасности операционной системы Windows, а именно про дескрипторы безопасности
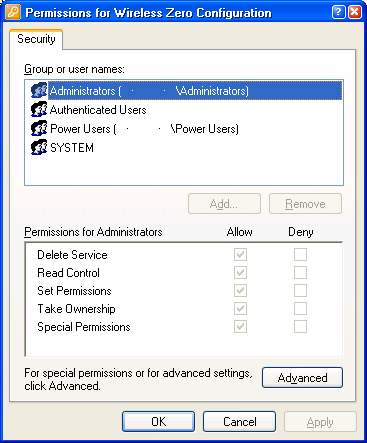
Figure 1: The ACL Editor
Introduction
In this series of articles, I will discuss the Windows Access Control model and its implementation in Windows NT and 2000. I intend this series to be four parts long. I originally intended this series of articles to be just one part long (I was only going to write about the Windows-2000 style ACL editor), but there is so much you need to know about Windows Access Control, I might as well devote an entire series dedicated to the topic.
This first article serves as an introduction to ACL-based Authorization (from a programming point of view) in Windows NT and how the access control model is implemented. If you have never programmed with Windows security, or are just starting, this first article is for you. Although this first article will display structures in C, you should read this article even if you aren’t programming in C. It contains concepts relevant to all programmers.
This series of articles isn’t meant as a primer on security administration (there are plenty of articles, websites, courses and books on that). Rather, it is intended to discuss the Windows NT Security model from a programmatic perspective. I will already assume you know how to set permissions on files, registry keys, and are quite proficient with the ACL editor. I will also assume you know what users are and what groups are.
Access Control is not available in 16-bit Windows or Windows 95/98/ME.
Table Of Contents
The table of contents is for the entire series.
- Part 1 — Background and Core Concepts. The Access Control Structures
- The Security Identifier (SID)
- The Security Descriptor (SD)
- The Access Control List (ACL)
- Choosing a good discretionary access control list
- Windows 2000 Inheritance Model
- The Token
- A Note on the Security Descriptor Definition Language
- Coming Up
- Part 2 — Basic Access Control programming
- Choosing your language
- Fun with SIDs
- Which Groups are you a member of?
- Enabling Token Privileges
- Dissecting the Security Descriptor
- Walking an Access Control List
- Creating an Access Control List
- Do I Have Access?
- Creating and Editing a Secure Object
- Making Your Own Classes Secure
- Toy Programs Download
- Part 3 — Access Control programming with .NET v2.0
- A history of .NET security.
- Reading a SID in .NET.
- Whoami .NET.
- Privilege handling in .NET.
- Running as an unprivileged user in .NET.
- Obtaining and editing a security descriptor in .NET, and applying it to an object.
- Access checks in .NET.
- NetAccessControl program and AccessToken class library.
- Part 4 — The Windows 2000-style Access Control editor
- Features of the ACL editor (ACLUI).
- Getting Started.
- Implementing the
ISecurityInformationInterface. ISecurityInformation::SetSecurity- Optional Interfaces.
- Presenting the interface.
- Filepermsbox — A program to display the security descriptor on an NTFS file or folder.
- History
Background
One of the original design goals of Windows NT was to provide a layer that can implement security for the operating system. The way Windows NT implemented security for its objects was through the Access control model. Even role-based security and the .NET classes could not replace this ACL-based security model. ACLs are far too embedded in the NTFS architecture objects, and the registry was to be rendered obsolete (so much so, that .NET v2.0 had to relent and end up supporting the ACL model too).
To start off, I will describe the different types of structures you may meet when programming for access control. This article is intended for all programmers (this part contains no code, just structures and programming concepts).
1. The Security Identifier (SID)
Before delving into the concepts of authorization, I should take a discussion about the Security Identifier (SID). We humans like to refer to a user by their user name (like «Administrator»). A computer must refer to the user in binary. It recognises a user by means of a hash (which is called a SID). When a user is created, the computer generates a SID for that user and from then on, it will refer to that user by its SID (not its username). To see a list of your own SIDs, open up regedit and expand the HKEY_USERS tree (you will see a list of the SIDs for the currently logged on users). You can convert the raw SID struct into a textual form by using ConvertSidToStringSid(). A textual SID (usually starts with S-1-5-21-…) consists of at least 3 dash-separated values (which stand for revision, authority, sub authority, ID and primary groups).
A SID can also represent a user group, a computer, a domain or even a forest. Windows maintains a list of hardcoded SIDs called the Well-Known SIDs (they represent accounts like the LocalSystem, or the NetworkService account). You can view a list of these SIDs in the WELL_KNOWN_SID_TYPE enumeration.
To convert a SID to a username, you would need to call LookupAccountSid(), and LookupAccountName() to convert a user name to a SID. However, most of the security functions accept either a SID or a username (they actually accept a TRUSTEE structure, which is a kind of union of the username and SID).
2. The Security Descriptor (SD)
Windows NT secures its objects by means of a structure called the security descriptor (SECURITY_DESCRIPTOR). The security descriptor is an integral part of the structure from which Windows objects are built. This means every object (be it file objects, registry keys, network shares, mutexes, semaphores, processes, threads, tokens, hardware, services, drivers…) recognized by Windows NT can be secured. The security descriptor structure exists in both kernel mode and user mode (and is identical in both modes). Although this allows for code reuse for both kernel mode and user mode security, it also means the SECURITY_DESCRIPTOR inherits some nasty quirks from kernel mode.
If you open up Winnt.h and scroll down to the SECURITY_DESCRIPTOR struct, you’ll see the structure of the security descriptor (Fig. 2). This SECURITY_DESCRIPTOR may actually be one of two structs, one is an absolute security descriptor (SECURITY_DESCRIPTOR), and the other is a self-relative security descriptor (Fig. 3 SECURITY_DESCRIPTOR_RELATIVE).
typedef struct _SECURITY_DESCRIPTOR
{
    BYTE Revision;
    BYTE Sbz1;
    SECURITY_DESCRIPTOR_CONTROL Control;

    PSID Owner;
    PSID Group;
    PACL Sacl;
    PACL Dacl;
} SECURITY_DESCRIPTOR, *PISECURITY_DESCRIPTOR;
Figure 2: The Absolute Security Descriptor.
Notice that a security descriptor consists of five members (excluding the two version control members):
- Discretionary Access Control List (
Dacl): This is where the permissions of the object are kept (who’s allowed access to the object, who’s denied). - System Access Control List (
Sacl): Specifies the type of auditing to be performed on the object. If an auditing event occurs, it will be stored in the Auditing Event Log. Owner: Specifies the owner of the object (as a SID). The owner of the object can always alter the security descriptor, regardless if someone else has locked out access.Group: Specifies the primary group of the object (as a SID). Windows mostly ignores this parameter (it was for POSIX compatibility, but its presence is rather vestigial now).Control: A bunch of flags that make up a 16-bit integer. It can be zero or more of the following flags:SE_DACL_PRESENT: TheDaclmember is valid.SE_SACL_PRESENT: TheSaclmember is valid.SE_DACL_AUTO_INHERITED: The DACL auto-inherits and gets entries from its parent included in itself.SE_SACL_AUTO_INHERITED: same asSE_DACL_AUTO_INHERITED, but it applies to the SACL.SE_DACL_PROTECTED: If the parent’s ACLs conflict with any ACL defined here, override the parent’s ACL. Useful for overriding inheritance.SE_SACL_PROTECTED: Same asSE_DACL_PROTECTED, but for SACLs.SE_DACL_DEFAULTED: TheDaclmember equals the default DACL for this object type.SE_SACL_DEFAULTED: TheSaclmember equals the default SACL for this object type.SE_GROUP_DEFAULTED: TheGroupmember equals the default Group for this object type.SE_OWNER_DEFAULTED: TheOwneris defaulted.SE_SELF_RELATIVE: Indicates this security descriptor is self-relative.
The last 4 entries of this structure are all pointers, and they point to the buffers where the ACLs etc. can be found. These pointers can point to any valid location in memory (not necessarily in a contiguous block). Because the security descriptors aren’t contiguous, it is going to be rather cumbersome to write the security descriptors to disk, or across processes. Microsoft solved this problem by introducing a new structure, called the self-relative security descriptor (Fig. 3 SECURITY_DESCRIPTOR_RELATIVE).
typedef struct _SECURITY_DESCRIPTOR_RELATIVE
{
    BYTE  Revision;
    BYTE  Sbz1;
    SECURITY_DESCRIPTOR_CONTROL Control;

    DWORD OwnerOffset;

    DWORD GroupOffset;
    DWORD SaclOffset;
    DWORD DaclOffset;

    struct SecurityDescriptorData
    {

        ...
        SID Owner;
        ...
        SID Group;
        ...
        ACL Sacl[];

        ...
        ACL Dacl[];
    } ;
} SECURITY_DESCRIPTOR_RELATIVE, *PISECURITY_DESCRIPTOR_RELATIVE;
Figure 3: The structure of the relative security descriptor
The self-relative security descriptor is much more complicated than the absolute security descriptor (so complex, that you cannot represent it in C++). Although the first three fields are the same as the absolute security descriptor, the security descriptors become very different after that. Following the Control member are four DWORDs (which represent offsets to the data). The data for the security descriptor all follow these four DWORDs. I’ve inserted padding bytes into the structure to illustrate that the data can appear anywhere in the buffer (simply change the Offset members to move the buffer). The four members do not need to appear in any particular order either. By choosing special offsets, you can make the Owner member appear after the group. At the expense of being horrendously complicated, the self-relative security descriptor occupies one contiguous block, making it suitable for transporting between application boundaries and storage media.
How can you tell the difference between an absolute and self-relative security descriptor? The difference is that with an absolute security descriptor, after the Control member are four pointers to the Group / Owner / SACL / DACL (in that order), and these four pointers point to separate locations in memory where the data can be found. With a self-relative security descriptor, after the Control member are four DWORDs which represent offsets to the Group / Owner / SACL / DACL. For example, if the group member has the value 0xf, then it’s telling Windows, «You can find the group SID 0xf bytes after me». 64-bit Windows makes this even more confusing when these two structures have differing sizes!
To make matters worse, Microsoft doesn’t distinguish between the absolute or self-relative security descriptor in their docs. Microsoft has reserved the right to make internal changes to the security descriptor, meaning you cannot rely on this structure being the same in future. Instead, if you want to manipulate a security descriptor, you should do so using the authorization APIs. Using the APIs encapsulate the complexity of these structures from you. So to distinguish between an absolute security descriptor and a self-relative one, call GetSecurityDescriptorControl(), and test for the SE_SELF_RELATIVE flag.
It’s important that you know which API expects an absolute security descriptor, and which ones expect a self-relative one. In Part 2 [^] of this series, you will get around to actually building a security descriptor.
3. The Access Control List (ACL)
Whenever you perform an action (e.g. a read) on an object in Windows NT, the action is encoded into a 32 bit integer (called the ACCESS_MASK). The ACCESS_MASK is specific to the object you are trying to create (if you read a file, the ACCESS_MASK would be FILE_GENERIC_READ). When you open the object with the requested ACCESS_MASK, Windows will get your username (inside your thread token) and then start reading the discretionary access control list (obtained from the security descriptor).
The DACL can be thought of as a table of user SIDs, ACCESS_MASKs, and access types. Don’t try to code it as an array of structs though. Use the low-level ACL functions GetAce(), GetAclInformation() & friends if you want to parse an ACL. In NT4, Microsoft provides a view of the ACL that looks exactly like a table of SIDs, ACCESS_MASKs and types (the EXPLICIT_ACCESS structure).
struct ACE
{
    BYTE AceType;
    BYTE AceFlags;
    ...
    ACCESS_MASK Mask;
    ...
    SID Sid;
} ;

struct ACL
{
    BYTE AclRevision;
    ...
    WORD AceCount;
    ...
    ACE AceList[this->AceCount];
} ;


typedef struct _EXPLICIT_ACCESS
{
    DWORD grfAccessPermissions;
    ACCESS_MODE grfAccessMode;
    DWORD grfInheritance;
    TRUSTEE Trustee;
} EXPLICIT_ACCESS, *PEXPLICIT_ACCESS;
Figure 4: An outline of the ACL and the ACE.
If the DACL is a table, then each row in the table is called an Access Control Entry. When an action is performed, Windows will enumerate this list of ACEs to find an entry that refers to you (you being the thread token). Windows enumerates the ACEs in the order they appear in the ACL. At first sight this goes against your intuition, the Help documentation, and what the MCP books say («I thought Windows walks the Deny ACEs first, then walks the Allow ACEs. Now you’re telling me this is wrong?»). Actually, we are both right. When Windows sets the DACL, it sorts the access control entries [^] so that deny ACEs do precede allow ACEs, and the access control model follows what you were taught.
If you make a call to the low level functions, you can circumvent the sorting, and make the ACEs appear in any order you like. The Cygwin tools utilise this technique to create DACLs unordered. However, these DACLs will not obey the access control rules, and you can make files with broken ACLs.
If you (your token) isn’t found in the ACL, then the open object function fails (Access denied). If you are found, Windows will look in the ACE to see what you are allowed to do. If the ACE allows you to open the object, you are granted access. If anything fails here, you are denied access (this is an example of a security best practice: «if anything goes wrong, make sure you fail securely»).
Now that you have been granted or denied access, Windows will now make a check on the other ACL, the System Access Control List. The difference between an SACL and a DACL is that DACL contains allow / deny entries, but an SACL contains audit entries. The SACL tells Windows which actions to log in the Security Event Log (audit successes / failures). Apart from that, you can treat the SACL / DACL as the same. If Windows finds an SACL which tells it to audit the access, then the access attempt is written to the Event log.
If you want to see if an ACL allows you access to the object, use the AccessCheck() API on the object.
4. Creating a good discretionary access control list
In almost every case, Windows has already decided a good discretionary access control list for you. When you encounter an API that asks for a security descriptor (or a SECURITY_ATTRIBUTES structure), simply pass in NULL for this parameter. Passing in NULL for either the SECURITY_ATTRIBUTES or SECURITY_DESCRIPTOR will tell the system to apply the default security descriptor. And that is probably what you were after.
If you need more advanced security, make sure you create a security descriptor that has a filled DACL. If you’ve initialized a security descriptor, but have forgotten to build up a DACL (and attach it to the security descriptor), you will get a NULL DACL. Windows sees this NULL DACL as an object that has the following ACE:
«Everyone: Full control»
Therefore, Windows will allow access to the object regardless of the action. This is one case where Microsoft broke its own best practices. When it encounters something unexpected, Windows should fail securely. In this case it doesn’t. So with a NULL DACL, everyone (including malware) will be able to do anything to the object (including setting a nasty rootkit-style DACL). For this reason, don’t create security descriptors with NULL DACLs.
Setting a NULL DACL isn’t the same as setting a NULL security descriptor. When passing a NULL security descriptor, Windows will replace it with a default security descriptor, and this security descriptor is secure, and allows enough access to the object. Setting a NULL DACL means passing a valid security descriptor, whose Dacl member happens to be NULL.
In a similar way, you probably don’t want to set a DACL that doesn’t contain any Access Control entries. In this DACL, when Windows attempts to enumerate the Access Control List, it will fail on the first attempt, therefore, it will deny access regardless of the action. The result is a completely inaccessible object (not much better than a non-existent object). You must have a filled DACL if you want to access the object.
So how do we build a Discretionary access control list?
Think about who you want to allow access to and who you don’t want to allow access. Is your DACL black list based (full of deny ACEs), or white list based (full of allow ACEs). If you are creating an ACL, you should prefer a white list approach to the security descriptor. How long is the object going to last? Is it a long running object (like the app mutex for a long running process), a short running object (like a synchronization event), or is it a permanent object (like a file)?
To determine a good security descriptor decide what you are going to do to the object. If you are securing a kernel object, you probably only need to synchronize, read and read the security on it. If you are securing a file, you’ll probably need all accesses available (one day).
Generally, for permanent objects you need at least two accounts to have access to the object. The first user is the LocalSystem account (restricting access to this account can lead to serious problems if it is a permanent object). The other is the object creator (or alternatively, the current owner) of the object. You should also consider giving administrators full control to the object. Another technique you can consider is only allowing the users read and execute access. When they want to delete the file, they will have to add the DELETE right themselves, then delete it.
For short running objects, you should apply the principal of least privilege to the object. For example, if all you are going to do with an object is read from it and synchronize it, then create a DACL that only allows read and synchronize access (you can even restrict the LocalSystem’s account this way if it is a short lived object).
If your object supports inheritance, then you don’t need a special DACL on the object (unless your file is special in terms of security), you can just apply the DACL for the parent (do this by setting the auto inherit flag in the Control member of the security descriptor). The default security descriptor will apply the inheritance flag for you.
And finally, if in doubt, ask the admins!
5. Windows 2000 Inheritance Model
Starting with Windows 2000, ACLs can be set to inherit from their parent. What this means is that the ACL of the parent will be applied to the child (e.g. the permissions for «Program FilesCommon FilesMicrosoft Shared» will be the same as «Program FilesCommon Files«). A special flag in the ACE will state that it is inherited.
As stated in the previous section, Windows walks the list of ACEs until it reaches the end or finds an ACE that matches you. If inheritance is enabled, when Windows reaches the end of the list, it will start walking the ACL of the parent folder to find a matching ACE. Therefore, the object will have the parent’s ACL applied to itself, automatically. This only occurs if the ACL is set to inherit from the parent object.
If the folder also has inheritance, Windows will walk up that folder too. This can continue all the way until Windows hits a folder that has inheritance disabled, or it hits the root of the drive. The result is that the resultant ACL is a merged view of the current object and its parent. The ACEs that come from the parent are called inherited ACEs, and the ACEs that come from the file itself are called the protected ACEs.
To support ACL inheritance, you must design your classes to have parent-child relationships (like a file/folder, or a registry key/value). The parent will be referred to as a container (e.g. folder), and the child will be referred to as an object (like a file).
For really advanced ACL control, Windows 2000 supports applying ACEs only to folders and not files (and vice versa). The ACE flag that controls inheritance also states which type of inheritance to apply. There are four flags:
OBJECT_INHERIT_ACE(OI): indicates the ACE gets inherited to child objects (e.g. files).CONTAINER_INHERIT_ACE(CI): indicates the ACE gets inherited to child containers (e.g. subfolders).INHERIT_ONLY_ACE(IO): indicates the ACE applies not to this object, but to child objects (e.g. child files/subfolders only).NO_PROPAGATE_INHERIT_ACE(NP): do not apply this ACE to grandchildren, just the direct children (e.g. apply files but not files in subfolders).
These flags can be (and usually are) combined. To make the ACE apply to every child object within yourself (including inside subfolders), specify (OBJECT_INHERIT_ACE | CONTAINER_INHERIT_ACE).
For a more complete description of ACE inheritance, check out Keith Brown’s book.
6. The Access Token
The final structure I will describe today is the Access token. I don’t want to delve too much into this structure otherwise I may stray off topic (it’s relevant not only to access control, but to privileges, policy, group membership as well as IPC across logon sessions). The access token forms an integral part of both the thread and process objects. The access token identifies who you are in the context of security. Windows NT maintains user information per process, as this allows processes and threads to run as a different user (if you wanted to know how Task Manager knows which user a process runs under, it’s in the access token). The access token is the feature that allows services, runas, and fast user switching to exist.
The access token can either be a process token, a primary thread token, or a thread impersonation token. Unless your thread is impersonating, your thread doesn’t have a token (you’ll be using the process token instead). Once you’ve made your thread impersonating, you’ll have an impersonation token associated with your thread. You can convert your impersonation token into a primary token (suitable for CreateProcessAsUser()) by calling DuplicateTokenEx()).
When you log in to Windows, your processes will have their tokens set to your username when run. If you open your own token and look inside it, you can find out the name of the user you are running as (all without needing to invoke GetUserName()).

Figure 5: An illustration of the access token.
There’s a lot of information you can gleam from a token via GetTokenInformation(). For example:
TokenUser: Which user the process runs as.TokenGroupsandPrivileges: Which groups the user belongs to (as well asTokenGroups,TokentRestrictedSids,TokenPrivilegesandTokenUser).TokenGroups: The complete list of groups to which the user belongs (gives more information than «net.exe user <user>«, WMI, User Management console, and «control userpasswords2«).TokenPrivileges: The list of privileges.TokenDefaultDacl,TokenOwner,TokenDefaultGroup: The definition of a default security descriptor.TokenType: Whether this token impersonates.TokenSource: The source of the access token.TokenRestrictedSids: The list of restricted SIDs.
For the purposes of access control, most of the information we need from the access token are in the TokenGroupsandPrivileges structure. With this value, you rollup the GetUserName(), NetUserGroups(), CheckTokenMembership() and LookupPrivilegeValue() APIs all in one. The token shows that being a member of the administrators group also makes you a member of the None group, the Authenticated Users group, the Users group, the Power Users group, and the LOCAL group. This is useful to you as you now have a list of user groups to which you belong, and can now search an ACL using this list. To see if an ACL grants you access:
- Open up your thread token.
- Get the list of groups.
- Obtain the
SECURITY_DESCRIPTORfor the object. - Get the ACL from the security descriptor.
- For each ACE in the ACL, lookup the SID associated with that ACE.
- Lookup this SID in the list of groups you created in step 2.
- If found, see if it is a deny or allow ACE.
- If it is an allow ACE, compare the
ACCESS_MASKwith your desiredACCESS_MASK. - If all accesses are allowed, you are allowed access.
- If an error occurs, you are denied access.
Add in error/parameter checking to the above list (and auditing), and you have just created yourself a pseudo AccessCheck() function.
You’ve probably already encountered the default security descriptor. Whenever you encountered an API that requested a SECURITY_ATTRIBUTES parameter, you most likely passed in NULL for that parameter (which means «default security descriptor»). By calling GetTokenInformation(TokenDefault*), you can find out what that default security descriptor is.
The privileges are a list of policies that must be enabled before you are allowed to perform certain system-critical functions (like shutdown the system, or install drivers). These privileges are configurable via group policy (user rights assignment), and are listed in your thread token. The privileges are disabled by default (exception: SeChangeNotifyPrivilege), so you must enable the privilege before you can use it. The Platform SDK provides a sample function SetPrivilege() that can enable and disable a privilege whenever you need it. I strongly suggest you add this function to your security utility library, because you are going to reuse that function again and again, especially with access control. Enabling a privilege then becomes a matter of adding two lines to your code:
...
SetPrivilege(SePrivilegeName, TRUE);


SetPrivilege(SePrivilegeName, FALSE);
...
Figure 16: Enabling and disabling a privilege using the Platform SDK sample function.
I don’t want to go into sandboxing or impersonation (since they are rather off topic for access control). If you want to know more about impersonation and privileges, look at this WindowsSecurity article, or Paul Cooke’s book.
7. A note on the Security Descriptor Definition Language
The Security Descriptor Definition Language is an attempt to represent a security descriptor in text form that both administrators and programs can understand. The full reference (and in my humble opinion, the only decent reference) to the SDDL format is located in the help documentation.
Briefly, the SDDL string contains the following parts: a group, an owner, the DACL and SACL. These sections are delimited by a one-letter label followed by a colon (O: delimits the owner, G: delimits the group, D: delimits the DACL, S: delimits the SACL). Following the group and delimiters are SIDs that denote the owner and group. Following the D: and S: delimiters are a list of bracket separated entries (each bracket represents an ACE in the list).
The ACE bracket consists of six semicolon delimited terms that represent ACE type, inheritance, ACCESS_MASK, GUID, inherited GUID, and user SID respectively. The ACE brackets are stacked up in the list to form the overall ACL. Prefixing the list of ACE brackets can be some other flags; these represent the control flags for the security descriptor. The following is an example SDDL we will dissect (I’ve separated the different sections for clarity):
O:AOG:DAS:D:(A;;RPWPCCDCLCSWRCWDWOGA;;;S-1-0-0)(A;;GA;;;SY)
First, tokenize this string using the delimiters:
| O: | G: | S: | D: |
AO |
DA |
(A;;RP WP CC DC LC SW RC WD WO GA;;;S-1-0-0) (A;;GA;;;SY) |
Figure 7a: The SDDL string tokenized into separate strings.
Next, expand the SID strings and ACE strings:
| Owner | Group | SACL | DACL |
| Account Operators | Domain Administrators | (A;;ADS_RIGHT_DS_READ_PROP | ADS_RIGHT_DS_WRITE_PROP | ADS_RIGHT_DS_CREATE_CHILD | ADS_RIGHT_DS_DELETE_CHILD | ADS_RIGHT_DS_LIST | ADS_RIGHT_DS_SELF | READ_CONTROL | WRITE_DAC | WRITE_OWNER | GENERIC_ALL;;; null SID)(A;;GENERIC_ALL;;;LocalSystem) |
Figure 7b: The SDDL string with the SID strings and ACE strings expanded
Finally, expand the constant strings:
| Owner | Group | SACL | DACL |
| Account Operators | Domain Administrators | Allow (null SID): 0x01e000bb Allow LocalSystem: 0x100000 |
Figure 7c: The security descriptor that the SDDL string specifies.
This is the meaning of the SDDL string specified. For a whole bunch of example SDDL strings, take a look at the %windir%securitytemplates*.inf files. This is what Windows Setup used to apply the default security descriptors for your Windows installation. See if you can decrypt the security descriptors for those strings. (To find out the answers, you can call the ConvertStringSecurityDescriptorToSecurityDescriptor() function on the security descriptor strings.)
Sorry about the poor explanation about SDDL strings. Like I said, the best reference for SDDL is in the SDK documentation, and I still stand by that statement.
8. Coming Up
In this part, you learnt how Windows NT secured its objects using security descriptors. You discovered that Windows recognizes users, groups and computers as SIDs. You learnt that security descriptors originally came from kernel mode, therefore they can be complex beasts. You were shown the parts of a security descriptor, the five components which make it up, and how it is stored in memory. You were then shown the two types of access control list. You discovered the structure of the ACL, how Windows reads an ACL, and how inheritance is implemented within the Access control model. The last structure you learnt about was the access token. You were taught what information can be read from a token, and finished off with enabling a permission.
In Part 2, you will start writing some example code for reading and writing security descriptors. You will also obtain information from the primary token to create a WhoAmI clone. Whilst you are waiting for the next article to come up, I want you to choose which technique you are going to program with. I am going to present four ways of programming with security:
- The low level way. If you need to program for NT3.5, and don’t have ATL, you’ll have no choice but to choose this method. This method makes direct calls to the low level ACL functions, and they are horrible! Not only is it nontrivial to program, this method is also excessively complex and error prone (no wonder Windows NT had so many security bugs [^]!). Unless you need to support backward compatibility (since when did you care about backward compatibility?), I strongly recommend you steer clear of this method if you can help it. If you want a preview of this method, check out the SDK docs on
SetEntriesInAcl()[^]. - The Windows 2000 way. Realising how difficult method 1 was, Microsoft invented an alternative API for creating security descriptors, the Security Descriptor Definition Language (SDDL). Initially, SDDL may not be much better than low level authorisation (just as complex, and not as compatible). However, being in text mode makes SDDL infinitely more readable, for both programmers and administrators. And if you look closely at a number of SDDLs, along with the corresponding ACLs, you’ll soon get the hang of it. Windows 2000 also introduces API helpers to automate repetitive tasks (like printing a SID in text form). If you want a preview, check out the SDK docs on
ConvertStringSecurityDescriptorToSecurityDescriptor()[^]. - The ATL way. As part of the Trustworthy Computing Initiative, Microsoft made a number of updates to ATL, culminating in the ATL security classes. If you have Visual C++ .NET, and don’t mind programming with ATL C++, you’ll want to choose this method. To see a preview, check out the
CSecurityDesc()[^] class from the Visual C++ help. - The .NET way. Starting with v2.0 of the .NET Framework, you can also choose to program security descriptors in a fully object oriented managed environment. Note, that I will not cover this in part 2 of the series. Instead programming security in .NET will have its very own part in this series (Part 3). If you have Visual Studio .NET 2005, you should strongly consider choosing this method. You can see a preview in the
System.Security.AccessControl[^].
History
The history and bibliography are now maintained in Part 4 [^].
Next Part… [^]
Figure 1: The ACL Editor
Introduction
In this series of articles, I will discuss the Windows Access Control model and its implementation in Windows NT and 2000. I intend this series to be four parts long. I originally intended this series of articles to be just one part long (I was only going to write about the Windows-2000 style ACL editor), but there is so much you need to know about Windows Access Control, I might as well devote an entire series dedicated to the topic.
This first article serves as an introduction to ACL-based Authorization (from a programming point of view) in Windows NT and how the access control model is implemented. If you have never programmed with Windows security, or are just starting, this first article is for you. Although this first article will display structures in C, you should read this article even if you aren’t programming in C. It contains concepts relevant to all programmers.
This series of articles isn’t meant as a primer on security administration (there are plenty of articles, websites, courses and books on that). Rather, it is intended to discuss the Windows NT Security model from a programmatic perspective. I will already assume you know how to set permissions on files, registry keys, and are quite proficient with the ACL editor. I will also assume you know what users are and what groups are.
Access Control is not available in 16-bit Windows or Windows 95/98/ME.
Table Of Contents
The table of contents is for the entire series.
- Part 1 — Background and Core Concepts. The Access Control Structures
- The Security Identifier (SID)
- The Security Descriptor (SD)
- The Access Control List (ACL)
- Choosing a good discretionary access control list
- Windows 2000 Inheritance Model
- The Token
- A Note on the Security Descriptor Definition Language
- Coming Up
- Part 2 — Basic Access Control programming
- Choosing your language
- Fun with SIDs
- Which Groups are you a member of?
- Enabling Token Privileges
- Dissecting the Security Descriptor
- Walking an Access Control List
- Creating an Access Control List
- Do I Have Access?
- Creating and Editing a Secure Object
- Making Your Own Classes Secure
- Toy Programs Download
- Part 3 — Access Control programming with .NET v2.0
- A history of .NET security.
- Reading a SID in .NET.
- Whoami .NET.
- Privilege handling in .NET.
- Running as an unprivileged user in .NET.
- Obtaining and editing a security descriptor in .NET, and applying it to an object.
- Access checks in .NET.
- NetAccessControl program and AccessToken class library.
- Part 4 — The Windows 2000-style Access Control editor
- Features of the ACL editor (ACLUI).
- Getting Started.
- Implementing the
ISecurityInformationInterface. ISecurityInformation::SetSecurity- Optional Interfaces.
- Presenting the interface.
- Filepermsbox — A program to display the security descriptor on an NTFS file or folder.
- History
Background
One of the original design goals of Windows NT was to provide a layer that can implement security for the operating system. The way Windows NT implemented security for its objects was through the Access control model. Even role-based security and the .NET classes could not replace this ACL-based security model. ACLs are far too embedded in the NTFS architecture objects, and the registry was to be rendered obsolete (so much so, that .NET v2.0 had to relent and end up supporting the ACL model too).
To start off, I will describe the different types of structures you may meet when programming for access control. This article is intended for all programmers (this part contains no code, just structures and programming concepts).
1. The Security Identifier (SID)
Before delving into the concepts of authorization, I should take a discussion about the Security Identifier (SID). We humans like to refer to a user by their user name (like «Administrator»). A computer must refer to the user in binary. It recognises a user by means of a hash (which is called a SID). When a user is created, the computer generates a SID for that user and from then on, it will refer to that user by its SID (not its username). To see a list of your own SIDs, open up regedit and expand the HKEY_USERS tree (you will see a list of the SIDs for the currently logged on users). You can convert the raw SID struct into a textual form by using ConvertSidToStringSid(). A textual SID (usually starts with S-1-5-21-…) consists of at least 3 dash-separated values (which stand for revision, authority, sub authority, ID and primary groups).
A SID can also represent a user group, a computer, a domain or even a forest. Windows maintains a list of hardcoded SIDs called the Well-Known SIDs (they represent accounts like the LocalSystem, or the NetworkService account). You can view a list of these SIDs in the WELL_KNOWN_SID_TYPE enumeration.
To convert a SID to a username, you would need to call LookupAccountSid(), and LookupAccountName() to convert a user name to a SID. However, most of the security functions accept either a SID or a username (they actually accept a TRUSTEE structure, which is a kind of union of the username and SID).
2. The Security Descriptor (SD)
Windows NT secures its objects by means of a structure called the security descriptor (SECURITY_DESCRIPTOR). The security descriptor is an integral part of the structure from which Windows objects are built. This means every object (be it file objects, registry keys, network shares, mutexes, semaphores, processes, threads, tokens, hardware, services, drivers…) recognized by Windows NT can be secured. The security descriptor structure exists in both kernel mode and user mode (and is identical in both modes). Although this allows for code reuse for both kernel mode and user mode security, it also means the SECURITY_DESCRIPTOR inherits some nasty quirks from kernel mode.
If you open up Winnt.h and scroll down to the SECURITY_DESCRIPTOR struct, you’ll see the structure of the security descriptor (Fig. 2). This SECURITY_DESCRIPTOR may actually be one of two structs, one is an absolute security descriptor (SECURITY_DESCRIPTOR), and the other is a self-relative security descriptor (Fig. 3 SECURITY_DESCRIPTOR_RELATIVE).
typedef struct _SECURITY_DESCRIPTOR
{
    BYTE Revision;
    BYTE Sbz1;
    SECURITY_DESCRIPTOR_CONTROL Control;

    PSID Owner;
    PSID Group;
    PACL Sacl;
    PACL Dacl;
} SECURITY_DESCRIPTOR, *PISECURITY_DESCRIPTOR;
Figure 2: The Absolute Security Descriptor.
Notice that a security descriptor consists of five members (excluding the two version control members):
- Discretionary Access Control List (
Dacl): This is where the permissions of the object are kept (who’s allowed access to the object, who’s denied). - System Access Control List (
Sacl): Specifies the type of auditing to be performed on the object. If an auditing event occurs, it will be stored in the Auditing Event Log. Owner: Specifies the owner of the object (as a SID). The owner of the object can always alter the security descriptor, regardless if someone else has locked out access.Group: Specifies the primary group of the object (as a SID). Windows mostly ignores this parameter (it was for POSIX compatibility, but its presence is rather vestigial now).Control: A bunch of flags that make up a 16-bit integer. It can be zero or more of the following flags:SE_DACL_PRESENT: TheDaclmember is valid.SE_SACL_PRESENT: TheSaclmember is valid.SE_DACL_AUTO_INHERITED: The DACL auto-inherits and gets entries from its parent included in itself.SE_SACL_AUTO_INHERITED: same asSE_DACL_AUTO_INHERITED, but it applies to the SACL.SE_DACL_PROTECTED: If the parent’s ACLs conflict with any ACL defined here, override the parent’s ACL. Useful for overriding inheritance.SE_SACL_PROTECTED: Same asSE_DACL_PROTECTED, but for SACLs.SE_DACL_DEFAULTED: TheDaclmember equals the default DACL for this object type.SE_SACL_DEFAULTED: TheSaclmember equals the default SACL for this object type.SE_GROUP_DEFAULTED: TheGroupmember equals the default Group for this object type.SE_OWNER_DEFAULTED: TheOwneris defaulted.SE_SELF_RELATIVE: Indicates this security descriptor is self-relative.
The last 4 entries of this structure are all pointers, and they point to the buffers where the ACLs etc. can be found. These pointers can point to any valid location in memory (not necessarily in a contiguous block). Because the security descriptors aren’t contiguous, it is going to be rather cumbersome to write the security descriptors to disk, or across processes. Microsoft solved this problem by introducing a new structure, called the self-relative security descriptor (Fig. 3 SECURITY_DESCRIPTOR_RELATIVE).
typedef struct _SECURITY_DESCRIPTOR_RELATIVE
{
    BYTE  Revision;
    BYTE  Sbz1;
    SECURITY_DESCRIPTOR_CONTROL Control;

    DWORD OwnerOffset;

    DWORD GroupOffset;
    DWORD SaclOffset;
    DWORD DaclOffset;

    struct SecurityDescriptorData
    {

        ...
        SID Owner;
        ...
        SID Group;
        ...
        ACL Sacl[];

        ...
        ACL Dacl[];
    } ;
} SECURITY_DESCRIPTOR_RELATIVE, *PISECURITY_DESCRIPTOR_RELATIVE;
Figure 3: The structure of the relative security descriptor
The self-relative security descriptor is much more complicated than the absolute security descriptor (so complex, that you cannot represent it in C++). Although the first three fields are the same as the absolute security descriptor, the security descriptors become very different after that. Following the Control member are four DWORDs (which represent offsets to the data). The data for the security descriptor all follow these four DWORDs. I’ve inserted padding bytes into the structure to illustrate that the data can appear anywhere in the buffer (simply change the Offset members to move the buffer). The four members do not need to appear in any particular order either. By choosing special offsets, you can make the Owner member appear after the group. At the expense of being horrendously complicated, the self-relative security descriptor occupies one contiguous block, making it suitable for transporting between application boundaries and storage media.
How can you tell the difference between an absolute and self-relative security descriptor? The difference is that with an absolute security descriptor, after the Control member are four pointers to the Group / Owner / SACL / DACL (in that order), and these four pointers point to separate locations in memory where the data can be found. With a self-relative security descriptor, after the Control member are four DWORDs which represent offsets to the Group / Owner / SACL / DACL. For example, if the group member has the value 0xf, then it’s telling Windows, «You can find the group SID 0xf bytes after me». 64-bit Windows makes this even more confusing when these two structures have differing sizes!
To make matters worse, Microsoft doesn’t distinguish between the absolute or self-relative security descriptor in their docs. Microsoft has reserved the right to make internal changes to the security descriptor, meaning you cannot rely on this structure being the same in future. Instead, if you want to manipulate a security descriptor, you should do so using the authorization APIs. Using the APIs encapsulate the complexity of these structures from you. So to distinguish between an absolute security descriptor and a self-relative one, call GetSecurityDescriptorControl(), and test for the SE_SELF_RELATIVE flag.
It’s important that you know which API expects an absolute security descriptor, and which ones expect a self-relative one. In Part 2 [^] of this series, you will get around to actually building a security descriptor.
3. The Access Control List (ACL)
Whenever you perform an action (e.g. a read) on an object in Windows NT, the action is encoded into a 32 bit integer (called the ACCESS_MASK). The ACCESS_MASK is specific to the object you are trying to create (if you read a file, the ACCESS_MASK would be FILE_GENERIC_READ). When you open the object with the requested ACCESS_MASK, Windows will get your username (inside your thread token) and then start reading the discretionary access control list (obtained from the security descriptor).
The DACL can be thought of as a table of user SIDs, ACCESS_MASKs, and access types. Don’t try to code it as an array of structs though. Use the low-level ACL functions GetAce(), GetAclInformation() & friends if you want to parse an ACL. In NT4, Microsoft provides a view of the ACL that looks exactly like a table of SIDs, ACCESS_MASKs and types (the EXPLICIT_ACCESS structure).
struct ACE
{
    BYTE AceType;
    BYTE AceFlags;
    ...
    ACCESS_MASK Mask;
    ...
    SID Sid;
} ;

struct ACL
{
    BYTE AclRevision;
    ...
    WORD AceCount;
    ...
    ACE AceList[this->AceCount];
} ;


typedef struct _EXPLICIT_ACCESS
{
    DWORD grfAccessPermissions;
    ACCESS_MODE grfAccessMode;
    DWORD grfInheritance;
    TRUSTEE Trustee;
} EXPLICIT_ACCESS, *PEXPLICIT_ACCESS;
Figure 4: An outline of the ACL and the ACE.
If the DACL is a table, then each row in the table is called an Access Control Entry. When an action is performed, Windows will enumerate this list of ACEs to find an entry that refers to you (you being the thread token). Windows enumerates the ACEs in the order they appear in the ACL. At first sight this goes against your intuition, the Help documentation, and what the MCP books say («I thought Windows walks the Deny ACEs first, then walks the Allow ACEs. Now you’re telling me this is wrong?»). Actually, we are both right. When Windows sets the DACL, it sorts the access control entries [^] so that deny ACEs do precede allow ACEs, and the access control model follows what you were taught.
If you make a call to the low level functions, you can circumvent the sorting, and make the ACEs appear in any order you like. The Cygwin tools utilise this technique to create DACLs unordered. However, these DACLs will not obey the access control rules, and you can make files with broken ACLs.
If you (your token) isn’t found in the ACL, then the open object function fails (Access denied). If you are found, Windows will look in the ACE to see what you are allowed to do. If the ACE allows you to open the object, you are granted access. If anything fails here, you are denied access (this is an example of a security best practice: «if anything goes wrong, make sure you fail securely»).
Now that you have been granted or denied access, Windows will now make a check on the other ACL, the System Access Control List. The difference between an SACL and a DACL is that DACL contains allow / deny entries, but an SACL contains audit entries. The SACL tells Windows which actions to log in the Security Event Log (audit successes / failures). Apart from that, you can treat the SACL / DACL as the same. If Windows finds an SACL which tells it to audit the access, then the access attempt is written to the Event log.
If you want to see if an ACL allows you access to the object, use the AccessCheck() API on the object.
4. Creating a good discretionary access control list
In almost every case, Windows has already decided a good discretionary access control list for you. When you encounter an API that asks for a security descriptor (or a SECURITY_ATTRIBUTES structure), simply pass in NULL for this parameter. Passing in NULL for either the SECURITY_ATTRIBUTES or SECURITY_DESCRIPTOR will tell the system to apply the default security descriptor. And that is probably what you were after.
If you need more advanced security, make sure you create a security descriptor that has a filled DACL. If you’ve initialized a security descriptor, but have forgotten to build up a DACL (and attach it to the security descriptor), you will get a NULL DACL. Windows sees this NULL DACL as an object that has the following ACE:
«Everyone: Full control»
Therefore, Windows will allow access to the object regardless of the action. This is one case where Microsoft broke its own best practices. When it encounters something unexpected, Windows should fail securely. In this case it doesn’t. So with a NULL DACL, everyone (including malware) will be able to do anything to the object (including setting a nasty rootkit-style DACL). For this reason, don’t create security descriptors with NULL DACLs.
Setting a NULL DACL isn’t the same as setting a NULL security descriptor. When passing a NULL security descriptor, Windows will replace it with a default security descriptor, and this security descriptor is secure, and allows enough access to the object. Setting a NULL DACL means passing a valid security descriptor, whose Dacl member happens to be NULL.
In a similar way, you probably don’t want to set a DACL that doesn’t contain any Access Control entries. In this DACL, when Windows attempts to enumerate the Access Control List, it will fail on the first attempt, therefore, it will deny access regardless of the action. The result is a completely inaccessible object (not much better than a non-existent object). You must have a filled DACL if you want to access the object.
So how do we build a Discretionary access control list?
Think about who you want to allow access to and who you don’t want to allow access. Is your DACL black list based (full of deny ACEs), or white list based (full of allow ACEs). If you are creating an ACL, you should prefer a white list approach to the security descriptor. How long is the object going to last? Is it a long running object (like the app mutex for a long running process), a short running object (like a synchronization event), or is it a permanent object (like a file)?
To determine a good security descriptor decide what you are going to do to the object. If you are securing a kernel object, you probably only need to synchronize, read and read the security on it. If you are securing a file, you’ll probably need all accesses available (one day).
Generally, for permanent objects you need at least two accounts to have access to the object. The first user is the LocalSystem account (restricting access to this account can lead to serious problems if it is a permanent object). The other is the object creator (or alternatively, the current owner) of the object. You should also consider giving administrators full control to the object. Another technique you can consider is only allowing the users read and execute access. When they want to delete the file, they will have to add the DELETE right themselves, then delete it.
For short running objects, you should apply the principal of least privilege to the object. For example, if all you are going to do with an object is read from it and synchronize it, then create a DACL that only allows read and synchronize access (you can even restrict the LocalSystem’s account this way if it is a short lived object).
If your object supports inheritance, then you don’t need a special DACL on the object (unless your file is special in terms of security), you can just apply the DACL for the parent (do this by setting the auto inherit flag in the Control member of the security descriptor). The default security descriptor will apply the inheritance flag for you.
And finally, if in doubt, ask the admins!
5. Windows 2000 Inheritance Model
Starting with Windows 2000, ACLs can be set to inherit from their parent. What this means is that the ACL of the parent will be applied to the child (e.g. the permissions for «Program FilesCommon FilesMicrosoft Shared» will be the same as «Program FilesCommon Files«). A special flag in the ACE will state that it is inherited.
As stated in the previous section, Windows walks the list of ACEs until it reaches the end or finds an ACE that matches you. If inheritance is enabled, when Windows reaches the end of the list, it will start walking the ACL of the parent folder to find a matching ACE. Therefore, the object will have the parent’s ACL applied to itself, automatically. This only occurs if the ACL is set to inherit from the parent object.
If the folder also has inheritance, Windows will walk up that folder too. This can continue all the way until Windows hits a folder that has inheritance disabled, or it hits the root of the drive. The result is that the resultant ACL is a merged view of the current object and its parent. The ACEs that come from the parent are called inherited ACEs, and the ACEs that come from the file itself are called the protected ACEs.
To support ACL inheritance, you must design your classes to have parent-child relationships (like a file/folder, or a registry key/value). The parent will be referred to as a container (e.g. folder), and the child will be referred to as an object (like a file).
For really advanced ACL control, Windows 2000 supports applying ACEs only to folders and not files (and vice versa). The ACE flag that controls inheritance also states which type of inheritance to apply. There are four flags:
OBJECT_INHERIT_ACE(OI): indicates the ACE gets inherited to child objects (e.g. files).CONTAINER_INHERIT_ACE(CI): indicates the ACE gets inherited to child containers (e.g. subfolders).INHERIT_ONLY_ACE(IO): indicates the ACE applies not to this object, but to child objects (e.g. child files/subfolders only).NO_PROPAGATE_INHERIT_ACE(NP): do not apply this ACE to grandchildren, just the direct children (e.g. apply files but not files in subfolders).
These flags can be (and usually are) combined. To make the ACE apply to every child object within yourself (including inside subfolders), specify (OBJECT_INHERIT_ACE | CONTAINER_INHERIT_ACE).
For a more complete description of ACE inheritance, check out Keith Brown’s book.
6. The Access Token
The final structure I will describe today is the Access token. I don’t want to delve too much into this structure otherwise I may stray off topic (it’s relevant not only to access control, but to privileges, policy, group membership as well as IPC across logon sessions). The access token forms an integral part of both the thread and process objects. The access token identifies who you are in the context of security. Windows NT maintains user information per process, as this allows processes and threads to run as a different user (if you wanted to know how Task Manager knows which user a process runs under, it’s in the access token). The access token is the feature that allows services, runas, and fast user switching to exist.
The access token can either be a process token, a primary thread token, or a thread impersonation token. Unless your thread is impersonating, your thread doesn’t have a token (you’ll be using the process token instead). Once you’ve made your thread impersonating, you’ll have an impersonation token associated with your thread. You can convert your impersonation token into a primary token (suitable for CreateProcessAsUser()) by calling DuplicateTokenEx()).
When you log in to Windows, your processes will have their tokens set to your username when run. If you open your own token and look inside it, you can find out the name of the user you are running as (all without needing to invoke GetUserName()).
Figure 5: An illustration of the access token.
There’s a lot of information you can gleam from a token via GetTokenInformation(). For example:
TokenUser: Which user the process runs as.TokenGroupsandPrivileges: Which groups the user belongs to (as well asTokenGroups,TokentRestrictedSids,TokenPrivilegesandTokenUser).TokenGroups: The complete list of groups to which the user belongs (gives more information than «net.exe user <user>«, WMI, User Management console, and «control userpasswords2«).TokenPrivileges: The list of privileges.TokenDefaultDacl,TokenOwner,TokenDefaultGroup: The definition of a default security descriptor.TokenType: Whether this token impersonates.TokenSource: The source of the access token.TokenRestrictedSids: The list of restricted SIDs.
For the purposes of access control, most of the information we need from the access token are in the TokenGroupsandPrivileges structure. With this value, you rollup the GetUserName(), NetUserGroups(), CheckTokenMembership() and LookupPrivilegeValue() APIs all in one. The token shows that being a member of the administrators group also makes you a member of the None group, the Authenticated Users group, the Users group, the Power Users group, and the LOCAL group. This is useful to you as you now have a list of user groups to which you belong, and can now search an ACL using this list. To see if an ACL grants you access:
- Open up your thread token.
- Get the list of groups.
- Obtain the
SECURITY_DESCRIPTORfor the object. - Get the ACL from the security descriptor.
- For each ACE in the ACL, lookup the SID associated with that ACE.
- Lookup this SID in the list of groups you created in step 2.
- If found, see if it is a deny or allow ACE.
- If it is an allow ACE, compare the
ACCESS_MASKwith your desiredACCESS_MASK. - If all accesses are allowed, you are allowed access.
- If an error occurs, you are denied access.
Add in error/parameter checking to the above list (and auditing), and you have just created yourself a pseudo AccessCheck() function.
You’ve probably already encountered the default security descriptor. Whenever you encountered an API that requested a SECURITY_ATTRIBUTES parameter, you most likely passed in NULL for that parameter (which means «default security descriptor»). By calling GetTokenInformation(TokenDefault*), you can find out what that default security descriptor is.
The privileges are a list of policies that must be enabled before you are allowed to perform certain system-critical functions (like shutdown the system, or install drivers). These privileges are configurable via group policy (user rights assignment), and are listed in your thread token. The privileges are disabled by default (exception: SeChangeNotifyPrivilege), so you must enable the privilege before you can use it. The Platform SDK provides a sample function SetPrivilege() that can enable and disable a privilege whenever you need it. I strongly suggest you add this function to your security utility library, because you are going to reuse that function again and again, especially with access control. Enabling a privilege then becomes a matter of adding two lines to your code:
...
SetPrivilege(SePrivilegeName, TRUE);


SetPrivilege(SePrivilegeName, FALSE);
...
Figure 16: Enabling and disabling a privilege using the Platform SDK sample function.
I don’t want to go into sandboxing or impersonation (since they are rather off topic for access control). If you want to know more about impersonation and privileges, look at this WindowsSecurity article, or Paul Cooke’s book.
7. A note on the Security Descriptor Definition Language
The Security Descriptor Definition Language is an attempt to represent a security descriptor in text form that both administrators and programs can understand. The full reference (and in my humble opinion, the only decent reference) to the SDDL format is located in the help documentation.
Briefly, the SDDL string contains the following parts: a group, an owner, the DACL and SACL. These sections are delimited by a one-letter label followed by a colon (O: delimits the owner, G: delimits the group, D: delimits the DACL, S: delimits the SACL). Following the group and delimiters are SIDs that denote the owner and group. Following the D: and S: delimiters are a list of bracket separated entries (each bracket represents an ACE in the list).
The ACE bracket consists of six semicolon delimited terms that represent ACE type, inheritance, ACCESS_MASK, GUID, inherited GUID, and user SID respectively. The ACE brackets are stacked up in the list to form the overall ACL. Prefixing the list of ACE brackets can be some other flags; these represent the control flags for the security descriptor. The following is an example SDDL we will dissect (I’ve separated the different sections for clarity):
O:AOG:DAS:D:(A;;RPWPCCDCLCSWRCWDWOGA;;;S-1-0-0)(A;;GA;;;SY)
First, tokenize this string using the delimiters:
| O: | G: | S: | D: |
AO |
DA |
(A;;RP WP CC DC LC SW RC WD WO GA;;;S-1-0-0) (A;;GA;;;SY) |
Figure 7a: The SDDL string tokenized into separate strings.
Next, expand the SID strings and ACE strings:
| Owner | Group | SACL | DACL |
| Account Operators | Domain Administrators | (A;;ADS_RIGHT_DS_READ_PROP | ADS_RIGHT_DS_WRITE_PROP | ADS_RIGHT_DS_CREATE_CHILD | ADS_RIGHT_DS_DELETE_CHILD | ADS_RIGHT_DS_LIST | ADS_RIGHT_DS_SELF | READ_CONTROL | WRITE_DAC | WRITE_OWNER | GENERIC_ALL;;; null SID)(A;;GENERIC_ALL;;;LocalSystem) |
Figure 7b: The SDDL string with the SID strings and ACE strings expanded
Finally, expand the constant strings:
| Owner | Group | SACL | DACL |
| Account Operators | Domain Administrators | Allow (null SID): 0x01e000bb Allow LocalSystem: 0x100000 |
Figure 7c: The security descriptor that the SDDL string specifies.
This is the meaning of the SDDL string specified. For a whole bunch of example SDDL strings, take a look at the %windir%securitytemplates*.inf files. This is what Windows Setup used to apply the default security descriptors for your Windows installation. See if you can decrypt the security descriptors for those strings. (To find out the answers, you can call the ConvertStringSecurityDescriptorToSecurityDescriptor() function on the security descriptor strings.)
Sorry about the poor explanation about SDDL strings. Like I said, the best reference for SDDL is in the SDK documentation, and I still stand by that statement.
8. Coming Up
In this part, you learnt how Windows NT secured its objects using security descriptors. You discovered that Windows recognizes users, groups and computers as SIDs. You learnt that security descriptors originally came from kernel mode, therefore they can be complex beasts. You were shown the parts of a security descriptor, the five components which make it up, and how it is stored in memory. You were then shown the two types of access control list. You discovered the structure of the ACL, how Windows reads an ACL, and how inheritance is implemented within the Access control model. The last structure you learnt about was the access token. You were taught what information can be read from a token, and finished off with enabling a permission.
In Part 2, you will start writing some example code for reading and writing security descriptors. You will also obtain information from the primary token to create a WhoAmI clone. Whilst you are waiting for the next article to come up, I want you to choose which technique you are going to program with. I am going to present four ways of programming with security:
- The low level way. If you need to program for NT3.5, and don’t have ATL, you’ll have no choice but to choose this method. This method makes direct calls to the low level ACL functions, and they are horrible! Not only is it nontrivial to program, this method is also excessively complex and error prone (no wonder Windows NT had so many security bugs [^]!). Unless you need to support backward compatibility (since when did you care about backward compatibility?), I strongly recommend you steer clear of this method if you can help it. If you want a preview of this method, check out the SDK docs on
SetEntriesInAcl()[^]. - The Windows 2000 way. Realising how difficult method 1 was, Microsoft invented an alternative API for creating security descriptors, the Security Descriptor Definition Language (SDDL). Initially, SDDL may not be much better than low level authorisation (just as complex, and not as compatible). However, being in text mode makes SDDL infinitely more readable, for both programmers and administrators. And if you look closely at a number of SDDLs, along with the corresponding ACLs, you’ll soon get the hang of it. Windows 2000 also introduces API helpers to automate repetitive tasks (like printing a SID in text form). If you want a preview, check out the SDK docs on
ConvertStringSecurityDescriptorToSecurityDescriptor()[^]. - The ATL way. As part of the Trustworthy Computing Initiative, Microsoft made a number of updates to ATL, culminating in the ATL security classes. If you have Visual C++ .NET, and don’t mind programming with ATL C++, you’ll want to choose this method. To see a preview, check out the
CSecurityDesc()[^] class from the Visual C++ help. - The .NET way. Starting with v2.0 of the .NET Framework, you can also choose to program security descriptors in a fully object oriented managed environment. Note, that I will not cover this in part 2 of the series. Instead programming security in .NET will have its very own part in this series (Part 3). If you have Visual Studio .NET 2005, you should strongly consider choosing this method. You can see a preview in the
System.Security.AccessControl[^].
History
The history and bibliography are now maintained in Part 4 [^].
Next Part… [^]
Дескриптор защиты
Объекты, к которым могут получать доступ процессы, имеют специальный атрибут – дескриптор защиты (security descriptor), содержащий информацию обо всех пользователях, которым разрешен или запрещен доступ к объекту.
Структура данных SECURITY_DESCRIPTOR, представляющая дескриптор защиты, описана в файле publicsdkincntseapi.h (строка 1173) и включает следующие основные поля:
- Owner – SID владельца;
- Dacl – список управления избирательным доступом;
- Sacl – системный список управления доступом.
Списки управления доступом (ACL, Access-Control List) в системе представлены заголовком (ACL Header) и последовательностью элементов списка (ACE, Access-Control Entry) (рис.13.3).
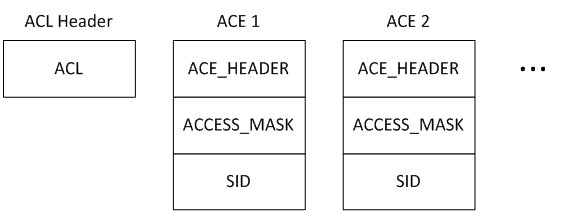
Рис.
13.3.
Внутреннее представление списка управления доступом ACL
Заголовок списка описывается структурой ACL (файл publicsdkincntseapi.h, строка 658), в которой хранятся количество элементов списка ACL (поле AceCount) и общий размер списка без заголовка (поле AclSize).
Элементы ACE имеют заголовок (ACE Header), описываемый структурой ACE_HEADER (тот же файл, строка 687), маску доступа и идентификатор безопасности SID. В заголовке указывается тип ACE (поле AceType); множество значений этого поля приведены в строках 699–728. Основными являются ACCESS_ALLOWED_ACE_TYPE (доступ разрешен) и ACCESS_DENIED_ACE_TYPE (доступ запрещен).
Маска доступа (Access Mask) описывает разнообразные виды доступа к объектам (строки 72–166). В маске выделяются стандартные права доступа (Standard Access Rights), применимые к большинству объектов, и специфичные для объектов права доступа (Object-Specific Access Rights).
Стандартными являются следующие права доступа:
- DELETE – право на удаление объекта;
- READ_CONTROL – право на просмотр информации о дескрипторе защиты объекта;
- SYNCHRONIZE – право на использование объекта для синхронизации;
- WRITE_DAC – право на изменение списка DACL;
- WRITE_OWNER – право на смену владельца объекта.
Списки управления доступом бывают двух видов: DACL и SACL. Список управления избирательным доступом (DACL, Discretionary Access-Control List) определяет пользователей, которые могут получать доступ к объекту, а также указывает тип доступа. В системном списке управления доступом (SACL, System Access-control List) перечислены пользователи и операции, которые должны учитываться в журнале аудита безопасности (security audit log).
Схема получения доступа процесса к объекту показана на рис.13.4.
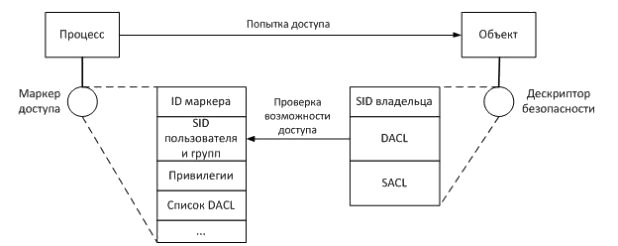
Рис.
13.4.
Схема получения доступа процесса к объекту
За проверку возможности доступа процесса к объекту отвечает функция SeAccessCheck (файл basentosseaccessck.c, строка 3391). На вход функции поступают следующие параметры:
- дескриптор защиты объекта (SecurityDescriptor);
- маркер доступа процесса (элемент структуры SubjectSecurityContext);
- маска запрашиваемого доступа (DesiredAccess);
- маска ранее предоставленного доступа (PreviouslyGrantedAccess);
- режим работы процессора (AccessMode);
Функция возвращает TRUE, если процессу возможно предоставить доступ к объекту, а также маску предоставленного доступа (GrantedAccess). Если доступ запрещен, функция возвращает FALSE.
Функция SeAccessCheck осуществляет следующие действия:
- Сначала анализируется режим работы процессора – если это режим ядра, доступ предоставляется без дальнейшего анализа (строки 3396–3416).
- В случае пользовательского режима проверяется дескриптор защиты: если он отсутствует (SecurityDescriptor == NULL), в доступе отказывается (строки 3423–3428).
- Если маска запрашиваемого доступа равна нулю (DesiredAccess == 0), возвращается маска ранее предоставленного доступа (строки 3442–3454).
- Если запрашивается доступ на изменение списка DACL (WRITE_DAC) или на чтение информации в дескрипторе защиты (READ_CONTROL), то при помощи функции SepTokenIsOwner проверяется, не является ли процесс владельцем объекта, к которому требуется получить доступ (строки 3477–3483). Если является, то ему предоставляются указанные права (3485–3492), а если запрашиваются только эти права, то функция успешно возвращает требуемую маску доступа (строки 3498–3506).
- Вызывается функция SepAccessCheck (определенная в том же файле, строка 1809), которая просматривает список DACL объекта в поисках соответствия идентификаторов безопасности SID в маркере доступа процесса. В том случае, если список DACL пустой, процессу предоставляется доступ (строка 3510–3527).
Права и привилегии
Кроме операций с объектами система должна контролировать множество других действий пользователей, например, вход в систему, включение/выключение компьютера, изменение системного времени, загрузка драйверов и т.д.
Для управления такими действиями, не связанными с доступом к конкретным объектам, система использует два механизма – права учетных записей и привилегии.
Право учетной записи (account right) – разрешение или запрет на определенный вид входа в систему.
Различают следующие виды входа:
- интерактивный (локальный) вход;
- вход из сети;
- вход через службу удаленных рабочих столов (ранее называлось – «через службу терминалов»);
- вход в качестве службы;
- вход в качестве пакетного задания.
Проверка прав учетных записей осуществляется не в ядре, а в процессах Winlogon.exe и Lsass.exe.
Привилегия (privilege) – разрешение или запрет определенных действий в системе, например, включение/выключение компьютера или загрузка драйверов. Привилегии хранятся в поле Privileges структуры маркера доступа TOKEN (см. выше).
Список всех привилегий в системе можно посмотреть в оснастке MMC «Локальная политика безопасности» (Local Security Policy), раздел «Локальные политики» – «Назначение прав пользователей» (Local Policies – User Rights Assignment) (см. рис.13.5). Вызывается оснастка через Панель управления – Администрирование. (Control Panel – Administrative Tools).
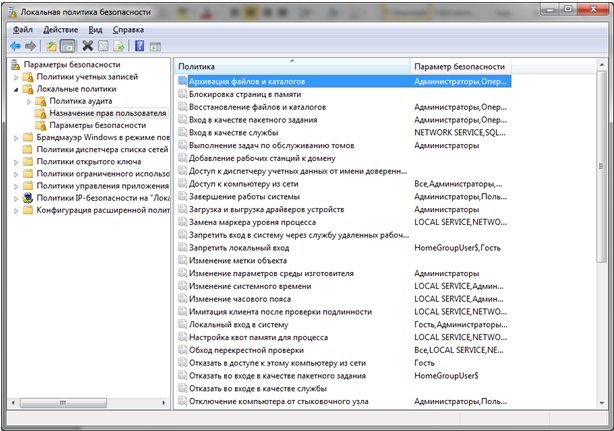
Рис.
13.5.
Оснастка «Локальная политика безопасности»
Следует отметить, что в оснастке не различаются права учетных записей и привилегии, но это легко можно сделать самостоятельно: право учетной записи всегда содержит слово «вход» (например, «Вход в качестве пакетного задания»).
Резюме
В лекции описываются требования к безопасности, предъявляемые к операционным системам Windows, и то, каким образом эти требования реализуются. Рассматривается схема проверки прав доступа процесса к объекту, которая заключается в сравнении параметров маркера доступа процесса и дескриптора защиты объекта. Также приводится информация о правах и привилегиях учетных записей.
Следующая лекция посвящена вопросам взаимодействия Windows с внешними устройствами.
Контрольные вопросы
- Какие требования к безопасности предъявляются к Windows?
- Что такое идентификатор защиты (SID)? Как его узнать?
- Что такое дескриптор защиты (security descriptor)? Где он хранится?
- Что такое маркер доступа (access token)? Где он хранится?
- Опишите схему получения доступа процесса к объекту.
- Что такое права и привилегии учетных записей? Чем они отличаются?
Разграничение
доступа к объектам
С объектом
разграничения доступа связывается
дескриптор безопасности SD
(security
descriptor),
содержащий следующую информацию:
-
идентификатор
безопасности (SID)
владельца объекта; -
идентификатор
безопасности первичной группы владельца; -
дискреционный
список
контроля
доступа
(discretionary access control list, DACL); -
системный
список контроля доступа (system
access control list, SACL).
Списки управления
доступом
-
Список
SACL
управляется администратором системы
и предназначен для аудита безопасности. -
Список
DACL
управляется владельцем объекта и
предназначен для идентификации
пользователей и групп, которым
предоставлен или запрещен определенный
тип доступа к объекту. Каждый элемент
списка DACL
(access
control
entry,
ACE)
определяет права доступа к объекту
одному пользователю или группе.
Состав ACE
Каждый ACE содержит
следующую информацию:
-
идентификатор
безопасности SID субъекта, для которого
определяются права доступа; -
маска
доступа (access
mask,
AM), которая специфицирует контролируемые
данным ACE права доступа; -
тип ACE;
-
признак наследования
прав доступа к объекту, определенных
для родительского объекта.
Разграничение
доступа к объектам
Элементы
списка DACL
могут быть двух типов – элементы,
запрещающие специфицированные в них
права доступа (Access-allowed
ACE), и элементы, запрещающие определенные
в них права доступа (Access-denied
ACE). Элементы для запрещения субъектам
использования определенных прав доступа
должны размещаться в «голове» списка,
до первого из элементов, разрешающих
использование субъектом тех или иных
прав доступа.
Права доступа в
Windows
-
Различаются
специальные, стандартные и общие
(generic)
права доступа к объектам. Специальные
определяют возможность обращения к
объекту по свойственному только данной
категории объектов методу – чтение
данных из объекта, запись данных в
объект, чтение атрибутов объекта,
выполнение программного файла и т.д. -
Стандартные
определяют возможность доступа к
объекту по методу, применимому к любому
объекту (изменение владельца, изменение
списка DACL, удаление и т.д.).
Специальные
права для файлов и папок

Стандартные права

Общие права
Каждое из них
представляет собой комбинацию специальных
и стандартных прав и предоставляет
возможность обращения к объекту с
помощью некоторого набора методов
доступа. Примеры общих прав доступа:
-
Чтение
(чтение DACL,
чтение данных, чтение атрибутов и
расширенных атрибутов, использование
объекта для синхронизации); -
Запись
(чтение DACL,
запись и добавление данных, запись
атрибутов и расширенных атрибутов,
использование объекта для синхронизации).
Разграничение
доступа к объектам
Маркер
доступа субъекта, обращающегося к
некоторому объекту, поступает в локальную
службу безопасности LSA.
От LSA
маркер доступа поступает к монитору
безопасных ссылок (security
reference
monitor,
SRM),
который просматривает DACL
из дескриптора безопасности SD
соответствующего объекта и принимает
решение R
о предоставлении доступа субъекту или
отказе в доступе. Получив от SRM
результат R,
LSA
передает его субъекту, запросившему
доступ к объекту.

Алгоритм проверки
прав доступа к объекту
-
Если
SID
из маркера доступа субъекта AT
не совпадает с SID,
содержащемся в элементе ACE
списка контроля доступа к объекту, то
осуществляется переход к следующему
ACE,
иначе переход к п. 2. -
Если в
элементе ACE
запрещается доступ к объекту для
субъекта с данным SID,
но этот субъект является владельцем
объекта и запрашиваемая маска доступа
содержит только попытку доступа к
объекту по методу «чтение (или) изменение
дискреционного списка контроля доступа
к объекту», то доступ субъекта к объекту
разрешается, иначе осуществляется
переход к п.3. -
Если в элементе
ACE запрещается доступ к объекту для
субъекта с данным SID, то сравниваются
запрашиваемая маска доступа и маска
доступа, определенная в ACE. Если при
сравнении находится хотя бы один общий
метод доступа, то попытка доступа
субъекта к объекту отклоняется, иначе
происходит переход к следующему ACE. -
Если в
элементе ACE
разрешается доступ к объекту для
субъекта с данным SID,
то также сравниваются запрашиваемая
маска доступа и маска доступа, определенная
в ACE.
Если при этом маски доступа полностью
совпадают, то доступ субъекта к объекту
разрешается, иначе происходит переход
к следующему ACE. -
Если
достигнут конец списка DACL
из дескриптора безопасности объекта,
то попытка доступа субъекта к объекту
отклоняется.
-
Если
DACL
объекта пуст, то любой доступ к нему
запрещен всем субъектам, за исключением
владельца объекта, которому разрешены
чтение и (или) изменение списка контроля
доступа к объекту. -
Если у
объекта нет дескриптора безопасности
(например, у папок и файлов, размещенных
на дисках под управлением файловой
системы FAT),
то любые пользователи и группы могут
получить любые права доступа к данному
объекту.
Контейнерные и
неконтейнерные объекты
Контейнерный
объект (папка, раздел реестра) имеет
логические связи с вложенными объектами,
которые могут наследовать права доступа
от своего родительского объекта.
По умолчанию,
изменение прав доступа к папке
распространяется на права доступа к
файлам этой папки, но не на вложенные в
нее другие папки. При наследовании права
доступа, установленные для дочерних
объектов, могут добавляться к правам
доступа, установленным для родительского
объекта, или полностью заменяться ими.
Назначение
дескрипторов безопасности вновь
создаваемым объектам
-
На
основе явно заданного дескриптора
безопасности (например, при вызове
системной функции CreateFile). -
На основе механизма
наследования (если при создании объекта
дескриптор безопасности не задается). -
Из маркера доступа
субъекта, создающего объект (если
наследование невозможно).
Соседние файлы в предмете Защита информации
- #
- #
- #
- #
- #
- #
- #
Контроль использования файлов, принтеров, реестра и других объектов
Категория аудита Audit object access (аудит доступа к объектам) Windows 2000 — важный источник информации о действиях пользователей сети на уровне операционной системы. С помощью этой категории можно определить источник, время и метод доступа к файлам, папкам, разделам реестра и принтерам. Связав события доступа к объектам с соответствующими событиями регистрации или выполнения процессов, можно выяснить конкретные детали сеанса, в ходе которого была сделана попытка доступа, или узнать, из какого приложения пользователь пытался открыть объект.
Контроль на двух уровнях
Чтобы следить за доступом к объектам, необходимо организовать аудит Windows 2000 как на уровне системы, так и на уровне объектов. Сначала следует активизировать категорию Audit object access для успешных и неудачных событий. (Подробнее о том, как использовать системную политику аудита, рассказано в статье «Контроль событий регистрации в Windows 2000». Полный список статей этого автора о журналах безопасности Windows 2000 и Windows NT приведен во врезке «В предыдущих выпусках» — прим. ред.) Затем необходимо обеспечить аудит контролируемого объекта. Каждый объект имеет два ACL (список управления доступом): разграничительный ACL (DACL) и системный ACL (SACL).

|
Экран 1. Упрощенный вид DACL объекта. |
Список DACL. В списке DACL перечислены пользователи, имеющие право доступа к объекту, и способы доступа. (Часто вместо DACL используется термин ACL.) Чтобы открыть DACL объекта из Windows Explorer (для папок и файлов) или в окне Printers (для принтеров), следует щелкнуть на объекте правой кнопкой мыши, выбрать пункт Properties и перейти к закладке Security (см Экран 1). На этой закладке дан упрощенный вид списка DACL, т. е. показаны разрешения только для одного пользователя или группы. Чтобы просмотреть полный список DACL, нужно щелкнуть на кнопке Advanced. Откроется диалоговое окно Access Control Settings объекта, показанное на Экране 2.
|
|
Экран 2. Полный список DACL-объекта. |
Список SACL. В списке SACL перечислены действия над объектом, подлежащие аудиту Windows 2000. SACL объекта состоит из элементов управления доступом (ACE). Элемент ACE точно определяет типы доступа, регистрируемые в журнале безопасности Windows 2000, когда конкретный пользователь или группа обращается к объекту. Специальный флаг каждого ACE показывает, к успешным или неудачным попыткам доступа относится данный элемент. Чтобы обратиться к SACL объекта, следует открыть диалоговое окно Access Control Settings и перейти к закладке Auditing. Каждый элемент в разделе Auditing Entries — это ACE. Из приведенного на Экране 3 списка SACL для файла примера (payroll.xls) видно, что Windows 2000 будет проверять успешные попытки записи и неудачные попытки чтения, предпринятые членами группы Everyone.
|
|
Экран 3. SACL объекта. |
Контроль попыток доступа к объекту
Windows 2000 производит аудит доступа в тот момент, когда пользователь пытается получить доступ к объекту через прикладную программу. Когда пользователь обращается к объекту из приложения, программа запрашивает у Windows 2000 дескриптор (handle) объекта. С помощью дескриптора приложение выполняет операции над объектом. Прежде чем предоставить дескриптор, Windows 2000 сопоставляет DACL объекта с учетной записью пользователя, запустившего прикладную программу, и типами доступа (например, запись или чтение), запрошенными приложением. Затем Windows 2000 определяет, предусмотрена ли системной политикой аудита запись результатов этого сравнения в журнал. Например, если попытка доступа неудачна, система выясняет, активизирована ли политика аудита для регистрации неудачных обращений к объектам.
Если системной политикой аудита предусмотрена запись результата в журнал, то Windows 2000 обрабатывает SACL объекта. Система исследует каждый элемент ACE, имеющий отношение к результату, и определяет, какие из элементов идентифицируют учетную запись пользователя, запустившего приложение, и все группы, к которым он принадлежит. Затем Windows 2000 исследует типы доступа, указанные в этих ACE. Если хотя бы один тип доступа в ACE совпадает с любым из типов доступа, запрошенных приложением, то Windows 2000 генерирует событие с ID 560 «объект открыт» с соответствующим типом события (Failure Audit или Success Audit). В оснастке Event Viewer консоли Microsoft Management Console (MMC) сообщения о неудачном завершении какой-либо операции отмечены пиктограммой замка, а записи об успешном завершении операции — изображением ключа.
Предположим, что пользователь Гарольд работает с Microsoft Excel и пытается открыть файл payroll.xls. Excel запрашивает у Windows 2000 дескриптор для payroll.xls. Windows 2000 сравнивает DACL файла с учетной записью Гарольда и запросом на чтение, поступившим от Excel; согласно DACL, у Гарольда нет права на чтение payroll.xls. Как показано на Экране 2, доступ к payroll.xls имеют только Administrators и группа HR, а Гарольд не является членом ни одной из этих групп. Windows 2000 выясняет, что системной политикой аудита предусмотрена регистрация неудачных попыток обращения к объекту, поэтому она просматривает SACL файла payroll.xls и исследует каждый элемент ACE, контролирующий неудачные попытки доступа. Windows 2000 определяет, какие из этих элементов ACE указывают на учетную запись Гарольда или группу, к которой он принадлежит. Как показано на Экране 3, SACL объекта содержит ACE, который относит неудавшуюся операцию чтения к группе Everyone, поэтому Windows 2000 регистрирует событие с ID 560 (см. Экран 4).
|
|
Экран 4. Событие с ID 560 неудачной попытки доступа. |
Предположим, что пользователь Салли также пытается открыть файл payroll.xls из Excel. Поскольку Салли является членом группы HR, она имеет право выполнять операции чтения и записи в файле payroll.xls. Системная политика аудита настроена на регистрацию успешных попыток доступа к объектам, и SACL файла содержит ACE, относящийся к успешным операциям записи и группе Everyone, поэтому Windows 2000 регистрирует событие с ID 560 (см. Экран 5).
|
|
Экран 5. Событие с ID 560 успешного доступа. |
Разобраться в полях события с ID 560 нетрудно. Значение параметра Object Server всегда Security. В поле Object Type идентифицируется объект аудита — файл, папка, раздел реестра, принтер или служба. Windows 2000 заполняет поле New Handle ID лишь в том случае, если доступ к объекту был предоставлен. Если пользователь не имеет соответствующих полномочий, то доступ не предоставляется, и Windows 2000 не создает ID дескриптора. Operation ID — просто число, которое увеличивается на единицу для каждой операции, выполняемой в Active Directory (AD).
Теоретически, с помощью поля Process ID можно вычислить приложение, через которое пользователь открыл объект. Однако соответствующее событие с ID 592 (новый процесс), генерируемое категорией Audit process tracking, показывает ID процесса в другом формате, нежели все остальные события Windows 2000. По некоторым сведениям, разработчики Microsoft устранят эту проблему в версиях Windows XP и Windows Server — известных под названием Whistler. Для событий, отображающих непрямой доступ к объектам, Process ID идентифицирует серверное приложение, а не клиентскую программу, через которую пользователь открыл объект. Если пользователь открывает файл в каталоге общего доступа, то Process ID указывает на процесс System как на программу, открывшую объект. Чтобы проверить эту информацию, можно открыть Task Manager, перейти к закладке Processes и посмотреть идентификатор процесса в столбце PID.
Поля Primary User Name и Primary Domain идентифицируют учетную запись пользователя, напрямую обратившегося к объекту. Когда пользователь обращается к объекту со своего локального компьютера через настольное приложение, такое, как Microsoft Word или Excel, то Primary User Name и Primary Domain показывают учетную запись компьютера, а поля Client User Name и Client Domain — учетную запись пользователя. Например, на Экране 6 показано событие с ID 560, которое было зарегистрировано, когда пользователь Джон подключился к сетевому диску на файл-сервере Tecra и открыл документ budget.doc. Тогда в поле Primary User Name стоит имя TECRA$, соответствующее учетной записи файл-сервера в домене. Client User Name идентифицирует Джона как пользователя, работающего на клиентской стороне.
|
|
Экран 6. Событие с ID 560 непрямого доступа. |
Поля Primary Logon ID и Client Logon ID содержат идентификатор logon ID, присваиваемый при регистрации с учетной записью пользователя, обратившегося к объекту. Чтобы определить, в каком сеансе был произведен доступ, следует посмотреть на событие с ID 540 (удаленная регистрация) или с ID 528 (все другие виды регистрации) с этим идентификатором (подробнее эти события описаны в статье «Контроль событий регистрации в Windows 2000».) Если пользователь напрямую открывает объект на своей локальной машине, то Primary Logon ID события с ID 560 соответствует Logon ID события с ID 528, зафиксированного Windows 2000 при регистрации пользователя в системе; поле Client Logon ID остается пустым. Если пользователь обращается к файлу на удаленной машине, то поле Primary Logon ID события с ID 560 идентифицирует сеанс, связанный с учетной записью локального компьютера, а поле Client Logon ID события с ID 528 соответствует Primary Logon ID.
В поле Accesses указаны типы доступа, запрошенные приложением. Одни типы доступа специфичны для определенного класса объектов, другие применимы к любому объекту. В Таблице 1 перечислены и описаны самые распространенные типы доступа.
Когда пользователь открывает файл или папку, в поле Accesses отмечаются предоставленные пользователю типы доступа, специфичные для данной папки или файла. Эти типы доступа соответствуют специальным разрешениям, приведенным в DACL файла. Параметры ReadAttributes и WriteAttributes указывают, что пользователь открыл файл с возможностью изменения его свойств (только чтение, архивный, скрытый, системный). ReadEA и WriteEA применяются к расширенным атрибутам файла, определяемым конкретными приложениями. Чтобы увидеть расширенные атрибуты файла, нужно открыть Windows Explorer и щелкнуть на файле правой кнопкой мыши. Выбрав Properties, следует перейти к закладке Custom, а затем к закладке Summary.
Тип AppendData означает, что пользователь имеет право добавить данные в открытый файл. ReadData и WriteData означают, что пользователь, открывший файл, имеет возможность прочитать или изменить его данные. Если задан режим аудита запуска исполняемых файлов, то Windows 2000 регистрирует доступ типа Execute при каждом запуске программы.
Те же типы доступа — с небольшими отличиями — используются Windows 2000 для контроля работы с папками. AppendData указывает, что пользователь создал в папке подпапку. Windows 2000 регистрирует тип WriteData, если в папке создается новый файл. Чтобы определить имя нового файла или подпапки, нужно посмотреть на последующее событие с ID 560, соответствующее новому дочернему объекту. Windows 2000 регистрирует тип ReadData, если пользователь просматривает содержимое папки (например, командой Dir или через Windows Explorer).
Завершение работы с объектом
Когда пользователь открывает объект из приложения, Windows 2000 регистрирует событие с ID 560, а при закрытии объекта операционная система регистрирует событие с ID 562 (дескриптор закрыт). Поля события с ID 562 частично совпадают с полями события с ID 560.
|
|
Экран 7. Событие с ID 562. |
Следует обратить внимание на поле New Handle ID события с ID 560 (см. Экран 5) и поле Handle ID события с ID 562 (см. Экран 7). Windows 2000 генерирует различные Handle ID для каждого открытого объекта. Таким образом, связав событие с ID 560 и событие с ID 562 с одинаковыми Hand-le ID, можно определить, как долго объект оставался открытым. Из оснастки Event Viewer следует открыть событие с ID 560 и запомнить Handle ID события. Затем нужно щелкнуть правой кнопкой мыши на журнале Security и выбрать функции View, Find. В поле Event ID следует ввести значение 562, а в поле Description — значение Handle ID. Если Event Viewer показывает сначала новые объекты, то следует изменить направление поиска на Up, а затем щелкнуть Find Next.
Не только файлы
Категория Audit object class используется не только для контроля доступа к файлам. Например, с помощью программы regedt32 можно запустить аудит разделов реестра и затем контролировать доступ к разделам и элементам реестра. Элементы реестра не имеют собственных списков DACL и SACL; как и операции управления доступом, операции аудита проводятся через родительский раздел реестра. Windows 2000 регистрирует типы доступа, соответствующие разрешениям в списке DACL раздела, и описывает разрешения, указанные в событии с ID 560. Если обращение к разделу реестра вызывает событие с ID 560, то Windows 2000 указывает в поле Object Type значение Key. Значение в поле Object Name начинается с REGISTRY, за которым следует ветвь и остальной путь к разделу. Например, подраздел HKEY_LOCAL_MACHI-NESOFTWAREAcme отображается как REGISTRYMACHINESOFT-WAREAcme.
Из меню Settings, Printers можно получить доступ к спискам SACL принтеров и реестра. Для этого достаточно выполнить те же операции, что и при доступе к SACL файла или папки, но отправной точкой будет служить не Windows Explorer, а меню Settings, Printers.
В статье Microsoft «Monitoring and Auditing for End Systems» (http://www.microsoft.com/technet/ security/monito.asp) говорится, что можно выполнять аудит системных служб, но в действительности это не так. Даже если в SACL службы режим аудита включен (с помощью политик Group Policy через ComputerConfiguration, Windows Settings, Security Settings, System Services), Windows 2000 не заносит в журнал безопасности сведений о запуске, остановке и отключении службы. Идентификаторы событий документированы для некоторых других операций (например, удаления объекта), но этот механизм пока не функционирует.
Наследование SACL
В Windows 2000 схема наследования SACL повторяет схему DACL. По умолчанию, элементы SACL автоматически переходят от родительских папок и разделов реестра к дочерним объектам. Например, если разрешить аудит неудачных операций записи в папку, то все файлы и подпапки наследуют этот элемент SACL. Существует несколько уровней настройки наследования SACL.
Дочерний уровень. Чтобы блокировать передачу элементов родительского SACL дочернему объекту, следует открыть окно Access Control Settings (параметры управления доступом) дочернего объекта, перейти к закладке Auditing и снять флажок Allow inheritable auditing entries from parent to propagate to this object. Затем нужно щелкнуть OK или Apply. Если к моменту сброса флажка какие-то наследуемые элементы SACL уже были переданы объекту-потомку, Windows 2000 потребует подтвердить необходимость их удаления или создать их копии без наследования.
|
|
Экран 8. Отмена блокировки наследования в дочерних объектах. |
Родительский уровень. Чтобы разблокировать наследование в дочерних объектах, следует открыть диалоговое окно Access Control Settings родительского объекта, показанное на Экране 8, перейти к закладке Auditing и установить флажок Reset auditing on all child objects and enable propagation of inheritable auditing entries. После щелчка на кнопке OK или Apply операционная система отменяет аудит на всех дочерних объектах и сбрасывает флажок, чтобы администратор мог выборочно блокировать наследование на дочерних объектах. Данная функция сброса полезна, если администратор не знает, какой режим наследования установлен в системе, и хочет начать все сначала.
Можно также контролировать глубину наследования и указать последний дочерний объект, на который распространяется действие каждого элемента SACL. Чтобы отредактировать отдельный элемент SACL, нужно открыть диалоговое окно Access Control Settings родительского объекта, перейти к закладке Auditing, выбрать элемент и открыть окно Auditing Entry щелчком на кнопке View/Edit, как показано на Экране 9. В данном диалоговом окне предусмотрено два способа реализации наследования дочерними объектами. Раскрывающийся список Apply onto определяет типы объектов, которым передается запись об аудите. По умолчанию из списка выбирается значение This folder, subfolders and files (данная папка, подпапки и файлы), но пользователь может выбрать любое сочетание этих объектов. (На Экране 9 выбран режим аудита неудачных операций чтения только файлов, но не папок.) С помощью флажка Apply these auditing entries to objects and/or containers within this container можно определить, передаст ли Windows 2000 запись объектам, расположенным непосредственно в папке, или рекурсивно распространит эту запись на все дочерние уровни ниже данной точки.
|
|
Экран 9. Редактирование отдельных элементов SACL. |
Как лучше провести аудит
Какую стратегию избрать для аудита объектов? Во-первых, если требуется проверить определенный каталог или раздел реестра на нескольких машинах, нужно использовать групповые политики. Например, чтобы исследовать неудачные попытки записи в каталоге %systemroot% на всех компьютерах домена, следует открыть оснастку MMC Active Directory Users and Computers и щелкнуть правой кнопкой мыши на корневом домене. Затем, выбрав Properties, необходимо перейти к закладке Group Policy. Отметив пункт Default Domain Policy Group Object (GPO), следует щелкнуть на кнопке Edit и пройти по Computer Configuration, Windows Settings, Security Settings, File System. Щелкнув правой кнопкой мыши на File System, нужно выбрать пункт Add File. Затем введите с клавиатуры
%systemroot%
и щелкните OK. На экране появится диалоговое окно разрешений, похожее на то, которое показано на Экране 1. Чтобы запустить процесс аудит объекта, следует повторить описанную ранее последовательность действий. При этом нужно внимательно отнестись к определению области аудита. Не рекомендуется ограничивать круг проверяемых лиц, так как взломщики часто используют чужие пароли. Поэтому в списке управления следует указать аудитом группу Everyone, чтобы охватить всех пользователей. Однако желательно ограничить подлежащие аудиту типы доступа и объекты. В процессе аудита объектов генерируется большой объем данных. Чтобы журнал безопасности не наполнялся бесполезными сведениями, лучше остановиться на небольшом числе типов доступа к немногим объектам.
Неопытным администраторам может показаться, что на самом деле активность системы не столь велика, как можно предположить исходя из событий Audit object access. Следует помнить, что Windows 2000 не выполняет аудит собственно операций (например, чтения и записи) над объектами; вместо этого проверяются запросы на доступ к объектам, поступающие из приложений. Поэтому в поле Accesses события с ID 560 указывается только тип доступа, который мог получить пользователь, но не сам факт выполнения пользователем каких-либо операций. Проблема усугубляется прикладными программами, которые автоматически запрашивают все типы доступа, независимо от того, нужны ли они пользователю. Представители Microsoft заявляют, что в конечном итоге в Windows 2000 может быть реализован аудит действительных операций, а не возможностей доступа.
С помощью категории Audit object access можно решить ряд трудных задач: например, выяснить, имели ли место попытки несанкционированного доступа к данным и кто мог изменить тот или иной файл. Несмотря на трудности анализа избыточных данных журнала, эта категория занимает достойное место в арсенале администратора.
SACL, англ. System Access Control List — список управления доступом к объектам Microsoft Windows, используемый для аудита доступа к объекту.[1]
SACL — это традиционный механизм логирования событий, который определяет, как проверяется доступ к файлам и папкам. В отличие от DACL, SACL не может ограничивать доступ к файлам и папкам. Но он может отследить событие, которое будет записано в журнал событий безопасности(security event log), когда пользователь обратится к файлу или папке. Это отслеживание может быть полезно при решении проблем доступа или при определении запрещенного проникновения.
Для специалистов в сфере безопасности, SACL важнейший инструмент для определения проникновения. Системные администраторы больше используют SACL для определения прав, которые необходимо дать пользователю, для корректной работы приложения. Разработчики используют SACL для определения ресурсов, к которым доступ приложения запрещен, для настройки корректности работы приложения, при ограниченных правах доступа.
По умолчанию, WINDOWS не отслеживает события доступа. Для включения SACL необходимо:
1) Открыть "Локальную политику безопасности", запустив secpol.msc
2) Развернуть "Локальная политика", и выбрать "Политика Аудита"
3) Справа произвести двойной клик по пункту "Аудит доступа к объектам". Выбрать "Отказ",
  в случае необходимости логирования ошибок доступа. Выбрать "Успех", в случае необходимости логирования успешных доступов.
В AD DS администратор домена может включить аудит доступа к объектам для всех членов используя групповую политику.
Примечания
- ↑ S (Windows)