Book description
Kali Linux: a complete pentesting toolkit facilitating smooth backtracking for working hackers
About This Book
- Conduct network testing, surveillance, pen testing and forensics on MS Windows using Kali Linux
- Footprint, monitor, and audit your network and investigate any ongoing infestations
- Customize Kali Linux with this professional guide so it becomes your pen testing toolkit
Who This Book Is For
If you are a working ethical hacker who is looking to expand the offensive skillset with a thorough understanding of Kali Linux, then this is the book for you. Prior knowledge about Linux operating systems and the BASH terminal emulator along with Windows desktop and command line would be highly beneficial.
What You Will Learn
- Set up Kali Linux for pen testing
- Map and enumerate your Windows network
- Exploit several common Windows network vulnerabilities
- Attack and defeat password schemes on Windows
- Debug and reverse-engineer Windows programs
- Recover lost files, investigate successful hacks and discover hidden data in innocent-looking files
- Catch and hold admin rights on the network, and maintain backdoors on the network after your initial testing is done
In Detail
Microsoft Windows is one of the two most common OS and managing its security has spawned the discipline of IT security. Kali Linux is the premier platform for testing and maintaining Windows security. Kali is built on the Debian distribution of Linux and shares the legendary stability of that OS. This lets you focus on using the network penetration, password cracking, forensics tools and not the OS.
This book has the most advanced tools and techniques to reproduce the methods used by sophisticated hackers to make you an expert in Kali Linux penetration testing. First, you are introduced to Kali’s top ten tools and other useful reporting tools. Then, you will find your way around your target network and determine known vulnerabilities to be able to exploit a system remotely. Next, you will prove that the vulnerabilities you have found are real and exploitable. You will learn to use tools in seven categories of exploitation tools. Further, you perform web access exploits using tools like websploit and more. Security is only as strong as the weakest link in the chain. Passwords are often that weak link. Thus, you learn about password attacks that can be used in concert with other approaches to break into and own a network. Moreover, you come to terms with network sniffing, which helps you understand which users are using services you can exploit, and IP spoofing, which can be used to poison a system’s DNS cache. Once you gain access to a machine or network, maintaining access is important.
Thus, you not only learn penetrating in the machine you also learn Windows privilege’s escalations. With easy to follow step-by-step instructions and support images, you will be able to quickly pen test your system and network.
Style and approach
This book is a hands-on guide for Kali Linux pen testing. This book will provide all the practical knowledge needed to test your network’s security using a proven hacker’s methodology. The book uses easy-to-understand yet professional language for explaining concepts.
Chapter 1. Sharpening the Saw
A craftsman is only as good as his tools and tools need to be set up and maintained. In this chapter we will go through the setup and configuration of Kali Linux.
There are several ways to set up Kali to perform different tasks. This chapter introduces you to the setup that works best for your Windows-hacking use case, the documentation tools that we use to make sure that the results of the tests are prepared and presented correctly, and the details of Linux services you need in order to use these tools. Most books about Kali set the chapters in the order of the submenus in the Kali security desktop. We have put all the set-up at the beginning to reduce the confusion for first-time Kali users, and because some things, such as the documentation tools, must be understood before you start using the other tools. The reason why the title of this chapter is Sharpening the Saw is because the skilled craftsman spends a bit more time preparing the tools to make the job go faster.
In the Kali Desktop Menu, there is a sub-menu, Top 10 Security Tools, and these are the tools that the creators of Kali Linux believe to be the most indispensable weapons for a working security analyst to understand. In this chapter we are going to show you the tools we use the most. Most of them are in the Kali Top 10 Menu, but not all of them!
Many of the system services on Kali Linux are the same as those on most Linux servers, but because there are security tools that use a client/server model, there are services that will need to have their servers started early to run your tests successfully.
-
Learn to set up Kali Linux like a professional. There are lots of choices in setting up a Kali Linux workstation, and some are more effective than others.
-
Once you have your installation complete, you need to make a decision on what documentation system you will use to keep your research notes and results organized and secure.
-
The final section of this chapter is a short primer in how to use security services on a Linux OS. Almost all of the services are started in the command line (CLI), and they are almost uniform in their operation syntax.
Installing Kali Linux to an encrypted USB drive
Secure networking environments such as those found in most organizations that have IT departments present several challenges to you as a security engineer. The company probably has a specific list of approved applications. Anti-virus applications are usually managed from a central location. Security tools are miscategorized as evil hacking tools or malware packages. Many companies have defensive rules against having any operating system that isn’t Microsoft Windows installed on company computing hardware.
To add to the challenge, they prohibit non-corporate assets on the corporate network. The main problem you will find is that there are very few economical penetration testing tools written for Windows, and the few, such as Metasploit, that do have a Windows version, tend to fight with the lower-level operating system functions. Since most company laptops must have anti-virus software running on the system, you have to do some serious exception voodoo on Metasploit’s directories. The anti-virus software will quarantine all the viruses that come with Metasploit. Also, intrusion protection software and local firewall rules will cause problems. These OS functions and security add-ons are designed to prevent hacking, and that is exactly what you are preparing to do.
Note
The Payment Card Industry Digital Security Standard (PCI DSS 3.0) requires that any Windows machine that handles payment data or is on a network with any machine that handles payment data to be patched, runs a firewall and has anti-virus software installed on it. Further, many company IT security policies mandate that no end user can disable anti-virus protection without a penalty.
Another issue with using a Windows machine as your penetration-testing machine is that you may do external testing from time to time. In order to do a proper external test the testing machine must be on the public Internet. It is unwise to hang a Windows machine out on the public network with all your security applications turned off. Such a configuration will probably be infected with worms within 20 minutes of putting it on the Internet.
So what’s the answer? An encrypted bootable USB drive loaded with Kali Linux. On Kali’s install screen there is the option to install Kali to a USB drive with what is called «persistence». This gives you the ability to install to a USB drive and have the ability to save files to the USB but the drive is not encrypted. By mounting the USB drive with a Linux machine your files are there for the taking. This is fine for trying out Kali but you don’t want real test data floating around on a USB drive. By doing a normal full install of Kali to the USB drive, full disk encryption can be used on the disk. If the USB is compromised or lost, the data is still safe.
In this chapter we will install Kali to a 64GB USB disk. You can use a smaller one but remember you will be gathering data from your testing and even on a small network this can amount to a lot of data. We do testing almost daily so we used a 1TB USB 3.0 drive. The 64GB drive is a good size for most testing.

Prerequisites for installation
For this chapter you will need a 64GB thumb drive, a copy of Kali burned to a DVD and a machine with a DVD player and USB capabilities on boot. You can download Kali at http://kali.org and look for the download link.
Booting Up
Once you are ready, insert your DVD and your USB drive into your machine.
Note
Be sure to insert the USB before powering up the machine. You want the machine to see the USB on boot so the installer will see it during the install.
Now power up the machine and you’ll get the screen below. Pick the Graphic Install from the menu. This installation will also work if you use the text installer found by picking the Install command on line six.

Installing configuration
If you have ever installed any distribution of Linux, the first section of the installation should seem very familiar. You will see a series of screens for the country, language, and keyboard set up. Set this up for your locale and language of choice. Normally the installer will discover the keyboard and you can click on the one chosen. Click the Continue button to continue on each of these pages.
After these configurations you’ll be presented with the following window and asked to give it a hostname. Give it a distinctive name and not the default. This will be helpful later when using saved data and screenshots taken. If you have several people using Kali and all the machines are named Kali it can be confusing as to exactly where the data came from.

In the next screen you will be asked for a domain name. Use a real domain name that you or your company controls. Do not use a bogus domain name such as .local or .localdomain. If you are doing business on the Internet, or even if you are an individual please use a proper domain name. This makes tracing routes and tracking packets easier. Domains are cheap. If the domain belongs to your employer, and you cannot just use their domain name, request a subdomain such as testing.mycompany.com.

In the next window you will be asked to provide a root password. Make this a good password. The longer and more complex the password, the better. Remember, after a few tests the keys to your network kingdom will be on this device. Unlike most computer operations during testing you will be using the root account and not a normal user account for testing. You will need the ability to open and close ports and have full control of the network stack.
Note
A standard Kali install does not offer you the chance to add a standard user. If you install Kali on the laptop itself, and use this laptop for other things besides testing, create a standard user and give it sudoer privileges. You never want to get into the habit of using your root account for browsing the World-Wide Web and sending e-mails.

Next to be set up is the time zone. Set up by your location on the graphical map, or pull-down menu, or pick your UTC offset. Many of the tools on Kali Linux output timestamps and these provide legal evidence that you did what you said you did, when you said you did.
Setting up the drive
The next step will be setting up the drive, encrypting it, and partitioning the drive. The next dialog will ask you to select the type of partitioning for this install.
-
Pick Guided – Use entire disk and set up encrypted LVM. This will fully-encrypt the entire drive, as opposed to just encrypting the
/homedirectory.
In the next window you will be asked to pick the disk you require for installation.
Tip
WARNING. Be careful to pick the USB disk and not your local drive. If you pick your local drive you will wipe the operating system from that drive. Note in the window below you can see the USB drive and a VMware virtual disk. The virtual disk is the hard drive of the virtual machine being used for this demonstration.
-
Pick the USB disk and click on Continue.
-
In the next window you will be asked how you want to partition the drive. Just keep the default and click on Continue.
-
Next you will be asked to save the partitioning information and this will start the partitioning process. When you click on Continue, here all data will be lost on the disk you are installing to. Click on Yes and then Continue.
This will start the disk encryption and partitioning process. First the drive is fully erased and encrypted. This will take a while. Get a cup of coffee, or better yet, go for a walk outside. A 1TB drive will take about 30 hours for the encrypting process. The 64GB drive takes about 30 minutes.
-
In the next window, you will be asked to give provide a passphrase for the drive encryption. You will use this passphrase when booting up Kali. Note the term passphrase.
Tip
Use something really long but easy to remember. A line from a song or a poem or quote! The longer the better! «Mary had a little lamb and walked it to town.» Even with no numbers in this phrase it would take John the Ripper over a month to crack this.
-
Next you will be asked to confirm these changes. Pick Finish partitioning and write changes to disk. And then click Continue.
-
Next, click on the Yes radio button and then click on Continue.
Now the system will start the partitioning process.
After the partitioning process, the system install will start.
-
Next you will be asked if you want to use a Network Mirror. Click Yes on this! This will select repository mirrors close to your location and help speed up your updates later when you update your system.
-
Your installation process will now complete and you will be asked to reboot the system. Be sure to remove the install disk before rebooting.


Booting your new installation of Kali
Now we’re ready to fire up Kali. Insert your Kali USB drive into your machine and power it up. In the beginning of the boot process you will be given the ability to manually select a boot drive. The specific keystroke will vary depending on the type and make of your machine. By whatever process your machine uses you will be given a menu of the available drives to boot from. Pick the USB drive and continue. When the system boots, you will be presented with a screen asking for your passphrase. This is the passphrase we had set earlier during the installation. This is not the root login password. Enter the passphrase and hit the Enter key.

This will start the actual boot process of the system from the now unencrypted drive. Once the system is booted up you will be presented the login following screen:

Tip
Hacker Tip
Before we go any further we would advise you to use these tools only on systems that you have written authorization to test, or systems that you personally own. Any use of these tools on a machine you do not have authorization to test is illegal under various Federal and State laws. When you get caught, you will go to jail. Sentences for hacking tend to be draconically long.
Get a personal copy of the testing waiver that your company receives to allow them to test the client’s network and systems. This document should contain the dates and times of testing and the IP addresses and/or networks to be tested. This is the «scope» of your testing. This document is your «Get out of jail free card.» Do not test without this.
Now with that said let’s login and continue our set up.
-
Hit the Enter key or click on Other in the menu box. You will then be given a field asking for the user name. Enter the root and hit the Enter key. You will then be prompted with the password field.
-
Enter the root password and hit Enter. Your desktop will now load.

On your first login, check to be sure that everything is up to date. Pull up a terminal window by clicking in the menu bar in the upper left hand corner and go to Applications | Accessories | Terminal. This will bring up the terminal or command-line window. Type the following:
root@kalibook :~# apt-get update
This will refresh the update list and check for new updates. Next run:
root@kalibook :~# apt-get -y upgrade
This will run the upgrade process as the -y automatically answers «yes» to the upgrade. The system will run an upgrade of all applications. Reboot if necessary.
Tip
Hacker Trick
Here’s another way to get to your terminal window and skip the main menu. Press Alt + F2. This opens a dialog window with a single field. You can type any program name into the field and it opens the program. In this case, type terminal in the field, and click OK
Running Kali from the live CD
Running Kali Linux from the live disk is best when you are doing forensics or recovery tasks. Some tools, such as OpenVAS will not work at all, because they have to be configured and file updates must be saved. You can’t do this from the CD. One thing you can do very neatly from the live disk is to start up a computer without writing anything to the hard drive, and this is an important consideration when you are working on recovering files from the hard drive in question for forensic investigation.
To run Kali from the CD, just load the CD and boot from it. You will see the following screen. Note there are several options in booting live from the CD:
-
Booting from the first option loads Kali complete with a working network stack. You can run a lot of the tools over the network with this option. One of the best uses for this mode is the recovery of a dead machine. It may allow you to resurrect a crashed machine after the OS drive dies. No matter what Voodoo you do with fsck and other disk utilities, it just will not come back up on its own. If you boot from the live CD, you can then run fsck and most likely get the drive back up enough to copy data from it. You can then use Kali to copy the data from the drive to another machine on the network.
-
Booting from the second option will boot Kali with no running services and no network stack. This option is good when things really go bad with a system. Perhaps it was struck by lightning and the network interface card is damaged. You can do the above operation and copy the data to a mounted USB drive in this mode.
-
The third option is «Forensic Mode». When booted with this option it does its best not touch the machine itself when booting. No drives are spun up and the memory is not fully flushed as with a normal boot up. This allows you to capture old memory from the last boot and allows you to do a forensic copy of any drives without actually touching the data. You do not have a working network stack or running services.
-
Booting from the fourth and fifth options requires you to install Kali onto a USB drive and run it from the USB drive. When you boot from the USB you will get the same screen as follows but you will pick one of these options. For the USB with persistence see the link listed http://kali.org/prst for an excellent tutorial.
-
If you are comfortable with the Linux command line, you may want the sixth option. This is the Debian Ncurses installer. It has all the functions of the graphical installer, but it lacks the modern slick look of the graphical installer. You can also use this installer with the section on fully installing to an encrypted USB. The steps are all the same.
-
The Graphical Installer is for installing directly to a hard drive and as in our demonstration you can also use it to do a full install to a USB or Flash Drive.

Installing and configuring applications
Most of what you need comes preloaded on Kali. There are a few applications we have found useful that are not loaded with the base install. We will also set up and configure OpenVAS to use as our vulnerability scanner.
Gedit – the Gnome text editor
Kali comes with Leafpad as its default text editor. This is a very lightweight text editor. Kali’s desktop is Gnome-based and the Gnome text editor Gedit is a much better editor. To install:
root@kalibook :~# apt-get -y install gedit
Once installed you will find it under Accessories.
Terminator – the terminal emulator for multitasking
This is Bo’s favorite terminal application. You can split the screen into several windows. This proves to be a great help when running several ssh sessions at the same time. It also has a broadcast function where you can run the same string in all windows at the same time.

To install:
root@kalibook :~# apt-get -y install terminator
EtherApe – the graphical protocol analysis tool
This is a great visual passive/active network sniffing tool. It works really well for sniffing Wi-Fi networks. It shows you where the services are running, and can also show you where users are doing suspicious bit-torrent downloads and other behavior that is not approved on most corporate networks.

Setting up and configuring OpenVAS
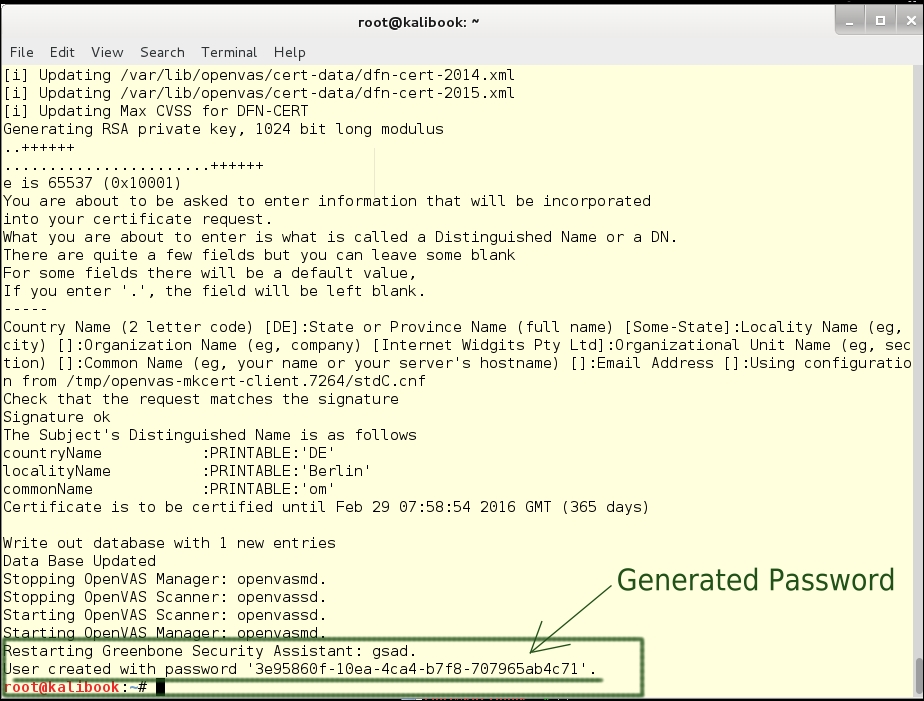
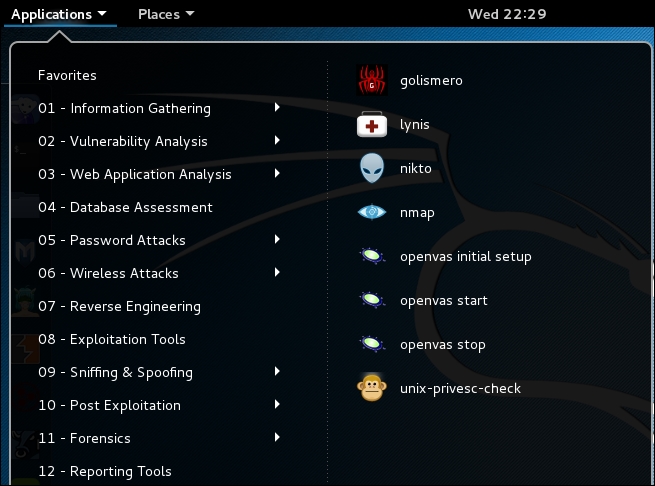
Recon is everything, so a good vulnerability scanner is necessary. Kali come with OpenVAS installed. It must be configured and updated before use. Fortunately, Kali comes with a helpful script to set this up. This can be found under Applications | openvas initial setup. Clicking on this will open a terminal window and run the script for you. This will set up the self-signed certificates for SSL and download the latest vulnerability files and related data. It will also generate a password for the admin account on the system.
Tip
Be sure to save this password as you will need it to login. You can change it after your first login.
Kali also comes with a check setup script which will check the services and configuration. If an issue does come up it will give you helpful information on the issue. This script can be found at Applications | Kali Linux | System Services | OpenVas | openvas check setup. Click here and a terminal window will open and run the script.
The script results are as shown in the following screenshot:
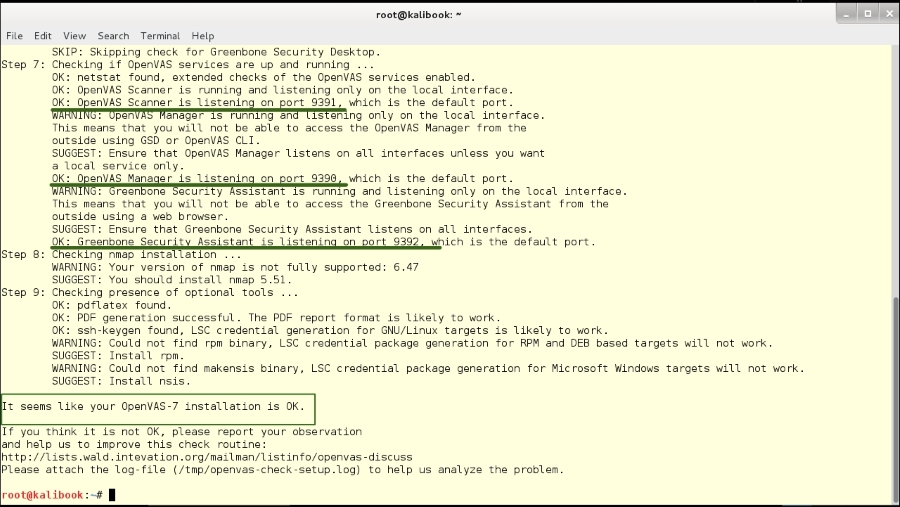
Note this check shows the running ports of the services. The check shows a warning that these services are only running on the local interface. This is fine for your work. It may at some point be useful for you to run the OpenVAS server on some other machine to improve the speed of your scans.
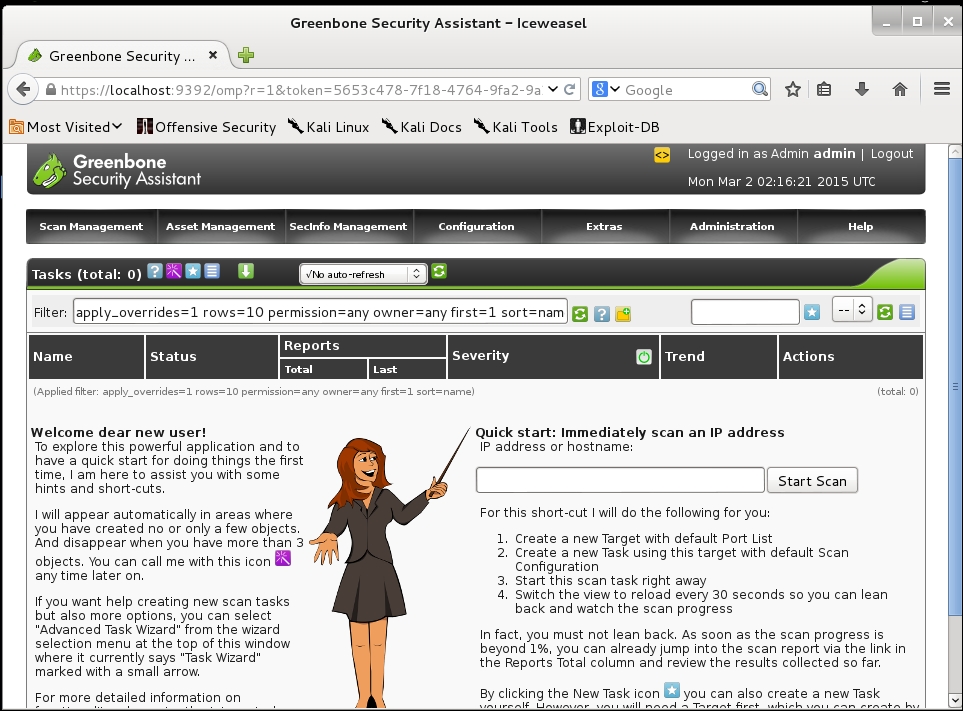
Next, we will log into the Greenbone web interface to check OpenVAS. Open the browser and go to https://localhost:9392. You will be shown the security warning for a self-signed certificate. Accept this and you will get the following login screen.
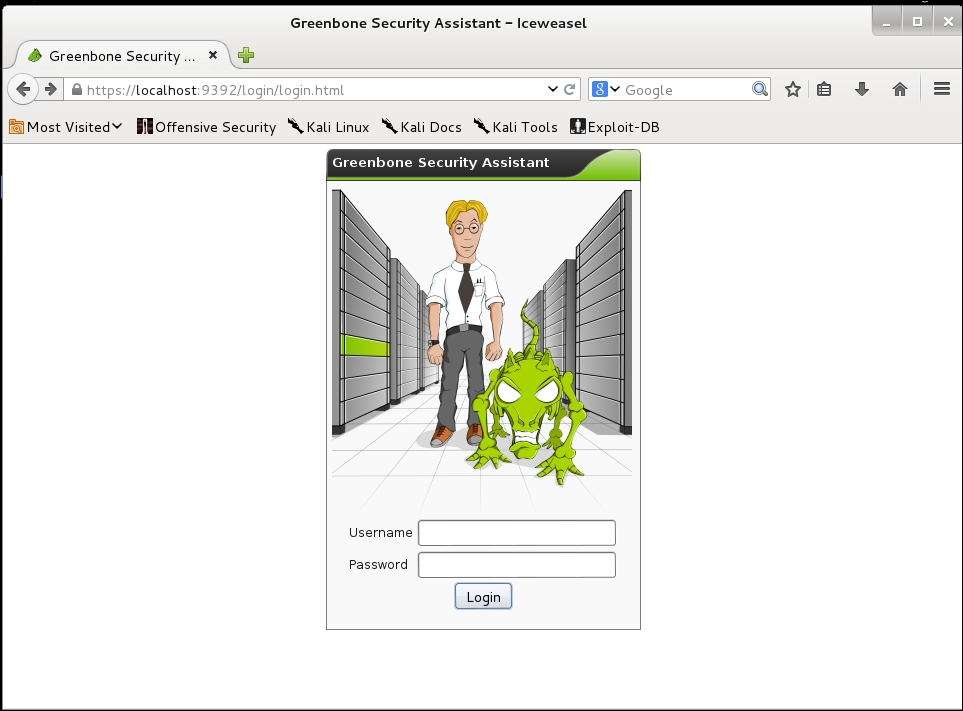
You will log in with the user name admin and the very long and complex password generated during the set up. Don’t worry, we’re going to change that once we get logged in. Once logged in you will see the following page.
Now go to the Administration | Users tab:
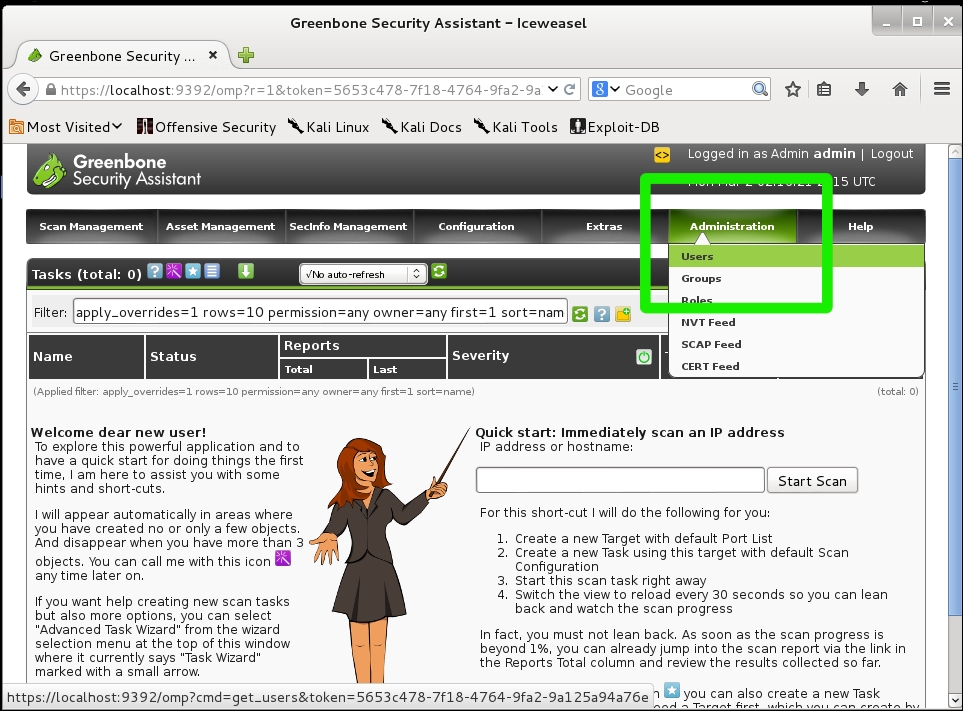
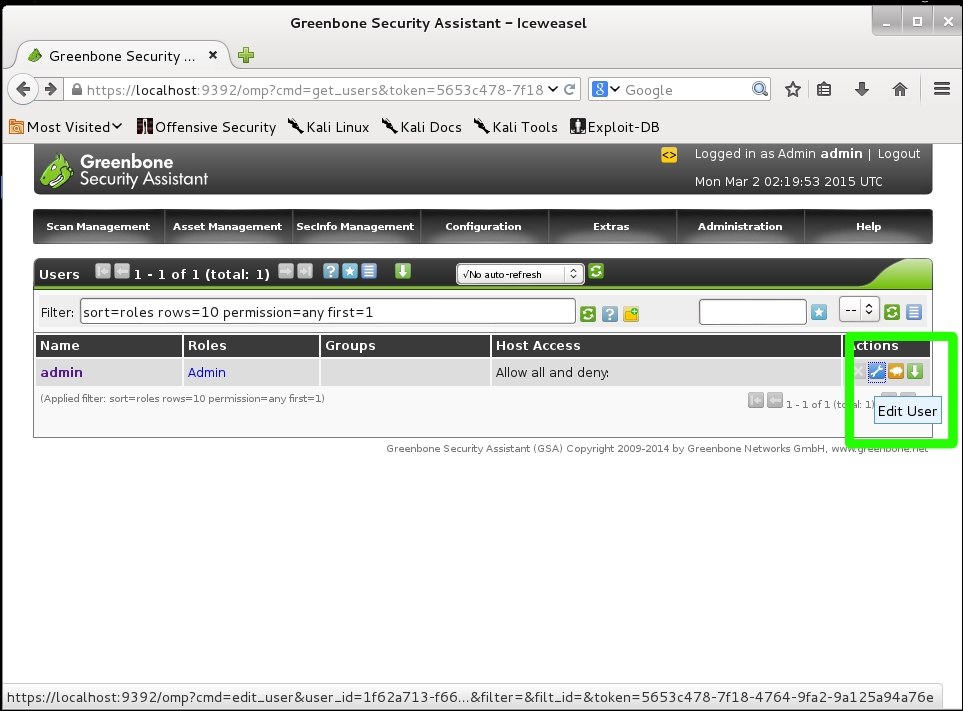
This will take you to the user administration page. Click the wrench link to the right of the name admin and this will open the edit page for the admin user.
This will take you to the edit page. Change the radio button for Use existing value to the blank field and add your new password and click the Save button.
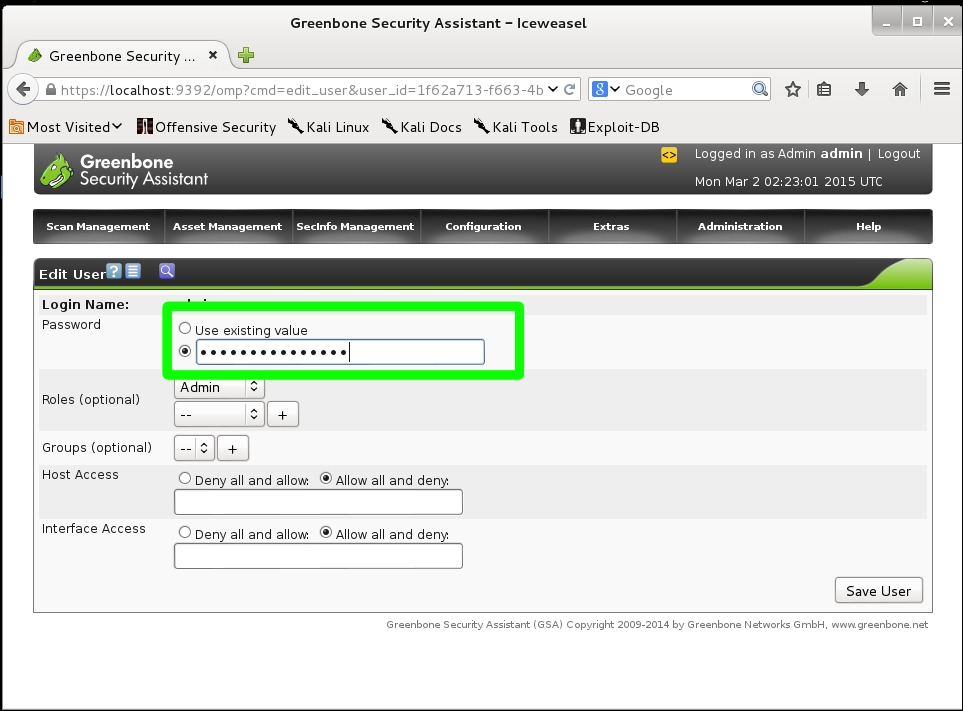
We’ve now finished the setup of OpenVAS and we’re ready to do some real work.
Reporting the tests
A clean and clear documentation helps you report your work. There are two documentation tools we use to keep documentation organized:
-
KeepNote
-
Dradis
A document organizer is a little different from a mere text editor or word processor. Proper documentation requires an organized filing structure. Certainly, a Windows security analyst could create a folder structure that lets them organize the documents. It is in-built in these document-organizing applications, and using them reduces the chance of losing a folder, or accidentally recursing your folders, or losing important parts of the investigation’s documentation.
KeepNote – the standalone document organizer
KeepNote is the simpler tool, and quite sufficient if you are working alone. To find KeepNote, open the Application menu and click on Kali Linux | Recording tools | Documentation | KeepNote. The following image shows a KeepNote setup similar to the way you would record a short test.

Dradis – the web-based document organizer
Dradis is a web application, and can be used to share documentation with a team. The default URL for Dradis is https://127.0.0.1:3004. The application can be hosted on a remote secure server, and that is the best feature about Dradis. The following screenshot comes from http://dradisframework.org.

Running services on Kali Linux
There are several services that you will want to turn on when you need them. The general use of services in Windows and Linux is to have them start when the computer boots up. Most administrators spend little time managing services unless something goes wrong. In the Kali system, you will tend to shut down the workstation when you are not actually doing security analysis tasks, and you certainly do not want the security tools, like OpenVAS or Metasploit that you have on your workstation, to be accessible over the Internet. This means that you will want to start them when you need them, and shut them down when you are not using them.
You can find the commands to start and stop Kali Services from the Application menu: Kali Linux | System Services | Metasploit | Community / Pro [Start|Stop]
Another way to work with services is using the command line. As an example, consider HTTP (Apache2). There are several options for services:
-
Start – This starts the Apache web server and shows the process ID (PID)
-
Status – Shows the status of the server. Is it up? Is it down? Is it stuck?
-
Restart – Takes the server down and restarts it on a different PID. Use this if the server is stuck or if you have changed the networking processes on which the server depends.
-
Reload – Re-reads the configuration. Use this when you make minor changes on the configurations.
-
Stop – This shuts down the web server.

Exploring the Kali Linux Top 10 and more
The creators of Kali Linux have a toolbar for the Top 10 Security Tools. We will show you appropriate uses for all of these tools: and several others:
-
Aircrack-ng: Encryption-cracking tool for cracking 802.11 WPA-PSA and WEP keys.
-
Burpsuite: An integrated tool for testing web applications.
-
(THC) Hydra: A parallelized login cracker.
-
John (the Ripper): A password-cracking tool.
-
Maltego: An intelligence and forensics application.
-
Metasploit Framework: An extremely flexible security testing suite.
-
NMap: The pre-eminent network mapping tool.
-
Owasp-ZAP: Another web application testing tool.
-
SqlMap: An SQL injection and database takeover tool
-
Wireshark: The premier network protocol analysis tool.
Summary
This chapter shows you two ways to set up Kali Linux so that you can use your company-issued Windows laptop, or any other laptop, to get a better performance out of Kali Linux and not to have requisition to a new machine just for Kali. Most enterprises do not allow you to dual-boot your computer, and running Kali on a VM throttles the resources for your Kali installation. Further, this chapter shows you the two reporting tools we use, and the situations where each of these tools makes the most sense. We showed you how to set up OpenVAS for the first time. We also showed you how to run services on Kali Linux. Finally, we introduced the top ten Kali security tools we use every day to perform penetration tests on Windows networks.
Kali Linux: a complete pentesting toolkit facilitating smooth backtracking for working hackers
About This Book
- Conduct network testing, surveillance, pen testing and forensics on MS Windows using Kali Linux
- Footprint, monitor, and audit your network and investigate any ongoing infestations
- Customize Kali Linux with this professional guide so it becomes your pen testing toolkit
Who This Book Is For
If you are a working ethical hacker who is looking to expand the offensive skillset with a thorough understanding of Kali Linux, then this is the book for you. Prior knowledge about Linux operating systems and the BASH terminal emulator along with Windows desktop and command line would be highly beneficial.
What You Will Learn
- Set up Kali Linux for pen testing
- Map and enumerate your Windows network
- Exploit several common Windows network vulnerabilities
- Attack and defeat password schemes on Windows
- Debug and reverse-engineer Windows programs
- Recover lost files, investigate successful hacks and discover hidden data in innocent-looking files
- Catch and hold admin rights on the network, and maintain backdoors on the network after your initial testing is done
In Detail
Microsoft Windows is one of the two most common OS and managing its security has spawned the discipline of IT security. Kali Linux is the premier platform for testing and maintaining Windows security. Kali is built on the Debian distribution of Linux and shares the legendary stability of that OS. This lets you focus on using the network penetration, password cracking, forensics tools and not the OS.
This book has the most advanced tools and techniques to reproduce the methods used by sophisticated hackers to make you an expert in Kali Linux penetration testing. First, you are introduced to Kali’s top ten tools and other useful reporting tools. Then, you will find your way around your target network and determine known vulnerabilities to be able to exploit a system remotely. Next, you will prove that the vulnerabilities you have found are real and exploitable. You will learn to use tools in seven categories of exploitation tools. Further, you perform web access exploits using tools like websploit and more. Security is only as strong as the weakest link in the chain. Passwords are often that weak link. Thus, you learn about password attacks that can be used in concert with other approaches to break into and own a network. Moreover, you come to terms with network sniffing, which helps you understand which users are using services you can exploit, and IP spoofing, which can be used to poison a system’s DNS cache. Once you gain access to a machine or network, maintaining access is important.
Thus, you not only learn penetrating in the machine you also learn Windows privilege’s escalations. With easy to follow step-by-step instructions and support images, you will be able to quickly pen test your system and network.
Style and approach
This book is a hands-on guide for Kali Linux pen testing. This book will provide all the practical knowledge needed to test your network’s security using a proven hacker’s methodology. The book uses easy-to-understand yet professional language for explaining concepts.
This post may contain affiliate links/ads and I may earn a small commission when you click on the links/ads at no additional cost to you. As an Amazon Affiliate, I earn from qualifying purchases. Techsphinx also participates in the StationX Affiliate program. You can read my full disclaimer here.

Do you want to be a Hacker? Do you want to learn “hacking” and practice your pen-testing skills? If your answer is YES!! Then let me tell you, the best way to learn “hacking” is by doing. In this hacking for beginners post, you’ll learn to create your own pen-testing lab to practice your hacking skills.
In this
scenario, the lab consists of 1 attacker machine (Kali Linux) and 2 victim
machines (Windows and Metasploitable).
So, without wasting time, Let’s start.
Pre-Requisites:
- A PC or Laptop with at least 4GB RAM.
- VirtualBox
- Kali Linux
- Windows 10
- Metasploitable
(Links to VirtualBox, Kali Linux Image, Windows 10 image and Metasploitable are provided in this post in their respective sections.)
VirtualBox
VirtualBox
is a software (a Hypervisor) that allows us to run an operating system (OS)
inside another operating system using a technology known as virtualization.
In the world
of virtualization, the main OS that is installed directly onto your hardware is
known as a “host machine” or “host OS”, and the other one that is
installed onto your hypervisor (In this case, VirtualBox) is known as a “virtual machine”, “guest machine” or “guest OS”.
A virtual machine has their own dedicated resources provided by the hypervisor taken from the main hardware, i.e. a portion of your ram, hard disk, and CPU form the main hardware is used by the guest OS when it is running. Also, the changes you make in the guest machine will not affect the host machine. They are like a whole different computer, just as you are using 2 laptops at the same time. Don’t worry if this is not clear now, when we install and run a virtual machine later in this post, you’ll know what I am talking about.
Install VirtualBox
Now, you
know what is a virtualbox? Let’s see how to Install VirtualBox.
1.) Download VirtualBox and its extension pack from its official website. Make sure you download the version compatible with your OS.
2.) Once Downloaded, Start the installer.

3.) Click Next.
4.) Click Next.
5.) Again Click Next.
6.) Click Yes.
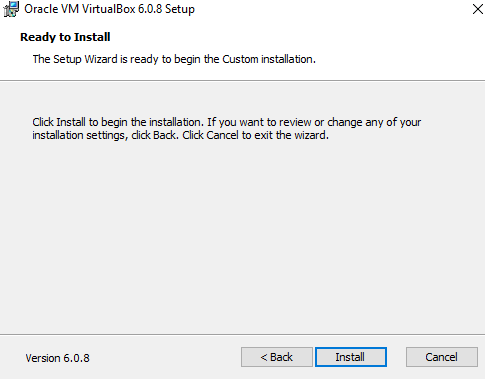
7.) Click Install.
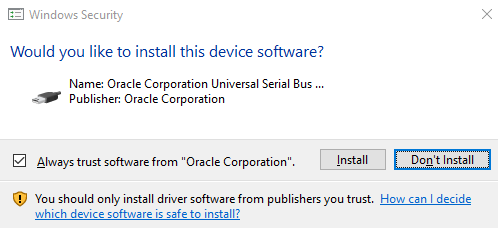
8.) Click Install to install the device software.

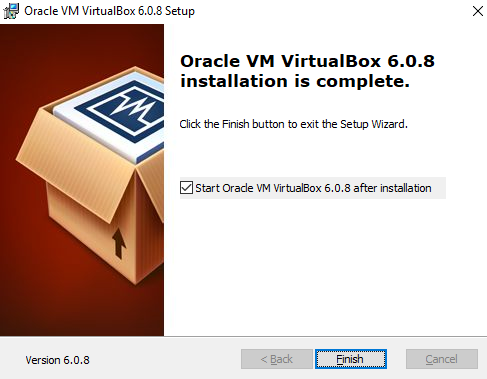
9.) Click Finish.
Let’s now install the extension pack.
1.) Double click on the downloaded VirtualBox extension pack file.
2.) It’ll automatically open VirtualBox, then click install.
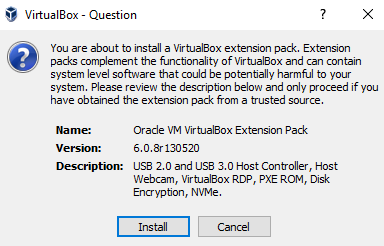
3.) Agree to the terms and conditions.
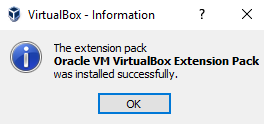
4,) Hit OK after successful installation.
Now you’ve successfully installed VirtualBox its time to install a guest OS.
Kali Linux
Kali Linux is an operating system specifically designed for “penetration testing” (pen-testing). It has all the necessary tools pre-installed that are used for hacking for beginners as well as pro-hackers.
You can go to offensive security website and learn more about Kali Linux, and OSCP certifications.
How to install Kali Linux in
VirtualBox?
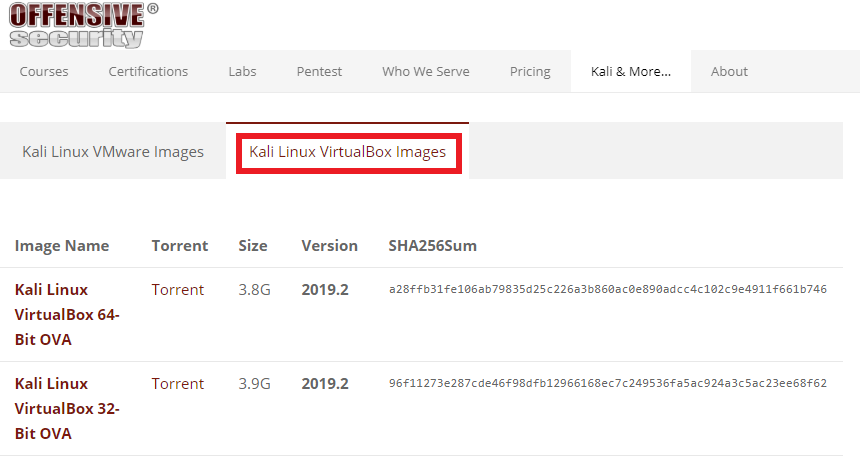
Offensive
Security has provided VirtualBox images for Kali Linux, that is ready for use.
You don’t have to install it; you just have to import it.
1.) Download Kali Linux VirtualBox image. (Make sure you don’t download the VMware image)
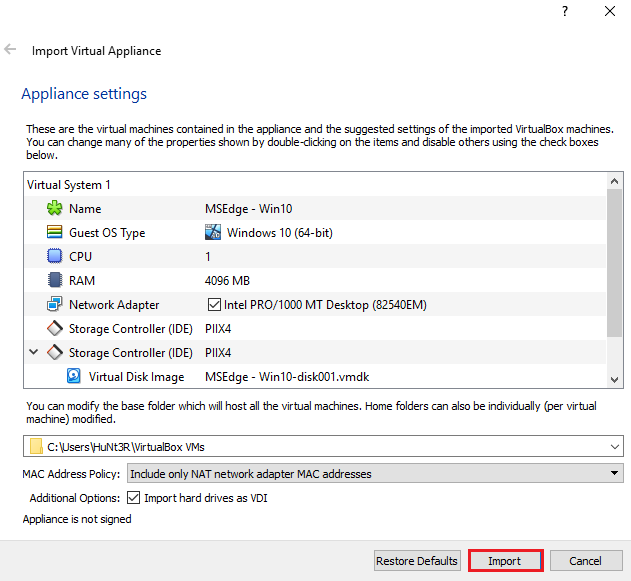
2.) Go to the downloaded location of Kali image & Double click on the Kali Linux “.ova” file. It’ll automatically open VirtualBox.

3.) Click on import.
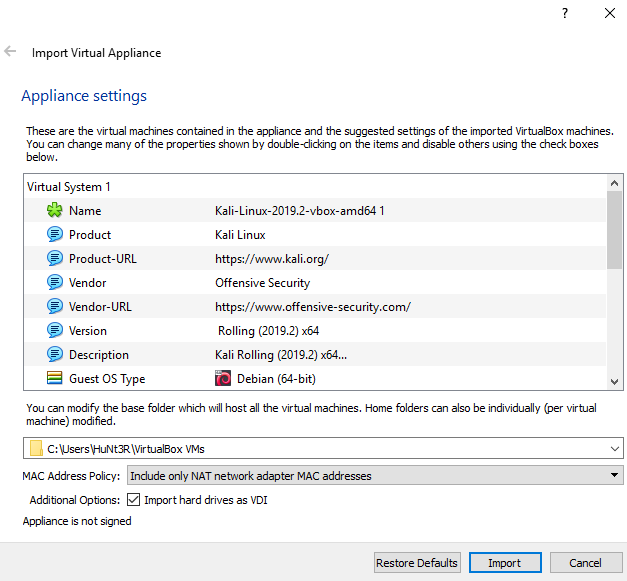
Please wait,
until the import has finished then you can start your Kali Linux virtual
machine.
The default username & password of Kali Linux is:
Username: root
Password: toor
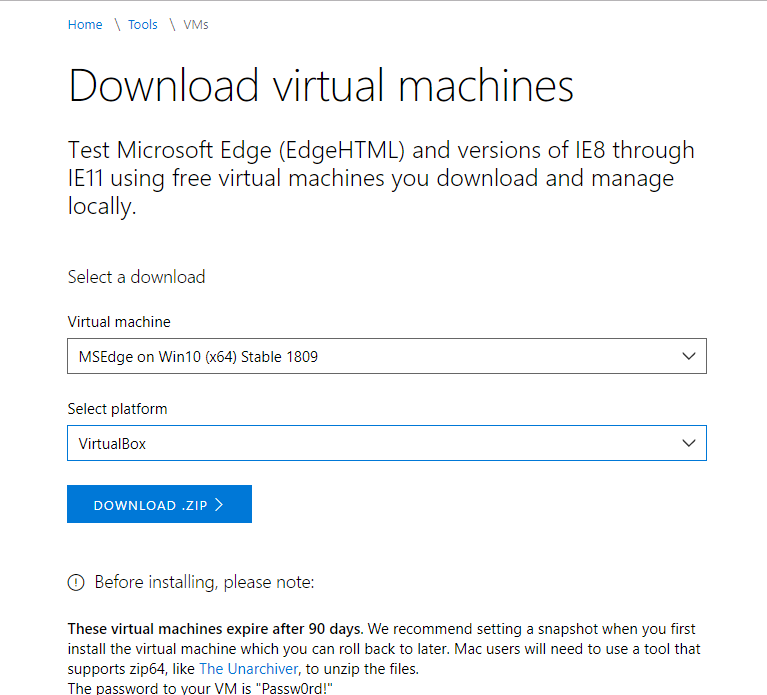
How to Install Windows in VirtualBox?
Microsoft
has also provided ready to use windows images for VirtualBox.
1.) Head on to this link and download the windows image, make sure you download windows 10 stable for VirtualBox.
2.) It will take some time to Download. After the download, go to the downloaded location and extract the downloaded zip file.
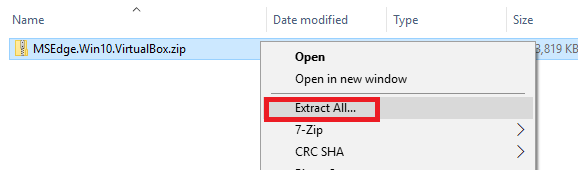
3.) Double click on the windows “.ova” file.

4.) It will automatically open VirtualBox. Click on import.
After importing you can start your windows virtual machine.
Windows VM Password : Passw0rd!
Metasploitable
Metasploitable is a Linux distro that is designed vulnerable, you can say it as the opposite of Kali Linux, as Kali is designed for hacking whereas metasploitable is designed to be hacked.
It also comes with DVWA (Damn Vulnerable Web Application) & Mutillidae already installed, which makes it the best victim machine to practice hacking for beginners.
How to install Metasploitable in
VirtualBox?
There is no
actual need to install Metasploitable, we just need to import the already
installed hard disk image of metasploitable.
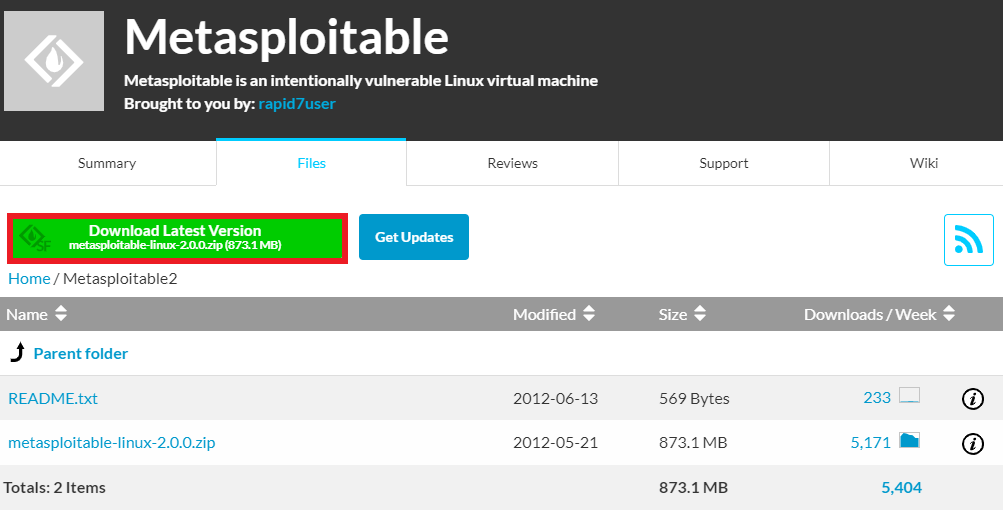
1.) Download Metasploitable.
2.) Extract the zip file.
3.) Start VirtualBox and Create a New Machine.
4.) Fill out the fields, Name, OS version etc.
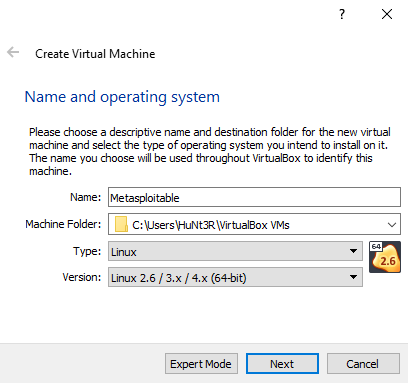
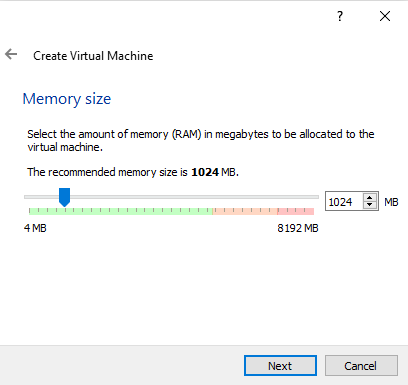
5.) Select the amount of RAM.
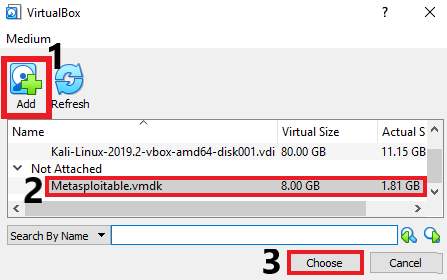
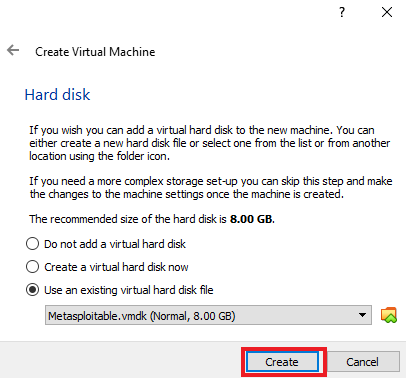
6.) Select Use existing hard disk
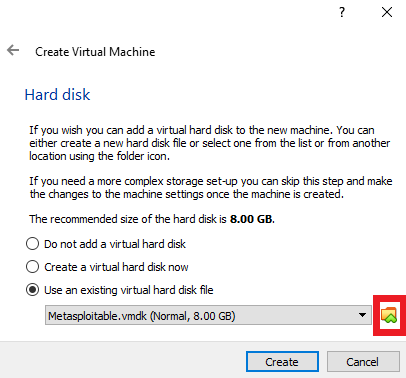
7.) Choose the “metasploitable.vmdk” from the extracted metsploitable folder.
8.) Click on create
Now, start the virtual machine.
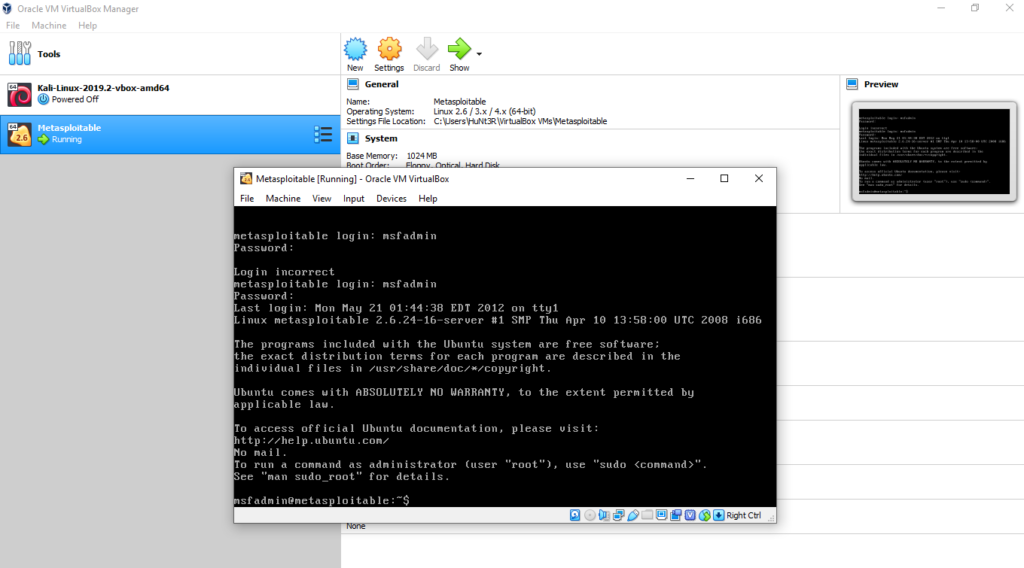
Username: msfadmin
Password: msfadmin
Metasploitable has no Graphical interface like Kali and Windows, you have to do everything via terminal.
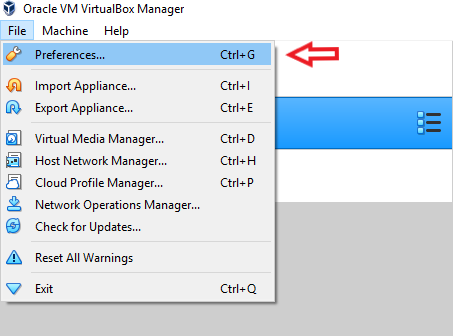
Configure NAT network for VirtualBox
VMs.
1.) Open VirtualBox, Click on File.
2.) Select preferences.
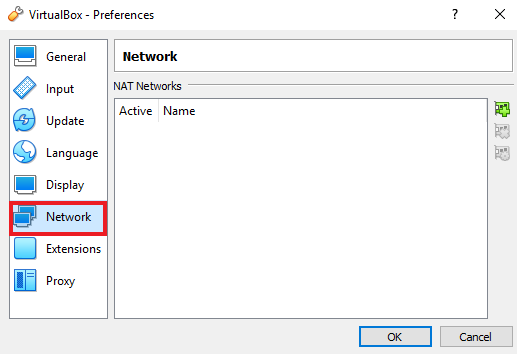
3.) Click on Network.
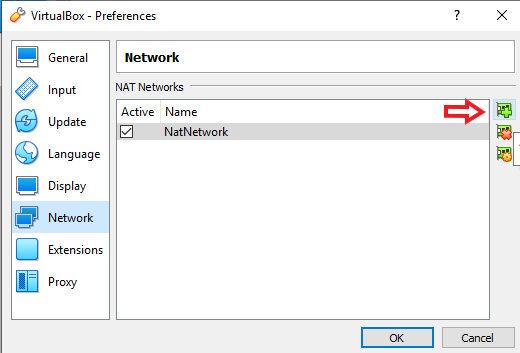
4.) Click on the small Plus icon.
5.) A new network will be created, Click OK.
6.) Click on a VM (Make sure it’s not running)
7.) Click on Settings.
8.) Navigate to Network tab.
9.) Select “NAT network” in “attached to” dropdown and Select the name of the NAT network you created above.
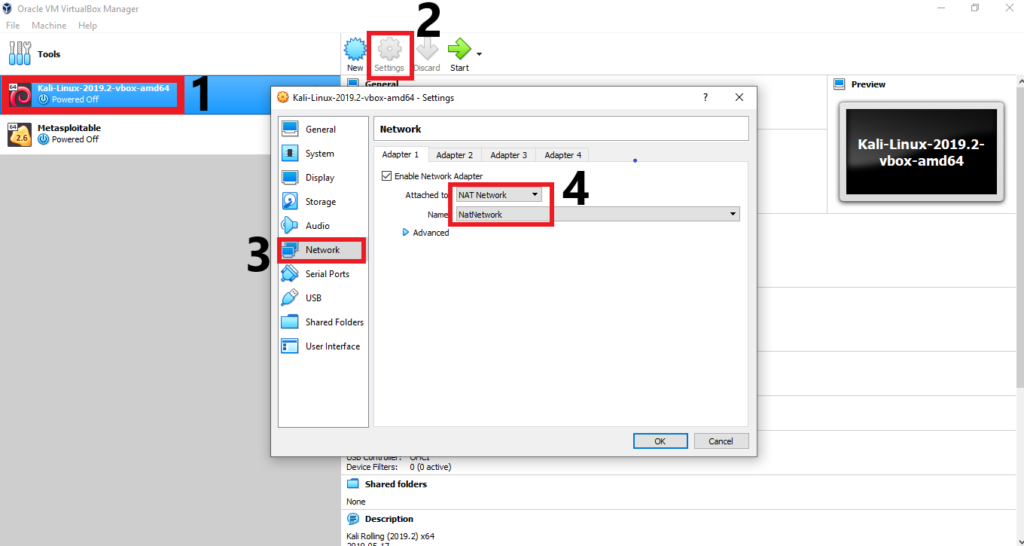
10.) Hit OK.
Do this for all your VMs to have connectivity among them. (In
my case, I’ve done this for KALI, Metaploitable and Windows. Make sure you
select same NAT network name for each virtual machine.)
There you go, you have successfully created a lab to practice your skills. I hope you enjoyed this hacking for beginners guide.
If you
encountered any problems, feel free to ask them in comments.
If you like this post, then follow Techsphinx on Facebook and Twitter for more reviews, tricks, tips and tutorials.
This article needs update or correction? Report the issue here so I can update it.