В сегодняшней статье мы создадим простой калькулятор способный выполнять сложение, вычитание, умножение, а также деление. И все это мы реализуем на языке C# и шаблонах Windows Forms. Так что, давайте приступим.
Шаг 1
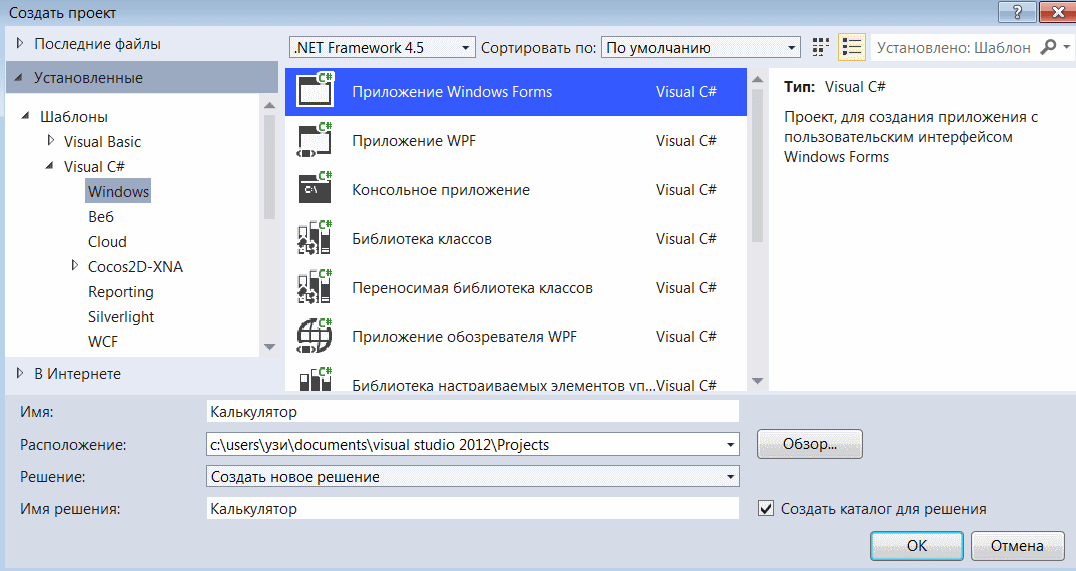
Откройте Visual Studio или Visual C# Express Edition и создайте новый проект.
Установите его тип в приложение Windows Forms и задайте имя в приложения Калькулятор. Нажмите кнопку ОК.
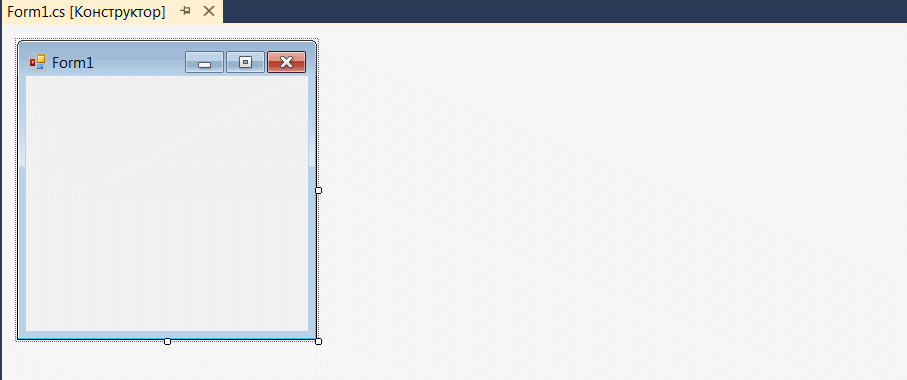
Должно получиться следующее:
Шаг 2
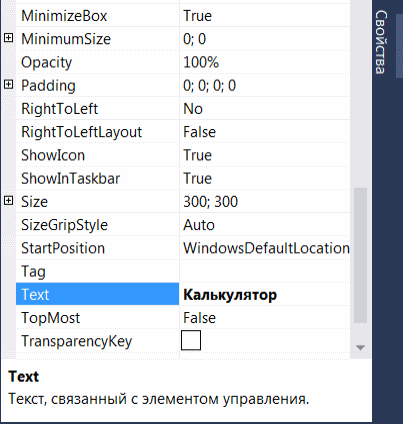
Измените свойство текста формы на Калькулятор, потому что мы не хотим, чтобы наше приложение имело заголовок Form1 при запуске.
Для чего заходим во вкладку свойтва.
Шаг 3
Далее во вкладке Вид находим панель элементов или ToolBox.
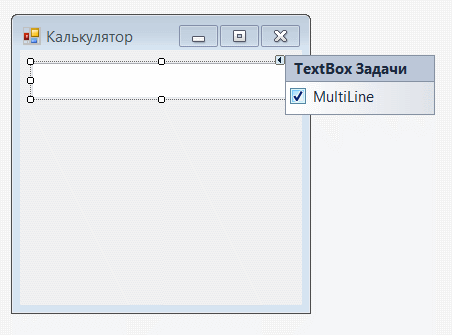
Поместите элемент управления TextBox на форму и измените его размер. Выполните некоторые изменения в свойствах, как показано на рисунке.
Шаг 4
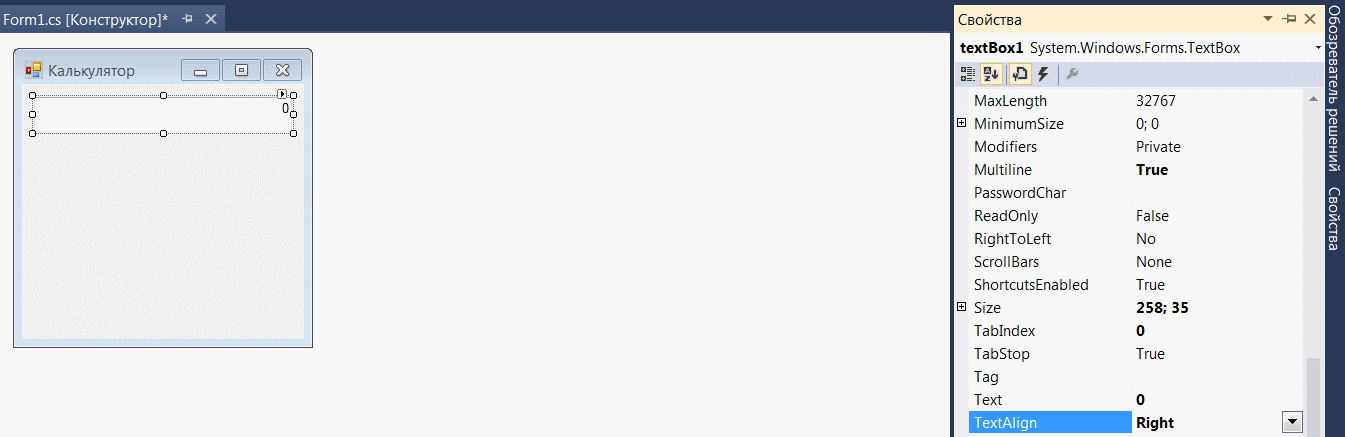
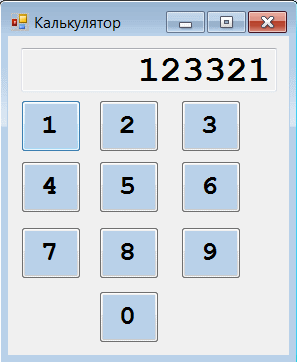
Теперь мы начинаем работать с дисплеем, обычно при запуске калькулятора на нем должно отображаться число 0. В нашем случае это не так. Поэтому мы изменяем свойство Text и записываем в нем 0. Убедитесь, что вы не добавляете никаких пробелов до или после 0.
Второе, что следует отметить, это то, что число выровнено слева, в то время как калькуляторы выравнивают число справа. Найдите свойство TextAlign и измените его на Right.
Вот как будет выглядеть окно.
Шаг 5
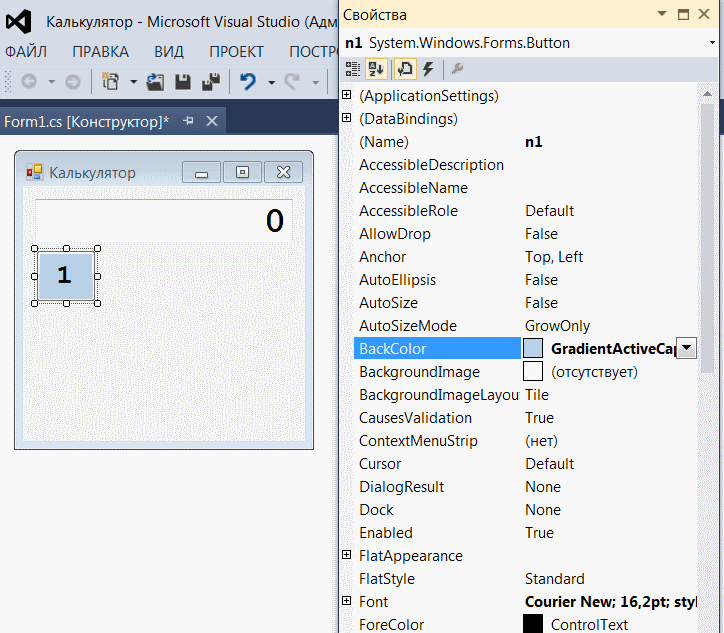
В окне панели инструментов перетащите кнопку на форму. Измените его свойство Name на n1. Это поможет нам определить, какой номер был нажат. Измените свойство backcolor для кнопки. После изменения цвета мы изменим текст, отображаемый кнопкой, поэтому измените свойство text на 1. Перейдите к свойству шрифта и установите для него значение шрифта Сourier new, а размер, например, 16.
Теперь мы можем повторить ту же операцию со всеми остальными девятью кнопками, или мы можем просто скопировать эту кнопку и быстро получить тот же результат. Просто удерживайте клавишу ctrl и перетащите элемент управления.
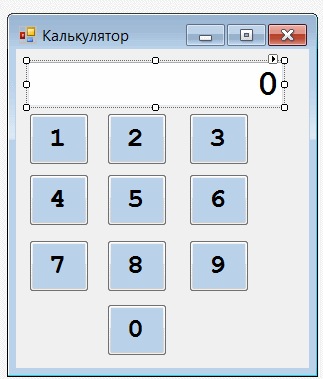
Измените названия кнопок (или вы можете оставить их как есть и пропустить эту часть). Имена по-прежнему будут n2, n3, n4, n5, n6, n7, n8, n9 и n0.Окно должно выглядеть так.
Шаг 6
Дважды нажмите кнопку n1, чтобы перейти к ее обработчику события. Тогда n1_Click — это название этой процедуры. Он сообщает вам, что он выполняется, когда пользователь нажимает кнопку с именем n1. Запишите код, чтобы он был таким:
    private void n1_Click(object sender, EventArgs e)

    {

        if (textBox1.Text == "0" && textBox1.Text != null)

        {

            textBox1.Text = "1";

        }

        else

        {

            textBox1.Text = textBox1.Text + "1";

        }

    }
Вы должны повторить код для кнопок n2, n3, n4, n5, n6, n7, n8, n9 и n0, чтобы добавить числа 2,3,4,5,6,7,8,9,0 соответственно.
Теперь запустите приложение и нажмите несколько кнопок:
Таким образом, мы создали простой шаблон калькулятора с C# и Windows Forms, в который осталось добавить арифметическую логику.
-

Создано 25.11.2021 10:26:55
-
Михаил Русаков

Копирование материалов разрешается только с указанием автора (Михаил Русаков) и индексируемой прямой ссылкой на сайт (http://myrusakov.ru)!
Добавляйтесь ко мне в друзья ВКонтакте: http://vk.com/myrusakov.
Если Вы хотите дать оценку мне и моей работе, то напишите её в моей группе: http://vk.com/rusakovmy.
Если Вы не хотите пропустить новые материалы на сайте,
то Вы можете подписаться на обновления: Подписаться на обновления
Если у Вас остались какие-либо вопросы, либо у Вас есть желание высказаться по поводу этой статьи, то Вы можете оставить свой комментарий внизу страницы.
Если Вам понравился сайт, то разместите ссылку на него (у себя на сайте, на форуме, в контакте):

In this post we will see How to create a Simple Calculator in C# with windows form application using Visual Studio.
Download Calculator Code C# (Calculator.zip)
Form1.cs
using System;
using System.Collections.Generic;
using System.ComponentModel;
using System.Data;
using System.Drawing;
using System.Linq;
using System.Text;
using System.Windows.Forms;

namespace Calculator
{
    public partial class Form1 : Form
    {
        Double resultValue = 0;
        String operationPerformed = "";
        bool isOperationPerformed = false;
        public Form1()
        {
            InitializeComponent();
        }

        private void button_click(object sender, EventArgs e)
        {
            if ((textBox_Result.Text == "0") || (isOperationPerformed))
                textBox_Result.Clear();

            isOperationPerformed = false;
            Button button = (Button)sender;
            if (button.Text == ".")
            {
               if(!textBox_Result.Text.Contains("."))
                   textBox_Result.Text = textBox_Result.Text + button.Text;

            }else
            textBox_Result.Text = textBox_Result.Text + button.Text;


        }

        private void operator_click(object sender, EventArgs e)
        {
            Button button = (Button)sender;

            if (resultValue != 0)
            {
                button15.PerformClick();
                operationPerformed = button.Text;
                labelCurrentOperation.Text = resultValue + " " + operationPerformed;
                isOperationPerformed = true;
            }
            else
            {

                operationPerformed = button.Text;
                resultValue = Double.Parse(textBox_Result.Text);
                labelCurrentOperation.Text = resultValue + " " + operationPerformed;
                isOperationPerformed = true;
            }
        }

        private void button4_Click(object sender, EventArgs e)
        {
            textBox_Result.Text = "0";
        }

        private void button5_Click(object sender, EventArgs e)
        {
            textBox_Result.Text = "0";
            resultValue = 0;
        }

        private void button15_Click(object sender, EventArgs e)
        {
            switch (operationPerformed)
            {
                case "+":
                    textBox_Result.Text = (resultValue + Double.Parse(textBox_Result.Text)).ToString();
                    break;
                case "-":
                    textBox_Result.Text = (resultValue - Double.Parse(textBox_Result.Text)).ToString();
                    break;
                case "*":
                    textBox_Result.Text = (resultValue * Double.Parse(textBox_Result.Text)).ToString();
                    break;
                case "/":
                    textBox_Result.Text = (resultValue / Double.Parse(textBox_Result.Text)).ToString();
                    break;
                default:
                    break;
            }
            resultValue = Double.Parse(textBox_Result.Text);
            labelCurrentOperation.Text = "";
        }
    }
}
//How to Create a Calculator in Visual Studio C#
//
Form1.Designer.cs
namespace Calculator
{
    partial class Form1
    {
        /// <summary>
        /// Required designer variable.
        /// </summary>
        private System.ComponentModel.IContainer components = null;

        /// <summary>
        /// Clean up any resources being used.
        /// </summary>
        /// <param name="disposing">true if managed resources should be disposed; otherwise, false.</param>
        protected override void Dispose(bool disposing)
        {
            if (disposing && (components != null))
            {
                components.Dispose();
            }
            base.Dispose(disposing);
        }

        #region Windows Form Designer generated code

        /// <summary>
        /// Required method for Designer support - do not modify
        /// the contents of this method with the code editor.
        /// </summary>
        private void InitializeComponent()
        {
            System.ComponentModel.ComponentResourceManager resources = new System.ComponentModel.ComponentResourceManager(typeof(Form1));
            this.buttonOne = new System.Windows.Forms.Button();
            this.button1 = new System.Windows.Forms.Button();
            this.button2 = new System.Windows.Forms.Button();
            this.button3 = new System.Windows.Forms.Button();
            this.button4 = new System.Windows.Forms.Button();
            this.button5 = new System.Windows.Forms.Button();
            this.button6 = new System.Windows.Forms.Button();
            this.button7 = new System.Windows.Forms.Button();
            this.button8 = new System.Windows.Forms.Button();
            this.button9 = new System.Windows.Forms.Button();
            this.button11 = new System.Windows.Forms.Button();
            this.button12 = new System.Windows.Forms.Button();
            this.button13 = new System.Windows.Forms.Button();
            this.button14 = new System.Windows.Forms.Button();
            this.button15 = new System.Windows.Forms.Button();
            this.button16 = new System.Windows.Forms.Button();
            this.button17 = new System.Windows.Forms.Button();
            this.button19 = new System.Windows.Forms.Button();
            this.textBox_Result = new System.Windows.Forms.TextBox();
            this.labelCurrentOperation = new System.Windows.Forms.Label();
            this.SuspendLayout();
            //
            // buttonOne
            //
            this.buttonOne.Font = new System.Drawing.Font("Microsoft Sans Serif", 14.25F, System.Drawing.FontStyle.Bold, System.Drawing.GraphicsUnit.Point, ((byte)(0)));
            this.buttonOne.Location = new System.Drawing.Point(22, 73);
            this.buttonOne.Name = "buttonOne";
            this.buttonOne.Size = new System.Drawing.Size(45, 45);
            this.buttonOne.TabIndex = 0;
            this.buttonOne.Text = "7";
            this.buttonOne.UseVisualStyleBackColor = true;
            this.buttonOne.Click += new System.EventHandler(this.button_click);
            //
            // button1
            //
            this.button1.Font = new System.Drawing.Font("Microsoft Sans Serif", 14.25F, System.Drawing.FontStyle.Bold, System.Drawing.GraphicsUnit.Point, ((byte)(0)));
            this.button1.Location = new System.Drawing.Point(73, 73);
            this.button1.Name = "button1";
            this.button1.Size = new System.Drawing.Size(45, 45);
            this.button1.TabIndex = 1;
            this.button1.Text = "8";
            this.button1.UseVisualStyleBackColor = true;
            this.button1.Click += new System.EventHandler(this.button_click);
            //
            // button2
            //
            this.button2.Font = new System.Drawing.Font("Microsoft Sans Serif", 14.25F, System.Drawing.FontStyle.Bold, System.Drawing.GraphicsUnit.Point, ((byte)(0)));
            this.button2.Location = new System.Drawing.Point(124, 73);
            this.button2.Name = "button2";
            this.button2.Size = new System.Drawing.Size(45, 45);
            this.button2.TabIndex = 2;
            this.button2.Text = "9";
            this.button2.UseVisualStyleBackColor = true;
            this.button2.Click += new System.EventHandler(this.button_click);
            //
            // button3
            //
            this.button3.Font = new System.Drawing.Font("Microsoft Sans Serif", 14.25F, System.Drawing.FontStyle.Bold, System.Drawing.GraphicsUnit.Point, ((byte)(0)));
            this.button3.Location = new System.Drawing.Point(175, 73);
            this.button3.Name = "button3";
            this.button3.Size = new System.Drawing.Size(45, 45);
            this.button3.TabIndex = 3;
            this.button3.Text = "/";
            this.button3.UseVisualStyleBackColor = true;
            this.button3.Click += new System.EventHandler(this.operator_click);
            //
            // button4
            //
            this.button4.Font = new System.Drawing.Font("Microsoft Sans Serif", 14.25F, System.Drawing.FontStyle.Bold, System.Drawing.GraphicsUnit.Point, ((byte)(0)));
            this.button4.Location = new System.Drawing.Point(226, 73);
            this.button4.Name = "button4";
            this.button4.Size = new System.Drawing.Size(53, 45);
            this.button4.TabIndex = 4;
            this.button4.Text = "CE";
            this.button4.UseVisualStyleBackColor = true;
            this.button4.Click += new System.EventHandler(this.button4_Click);
            //
            // button5
            //
            this.button5.Font = new System.Drawing.Font("Microsoft Sans Serif", 14.25F, System.Drawing.FontStyle.Bold, System.Drawing.GraphicsUnit.Point, ((byte)(0)));
            this.button5.Location = new System.Drawing.Point(226, 124);
            this.button5.Name = "button5";
            this.button5.Size = new System.Drawing.Size(53, 45);
            this.button5.TabIndex = 9;
            this.button5.Text = "C";
            this.button5.UseVisualStyleBackColor = true;
            this.button5.Click += new System.EventHandler(this.button5_Click);
            //
            // button6
            //
            this.button6.Font = new System.Drawing.Font("Microsoft Sans Serif", 14.25F, System.Drawing.FontStyle.Bold, System.Drawing.GraphicsUnit.Point, ((byte)(0)));
            this.button6.Location = new System.Drawing.Point(175, 124);
            this.button6.Name = "button6";
            this.button6.Size = new System.Drawing.Size(45, 45);
            this.button6.TabIndex = 8;
            this.button6.Text = "*";
            this.button6.UseVisualStyleBackColor = true;
            this.button6.Click += new System.EventHandler(this.operator_click);
            //
            // button7
            //
            this.button7.Font = new System.Drawing.Font("Microsoft Sans Serif", 14.25F, System.Drawing.FontStyle.Bold, System.Drawing.GraphicsUnit.Point, ((byte)(0)));
            this.button7.Location = new System.Drawing.Point(124, 124);
            this.button7.Name = "button7";
            this.button7.Size = new System.Drawing.Size(45, 45);
            this.button7.TabIndex = 7;
            this.button7.Text = "6";
            this.button7.UseVisualStyleBackColor = true;
            this.button7.Click += new System.EventHandler(this.button_click);
            //
            // button8
            //
            this.button8.Font = new System.Drawing.Font("Microsoft Sans Serif", 14.25F, System.Drawing.FontStyle.Bold, System.Drawing.GraphicsUnit.Point, ((byte)(0)));
            this.button8.Location = new System.Drawing.Point(73, 124);
            this.button8.Name = "button8";
            this.button8.Size = new System.Drawing.Size(45, 45);
            this.button8.TabIndex = 6;
            this.button8.Text = "5";
            this.button8.UseVisualStyleBackColor = true;
            this.button8.Click += new System.EventHandler(this.button_click);
            //
            // button9
            //
            this.button9.Font = new System.Drawing.Font("Microsoft Sans Serif", 14.25F, System.Drawing.FontStyle.Bold, System.Drawing.GraphicsUnit.Point, ((byte)(0)));
            this.button9.Location = new System.Drawing.Point(22, 124);
            this.button9.Name = "button9";
            this.button9.Size = new System.Drawing.Size(45, 45);
            this.button9.TabIndex = 5;
            this.button9.Text = "4";
            this.button9.UseVisualStyleBackColor = true;
            this.button9.Click += new System.EventHandler(this.button_click);
            //
            // button11
            //
            this.button11.Font = new System.Drawing.Font("Microsoft Sans Serif", 14.25F, System.Drawing.FontStyle.Bold, System.Drawing.GraphicsUnit.Point, ((byte)(0)));
            this.button11.Location = new System.Drawing.Point(175, 175);
            this.button11.Name = "button11";
            this.button11.Size = new System.Drawing.Size(45, 45);
            this.button11.TabIndex = 13;
            this.button11.Text = "-";
            this.button11.UseVisualStyleBackColor = true;
            this.button11.Click += new System.EventHandler(this.operator_click);
            //
            // button12
            //
            this.button12.Font = new System.Drawing.Font("Microsoft Sans Serif", 14.25F, System.Drawing.FontStyle.Bold, System.Drawing.GraphicsUnit.Point, ((byte)(0)));
            this.button12.Location = new System.Drawing.Point(124, 175);
            this.button12.Name = "button12";
            this.button12.Size = new System.Drawing.Size(45, 45);
            this.button12.TabIndex = 12;
            this.button12.Text = "3";
            this.button12.UseVisualStyleBackColor = true;
            this.button12.Click += new System.EventHandler(this.button_click);
            //
            // button13
            //
            this.button13.Font = new System.Drawing.Font("Microsoft Sans Serif", 14.25F, System.Drawing.FontStyle.Bold, System.Drawing.GraphicsUnit.Point, ((byte)(0)));
            this.button13.Location = new System.Drawing.Point(73, 175);
            this.button13.Name = "button13";
            this.button13.Size = new System.Drawing.Size(45, 45);
            this.button13.TabIndex = 11;
            this.button13.Text = "2";
            this.button13.UseVisualStyleBackColor = true;
            this.button13.Click += new System.EventHandler(this.button_click);
            //
            // button14
            //
            this.button14.Font = new System.Drawing.Font("Microsoft Sans Serif", 14.25F, System.Drawing.FontStyle.Bold, System.Drawing.GraphicsUnit.Point, ((byte)(0)));
            this.button14.Location = new System.Drawing.Point(22, 175);
            this.button14.Name = "button14";
            this.button14.Size = new System.Drawing.Size(45, 45);
            this.button14.TabIndex = 10;
            this.button14.Text = "1";
            this.button14.UseVisualStyleBackColor = true;
            this.button14.Click += new System.EventHandler(this.button_click);
            //
            // button15
            //
            this.button15.Font = new System.Drawing.Font("Microsoft Sans Serif", 14.25F, System.Drawing.FontStyle.Bold, System.Drawing.GraphicsUnit.Point, ((byte)(0)));
            this.button15.Location = new System.Drawing.Point(226, 175);
            this.button15.Name = "button15";
            this.button15.Size = new System.Drawing.Size(53, 96);
            this.button15.TabIndex = 19;
            this.button15.Text = "=";
            this.button15.UseVisualStyleBackColor = true;
            this.button15.Click += new System.EventHandler(this.button15_Click);
            //
            // button16
            //
            this.button16.Font = new System.Drawing.Font("Microsoft Sans Serif", 14.25F, System.Drawing.FontStyle.Bold, System.Drawing.GraphicsUnit.Point, ((byte)(0)));
            this.button16.Location = new System.Drawing.Point(175, 226);
            this.button16.Name = "button16";
            this.button16.Size = new System.Drawing.Size(45, 45);
            this.button16.TabIndex = 18;
            this.button16.Text = "+";
            this.button16.UseVisualStyleBackColor = true;
            this.button16.Click += new System.EventHandler(this.operator_click);
            //
            // button17
            //
            this.button17.Font = new System.Drawing.Font("Microsoft Sans Serif", 14.25F, System.Drawing.FontStyle.Bold, System.Drawing.GraphicsUnit.Point, ((byte)(0)));
            this.button17.Location = new System.Drawing.Point(124, 226);
            this.button17.Name = "button17";
            this.button17.Size = new System.Drawing.Size(45, 45);
            this.button17.TabIndex = 17;
            this.button17.Text = ".";
            this.button17.UseVisualStyleBackColor = true;
            this.button17.Click += new System.EventHandler(this.button_click);
            //
            // button19
            //
            this.button19.Font = new System.Drawing.Font("Microsoft Sans Serif", 14.25F, System.Drawing.FontStyle.Bold, System.Drawing.GraphicsUnit.Point, ((byte)(0)));
            this.button19.Location = new System.Drawing.Point(22, 226);
            this.button19.Name = "button19";
            this.button19.Size = new System.Drawing.Size(96, 45);
            this.button19.TabIndex = 15;
            this.button19.Text = "0";
            this.button19.UseVisualStyleBackColor = true;
            this.button19.Click += new System.EventHandler(this.button_click);
            //
            // textBox_Result
            //
            this.textBox_Result.Font = new System.Drawing.Font("Microsoft Sans Serif", 14.25F, System.Drawing.FontStyle.Bold, System.Drawing.GraphicsUnit.Point, ((byte)(0)));
            this.textBox_Result.Location = new System.Drawing.Point(22, 40);
            this.textBox_Result.Name = "textBox_Result";
            this.textBox_Result.Size = new System.Drawing.Size(257, 29);
            this.textBox_Result.TabIndex = 20;
            this.textBox_Result.Text = "0";
            this.textBox_Result.TextAlign = System.Windows.Forms.HorizontalAlignment.Right;
            //
            // labelCurrentOperation
            //
            this.labelCurrentOperation.AutoSize = true;
            this.labelCurrentOperation.BackColor = System.Drawing.SystemColors.Window;
            this.labelCurrentOperation.Font = new System.Drawing.Font("Microsoft Sans Serif", 14.25F, System.Drawing.FontStyle.Bold, System.Drawing.GraphicsUnit.Point, ((byte)(0)));
            this.labelCurrentOperation.ForeColor = System.Drawing.SystemColors.ControlDark;
            this.labelCurrentOperation.Location = new System.Drawing.Point(18, 13);
            this.labelCurrentOperation.Name = "labelCurrentOperation";
            this.labelCurrentOperation.Size = new System.Drawing.Size(0, 24);
            this.labelCurrentOperation.TabIndex = 21;
            //
            // Form1
            //
            this.AutoScaleDimensions = new System.Drawing.SizeF(6F, 13F);
            this.AutoScaleMode = System.Windows.Forms.AutoScaleMode.Font;
            this.ClientSize = new System.Drawing.Size(305, 291);
            this.Controls.Add(this.labelCurrentOperation);
            this.Controls.Add(this.textBox_Result);
            this.Controls.Add(this.button15);
            this.Controls.Add(this.button16);
            this.Controls.Add(this.button17);
            this.Controls.Add(this.button19);
            this.Controls.Add(this.button11);
            this.Controls.Add(this.button12);
            this.Controls.Add(this.button13);
            this.Controls.Add(this.button14);
            this.Controls.Add(this.button5);
            this.Controls.Add(this.button6);
            this.Controls.Add(this.button7);
            this.Controls.Add(this.button8);
            this.Controls.Add(this.button9);
            this.Controls.Add(this.button4);
            this.Controls.Add(this.button3);
            this.Controls.Add(this.button2);
            this.Controls.Add(this.button1);
            this.Controls.Add(this.buttonOne);
            this.FormBorderStyle = System.Windows.Forms.FormBorderStyle.FixedDialog;
            this.Icon = ((System.Drawing.Icon)(resources.GetObject("$this.Icon")));
            this.MaximizeBox = false;
            this.Name = "Form1";
            this.StartPosition = System.Windows.Forms.FormStartPosition.CenterScreen;
            this.Text = "Calculator";
            this.ResumeLayout(false);
            this.PerformLayout();

        }

        #endregion

        private System.Windows.Forms.Button buttonOne;
        private System.Windows.Forms.Button button1;
        private System.Windows.Forms.Button button2;
        private System.Windows.Forms.Button button3;
        private System.Windows.Forms.Button button4;
        private System.Windows.Forms.Button button5;
        private System.Windows.Forms.Button button6;
        private System.Windows.Forms.Button button7;
        private System.Windows.Forms.Button button8;
        private System.Windows.Forms.Button button9;
        private System.Windows.Forms.Button button11;
        private System.Windows.Forms.Button button12;
        private System.Windows.Forms.Button button13;
        private System.Windows.Forms.Button button14;
        private System.Windows.Forms.Button button15;
        private System.Windows.Forms.Button button16;
        private System.Windows.Forms.Button button17;
        private System.Windows.Forms.Button button19;
        private System.Windows.Forms.TextBox textBox_Result;
        private System.Windows.Forms.Label labelCurrentOperation;
    }
}
Program.cs
using System;
using System.Collections.Generic;
using System.Linq;
using System.Windows.Forms;

namespace Calculator
{
    static class Program
    {
        /// <summary>
        /// The main entry point for the application.
        /// </summary>
        [STAThread]
        static void Main()
        {
            Application.EnableVisualStyles();
            Application.SetCompatibleTextRenderingDefault(false);
            Application.Run(new Form1());
        }
    }
}
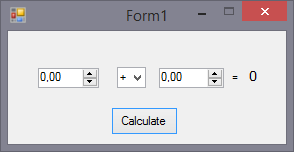
In the previous lesson, Introduction to Windows Forms applications, we introduced Windows Forms and created a
window with a text label. In today’s C# .NET tutorial, we’re going to take a
look at events and create a simple calculator. It’ll look like this:

Form preparation
Create a new Windows Forms project named Calculator. We’ll
rename the form to CalculatorForm. We usually start our
applications with form design. From the Toolbox, we’ll drag a few controls into
it. We’re going to need:
- 2x
Label - 1x
Button - 2x
NumericUpDown - 1x
ComboBox
Label
We already know the Label, it’s simply a text label.
If we don’t use a control in the code, we don’t have to name it. If we do, we
should set the Name property of it (in the Properties window, the
property name is in parentheses (Name)), then we’ll be able to access this
control using this name. I recommend switching the properties from the
categorized view to alphabetical order (first 2 icons in the Properties window),
you’ll find properties faster. Name is the name of the control,
Text is what is written on the control. This logically implies that
we can have multiple controls with the same text on a form, but they have to
have different names.
One label will only serve as a label with the text "=", so let’s
set it. The second Label will be used for displaying the result, and since we
want to enter the value into it programmatically, we’ll set its
Name property to resultLabel. We’ll set the text to
"0". We can also increase the font to 10.
Button
The button is simply a button that calls a method (more precisely, an event)
when clicked. In this case, we’ll name this button as
calculateButton and we set its Text to
"Calculate". We’ll assign the event to the button later.
NumericUpDown
NumericUpDown is the first control for entering a value we’re
going to introduce. By default, we can only enter an integer in it. We can
change this behavior by setting the DecimalPlaces property, which
specifies the number of decimal places. We’ll set this value to 2
for both controls we put in our form. We also set their Minimum and
Maximum properties. In our case, the minimum should be some low
value and the maximum some high value, let’s say -1000000 and
1000000. To use the maximum values of a given data type, we’d have
to set the limits in the form code using the MaxValue and
MinValue properties of the respective data type.
The advantage of entering numbers using this control is that the user isn’t
able to enter any nonsense value. If we parsed the number from a
TextBox (which we’ll show you in the next lessons), our application
might crash when it gets an invalid value. It’s always easier to choose the
right control than to check the user’s input.
We’ll name the controls as number1NumericUpDown and
number2NumericUpDown. Note that the name should always contain the
control type. For example, we can have both ageLabel and
ageNumericUpDown, where ageLabel is the label of the
age field, and ageNumericUpDown is the field. Moreover, it makes
easier to orientate in the code. Sometimes names as numberNmr,
calculateBtn, etc. are used as well.
ComboBox
We’re almost there. ComboBox is a drop-down list with several
predefined items. The items can be either added in the designer or specified in
the code, even while the program is running. This applies to all controls — all
their properties from the designer can also be set in the code. However, some
advanced properties can only be set from the code and aren’t present in the
designer.
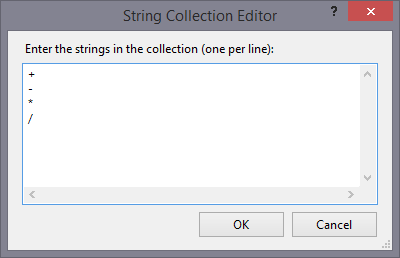
We’ll name the control operationComboBox and then click the
«…» button in the Items property. Inside the newly opened window,
we’ll list the options that can be selected in the comboBox. We write each
option on a separated line. In our case, those options are +,
-, *, /.
The items don’t have to be strings, we can pass objects as well.
We’ll show this later.
Unfortunately, the selected item can only be set from the code.
We’ll arrange the controls on the form as shown at the beginning of this
lesson.
Form code
We’ll move to the source code of the form. We already know we do this by
pressing Ctrl + Alt + 0 or by right-clicking on
the form and selecting View Code.
Inside the form constructor, below the InitializeComponents()
method call, we’ll set the selected item of the operationComboBox.
To do this, we’ll set the SelectedIndex property to 0,
thus the first item:
public CalculatorForm()
{
    InitializeComponent();
    operationComboBox.SelectedIndex = 0;
}
Of course, we can access all the form’s items from the form.
Into the constructor, we write the code that should be executed right after
the form is created. When you run the app, adding will be selected as the
operation:
Event handler
Now all we have to do is to respond to the button’s click event. We’ll move
back from the code to the form again, then we’ll double-click the button. A new
method will be automatically added into the code:
private void calculateButton_Click(object sender, EventArgs e)
{

}
If you’ve read the C# .NET object-oriented tutorial,
the method header should remind you of EventHandler. In the
CalculatorForm.Designer.cs file, we can find code that assigns this
method to the button’s event. In case you don’t understand the previous
sentences, it doesn’t mind at all. All you need to know is this method is called
when the button is clicked.
Let’s go back to the designer (Shift + F7) to select
the button. In the Properties window, we can switch between properties
and events using the buttons highlighted in red below:
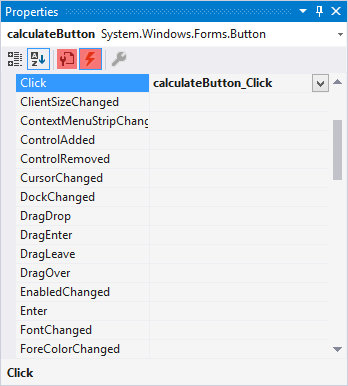
Here we see our Click event. This is the place from which we’re
able to remove it or add it again. Some controls have special events for which
we can generate methods from here.
Never delete events just by removing the handler method from the
code. The designer would stop working, and you’d have to fix its file
(specifically, remove the assignment of a no longer existent method to the
event). The only correct way is to use the designer.
Calculation
Let’s move to the calculation itself. The code won’t be complicated at all.
We’ll simply just use conditions for the operationComboBox items
and calculate the result inside the event handler of the button accordingly.
Then we’ll set the result as the text of resultLabel. We shouldn’t
forget to handle division by zero.
The event handling method’s code may look like this:
private void calculateButton_Click(object sender, EventArgs e)
{

    string operation = operationComboBox.SelectedItem.ToString();
    double number1 = Convert.ToDouble(number1NumericUpDown.Value);
    double number2 = Convert.ToDouble(number2NumericUpDown.Value);
    double result = 0;


    if (operation == "+")
        result = number1 + number2;
    else if (operation == "-")
        result = number1 - number2;
    else if (operation == "*")
        result = number1 * number2;
    else if (operation == "/")
    {
        if (number2 != 0)
            result = number1 / number2;
        else
            MessageBox.Show("You can't divide by zero");
    }
    resultLabel.Text = result.ToString();
}
First, we store the values from the controls in variables to make the code
more readable. We access the selected comboBox item using the
SelectedItem property, which is of the object type.
This means we have to convert it to string in our case. Similarly,
we could also use just the item index using SelectedIndex. Since
NumericUpDown returns the value in its Value property
which is of the decimal type, we must convert it to the
double type using the Convert class.
For the case of zero divisor, we display a MessageBox using the
static class of the same name and calling the Show() method.
Finally, we display the result in resultLabel. Unlike the console,
where we could simply print the numbers, we must first convert the numbers to
string here.
You can also set the Icon property of the form (by selecting the
icon file), Text to «Calculator» and StartPosition to
CenterScreen. Like this, the form will be created in the center of
the screen. If we set FormBorderStyle to FixedSingle,
the form can’t be resized, which fits our application. We can also disable
window maximization using the MaximizeBox property.
The code is available in the article’s attachment as always. In the next
lesson, Birthday Reminder — Designing Forms, we’ll create a more complex app using multiple forms — a
birthday reminder.
Did you have a problem with anything? Download the sample application below and compare it with your project, you will find the error easily.
В статье «Делаем консольный калькулятор.» мы создавали небольшой калькулятор, который работает в консоли. В этой статье пришло время научиться создавать графический калькулятор на языке C# с помощью Windows Forms.
Сам по себе калькулятор довольно прост, но если вы совсем новичок в создании подобных приложений, тогда будет посложнее. Разработку калькулятора начнем с разработки формы (Windows Forms) приложения. Запускаем Visual Studio и создаем проект:

Интерфейс созданного проекта должен выглядеть так:

На интерфейсе мы видим: слева панель элементов для нашей формы, справа обозреватель решений и свойства выбранной формы/элемента и по середине виден сам конструктор с формой (по умолчанию он имеет имя «Form1»).
На форму нужно поместить кнопки, текстовое поле, а также надпись. Надпись нужна, чтобы пользователь видел первый операнд. Когда введет нужную цифру, нажмет кнопку, например «+», надпись будет содержать введенное значение.
Все нужные элементы можно найти слева в панели элементов. Чтобы найти текстовое поле просто введите в поиске «textBox» и с помощью мышки перенесите его на свою форму. Для добавления кнопок просто введите в поиске «Button» и перенесите нужное количество кнопок на свою форму. Также добавьте на «ListBox» один пустой «Label»:

Изменять свойства формы можно с помощью окна «Свойства» справа внизу. Для этого нажмите на нужную форму, например «Button1» и поменяйте ему свойство «text» на «С»:

Добавьте все нужные кнопки. Измените свойство «Font» для элементов TextBox и Label. Цвет кнопок и имя программы меняйте на свое усмотрение.

С помощью «MultiLine» измените ширину элемента TextBox:

В итоге у нас получилось 19 кнопок Button, 1 TextBox и ещё 1 пустой Label:

Теперь посмотрим, как работает калькулятор. Мы используем четыре члена класса. Напишем их в самое начало программы:
    float a, b;
    int oper;
    bool znak = true;
Первые два — это наши операнды, a и b. Третий — это выбранный пользователем оператор. Четвертый — признак знака. Запрограммируем обработчик кнопки «+/-«, изменяющий знак числа. Для этого в форме нажмите на нужную кнопку два раза. Visual Studio переведет вас в нужную секцию кода:
        private void button3_Click(object sender, EventArgs e)
        {

        }
В фигурных скобках пишем код:
            if (znak == true)
            {
                textBox1.Text = "-" + textBox1.Text;
                znak = false;
            }
            else if (znak==false)
            {
                textBox1.Text = textBox1.Text.Replace("-", "");
                znak = true;
            }
Если znak=true, мы меняем знак операнда в textBox1, а если false, то знак числа удаляется из текстового поля.
Для каждой цифровой кнопки обработчик будет следующий:
// Обработчик цифровой кнопки "0"

textBox1.Text = textBox1.Text + 0;
На основе этого кода повесьте на цифровые кнопки от 0 до 9 обработчик событий. Нажмите на нужную цифровую кнопку и впишите код.
Обработчик кнопки операторов «+, -, *, /». Нажмите на нужную кнопку с оператором и впишите код.
            // Обработчик оператора "+"

            a = float.Parse(textBox1.Text);
            textBox1.Clear();
            oper = 1;
            label1.Text = a.ToString() + "+";
            znak = true;
В данном коде мы в переменную «a» записываем значение из текстового поля, попутно преобразовав его в float посредством вызова метода float.Parse(). Далее мы очищаем текстовое поле, чтобы можно было вводить второй операнд. oper = 1 означает присвоение номера оператора (для + — это 1 и так далее по увеличению). Далее заносим в надпись информацию об операнде и операторе.
Обработчик кнопки «,» добавляет запятую в текстовое поле:
textBox1.Text = textBox1.Text + ",";
Далее нам понадобится создать функцию, которая будет применять нужные нам математические операции к числам. Назовём её calculate. Но перед этим мы кликнем дважды на кнопку «=» на форме и в коде к ней мы запишем:
// вызов функции
calculate();
label1.Text = "";
При нажатии пользователем на кнопку «=» выполнится функция подсчёта calculate, и, заодно, очистится Label, так как результат мы в будущем коде выведем в TextBox.
Функция calculate:
        private void calculate()
        {
            switch (oper)
            {
                case 1:
                    b = a + float.Parse(textBox1.Text);
                    textBox1.Text = b.ToString();
                    break;
                case 2:
                    b = a - float.Parse(textBox1.Text);
                    textBox1.Text = b.ToString();
                    break;
                case 3:
                    b = a * float.Parse(textBox1.Text);
                    textBox1.Text = b.ToString();
                    break;
                case 4:

                    if (float.Parse(textBox1.Text) == 0)
                    { textBox1.Text = "Делить на 0 нельзя!"; }
                    else
                    {
                        b = a / float.Parse(textBox1.Text);
                        textBox1.Text = b.ToString();
                    }
                    break;
                default:
                    break;
            }

        }
Здесь мы используем конструкцию switch-case. Нам осталось обработать две кнопки:
Обработчик кнопки «С». Данная кнопка будет очищать все записи из TextBox’a и Label’a. Код кнопки:
textBox1.Text = "";
label1.Text = "";
Кнопка «<–» будет удалять последнюю цифру записанного в TextBox’e числа. Код кнопки:
            int lenght = textBox1.Text.Length - 1;
            string text = textBox1.Text;
            textBox1.Clear();
            for (int i = 0; i < lenght; i++)
            {
                textBox1.Text = textBox1.Text + text[i];
            }
Мы вводим новую переменную lenght целочисленного типа и записываем в неё количество символов в TextBox’e минус один символ.
Также мы вводим новую переменную text, в которую полностью заносим текст из TextBox’а. Затем мы очищаем TextBox и вводим цикл for, через который записываем в TextBox строку text, но уже на символ короче.
Теперь наш графический калькулятор готов к работе. Скомпилируйте программу, нажав на «Пуск». Если все заработало и калькулятор делает вычисления, тогда вы все правильно сделали и теперь можете пользоваться свомим личным графическим калькулятором.

В данном уроке мы разработаем с вами калькулятор на C#. Программа будет написана согласно принципам объектно-ориентированного программирования (ООП): будет определен интерфейс для методов, реализующих функционал клавиш математических операций калькулятора, от интерфейса выполним наследование и напишем соответствующий класс и методы. Калькулятор, помимо базовых операций сложения, вычитания, умножения и деления, будет предоставлять возможность выполнять операции: извлечения квадратного корня, извлечения корня произвольной степени, возведения в квадрат, возведения в произвольную степень, вычисления факториала, а также работу с регистром памяти (MRC).
Создание интерфейса.
Создадим в Visual Studio проект на Visual C# Windows Forms. Добавим на форму элемент GroupBox, в который поместим Label. В свойстве Dock, элемента Label, необходимо указать Right, чтобы Label был привязан к правому краю. Связка данных элементов управления будет реализовывать дисплей калькулятора.
Калькулятор также содержит кнопки. Всего их 28 штук.
Программирование калькулятора на C#Реализация интерфейса класса.
Поскольку наш калькулятор будет написан в рамках парадигмы ООП (объектно-ориентированного программирования), то начнем кодирование с описания структуры интерфейса для класса, реализующего математические операции программы.
Добавим в проект класс InterfaceCalc.cs и определим в созданном файле интерфейс InterfaceCalc.
//интерфейс
public interface InterfaceCalc
{
//а — первый аргумент, b — второй
void Put_A(double a); //сохранить а
void Clear_A();
double Multiplication(double b);
double Division(double b);
double Sum(double b);
double Subtraction(double b); //вычитание
double SqrtX(double b);
double DegreeY(double b);
double Sqrt();
double Square();
double Factorial();
double MemoryShow(); //показать содержимое регистра памяти
void Memory_Clear(); //стереть содержимое регистра памяти
//* / + — к регистру памяти
void M_Multiplication(double b);
void M_Division(double b);
void M_Sum(double b);
void M_Subtraction(double b); //вычитание
}
Для выполнения математических операций понадобится два операнда: a и b (например, a + b). Операнд a придется хранить в памяти калькулятора, пока пользователь будет вводить второй аргумент операции. Для сохранения числа a объявим прототип метода void Put_A(double a), для очистки — void Clear_A(). Для умножения, деления, сложения и вычитания чисел a и b соответственно понадобятся методы: double Multiplication(double b), double Division(double b), double Sum(double b), double Subtraction(double b). Вычисление корня степени b из a: double SqrtX(double b). Возведение числа a в степень b: double DegreeY(double b). Вычисление квадратного корня: double Sqrt(). Возведение числа a в квадрат: double Square(). Вычисление факториала a!: double Factorial(). Теперь объявления методов для работы с регистром памяти (MRC) калькулятора. Показать содержимое памяти и очистить его: double MemoryShow(), void Memory_Clear(). M×, M÷, M+ и M- к регистру соответственно: void M_Multiplication(double b), void M_Division(double b), void M_Sum(double b), void M_Subtraction(double b).
Создание класса, реализующего интерфейс InterfaceCalc
Теперь добавим в калькулятор класс, который будет реализовывать написанный ранее интерфейс. Для этого в проекте создадим класс Calc : InterfaceCalc. Как вы видите, здесь используется наследование (оператор «двоеточие»). В данном классе напишем реализацию всех методов, требуемых спецификацией нашего интерфейса.
public class Calc : InterfaceCalc
{
private double a = 0;
private double memory = 0;
public void Put_A(double a)
{
this.a = a;
}
public void Clear_A()
{
a = 0;
}
public double Multiplication(double b)
{
return a * b;
}
public double Division(double b)
{
return a / b;
}
public double Sum(double b)
{
return a + b;
}
public double Subtraction(double b) //вычитание
{
return a — b;
}
public double SqrtX(double b)
{
return Math.Pow(a, 1 / b);
}
public double DegreeY(double b)
{
return Math.Pow(a, b);
}
public double Sqrt()
{
return Math.Sqrt(a);
}
public double Square()
{
return Math.Pow(a, 2.0);
}
public double Factorial()
{
double f = 1;
for (int i = 1; i <= a; i++)
f *= (double)i;
return f;
}
//показать содержимое регистра мамяти
public double MemoryShow()
{
return memory;
}
//стереть содержимое регистра мамяти
public void Memory_Clear()
{
memory = 0.0;
}
//* / + — к регистру памяти
public void M_Multiplication(double b)
{
memory *= b;
}
public void M_Division(double b)
{
memory /= b;
}
public void M_Sum(double b)
{
memory += b;
}
public void M_Subtraction(double b)
{
memory -= b;
}
}
Реализация работы калькулятора
Перейдем к написанию кода в классе Form1.
Объявим два поля:
CalcC;
int k;
Это классовая переменная C для класса Calc и целое число k. С помощью k будем считать количество нажатий кнопки MRC, чтобы при первом нажатии выводить значение регистра памяти на экран, а при последующем повторном — стирать значение регистра.
Далее. Нам понадобится ряд методов, которые будут обеспечивать правильное функционирование калькулятора.
Дисплеем в нашем калькуляторе является Label. Его содержимое — это строка текста. Нажатие на цифровые клавиши — это конкатенация текущего значения строки с символом клавиши. Необходимо исключить дублирование нулей в левой части строки (это делают 2-й и 3-й if в коде ниже), а также не допустить написание цифр, если в Label находится знак «бесконечность» (он появляется, например, при делении на ноль; 1-й if). Для решения данных проблем напишем метод CorrectNumber():
privatevoidCorrectNumber(){//если есть знак «бесконечность» — не даёт писать цифры после негоif(labelNumber.Text.IndexOf(«∞»)!=-1)labelNumber.Text=labelNumber.Text.Substring(0,labelNumber.Text.Length-1);//ситуация: слева ноль, а после него НЕ запятая, тогда ноль можно удалитьif(labelNumber.Text[0]==’0’&& (labelNumber.Text.IndexOf(«,») != 1)) labelNumber.Text = labelNumber.Text.Remove(0, 1);//аналогично предыдущему, только для отрицательного числаif(labelNumber.Text[0]==’-‘)if(labelNumber.Text[1]==’0’&& (labelNumber.Text.IndexOf(«,») != 2)) labelNumber.Text = labelNumber.Text.Remove(1, 1);}
Еще необходим метод, проверяющий: не нажата ли какая-нибудь кнопка калькулятора из математических операций, требующих два операнда. Данная проверка необходима для недопущения нажатия других мат. операций, если какая-либо уже нажата. Код метода CanPress():
privateboolCanPress(){if(!buttonMult.Enabled)returnfalse;if(!buttonDiv.Enabled)returnfalse;if(!buttonPlus.Enabled)returnfalse;if(!buttonMinus.Enabled)returnfalse;if(!buttonSqrtX.Enabled)returnfalse;if(!buttonDegreeY.Enabled)returnfalse;returntrue;}
Также, напишем вспомогательный метод FreeButtons(), который снимает нажатия со всех кнопок математических операций калькулятора, требующих два операнда (умножение, деление, сложение, вычитание, вычисление корня произвольной степени и возведение числа в произвольную степень):
privatevoidFreeButtons(){buttonMult.Enabled=true;buttonDiv.Enabled=true;buttonPlus.Enabled=true;buttonMinus.Enabled=true;buttonSqrtX.Enabled=true;buttonDegreeY.Enabled=true;}
Со вспомогательными методами закончили. Идем дальше.
В конструкторе Form1 создадим экземпляр класса Calc, а также в «дисплей» калькулятора занесем значение ноль.
publicForm1(){InitializeComponent();C=newCalc();labelNumber.Text=»0″;}
Теперь перейдем к кодированию обработчиков нажатий кнопок калькулятора. Кнопка «Очистка» (CE):
privatevoidbuttonClear_Click(objectsender,EventArgse){labelNumber.Text=»0″;C.Clear_A();FreeButtons();k=0;}
В «дисплей» записывается ноль, переменная a стирается, нажатия с кнопок математических операций снимаются и k обнуляется.
Кнопка изменения знака у числа «+/-«:
privatevoidbuttonChangeSign_Click(objectsender,EventArgse){if(labelNumber.Text[0]==’-‘)labelNumber.Text=labelNumber.Text.Remove(0,1);elselabelNumber.Text=»-«+labelNumber.Text;}
Кнопка «запятая» (будет добавлена, если ее еще нет и на «дисплее» нет знака бесконечность):
privatevoidbuttonPoint_Click(objectsender,EventArgse){if((labelNumber.Text.IndexOf(«,»)==-1)&& (labelNumber.Text.IndexOf(«∞») == -1)) labelNumber.Text += «,»;}
Теперь цифровые клавиши 0, 1, 2, 3, 4, 5, 6, 7, 8, 9:
privatevoidbutton0_Click(objectsender,EventArgse){labelNumber.Text+=»0″;CorrectNumber();}privatevoidbutton1_Click(objectsender,EventArgse){labelNumber.Text+=»1″;CorrectNumber();}privatevoidbutton2_Click(objectsender,EventArgse){labelNumber.Text+=»2″;CorrectNumber();}privatevoidbutton3_Click(objectsender,EventArgse){labelNumber.Text+=»3″;CorrectNumber();}privatevoidbutton4_Click(objectsender,EventArgse){labelNumber.Text+=»4″;CorrectNumber();}privatevoidbutton5_Click(objectsender,EventArgse){labelNumber.Text+=»5″;CorrectNumber();}privatevoidbutton6_Click(objectsender,EventArgse){labelNumber.Text+=»6″;CorrectNumber();}privatevoidbutton7_Click(objectsender,EventArgse){labelNumber.Text+=»7″;CorrectNumber();}privatevoidbutton8_Click(objectsender,EventArgse){labelNumber.Text+=»8″;CorrectNumber();}privatevoidbutton9_Click(objectsender,EventArgse){labelNumber.Text+=»9″;CorrectNumber();}
Кнопка «Равно»:
private void buttonCalc_Click(object sender, EventArgs e)
{
if (!buttonMult.Enabled)
labelNumber.Text = C.Multiplication(Convert.ToDouble(labelNumber.Text)).ToString();
if (!buttonDiv.Enabled)
labelNumber.Text = C.Division(Convert.ToDouble(labelNumber.Text)).ToString();
if (!buttonPlus.Enabled)
labelNumber.Text = C.Sum(Convert.ToDouble(labelNumber.Text)).ToString();
if (!buttonMinus.Enabled)
labelNumber.Text = C.Subtraction(Convert.ToDouble(labelNumber.Text)).ToString();
if (!buttonSqrtX.Enabled)
labelNumber.Text = C.SqrtX(Convert.ToDouble(labelNumber.Text)).ToString();
if (!buttonDegreeY.Enabled)
labelNumber.Text = C.DegreeY(Convert.ToDouble(labelNumber.Text)).ToString();
C.Clear_A();
FreeButtons();
k = 0;
}
В зависимости от того, какая из кнопок математических операций нажата, будет вызван соответствующий метод из класса Calc, вычисляющий данную функцию, и результат выведется в Label.
Далее кнопки математических операций. Сработают только в том случае, если другие в данный момент не нажаты (CanPress() вернет true):
//кнопка УмножениеprivatevoidbuttonMult_Click(objectsender,EventArgse){if(CanPress()){C.Put_A(Convert.ToDouble(labelNumber.Text));buttonMult.Enabled=false;labelNumber.Text=»0″;}}//кнопка ДелениеprivatevoidbuttonDiv_Click(objectsender,EventArgse){if(CanPress()){C.Put_A(Convert.ToDouble(labelNumber.Text));buttonDiv.Enabled=false;labelNumber.Text=»0″;}}//кнопка СложениеprivatevoidbuttonPlus_Click(objectsender,EventArgse){if(CanPress()){C.Put_A(Convert.ToDouble(labelNumber.Text));buttonPlus.Enabled=false;labelNumber.Text=»0″;}}//кнопка ВычитаниеprivatevoidbuttonMinus_Click(objectsender,EventArgse){if(CanPress()){C.Put_A(Convert.ToDouble(labelNumber.Text));buttonMinus.Enabled=false;labelNumber.Text=»0″;}}//кнопка Корень произвольной степениprivatevoidbuttonSqrtX_Click(objectsender,EventArgse){if(CanPress()){C.Put_A(Convert.ToDouble(labelNumber.Text));buttonSqrtX.Enabled=false;labelNumber.Text=»0″;}}//кнопка Возведение в произвольную степеньprivatevoidbuttonDegreeY_Click(objectsender,EventArgse){if(CanPress()){C.Put_A(Convert.ToDouble(labelNumber.Text));buttonDegreeY.Enabled=false;labelNumber.Text=»0″;}}//кнопка Корень квадратныйprivatevoidbuttonSqrt_Click(objectsender,EventArgse){if(CanPress()){C.Put_A(Convert.ToDouble(labelNumber.Text));labelNumber.Text=C.Sqrt().ToString();C.Clear_A();FreeButtons();}}//кнопка Квадрат числаprivatevoidbuttonSquare_Click(objectsender,EventArgse){if(CanPress()){C.Put_A(Convert.ToDouble(labelNumber.Text));labelNumber.Text=C.Square().ToString();C.Clear_A();FreeButtons();}}//кнопка ФакториалprivatevoidbuttonFactorial_Click(objectsender,EventArgse){if(CanPress()){if((Convert.ToDouble(labelNumber.Text)==(int)(Convert.ToDouble(labelNumber.Text)))&& ((Convert.ToDouble(labelNumber.Text) >= 0.0))) { C.Put_A(Convert.ToDouble(labelNumber.Text));labelNumber.Text=C.Factorial().ToString();C.Clear_A();FreeButtons();}elseMessageBox.Show(«Число должно быть >= 0 и целым!»);}}
Калькулятор вычислит факториал только в том случае, если текущее введенное число целое и больше, либо равно нулю.
Кнопки математических операций над регистром памяти (MRC):
//кнопка М+privatevoidbuttonMPlus_Click(objectsender,EventArgse){C.M_Sum(Convert.ToDouble(labelNumber.Text));}//кнопка М-privatevoidbuttonMMinus_Click(objectsender,EventArgse){C.M_Subtraction(Convert.ToDouble(labelNumber.Text));}//кнопка М*privatevoidbuttonMMult_Click(objectsender,EventArgse){C.M_Multiplication(Convert.ToDouble(labelNumber.Text));}//кнопка М/privatevoidbuttonMDiv_Click(objectsender,EventArgse){C.M_Division(Convert.ToDouble(labelNumber.Text));}
И последняя кнопка — «MRC». Она показывает содержимое регистра памяти на экран, а при повторном нажатии стирает его:
privatevoidbuttonMRC_Click(objectsender,EventArgse){if(CanPress()){k++;if(k==1)labelNumber.Text=C.MemoryShow().ToString();if(k==2){C.Memory_Clear();labelNumber.Text=»0″;k=0;}}}
На этом написание калькулятора на C# закончено. Спасибо за прочтение статьи!
CALCULATOR IN WINDOWS FORM
Microsoft.net framework or Mono Framework provides a free and open source graphical (GUI) class library called as Windows Form or WinForms.
These WinForms provide a platform to App developers to write rich client applications for laptop, desktops, and tablet PCs etc.
These WinForms are written in C# programming
Language and an attractive feature included in it is the drag and drop facilities that can be applied on the native Windows Controls like button , textbox, checkbox, listview etc
These controls included in uncountable number of applications. One of the application that we will study about is Calculator made in Windows Forms.
So let us quickly get started to make our own basic calculator in WinForms.
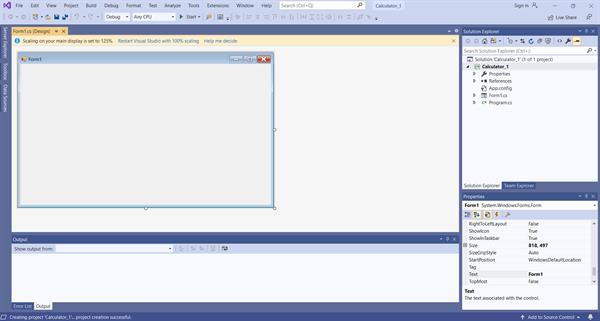
STEP 1: Open Visual Studio or the IDE which you are comfortable with and create a new project . Select the Windows Form Application that comes under .net framework.
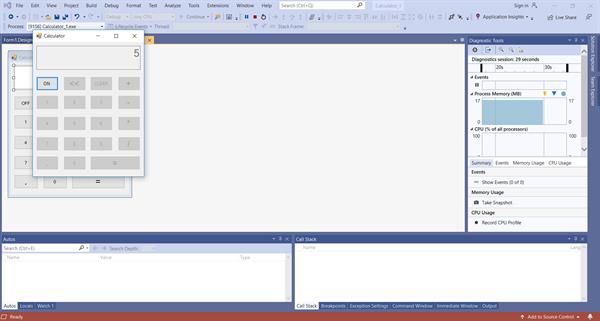
Click on create and then name the project as per your choice, for eg. “Calculator_1” and then press OK.
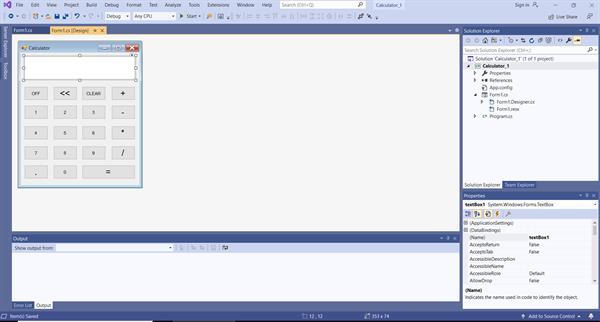
A main form on your workspace will appear as this:
STEP 2: Right click on the form and select “properties” from the dialog box and then change the text property to “calculator” for your convenience.
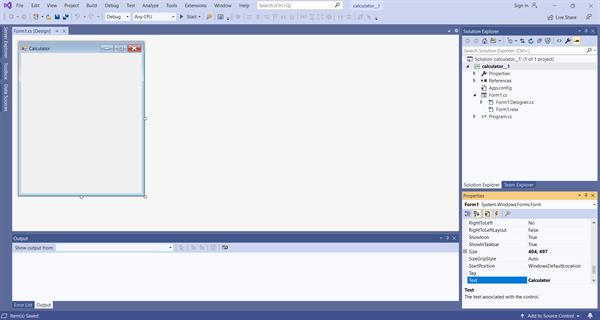
Also, you can modify the size of the form by adjusting its property attributes.
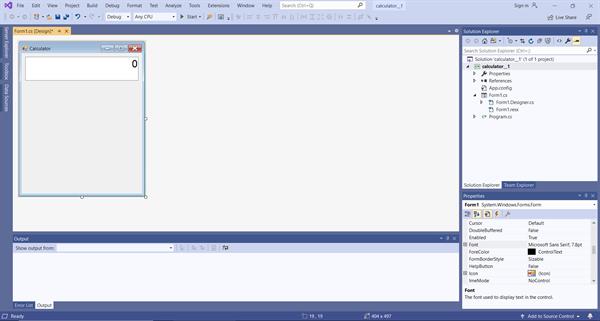
STEP 3: Open toolbox by pressing Ctrl + Alt + X or from the view in Menu Bar if toolbox is not there on the workspace already.
- Once you come across the toolbox , select “textbox“ control and drop it onto the form. Resize it according to your need from the properties or you can adjust it directly by the arrows that appear on the textbox boundary once you click on the textbox.
- This textbox will display the values selected by the user and the result generated by the calculator.
- Change the alignment of the text in the textbox to right in the properties. You can also set the default value in calculator textbox to 0.
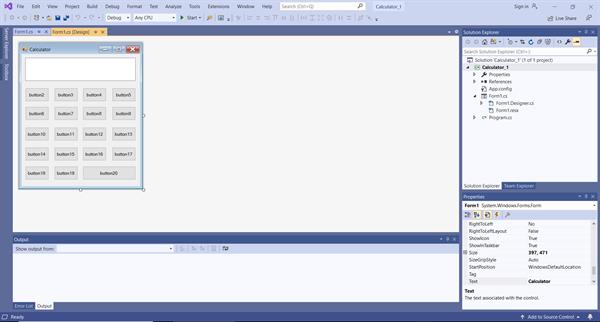
STEP 4: A basic calculator will contain numerical digits from 0 to 9, + , — , * , /, . , = . Also ON ,OFF buttons for turning the calculator on and off and vice versa. Two additional buttons namely “clear” and “<=” (backspace) are added if any value is to be removed from the textbox .
Therefore, we will be adding 20 buttons in the form. Please note that we will add the ON and OFF button in such a way that one button overlaps the other. This is to make any one button out of these two to be visible when the calculator is on or off. i. e , the ON button will be hidden when we turn it on and the OFF button will be shown and vice versa.
STEP 5: Select “ button control” from the toolbox and resize it. Copy and paste this button on the form for all the other buttons on the calculator to maintain symmetry in the calculator.
Adjust the “=” button size as according to the picture here.
STEP 6: Name these buttons according to the function they are performing . for eg. For numerical values , name them as “ b0 to b9 ” for 0 to 9. For + , — ,* ,/ ,= ,. , change name to add , sub , mul , div, result, point respectively.
Also change their text according to the values that are to be displayed on the buttons in the calculator.
STEP 7: Once it is done , you will have to specify the action that has to be performed by any button when it is pressed. Double click on the button you will come across the coding section of that button. You have to specify the functionality of each button one by one in the code section.
The coding should look like this:
using System;
using System.Collections.Generic;
using System.ComponentModel;
using System.Data;
using System.Drawing;
using System.Linq;
using System.Text;
using System.Threading.Tasks;
using System.Windows.Forms;

namespace Calculator_1
{
    public partial class Form1 : Form
    {
        public Form1()
        {
            InitializeComponent();
        }

        float num, ans;
        int count;
        public void disable()
        {
            textBox1.Enabled = false;
            on.Show();
            off.Hide();
            b0.Enabled = false;
            b1.Enabled = false;
            b2.Enabled = false;
            b3.Enabled = false;
            b4.Enabled = false;
            b5.Enabled = false;
            b6.Enabled = false;
            b7.Enabled = false;
            b8.Enabled = false;
            b9.Enabled = false;
            add.Enabled = false;
            sub.Enabled = false;
            mul.Enabled = false;
            div.Enabled = false;
            point.Enabled = false;
            backspace.Enabled = false;
            clear.Enabled = false;
            result.Enabled = false;
        }
        public void enable()
        {
            textBox1.Enabled = true;
            on.Hide();
            off.Show();
            b0.Enabled = true;
            b1.Enabled = true;
            b2.Enabled = true;
            b3.Enabled = true;
            b4.Enabled = true;
            b5.Enabled = true;
            b6.Enabled = true;
            b7.Enabled = true;
            b8.Enabled = true;
            b9.Enabled = true;
            add.Enabled = true;
            clear.Enabled = true;
            backspace.Enabled = true;
            result.Enabled = true;
            div.Enabled = true;
            sub.Enabled = true;
            mul.Enabled = true;
            point.Enabled = true;
        }


        private void b1_Click(object sender, EventArgs e)
        {
            textBox1.Text = textBox1.Text + 1;
        }

        private void b2_Click(object sender, EventArgs e)
        {
            textBox1.Text = textBox1.Text + 2;
        }

        private void b3_Click(object sender, EventArgs e)
        {
            textBox1.Text = textBox1.Text + 3;
        }

        private void b4_Click(object sender, EventArgs e)
        {
            textBox1.Text = textBox1.Text + 4;
        }

        private void b5_Click(object sender, EventArgs e)
        {
            textBox1.Text = textBox1.Text + 5;

        }

        private void b6_Click(object sender, EventArgs e)
        {
            textBox1.Text = textBox1.Text + 6;

        }

        private void b7_Click(object sender, EventArgs e)
        {
            textBox1.Text = textBox1.Text + 7;
        }

        private void b8_Click(object sender, EventArgs e)
        {
            textBox1.Text = textBox1.Text + 8;
        }

        private void b9_Click(object sender, EventArgs e)
        {
            textBox1.Text = textBox1.Text + 9;
        }

        private void b0_Click(object sender, EventArgs e)
        {
            textBox1.Text = textBox1.Text + 0;
        }

        private void div_Click(object sender, EventArgs e)
        {
            num = float.Parse(textBox1.Text);
            textBox1.Clear();
            textBox1.Focus();
            count = 4;
            label1.Text = num.ToString() + "/";

        }
        private void result_Click(object sender, EventArgs e)
        {
            compute();
            label1.Text = "";
        }


        private void add_Click(object sender, EventArgs e)
        {
            num = float.Parse(textBox1.Text);
            textBox1.Clear();
            textBox1.Focus();
            count = 1;
            label1.Text = num.ToString() + "+";
        }

        private void sub_Click(object sender, EventArgs e)
        {
            num = float.Parse(textBox1.Text);
            textBox1.Clear();
            textBox1.Focus();
            count = 2;
            label1.Text = num.ToString() + "-";
        }

        private void mul_Click(object sender, EventArgs e)
        {
            num = float.Parse(textBox1.Text);
            textBox1.Clear();
            textBox1.Focus();
            count = 3;
            label1.Text = num.ToString() + "*";
        }

        private void point_Click(object sender, EventArgs e)
        {
            textBox1.Text = textBox1.Text + ".";
        }


        private void result_Click_1(object sender, EventArgs e)
        {
            compute();
            label1.Text = "";
        }

        private void on_Click(object sender, EventArgs e)
        {
            enable();
        }

        private void off_Click(object sender, EventArgs e)
        {
            disable();
        }

        private void clear_Click(object sender, EventArgs e)
        {
            textBox1.Text = "";
        }

        private void backspace_Click(object sender, EventArgs e)
        {
            int length = textBox1.TextLength - 1;
            string text = textBox1.Text;
            textBox1.Clear();
            for(int i=0; i< length; i++ )
            {
                textBox1.Text = textBox1.Text + text[i];
            }
        }

        public void compute()
        {
            switch (count)
            {
                case 1:

                    ans = num + float.Parse(textBox1.Text);
                    textBox1.Text = ans.ToString();
                    break;
                case 2:
                    ans = num - float.Parse(textBox1.Text);
                    textBox1.Text = ans.ToString();
                    break;
                case 3:
                    ans = num * float.Parse(textBox1.Text);
                    textBox1.Text = ans.ToString();
                    break;
                case 4:
                    ans = num / float.Parse(textBox1.Text);
                    textBox1.Text = ans.ToString();
                    break;
                default:
                    break;


            }
        }


    }
}
The calculator will appear somewhat like this: