NV1 SSD (SNVS)
- Resources
- PCN
- Videos
- FAQ
- Contact Us

1:10
How to install an M.2 SSD in a desktop PC

1:29
How to install an M.2 SSD in a laptop
ElectroStatic Discharge, ESD is simply the discharge of built-up static electricity. ESD should not be taken lightly as this is one of the few things that an individual can do to damage or destroy their computer or hardware components. It is like when you rub your feet on the carpet and you touch something metal. ESD can occur without the user feeling a shock and will occur when only working on the inside of the computer or handling hardware.
How to help prevent ESD
The best method of preventing ESD is to use an ESD wrist strap or an earthing mat or table. However, because most users do not have access to these items, we have included the below steps to help reduce the chance of ESD as much as possible.
- Standing – We recommend that you are standing at all times when working on the computer. Sitting on a chair can generate more electrostatic.
- Cables – Make sure that everything is removed from the back of the computer (power cable, mouse, keyboard, etc).
- Clothes – Do not wear any clothing that conducts a lot of Electrical Charge, such as a wool jumper.
- Accessories – To help reduce ESD and prevent other problems, it is also a good idea to remove all jewellery.
- Weather – Electrical storms can increase the ESD risk; unless absolutely necessary, try not to work on a computer during an electrical storm. In very dry areas, the air itself becomes a part of the electrostatic build-up mechanism every time there is an air flow (wind, air conditioning, blower) passing over an insulated surface. Do not let high humidity levels build false confidence, and beware of corrosion problems with interconnects and other electrical interfaces.
To learn more about ESD and how to protect your electronics, please refer to the below site.
ESD Association
https://www.esda.org
FAQ: KTC-Gen-ESD
Secure Erase User Guide for Linux
This guide will walk you through securely erasing your Kingston SSD using Linux tools
SATA Secure Erase Procedure
Warning
Please make sure to have a full backup of any important data before you proceed!
Prerequisites
• You must have root privileges.
• You must have your SSD connected to the system as a secondary (non-OS) drive.
• You must have lsscsi and hdparm installed. You may need to install them with your distribution’s package manager.
• Your drive must not be in a security freeze.
• Your drive must not be password protected.
Instructions
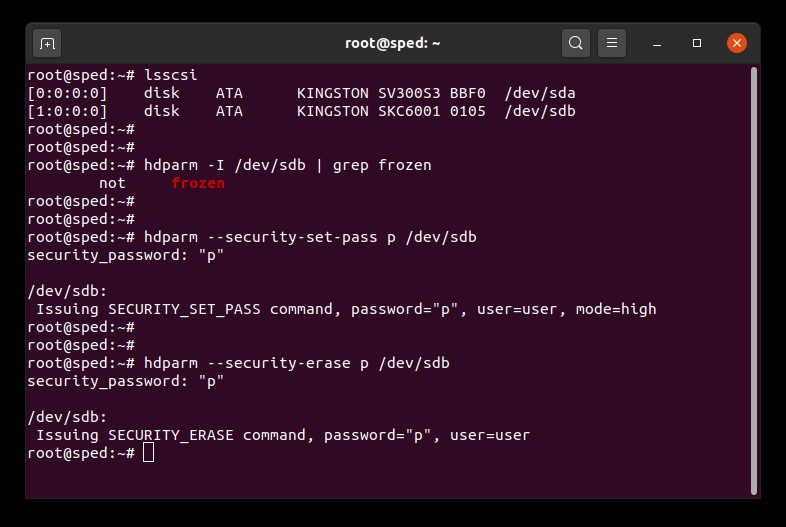
1. Find the device name (/dev/sdX) of the drive you wish to erase:
# lsscsi
2. Make sure drive security is not frozen:
# hdparm -I /dev/sdX | grep frozen
If the output shows «frozen» (instead of «not frozen») then you cannot continue to the next step. You must try to remove the security freeze by trying one of the following methods:
Method 1: Put the system to sleep (suspend to RAM) and wake it up. On most distributions the command to suspend is:
# systemctl suspend
Now issue the hdparm command again. If it worked the output will show “not frozen” (instead of “frozen”).
Method 2: Hot plug the drive. This is done by physically unplugging the SATA power cable from the drive and plugging it back in while the system is powered on. You may need to enable hot plug in BIOS. Not all systems support hot plug.
Now issue the hdparm command again. If it worked the output will show “not frozen” (instead of “frozen”).
3. Set a user password on the drive. The password can be anything. Here we are setting the password to “p”:
# hdparm —security-set-pass p /dev/sdX
4. Issue the secure erase command to the drive using the same password:
# hdparm —security-erase p /dev/sdX
This command may take a few minutes to complete. The drive password is removed upon successful completion.
If the secure erase is interrupted or otherwise fails your drive may become security locked. In this case you can remove the security lock using the command below and then try the secure erase procedure again:
# hdparm —security-disable p /dev/sdX
SATA Secure Erase Example
NVMe Secure Erase Procedure
Warning
Please make sure to have a full backup of any important data before you proceed!
Prerequisites
• You must have root privileges.
• You must have your SSD connected to the system as a secondary (non-OS) drive.
• You must have nvme-cli installed. You may need to install it with your distribution’s package manager.
• Your drive must not be password protected.
Instructions
1. Find the device name (/dev/nvmeXn1) of the drive you wish to erase:
# nvme list
2. Issue the format command to the drive. Here we set the secure erase setting to 1 which indicates a user data erase:
# nvme format /dev/nvmeXn1 —ses=1
This command may take a few minutes to complete.
NVMe Secure Erase Example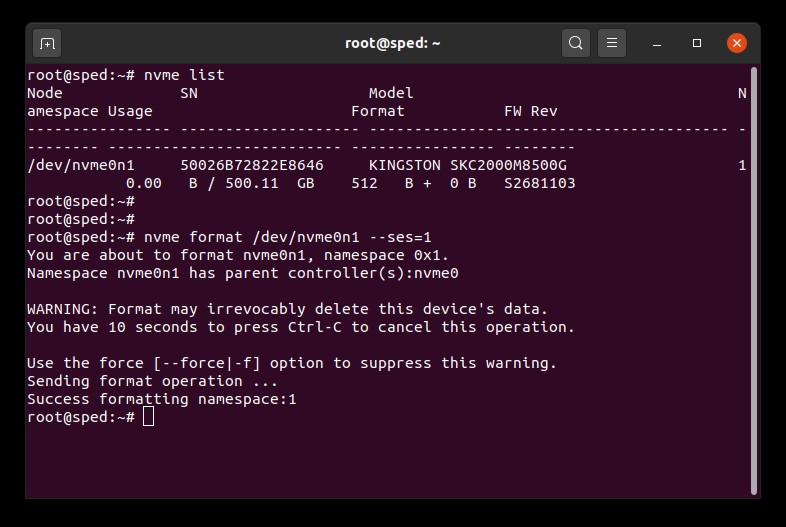
FAQ: KSM-SE-LIX
Trim and garbage collection are technologies that modern SSDs incorporate to improve both their performance and endurance. When your SSD is fresh out of the box, all of the NAND blocks are empty so the SSD can write new data to the empty blocks in a single operation. Over time, most of the empty blocks will become used blocks that contain user data. In order to write new data to used blocks, the SSD is forced to perform a read-modify-write cycle. The read-modify-write cycle hurts the SSD’s overall performance because it must now do three operations instead of a single operation. The read-modify-write cycle also causes write amplification, which hurts the SSD’s overall endurance.
Trim and garbage collection can work together to improve SSD performance and endurance by freeing up used blocks. Garbage collection is a function built into the SSD controller that consolidates data stored in used blocks in order to free up more empty blocks. This process happens in the background and is completely handled by the SSD itself. However, the SSD may not know which blocks contain user data and which blocks contain stale data that the user has already deleted. This is where the trim function comes in. Trim allows the operating system to inform the SSD that data has been deleted so that the SSD can free up those previously used blocks. For trim to work, both the operating system and the SSD must support it. Most modern operating systems and SSDs support trim, although most RAID configurations do not.
Kingston SSDs take advantage of both garbage collection and trim technologies in order to maintain the highest possible performance and endurance over their lifetime.
Learn More
FAQ: KSD-011411-GEN-13
In Windows — Open the control panel, open administrative tools and then open computer management. Click on Disk Management and see if the SSD drive is seen in the right window pane. If it is, right click on where it is labeled as disk 1, disk 2, etc and select «Initialize disk» (this may come up automatically when you go to Disk Management). Next, right-click on the area to the right of the disk label and choose «New Simple Volume». Continue with the wizard by choosing the size, drive letter and formatting of the partition.
In macOS — A «disk insertion» window will appear. Click on the «initialize» button. This will take you to the disk utility. Select the Kingston drive from the list of drives on the left side of the Window. From the actions available, choose partition. For the «Volume Scheme», choose «1 partition». For the format, choose MacOS extended for a permanent drive. Choose ExFAT for an external drive (available on MacOS 10.6.6 and above). Click Apply. A warning windows will appear stating you will erase all data from the drive. Click on the partition button at the bottom.
FAQ: c
Kingston realises the importance of keeping our customers’ personal data and information confidential and secure.
Kingston takes measures to ensure the security of all of our customers’ personal information when a Solid State Drive (SSD) is returned to our RMA facility for warranty replacement or repair.
When an SSD reaches our repair centre, it will undergo a thorough testing process.
During the first phase of testing, an ATA Secure Erase is performed on the SSD, which erases all data and information.
ATA Secure Erase is federally approved by the National Institute of Standards and Technology (NIST 800-88) for legal sanitisation of confidential user data.
If the SSD is not in a functional state and not capable of undergoing an ATA Secure Erase, the SSD is dismantled and the NAND Flash Memory is destroyed.
FAQ: KSD-022411-GEN-15
Any of our SSDs can be used in RAID.
However, due to endurance specifications, only certain part numbers should be used in RAID. For servers, please contact Kingston to determine the best Kingston SSD to use for your workload.
FAQ: KSD-052511-GEN-17
Kingston SSD Manager (KSM) is ending support for Microsoft Windows 7. The latest version of KSM with Windows 7 support is v1.1.2.5. If you are using Windows 7 and experience complications with KSM, please make sure you have AHCI mode enabled in BIOS and install the latest Intel RST storage driver provided by your system manufacturer. If you still need assistance, feel free to contact our Kingston Technical Support department.
FAQ: KSM-001125-001-00
Kingston SSD Manager 1.1.2.6 will not offer firmware updates for NVMe SSDs until IEEE 1667 support has been disabled. In order to complete the firmware update you must do the following:
1. First, we recommend you backup your data.
2. Then use a secondary system to complete a REVERT using the PSID on the drive label. Note: Performing a REVERT will securely erase all data on the drive.
3. Disable IEEE 1667 support
4. The firmware update will become available upon refresh or restart of KSM
FAQ: KSM-001125-001-01
Self-Monitoring Analysis and Reporting Technology (SMART) is a built-in monitoring capability in hard drives and SSDs.
It can allow users to monitor the health of a device.
It does this through monitoring software designed specifically for the SMART feature. All of our SSDNow drives support SMART.
FAQ: KSD-011411-GEN-10
Performance decreases have been reported on some SSDNow drives.
If you have an older SSD drive that does not have effective Garbage Collection, SSD drive performance will decrease over time.
This is due to the way the system overwrites data that has been flagged for deletion.
Try using the Secure Erasetool like HDDErase to wipe the drive and restore it to its original condition.
FAQ: KSD-011411-GEN-12
Your system may be loading the Intel RST driver instead of the Microsoft NVMe driver. There is a known compatibility issue with the Intel RST driver that interferes with NVMe firmware update commands. Additionally, KSM is only supported on Windows based systems. Therefore, if you are attempting to run KSM on a macOS or Linux based system, unfortunately these OS are not compatible with KSM.
FAQ: KSM-001125-002-01
To determine which NVMe driver is in use, you can run the AS SSD benchmark tool and select your Kingston NVMe SSD from the drop-down menu. This will report the driver being used for that drive. If the driver is «iaStorAC» then your drive is using the Intel driver. If the driver is «stornvme» then your drive is using the Microsoft driver.
FAQ: KSD-001525-001-00
Caution! The workarounds below will break RST RAID arrays and could lead to data loss. If your system has RST RAID
arrays you should consider an alternate solution.
Workaround 1: Disable RST Control in BIOS
This workaround requires BIOS options to enable or disable RST Control and is not available on all systems.
Note: Please backup all important data before you proceed!
1. Restart and enter the system BIOS
2. Locate the RST Configuration settings in BIOS
3. Change «RST Controlled» to «Not RST Controlled»
4. Save and exit BIOS
5. Open KSM and update the drive firmware
Once these steps are completed you may optionally switch back to «RST Controlled» in BIOS.
Workaround 2: Switch from RAID to AHCI in BIOS
This workaround is to change your system storage mode from RAID to AHCI and should work on all systems.
Note: Please backup all important data before you proceed!
1. Open msconfig
2. Select the Boot tab
3. Check Safe boot (minimal)
4. Click OK and Restart
5. When the system restarts go into the system BIOS
6. Change the storage mode from RAID to AHCI
7. Save and exit BIOS
8. Wait for Windows to boot into safe mode
9. Open msconfig
10. Select the Boot tab
11. Uncheck Safe boot
12. Click OK and Restart
13. Wait for Windows to boot normally
14. Open KSM and update the drive firmware
Once these steps are completed you may optionally switch the storage mode back to RAID in BIOS.
FAQ: KSD-001525-001-01
When the SSD is recognised in the BIOS, but the Windows 7 installation does not detect the drive:
Follow these steps:
Disconnect any other hard drives or SSDs. Boot the Windows 7 installation disk. Choose repair, then advanced, then command prompt. Type: «diskpart» without quotes and press Enter. You will see a prompt labeled «diskpart». Type the following commands and press Enter after each one.
Diskpart > Select Disk 0
Diskpart > Clean
Diskpart > Create Partition Primary Align=1024
Diskpart > Format Quick FS=NTFS
Diskpart > List Partition
Diskpart > Active
Diskpart > Exit
Then, reboot the computer to the Windows 7 installation disk.
KSD-100214-GEN-20
FAQ: KSD-100214-GEN-20
SSDs do not require defragmentation.
Since they do not contain a physical disk, there is no need to organise the data in order to reduce seek time.
Therefore defragmenting an SSD is not effective.
Also, defragmenting an SSD can put undue wear on specific areas of the drive.
SSDs are designed to write data as evenly as possible over the entire drive to reduce undue wear to any one location.
Defragmenting your SSD drive a couple of times will not harm it.
However, if it is done continuously over a long period, it may reduce the life of the drive.
FAQ: KSD-011411-GEN-03
The Windows Experience Index (WEI) merely measures the relative capability of components. The WEI only runs for a short time and does not measure the interactions of components under a software load, but rather characteristics or your hardware.
The WEI does not therefore measure the performance of a system, but merely the relative hardware capabilities when running Windows 7. An article about the WEI can be found here: http://blogs.msdn.com/b/e7/archive/2009/01/19/engineering-the-windows-7-windows-experience-index.aspx
In Vista, the WEI scores ranged from 1.0 to 5.9. In Windows 7, the range has been extended upward to 7.9.
FAQ: KSD-011411-GEN-08
During the OS installation, go to UTILITIES / TERMINAL
In terminal type:
diskutil list
Then press RETURN. Scroll up to top and verify the Kingston SSD disk (i.e. disk0, disk1, etc).
Then type:
diskutil mountDISK disk0 (or whichever ddisk is the Kingston SSD).
Then press RETURN. It should show «mounted successfully».
Then type:
diskutil eraseDISK apfs YOURDRIVENAME disk0 (or whichever disk is the Kingston SSD)
Warning – This step (eraseDISK command) will delete all data on the target drive. Confirm that you have selected the drive you wish to delete and then continue.
Then press RETURN. It should show «successful». Then exit terminal and proceed with the normal installation of the OS.
FAQ: KSD-092917-GEN-21
First, open an Elevated Command Prompt window.
To open an Elevated Command Prompt window: Click on Start Orb > Type «CMD.exe» in Search box > Right click on «CMD» and select «Run as Administrator» (If you receive a prompt confirmation, click YES)
To verify that the TRIM command is enabled, type the following and press enter in the Elevated command:
fsutil behavior query disabledeletenotify
The results will be as follows:
DisableDeleteNotify = 1 (Windows TRIM commands are disabled)
DisableDeleteNotify = 0 (Windows TRIM commands are enabled)
To enable the TRIM command,type the following and press enter in the Elevated command:
fsutil behavior set disabledeletenotify 0
To disable the TRIM command,type the following and press enter in the Elevated command:
fsutil behavior set disabledeletenotify 1
FAQ: KSD-072211-GEN-18
Encrypted solid state drives utilise the hard drive security command available on most business-class computers and motherboards.It is accessed through the BIOS.
This will allow you to create a password for multiple HDDs and SSDs and securely erase the drives if needed.
Some computers will not have this feature.
If this is the case, the drive can still be used, just without these security features.
Be sure not to confuse the BIOS password with the hard drive security password.
KSD-011411-ENC-01
FAQ: KSD-011411-ENC-01
You can, but you must first disable the security for the drive in the original computer.
Then you can enable it again in the new computer.
KSD-011411-ENC-02
FAQ: KSD-011411-ENC-02
No. If you forget the password for this drive, it cannot be accessed. Be aware that forgetting your password is not covered under Kingston’s warranty.
The only exception to this is using a master or administrative password for the drive in addition to the user password. The BIOS would have to support this and it would have to be enabled at the time you initiated the ATA security for this drive. Using a master password would allow an administrator to reset the drive.
FAQ: KSD-011411-ENC-03
SSD Firmware Update
Kingston SSD firmware updates are provided via Kingston’s SSD Manager (KSM) application. If a firmware update is applicable or available for your product, KSM will indicate this, and the firmware release notes related to the update will be displayed within the application interface.
To check for a firmware update for your product, please download and install Kingston SSD Manager (KSM) from the link below. You will be able to perform the firmware update by selecting the target SSD within the application and clicking on the firmware update button. Note that the application must be run with Administrator privileges within Windows. Always remember to backup your data before proceeding with a firmware update.
If you cannot update within a Windows environment, or if you need a copy of the firmware release notes please contact technical support for assistance.
FIRMWARE AND FIRMWARE UPDATES ARE PROVIDED AT KINGSTON’S DISCRETION IN CONNECTION WITH CERTAIN KINGSTON PRODUCTS. THE FIRMWARE AND FIRMWARE UPDATES ARE PROVIDED «AS IS» AND ARE USED AT YOUR SOLE RISK WITH NO WARRANTIES, CLAIMS, OR REPRESENTATIONS FROM KINGSTON WHATSOEVER.
KINGSTON EXPRESSLY DISCLAIMS ALL SUCH WARRANTIES OF ANY KIND, WHETHER EXPRESS, IMPLIED OR STATUTORY, WITH RESPECT TO THE FIRMWARE AND FIRMWARE UPDATES INCLUDING, WITHOUT LIMITATION, WARRANTIES OR CONDITIONS OF QUALITY, PERFORMANCE, NON-INFRINGEMENT, MERCHANTABILITY, OR FITNESS FOR USE FOR A PARTICULAR PURPOSE.
KINGSTON DOES NOT REPRESENT OR WARRANT THAT THE FIRMWARE OR FIRMWARE UPDATES WILL ALWAYS BE AVAILABLE, ACCESSIBLE, UNINTERRUPTED, TIMELY, SECURE, ACCURATE, COMPLETE OR ERROR-FREE, INCLUDING BUT NOT LIMITED TO THE ACCURACY OR COMPLETENESS OF ANY INFORMATION, TEXT, GRAPHICS, LINKS OR OTHER ITEMS CONTAINED WITHIN THE FIRMWARE.
NO LICENSE, EXPRESS OR IMPLIED, BY ESTOPPEL OR OTHERWISE, TO ANY INTELLECTUAL PROPERTY RIGHTS IS GRANTED BY ALLOWING THE DOWNLOAD OF ANY FIRMWARE AND / OR FIRMWARE UPDATE, EXCEPT AS PROVIDED HEREIN.
BY DOWNLOADING THIS SOFTWARE YOU AGREE TO ACCEPT THE AFOREMENTIONED TERMS.
Downloads:
Kingston SSD Manager (Windows only)
Release Notes:
SATA:
A400 SBFK71F1 2019-07-10
UV500 003056RR 2019-11-04
UV400 000056RA 2019-11-04
DC400 SAFM02.H 2016-10-26
DC400 SAFM32.I 2016-10-26
A400 SBFKB1H5 2020-01-16
A400/Q500 SBFKP1C5 2022-06-27
KC600 S4500109 2022-09-02
NVMe:
NV2 ELFK0S.6 2022-11-14
NV1 S8542107 2022-08-30
NV1 S8H40105 2022-05-03
NV1 S8442105 2021-07-28
A1000 E8FK11.R 2018-11-08
A2000 S5Z42109 2021-03-30
KC2000 S2681103 2020-01-14
KC2500 S7780102 2021-04-29
KC2500 S7781102 2021-04-29
USB:
XS2000/DTMAX S9800111 2022-12-25
|
0 / 0 / 0 Регистрация: 25.03.2021 Сообщений: 1 |
|
|
1 |
|
|
25.03.2021, 23:48. Показов 20095. Ответов 1
Привет! Была лицензионная про но неудачно обновилась. хочу переустановить и видимо нужно драйвер подсунут, а найти не могу.
__________________
0 |

|
0 / 0 / 0 Регистрация: 09.10.2019 Сообщений: 25 |
|
|
26.03.2021, 09:06 |
2 |
|
Привет! Драйвер нужен не на сам SSD, а на контроллер. Я качал на сайте производителя, в моём случае это asus.com. Нужен драйвер Intel Rapid Storage Technology (IRST) драйвер.
0 |

Оказывается Windows 10 можно легко заставить дружить с SSD NVMe, если просто взять не кривую сборку от Microsoft. У компании с обновлениями в последнее время получается сложно.
Итак, вы обновили своё «железо», например, купив не самую дорогую материнскую плату Asus TUF H370 Pro Gaming. Вполне разумный выбор, который даст вам возможность собрать новый ПК, используя самые современные процессоры Intel, при необходимости использовать наработки компании в области Optane-памяти, а также поставить высокоскоростной SSD NVMe вместо жёсткого диска или вместо всё ещё актуального, но уже медленного классического SATA SSD. Именно в случае с NVMe вас может подстерегать проблема.
Скоростной SSD в первую очередь стоит использовать для установки системы, чтобы летали и игрушки, и установленный софт и сама Windows. По идее Windows 10 уже давно умеет работать с таким железом, но на практике оказывается, что это не так. В сети можно увидеть на многих форумах обсуждение проблемы, когда Windows не хочет устанавливаться на SSD NVMe, но при этом легко ставится на обычный жёсткий диск или SATA SSD. Ситуация, на наш взгляд, абсурдная, как и с масштабированием интерфейса, если у вас разрешение выше 1080p. Кстати, проблему с масштабированием мы решили.
Что за беда с SSD? Виновата материнская плата?
Предыстория такова, что получив во владение материнскую плату Asus TUF H370 Pro Gaming, мы решили, что она запросто подружится с современными SSD, благо слот M.2 в наличии, их здесь целых два. Да и в описании продукта указано, что она может:
1 x M.2 Socket 3*2, , with M Key, type 2242/2260/2280 storage devices support (SATA & PCIE 3.0 x 2 mode)
1 x M.2 Socket 3, with M key, type 2242/2260/2280/22110 storage devices support (PCIE 3.0 x 4 mode)
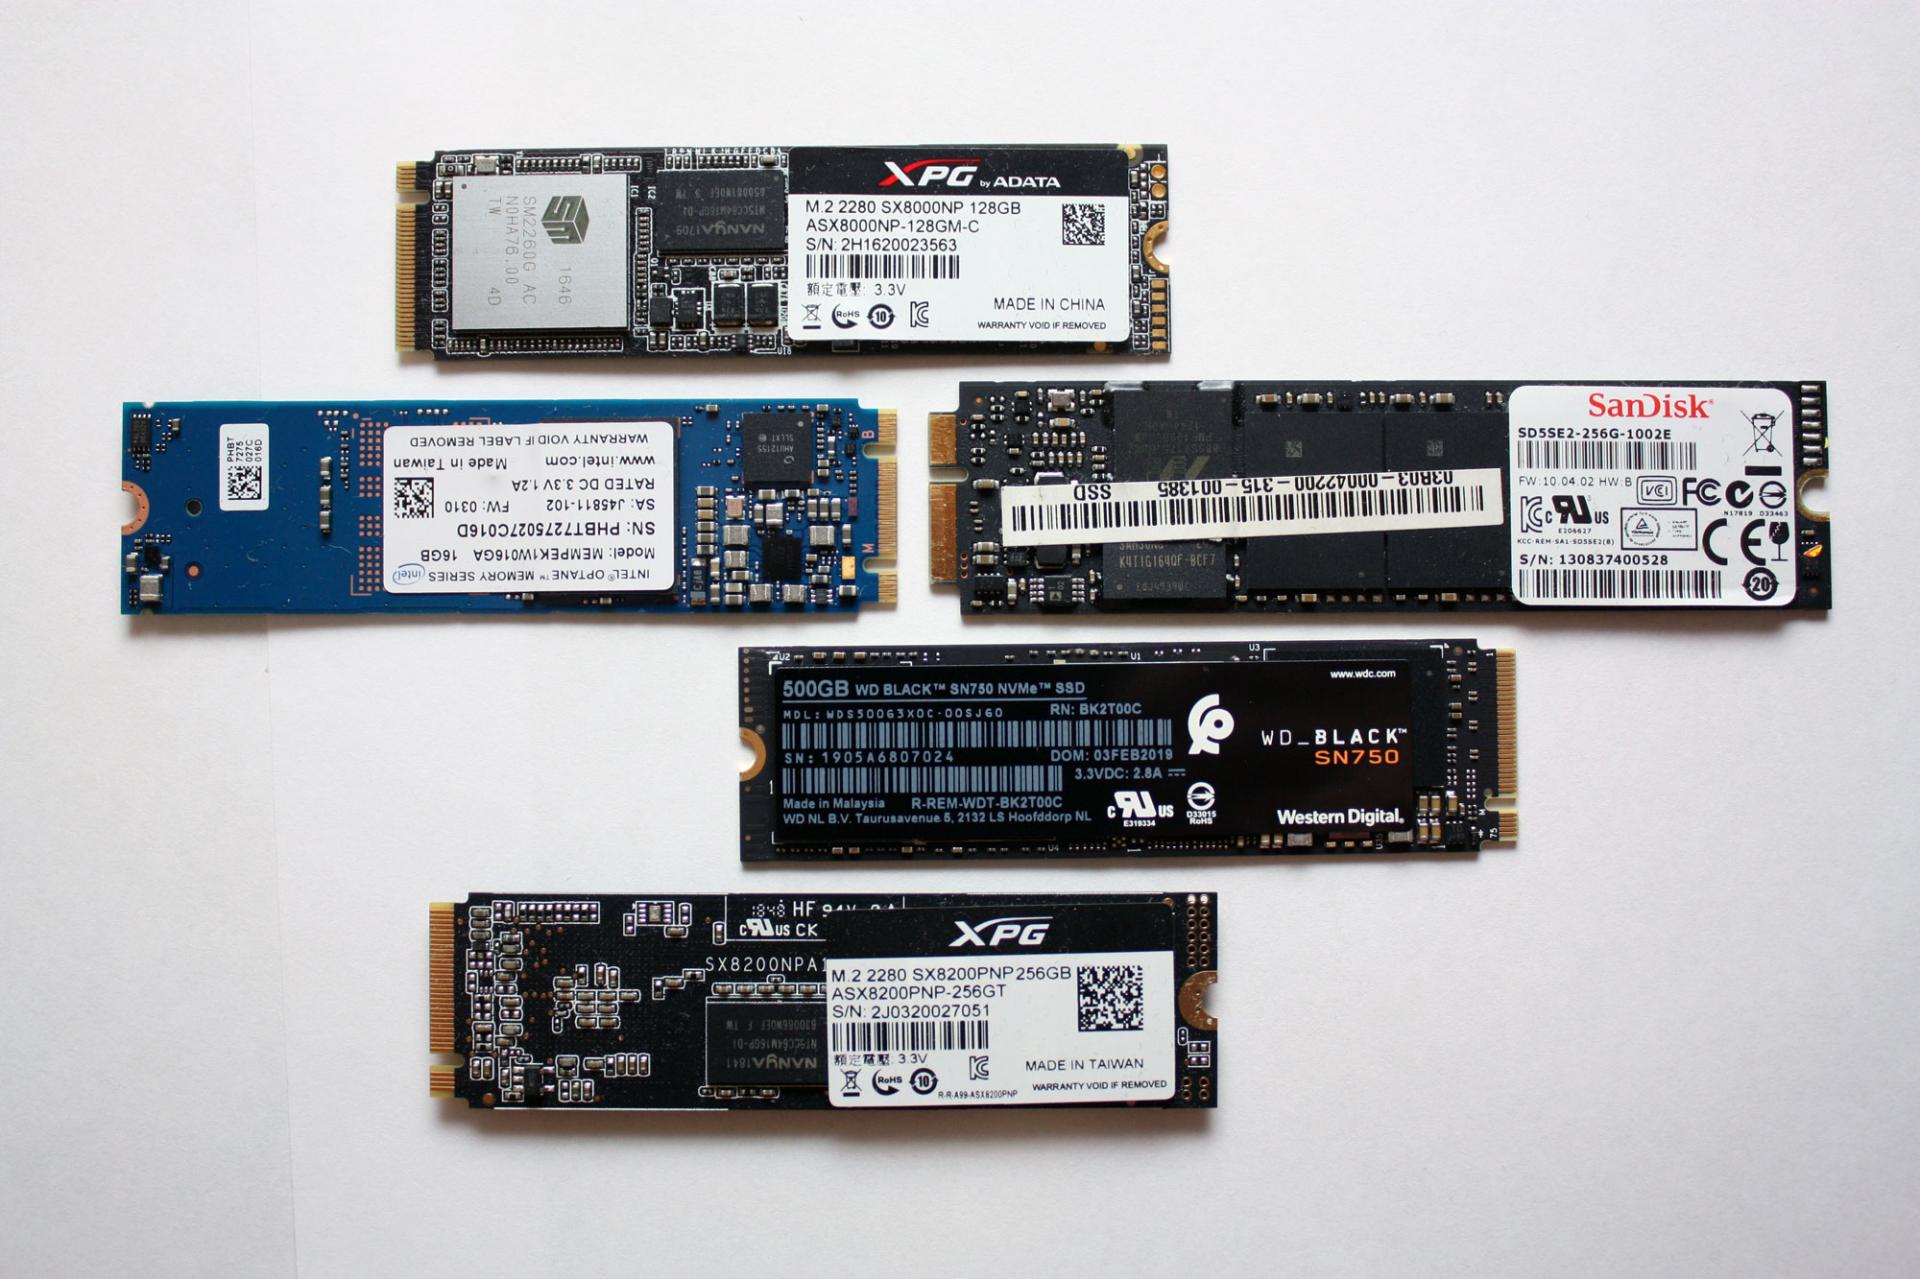
Не тут-то было. Для теста мы решили приобрести не самый дорогой, но один из самых шустрых SSD ADATA XPG ASX8200. Про цены мы тоже писали немного ранее. В нашей ревизии на коробке продукта указано, что он развивает скорости на чтение/запись до 3500/1200 Мб/с. Впечатляет!
Но после нескольких часов возни стало понятно, что работать этот SSD вместе с материнской платой не хочет. Разумеется, BIOS был обновлён до последней версии. И вина в этом не производителей железа. Хотя ADATA оказывается сообщает, что этот модуль не указан среди совместимых для TUF H370. Но чуть позже мы его всё же сможем завести.
Эксперимент продолжился через несколько дней, когда в нашем распоряжении оказался чип-памяти попроще — ADATA XPG SX8000. Здесь скорости чтения/записи уже 1900/1100 Мб/с. Снова вылез нюанс. На странице совместимости указана материнская плата Asus TUF H370 Pro Gaming Wi-Fi, на ша же без поддержки беспроводных сетей, логично предположили, что этот момент не будет никоим образом влиять на совместимость с современными SSD, ведь в остальном материнки Asus идентичны. Но снова неудача.
Попытка номер 3 была предпринята с «железкой» Western Digital Black SN750. Скорости для него заявлены производителем 3470 Мб/с на чтение и 2600 Мб/с на запись. Опять неудача.
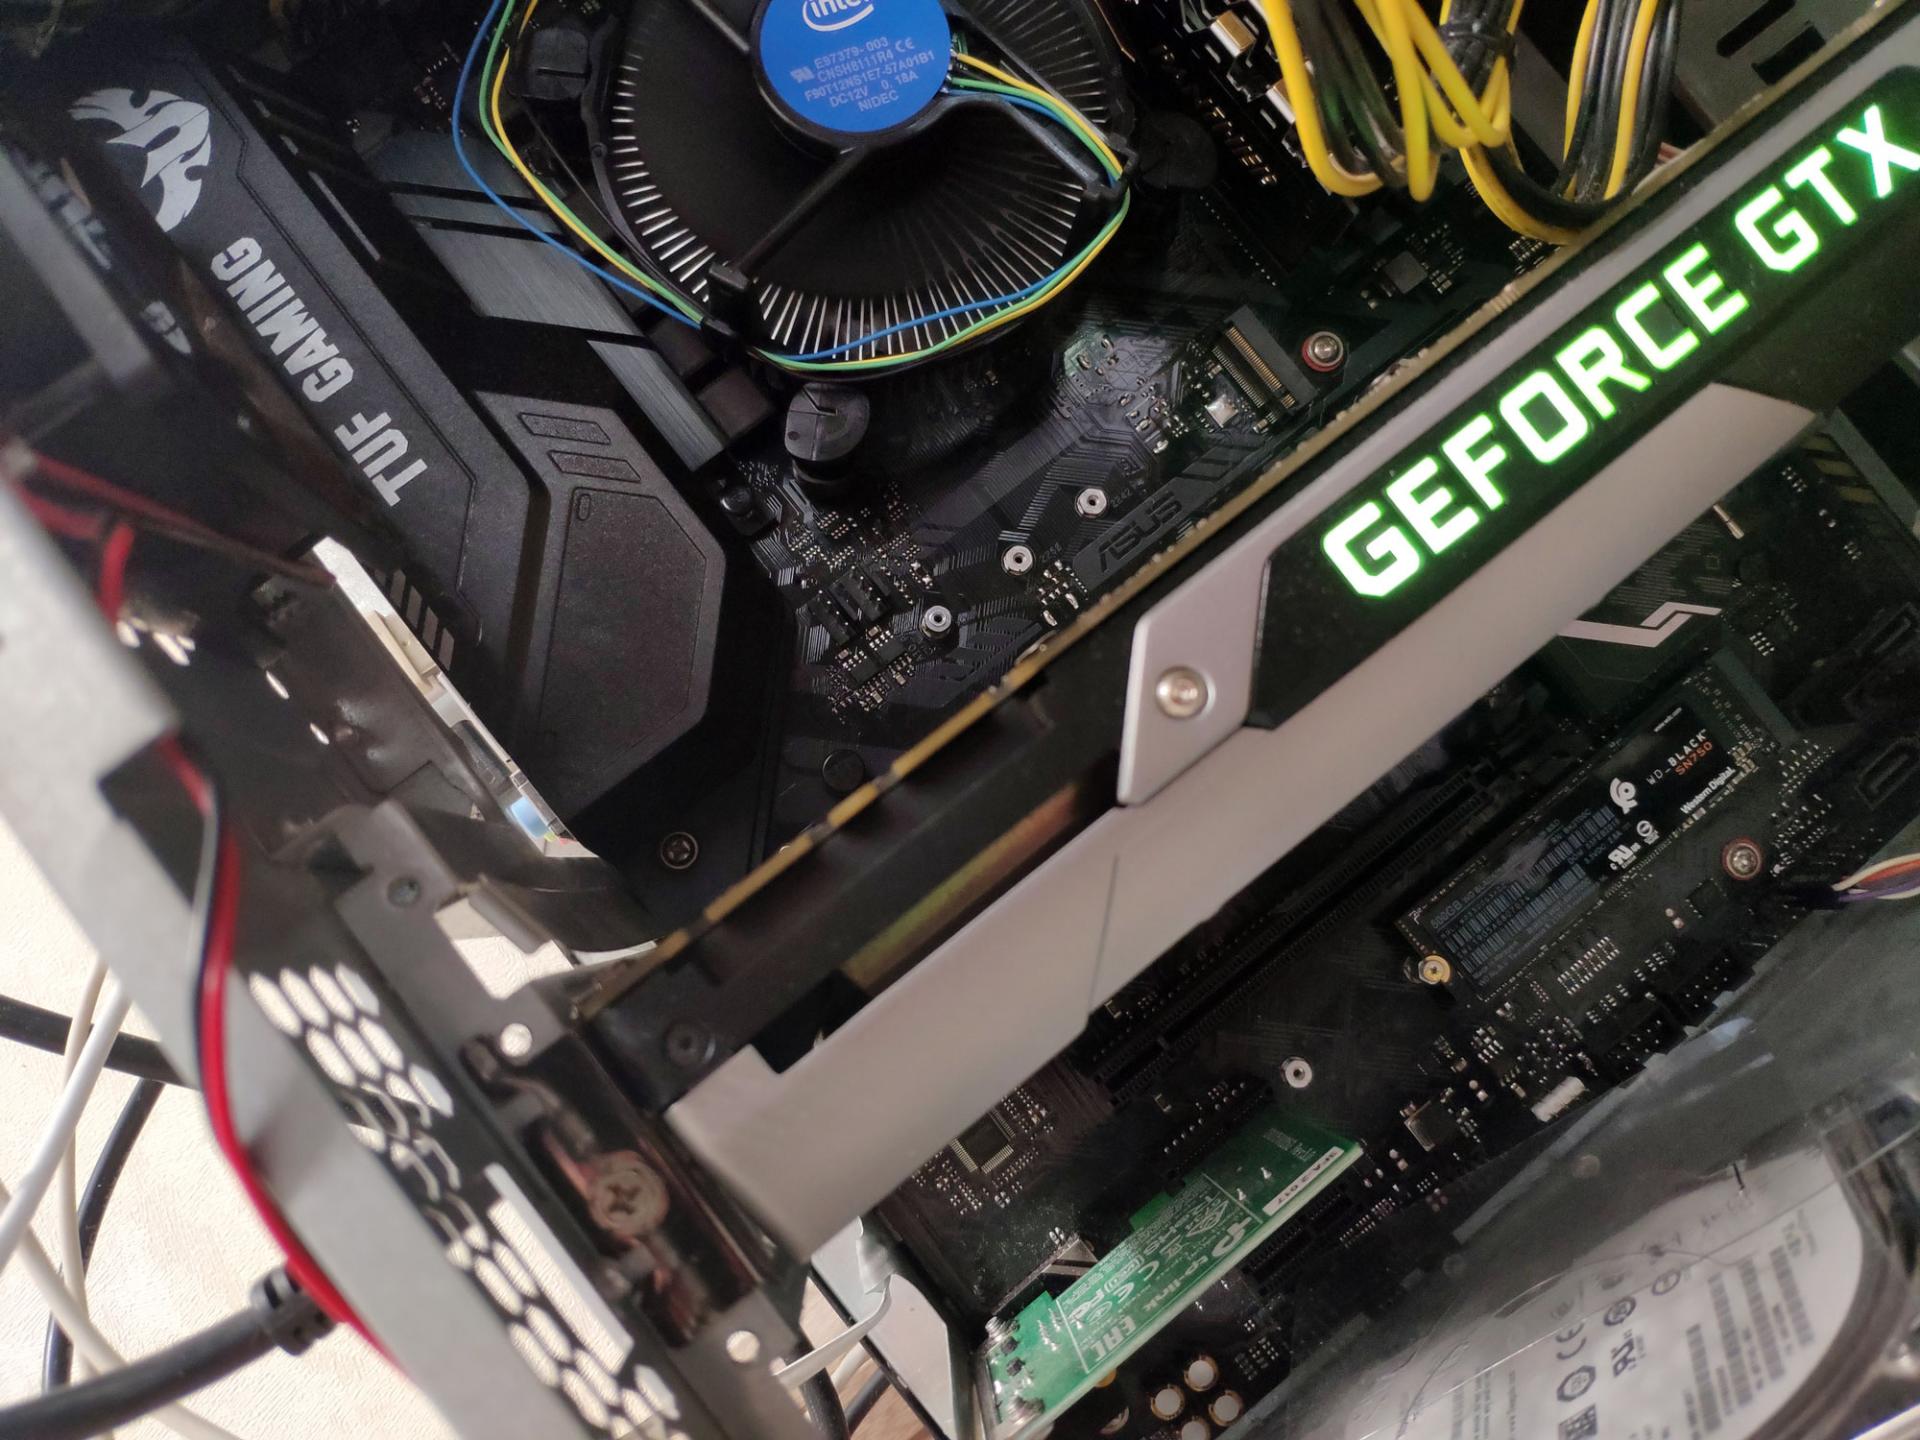
Все три SSD удалось заставить работать в качестве второго диска в системе, но системным выступал всё равно традиционный SATA SSD. Развязка оказалась неожиданной, проблема была в Microsoft.
Суть проблемы
Загвоздка была понятна. Детище Microsoft не знает, как работать с NVMe накопителем данных, подходящего драйвера, который бы всё объяснил, нет, а потому инсталлятор не может начать процесс на необходимый нам диск. При этом драйвер Intel RST, загружаемый со второй флешки, не помогал. Здесь также любопытно, что инсталлятор Windows признал драйвер совместимым с оборудованием и даже пытался его использовать, но безуспешно.
Даже когда далось продвинуться на один шаг в инсталляторе до момента выбора жёсткого диска и раздела для установки (путём форматирования и разбивки через Diskpart в NTFS, GPT, привоения статуса Primary, а затем внедрения BCD с помощью приложения Easy BCD и последующего запуска Repair-установщика), он говорил, что не может установить Windows 10 на любой выбранный раздел, который был на SSD от Western Digital. Зато установку можно было продолжить на другие диски, на которых уже была прошлая установка Windows.
Ещё раз стало понятно, что это чудачества Microsoft, когда мы решили попробовать установить Linux Deepin на новый SSD. Несколько кликов мыши, ещё несколько минут работы установщика — система успешно запустилась.
В сети удалось найти советы о том, что стоит вставлять загрузочную флешку с Windows в порт USB 2.0, а не 3.0, так как у многих это решало проблему.
Были советы об использовании режима совместимости CSM, выбираемом в BIOS. Некоторым это помогало.
Удалось найти даже инструкцию по модификации BIOS, не слишком сложную и в целом логичную, но этим заниматься хотелось всё же в последнюю очередь.
Хеппиэнд!
Лекарство оказалось внезапным. Несмотря на то, что мы пытались установить Windows с флешки, созданной в приложении Rufus по мотивам оригинального образа (версия 1809), скаченного официальным приложением Windows Media Creation Tool (кстати флешку созданную этой программой мы тоже использовали, но неудачно), выстрелила более старая флешка, опять же, созданная в Rufus, но с образом Windows 10 версии 1803.
Делать не пришлось ровным счётом ничего. Мы просто отключили все SSD и HDD, чтобы не смущать установщик и загрузились со старой флешки с билдом 1803. Он сразу подружился с NVMe SSD.
Такие дела.
👍 / 👎
Тогда можно поддержать её лайком в соцсетях. На новости сайта вы ведь уже подписались? 
Или хотя бы оставить довольный комментарий, чтобы мы знали, какие темы наиболее интересны читателям. Кроме того, нас это вдохновляет. Форма комментариев ниже.
Что с ней так? Своё негодование вы можете высказать на zelebb@gmail.com или в комментариях. Мы постараемся учесть ваше пожелание в будущем, чтобы улучшить качество материалов сайта. А сейчас проведём воспитательную работу с автором.
Если вам интересны новости мира ИТ так же сильно, как нам, подписывайтесь на Telegram-канал. Там все материалы появляются максимально оперативно. Или, может быть, удобнее «Вконтакте»?
Читайте нас где удобно
Ещё на эту тему было
- Как запретить OneDrive перехватывать клавишу PrtSc?
- Microsoft сделает Windows более безопасной
- Как передавать файлы со смартфона на ПК и обратно по Bluetooth?
- Приложение просмотра фото Windows желтит кадры. Как починить?
- Windows 11, наконец, догнала по скорости работы windows 10
- Поддерживает ли ваш ПК DirectStorage? Microsoft выпустила утилиту для проверки
- Windows 11 может получить новый инструмент контроля приватности
- Скачать Windows 11 и Windows 10 с сайта Microsoft из России больше невозможно
- В обновлении Windows 11 появятся папки на рабочем столе, как в Android
- Обновление Windows 11 даст больше эффектов прозрачности для сторонних приложений
Для тех, кто долистал
Ай-ти шуточка бонусом. Заходит Android в бар, садится и спрашивает: – А где iPhone? – А он ещё работает.
-
Standard NVM Express Controller
Производитель:
Advanced Micro Devices Inc
Версия:
9.4.0.00059
(05 янв 2022)
Файл *.inf:
rcbottom.inf
Windows Vista x64, 7 x64, 8 x64, 8.1 x64, 10 x64
-
Standard NVM Express Controller
Производитель:
Broadcom Limited
Версия:
3.00.71.90
(07 ноя 2020)
Файл *.inf:
mpi3drvi.inf
Windows Vista, 7, 8, 8.1, 10
В каталоге нет драйверов для Standard NVM Express Controller под Windows.
Скачайте DriverHub для автоматического подбора драйвера.
Драйверы для Standard NVM Express Controller собраны с официальных сайтов компаний-производителей и других проверенных источников.
Официальные пакеты драйверов помогут исправить ошибки и неполадки в работе Standard NVM Express Controller (контроллеры).
Скачать последние версии драйверов на Standard NVM Express Controller для компьютеров и ноутбуков на Windows.