
KKmulticopter Flash Tool is a software tool to easily upload new firmware to your KKmulticopter board or ATmega8 based brushless ESC. It is designed to support users that have never flashed firmware to a micro-controller. The KKmulticopter Flash Tool is very simple to set up and use.
Once the software is installed you select your programmer and your board or controller type you want to flash. You can then flash a firmware file from your PC, or from the Internet, by selecting from a list of the latest available firmware. The software will save your settings when you exit, so you will not need to set up everything again when you next launch the software.
The list of firmware files are maintained by me, so if I miss a new version, please let me know using the form below and I will update the repository.

The software is written in Java under the GPL V3 license. To run the software you need at least Java 6 or greater.
Currently Windows, Mac OS X and Linux are supported.
Available languages are: Brazilian, Chinese, Danish, Dutch, English, Faroese, French, German, Italian, Swedish, Spanish, Polish, Portuguese, Russian, Turkish, Slovakian, Czech, Korean, Hebrew, Croatian, Greek, Japanese, Romanian, Hungarian, Bosnian, Serbian and Norwegian.
Supported boards:
The Flycam Blackboard is also supported by the tool. Please be careful when you select which board you wish to flash with new firmware. The board must have the capacity to store the new firmware selected.
SimonK BL-ESC firmware and Wii-ESC can be flashed to any by the firmware supported ATmega8 based BL-ESC. If you updated your ESC to SimonK firmware version 01.06.2012 or newer and enabled the bootlader you can later reflash the ESC with the ArduinoUSBLinker, Afro USB Programming Tool or the Turnigy USB Linker simply via the Servo plug. I already use successfully HobbyKing 10A with bs.hex, F-20 (HobbyKing 20A)EU Warehouse and F-30 (HobbyKing 30A)EU Warehouse both with bs_nfet.hex.To get more informations on how to flash BL-ESC see also the Flashing ATmega8 based BL-ESC manual. And the How to make a ArduinoUSBLinker.
Helpful for first time flashing BL-ESC with Simonk firmware is also the Atmel Atmega Socket Firmware Flashing Tool that can be put directly on most ESC without the need to solder any cable to the processor or pads.
The OrangeRX RX3S 3-Axis Flight Stabilizer V2 and OrangeRX RX3S 3-Axis Flight Stabilizer w/DSM2 can be flashed with the Open Flight Stabilizer firmware from noobee.
An ISP programmer interface is required to connect your PC to your controller board. If you do not have an ISP programmer already, take a look at this USBasp with 10pin and 6pin, 10pin 5V and 3.3V Version or this one with 10 pin header. For boards with a 6pin header you may require a 10→6pin adapter like this one. I also have tested many different styles of USBasp’s from eBay and other sources. They generally work very well however, you should always confirm if they work with avrdude.
When installing the drivers for your USBasp programmer dongle, it’s recommend to install the original drivers from fischl.de. The drivers supplied with eBay auctions often don’t work very well.
The tool also supports xwopen USBasp, please use the driver provided by xwopen not the fischl driver.
It is recommended to read the manual first. If you have a problem during the flashing process please read the FAQ.
I am currently looking for volunteers to translate the tool into additional languages. Don’t be afraid, you do not need any programming skills to help. All of the editing is done within a web based system located on this homepage. If you would like to help, please use the contact form on the bottom of the page. Thank you.
I like to invite you to contribute to the project on github.com. I pushed the source code to github, because it offers great tools to do collaborative works.
There is also the possibility to work on the manual and other documents in the wiki there.
Last but not least you can file bug-reports and feature requests in the issue tracker.
Latest beta software version:
Changelog
Latest stable software versions:
Changelog
Old versions can be found here.
Manual Download a firmware can be found here.
Before running KKmulticopter Flash Tool on Windows with an USB programming dongle please make sure you install a driver based on libusb on your computer. On Linux and Mac OS X, you normally do not need to install additional drivers.
If you have already installed AVRStudio, you have to remove the Jungo-Driver for your AVRisp mkII.
Please report if your programmer is not working correctly with this software by using the form at the end of the page.
There is a FAQ that may solve some of your questions.
If you have a USBtiny the flashtool newer than 0.33 and older than 0.63 beta 11 will not work with until you replace the avrdude.exe and avrdude.conf in the folder /lib/avrdude/windows/ with the one in this download. Since 0.63 beta 11 the usbtiny part of the flashtool is fixed.
Changelog
Pinout of KK2.x Boards

If you have already installed AVRStudio, you have to remove the Jungo-Driver for your AVRisp mkII.
For the most USB programming dongles you need a Windows driver. (Windows 8 doesn’t allow to install unsigned drivers by default. see the FAQ for more informations)
If you find other drivers to make your USB programmer dongle work with avrdude and Windows, please send me a note.
License and Warranty
This software is under the GNU GPL V3. To read the full license read the license.txt file in the download or use the license menu entry.
THERE IS NO WARRANTY FOR THE PROGRAM, TO THE EXTENT PERMITTED BY APPLICABLE LAW. EXCEPT WHEN OTHERWISE STATED IN WRITING THE COPYRIGHT HOLDERS AND/OR OTHER PARTIES PROVIDE THE PROGRAM “AS IS” WITHOUT WARRANTY OF ANY KIND, EITHER EXPRESSED OR IMPLIED, INCLUDING, BUT NOT LIMITED TO, THE IMPLIED WARRANTIES OF MERCHANTABILITY AND FITNESS FOR A PARTICULAR PURPOSE. THE ENTIRE RISK AS TO THE QUALITY AND PERFORMANCE OF THE PROGRAM IS WITH YOU. SHOULD THE PROGRAM PROVE DEFECTIVE, YOU ASSUME THE COST OF ALL NECESSARY SERVICING, REPAIR OR CORRECTION.
Thanks to the very generous donations of Bill, Geoffrey, Alex and Gary I was able to order the license to make the nice exe files.
|
Thread OP |
Hi, I just opened this thread to centralize the hole questions, ideas, informations and so on in one place, as I do not check all 3 pages of thread updates per day in this section. So I loose a little bit the overview. Most of you may know about the KKmulticopter Flash Tool. For the others that are new to it. KKmulticopter Flash Tool is an easy to use tool for flashing new firmware to any kind of KK-board. If you have any wishes, suggestions, ideas, problems please feel free to post it here. If want contribute the project feel free to contact me throw the build in mail feature of the tool or by the form on my home page. There are today already 21 persons translating the tool to 19 languages. The tool can be found on http://kkflashtool.de I want also to thank once again kapteinKuk for the great project he started, and all people that are contributing to kk and especially the flashtool. Christian Please give me your feedback about the new Logo: http://lazyzero.de/en/kklogopoll
|
|
Last edited by LazyZero; Sep 10, 2014 at 08:26 AM.
|
|

|
Sign up now to remove ads between posts |
|
|
Thanks a Lot………Hi Christian, thank you for making this Tool. Now flying 2 Years Multicopters and here on my Table lying two Minsoo Kim Boards, will try tomorrow to flash them with your tool. I get my USBASp before two days from China. So I have to frickle me a 10 to 6 Adapter like you show us. I am a total beginner in Flashing. So Thanks a Lot for Help us all. And now the problems beginn. Have all new fischl.de Usbasp driver installed. Blue Board is not connected. Then i push the Button for Test. What is wrong ? Mike |
|
Last edited by Rc Heli Halle; Oct 22, 2011 at 07:40 AM.
|
|
|
|
All working.. try and error… Hi, |
|
|
Beer Donate on the Way…………… |
|
Thread OP |
Hi Mike, thanks for the beer. I will enjoy it next weekend. And sorry for the late reply but this weekend was dedicated to the family. Christian |
|
|
Hi all, I am having some trouble flashing one of Minsoo Kim’s blackboards with a Atmega 168 MCU. The issue I am having when using the flashool, is that once I have flashed the board(using Fischl’s usbasp driver), and I plug it back on the the Y6 frame, as I swtich the thing on, the led stays on instead of just turning on and then off again… Then when I try to arm the board, it does’nt do anything… I have another kkmulticopter.kr board (the blue one) and I have no issues at all flashing that one. I have not seen any similar cases online, this is why I am posting this here. Any help would be greatly appreciated as due to this I have’nt been able to take off with this Y6 prohect I have been on… Cheers |
|
Thread OP |
I already wrote this to the FLYCAM blackboard threat. In the moment the firmwares in the kkmulticopter flash tool are only for kk-boards not for Flycam blackboard. The repository is currently only containing the blueboard branch of Minsoo’s firmware. I may indicate this more clearer on my page. But you can try to download the adequate firmware from Minsoo’s page and unzip it some where. Then you can flash it by the flash from file function of my tool. I hope this works. If that is the case and you can confirm I will try to do some changes in my tool to make the FLYCAM blackboard also supported by me. Best Christian |
|
|
I’m using AVR Studio with an AVR ISPMkII, but I used your flashtool to retrieve .hex file for a tricopter. Initially, I used the libusb with your flashtool, but I didnt like the way the AVR reacted so I uninstalled the libusb driver. What I wonder is how do I totally uninstall libusb? Everything works at this point with AVR Studio and I appreciate the flashtool as a repository, but I dont know what or where libusb installed stuff. Win7 |
|
Thread OP |
The libusb0.sys and libusb0.dll must be installed somewhere in system32, sytem32/drivers or system64. That what I read in the installation script of the driver. BTW I am currently preparing the next beta, there will be some major changes in the avrdude backend. Therefore I need some testers. They have to be experienced with the flashtool and their PC. Preferable they should have one of mySmartUSB, popolu or an other programmer different to avrisp mkII and usbasp. Christian P.S. Please fill the poll. So I see which programmer is important to support. |
|
|
Quote:
Originally Posted by LazyZero I already wrote this to the FLYCAM blackboard threat. In the moment the firmwares in the kkmulticopter flash tool are only for kk-boards not for Flycam blackboard. The repository is currently only containing the blueboard branch of Minsoo’s firmware. I may indicate this more clearer on my page. But you can try to download the adequate firmware from Minsoo’s page and unzip it some where. Then you can flash it by the flash from file function of my tool. I hope this works. If that is the case and you can confirm I will try to do some changes in my tool to make the FLYCAM blackboard also supported by me. Best Christian Hi Christian, That is actually what I did. I used the option Atmega168 as the MCU and then flash from file using the Y6 v2.3 from kkmulticopter.kr which I had peviously downloaded. I flash the board, everything thing seems to be ok as there are no errors during flashing. But when I plug the board up to the Y6, switch it on and try to arm it, it doesnt respond… I have done it in the past with the blueboard and no problems at all! I have also tried using AVRstudio, but it doesnt seem to recognise my USB device. I am using a USBAVE programer from betemcu.cn (it also says on the usb device: S51 & AVR). I have converted the 10 pin conector to a 6 pin using your secifications and it has worked perfectly with the blueboard, so I dont think the problem lies there… Any help would be greatly appreciated. Thanks for all your hard work Christian. It has been very helpfull to me until this small issue I am having with the blackboard… Regards, James |

|
Thread OP |
You are sure you downloaded the Y6 for blackboard? Sorry for asking such stupid questions. If that is the case it seams at the FLYCAM blackboard has other fuse settings. Christian |
|
|
Where’s the PayPal donate button?
|

|
Thread OP |
It is hidden on the flashtool page. Search for «buy me a beer» |

|
|
Prost.
|

|
|
Quote:
Originally Posted by LazyZero You are sure you downloaded the Y6 for blackboard? Sorry for asking such stupid questions. If that is the case it seams at the FLYCAM blackboard has other fuse settings. Christian Hi Christian, Yes I am sure that I am downloading the firmware for Y6 for the blackboard as found here: http://www.kkmulticopter.kr/index.html?modea=flycamfc what is very wierd is that as I flash the board, it says the it has been flashed correclty… there are no fuse or other types of errors… regards, James |
![]()
Евгений Кайдаш, Первомайское, Респ. Крым
, 31 янв. 2015 г., 2:12:36
0
Тогда, остается только подключить правильно програматор к платке, встаить в Usb, запустить kkflashtool_win32.exe, выбрать тип програматора, тип платки, выбрать прошивку, и нажать зеленую кнопку)
![]()
Евгений Кайдаш, Первомайское, Респ. Крым
, 31 янв. 2015 г., 17:28:55
0
И у меня 64 не запускается, я больше скажу, ни у кого не запускается)) хвост на програматоре смотрю уже сделан, что бы правильно подключить, нужно только проследиь, где у него земля, и найти землю на контроллере, подключать и можно шить.
![]()
Игорь Лыков, Елец
, 31 янв. 2015 г., 18:18:03
0
Спасибо Евгений.У сына комп на 32 бита,запустилась программа ККmulticopter прошил а эта программа AVR Studio 4 так не видет контролер.Будем дальше собирать двигатель и регулятор и настраивать.
![]()
Игорь Лыков, Елец
, 4 февр. 2015 г., 19:52:42
0
Евгений подскажи я решил другу прошивку поставить стирать не надо?или она сама при установки удаляется?а то я не могу прошить FlyCam_XCopter v2.9 а получается FlyCam_QuadCopter v2.9 разные прошивки ставлю все равно работает FlyCam_QuadCopter v2.9 программа такая KKmulticopter Flash Tool может что не так делаю?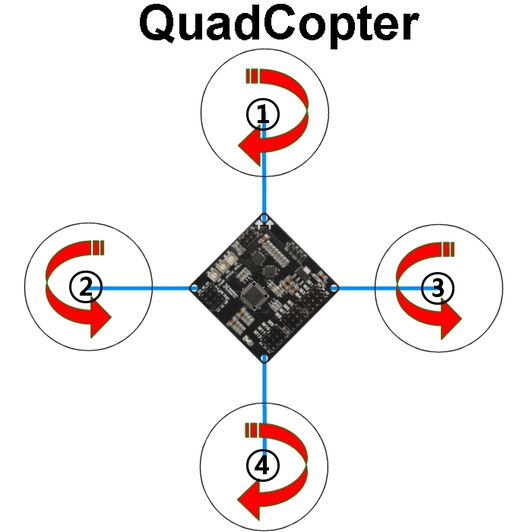
![]()
Евгений Кайдаш, Первомайское, Респ. Крым
, 5 февр. 2015 г., 2:23:51
0
Стирание чипа происходит перед прошивкой автоматически. если по виду прошивается нормально, значит с подключением все в порядке, остается только прошивка, попробуйте выбрать другую версию..
![]()
Игорь Лыков, Елец
, 5 февр. 2015 г., 11:55:14
0
Евгений у меня такая проблема ставлю разные прошивки установка проходит отлично и двигатели и винты ставлю по прошивки.но как запускаю двигатели и ручкой насебя то один по номером 2 двигатель поднимается от себя поднимается 4 в право 1 в лево 3 получается у меня работает как QuadCopter но вопрос меня мучает почему 2 двигатель поднимает а не 1? все двигатели подключены по номерам в контролере.прошивки ставил FlyCam_XCopter v2.9 и такой FlyCam_VTailCopter_v2_9.
![]()
Игорь Лыков, Елец
, 5 февр. 2015 г., 22:24:57
0
Все разобрался ,была моя ошибка.Теперь летает отлично.))))
![]()
Игорь Лыков, Елец
, 6 февр. 2015 г., 9:04:07
0
На передатчике тумблер стоял на микширование.))))Что то я и про него и забыл.)))два дня голову ломал.вот только настроить а то его почемуто влево тянет, тримером на всю сдвинул в право.
KK Multicopter — это самый дешевый контроллер для квадрокоптеров и других мультироторных летательных аппаратов с поддержкой до 6ти моторов.
Этот полетный контроллер хорош двумя вещами:
1. Он очень дешевый
2. Легко настраивается и позволяет выполнять любые акробатические трюки.
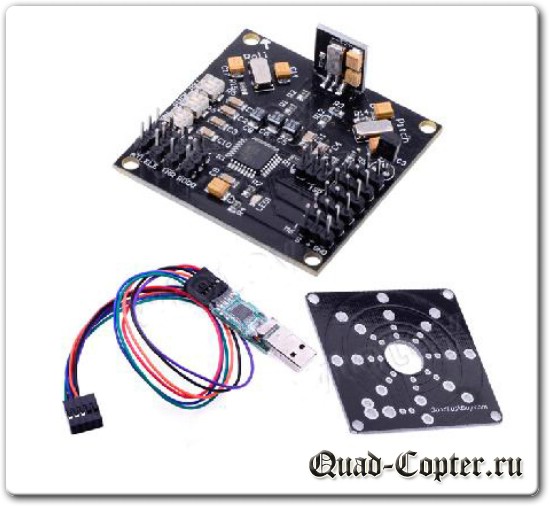
Фактически контроллер квадрокоптера KK Multicopter состоит из трех гироскопов, процессора обрабатывающего данные от приемника и подстроечных резисторов которые отвечают за чувствительность гироскопов.
Этот контролер полета появился первым и изначально был разработан энтузиастами. Так что у него достаточно большое применение и отлаженное ПО.
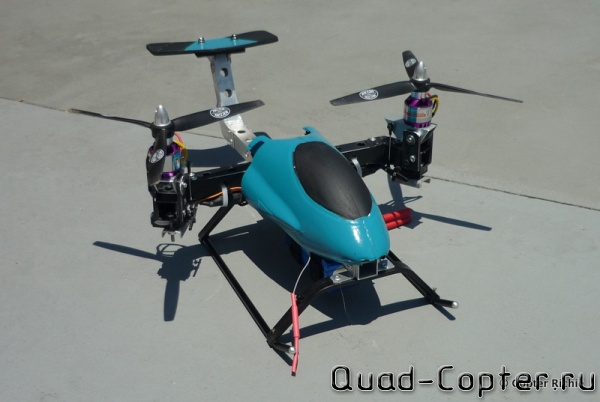
KK Multicopter ставят или на небольшие модели собранные на скору руку, как например квадрокоптер из коробки — см фото ниже.

На экспериментальные модели, типа ТвинКоптера.
Или на квадрокоптеры для полетов в зале, на которых GPS просто не нужен, так как все равно не отрабатывает в помещениях и все полеты выполняются в «ручном режиме», где работают только гироскопы.
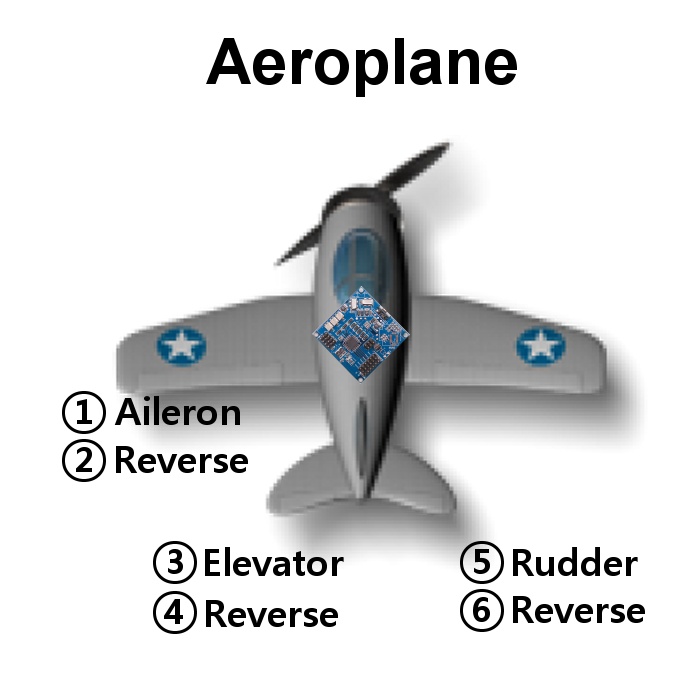
Так же можно устанавливать KK Multicopter и в качестве самолетного контролера полета, все схемы и прошивки для них смотрите в конце статьи.
Вот как выглядит плата полетного контролера квадрокоптера.
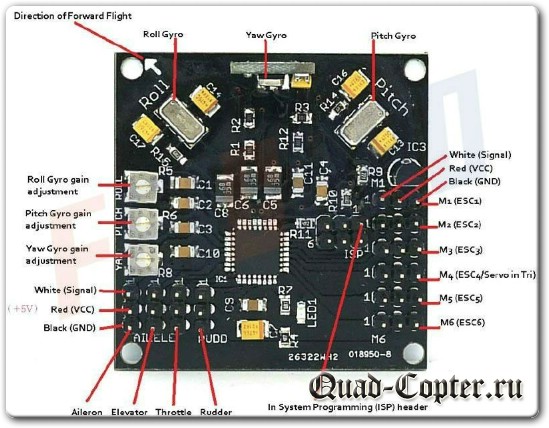
Как видите — деталей минимум, поэтому и цена не велика. Цвета платы могут быть разными, на DX продаются черные, на ХоббиКинг — зеленые, встречал и синие.
Для заливки прошивки потребуется программатор. Его можно иметь один и использовать с различными контроллерами, так что первый KK Multicopter лучше брать в наборе с программатором, так и дешевле выходит.
-
Купить контроллер квадрокоптера KK Multicopter с программатором можно тут.
Бонусом идет плата разводки питания, очень удобно — уменьшает количество проводов на квадрокоптере.
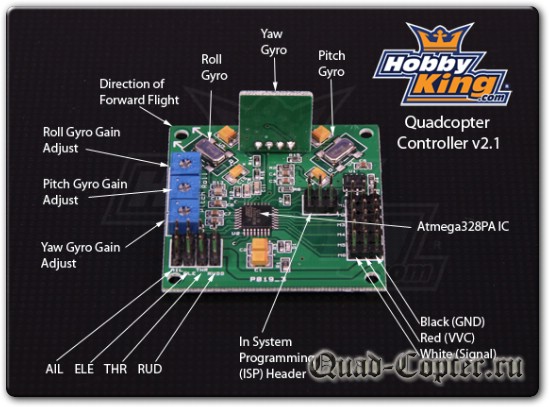
Вот контроллер HobbyKing Multi-Rotor Control Board V2.1 (Atmega168PA), не смотря на другое название прекрасно работает с прошивками KK Multicopter, сам проверял.
-
Купить HobbyKing Multi-Rotor Control Board V2.1 (Atmega168PA) можно тут.
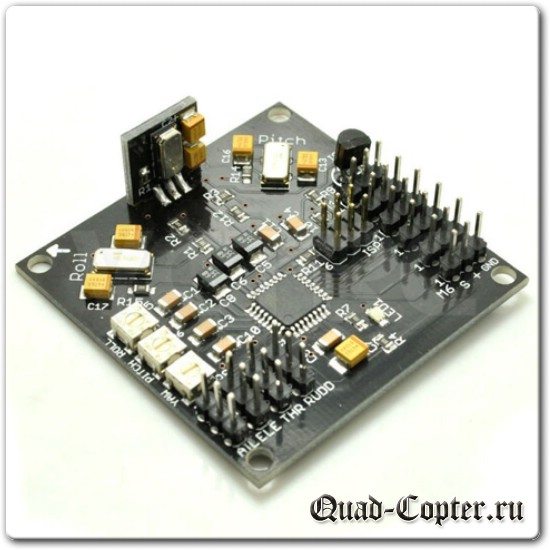
А вот отдельный контроллер KK Multicopter с сайта ДХ.
-
Купить контроллер квадрокоптера KK Multicopter можно тут.
Отличие этих плат — только в оформлении.
Для прошивки потребуется программа kkMulticopter flash tool, скачивайте последнюю версию.
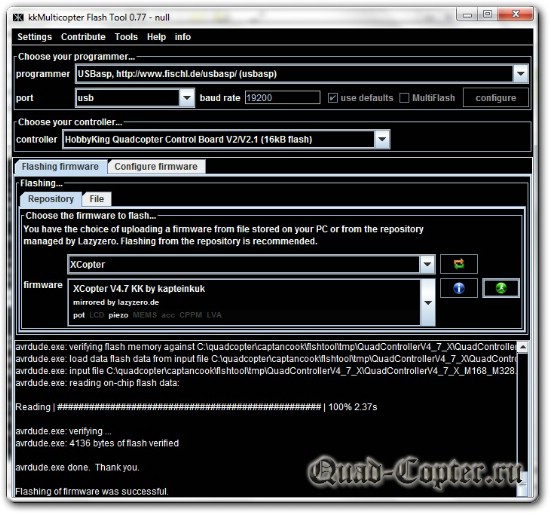
Что бы залить прошивки из этой статьи — выберете тип контроллера и нажмите File, загрузите файл и нажмите на кнопку прошивки. Пара минут и контроллер прошит!
Настройка передатчика для контроллера KK Multicopter
Для полетов вам потребуется настроить и пульт управления (передатчик), привожу основные настройки для разных моделей передатчиков.
Настройка каналов Aileron, Elevator, Throttle, Rudder передатчика:
JR / SPEKTRUM — все каналы в реверсе, канал газа — норма;
FUTABA — все каналы норма, канал газа в реверс;
HITEC — все каналы норма, канал руля высоты (Elevator) реверс;
TURNIGY — все каналы норма, канал газа и руля высоты(Elevator) реверс;
Данные взяты с интернета, поручусь только за Turnigy.
Центровка стиков передатчика:
— Установить все стики на передатчике в центральное положение.
— На плате повернуть барашек потенциометра Pitch в положение 0.
— Включить питание платы (подключить батарейку).
— На плате светодиод мигнет один раз, потом через несколько секунд три раза быстро (стики на передатчике НЕ ТРОГАТЬ).
— Выключить питание платы (отключить батарейку)
— Восстановить значение барашка потенциометра Pitch в 50%
Калибровка газа:
Рекомендую снять винты с двигателей — во избежание, некоторые регуляторы могут дать полный газ!
Установить стик газа на передатчике НА МАКСИМУМ!
— На плате повернуть барашек потенциометра Yaw в положение 0.
— Включить питание платы (подключить батарейку).
— На плате светодиод мигнет один раз, потом через несколько секунд три раза быстро.
— Движки должны «запеть свою мелодию» и регуляторы войдут в режим программирования, игнорируете этот сигнал регулей и переводите стик газа НА МИНИМУМ!
— Движки должны подать звуковой сигнал.
— Выключить питание платы (отключить батарейку)
— Восстановить значение барашка потенциометра Yaw в 50%
Сброс настроек:
— Установить все барашки потенциометров на 0.
— Включить питание платы (подключить батарейку).
— Подождать несколько секунд.
— Выключить питание платы (отключить батарейку)
— Установить все барашки потенциометров на 50%
Реверсирование каналов гироскопов:
— Установите все барашки потенциометров на ноль.
— Включите передатчик и квадрокоптер.
— Светодиод должен мигнуть 10 раз.
— Переместите ручку передатчика соответствующую гироскопу, который Вы хотите реверсировать.
Правая влево/вправо CH1 — Aileron – элероны Roll — крен
Правая вперёд/назад CH2 — Elevator — руль высоты Pitch — тангаж
Левая вперёд/назад CH3 — Throttle — газ —
Левая влево/вправо CH4 — Rudder — руль направления Yaw — рыскание
— Светодиод будет мигать непрерывно.
— Выключите квадрокоптер.
— Выполните эти действия последовательно для всех гироскопов, которые необходимо реверсировать, после чего верните все барашки потенциометров в изначальное положение.
Все! Квадрокоптер готов к полету!
Включайте передатчик, затем подключайте питание квадрокоптера.
Включение и отключение моторов
Для того, что бы моторы перешли в рабочий режим — переведите правый стик вниз-вправо. Загорится светодиод на контролере полета KK Multicopter.
Для отключения двигателей — переведите правый стик влево вниз. Совет дан для прошивок которые лежат ниже.
Для других прошивок существуют следующие комбинации — оба стика вниз вправо, оба стика вниз друг к другу. Отключение — в другую сторону соответственно.
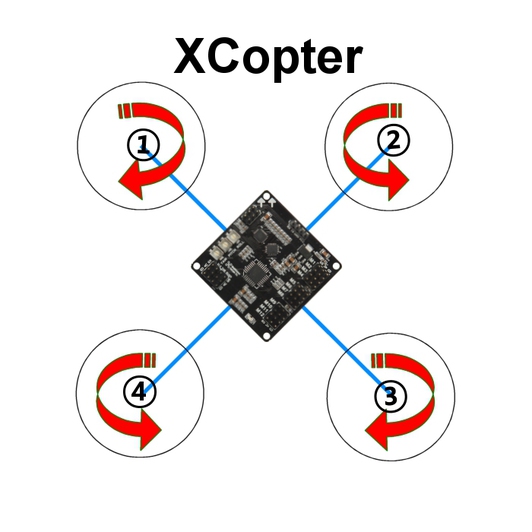
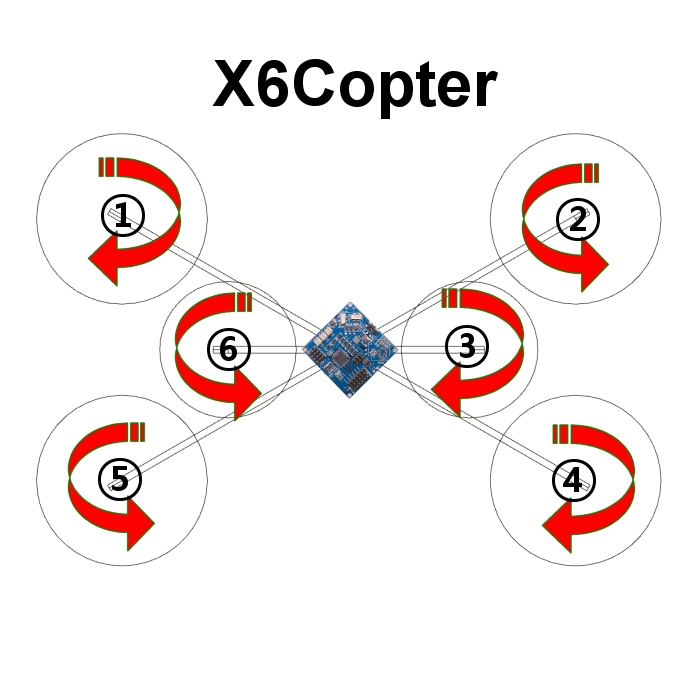
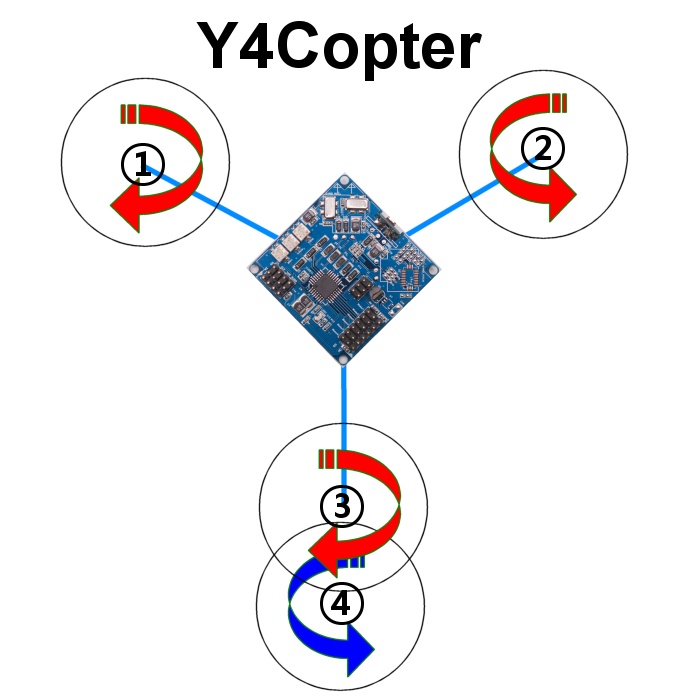
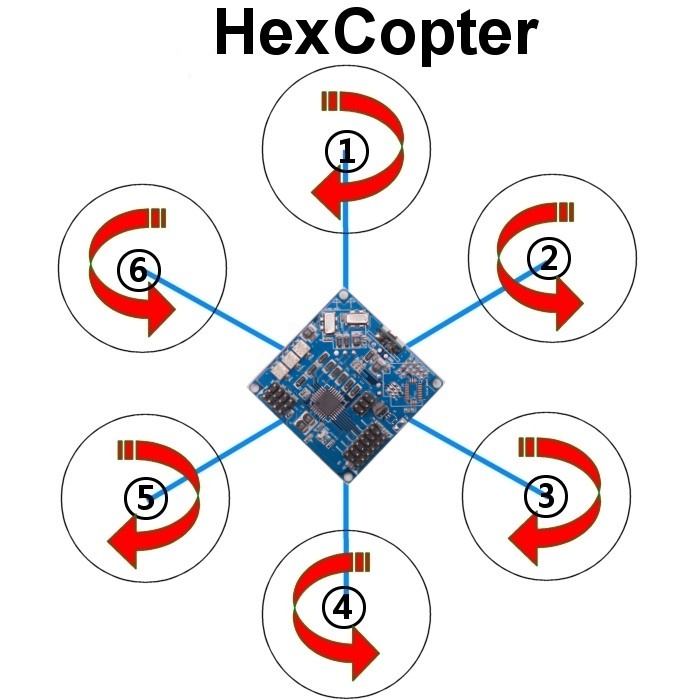
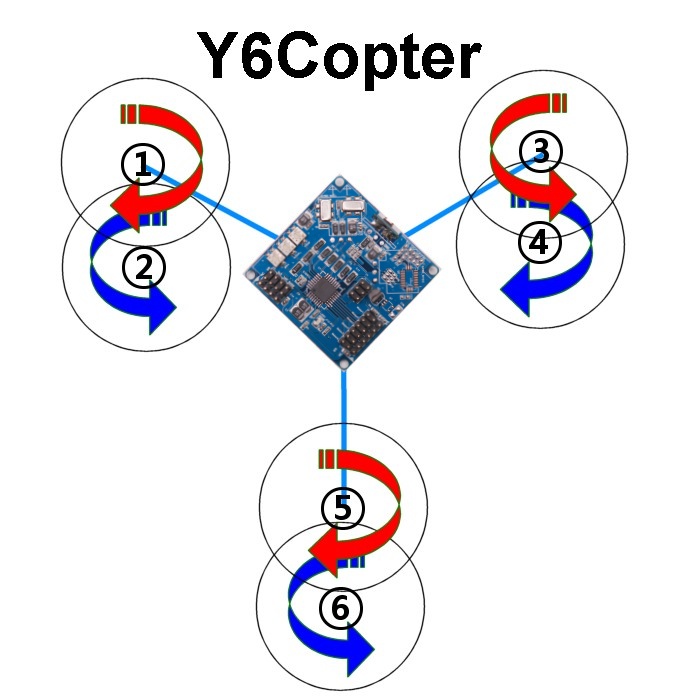
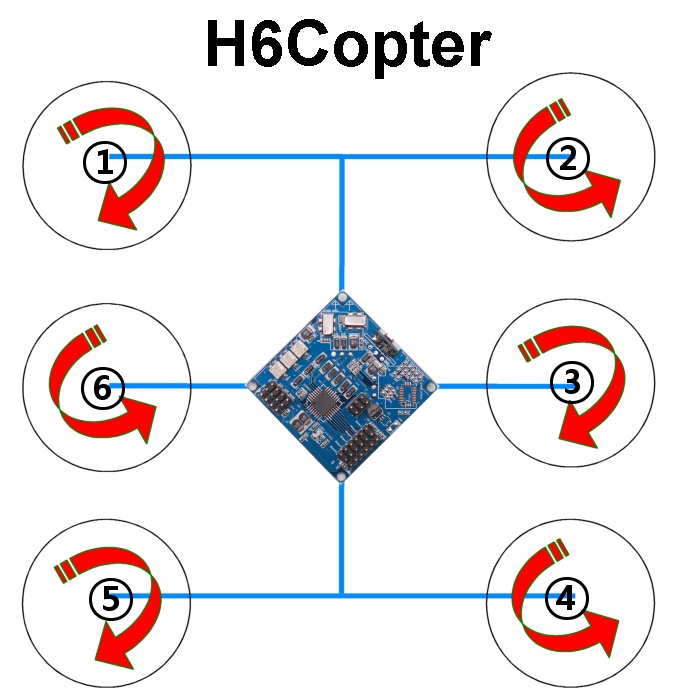
Прошивки для KK Multicopter и расположение моторов
XXcontrol_KR_X6Copter v2.9
XXcontrol_KR_AeroPlane v2.9
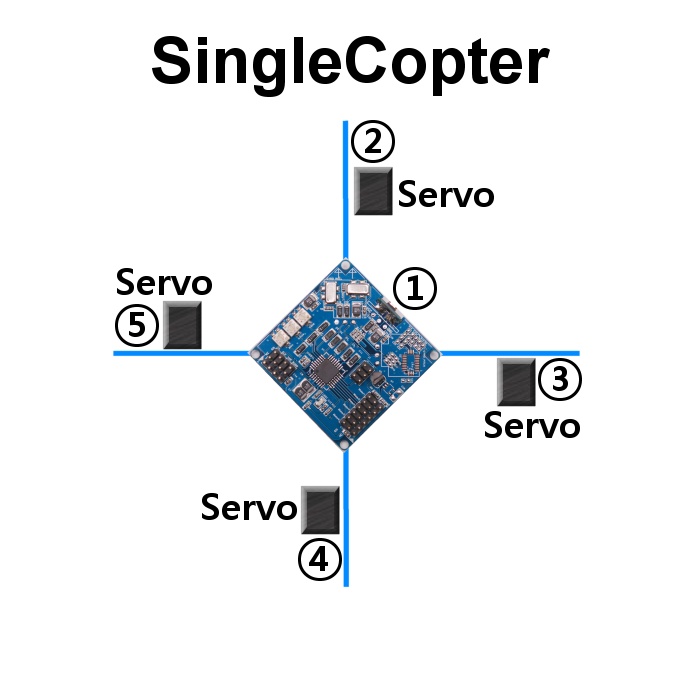
XXcontrol_KR_SingleCopter v2.9
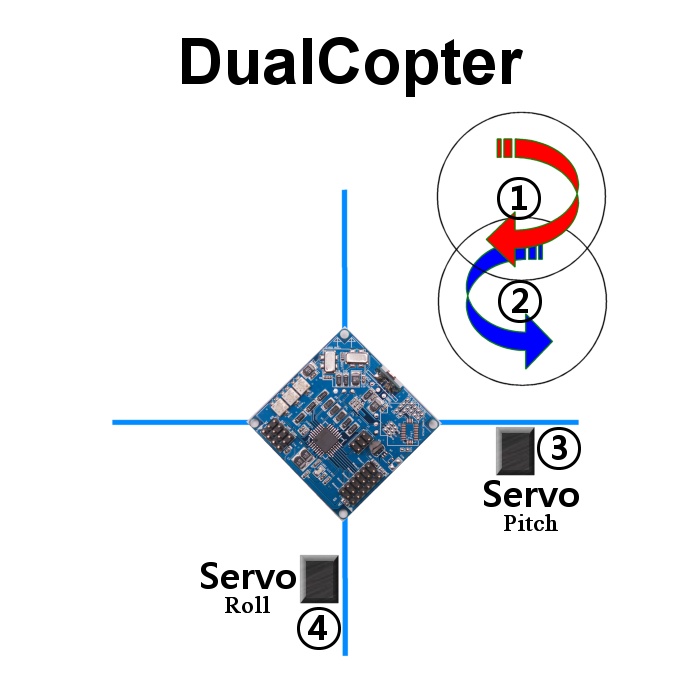
XXcontrol_KR_DualCopter v2.9
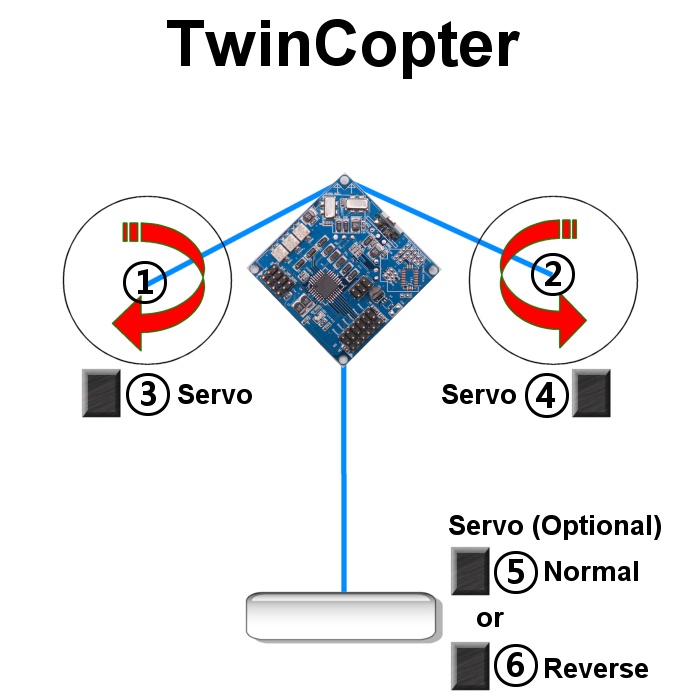
XXcontrol_KR_TwinCopter v2.9
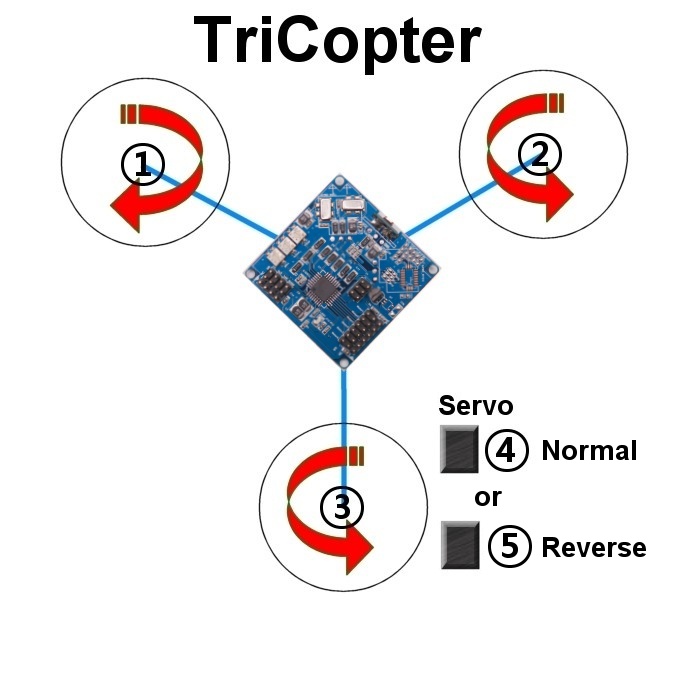
XXcontrol_KR_TriCopter v2.9
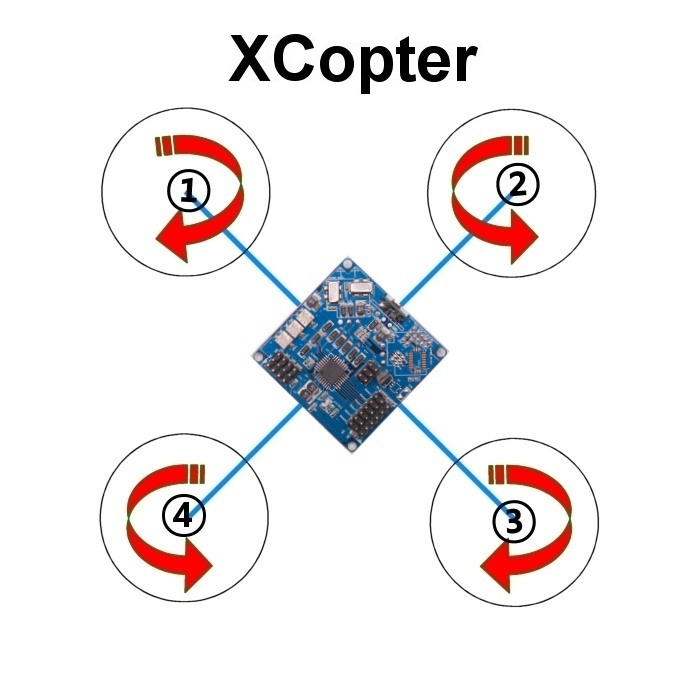
XXcontrol_KR_XCopter v2.9
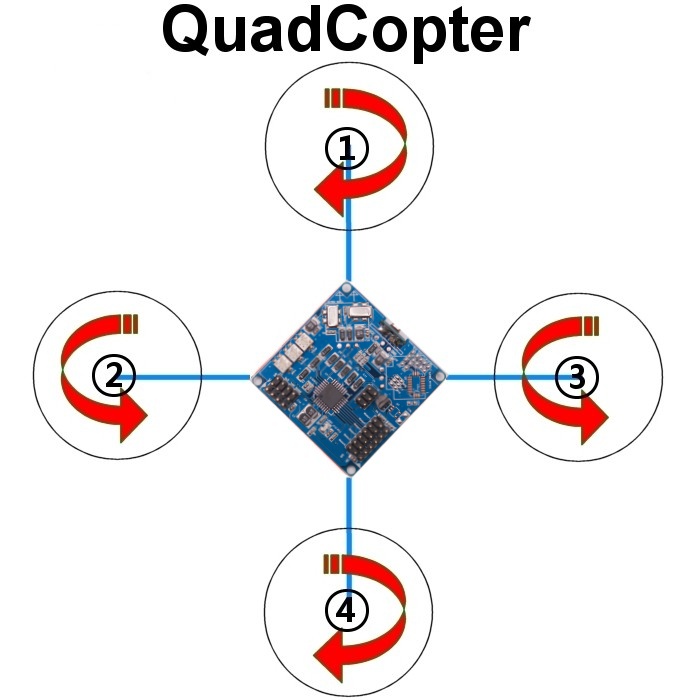
XXcontrol_KR_QuadCopter v2.9
XXcontrol_KR_Y4Copter v2.9
XXcontrol_KR_HexCopter v2.9
XXcontrol_KR_Y6Copter v2.9
XXcontrol_KR_H6Copter v2.9
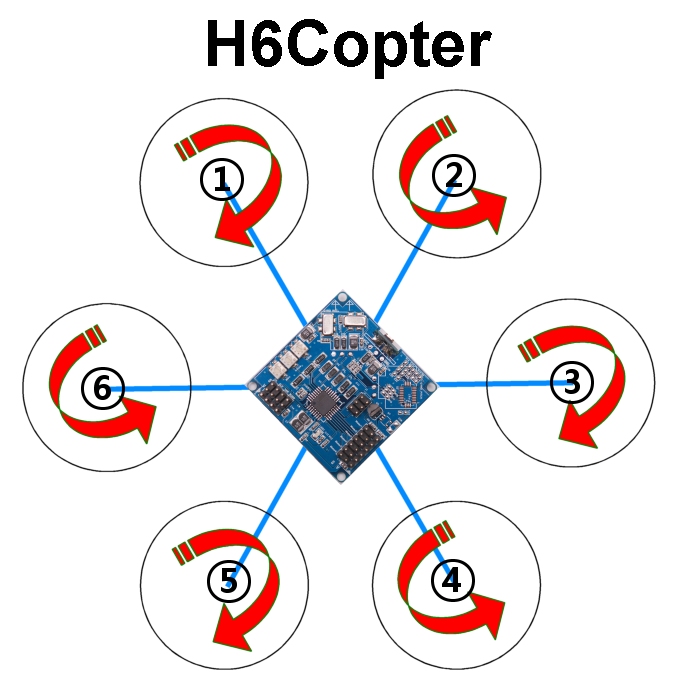
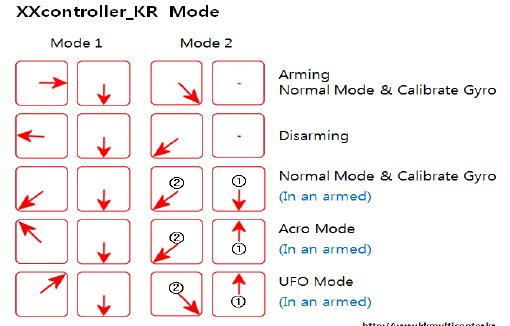
Дополнительные возможности калибровки гироскопов KK Multicopter и включения режимов через стики передатчика
Вот собственно и все о контроллере полетов KK Multicopter! Удачной постройки квадрокоптеров!
Похожие статьи:
Инструкции для квадрокоптеров → Инструкция для GlobalFly
Полетные контроллеры → Обзор CC3D OpenPilot
Полетные контроллеры → Обзор Tarot ZYX-M Flight Controller
Полетные контроллеры → KK Multicopter c экраном
Полетные контроллеры → Обзор JIYI P2 Flight Controller — убийца Naza-M V2
Обсудить на форуме
Страница 1 из 8
-

raefa
Главнокомандующий
Команда форумаПоследнее редактирование: 12 авг 2016
-
Задался вопросом перепрошивки регулятора скорости (ESC) для коптера.
На данный момент имею на руках 8 штук DYS HV40A OPTO n-FET
Этот товарищ DYS брат-близнец товарища RCTIMER HVSK-40A OPTO.
Железо абсолютно идентичное.
Вот мой DYS:
Собран на основе чипа ATMEL Atmega8A 1402.
И так. Шью через USBasp на скорости 19200 бод посредством KKFlashTool 0.8 BETA 6.
Конфиг: atmega 8-based brushless ESC + eneble Bootloader (8kB flash).
Вопросов два:
1. Смущает результат:Прошить прошивкой из файла. C:UsersMasterDocumentsPIXHAWKkkmulticopterflashtool_0.80beta6libavrdudewindowsavrdude.exe -C C:UsersMasterDocumentsPIXHAWKkkmulticopterflashtool_0.80beta6libavrdudewindowsavrdude.conf -p m8 -P usb -c usbasp -e -U lfuse:r:C:UsersMasterDocumentsPIXHAWKkkmulticopterflashtool_0.80beta6tmp/lfuse.hex:r -U hfuse:r:C:UsersMasterDocumentsPIXHAWKkkmulticopterflashtool_0.80beta6tmp/hfuse.hex:r avrdude.exe: warning: cannot set sck period. please check for usbasp firmware update. avrdude.exe: AVR device initialized and ready to accept instructions Reading | ################################################## | 100% 0.00s avrdude.exe: Device signature = 0x1e9307 avrdude.exe: erasing chip avrdude.exe: warning: cannot set sck period. please check for usbasp firmware update. avrdude.exe: reading lfuse memory: Reading | ################################################## | 100% 0.00s avrdude.exe: writing output file "C:UsersMasterDocumentsPIXHAWKkkmulticopterflashtool_0.80beta6tmp/lfuse.hex" avrdude.exe: reading hfuse memory: Reading | ################################################## | 100% 0.00s avrdude.exe: writing output file "C:UsersMasterDocumentsPIXHAWKkkmulticopterflashtool_0.80beta6tmp/hfuse.hex" avrdude.exe done. Thank you. C:UsersMasterDocumentsPIXHAWKkkmulticopterflashtool_0.80beta6libavrdudewindowsavrdude.exe -C C:UsersMasterDocumentsPIXHAWKkkmulticopterflashtool_0.80beta6libavrdudewindowsavrdude.conf -p m8 -P usb -c usbasp -e -U lfuse:w:47:m -U hfuse:w:202:m avrdude.exe: warning: cannot set sck period. please check for usbasp firmware update. avrdude.exe: AVR device initialized and ready to accept instructions Reading | ################################################## | 100% 0.00s avrdude.exe: Device signature = 0x1e9307 avrdude.exe: erasing chip avrdude.exe: warning: cannot set sck period. please check for usbasp firmware update. avrdude.exe: reading input file "47" avrdude.exe: writing lfuse (1 bytes): Writing | ################################################## | 100% 0.00s avrdude.exe: 1 bytes of lfuse written avrdude.exe: verifying lfuse memory against 47: avrdude.exe: load data lfuse data from input file 47: avrdude.exe: input file 47 contains 1 bytes avrdude.exe: reading on-chip lfuse data: Reading | ################################################## | 100% 0.00s avrdude.exe: verifying ... avrdude.exe: 1 bytes of lfuse verified avrdude.exe: reading input file "202" avrdude.exe: writing hfuse (1 bytes): Writing | ################################################## | 100% 0.00s avrdude.exe: 1 bytes of hfuse written avrdude.exe: verifying hfuse memory against 202: avrdude.exe: load data hfuse data from input file 202: avrdude.exe: input file 202 contains 1 bytes avrdude.exe: reading on-chip hfuse data: Reading | ################################################## | 100% 0.00s avrdude.exe: verifying ... avrdude.exe: 1 bytes of hfuse verified avrdude.exe done. Thank you. Прошить данными из файла.: C:UsersMasterDocumentsPIXHAWKRCTIMER_40A_MULTI_REV14_3.HEX C:UsersMasterDocumentsPIXHAWKkkmulticopterflashtool_0.80beta6libavrdudewindowsavrdude.exe -C C:UsersMasterDocumentsPIXHAWKkkmulticopterflashtool_0.80beta6libavrdudewindowsavrdude.conf -p m8 -P usb -c usbasp -e -U flash:w:C:UsersMasterDocumentsPIXHAWKRCTIMER_40A_MULTI_REV14_3.HEX:i avrdude.exe: warning: cannot set sck period. please check for usbasp firmware update. avrdude.exe: AVR device initialized and ready to accept instructions Reading | ################################################## | 100% 0.00s avrdude.exe: Device signature = 0x1e9307 avrdude.exe: erasing chip avrdude.exe: warning: cannot set sck period. please check for usbasp firmware update. avrdude.exe: reading input file "C:UsersMasterDocumentsPIXHAWKRCTIMER_40A_MULTI_REV14_3.HEX" avrdude.exe: WARNING: no end of file record found for Intel Hex file "C:UsersMasterDocumentsPIXHAWKRCTIMER_40A_MULTI_REV14_3.HEX" avrdude.exe: writing flash (0 bytes): Writing | ################################################## | 100% 0.00s avrdude.exe: 0 bytes of flash written avrdude.exe: verifying flash memory against C:UsersMasterDocumentsPIXHAWKRCTIMER_40A_MULTI_REV14_3.HEX: avrdude.exe: load data flash data from input file C:UsersMasterDocumentsPIXHAWKRCTIMER_40A_MULTI_REV14_3.HEX: avrdude.exe: WARNING: no end of file record found for Intel Hex file "C:UsersMasterDocumentsPIXHAWKRCTIMER_40A_MULTI_REV14_3.HEX" avrdude.exe: input file C:UsersMasterDocumentsPIXHAWKRCTIMER_40A_MULTI_REV14_3.HEX contains 0 bytes avrdude.exe: reading on-chip flash data: Reading | ################################################## | 100% 0.00s avrdude.exe: verifying ... avrdude.exe: 0 bytes of flash verified avrdude.exe done. Thank you. Flashing of firmware was successfull.
Вроде как:
avrdude.exe done. Thank you.

Flashing of firmware was successfull.
, но несмотря на это:
avrdude.exe: warning: cannot set sck period. please check for usbasp firmware update.
И так неоднократно. Чем шить USBasp?
2. После перепрошивки ESC встал в позу и обиделся на меня. Как слить стоковую прошивку с родного и непрошитого, что бы залить в этот «экспериментальный»?
Спасибо! Участие в обсуждении однозначно приветствуется! -
raefa
Главнокомандующий
Команда форумаЭто нормально. Чтобы не было этого сообщения, необходимо обновить прошивку в программаторе. Посмотрел ваши логи прошивки — все залилось нормально.
А вот тут возможно залили что-то не то.
Как слить с живого. Не плохо изучить команды avrdude и изменить ключи в командах. Извиняюсь, сейчас возможности посмотреть нет.
-
Саша, спасибо за ответ. Уже начитался, что на баг не стоит обращать внимания. Обновлять прошивку некуда, разработчики забросили проект ещё в 2011 году.
По поводу того, что лью:
RCTIMER_40A_MULTI_REV14_3.HEX
от BLHeli для ATMEGAДаже мотор не пищит.
-
5yoda5
Master
Команда форума- Регистрация:
- 29 янв 2015
- Сообщения:
- 7.137
- Город:
- Реж
- Имя:
- Тимур
-
5yoda5
Master
Команда форума- Регистрация:
- 29 янв 2015
- Сообщения:
- 7.137
- Город:
- Реж
- Имя:
- Тимур
Вопрос. Пытались связаться с регулем в ГУИ?
-
Тимур, большое спасибо за информацию!
У меня штук 10 разных программаторов, в т.ч. AVR ISP mkII, пытаюсь с ним воевать через Atmel Studio 6.
Пока стабильно шьётся только через USBasp.
У меня есть BLH GUI 14.3, но я пока с ним не разобрался. Там слишком много всего, в т.ч. и всякой ненужной лажи, которая только запутывает.
Эту статью ещё давно всю перечитал. Там бутлоадер всё-равно шьётся только ч/з программатор, а сама прошивка уже потом может быть залита.Пока нет. Передо мной стоит две задачи. Одна-это залить рабочую прошивку, а вторая-считать и сохранить в хекс стоковую. Вроде так делается:avrdude -p m8 -c usbasp -P usb -v -U flash:r:/home/nixuser/stock_flash_dump.hex:i
— Сообщения объединены, 18 дек 2015 —
Прошивка RCTIMER_40A_MULTI_REV14_3.HEX и есть та самая от BLHeli для Atmel.
-
5yoda5
Master
Команда форума- Регистрация:
- 29 янв 2015
- Сообщения:
- 7.137
- Город:
- Реж
- Имя:
- Тимур
-
Xichnik55
Старший научный сотрудник- Регистрация:
- 10 сен 2015
- Сообщения:
- 665
- Город:
- Омск
- Имя:
- Иван
— Сообщения объединены, 19 дек 2015 —
Вот здесь почитайте
-
Xichnik55
Старший научный сотрудник- Регистрация:
- 10 сен 2015
- Сообщения:
- 665
- Город:
- Омск
- Имя:
- Иван
Оригинальную прошивку сохранить не удастся,вроде как стоит защита от копирования.Вот еще прога для прошивки Xtreme Burner AVR.
-
Тимур, Александр, а с AVR ISP mkII или с Atmel Studio 6 есть опыт работы?
Дудка отказывается работать на x64 архитектуре.
Как же слить прошивку и чем? Возможно есть иное ПО? -
raefa
Главнокомандующий
Команда форумаПросто программатор. Если с драйверами на x64 все в порядке, то искать только программу.
Опыта нет, но что-то подсказывает, что это среда разработки и она поможет hex только залить, а не слить.
Вот эта штука может вполне адекватно все сделать.
Хм, на 2х компах с x64 проблем замечено не было.
Если смотреть на другие программы, то они либо используют дудку (а сами являются графической оболочкой), либо в редком исключении имеют свой модуль для работы с контроллерами. eXtreme Burner — AVR вроде какраз второй вариант.Последнее редактирование: 19 дек 2015
-
Xichnik55
Старший научный сотрудник- Регистрация:
- 10 сен 2015
- Сообщения:
- 665
- Город:
- Омск
- Имя:
- Иван
Еще есть програмка avrdudeprog 3.3 в ней можно прошивать разными программаторами.В менюшке выбрать можно из списка.
-
Сорри господа, Дудка работает, это я об KV OSD высказался, которая тут никоим боком. KV OSD GUI не работает.
Дудка у меня давно есть.
Александр, спасибо за развёрнутый ответ.
Вот я лью прошивку, а грешу на бутлоадер. При подключении ESC одиночный писк мотора с промежутком в 6 секунд.
Я Экстримом полностью очистил чип и снова заливаю прошивку. Мне так кажется, что нужно что-то большее, типа бутлоадера. -
raefa
Главнокомандующий
Команда форумаДавайте подумаем, что такое бутлоадер. Это программа, сидящая в определенной области памяти, предназначеная для создания дополнительных функций, такие как:
упрощение заливки прошивки через какой-либо интерфейс (не только через ISP), отработка каких-то условий при загрузке контроллера и т.д. и, самое главное, в конечном итоге — запуск основной программы.Вспомнено из даташита:
При подаче питания на МК, обращение происходит к специальной области, куда может быть залит бутлоадер. Если он там есть, то отрабатывает он (ждет каких-то условий) и далее он должен запустить уже основную рабочую программу. Если бутлоадера нет и МК его не обнаруживает, но происходит сразу загрузка основной программы. Как-то так. Т.е. по сути он и не нужен.Теория (может и не прав):
Если не предусмотрено защит прошивки с применением бутлоадера, то и без него все стартует, либо прошивка может отказаться работать без специального для нее бутаPS: Почитайте даташиты, чтобы уже самому представлять как оно работает, поищите соседние файлы к прошивкам (а может оно и действительно что надо еще сделать).
-
Ок. Спасибо Александр. Практически так и представляю.
Что же делать с ESC? Как его вернуть в чувства?
Пробовал:
dys_nfet.hex
dys_nfet_Old_Tested_Apr2015.hex
RCTIMER_40A_MULTI_REV14_3.HEX
RCTIMER_40A_MULTI_REV14_3.EEP
Даже дамп заливал……….Всё «якобы» успешно…………… -
raefa
Главнокомандующий
Команда форумаИнструкцию по «родной программе» надеюсь читали?
https://github.com/bitdump/BLHeli/blob/master/Atmel/BLHeli programming adapters.pdf
Написано, что бут должен быть. А где взять, не знаю. Видимо в папке с программой искать.
-
Спасибо Саша, полезная информация и «от производителя». Так чем же всё-таки прошить ESC, что бы он заработал?(независимо на какой прошивке)
-
raefa
Главнокомандующий
Команда форумаЕсть еще догадка, что фьюзы могут отличаться. Под каждую прошивку возможно, что надо устанавливать «свои», отличные от заводских.


Страница 1 из 8