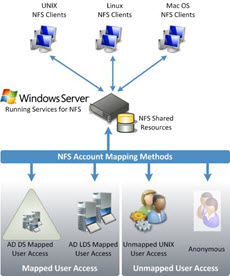
When connecting to NFS shared folder the windows credentials needs to be mapped to a equivalent unix account+ group.
In Windows Server 2008 R2 the support for User Mapping is dropped and the same functionality can only be achived using Identity Management for Unix Components (extension schema for Active Directory).
Below describes on how you can connect to a NFS folder without using User Mapping Server.
A. Install NFS Client
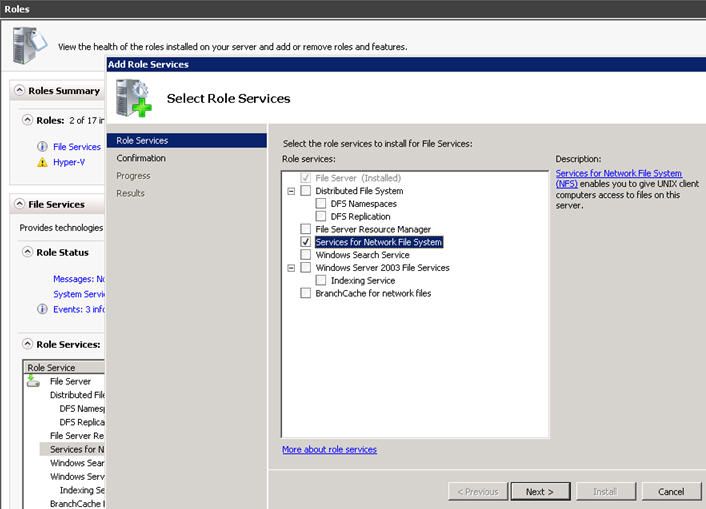
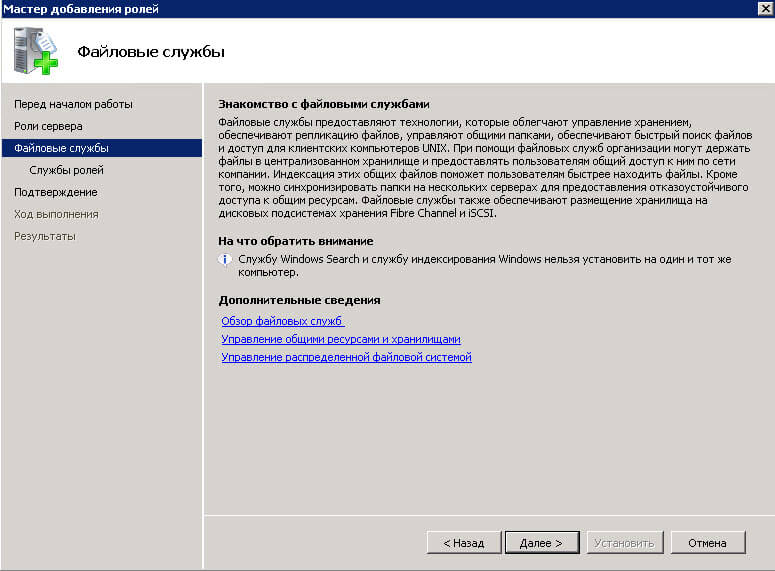
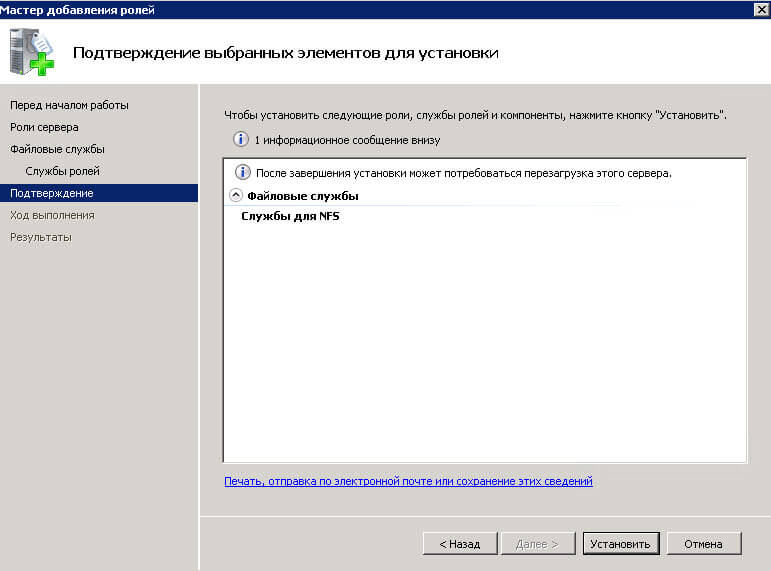
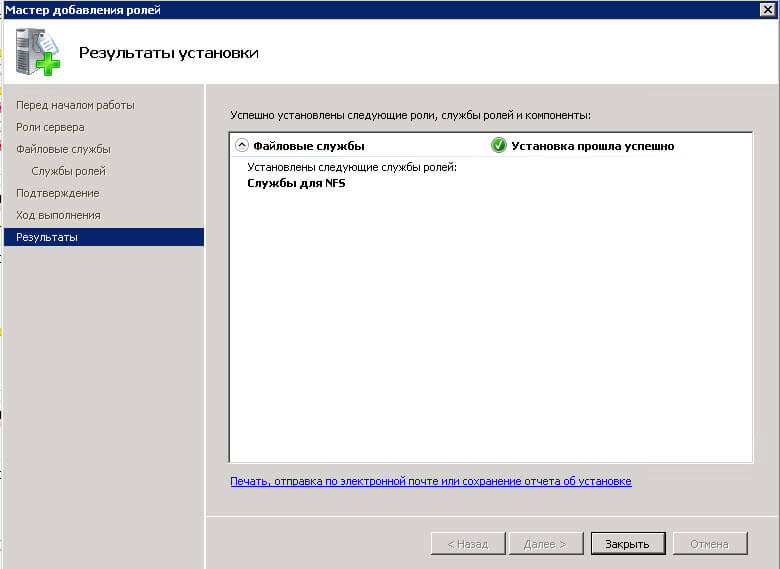
Step 1. Enable File Services Role. Go to Server Management – > Add Roles -> File Services
Step 2. Install Services for Network File System. Go to File Services – > Add Role Services

B. Update NFS Client Registry
In this step, we are going to map the anonymous user credential to the unix account credential that you’ll be using to connect to NFS share. First you need to get the User Id and Group Id of the unix account from the unix administrator. It should be of decimal value like: UserId= 6500000 GroupId=4200. Once you have it, we can proceed.
1. Open Regedit.
2. Go to HKEY_LOCAL_MACHINESOFTWAREMicrosoftClientForNFSCurrentVersionDefault.
3. Create 2 DWORD value, one for AnonymousUid with decimal value=<User Id> and another for AnonymousGid with decimal value=<GroupId>.
It should look like this:

4. Restart the NFS Client. Go to Administrative Tools -> Services for Network File System (NFS) ->

C. Test NFS Connection
1. Open command prompt.
2. Type: mount -u:<UserName and not UserId> -p:<Password> <SharedNFSFolder> <drive letter to mount, Ex: J:>
3. dir <drive letter:>
Copy file to this NFS folder. This is only way to confirm that the registry hacking is successfully. Because by default if the anonymous access is turned on in NFS side, you can see the files without having to supply user/password.
Note: Limitation is that, you can only connect to a single NFS share because it would use the same UserId and Group Id everytime you connect.
- Remove From My Forums
-
Question
-
You know, I can install NFS server for windows 2008 from servermanager GUI through add roles.
But where can I find and install «client for NFS»?
In windows 2003, it can be found: windows componets wizard -> other network file and print services -> client for NFS.
Thank you in advance.
Answers
-
Hi brant_chen,
Thanks for the concentration and feedback on this TechNet online document.
Services for NFS Step-by-Step Guide for Windows Server 2008
http://technet.microsoft.com/en-us/library/cc753302.aspx
I am sorry for the inconvenience and I will also forward the content change request to the corresponding document team. If there is any update, we will update it as soon as possible.
According the research, the «Service for Network File System» is a sub role service of «File Services» role on Windows Server 2008. We can refer to the following steps to install «Service for Network File System» on Windows Server 2008 via Server Manager.
Steps:
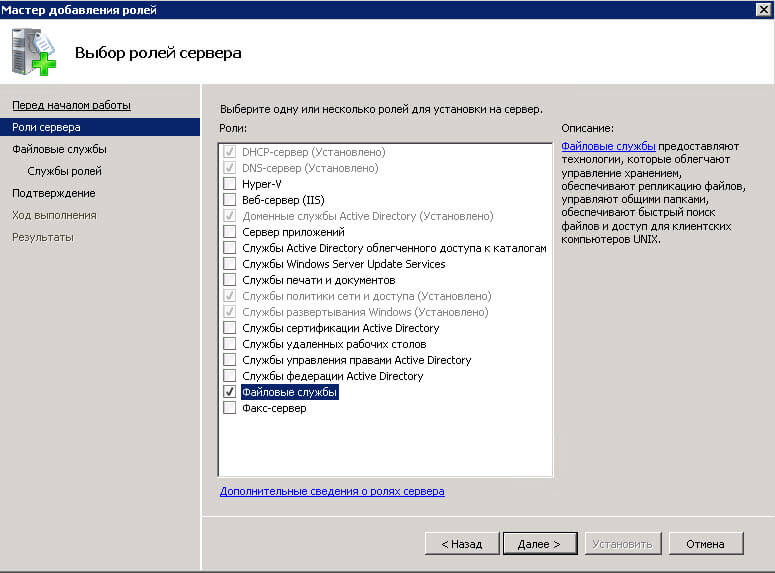
1. Launch the «Server Manager»
2. Click Role, Click «Add Roles» in the right panel
3. Click Next, Select the checkbox of «File Services», Click Next.
4. When the «Select Role Services» appears, select the checkbox of «Service for Network File System»
5. Click Next, Click install.
Hope it helps.
David Shen — MSFT
-
Proposed as answer by
Thursday, November 6, 2008 5:43 PM
-
Marked as answer by
David Shen
Monday, November 10, 2008 3:03 AM
-
Proposed as answer by
-
Hi brant_chen,
Thanks for the reply.According to the further research, if you have successfully installed the «Service for Network File System» service role based on the steps that I mentioned in the previous post, both of the «Client for NFS» and «Server for NFS» should be appear in the «Service for Network File System» management console. And the services «Client for NFS» and «Server for NFS» also should be started in Services.msc. They are the components of the «Service for Network File System».
Could you please remove the file role via Server Manager firstly, and then refer to the previous steps to re-install the «Service for Network File System» service role? Afterwards, please reboot the server to make it take into effect. Then you may check if the «Client for NFS» node appears in «Service for Network File System» console.
Hope it helps.
David Shen — MSFT
-
Marked as answer by
David Shen
Monday, November 10, 2008 3:03 AM
-
Marked as answer by
First published on MSDN on Feb 03, 2011
Installation & Configuration of Windows NFS Client to enable UNIX to Windows to Mount a U…
When migrating a SAP system from UNIX/Oracle or UNIX/DB2 to Windows/SQL it is sometimes useful to be able to mount a UNIX file system on a Windows server. The
Network File System protocol
(NFS) is used by most UNIX and Linux operating systems such as Solaris, HPUX, AIX etc. The Windows equivalent of NFS is
Server Message Block
known as SMB or CIFS
SAP fully support “heterogeneous” SAP application servers, that is a UNIX/Oracle or DB2 database server and Windows/Intel application servers. The Windows platform offers integrated clustering/HA (documented, supported and free of charge from SAP) and single sign on. Windows applications servers are fully supported on both Hyper-V and VMWare.
How to Setup Windows to UNIX File System Interoperability
There are several technologies to enable connectivity between Windows servers and UNIX operating systems:
1. Samba is a freeware software available from
www.samba.org
that exposes UNIX server file systems as Windows (actually SMB Compatible) shares. Samba also allows some integration into Microsoft Windows Domains & Active Directory. Samba is configured and managed on the UNIX server and requires installation/configuration by the UNIX administrator
2. Windows 2003 has an add on component called
Windows Services for UNIX
has a component called Client for NFS. Services for UNIX setup is used to
add/remove Client for NFS
.
3. Windows 2008 and Windows 2008 R2 the Services for Network File System have been made part of the File Server Role. The Server Manager tool is used to
add/remove the Services for Network File System
as of Windows 2008 or later. Windows 2008 and higher also has additional interoperability features for UNIX environments called
Subsystem for UNIX-based Applications
however installation of this component is not required to enable simple NFS connectivity
In all cases it is
highly recommended to use the Windows 2008 R2
product if possible. Check the
SAP Product Availability Matrix
or post a question in this blog to verify if your SAP version is supported on Windows 2008 R2. In general all SAP Kernel 7.0 or higher systems are supported on
Windows 2008 R2 since November 2010
.
Installation Tasks:
1. Follow the
step-by-step procedure to add NFS support for Windows 2008 R2
and basic configuration
To install Services for NFS components
1. Click
Start
, point to
Administrative Tools
, and then click
Server Manager
.
2. In the left pane, click
Roles
.
3. Under
Roles Summary
in the right pane, click
Add Roles
. The Add Roles Wizard appears. Click
Next
.
4. Select the
File Services
check box to install this role on the server, and then click
Next
.
5. Select the
Services for Network File System
check box, and then click
Next
.
6. Confirm your selection, and then click
Install
.
7. When the installation completes, the installation results appear. Click
Close
.
2. Logon to the UNIX host and type
id –u <sid>adm
id –g <sid>adm
or while logged on as <sid>adm type id
3. The next step involves “mapping” the Windows user id to the UID and GID of the <sid>adm account on the UNIX server
There are three ways of doing this, however in most cases we recommend option #1
Username mapping:
#1 Configure the
UID/GID using the registry entries
explained in this blog – (Recommended technique)
#2 Configure
Active Directory Lookup
or
ADLDS
(for Win2008 or higher) — optional
#3
User Name Mapping
if required (for
Win2003 see this post
) — optional
4. Ensure the Windows host is defined in the /etc/hosts file on the UNIX server. Add the UNIX server to the WindowsDriversetchosts file on the Windows server
5. Ensure NFS configuration (/etc/dfs/dfstab or similar) on the UNIX server is correct – the Windows hostname must be allowed to mount the file system usually
6.
Mount the SAP profile directory
using Windows Explorer or command line with the
syntax
unixserver:/export (recommended) or use the traditional Windows
\servernameshare
7. Test creating and deleting a file
8. Install a SAP instance using SAPInst or use SAPInst to export the UNIX/Oracle system to Win/SQL
Note: SAP requires that the NFS connection has a drive letter. It is therefore always necessary to logon the Windows host and ensure the NFS drives are connected prior to starting the SAP application server. NFS is not a particularly robust protocol therefore it is not to be used as a Export or Import location. It is not permitted to export an SAP system to dump files on an NFS source. In addition it is not recommended to store dump files on a NFS source and import on a Windows server. Always read/write to dump files on a local disk
Several Great Uses of Windows to UNIX File System Interoperability
During OS/DB Migrations from proprietary UNIX systems to Intel/AMD commodity solutions the R3LOAD export/dump files need to be transferred to Windows.
SAP Migration Monitor supports FTP to transfer dump files to a Windows environment. However this requires the installation of FTP on the Windows server.
There are three good reasons for establishing Windows to UNIX interoperability:
1. The ability to use powerful Intel/AMD servers for the Migration. This will greatly speed up the export/import process
2. The ability to use SAPInst GUI to complete the full OS/DB Migration process without the need to use command line tools.
A full manual procedure for exporting and importing a SAP system
has been documented in this blog, however the latest versions of SAPInst for SAP Kernel 7.0 systems and higher can be exported/imported provided that the UNIX file system containing the SAP profiles is exposed. SAPInst will check the profile directory before starting the export. Provided a Wintel server can access the profile directory, SAPInst will allow a GUI based export of a UNIX system.
3. Increasing numbers of customers are using modern Intel and AMD servers as SAP application servers connecting to UNIX database servers. Modern Intel and AMD based servers are vastly cheaper than proprietary UNIX servers and deliver comparable or better performance. SAP OLTP type applications such as ECC 6.0 usually require 60% to 80% of the system CPU resources on the Application Tier with the remainder on the Database Tier. Therefore 60% to 80% of the SAPS (Unit of SAP workload sizing) can run on low cost Intel or AMD commodity servers.
As of February 2010 a typical fully configured SAP application server deployed in our customer base costs less than $15,000 inclusive of 96-128GB RAM service & support.
A typical medium size SAP system may have about 100,000 SAPS in total with 30,000 SAPS for Database Layer and about 70,000 SAPS for the SAP Application Layer (a typical 30% Database / 70% Application Tier split). In this hypothetical case where the application workload requirement is equal to 70,000 SAPS, this requirement can be met with only 3 Intel or AMD servers at a cost of approximately $45,000 in total. The energy consumption is much lower than UNIX systems and the rack space required is only 2U each or less if blades are used.
Many customers compare the workload capabilities of modern Intel and AMD based servers and the total all up cost including Operating System License, Energy/Aircon/rackspace, 3 year maintenance and administration + OS patching costs (practically zero for a Windows 2008 R2 server with
Internet Explorer removed
and all other
Windows features secured/disabled
) find that Intel/AMD based systems cost is 1/8
th
to 1/10
th
that of proprietary UNIX platforms.
Additional information about
Intel/AMD systems increase in market share
vs. UNIX system and
Intel displacement of high cost proprietary UNIX systems confirms a general trend to commodity …
.
4. Windows NFS Services also allows a customer to preserve a single SAP Transport directory and domain during a migration from UNIX/Oracle to Win/SQL. During a period of 2-6 weeks the Dev and QAS systems are running on Win/SQL and the Production system is running on UNIX/Oracle. It is still supported to transport configuration settings, SAP Security and ABAP programs from a Win/SQL Development system to a Production system running on UNIX/Oracle (because SAP is largely OS/DB independent).
Useful Links
Below are some useful links. If you have any questions feel free to post them in this blog.
http://brneurosci.org/linuxsetup108.html
— a very good overview of setup and configuration process for Win2003
http://www.softpanorama.org/Net/Application_layer/nfs.shtml
— a generic overview of UNIX side configuration
http://technet.microsoft.com/en-us/library/cc785878(WS.10).aspx
– troubleshooting NFS Client (Win2008 R2)
http://technet.microsoft.com/en-us/library/cc737549(WS.10).aspx
– general overview of NFS Client (Win2008 R2)
More information on SAP Benchmarks can be found on the
official SAP Benchmark website
. The above statements about SAPS as unit of SAP sizing and cost of various hardware platforms are derived out from real SAP customer deployment or migration. The term “SAPS” is used as a measure of equivalent workload.
SAP Note 80266 — Installing NT Applicn. Servers in UNIX Environment
SAP Note 97993 — Central NT/UNIX transport directory
Note 680617 — INST: Appl.Server in Heterogeneous SAP System Environment
Note 1067221 — Composite note for heterogeneous installation
Note 1148109 — Heterogeneous Inst.(Appl. Server Windows, DB Unix)
Thanks to:
Ashish Sahu — owner of
http://blogs.msdn.com/b/sfu/
Warwick Chai — owner of
http://www.bnw.com.au
-
wikussmit
- New here
- Posts: 6
- Joined: Tue Nov 09, 2010 5:04 pm
How do I mount a NFS folder to Windows Server 2008 R2
Hi,
Does anyone know how to mount a NFS share from a NAS (TS-809U-RP Turbo NAS) box on Microsoft 2008 R2 Server?
I need the drive to be seen as a local drive and not as a network mounted drive. The reason for this is that our backup software can only access local storage.
-
tmt
- Experience counts
- Posts: 1006
- Joined: Mon Nov 16, 2009 11:02 am
Re: How do I mount a NFS folder to Windows Server 2008 R2
Post
by tmt » Wed Nov 10, 2010 12:31 am
Do you have the Windows Client for NFS component installed? (Control panel -> Programs and Features -> Turn Windows features on and off -> Services for NFS -> Client for NFS). If so, there’s a help file in it and you should be able to mount the NAS as you would any other NFS server. Whether your backup app runs properly on the share depends on the app, however, and not Windows or the NAS.
SS-439, Ubuntu Server 12.04.3 LTS, EXT4, RAID10, 4xHitachi 5K1000
TS-112, 4.1.x Beta, EXT4, 1xHitachi 7K1000
-
wikussmit
- New here
- Posts: 6
- Joined: Tue Nov 09, 2010 5:04 pm
Re: How do I mount a NFS folder to Windows Server 2008 R2
Post
by wikussmit » Wed Nov 10, 2010 6:47 pm
I have done as you suggested and enabled the client for NFS on the 2008 Server. I have tried many different commands (below) from the command line but keep on getting a ‘Network Error 53’ error
mount -o mtype=hard anon fileaccess=7 \192.168.0.100NFS f:
mount \192.168.0.100:/NFS f:
mount \192.168.0.100NFS f:
Any idea why?
-
tmt
- Experience counts
- Posts: 1006
- Joined: Mon Nov 16, 2009 11:02 am
Re: How do I mount a NFS folder to Windows Server 2008 R2
Post
by tmt » Wed Nov 10, 2010 9:12 pm
Have you verified that you can mount the NFS share from other clients, and enabled the share for NFS access in the QNAP gui with guest access rights (since you’re using «anon»)? Also, what QNAP firmware rev are you using btw?
Running Win7 and NFS-mounting my SS-439 running 3.3.5 works just fine with your first and last commandlines (using the dotted quad IP and share). The second one does fail with error 53, see below.
Code: Select all
Microsoft Windows [Version 6.1.7600]
Copyright (c) 2009 Microsoft Corporation.  All rights reserved.

C:Userstmt>mount -o mtype=hard anon fileaccess=7 \192.168.0.100Public F:
F: is now successfully connected to \192.168.0.100Public

The command completed successfully.

C:Userstmt>dir f:
 Volume in drive F has no label.
 Volume Serial Number is 91D9-ED67

 Directory of F:

02/28/2010  11:30 PM    <DIR>          ...
(file listing follows)
              11 File(s)  2,215,804,300 bytes
               6 Dir(s)  600,150,368,256 bytes free

C:Userstmt>umount F:

Disconnecting           F:      \192.168.0.100Public
The command completed successfully.

C:Userstmt>mount \192.168.0.100:/Public F:
Network Error - 53

Type 'NET HELPMSG 53' for more information.


C:Userstmt>net helpmsg 53

The network path was not found.


C:Userstmt>mount \192.168.0.100Public F:
F: is now successfully connected to \192.168.0.100Public

The command completed successfully.

C:Userstmt>
SS-439, Ubuntu Server 12.04.3 LTS, EXT4, RAID10, 4xHitachi 5K1000
TS-112, 4.1.x Beta, EXT4, 1xHitachi 7K1000
-
wikussmit
- New here
- Posts: 6
- Joined: Tue Nov 09, 2010 5:04 pm
Re: How do I mount a NFS folder to Windows Server 2008 R2
Post
by wikussmit » Wed Nov 10, 2010 10:57 pm
It’s working now. It turned out to be the access rights on the NFS Access Control which was set to ‘Deny Access’ rather than ‘No limit’ on the QNAP.
Our Current firmware version is 3.3.5 Build 1105T, the command worked as you suggested — mount -o mtype=hard anon fileaccess=7 \192.168.0.100NFS F:
Thank you!
-
tmt
- Experience counts
- Posts: 1006
- Joined: Mon Nov 16, 2009 11:02 am
Re: How do I mount a NFS folder to Windows Server 2008 R2
Post
by tmt » Thu Nov 11, 2010 12:00 am
Great! Glad it was so simple to fix. So, does your backup application work correctly now?
SS-439, Ubuntu Server 12.04.3 LTS, EXT4, RAID10, 4xHitachi 5K1000
TS-112, 4.1.x Beta, EXT4, 1xHitachi 7K1000
-
wikussmit
- New here
- Posts: 6
- Joined: Tue Nov 09, 2010 5:04 pm
Re: How do I mount a NFS folder to Windows Server 2008 R2
Post
by wikussmit » Thu Nov 11, 2010 5:02 pm
The drive is mounted as F: on the system but it seems that the system can’t access the drive once logged out.
I really want to get this working with NFS because you have the option to synchronise you NFS share with an external USB drive. You can also browse your shares with the file manager and move data between them.
I really don’t want to go down the iSCSI route as you can’t synchronise or browse and Microsoft apparently don’t recommend using NIC teaming.
Is there a way to make the share persistent or accessible by the system once you logged off? I tried it with the –o mtype=hard with no avail.
-
tmt
- Experience counts
- Posts: 1006
- Joined: Mon Nov 16, 2009 11:02 am
Re: How do I mount a NFS folder to Windows Server 2008 R2
Post
by tmt » Thu Nov 11, 2010 9:50 pm
Hard mounts have nothing to do with being persistent. You can use the standard «net use» command to do this. Details are in the NFS help file (just click start->run->nfsmgmt.msc).
You need to add the «persistent:yes» flag to the appropriate «net use» command. After you enter it once, it’s not necessary to enter it again, unless you want to delete it.
«net use F: nfsserver:/nfsshare /persistent:yes» plus any other options you prefer. You can use the «nfsadmin» command to set default, in fact. Hopefully these examples will get you started:
Code: Select all
C:Userstmt>nfsadmin
Invalid option argument.
Usage : nfsadmin [server | client | mapping ] [\host]

For detailed help type nfsadmin [server|client|mapping] /?

C:Userstmt>nfsadmin client /?

Usage: nfsadmin client [computer name] [common_options] start | stop | config config_options

common_options are:
    -u user              Identity of the user whose credentials are to be used
    -p password          Password of the user

config_options are:
    protocol = TCP|UDP|TCP+UDP Set the preferred transport protocol.
    mtype = hard|soft       Specify the type of mount.
    casesensitive = yes|no  Specify the default case sensitivity of mounted file shares.
    retry = <number>        Set the number of retries for a soft mount.
    timeout = <duration>    Set the timeout (in seconds) for an RPC call.
    perf = default          Reset performance parameters to default values.
    UseReservedPorts = yes|no Use ports less than 1024
    rsize = <size>          Set the read buffer size (in KB).
    wsize = <size>          Set the write buffer size (in KB).
    fileaccess = <mode>     Specify the permission mode of the file.
                            These are used for new files created on NFS
                            servers. Specified using UNIX style mode bits.
    SecFlavors = [+|-]sys [+|-]krb5 [+|-]krb5i
                            Specify permitted security flavors.

C:Userstmt>net help use
The syntax of this command is:

NET USE
[devicename | *] [\computernamesharename[volume] [password | *]]
        [/USER:[domainname]username]
        [/USER:[dotted domain name]username]
        [/USER:[username@dotted domain name]
        [/SMARTCARD]
        [/SAVECRED]
        [[/DELETE] | [/PERSISTENT:{YES | NO}]]

NET USE {devicename | *} [password | *] /HOME

NET USE [/PERSISTENT:{YES | NO}]

NET USE connects a computer to a shared resource or disconnects a
computer from a shared resource. When used without options, it lists
the computer's connections.

devicename       Assigns a name to connect to the resource or specifies
                 the device to be disconnected. There are two kinds of
                 devicenames: disk drives (D: through Z:) and printers
                 (LPT1: through LPT3:). Type an asterisk instead of a
                 specific devicename to assign the next available
                 devicename.
\computername   Is the name of the computer controlling the shared
                 resource. If the computername contains blank characters,
                 enclose the double backslash (\) and the computername
                 in quotation marks (" "). The computername may be from
                 1 to 15 characters long.
sharename       Is the network name of the shared resource.
volume          Specifies a NetWare volume on the server. You must have
                 Client Services for Netware (Windows Workstations)
                 or Gateway Service for Netware (Windows Server)
                 installed and running to connect to NetWare servers.
password         Is the password needed to access the shared resource.
*                Produces a prompt for the password. The password is
                 not displayed when you type it at the password prompt.
/USER            Specifies a different username with which the connection
                 is made.
domainname       Specifies another domain. If domain is omitted,
                 the current logged on domain is used.
username         Specifies the username with which to logon.
/SMARTCARD       Specifies that the connection is to use credentials on
                 a smart card.
/SAVECRED        Specifies that the username and password are to be saved.
                 This switch is ignored unless the command prompts for username
                 and password.
/HOME            Connects a user to their home directory.
/DELETE          Cancels a network connection and removes the connection
                 from the list of persistent connections.
/PERSISTENT      Controls the use of persistent network connections.
                 The default is the setting used last.
YES              Saves connections as they are made, and restores
                 them at next logon.
NO               Does not save the connection being made or subsequent
                 connections; existing connections will be restored at
                 next logon. Use the /DELETE switch to remove
                 persistent connections.

NET HELP command | MORE displays Help one screen at a time.


C:Userstmt>net use f: 192.168.0.100:/Public /persistent:yes
The command completed successfully.


C:Userstmt>dir f:
 Volume in drive F has no label.
 Volume Serial Number is 91D9-ED67

 Directory of F:

02/28/2010  11:30 PM    <DIR>          ...
              11 File(s)  2,215,804,300 bytes
               6 Dir(s)  599,986,257,920 bytes free


C:Userstmt>net use
New connections will be remembered.


Status       Local     Remote                    Network

-------------------------------------------------------------------------------
             f:        \192.168.0.100Public    NFS Network

The command completed successfully.


C:Userstmt>
SS-439, Ubuntu Server 12.04.3 LTS, EXT4, RAID10, 4xHitachi 5K1000
TS-112, 4.1.x Beta, EXT4, 1xHitachi 7K1000
-
wikussmit
- New here
- Posts: 6
- Joined: Tue Nov 09, 2010 5:04 pm
Re: How do I mount a NFS folder to Windows Server 2008 R2
Post
by wikussmit » Thu Nov 11, 2010 10:37 pm
I tried the command below and mounted the NFS share fine, when I log in with another admin account the network drive is missing. But when I log in again with domain admin (account used to add NFS share) the share is back.
F: 192.168.0.100:/Attixdata /persistent:yes»
I just want the system or Attix (backup software) to have access to this drive when nobody is logged in. The reason for using NFS is that the backup server is virtualized and not directly connected to the NAS storage. Also, I tried copying data with a batch file (using Task Scheduler) to the NFS share (f:) when everyone is logged out with no success.
Do you know if this is even possible — for the OS to have access to a NFS share when logged out?
-
tmt
- Experience counts
- Posts: 1006
- Joined: Mon Nov 16, 2009 11:02 am
Re: How do I mount a NFS folder to Windows Server 2008 R2
Post
by tmt » Thu Nov 11, 2010 11:13 pm
Well, the problem with your plan is that you need user credentials, and without someone logged on, there aren’t any. Do you really want to do that? If so, I suggest you look into scripting the mount, using the user/password options provided by mount.exe or nfsadmin.exe. It’s not a very secure approach!
By the way, remember too that you don’t need to assign a drive letter unless your app requires it. You can use UNC paths just as easily, perhaps.
SS-439, Ubuntu Server 12.04.3 LTS, EXT4, RAID10, 4xHitachi 5K1000
TS-112, 4.1.x Beta, EXT4, 1xHitachi 7K1000
-
wikussmit
- New here
- Posts: 6
- Joined: Tue Nov 09, 2010 5:04 pm
Re: How do I mount a NFS folder to Windows Server 2008 R2
Post
by wikussmit » Thu Nov 11, 2010 11:22 pm
The NAS sits on a private rage not accesble by anyone else . Also, only the backup server IP is allowed access to the NFS share. I just found out that the backup software does support backing up to an UNC path so will rather go that way. Thanks for all the help!
Обновлено 26.07.2016
Как установить NFS server в Windows Server 2008 R2
Всем привет сегодня рассмотрим как установить NFS server в Windows Server 2008 R2. Эта тема в догонку к ранее уже описанной Как установить NFS server в Windows Server 2012 R2. Давайте попробуем сделать из нашего сервера под управлением Windows Server 2008 R2 хранилище виртуальных машин по протоколу NFS. Для этого мы с вами установим специальную роль через графические и консольные средства.
Как установить NFS роль через графический интерфейс
Для установки NFS server откройте Диспетчер сервера и нажимаем Добавить роли
Как установить NFS server в Windows Server 2008 R2-01
Выбираем в мастере установки Файловые службы
Как установить NFS server в Windows Server 2008 R2-02
Далее будет окно которое познакомит вас с данной ролью пропускаем его.
Как установить NFS server в Windows Server 2008 R2-03
Выбираем компонент Службы для NFS

Как установить NFS server в Windows Server 2008 R2-04
Установить.
Как установить NFS server в Windows Server 2008 R2-05
Пройдет немного времени и роль установится.
Как установить NFS server в Windows Server 2008 R2-06
Как установить NFS роль через консоль
Для решения данной задачи нам поможет команда servermanagercmd. Открывает командную строку и вводим
servermanagercmd -install FS-FileServer -FS-NFS-Services
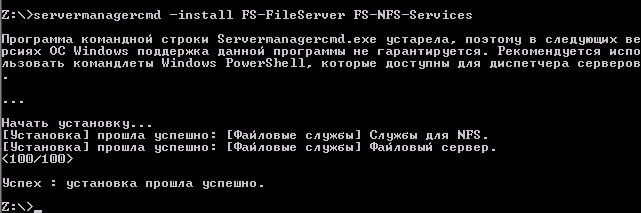
Как установить NFS server в Windows Server 2008 R2-07
Вот так вот просто установить NFS server в Windows Server 2008 R2.
Материал сайта pyatilistnik.org
Июл 26, 2016 23:31
Для подключения NFS тома c NetApp к Windows Server для копирования данных необходимо сделать следующее:
1. на Windows Serve установить компоненты Windows:
- Клиент NFS
- в Windows Server 2008 клиент включён в службу Service for Network File System;
- в Windows Server 2012 это отдельный клиент Client for NFS;
- Service for Network File System Managment Tools.
Cделать это можно из Server Manager или через PowerShell.
Из GUI для Windows Server 2008 это можно сделать так:

Для установки через PowerShell выполните команды:
Для Windows Server 2008 (NFS клиент включён в сервер NFS для Windows):
Import-Module ServerManager
Add-WindowsFeature -Name FS-NFS-Services -IncludeAllSubFeature
Add-WindowsFeature -Name RSAT-NFS-Admin -IncludeAllSubFeature
Для Windows Server 2012 (NFS клиент устанавливается отдельно):
Import-Module ServerManager
Add-WindowsFeature -Name NFS-Client -IncludeAllSubFeature
Add-WindowsFeature -Name RSAT-NFS-Admin -IncludeAllSubFeature
2. На сервере на котором установили NFS клиент в реестре по пути:
HKEY_LOCAL_MACHINESOFTWAREMicrosoftClientForNFSCurrentVersionDefault
добавить два dword 32 ише ключа AnonymousUid и AnonymousGid со значением 0

потом перезапустить nfs клиент через команды:
nfsadmin client stop
nfsadmin client start
3. на сервере с NFS клиентов в командной строке дать команду:
mount \NetApp_IPvolVOL_NAME Z:
Где:
NetApp_IP — ip адрес NFS на NetApp
VOL_NAME — имя тома с учётом регистра
Z: — буква диска на которую подключать NFS том.
Согласитесь, и у Вас когда-либо возникала проблема с нехваткой дискового пространства на ESX. И само-собой встает вопрос, а что делать??? Конечно самое простое это добавить хардов и проблема решена, но не всегда это возможно, к примеру, нет денег на HDD или же еще хуже, закончились свободные отсеки для HDD. И опять же что делать?
Если у Вас к примеру есть сервер, работающий на Windows 2008 R2, и на нем есть достаточно свободного места, то его можно прекрасно использовать для наших целей.
Итак переходим от прелюдий к практике:
1. Заходим Start > Administrative Tools > Server Manager
Выбираем Roles и нажимаем Add Roles:

Далее выбираем Роль File Services

В следующем меню нас интересует только Services for Network File System:

Нажимаем Далее и устанавливает данную Роль.
Если данный Windows 2008 Server не является контроллер AD, то устанавливаем Роль Active Directory Domain Services, иначе пропускаем этот пункт и делаем все дальше.

P.S. Как устанавливать AD думаю описывать не стоит…
В окне Server Manager в категории Active Directory жмем Add Roles Services

Устанавливаем Роль маппинг в AD для UNIX-систем.

После установки перегружаем сервер.
После перезагрузки сервера запускаем Active Directory Users and Computers из меню Administrative Tools. Раскрываем дерево домена и выбираем OU Users:

Добавляем новую группу:

Нажимаем ОК и открываем группу еще раз, переходим на закладку UNIX Attributes, тут в качестве NIS Domain выбираем имя домена и устанавливаем GID (Group ID) в 0

С группами покончили, создаем User и добавляем его в нашу созданную группу UnixGroup. Далее перейдите на вкладку UNIX Attributes. Там в качестве NIS Domain выбираем имя домена и устанавливаем GID (Group ID) в 0. Это позволит серверу VMware ESX получить доступ к NFS-ресурсу для пользователя.

Теперь в Administrative Tools открываем Service for Network File System (NFS). Нажимаем правой кнопкой на Services for NFS и выбираем Properties:

На вкладке General Settings в поле Identity mapping source вводим имя домена:

Теперь создаем папку, где будут храниться виртуальные машины на хранилище NFS. Заходим в ее свойства и переходим на вкладку NFS Sharing, жмем Manage NFS Sharing.

Далее попадаем в окно, где ставил галочку Share this folder и вводим Share name (!без пробела!), а также ставим как изображено на картинке Allow anonymous access:

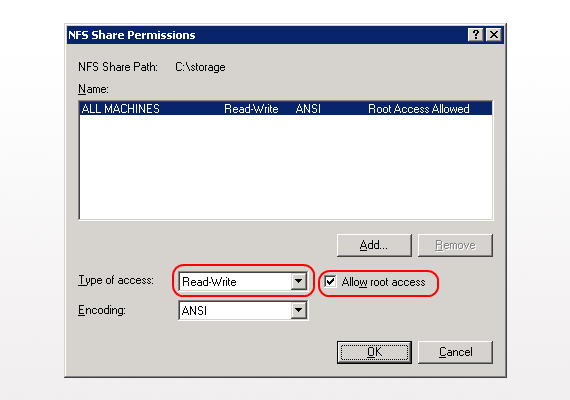
Нажимаем кнопку Permissions и меняем тип доступа на Read-Write, так же ставим галку: Allow root access checkbox.

Если все получилось, то в поле Network Path в свойствах NFS-шары будет отображен путь к этому ресурсу.

С виндой закончили, теперь заходим в наш родной vSphere Client, жмем Add Storage, указываем Network File System указываем FQDN-имя сервера Windows 2008 Server R2, в поле Folder указываем имя папки на Windows Server, а в поле Datastore Name указываем имя нового виртуального хранилища NFS.

Теперь хранилище доступно, можно указывать при создании новой машины или перераспределении места существующей.
Всем удачи, с Вами был valhome 
We are currently working on a feature that will allow potential clients to download a trial of Atomia Cloud Hosting Platform and install it in their OpenStack cloud. This means we have to keep the size of the installation package as well as the footprint in their cloud (in terms of numbers of virtual machines) to a minimum. While a clustered productions environment may contain dozens of VMs we aim for a fully functional test environment with as few VMs as possible (currently 3, but we strive for 2).
Since we offer both Linux and Windows websites we need a storage solution that supports both SMB (Windows) and NFS (Linux). For production environments we recommend Nexenta ZFS, but for testing this is less suitable because it means that we would have to ship another image (and another VM is needed).
This can be avoided by exposing the NFS through Windows Server for NFS Services. While there are hundreds to tutorials regarding creating SMB shares, few are to be find about NFS Services. In Windows 2008 R2 there has been a number of changes and this blog post will guide you from start to finish on how to set it up.
Installing Server for NFS Services
To install Server for NFS Services simply execute this command:
ServerManagerCmd -install File-Services FS-NFS-Services
Setting up the User Mapping
This version of Server for NFS Services lacks the User Mapping server. The mapping is now done by Active Directory itself. But first a short explanation on what user mapping does: If you want to connect to the Windows NFS share from Linux, and you don’t use a common authentication scheme like Kerberos, Linux will identify the user to Windows using their user ID and group ID (which every user and group in Linux has). Run the following command in your Linux terminal to get the IDs:
less /etc/passwd
This is of course insecure because if an attacker controls a Linux machine of his own and connects to your NFS share he can simply pretend to be any user. Unlike among Windows machines it is not required for the Linux and the Windows user to share the same password. It is therefore important to control the access to the share via firewall or IP restrictions.
For the root you can choose for every share if it should be either considered anonymous or if it should be mapped to Administrator automatically. All unmapped users are covered by the entity Anonymous Logon in Windows. So you can save yourself the user mapping if you trust all users of the Linux machine, by granting rights to Anonymous Logon.
Run the following command on your Windows server to enable user mapping:
nfsadmin mapping localhost config adlookup=yes addomain=<yourdomain>
sc.exe stop NfsService
sc.exe start NfsService
Where the domain is given in its full DNS name.
To set up the mapping, let assume you found the line
ubuntu:x:1000:1000:Ubuntu,,,:/home/ubuntu:/bin/bash
in the passwd file. That means ubuntu is member of Ubuntu group and both have the ID 1000. To replicate that in windows you need to create a user ubuntu and a group we call g-ubuntu, but the name won’t matter.
MSDN has an excelent blog post with scripts on how to set the user and group ID
here.
Unfortunately it does not cover how to set the default group. In Windows a user can be member of several groups, but in Linux it can be only one. To set the default group, you open Active Directory Users and Computers, navigate to the users account, right click, select Properties, select the Member of tab and then select the group and click on Set Primary Group.
The User properties dialog
Creating the share
To create an NFS share simply right-click on folder and select the NFS Sharing tab. You can activate NFS sharing there. The defaults are usually ok.
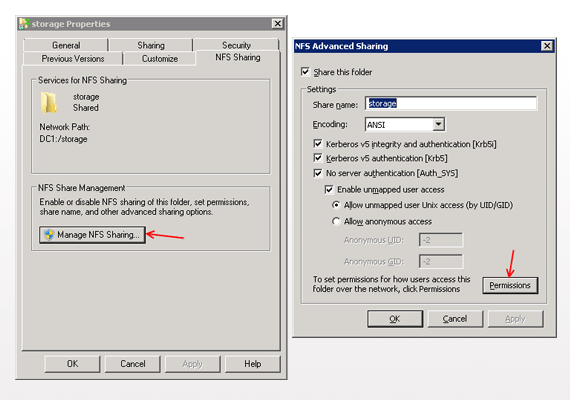 The NFS sharing dialog in Windows explorer
Then click on the Permissions button. By default all machines have read access. You should limit access to those machines that really need it. If you need that you can allow root access which means that the root user is given Administrative privileges.
 The permissions dialog for an NFS share
The NTFS permissions
The trickiest part are the NTFS permissions. Let’s say you want to give the user ubuntu access to a file. In that case you will probably add ubuntu to the users of that file and add permissions. But on the linux side this will change nothing. This is because Linux is only aware of three entities, the owner, the owner’s group and all. So when you give permissions this applies:
Use the Everyone entity in Windows to give permissions to all. To give permissions to a specific user or group you must first change the ownership of the folder to that group and then give explicitly permissions to that user or group.
To give ownership to a certain user/group it is best to use SetACL:
SetACL -on c:Storageb -ot file -actn setowner -ownr "n:ubuntu" -actn setgroup -grp "n:g-ubuntu" -rec cont_obj
To give the user and group explicit read and execute access use:
SetACL -on c:Storage -ot file -actn ace -ace "n:ubuntu;p:read_ex" -ace "n:g-ubuntu;p:read_ex" -actn rstchldrn -rst dacl
On the Linux side
On the Linux side you simply mount the NFS share
mount <IP>:/<name_of_the_share> /<mountpoint>
When the Server for NFS Services role service is installed it automatically opens the right ports in the Windows firewall.