Настоящая книга — универсальное руководство по Windows Server 2012 R2, поможет быстро освоить все новые средства и функции Windows Server, включает реальные сценарии развертывания.
Попробуйте новый гипервизор Hyper-V, найдите новые и более простые способы дистанционного подключения к офису, а также изучите Storage Spaces — это всего лишь несколько компонентов Windows Server 2012 R2, которые подробно рассматриваются в данном обновленном издании от признанного авторитета в области Windows Марка Минаси и команды экспертов по Windows Server, возглавляемой Кевином Грином. Настоящая книга поможет быстро освоить все новые средства и функции Windows Server, а также включает реальные сценарии развертывания. Если вы — системный администратор, которому необходимо модернизировать, перейти или управлять Windows Server 2012 R2, то в этом полном пособии вы найдете все, что нужно.
Windows Server 2012 R2. Полное руководство. Том 1. Установка и конфигурирование сервера, сети, DNS, Active Directory и общего доступа к данным и принтерам
 Основные темы тома 1:
новые возможности и установка Windows Server 2012 R2, включая Server Core;
организация сетей и компоненты IP Address Management и DHCP Failover;
Active Directory в Windows Server 2012 R2 и выполнение задач по управлению учетными записями;
общее хранилище и кластеризация, создание и управление общими ресурсами, а также развертывание динамического управления доступом.
Вы изучите следующие темы:
Установка или модернизация и последующее управление сервера Windows Server 2012 R2
Настройка объединения сетевых интерфейсных плат Microsoft NIC Teaming 2012 и работа с PowerShell
Установка операционной системы через графический пользовательский интерфейс или обновленную версию Server Core 2012
Миграция, слияние и модификация Active Directory
Управление адресным пространством с помощью IPAM
Новые общие хранилища, пространства хранения и улучшенные инструменты для работы с ними
Управление доступом к общим файлам — новый и усовершенствованный подход
Использование и администрирование Remote Desktop, Virtual Desktop и Hyper-V
Windows Server 2012 R2. Полное руководство. Том 2. Дистанционное администрирование, установка среды с несколькими доменами, виртуализация, мониторинг и обслуживание сервера
 Попробуйте новый гипервизор Hyper-V, найдите новые и более простые способы дистанционного подключения к офису, а также изучите Storage Spaces – это всего лишь несколько компонентов Windows Server 2012 R2, которые подробно рассматриваются в данном обновленном издании от признанного авторитета в области Windows Марка Минаси и команды экспертов по Windows Server, возглавляемой Кевином Грином. Настоящая книга поможет быстро освоить все новые средства и функции Windows Server, а также включает реальные сценарии развертывания. Если вы — системный администратор, которому необходимо перейти к Windows Server 2012 R2 и управлять им или же модернизировать его, то в этом полном пособии вы найдете все, что нужно.
Прочитали: 197
Windows Server 2012 R2: Полное руководство. Том 1: Установка и конфигурирование сервера, сети, DNS, Active Directory и общего доступа к данным
Тема в разделе «Операционные системы», создана пользователем MoWils, 16 май 2015.
-
Минаси Марк
Windows Server 2012 R2: Полное руководство. Том 1: Установка и конфигурирование сервера, сети, DNS, Active Directory и общего доступа к данным![[IMG]](data:image/svg+xml,%3Csvg%20xmlns='http://www.w3.org/2000/svg'%20viewBox='0%200%200%200'%3E%3C/svg%3E)
Издательство: Диалектика / Вильямс
Жанр: Windows ServerКачество: Хорошее
Страниц: 960
Формат: pdf, fb2, epubДобро пожаловать в книгу, посвященную Windows Server 2012 R2. Все усовершенствования и новые средства, которые предлагает эта флагманская операционная система производственного уровня от Microsoft, определенно поднимают планку будущих версий Windows Server. Чтобы уловить, насколько много возможностей вы получаете с Windows Server 2012 R2, нам нужно только взглянуть на первоначальный выпуск Windows Server 2012, который достиг общей готовности в сентябре 2012 года. Вскоре после поступления данной версии в продажу издательство Sybex собрало группу авторов для написания книги по этой версии, но как только мы подошли к этапу финального редактирования глав, в Microsoft анонсировали выход версии Windows Server 2012 R2 в октябре 2013 года — всего лишь спустя 12 месяцев после выпуска Windows Server 2012. За этот короткий период в версии Windows Server 2012 R2 появился настолько большой объем новой функциональности, что нам пришлось буквально переписать около половины первоначальной книги, посвященной предыдущей версии Windows Server 2012! Коллектив авторов, работающих над этой книгой, обладал обильным опытом проектирования, развертывания, управления и устранения неполадок Windows Server is крупномасштабных производственных средах, и они с радостью расскажут вам все о данной версии продукта. Если вы являетесь новичком в Windows Server, эта книга предоставит вам багаж знаний, требуемых для того, чтобы немедленно приступить к самостоятельной работе. Если вы — опытный администратор или консультант и уже знакомы с этой операционной системой, волноваться не стоит; вы определенно найдете здесь массу новой информации, чтобы уверенно держаться во главе стаи.
Вложения:
![[IMG]](http://piratebooks.ru/attachments/windows-server-2012-r2.jpg)
Поделиться этой страницей
Обновлено 24.11.2018
Скачать книгу Windows Server 2012 R2 Полное Руководство Том 1
Всем привет как и обещал сегодня выложу книгу Windows Server 2012 R2 Полное Руководство Том 1. Второй том книги выкладывал тут. Книги по администрированию на русском языке смотрите в разделе книги администратора. Хочу отметить, что на текущий момент это лучший двухтомник по операционным системам Microsoft, охватывающий абсолютно все тонкости настройки любых ролей, которые будет устанавливать системный администратор.
Автор: Марк Минаси, Кевин Грин, Кристиан Бус, Роберт Батлер, Джон Мак-Кейб, Роберт Панек, Майкл Райс, Стефан Рот
Издательство: Диалектика
Жанр: Компьютерная литература, Операционные системы
Формат: PDF
Размер: 25 мб
Иллюстрации: Чёрно-белые
Страниц: 950
Описание:
Универсальное руководство по Windows Server 2012 R2. Попробуйте новый гипервизор Hyper-V, найдите новые и более простые способы дистанционного подключения к офису, а также изучите Storage Spaces — это всего лишь несколько компонентов Windows Server 2012 R2, которые подробно рассматриваются в данном обновленном издании от признанного авторитета в области Windows Марка Минаси и команды экспертов по Windows Server, возглавляемой Кевином Грином. Настоящая книга поможет быстро освоить все новые средства и функции Windows Server, а также включает реальные сценарии развертывания. Если вы — системный администратор, которому необходимо модернизировать, перейти или управлять Windows Server 2012 R2, то в этом полном пособии вы найдете все, что нужно. Материал сайта pyatilistnik.org
Скачать книгу Windows Server 2012 R2 Полное Руководство Том 1
Ноя 24, 2018 21:17
Администрирование Microsoft Windows Server 2012, Линн С., 2014.
Эта книга представляет собой руководство по развертыванию, настройке, защите и управлению Windows Server 2012. Здесь рассмотрены такие вопросы, как новый подход к администрированию Windows Server и новые возможности Active Directory, примеры работы с системой Dynamic Access Control, улучшение организации хранилищ данных, кластеризации и Hyper-V, технологии унифицированного удаленного доступа (Unified Remote Access). Также в книге описываются новые способы решения проблем в работе Windows Server 2012 и приводятся дополнительные сведения об этой системе.

Цели книги.
Эта книга посвящена новым функциям и возможностям, благодаря которым Server 2012 можно назвать операционной системой, предназначенной для работы с облачными сервисами. Моя цель заключается в том, чтобы показать системным администраторам новые возможности с помощью примеров развертывания и настройки системы. Среди тех возможностей, о которых вы узнаете, — новые способы управления виртуальными сетями и хранилищами данных, улучшенная технология унифицированного удаленного доступа (Unified Remote Access), улучшения в области хранения данных, достигнутые благодаря использованию новой файловой системы. Именно они позволяют Server 2012 пребывать на пике технологического прогресса. Пошаговые инструкции, снабженные копиями экранов, проведут вас через развертывание системы и настройку ее возможностей. Все копии экранов и описания основаны на реальных примерах развертывания и настройки системы в тестовой среде и на документации из Microsoft TechNet.
Краткое содержание.
Предисловие.
Глава 1. Обзор Windows Server 2012.
Глава 2. Аппаратные требования Server 2012 и установка.
Глава 3. Управление Windows Server 2012.
Глава 4. Active Directory.
Глава 5. Динамический контроль доступа при управлении пользователями и данными.
Глава 6. Управление хранилищами и кластеризация.
Глава 7. Hyper-V.
Глава 8. Сетевые возможности.
Глава 9. Удаленный доступ.
Глава 10. Решение проблем, безопасность и мониторинг.
Об авторе.
Бесплатно скачать электронную книгу в удобном формате, смотреть и читать:
Скачать книгу Администрирование Microsoft Windows Server 2012, Линн С., 2014 — fileskachat.com, быстрое и бесплатное скачивание.
Скачать pdf
Ниже можно купить эту книгу по лучшей цене со скидкой с доставкой по всей России.Купить эту книгу
Скачать
— pdf — Яндекс.Диск.
Дата публикации: 06.11.2020 06:15 UTC
Теги:
Линн :: 2014 :: администрирование :: Microsoft Windows Server 2012
Следующие учебники и книги:
- Системное администрирование в Linux, Адельштайн Т., Любанович Б., 2010
- Современные информационно-коммуникационные технологии в научно-исследовательской деятельности и образовании, Луценко Е.В., Меретуков Г.М., Лойко В.И., 2020
- Блокчейн, Руководство для начинающих разработчиков, Сингхал Б., Дамеджа Г., Панда П.С., 2020
- Децентрализованные приложения, технология Blockchain в действии, Равал С., 2017
Предыдущие статьи:
- Unity для разработчика, мобильные мультиплатформенные игры, Мэннинг Д., Батфилд-Эддисон П., 2018
- Регрессионный анализ данных в пакете Mathcad, Воскобойников Ю.Е., 2011
- Spark для профессионалов, современные паттерны обработки больших данных, Риза С., Лезерсон У., Оуэн Ш., Уилле Дж., 2017
- Oracle PL/SQL, для профессионалов, Фейерштейн С., Прибыл Б., 2015
Chapter 4. Active Directory
Perhaps no aspect of a Windows environment can cause as many
headaches, frustrations, and consumption of valuable IT time as Active
Directory (AD). Active Directory was first introduced into Windows Server with the release of
Server 2000 and has steadily evolved in subsequent Windows Server versions.
Server 2012 includes the most polished Active Directory services offering to
date. One major reason why this is the best AD yet is that an Active
Directory Domain Services (AD DS) deployment now integrates all the steps
required to deploy new domain controllers into a single interface with the
new Active Directory Domain Services Configuration Wizard.
AD DS is also easier to manage in Server 2012 due to an enhanced wizard built on
PowerShell that integrates with Server Manager. Preinstallation checks with
the Adprep.exe tool and prerequisite validation are part of the install process,
helping to lessen the chance of errors with an AD DS install.
Do these enhancements mean deploying and managing AD is flawless in
Server 2012? Not by any means. While deploying Server 2012 AD for the first
time, I ran into some errors and cautions warning me that certain services
or features had to be added or configured a certain way for a successful AD
install.
Yet I got those warnings and errors automatically, not by having to
hunt through Event Viewer for AD-related warnings, as I would normally have
to do in Server 2008 R2 and older Windows Server versions. Warnings, errors,
and suggestions for getting the server in shape to run AD are all displayed
as easy-to-read, comprehensible alerts within the updated Server Manager.
The entire AD install deployment centralized in Server Manager makes AD
deployment more efficient and easier to troubleshoot.
This chapter introduces the new Active Directory Administrative Center
(ADAC) interface. I’ll also cover deploying and managing AD DS, as
well as how to join Server 2012 to an existing domain and, conversely, join
a member Server 2012 machine to a Server 2008 R2 domain.
The chapter also outlines using new and updated features in AD, such
as using the AD Recycle Bin to restore deleted objects, performing AD
searches, deploying AD with PowerShell, and remotely managing Server
2012.
Deploying Active Directory Domain Services
With both Server Manager and Active Directory refreshed with updated management
interfaces in Server 2012, the install process may be not as familiar even
to those who have installed AD DS before. Before installing Active
Directory Domain Services, ensure that DNS Server is running on the
network; otherwise, you will be prompted to install DNS after the AD
install.
Installing Active Directory
To deploy Active Directory Domain Services on a local Server 2012 machine,
launch Server Manager and select “Add roles and features” in the
“Configure this local server” area of the dashboard.
Select “Role-based or feature-based installation,” and click Next.
Then select the local server (or the server to which you want to deploy
AD DS) as the destination server. Choose Active Directory Domain
Services. (See Figure 4-1.)
There are several features and tools that you are required to
install along with AD DS. These features are listed, and you are given
the option to install them as well. To do so, click “Add features,” then
click Next.
You can opt to install additional features, or just click Next
once again to begin the installation process (Figure 4-2).

Figure 4-1. Selecting Active Directory Domain Services
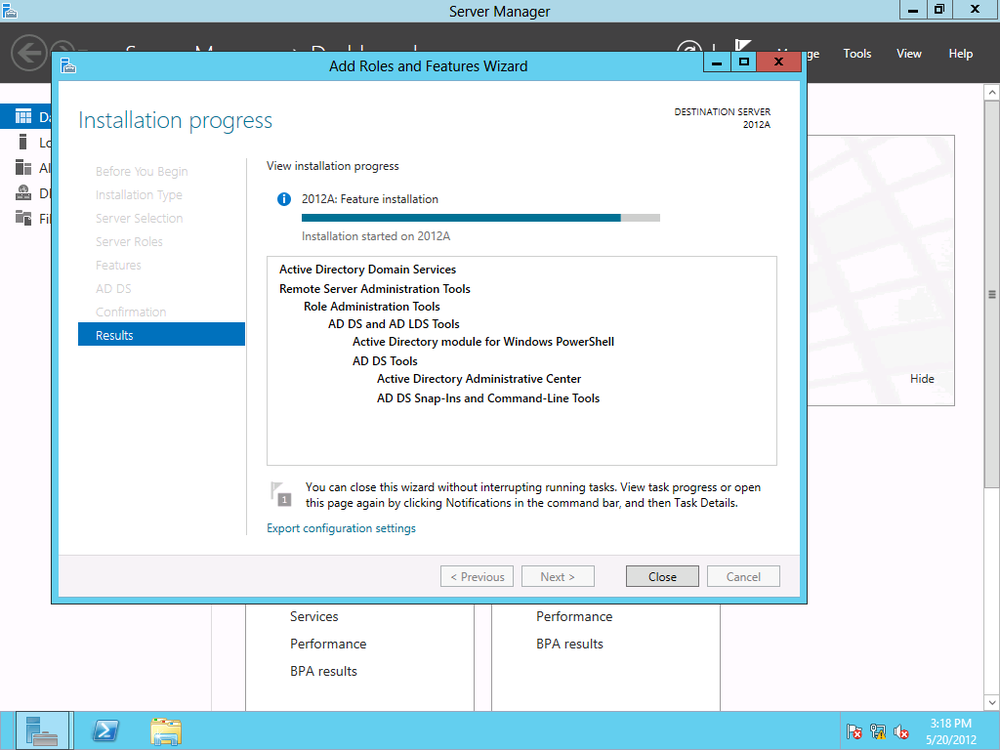
Figure 4-2. Start of the AD DS install
After a successful install, Server Manager’s notification prompts
you to “Promote this server to a domain controller,” as shown in Figure 4-3.
Note
Of course, you don’t want to just start adding servers as domain
controllers (DCs) in a network. Most readers will probably already
have DCs deployed. You can certainly add Server 2012 as a physical or
virtual DC, or as a read-only DC for security purposes. Before
promoting any new Server 2012 deployments to DCs, consider your
existing infrastructure and what role Server 2012 should play.
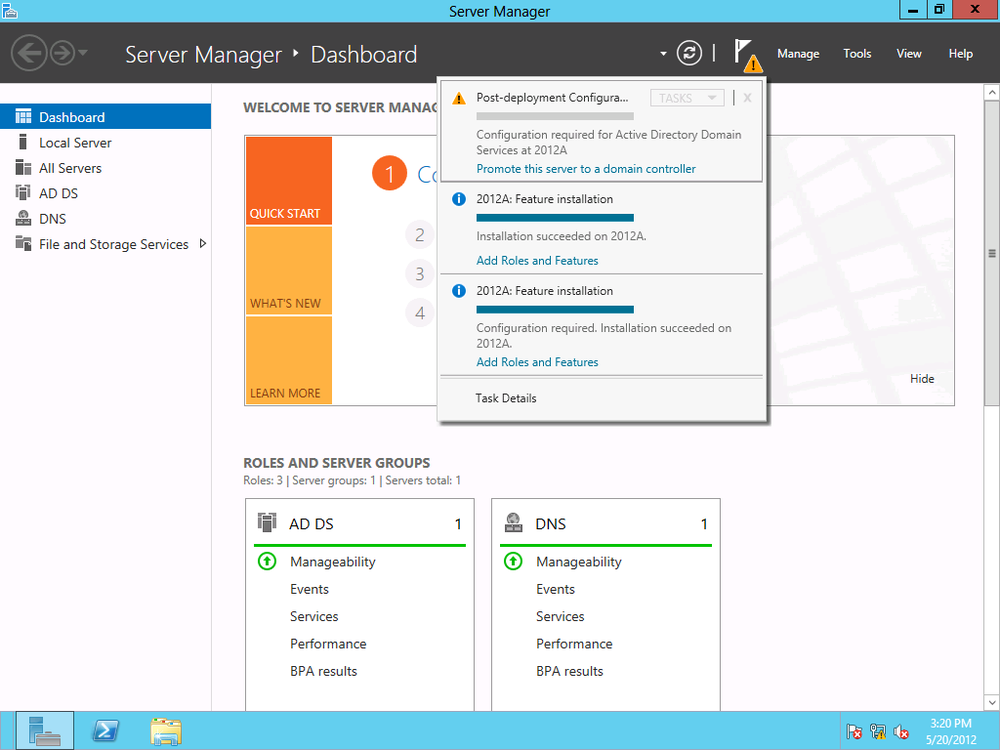
Figure 4-3. Notification to promote to domain controller
You have several options to promote to a DC. You can use the GUI
or PowerShell. There’s some confusion about whether or not Microsoft has
eliminated the Dcpromo command system that administrators have long
used to promote servers to DCs.
Dcpromo can still be executed in Server 2012. You run the command
by pointing to an answer file, using the dcpromo.exe command in the command prompt. The
answer file is a text file you create with specific fields that will
customize an unattended DC promotion based on the configuration needed
for your particular organization.
Promoting DCs using Dcpromo and an answer file is necessary only
if an organization already has in-place automation for creating DCs or
for infrastructures that need to deploy large numbers of DCs. For
smaller organizations, using the DC install and promotion capabilities
within Server Manager is easier and more efficient because you have less
chance of syntax errors than with creating answer files. For those
comfortable with scripting, PowerShell also provides a good alternative
for creating and promoting servers as DCs.
The Active Directory Administrative Center allows you to add a
DC to an existing domain, add a new domain to an existing forest, or add a new forest. To set up an entirely new domain without
an existing forest, select “Add a new forest,” as shown in Figure 4-4. You must specify a root domain name,
in the form of <domainname>.com or
<domainname>.net, for example, or whatever
top-level domain (TLD) ending is designated for your
organization.

Figure 4-4. Adding a new forest
Next, you have to select the forest and domain’s functional level. The functional level you select
depends on whether you have an existing AD domain or forest and which
servers you are running. For instance, if your infrastructure has Server
2003 servers, you may keep the forest or domain level set at Windows
2003 until all DCs are upgraded to Server 2008 or 2008 R2.
Server 2012 can be set to Server 2012 AD, Server 2008 R2, Server
2008, or Server 2003 functional levels. If the DC is going to also function as a global catalog server, or as a read-only DC, you can
select those capabilities in this step as well. It is important to
ensure that adding a new DC does not execute an unplanned upgrade of the
functional level of the domain, so read all of the wizard text closely
when joining an existing domain.
Finally, in the next screen (Figure 4-5), you can also set
the Directory Services Restore Mode (DSRM) password.

Figure 4-5. Setting the functional level of the domain
Before final installation, a prerequisites check is automatically
run to ensure that there are no issues with the AD install (Figure 4-6).
After a successful install, AD DS is listed in the dashboard, as
shown in Figure 4-7.

Figure 4-6. Prerequisites check

Figure 4-7. Successful install of AD DS
Adding Machines to a Server 2012 Domain
Traditionally, IT professionals will upgrade servers before upgrading client
machines or just replace dated user machines with new ones preinstalled
with the latest Windows client operating system. It’s conceivable that
there will be organizations that will want to join not only Windows 8
clients, but Windows 7 (and in some cases, Windows XP) machines, to Server
2012 domains.
Client machines and servers can be joined to domains in large
organizations and enterprises via automated methods such as scripting and
batch files. This section focuses on client-side installation through the
GUI, the method typically employed in smaller networks. These steps will
also work for virtual machines.
Joining Windows 7 to a Server 2012–Level Domain
From System Properties in the Windows 7 client’s Control Panel, click the Computer Name tab and click
Change, as shown in Figure 4-8.

Figure 4-8. Windows 7 System Properties
Enter the domain name under “Member of” in the Domain field (Figure 4-9).

Figure 4-9. Entering the domain name
Enter user account credentials with permission to join computers
to the domain. A confirmation message pops up when the machine is
successfully joined (Figure 4-10).
Once the client machine is joined to the domain, you can find the
machine in the Computers container in the ADAC, as shown in Figure 4-11.

Figure 4-10. Successfully joining the domain
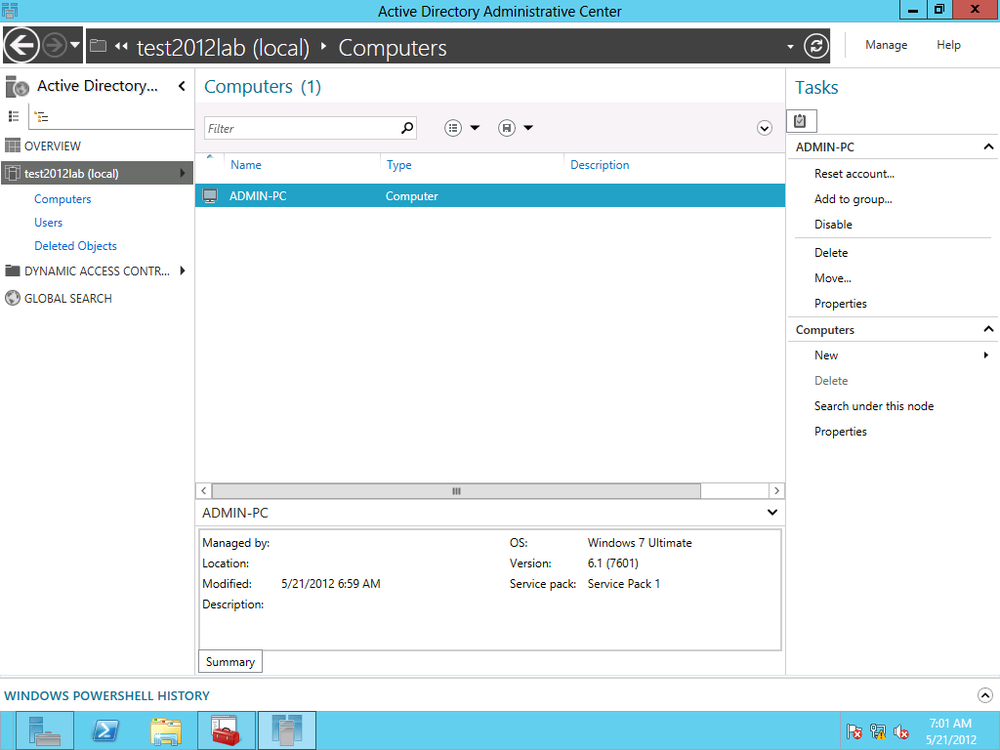
Figure 4-11. Machine joined to domain, now listed in the ADAC
Joining Windows 8 to a Server 2012–Level Domain
Since Windows 8 was released in Consumer Preview version, there has been lots
of controversy surrounding the Windows 8 client and criticisms that the
operating system is designed more as a consumer mobile operating
platform with less emphasis on the enterprise. However, it’s inevitable
that Windows 8 will find its way into business infrastructures, if only
for its novelty at first. I remember my days as a Windows Server
administrator, having to fit the latest client OS into the domain
infrastructure simply because some C-level executive wanted to
test-drive the latest operating system!
There’s good news and bad news about joining Windows 8 to
corporate domains. Windows 8 systems installed on ARM-based mobile
devices—called Windows RT—can’t officially join a Windows domain. That
does not mean you can’t introduce Windows RT mobile devices into your
organization’s infrastructure; there are native Windows capabilities and
plenty of third-party utilities for mobile device management
(MDM).
You can, however, join computers with Windows 8 installed to a
domain, as well as Windows 8 virtual machines. To install Windows 8
clients to a Server 2012–level domain, you follow the same procedures as
for joining a Windows 7 client. Launch the Control Panel and click
“System and Security.” Click System and then “Advanced system
settings.”
Click the Computer Name tab and click Change. Type the domain name
into the Domain field. Once joined, the computer is added in ADAC in the
Computers container.
The procedures for joining Server 2003, 2008, and 2008 R2 as
member servers to a Server 2012 domain follow the same steps as joining
Windows clients.
The refreshed Server Manager interface in Server 2012 allows you to quickly add a
Server 2012 to a domain. To do so, open Server Manager. Click “Configure
this local server.” Under Properties, click Workgroup, as shown in Figure 4-12.
The Workgroup link brings up the System Properties window, from
which you can add the server to a domain (Figure 4-13).

Figure 4-12. Clicking Workgroup to join Server 2012 to a domain

Figure 4-13. Clicking Change to add to the domain
Joining Server 2012 to a Server 2008 R2–Level Domain
You can add Server 2012 machines to other functional levels of
Active Directory domains, although such a mixed environment won’t have
the benefits of a Server 2012 domain.
To add a Server 2012 machine to a Server 2008 R2 domain, for
example, open Server Manager. Click “Configure this local server.” Under
Properties, click Workgroup. Under System Properties, add the server to
the 2008 R2 domain. (See Figure 4-14.)
Once added, the Server 2012 machine is listed in the Computers
container in the Server 2008 R2.

Figure 4-14. Adding Server 2012 to a Server 2008 R2 domain
Managing Active Directory
The Active Directory Administrative Center is the console used to
manage AD. You launch the console from Server Manager by clicking Tools.
Navigating ADAC
ADAC has the same tiled interface as Server Manager. The interface
provides a nice overview that offers useful links and help documentation
on AD, as well as detailed deployment of Dynamic Access Control (covered
in Chapter 5).
Figure 4-15 shows the initial ADAC
screen. From here, you can reset the domain administrator’s password and
perform a global search against AD. On the left side of the screen, you
can select the DC you want to manage.
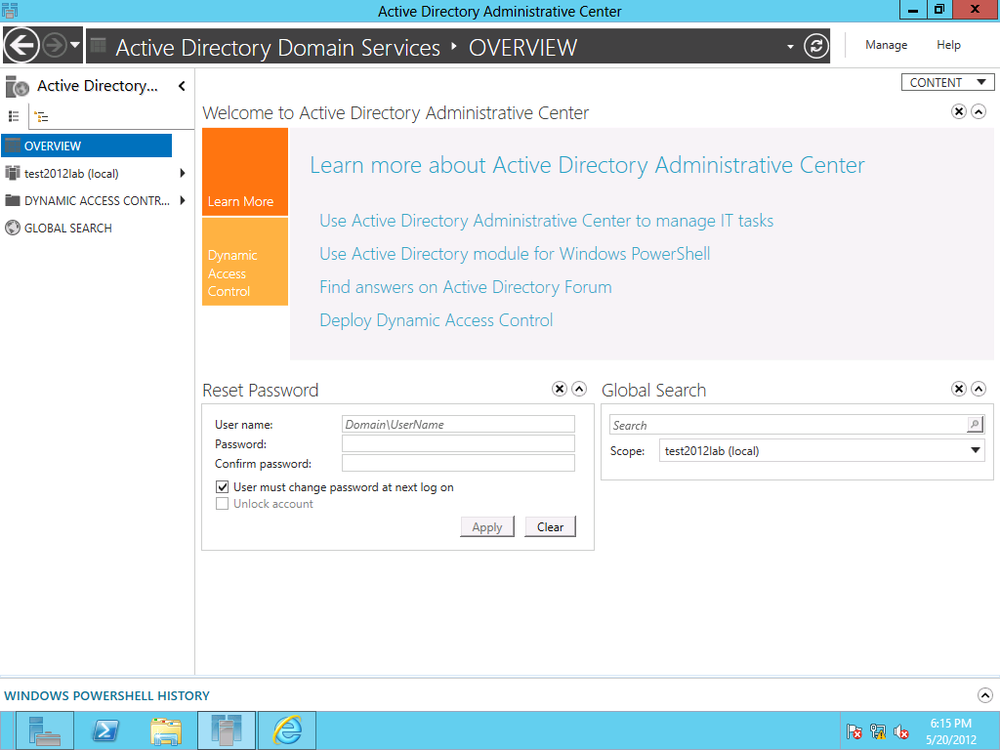
Figure 4-15. The ADAC initial screen
When you select the DC, a listing of all the AD objects, including
containers and organizations units (OUs), is displayed. On the right of the screen is a menu for
performing various AD-associated tasks, such as adding new objects,
deleting objects, searching, and viewing properties of containers
(permissions, for example).
The layout for creating objects in AD has gone through some changes. First we will
walk through creating a new group.
To begin creating a new group, open Server Manager. In the dashboard, from the left menu,
click “AD DS.” Right-click the local server (or the server on which
you’ve installed AD) and select Active Directory Administrative Center,
as shown in Figure 4-16.
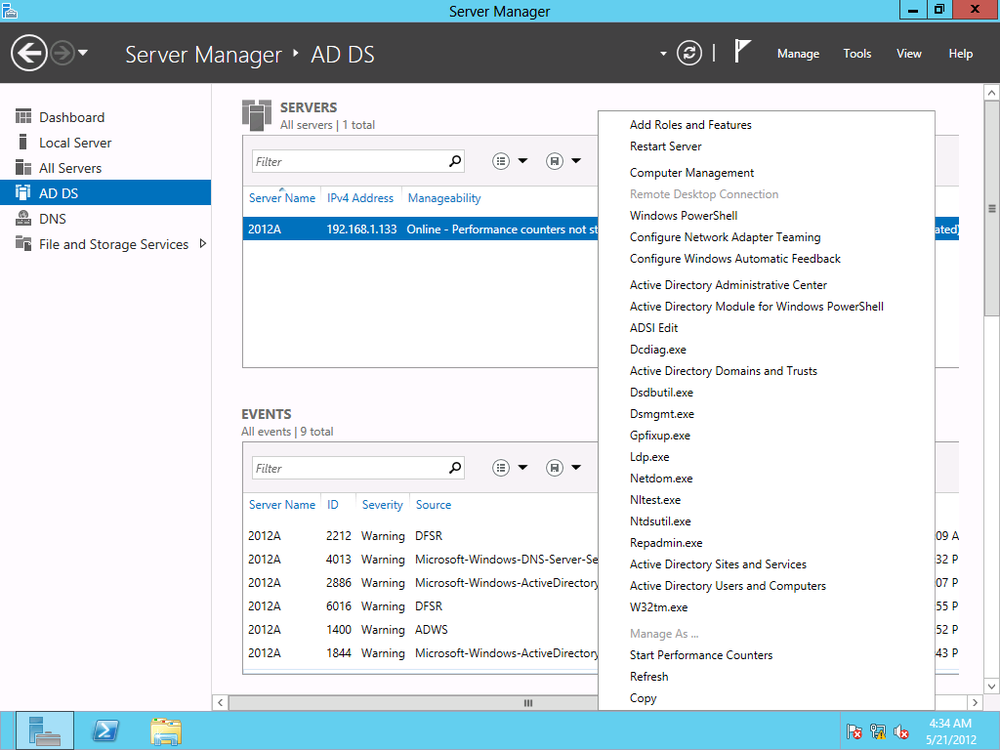
Figure 4-16. Selecting Active Directory Administrative Center
From the left menu in ADAC, click on “AD DS.” All AD container
objects are displayed. From the righthand Tasks menu, under Program
Data, click New and then Group (Figure 4-17).
The Create Group screen opens. Fields with red asterisks are required. In Figure 4-18, I name my group Human Resources
NY. As you type the group name, the field directly under the
“Group name” field, Group (SamAccountName), is automatically
populated.
Note
Group(SamAccountName) is used as an alternate logon for legacy
pre-AD clients and servers such as Windows 95.

Figure 4-17. Tasks menu options

Figure 4-18. Creating groups
Next, select the group type; by default, this is set to Security,
but you can set it as an email distribution list as well. Then choose
the group scope. The default scope is Global, but we can set it to only
the local domain or to universal (i.e., permissions and accessibility
across multiple Active Directory forests).
You can add a member to the group or make the group a member of a parent
group under the “Members” and “Member of” sections, respectively. The
rest of the fields are optional, such as adding information about who
manages the group, a description, notes about the group, and so
on.
If you don’t need to see all that information in the Create Group
screen, you can hide sections. For example, a small organization with
few IT staff members may not need to specify who manages a group. To
customize this interface, click the Sections drop-down button at the top
right of the Create Group screen. As shown in Figure 4-19, checked sections are
displayed. To hide a section, simply uncheck it.

Figure 4-19. Adding and removing sections
You can also close a section by clicking the X button directly
above and to the far right of each section.
If you use a specific section at times, you may just want to
collapse it when you don’t need it instead of closing it. To collapse a
section, click on the arrow next to the X button directly above and to
the far right of each section.
The interface is consistent for creating any kind of AD object in
ADAC, although fields may change depending on the object (such as a new
computer or user). Creating and managing users is detailed more
thoroughly in Chapter 5.
ADAC also allows you to perform domain-wide duties, such as
changing the domain controller or raising the forest or domain functional level.
AD Recycle Bin
The Active Directory Recycle Bin is a way to restore deleted AD objects without losing any of those
objects’ attributes. For example, if you delete a user account and
restore it using the AD Recycle Bin, that account retains its
permissions and group memberships.
Note
When creating a new AD object, you can set it to never get
accidentally deleted by checking “Protect from accidental deletion” in
the Create screen.
ADAC in Server 2012 provides an easy way to enable the AD Recycle
Bin. From the right side of the ADAC window, under Tasks, click Enable
Recycle Bin (Figure 4-20).
Click OK in the pop-up message to confirm enabling the Recycle Bin
(Figure 4-21). Refresh the
screen and a new container, Deleted Objects, is listed.
To restore a deleted object, open Deleted Objects and either
right-click the container and select Restore to restore the object to
its original location, or click Restore To to specify a location (Figure 4-22). You can also access the same
commands under the Tasks menu.

Figure 4-20. Enabling the Recycle Bin

Figure 4-21. Confirming to enable the Recycle Bin

Figure 4-22. Restoring deleted objects
Performing Searches in ADAC
Sometimes you need to perform an action on a specific object within AD. Perhaps
you have to disable a user account for a user who no longer is part of your organization. It
can be tedious to scroll through Active Directory looking for that user
account, especially in large organizations that may have many AD
objects.
That’s where ADAC’s search capabilities come in very handy. You
can perform global searches in the ADAC against the local AD or
throughout an entire AD infrastructure.
To search, click Global Search on the left menu of ADAC. You can
type a term directly, or you can build a search query for more complex
searches.
To start building a query, click the arrow to the far right of the
search field to display the “+Add criteria” drop-down menu (Figure 4-23).
The drop-down list contains the fields you can search against to
build your query. Figure 4-24 shows a query
built with the Name, City, and State fields.

Figure 4-23. Adding criteria for a query

Figure 4-24. Building a query
Press Enter or click the magnifying glass to execute the
query.
You can save queries by clicking the disk icon to the right of the
search field (Figure 4-25).

Figure 4-25. Saving a query
Once you’ve saved a query, you can quickly access it by clicking
the query list icon (Figure 4-26).
Windows PowerShell History
At the bottom of the ADAC interface is Windows PowerShell History, a
section that is collapsed by default. By clicking on the up arrow all
the way to the right of the section, you can expand the area.
Displayed here are all the PowerShell commands associated with the
tasks you perform in the ADAC GUI. It’s a great way to become acquainted
with PowerShell syntax. The Copy option will copy selected syntax to the
clipboard for you to save for later use.
Take the time to learn how the routine tasks are iterated with
PowerShell. Microsoft could not have made it easier with Server 2012 for
you to see how much more efficiently you can do some of your normal
tasks with PowerShell. So, when you need to get many things done, you
have a scripted way to avoid spending incredible amounts of interactive
time in the GUI.

Figure 4-26. Accessing the query list
Using PowerShell to Deploy Active Directory
The administrative tasks performed in the ADAC can also be handled in
PowerShell. While the focus of this book is not to teach PowerShell, it’s
a good idea to become familiar with PowerShell to do major management
tasks such as deploying AD.
To deploy AD via PowerShell, type the following in the PowerShell console (Figure 4-27):
Install-windowsfeature -name AD-Domain-Services -IncludeManagement Tools
Upon successful execution, the installation begins, as shown in
Figure 4-28.

Figure 4-27. Deploying AD with PowerShell

Figure 4-28. Installing AD in PowerShell
After AD is deployed, a confirmation is displayed, as well as any
follow-up action needed for a successful AD deployment.
Note
Just about any task that can be performed in the ADAC GUI can be
done in PowerShell. For example, to enable the ADAC Recycle Bin, you can
use this cmdlet:
Enable-ADOptionalFeature –Identity'CN=RecycleBinFeature,
CN=OptionalFeatures,CN=DirectoryService,CN=WindowsNT,
CN=Service,CN=Configuratio,DC=xyz,
DC=local'ScopeForestofConfiguratioSet-Target 'xyzlocal'
Summary
Active Directory Domain Services is more efficient to manage in
Server 2012. It offers more centralized administration with
preinstallation checks, and integrated Adprep.exe with the install process
means a more hassle-free deployment experience.
Having AD DS configured easily and correctly is a critical step to
ensure the effectiveness of a directory service for amenities such as user
identity management, security and authorization management, and device
management.
Although the Active Directory Administrative Center has capabilities
that have been included in previous Windows servers, such as search and
the Recycle Bin, the interface has changed enough that it’s important to
familiarize yourself with where to find features and how to use them. The
interface also offers customization functionality, such as the ability to
collapse or hide sections when creating new AD objects.
Server 2012 Active Directory can run at the Server 2012 functional
level, or it can be incorporated into older functional levels of Active
Directory domains, although some functionality may be sacrificed.
While it may seem like a bother to use PowerShell to execute
commands that you can perform with just a click in the GUI, it’s worth
getting acquainted with various PowerShell commands—in particular, ones
related to Active Directory tasks—in order to manage AD quickly and
efficiently. The best way to grasp PowerShell’s potential is to imagine
needing to apply a slight change to every user object in Active
Directory—a process that would take forever with the GUI. Investing a
little time in learning PowerShell can make accomplishing such seemingly
daunting tasks quick and easy, and this is a central theme of Server
2012.