by Milan Stanojevic
Milan has been enthusiastic about technology ever since his childhood days, and this led him to take interest in all PC-related technologies. He’s a PC enthusiast and he… read more
Updated on December 23, 2022
- Windows 10 is an operating System that has been optimized for both PC and Tablet devices, so the Rotation Lock button is crucial for when switching between the two modes.
- Sometimes, issues can prevent the Rotation Lock button from becoming accessible, and that is where the steps in our guide can become extremely handy.
XINSTALL BY CLICKING THE DOWNLOAD FILE
This software will repair common computer errors, protect you from file loss, malware, hardware failure and optimize your PC for maximum performance. Fix PC issues and remove viruses now in 3 easy steps:
- Download Restoro PC Repair Tool that comes with Patented Technologies (patent available here).
- Click Start Scan to find Windows issues that could be causing PC problems.
- Click Repair All to fix issues affecting your computer’s security and performance
- Restoro has been downloaded by 0 readers this month.
If you own 2 in 1 Windows 10 device, the rotation is one of the basic features that you’re going to use.
Unfortunately, users have reported that Rotation Lock option is grayed out and that rotation isn’t working on their devices, so let’s fix that.
- Windows 10 rotation lock missing
- Windows 10 auto rotate not working
- Lenovo Yoga rotation lock greyed out
- Lenovo Yoga Screen rotation not working
- Lenovo Yoga auto rotate not working
How do I fix a greyed-out Rotation Lock button in Windows 10?
- How do I fix a greyed-out Rotation Lock button in Windows 10?
- 1. Turn on portrait mode on your device
- 2. Reset your device
- 3. Uninstall / Update your display drivers
- Update drivers automatically
- 4. Use your device in tent mode
- 5. Disconnect your keyboard
- 6. Switch to Tablet Mode
- 7. Change LastOrientation registry value
- 8. Make sure that your screen is allowed to auto-rotate
- 9. Check Sensor Monitoring Service
- 10. Disable YMC service
- 11. Remove Intel Virtual Buttons Driver
- 12. Disable sensors from Device Manager and enable them again
- 13. Download latest firmware, drivers, and Windows updates
- 14. Update your BIOS
- 15. Restart Windows 10
- 16. Reset this PC
1. Turn on portrait mode on your device
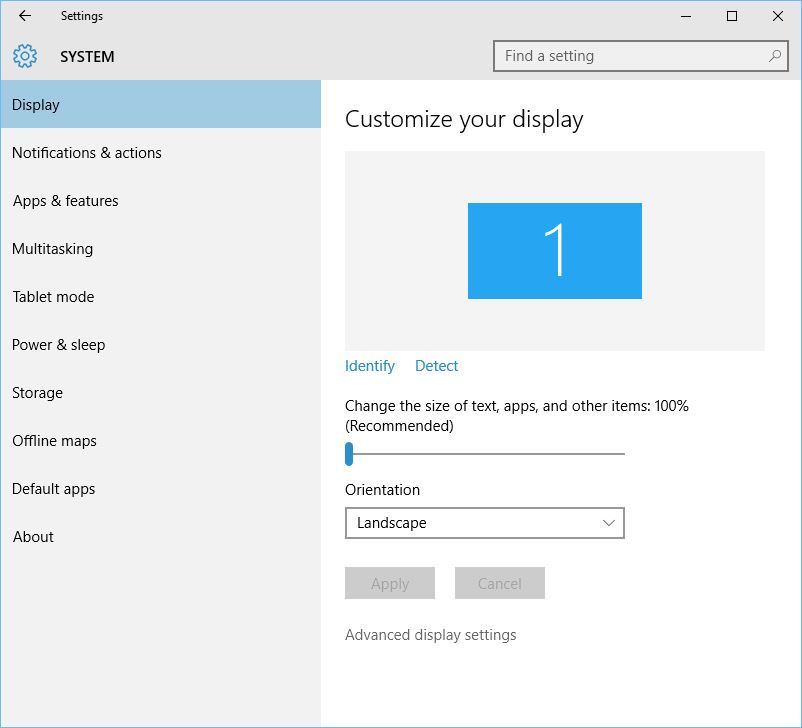
- Open Settings App and go to System > Display.
- Find Orientation and choose Portrait from the menu.

- Your device should automatically switch to portrait mode.
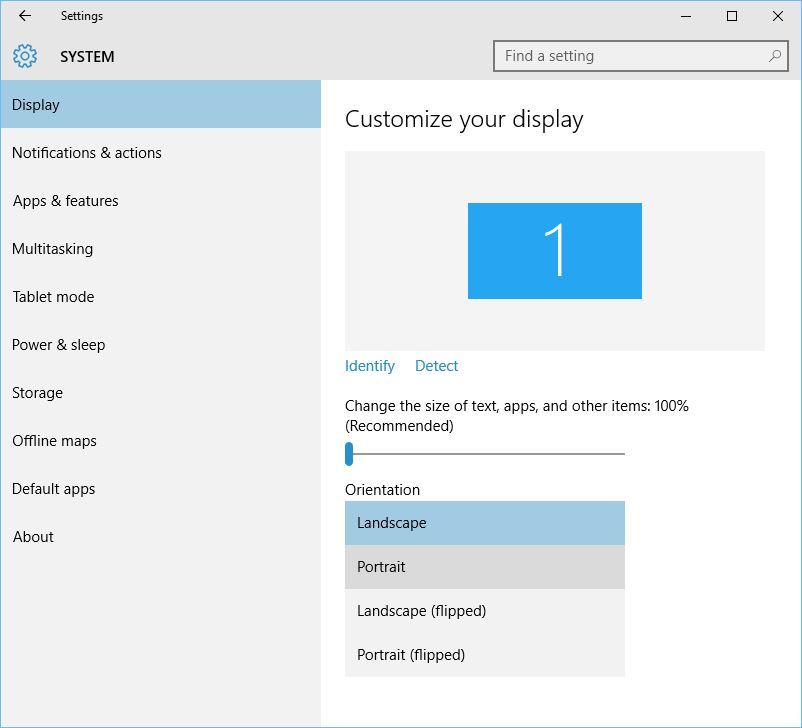
If Rotation Lock is grayed out or missing on your device, sometimes you just need to rotate it to portrait mode. After rotating your device, rotation lock should be clickable again.
2. Reset your device
- Turn off your device.
- When the device turns off, hold Volume Up and Power button.
- Choose reset and save option and exit.
Users have reported that Rotation Lock function isn’t even showing in the notification area on their Microsoft Surface, and if you have the same problem on your Surface device, you can try to reset your device.
After you’ve done that, Rotation Lock should now appear in the Notification area, and it should work properly.
It seems that this issue is caused by connecting your Surface to an external display, so in order to avoid future problems, maybe you should avoid connecting your device to external displays until Microsoft releases a patch that fixes this issue.
3. Uninstall / Update your display drivers
Sometimes, problems with Rotation Lock can be caused by your display drivers, so you might need to update them or uninstall them.
To uninstall your drivers, do the following:
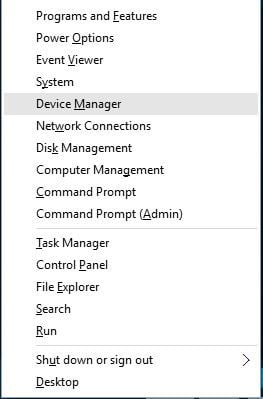
- Press Windows Key + X and choose Device Manager from the list.

- When Device Manager opens, navigate to Display adapters section and locate your driver.
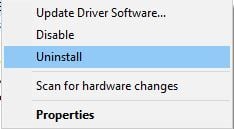
- Right-click the driver and choose Uninstall.

- After you have uninstalled the driver, restart your device.
If the problem still persists, you might have to update your display adapters. To do that, follow these steps:
- Open Device Manager and locate your display adapter driver.
- Right-click it and choose Update Driver Software.

- Choose one of the options and follow the instructions.
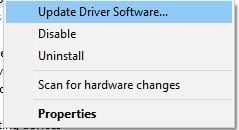
In addition, you can always go to your device manufacturer’s website and download the latest drivers for your device.
Update drivers automatically
If this solution doesn’t work or you do not have the necessary computer skills to update the right driver version (wrong drivers can damage your system), we strongly suggest doing it automatically by using a professional driver updater tool.
Once installed, the program will start scanning your PC for outdated drivers automatically.
A driver updater will check your installed driver versions against its cloud database of the latest versions and recommend proper updates. All you need to do is wait for the scan to complete.
4. Use your device in tent mode
- Put your device in tent mode. If your display is upside down, don’t worry.
- Click the Action Center icon in your Taskbar and Rotation Lock should be available.
- Now you can turn off the rotation lock and your display should rotate to a proper position.
Users have reported that Rotation Lock is grayed out on their Dell Inspiron 11, and the only way to fix this is to use the tent mode. To enable Rotation Lock, perform the steps above.
5. Disconnect your keyboard
If Rotation Lock is grayed out on your Surface Pro 3 or Dell XPS 2-in-1 device, you might want to try disconnecting your keyboard.
Users have reported that after the keyboard is disconnected Rotation Lock button starts working normally.
Of course, if you own a different 2-in-1 device, you can still try this solution.
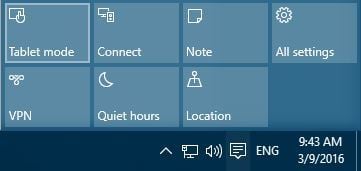
6. Switch to Tablet Mode
Some users claim that problems with grayed out or missing Rotation Lock button can be fixed simply by switching to Tablet Mode.
If your device doesn’t switch automatically to Tablet Mode, you can do the following to access Tablet Mode manually:
- Click the Action Center button in the Taskbar.

- When Action Center opens, click the Tablet Mode.

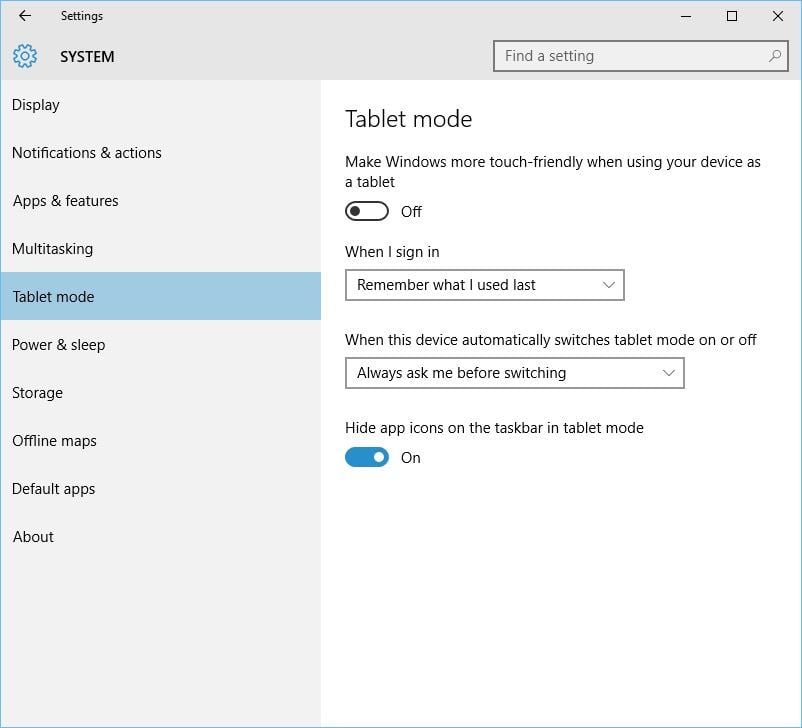
You can also enter Tablet Mode using the Settings app:
- Open Settings > System > Tablet Mode.
- Make sure that Make Windows more touch-friendly when using your device as a tablet is turned On.

- If you want, you can also change how your device will work when you automatically switch Tablet Mode on or off.
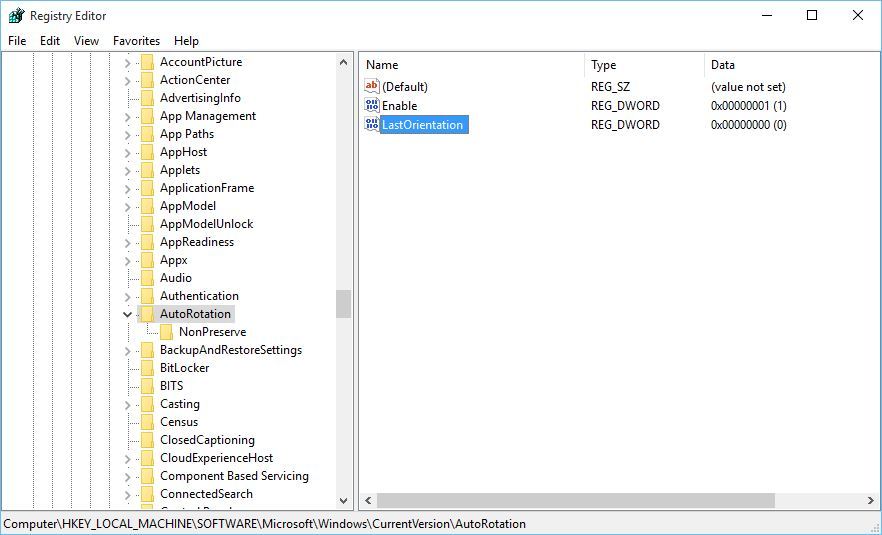
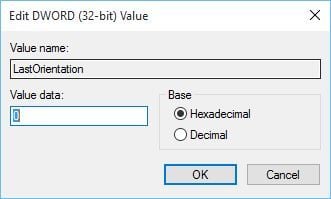
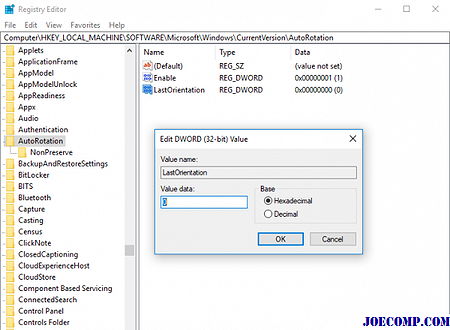
7. Change LastOrientation registry value
- Press Windows Key + R and type regedit.
- Press Enter or click OK.

- When Registry Editor opens, you need to navigate to the following key in the left pane:
- HKEY_LOCAL_MACHINESOFTWAREMicrosoftWindowsCurrentVersionAutoRotation
- In the right pane, find LastOrientation and double-click it.

- In Value data box enter 0 and click OK to save changes.

- If you see SensorPresent DWORD available, double-click it and make sure that its value is set to 1.

If you have problems with Rotation Lock and if the rotation isn’t working on your device, you might have to change some registry values.
- READ ALSO:Can’t access Registry Editor? Don’t panic! Check out this guide and solve the issue quickly.
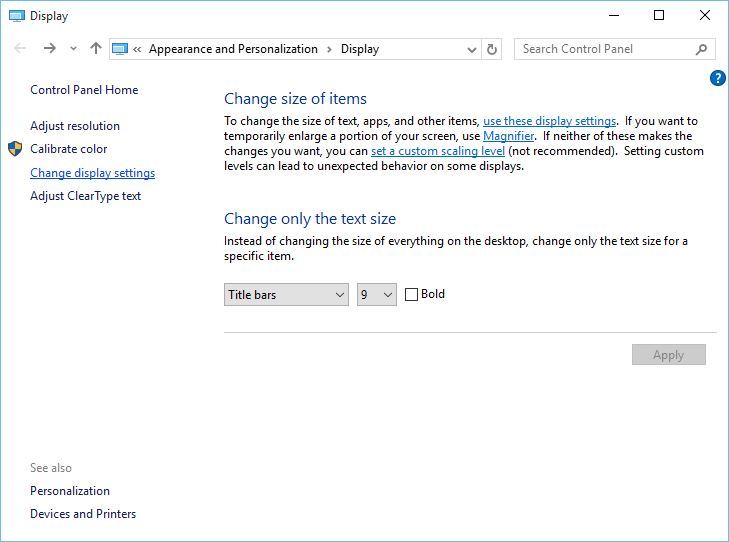
8. Make sure that your screen is allowed to auto-rotate
If your screen isn’t allowed to auto-rotate, this can be one of the causes for Rotation Lock problems. To fix this issue, you need to check if your screen is allowed to auto-rotate. To do that, follow these steps:
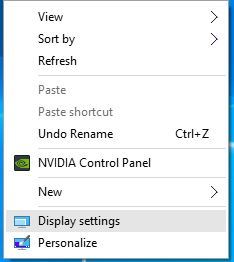
- Right-click your desktop and choose Display settings.

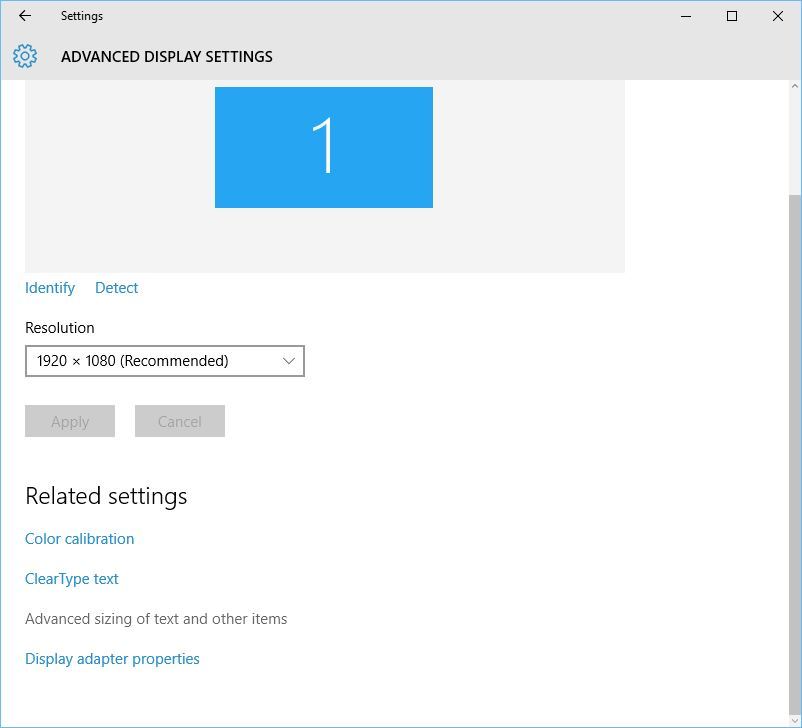
- When Display settings open, click on Advanced display settings.
- Now click on the Advanced sizing of text and other items.
- On the left side choose Change display settings.

- Check Allow the screen to auto-rotate.
- Click Apply and OK to save the changes.
- After you’ve done that, restart your computer in order to apply the changes.
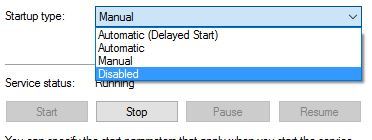
9. Check Sensor Monitoring Service
- Press Windows Key + R and type services.msc.
- Press Enter or click OK.
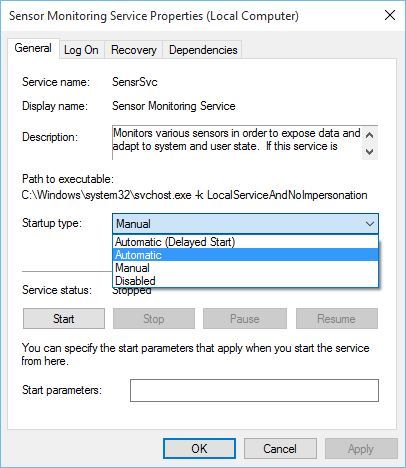
- When Services window opens, locate Sensor Monitoring Service and double-click it.

- Change the Startup type to Automatic and click Start to start the service.

- Click Apply and OK to save the changes.
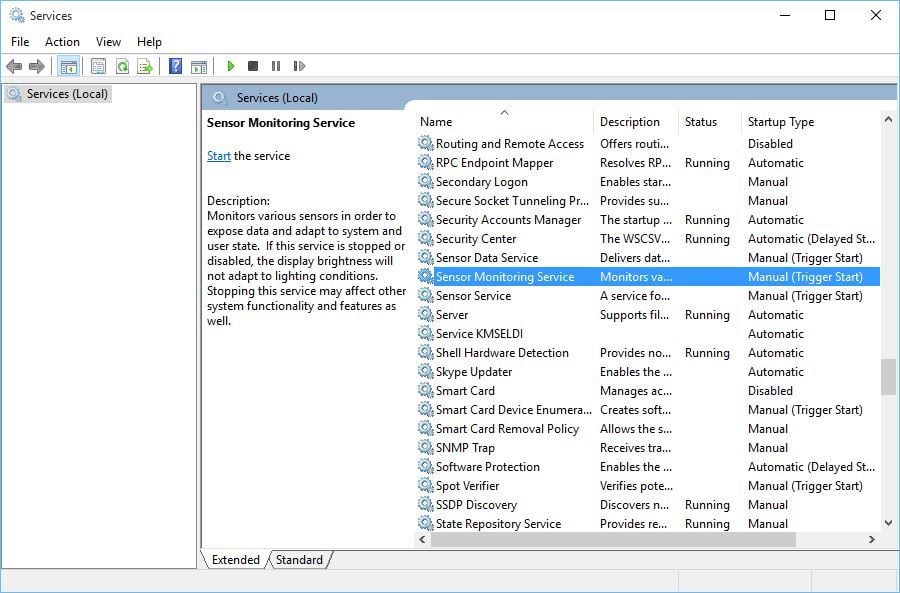
Problems with Rotation Lock and rotation can be caused by certain services, so let’s check if those services are working properly.
10. Disable YMC service
- Open Services window and locate YMC service.
- Double click the service to open its properties and set the Startup type to Disabled.

- Click Apply and OK to save the changes.
If you own Lenovo Yoga device and you have problems with rotation and Rotation Lock button, you can fix these problems by disabling the YMC service.
- READ ALSO: We’ve written a nice piece on screen Rotation issues on Lenovo Yoga. Check out this guide to find out more.
11. Remove Intel Virtual Buttons Driver
- Open Device Manager. You can open Device Manager by pressing Windows Key + X and choosing Device Manager from the list.
- Once Device Manager opens, locate Intel Virtual Buttons driver.
- Right-click it and choose Uninstall.
It has been reported that Intel Virtual Buttons driver causes problems with rotation and it also makes the Rotation Lock button grayed out.
After the driver has been removed, rotation and Rotation Lock button should be working normally.
- READ ALSO: Delete drivers safely and efficiently with these great tools from our list!
12. Disable sensors from Device Manager and enable them again
- Start Device Manager.
- Find Sensor sections and disable all sensors by right-clicking them and choosing Disable from the menu.

- After you’ve disabled all the sensors, you need to enable them again. To do that, just right-click the disabled device and choose Enable from the menu.
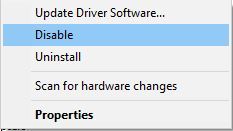
Problems with rotation can be caused by your sensors, and you might have to temporarily disable them from Device Manager.
If the issue still persists, it’s advised that you restart your computer after you’ve disabled the sensors. After Windows 10 starts, you need to go back to Device Manager to enable the sensors again.
13. Download latest firmware, drivers, and Windows updates
Often these issues can be resolved by downloading the latest drivers from the manufacturer’s website, so if you have problems with missing or grayed out Rotation Lock button, try downloading and installing all latest drivers for your device.
Yoga 3 users have reported that problems with rotation and Rotation Lock have been fixed after ITE sensor firmware update, so make sure that you download and install the latest firmware for your device.
Other users have reported that these problems have been resolved by downloading latest Windows updates, so if you’re having this problem, it won’t be a bad idea to update your Windows 10.
14. Update your BIOS
If Rotation Lock is grayed out or missing, you might be able to fix that by updating your BIOS. To update BIOS, you need to go your device manufacturer’s website and download the latest BIOS.
Before you perform a BIOS update, make sure that you read the instruction manual carefully in order to avoid any potential damage.
- READ ALSO: Become an expert in updating BIOS with our comprehensive guide!
15. Restart Windows 10
In some cases, the most obvious solution is the best solution, and few users have reported that they have managed to fix missing Lock Rotation button by simply restarting their device.
We have to mention that turning off and turning on your device won’t work since Windows 10 uses hybrid shutdown (that is similar to Hibernate feature from previous versions of Windows).
Instead, you’ll have to choose Restart option from the Power menu in order to perform a proper restart.
16. Reset this PC
- Press Windows key + I to open Settings.
- Choose Update & security.
- Select Recovery from the left pane.

- Under the ”Reset this PC” section, click Get Started.
- Choose whether to preserve your data or to delete it and wait for the procedure to end.
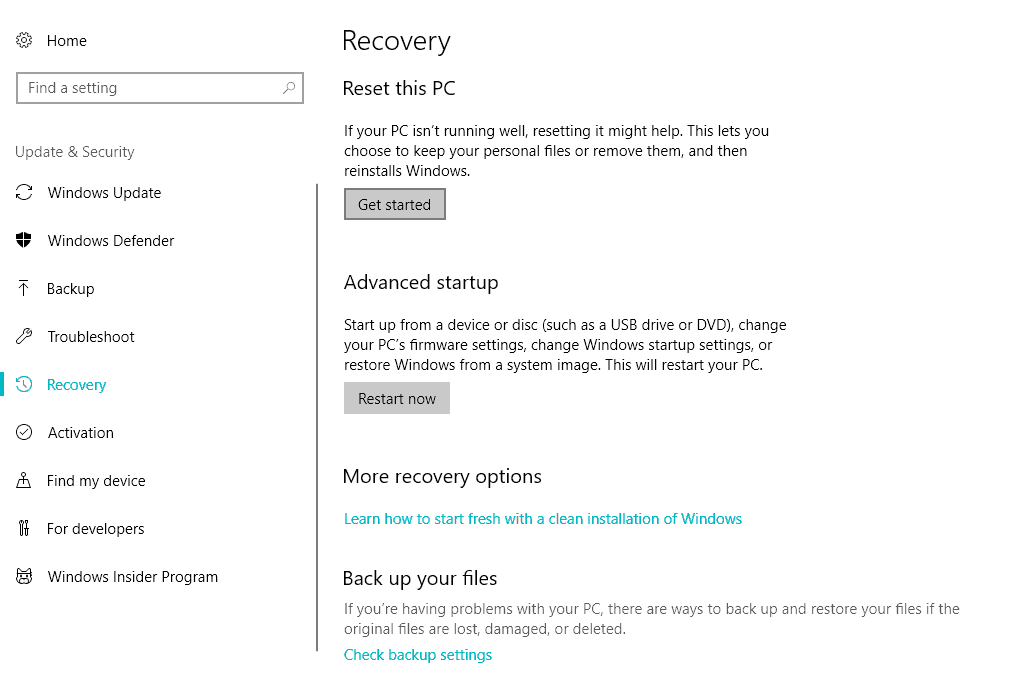
Finally, if none of the available solutions provided a terminal solution for your problem and you’re still experiencing inconsistency with the Rotation Lock, we advise you to reset your PC to factory settings.
This is a nifty recovery option introduced in Windows 10. You can preserve your data in the process, which is great in comparison to a clean reinstallation.
- READ MORE: Resetting your PC won’t work? No worries! Follow this guide to quickly solve the issue!
There are many reasons why the Rotation Lock button might be grayed out or missing on your Windows 10 device, but we hope that you’ve managed to fix this issue by following our solutions.
If you have any comments, questions or suggestions, just let us know in the comments below.
![]()
Newsletter
by Milan Stanojevic
Milan has been enthusiastic about technology ever since his childhood days, and this led him to take interest in all PC-related technologies. He’s a PC enthusiast and he… read more
Updated on December 23, 2022
- Windows 10 is an operating System that has been optimized for both PC and Tablet devices, so the Rotation Lock button is crucial for when switching between the two modes.
- Sometimes, issues can prevent the Rotation Lock button from becoming accessible, and that is where the steps in our guide can become extremely handy.
XINSTALL BY CLICKING THE DOWNLOAD FILE
This software will repair common computer errors, protect you from file loss, malware, hardware failure and optimize your PC for maximum performance. Fix PC issues and remove viruses now in 3 easy steps:
- Download Restoro PC Repair Tool that comes with Patented Technologies (patent available here).
- Click Start Scan to find Windows issues that could be causing PC problems.
- Click Repair All to fix issues affecting your computer’s security and performance
- Restoro has been downloaded by 0 readers this month.
If you own 2 in 1 Windows 10 device, the rotation is one of the basic features that you’re going to use.
Unfortunately, users have reported that Rotation Lock option is grayed out and that rotation isn’t working on their devices, so let’s fix that.
- Windows 10 rotation lock missing
- Windows 10 auto rotate not working
- Lenovo Yoga rotation lock greyed out
- Lenovo Yoga Screen rotation not working
- Lenovo Yoga auto rotate not working
How do I fix a greyed-out Rotation Lock button in Windows 10?
- How do I fix a greyed-out Rotation Lock button in Windows 10?
- 1. Turn on portrait mode on your device
- 2. Reset your device
- 3. Uninstall / Update your display drivers
- Update drivers automatically
- 4. Use your device in tent mode
- 5. Disconnect your keyboard
- 6. Switch to Tablet Mode
- 7. Change LastOrientation registry value
- 8. Make sure that your screen is allowed to auto-rotate
- 9. Check Sensor Monitoring Service
- 10. Disable YMC service
- 11. Remove Intel Virtual Buttons Driver
- 12. Disable sensors from Device Manager and enable them again
- 13. Download latest firmware, drivers, and Windows updates
- 14. Update your BIOS
- 15. Restart Windows 10
- 16. Reset this PC
1. Turn on portrait mode on your device
- Open Settings App and go to System > Display.
- Find Orientation and choose Portrait from the menu.
- Your device should automatically switch to portrait mode.
If Rotation Lock is grayed out or missing on your device, sometimes you just need to rotate it to portrait mode. After rotating your device, rotation lock should be clickable again.
2. Reset your device
- Turn off your device.
- When the device turns off, hold Volume Up and Power button.
- Choose reset and save option and exit.
Users have reported that Rotation Lock function isn’t even showing in the notification area on their Microsoft Surface, and if you have the same problem on your Surface device, you can try to reset your device.
After you’ve done that, Rotation Lock should now appear in the Notification area, and it should work properly.
It seems that this issue is caused by connecting your Surface to an external display, so in order to avoid future problems, maybe you should avoid connecting your device to external displays until Microsoft releases a patch that fixes this issue.
3. Uninstall / Update your display drivers
Sometimes, problems with Rotation Lock can be caused by your display drivers, so you might need to update them or uninstall them.
To uninstall your drivers, do the following:
- Press Windows Key + X and choose Device Manager from the list.
- When Device Manager opens, navigate to Display adapters section and locate your driver.
- Right-click the driver and choose Uninstall.
- After you have uninstalled the driver, restart your device.
If the problem still persists, you might have to update your display adapters. To do that, follow these steps:
- Open Device Manager and locate your display adapter driver.
- Right-click it and choose Update Driver Software.
- Choose one of the options and follow the instructions.
In addition, you can always go to your device manufacturer’s website and download the latest drivers for your device.
Update drivers automatically
If this solution doesn’t work or you do not have the necessary computer skills to update the right driver version (wrong drivers can damage your system), we strongly suggest doing it automatically by using a professional driver updater tool.
Once installed, the program will start scanning your PC for outdated drivers automatically.
A driver updater will check your installed driver versions against its cloud database of the latest versions and recommend proper updates. All you need to do is wait for the scan to complete.
4. Use your device in tent mode
- Put your device in tent mode. If your display is upside down, don’t worry.
- Click the Action Center icon in your Taskbar and Rotation Lock should be available.
- Now you can turn off the rotation lock and your display should rotate to a proper position.
Users have reported that Rotation Lock is grayed out on their Dell Inspiron 11, and the only way to fix this is to use the tent mode. To enable Rotation Lock, perform the steps above.
5. Disconnect your keyboard
If Rotation Lock is grayed out on your Surface Pro 3 or Dell XPS 2-in-1 device, you might want to try disconnecting your keyboard.
Users have reported that after the keyboard is disconnected Rotation Lock button starts working normally.
Of course, if you own a different 2-in-1 device, you can still try this solution.
6. Switch to Tablet Mode
Some users claim that problems with grayed out or missing Rotation Lock button can be fixed simply by switching to Tablet Mode.
If your device doesn’t switch automatically to Tablet Mode, you can do the following to access Tablet Mode manually:
- Click the Action Center button in the Taskbar.
- When Action Center opens, click the Tablet Mode.
You can also enter Tablet Mode using the Settings app:
- Open Settings > System > Tablet Mode.
- Make sure that Make Windows more touch-friendly when using your device as a tablet is turned On.
- If you want, you can also change how your device will work when you automatically switch Tablet Mode on or off.
7. Change LastOrientation registry value
- Press Windows Key + R and type regedit.
- Press Enter or click OK.
- When Registry Editor opens, you need to navigate to the following key in the left pane:
- HKEY_LOCAL_MACHINESOFTWAREMicrosoftWindowsCurrentVersionAutoRotation
- In the right pane, find LastOrientation and double-click it.
- In Value data box enter 0 and click OK to save changes.
- If you see SensorPresent DWORD available, double-click it and make sure that its value is set to 1.
If you have problems with Rotation Lock and if the rotation isn’t working on your device, you might have to change some registry values.
- READ ALSO:Can’t access Registry Editor? Don’t panic! Check out this guide and solve the issue quickly.
8. Make sure that your screen is allowed to auto-rotate
If your screen isn’t allowed to auto-rotate, this can be one of the causes for Rotation Lock problems. To fix this issue, you need to check if your screen is allowed to auto-rotate. To do that, follow these steps:
- Right-click your desktop and choose Display settings.
- When Display settings open, click on Advanced display settings.
- Now click on the Advanced sizing of text and other items.
- On the left side choose Change display settings.
- Check Allow the screen to auto-rotate.
- Click Apply and OK to save the changes.
- After you’ve done that, restart your computer in order to apply the changes.
9. Check Sensor Monitoring Service
- Press Windows Key + R and type services.msc.
- Press Enter or click OK.
- When Services window opens, locate Sensor Monitoring Service and double-click it.
- Change the Startup type to Automatic and click Start to start the service.
- Click Apply and OK to save the changes.
Problems with Rotation Lock and rotation can be caused by certain services, so let’s check if those services are working properly.
10. Disable YMC service
- Open Services window and locate YMC service.
- Double click the service to open its properties and set the Startup type to Disabled.
- Click Apply and OK to save the changes.
If you own Lenovo Yoga device and you have problems with rotation and Rotation Lock button, you can fix these problems by disabling the YMC service.
- READ ALSO: We’ve written a nice piece on screen Rotation issues on Lenovo Yoga. Check out this guide to find out more.
11. Remove Intel Virtual Buttons Driver
- Open Device Manager. You can open Device Manager by pressing Windows Key + X and choosing Device Manager from the list.
- Once Device Manager opens, locate Intel Virtual Buttons driver.
- Right-click it and choose Uninstall.
It has been reported that Intel Virtual Buttons driver causes problems with rotation and it also makes the Rotation Lock button grayed out.
After the driver has been removed, rotation and Rotation Lock button should be working normally.
- READ ALSO: Delete drivers safely and efficiently with these great tools from our list!
12. Disable sensors from Device Manager and enable them again
- Start Device Manager.
- Find Sensor sections and disable all sensors by right-clicking them and choosing Disable from the menu.
- After you’ve disabled all the sensors, you need to enable them again. To do that, just right-click the disabled device and choose Enable from the menu.
Problems with rotation can be caused by your sensors, and you might have to temporarily disable them from Device Manager.
If the issue still persists, it’s advised that you restart your computer after you’ve disabled the sensors. After Windows 10 starts, you need to go back to Device Manager to enable the sensors again.
13. Download latest firmware, drivers, and Windows updates
Often these issues can be resolved by downloading the latest drivers from the manufacturer’s website, so if you have problems with missing or grayed out Rotation Lock button, try downloading and installing all latest drivers for your device.
Yoga 3 users have reported that problems with rotation and Rotation Lock have been fixed after ITE sensor firmware update, so make sure that you download and install the latest firmware for your device.
Other users have reported that these problems have been resolved by downloading latest Windows updates, so if you’re having this problem, it won’t be a bad idea to update your Windows 10.
14. Update your BIOS
If Rotation Lock is grayed out or missing, you might be able to fix that by updating your BIOS. To update BIOS, you need to go your device manufacturer’s website and download the latest BIOS.
Before you perform a BIOS update, make sure that you read the instruction manual carefully in order to avoid any potential damage.
- READ ALSO: Become an expert in updating BIOS with our comprehensive guide!
15. Restart Windows 10
In some cases, the most obvious solution is the best solution, and few users have reported that they have managed to fix missing Lock Rotation button by simply restarting their device.
We have to mention that turning off and turning on your device won’t work since Windows 10 uses hybrid shutdown (that is similar to Hibernate feature from previous versions of Windows).
Instead, you’ll have to choose Restart option from the Power menu in order to perform a proper restart.
16. Reset this PC
- Press Windows key + I to open Settings.
- Choose Update & security.
- Select Recovery from the left pane.
- Under the ”Reset this PC” section, click Get Started.
- Choose whether to preserve your data or to delete it and wait for the procedure to end.
Finally, if none of the available solutions provided a terminal solution for your problem and you’re still experiencing inconsistency with the Rotation Lock, we advise you to reset your PC to factory settings.
This is a nifty recovery option introduced in Windows 10. You can preserve your data in the process, which is great in comparison to a clean reinstallation.
- READ MORE: Resetting your PC won’t work? No worries! Follow this guide to quickly solve the issue!
There are many reasons why the Rotation Lock button might be grayed out or missing on your Windows 10 device, but we hope that you’ve managed to fix this issue by following our solutions.
If you have any comments, questions or suggestions, just let us know in the comments below.
![]()
Newsletter
Windows 10 – это операционная система, предназначенная для искусной работы с интеграцией сенсорных и мышиных интерфейсов. ОС предназначена для работы на различных устройствах, таких как ПК, планшеты, Xbox One, смартфоны и другие встроенные системы. Как и многие, вы, возможно, перешли на последнюю версию Windows 10 для своего планшета или ноутбука. Хотя он работает исключительно на всех устройствах, будь то ПК или планшеты, пользователи столкнулись с некоторыми проблемами, связанными с автоповоротом экрана в режиме планшета. Проблема в основном сталкивается с пользователями, которые недавно загрузили Windows 10 для своих устройств, используемых в режиме планшета.
Автоповорот – это одна из функций, которая в основном используется для больших устройств, особенно для вашего планшета. Это удобнее, когда вы хотите переключиться из книжной в альбомную ориентацию и наоборот в зависимости от поворота устройства. Кратко о его работе. В основном планшет использует датчики для определения поворота и настройки дисплея в соответствии с текущей ориентацией. То есть датчики в устройстве автоматически поворачиваются при переходе из портретного режима в ландшафтный и наоборот. Но при использовании Windows 10 на планшете автоповорот экрана может не работать для некоторых пользователей. Так что если вы не можете повернуть экран в Windows 10, читайте дальше.
Автоповорот экрана не работает
Основная причина проблемы может быть связана с проблемой программного обеспечения или с драйверами устройств . Перед тем, как попробовать эти предложения, убедитесь, что ваше устройство обновлено до последнего патча, так как иногда загрузка последнего обновления может решить большинство проблем программного обеспечения, связанных с автоматическим поворотом.
1] Отключите блокировку вращения .

- Если вы используете систему в режиме ноутбука, переведите ваш компьютер из режима ноутбука в режим планшета.
- Затем откройте Центр поддержки на панели задач и переключите блокировку вращения в положение «Выкл.».
Вы также можете отключить вращение блокировки в настройках следующим образом. Откройте Центр поддержки и нажмите на режим планшета. Это переведет ваш компьютер в режим ноутбука в режим планшета.
Затем перейдите в меню «Настройки» в меню «Пуск», нажмите «Системы» и нажмите «Дисплей». Здесь отключите блокировку автоповорота и закройте.
2] Обновите драйверы

Обновите драйверы вашего устройства и посмотрите. Для этого откройте панель управления, нажмите «Диспетчер устройств» и найдите сенсорные устройства ввода-вывода .
Нажмите правой кнопкой мыши на сенсорных устройствах и выберите в меню Обновить драйвер . В открывшемся мастере выберите « Автоматический поиск обновленного программного обеспечения драйвера ».
После установки драйвера перезагрузите устройство и посмотрите, помогло ли оно.
Автоповорот экрана серый
Если вы обнаружите, что опция автоповорота экрана неактивна, сделайте резервную копию реестра. а затем откройте команду Выполнить , нажав клавишу Windows + R.
Введите regedit и нажмите ОК.
Теперь перейдите по следующему пути:
HKEY_LOCAL_MACHINE SOFTWARE Microsoft Windows CurrentVersion AutoRotation
Найдите ключ LastOrientation и дважды щелкните его.

Добавьте 1 в поле данных значения DWORD и нажмите OK, чтобы сохранить изменения.
Затем используйте Ctrl + F для поиска клавиши SensorPresent . Если он доступен, дважды щелкните его и измените значение DWORD на 1 . Если он недоступен, вы можете создать его в AutoRotation и присвоить ему значение 1.
Перезагрузите компьютер и посмотрите.
***Решаем проблему кодировки***
Оглавление:
- Автоматическое вращение экрана не работает
Windows 10 — это операционная система, которая умело работает с интеграцией интерфейсов touch и mouse. ОС предназначена для работы на различных устройствах, таких как ПК, планшеты, Xbox One, смартфоны и другие встроенные системы. Как и многие, вы могли перейти на последнюю версию Windows 10 для планшета или ноутбука. Несмотря на то, что на всех устройствах он работает исключительно на ПК или планшетах, пользователи столкнулись с некоторыми проблемами с screen auto rotate в режиме Tablet. В основном проблема связана с пользователями, которые недавно загрузили Windows 10 для своих устройств, используемых в режиме планшета.
Авторотация — одна из функций, которая в основном используется для более крупных устройств, особенно вашего планшета. Это удобнее, когда вы хотите перейти от портретной ориентации к пейзажной ориентации и наоборот в соответствии с настройкой устройства. Рассказывая о своей работе, в основном ваш планшет использует датчики для обнаружения вращения и настройки отображения на текущую ориентацию. То есть, датчики в устройстве автоматически вращаются, когда вы переходите из портретного режима в альбомный и наоборот. Но с Windows 10 на планшете экранный поворот экрана может не работать для некоторых пользователей.
Автоматическое вращение экрана не работает
Основная причина проблемы может быть связана с проблемой в программном обеспечении или может быть проблема с Драйверы устройств . Перед тем, как попробовать эти рекомендации, убедитесь, что ваше устройство обновлено до последнего патча, так как иногда загрузка последнего обновления может устранить большинство проблем с программным обеспечением, связанным с авторотированием.
1] Поверните блокировку вращения

- Если вы используете система в режиме ноутбука преобразует ваш компьютер из режима ноутбука в режим планшета.
- Затем откройте «Центр действий» на панели задач и переключите блокировку вращения в положение «Выключено».
Вы также можете отключить вращение блокировки в настройках как следующим образом. Откройте Центр действий и нажмите «Режим планшета». Это преобразует ваш компьютер в режим ноутбука в режим Tablet.
Затем перейдите в «Настройки» в меню «Пуск» и выберите «Системы» и нажмите «Показать». Здесь отключите блокировку автоповтора и закройте.
2] Обновите драйверы

Обновите драйверы устройств и посмотрите. Для этого откройте панель управления, щелкните Диспетчер устройств и найдите устройства ввода-вывода .
Щелкните правой кнопкой мыши на сенсорных устройствах и нажмите Обновить драйвер в меню, В открывшемся окне выберите « Поиск автоматически для обновленного программного обеспечения драйвера ».
После установки драйвера перезагрузите устройство и посмотрите, помогло ли оно.
Экран «Автоповорот» с серым цветом
Если вы обнаружите, что опция автоматического поворота экрана выделена серым цветом, создайте резервную копию реестра. и затем откройте команду Выполнить , нажав клавишу Windows + R.
Введите regedit и нажмите «ОК».
Теперь перейдите к следующему пути:
HKEY_LOCAL_MACHINE ПРОГРАММНОЕ ОБЕСПЕЧЕНИЕ Microsoft Windows CurrentVersion AutoRotation
Найдите ключ LastOrientation и дважды щелкните по нему.

Добавить 1 в поле данных значения DWORD и нажмите OK, чтобы сохранить изменения.
Далее, используйте Ctrl + F для поиска SensorPresent . Если он доступен, дважды щелкните его и измените значение DWORD на 1 . Если он недоступен, вы можете создать его в AutoRotation и дать ему значение 1.
Перезагрузите компьютер и посмотрите.
Содержание
- 1 Комбинации кнопок
- 2 Другие варианты
- 3 Исправление обновления января 2020 года:
- 4 Автоматическое вращение экрана не работает
Автор: AleksPayne · 01.01.2018
Всем здравствуйте. Тема сегодняшней статьи «Поворот экрана в Windows 10: горячие клавиши и ещё несколько простых способов». Объясню, с чем это связано. Дело в том, что с одним моим знакомым приключилась интересная история. Он много работает, иногда круглосуточно, за ноутбуком. Пару дней назад тоже работал ночью, вымотался, положил голову на клавиатуру отдохнуть и случайно уснул. Под утро просыпается, а у него изображение на мониторе ноута вверх ногами. Сам попытался что-то сделать, но не вышло. Позвонил мне. Я ему и подсказал те чудо-кнопочки, на которые он во сне лбом нажимал. Вот решил и вам рассказать, вдруг пригодится.
Комбинации кнопок
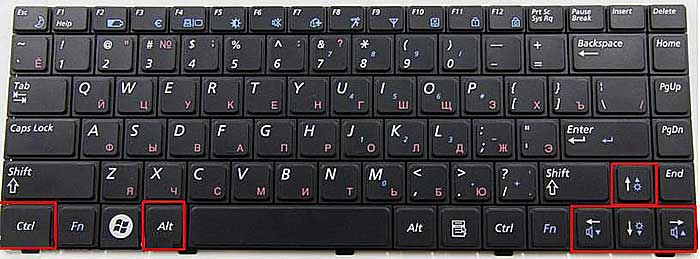
Выполнить поворот экрана в Windows 10 горячими клавишами на 90 и 180 градусов легко. Нужно только знать, что нажимать:
- Стрелочка вверх + Alt + Ctrl – эта комбинация перевернёт картинку вверх ногами.
- Стрелочка вниз + Alt + Ctrl – поможет вернуть его в нормальное положение после переворота.
- Стрелочки влево/вправо + Ctrl + Alt – развернут картинку на 90 градусов в соответствующую сторону.
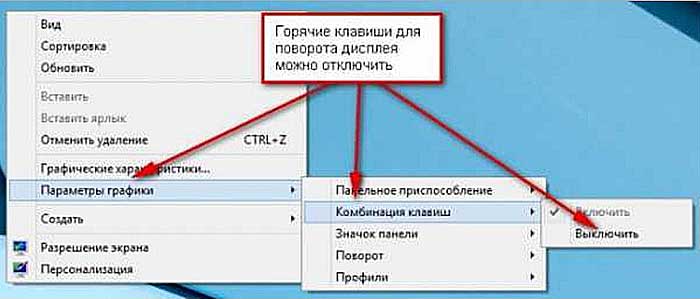
Друзья, согласитесь, что разворачивать рабочее пространство весьма занимательно, но не всегда нужно. Поэтому, чтобы аналогично моему знакомому не попасть в неловкую ситуацию, рекомендую поворот экрана в Windows 10 горячими клавишами отключить:
- В любой точке стола нужно сделать одно нажатие на кнопку мыши справа.
- Навести курсор на пункт «Параметры графики».
- Затем на «Комбинации клавиш».
- Выбрать пункт «Выключить».
Другие варианты
Нажать три кнопки – безусловно, самый быстрый и лёгкий способ развернуть картинку, но хотя бы для общего развития не помешает узнать и другие варианты.
Панель управления и Рабочий стол
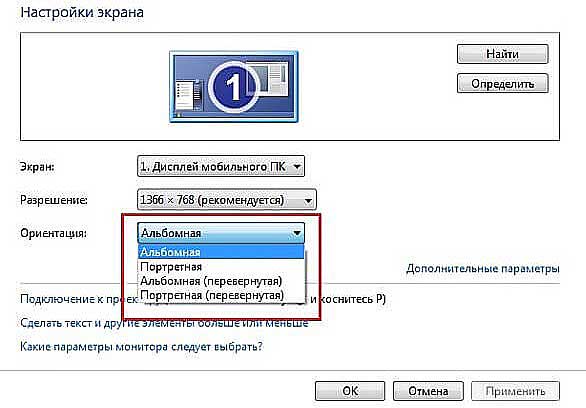
Добиться желаемого разворота можно через «Панель управления»:
- Раскрыть раздел «Все элементы ПУ»
- Затем зайти в каталог «Экран» и перейти к пункту «Расширение экрана»
Попасть в то же место можно в два щелчка на рабочем столе:
- Первый – правая кнопка мышки.
- Второй – выбор нужного пункта «Расширение экрана».
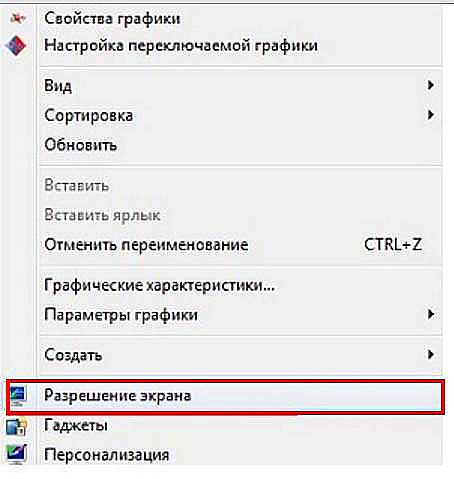
- Дальше в параграфе «Ориентация» установить требуемый параметр.
Видеокарта
- Правый щелчок мышью в любом месте свободного пространства.
- Перейти в раздел «Свойства графики».
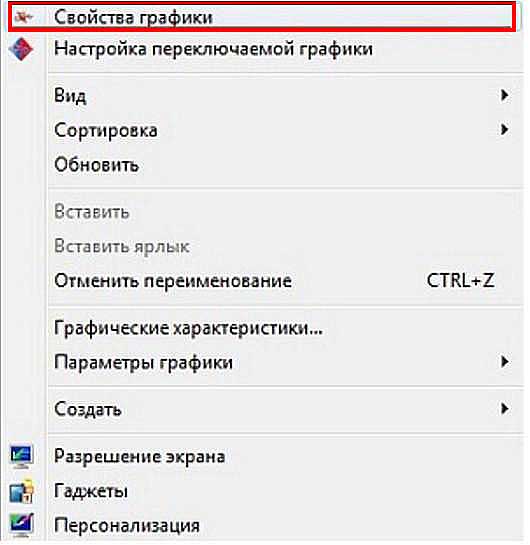
- Раскрыть меню «Общих задач дисплея».
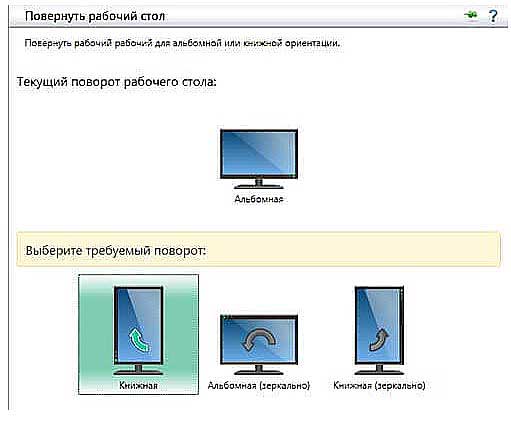
- Выбрать задачу «Повернуть рабочий стол».

- Выбрать требуемый разворот из предложенных вариантов.
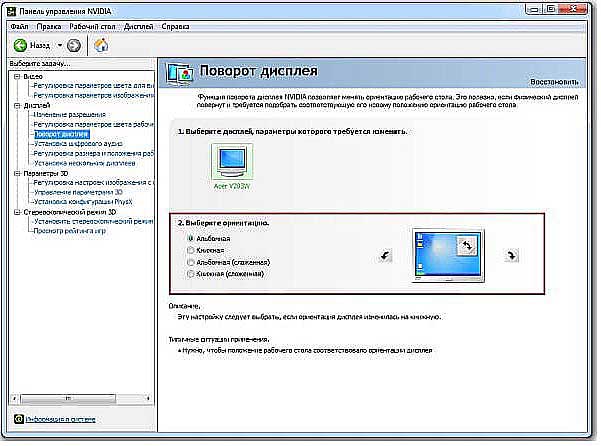
nVidia:
- Сделать правокнопочный клик на рабочем пространстве.
- Проследовать в «Панель управления Nvidia».
- С левой стороны выбрать задачу «Поворот экрана».
- Отметить точкой нужную ориентацию.
Утилиты
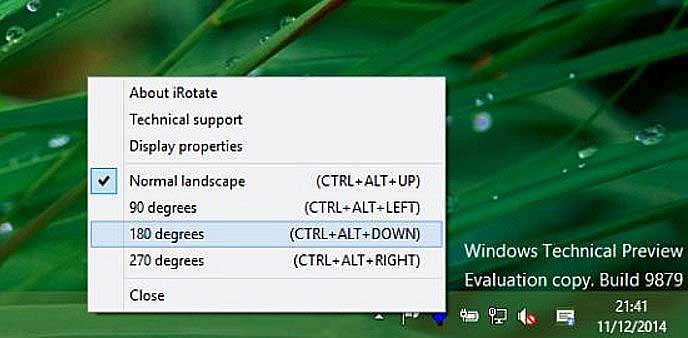
Друзья, умные люди для любой цели уже давно написали специальные программы. Разворот изображения на мониторе также не стал исключением. Если вам не хочется заморачиваться, то просто установите на свой ПК утилиту iRotate. Ей пользоваться очень просто:
- Запустить двумя кликами на ярлыке программы.
- Выбрать подходящий вариант ротации из четырёх возможных.
На этом закончу. Друзья, пишите мне о тех нелепых случайностях, что произошли с вами и компьютером, в результате которых пришлось искать в сети верное решение. Именно ваша история может стать темой следующего обсуждения. Всем пока.
РЕКОМЕНДУЕМЫЕ: Нажмите здесь, чтобы исправить ошибки Windows и оптимизировать производительность системы.
Windows 10 может автоматически поворачивать экран, если у вас есть компьютер или конвертируемый планшет — так же, как ваш смартфон. Вы можете установить поворот вашего экрана, если хотите.
Автоматическое вращение экрана доступно только на устройствах со встроенным акселерометром. Windows использует этот аппаратный компонент для определения текущей физической ориентации экрана.

Автоматический поворот экрана очень полезен. Однако есть ряд ситуаций, в которых это может раздражать. Лучший пример — когда вы лежите в кровати с планшетом и что-то читаете. Как только вы слегка измените угол обзора, камера внезапно изменит ориентацию экрана. Это очень тревожно. Поэтому вы можете временно заблокировать поворот экрана.
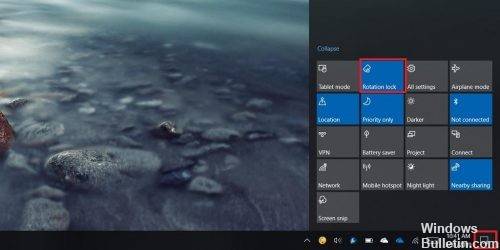
Автоматическая блокировка вращения включена в Windows 10 по умолчанию. Чтобы отключить эту функцию, действуйте следующим образом.
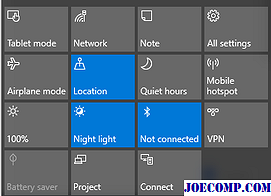
- Откройте Центр действий. Вы можете нажать значок на панели задач (область уведомлений).
- В Центре действий нажмите кнопку доступа к блокировке штатива DeepL, чтобы активировать ее.
- Позже вы можете разблокировать функцию поворота экрана с помощью той же кнопки.
Совет. Если к вашему устройству подключена клавиатура, вы можете использовать комбинацию клавиш Win + A, чтобы быстро открыть Центр поддержки.
Мы рекомендуем вам попробовать этот новый инструмент. Он исправляет множество компьютерных ошибок, а также защищает от таких вещей, как потеря файлов, вредоносное ПО, сбои оборудования и оптимизирует ваш компьютер для максимальной производительности. Это исправило наш компьютер быстрее, чем делать это вручную:
- Шаг 1: Скачать PC Repair & Optimizer Tool (Windows 10, 8, 7, XP, Vista — Microsoft Gold Certified).
- Шаг 2: Нажмите «Начать сканирование”, Чтобы найти проблемы реестра Windows, которые могут вызывать проблемы с ПК.
- Шаг 3: Нажмите «Починить все», Чтобы исправить все проблемы.
(дополнительное предложение для Advanced System Repair Pro -> Cайт | Лицензионное соглашение | Политика Kонфиденциальности | Удалить)
Существует также специальная клавиша быстрого доступа, которую вы можете использовать для активации блокировки поворота. Просто нажмите Win + O.
Отключить поворот экрана в настройках
- Откройте «Настройки» и нажмите на значок «Система».
- Вы также можете щелкнуть правой кнопкой мыши или нажать и удерживать на рабочем столе и нажать / нажать на настройки дисплея, чтобы открыть ту же страницу в настройках.
- Нажмите / коснитесь дисплея слева и включите или выключите турникет справа (по умолчанию). (см. скриншоты ниже)
- Когда вы закончите, вы можете закрыть настройки, если хотите.
Отключить поворот экрана под Windows 10 с помощью реестра.
Windows 10 также предоставляет другой способ отключить поворот экрана. Все, что вам нужно сделать, это изменить определенное значение DWORD в редакторе реестра. Тем не менее, чтобы выполнить следующие шаги, убедитесь, что все административные органы на месте. Некоторые устройства доступны там, где опция отключения этой функции вращения недоступна. Для таких пользователей эта настройка реестра будет очень полезна.
a) Введите Regedit в поле поиска Cortana и нажмите Enter, когда та же команда появится в результате.
б) В редакторе реестра перейдите от левой панели к следующему пути.
HKEY_LOCAL_MACHINE LOCAL_MACHINE LE ПРОГРАММНОЕ ОБЕСПЕЧЕНИЕ Microsoft Windows Текущая версия AutoRotation
c) Как только вы дойдете до кнопки AutoRotation, перейдите на правую сторону и создайте новое значение DWORD в битах 32. Для этого щелкните правой кнопкой мыши на свободном месте, переместите указатель мыши на Новый и выберите значение DWORD (биты 32).
Вывод
Теперь вы можете отключить свой экран, который запускается автоматически, выполнив несколько простых шагов. Вы можете снова активировать функцию автоповорота, выполнив тот же набор шагов с небольшим изменением, что означает, что на шаге 5 необходимо деактивировать клавишу Shift, соответствующую полю блокировки поворота, и функция автоповорота будет активирована повторно.
https://us.answers.acer.com/app/answers/detail/a_id/38171/~/windows-10%3A-auto-rotation-disabled
РЕКОМЕНДУЕМЫЕ: Нажмите здесь, чтобы устранить ошибки Windows и оптимизировать производительность системы
CCNA, веб-разработчик, ПК для устранения неполадок
Я компьютерный энтузиаст и практикующий ИТ-специалист. У меня за плечами многолетний опыт работы в области компьютерного программирования, устранения неисправностей и ремонта оборудования. Я специализируюсь на веб-разработке и дизайне баз данных. У меня также есть сертификат CCNA для проектирования сетей и устранения неполадок.
Windows 10 — это операционная система, которая умело работает с интеграцией интерфейсов touch и mouse. ОС предназначена для работы на различных устройствах, таких как ПК, планшеты, Xbox One, смартфоны и другие встроенные системы. Как и многие, вы могли перейти на последнюю версию Windows 10 для планшета или ноутбука. Несмотря на то, что на всех устройствах он работает исключительно на ПК или планшетах, пользователи столкнулись с некоторыми проблемами с screen auto rotate в режиме Tablet. В основном проблема связана с пользователями, которые недавно загрузили Windows 10 для своих устройств, используемых в режиме планшета.
Авторотация — одна из функций, которая в основном используется для более крупных устройств, особенно вашего планшета. Это удобнее, когда вы хотите перейти от портретной ориентации к пейзажной ориентации и наоборот в соответствии с настройкой устройства. Рассказывая о своей работе, в основном ваш планшет использует датчики для обнаружения вращения и настройки отображения на текущую ориентацию. То есть, датчики в устройстве автоматически вращаются, когда вы переходите из портретного режима в альбомный и наоборот. Но с Windows 10 на планшете экранный поворот экрана может не работать для некоторых пользователей.
Автоматическое вращение экрана не работает
Основная причина проблемы может быть связана с проблемой в программном обеспечении или может быть проблема с Драйверы устройств . Перед тем, как попробовать эти рекомендации, убедитесь, что ваше устройство обновлено до последнего патча, так как иногда загрузка последнего обновления может устранить большинство проблем с программным обеспечением, связанным с авторотированием.
1] Поверните блокировку вращения
- Если вы используете система в режиме ноутбука преобразует ваш компьютер из режима ноутбука в режим планшета.
- Затем откройте «Центр действий» на панели задач и переключите блокировку вращения в положение «Выключено».
Вы также можете отключить вращение блокировки в настройках как следующим образом. Откройте Центр действий и нажмите «Режим планшета». Это преобразует ваш компьютер в режим ноутбука в режим Tablet.
Затем перейдите в «Настройки» в меню «Пуск» и выберите «Системы» и нажмите «Показать». Здесь отключите блокировку автоповтора и закройте.
2] Обновите драйверы
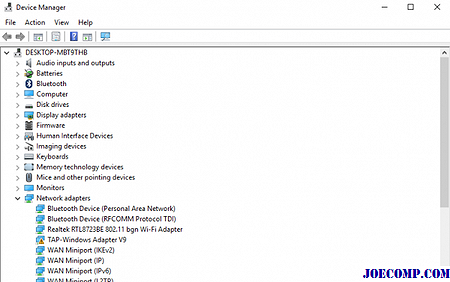
Обновите драйверы устройств и посмотрите. Для этого откройте панель управления, щелкните Диспетчер устройств и найдите устройства ввода-вывода .
Щелкните правой кнопкой мыши на сенсорных устройствах и нажмите Обновить драйвер в меню , В открывшемся окне выберите « Поиск автоматически для обновленного программного обеспечения драйвера ».
После установки драйвера перезагрузите устройство и посмотрите, помогло ли оно.
Экран «Автоповорот» с серым цветом
Если вы обнаружите, что опция автоматического поворота экрана выделена серым цветом, создайте резервную копию реестра. и затем откройте команду Выполнить , нажав клавишу Windows + R.
Введите regedit и нажмите «ОК».
Теперь перейдите к следующему пути:
HKEY_LOCAL_MACHINE ПРОГРАММНОЕ ОБЕСПЕЧЕНИЕ Microsoft Windows CurrentVersion AutoRotation
Найдите ключ LastOrientation и дважды щелкните по нему.
Добавить 1 в поле данных значения DWORD и нажмите OK, чтобы сохранить изменения.
Далее, используйте Ctrl + F для поиска SensorPresent . Если он доступен, дважды щелкните его и измените значение DWORD на 1 . Если он недоступен, вы можете создать его в AutoRotation и дать ему значение 1.
Перезагрузите компьютер и посмотрите.
Используемые источники:
- https://itswat.ru/rotating-windows10/
- http://windowsbulletin.com/ru/как-отключить-автоповорот-экрана-в-windows-10/
- https://ru.joecomp.com/screen-auto-rotation-not-working-or-grayed-out-in-windows-10-table-mode
Table of Contents:
Windows 10 — это операционная система, которая умело работает с интеграцией интерфейсов touch и mouse. ОС предназначена для работы на различных устройствах, таких как ПК, планшеты, Xbox One, смартфоны и другие встроенные системы. Как и многие, вы могли перейти на последнюю версию Windows 10 для планшета или ноутбука. Несмотря на то, что на всех устройствах он работает исключительно на ПК или планшетах, пользователи столкнулись с некоторыми проблемами с screen auto rotate в режиме Tablet. В основном проблема связана с пользователями, которые недавно загрузили Windows 10 для своих устройств, используемых в режиме планшета.
Авторотация — одна из функций, которая в основном используется для более крупных устройств, особенно вашего планшета. Это удобнее, когда вы хотите перейти от портретной ориентации к пейзажной ориентации и наоборот в соответствии с настройкой устройства. Рассказывая о своей работе, в основном ваш планшет использует датчики для обнаружения вращения и настройки отображения на текущую ориентацию. То есть, датчики в устройстве автоматически вращаются, когда вы переходите из портретного режима в альбомный и наоборот. Но с Windows 10 на планшете экранный поворот экрана может не работать для некоторых пользователей.
Автоматическое вращение экрана не работает
Основная причина проблемы может быть связана с проблемой в программном обеспечении или может быть проблема с Драйверы устройств . Перед тем, как попробовать эти рекомендации, убедитесь, что ваше устройство обновлено до последнего патча, так как иногда загрузка последнего обновления может устранить большинство проблем с программным обеспечением, связанным с авторотированием.
1] Поверните блокировку вращения
- Если вы используете система в режиме ноутбука преобразует ваш компьютер из режима ноутбука в режим планшета.
- Затем откройте «Центр действий» на панели задач и переключите блокировку вращения в положение «Выключено».
Вы также можете отключить вращение блокировки в настройках как следующим образом. Откройте Центр действий и нажмите «Режим планшета». Это преобразует ваш компьютер в режим ноутбука в режим Tablet.
Затем перейдите в «Настройки» в меню «Пуск» и выберите «Системы» и нажмите «Показать». Здесь отключите блокировку автоповтора и закройте.
2] Обновите драйверы
Обновите драйверы устройств и посмотрите. Для этого откройте панель управления, щелкните Диспетчер устройств и найдите устройства ввода-вывода .
Щелкните правой кнопкой мыши на сенсорных устройствах и нажмите Обновить драйвер в меню , В открывшемся окне выберите « Поиск автоматически для обновленного программного обеспечения драйвера ».
После установки драйвера перезагрузите устройство и посмотрите, помогло ли оно.
Экран «Автоповорот» с серым цветом
Если вы обнаружите, что опция автоматического поворота экрана выделена серым цветом, создайте резервную копию реестра. и затем откройте команду Выполнить , нажав клавишу Windows + R.
Введите regedit и нажмите «ОК».
Теперь перейдите к следующему пути:
Найдите ключ LastOrientation и дважды щелкните по нему.
Добавить 1 в поле данных значения DWORD и нажмите OK, чтобы сохранить изменения.
Далее, используйте Ctrl + F для поиска SensorPresent . Если он доступен, дважды щелкните его и измените значение DWORD на 1 . Если он недоступен, вы можете создать его в AutoRotation и дать ему значение 1.
Windows 10 операционная система, которая поддерживает как планшеты, так и традиционные ПК и конечно же, имеет функцию автоповорота. Иногда, либо из-за неудачного прошедшего обновления, либо в следствии других причин, Windows может сломать функцию автоматического поворота на вашем устройстве. Под сломанным я имею в виду, что функция больше не предлагается ни в центре действий и уведомлений Windows, ни в приложении «Параметры». В таком случае, вот как вы можете получить его обратно.
Как заставить работать автоповорот на вашем планшете с Windows
- Откройте редактор реестра, введя Regedit в строку поиска (см. как).
- Скопируйте и вставьте следующее в адресную строку и нажмите Enter :

Теперь проверьте, правильно ли назначены следующие значения для параметров:
- Enable: 1
- LastOrientation: 0
- SensorPresent: 1
- SlateEnable :1
Если, перечисленные параметры отсутствуют, вы можете создать их вручную, в разделе реестра Autorotate, выбрав Создать Параметр DWORD (32 бита), а затем присвоив ему его имя и значение, как указано выше.
Все! После перезагрузки Windows 10 — автоповорот будет работать.
Windows 10 операционная система, которая поддерживает как планшеты, так и традиционные ПК и конечно же, имеет функцию автоповорота. Иногда, либо из-за неудачного прошедшего обновления, либо в следствии других причин, Windows может сломать функцию автоматического поворота на вашем устройстве. Под сломанным я имею в виду, что функция больше не предлагается ни в центре действий и уведомлений Windows, ни в приложении «Параметры». В таком случае, вот как вы можете получить его обратно.
Как заставить работать автоповорот на вашем планшете с Windows
- Откройте редактор реестра, введя Regedit в строку поиска (см. как).
- Скопируйте и вставьте следующее в адресную строку и нажмите Enter :
Теперь проверьте, правильно ли назначены следующие значения для параметров:
- Enable: 1
- LastOrientation: 0
- SensorPresent: 1
- SlateEnable :1
Если, перечисленные параметры отсутствуют, вы можете создать их вручную, в разделе реестра Autorotate, выбрав Создать Параметр DWORD (32 бита), а затем присвоив ему его имя и значение, как указано выше.
Все! После перезагрузки Windows 10 — автоповорот будет работать.