Некогда мы уже создавали подобный калькулятор, но он был довольно простенький и не имел общего TextBox’a для всех чисел.
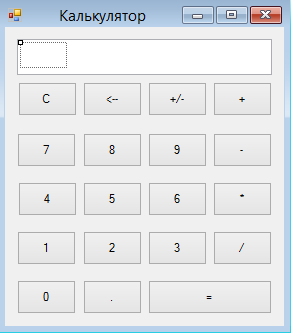
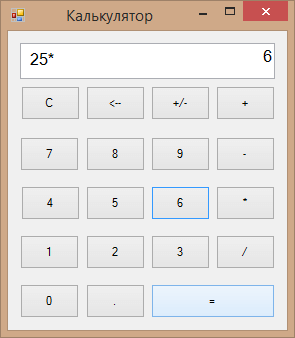
В данной статье же мы создадим более усовершенствованный калькулятор Windows Forms.Итак, выглядеть у нас он будет вот так:
Здесь у нас 19 кнопок Button, 1 Textbox и ещё 1 пустой Label (на рисунке он выделен). Применение его будет описано ниже.
Итак, создаём такую или похожую форму. Мы увеличили ширину TextBox’a, используя MultiLine:
Также в Свойствах мы увеличили размер шрифта в TextBox’e и Label’e до 12 пт.
Теперь делаем так, чтобы при нажатии на цифровые кнопки, в TextBox’e появлялась соответствующая цифра.
Для этого дважды кликаем на кнопке «0» и в открывшемся коде пишем:
|
private void button17_Click(object sender, EventArgs e) { textBox1.Text = textBox1.Text + 0; } |
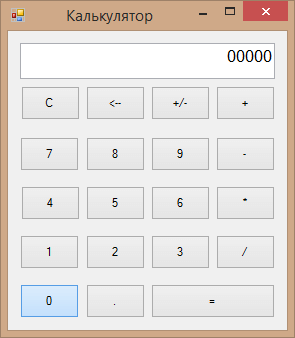
Проверяем, несколько раз нажав на кнопку «0» у нас в форме.
Работает. Делаем то же самое с остальными цифровыми кнопками:
|
1 2 3 4 5 6 7 8 9 10 11 12 13 14 15 16 17 18 19 20 21 22 23 24 25 26 27 28 29 30 31 32 33 34 35 36 37 38 39 40 41 42 43 44 |
private void button13_Click(object sender, EventArgs e) { textBox1.Text = textBox1.Text + 1; } private void button14_Click(object sender, EventArgs e) { textBox1.Text = textBox1.Text + 2; } private void button15_Click(object sender, EventArgs e) { textBox1.Text = textBox1.Text + 3; } private void button9_Click(object sender, EventArgs e) { textBox1.Text = textBox1.Text + 4; } private void button10_Click(object sender, EventArgs e) { textBox1.Text = textBox1.Text + 5; } private void button11_Click(object sender, EventArgs e) { textBox1.Text = textBox1.Text + 6; } private void button5_Click(object sender, EventArgs e) { textBox1.Text = textBox1.Text + 7; } private void button6_Click(object sender, EventArgs e) { textBox1.Text = textBox1.Text + 8; } private void button7_Click(object sender, EventArgs e) { textBox1.Text = textBox1.Text + 9; } |
Таким же образом кликаем дважды на кнопку «.» в форме. Она будет использоваться для создания десятичной дроби. Пишем следующий код:
|
private void button18_Click(object sender, EventArgs e) { textBox1.Text = textBox1.Text + «,»; } |
Кнопки нажимаются, в TextBox’e отображаются нажатые цифры. Теперь надо научить программу производить с ними какие-либо операции. Как видно из формы, наш калькулятор сможет производить стандартные математические операции: сложение, вычитание, умножение и деление. Для начала мы создадим в самом начале программы несколько переменных, которые нам для этого понадобятся:
|
float a, b; int count; bool znak = true; |
Первым двум переменным будут присваиваться значения, набранные пользователем в калькуляторе. В последствии с ними будут производиться нужные математические операции. Тип float — это тип с плавающей точкой, позволяющий работать с десятичными дробями, что нам, безусловно, нужно при наличии кнопки «.» .
Благодаря второй переменной мы будем давать программе указания, какую именно операцию производить с переменными, описанными выше. Здесь нам не нужна дробь, поэтому обойдёмся целочисленным типом int.
Последняя переменная znak нам понадобится для того, чтобы менять знаки у введённых чисел. Тип bool может иметь два значения — ture и false. Мы представим, что если znak имеет значение true в программе, то это означает, что у числа знак +, если false — число отрицательное и перед собой имеет знак —. Изначально в калькуляторе вбиваются положительные числа, поэтому мы сразу присвоили переменной значение true.
Далее мы дважды нажимаем на кнопку «+», обозначающую сложение, на форме и пишем следующий код:
|
private void button4_Click(object sender, EventArgs e) { a = float.Parse(textBox1.Text); textBox1.Clear(); count = 1; label1.Text = a.ToString() + «+»; znak = true; } |
В строке 3 мы присваиваем первой переменной a то, что будет написано в TextBox’e (а именно число, которое введёт пользователь перед тем, как нажать кнопку «+»).
Затем TextBox очищается, число, введённое пользователем, в нём пропадает (но остаётся в переменной a)
Переменной count присваивается число 1, которая потом укажет программе, что именно операцию сложения надо будет произвести с числами.
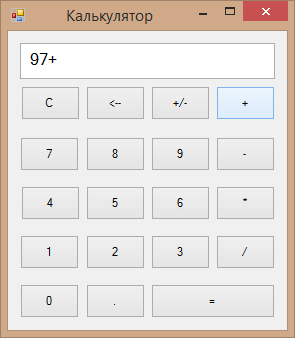
Затем в Label записывается число из переменной a (то самое, которое изначально ввёл пользователь) и знак плюса. Выглядеть в форме это будет так, как описано ниже.
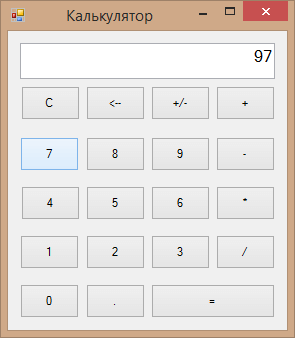
Пользователь вводит какое-либо число:
Затем нажимает на кнопку «+» и после этого видит:
Кроме того, как бы не было странным с первого взгляда, мы присваиваем переменной znak значение true, хотя выше, в начале кода, мы и так присваивали это же значение. Подробнее данную переменную мы опишем ниже, но смысл в том, что мы присваиваем значение true, когда хотим сделать введённое число отрицательным, если оно положительно, а значение false, когда хотим сделать число положительным, если оно отрицательное. Изначально у нас вводятся положительные числа, сначала первое, потом второе. И если первое число мы сделаем отрицательным, то значение у znak перейдёт в false и тогда получится, что второе слагаемое как бы отрицательное (на практике, просто чтобы поставить перед ним минус, придётся нажать дважды на соответствующую кнопку, чтобы с false значение перешло в true, а затем обратно с true в false, и появился знак минуса).
Подобным образом заполняем код для кнопок «-«, «*» и «/»:
|
1 2 3 4 5 6 7 8 9 10 11 12 13 14 15 16 17 18 19 20 21 22 23 24 25 26 |
private void button8_Click(object sender, EventArgs e) { a = float.Parse(textBox1.Text); textBox1.Clear(); count = 2; label1.Text = a.ToString() + «-«; znak = true; } private void button12_Click(object sender, EventArgs e) { a = float.Parse(textBox1.Text); textBox1.Clear(); count = 3; label1.Text = a.ToString() + «*»; znak = true; } private void button16_Click(object sender, EventArgs e) { a = float.Parse(textBox1.Text); textBox1.Clear(); count = 4; label1.Text = a.ToString() + «/»; znak = true; } |
Разница лишь в значении переменной count и в том, какой знак добавляется в Label’e.
Далее нам понадобится создать функцию, которая будет применять нужные нам математические операции к числам. Назовём её calculate. Но перед этим мы кликнем дважды на кнопку «=» на форме и в коде к ней мы запишем:
|
private void button19_Click(object sender, EventArgs e) { calculate(); label1.Text = «»; } |
То есть, при нажатии пользователем на кнопку «=», как раз выполнится наша функция подсчёта calculate, и, заодно, очистится Label, так как результат мы в будущем коде выведем в TextBox.
Теперь-таки создаём нашу функцию calculate и пишем следующий код:
|
1 2 3 4 5 6 7 8 9 10 11 12 13 14 15 16 17 18 19 20 21 22 23 24 25 26 |
private void calculate() { switch(count) { case 1: b = a + float.Parse(textBox1.Text); textBox1.Text = b.ToString(); break; case 2: b = a — float.Parse(textBox1.Text); textBox1.Text = b.ToString(); break; case 3: b = a * float.Parse(textBox1.Text); textBox1.Text = b.ToString(); break; case 4: b = a / float.Parse(textBox1.Text); textBox1.Text = b.ToString(); break; default: break; } } |
Здесь мы используем конструкцию switch-case.
Switch — это оператор управления. Он может включать в себя несколько case’ов. Case — метки, от значения которых зависит, какие операции будут происходить.
Строка switch(count) означает, что именно от значения count будет зависеть, какое действие будет происходить в коде switch’a.
Итак, если count=1 (в коде case 1:), то произойдёт следующее:
После того, как пользователь нажал «+», он, естественно, должен ввести второе слагаемое, что он и делает по стандартному сценарию, а затем нажать кнопку «=» (и в ней, как мы помним, как раз выполнится наша функция).
Как только кнопка «=» будет нажата, программа сложит число из переменной a с тем вторым слагаемым, которое записал пользователь в TextBox, и запишет результат в переменную b (строка 6 кода функции). В строке 7 программа выведет в TextBox результат сложения — переменную b.
Оператор break (строка 
Точно так же строится алгоритм при case 2, case 3 и case 4 с той разницей, что в них происходит не сложение, а вычитание, умножение и деление соответственно.
Оператор default срабатывает, если вдруг что-то пойдёт не по плану и count примет какое-либо иное значение, не описанное в switch. Тогда срабатывает лишь оператор break.
Львиная доля программы готова. Нам надо лишь написать код для трёх оставшихся нетронутыми до этого время кнопок.
Дважды жмём в форме на кнопку «С». Она будет очищать все записи из TextBox’a и Label’a.
Код у неё элементарный:
|
private void button3_Click(object sender, EventArgs e) { textBox1.Text = «»; label1.Text = «»; } |
На очереди у нас кнопка «<—«. Она будет удалять последнюю цифру записанного в TextBox’e числа. Код:
|
private void button2_Click(object sender, EventArgs e) { int lenght = textBox1.Text.Length — 1; string text = textBox1.Text; textBox1.Clear(); for (int i = 0; i < lenght; i++) { textBox1.Text = textBox1.Text + text[i]; } } |
Мы вводим новую переменную lenght целочисленного типа и записываем в неё количество символов в TextBox’e минус один символ.
Также мы вводим новую переменную text, в которую полностью заносим текст из TextBox’а. Затем мы очищаем TextBox и вводим цикл for, через который записываем в TextBox строку text, но уже на символ короче.
Например, в TextBox’e записано число 504523
При нажатии на кнопку «<—« в переменную lenght записывается число 5 (6 цифр — 1), в переменную text записывается строка «504523», TextBox очищается, а затем в него по одному записываются символы из text, но в этот раз их будет не 6, а 5, то есть в TextBox’e появится число 50452.
У нас остаётся последняя кнопка, которая отвечает за знак первого слагаемого. Переходим к её коду. Тут мы будет работать с переменной znak, которую описывали выше. Код выглядит вот так:
|
private void button1_Click(object sender, EventArgs e) { if(znak==true) { textBox1.Text = «-« + textBox1.Text; znak = false; } else if (znak==false) { textBox1.Text=textBox1.Text.Replace(«-«, «»); znak = true; } |
Изначально, как мы помним, у переменной znak стоит значение true. Если мы нажмём на кнопку первый раз, то в TextBox’e перед числом появится знак «-«, а переменной znak будет присвоено значение false.
Если второй раз нажать на данную кнопку, то, так как znak у нас false, произойдёт второе условие. Здесь используется метод Replace, который заменяет какой-либо кусок строки на другой. В скобках после метода вначале пишется, что будет заменено в строке, а после запятой, то, на что заменять. В данном случае мы заменяем в TextBox’e минус на пустое значение.
Вот и всё, наш калькулятор Windows Forms готов! Можно его тестировать!
Если у Вас возникнут вопросы или просьбы по данной программе, можете оставить комментарий под этой записью. А исходный код калькулятора можно скачать ниже:
Скачать исходник
В статье «Делаем консольный калькулятор.» мы создавали небольшой калькулятор, который работает в консоли. В этой статье пришло время научиться создавать графический калькулятор на языке C# с помощью Windows Forms.
Сам по себе калькулятор довольно прост, но если вы совсем новичок в создании подобных приложений, тогда будет посложнее. Разработку калькулятора начнем с разработки формы (Windows Forms) приложения. Запускаем Visual Studio и создаем проект:
Интерфейс созданного проекта должен выглядеть так:
На интерфейсе мы видим: слева панель элементов для нашей формы, справа обозреватель решений и свойства выбранной формы/элемента и по середине виден сам конструктор с формой (по умолчанию он имеет имя «Form1»).
На форму нужно поместить кнопки, текстовое поле, а также надпись. Надпись нужна, чтобы пользователь видел первый операнд. Когда введет нужную цифру, нажмет кнопку, например «+», надпись будет содержать введенное значение.
Все нужные элементы можно найти слева в панели элементов. Чтобы найти текстовое поле просто введите в поиске «textBox» и с помощью мышки перенесите его на свою форму. Для добавления кнопок просто введите в поиске «Button» и перенесите нужное количество кнопок на свою форму. Также добавьте на «ListBox» один пустой «Label»:
Изменять свойства формы можно с помощью окна «Свойства» справа внизу. Для этого нажмите на нужную форму, например «Button1» и поменяйте ему свойство «text» на «С»:
Добавьте все нужные кнопки. Измените свойство «Font» для элементов TextBox и Label. Цвет кнопок и имя программы меняйте на свое усмотрение.
С помощью «MultiLine» измените ширину элемента TextBox:
В итоге у нас получилось 19 кнопок Button, 1 TextBox и ещё 1 пустой Label:
Теперь посмотрим, как работает калькулятор. Мы используем четыре члена класса. Напишем их в самое начало программы:
    float a, b;
    int oper;
    bool znak = true;
Первые два — это наши операнды, a и b. Третий — это выбранный пользователем оператор. Четвертый — признак знака. Запрограммируем обработчик кнопки «+/-«, изменяющий знак числа. Для этого в форме нажмите на нужную кнопку два раза. Visual Studio переведет вас в нужную секцию кода:
        private void button3_Click(object sender, EventArgs e)
        {

        }
В фигурных скобках пишем код:
            if (znak == true)
            {
                textBox1.Text = "-" + textBox1.Text;
                znak = false;
            }
            else if (znak==false)
            {
                textBox1.Text = textBox1.Text.Replace("-", "");
                znak = true;
            }
Если znak=true, мы меняем знак операнда в textBox1, а если false, то знак числа удаляется из текстового поля.
Для каждой цифровой кнопки обработчик будет следующий:
// Обработчик цифровой кнопки "0"

textBox1.Text = textBox1.Text + 0;
На основе этого кода повесьте на цифровые кнопки от 0 до 9 обработчик событий. Нажмите на нужную цифровую кнопку и впишите код.
Обработчик кнопки операторов «+, -, *, /». Нажмите на нужную кнопку с оператором и впишите код.
            // Обработчик оператора "+"

            a = float.Parse(textBox1.Text);
            textBox1.Clear();
            oper = 1;
            label1.Text = a.ToString() + "+";
            znak = true;
В данном коде мы в переменную «a» записываем значение из текстового поля, попутно преобразовав его в float посредством вызова метода float.Parse(). Далее мы очищаем текстовое поле, чтобы можно было вводить второй операнд. oper = 1 означает присвоение номера оператора (для + — это 1 и так далее по увеличению). Далее заносим в надпись информацию об операнде и операторе.
Обработчик кнопки «,» добавляет запятую в текстовое поле:
textBox1.Text = textBox1.Text + ",";
Далее нам понадобится создать функцию, которая будет применять нужные нам математические операции к числам. Назовём её calculate. Но перед этим мы кликнем дважды на кнопку «=» на форме и в коде к ней мы запишем:
// вызов функции
calculate();
label1.Text = "";
При нажатии пользователем на кнопку «=» выполнится функция подсчёта calculate, и, заодно, очистится Label, так как результат мы в будущем коде выведем в TextBox.
Функция calculate:
        private void calculate()
        {
            switch (oper)
            {
                case 1:
                    b = a + float.Parse(textBox1.Text);
                    textBox1.Text = b.ToString();
                    break;
                case 2:
                    b = a - float.Parse(textBox1.Text);
                    textBox1.Text = b.ToString();
                    break;
                case 3:
                    b = a * float.Parse(textBox1.Text);
                    textBox1.Text = b.ToString();
                    break;
                case 4:

                    if (float.Parse(textBox1.Text) == 0)
                    { textBox1.Text = "Делить на 0 нельзя!"; }
                    else
                    {
                        b = a / float.Parse(textBox1.Text);
                        textBox1.Text = b.ToString();
                    }
                    break;
                default:
                    break;
            }

        }
Здесь мы используем конструкцию switch-case. Нам осталось обработать две кнопки:
Обработчик кнопки «С». Данная кнопка будет очищать все записи из TextBox’a и Label’a. Код кнопки:
textBox1.Text = "";
label1.Text = "";
Кнопка «<–» будет удалять последнюю цифру записанного в TextBox’e числа. Код кнопки:
            int lenght = textBox1.Text.Length - 1;
            string text = textBox1.Text;
            textBox1.Clear();
            for (int i = 0; i < lenght; i++)
            {
                textBox1.Text = textBox1.Text + text[i];
            }
Мы вводим новую переменную lenght целочисленного типа и записываем в неё количество символов в TextBox’e минус один символ.
Также мы вводим новую переменную text, в которую полностью заносим текст из TextBox’а. Затем мы очищаем TextBox и вводим цикл for, через который записываем в TextBox строку text, но уже на символ короче.
Теперь наш графический калькулятор готов к работе. Скомпилируйте программу, нажав на «Пуск». Если все заработало и калькулятор делает вычисления, тогда вы все правильно сделали и теперь можете пользоваться свомим личным графическим калькулятором.
Одна из задач, задаваемых студентам по программированию, это создание калькулятора. Раскрою вам небольшой секрет: немало практических, курсовых и лабораторных работ на C++, C# и Java можно и не делать самостоятельно – есть готовые решения в сети. Однако, я был несколько удивлен, что для такого распространенного задания, как визуальный калькулятор на C++ нет такого готового решения. Ну что ж, нет, так нет, давайте напишем его сами.
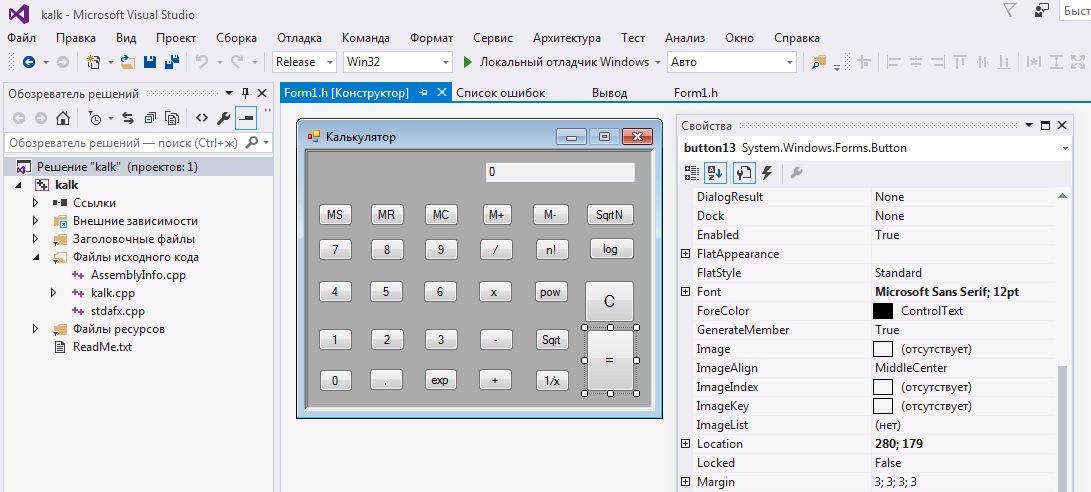
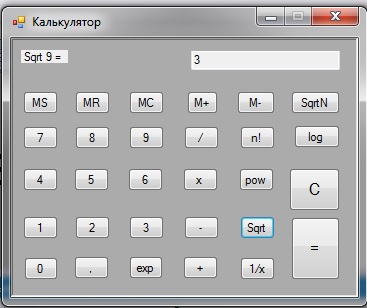
Итак, как в большинстве проектов, все начинается с создания приложения Windows Forms, а уже в нем – с редактирования формы. У нас получилась вот такая:
Проект для VS2015
В чем будем считать и хранить числа? Я выбрал тип double – точности его нам вполне хватит; это все же студенческая работа, а не для точных инженерных расчетов. Дальше определимся с тем, сколько чисел и операций будем хранить в памяти. Предположим, штук двадцать: тогда надо создать два массива – один для чисел, а другой для операций между ними.
static array<double> ^mass = gcnew array<double>{0,0,0,0,0,0,0,0,0,0,0,0,0,0,0,0,0,0,0,0};
static array<int> ^ukaz = gcnew array<int>{0,0,0,0,0,0,0,0,0,0,0,0,0,0,0,0,0,0,0,0};
Почему мы воспользовались указателями, а не просто создали глобальные переменные за пределами windows forms? Дело в том, что, использование глобальных переменных – это плохой тон при программировании, и очень часто преподаватели против данной практики студентов.
В нашей программе будут три основных метода: vvod — принимает цифру (нажатую кнопку) в качестве аргумента и добавляет её к числу. ravno — нажатие на кнопку равно — все считает, ravno2 — это нажатие на кнопку знака. Факториал, деление единицы на число и корень квадратные — там реализуются методы сразу при нажатии все обрабатывается.
Добавим также флаг для памяти:
static int mem_flag=0;
И еще систему флагов:
//переменные для памяти
static double memory_znachenie = 0.0;
static int memory_status = 0;
//предыдущая клавиша
static int pred_klav = 0;
static int flag_ravno = 0;
static int put = 0;
Вот, например, как у нас будет выглядеть метод vvod():
//ввод цифр на экран
private: System::Void	vvod (double pr) {
if (pred_klav==0) {
String^ s = textBox1->Text;
int dl = s->Length;
if (dl<10) {
String^ st = s + Convert::ToString(pr);
textBox1->Text = st;
mass[mem_flag] = Convert::ToDouble(textBox1->Text);
textBox1->Text = Convert::ToString(mass[mem_flag]);
pred_klav = 0;
}
}
else {
String^ st = Convert::ToString(pr);
textBox1->Text = st;
mass[mem_flag] = Convert::ToDouble(textBox1->Text);
textBox1->Text = Convert::ToString(mass[mem_flag]);
pred_klav = 0;
}
}
Здесь мы проверяем, какая клавиша в нашем калькуляторе была нажата перед этим – цифра, арифметическая операция или знак равно. Далее получаем из текстбокса значение, конвертируем предыдущее из массива, конкатенируем строки, потом обратно в double и обновляем значение массива. Также в этом методе мы проверяем длину числа – мы поставили ограничение на 10 знаков.
Обработка кнопки равно – то есть метод вычисления – также не представляет сложности. Пользуясь оператором ветвления switch перебираем все варианты.
Также реализуем собственный класс для обработки ошибок. Зачем это надо? Дело в том, что мы оперируем с числами типа double, а они не выбрасывают некоторые стандартные исключения, например – деление на ноль. Также мы предусмотрим обработку переполнения и вычисления квадратного корня из отрицательного числа. На вход конструкторов этого класса будем принимать пару чисел. Выводятся ошибки при:
- взятии корня четной степени из отрицательного числа
- логарифмировании отрицательного числа и нуля
- делении на нуль.
- переполнении (калькулятор все же не бесконечный)
Также не забудем и обработку клавиши запятой. Для этого проверяем, есть ли она уже во введённом числе:
MarshalString(s, s2);
int pos = s2.find(",") ;
if (pos==-1) { }
Вот такие основные моменты надо знать для написания данной программы. Ну а если вы не можете самостоятельно написать визуальный калькулятор на C++, то обратитесь ко мне. Актуальную цену за архив с готовой программой и исходниками с подробными комментариями в настоящий моент 500 рублей. Это будет проект в Visual Studio C++ 2010 — он откроется в любой другой версии студии не ниже 2010. Также есть проект для Visual Studio 2015.
Мой калькулятор реализует все основные функции: сложение, вычитание, деление, умножение, факториал, возведение в степень, извлечение квадратного корня, вычисление 1/x, функции памяти (занести в память, вывести содержимое памяти, очистить память).
Обновление
Добавились новые функции в калькуляторе. А именно:
- Извлечение корня четной и нечетной степени из числа
- Вычисление логарифма по любому основанию
- Вычисление экспоненты
Если вам требуется реализация других функций, то это делается за отдельную плату. Пишите на почту up777up@yandex.ru, стучитесь vk.com/idup7, @upreadru или по другим контактам.
Автор этого материала — я — Пахолков Юрий. Я оказываю услуги по написанию программ на языках Java, C++, C# (а также консультирую по ним) и созданию сайтов. Работаю с сайтами на CMS OpenCart, WordPress, ModX и самописными. Кроме этого, работаю напрямую с JavaScript, PHP, CSS, HTML — то есть могу доработать ваш сайт или помочь с веб-программированием. Пишите сюда.
статьи IT, си плюс плюс, visual studio, калькулятор
Читайте также:
- Морской бой на Java с исходниками
Learn how to create a basic calculator app and begin your programming journey with Windows Forms.
When learning how to code, it can be useful to gain experience by re-creating apps that already exist. One common beginner app that you can start with is a calculator.
You can create a desktop calculator app using a Windows Forms project in Visual Studio. In a Windows Forms application, you can click and drag UI elements onto a canvas, to visualize the design of your calculator.
You can then add code logic to the underlying C# files to determine what should happen when the user clicks on a number, operator, clear, or equals button.
How to Add UI Elements to the Calculator
Start by creating a new Windows Form Application in Visual Studio. Then, add UI elements to the canvas to create the calculator’s user interface.
How to Add the Number and Operator Buttons
Add buttons to represent the numbers and operators (+, -, etc.) that the user will click on.
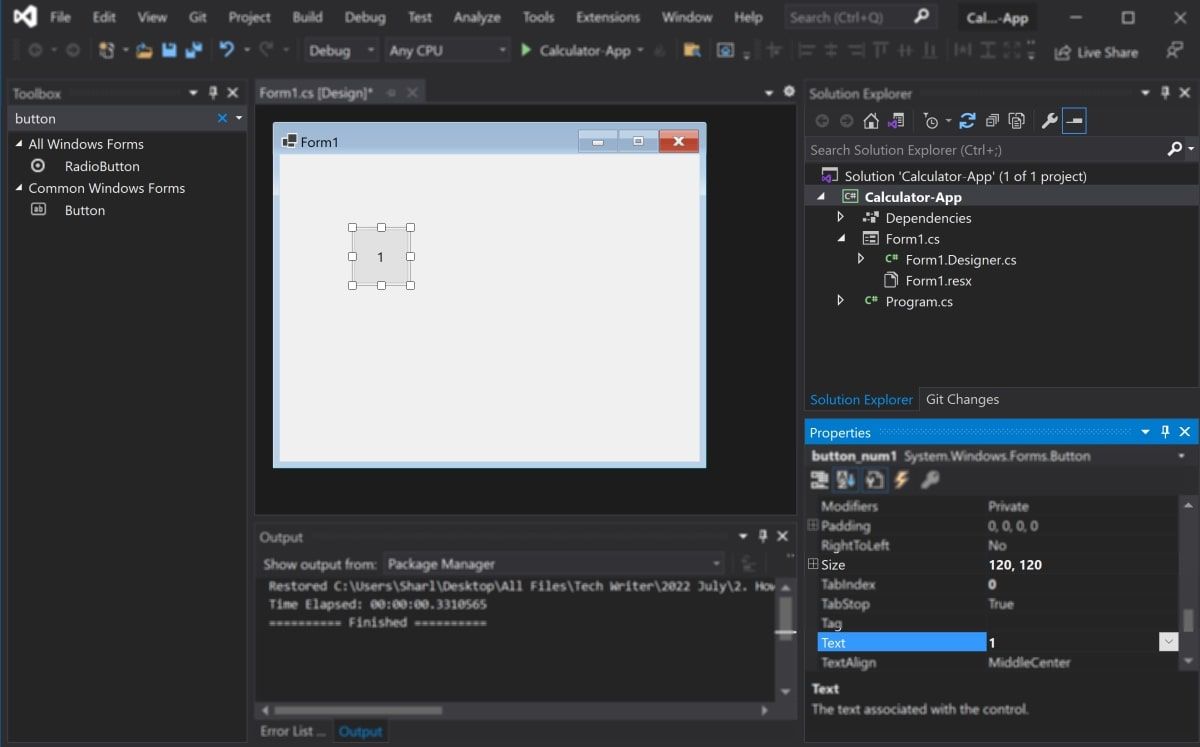
- Navigate to the canvas, which should be open by default. If it isn’t, click on the .cs file for the form (e.g. Form1.cs). Click the dropdown and switch to design mode.
- In the Toolbox, search for a Button UI element. Click and drag a button onto the canvas.
- Highlight the button. In the properties window, change each of the following button properties to its corresponding new value:
Property
New Value
Name
button1
Size
120, 120
Text
1
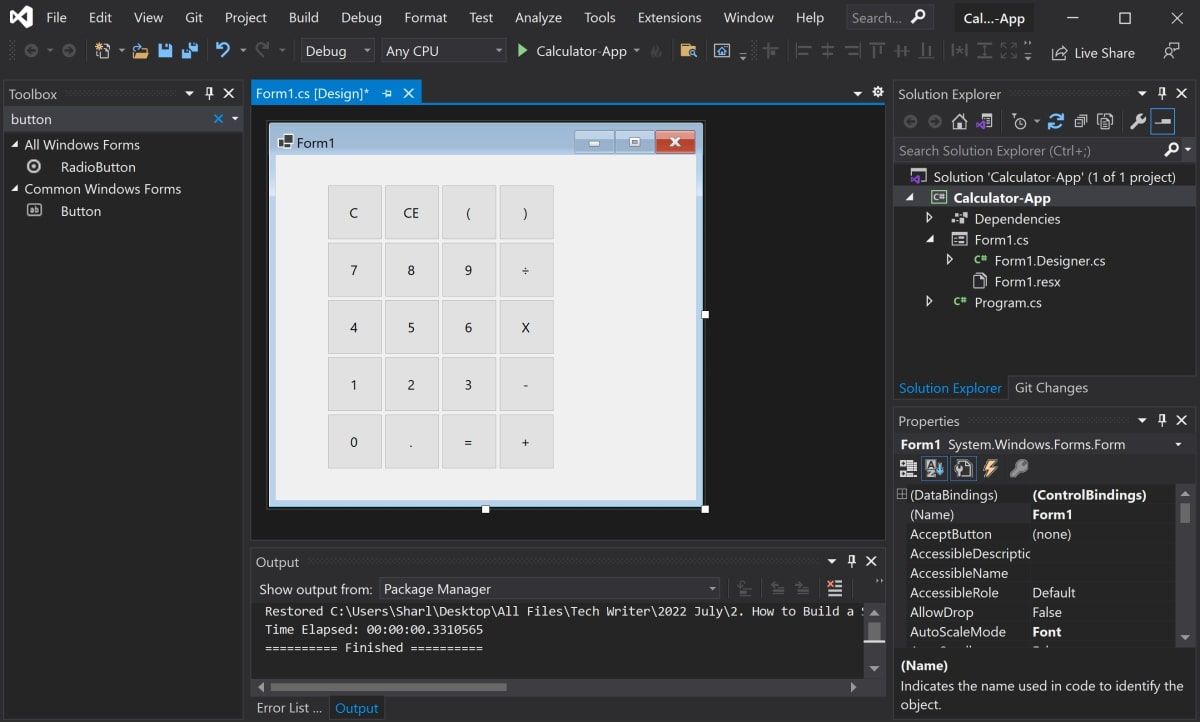
- Add 19 more buttons to the canvas to represent the other numbers, operators, and functions of the calculator.
- For each button, highlight the button and change the text and name property in the property window. Change the values to match the button’s number or function.
Button
Name Property
Text Property
2
button2
2
3
button3
3
4
button4
4
5
button5
5
6
button6
6
7
button7
7
8
button8
8
9
button9
9
button0
Addition
buttonAddition
+
Subtraction
buttonSubtraction
—
Multiplication
buttonMultiplication
X
Division
buttonDivision
÷
Decimal Point
buttonDecimal
.
Equals Sign
buttonEquals
=
Right Bracket
buttonRightBracket
)
Left Bracket
buttonLeftBracket
(
Clear
buttonClear
C
Clear Entry
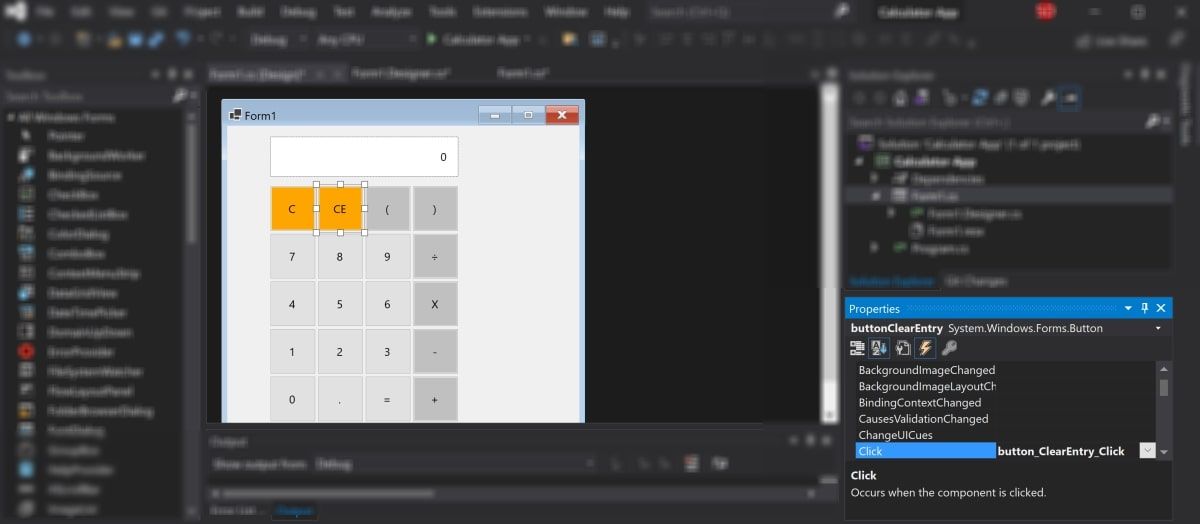
buttonClearEntry
CE
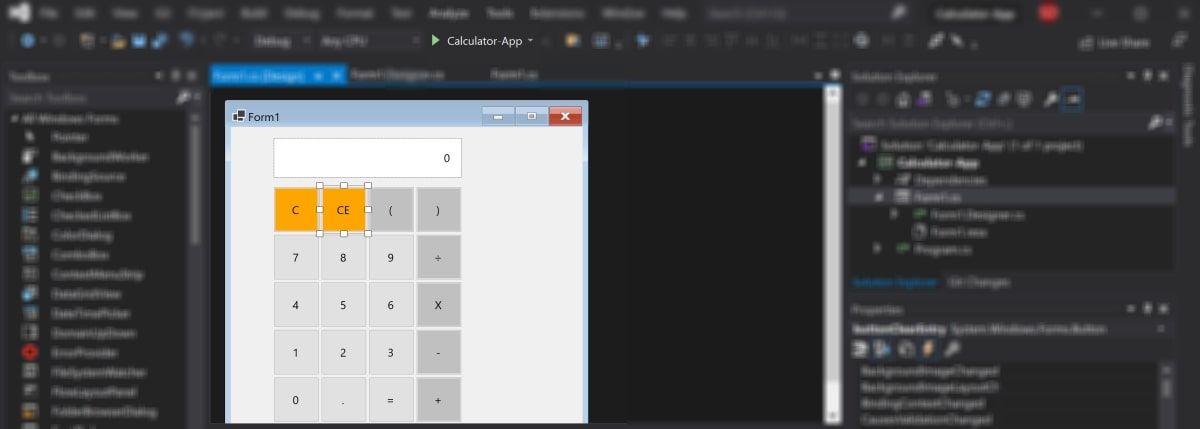
- Rearrange the order of the buttons to replicate the look of a standard calculator. Keep all the buttons the same size.
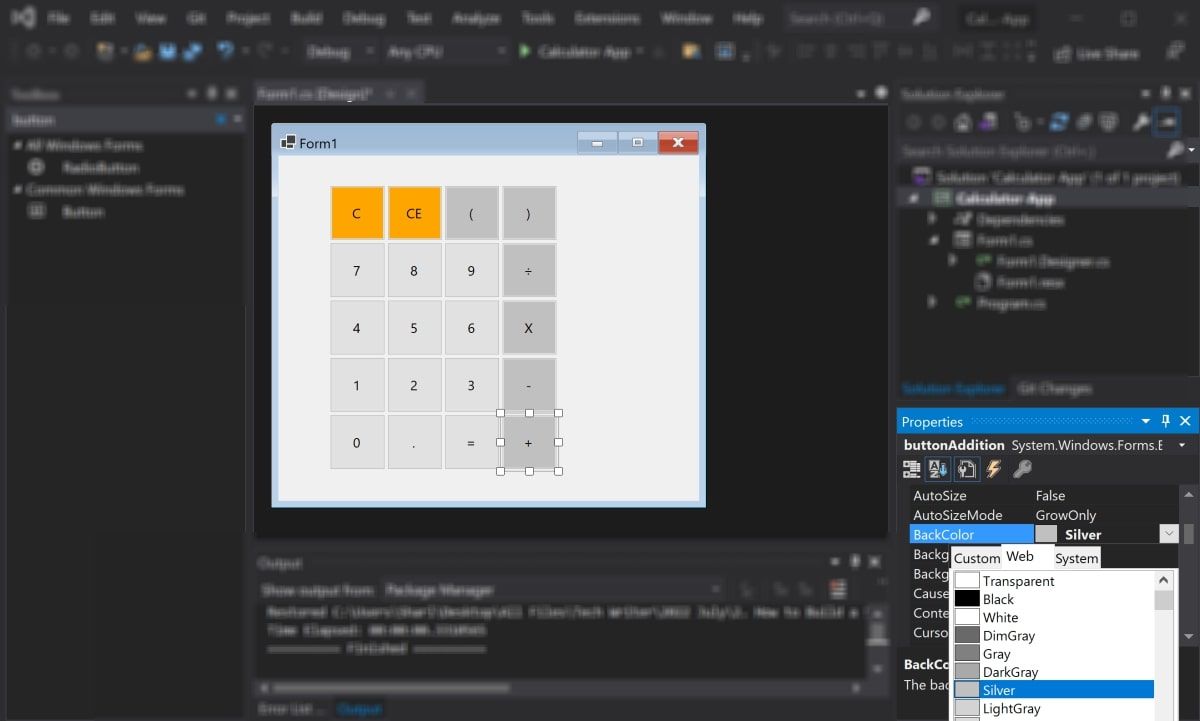
- You can also highlight some buttons and change their color to one of your choice, using the BackColor property in the properties window.
- For example, highlight the addition button. Go into the properties window and find the BackColor property. Choose Silver from the list of options in the dropdown. You can make operator buttons silver, and the C and CE buttons orange.
How to Add the Output Result Label
Add a textbox UI element to represent the result that the calculator will display to the user.
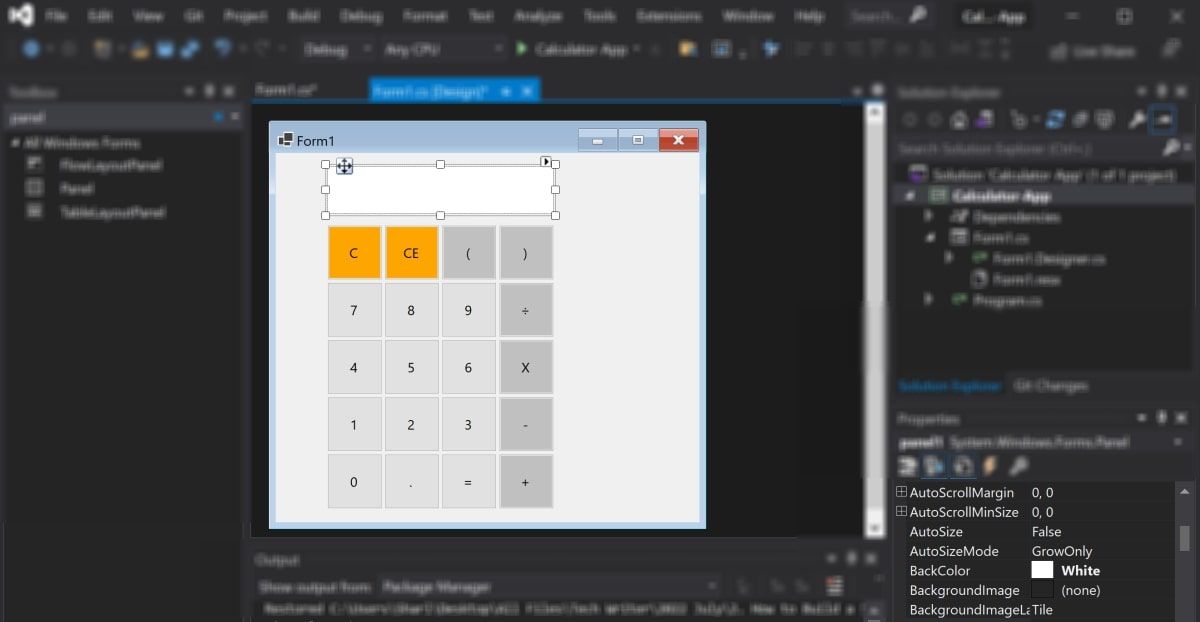
- In the Toolbox, drag a Panel UI element onto the canvas.
- Highlight the panel, and find the BackColor property in the properties window. Change this to white. You can also re-size and re-position the panel to make it look more like a calculator.
- In the Toolbox, drag a TextBox UI element onto the canvas.
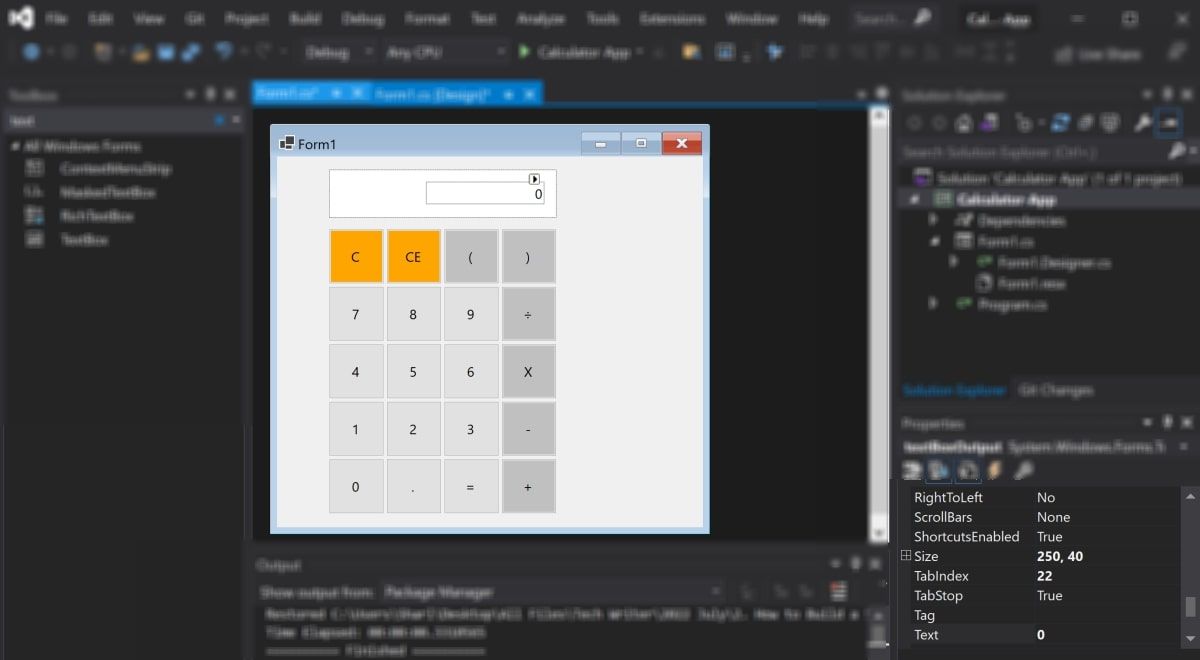
- Highlight the textbox. In the properties window, change the following properties to the new value:
Property
New Value
name
textBoxOutput
BorderStyle
None
Text
TextAlign
Right
Enabled
False
BackColor
White
- Position the textbox inside the panel.
How to Add the Calculation Logic
Add code to execute the calculation logic when the user clicks on the buttons.
- Open your .cs file for the form (for example, Form1.cs).
- Declare a variable called currentCalculation, at the top of the class. You can learn how to create classes in C# if you’re not familiar with them.
public partial class Form1 : Form
{
private string currentCalculation = "";public Form1()
{
InitializeComponent();
}
} - Underneath the constructor, create a new function called button_Click(). This will execute every time the user clicks on a number (0-9) or operator (+, -, X, ÷, etc.) button.
private void button_Click(object sender, EventArgs e)
{}
- One of the arguments passed to the button_Click() function is the object of the button the user clicks on. Add the text property of the button object to the string calculation. As the user clicks on buttons, this will build a string for the calculation, such as «22+5-7».
private void button_Click(object sender, EventArgs e)
{
// This adds the number or operator to the string calculation
currentCalculation += (sender as Button).Text;// Display the current calculation back to the user
textBoxOutput.Text = currentCalculation;
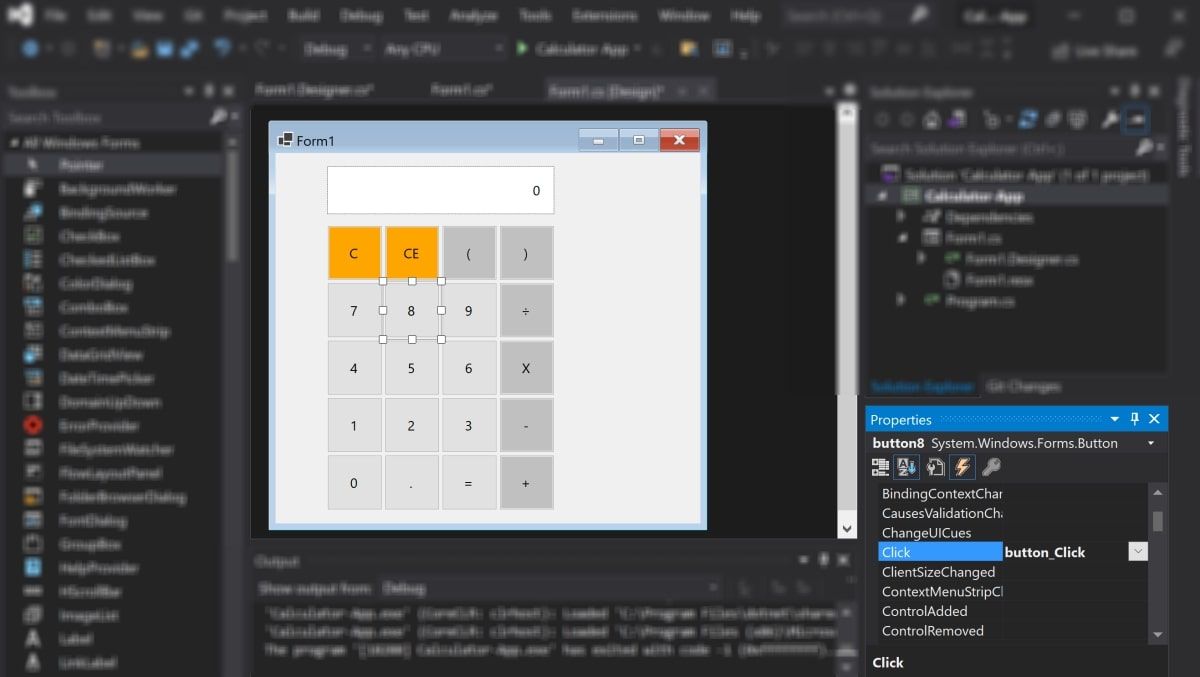
} - Go back to the canvas. Highlight each button (excluding the C, CE, and equals buttons) and navigate to the Events window. Find the Click event, and select the button_Click() function. This will trigger the function to execute when you click the button.
How to Calculate the Result and Display It to the User
Create another function to calculate the final result when the user clicks on the equals button.
- Create a new function called button_Equals_Click(). First, you will need to format the string to replace the X and ÷ characters with * and /. Then, use the Compute() function to calculate the result. Display the result back to the user.
private void button_Equals_Click(object sender, EventArgs e)
{
string formattedCalculation = currentCalculation.ToString().Replace("X", "*").ToString().Replace("÷", "/");try
{
textBoxOutput.Text = new DataTable().Compute(formattedCalculation, null).ToString();
currentCalculation = textBoxOutput.Text;
}
catch (Exception ex)
{
textBoxOutput.Text = "0";
currentCalculation = "";
}
} - Make sure you include the try-catch block around the Compute() function to capture any invalid inputs, such as «123++7». In this case, if the user enters an invalid calculation, the result will always return 0.
- The Compute() function is part of the System.Data namespace. Add the using statement to include it at the top of the class, if it is not already there.
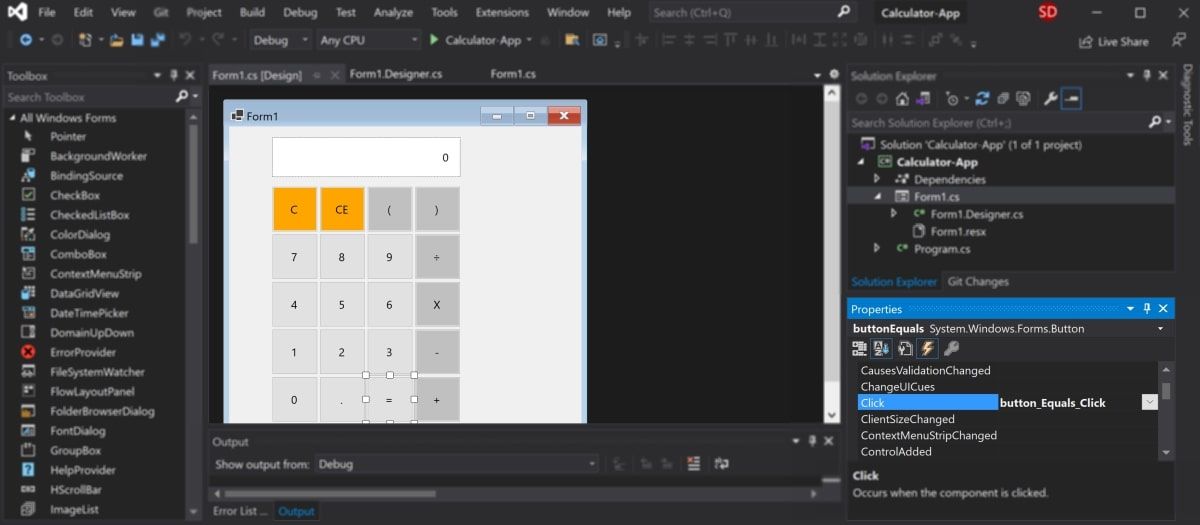
using System.Data; - Go back to the canvas. Highlight the equals button, and navigate to the Events window. Find the Click event, and select the button_Equals_Click() function. This will trigger the function to execute when you click the equals button.
How to Clear the Calculator
Add the functionality for the C (Clear) and CE (Clear Entry) buttons. The Clear button will completely erase the current calculation. The Clear Entry button will only erase the last entered number or operator.
- Create another function called button_Clear_Click(). This will execute when the user clicks on the Clear button on the calculator. Inside the function, reset the calculation and the value inside the results textbox.
 private void button_Clear_Click(object sender, EventArgs e)
{
    // Reset the calculation and empty the textbox
    textBoxOutput.Text = "0";
    currentCalculation = "";
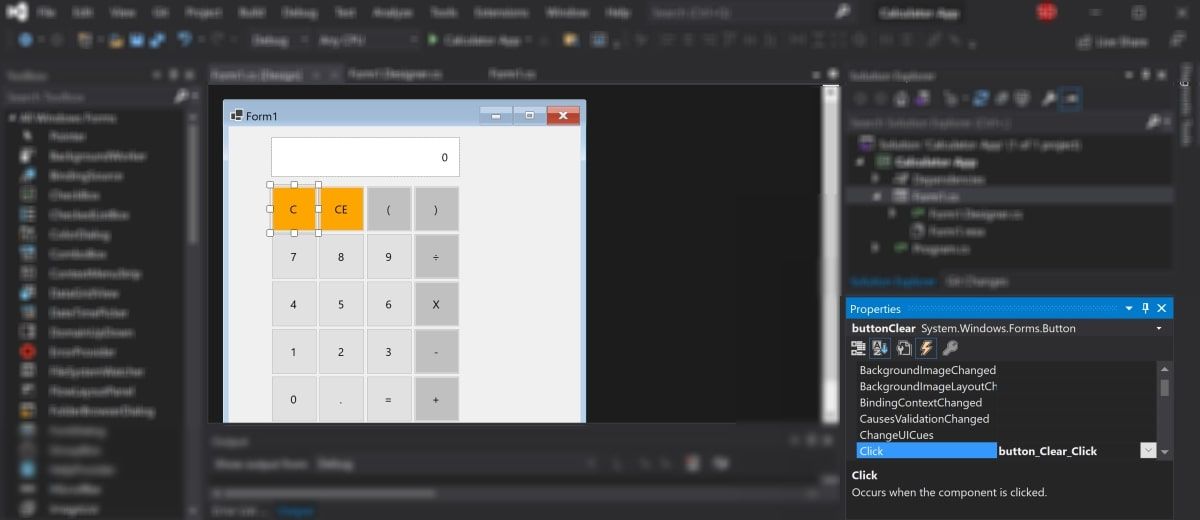
} - On the canvas, highlight the Clear button, and navigate to the Events Window.
- Find the Click event. Change the value to button_Clear_Click.
- Create another function called button_ClearEntry_Click(). This will execute when the user clicks on the Clear Entry button on the calculator. Inside the function, remove the last character from the current calculation string.
private void button_ClearEntry_Click(object sender, EventArgs e)
{
// If the calculation is not empty, remove the last number/operator entered
if (currentCalculation.Length > 0)
{
currentCalculation = currentCalculation.Remove(currentCalculation.Length - 1, 1);
}// Re-display the calculation onto the screen
textBoxOutput.Text = currentCalculation;
} - On the canvas, highlight the Clear Entry button, and navigate to the Events Window.
- Find the Click event. Change the value to button_ClearEntry_Click.
How to Run the Calculator Application
You can run the calculator in Visual Studio to test its functionality.
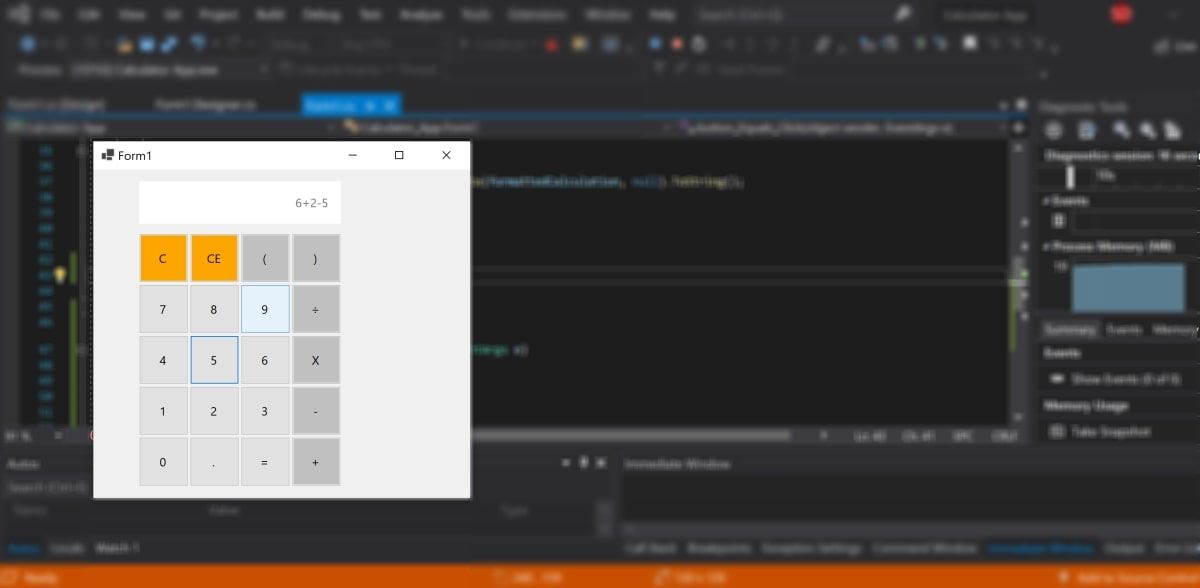
- Click on the green play button at the top of the Visual Studio application.
- Click on the buttons of the calculator. The calculation will show in the white space at the top of the calculator. Pressing the equals button will replace it with the answer. The Clear and Clear Entry buttons will also clear the calculation or entry.
Creating Desktop Applications Using Windows Forms
You can create a desktop calculator app using a Windows Forms project in Visual Studio. Use the canvas and Toolbox to drag and drop UI elements to make up the design of the calculator. Add your code logic and functionality in the C# code behind files.
A calculator is just one of many simple beginner apps that you can make while learning to code. Other beginner apps you can create include converters, file managers, dice games, or flag generators. You can create these from scratch using a Windows Forms application.
In this post we will see How to create a Simple Calculator in C# with windows form application using Visual Studio.
Download Calculator Code C# (Calculator.zip)
Form1.cs
using System;
using System.Collections.Generic;
using System.ComponentModel;
using System.Data;
using System.Drawing;
using System.Linq;
using System.Text;
using System.Windows.Forms;

namespace Calculator
{
    public partial class Form1 : Form
    {
        Double resultValue = 0;
        String operationPerformed = "";
        bool isOperationPerformed = false;
        public Form1()
        {
            InitializeComponent();
        }

        private void button_click(object sender, EventArgs e)
        {
            if ((textBox_Result.Text == "0") || (isOperationPerformed))
                textBox_Result.Clear();

            isOperationPerformed = false;
            Button button = (Button)sender;
            if (button.Text == ".")
            {
               if(!textBox_Result.Text.Contains("."))
                   textBox_Result.Text = textBox_Result.Text + button.Text;

            }else
            textBox_Result.Text = textBox_Result.Text + button.Text;


        }

        private void operator_click(object sender, EventArgs e)
        {
            Button button = (Button)sender;

            if (resultValue != 0)
            {
                button15.PerformClick();
                operationPerformed = button.Text;
                labelCurrentOperation.Text = resultValue + " " + operationPerformed;
                isOperationPerformed = true;
            }
            else
            {

                operationPerformed = button.Text;
                resultValue = Double.Parse(textBox_Result.Text);
                labelCurrentOperation.Text = resultValue + " " + operationPerformed;
                isOperationPerformed = true;
            }
        }

        private void button4_Click(object sender, EventArgs e)
        {
            textBox_Result.Text = "0";
        }

        private void button5_Click(object sender, EventArgs e)
        {
            textBox_Result.Text = "0";
            resultValue = 0;
        }

        private void button15_Click(object sender, EventArgs e)
        {
            switch (operationPerformed)
            {
                case "+":
                    textBox_Result.Text = (resultValue + Double.Parse(textBox_Result.Text)).ToString();
                    break;
                case "-":
                    textBox_Result.Text = (resultValue - Double.Parse(textBox_Result.Text)).ToString();
                    break;
                case "*":
                    textBox_Result.Text = (resultValue * Double.Parse(textBox_Result.Text)).ToString();
                    break;
                case "/":
                    textBox_Result.Text = (resultValue / Double.Parse(textBox_Result.Text)).ToString();
                    break;
                default:
                    break;
            }
            resultValue = Double.Parse(textBox_Result.Text);
            labelCurrentOperation.Text = "";
        }
    }
}
//How to Create a Calculator in Visual Studio C#
//
Form1.Designer.cs
namespace Calculator
{
    partial class Form1
    {
        /// <summary>
        /// Required designer variable.
        /// </summary>
        private System.ComponentModel.IContainer components = null;

        /// <summary>
        /// Clean up any resources being used.
        /// </summary>
        /// <param name="disposing">true if managed resources should be disposed; otherwise, false.</param>
        protected override void Dispose(bool disposing)
        {
            if (disposing && (components != null))
            {
                components.Dispose();
            }
            base.Dispose(disposing);
        }

        #region Windows Form Designer generated code

        /// <summary>
        /// Required method for Designer support - do not modify
        /// the contents of this method with the code editor.
        /// </summary>
        private void InitializeComponent()
        {
            System.ComponentModel.ComponentResourceManager resources = new System.ComponentModel.ComponentResourceManager(typeof(Form1));
            this.buttonOne = new System.Windows.Forms.Button();
            this.button1 = new System.Windows.Forms.Button();
            this.button2 = new System.Windows.Forms.Button();
            this.button3 = new System.Windows.Forms.Button();
            this.button4 = new System.Windows.Forms.Button();
            this.button5 = new System.Windows.Forms.Button();
            this.button6 = new System.Windows.Forms.Button();
            this.button7 = new System.Windows.Forms.Button();
            this.button8 = new System.Windows.Forms.Button();
            this.button9 = new System.Windows.Forms.Button();
            this.button11 = new System.Windows.Forms.Button();
            this.button12 = new System.Windows.Forms.Button();
            this.button13 = new System.Windows.Forms.Button();
            this.button14 = new System.Windows.Forms.Button();
            this.button15 = new System.Windows.Forms.Button();
            this.button16 = new System.Windows.Forms.Button();
            this.button17 = new System.Windows.Forms.Button();
            this.button19 = new System.Windows.Forms.Button();
            this.textBox_Result = new System.Windows.Forms.TextBox();
            this.labelCurrentOperation = new System.Windows.Forms.Label();
            this.SuspendLayout();
            //
            // buttonOne
            //
            this.buttonOne.Font = new System.Drawing.Font("Microsoft Sans Serif", 14.25F, System.Drawing.FontStyle.Bold, System.Drawing.GraphicsUnit.Point, ((byte)(0)));
            this.buttonOne.Location = new System.Drawing.Point(22, 73);
            this.buttonOne.Name = "buttonOne";
            this.buttonOne.Size = new System.Drawing.Size(45, 45);
            this.buttonOne.TabIndex = 0;
            this.buttonOne.Text = "7";
            this.buttonOne.UseVisualStyleBackColor = true;
            this.buttonOne.Click += new System.EventHandler(this.button_click);
            //
            // button1
            //
            this.button1.Font = new System.Drawing.Font("Microsoft Sans Serif", 14.25F, System.Drawing.FontStyle.Bold, System.Drawing.GraphicsUnit.Point, ((byte)(0)));
            this.button1.Location = new System.Drawing.Point(73, 73);
            this.button1.Name = "button1";
            this.button1.Size = new System.Drawing.Size(45, 45);
            this.button1.TabIndex = 1;
            this.button1.Text = "8";
            this.button1.UseVisualStyleBackColor = true;
            this.button1.Click += new System.EventHandler(this.button_click);
            //
            // button2
            //
            this.button2.Font = new System.Drawing.Font("Microsoft Sans Serif", 14.25F, System.Drawing.FontStyle.Bold, System.Drawing.GraphicsUnit.Point, ((byte)(0)));
            this.button2.Location = new System.Drawing.Point(124, 73);
            this.button2.Name = "button2";
            this.button2.Size = new System.Drawing.Size(45, 45);
            this.button2.TabIndex = 2;
            this.button2.Text = "9";
            this.button2.UseVisualStyleBackColor = true;
            this.button2.Click += new System.EventHandler(this.button_click);
            //
            // button3
            //
            this.button3.Font = new System.Drawing.Font("Microsoft Sans Serif", 14.25F, System.Drawing.FontStyle.Bold, System.Drawing.GraphicsUnit.Point, ((byte)(0)));
            this.button3.Location = new System.Drawing.Point(175, 73);
            this.button3.Name = "button3";
            this.button3.Size = new System.Drawing.Size(45, 45);
            this.button3.TabIndex = 3;
            this.button3.Text = "/";
            this.button3.UseVisualStyleBackColor = true;
            this.button3.Click += new System.EventHandler(this.operator_click);
            //
            // button4
            //
            this.button4.Font = new System.Drawing.Font("Microsoft Sans Serif", 14.25F, System.Drawing.FontStyle.Bold, System.Drawing.GraphicsUnit.Point, ((byte)(0)));
            this.button4.Location = new System.Drawing.Point(226, 73);
            this.button4.Name = "button4";
            this.button4.Size = new System.Drawing.Size(53, 45);
            this.button4.TabIndex = 4;
            this.button4.Text = "CE";
            this.button4.UseVisualStyleBackColor = true;
            this.button4.Click += new System.EventHandler(this.button4_Click);
            //
            // button5
            //
            this.button5.Font = new System.Drawing.Font("Microsoft Sans Serif", 14.25F, System.Drawing.FontStyle.Bold, System.Drawing.GraphicsUnit.Point, ((byte)(0)));
            this.button5.Location = new System.Drawing.Point(226, 124);
            this.button5.Name = "button5";
            this.button5.Size = new System.Drawing.Size(53, 45);
            this.button5.TabIndex = 9;
            this.button5.Text = "C";
            this.button5.UseVisualStyleBackColor = true;
            this.button5.Click += new System.EventHandler(this.button5_Click);
            //
            // button6
            //
            this.button6.Font = new System.Drawing.Font("Microsoft Sans Serif", 14.25F, System.Drawing.FontStyle.Bold, System.Drawing.GraphicsUnit.Point, ((byte)(0)));
            this.button6.Location = new System.Drawing.Point(175, 124);
            this.button6.Name = "button6";
            this.button6.Size = new System.Drawing.Size(45, 45);
            this.button6.TabIndex = 8;
            this.button6.Text = "*";
            this.button6.UseVisualStyleBackColor = true;
            this.button6.Click += new System.EventHandler(this.operator_click);
            //
            // button7
            //
            this.button7.Font = new System.Drawing.Font("Microsoft Sans Serif", 14.25F, System.Drawing.FontStyle.Bold, System.Drawing.GraphicsUnit.Point, ((byte)(0)));
            this.button7.Location = new System.Drawing.Point(124, 124);
            this.button7.Name = "button7";
            this.button7.Size = new System.Drawing.Size(45, 45);
            this.button7.TabIndex = 7;
            this.button7.Text = "6";
            this.button7.UseVisualStyleBackColor = true;
            this.button7.Click += new System.EventHandler(this.button_click);
            //
            // button8
            //
            this.button8.Font = new System.Drawing.Font("Microsoft Sans Serif", 14.25F, System.Drawing.FontStyle.Bold, System.Drawing.GraphicsUnit.Point, ((byte)(0)));
            this.button8.Location = new System.Drawing.Point(73, 124);
            this.button8.Name = "button8";
            this.button8.Size = new System.Drawing.Size(45, 45);
            this.button8.TabIndex = 6;
            this.button8.Text = "5";
            this.button8.UseVisualStyleBackColor = true;
            this.button8.Click += new System.EventHandler(this.button_click);
            //
            // button9
            //
            this.button9.Font = new System.Drawing.Font("Microsoft Sans Serif", 14.25F, System.Drawing.FontStyle.Bold, System.Drawing.GraphicsUnit.Point, ((byte)(0)));
            this.button9.Location = new System.Drawing.Point(22, 124);
            this.button9.Name = "button9";
            this.button9.Size = new System.Drawing.Size(45, 45);
            this.button9.TabIndex = 5;
            this.button9.Text = "4";
            this.button9.UseVisualStyleBackColor = true;
            this.button9.Click += new System.EventHandler(this.button_click);
            //
            // button11
            //
            this.button11.Font = new System.Drawing.Font("Microsoft Sans Serif", 14.25F, System.Drawing.FontStyle.Bold, System.Drawing.GraphicsUnit.Point, ((byte)(0)));
            this.button11.Location = new System.Drawing.Point(175, 175);
            this.button11.Name = "button11";
            this.button11.Size = new System.Drawing.Size(45, 45);
            this.button11.TabIndex = 13;
            this.button11.Text = "-";
            this.button11.UseVisualStyleBackColor = true;
            this.button11.Click += new System.EventHandler(this.operator_click);
            //
            // button12
            //
            this.button12.Font = new System.Drawing.Font("Microsoft Sans Serif", 14.25F, System.Drawing.FontStyle.Bold, System.Drawing.GraphicsUnit.Point, ((byte)(0)));
            this.button12.Location = new System.Drawing.Point(124, 175);
            this.button12.Name = "button12";
            this.button12.Size = new System.Drawing.Size(45, 45);
            this.button12.TabIndex = 12;
            this.button12.Text = "3";
            this.button12.UseVisualStyleBackColor = true;
            this.button12.Click += new System.EventHandler(this.button_click);
            //
            // button13
            //
            this.button13.Font = new System.Drawing.Font("Microsoft Sans Serif", 14.25F, System.Drawing.FontStyle.Bold, System.Drawing.GraphicsUnit.Point, ((byte)(0)));
            this.button13.Location = new System.Drawing.Point(73, 175);
            this.button13.Name = "button13";
            this.button13.Size = new System.Drawing.Size(45, 45);
            this.button13.TabIndex = 11;
            this.button13.Text = "2";
            this.button13.UseVisualStyleBackColor = true;
            this.button13.Click += new System.EventHandler(this.button_click);
            //
            // button14
            //
            this.button14.Font = new System.Drawing.Font("Microsoft Sans Serif", 14.25F, System.Drawing.FontStyle.Bold, System.Drawing.GraphicsUnit.Point, ((byte)(0)));
            this.button14.Location = new System.Drawing.Point(22, 175);
            this.button14.Name = "button14";
            this.button14.Size = new System.Drawing.Size(45, 45);
            this.button14.TabIndex = 10;
            this.button14.Text = "1";
            this.button14.UseVisualStyleBackColor = true;
            this.button14.Click += new System.EventHandler(this.button_click);
            //
            // button15
            //
            this.button15.Font = new System.Drawing.Font("Microsoft Sans Serif", 14.25F, System.Drawing.FontStyle.Bold, System.Drawing.GraphicsUnit.Point, ((byte)(0)));
            this.button15.Location = new System.Drawing.Point(226, 175);
            this.button15.Name = "button15";
            this.button15.Size = new System.Drawing.Size(53, 96);
            this.button15.TabIndex = 19;
            this.button15.Text = "=";
            this.button15.UseVisualStyleBackColor = true;
            this.button15.Click += new System.EventHandler(this.button15_Click);
            //
            // button16
            //
            this.button16.Font = new System.Drawing.Font("Microsoft Sans Serif", 14.25F, System.Drawing.FontStyle.Bold, System.Drawing.GraphicsUnit.Point, ((byte)(0)));
            this.button16.Location = new System.Drawing.Point(175, 226);
            this.button16.Name = "button16";
            this.button16.Size = new System.Drawing.Size(45, 45);
            this.button16.TabIndex = 18;
            this.button16.Text = "+";
            this.button16.UseVisualStyleBackColor = true;
            this.button16.Click += new System.EventHandler(this.operator_click);
            //
            // button17
            //
            this.button17.Font = new System.Drawing.Font("Microsoft Sans Serif", 14.25F, System.Drawing.FontStyle.Bold, System.Drawing.GraphicsUnit.Point, ((byte)(0)));
            this.button17.Location = new System.Drawing.Point(124, 226);
            this.button17.Name = "button17";
            this.button17.Size = new System.Drawing.Size(45, 45);
            this.button17.TabIndex = 17;
            this.button17.Text = ".";
            this.button17.UseVisualStyleBackColor = true;
            this.button17.Click += new System.EventHandler(this.button_click);
            //
            // button19
            //
            this.button19.Font = new System.Drawing.Font("Microsoft Sans Serif", 14.25F, System.Drawing.FontStyle.Bold, System.Drawing.GraphicsUnit.Point, ((byte)(0)));
            this.button19.Location = new System.Drawing.Point(22, 226);
            this.button19.Name = "button19";
            this.button19.Size = new System.Drawing.Size(96, 45);
            this.button19.TabIndex = 15;
            this.button19.Text = "0";
            this.button19.UseVisualStyleBackColor = true;
            this.button19.Click += new System.EventHandler(this.button_click);
            //
            // textBox_Result
            //
            this.textBox_Result.Font = new System.Drawing.Font("Microsoft Sans Serif", 14.25F, System.Drawing.FontStyle.Bold, System.Drawing.GraphicsUnit.Point, ((byte)(0)));
            this.textBox_Result.Location = new System.Drawing.Point(22, 40);
            this.textBox_Result.Name = "textBox_Result";
            this.textBox_Result.Size = new System.Drawing.Size(257, 29);
            this.textBox_Result.TabIndex = 20;
            this.textBox_Result.Text = "0";
            this.textBox_Result.TextAlign = System.Windows.Forms.HorizontalAlignment.Right;
            //
            // labelCurrentOperation
            //
            this.labelCurrentOperation.AutoSize = true;
            this.labelCurrentOperation.BackColor = System.Drawing.SystemColors.Window;
            this.labelCurrentOperation.Font = new System.Drawing.Font("Microsoft Sans Serif", 14.25F, System.Drawing.FontStyle.Bold, System.Drawing.GraphicsUnit.Point, ((byte)(0)));
            this.labelCurrentOperation.ForeColor = System.Drawing.SystemColors.ControlDark;
            this.labelCurrentOperation.Location = new System.Drawing.Point(18, 13);
            this.labelCurrentOperation.Name = "labelCurrentOperation";
            this.labelCurrentOperation.Size = new System.Drawing.Size(0, 24);
            this.labelCurrentOperation.TabIndex = 21;
            //
            // Form1
            //
            this.AutoScaleDimensions = new System.Drawing.SizeF(6F, 13F);
            this.AutoScaleMode = System.Windows.Forms.AutoScaleMode.Font;
            this.ClientSize = new System.Drawing.Size(305, 291);
            this.Controls.Add(this.labelCurrentOperation);
            this.Controls.Add(this.textBox_Result);
            this.Controls.Add(this.button15);
            this.Controls.Add(this.button16);
            this.Controls.Add(this.button17);
            this.Controls.Add(this.button19);
            this.Controls.Add(this.button11);
            this.Controls.Add(this.button12);
            this.Controls.Add(this.button13);
            this.Controls.Add(this.button14);
            this.Controls.Add(this.button5);
            this.Controls.Add(this.button6);
            this.Controls.Add(this.button7);
            this.Controls.Add(this.button8);
            this.Controls.Add(this.button9);
            this.Controls.Add(this.button4);
            this.Controls.Add(this.button3);
            this.Controls.Add(this.button2);
            this.Controls.Add(this.button1);
            this.Controls.Add(this.buttonOne);
            this.FormBorderStyle = System.Windows.Forms.FormBorderStyle.FixedDialog;
            this.Icon = ((System.Drawing.Icon)(resources.GetObject("$this.Icon")));
            this.MaximizeBox = false;
            this.Name = "Form1";
            this.StartPosition = System.Windows.Forms.FormStartPosition.CenterScreen;
            this.Text = "Calculator";
            this.ResumeLayout(false);
            this.PerformLayout();

        }

        #endregion

        private System.Windows.Forms.Button buttonOne;
        private System.Windows.Forms.Button button1;
        private System.Windows.Forms.Button button2;
        private System.Windows.Forms.Button button3;
        private System.Windows.Forms.Button button4;
        private System.Windows.Forms.Button button5;
        private System.Windows.Forms.Button button6;
        private System.Windows.Forms.Button button7;
        private System.Windows.Forms.Button button8;
        private System.Windows.Forms.Button button9;
        private System.Windows.Forms.Button button11;
        private System.Windows.Forms.Button button12;
        private System.Windows.Forms.Button button13;
        private System.Windows.Forms.Button button14;
        private System.Windows.Forms.Button button15;
        private System.Windows.Forms.Button button16;
        private System.Windows.Forms.Button button17;
        private System.Windows.Forms.Button button19;
        private System.Windows.Forms.TextBox textBox_Result;
        private System.Windows.Forms.Label labelCurrentOperation;
    }
}
Program.cs
using System;
using System.Collections.Generic;
using System.Linq;
using System.Windows.Forms;

namespace Calculator
{
    static class Program
    {
        /// <summary>
        /// The main entry point for the application.
        /// </summary>
        [STAThread]
        static void Main()
        {
            Application.EnableVisualStyles();
            Application.SetCompatibleTextRenderingDefault(false);
            Application.Run(new Form1());
        }
    }
}
CALCULATOR IN WINDOWS FORM
Microsoft.net framework or Mono Framework provides a free and open source graphical (GUI) class library called as Windows Form or WinForms.
These WinForms provide a platform to App developers to write rich client applications for laptop, desktops, and tablet PCs etc.
These WinForms are written in C# programming
Language and an attractive feature included in it is the drag and drop facilities that can be applied on the native Windows Controls like button , textbox, checkbox, listview etc
These controls included in uncountable number of applications. One of the application that we will study about is Calculator made in Windows Forms.
So let us quickly get started to make our own basic calculator in WinForms.
STEP 1: Open Visual Studio or the IDE which you are comfortable with and create a new project . Select the Windows Form Application that comes under .net framework.
Click on create and then name the project as per your choice, for eg. “Calculator_1” and then press OK.
A main form on your workspace will appear as this:
STEP 2: Right click on the form and select “properties” from the dialog box and then change the text property to “calculator” for your convenience.
Also, you can modify the size of the form by adjusting its property attributes.
STEP 3: Open toolbox by pressing Ctrl + Alt + X or from the view in Menu Bar if toolbox is not there on the workspace already.
- Once you come across the toolbox , select “textbox“ control and drop it onto the form. Resize it according to your need from the properties or you can adjust it directly by the arrows that appear on the textbox boundary once you click on the textbox.
- This textbox will display the values selected by the user and the result generated by the calculator.
- Change the alignment of the text in the textbox to right in the properties. You can also set the default value in calculator textbox to 0.
STEP 4: A basic calculator will contain numerical digits from 0 to 9, + , — , * , /, . , = . Also ON ,OFF buttons for turning the calculator on and off and vice versa. Two additional buttons namely “clear” and “<=” (backspace) are added if any value is to be removed from the textbox .
Therefore, we will be adding 20 buttons in the form. Please note that we will add the ON and OFF button in such a way that one button overlaps the other. This is to make any one button out of these two to be visible when the calculator is on or off. i. e , the ON button will be hidden when we turn it on and the OFF button will be shown and vice versa.
STEP 5: Select “ button control” from the toolbox and resize it. Copy and paste this button on the form for all the other buttons on the calculator to maintain symmetry in the calculator.
Adjust the “=” button size as according to the picture here.
STEP 6: Name these buttons according to the function they are performing . for eg. For numerical values , name them as “ b0 to b9 ” for 0 to 9. For + , — ,* ,/ ,= ,. , change name to add , sub , mul , div, result, point respectively.
Also change their text according to the values that are to be displayed on the buttons in the calculator.
STEP 7: Once it is done , you will have to specify the action that has to be performed by any button when it is pressed. Double click on the button you will come across the coding section of that button. You have to specify the functionality of each button one by one in the code section.
The coding should look like this:
using System;
using System.Collections.Generic;
using System.ComponentModel;
using System.Data;
using System.Drawing;
using System.Linq;
using System.Text;
using System.Threading.Tasks;
using System.Windows.Forms;

namespace Calculator_1
{
    public partial class Form1 : Form
    {
        public Form1()
        {
            InitializeComponent();
        }

        float num, ans;
        int count;
        public void disable()
        {
            textBox1.Enabled = false;
            on.Show();
            off.Hide();
            b0.Enabled = false;
            b1.Enabled = false;
            b2.Enabled = false;
            b3.Enabled = false;
            b4.Enabled = false;
            b5.Enabled = false;
            b6.Enabled = false;
            b7.Enabled = false;
            b8.Enabled = false;
            b9.Enabled = false;
            add.Enabled = false;
            sub.Enabled = false;
            mul.Enabled = false;
            div.Enabled = false;
            point.Enabled = false;
            backspace.Enabled = false;
            clear.Enabled = false;
            result.Enabled = false;
        }
        public void enable()
        {
            textBox1.Enabled = true;
            on.Hide();
            off.Show();
            b0.Enabled = true;
            b1.Enabled = true;
            b2.Enabled = true;
            b3.Enabled = true;
            b4.Enabled = true;
            b5.Enabled = true;
            b6.Enabled = true;
            b7.Enabled = true;
            b8.Enabled = true;
            b9.Enabled = true;
            add.Enabled = true;
            clear.Enabled = true;
            backspace.Enabled = true;
            result.Enabled = true;
            div.Enabled = true;
            sub.Enabled = true;
            mul.Enabled = true;
            point.Enabled = true;
        }


        private void b1_Click(object sender, EventArgs e)
        {
            textBox1.Text = textBox1.Text + 1;
        }

        private void b2_Click(object sender, EventArgs e)
        {
            textBox1.Text = textBox1.Text + 2;
        }

        private void b3_Click(object sender, EventArgs e)
        {
            textBox1.Text = textBox1.Text + 3;
        }

        private void b4_Click(object sender, EventArgs e)
        {
            textBox1.Text = textBox1.Text + 4;
        }

        private void b5_Click(object sender, EventArgs e)
        {
            textBox1.Text = textBox1.Text + 5;

        }

        private void b6_Click(object sender, EventArgs e)
        {
            textBox1.Text = textBox1.Text + 6;

        }

        private void b7_Click(object sender, EventArgs e)
        {
            textBox1.Text = textBox1.Text + 7;
        }

        private void b8_Click(object sender, EventArgs e)
        {
            textBox1.Text = textBox1.Text + 8;
        }

        private void b9_Click(object sender, EventArgs e)
        {
            textBox1.Text = textBox1.Text + 9;
        }

        private void b0_Click(object sender, EventArgs e)
        {
            textBox1.Text = textBox1.Text + 0;
        }

        private void div_Click(object sender, EventArgs e)
        {
            num = float.Parse(textBox1.Text);
            textBox1.Clear();
            textBox1.Focus();
            count = 4;
            label1.Text = num.ToString() + "/";

        }
        private void result_Click(object sender, EventArgs e)
        {
            compute();
            label1.Text = "";
        }


        private void add_Click(object sender, EventArgs e)
        {
            num = float.Parse(textBox1.Text);
            textBox1.Clear();
            textBox1.Focus();
            count = 1;
            label1.Text = num.ToString() + "+";
        }

        private void sub_Click(object sender, EventArgs e)
        {
            num = float.Parse(textBox1.Text);
            textBox1.Clear();
            textBox1.Focus();
            count = 2;
            label1.Text = num.ToString() + "-";
        }

        private void mul_Click(object sender, EventArgs e)
        {
            num = float.Parse(textBox1.Text);
            textBox1.Clear();
            textBox1.Focus();
            count = 3;
            label1.Text = num.ToString() + "*";
        }

        private void point_Click(object sender, EventArgs e)
        {
            textBox1.Text = textBox1.Text + ".";
        }


        private void result_Click_1(object sender, EventArgs e)
        {
            compute();
            label1.Text = "";
        }

        private void on_Click(object sender, EventArgs e)
        {
            enable();
        }

        private void off_Click(object sender, EventArgs e)
        {
            disable();
        }

        private void clear_Click(object sender, EventArgs e)
        {
            textBox1.Text = "";
        }

        private void backspace_Click(object sender, EventArgs e)
        {
            int length = textBox1.TextLength - 1;
            string text = textBox1.Text;
            textBox1.Clear();
            for(int i=0; i< length; i++ )
            {
                textBox1.Text = textBox1.Text + text[i];
            }
        }

        public void compute()
        {
            switch (count)
            {
                case 1:

                    ans = num + float.Parse(textBox1.Text);
                    textBox1.Text = ans.ToString();
                    break;
                case 2:
                    ans = num - float.Parse(textBox1.Text);
                    textBox1.Text = ans.ToString();
                    break;
                case 3:
                    ans = num * float.Parse(textBox1.Text);
                    textBox1.Text = ans.ToString();
                    break;
                case 4:
                    ans = num / float.Parse(textBox1.Text);
                    textBox1.Text = ans.ToString();
                    break;
                default:
                    break;


            }
        }


    }
}
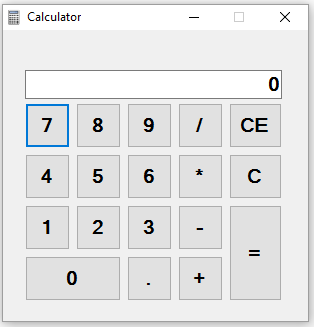
The calculator will appear somewhat like this:

