Как правило, эта ошибка возникает после установки нового оборудования или приложений, несовместимых с вашим компьютером. Далее приведены некоторые возможные решения.
-
Перезапустите компьютер, нажав кнопку «Пуск» и выбрав «Выключение» > «Перезапуск». Во время запуска быстро нажмите клавишу F8 на клавиатуре несколько раз. Когда откроется страница «Дополнительные параметры меню загрузки», с помощью клавиш со стрелками выберите пункт «Безопасный режим», а затем нажмите клавишу ВВОД.
-
Проверьте, удается ли открыть значки недавно установленных устройств или программного обеспечения. Если не удается, удалите их.
-
Убедитесь, что программное обеспечение компьютера обновлено до последней версии. Нажмите кнопку «Пуск» , а затем в поле поиска рядом с кнопкой «Пуск» введите «Центр обновления Windows» и в списке результатов выберите пункт «Проверка наличия обновлений». В меню «Параметры» нажмите кнопку «Проверка наличия обновлений» . Когда все будет готово, перезапустите компьютер, нажав кнопку «Пуск» и выбрав элементы «Выключение» > «Перезапуск».
-
Перейдите на веб-сайт изготовителя, чтобы установить последнюю версию драйвера.
Дополнительные сведения можно найти в разделе «Устранение ошибок «синий экран»»
Нужна дополнительная помощь?
Bad Pool Header Windows 10 относится к ошибкам, вызывающим очень серьезную неприятность — экран смерти (BSOD), и в данной статье мы поговорим о том, как ее исправить. Чаще всего такие ошибки всплывают при установке нового «железа» или ПО. Для успешного устранения проблемы важно отследить момент, когда именно появилась эта ошибка.
Как понять, что при запуске Windows 10 вы столкнулись именно с ошибкой 0x00000019 Bad Pool Header. Вот основные признаки:
- окно активной программы вылетает
- появляется сообщение об ошибке — синий экран смерти код ошибки 0x00000019
- После этого компьютер зависает или начинает работать очень медленно, с заторможенным реагированием на ввод с клавиатуры и мыши.

Что это за ошибка Bad Pool Header? Каковы причины ее появления?
- Неверно сконфигурированы драйверы, они устарели или повреждены (это случается чаще всего);
- Реестр поврежден из-за недавних изменений ПО, связанного с Windows
- У вас появился вирус или вредоносное ПО
- После установки нового оборудования произошел конфликт между драйверами
- Неполадки с системными файлами
- Повреждения загрузочного диска или оперативной памяти.
К сожалению, это не всё. Причина появления blue screen может крыться где угодно — в самом оборудовании, в драйверах, прошивках и программном обеспечении. Stop 0x00000019 Bad Pool Header — требует предельного внимания с вашей стороны, и запускать ситуацию не стоит.
Как исправить ошибку 0x00000019 Bad Pool Header?
Мы предлагаем попробовать следующие варианты устранения этой проблемы под названием «код остановки Bad Pool Header», но будьте, пожалуйста, внимательны.
- Восстановление записи реестра, которые связаны с этой ошибкой. Данный шаг не рекомендуется выполнять самостоятельно, поскольку малейшая погрешность парализует всю работу компьютера напрочь.
- Провести сканирование компьютера на вирусы и вредоносное ПО
- Почистить систему от мусора, убрать с диска временные файлы и папки
- Обновить драйверы
- Использовать Восстановление системы и Отменить последние изменения в Windows
- Удалить и поставить снова программу Windows Operating System
- Проверяем системные файлы
- Поставьте все имеющиеся в доступе обновления для Windows
- Проверяем жесткий диск на ошибки
- Проверяем оперативку
- Производим чистую установку Windows
Упростим вам задачу и приведем самый популярный алгоритм, который чаще всего помогает при появлении синего экрана с ошибкой Bad Pool Header:
Также обратите внимание на статьи на нашем сайте по аналогичным темам:
- ошибка Dpc Watchdog Violation Windows 10 ;
- ошибка Video TDR Failure в Windows 10 — с инструкциями для видеокарт Nvidia и AMD.
Все эти ошибки появляются вследствие устаревания ПО и драйверов, повреждений реестра, жесткого диска или оперативки, или вирусов.
Если вы интересуетесь, как создать разделы на жестком диске Windows 10, в одноименной статье-инструкции мы рассказали об этом подробно.
Надеемся, что данная статья вам помогла, и теперь вы знаете, как исправить Bad Pool Header Windows 10.
Синий экран смерти встречается пользователям Windows не так уж редко. Коды ошибок, с которыми мы сталкиваемся, могут быть самыми разными. Но все они сигнализируют о неполадках операционной системы. Одна из них — Bad pool header. Давайте разберемся, что это за проблема и как ее можно исправить.
Причины появления
Bad pool header связана с ошибкой пула при выделении памяти – физической или виртуальной. Она сигнализирует о том, что поставленное вами ПО или оборудование требует ресурсов больше, чем способна выделить Windows.
Самыми частыми источниками являются:
- Недостаточный объем винчестера, в том числе и наличие множества повреждений.
- Нехватка оперативной памяти вследствие ее малого объема изначально или повреждений плашек.
- Проблемы с оборудованием. Оно или просто не функционирует с вашим ПК, или драйвера поставлены неправильно.
- Вирусы.
- Непорядок в системных файлах или в реестре.
- Неправильно выполненное обновление. Некоторые антивирусные программы могут заблокировать процесс обновления в самый его разгар. В этом случае Windows будет работать некорректно.
Если у вас наблюдается нехватка памяти из-за малого объема ПЗУ или ОЗУ – здесь мы помочь не сможем. Вам надо провести апгрейд своего компьютера. А вот повреждения попробовать исправить можно. Для оперативной памяти используйте программу Memtest86.
Memtest86
Если с оперативной памятью все в порядке, просканируйте диск на ошибки. В случае, когда компьютер грузится, вызовите командную строку от имени администратора через «Выполнить» (WIN+R). Если же ПК зависает, вам придется зайти в безопасном режиме (в 7 версии) или при загрузке (если это 10-ка) вызывать ее. Давайте рассмотрим оба варианта.
Bad pool header Windows 7 — как исправить?
До версии 8 вход в режим безопасности Windows осуществлялся очень просто. При перезагрузке нажимайте F8 и далее выбирайте в меню «Безопасный режим с поддержкой командной строки».
Далее произойдет обычная загрузка ПК, и в системе вы сможете вызвать командную строку. Нажмите WIN_R и введите cmd.
Закройте ВСЕ файлы и папки. Должно остаться только черное окно как на скриншоте. Введите команду chkdsk /f /r. Она позволит проверить весь жесткий диск на наличие ошибок (ключ /f) и вдобавок еще и отсканирует системные файлы (ключ/r). Если диск все же чем-то занят, то вы увидите следующее сообщение:
Согласитесь (нажмите Y) и перезагрузите ПК. Сразу же при его загрузке начнется сканирование. Хотим предупредить, что процесс это долгий, так что запаситесь терпением.
Ошибка Bad pool header — как исправить в Windows 10?
Проблема Bad pool header 0x00000019 при загрузке Windows 7 решается просто. А вот в 10-ке вход в безопасный режим усложнили. Сейчас для этого требуется установочный диск или накопитель с восстановлением системы. Вообще, он создается заранее. Если вы не обзавелись таким, создайте его на другом компьютере. Вам даже не понадобится искать ПК с Windows 10. Этот инструмент есть и в 7-й версии.
После того, как вы обзавелись нужным накопителем, загружайте компьютер. Как только появится черный экран, входите в БИОС (F2 или DEL – обычно написано внизу). Для ноутбуков варианты могут быть разные. Например, Леново имеет отдельную кнопку.
В БИОСе вам необходим раздел загрузки – BOOT. В нем измените загрузочной устройство, сохраните и выйдите. Например, флешка.
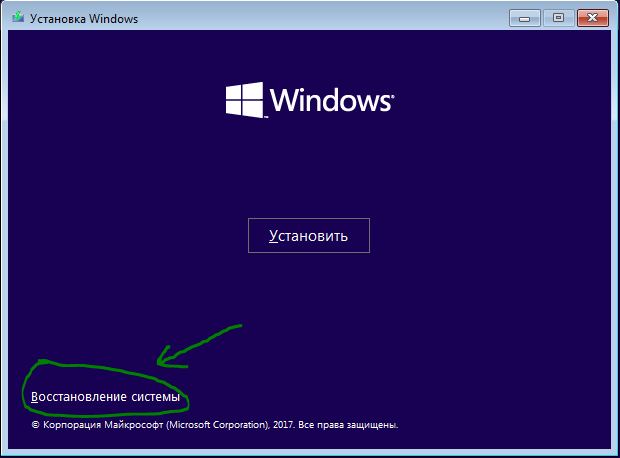
Следующий вход в систему будет осуществляться уже с флеш-устройства. Вы увидите установочный экран Windows. Нажимайте внизу «Восстановление системы».
Далее последовательно выбирайте:
- Поиск и устранение неисправностей.

- Дополнительные параметры

- Командная строка

- И далее произведите все те же действия, что были описаны ранее для исправления ошибки Bad pool header посредством команды chkdsk.


Вход в безопасный режим в Windows 10
Для всех остальных вариантов исправления синего экрана смерти Bad pool header вам понадобится на этом этапе выбрать не командную строку, а «Параметры загрузки». Это позволит зайти в систему в безопасном режиме, чтобы начать дальнейшую борьбу Bad pool header. Нажмите кнопку «Перезагрузить».
И выберите шестой вариант (F6).
Теперь начнется загрузка ОС.
Код ошибки bsod bad pool header – качаем обновления
Как уже говорили ранее, сбой при установке обновлений может вызвать такую проблему. После того, как вам удалось загрузиться, зайдите в параметры.
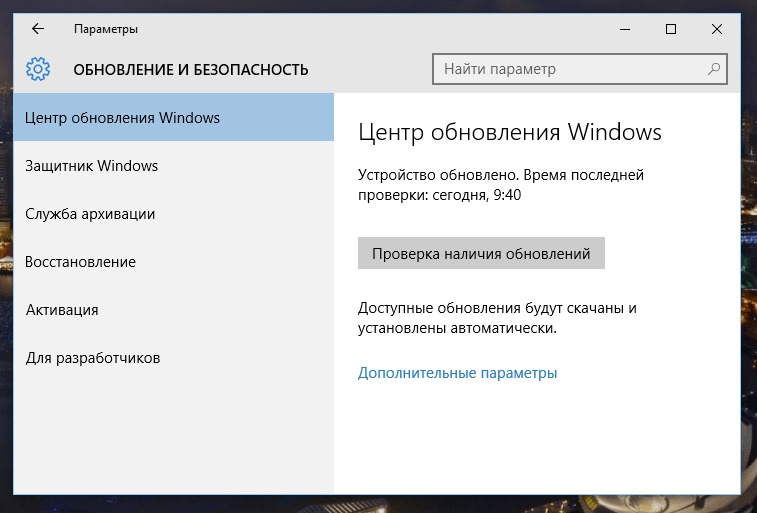
Выберите обновление и безопасность.
И проверьте наличие.
После установки перезагрузитесь. Если проблема была в этом, bad pool header пропадет и не будет вас беспокоить.
Stop 0x00000019 bad pool header Windows 7 или 10 – вирусы
После входа в безопасный режим в любой версии, обновите антивирусные базы и проверьте свой ПК. Вам нужна глубокая проверка. Например, в Avira это делается следующим образом:
- Найдите в трее значок и нажмите на него.

- Далее нажмите «Сканировать».

Ваша система будет вылечена от вирусов, если таковые имелись.

Исправляем bad pool header откатом системы
Последний вариант – откат системы до точки восстановления. Он поможет, если вы установили ПО или оборудование, которое вызвало конфликт. Надо вернуться назад, до момента инсталляции. Здесь возможны два варианта для Windows 10:
- Зайти в безопасном режиме и пройти следующими этапами: Пуск – Параметры – Восстановление – Запуск восстановления системы.
- При загрузке с установочного диска на этапе «Дополнительные параметры» (После выбора диагностики) выбрать «Восстановление системы».

В обоих случаях вы попадете в мастер восстановления. Здесь выполняйте следующие действия:
- Нажмите «Далее»

- Выберите точку восстановления.

- Если вы затрудняетесь, проверьте какое ПО будет затронуто и соотнесите эту информацию с тем, что было изменено последним до появления ошибки.
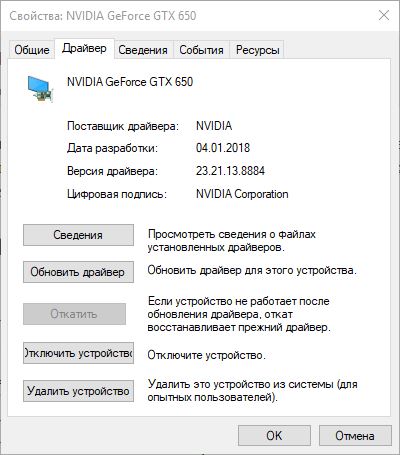
- Если данные совпадают с вашим анализом, нажмите «Закрыть» и вернитесь в окно восстановления.Например, на скрине видно, что основные изменения касались драйвера видеокарты NVidia. После их обновления и стала появляться ошибка bad pool header.

- Кликайте «Далее».
- Готово.


После восстановления все изменения будут удалены, и система вернется в нормальное состояние.
Все вышеперечисленные действия относятся и к системе Windows 8. Она очень близка к 10-ке. Только «Параметры» приходится искать в меню «Пуск».
Надеемся, что наши инструкции помогут вам избавиться от ошибки bad pool header.
Отличного Вам дня!
-
Что это за ошибка?
-
Причины возникновения
-
Советы по исправлению
Ошибки синего экрана смерти (BSoD) являются самыми распространенными в ОС Windows. Не стала исключением и BSoD-ошибка BAD_POOL_HEADER Windows 10. Как исправить ее и из-за чего возникает, расскажу в этой статье.
Что это за ошибка?
0x00000019 BAD_POOL_HEADER – BSoD-ошибка, недопустимый заголовок пула, которая проявляется из-за того, что ОС не выделяет нужный объем виртуальной или физической памяти для работы программного или аппаратного компонента. Она может проявится при обновлении системы или переустановке Windows.

Причины возникновения
Возникновению BAD_POOL_HEADER может служить как один из указанных компонентов, так и взаимодействие целого их ряда. Это может быть из-за:
- Нехватки места на жестком диске.
- Битых секторов и бэдов на винчестере.
- Повреждения или конфликта драйверов с оборудованием.
- Повреждения системных файлов и реестра Windows вирусным ПО.
- Блокировки процессов обновления антивирусным ПО.
- Ошибки или повреждения платы оперативной памяти.
Советы по исправлению
Важно! Предварительно отключите периферийные устройства от ПК (принтеры, сканеры, подключенные по USB смартфоны и т.д.)
Чтобы устранить неисправность, понадобится диск или флешка c установочными файлами Windows 10:
- Подключите флешку к ПК, поменяйте приоритет загрузки в BIOS или в boot режиме выполните загрузку с флешки.
- В окне “Установить” нажмите в левом нижнем углу “Восстановление системы”. Следуя инструкции, включите безопасный режим и войдите в него.
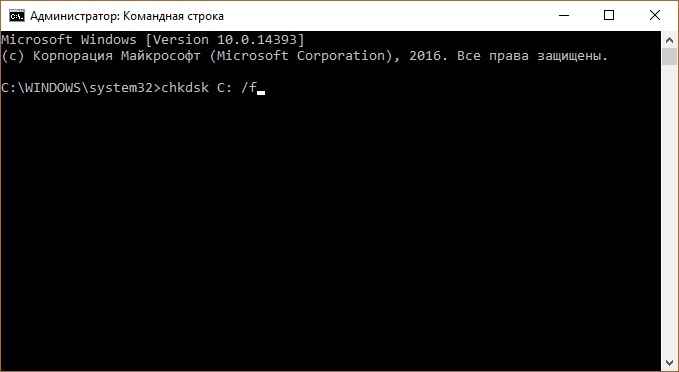
- Нажмите правой кнопкой мыши по Пуск и войдите в “командная строка (Администратор)”. Выполните команду проверки и устранения ошибок Windows
chkdsk C: /f
C: – это диск с ОС. Если у вас Windows 10 на другом диске, вместо C: укажите свой.

- После проверки и исправления ошибок перезапустите систему. Отключите безопасный режим и проверьте работу системы.
- Также, проверьте наличие последних обновлений и установите их.

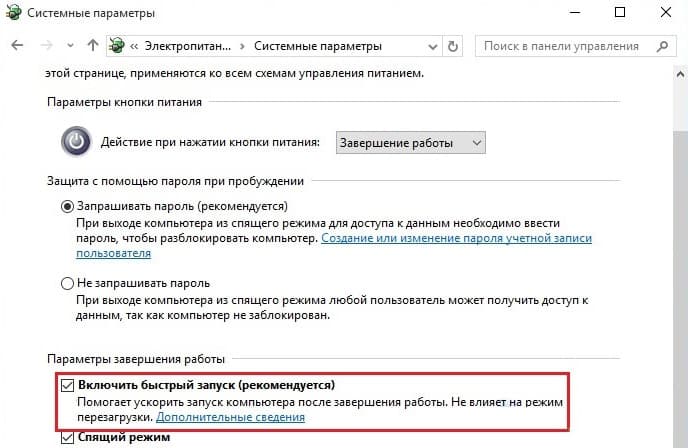
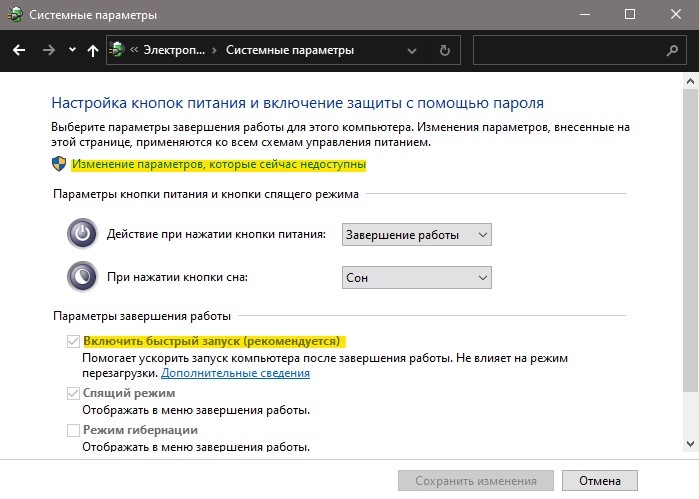
- Зайдите в “Управление электропитанием” → “Действие кнопок питания” → “Изменение параметров, которые сейчас не доступны” → снимите галку с “Включить быстрый запуск”. Перезагрузите ПК.

- Просканируйте систему на вирусы с помощью бесплатных утилит Dr.Web CureIt! или Kaspersky Virus Removal Tool. Удалите последние установленные программы, переустановите драйвера.
- Если ошибка не устранена, возможно дело в аппаратной части. Проверьте оперативную память программой memtest86 и жесткий диск на бэды, ошибки и битые сектора.
Остались вопросы после прочтения статьи? Задавайте их в комментариях или используйте специальную форму.
Популярное за неделю

Отключаем AdBlock в популярных браузерах
Современное киберпространство построено на маркетинге. Для бесплатного просмотра фильмов, видеоклипов и прочего контента владельцы сайтов добровольно-принудительно просят отключить блокировщик рекламы. Также это требуется для…

Как скинуть фото с iPhone на компьютер
В Apple постарались максимально закрыть операционную систему от вмешательства со стороны пользователей, что сделало ее наиболее безопасной ОС, но в то же время вызвало…

Как взломать Wi-Fi сеть: лучшие способы
В мире беспроводных технологий, любая система подвержена риску, что ее взломают. Беспроводные сети или Wi-Fi имеют свои слабые точки, которыми можно воспользоваться. Взлом Wi-Fi…
BAD_POOL_HEADER (плохой заголовок пула) — ошибка появляется на синем экране в Windows 10/7 и в большинстве случаев с ней можно столкнуться после обновления системы. Также, ошибка возникает из-за проблем с неправильным распределением памяти.
Виновником ошибки BAD POOL HEADER может быть недавнее установленное оборудование в ПК, включая USB устройства. Также, проблема может быть связана со сторонней программой как антивирус, драйверами, плохими секторами на диске или повреждением системных файлов.

Если ошибка BAD POOL HEADER не циклическая, и вы можете попасть на рабочий стол, то можете приступить ниже к способам, но я рекомендую начать с рекомендации 1 ниже (попасть в дополнительные параметры «Включить 4-5 раза…»). Если вы не можете загрузиться на рабочий стол, так как ошибка появляется каждый раз при включении, то у вас два варианта:
- Включить 4-5 раза компьютер или ноутбук, доходя до ошибки или логотипа загрузки. Тогда вас автоматически перекинет в дополнительные параметры.
- Вы можете создать установочную флешку с Windowsw 10 и во время установки нажать на восстановление системы, после чего, вас перекинет в дополнительные параметры.
В дополнительных параметрах, в первую очередь, выберите «Восстановление при загрузке». Если вы получили ошибку после обновления системы, то можно удалить последнее обновление. Также, вы можете «Восстановить систему» выбрав точку восстановления на пару дней назад, когда ошибки еще не было. Далее вы можете загрузиться в безопасном режиме, что позволит нам загрузиться на рабочий стол. И запустить командную строку, которая нам понадобиться ниже.

1. Стороннее ПО
Попробуйте вспомнить, что недавно устанавливали и удалите. Удалите сторонний антивирус полностью, так как он может со временем вызывать различные ошибки BSOD. В ошибке BAD POOL HEADER была замечена программа Dell Sonic Global VPN.
Если вам сложно определить программу, то лучшим способом будет, это загрузка системы в чистом состоянии. Это позволит загрузить систему только с процессами и службами Microsoft ОС Windows. Если синего экрана не появится, то нужно искать виновника ошибки. Это может быть стороннее ПО, драйвер и т.п.
- Выполнение чистой загрузки в Windows 10/8/7
2. Отключите быстрый запуск
Быстрый запуск ускоряет загрузку компьютеру, но также имеет и недостатки. Иногда, система не успевает обработать нужные операции и соответственно появляется различные ошибки, ошибка BAD POOL HEADER не исключение. По этому отключим быстрый запуск.
Перейдите в панель управление > оборудование и звук > электропитание > действие кнопок питание > изменить параметры, которые сейчас недоступны и ниже уберите галочку «Включить быстрый запуск«.
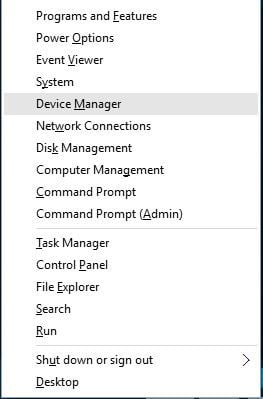
3. Проверка драйверов
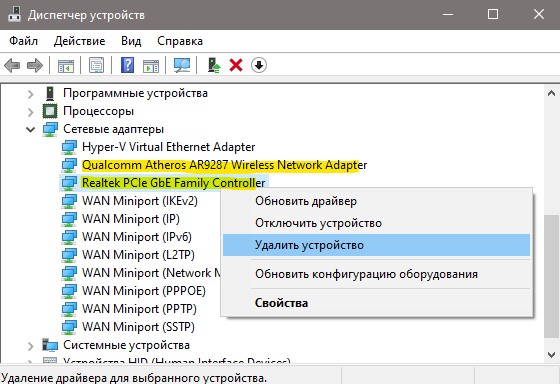
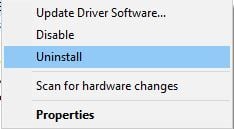
Нажмите сочетание кнопок Win+X и выберите «Диспетчер устройств«. В диспетчере устройств вам нужно определить какой драйвер может вызывать ошибку BAD_POOL_HEADER и удалите его, после чего перезагрузить ПК, чтобы драйвер переустановился. Ниже пример показан на удаление драйверов сетевого адаптера Ethernet и WiFi и мне помогло решить данную проблему, так как Netgear вызывал конфликт с Realtek PCIe Controller.
Вы также, можете запустить проверку плохих драйверов с этим руководством.
Обязательно сравните установленные версии драйвера с версией на сайте производителя устройства. Если текущая версия старая, то нужно скачать последнюю именно с сайта производителя оборудования.
4. Проверка ОЗУ
Если у вас компьютер, то вы можете физически поменять местами планки ОЗУ в разные слоты. Также, если у вас установлено две планки, то извлеките одну. Комбинируйте любые возможные моменты, чтобы убедиться, что ошибка BAD POOL HEADER не из-за оперативной памяти. На форму Microsoft, некоторым пользователям помогло удаление и переустановка Аудио драйвера.
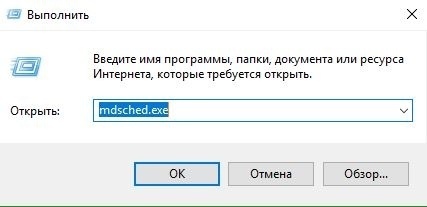
- Также, есть возможность проверить память на ошибки программным путем, нажав Win+R и введя mdsched.exe.
5. Проверка SYS файлов
Повреждение системных файлов может вызывать ошибку BAD POOL HEADER. Запустим инструмент, который проверит целостность системных файлов и, если будут поврежденные, то их попытается автоматически исправить.
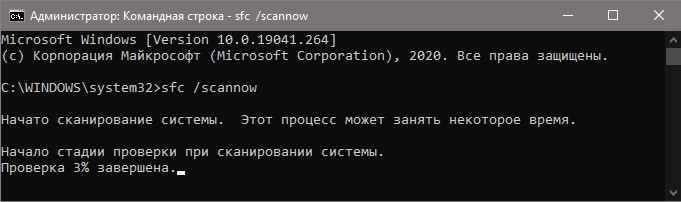
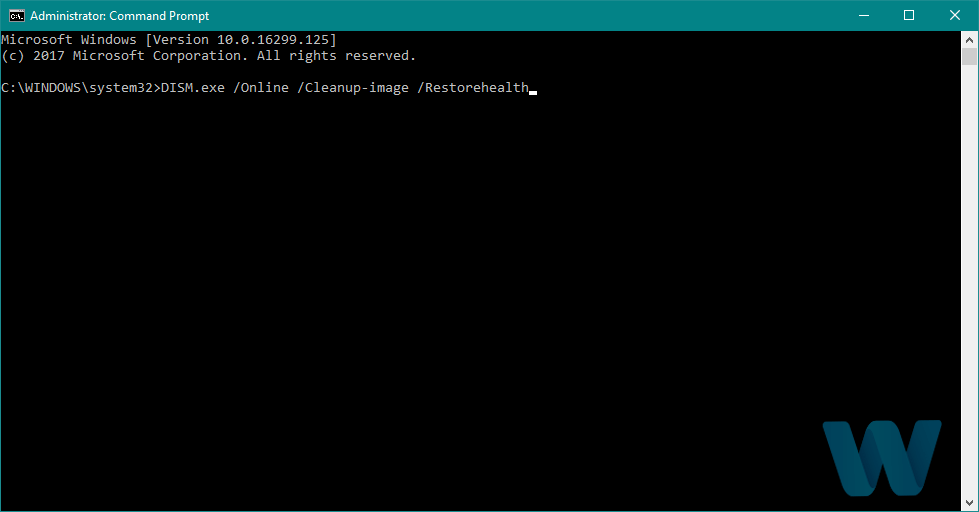
Запустите командную строку от имени администратора и введите ниже команды по очереди:
sfc /scannow
DISM /ONLINE /CLEANUP-IMAGE /RESTOREHEALTH
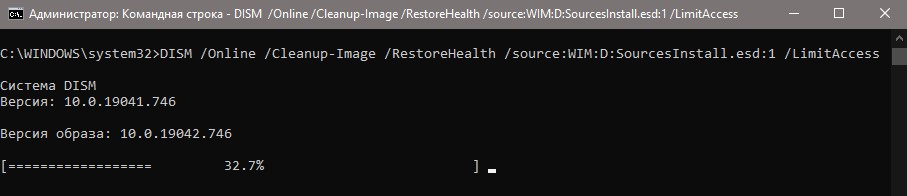
Если какие-либо ошибки обнаружены и не исправлены, особенно в случае команды DISM, то создайте установочную флешку с Windows 10. Также, можно монтировать ISO образ в виртуальный привод. Далее запустите обратно командную строку от имени администратора и введите:
DISM /Online /Cleanup-Image /RestoreHealth /source:WIM:D:SourcesInstall.esd:1 /LimitAccess
Замените D на свой путь к флешке или виртуальному приводу.
Смотрите еще:
- Исправить ошибку BAD_SYSTEM_CONFIG_INFO в Windows
- Ошибка Bad Image 0xc000012f и 0xc0000020 в Windows 10
- Программа Bad_Module_Info не работает в Windows 10
- Диагностика ошибок синего экрана смерти BSOD Window
- netio.sys: Ошибки синего экрана BSOD в Windows 10
[ Telegram | Поддержать ]
Bad Pool Header — ошибка появляется вместе с синим экраном BSoD. Может возникнуть внезапно, но в основном, пользователи с ней сталкивались после обновления или переустановки Windows 7, 8.1, 10. С ее появлением дальнейшая работа на компьютере будет невозможной, потребуется его перезагрузка. Но, чаще всего, после перезагрузки она появляется снова и снова.
Bad Pool Header в основном связана с неправильным выделением памяти системой Windows. Это может произойти по множеству причин. Но все же, самым распространенным виновником являются устаревшие или неправильные драйвера. Поскольку это связано с выделением памяти, причиной также может быть сбой в работе планок ОЗУ (например, через плохой контакт). Также ошибку могут вызвать некоторые антивирусные программы. Есть несколько способов ее исправить.

Содержание
- 1 Способ 1: отключение или удаление антивируса
- 2 Способ 2: отключение быстрого запуска
- 3 Способ 3: проверка драйверов
- 4 Способ 4: проверка ОЗУ
Способ 1: отключение или удаление антивируса
Прежде всего, нужно проверить, не является ли источником ошибки антивирус. Хотя он не относится к самым распространенным источникам, но, безусловно, поможет сузить диапазон поиска.
Попробуйте отключить через иконку в трее (правый нижний угол). Просто кликните правой кнопкой мыши на значок антивируса и выберите пункт «Отключить». Если пункт отключения не отображается, кликните дважды по значку для входа в основное окно и поищите его в настройках.
Если решили удалить, выполните следующие действия:
- Нажмите совместно клавиши Win+R.
- Введите appwiz.cpl и подтвердите выполнение на Enter.
- Найдите антивирусную программу, кликните на ней правой кнопкой и выберите «Удалить». Следуйте инструкциям на экране. После перезагрузите компьютер и проверьте, возникает ли синий экран BSoD.
Если при удалении антивируса возникает синий экран и препятствует дальнейшей работе, попробуйте загрузить компьютер в безопасном режиме.
- Нажмите вместе клавиши Win+R.
- Впишите msconfig и кликните на Enter.
- Перейдите на вкладку «Загрузка».
- Отметьте в параметрах загрузки «Безопасный режим». Сохраните изменения нажатием на «Применить» и «ОК».
- Перезагрузите систему, если перезагрузка не началась автоматически.
Система будет загружена в безопасном режиме. Теперь можно легко удалить антивирусную программу, минуя BSoD, так как антивирус не работает в этом режиме.
- Нажмите Win+R, введите appwiz.cpl и подтвердите запуск на Enter.
- Кликните правой кнопкой мыши на антивирус и выполните его удаление.
После успешного удаления выйдите из безопасного режима:
- Вызовите окно «Выполнить» (Win+R), введите msconfig.
- Откройте вкладку «Загрузка».
- Снимите флажок с параметра «Безопасный режим». После нажатия на «Применить» и «ОК» компьютер автоматически перезагрузится в обычном режиме.
Если ошибку Bad Pool Header удалось исправить удалением антивируса, то рекомендуем установить другой для полноценной защиты ваших данных, который не вызывает эту проблему.
Способ 2: отключение быстрого запуска
Этот способ помог исправить ошибку Bad Pool Header у большинства пользователей. В ускоренном режиме компьютер грузится намного быстрее в сравнении с обычным запуском. Иногда это вызывает проблемы, поскольку быстрый запуск не дает программному обеспечению достаточно времени для правильной загрузки.
- Удерживая клавишу Win нажмите R.
- Впишите команду powercfg.cpl и подтвердите ее на Enter.
- Перейдите в раздел «Действие кнопок питания».
- Нажмите «Изменение параметров которые сейчас не доступны».
- Снимите флажок с «Быстрого запуска», и сохраните изменения.
Перезагрузите ПК и проверьте, появляется ли синий экран с ошибкой Bad Pool Header.
Способ 3: проверка драйверов
Чаще всего к возникновению ошибки Bad Pool Header причастны драйверы устройств.
Если недавно переустанавливали или обновляли WIndows, то проверьте их в первую очередь. Во время переустановки или обновления WIndows автоматически устанавливает стандартные поверх оригинальных драйверов производителей. Обновленные версии, загруженные из Центра обновления Windows могут не подходить, вследствие неправильная работа и распознавание устройств приводит к ошибке Bad Pool Header.
Конечно, выявление «неправильного» драйвера может оказаться долгой процедурой. Нужно обновить все устройства. Но можно сузить поиск. Например, если синий экран BSOD возникает всякий раз при подключении к интернету, то сначала проверяем в Диспетчере устройств Wi-Fi адаптер и сетевую карту (Ethernet).
Приведем пример обновления сетевого адаптера. Эти шаги нужно повторить для обновления всех устройств, которые, по вашему видению, могут быть причиной проблемы:
- Нажмите одновременно Win+R.
- Наберите devmgmt.msc и подтвердите выполнение.
- Разверните раздел Сетевые адаптеры.
- Проверьте, есть ли желтый треугольник с восклицательным знаком, который указывает на ошибки с драйверами. Если присутствует красный значок, то у Windows возникли проблемы с установкой соединения с этим оборудованием.
Если видите желтый предупреждающий знак, выполните следующие действия:
- Щелкните правой кнопкой мыши на адаптер и выберите «Обновить драйвер».
- Выберите автоматический поиск обновленных драйверов.
Если ничего не находит, перейдите на официальный сайт производителя сетевой карты и скачайте последнюю версию в любую папку на компьютере.
После загрузки последней версии выполните следующие действия:
- В Диспетчере задач разверните Сетевые адаптеры.
- Щелкните правой кнопкой мыши на сетевую карту и выберите Свойства.
- Перейдите на вкладку Драйвер.
- Посмотрите на версию драйвера и проверьте, совпадает ли она с последней версией, загруженной из сайта производителя. Если это не так, закройте это окно.
- Снова щелкните правой кнопкой мыши на устройстве и выберите «Обновить…».
- Выполните поиск драйверов на этом компьютере.
- Кликните на «Обзор» и перейдите к папке, в которую скачали последнюю версию.
- Нажмите «Далее» и следуйте инструкциям на экране.
Если проблема все еще не решена, нужно удалить устройство и пусть Windows установит стандартный набор сетевых драйверов. Это может решить проблему, так как Windows установит наиболее совместимые.
Для этого, кликните на сетевой карте правой кнопкой мыши, выберите «Удалить», сохраните изменения и перепустите компьютер. Система автоматически установит новый универсальный драйвер для этого устройства.
Способ 4: проверка ОЗУ
Синий экран с ошибкой Bad Pool Header может вызван неисправностью оперативной памяти. В частности, через плохой контакт или наличием пыли как на самой планке, так и вокруг слота.
Первое, что нужно сделать, извлечь планку ОЗУ, очистить контакты ластиком, продуть слоты от пыли и вставить ее обратно. Убедитесь, что планка подключена правильно, защелки с обеих сторон зафиксированы. После этого включите компьютер и проверьте на наличие ошибки Bad Pool Header.
Если не удалось исправить ошибку, приготовьтесь потратить некоторое время на тестирование ОЗУ утилитой Memtest.
Диагностика памяти Windows
В системе Windows есть собственный встроенный инструмент для проверки оперативной памяти. Хотя он не считается более точным инструментом, когда дело доходит до тестирования. Поэтому лучше использовать стороннюю утилиту Memtest.
Чтобы запустить встроенное средство диагностики памяти:
- Вызовите окно «Выполнить» нажатием клавиш Win+R.
- Впишите команду mdsched и щелкните на Enter.
- Нажмите «Выполнить перезагрузку и проверку (рекомендуется)».
Если возникли какие-либо ошибки или он не запускается:
- Нажмите клавишу Windows один раз.
- Введите «диагностика памяти» в поисковую строку.
- В результатах поиска щелкните правой кнопкой мыши на «Диагностика проблем оперативной памяти» и выберите Запуск от имени администратора.
- Нажмите «Выполнить перезагрузку и проверку (рекомендуется)».
Windows автоматически перезагрузится и начнется тестирование. На экране будет отображаться сам процесс тестирования. После завершения компьютер автоматически перезагрузится, и результаты будут отображены при входе в Windows. По результата тестирования можно определить, нужно ли вам менять оперативную память или нет.
Memtest
Это основная программа для проверки состояния оперативной памяти. Она занимает много времени, но очень полезна для определения ее состояния.
Ручное тестирование
Поскольку Memtest занимает много времени, есть другой вариант, при условии, что имеется запасная планка ОЗУ.
Если после замены одной из планок система работает нормально и не возникает синий экран с ошибкой bad pool header, то эта замененная планка была источником проблемы. Но, все же рекомендуем ее проверить утилитой Memtest, чтобы на 100% убедится в ее неисправности.
by Milan Stanojevic
Milan has been enthusiastic about technology ever since his childhood days, and this led him to take interest in all PC-related technologies. He’s a PC enthusiast and he… read more
Updated on March 15, 2022
- One BSoD error users have encountered is the BAD_POOL_HEADER error in Windows 10.
- When the bad pool header appears in Windows 10, it usually won’t boot.
- To fix this issue, you should consider checking or updating your driver.
- The use of PC repair software can also prove handy in handling this BSoD.
One of the most frustrating errors on any computer must be Blue Screen of Death error.
These errors will constantly restart your PC in order to prevent potential damage, and in some cases, you won’t be able to enter Windows 10 at all.
Since BSoD errors can be such a major problem, today we’re going to show you how to fix BAD_POOL_HEADER BSOD error on Windows 10.
- Use software to fix your BSoD
- Uninstall Dell Sonic Global VPN
- Remove your antivirus software
- Reinstall your wireless card drivers
- Run the BSOD Troubleshooter
- Run the SFC scan
- Run DISM
- Disable Nvidia Streamer Service
- Remove overclock settings
- Uninstall your audio driver
- Check your network adapter driver
- Disable Fast Startup
- Check for faulty hardware
- Reset Windows 10
1. Use Software to fix your BSoD
As you can see from the number of solutions, it’s hard to pinpoint exactly what causes this particular BSoD error, and trying them all is time-consuming.
However, with third-party PC cleaners, most of these solutions are performed all at once, saving you time, headaches, and the possibility of making things worse because of a lack of experience.
We recommend Restoro because it offers multiple PC repair and optimization features, all packed into a simple and easy-to-navigate UI.
Restoro can fix BSoD errors using its Windows system file database. It scans your PC and detects whether you have any corrupt or missing system files and replaces them with new ones.
After you install the soft, let it scan your PC. See the results, select what you want it to fix, and select Start Repair.
⇒ Get Restoro
2. Uninstall Dell Sonic Global VPN
VPN software is useful, but certain VPN software, such as Dell Sonic Global VPN, has issues with Windows 10.
It was confirmed by the users that this software can cause BAD_POOL_HEADER BSoD error to appear.
If you have this VPN tool installed, we urge you to remove it in order to fix this error.
3. Remove your antivirus software
In some cases, BSoD errors, such as BAD_POOL_HEADER can be caused by your antivirus software. Users reported that Malwarebytes, as well as other security software, can cause this error.
In order to fix it, it’s advised that your remove your antivirus software and reinstall it. Bear in mind that certain antivirus software needs to be removed completely before this error can be fixed.
To do that, you can download specific uninstallers designed to completely remove certain antivirus software. If you’re using McAfee, you can use the MCPR tool to remove it.
AVG also has its own tool, and you can download it from here. Many antivirus companies provide you with special uninstallers, and you can download them directly from the company’s website.
Alternatively, you can switch to different antivirus software, and if you’re looking for new security software, we did a list of the best antivirus programs for Windows 10, so make sure to check it out.
4. Reinstall your wireless card drivers
- Press Windows Key + X and choose Device Manager from the menu.

- Once the Device Manager opens, locate your wireless network adapter, right-click it and choose Uninstall.

- After you’ve uninstalled the driver, restart your computer.
BAD_POOL_HEADER is often caused by outdated or incompatible drivers, and users reported that the issue was fixed after uninstalling and reinstalling their wireless network card.
It’s always a good idea to update your network adapter driver, and in order to do that, make sure you visit your network adapter manufacturer’s website and download the latest drivers.
Update drivers automatically
Searching for drivers on your own can be time-consuming. So, we advise you to use a tool that will do this for you automatically.
Using an automatic driver updater will certainly save you from the hassle of searching for drivers manually, and it will always keep your system up to date with the latest drivers.
5. Run the BSOD Troubleshooter
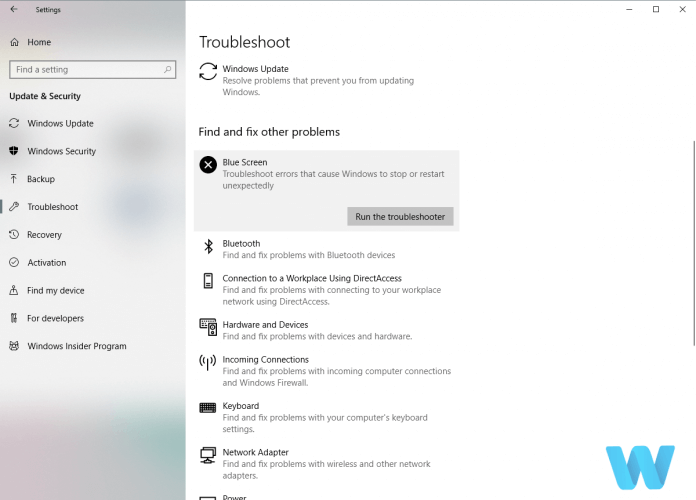
- Open the Settings app and go to Update & Security section.
- Select Troubleshoot from the menu on the left.
- Select BSOD from the right pane and click Run the troubleshooter.

- Follow the instructions on the screen to complete the troubleshooter.
If none of the previous solutions managed to resolve the BAD_POOL_HEADER BSOD issue, let’s try with the troubleshooting tools.
Some PC issues are hard to tackle, especially when it comes to corrupted repositories or missing Windows files. If you are having troubles fixing an error, your system may be partially broken.
We recommend installing Restoro, a tool that will scan your machine and identify what the fault is.
Click here to download and start repairing.
The first one we’re going to try is Windows 10’s built-in troubleshooter. This troubleshooting tool can resolve all kinds of system issues, including BSOD errors. So, it might be helpful in this case.
6. Run the SFC scan
The SFC scan is a command-line tool that scans your system for potential issues and resolves them on the way (if the solutions are possible, of course).
So, it might be helpful when dealing with the BAD_POOL_HEADER BSOD error, as well.
Here’s how to run the SFC scan in Windows 10:
- Right-click on the Start Menu button, and open Command Prompt (Admin).
- Enter the following line and press Enter:
sfc/scannow
- Wait until the process is done (it may take a while).
- If the solution is found, it will automatically be applied.
- Now, close the Command Prompt and restart your computer.

7. Run DISM
7.1. Standard way
- Right-click Start and open Command Prompt (Admin).
- Paste the following command and press Enter:
DISM /Online /Cleanup-Image /RestoreHealth - Wait until the scan is finished.
- Restart your computer and try updating again.
7.2. With the Windows installation media
- Insert your Windows installation media.
- Right-click the Start menu and, from the menu, choose the Command Prompt (Admin).
- In the command line, type the following commands and press Enter after each:
dism /online /cleanup-image /scanhealthdism /online /cleanup-image /restorehealth
- Now, type the following command and press Enter:
DISM /Online /Cleanup-Image /RestoreHealth/source:WIM:X:SourcesInstall.wim:1 /LimitAccess
- Make sure to change an X value with the letter of the mounted drive with Windows 10 installation.
- After the procedure is finished, restart your computer.
The final troubleshooting tool we’re going to try here is DISM. Deployment Image and Servicing Management freshly deploys the system image, so it’s possible it will wipe away the potential BSOD issues.
8. Disable Nvidia Streamer Service
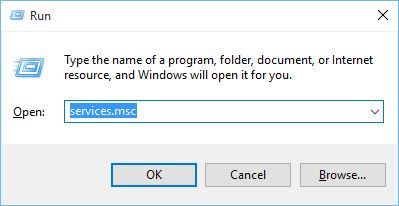
- Press Windows Key + R and enter services.msc. Press Enter or click OK.

- Once the Services window opens, locate Nvidia Streamer Service and double click it.
- Set the Startup type to Disabled and click the Stop button. This should stop the service from automatically starting.

- Click Apply and OK to save changes.
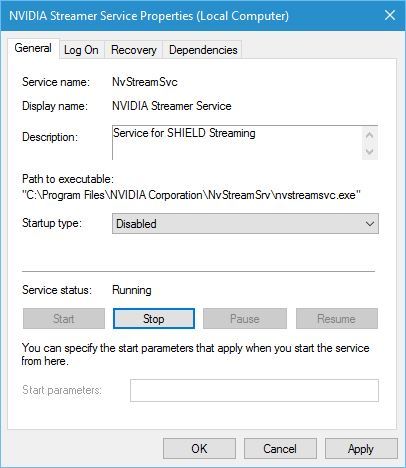
A number of users reported BAD_POOL_HEADER error while using Nvidia graphic card.
According to them, the error was caused by an Nvidia Streamer Service, and in order to fix this error, you’ll have to disable this service.
9. Remove overclock settings
Overclocking is an advanced procedure that allows you to change the settings of your hardware in order to achieve the best performance.
In our list of 10 best overclocking software for Windows 10, we briefly mentioned that overclocking can lead to system instability and cause BAD_POOL_HEADER BSoD error to appear.
If your hardware is overclocked and you’re getting this error, be sure to remove any overclocking settings that you have and the error should be resolved.
- Fix BAD POOL CALLER error in a few easy steps
- How to Fix Windows 10 Stuck in Boot Loop After Reset
- Critical Service Failed BSoD on Windows 10: Fix & Causes
- Fix: The Specified User Does not Have a Valid Profile Error
10. Uninstall your audio driver
Few users reported that the issue with BAD_POOL_HEADER was caused by their audio driver, and in order to fix this issue, it was required to uninstall the problematic driver.
Uninstalling a driver is rather simple and you can easily uninstall it from Device Manager. For detailed instructions on how to uninstall your driver, check Solution 4
11. Check your network adapter driver
According to users, BAD_POOL_HEADER can occur due to a network adapter driver conflict.
Few Netgear users reported that Realtek PCIe GBE Family Controller driver was installed on their system, and that driver caused a conflict with a Netgear driver.
According to users, removing the Realtek PCIe GBE Family Controller driver fixed the BSoD error.
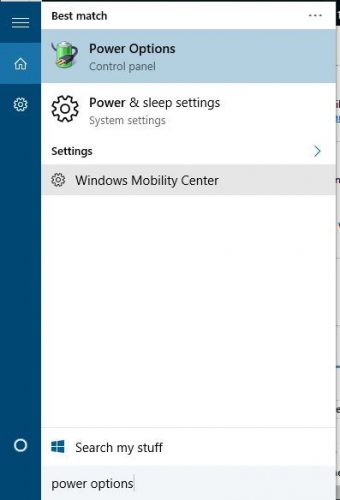
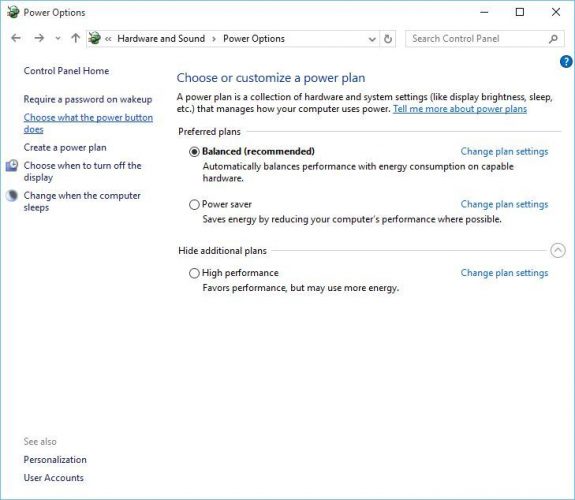
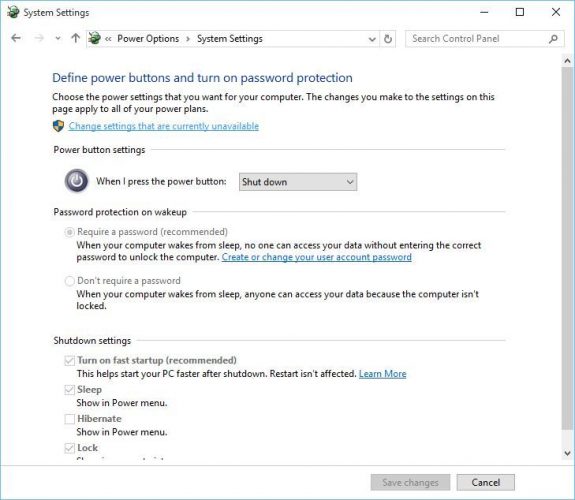
12. Disable Fast Startup
- Press Windows Key + S and enter Power Options. Choose Power Options from the menu.

- Once the Power Options opens, click the Choose what power button does.

- Click Change settings that are currently unavailable and scroll down to the Shutdown settings section.
- Uncheck Turn on fast startup (recommended) and click on Save changes.
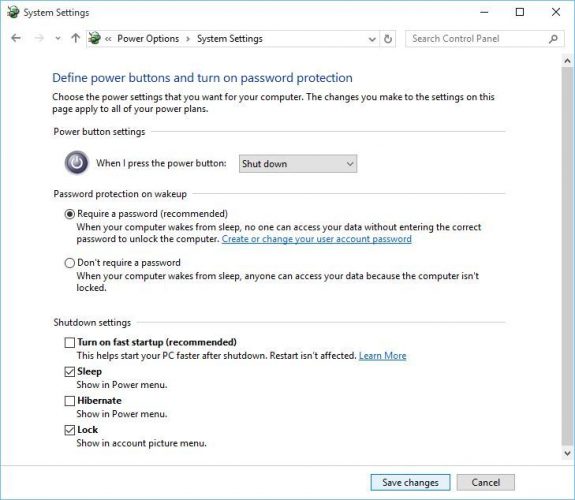
If you have a problem with BAD_POOL_HEADER BSoD error, you can fix it by disabling Fast Startup.
After disabling Fast startup, your computer might start a bit slower, but the issues with BAD_POOL_HEADER should be resolved.
13. Check for faulty hardware
BSoD errors are commonly caused by faulty hardware, most notably RAM memory, and many users reported that replacing their RAM memory fixed the BAD_POOL_HEADER error.
Other components can also cause this error, and users reported that sometimes the problem can be fixed by replacing your wireless card or your motherboard.
14. Reset Windows 10
If BAD_POOL_HEADER error still persists, you can fix it by resetting Windows 10.
Bear in mind that resetting Windows 10 will delete all your installed applications and you’ll have to download and install them again. To reset your PC, do the following:
- Restart your computer a few times while it boots. After you do that your PC should enter Automatic Repair mode.
- Click Repair your computer and choose Troubleshoot.
- Select Reset this PC.
- Select Keep my files option and follow the instructions.
- Optional: If the problem still persists, repeat the entire step and choose Remove everything > Only the drive where Windows is installed > Just remove my files.
- By performing this step all files file be deleted from your C partition so keep that in mind.
BAD_POOL_HEADER BSoD error can create all sorts of problems on Windows 10, but you can easily fix this issue by using one of our solutions.
![]()
Newsletter
by Milan Stanojevic
Milan has been enthusiastic about technology ever since his childhood days, and this led him to take interest in all PC-related technologies. He’s a PC enthusiast and he… read more
Updated on March 15, 2022
- One BSoD error users have encountered is the BAD_POOL_HEADER error in Windows 10.
- When the bad pool header appears in Windows 10, it usually won’t boot.
- To fix this issue, you should consider checking or updating your driver.
- The use of PC repair software can also prove handy in handling this BSoD.
One of the most frustrating errors on any computer must be Blue Screen of Death error.
These errors will constantly restart your PC in order to prevent potential damage, and in some cases, you won’t be able to enter Windows 10 at all.
Since BSoD errors can be such a major problem, today we’re going to show you how to fix BAD_POOL_HEADER BSOD error on Windows 10.
- Use software to fix your BSoD
- Uninstall Dell Sonic Global VPN
- Remove your antivirus software
- Reinstall your wireless card drivers
- Run the BSOD Troubleshooter
- Run the SFC scan
- Run DISM
- Disable Nvidia Streamer Service
- Remove overclock settings
- Uninstall your audio driver
- Check your network adapter driver
- Disable Fast Startup
- Check for faulty hardware
- Reset Windows 10
1. Use Software to fix your BSoD
As you can see from the number of solutions, it’s hard to pinpoint exactly what causes this particular BSoD error, and trying them all is time-consuming.
However, with third-party PC cleaners, most of these solutions are performed all at once, saving you time, headaches, and the possibility of making things worse because of a lack of experience.
We recommend Restoro because it offers multiple PC repair and optimization features, all packed into a simple and easy-to-navigate UI.
Restoro can fix BSoD errors using its Windows system file database. It scans your PC and detects whether you have any corrupt or missing system files and replaces them with new ones.
After you install the soft, let it scan your PC. See the results, select what you want it to fix, and select Start Repair.
⇒ Get Restoro
2. Uninstall Dell Sonic Global VPN
VPN software is useful, but certain VPN software, such as Dell Sonic Global VPN, has issues with Windows 10.
It was confirmed by the users that this software can cause BAD_POOL_HEADER BSoD error to appear.
If you have this VPN tool installed, we urge you to remove it in order to fix this error.
3. Remove your antivirus software
In some cases, BSoD errors, such as BAD_POOL_HEADER can be caused by your antivirus software. Users reported that Malwarebytes, as well as other security software, can cause this error.
In order to fix it, it’s advised that your remove your antivirus software and reinstall it. Bear in mind that certain antivirus software needs to be removed completely before this error can be fixed.
To do that, you can download specific uninstallers designed to completely remove certain antivirus software. If you’re using McAfee, you can use the MCPR tool to remove it.
AVG also has its own tool, and you can download it from here. Many antivirus companies provide you with special uninstallers, and you can download them directly from the company’s website.
Alternatively, you can switch to different antivirus software, and if you’re looking for new security software, we did a list of the best antivirus programs for Windows 10, so make sure to check it out.
4. Reinstall your wireless card drivers
- Press Windows Key + X and choose Device Manager from the menu.
- Once the Device Manager opens, locate your wireless network adapter, right-click it and choose Uninstall.
- After you’ve uninstalled the driver, restart your computer.
BAD_POOL_HEADER is often caused by outdated or incompatible drivers, and users reported that the issue was fixed after uninstalling and reinstalling their wireless network card.
It’s always a good idea to update your network adapter driver, and in order to do that, make sure you visit your network adapter manufacturer’s website and download the latest drivers.
Update drivers automatically
Searching for drivers on your own can be time-consuming. So, we advise you to use a tool that will do this for you automatically.
Using an automatic driver updater will certainly save you from the hassle of searching for drivers manually, and it will always keep your system up to date with the latest drivers.
5. Run the BSOD Troubleshooter
- Open the Settings app and go to Update & Security section.
- Select Troubleshoot from the menu on the left.
- Select BSOD from the right pane and click Run the troubleshooter.
- Follow the instructions on the screen to complete the troubleshooter.
If none of the previous solutions managed to resolve the BAD_POOL_HEADER BSOD issue, let’s try with the troubleshooting tools.
Some PC issues are hard to tackle, especially when it comes to corrupted repositories or missing Windows files. If you are having troubles fixing an error, your system may be partially broken.
We recommend installing Restoro, a tool that will scan your machine and identify what the fault is.
Click here to download and start repairing.
The first one we’re going to try is Windows 10’s built-in troubleshooter. This troubleshooting tool can resolve all kinds of system issues, including BSOD errors. So, it might be helpful in this case.
6. Run the SFC scan
The SFC scan is a command-line tool that scans your system for potential issues and resolves them on the way (if the solutions are possible, of course).
So, it might be helpful when dealing with the BAD_POOL_HEADER BSOD error, as well.
Here’s how to run the SFC scan in Windows 10:
- Right-click on the Start Menu button, and open Command Prompt (Admin).
- Enter the following line and press Enter:
sfc/scannow - Wait until the process is done (it may take a while).
- If the solution is found, it will automatically be applied.
- Now, close the Command Prompt and restart your computer.
7. Run DISM
7.1. Standard way
- Right-click Start and open Command Prompt (Admin).
- Paste the following command and press Enter:
DISM /Online /Cleanup-Image /RestoreHealth - Wait until the scan is finished.
- Restart your computer and try updating again.
7.2. With the Windows installation media
- Insert your Windows installation media.
- Right-click the Start menu and, from the menu, choose the Command Prompt (Admin).
- In the command line, type the following commands and press Enter after each:
dism /online /cleanup-image /scanhealthdism /online /cleanup-image /restorehealth
- Now, type the following command and press Enter:
DISM /Online /Cleanup-Image /RestoreHealth/source:WIM:X:SourcesInstall.wim:1 /LimitAccess
- Make sure to change an X value with the letter of the mounted drive with Windows 10 installation.
- After the procedure is finished, restart your computer.
The final troubleshooting tool we’re going to try here is DISM. Deployment Image and Servicing Management freshly deploys the system image, so it’s possible it will wipe away the potential BSOD issues.
8. Disable Nvidia Streamer Service
- Press Windows Key + R and enter services.msc. Press Enter or click OK.
- Once the Services window opens, locate Nvidia Streamer Service and double click it.
- Set the Startup type to Disabled and click the Stop button. This should stop the service from automatically starting.
- Click Apply and OK to save changes.
A number of users reported BAD_POOL_HEADER error while using Nvidia graphic card.
According to them, the error was caused by an Nvidia Streamer Service, and in order to fix this error, you’ll have to disable this service.
9. Remove overclock settings
Overclocking is an advanced procedure that allows you to change the settings of your hardware in order to achieve the best performance.
In our list of 10 best overclocking software for Windows 10, we briefly mentioned that overclocking can lead to system instability and cause BAD_POOL_HEADER BSoD error to appear.
If your hardware is overclocked and you’re getting this error, be sure to remove any overclocking settings that you have and the error should be resolved.
- Fix BAD POOL CALLER error in a few easy steps
- How to Fix Windows 10 Stuck in Boot Loop After Reset
- Critical Service Failed BSoD on Windows 10: Fix & Causes
- Fix: The Specified User Does not Have a Valid Profile Error
- How to Fix Aoddriver2.sys Blue Screen Error on Windows
10. Uninstall your audio driver
Few users reported that the issue with BAD_POOL_HEADER was caused by their audio driver, and in order to fix this issue, it was required to uninstall the problematic driver.
Uninstalling a driver is rather simple and you can easily uninstall it from Device Manager. For detailed instructions on how to uninstall your driver, check Solution 4
11. Check your network adapter driver
According to users, BAD_POOL_HEADER can occur due to a network adapter driver conflict.
Few Netgear users reported that Realtek PCIe GBE Family Controller driver was installed on their system, and that driver caused a conflict with a Netgear driver.
According to users, removing the Realtek PCIe GBE Family Controller driver fixed the BSoD error.
12. Disable Fast Startup
- Press Windows Key + S and enter Power Options. Choose Power Options from the menu.
- Once the Power Options opens, click the Choose what power button does.
- Click Change settings that are currently unavailable and scroll down to the Shutdown settings section.
- Uncheck Turn on fast startup (recommended) and click on Save changes.
If you have a problem with BAD_POOL_HEADER BSoD error, you can fix it by disabling Fast Startup.
After disabling Fast startup, your computer might start a bit slower, but the issues with BAD_POOL_HEADER should be resolved.
13. Check for faulty hardware
BSoD errors are commonly caused by faulty hardware, most notably RAM memory, and many users reported that replacing their RAM memory fixed the BAD_POOL_HEADER error.
Other components can also cause this error, and users reported that sometimes the problem can be fixed by replacing your wireless card or your motherboard.
14. Reset Windows 10
If BAD_POOL_HEADER error still persists, you can fix it by resetting Windows 10.
Bear in mind that resetting Windows 10 will delete all your installed applications and you’ll have to download and install them again. To reset your PC, do the following:
- Restart your computer a few times while it boots. After you do that your PC should enter Automatic Repair mode.
- Click Repair your computer and choose Troubleshoot.
- Select Reset this PC.
- Select Keep my files option and follow the instructions.
- Optional: If the problem still persists, repeat the entire step and choose Remove everything > Only the drive where Windows is installed > Just remove my files.
- By performing this step all files file be deleted from your C partition so keep that in mind.
BAD_POOL_HEADER BSoD error can create all sorts of problems on Windows 10, but you can easily fix this issue by using one of our solutions.
![]()
Newsletter
Contents
- What does ‘Bad Pool Header’ mean?
- Why does the Bad Pool Header error come up?
- How to fix Bad Pool Header in Windows 10?
- 1. Unplug your external devices
- 2. Undo recent changes
- 3. Temporarily disable your third-party antivirus
- 4. Make use of Windows Update
- 5. Update your drivers
- 6. Check your disk
- 7. Diagnose your RAM
- 8. Disable Indexing Service / Windows Search
- 9. Perform a clean boot
- 10. Clean Windows Registry
- 11. Use System Restore
- 12. Run a complete system checkup
- 13. Reset your PC
- 14. Perform a clean Windows install

‘The root of oppression is the loss of memory’
Paula Gunn Allen
The BAD_POOL_HEADER error (the “0x00000019” code) is one of those scary blue screen of death (BSOD) issues that can give you the creeps and force you to think that your computer is all but at death’s door. The good news is, it isn’t, as the problem in question is proven to be pretty fixable. Just read on to find out how to resolve Bad Pool Header in Windows 10.
Let’s make this error message (x00000019) a bit more meaningful by analyzing its anatomy. ‘Pool’ is actually the memory pool your OS uses to allocate memory. The ‘Header’ part ensures that the Windows API (application programming interface) is properly addressed. As such, the BAD_POOL_HEADER error message signifies your PC is having memory management issues.
The issue in question appears when the memory pool becomes corrupt. The most common reasons for this adversity are driver issues, disk-related problems, RAM malfunction, software conflicts, and hardware failure. In this article, we will provide fixes for all of them.
The issue in question is extremely annoying: it makes your system crash, causes you to lose your progress and leads to permanent data loss, which, in fact, is a huge spanner in the works. A long story short, you should fix that poor ‘pool’ thing to make your OS usable again.
Here our top 14 tips on how to resolve Bad Pool Header in Windows 10:
- Unplug your external devices
- Undo recent changes
- Temporarily disable your third-party antivirus
- Make use of Windows Update
- Update your drivers
- Check your disk
- Diagnose your RAM
- Disable Indexing Service / Windows Search
- Perform a clean boot
- Clean Windows Registry
- Use System Restore
- Run a complete system checkup
- Reset your PC
- Perform a clean Windows install
One of them is sure to work for you:
1. Unplug your external devices
The first fix to be carried out implies disconnecting all your external pieces of hardware: any USB hubs, flash drives, external hard drives, webcams, etc. should be removed. Then check if the issue in question has been resolved.
2. Undo recent changes
Now it is time for you to take a few steps back. For example,
- remove newly installed hardware and software;
- revert recent system changes;
- uninstall the latest updates.
To sum up, you should undo any changes that you think might be responsible for the current memory malfunction.
3. Temporarily disable your third-party antivirus
The point is, your non-Microsoft security solution might be in conflict with your Windows 10. Thus, feel free to disable it to check if it is the culprit.
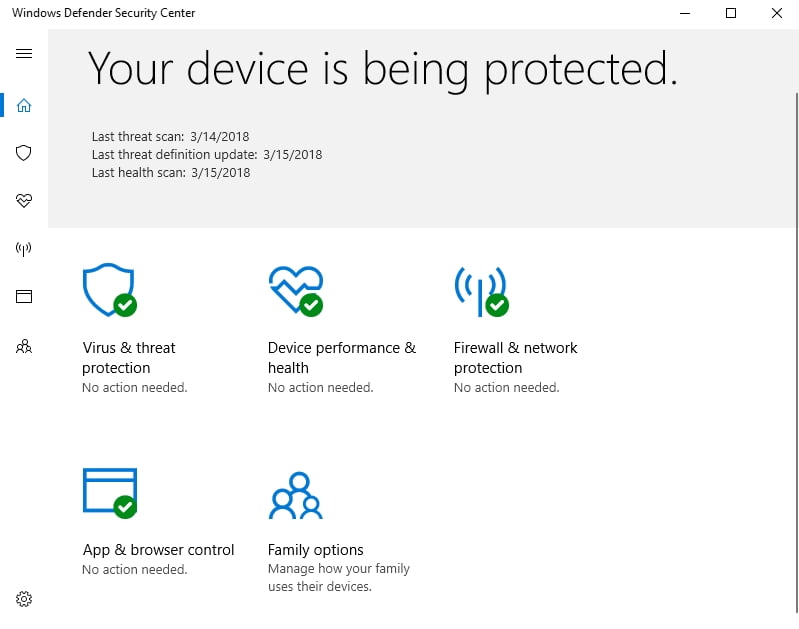
Note: There is no need to worry about your Win 10 PC’s safety, as it has the built-in Windows Defender guard to keep malware at bay if you have no other antivirus software installed:
Settings -> Update & Security -> Windows Defender
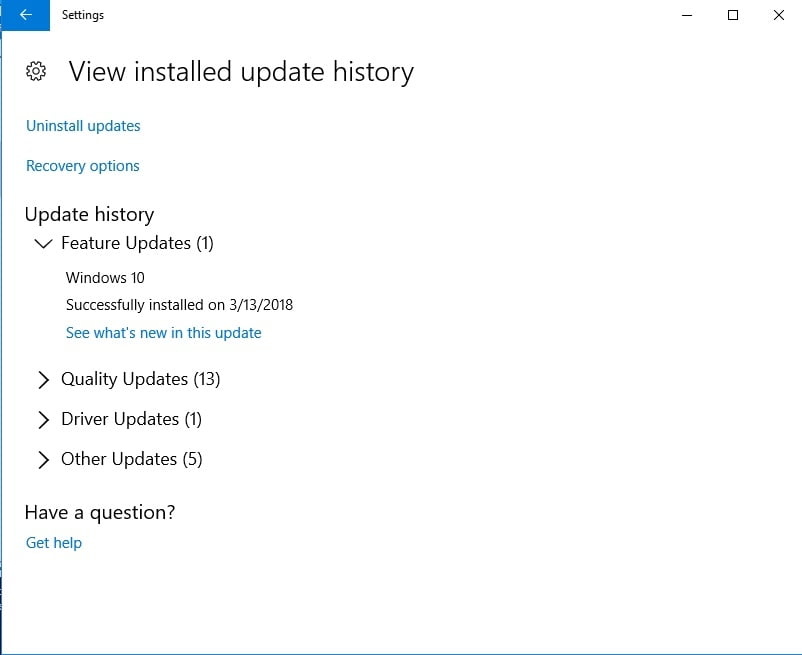
4. Make use of Windows Update
If the BAD_POOL_HEADER error persists, you should pay your Windows Update a visit, as your OS might be sitting on updates. Here is how you can install them:
Start -> Settings -> Update & security -> Windows Update -> Update Status
5. Update your drivers
Out-of-date drivers are certainly not an issue to turn a blind eye to: they make your OS turbulent and bring about various mishaps, such as BAD_POOL_HEADER.
Here are 3 easy ways to update your drivers in Windows 10:
Utilize Device Manager
Your OS is quite a resourceful thing: for instance, it has an embedded tool named Device Manager able to fix your driver issues automatically. Just follow the instructions below to let it do its job:
- Win + X -> Device Manager
- Select the device which driver is out of date and right-click on it -> Select the Update driver option
Update your drivers yourself
You can always do it ‘your way’: browse the net for the latest driver software for your device models and install it on your PC.
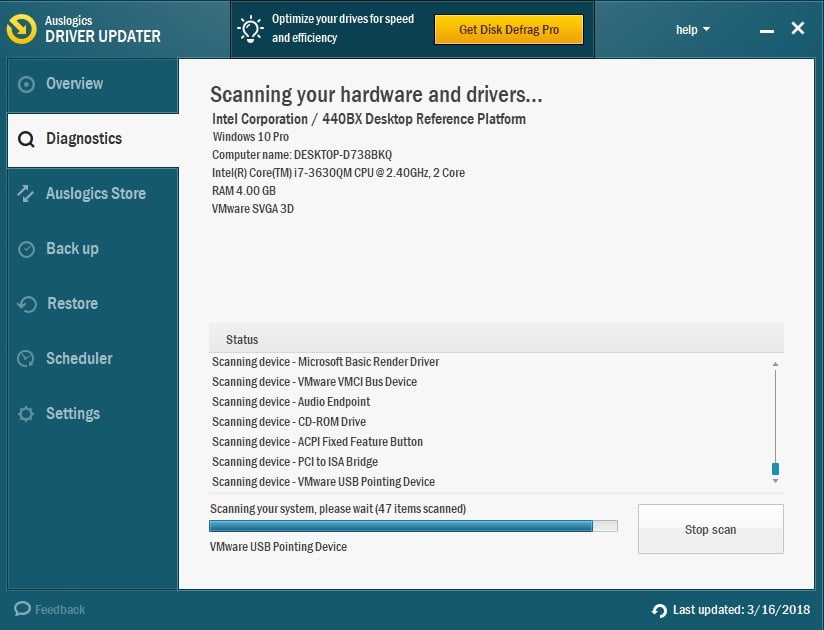
Use a special tool
If you do not have time to update your drivers one by one, you can get them all in tip-top shape by clicking a single button – Auslogics Driver Updater makes things easier.
6. Check your disk
If the fixes above have been to no avail, you should thoroughly examine your hard disk – it might be having issues.
Here is how to do that in Windows 10:
- Windows Key + S -> Type ‘cmd’ (without quotes) -> Run your Command Prompt as an administrator
- Type ‘chkdsk.exe /f /r’ (without quotes) -> Enter -> Type Y
- Save your work and close your apps -> Restart your PC
- You disk will be scanned for errors -> They will be repaired if present
7. Diagnose your RAM
The creepy BAD_POOL_HEADER error might mean your Random Access Memory (RAM) is playing up.
To test your RAM for issues in Windows 10, follow the instructions below:
- Press Windows logo key and R simultaneously -> Type ‘mdsched.exe’ (without quotes) -> Press Enter
- ‘Restart now and check for problems (recommended) -> The RAM test will be conducted (You can’t use your PC while the test is being performed)
- Your PC will restart -> Right-click on your Start button -> Select Event Viewer
- Search for Windows Logs -> System -> Find
- Type ‘MemoryDiagnostic’ (without quotes) into the Find box -> Find Next -> You will be presented with the memory diagnostics results
8. Disable Indexing Service / Windows Search
Try turning off the indexing service on your PC to fix the BAD_POOL_HEADER problem.
Take a few steps below to check if this method works:
- Windows logo key + R -> Type ‘services.msc’ (without quotes) into the Run box
- Double-click on Indexing service or Windows Search
- Change its startup type to Disabled or Manual
9. Perform a clean boot
Clean booting your Windows 10 may help to repair your Bad Pool Header.
To perform a clean boot, do the following:
- Windows logo key + S -> Type ‘msconfig’ (no quotes) into the Search box -> Press Enter
- General -> Selective startup -> Clear the Load startup items box
- Go to the Services tab -> Disable all the items in the Hide all Microsoft services box
- Click OK to save your changes -> Restart your PC
See if the BSOD Bad Pool Header problem is present. If it isn’t, the issue in question was caused by one of the disabled programs or services. Enable them one at a time to locate the culprit.
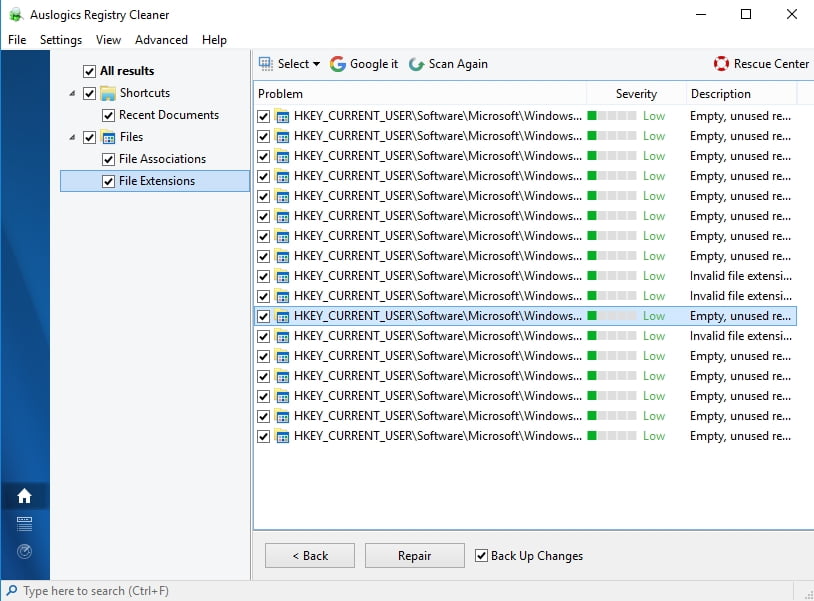
10. Clean Windows Registry
The Bad Pool Header screen might signify that your registry is corrupt and needs fixing. Please keep in mind that editing it is a procedure to carry out only by an advanced user. The thing is, you may damage your system beyond repair. Thereupon, we strongly advise you to use special software for the purpose of modifying your Windows Registry. To get it in tip-top shape, employ Auslogics Registry Cleaner, which is a 100 % free tool that is totally safe to use and gives you full control of the process.
11. Use System Restore
If the System Restore feature is enabled on your PC, you can configure your system to an earlier state. This trick will get your Win 10 back to the days when there was no BAD_POOL_HEADER to mess things up.
Here is how you can use System Restore to your advantage:
- Go to your Start menu -> Enter your Control Panel -> Go to the System and Security section
- Select File History -> Go to Recovery -> Select Open System Restore -> Click Next
- Select the restore point you to which you wish to roll your PC back -> Click Next -> Finish -> Provide your confirmation
12. Run a complete system checkup
If none of the fixes above has saved your day, you should scan your system for junk, corrupt or missing system files, incorrect settings, and other issues that can affect its running – this kind of crusade may rid you of the persistent Bad Pool Header error.
To tell the truth, it requires a lot of time and effort to examine your computer in a thorough and comprehensive way, so you have to learn some patience. Or you can use an acknowledged tool to get the work done. For example, Auslogics BoostSpeed will leave no stone unturned to examine every nook and cranny of your OS and improve its performance.
13. Reset your PC
Your OS might need a fresh start to overcome the Bad Pool Header challenge.
Here is how you can perform the necessary manoeuvre, using the built-in reset options in Win 10:
- Start -> Go to the Settings section -> Move to Update & security
- Navigate to Reset this PC option -> Get started
- Then you can choose to keep your files, to remove everything, or to restore factory settings.
Bear in mind that the last two options imply wiping your files off your PC, which means you should back up your important data beforehand. In fact, there are many backup options available for you: for example, you can utilize a cloud solution or a portable storage device. Besides, you can use Auslogics BitReplica, which is a special program that can shoulder the responsibility of keeping your files safe and secure.
14. Perform a clean Windows install
No luck so far? Then clean installing your OS seems to be your last resort. In a situation like this, you can choose the above-mentioned ‘Remove everything’ option or install your Windows from scratch by using installation media.
We hope your Windows 10 memory issues has gone for good.
Do you have any ideas or questions regarding this issue?
We are looking forward to your comments!