-
Конвертируем системные диски с помощью disk2vhd
-
Конвертируем диск vhdx в qcow2 в Windows
-
Создаем виртуальную машину Proxmox
-
Отключаем и удаляем диск виртуальной машины в Proxmox
-
Переносим сконвертированный диск формата qcow2 на локальный store Proxmox или хранилища подключенного к нему по SMB или NFS.
-
Делаем импорт диска в Proxmox и подключаем его к нашей виртуальной машине
-
Запускаем и проверяем
-
Уменьшение диска виртуальной машины
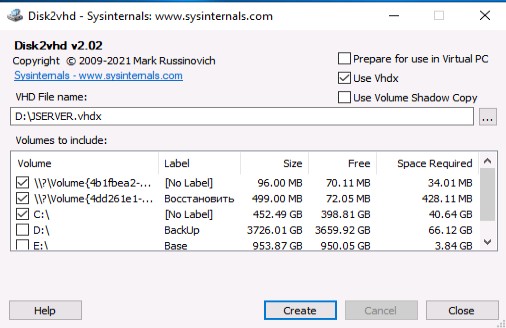
Конвертируем системные диски с помощью disk2vhd
Скачать disk2vhd можно здесь
Распаковываем и запускаем на сервере который хотим конвертировать.

При конвертации я выбираю системный диск, остальные диски отдельно так как их можно подключить и перенести данные вручную, а на самой виртуальной машине в Proxmox можно создать диски на тех разделах что предпочтительнее по скорости и размерности.
Конвертируем диск vhdx в qcow2 в Windows
Для конвертации диска нам понадобится программа qemu-img скачать можно тут.
Скачиваем и распаковываем, запускаем командную строку с правами администратора.
Выполняем команду: D:qemu>qemu-img.exe convert -O qcow2 d:JSERVER.VHDX d:JSERVER.qcow2 и ждем процесс долгий

Создаем виртуальную машину Proxmox
Создаем виртуальную машину с любым размером жесткого диска.
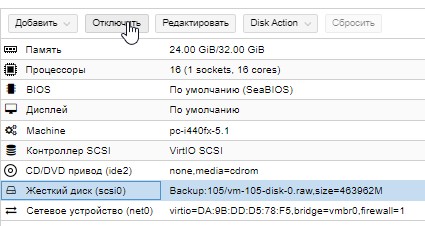
Отключаем и удаляем диск виртуальной машины в Proxmox
Выбираем нашу виртуальную машину, переходим на вкладку оборудование выбираем жесткий диск и сверху кнопка отключить.

После отключения диска появится кнопка удалить, нажимаем ее.
Переносим сконвертированный диск формата qcow2 на локальный store Proxmox или хранилища подключенного к нему по SMB или NFS.
Чтобы выполнить перенос диска на гипервизор Proxmox используем WInSCP, тем кто пользовался вопросов не возникнет. Скачать можно тут.
Вот сконвертированный диск, который я забросил на хранилище подключенное к Proxmox по NFS и его переименовал, имя такое же как на фото выше, так как оно прописано в конфигурационном файле.

Делаем импорт диска в Proxmox и подключаем его к нашей виртуальной машине
Импорт диска в нашу созданную виртуальную машину взамен удаленного делается командой: qm importdisk 105 /mnt/pve/Backup/vm-105-disk-0.qcow2 Backup
где 105 — id виртуальной машины,
/mnt/pve/Backup/vm-105-disk-0.qcow2 — полный путь к диску
Backup — название store.
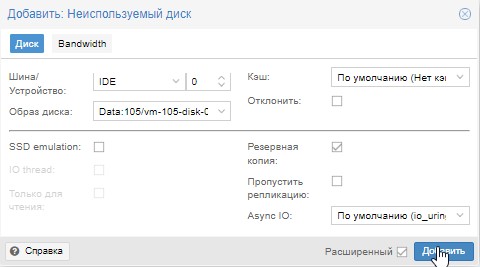
После успешного выполнения команды по импорту, выбираем виртуальную машину заходим в оборудование и видим не используемый диск.
![]()
Сверху выбираем редактировать

откроется окно и выбираем добавить

Все диск добавился.
Запускаем и проверяем
Как видно из скриншота машинка благополучно стартанула.

Уменьшение диска виртуальной машины
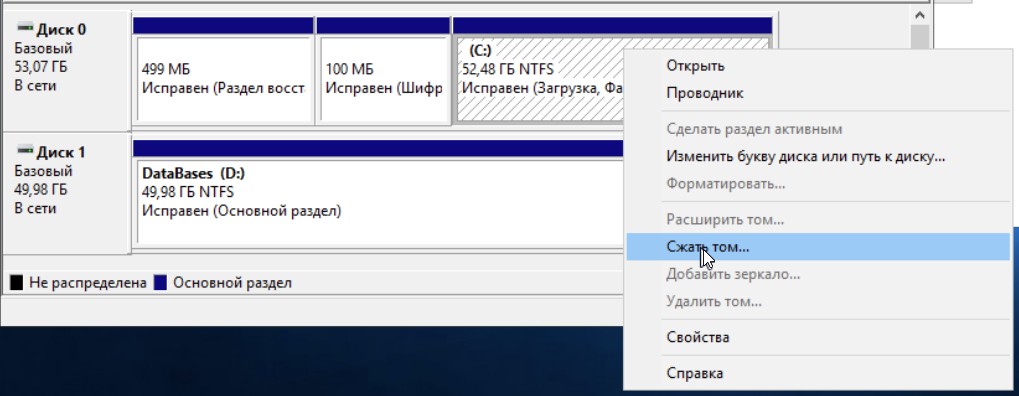
Не забывайте, что предварительно нужно в службе управления дисками сжать наш диск с системой на тот объем, который хотим отрезать, эта область перейдет в статус неразмеченная.

Выключаем машину и отключаем жесткий диск в разделе оборудование виртуальной машины.
Идем в консоль гипервизора и выполняем команду:
qemu-img resize —shrink /Data/images/105/vm-105-disk-0.raw -400G
где -400G — объем на который уменьшаем диск.
Добавляем повторно диск и стартуем машину.
-
Конвертируем системные диски с помощью disk2vhd
-
Конвертируем диск vhdx в qcow2 в Windows
-
Создаем виртуальную машину Proxmox
-
Отключаем и удаляем диск виртуальной машины в Proxmox
-
Переносим сконвертированный диск формата qcow2 на локальный store Proxmox или хранилища подключенного к нему по SMB или NFS.
-
Делаем импорт диска в Proxmox и подключаем его к нашей виртуальной машине
-
Запускаем и проверяем
-
Уменьшение диска виртуальной машины
Конвертируем системные диски с помощью disk2vhd
Скачать disk2vhd можно здесь
Распаковываем и запускаем на сервере который хотим конвертировать.
При конвертации я выбираю системный диск, остальные диски отдельно так как их можно подключить и перенести данные вручную, а на самой виртуальной машине в Proxmox можно создать диски на тех разделах что предпочтительнее по скорости и размерности.
Конвертируем диск vhdx в qcow2 в Windows
Для конвертации диска нам понадобится программа qemu-img скачать можно тут.
Скачиваем и распаковываем, запускаем командную строку с правами администратора.
Выполняем команду: D:qemu>qemu-img.exe convert -O qcow2 d:JSERVER.VHDX d:JSERVER.qcow2 и ждем процесс долгий

Создаем виртуальную машину Proxmox
Создаем виртуальную машину с любым размером жесткого диска.
Отключаем и удаляем диск виртуальной машины в Proxmox
Выбираем нашу виртуальную машину, переходим на вкладку оборудование выбираем жесткий диск и сверху кнопка отключить.
После отключения диска появится кнопка удалить, нажимаем ее.
Переносим сконвертированный диск формата qcow2 на локальный store Proxmox или хранилища подключенного к нему по SMB или NFS.
Чтобы выполнить перенос диска на гипервизор Proxmox используем WInSCP, тем кто пользовался вопросов не возникнет. Скачать можно тут.
Вот сконвертированный диск, который я забросил на хранилище подключенное к Proxmox по NFS и его переименовал, имя такое же как на фото выше, так как оно прописано в конфигурационном файле.

Делаем импорт диска в Proxmox и подключаем его к нашей виртуальной машине
Импорт диска в нашу созданную виртуальную машину взамен удаленного делается командой: qm importdisk 105 /mnt/pve/Backup/vm-105-disk-0.qcow2 Backup
где 105 — id виртуальной машины,
/mnt/pve/Backup/vm-105-disk-0.qcow2 — полный путь к диску
Backup — название store.
После успешного выполнения команды по импорту, выбираем виртуальную машину заходим в оборудование и видим не используемый диск.
![]()
Сверху выбираем редактировать

откроется окно и выбираем добавить
Все диск добавился.
Запускаем и проверяем
Как видно из скриншота машинка благополучно стартанула.
Уменьшение диска виртуальной машины
Не забывайте, что предварительно нужно в службе управления дисками сжать наш диск с системой на тот объем, который хотим отрезать, эта область перейдет в статус неразмеченная.
Выключаем машину и отключаем жесткий диск в разделе оборудование виртуальной машины.
Идем в консоль гипервизора и выполняем команду:
qemu-img resize —shrink /Data/images/105/vm-105-disk-0.raw -400G
где -400G — объем на который уменьшаем диск.
Добавляем повторно диск и стартуем машину.
Step 4: Create the VM you want to use
At this point, we wanted to create a VM that we are going to use with the image we transferred. Here the key is to ensure that you make a VM that mirrors the Hyper-V VM in terms of CPU, RAM, network and disk options. Most modern OSes are supported via KVM so you should have little issue getting things to work, especially with Linux guests.
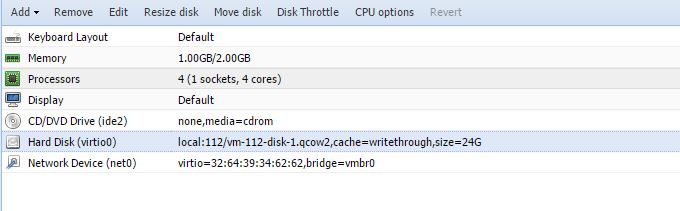
Step 5: Find the VMs qcow2 image
There are a few different ways you can do this, including creating the VM and attaching the disk after converting the vhdx. Since we want to keep Proxmox VE’s naming convention (and make the process easy), we are going to simply overwrite the qcow2 image that the virtual machine wizard created. First, we need to find the VM.
Since you can see that the disk in the shot above is named vm-112-disk-1.qcow2, we can search for that on our Linux/ Proxmox VE host.

Now that we know the location, we can set the output of the conversion operation to overwrite the empty disk.
Step 6: Convert the vhdx to qcow2 and verify
The command to convert our image and overwrite the empty qcow2 is very simple. We are going to use qemu-img convert, specify the output type and then the vhdx followed by the full path to the qcow2 image.

Here is the command you can adapt to your setup:
qemu-img convert -O qcow2 Bench-Dev.vhdx /var/lib/vz/images/112/vm-112-disk-1.qcow2
We also validated that the disk is indeed written int eh correct place.
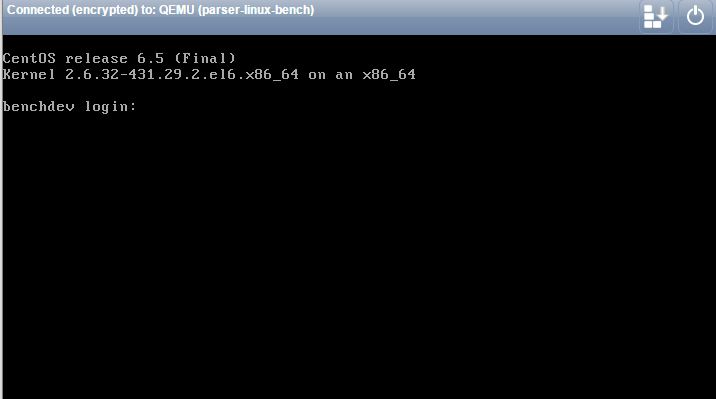
Step 7: Boot the VM
At this point, you should be able to boot the VM. There are still some tasks that will need to be completed. For example, updating network settings. Generally, this type of conversion will yield a different network interface so there are likely steps like setting that up in the guest OS that will need to happen. Platforms like Proxmox VE have built-in console viewer applications so we were able to do this post-transfer. Another option is to complete these steps before transferring/ converting the VM so that you can power-up and verify that the operation works.
These 7 quick steps take only a few minutes (save for the inter-data center transfer) and helped us move our Hyper-V VMs to KVM quickly and painlessly.
This post talks about two software to convert VMDK to QCOW2 in Windows for free. The software I have added here takes a healthy VMDK file from you and produces the corresponding QCOW2 file. The generated QCOW2 files can be used in the dedicated software such as Qemu as a virtual hard drive for the machine. Also, there are other Linux tools that can mount QCOW2 files, you can use it in those as well. However, currently there is no way in Windows to mount them as virtual drives. But you can create QCOW2 files in Windows using a couple of free software that you will see in the post below.
There are quite a number of virtual machine software out there. Some of them are popular and some of them are not. Those virtual machine software use a virtual hard disk file of different formats. The most popular format for the disk of virtual machines are VMDK and VHD but there are some that use other raw formats as well. And one such formats is QCOW2. This format is not supported in Windows and nor you can mount in Windows OS as of now. But you can access its content using free archiver software such as 7-Zip.
If you have a VMDK file and want to use that in another virtual machine that uses QCOW2 format for hard disks then you will have to convert the VMDK file. And the software I have mentioned here lets you do that easily and in just a few minutes. And not only VMDK but the following software can convert the other type of disk images to QCOW2 such as from VHD, VHDX, etc.
qemu-img
qemu-img is a Linux tool but luckily available for Windows as well. This tool comes with a CLI and there is a simple command to convert a VMDK file to QCOW2. It analyzes the given VMDK file and creates the corresponding QCOW2 file that you can use wherever you want. Basically, this tool allows you to convert different kind of virtual hard disk images from one format to other. It supports VMDK, VJD, VHDX, IMG, QCOW2, RAW, and IMG like formats and you can convert them among one another easily, including VMDK to QCOW2. In some Linux distros, you will find this tool pre-installed but in Windows you will have to manually install it.
You can get the Windows binary of this tool from above and then save it somewhere safe. Next, you can add the folder where the binary files of qemu-img are to the system PATH environment variable. If you don’t know what that is then you can see this post. After you’re done with setting the PATH variable, you can start using this tool. Open command prompt or any other CMD emulator and then run this command.
qemu-img.exe convert -f vmdk "Source_VMDK_Image" -O qcow2 "Destination_QCOW2_File"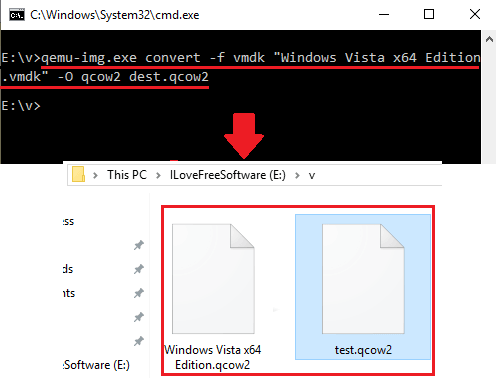
Change the colored parameters in the above command and execute it. It will start processing the input VMDK file after it is done, it will leave the converted QCOW2 file in the same folder. The time it takes for the conversion of the VMDK file depends on its size. In my case, it took around 4 minutes to convert a VMDK of size 2GB to QCOW2. But if you have VMDK of large size, then you will have to be patient during the conversion process.
StarWind V2V Image Converter
StarWind V2V Image Converter is another free software that allows you to painlessly convert a VMDK file to QCOW2 and then you can use that in the virtual machine software that use QCOW format for the virtual disk. This is quite a powerful software that you can use in Windows to convert different type of virtual machine hard disk files to variety of formats including QCOW2. In just a few clicks, you can easily convert a VMDK file to QCOW2 and it even supports the reverse conversion as well. Recently, I uses the same software for VMDK to VHD conversion and now you can use it for VMDK to QCOW2 disk as well.
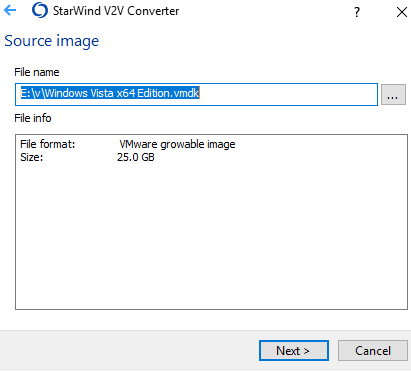
To download this software on your PC, you will have to fill a short form and enter your email address to get the download link. Next, you install the software and then open it up and its wizard like interface. Actually have to specify the different parameters for the conversion in different steps. In the first form, select the “Local File” option and then give it the path to the source VMDK file.
Now, specify the QCOW2 as the target format and location in your PC where it will save the final QCOW2 file.

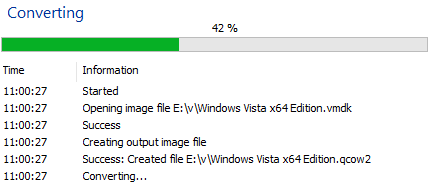
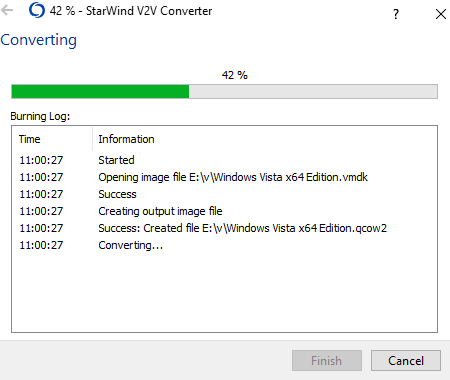
Now, you have specified all the parameters and it is time to start the conversion. So, start the conversion process and you can see its progress on its interface. When it fully converts the VMDK file to QCOW2, you can access or use it in the software or other applications that support QCOW2.
In this way, you can use this simple and handy software to easily convert a VMDK file. And not just VMDK but it supports various other kind of virtual hard disk files such as VMDK, VHD, VHDX, etc. Also, you can even use this software to convert an existing hard drive to virtual machine hard disk file.
Closing Thoughts
QCOW2 is not really a very popular format in the context of virtual machines. And this is why these are the only free software I could find to convert a VMDK file to QCOW2 in Windows. If you are on Linux, there are more advantages for you as you can mount QCOW2 images there easily but this is not the case with Windows. So, if you are looking for some free software to convert VMDK to QCOW2 then you have come to the right place. If you can handle command line tools pretty well then you can use qemu-img. Or, if you want to use simple GUI based software then you can use StarWind V2V Image Converter. And this post will help you in getting started with these free software.
Для переноса виртуальной машины с одного гипервизора на другой может потребоваться конвертация образа диска этой виртуальной машины.
С этой задачей на отлично справляется qemu-img.
Програма поддерживает форматы дисков для всех распространённых гипервизоров:
- KVM, Xen — qcow2
- VMware — vmdk
- Hyper-V — vhd, vhdx
- VirtualBox — vdi
Так же возможна конвертация образов дисков, созданных с помощью dd.
Далее будет описана работа программы под Windows, однако qemu-img так же доступен и на Linux, формат команд везде одинаковый
apt install qemu-utils


yum install qemu-img
Информацю об образе диска можно получить выполнив команду
qemu-img.exe info D:testtest-mv.vhd
Ответ будет примерно таким:
image: D:testtest-vm.vhd
file format: vpc
virtual size: 40G (42949017600 bytes)
disk size: 17G
cluster_size: 2097152
Конвертация диска виртуальной машины из формата vpc (Hyper-V) в qcow2 (KVM) выполняется командой
qemu-img.exe convert -p -f vdi -O qcow2 D:testtest-mv.vhd D:testtest-mv.qcow2
Ключи обозначают следующее:
- -p — отображение прогресса конвертации
- -f — исходный формат образа
- -O — формат образа после конвертации
Форматы файлов указываются именно ключами, а не расширениями имён файлов.
Более подробную справку можно увидеть выполнив команду
qemu-img.exe --help
Возможность импорта виртуальных машин на платформу «TIONIX» реализована
поддержкой образов, загружаемых в различных форматах:
- AKI — образ Amazon Kernel;
- AMI — образ Amazon Machine;
- ARI — образ Amazon Ramdisk;
- Docker — образ контейнера Docker;
- ISO — образ оптического диска;
- OVA — Open Virtual Appliance;
- QCOW2- образ QEMU;
- RAW — диск неструктурируемого формата RAW;
- VDI — образ виртуального диска;
- VHD — виртуальный жесткий диск;
- VMDK — диск виртуальной машины;
- PLOOP — петлевой диск.
При необходимости использования определенного формата (например, RAW
для некоторых бэкендов) можно воспользоваться конвертацией образа.
Конвертация может быть выполнена с помощью командной строки, например –
в управляющем узле (платформы OpenStack).
Параметры конвертации образов диска виртуальной машины приведены в таблице
(Таблица 6.1).
| Формат образа | Аргумент для qemu-img |
|---|---|
| QCOW2 (KVM, Xen) | qcow2 |
| QED (KVM) | qed |
| RAW | raw |
| VDI (VirtualBox) | vdi |
| VHD (Hyper-V) | vpc |
| VMDK (VMware) | vmdk |
Команда qemu-img convert может выполнять преобразование между
несколькими форматами, включая qcow2, qed, raw, vdi, vhd, и vmdk.
Примеры
-
Преобразование файла необработанного изображения с именем
image.img
в файл формата QCOW2:qemu-img convert -f raw -O qcow2 image.img image.qcow2
-
Преобразование файла образа vmdk в необработанный файл образа:
qemu-img convert -f vmdk -O raw image.vmdk image.img
-
Преобразование файла образа vmdk в файл образа формата QCOW2:
$ qemu-img convert -f vmdk -O qcow2 image.vmdk image.qcow2
Примечание.
При преобразовании файла образа, содержащего гостевую ОС Windows,
следует убедиться, что в ней установлен драйвер VirtIO.
В противном случае, будет выведен при запуске образа «синий экран».Другой вариант — назначить свойство образа, указывающее на использование
устаревшей шины обмена (IDE), но это значительно снизит
производительность виртуальной машины:openstack image set --property hw_disk_bus='ide' image_name_or_id
Необходимо убедиться, что гостевые дополнения исходной инфраструктуры
среды виртуализации VMware или Hyper-V удалены, прежде чем будет выполнен
окончательный перенос на платформу TIONIX (cм. Приложения).
6.2.1 Использование VBoxManage
Если образ VDI машины был создан с помощью VirtualBox, то его преобразование
в необработанный формат (RAW) возможно с помощью командной строки –
инструмента VBoxManage, поставляемого в составе ПО VirtualBox.
Пример создания необработанного образа в текущем каталоге из образа
VirtualBox VDI.~/VirtualBox VMs/:
VBoxManage clonehd ~/VirtualBox VMs/image.vdi image.img --format raw
6.2.2 Конвертация образа диска для форматов VMDK и VHDX
По завершении подготовительного этапа на выбранном (USB-) носителе имеются
выгруженные из среды виртуализации (VMware) файлы, хранящие образ(ы) ВМ,
предназначенной для миграции. Файл сохранен в формате VMDK.
Перенос осуществляется в среду виртуализации libvirt/KVM (ОП TIONIX).
Примечание.
В случае, если миграция осуществляется из Hyper-V (виртуализация под
управлением Windows Server), вместо формата VMDK будет подразумеваться
формат VHDX.
Исходный образ может быть сконвертирован из формата VMDK/VHDX в формат
raw или qcow2. Данные форматы распознаются гипервизором KVM, используемым
в основе подсистемы виртуализации ОП TIONIX.
При конвертации используется утилита qemu-img, запускаемая
с указанием команды convert. Данная утилита доступна только, если в ОС
хоста виртуализации установлен менеджер виртуальных машин (virt-manager).
Если для конвертации использована промежуточная среда – ОС с локальным
гипервизором (АРМ администратора), то может потребоваться установка
ПО виртуализации. Например, в ОС Ubuntu (16.04 или выше) для установки
потребуется выполнить команду:
sudo apt install libvirt0 libvirt-bin qemu-kvm virt-manager
Полученный целевой образ, оптимизированный (qcow2-) или неоптимизированный (raw-),
подлежит импорту в среду виртуализации (libvirt).
Для импорта может использоваться непосредственно virt-manager,
функционирующий в АРМ администратора и подключенный к действующему
гипервизору (KVM), локальному либо удаленному.
6.2.2.1 Конвертация исходного образа в целевой
В командной строке консоли АРМ администратора выполнить команду
по конвертации образа из исходного формата в целевой образ (RAW-формата):
# qemu-img convert -f <исходный_формат> -O raw <имя_исходного_образа>-flat.vmdk <имя_целевого_образа>_raw.img
где:
формат_образа – VMDK (VMware) или VHDX (Hyper-V).
В результате в рабочей директории должен появиться файл образа диска
с расширением .img.
6.2.2.2 Оптимизация целевого образа
Оптимизация – уменьшение размера хранимого файла образа – должна
выполняться до того, как в среде (целевой) виртуализации будет создана ВМ
и импортирован образ:
# qemu-img convert <исходный_образ>_raw.img -O qcow2 -c <целевой_образ>_qcow2.img
Уточнить информацию о целевых образах:
$ qemu-img info <целевой_образ>_raw.img
$ qemu-img info <целевой_образ>_qcow2.img
6.2.2.3 Импорт целевого образа в среду виртуализации
После настройки подключения к гипервизору потребуется выполнить операцию
создания виртуальной машины (см. описание ниже – Создание ВМ).
В качестве расширения файла (целевого) образа может использоваться
как суффикс .img, так и .qcow2.
При интеграции в облачную инфраструктуру, не находящуюся в экcплуатации,
может быть использована непосредственно среда функционирования контроллера
(серверный узел должен быть доступен через SSH-порт).
Также может быть использована консоль администратора (TIONIX Dashboard).
Внимание.
Выполнение миграции ОС Windows имеет свои особенности в зависимости
от используемой версии (гостевой ОС) .
ВАЖНО!
Если сетевой интерфейс не отключен, то после первого входа в Рабочий стол
ОС Windows может начать автоматически загружать и устанавливать обновления,
что нежелательно для процесса установки драйверов поддержки VirtIO.
6.2.3 Регенерация initramfs в RHEL-подобных ОС после конвертации образа
Часто, в результате конвертации VMDK и VDI образов RHEL-подобных операционных
систем в QCOW2 или RAW форматы, образ операционной системы перестает
загружаться на этапе инициализации системы после загрузки ядра и initramfs.
Это связано с тем, что после конвертации у разделов диска меняются
параметры UUID и initramfs не может выполнить загрузку системы.
Решить эту проблему можно с помощью набора инструментов для работы
с образами ВМ – libguestfs (после установки соответствующего пакета).
Примечание.
Initramfs (Initial ram file system) – образ файловой системы,
загружаемый в оперативную память вместе с ядром.
Основные задачи этого образа: монтирование реального корня файловой
системы и запуск процесса init лежащего на нем.
6.2.3.2 Обновление initramfs
Для корректной генерации initramfs прежде всего необходимо определить
версию ядра, которая используется в образе (Linux).
Определить версию ядра можно с помощью утилиты virt-ls [2].
Выполните команду:
virt-ls -l -a CentOS-7.5-converted.qcow2 /boot/
Данная команда выведет список файлов, в том числе, файлы ядра,
которые находятся в каталоге /boot/.
Пример вывода:
total 145800
dr-xr-xr-x. 5 root root 4096 May 31 21:02 .
dr-xr-xr-x. 25 root root 4096 May 31 21:02 ..
…
-rwxr-xr-x. 1 root root 6734016 Dec 6 2019 vmlinuz-3.10.0-1062.9.1.el7.x86_64
-rwxr-xr-x. 1 root root 5877760 Aug 22 2017 vmlinuz-3.10.0-693.el7.x86_64
…
Для дальнейшей работы необходимо обратить внимание на файлы vmlinuz-*,
содержащие образ ядра Linux. Определите наиболее свежую версию ядра системы.
В приведенном выше примере система работает на ядре версии
3.10.0-1062.9.1.el7.x86_64.
Далее, с помощью утилиты virt-customize, появляется возможность
выполнения команд внутри образа, без процедуры загрузки с Rescue-образа и
выполнения chroot, как это традиционно практикуется на ПК.
Выполните команду:
virt-customize -a disk.qcow2 \
--run-command 'dracut -f /boot/initramfs-3.10.0-1062.9.1.el7.x86_64.img 3.10.0-1062.9.1.el7.x86_64'
В качестве значения аргумента –run-command передается команда в формате
dracut -f /boot/initramfs-<ВЕРСИЯ_ЯДРА>.img <ВЕРСИЯ_ЯДРА>
Дождитесь завершения выполнения команды – это может занять некоторое время;
по окончании процесса можно проверять корректность выполнения проделанных
операций и работоспособность гостевой ОС (образа ВМ).
6.2.4 Пример конвертации исходного образа (OVA)
Ниже показан пример конверации образа (жёсткого диска) виртуальной машины
из формата OVA [3] в формат QCOW2 и запуска ВМ
с оптимизированного образа, поддерживаемого ОП TIONIX.
Убедитесь, что свободного места на локальном носителе достаточно для
загрузки архива исходного образа (OVA). Выполните скачивание архивного образа,
с помощью команды:
wget http://<доменное_имя_или_IP>/<путь_к_ресурсу>/<название_исходного_образа>.ova
Для просмотра листинга содержимого архивного файла используйте утилиту
tar:
tar -tf название_исходного_образа.ova

---.ovf
---.vmdk
Для распаковки OVA-файла выполните команду:
tar -xvf название_исходного_образа.ova

file название_исходного_образа*

---.vmdk: VMware4 disk image
---.ovf: XML document text
Чтобы оптимизировать полученный формат (VMDK), используйте
сторонние программные средства. Например, инструмент дискового менеджера
VMware [4]:
./vmware-vdiskmanager -r ---.vmdk -t 0 ---new.vmdk
Используя формат VMDK, сконвертируйте образ в формат qcow2 с помощью
утилиты qemu-img:
qemu-img convert ---new.vmdk -O qcow2 new.qcow2
Примечание.
Для просмотра всех поддерживаемых форматов выполните команду:
qemu-img -h
Сноски
| [1] | https://russianblogs.com/article/97521372033/ |
| [2] | https://libguestfs.org/virt-ls.1.html |
| [3] | https://filext.com/file-extension/OVA, https://virtualboxpc.ru/kak-rabotat-s-virtualbox-ova/ |
| [4] | https://www.vmgu.ru/articles/vmware-disk-tools |
Table of contents
- Vmdk and qcow2
- How to convert vmdk to qcow2 with qemu-img?
- How to convert VMware to KVM with Vinchin Backup & Recovery?
- Sum Up
The invention of server virtualization technology has greatly optimized the utilization of hardware resources and work efficiency of IT environment. After several years, there are many kinds of virtualization solutions in the market.
To move VM or migrate data between different platforms, IT administrators often need V2V converter. Although some platforms can directly accept the files from another platform, sometimes VM conversion is still needed.
In the following sections, you will know the way to convert vmdk to qcow2.
Vmdk and qcow2
VMware vSphere is the leading virtualization solution in the world. With ESXi hypervisor installed on the server, users can easily create virtual machines for all kinds of business systems.
Although virtual machine is a small part of the server, it is still as complete as the physical machine which has CPU, storage, network adapter, etc. Physical machine will save application data to hard disks. When it is needed to clone or migrate data, hard disk data is important. In virtual machine, there are virtual hard disks which also contain applications and data. Because of server virtualization technology, virtual hard disks are just files on the server.
In VMware virtual machine file system, the file format of virtual hard disk is .vmdk, short for Virtual Machine Disk. A VMDK file represents a physical hard drive storing all the user data and configuration data of virtualization.
Generally speaking, vmdk. file is often very large, more than several GB. It will be updated whenever user data or server configuration is modified. There is no feature for acquiring incremental data in VMDK so the entire file needs to be backed up again when any file is modified.
To use the powerful features of VMware, vmdk files are often stored in shared storage. You can copy vmdk files to another datastore for later use. To locate the vmdk files of a VM, you can right-click the VM in vSphere client > select Edit Settings > expand Hard disk to see where they are stored.
Qcow2, short for QEMU copy-on-write format 2, is the successor of the first-generation qcow, which has barely satisfying performance, but still cannot be compared with raw format. After optimization to the first generation of qcow, it is close to raw format in performance. Now, qcow2 is one of the mainstream image formats.
To better use data from VMware, you can change the format of virtual hard disk to let it better work in QEMU environment.
How to convert vmdk to qcow2 with qemu-img?
Qemu-img is an image converter which supports multiple image formats including vhd, qcow2,raw, vhdx, qcow, vdi, qed, zvh and zvhd2. It is needed to add the directory to environment variables like JDK or Python.
In Windows environment:
1. Download the installation package and install it
2. After installation, add the directory to path environment variables
3. Verify the installation by typing the command below:
qemu-img —help
If the version information of qemu-img is presented in the output, the installation is successful
4. Converting the image by typing the command below:
qemu-img convert -p -f vmdk -O qcow2 my_centos7.vmdk my_centos7.qcow2
-p: presenting the conversion progress
-f: format of the source image
-O: format of the target image
In Linux environment:
1. Select the command to install it according to your operating system
For Ubuntu/Debian, type the command below:
apt install qemu-img
For CentOS/Red Hat/Oracle, type the command below:
yum install qemu-img
For SUSE/OpenSUSE, type the command below:
zypper install qemu-img
2. Verify the installation by typing the command below:
qemu-img -v
If the version information of qemu-img is presented in the output, the installation is successful
3. Converting the image by typing the command below:
qemu-img convert -p -f vmdk -O qcow2 ./my_centos7.vmdk ./my_centos7.qcow2
How to convert VMware to KVM with Vinchin Backup & Recovery?
To move VMware to KVM, you can have better solution. Vinchin Backup & Recovery will require you to select only source and destination platforms to migrate VM without manually converting virtual disk format.

Vinchin Virutal Machine Convert Engine supports virtualization platforms like VMware, Red Hat Virtualization, oVirt, Oracle Linux KVM, OpenStack, etc. Generally speaking, it needs only 3 steps to perform cross-platform migration, step 1, adding hosts of VMware and the other platform into Vinchin backup system, step 2, making a backup of VMware VM agentlessly, and step 3, restoring the VM backup to the destination platform.
The whole process will be easily completed on a user-friendly web console. You can start a 60-day full-featured free trial to see how convenient it is to convert virtual machine.
Sum Up
There are many virtualization platforms in the world. To migrate data to another platform, IT administrators often need to do conversion job to the source VM. In this post, the methods of converting vmdk to qcow2 are introduced for IT administrators.
Vinchin Backup & Recovery is a convenient tool for you to import VMDK to KVM without complicated commands. Don’t miss the free trial.