Repair L2TP VPN error using our practical solutions or VPN pick
by Milan Stanojevic
Milan has been enthusiastic about technology ever since his childhood days, and this led him to take interest in all PC-related technologies. He’s a PC enthusiast and he… read more
Updated on September 20, 2022
Reviewed by
Edgar Nicov

Since the dial-up Internet era, Edgar was interested in online resources. From forums to e-commerce websites, he started digging into how those resources could generate revenue. Today he… read more
- VPN error 789 appears when a Windows system isn’t configured properly while using the L2TP protocol.
- This error can be fixed with a quick network adapter reset from Device Manager.
- IPSec configuration should be changed as well as a fallback solution, so tweak the services as shown in our guide.
Using a VPN is a great way to protect your online privacy, but sometimes you might experience issues with it. Many Windows 10/11 users reported VPN error 789 which states the following message:
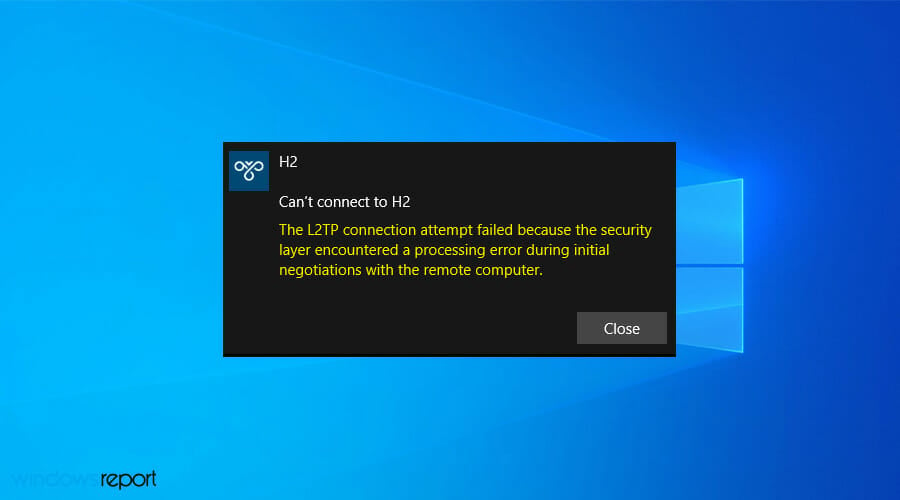
The L2TP connection attempt failed because the security layer encountered a processing error during initial negotiations with the remote computer
This issue will prevent you from achieving a safe connection on your PC, so it’s crucial that you fix it. So keep on reading to find out how to fix this problem once and for all.
Why does VPN error 789 appear?
This error pops up when your system is not properly set up to connect to an L2TP server, thus the connection attempt fails even before you establish a connection with the server.
It is also linked to the incorrect configuration of your operating system like Windows 10 in this case. This generic error is thrown when the IPSec negotiation fails for the L2TP/IPSec connections.
Other possible causes include:
- L2TP-based VPN client (or VPN server) is behind NAT
- The wrong certificate or pre-shared key is set on the VPN server or client
- A machine certificate or trusted root machine certificate is not present on the VPN server
- Machine Certificate on VPN Server does not have Server Authentication as the EKU
Before trying any of these solutions, ensure that L2TP and IPSec pass-through options are enabled from your router.
If you configured your VPN service manually, then make sure you use the preshared key 12345678. If this doesn’t work, here are more solutions you can use to fix this problem on your PC.
How do I fix the VPN error 789 on Windows 10 & 11?
- Reset network adapter
- Check the certificate
- Use a reliable VPN service
- Re-enable IPSec on your computer
1. Reset network adapter
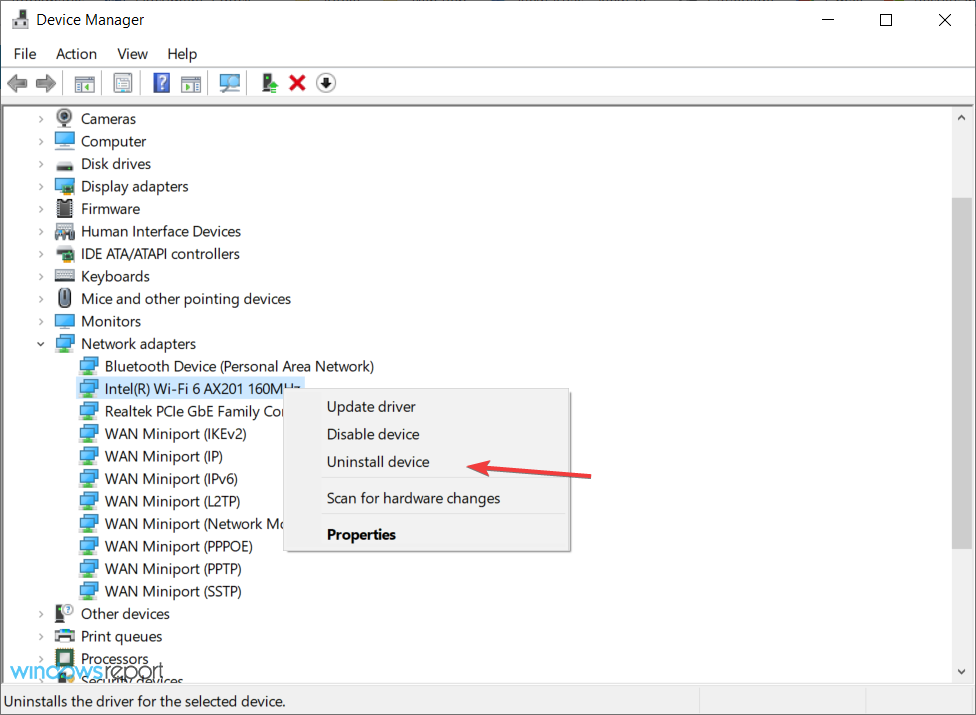
- Press the Windows key + X and select Device Manager.

- Identify your network adapter and right-click on it then select Uninstall device.

- Click on Uninstall to confirm.

- Restart your computer. The device will reinstall and should reset it to default settings.

Refreshing the network adapter driver can make this problem go away quickly so make sure you try it out by performing the steps above.
2. Check the certificate
It is very important to ensure the correct certificate is used both on the client and the server side.
In case the two don’t match, you won’t be able to use the virtual private network. You might need to renew the certificate with your provider.
If you are using a Pre Shared Key (PSK), ensure that the same PSK is configured on the client-side, and the VPN server machine.
3. Use a reliable VPN service
It is very likely that the root of this problem is that the servers you use are not very optimal for your connection. For this reason, it is recommended to use a top-level VPN service.
To make sure you will not encounter this kind of issue in the future, look for a VPN service that has a large number of servers worldwide. That guarantees an increased chance of server availability and functionality.
We used and tested ExpressVPN with 3,000 servers across the globe and multiple locations in the US to access restricted content like streaming shows or sports from overseas.
Plus, it is easy to use, you don’t need any level of proficiency to get an optimal connection.
To get started, select the subscription plan of your choice, create an account and install it. When the app is ready to open, connect to a secure server with just one click.
This VPN is amongst the most secure services out there, with a verified no-logs policy. It provides a remarkably fast connection and free content access for geo-blocked content globally.
ExpressVPN
Overcome the VPN error 789 and enjoy secure and fast browsing across the whole globe.
4. Re-enable IPSec on your computer
- Press the Windows key + R keyboard shortcut to start Run.
- Type services.msc and press Enter or click OK.
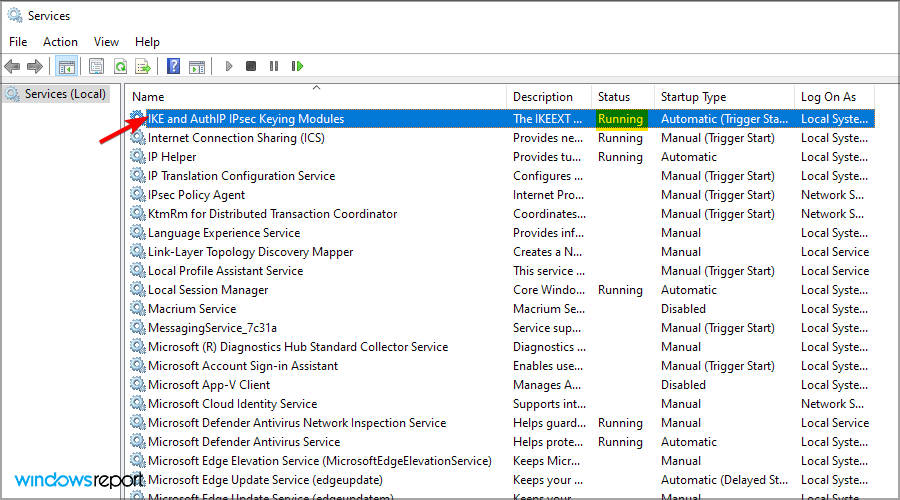
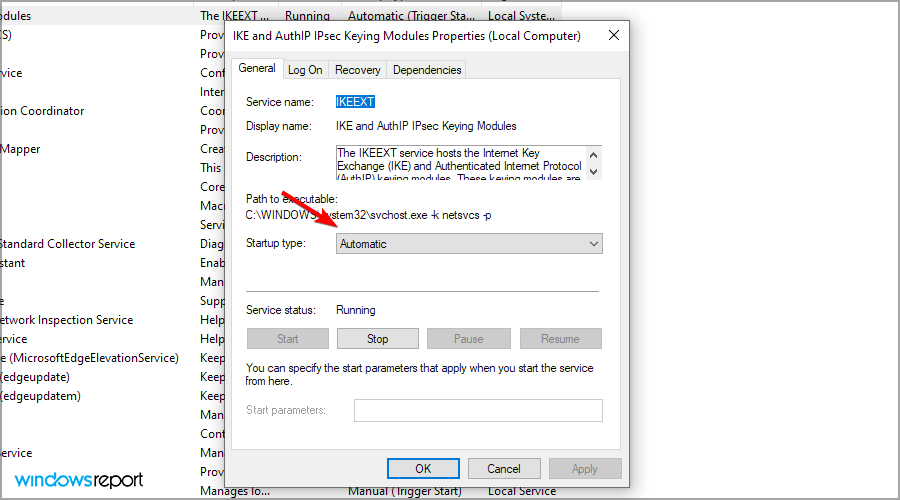
- Double-click the IKE and AuthIP IPSec Keying Modules service.
- Set the Startup type to Automatic. If the service is running, click Stop and then Start. If it’s disabled, just click Start.
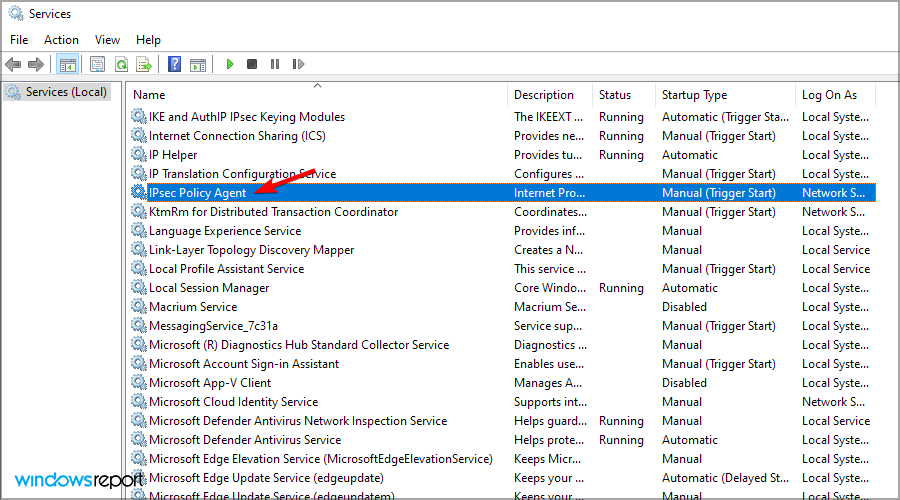
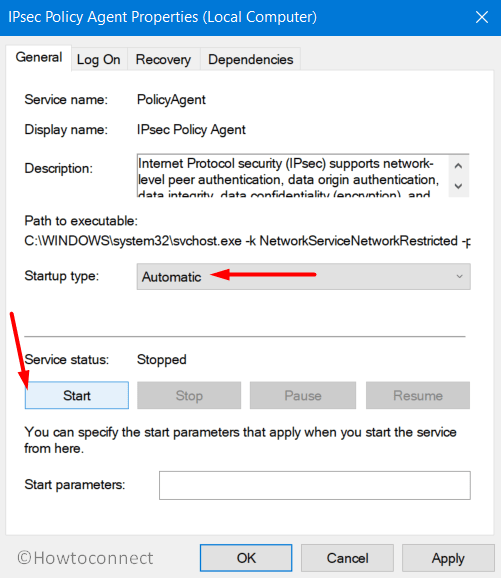
- Find IPSec Policy Agent and double-click it.
- Set the Startup type to Automatic. If the service is running, stop it and start it again. If it’s not running, start it.
- Save the changes.
- Restart your VPN service.


Once you have done all the steps above carefully, the VPN should work smoothly as the protocol settings have been reset to default.
If, however, it doesn’t work, you have to manually set the encryption method both for the server and the client-side, in order for them to be compatible.
In case you have a user-specific issue on your computer yet you still get the L2TP connection attempt failed error, you can also contact the customer care or tech support team for your specific VPN provider.
- How to Check Your Windows Experience Index on Windows 11
- Browser Not Working on Windows 11: How to Fix This
- Fix: Your Account Doesn’t Match Your Dev Environment
- How to Password Protect Zip Files in Windows 11 [3 Tips]
How do I fix Windows 11’s VPN error 789?
The following guide presents a useful method to resolve the VPN 789 error on Windows 11 PC.
Before starting this system process, be sure you understood it correctly and apply the steps as shown below to avoid potential registry damages.

NOTE
This method works only if your system is behind a NAT.
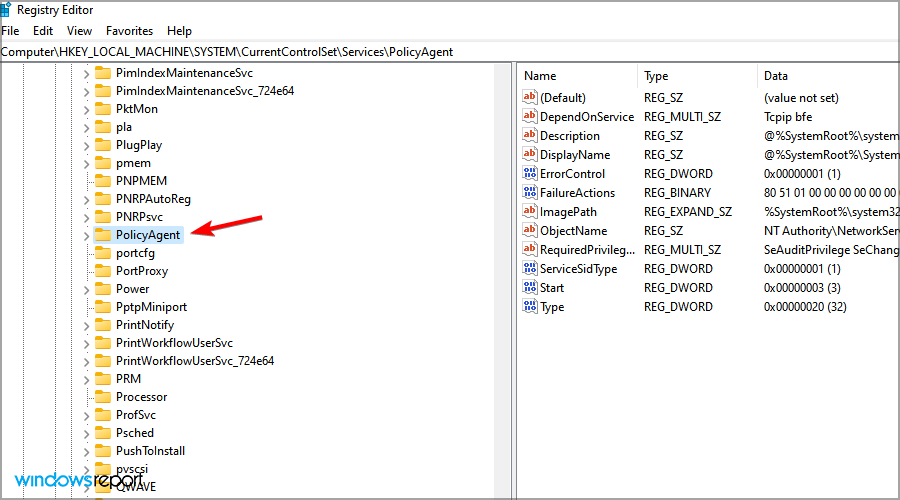
- Press Windows key + R and enter regedit.
- Navigate to the following path:
HKEY_LOCAL_MACHINESYSTEMCurrentControlSetServicesPolicyAgent - Right-click the space in the right pane and expand the New section. Select DWORD (32-bit) Value.
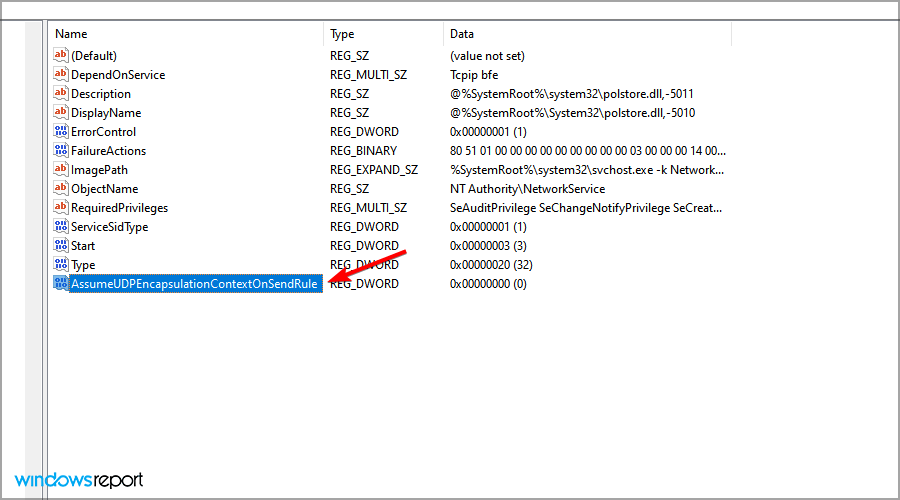
- Enter AssumeUDPEncapsulationContextOnSendRule as the name of the DWORD and double-click it.
- Set the Value data to 2 and click OK to save changes.


How does L2TP work?
Layer 2 Tunneling Protocol, also known as L2TP, is a tunneling protocol used by many VPN software.
It combines the features of other protocols including PPTP and L2F and establishes a safe connection between the VPN client and the server.
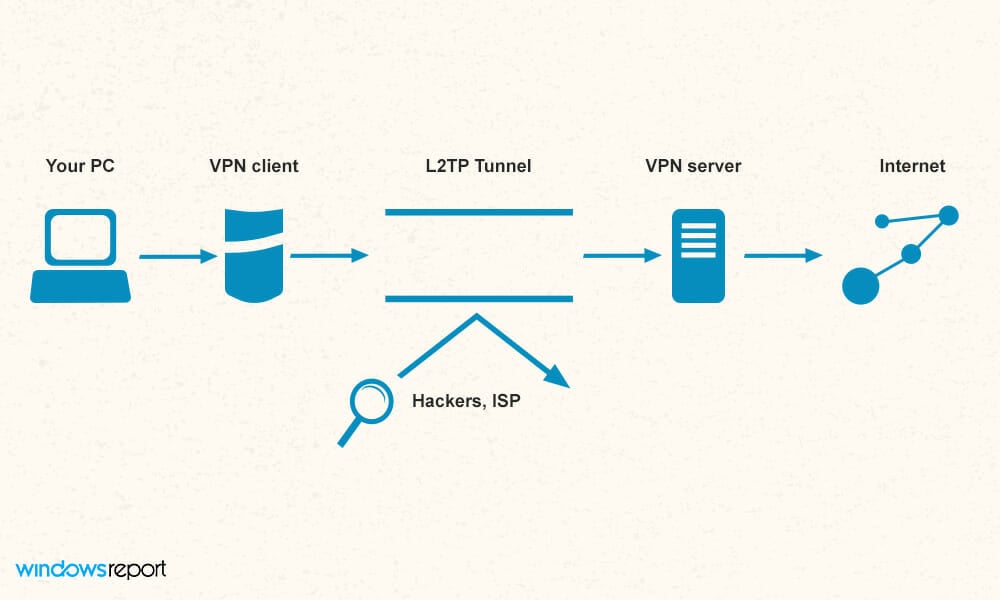
It’s important to mention that L2TP doesn’t offer encryption, and this is why it’s always paired with IPSec in order to provide the necessary security.
L2TP is also considered better than PPTP. It secures the traffic passing by it in an IPsec tunnel. If you have issues with it, we have an excellent guide on how to fix L2TP problems.
In addition, the ports you need to open are 500 and 4500 for UDP. You have the complete guide on unblocking L2TP for other ports and more.
Which is better, paid or free VPN?
While free VPNs are useful, they usually come with major limitations. In most cases, you’ll have a daily bandwidth cap. Other restrictions include the number of servers or the maximum speed that you can achieve.
With a reliable and paid VPN, you’ll have unlimited access to any server and no data restrictions, which makes it a superior choice for most users.
Fixing VPN error 789 is relatively simple, and we hope that this guide helped you solve the issue on your PC.
If the issue is still there, you can change your software completely. Just check our list including the best VPNs for Windows 10 and pick the one that suits your needs.
Do let us know if any of these solutions fixed VPN error 789 by leaving a comment in the section below.
![]()
Newsletter
An L2TP connection uses the Layer 2 Tunneling Protocol and is used mostly for supporting Virtual Private Networks. A Virtual Private Network(VPN) is used to mask the origin of connection by reflecting the connection over a server located in a different area than the origin of the connection. This can help many people to hide their locations from certain websites in order to bypass some security restrictions.
However, quite recently, a lot of reports have been coming in where users are unable to make a VPN connection and a “The L2TP connection attempt failed because the security layer encountered a processing error during the initial negotiations with the remote computer” Error is returned while trying to do so. In this article, we will discuss the reasons due to which it is triggered and also provide viable solutions to fix it completely.

What Causes the “L2TP Connection Attempt Failed” Error?
After receiving numerous reports from multiple users, we decided to investigate the issue and devised a set of solutions to fix it completely. Also, we looked into the reasons due to which it is triggered and listed them as follows.
- Disabled Protocols: In some cases, the error is triggered if the Microsoft CHAP v2 protocol is disabled inside the VPN Connection’s properties. This protocol needs to be enabled in order for most VPN connections to work.
- PPP Settings: The Point to Point protocol needs to be properly configured before users can attempt a VPN connection. This protocol contains an LCP protocol and the LCP Protocol has some further extensions that need to be enabled in order for the connection to work properly.
Now that you have a basic understanding of the nature of the problem, we will move on towards the solutions. Make sure to implement these in the specific order in which they are presented to avoid conflicts.
Solution 1: Enabling MS-CHAP v2
Since it is important that the Microsoft CHAP v2 protocol is enabled before trying to connect to a VPN in Windows 10, in this step, we will be enabling the protocol. For that:
- Make sure that the VPN connection has been properly configured to match the credentials of the VPN server that you are trying to connect to and add the connection.
- Once the connection has been added, it will appear in the network adapter list.
- Press “Windows” + “R” to open the “Run” prompt.
- Type in “ncpa.cpl” and press “Enter” to open the Network Adapter Settings.

Typing in “ncpa.cpl” and pressing “Enter” - Right-click on the “VPN” connection that has been added and select “Properties“.

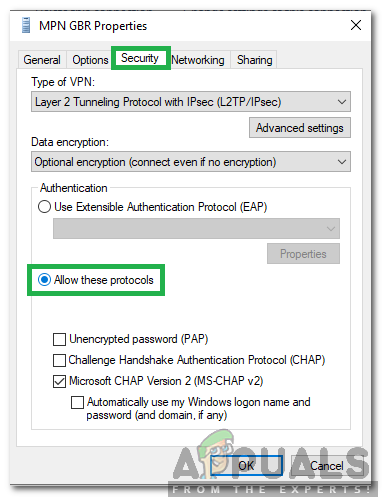
Right-clicking on the VPN and selecting “Properties” - Click on the “Security” tab and check the “Allow These Protocols” option.

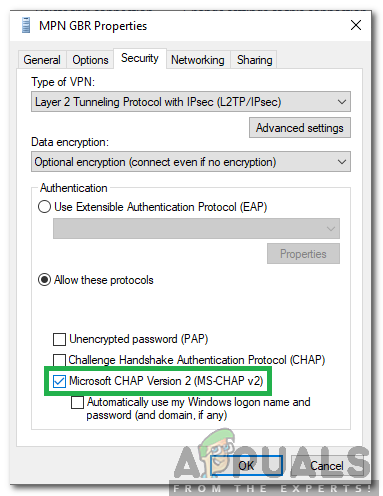
Selecting the “Allow these Protocols” option - Check the “Microsoft-CHAP Version 2” option and click on “OK”.

Checking the “Microsoft-CHAP Version 2” option - Try to connect to the VPN and check to see if the issue persists.


Solution 2: Enabling LCP Extensions
It is also important that the PPP Settings are configured to allow LCP Extensions, therefore, in this step, we will be changing the VPN properties and enabling the extensions. For that:
- Press “Windows” + “R” to open the “Run” prompt.

Opening Run Prompt - Type in “ncpa.cpl” and press “Enter” to open the Network Adapter Settings.
- Right-click on the “VPN” connection that has been added and select “Properties“.
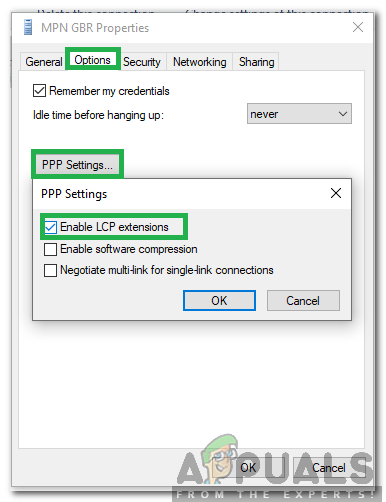
Right-clicking on the VPN and selecting “Properties” - Click on the “Options” tab and select “PPP Settings“.
- Check the “Enable LCP Extensions” option and click on the “OK” button.

Checking the “Enable LCP Extensions” button and selecting “OK” - Again, select the “OK” option to save your settings.
- Try to connect to the VPN and check to see if the issue persists.


Kevin Arrows
Kevin is a dynamic and self-motivated information technology professional, with a Thorough knowledge of all facets pertaining to network infrastructure design, implementation and administration. Superior record of delivering simultaneous large-scale mission critical projects on time and under budget.
Back to top button
If you are getting the “The L2TP Connection Attempt Failed because the Security Layer Encountered a Processing Error” issue while trying to create a VPN connection between their computer and the VPN server. The L2TP type of connection is used most commonly in VPN connections and it provides encryption to the connection. However, the issue is most commonly faced because some features on your operating system might have been disabled.

After going through most of the solutions that worked for our users, we came to the conclusion that the following must be the most vital reasons behind its occurrence.
- Microsoft Chap V2 Protocol: It is sometimes possible that the Microsoft Chap V2 Protocol might have been disabled due to which The L2TP Connection Attempt Failed because the Security Layer Encountered a Processing Error might be getting triggered.
- Corrupted Network Drivers: Sometimes the Network Drivers that you have installed on the computer might be corrupted due to which the issue might be triggered. Therefore, we suggest that you try to reinstall the corrupted drivers and check to see if the issue is fixed.
- Missing Registry Values: Some users found that if certain Registry Entries haven’t been added, the error might be triggered because the connection to the VPN cannot be established. Therefore, we suggest that you try to add these as we have mentioned below.
- Glitched Service: In certain situations, some services responsible for the proper functioning of the computer might be glitched due to which the “The L2TP Connection Attempt Failed because the Security Layer Encountered a Processing Error” error is being triggered.
Now that you have been taken through most of the reasons behind this issue, we can finally start implementing the solutions.
Fixing The L2TP Connection Attempt Failed because the Security Layer Encountered a Processing Error Meraki
Method 1: Enable Microsoft CHAP V2 Protocol
- Press the “Window + R” keys combination on your keyboard to open the “Run” box, type “ncpa.cpl” and hit the “Enter” key.

Typing ncpa.cpl - From the “Network Connections” window, right-click on your VPN connection and select “Properties” from the context menu.
- Now navigate to the “Security” tab and click on the circle associated with “Allow these protocols” and afterwards checkmark the “Microsoft CHAP Version 2 (MS-CHAP v2)” box

Checkmark Microsoft CHAP Version 2 Box - Save the changes made and see if the issue is resolved.


Method 2: Enable LCP Protocol Extensions
- Press the “Window + R” keys combination on your keyboard to open the search box, type “ncpa.cpl” and hit the “Enter” key.
Typing ncpa.cpl - From the “Network Connections” window, right-click on your VPN connection and select “Properties” from the context menu.
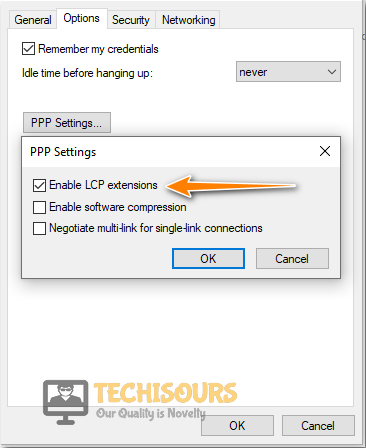
- Now navigate to the “Options” tab and click on the “PPP Settings…” button. In the following window, checkmark the box associated with “Enable LCP Extensions” and afterwards, click on “OK”.

Enable LCP Extensions - Finally, try reconnecting to your VPN and see if the issue persists.
Method 3: Restart IPSec Service
- For this purpose, press “Window + R” keys simultaneously on your keyboard to open the search box, type “services.msc” and hit the “Enter” key to open Service manager.

Typing in “services.msc” - Now locate the “IKE and AuthIP IPsec Keying Modules” service, right-click on it and select “Restart” from the context menu.

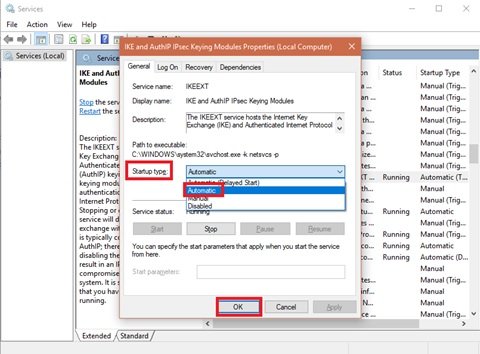
Restart IKE Module - After that, again right-click on it and select “Properties”. Navigate to the “General” tab and click on the dropdown next to “Start-up type” and then select “Automatic” from the menu.
- Finally, save the changes made by clicking on Apply button and afterwards repeat the whole process for the “IPsec Policy Agent” service and see if the l2tp connection attempt failed because the security layer encountered a processing error unifi is rectified.


Method 4: Reinstall Network Drivers
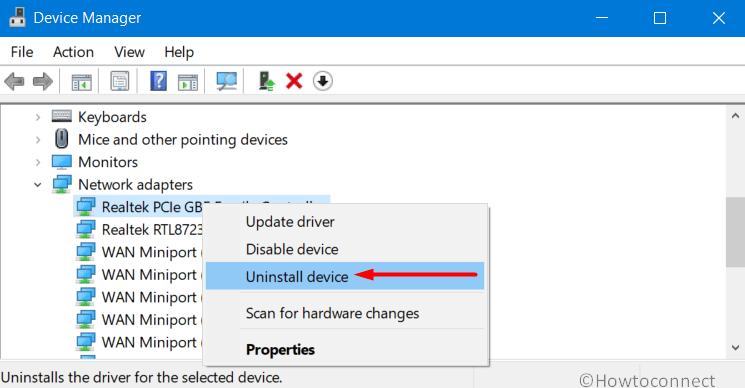
- Press “Window + X” keys combination and select “Device Manager” from the list of options.
- After that, scroll down to “Network adapters” and click on it to expand its contents. Right-click on your installed network drivers and select “Uninstall driver” from the context menu.

Uninstall Network Driver - Now restart your device and again launch the device manager. Click on the “Scan for hardware changes” button at the top middle of the screen. Now a window will detect missing drivers and automatically install drivers on your device.

Scan For Hardware Changes


Method 5: Use Correct Certificates
This might be the most basic and root cause of this issue. There might be the possibility where certificates do not match on the server and client-side. If the correct certificate is not used on both sides, you will get this error and your VPN will cause an error connecting to the internet. The best solution in this regard is to ensure that Certificates on both sides match. If you are using a Pre Shared Key (PSK), ensure that the same PSK is configured on the client-side, and the VPN server machine.
Method 6: Add a New Value in Registry
- For this purpose, press “Window + R” keys simultaneously on your keyboard to open the “Run” box, type the “Regedit” command and hit the “Enter” key to open Registry Editor.
- Paste the following address in the address bar and hit the “Enter” key:
HKEY_LOCAL_MACHINESYSTEMCurrentControlSetServicesPolicyAgent
- Now right click on the right pane and select “New-> DWORD(32-bit)” and rename it to “AssumeUDPEncapsulationContextOnSendRule”.
- After that, double click on it and set “Value Data” to “2”. Exit from the registry editor and restart your PC.
Method 7: Enable EAP-MSCHAPv2 Encryption
- First, press the “Window + R” keys combination from your keyboard to open the “Run” box, type “ncpa.cpl” and hit the “Enter” key:
Typing ncpa.cpl - In the “Network Connections” window, right-click on your VPN connection and select “Properties” from the context menu.
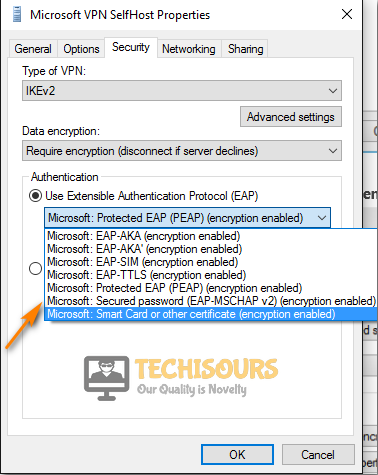
- Now navigate to the “Security” tab located under the “Authentication” section and select the “Use Extensible Authentication Protocol (EAP)” option.
- Then click on the dropdown below that and select “Microsoft: Secured password (EAP-MSCHAPv2) (encryption enabled)” from the menu.

Selecting the Secured Password Option - Save the changes made and hopefully now the l2tp connection attempt failed because the security layer encountered a processing error Meraki issue would be resolved.
Method 8: Create a New Entry in Registry
- For this purpose, press “Window + R” keys simultaneously from your keyboard to open the “Run” box and type “Regedit” and hit the “Enter” key to open Registry Editor.
Typing “Regedit” - Paste the following address in the address bar and hit the “Enter” key:

HKEY_LOCAL_MACHINESystemCurrentControlSetServicesRasmanParameters
- Now right click on the Right pane and select “New-> DWORD (32-bit)” and rename it to “AllowL2TPWeakCrypto”.
- After that, double click on it and set “Value Data” to “1” and exit from the registry editor, and restart your PC.
Method 9: Forward the Ports Manually
Note: If you are already familiar with the IP address of your router then skip steps from “1-3”.
- Press the “Window + R” keys simultaneously on your keyboard and type “cmd” in the “Run” dialogue box.

Typing in cmd - Then paste the following command in the command window and hit “Enter”:
ipconfig
- Under the Wireless LAN adapter option locate the options of “Default Gateway” and “IPv4 addresses”.
- Now first navigate to “Settings” and afterwards “Network”. Under “View Connection Status” find the IP address.
- Note this address and then copy-paste the default gateway in your browser and press “Enter”.
- Login to your account using the login credentials provided to you by your Internet Service Provider.
- Next, navigate to the “Forwarding” option from the left pane and enter this IP address in the “IP Address Box”.
- Then you have to open the connection ports required by the game.
- Here navigate to “Forwarding”, “Virtual Server” and then “Add New”.
- Now enter the following numbers:
TCP: 80, 443, 1935, 3478-3480

UDP: 3478-3479
- Finally, click on the “Save” button, exit from the browser.

Method 10: Update Windows
- First, Press the “Window + I” keys combination on your keyboard to open “Settings” and click on the “Update & Security” option.

Clicking on Update and Security - Then select “Windows Update” from the left column.
- Finally, click on the “Check for updates” button and download and install if any updates are available.

Check for updates


Method 11: Disable Avast
- Right-click on your Avast icon at the taskbar and select “Avast shield control” from the context menu.
- Now choose “Disable Permanently” and close all the windows.

Disable antivirus permanently

Method 12: Run Commands in Command Window
- Press the “Window + R” keys combination from your keyboard to open the “Run” prompt and type “cmd” and press the “Ctrl + Shift + Enter” keys combination to launch it with administrative privileges.
- Now type the following commands and hit “Enter”:
sc config IKEEXT start=demand

sc config PolicyAgent start=demand
- Restart your PC and the l2tp connection attempt failed because the security layer encountered a processing error unifi would be rectified.
Workaround:
If none of the above methods resolves your issue, then disconnect your VPN and try connecting with another VPN. There might be a possibility that the VPN you were using might not be compatible with the security layer. Use a VPN that has a security layer that matches your current settings.
If after trying all of these methods, the issue still persists for you, we recommend that you Contact Us for further troubleshooting.
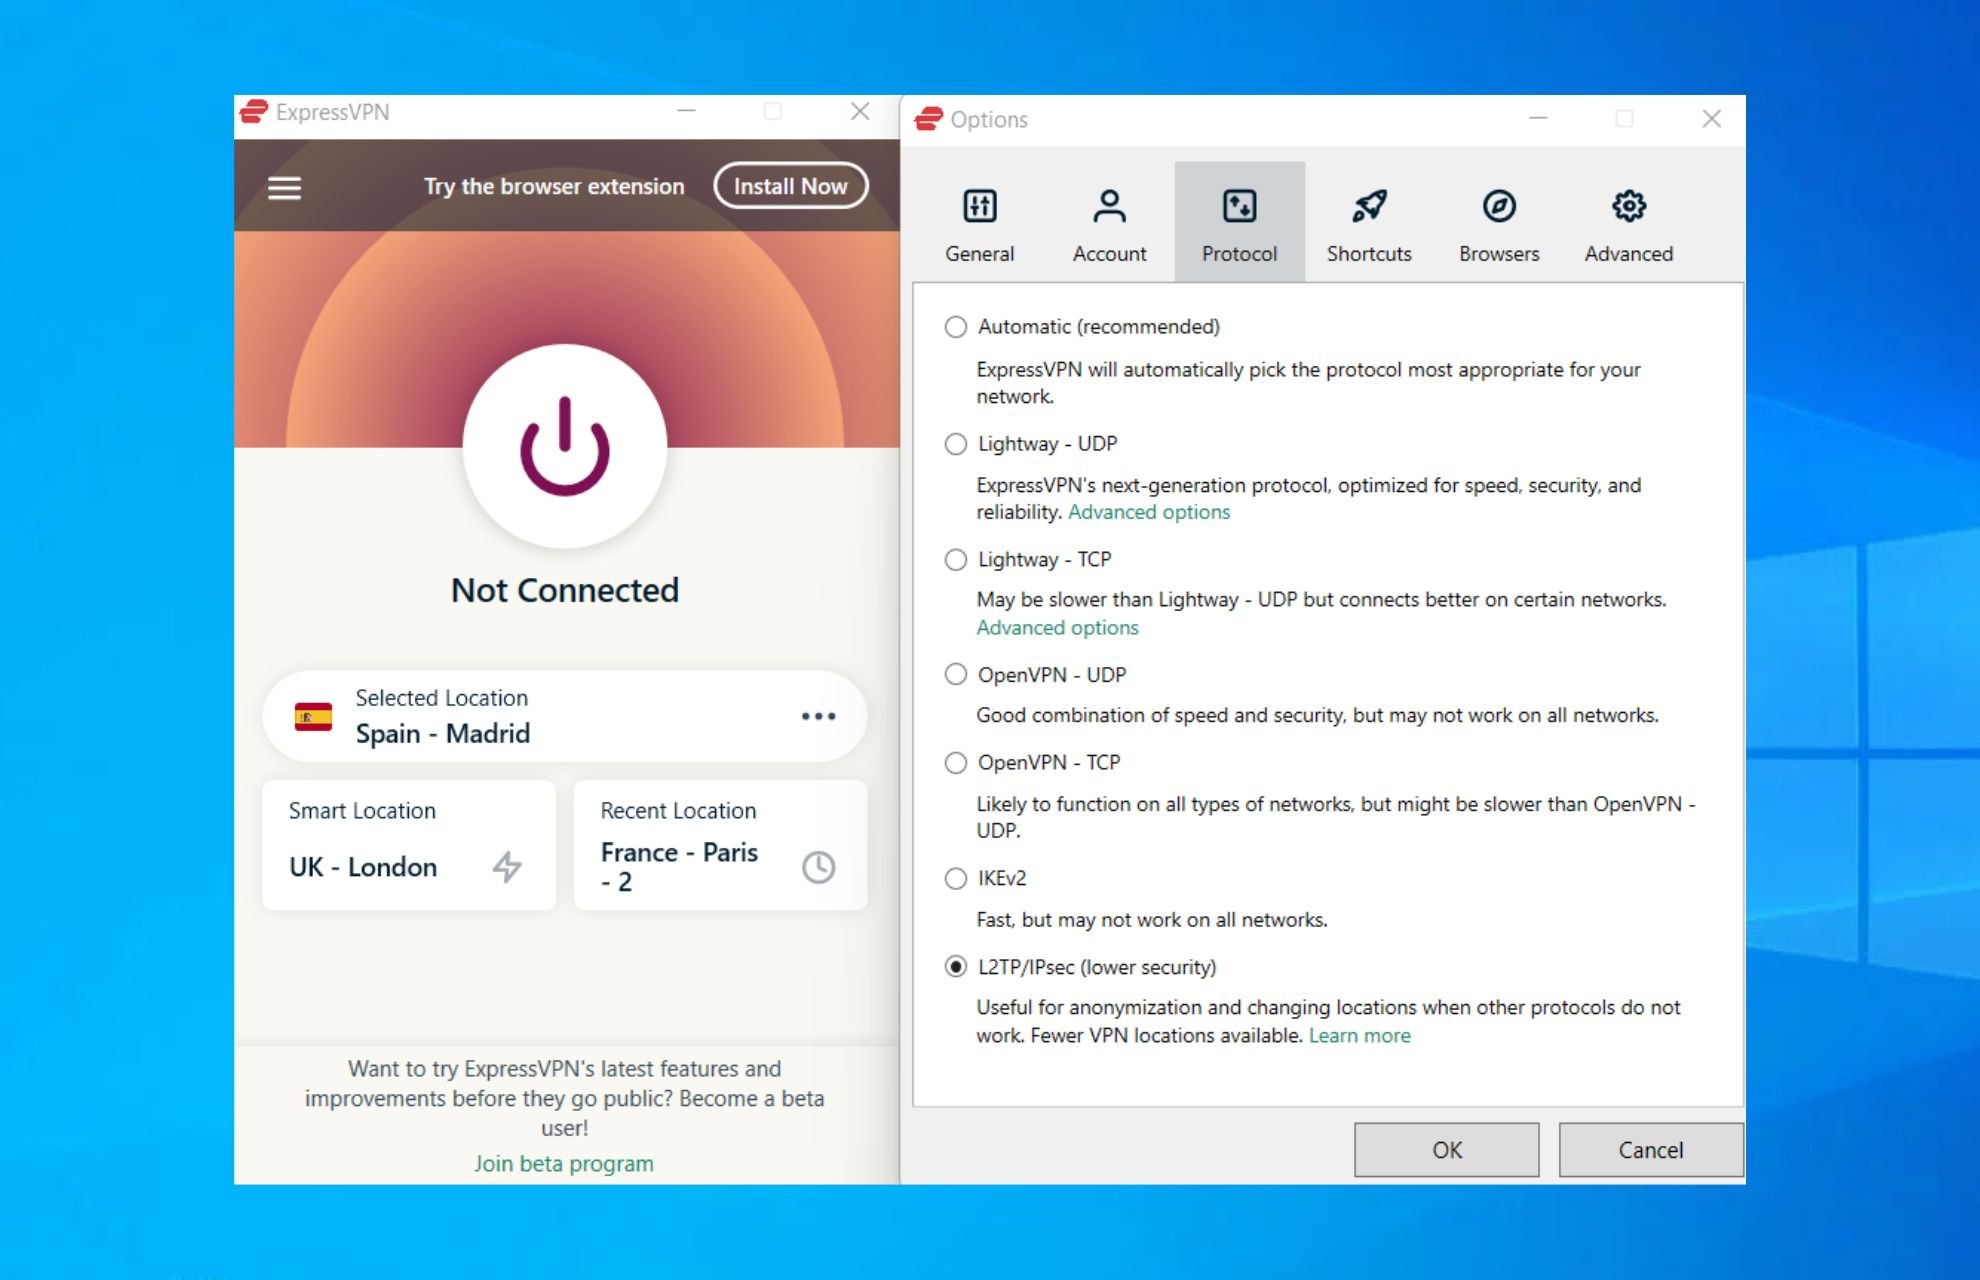
L2TP is a sought-after VPN with the Layer 2 tunneling protocol that bypasses the security restriction of a particular area. But sometimes you may encounter The L2TP connection attempt failed because the security layer encountered a processing error in Windows 10 or 11. This issue confirms a VPN error 789 which indicates the security layer is facing a conflict when a user attempts to connect to a remote VPN server.
The L2TP connection attempt failed because the security layer encountered a processing error is likely to come up when a user makes an effort to commence a new client session using Windows 2000 terminal service. There might be issues with the computer and the VPN itself that generates the error. Furthermore, the Operating System may not be set correctly for using the L2TP VPN for which the connection is terminating locally even before it starts. Today in this write-up, we will discuss a few game-changing workarounds to resolve this VPN trouble. When this error occurs Cisco Meraki VPN, Anyconnect L2TP VPN, DTC, IKEv2, Mikrotik might stop working. For example, recently, KB5009543 for Windows 10 and KB5009566 for Windows 11 have broken the have the VPN. See – How to Fix VPN KB5009543 Problem in Windows 10. Let’s start –
Here is How to Fix The L2TP connection attempt failed because the security layer encountered a processing error in Windows 10 –
1] Reinstall the VPN Network Adapter
Many cases are evident that error VPN 789 occurs in a system for instability in the network adapter. Thus, it becomes pretty complex for the VPN server to receive the required data for initialization. Oftentimes simply reinstalling the Network Adapter driver diminishes The L2TP connection attempt failed because the security layer encountered a processing error in Windows 10. For that, you have to uninstall the existing Driver Software from Device Manager and then install a new one downloading from the internet. Here is how to approach the task –
- Open Run dialog pressing Win+R hotkeys.
- Write devmgmt.msc in the search box of Run.
- Click the OK button and open up Device Manager in a separate window.
- Move out for Network Adapter and double click the device.
- Once the drivers are split up, make a right-click on your Network Adapter. Select the Uninstall device.
- Click Uninstall again and when the process is completed, restart Windows 10.
- Coming back to another session, open the web browser, visit the manufacturer webpage for driver software, and download the compatible one.
- Install the file in the system.
2] Start the IPSEC Parameters to Fix The L2TP connection attempt failed because the security layer encountered a processing error
According to the majority of users who have encountered The L2TP connection attempt failed, the issue came up after disabling the IPsec Keying Modules & IPsec Policy Agent services. Hence, enabling these services may resolve the problem of Self-Hosted VPN client. Here is how to enable the services –
- Access taskbar Search pressing Win+Q hotkeys together.
- Type services in the empty box and press Enter key.
- Once Services console appears, find out the IKE and AuthIP IPsec Keying Modules service.
- Make a double click on it and in the General tab, choose the Startup type as Automatic.
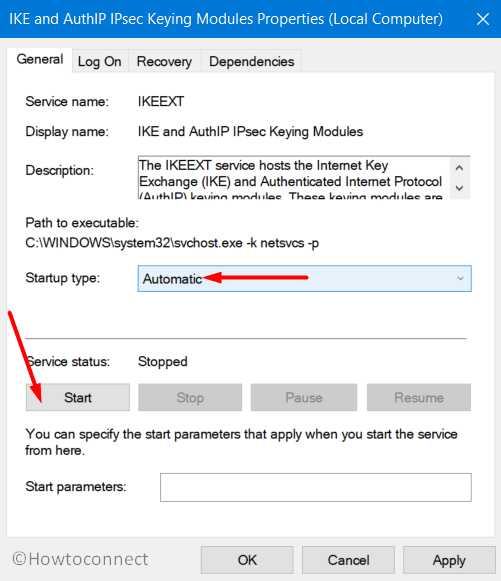
- Hover down to the Service status area and click Start button.
- Lastly, click the Apply button followed by OK to save the changes.
- Now, move back to the Services window and locate IPsec Policy Agent service.
- Double click on it and let the Startup type be Automatic. Click Start and hit OK button.
- After saving the changes, Restart the VPN and try establishing a connection.
3] Activate the Microsoft MS-CHAP v2 Protocol
Disabled Microsoft CHAP v2 protocol often leads to an The L2TP connection attempt failed because the security layer encountered a processing error in the system. Therefore, enable it and try resolving the error eventually using the below guidelines –
- Right-click on Start, select Run, type ncpa.cpl in the given text box, and press Enter key.
- Once Network Adapter Settings shows up, right-click the VPN connection.
- Choose Properties from the appearing menu.
- When a new popup floats up, jump into the Security tab.
- Scroll down here and click the radio button that reads Allow These Protocols.
- Hover down and check the small box beside Microsoft-CHAP Version 2.
- Click OK and try to reconnect the VPN client.
4] Enable the LCP Protocol Extensions
It is a very much necessary task to configure the PPP (Point to Point Protocol) settings for allowing LCP extension. The system may have been disabled by some means like third-party software or human error and giving away The L2TP connection attempt failed. We can enable it easily through these sequence of steps –
- Press Win logo + X keys and choose Run.
- Insert the text ncpa.cpl in the given box and click OK.
- On the Network Adapter Settings, make a right-click on VPN connection and select Properties.
- Highlight the Options tab and click the PPP Settings button.
- Check the box that says Enable LCP Extensions. Click the OK button to save the changes.
- Try connecting to the VPN server and check if the error has resolved.
5] Verify the Certificate Placed on VPN server
Often placing an invalid certificate or a previously shared and inadequately configured key to VPN server may lead to The L2TP connection attempt failed because the security layer encountered a processing error. Therefore, it is pretty much necessary to ensure the certificate you are placing is a correct and valid one. At the same time, there must be a unique and correctly configured key placed on the client-side or the VPN server end. You can surely use a Pre-Shared Key (PSK) by confirming the same credentials on the client-side and VPN operator. Be very much cautious before placing them in order to avoid the L2TP connection attempt failed because the security layer encountered a processing error in Windows 10 or 11.
6] Create new UDPE Encapsulation Registry Key
Users often face The L2TP connection attempt failed because the security layer encountered a processing error when it is behind Network address translation (NAT). The same may happen also for cases like frequent disconnections, or when the VPN client is wrongly configured to run behind a NAT service. When this causes instability in the system, you won’t be able to connect with the VPN server smoothly. In that case, you have to modify a Registry Editor keys and to accomplish the task, follow the below guidelines –
Before you proceed, it is important to take a backup of the registry keys. See How to Import and Export Registry Editor on Windows 10
- Type regedit on taskbar search box and press Enter.
- After you access Registry Editor, navigate to the following path in the left pane –
HKEY_LOCAL_MACHINESYSTEMCurrentControlSetServicesPolicyAgent
- Upon reaching to PolicyAgent, jump to right side pane.
- Right-click on the empty space and choose New => DWORD (32-bit) Value from the available context menu.
- Name the new DWORD as AssumeUDPEncapsulationContextOnSendRule.
- Double click the newly created DWORD and enter the Value data as 2 and click OK.
- Restart Windows 10 PC and on startup, try reconnecting the VPN connection.
Causes behind The L2TP connection attempt failed because the security layer encountered a processing error
Upon investigating a good number of case studies, we have found the following reasons may actively participate to cause the The L2TP connection attempt failed because the security layer encountered a processing error in Windows 10 and 11 –
- Placing a previously shared key or a duplicate certificate on the VPN client.
- The L2TP established VPN server is behind Network address translation (NAT).
- Absence of a trusted machine certificate or root machine certificate on VPN client.
- Machine Certificate placed on VPN server does not contain ‘server authentication’ as EKU (Extended Key Usage).
- Missing of Registry keys like AssumeUDPEncapsulationContextOnSendRule which may lead to repetitive failure in connectivity by the VPN server.
- Disabling the IPsec Keying Modules & Policy Agent services which are actually required for all Self-hosted VPN.
- Mis-configured PPP (Point to Point Protocol) settings affecting the VPN connection.
- Disabling the Microsoft CHAP v2 protocol inside the periphery of VPN server.
Methods:
1] Reinstall the VPN Network Adapter
2] Start the IPSEC Parameters
3] Activate the Microsoft MS-CHAP v2 Protocol
4] Enable the LCP Protocol Extensions
5] Verify the Certificate Placed on VPN server
6] Create new UDPE Encapsulation Registry Key
That’s all!!
Repair any Windows problems such as Blue/Black Screen, DLL, Exe, application, Regisrty error and quickly recover system from issues using Reimage.
Today one of my customers can’t connect to VPN because of error: «The L2TP connection attempt failed because the security layer encountered a processing error during initial negotiations with the remote computer».
After confirming that all L2TP VPN connection settings are correct, I discovered that the problem occurs after the KB5009543 update, in Windows 10, or the KB5009566 in Windows 11, as reported by many users in the Microsoft Q&A forums.

How to FIX: KB5009543 & KB5009566 updates breaks L2TP and IPSec VPN Connections. *
* Update (January 18, 2022): According Microsoft the issue is resolved in KB5010793 update for Windows 10 and in KB5010795 for Windows 11. So proceed to download and install the corresponding update from the Microsoft Update Catalog and see if the issue is fixed. (if not, then apply the steps below)
- Download KB5010793 update for Windows 10.
- Download KB5010795 update for Windows 11.
Step 1. Uninstall KB5009543 or KB5009566 updates
1. Open the Run utility by pressing the Windows + R keys on your keyboard.
2. Type cmd and press the keys Ctrl+Shift+Enter to open the Command Prompt in Admin mode. *
* Note: If you see any windows asking up for permission, click on Yes.

3. Type the following command according your OS and press Enter:
Windows 10:
- wusa /uninstall /kb:5009543

Windows 11:
- wusa /uninstall /kb:5009566
4. On the Confirmation dialogue box appears, click on Yes.

5. Once the uninstallation process is completed, restart the computer and try to connect to L2TP VPN. Normally, the problem should be solved. *
* Note: If the problem persists, follow the instructions on the following article: FIX: Cannot Connect to L2TP VPN in Windows 10
Step 2. Prevent the Reinstallation of the KB5009543 & KB5009566 updates.
Now proceed and prevent the reinstallation of the KB5009543 or KB5009566 update, by using the Show/Hide Updates utility.
1. Download the Show or Hide updates tool tool from: https://www.majorgeeks.com/files/details/wushowhide.html
2. Run the «wushowhide.diagcab», click Next and then click Hide Updates.

3. Select the 2022-01 Cumulative Update for Windows 10 (KB5009543) or the 2022-01 Cumulative Update for Windows 11 (KB5010795) and click Next.
4. When the operation is completed, click Finish and continue your work!
That’s it! Let me know if this guide has helped you by leaving your comment about your experience. Please like and share this guide to help others.
If this article was useful for you, please consider supporting us by making a donation. Even $1 can a make a huge difference for us in our effort to continue to help others while keeping this site free:

If you want to stay constantly protected from malware threats, existing and future ones, we recommend that you install Malwarebytes Anti-Malware PRO by clicking below (we
do earn a commision from sales generated from this link, but at no additional cost to you. We have experience with this software and we recommend it because it is helpful and useful):
Full household PC Protection — Protect up to 3 PCs with NEW Malwarebytes Anti-Malware Premium!
Download PC Repair Tool to quickly find & fix Windows errors automatically
Most of us use VPNs to stay unidentified and protected when surfing the web, while these software’s are great, they come with certain limits. Very often, Internet users encounter various issues while trying to use this safe connection, and regardless of what operating system you are using, there is a great possibility of encountering several VPN error codes. Today, the error in recognition is VPN Error 789.
The L2TP connection attempt failed because the security layer encountered a processing error during initial negotiations with the remote computer.

VPN Error 789 is one of the most common errors which occurs when a user attempts to connect to L2TP. Here, the L2TP connection attempt failed because the security layer encountered a processing error initial negotiation with the remote computer.
One of the possible reasons this error may occur is when you establish a client session by using Windows 2000 Terminal Services. Or when your system is not configured to connect to the L2TP server correctly. Other possible causes for this are usually:
- L2TP based VPN client (or VPN server) is behind NAT.
- Wrong certificate or pre-shared key is set on the VPN server or client
- Machine certificate or trusted root machine certificate is not present on the VPN server.
- Machine Certificate on VPN Server does not have ‘Server Authentication’ as the EKU
All Windows OS versions are all vulnerable to this VPN error. And most VPN users will experience this problem especially through Windows 7 L2TP IPSEC.
Read: Common VPN error codes troubleshooting & solutions.
VPN Error 789 is one of the most common errors which occurs when a user attempts to connect to L2TP. You can opt for any of the following options to troubleshoot VPN Error 789:
- Reboot your VPN Network Adapter
- Check the certificate
- Re-enable IPsec Service
Let’s look at each of these troubleshooting options in detail.
Option 1: Reboot your VPN Network Adapter:
Before getting into full-on troubleshooting, try to this simple trick. Reboot your VPN and see if it works; here are the steps:
1] Right-click ‘Start’ and click on ‘Device Manager’
2] Find ‘Network adapters’ and click on the drop-down to expand the list.

3] Find your ‘network adapter’
4] Right-click on it and select ‘Uninstall’
5] Now click ‘OK’
6] ‘Restart’ your system
The device will reinstall the network adapter with the next login and should reset it to its default factory settings. If this doesn’t help in fixing VPN error 789, try the next option.
Option 2: Check the certificate:
Here you will need to ensure that the correct certificate is used both on the client and the server-side. Also, in case Pre-Shared Key (PSK) is used, confirm that the same PSK is configured on the client-side, and the VPN server machine.
Option 3: Re-enable IPsec Service:
Here are the steps to re-enabling the IPsec Service:
1] Right-click ‘Start’ and hit ‘Run’
2] Type ‘services.msc’
3] Look for ‘IKE and AuthIP IPSec Keying Modules’ and ‘IPSec Policy Agent’
4] You will have to check the status of both these services. If it indicates ‘Started’ click to ‘Restart’. Also, if the ‘Started’ option is disabled, ‘Enable’ it.
5] Double click on both the services and select ‘Startup type’.
6] Change it to ‘Automatic’
7] Click ‘OK’ to save the changes
8] Now ‘Restart’ your VPN service and try to connect again.
If VPN Error 789 persists even after trying all the above options, you should immediately get in touch with your VPN service provider. Do let us know if any of these solutions fixed the Windows VPN error 789 by leaving a comment in the comments section below.
Related errors:
- VPN error 812, Connection prevented because of a policy configured on RAS/VPN server
- VPN Error 720, Error connecting to a VPN Connection
- Error 13801, IKE authentication credentials are unacceptable
- VPN Error 868, Name of the Remote Access Server did not resolve
- VPN Error 809, Network connection between your computer and the VPN server could not be established.
Ankit Gupta is a writer by profession and has more than 7 years of global writing experience on technology and other areas. He follows technological developments and likes to write about Windows & IT security. He has a deep liking for wild life and has written a book on Top Tiger Parks of India.
“The L2TP connection attempt failed because the security layer encountered a processing error” this is an error message that you may come across while using a VPN on your Windows PC.
Using a VPN to access the internet is a pretty common practice and if you are also one such internet user then you may come across the above-mentioned error message, making you unable to use the VPN services on the PC. L2TP is a well-known Tunneling Protocol that is used majorly for supporting VPN services.
L2TP stands for Layer 2 Tunnelling Protocol and some of the reasons behind this error can be when the PPP (Point to Point Protocol) settings are misconfigured or when the Microsoft CHAP v2 protocol is not enabled.
But hey, you can solve this error on your Windows 10 / Windows 11 PC, and here’s how.

How to Fix the “The L2TP Connection Attempt Failed Because the Security Layer Encountered a Processing Error” error on Windows
The “The L2TP Connection Attempt Failed Because the Security Layer Encountered a Processing Error” error can majorly occur due to two main reasons. Either the Microsoft CHAP v2 protocol is disabled or the PPP settings are not configured properly on the Windows PC. However, if resolving these issues didn’t work then I have mentioned other ways to fix the issue.

Attention Windows Users!!
Facing issues on your Windows PC every now and then? We would recommend you use the Restoro PC Repair tool.
It is a one-stop solution to repair common computer errors, protect your Windows PC from data loss, malware, hardware failure, Registry issues, BSOD errors, etc. and optimize your PC for maximum performance in just three simple steps:
- Download Restoro Tool that comes with Patented Technologies (see patents here).
- Install and click on Start Scan to find the issues on your Windows PC.
- Finally, click on Repair All to fix the issues.
475,131 readers have downloaded Restoro this month.
Fix 1: Enable Microsoft CHAP Version 2
It is always important to have the Microsoft CHAP Version 2 (MS-CHAP v2) enabled on Windows in order to get the VPN up and running. Hence it is very important to check if it is enabled and if it is not, then enable it.
- Open the Run dialog box. You can either search for it or can directly press Win + R on the keyboard.
- In the Run dialog box, type-in
ncpa.cpland click on OK.
- You will now be on the Network connections window. Here, right-click on the VPN connection and select Properties.

- In the VPN properties window, switch to the Security tab.
- Now, enable the Allow these protocols option. Also, check mark the Microsoft CHAP Version 2 (MS-CHAP v2) to enable it.
- Finally, click on OK.


Once done, now try to connect the VPN one more time and see if the error is still popping up or not.
Fix 2: Enable the LCP extensions in PPP settings
There can be a possibility that the LCP extensions in the Point to Point Protocol (PPP) settings. This can definitely cause the L2TP connection to get hindered. Here is how you can enable the LCP extensions.
- open the Run dialog box (Win + R), type in
ncpa.cpl, and click on OK. - You will now be on the Network connections window. Here, right-click on your VPN connection and go to Properties.
- In the Properties window, go to the Options tab.
- Click on the PPP Settings… button and check to mark the Enable LCP extensions option.
- Click on OK to save the changes, followed by again clicking on OK.
Once the LCP extensions option is enabled, try to connect your VPN again and see if you are able to use it now or not.
Fix 3: Restart the IPSec Services
The reason behind the failure of the L2TP connection can be the reason that the IPSec services are going through some kind of bug or glitch. In such a case, you should consider restarting the IPSec services on your PC.
- Search and open Services. You can also enter
services.mscin the Run dialog box.
- You will now be on the Services Manager window. Here, look for the IKE and AuthIP IPSec Keying Modules under the Name column and double-click on it.

- In the IKE and AuthIP IPSec Keying Modules Properties window, make sure the startup type is set to Automatic.
- After that click on the Stop button to stop the service and after that click on Start to restart it.
- Click on OK.

- Now, in the Services Manager window, open the IPSec Policy Agent service and repeat the same steps with this service as well.


Once done, you have successfully restarted the IPSec services and you can now try restarting your VPN connection it should be up and running this time.
Fix 4: Reinstall the Network Adapters
You can also try reinstalling the network adapters in order to eliminate any of the rare bugs that are affecting the connection.
- Search and open the Device Manager. Alternatively, you can also enter devmgmt.msc in the Run dialog box.

- On the Device Manager window, click on the Network adapters option to expand it.
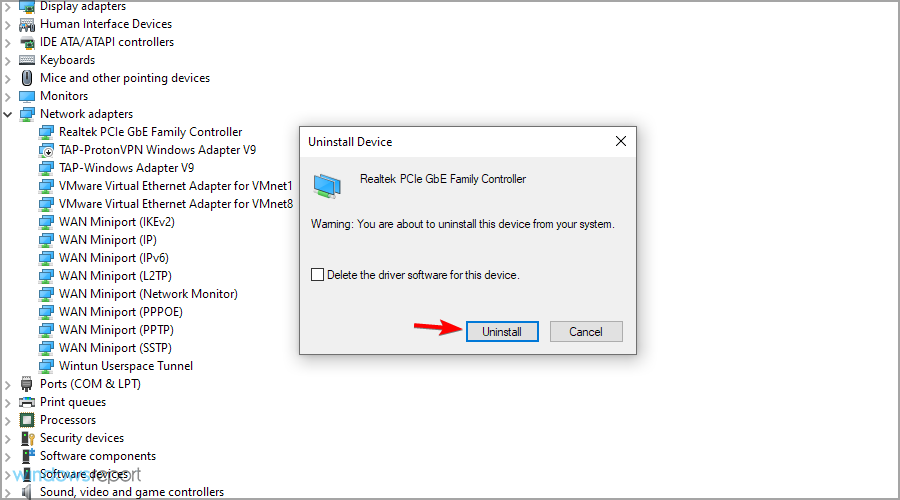
- Now from the list of Network adapters, right-click on your VPN adapter(s), right-click on it, and select Uninstall device.

- Again click on Uninstall on the prompted window to confirm the selection.

- Do the same if there is more than one VPN adapter listed.


Once done, restart your PC and it will automatically install the drivers and set them to their default settings.
Fix 5: Uninstall Latest Windows Security Updates
Recently installed Windows security updates can also cause this issue by creating a hindrance. You can try uninstalling the recent security update that you have installed.
- Open Windows Settings by pressing Win + I on the keyboard.
- Go to Windows Update and select Update history.

- On the Update history window, you can look at the latest update so that you can uninstall that specific update. Now, click on Uninstall updates.
- This will open the Control Panel window, now, search for the update that you want to uninstall, select it and click on Uninstall.


- Now, follow the on-screen instructions to uninstall the update, restart the PC and try to run the install/uninstall again.
Bottom Line
Ok, so these were the possible ways to fix the “The L2TP Connection Attempt Failed Because the Security Layer Encountered a Processing Error” issue on your Windows 11 or Windows 10 PC.
I am hoping that this fixing guide would have helped you in some way. As in most cases, the disabled MS-CHAP v2 or LCP extensions cause the VPN not able to establish the L2TP connection, and hence Fix 1 and 2 should be enough to solve the issue.
However, you can also consider restarting the IPSec services, reinstalling the VPN network adapter drivers, and uninstalling the latest security update to eliminate the chances of software conflicts.
Also Read:
- Backwards 3 or Reverse 3 | How to type Ɛ on PC and Phone
- Fix Oculus Software not Installing on Windows 11/10
- Fix Skyrim failed to allocate memory on Windows 11/10
- Auepuf.exe/Auepuc.exe Explained | Is it safe for Windows 11/10?
- Fix The instruction at 0x000000000 referenced memory at 0x00000000. The memory could not be read