В операционной системе Windows 10 настроить VPN-подключение по протоколу L2TP не составит большого труда — достаточно выполнить все действия, как показано на картинках, и уже через минуту вы сможете анонимно посещать любые сайты, обойти блокировку Вконтакте, безопасно использовать бесплатный Wi-Fi.
1
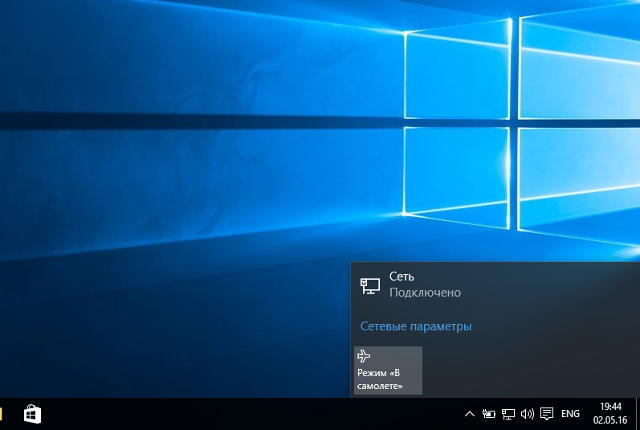
Кликнуть на иконке сетевого подключения в системном трее, и в появившемся окне выбрать Сетевые параметры.
Далее


4
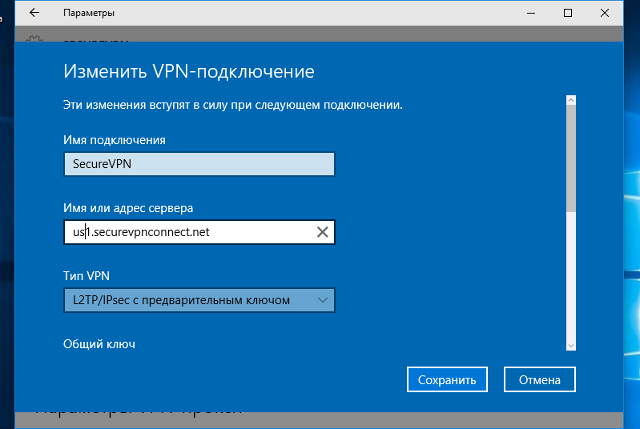
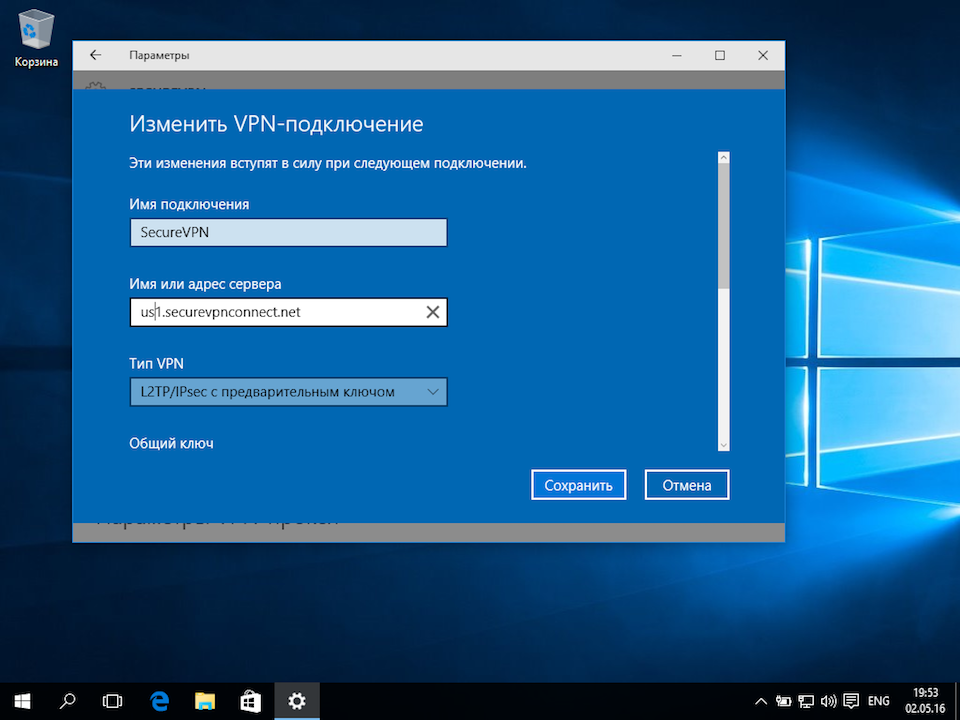
Указать идентификационные данные:
- Общий ключ — a-secure-psk
- Тип данных для входа — Имя пользователя и пароль
- Имя пользователя — username
- Пароль — password
Для завершения настройки нажать Сохранить.
Важное замечание: имя пользователя и пароль находятся в файле readme.txt, отправленном на Вашу почту после заказа подписки.
Далее
a-secure-psk
username
password


5
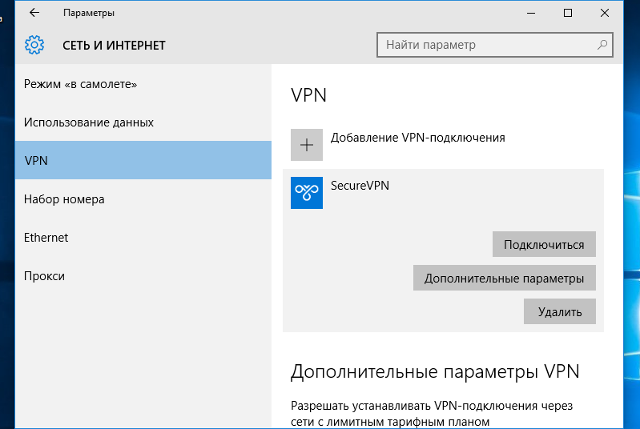
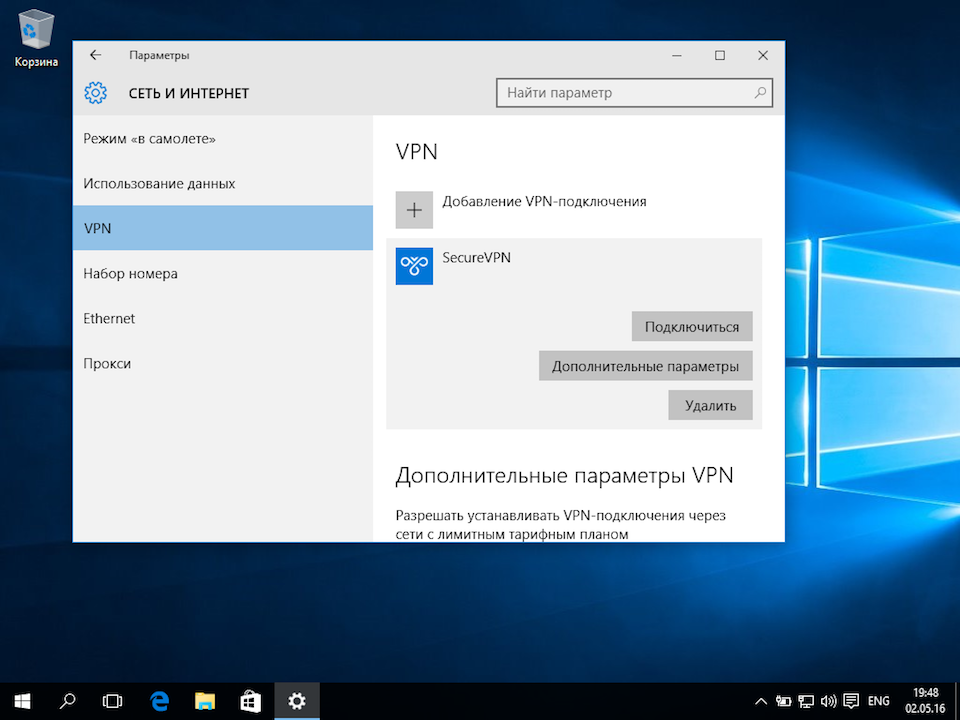
Для подключения выбрать только что созданное соединение, и нажать кнопку Подключиться.
Далее
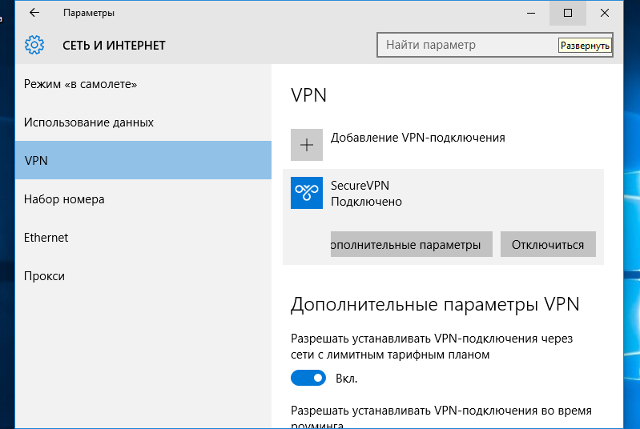
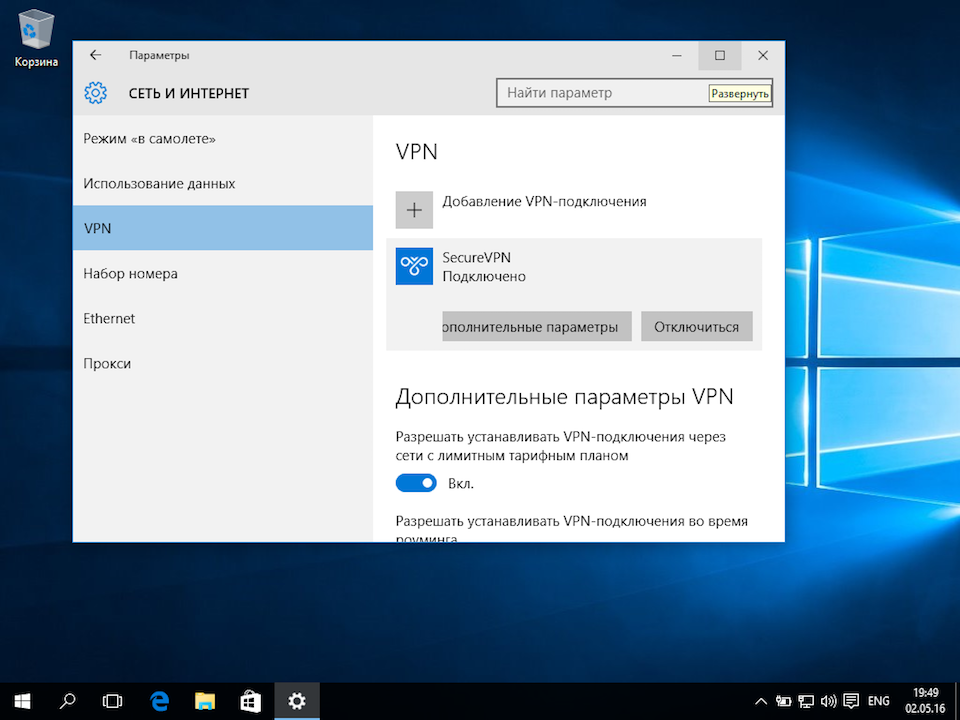
6
Соединение будет установлено через некоторое время. Для отключения нажать Отключиться.
Далее
8
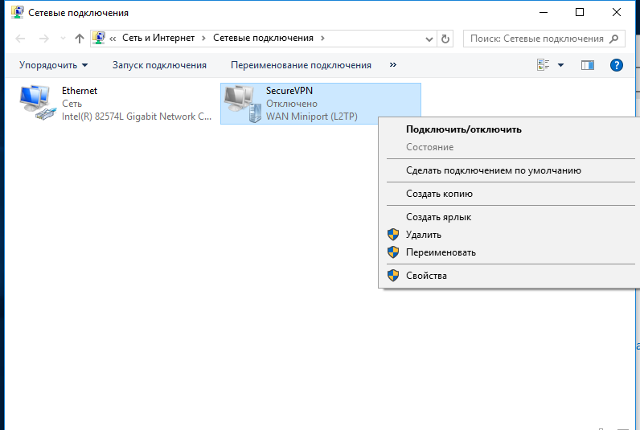
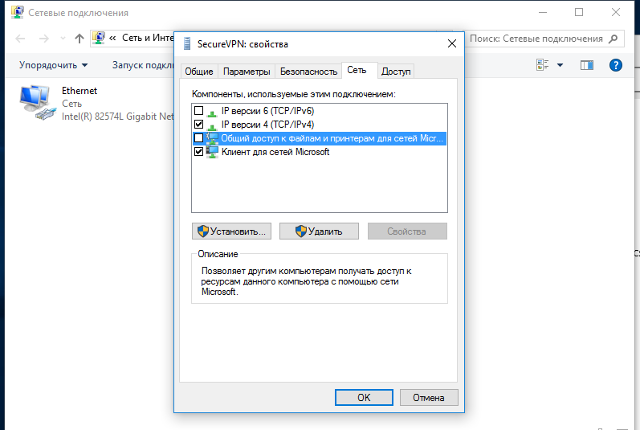
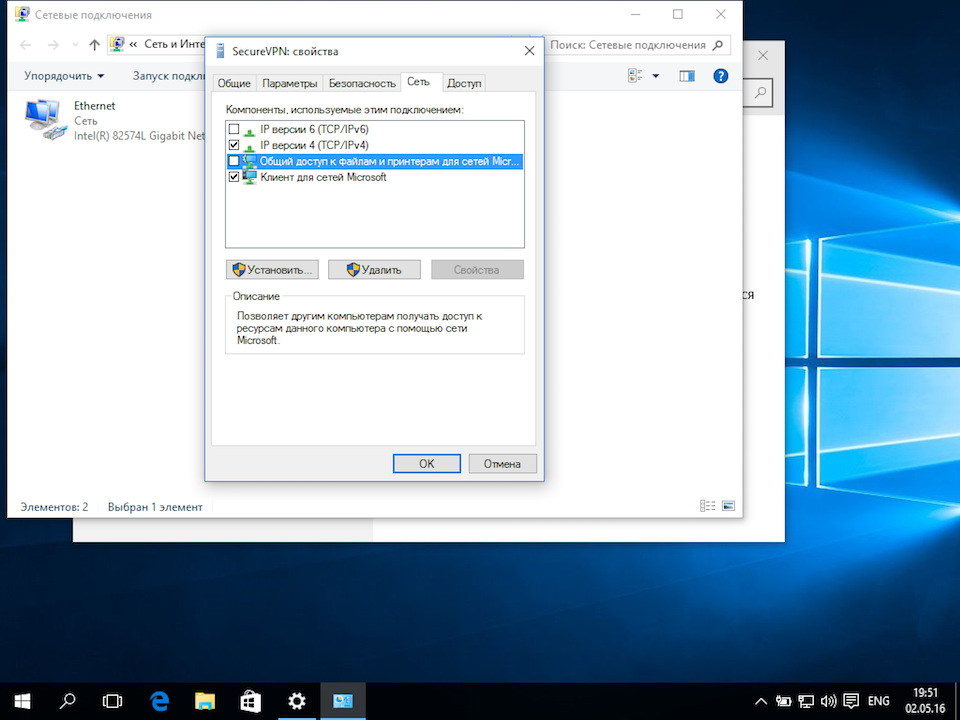
В открывшемся окне Сетевые подключения кликнуть правой кнопкой на созданном подключении, и выбрать Свойства.
Далее


Шаг 1.
Нажмите кнопку “Пуск” (1) и выберите “Параметры” (2).

Шаг 2.
В открытом окне “Параметров” кликните подраздел “Сеть и Интернет”.

Шаг 3.
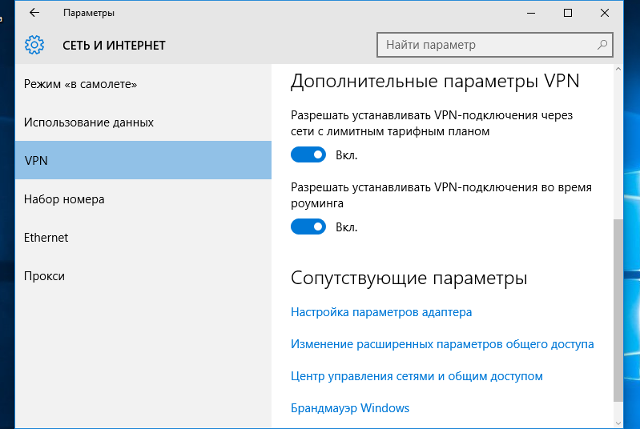
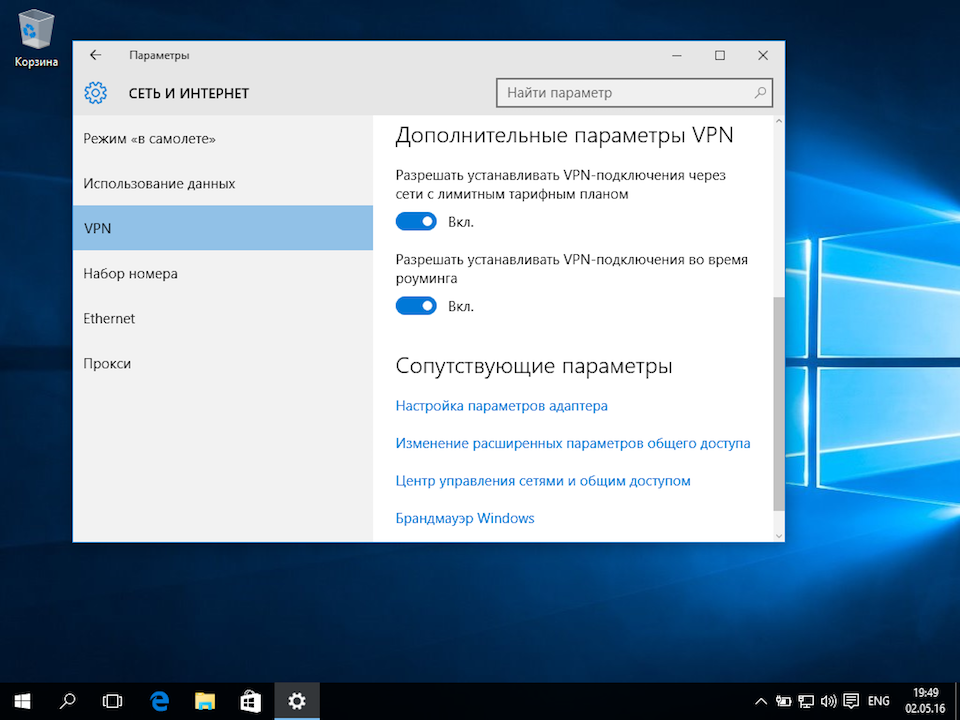
В меню “VPN” (1) перейдите к пункту “Добавление VPN-подключения” (2).

Шаг 4.
- (1) “Поставщик услуг VPN” – Windows;
- (2) “Имя подключения” – любое удобное вам имя подключения;
- (3) “Имя или адрес сервера” – IP-адрес вашего сервера из письма;
- (4) “Тип VPN” – L2TP/IPsec с предварительным ключом;
- (5) “Общий ключ” – vpnext;
- (6) “Тип данных для входа” – Имя пользователя и пароль;
- (7) “Имя пользователя” – заданное вами при настройке сервера;
- (8) “Пароль” – заданный вами при настройке сервера.
(Не путать с логином/паролем от Личного Кабинета).
Нажмите «Сохранить».

Шаг 5.
VPN-профиль успешно создан (1). Перейдите к разделу “Сопутствующие параметры” и выберите “Центр управления сетями и общим доступом” (2).

Шаг 6.
В новом окне сведений о сети выберите “Изменение параметров адаптера”.

Шаг 7.
Кликните правой кнопкой мыши на сетевом подключении с выбранным вами именем профиля (1) и в функциональном меню выберите “Свойства” (2).

Шаг 8.
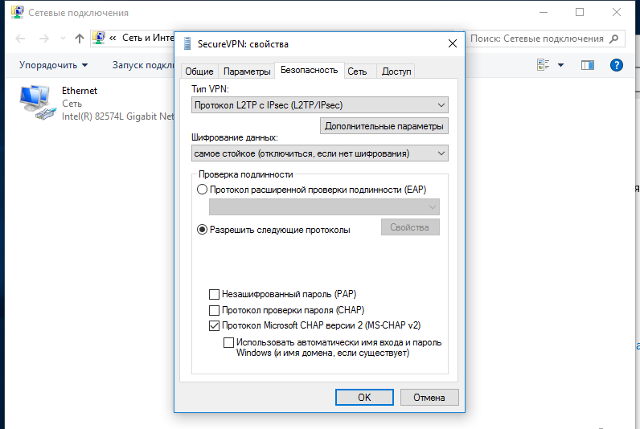
На вкладке “Безопасность” (1) установите:
- (2) “Тип VPN” – Протокол L2TP с IPSec;
- (3) “Шифрование данных” – самое стойкое;
- (4) “Разрешить следующие протоколы” – оба пункта “Протокол проверки CHAP…”.

Шаг 9.
В свойствах протокола нажмите “Дополнительные параметры” (1) и в новом окне введите ключ – vpnext (2), если вы не сделали этого на Шаге 4.
После всех настроек нажмите кнопку “Ок”.

Шаг 10.
Перейдите ко вкладке “Сеть” (1) и выберите “IP версии 4” (2), после чего нажмите кнопку “Свойства” (3).

Шаг 11.
Выберите автоматическое получение IP-адреса и автоматическое получение адреса DNS-сервера (1).
После изменения сетевой конфигурации нажмите кнопку “Ок” (3).

Шаг 12.
Для подключения нажмите на значок сети (1) в правом нижнем углу. Затем выберите созданный ранее профиль (2).
![]()
В Windows 10 существует проблема с подключением по VPN в качестве клиента по протоколу L2TP/IPSec. В очередной раз столкнулся с ней недавно, когда свежеустановленная система отказалась подключаться к VPN-серверу, запущенному в другой квартире на роутере Keenetic.
С учетом того, что вряд ли эту проблему исправят в грядущих обновлениях, публикую памятку по ее самостоятельному исправлению.
Содержание
- 1 Причина и симптомы
- 2 Решение проблемы
- 2.1 Вариант 1 — через редактор реестра
- 2.2 Вариант 2 — через Powershell
- 3 Заключение
Причина и симптомы
Симптомы. При попытке подключения со всеми корректно введенными настройками система долго думает и в конце концов выдает ошибку:
Не удалось установить связь по сети между компьютером и VPN-сервером, так как удаленный сервер не отвечает.
Причина заключается в том, что с настройками по умолчанию встроенный VPN-клиент Windows не поддерживает подключение через NAT.
В двух словах про NAT
NAT — это механизм преобразования роутером внешнего IP-адреса (предоставляемого провайдером при подключении) в локальные IP-адреса устройств, подключенных к вашей домашней сети. Практически все пользователи домашнего интернета «сидят за NATом», исключение составляют лишь случаи, когда интернет-кабель от провайдера подключен непосредственно к компьютеру в обход роутеров и свитчей.
В целом родной VPN-клиент в Windows 10 способен работать за NAT, но для этого необходимо поменять один пункт в его настройках — и делается это не самым очевидным способом.
Решение проблемы
Для решения проблемы нужно открыть следующую ветку реестра:
HKEY_LOCAL_MACHINESYSTEMCurrentControlSetServicesPolicyAgent
И внести в нее параметр AssumeUDPEncapsulationContextOnSendRule со значением 2.
Вариант 1 — через редактор реестра
Запускаем редактор реестра, открыв окно поиска и введя в нем regedit:

Находим в реестре ветку HKEY_LOCAL_MACHINESYSTEMCurrentControlSetServicesPolicyAgent и создаем в нем 32-битный параметр DWORD с именем AssumeUDPEncapsulationContextOnSendRule и значением 2:

Вариант 2 — через Powershell
Запускаем Windows PowerShell, введя powershell в окне поиска и выбрав в контекстном меню запуск от имени администратора:

В открывшемся окне выполняем следующую команду:
Set-ItemProperty -Path "HKLM:SYSTEMCurrentControlSetServicesPolicyAgent" -Name "AssumeUDPEncapsulationContextOnSendRule" -Type DWORD -Value 2 –Force;

Заключение
После внесения изменений, независимо от способа которым они были внесены, необходимо перезагрузить компьютер чтобы параметр подтянулся в используемые настройки. Затем снова запускаем подключение к VPN-серверу и убеждаемся, что оно успешно стартует.
Стоит отметить, что данная проблема присуща исключительно Windows и не встречается ни в Linux, ни в macOS, ни в iOS.
Существует множество приложений, которые будут реализовывать аутентификацию и шифрование сетевого трафика через отдельную стороннюю программу.
Тем не менее, операционная система Microsoft может также реализовать это через конфигурацию IPSEC. В этой статье мы рассмотрим, что такое IPSEC, и простой пример реализации.
Internet Protocol Security или IPSEC — это протокол, используемый для аутентификации и шифрования IP-коммуникаций. Это достигается путем взаимной аутентификации между агентами, а также обмена криптографическими ключами в начале сеанса.
IPSEC также позволит добавлять ограничения IP и шифрование на уровне TCP / UDP к приложениям, которые иначе не могут его поддерживать. IPSEC использует IP-протокол 50 (ESP), IP-протокол 51 (AH) и UDP-порт 500.
Внедрение IPSEC
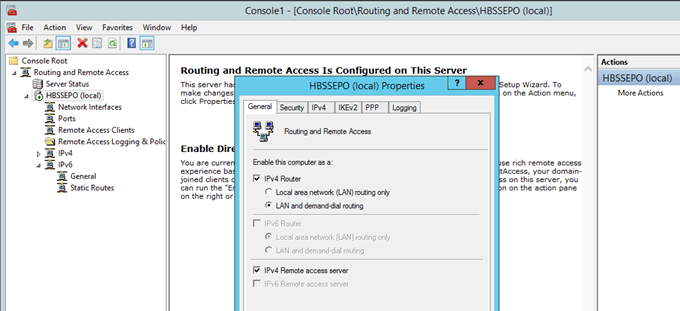
В этом примере мы настроим IPSEC для шифрования связи между двумя компьютерами Windows. Первый компьютер, сервер Windows 2012 будет выступать в качестве сервера VPN.
Второй компьютер, клиент Windows 10, будет действовать как клиент VPN. LT2P IPSEC VPN может обмениваться либо предварительным общим ключом, либо сертификатом. В этом примере мы будем обмениваться предварительным общим ключом.
Настройка VPN-сервера
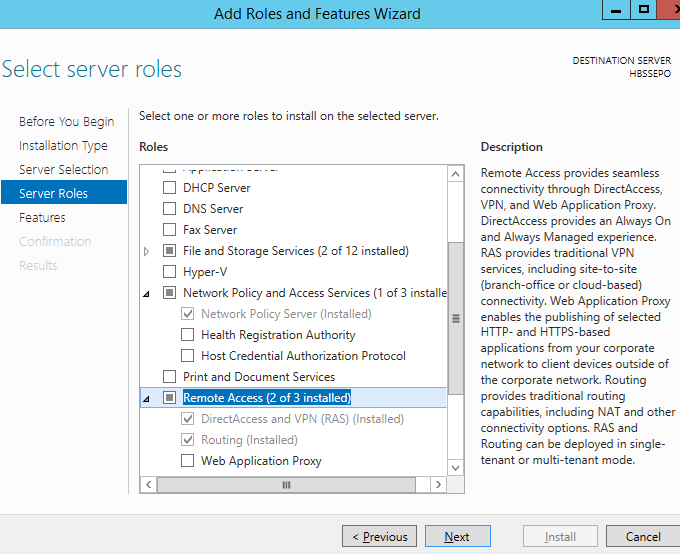
На компьютере с Windows 2012 нам потребуется установить функции маршрутизации и удаленного доступа. Для этого перейдите в диспетчер серверов и добавьте роли и компоненты . Выберите установку на основе ролей или функций . Выберите локальный сервер. Выберите для установки следующие роли сервера.
Сетевая политика и службы доступа
Сервер сетевой политики
Удаленный доступ
Прямой доступ и VPN (RAS)
Маршрутизация
После установки этих новых функций вам потребуется оснастка для управления ими. Откройте mmc.exe с правами администратора. Перейти к файлу | Добавить / удалить оснастку. Добавьте оснастку маршрутизации и удаленного доступа .
Эта оснастка позволяет настраивать многопротокольные службы маршрутизации LAN-to-LAN, LAN-to-WAN, виртуальная частная сеть (VPN) и трансляция сетевых адресов (NAT).
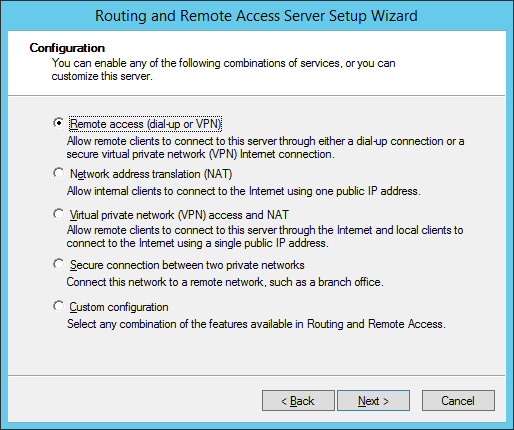
В консоли MMC щелкните правой кнопкой мыши на маршрутизации и удаленного доступа и выберите, чтобы добавить сервер. Выберите локальную машину. Затем щелкните правой кнопкой мыши на только что созданном компьютере и выберите «Настроить и включить маршрутизацию и удаленный доступ» . Выберите Удаленный доступ (Dial Up или VPN).
Затем проверьте параметр VPN . У вас должно быть как минимум две сетевые карты, чтобы это работало. Одним из них может быть петля. Укажите диапазон адресов, которые будут предоставлены для входящего соединения. Убедитесь, что они не конфликтуют с другими адресами, выделенными в вашей существующей сети. В этом примере мы не будем использовать радиус-сервер.
Далее попытайтесь запустить службу маршрутизации и удаленного доступа. Следующий ключ реестра может потребоваться удалить, чтобы запустить службу.
HKEY_LOCAL_MACHINESYSTEMCurrentControlSetServicesRemoteAccessRouterManagersIpv6
В консоли mmc.exe щелкните правой кнопкой мыши на имени компьютера и перейдите в Свойства. Измените эти свойства на вкладке безопасности.
Выберите методы аутентификации, как показано ниже.
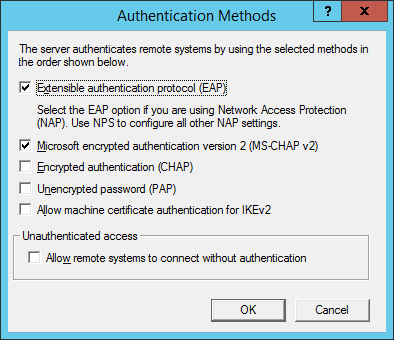
Установите флажок, чтобы разрешить настраиваемую политику IPSEC для соединения L2TP / IKEv2. Добавьте предварительный общий ключ.
Наконец, вам нужно будет изменить пользователя, чтобы получить доступ к VPN. Откройте compmgmt.msc, перейдите в раздел «Локальные пользователи и группы» и выберите свойства пользователя, которого вы хотите использовать для VPN.
Перейдите на вкладку Dial Up. Выберите Разрешить доступ и нажмите Применить . На вашем компьютере потребуется перезагрузка. После перезагрузки вы будете готовы протестировать свой первый клиент.
Настройка машины с Windows 10
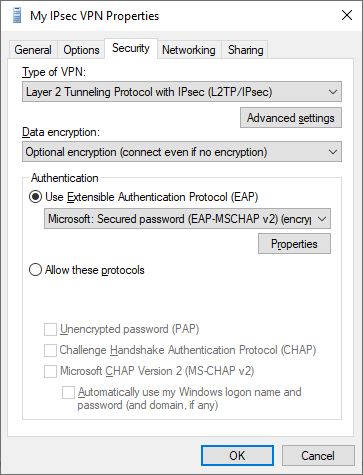
На компьютере с Windows 10 откройте «Настройки сети и Интернета». Выберите VPN на левой панели и добавьте VPN-соединение. Отредактируйте дополнительные параметры.
Разместите IP-адрес вашего VPN-сервера под именем или адресом сервера. Выберите L2TP/IPSEC с параметром предварительного общего ключа в разделе Тип VPN. Добавьте предварительно общий ключ и имя пользователя и пароль.
Свойства безопасности для VPN должны быть изменены под сетевым адаптером. На адаптере VPN выберите «Свойства» и перейдите на вкладку «Безопасность». Установите переключатель EAP и выберите Microsoft: защищенный пароль (EAP-MSCHAPv2) (шифрование включено).
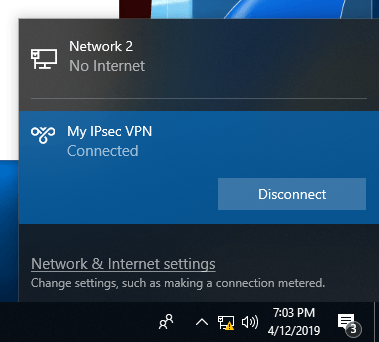
Наконец, снова щелкните правой кнопкой на адаптере для подключения. Поздравляем! Вы создали VPN-туннель IPSEC.
07.11.2019
Инструкция: Настройка L2TP/IPSec VPN-подключения в ОС Windows
Для клиентов ИТ аутсорсинга мы составляем инструкции по самостоятельной настройке оборудования, данные рекомендации позволяют пользователям произвести настройку в удобное время, например, настроить удаленное подключение домашнего компьютера к рабочей сети.
Вводные данные
Для настройки L2TP/IPSEC VPN-подключения Вам потребуются следующие данные:
- IP-адрес, либо доменное имя VPN-сервер
- Логин VPN-пользователя
- Пароль VPN-пользователя
- Общий ключ шифрования
Эти данные Вы можете получить у контактного лица в Вашей компании.
В зависимости от версии ОС Windows, установленной на Вашем ПК, внешний вид меню настройки VPN-подключения будет различаться. Для того, чтобы определить версию Windows, находясь на рабочем столе системы, одновременно зажмите комбинацию клавиш Win (клавиша с изображением логотипа Windows) + R. В появившемся окне «Выполнить», введите команду «winver» (без кавычек):

Откроется окно «Windows: сведения», в котором будет указана версия Вашей операционной системы:

После того, как Вы выяснили версию Вашей ОС, перейдите к соответствующему ей разделу инструкции.
Настройка VPN-подключения в Windows 10
Нажмите правой кнопкой мыши на кнопке меню «Пуск» и выберите из контекстного меня пункт «Параметры»:

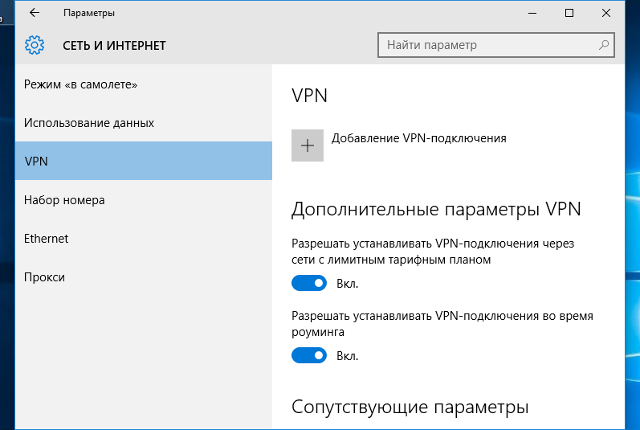
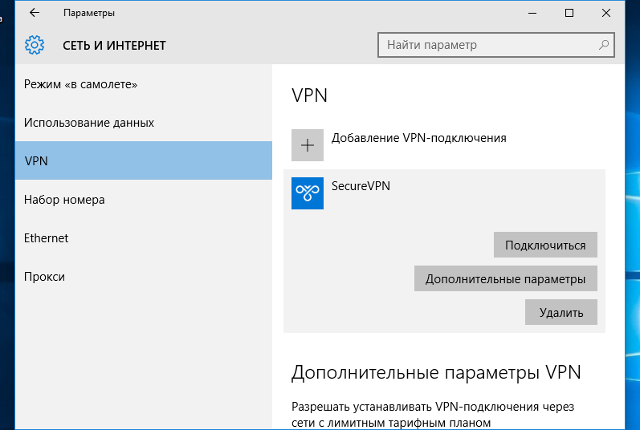
В окне «Параметры» выберите раздел «Сеть и Интернет», затем выберите из списка пункт «VPN» и нажмите кнопку «Добавить VPN-подключение»


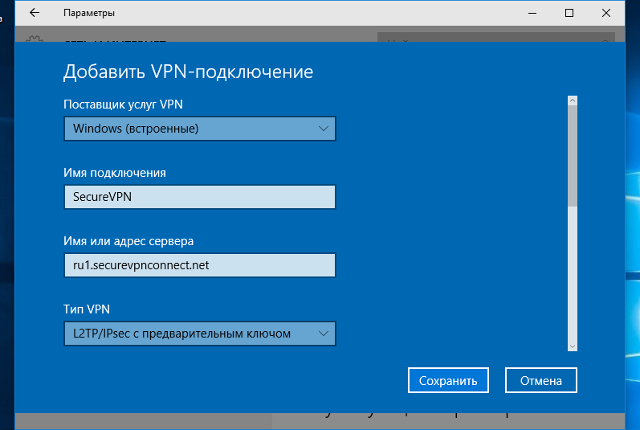
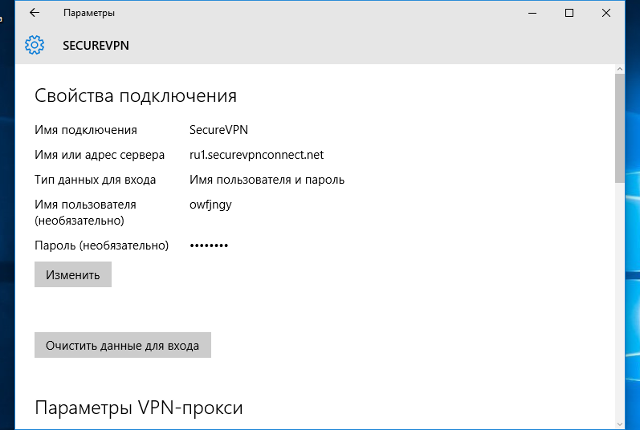
В окне настроек VPN-подключения, укажите следующие значения:
- Поставщик услуг VPN – Windows (встроенные)
- Имя подключения – любое понятное Вам название данной VPN-сети (на технические свойства настраиваемой сети никак не влияет)
- Адрес или имя сервера – IP-адрес, либо доменное имя VPN-сервера
- Тип VPN – L2TP/IPsec с предварительным ключом
- Общий ключ – Общий ключ шифрования
- Тип данных для входа – Имя пользователя и пароль
- Имя пользователя – Логин VPN-пользователя
- Пароль – Пароль VPN-пользователя
После ввода данных нажмите кнопку «Сохранить»:

Чтобы подключиться к добавленной сети, в правом нижнем углу экрана (рядом с часами и значком ![]() или
или ![]() ), кликните по нему левой кнопкой мыши, выберите из списка VPN-сеть и нажмите кнопку «Подключить» (отключение производится тем же способом):
), кликните по нему левой кнопкой мыши, выберите из списка VPN-сеть и нажмите кнопку «Подключить» (отключение производится тем же способом):

Об успешном подключении говорит надпись «Подключено», под названием VPN-подключения:

Прим.: опционально для настройки может быть указано, что необходимо отключить «Шлюз в удалённой сети». Для выполнения этой настройки перейдите к соответствующему разделу данной инструкции
Настройка VPN-подключения в Windows 8.1 / Windows 7
Находясь на рабочем столе системы, одновременно зажмите комбинацию клавиш Win (клавиша с изображением логотипа Windows) + R. В появившемся окне «Выполнить», введите команду «control» (без кавычек):

Откройте мастер создания нового подключения («Сеть и Интернет –> Центр управления сетями и общим доступом –> Центр управления сетями и общим доступом –> Создание и настройка нового подключения или сети»):


Следуйте указаниям мастера, как указано на изображениях ниже:


В окне настроек VPN-подключения, укажите следующие значения:
- Адрес в Интернете – IP-адрес, либо доменное имя VPN-сервер
- Имя объекта назначения – любое понятное Вам название данной VPN-сети (на технические свойства настраиваемой сети никак не влияет)
- Нажмите кнопку «Создать»


В окне свойств подключения, перейдите на вкладку «Безопасность» и нажмите кнопку «Дополнительные параметры»:

В окне дополнительных свойств, отметьте пункт «Для проверки подлинности использовать общий ключ» и в поле «Ключ» введите общий ключ шифрования, нажмите кнопку «Ок»:

В основном окне свойств подключения, настройте следующие параметры:
- Тип VPN – Протокол L2TP с IPsec (L2TP/IPsec)
- Шифрование данных – обязательное (отключиться, если нет шифрования)
- Разрешить следующие протоколы – Протоколы Microsoft CHAP версии 2 (MS-CHAP v2)

Чтобы подключиться к добавленной сети, в правом нижнем углу экрана (рядом с часами и значком раскладки клавиатуры), найдите значок с изображением сетевого подключения (![]() или
или ![]() ), кликните по нему левой кнопкой мыши, выберите из списка VPN-сеть и нажмите кнопку «Подключить» (отключение производится тем же способом):
), кликните по нему левой кнопкой мыши, выберите из списка VPN-сеть и нажмите кнопку «Подключить» (отключение производится тем же способом):

Рисунок 1. Вид окна подключения в Windows 8.1

Рисунок 2. Вид окна подключения в Windows 7
Об успешном подключении говорит надпись «Подключено», под названием VPN-подключения:

Для отключения от VPN нажмите кнопку «Отключить»:

Прим.: опционально для настройки может быть указано, что необходимо отключить «Шлюз в удалённой сети». Для выполнения этой настройки перейдите к соответствующему разделу данной инструкции.
Как отключить шлюз в удаленной сети
Находясь на рабочем столе системы, одновременно зажмите комбинацию клавиш Win (клавиша с изображением логотипа Windows) + R. В появившемся окне «Выполнить», введите команду «control» (без кавычек):
В открывшемся окне «Все элементы панели управления» последовательно перейдите в разделы «Центр управления сетями и общим доступом» -> «Изменения параметров адаптера», кликните правой кнопкой мыши по ярлыку Вашего VPN-подключения и из контекстного меню выберите пункт «Свойства»:

В окне свойств VPN-подключения перейдите на вкладку «Сеть», выделите мышью компонент «IP версии 4 (TCP/IPv4)», нажмите кнопку «Свойства», в следующем окне нажмите кнопку «Дополнительно», в открывшемся окне «Дополнительные параметры TCP/IP» снимите галочку с пункта «Использовать основной шлюз в удалённо сети» и нажимайте кнопку «Ок» во всех открытых на предыдущих шагах окнах.

Learn how to correctly configure L2TP to avoid any errors on your PC
by Elena Constantinescu
Elena started writing professionally in 2010 and hasn’t stopped exploring the tech world since. With a firm grasp of software reviewing and content editing, she is always trying… read more
Updated on October 28, 2022
Reviewed by
Edgar Nicov

Since the dial-up Internet era, Edgar was interested in online resources. From forums to e-commerce websites, he started digging into how those resources could generate revenue. Today he… read more
- If you cannot connect to L2TP VPN on Windows 10, your VPN or OS is at fault.
- However, if it’s a VPN server-side issue, you must fix it there or contact the server admin.
- Our complete guide shows how to fix L2TP VPN connection issues on Windows 10 one step at a time.
- We prepared 12 solutions and 1 better alternative for your PC to prevent recurring problems.

If you created an L2TP VPN connection on Windows 10 but cannot connect, you can fix this problem by trying the workarounds in this guide.
L2TP is one of the most secure VPN protocols. It supports 256-bit encryption, which is highly recommended by privacy experts.
It’s meant to offer good VPN speed and a stable connection, so if your configuration isn’t working, make sure to tweak your setup.
Why is my L2TP VPN not working?
A failed L2TP VPN connection could occur due to several reasons, such as:
- Invalid username and password
- Inaccurate server name or address
- Wrong certificate or pre-shared key
- Bad proxy settings
- Faulty encryption settings on the server side
- Incorrect authentication settings
- The connection is blocked by your firewall
- The VPN server, client, or both are behind NAT
Our complete step-by-step guide below shows how to fix L2TP VPN connection issues on Windows 10. If possible, you should also check the L2TP connection settings on the VPN server.
Quick Tip:
Use a premium VPN instead. If you keep having problems with your current configuration, consider using a dedicated VPN app that’s way easier to configure.
ExpressVPN is a great alternative that supports L2TP/IPsec. The only thing you have to do is to install it and select the protocol in one click from settings.
ExpressVPN
Connect to ExpressVPN using its L2TP/IPsec protocol and get high-speed connections without any errors!
How do I fix L2TP VPN connection issues on Windows 10?
1. Check the username and password
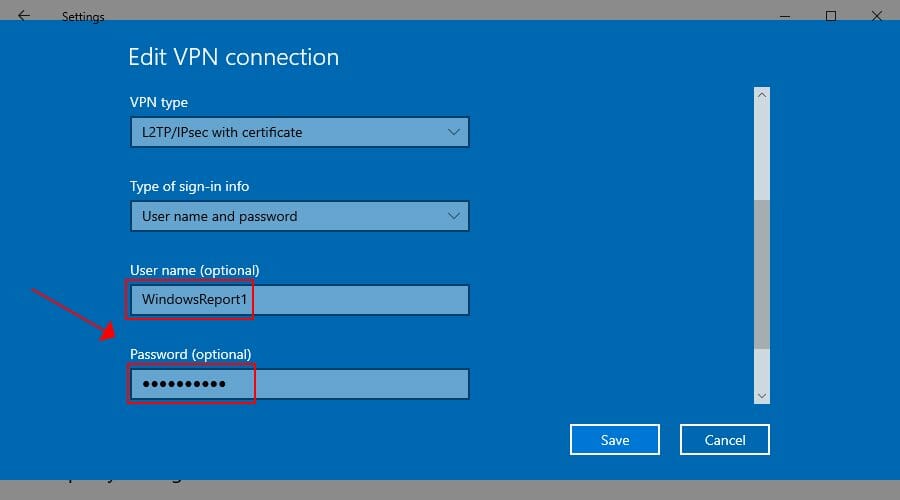
- Right-click the Start button and go to Network Connections.
- Click VPN on the left side.
- Select your L2TP VPN connection and click Advanced options.
- Press Edit.
- Retype your User name and Password.
- Click Save.
If your entered your VPN credentials wrong or if they were changed by the VPN server administrator in the meantime, then a simple update to your username and password should help if you cannot connect to L2TP VPN on Windows 10.
2. Check the server name or address
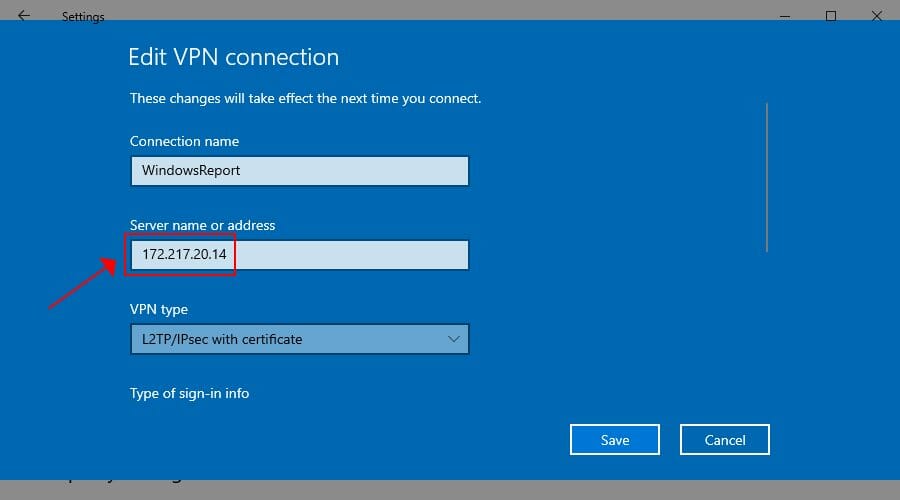
- Go to VPN settings and choose the L2TP VPN profile.
- Click Advanced options and then Edit.
- Retype your Server name or address or try a different one.
- Click Save.
The L2TP VPN connection problem could be caused by a simple typo made to your server name or address, so make sure to re-enter this information. Otherwise, the remote L2TP VPN server might not be working. In that case, you can try connecting to another server if possible.
3. Check the certificate or pre-shared key
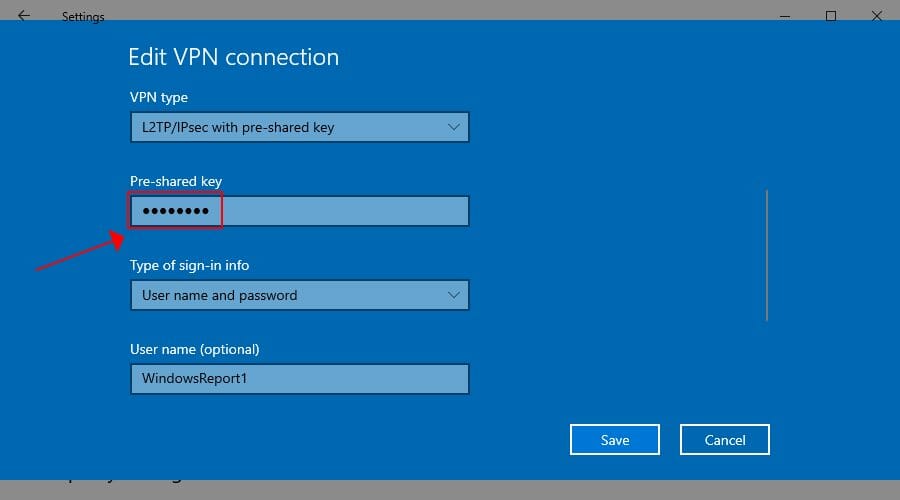
- Go to VPN settings and select your L2TP VPN connection.
- Click Advanced options and then Edit.
- Retype your Pre-shared key.
- Click Save.
Similar to the username and password situation, the pre-shared key you initially typed could have been wrong or changed by the VPN server administrator. After adding the new pre-shared key, try to connect to the L2TP VPN again to see if it works now.
However, if there’s an issue with the L2TP VPN certificate, there’s nothing you can do on the VPN client side. You have to either verify the certificate on the server or contact the administrator for help.
Alternatively, try switching between L2TP/IPsec with certificate and pre-shared key, in case the server admin changed the VPN type.
4. Check the VPN proxy settings
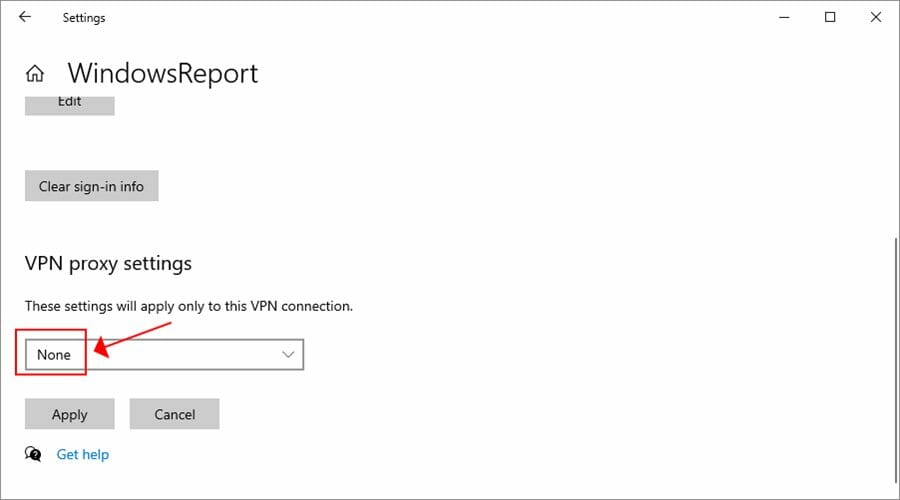
- Go to VPN settings and click your L2TP VPN profile.
- Select Advanced options.
- Scroll down to VPN proxy settings
- If you need to redirect your VPN connection to a proxy server, make sure the proxy settings are correct.
- Otherwise, remove the proxy by selecting None.
- Click Apply.
Even if you need to use a VPN proxy server, disable it temporarily and try to connect to L2TP VPN again to see if it’s really the proxy’s fault. It might not be working properly.
In that case, you should fix proxy server connection issues, use another proxy, or keep it disabled.
5. Check the encryption settings
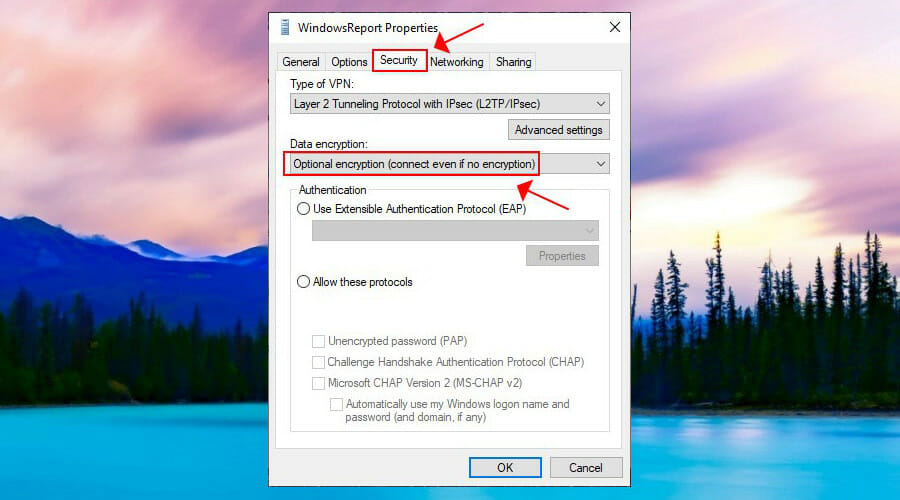
- Right-click the Start button and go to Network Connections.
- Click Change adapter options.
- Right-click your VPN connection and select Properties.
- Switch to the Security tab.
- Set Data encryption to Optional encryption (connect even if no encryption).
- Click OK.
If the VPN server has encryption issues, this could be the reason why you cannot connect to L2TP VPN on Windows 10. By making the encryption optional, you might be able to temporarily solve this problem.
However, encryption is a critical component of a VPN connection, so you should contact the VPN server administrator to fix this issue as soon as possible.
6. Check the authentication settings
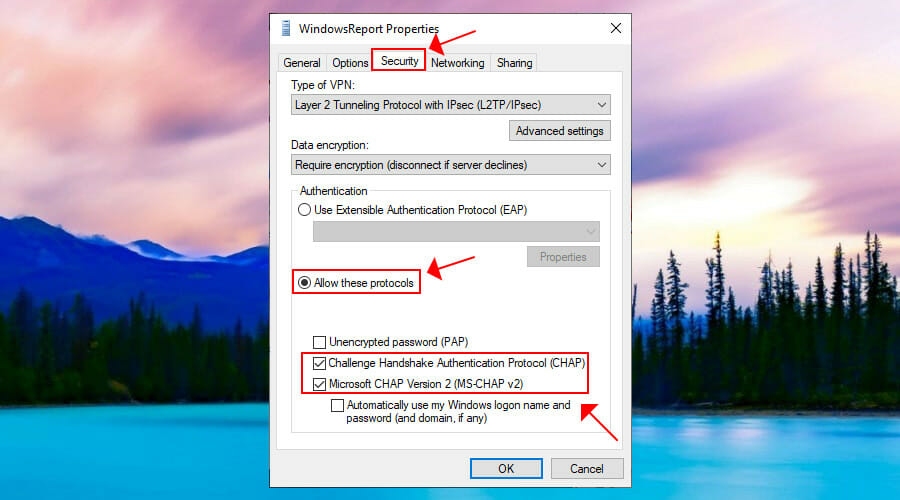
- Go to Network Connections > Change adapter options.
- Right-click your VPN and go to Properties.
- Switch to the Security tab.
- At Authentication, select Allow these protocols.
- Enable Challenge Handshake Authentication Protocol (CHAP).
- Enable Microsoft CHAP Version 2 (MS-CHAP v2).
- Click OK.
L2TP connection issues are typically caused by invalid VPN authentication settings. Try the configuration above to see if it works. Otherwise, you should get in touch with the VPN server administrator and request assistance.
7. Open L2TP ports in your firewall
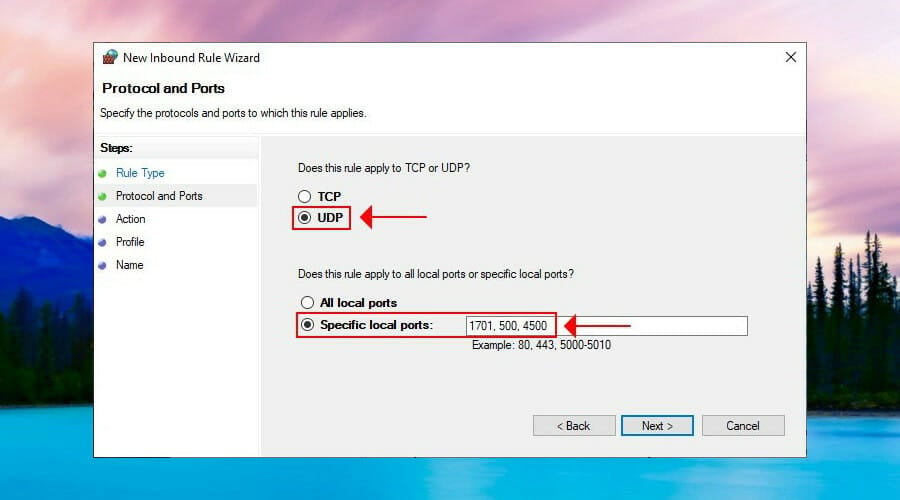
- Click the Start button, type firewall, and select Firewall & network connection.
- Click Advanced settings and Yes if prompted by UAC (User Account Control).
- Select Inbound Rules on the left side.
- Click New Rule on the right actions panel.
- At Rule Type, select Port.
- At Protocol and Ports, select UDP with Specific local ports and type 1701, 500, 4500.
- Set Action to Allow the connection if it is secure.
- Enter any rule name and click Finish.
- Go to Outbound Rules and do the same.
If your L2TP VPN connection gets blocked by the firewall, then you have to open the correct ports for sending and receiving network traffic. However, the firewall configuration above should also be made on the VPN server.
This solution can help fix The connection was terminated by the remote computer before it could be completed, also known as VPN error 628.
8. Make an easy tweak to the registry
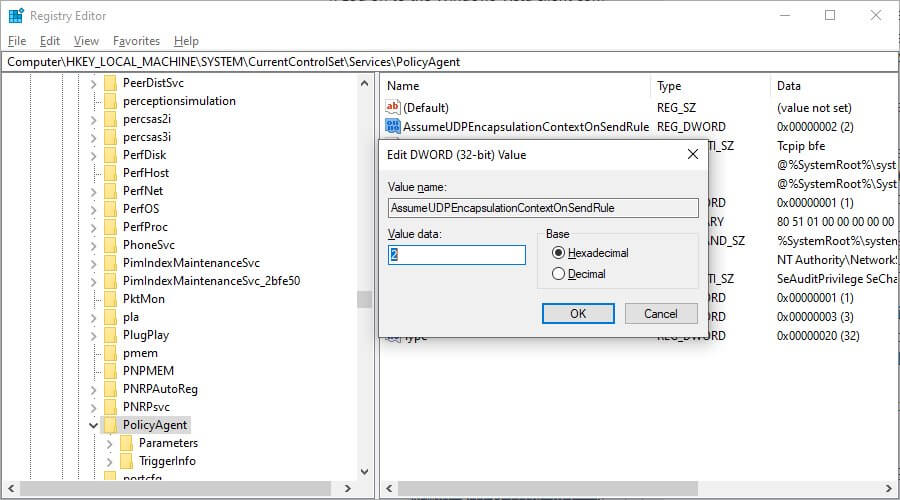
- Press Ctrl+R, type regedit, hold down Shift, and press Enter.
- Click Yes if prompted by User Account Control.
- Delete what’s inside the address bar on top.
- Paste the following address and press Enter:
HKEY_LOCAL_MACHINESYSTEMCurrentControlSetServicesPolicyAgent - Open Edit menu > New and click DWORD (32-bit) Value.
- Set AssumeUDPEncapsulationContextOnSendRule as the value name.
- Right-click AssumeUDPEncapsulationContextOnSendRule and press Modify.
- Set Value data to 2.
- Set Base to Hexadecimal.
- Click OK.
- Next, paste this address and hit Enter:
HKEY_LOCAL_MACHINESYSTEMCurrentControlSetServicesRasMan - Open Edit menu > New and click DWORD (32-bit) Value.
- Set ProhibitIpSec as the value name.
- Right-click ProhibitIpSec and click Modify.
- Set Value data to 0.
- Set Base to Hexadecimal.
- Click OK.
- Restart your computer.
If the VPN server, client, or both as behind a NAT, such as a home router, you can use the registry tweaks above to fix the NAT traversal problem.
A faster way to tweak the registry and make Windows 10 connect to L2TP VPN by entering a couple of lines of code in Command Prompt (look inside the article to see how).
9. Reinstall the network adapters
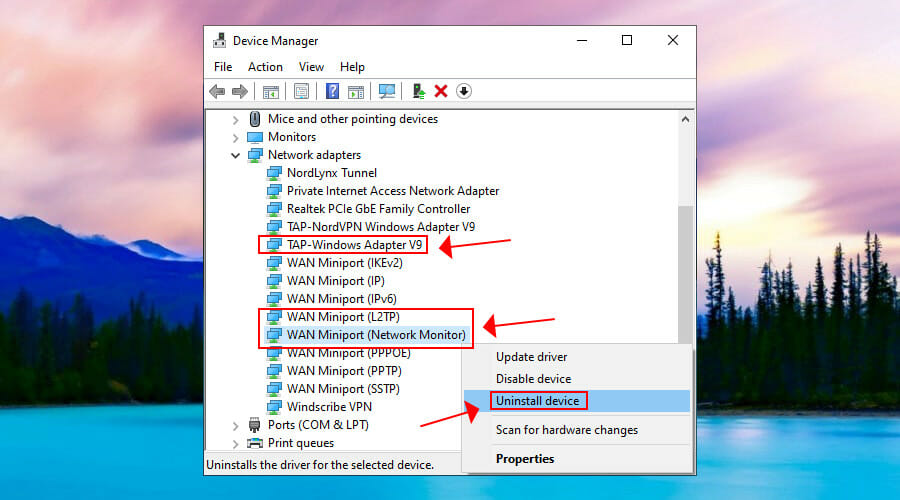
- Right-click the Start button and go to Device Manager.
- Expand the Network adapters menu.
- Right-click TAP-Windows Adapter V9 and select Uninstall device.
- Leave Delete the driver software for this device unchecked.
- Click Uninstall.
- Do the same for WAN Miniport (L2TP) and WAN Miniport (Network Monitor).
- Open the Action menu and select Scan for hardware changes.
If you uninstall the network adapters but without also removing the driver software, Windows will automatically reinstall them.
Fixing Windows 10 network adapter problems is a practical way to handle the L2TP VPN connection issue.
It can also help fix the L2TP connection attempt failed, also known as VPN error 789.
10. Update the network drivers
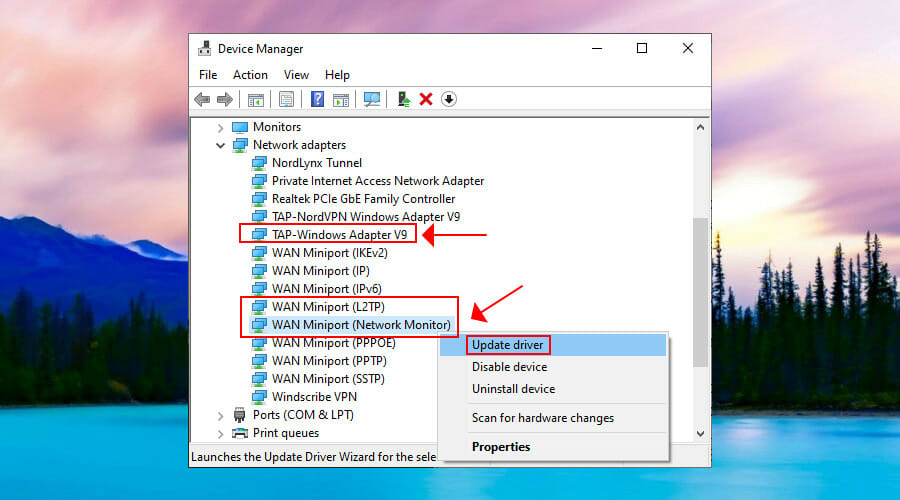
- Go to Device Manager and expand the Network adapters menu.
- Right-click TAP-Windows Adapter V9 and select Update Driver.
- Choose Search automatically for updated driver software.
- Follow the on-screen instructions.
- Do the same for WAN Miniport (L2TP) and WAN Miniport (Network Monitor).
If you receive The best drivers for your device are already installed message, you can look for newer driver versions in Windows Update, install the drivers manually, or find and install newer device drivers automatically using driver update tools.
11. Restart the IPsec service
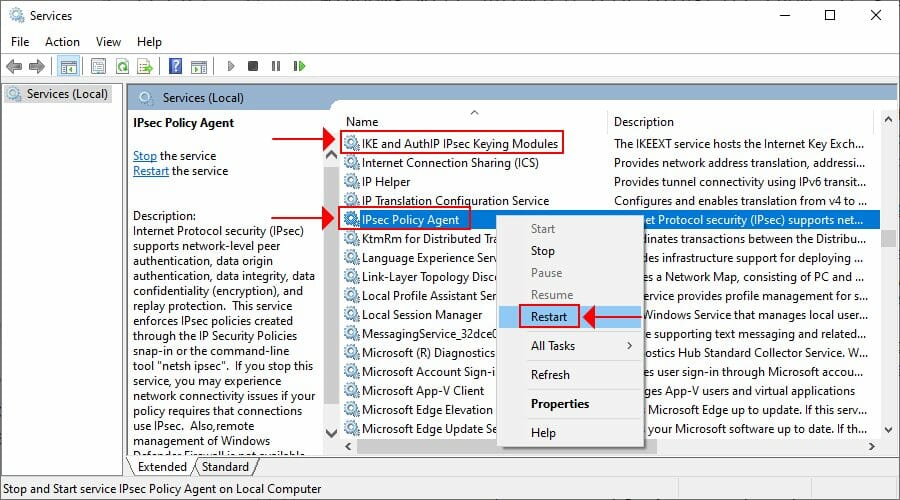
- Click the Start button, type Services, and press Enter.
- Find and right-click IKE and AuthIP IPsec Keying Modules.
- Press Restart (or Start if the service is stopped).
- Do the same for IPsec Policy Agent.
Windows 10 uses L2TP in combination with IPsec to establish a secure tunnel. If there’s a problem with IPsec, not with the L2TP, then you can restart its service.
It’s also a good way to fix VPN error 789.
12. Turn off Xbox Live Networking Service
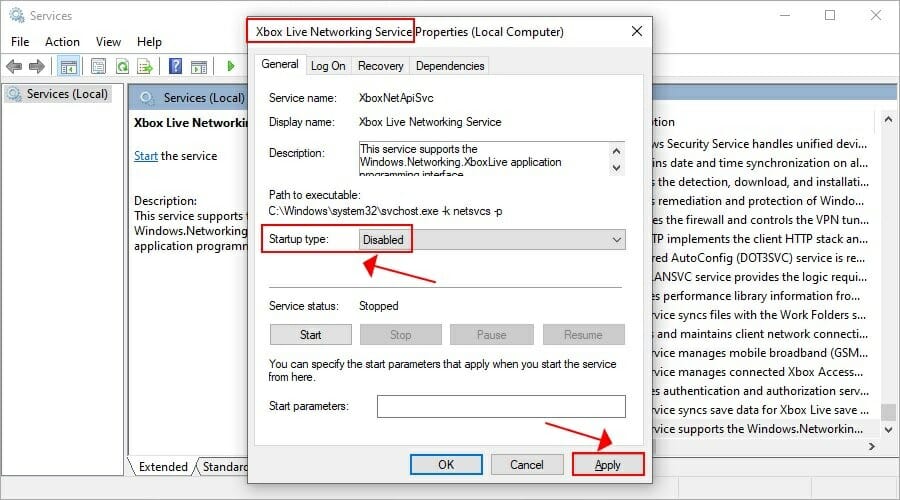
- Go to Services and locate Xbox Live Networking Service (last on the list).
- Double-click this entry and set Startup type to Disabled.
- Click Apply.
- Restart your PC.
Xbox Live Networking Service uses the IPsec protocol for chatting and multiplayer features. However, the Windows 10 L2TP VPN also uses IPsec. And many ISPs don’t permit two or more simultaneous IPsec connections.
Therefore, you can disable Xbox Live Networking Service to fix this problem, especially if you don’t play Xbox multiplayer games. This is also a workaround to fix VPN error 809.
In conclusion, the solutions above should help you if you cannot connect to L2TP VPN on Windows 10. However, if you don’t want to worry about such problems anymore, we suggest skipping to the 13th step and using ExpessVPN instead. It’s also the best VPN for Google Chrome.
Your connection is not secure — websites you visit can find out your details:

- Your IP Address:
loading

Companies can sell this information, alongside your location and internet provider name, and profit from it by serving targeted ads or monitoring your data usage.
We recommend Private Internet Access, a VPN with a no-log policy, open source code, ad blocking and much more; now 79% off.
![]()
Newsletter
Learn how to correctly configure L2TP to avoid any errors on your PC
by Elena Constantinescu
Elena started writing professionally in 2010 and hasn’t stopped exploring the tech world since. With a firm grasp of software reviewing and content editing, she is always trying… read more
Updated on October 28, 2022
Reviewed by
Edgar Nicov
Since the dial-up Internet era, Edgar was interested in online resources. From forums to e-commerce websites, he started digging into how those resources could generate revenue. Today he… read more
- If you cannot connect to L2TP VPN on Windows 10, your VPN or OS is at fault.
- However, if it’s a VPN server-side issue, you must fix it there or contact the server admin.
- Our complete guide shows how to fix L2TP VPN connection issues on Windows 10 one step at a time.
- We prepared 12 solutions and 1 better alternative for your PC to prevent recurring problems.
If you created an L2TP VPN connection on Windows 10 but cannot connect, you can fix this problem by trying the workarounds in this guide.
L2TP is one of the most secure VPN protocols. It supports 256-bit encryption, which is highly recommended by privacy experts.
It’s meant to offer good VPN speed and a stable connection, so if your configuration isn’t working, make sure to tweak your setup.
Why is my L2TP VPN not working?
A failed L2TP VPN connection could occur due to several reasons, such as:
- Invalid username and password
- Inaccurate server name or address
- Wrong certificate or pre-shared key
- Bad proxy settings
- Faulty encryption settings on the server side
- Incorrect authentication settings
- The connection is blocked by your firewall
- The VPN server, client, or both are behind NAT
Our complete step-by-step guide below shows how to fix L2TP VPN connection issues on Windows 10. If possible, you should also check the L2TP connection settings on the VPN server.
Quick Tip:
Use a premium VPN instead. If you keep having problems with your current configuration, consider using a dedicated VPN app that’s way easier to configure.
ExpressVPN is a great alternative that supports L2TP/IPsec. The only thing you have to do is to install it and select the protocol in one click from settings.
ExpressVPN
Connect to ExpressVPN using its L2TP/IPsec protocol and get high-speed connections without any errors!
How do I fix L2TP VPN connection issues on Windows 10?
1. Check the username and password
- Right-click the Start button and go to Network Connections.
- Click VPN on the left side.
- Select your L2TP VPN connection and click Advanced options.
- Press Edit.
- Retype your User name and Password.
- Click Save.
If your entered your VPN credentials wrong or if they were changed by the VPN server administrator in the meantime, then a simple update to your username and password should help if you cannot connect to L2TP VPN on Windows 10.
2. Check the server name or address
- Go to VPN settings and choose the L2TP VPN profile.
- Click Advanced options and then Edit.
- Retype your Server name or address or try a different one.
- Click Save.
The L2TP VPN connection problem could be caused by a simple typo made to your server name or address, so make sure to re-enter this information. Otherwise, the remote L2TP VPN server might not be working. In that case, you can try connecting to another server if possible.
3. Check the certificate or pre-shared key
- Go to VPN settings and select your L2TP VPN connection.
- Click Advanced options and then Edit.
- Retype your Pre-shared key.
- Click Save.
Similar to the username and password situation, the pre-shared key you initially typed could have been wrong or changed by the VPN server administrator. After adding the new pre-shared key, try to connect to the L2TP VPN again to see if it works now.
However, if there’s an issue with the L2TP VPN certificate, there’s nothing you can do on the VPN client side. You have to either verify the certificate on the server or contact the administrator for help.
Alternatively, try switching between L2TP/IPsec with certificate and pre-shared key, in case the server admin changed the VPN type.
4. Check the VPN proxy settings
- Go to VPN settings and click your L2TP VPN profile.
- Select Advanced options.
- Scroll down to VPN proxy settings
- If you need to redirect your VPN connection to a proxy server, make sure the proxy settings are correct.
- Otherwise, remove the proxy by selecting None.
- Click Apply.
Even if you need to use a VPN proxy server, disable it temporarily and try to connect to L2TP VPN again to see if it’s really the proxy’s fault. It might not be working properly.
In that case, you should fix proxy server connection issues, use another proxy, or keep it disabled.
5. Check the encryption settings
- Right-click the Start button and go to Network Connections.
- Click Change adapter options.
- Right-click your VPN connection and select Properties.
- Switch to the Security tab.
- Set Data encryption to Optional encryption (connect even if no encryption).
- Click OK.
If the VPN server has encryption issues, this could be the reason why you cannot connect to L2TP VPN on Windows 10. By making the encryption optional, you might be able to temporarily solve this problem.
However, encryption is a critical component of a VPN connection, so you should contact the VPN server administrator to fix this issue as soon as possible.
6. Check the authentication settings
- Go to Network Connections > Change adapter options.
- Right-click your VPN and go to Properties.
- Switch to the Security tab.
- At Authentication, select Allow these protocols.
- Enable Challenge Handshake Authentication Protocol (CHAP).
- Enable Microsoft CHAP Version 2 (MS-CHAP v2).
- Click OK.
L2TP connection issues are typically caused by invalid VPN authentication settings. Try the configuration above to see if it works. Otherwise, you should get in touch with the VPN server administrator and request assistance.
7. Open L2TP ports in your firewall
- Click the Start button, type firewall, and select Firewall & network connection.
- Click Advanced settings and Yes if prompted by UAC (User Account Control).
- Select Inbound Rules on the left side.
- Click New Rule on the right actions panel.
- At Rule Type, select Port.
- At Protocol and Ports, select UDP with Specific local ports and type 1701, 500, 4500.
- Set Action to Allow the connection if it is secure.
- Enter any rule name and click Finish.
- Go to Outbound Rules and do the same.
If your L2TP VPN connection gets blocked by the firewall, then you have to open the correct ports for sending and receiving network traffic. However, the firewall configuration above should also be made on the VPN server.
This solution can help fix The connection was terminated by the remote computer before it could be completed, also known as VPN error 628.
8. Make an easy tweak to the registry
- Press Ctrl+R, type regedit, hold down Shift, and press Enter.
- Click Yes if prompted by User Account Control.
- Delete what’s inside the address bar on top.
- Paste the following address and press Enter:
HKEY_LOCAL_MACHINESYSTEMCurrentControlSetServicesPolicyAgent - Open Edit menu > New and click DWORD (32-bit) Value.
- Set AssumeUDPEncapsulationContextOnSendRule as the value name.
- Right-click AssumeUDPEncapsulationContextOnSendRule and press Modify.
- Set Value data to 2.
- Set Base to Hexadecimal.
- Click OK.
- Next, paste this address and hit Enter:
HKEY_LOCAL_MACHINESYSTEMCurrentControlSetServicesRasMan - Open Edit menu > New and click DWORD (32-bit) Value.
- Set ProhibitIpSec as the value name.
- Right-click ProhibitIpSec and click Modify.
- Set Value data to 0.
- Set Base to Hexadecimal.
- Click OK.
- Restart your computer.
If the VPN server, client, or both as behind a NAT, such as a home router, you can use the registry tweaks above to fix the NAT traversal problem.
A faster way to tweak the registry and make Windows 10 connect to L2TP VPN by entering a couple of lines of code in Command Prompt (look inside the article to see how).
9. Reinstall the network adapters
- Right-click the Start button and go to Device Manager.
- Expand the Network adapters menu.
- Right-click TAP-Windows Adapter V9 and select Uninstall device.
- Leave Delete the driver software for this device unchecked.
- Click Uninstall.
- Do the same for WAN Miniport (L2TP) and WAN Miniport (Network Monitor).
- Open the Action menu and select Scan for hardware changes.
If you uninstall the network adapters but without also removing the driver software, Windows will automatically reinstall them.
Fixing Windows 10 network adapter problems is a practical way to handle the L2TP VPN connection issue.
It can also help fix the L2TP connection attempt failed, also known as VPN error 789.
10. Update the network drivers
- Go to Device Manager and expand the Network adapters menu.
- Right-click TAP-Windows Adapter V9 and select Update Driver.
- Choose Search automatically for updated driver software.
- Follow the on-screen instructions.
- Do the same for WAN Miniport (L2TP) and WAN Miniport (Network Monitor).
If you receive The best drivers for your device are already installed message, you can look for newer driver versions in Windows Update, install the drivers manually, or find and install newer device drivers automatically using driver update tools.
11. Restart the IPsec service
- Click the Start button, type Services, and press Enter.
- Find and right-click IKE and AuthIP IPsec Keying Modules.
- Press Restart (or Start if the service is stopped).
- Do the same for IPsec Policy Agent.
Windows 10 uses L2TP in combination with IPsec to establish a secure tunnel. If there’s a problem with IPsec, not with the L2TP, then you can restart its service.
It’s also a good way to fix VPN error 789.
12. Turn off Xbox Live Networking Service
- Go to Services and locate Xbox Live Networking Service (last on the list).
- Double-click this entry and set Startup type to Disabled.
- Click Apply.
- Restart your PC.
Xbox Live Networking Service uses the IPsec protocol for chatting and multiplayer features. However, the Windows 10 L2TP VPN also uses IPsec. And many ISPs don’t permit two or more simultaneous IPsec connections.
Therefore, you can disable Xbox Live Networking Service to fix this problem, especially if you don’t play Xbox multiplayer games. This is also a workaround to fix VPN error 809.
In conclusion, the solutions above should help you if you cannot connect to L2TP VPN on Windows 10. However, if you don’t want to worry about such problems anymore, we suggest skipping to the 13th step and using ExpessVPN instead. It’s also the best VPN for Google Chrome.
Your connection is not secure — websites you visit can find out your details:
-
- Your IP Address:
loading
Companies can sell this information, alongside your location and internet provider name, and profit from it by serving targeted ads or monitoring your data usage.
We recommend Private Internet Access, a VPN with a no-log policy, open source code, ad blocking and much more; now 79% off.
![]()