Что это за программа и обязательно ли должна быть установлена на ноутбуке?
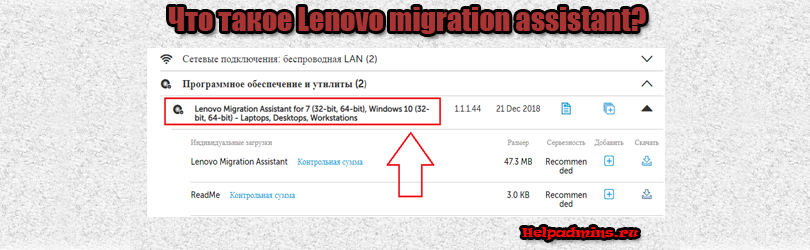
Практически для любого ноутбука фирмы Lenovo на официальном сайте поддержки в разделе “Программное обеспечение и утилиты” для загрузки доступна программа Lenovo migration assistant. Также ее можно встретить на ноутбуках того же производителя с предустановленной версией Windows.
Что это такое, для чего нужно и обязательно ли наличие на ноутбуке вы узнаете из данной статьи.
Что программа умеет делать?
Основным и единственным назначением фирменной утилиты Lenovo migration assistant является быстрый и удобный перенос данных и настроек со старого ноутбука на новый.
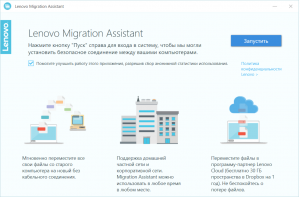
Главное окно программы
Закладки браузера, настройки Microsoft Office, электронная почта, документы и загрузки всего за несколько кликов мышкой будут перенесены с одного ноутбука на другой.
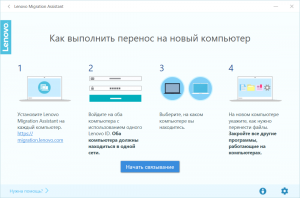
Как работает lenovo migration assistant?
Главное условие – расположение старого и нового ноутбуков в одной сети, то есть подключение к одной точке Wi-Fi.
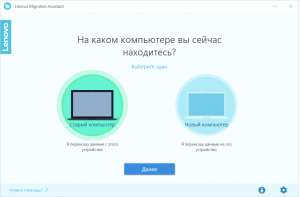
Выбор ноутбука
Далее устанавливаете программу на обеих ноутбуках, входите под одним и тем же Lenovo ID, выбираете переносимые данные, подключаетесь к новому ноутбуку и переносите все что нужно на него.
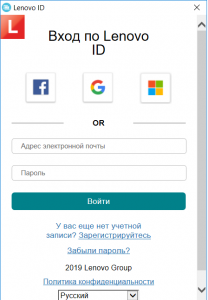
Вход в учетную запись Lenovo ID
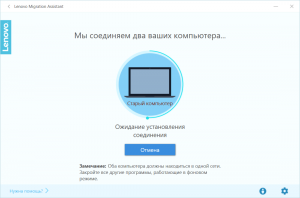
Установка связи между ноутбуками для переноса данных
Вывод
Таким образом можно сделать вывод, что Lenovo migration assistant не относится к обязательным программам. Все те возможности, которые она предоставляет, можно использовать и без нее. Например, перенести все через флешку или через облачное хранилище.
Если вы не собираетесь переносить данные между ноутбуками, то смело можете удалять данное приложение.
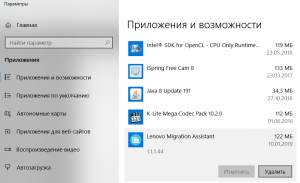
Удаление утилиты
Лучшая благодарность автору — репост к себе на страничку:
 Приветствую всех
  Сегодня мы будем разбираться с Lenovo Migration Assistant — я расскажу что это за программа простыми словами. Информации немного, но удалось выяснить, что эта программа может помочь пользователям перенести личные данные со старого компьютера на новый.
Некоторые мои мыслишки:
- Есть вариант быстрого переноса минимальных личных данных, и вариант, когда вы сами указываете какие данные переносить. Также данные можно.. перенести в облако Dropbox

- В общем примерно понятно, это фирменная программа от Lenovo для переноса личных файлов. Я такие программы не особо люблю, кажется такое дело лучше сделать самостоятельно.
- С другой стороны, например, если вы пользуетесь Хромом, то его можно и не переносить — достаточно создать учетную запись Гугле и синхронизировать все данные Хрома с учеткой.
- В итоге на новом компьютере вам останется только установить Хром, ввести логин и пароль, и все ваши данные восстановятся — закладки, расширения, история и остальное. Это удобно.
По поводу остальных программ — в некоторых можно сохранить настройки в файл конфигурации и потом этот файл перенести, ну а личные файлы уж лучше вручную переносить — все это скопировать на флешку или.. в облако, если вы продвинутый юзер
В общем я все к тому, что можно обойтись и без программы Lenovo Migration Assistant, как мне кажется.
Вот нашел картинку где мы видим, что можно выбрать папки/файлы на старом ПК для переноса:

Это все можно выбрать на вкладке Files/Folders, а вот на вкладке File Types можно указать типы файлов для переноса. То есть выбираете или первая вкладка или вторая, вместе наверно нельзя. Кстати судя по названию окна.. то программа называется так — System Migration Assistant 
Галочками можно отметить программы, настройки которых нужно перенести. Смотрите, можно перенести настройки Microsoft Access, Tablet OS Settings (не знаю что это за прога), Microsoft Windows Media Player:

Не совсем понятно что здесь, но кажется это.. нужно указать что вы хотите сделать, то есть какую именно задачу запустить:

На этом все. Удачи вам. До новых встреч! 
На главную!
17.11.2018
| Workable Solutions | Step-by-step Troubleshooting |
|---|---|
| Lenovo Migration Assistant |
Mode 1: The Same Local Network…Full steps Mode 2: USB…Full steps |
| Alternatives of Lenovo Migration Assistant | Solution 1: EaseUS Todo PCTrans…Full steps Solution 2: Shared Folder…Full steps Solution 3: Email…Full steps Solution 4: Cloud device…Full steps |
Lenovo Migration Assistant (LMA) is a fast, and smart file transfer tool in Windows. In this post, we will introduce what Lenovo Migration Assistant is and how to use it. Besides, the alternatives to windows easy transfer tool are on the list.
Ready to enjoy your new PC? Upgrade your computer is cool, but how to seamlessly migrate files and settings from the old one may confuse you. You may hear about Lenovo Migration Assistant but don’t know how to use it.
Lenovo Migration Assistant is a file and setting transfer software released by Lenovo, aiming to help move files and the account settings of your new PC. Here are the main features of LMA: log in with Lenovo ID, fast migration for minimum user data, user-defined migration for files selection, and cloud-based migration. It is available on Microsoft Windows 7 (32-bit, 64-bit) and Microsoft Windows 10 (32-bit, 64-bit).
As the data migration tool we mentioned, you may want to download migration assistant for transferring files and setup to another new computer. Go ahead! And we will let you know how to use migration assistant in the next part.
How to Use Lenovo Migration Assistant
To meet users’ need to move data in Windows, Lenovo Migration Assistant prepares two modes for LAN users or USB users. Try one of the methods on the following guide:
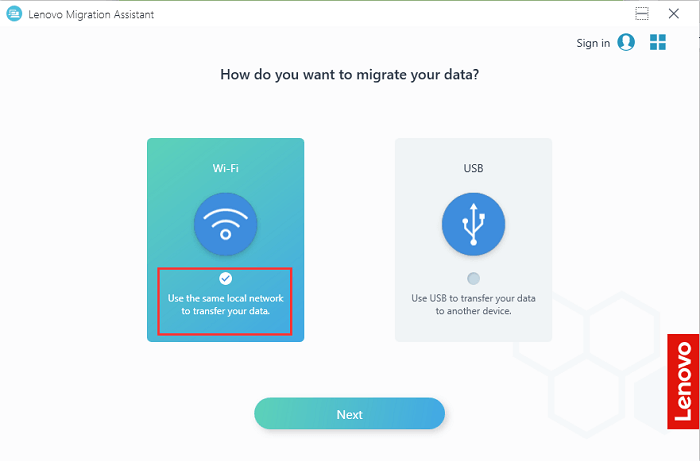
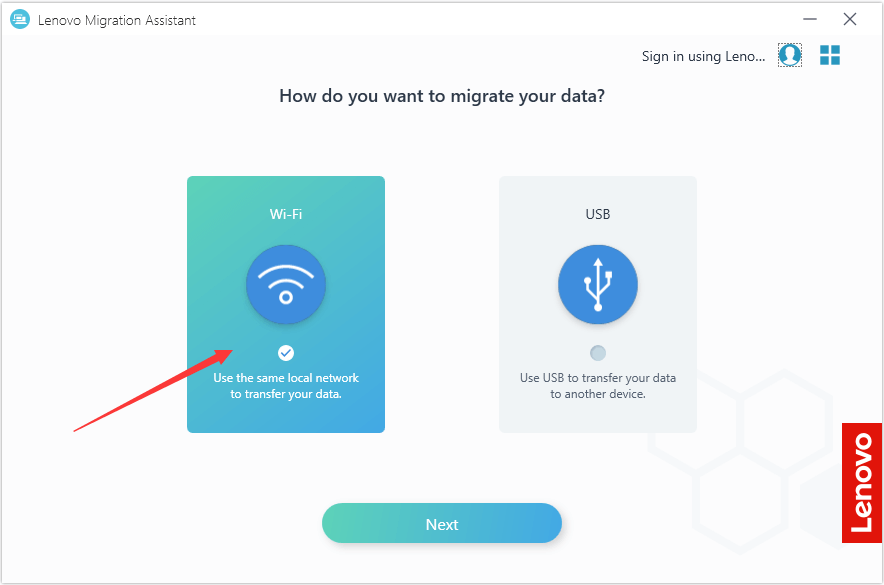
Mode 1: Use the same local network to transfer your data.
If your two PCs are on the same LAN network, Mode 1 is the best choice. It supports transferring files and other data from PC to PC without any external devices.
Step 1. Download and Launch the Lenovo Migration Assistant on both PCs.
Step 2. Choose the WiFi option on the left side and click Next.
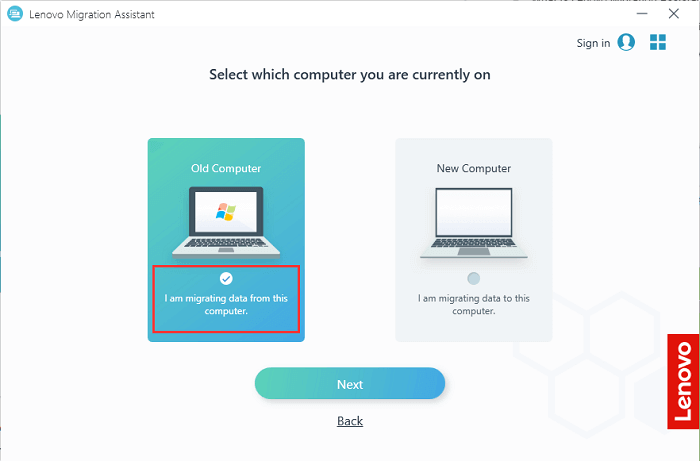
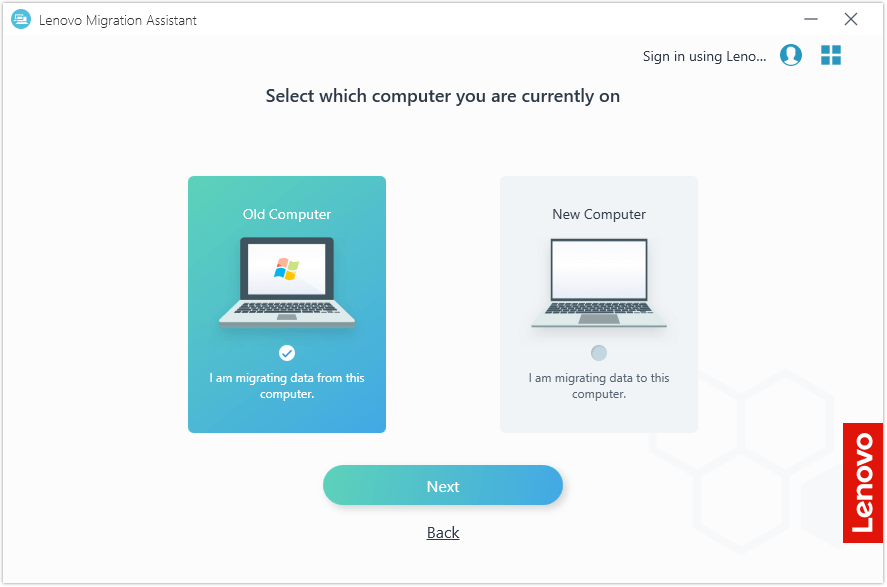
Step 3. Select which computer you are currently on. For the local PC, choose Old Computer; for the remote computer, choose New Computer. Click Next.
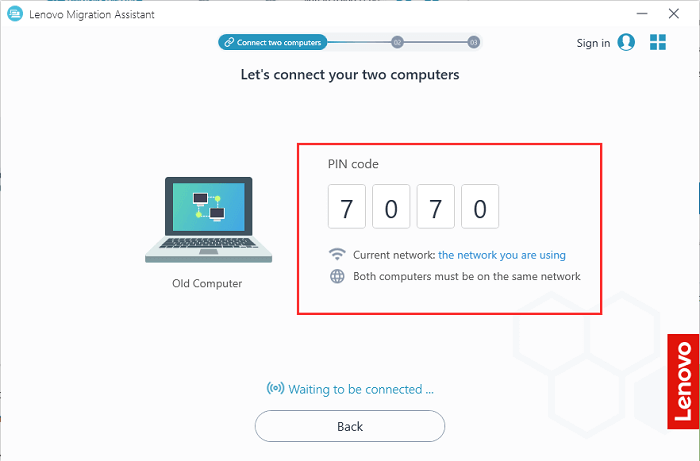
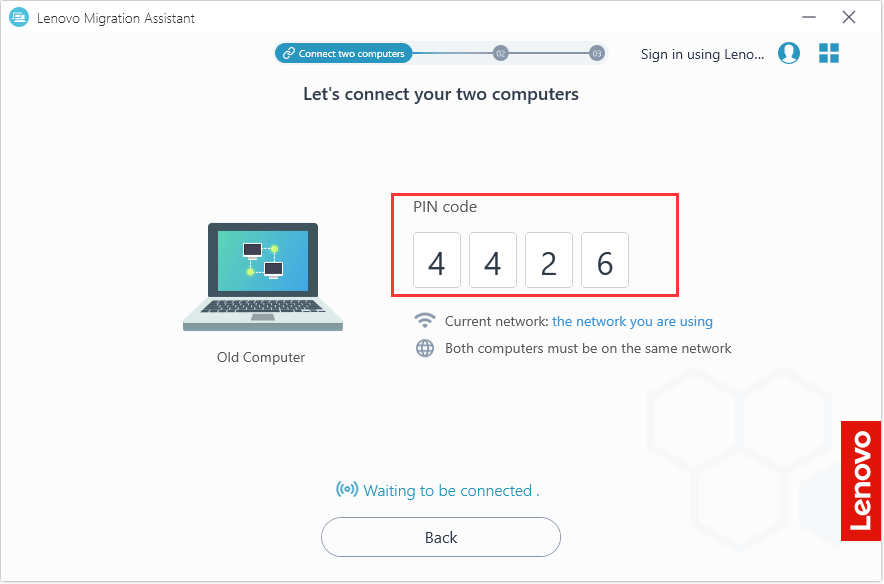
Step 4. Then you can see a PIN code. File it on the target PC for connecting.
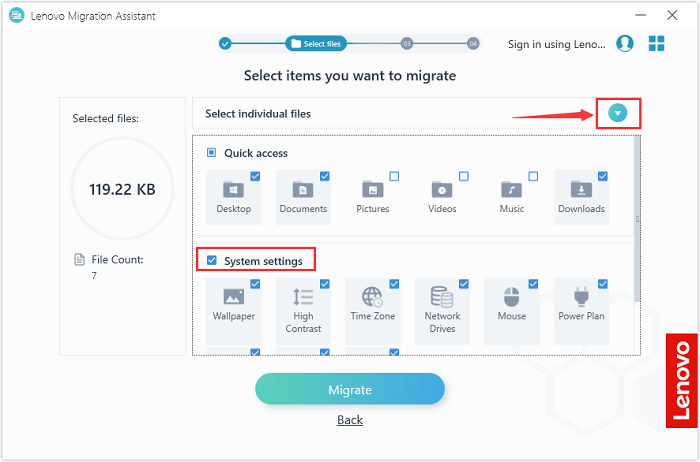
Step 5. After the connection between two computers, you can select items you want to migrate.
You can choose Quick Access or System Settings to customize your preferred files or settings. Or you can select the arrow icon to select more individual files.
Step 6. Lenovo Migration Assistant will migrate the selected data.
- Tip
- The transferred files will be saved in the same storage path on the new PC.
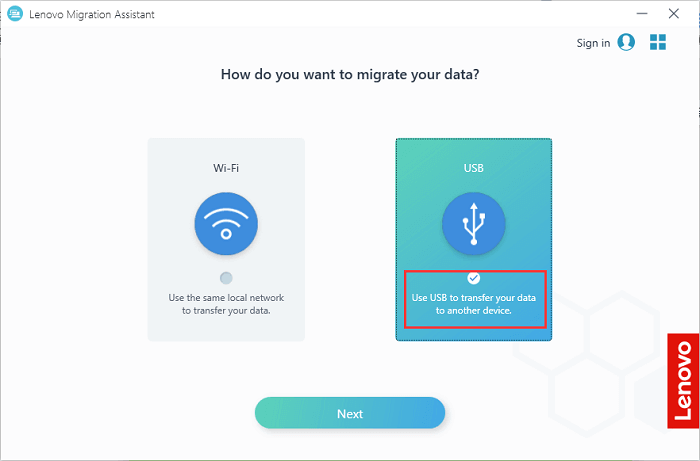
Mode 2:Use USB to transfer your data to another device.
If your two devices are not on the same network, you can use USB to migrate data with one click. It also works well for saving time than copy and paste.
Step 1. Download and Launch the Lenovo Migration Assistant on both PCs.
Step 2. Connect your USB to the source computer and choose the USB option.
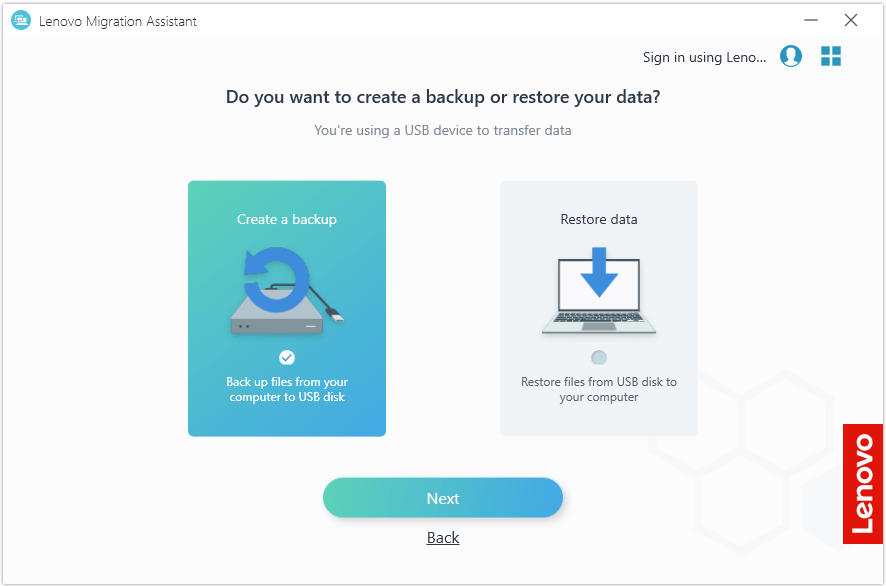
Step 3. Choose Create a backup to back up files from your computer to USB disk. Click Next.
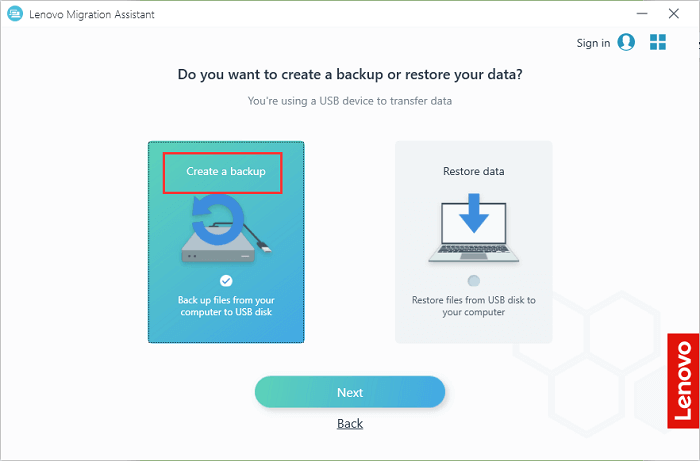
Step 4. It will detect your inserted USB, and you can choose the preferred files to back up. LMA will create a backup file on your USB.
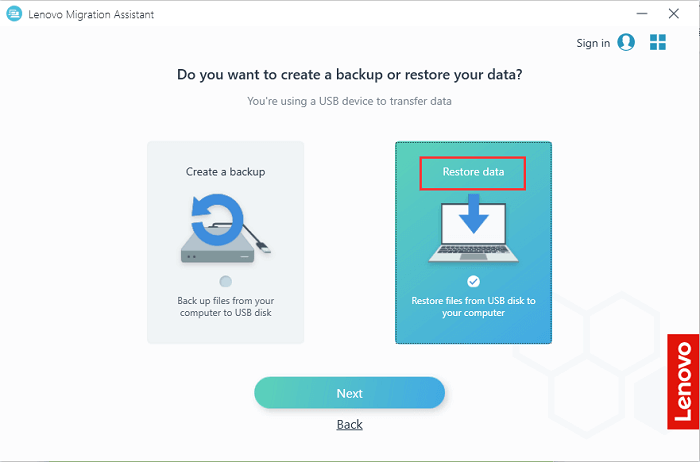
Step 5. Connect the USB to the target computer. Choose USB and Restore data to restore files from USB disk to your computer.
Step 6. Select the backup you want to restore and click Migrate.
Alternatives of Lenovo Migration Assistant
According to comments on the Reddit forum or other platforms, the problem appears, such as the migration assistant not working or migration assistant stuck. We have no idea why the difficulties arise, but we can let you view some alternatives of Lenovo Migration Assistant to transfer files from PC to PC.
#1. EaseUS Todo PCTrans
#2. Shared Folder
#3. Email
#4. Cloud
Solution 1: Using EaseUS Todo PCTrans.
Were you looking for another windows migration tool? EaseUS Todo PCTrans is a straightforward software designed to do PC transfer, including files, applications, and accounts. Here we set WiFi transfer as an example:
Step 1. Launch EaseUS Todo PCTrans on your source and target computers, connect both PCs via the internet.
1. At the «PC to PC» section, click «PC to PC» to continue.

2. Select your target computer via its device name, then enter its account password or verification code and select the transfer direction. Then click «Connect» to continue.
You can check the verification code on the right top of «PC to PC» mainscreen on the target computer.

Step 2. Select the categories Applications, Files, and Accounts to transfer via the internet.
If you want to transfer data selectively, click «Edit» under each category, and choose the specific items.

Step 3. Click «Transfer» to start transferring your apps/files/accounts from one computer to another computer via the Internet.

Solution 2: Create a Shared Folder.
You can create a shared folder to share files over the network. The solution is more complicated than the first one.
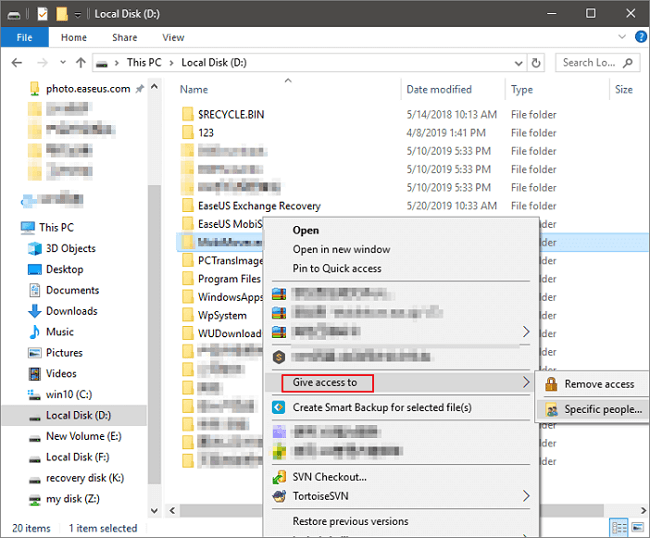
Step 1. Right-click the files > Give access to > Specific people
Step 2. Select a user or group to add > Add > Click Share
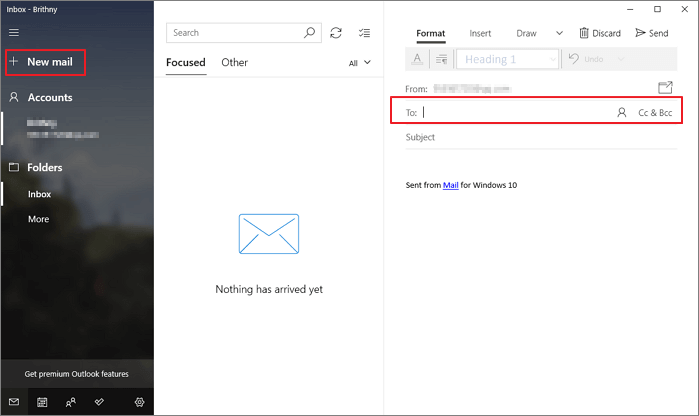
Solution 3: Use Email.
You can send an email from the old computer, then log in to your email account on the new PC. It is available for transferring small size data.
Step 1. Add file to email.
Step 2. Log in email account on the new one > Download files
Solution 4: Use Cloud device.
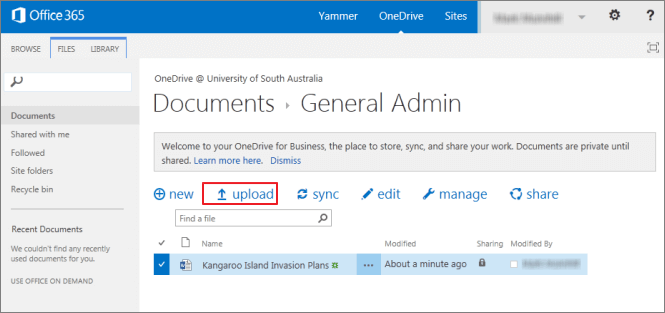
Make sure your Cloud has enough space for data transfer. Let’s take OneDrive as an example.
Step 1. Upload files to OneDrive.
Step 2. Download files on the new PC.
| Workable Solutions | Step-by-step Troubleshooting |
|---|---|
| Lenovo Migration Assistant |
Mode 1: The Same Local Network…Full steps Mode 2: USB…Full steps |
| Alternatives of Lenovo Migration Assistant | Solution 1: EaseUS Todo PCTrans…Full steps Solution 2: Shared Folder…Full steps Solution 3: Email…Full steps Solution 4: Cloud device…Full steps |
Lenovo Migration Assistant (LMA) is a fast, and smart file transfer tool in Windows. In this post, we will introduce what Lenovo Migration Assistant is and how to use it. Besides, the alternatives to windows easy transfer tool are on the list.
Ready to enjoy your new PC? Upgrade your computer is cool, but how to seamlessly migrate files and settings from the old one may confuse you. You may hear about Lenovo Migration Assistant but don’t know how to use it.
Lenovo Migration Assistant is a file and setting transfer software released by Lenovo, aiming to help move files and the account settings of your new PC. Here are the main features of LMA: log in with Lenovo ID, fast migration for minimum user data, user-defined migration for files selection, and cloud-based migration. It is available on Microsoft Windows 7 (32-bit, 64-bit) and Microsoft Windows 10 (32-bit, 64-bit).
As the data migration tool we mentioned, you may want to download migration assistant for transferring files and setup to another new computer. Go ahead! And we will let you know how to use migration assistant in the next part.
How to Use Lenovo Migration Assistant
To meet users’ need to move data in Windows, Lenovo Migration Assistant prepares two modes for LAN users or USB users. Try one of the methods on the following guide:
Mode 1: Use the same local network to transfer your data.
If your two PCs are on the same LAN network, Mode 1 is the best choice. It supports transferring files and other data from PC to PC without any external devices.
Step 1. Download and Launch the Lenovo Migration Assistant on both PCs.
Step 2. Choose the WiFi option on the left side and click Next.
Step 3. Select which computer you are currently on. For the local PC, choose Old Computer; for the remote computer, choose New Computer. Click Next.
Step 4. Then you can see a PIN code. File it on the target PC for connecting.
Step 5. After the connection between two computers, you can select items you want to migrate.
You can choose Quick Access or System Settings to customize your preferred files or settings. Or you can select the arrow icon to select more individual files.
Step 6. Lenovo Migration Assistant will migrate the selected data.
- Tip
- The transferred files will be saved in the same storage path on the new PC.
Mode 2:Use USB to transfer your data to another device.
If your two devices are not on the same network, you can use USB to migrate data with one click. It also works well for saving time than copy and paste.
Step 1. Download and Launch the Lenovo Migration Assistant on both PCs.
Step 2. Connect your USB to the source computer and choose the USB option.
Step 3. Choose Create a backup to back up files from your computer to USB disk. Click Next.
Step 4. It will detect your inserted USB, and you can choose the preferred files to back up. LMA will create a backup file on your USB.
Step 5. Connect the USB to the target computer. Choose USB and Restore data to restore files from USB disk to your computer.
Step 6. Select the backup you want to restore and click Migrate.
Alternatives of Lenovo Migration Assistant
According to comments on the Reddit forum or other platforms, the problem appears, such as the migration assistant not working or migration assistant stuck. We have no idea why the difficulties arise, but we can let you view some alternatives of Lenovo Migration Assistant to transfer files from PC to PC.
#1. EaseUS Todo PCTrans
#2. Shared Folder
#3. Email
#4. Cloud
Solution 1: Using EaseUS Todo PCTrans.
Were you looking for another windows migration tool? EaseUS Todo PCTrans is a straightforward software designed to do PC transfer, including files, applications, and accounts. Here we set WiFi transfer as an example:
Step 1. Launch EaseUS Todo PCTrans on your source and target computers, connect both PCs via the internet.
1. At the «PC to PC» section, click «PC to PC» to continue.
2. Select your target computer via its device name, then enter its account password or verification code and select the transfer direction. Then click «Connect» to continue.
You can check the verification code on the right top of «PC to PC» mainscreen on the target computer.
Step 2. Select the categories Applications, Files, and Accounts to transfer via the internet.
If you want to transfer data selectively, click «Edit» under each category, and choose the specific items.
Step 3. Click «Transfer» to start transferring your apps/files/accounts from one computer to another computer via the Internet.
Solution 2: Create a Shared Folder.
You can create a shared folder to share files over the network. The solution is more complicated than the first one.
Step 1. Right-click the files > Give access to > Specific people
Step 2. Select a user or group to add > Add > Click Share
Solution 3: Use Email.
You can send an email from the old computer, then log in to your email account on the new PC. It is available for transferring small size data.
Step 1. Add file to email.
Step 2. Log in email account on the new one > Download files
Solution 4: Use Cloud device.
Make sure your Cloud has enough space for data transfer. Let’s take OneDrive as an example.
Step 1. Upload files to OneDrive.
Step 2. Download files on the new PC.
Содержание
- Lenovo Migration Assistant что это за программа?
- Lenovo migration assistant что это за программа
- Что программа умеет делать?
- Вывод
- Добавить комментарий Отменить ответ
- Lenovo Migration Assistant
- Basta de dolores de cabeza
- Súper fácil
- Seguro y rápido
- ¿Por qué esperar?
- PAGA CON CUALQUIERA DE ESTOS MÉTODOS DE PAGO:
- Lenovo Migration Assistant
- Basta de dolores de cabeza
- Súper fácil
- Seguro y rápido
- ¿Por qué esperar?
- PAGA CON CUALQUIERA DE ESTOS MÉTODOS DE PAGO:
- [2022 Update] How to Use Lenovo Migration Assistant and its Alternatives
- What is Lenovo Migration Assistant
- How to Use Lenovo Migration Assistant
- Mode 1: Use the same local network to transfer your data.
- Mode 2пјљUse USB to transfer your data to another device.
- Alternatives of Lenovo Migration Assistant
- Solution 1. Using EaseUS Todo PCTrans.В
- Solution 2. Create a Shared Folder.
- Solution 3: Use Email.
- Solution 4: Use Cloud device.
Lenovo Migration Assistant что это за программа?
Приветствую всех Сегодня мы будем разбираться с Lenovo Migration Assistant — я расскажу что это за программа простыми словами. Информации немного, но удалось выяснить, что эта программа может помочь пользователям перенести личные данные со старого компьютера на новый.
Некоторые мои мыслишки:
По поводу остальных программ — в некоторых можно сохранить настройки в файл конфигурации и потом этот файл перенести, ну а личные файлы уж лучше вручную переносить — все это скопировать на флешку или.. в облако, если вы продвинутый юзер
В общем я все к тому, что можно обойтись и без программы Lenovo Migration Assistant, как мне кажется.
Вот нашел картинку где мы видим, что можно выбрать папки/файлы на старом ПК для переноса:
Это все можно выбрать на вкладке Files/Folders, а вот на вкладке File Types можно указать типы файлов для переноса. То есть выбираете или первая вкладка или вторая, вместе наверно нельзя. Кстати судя по названию окна.. то программа называется так — System Migration Assistant
Галочками можно отметить программы, настройки которых нужно перенести. Смотрите, можно перенести настройки Microsoft Access, Tablet OS Settings (не знаю что это за прога), Microsoft Windows Media Player:
Не совсем понятно что здесь, но кажется это.. нужно указать что вы хотите сделать, то есть какую именно задачу запустить:
На этом все. Удачи вам. До новых встреч!
Источник
Lenovo migration assistant что это за программа
Практически для любого ноутбука фирмы Lenovo на официальном сайте поддержки в разделе «Программное обеспечение и утилиты» для загрузки доступна программа Lenovo migration assistant. Также ее можно встретить на ноутбуках того же производителя с предустановленной версией Windows.
Что это такое, для чего нужно и обязательно ли наличие на ноутбуке вы узнаете из данной статьи.
Что программа умеет делать?
Основным и единственным назначением фирменной утилиты Lenovo migration assistant является быстрый и удобный перенос данных и настроек со старого ноутбука на новый.
Главное окно программы
Закладки браузера, настройки Microsoft Office, электронная почта, документы и загрузки всего за несколько кликов мышкой будут перенесены с одного ноутбука на другой.
Как работает lenovo migration assistant?
Главное условие — расположение старого и нового ноутбуков в одной сети, то есть подключение к одной точке Wi-Fi.
Далее устанавливаете программу на обеих ноутбуках, входите под одним и тем же Lenovo ID, выбираете переносимые данные, подключаетесь к новому ноутбуку и переносите все что нужно на него.
Вход в учетную запись Lenovo ID
Установка связи между ноутбуками для переноса данных
Вывод
Таким образом можно сделать вывод, что Lenovo migration assistant не относится к обязательным программам. Все те возможности, которые она предоставляет, можно использовать и без нее. Например, перенести все через флешку или через облачное хранилище.
Если вы не собираетесь переносить данные между ноутбуками, то смело можете удалять данное приложение.
 Приветствую всех
  Сегодня мы будем разбираться с Lenovo Migration Assistant — я расскажу что это за программа простыми словами. Информации немного, но удалось выяснить, что эта программа может помочь пользователям перенести личные данные со старого компьютера на новый.
Некоторые мои мыслишки:
По поводу остальных программ — в некоторых можно сохранить настройки в файл конфигурации и потом этот файл перенести, ну а личные файлы уж лучше вручную переносить — все это скопировать на флешку или.. в облако, если вы продвинутый юзер
В общем я все к тому, что можно обойтись и без программы Lenovo Migration Assistant, как мне кажется.
Вот нашел картинку где мы видим, что можно выбрать папки/файлы на старом ПК для переноса:

Это все можно выбрать на вкладке Files/Folders, а вот на вкладке File Types можно указать типы файлов для переноса. То есть выбираете или первая вкладка или вторая, вместе наверно нельзя. Кстати судя по названию окна.. то программа называется так — System Migration Assistant 
Галочками можно отметить программы, настройки которых нужно перенести. Смотрите, можно перенести настройки Microsoft Access, Tablet OS Settings (не знаю что это за прога), Microsoft Windows Media Player:

Не совсем понятно что здесь, но кажется это.. нужно указать что вы хотите сделать, то есть какую именно задачу запустить:

На этом все. Удачи вам. До новых встреч! 
Добавить комментарий Отменить ответ
Этот сайт использует Akismet для борьбы со спамом. Узнайте как обрабатываются ваши данные комментариев.
Новость с Гиктаймс. Всем параноикам и любителям Lenovo. Ссылка на новость в коментах.
У восстановленного с завода Thinkpad с предустановленной Windows 7 в планировщике есть приложение, которое включается раз в день и собирает данные о том, как вы используете компьютер. После этого все сведения отправляются компании-аналитику. Информация о сборе данных присутствует в пользовательском соглашении, но зарыта очень глубоко.
За последний год это уже третий скандал по поводу предустановленного шпионского ПО, в котором участвует Lenovo: сначала компания была поймана на установке Superfish, который грубо нарушал безопасность пользователя, устанавливая MitM сертификат. Потом их поймали на загрузке в BIOS неудаляемого самоустанавливающегося ПО, в место, предназначенное для кастомных драйверов.
Этот скандал особенно примечателен тем, что касается бренда премиум класса Thinkpad, приобретенного у IBM.
Стоит отметить, что в 21-го веке, если вы не готовы платить за продукт, то вы сами являетесь продуктом. В случае с устройствами Lenovo кажется, что даже если вы платите за продукт, то по-прежнему остаетесь продуктом.
Задача, которая заставила обратить на это внимание, называется «Lenovo Customer Feedback Program 64». В описании в планировщике значится: » This task uploads Customer Feedback Program data to Lenovo».
Задача запускает программу Lenovo.TVT.CustomerFeedback.Agent.exe расположенную в C:Program Files (x86)LenovoCustomer Feedback Program. Другие файлы в этой папке:
Lenovo.TVT.CustomerFeedback.Agent.exe.config, Lenovo.TVT.CustomerFeedback.InnovApps.dll и Lenovo.TVT.CustomerFeedback.OmnitureSiteCatalyst.dll.
Согласно Википедии, Omniture – это онлайн фирма, специализирующаяся на маркетинге и веб-аналитике, а SiteCatalyst – их приложение для веб-аналитики со стороны клиента.
Может быть на ThinkPads и не показывается дополнительная реклама, но сбор данных мониторинга и отслеживание ведется.
Источник
Lenovo Migration Assistant
¿Listo para disfrutar de tu nueva PC? Lenovo Migration Assistant es la herramienta que necesitas. Migra archivos y configuraciones desde tu dispositivo anterior al nuevo.


Basta de dolores de cabeza
Utiliza WiFi o una conexión a Internet en vez de unidades externas para mover los archivos y la configuración que quieres conservar
Súper fácil
Las instrucciones simples facilitan la duplicación de tu configuración favorita en tu nueva PC.
Seguro y rápido
Transfiere tus archivos de manera segura con el software de migración de archivos más rápido disponible

¿Por qué esperar?
PAGA CON CUALQUIERA DE ESTOS MÉTODOS DE PAGO:
(*) Precios: Los precios se encuentran expresados en Pesos. Incluyen impuestos, aranceles de gestión, envío al domicilio del comprador dentro del territorio nacional y garantía del producto, según lo expresado en los términos y condiciones. No incluyen cargos adicionales relacionados con el reciclaje. Los precios de los distribuidores o revendedores pueden variar sin previo aviso.
Cuotas sin intereses: Los plazos de financiamiento disponible, así como sus condiciones y costos se encuentran expresados en el momento del pago y podrán variar sin previo aviso. Para obtener información actualizada acerca de la disponibilidad, llama a servicio al cliente.
Territorio:Lenovo Argentina vende y entrega sus productos únicamente dentro del territorio nacional. No se hacen entregas en la Provincia de Tierra del Fuego, Antártida e Islas del Atlántico Sur.
Garantía: La garantía limitada de Lenovo sólo corresponde para los productos de hardware de Lenovo adquiridos para uso personal y no se transfiere en caso de reventa.
Facturación: La factura será entregada una vez que el producto sea ingresado al país, finalizando el proceso aduanal y se confirme el envío dentro del territorio nacional. Este proceso aplica para cualquier producto. La facturación podrá ser diferida hasta no haber enviado la orden completa.
Disponibilidad: La disponibilidad de los equipos y sus opciones puede variar de acuerdo con la forma de pago, el tipo de producto, el inventario asignado y está sujeta a stock.
General: Revise la información importante suministrada por Microsoft que puede ser aplicada a tu sistema de compra, incluyendo detalles de Windows 10, Windows 8, Windows 7, y potenciales actualizaciones/volver al sistema anterior. Lenovo no hace representación ni garantía con respecto a productos o servicios de terceros.
Fecha de envío: Los tiempos de entrega reflejados en el sitio cuenta a partir de la confirmado del pago de la orden de compra y no determina la fecha exacta de envío de su pedido. Para obtener información actualizada acerca de la disponibilidad, llama a servicio al cliente.
Generales: Las ofertas, precios, especificaciones y disponibilidad de las laptops, ultrabooks, desktops, all-in-one, workstations, servidores, accesorios o cualquier otro producto comercializado por Lenovo Argentina pueden variar o cambiar sin previo aviso. Lenovo no se responsabiliza por errores fotográficos y/o tipográficos. Para cualquier aclaración deberás contactar a servicio al cliente.
Lenovo es una marca registrada de Lenovo. Chromebook, Google Play y el logotipo de Google Play son marcas registradas de Google Inc. Todas las demás marcas comerciales son propiedad de sus respectivos dueños. © 2019, Lenovo Group Limited.
Источник
Lenovo Migration Assistant
¿Listo para disfrutar de tu nueva PC? Lenovo Migration Assistant es la herramienta que necesitas. Migra archivos y configuraciones desde tu dispositivo anterior al nuevo.
Basta de dolores de cabeza
Utiliza WiFi o una conexión a Internet en vez de unidades externas para mover los archivos y la configuración que quieres conservar
Súper fácil
Las instrucciones simples facilitan la duplicación de tu configuración favorita en tu nueva PC.
Seguro y rápido
Transfiere tus archivos de manera segura con el software de migración de archivos más rápido disponible
¿Por qué esperar?
PAGA CON CUALQUIERA DE ESTOS MÉTODOS DE PAGO:

Generales: Las ofertas, precios, especificaciones y disponibilidad de las laptops, ultrabooks, desktops, all-in-one, workstations, servidores, accesorios o cualquier otro producto comercializado por Lenovo Colombia pueden variar o cambiar sin previo aviso. Lenovo no se responsabiliza por errores fotográficos y/o tipográficos.
*Precios: Los precios se encuentran expresados en Pesos Colombianos. Incluyen impuestos, aranceles de gestión y transporte dentro del territorio nacional. No incluye cualquier tipo de cargo relacionado con el reciclaje. Los precios de los revendedores pueden variar. En la factura que recibirá con su producto encontrará detallado el valor del IVA aplicado a su compra.
General: Revise la información importante suminstrada por Microsoft que puede ser aplicada a tu sistema de compra, incluyendo detalles de Windows 10, Windows 8, Windows 7, y potenciales actualizaciones/volver al sistema anterior. Lenovo no hace representación ni garantía con respecto a productos o servicios de terceros.
Fecha de envío: La fecha reflejada en el sitio no determina la fecha de envío de su pedido, ya que el estado del inventario puede variar antes de que su orden esté completa, además los productos pueden quedar retenidos hasta que todos los ítems solicitados estén listos para entregar. Para obtener información actualizada acerca de la disponibilidad de un número de parte específico, llame a atención al cliente. No se hacen entregas en el Archipiélago de San Andrés y Providencia.
Garantía: Lenovo no representa productos o servicios de terceros, tampoco otorga garantías relacionadas con productos y servicios de terceros. La garantía limitada de Lenovo sólo corresponde para los productos de hardware de Lenovo adquiridos para uso personal y no se transfiere en caso de reventa.
Lenovo es una marca registrada de Lenovo. Chromebook, Google Play y el logotipo de Google Play son marcas registradas de Google Inc. Todas las demás marcas comerciales son propiedad de sus respectivos dueños. © 2019, Lenovo Group Limited.
Источник
[2022 Update] How to Use Lenovo Migration Assistant and its Alternatives
Lenovo Migration Assistant (LMA) is a fast, and smart file transfer tool in Windows. In this post, we will introduce what Lenovo Migration Assistant is and how to use it. Besides, the alternatives to windows easy transfer tool are on the list.
What is Lenovo Migration Assistant
Ready to enjoy your new PC? Upgrade your computer is cool, but how to seamlessly migrate files and settings from the old one may confuse you. You may hear about Lenovo Migration Assistant but don’t know how to use it.В
Lenovo Migration Assistant is a file and setting transfer software released by Lenovo, aiming to help move files and the account settings of your new PC. Here are the main features of LMA: log in with Lenovo ID, fast migration for minimum user data, user-defined migration for files selection, and cloud-based migration. It is available on Microsoft Windows 7 (32-bit, 64-bit) and Microsoft Windows 10 (32-bit, 64-bit).
As the data migration tool we mentioned, you may want to download migration assistant for transferring files and setup to another new computer. Go ahead! And we will let you know how to use migration assistant in the next part.
How to Use Lenovo Migration Assistant
To meet users’ need to move data in Windows, Lenovo Migration Assistant prepares two modes for LAN users or USB users. Try one of the methods on the following guide:
Mode 1: Use the same local network to transfer your data.
If your two PCs are on the same LAN network, Mode 1 is the best choice. It supports transferring files and other data from PC to PC without any external devices.В
Step 1. Download and Launch the Lenovo Migration Assistant on both PCs.
Step 2. Choose the WiFi option on the left side and click Next.
Step 3. Select which computer you are currently on. For the local PC, choose Old Computer; for the remote computer, choose New Computer. Click Next.
Step 4. Then you can see a PIN code. File it on the target PC for connecting.
Step 5. After the connection between two computers, you can select items you want to migrate.В
You can choose Quick Access or System Settings to customize your preferred files or settings. Or you can select the arrow icon to select more individual files.
Step 6. Lenovo Migration Assistant will migrate the selected data.В
Mode 2пјљUse USB to transfer your data to another device.
If your two devices are not on the same network, you can use USB to migrate data with one click. It also works well for saving time than copy and paste.
Step 1. Download and Launch the Lenovo Migration Assistant on both PCs.
Step 2. Connect your USB to the source computer and choose the USB option.В
Step 3. Choose Create a backup to back up files from your computer to USB disk. Click Next.
Step 4. It will detect your inserted USB, and you can choose the preferred files to back up. LMA will create a backup file on your USB.
Step 5. Connect the USB to the target computer. Choose USB and Restore data to restore files from USB disk to your computer.
Step 6. Select the backup you want to restore and click Migrate.
Alternatives of Lenovo Migration Assistant
According to comments on the Reddit forum or other platforms, the problem appears, such as the migration assistant not working or migration assistant stuck. We have no idea why the difficulties arise, but we can let you view some alternatives of Lenovo Migration Assistant to transfer files from PC to PC.
Solution 1. Using EaseUS Todo PCTrans.В
оћѓ Happy autumn sale once for all
Support Windows 11/10/8/7
Were you looking for another windows migration tool? EaseUS Todo PCTrans is a straightforward software designed to do PC transfer, including files, applications, and accounts. Here we set WiFi transfer as an example:
Step 1. Launch EaseUS Todo PCTrans on your source and target computers, connect both PCs via the internet.
1. At the «PC to PC» section, click «PC to PC» to continue.В
2. Select your target computer via its device name, then enter its account password or verification code and select the transfer direction. Then click «Connect» to continue.
You can check the verification code on the right top of «PC to PC» mainscreen on the target computer.
Step 2. Select the categories Applications, Files, and Accounts to transfer via the internet.
If you want to transfer data selectively, click «Edit» under each category, and choose the specific items.
Step 3. Click «Transfer» to start transferring your apps/files/accounts from one computer to another computer via the Internet.
оћѓ Happy autumn sale once for all
Support Windows 11/10/8/7
Solution 2. Create a Shared Folder.
You can create a shared folder to share files over the network. The solution is more complicated than the first one.
Step 1. Right-click the files > Give access to > Specific people
Step 2. Select a user or group to add > Add > Click ShareВ
Solution 3: Use Email.
You can send an email from the old computer, then log in to your email account on the new PC. It is available for transferring small size data.
Step 1. Add file to email.
Step 2. Log in email account on the new one > Download files
Solution 4: Use Cloud device.
Make sure your Cloud has enough space for data transfer. Let’s take OneDrive as an example.
Step 1. Upload files to OneDrive.
Step 2. Download files on the new PC.
Источник
The Lenovo Migration Assistant is a useful tool to help users transfer files from an old system to a new one. Here, MiniTool Solution provides a brief introduction about Lenovo Migration Assistant and displays some other easy ways to transfer data.
What Is Lenovo Migration Assistant?
You might have heard about or even benefited from the ThinkVantage System Migration Assistant (SMA) developed by Lenovo, which enables you to transfer the work environment from one computer to another.
However, since December 1, 2013, this tool has been discontinued by Lenovo and is no longer available for download from Lenovo. Lenovo has stopped supporting any new deployments or installation of this software. It is really frustrating for the fans of Lenovo.
Luckily, the Lenovo Migration Assistant (LMA) was released with the same and even more advanced features. And recently, Lenovo Migration Assistant for Windows 7 and Windows 10(laptops, desktops, workstations) was released on January 16, 2020, which is popular among users who want to upgrade Windows 7 to Windows 10.
It enables users to migrate all the user files as well as the settings from old PC to new PC with ease. Besides, it works for a wider range of platforms and operating systems. Here are some descriptions about Lenovo Migration Assistant from its official website:
Supported systems
- All ideaCentre
- All ideaPad
- All ThinkCentre
- All ThinkPad
- All ThinkStation
Supported operating systems
- Windows 7 (32-bit and 64-bit)
- Windows 10 (32-bit and 64-bit)
Main features
- Login with Lenovo ID
- Fast migration for minimum user data
- User defined migration for files selection
- Cloud-base migration (support syncing files from Dropbox drive)
As mentioned before, Lenovo Migration Assistant is a free application that can help you seamlessly transfer files and settings from one PC to another one. Some of you might want to try this data migration software. Just do it! In the next part, I will show you how to transfer files from old PC to new PC using this tool.
How to Use Lenovo Migration Assistant?
To transfer data from one PC to another using Lenovo Migration Assistant, there are 2 options available for you. You can choose to use the same local network or use a USB drive. The detailed information is displayed below.
Option 1: Use the Same Local Network
If the two involved computers are in the same local network or you are in a hurry to get the data transferred to the new PC, you had better to choose this option. In this way, you don’t need to physically connect PCs with any cords or USB drives and you can migrate your files immediately. Here are the steps:
Step 1: Install Lenovo Migration Assistant on both computers and launch them.
Step 2: Choose Wi-Fi module and click Next button to use the same local network to transfer your data.
Step 3: Select which computer you are currently on and click Next button. For the source computer, choose Old Computer; for the target computer, choose New Computer.
Step 4: A set of PIN code will appear on the source computer and you need to fill the same code to the target computer to connect them.
Note: You have to make sure the two devices are in the same network. You can click the network you are using to check the current network connection.
Step 5: Once you have successfully connected PCs, the source PC will display We are transferring your data. Then, you should go for the source computer to select files you want to transfer.
Here, you can choose System settings, and click the arrow icon to select more saved data and even a whole drive. After that, click Migrate button.

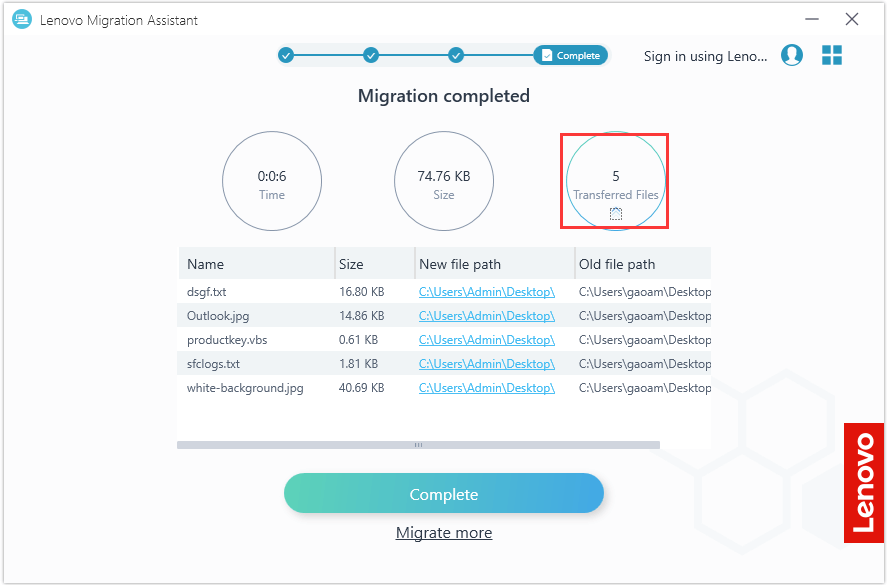
Step 6: Then, Lenovo Migration Assistant will start transferring selected files immediately and the time it will take depends on the size of files. Once it’s done, you can click Migrate more to transfer other data or directly exit the window.
Note: Commonly, the transferred files will be saved in the same path (different user account definitely) on the new computer. For the details of the result, you can click Transferred Files to check the report.
Option 2: Use USB to Transfer Data
If the involved devices are not in the same local network, you might need to use a USB drive to transfer data. Besides, if you want to make a backup of the data on the original computer and migrate it later, using USB drive is always a good choice.
Compared with copying and pasting files into USB drive, this tool works faster, and allows you to select data of different path at one time and restore the backups to the original path. You don’t have to manage these files after transferring them.
Similarly, both computers should have Lenovo Migration Assistant installed.
Step 1: Prepare a USB drive with enough free space and connect it to the source computer.
Step 2: Choose USB module in the main interface.
Step 3: Choose Create a backup and click Next button.
Step 4: Once the USB drive is detected by this tool, click Connect.
Step 5: Select the files you want to migrate as mentioned in Option 1, and then click Migrate to create a backup of these files to the USB.
Note: Every time when you choose files and click Migrate, a backup file will be created in the USB drive.
Step 6: Exit the tool and disconnect the USB drive. Now, insert the USB to the target computer and launch Lenovo migration assistant. Choose USB > Restore data this time.
Step 7: All the backup files you create using this tool will be detected and displayed here. Just choose the backups you need and click Migrate to restore the data to your new computer.
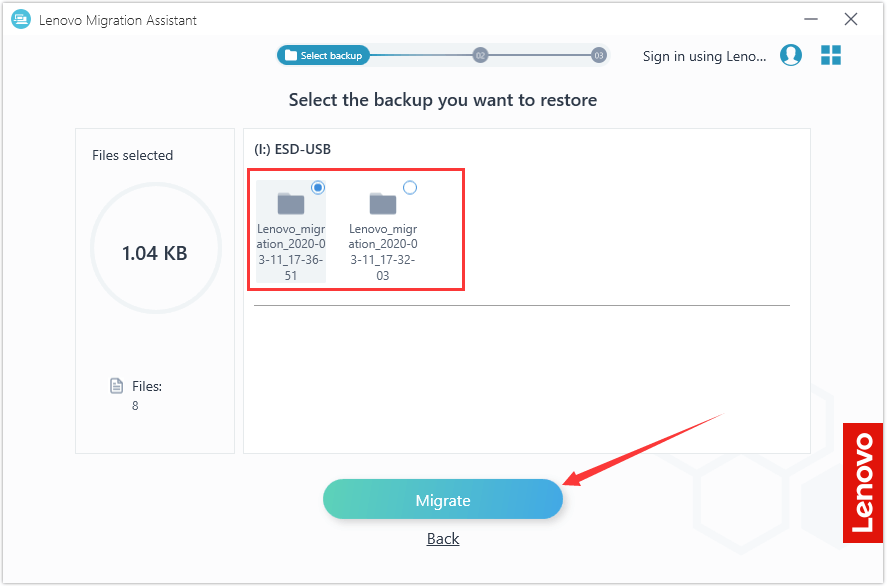
How to transfer files from old PC to new PC using Lenovo Migration Assistant? Here’s a simple guide.Click to Tweet
Alternatives of Lenovo Migration Assistant
According to the reports from users, migration assistant stuck or migration assistant not working issue might occur from time to time. Thus, some of them are seeking for other methods to transfer data between two computers easily.
To meet the needs, I put together 5 alternative methods in the following contents. Let’s see them one by one, and you can choose a preferred one to have a try.
Alternatives of Lenovo Migration Assistant
- Use cloud drive
- Try MiniTool Partition Wizard
- Create a shared folder
- Use Windows Nearby sharing
#1. Use Cloud Drive
This should be a relatively convenient way to transfer files. The cloud drive, such as OneDrive, allows you to view, manage and edit your files without device limitation.
Once you save your files to OneDrive, you can access them on the website at any time even if your device is lost or damaged. You can also download the saved data on the cloud drive to your new device whenever you want.
#2. Try MiniTool Partition Wizard
You can also try another professional program if you are experiencing Lenovo Migration Assistant stuck or not working issue. Here, MiniTool Partition Wizard is recommended for you.
This utility can help you upgrade hard drive to a larger one within a computer without data loss and migrate operating system from one computer to another one. Of course, you can also use it to transfer all the data on a drive to another computer by making a backup.
As MiniTool Partition Wizard is a safe and reliable alternative of Lenovo Migration Assistant, you can click the following button to download it and have a try.
Free Download
Step 1: Prepare a USB drive with enough capacity and connect it to the original computer.
Step 2: Open MiniTool Partition Wizard to get the main interface.
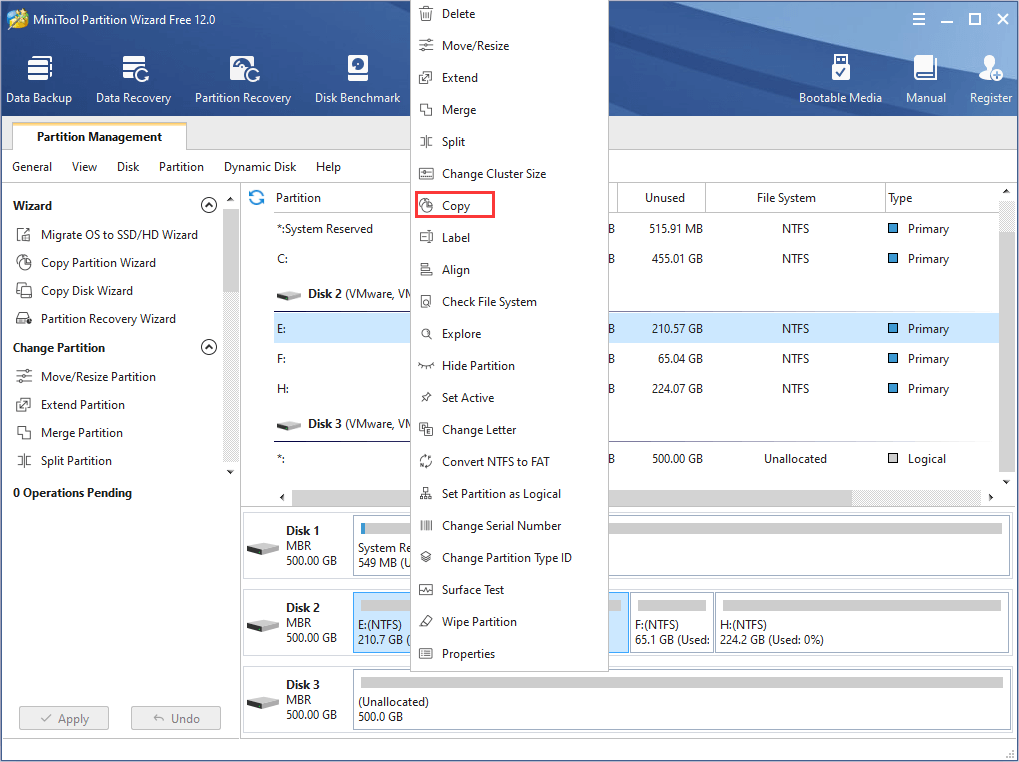
Step 3: Right-click the target drive and choose Copy from the context menu.
Note: If you want to transfer all the data on the disk to the new computer, you can select the disk and use the Copy Disk feature.
Step 4: Choose the unallocated space on the USB drive and click Next.
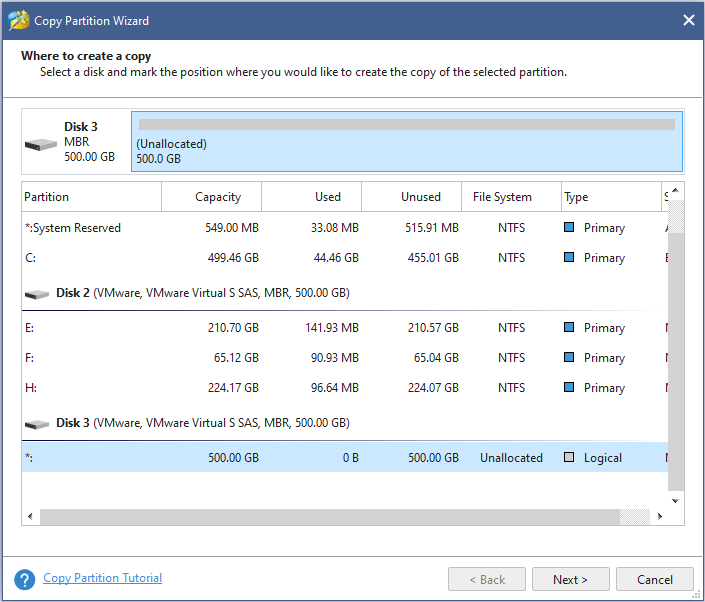
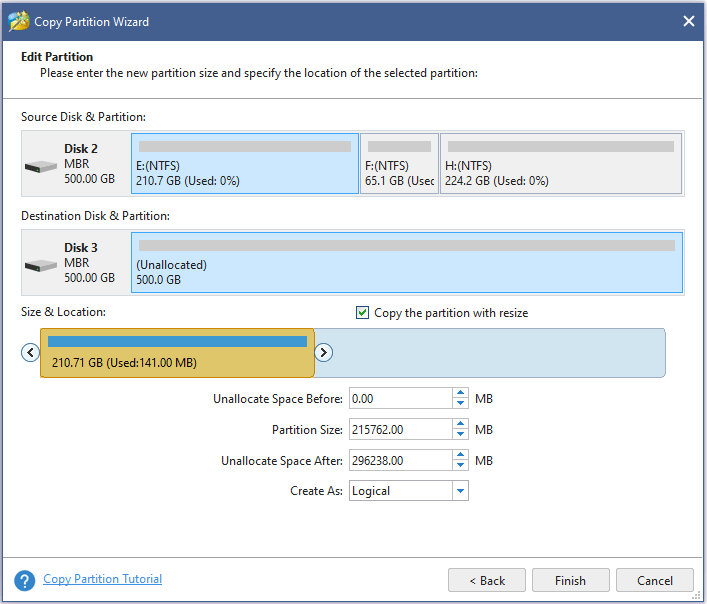
Step 5: In the next page, you need to specify the size and location of the new partition. Then, click Finish button.
Step 6: When you back to the main interface, click Apply button to execute the operation.
Once it’s done, you can unplug the USB drive and connect it to the new computer. Then, refer to the steps above to transfer the data to the new PC.
MiniTool Partition Wizard is a great alternative of Lenovo Migration Assistant. I have successfully migrated my data to another device using this tool.Click to Tweet
#3. Create a Shared Folder
If the two devices are in the same local network, you can also choose to transfer files by creating a shared folder – no need for any third-party programs. If there are a few data to be transferred, sharing folder is a nice choice. Just follow the steps below to share files.
Step 1: Right-click the file or folder you want to share, choose Give access to > Specific people.
Step 2: Type a username you want to share data to and click Add button. By clicking the arrow beside the username, you can adjust the Permission Level as your needs.
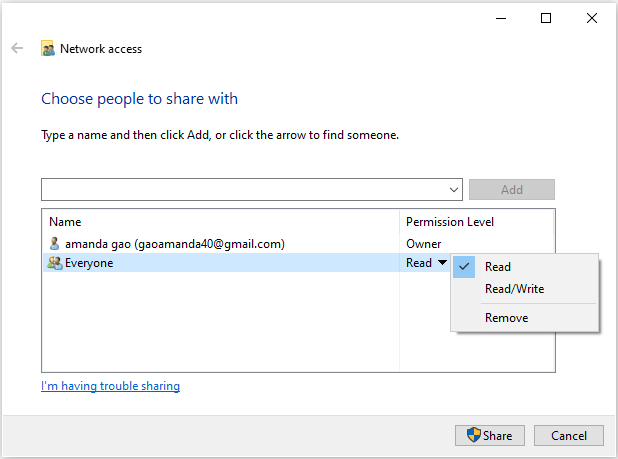
Step 3: Click Share button.
Then, on the target computer, open the File Explorer, choose Network from the left pane and select the computer that has the shared folders you need. If given permissions, you can access the shared file and save it.
#4. Use Windows Nearby Sharing
For Windows 10 version 1803 and later versions, the Nearby sharing feature is available for users to quickly transfer data wirelessly to nearby devices by using Wi-Fi or Bluetooth. So, if the involved computers meet the requirement and are not far from each other, you can try this method.
Step 1: Press Windows + I to open Settings app.
Step 2: Go to System > Shared experiences.
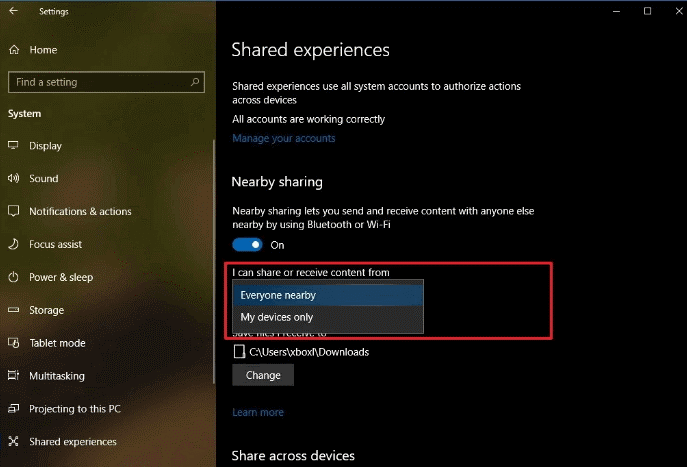
Step 3: In the right pane, make sure the Nearby sharing feature is enabled, and choose to share or receive content from Everyone nearby or My devices only. Besides, you can click Change button to select other storage path for the received files. Then, do the same operation on your new computer.
Step 4: Right-click the file or folder you want to share and click Share. Then, choose another computer from the device list.
Step 5: Then, the target computer will receive a notification and you can choose to accept or decline to receive the sharing file.
Hi there! I have learnt about 4 easily methods to transfer data between computers except Lenovo Migration Assistant. Share them with you all and hope you can benefit from them.Click to Tweet
Bottom Line
I have introduced Lenovo Migration Assistant and how to use it for you. Besides, several alternative methods to transfer data are also displayed for you. Do you have any questions about the contents in this post?
You can leave a message in the comment section below, or contact us via [email protected].
Lenovo Migration Assistant FAQ
How do I use Lenovo Migration Assistant?
Lenovo Migration Assistant provides 2 methods for you to transfer data. You can choose to use the same local network or use a USB drive.
- Use the same local network: choose Wi-Fi > connect 2 computers > select needed data to migrate.
- Use a USB drive: connect USB drive to source computer> choose USB > select needed data to make a backup on USB drive > connect USB drive to target computer and restore data.
How do I transfer files between Lenovo laptops?
Here are several methods you can adopt to transfer files between Lenovo laptops:
- Use Lenovo Migration Assistant
- Use could drive such as OneDrive and Google Drive
- Try MiniTool Partition Wizard
- Create a shared folder
- Use Windows Nearby sharing
Will Migrate Assistant delete files on old computer?
No, it won’t delete any files from your computer. It just works as a medium to help you transfer the existing data to another computer and won’t make any changes for the data.
На чтение 4 мин. Просмотров 99 Опубликовано 15.12.2019
Приветствую всех Сегодня мы будем разбираться с Lenovo Migration Assistant — я расскажу что это за программа простыми словами. Информации немного, но удалось выяснить, что эта программа может помочь пользователям перенести личные данные со старого компьютера на новый.
Некоторые мои мыслишки:
- Есть вариант быстрого переноса минимальных личных данных, и вариант, когда вы сами указываете какие данные переносить. Также данные можно.. перенести в облако Dropbox
- В общем примерно понятно, это фирменная программа от Lenovo для переноса личных файлов. Я такие программы не особо люблю, кажется такое дело лучше сделать самостоятельно.
- С другой стороны, например, если вы пользуетесь Хромом, то его можно и не переносить — достаточно создать учетную запись Гугле и синхронизировать все данные Хрома с учеткой.
- В итоге на новом компьютере вам останется только установить Хром, ввести логин и пароль, и все ваши данные восстановятся — закладки, расширения, история и остальное. Это удобно.
По поводу остальных программ — в некоторых можно сохранить настройки в файл конфигурации и потом этот файл перенести, ну а личные файлы уж лучше вручную переносить — все это скопировать на флешку или.. в облако, если вы продвинутый юзер
В общем я все к тому, что можно обойтись и без программы Lenovo Migration Assistant, как мне кажется.
Вот нашел картинку где мы видим, что можно выбрать папки/файлы на старом ПК для переноса:
Это все можно выбрать на вкладке Files/Folders, а вот на вкладке File Types можно указать типы файлов для переноса. То есть выбираете или первая вкладка или вторая, вместе наверно нельзя. Кстати судя по названию окна.. то программа называется так — System Migration Assistant
Галочками можно отметить программы, настройки которых нужно перенести. Смотрите, можно перенести настройки Microsoft Access, Tablet OS Settings (не знаю что это за прога), Microsoft Windows Media Player:
Не совсем понятно что здесь, но кажется это.. нужно указать что вы хотите сделать, то есть какую именно задачу запустить:
На этом все. Удачи вам. До новых встреч!
Содержание
- Добавить комментарий Отменить ответ
- Что программа умеет делать?
- Вывод
Добавить комментарий Отменить ответ
Этот сайт использует Akismet для борьбы со спамом. Узнайте как обрабатываются ваши данные комментариев.
Практически для любого ноутбука фирмы Lenovo на официальном сайте поддержки в разделе «Программное обеспечение и утилиты» для загрузки доступна программа Lenovo migration assistant. Также ее можно встретить на ноутбуках того же производителя с предустановленной версией Windows.
Что это такое, для чего нужно и обязательно ли наличие на ноутбуке вы узнаете из данной статьи.
Что программа умеет делать?
Основным и единственным назначением фирменной утилиты Lenovo migration assistant является быстрый и удобный перенос данных и настроек со старого ноутбука на новый.

Главное окно программы
Закладки браузера, настройки Microsoft Office, электронная почта, документы и загрузки всего за несколько кликов мышкой будут перенесены с одного ноутбука на другой.

Как работает lenovo migration assistant?
Главное условие — расположение старого и нового ноутбуков в одной сети, то есть подключение к одной точке Wi-Fi.

Далее устанавливаете программу на обеих ноутбуках, входите под одним и тем же Lenovo ID, выбираете переносимые данные, подключаетесь к новому ноутбуку и переносите все что нужно на него.

Вход в учетную запись Lenovo ID

Установка связи между ноутбуками для переноса данных
Вывод
Таким образом можно сделать вывод, что Lenovo migration assistant не относится к обязательным программам. Все те возможности, которые она предоставляет, можно использовать и без нее. Например, перенести все через флешку или через облачное хранилище.
Если вы не собираетесь переносить данные между ноутбуками, то смело можете удалять данное приложение.
You must sign-in with your Lenovo ID to access your Shopping Cart, directly. Otherwise, select an item to start building your Cart.
Benefits of having a Lenovo ID
Critical product support, upgrades, and alerts on topics such as safety issues or product recalls.
Quick, secure access to your purchase history for warranty validation or insurance claims.
New product announcement updates and exclusive online offers