
Образ загрузочного DVD диска Windows 7 Starter, продававшегося с нетбуком Lenovo S10-3S
Системные требования:
Нетбук Lenovo IdeaPad S10-3S
Intel Atom N450 1.6GHz, RAM 1GB, HDD 160G
Торрент Загрузочный DVD диск — Recovery DVD for Lenovo IdeaPad S10-3S / Windows 7 Starter (х32) подробно:
Как использовать:
1. Записать .iso образ на USB флешку или съёмный диск с помощью утилиты Rufus.
2. Зайти в BIOS нетбука (при загрузке нажать клавишу F2)
3. На вкладке Boot с помощью клавиш F5 и F6 установить USB HDD первым загрузочным устройством.
4. Нажать F10, затем Yes для сохранения настроек.
5. Устанавливаем Windows обычным способом.
6. Для установки драйверов (Wi-Fi и др.) можно использовать диск из этой раздачи: Драйверы Lenovo IdeaPad S10-3S / Windows 7 Starter (х32) [Ru]
Контрольные суммы:
CRC-32: adc0577a
MD4: 4337f4d1b6476d81cc6abe300325f8e2
MD5: 396fc94a4e36971e31ecc1b50d1cb19d
SHA-1: c5524126bc9b9e4911a18470c193a198f1edf94d
Скриншоты Загрузочный DVD диск — Recovery DVD for Lenovo IdeaPad S10-3S / Windows 7 Starter (х32) торрент:


Скачать Загрузочный DVD диск — Recovery DVD for Lenovo IdeaPad S10-3S / Windows 7 Starter (х32) через торрент:

 Для сброса ноутбуков Lenovo на заводские настройки, обычно достаточно нажать скрытую кнопку «Novo», обычно утопленную в корпусе на левой или правой грани ноутбука, и выбрать в меню «System Recovery» или же зайти в особые варианты загрузки Windows 10 и найти пункт для восстановления в особых вариантах загрузки. Однако, это работает лишь в том случае, если на ноутбуке сохранился скрытый образ восстановления системы.
Если же образа нет, его можно скачать с официального сайта Lenovo и использовать фирменную утилиту для создания загрузочной флешки для восстановления Windows со всеми драйверами. В этой инструкции — о том, как это сделать. Также может быть полезным: Как сбросить ноутбук на заводские настройки.
Примечание: для сброса ноутбука с помощью особых вариантов загрузки вы можете на экране блокировки Windows 10 нажать по кнопке питания, изображенной справа внизу, затем, удерживая Shift, нажать «Перезагрузка». В открывшемся меню в разделе «Поиск и устранение неисправностей» присутствует пункт для сброса системы. Также, некоторые модели Lenovo по нажатию клавиши F8, F9, F4 (иногда в сочетании с Alt или Fn, на разных по-разному) во время включения показывают экран с ошибкой, с которого можно перейти в дополнительные параметры и найти пункт для сброса там.
Как скачать образ восстановления для Lenovo
Официальный сайт Lenovo предлагает загрузку образов восстановления, содержащих ОС и драйверы конкретно для вашего ноутбука. К сожалению, в отличие от Dell, Lenovo предоставляет такие образы далеко не для каждой модели своего ноутбука, тем не менее попробовать выполнить загрузку стоит: на сайте заявлено, что образы доступны для ThinkPad, «выбранных моделей IdeaPad», а также для ПК и моноблоков Lenovo.
Прежде всего, вам потребуется серийный номер, найти который можно на нижней части вашего ноутбука Lenovo, где он обозначен буквами «S/N». Дополнительно, необходима учетная запись Lenovo ID, создать которую вы можете на странице https://account.lenovo.com/ru/ru/. После того, как серийный номер найден, а аккаунт заведен, выполните следующие шаги:
- Перейдите на страницу https://pcsupport.lenovo.com/ru/ru/lenovorecovery/ и введите серийный номер вашего ноутбука.

- Если вы увидите сообщение «Это не допустимая машина Windows для восстановления», значит для вашего ноутбука скачать образ не предлагается.
- Если образ есть, вы увидите модель вашего ноутбука и возможность выбрать страну и язык загружаемого образа. Отметьте пункт «Я принимаю правила» и нажмите «Далее».

- На следующем этапе потребуется указать свои имя, фамилию, страну и адрес электронной почты.
- Вы увидите сообщение, что загрузка Lenovo Recovery доступна и ссылку, перейдите по ней.

- На следующей странице вам будет предложено загрузить одну из двух версий Lenovo USB Recovery Creator, скачайте нужную в зависимости от версии Windows.

- Подключите флешку (лучше 16 Гб и больше, данные с неё будут удалены) к компьютеру или ноутбуку, запустите утилиту Lenovo USB Recovery Creator, введите данные вашего Lenovo ID, а на следующем экране — нужный образ восстановления системы.

- Все остальные шаги достаточно понятны: вам потребуется указать место хранения файлов, а после их загрузки — выбрать флешку, на которую будет записан образ восстановления Lenovo.


По завершении процесса вы получите готовую загрузочную флешку именно для вашего ноутбука, с помощью которой легко сможете восстановить заводскую систему со всеми драйверами и ПО от Lenovo.
Если для вашего ноутбука образа нет, а восстановление системы никакими способами не получается произвести, опишите в комментариях ситуацию: точную модель ноутбука, загружается ли система, до какого этапа и какая версия системы — я постараюсь подсказать решение.
Возможно, окажется полезным материал: Как сбросить Windows 10 или автоматическая переустановка ОС.
Программист ®
Пол: ![]()
Стаж: 8 лет 11 месяцев
Сообщений: 10348
![]()
Recovery Lenovo B570e -G570 -G770 2xDVD Windows 7 Home Basic x64
Год/Дата Выпуска: 2012
Версия: 7.0
Разработчик: Lenovo
Сайт разработчика: www.lenovo.com
Разрядность: 64bit
Язык интерфейса: Русский
Таблэтка: не требуется
Системные требования: Ноутбук Lenovo B570e (или Lenovo, схожий по железу)
Описание: 2 диска для восстановления системы. Диски записаны с помощью встроенной программы Lenovo OneKey Recovery 7.0.
Доп. информация: Образ снят с ноутбука Lenovo B570e
Дата заводского образа 15.03.2012г.
Для запуска восстановления вставьте записанный диск RecoveryDisc001 и выберите загрузку с диска.
*После восстановления станет доступен встроенный механизм Recovery, через нажатие специальной клавиши «Lenovo-Recovery».
!! ВНИМАНИЕ !! Для корректной работы диска восстановления требуется полная очистка жесткого диска с удалением всех разделов и MBR (сделать диск НЕ инициализированным).
Контрольные суммы
RecoveryDisc001.iso:
MD5: FB44CBA52942A9BFE01DFA0E2F7FD707
SHA-1: 346874739812C2DF762F281D4FE6975AE223086B
RecoveryDisc002.iso:
MD5: 0336DDA07D8F2C75B6AA789526FF7DC8
SHA-1: 847736CBD0D8439A9D0DA5AC43E2CC10BF2B8915
Скриншоты
Скриншоты окна About
| [only-soft.org].t105041.torrent | ||
|---|---|---|
| Торрент: |
Зарегистрирован [ 2019-10-30 16:15 ] |
21 KB |
| Статус: |
√ проверено |
|
| Скачан: | 4 раз | |
| Размер: | 8 GB | |
| Оценка: |
(Голосов: 0) |
|
| Поблагодарили: | 0  |
|
|
Recovery Lenovo B570e -G570 -G770 2xDVD Windows 7 Home Basic x64 7.0 x64 [2012, RUS] скачать торрент бесплатно и без регистрации |


![]()
![]()

![]()
1
|
2508
1
2023-01-23 15:27
![]()
![]()
1
|
1472
6
2023-01-23 15:23
![]()
![]()
3
|
1990
5
2022-10-09 09:23
![]()
![]()
1
|
3098
15
2022-08-03 08:21
![]()
![]()
2
|
2696
0
2022-06-28 23:58
![]()
![]()
3
|
4146
10
2022-02-09 19:02
![]()
![]()
2
|
6706
21
2021-12-19 23:10
![]()
![]()
6
|
5090
1
2021-06-09 12:20
![]()
![]()
5
|
2054
1
2021-05-12 22:27
![]()
![]()
4
|
8439
84
2020-07-31 14:13
![]()
![]()
4
|
3488
3
2019-04-09 00:12
![]()
![]()
3
|
2572
0
2019-01-21 20:20
![]()
![]()
7
|
10135
13
2018-12-23 08:45
![]()
![]()
7
|
7101
85
2018-10-18 22:34
![]()
![]()
1
|
2896
16
2018-06-04 17:35
![]()
![]()
3
|
5154
3
2018-05-04 06:44
![]()
![]()
3
|
9121
7
2018-03-30 15:09
![]()
![]()
2
|
3809
12
2018-03-19 08:27
![]()
![]()
3
|
3012
3
2018-03-14 11:49
![]()
![]()
10
|
9294
9
2018-02-24 17:10
![]()
![]()
1
|
2986
16
2017-07-05 14:36
![]()
![]()
2
|
6083
55
2017-06-10 14:46
![]()
![]()
11
|
7779
0
2017-05-20 07:02
![]()
![]()
3
|
12353
60
2017-04-26 21:01
![]()
![]()
6
|
11161
30
2017-03-30 11:20
![]()
![]()
1
|
3033
3
2017-03-10 09:04
![]()
![]()
1
|
4212
6
2017-01-28 22:56
![]()
![]()
0
|
1432
2
2016-12-22 20:05
![]()
![]()
3
|
2916
5
2016-11-21 10:05
![]()
![]()
0
|
2864
4
2016-10-20 21:13
![]()
![]()
4
|
4676
4
2016-10-16 00:59
![]()
![]()
0
|
1641
6
2016-09-20 15:01
![]()
![]()
0
|
3128
18
2016-09-20 14:59
![]()
![]()
0
|
1620
6
2016-09-16 03:27
![]()
![]()
0
|
1208
1
2016-09-16 03:26
![]()
![]()
0
|
1389
12
2016-09-01 16:42
![]()
![]()
0
|
1323
6
2016-09-01 16:39
![]()
![]()
0
|
1368
0
2016-08-17 21:27
![]()
![]()
0
|
1841
0
2016-08-17 21:25
![]()
![]()
0
|
1813
5
2016-08-17 21:23
![]()
![]()
0
|
1516
0
2016-08-17 21:18
![]()
![]()
0
|
2878
22
2016-08-17 21:17
![]()
![]()
0
|
1206
0
2016-08-17 21:16
![]()
![]()
1
|
4474
4
2016-07-31 06:31
![]()
![]()
0
|
1536
1
2016-07-25 21:47
![]()
![]()
1
|
3653
6
2016-06-12 15:00
![]()
![]()
0
|
1266
4
2016-04-23 03:19
![]()
![]()
0
|
1776
4
2016-03-03 21:39
![]()
![]()
0
|
2020
20
2016-03-03 21:36
![]()
![]()
0
|
1682
8
2016-03-03 21:34
![]()
/Guides /Lenovo Recovery Disk – Guide for Windows XP, Vista, 7, 8, and 10
This is a guide about Lenovo recovery disks for the following versions of Windows: Windows XP, Windows Vista, Windows 7, Windows 8, and Windows 10.
A recovery disk is also known as a restore disc, repair disc, boot disc or rescue disk.
Looking for a recovery disk for Lenovo? Download Easy Recovery Essentials (our recovery and repair disk for Lenovo).
![]()
Contents
- 1 Download alternative recovery disk for Lenovo
- 2 Create a recovery disk for Lenovo
- 2.1 Create the recovery disk for Windows XP
- 2.2 Create the recovery disk for Windows Vista
- 2.3 Create the recovery disk for Windows 7
- 2.4 Create the recovery disk for Windows 8
- 3 Recover a Lenovo using the recovery partition or disk
- 3.1 Recover Windows XP
- 3.2 Recover Windows Vista
- 3.3 Recover Windows 7
- 3.4 Recover Windows 8
- 4 More Information
- 4.1 Support Links
- 4.2 Applicable Systems
- 4.3 Applicable Models
Download alternative recovery disk for Lenovo
If the recovery partition of your computer is corrupt or damaged or you no longer have your recovery DVDs, download Easy Recovery Essentials.
Easy Recovery Essentials works with any Lenovo computer model and it’s compatible with the following Windows versions:
- Microsoft Windows 10 (read more on our Windows 10 Recovery Disk and Repair Disc Download article)
- Microsoft Windows 8 (read more on our Windows 8 Recovery Disk and Repair Disc Download article)
- Microsoft Windows 7 (read more on our Windows 7 Recovery Disk and Repair Disc Download article)
- Microsoft Windows Vista (read more on our Windows Vista Recovery Disk and Repair Disc Download article)
- Microsoft Windows XP (read more on our Windows XP Recovery and Repair Disk article)
- Microsoft Windows Server 2003, 2008 and 2012 (read more on our Windows Server 2008 and 2012 Recovery Discs Download article)

Screenshot of Easy Recovery Essentials
You can burn Easy Recovery Essentials directly to a CD, DVD or a USB flash drive and use the Automated Repair function to automatically find and fix boot errors.
Download Easy Recovery Essentials for Lenovo
Note: Easy Recovery Essentials can not be used to install or reinstall Windows.
Create a recovery disk for Lenovo
Lenovo computers have a hidden partition that can be used for recovery and restore. Some computer models also have a recovery DVD (or recovery USB, in case of Windows 8 users) that can be used for the same process.
Depending on the computer series model and what type of Windows you are using, you can have one of the several recovery software programs installed by Lenovo:
- Lenovo OneKey Recovery for Idea series models, including laptops and desktops (IdeaPad and IdeaCentre)
- Lenovo ThinkVantage Rescue and Recovery for Think series models: ThinkPad, ThinkStation, ThinkCentre and Lenovo 3000 models
- Computers with Windows 8 don’t have the Lenovo ThinkVantage Rescue and Recovery software. Instead it uses a different process for creating a recovery media (USB only) – go to Create the recovery disk for Windows 8 or Restore Windows 8 using the recovery partition or disk.
Create the recovery disk for Windows XP
The instructions for creating the disk with Lenovo OneKey Recovery on Windows XP are below. If you are not sure if your computer uses this software, go to Create a recovery disk for Lenovo.
- Start Windows XP
- Find the OneKey Recovery icon on your desktop or go to Start > All Programs and find it there

The OneKey Recovery Software icon
- Click Create Recovery Disc
- Select Factory default recovery disc
- Insert your blank CDs or DVDs. You will need up to 3 DVDs or 17 CDs
- Select the drive location to use
- The recovery disc creation process will now start. The software will ask you to insert the second disk when the burning process for the first one is finished
- Mark each CD or DVD and keep them safe!
The instructions for creating the disk with Lenovo ThinkVantage Rescue and Recovery on Windows XP are below. If you are not sure you’re using the ThinkVantage software, go to Create a recovery disk for Lenovo.
- Boot Windows XP
- Go to Start
- Select All Programs
- Find the ThinkVantage folder. If you have a Lenovo 3000 the folder name would be “Lenovo Care”
- Click Create Rescue and Recovery Media
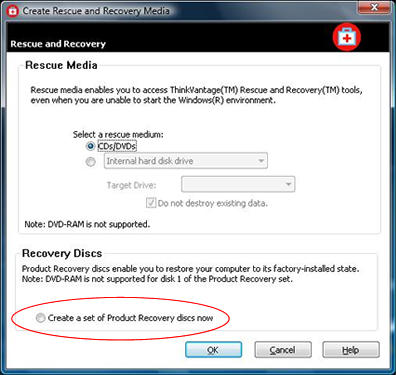
- At the Recovery Discs tab, select the Create a set of Product Recovery discs now option and click OK

Create a set of Product Recovery discs in ThinkVantage
- Insert your CD or DVD and click OK
- When the recovery disks are created, you can verify them by inserting the first one in the disk tray, open ThinkVantage again and see if the “You have already created a set of Product Recovery discs” message appears at the Recovery Discs tab.
Create the recovery disk for Windows Vista
The instructions for creating the disk using Lenovo ThinkVantage Rescue and Recovery on Windows Vista are below. If your computer has the OneKey software instead (IdeaPad and IdeaCentre series models), follow the instructions for this software, according to the steps below.
- Go to Start and then All Programs
- Find the ThinkVantage folder from the list. If you have a Lenovo 3000, the folder name can be “Lenovo Care” instead
- Click on Create Product Recovery Media
- Check the The Product Recovery discs you are going to create are for use on this computer only. Do you want to proceed? option and click OK
- Select your optical drive to use with blank CDs or DVDs
- Insert the blank DVD and click OK
- Follow the next instructions on the screen to complete the process
- When the DVDs are created successfully, label them and keep them safe!
The instructions for using OneKey Recovery on Windows Vista are below. If you are not sure if your computer is using this software, go to Create a recovery disk for Lenovo.
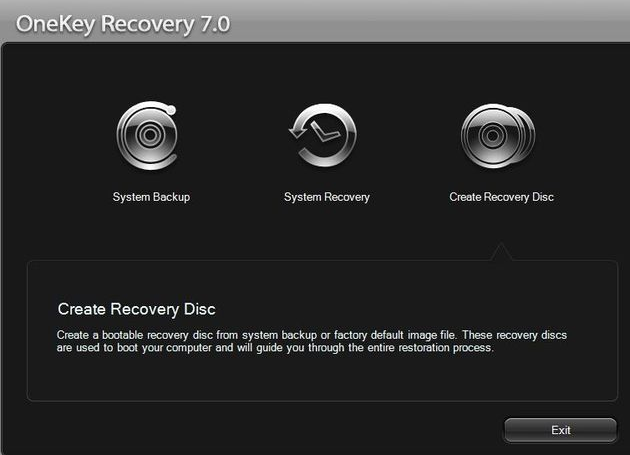
- Open OneKey Recovery

Lenovo OneKey Recovery 7.0 on Windows Vista
- Click Create Recovery Disc
- Click Factory default recovery disc
- Insert your first blank CD or DVD. You will need up to 3 DVDs or 17 CDs
- Select your optical drive location to use
- The process will now start
- After each CD/DVD is successfully created, label them and keep them safe!
Create the recovery disk for Windows 7
Computers with Windows 7 from Lenovo have the ThinkVantage Rescue and Recovery software installed (ThinkPad, ThinkStation etc.), but if your computer series model is an IdeaPad or an IdeaCentre and it has the OneKey software instead, follow the next set of instructions.
The instructions for creating the disk using Lenovo ThinkVantage Rescue and Recovery on Windows 7 are:
- Click Start
- Start typing factory recovery in the search bar
- Find the Lenovo – Factory Recovery Disks item
- If the User Account Control window shows up, click Yes
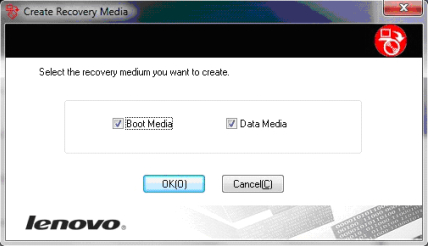
- Check the “The recovery media you are going to create can only be used on this system. Do you want to continue?” option and then click OK
- Select both Boot Media and Data Media options and click OK

Boot Media and Data Media options on Lenovo ThinkVantage software
- Insert the first blank DVD
- Select your optical drive that has the blank DVDs inserted
- Click OK and follow the next steps to complete the process
- When the DVDs are created, label them and keep them safe!
The instructions for creating the disk using Lenovo OneKey Recovery on Windows 7 are:
- Open the OneKey Recovery software either by finding the icon on your desktop or go to Start and then All Programs.
- Click Create Recovery Disc and then select Factory default recovery disc
- Select the drive location to use and insert the first blank CDs or DVDs. You will need up to 3 DVDs or 17 CDs
- The process will now start. Insert the second blank CD or DVD when asked
- When the process is complete, label the CDs/DVDs and keep them safe!
Create the recovery disk for Windows 8
If you are using Windows 8, you can only use a USB flash drive to create the recovery media. A minimum 16 GB flash drive is required.
Lenovo doesn’t provide a specific software to create the recovery disk in Windows 8, but you can create it using the Advanced recovery tools option from Windows 8’s Control Panel.
- Insert the USB flash drive
- Press the
 key and X
 - Select Control Panel from the list
- Select Recovery from the list
- Select Advanced recovery tools
- Select Create a recovery drive


Windows 8: Create a recovery drive option
- If the User Account Control (UAC) screen appears, click Yes
- Check the “Copy the recovery partition from the PC to the recovery drive” checkbox
- Select the USB flash drive from the list
- Continue the process and wait for it to finish. It may take up to an hour.

Wait for the process to finish
Personal files stored on the USB flash drive will be deleted! Backup your files before you continue.
- When the process is finished, it will ask you if you want to delete the recovery partition. It’s recommended that you do not delete it as you won’t be able to recover or restore your computer with the USB flash drive in the future
- Remove the USB flash drive. You can close the Control Panel window at this point.

Recover a Lenovo using the recovery partition or disk
A Lenovo computer can be recovered and restored using the hidden recovery partition or the recovery disks that you created (or already had).
CDs or DVDs are used for Windows XP, Vista and 7. USB flash drives are used for computers with Windows 8 installed.
Not all series models will have the hidden partition. If you don’t have the recovery partition and neither the recovery disk already at hand, go to Download alternative recovery disk for Lenovo.
Recover Windows XP
IdeaPad and IdeaCentre computers with the OneKey Recovery software installed can follow these instructions to recover and restore Windows XP:
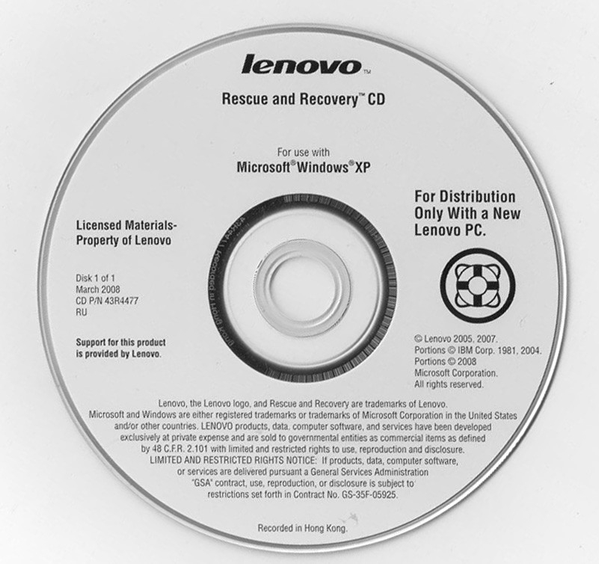
- Insert the first recovery CD or DVD in the tray
If you don’t have the recovery CD or DVD, go to Download alternative recovery disk for Lenovo.

The Lenovo Rescue and Recovery CD for Windows XP
- Boot your computer
- Press F12 several times
- In the Boot Manager screen that shows up, select the item with ODD (stands for Optical Disc Drive)
- Press Enter to continue with the selection
- At the Press any key to boot from CD or DVD message, press any keyboard key to boot from the recovery media
- Read the License Agreement and then select the I accept the terms of the license agreement and then click Next

License agreement message in Lenovo ThinkVantage software
- Click OK at the warning message
- Click OK when asked to insert the second disk and so on
- Wait for the process to finish.
Recover Windows Vista
Windows Vista users can restore their system with ThinkVantage software using the recovery disk with these instructions:
- Make sure you have the Rescue & Recovery Startup/Boot Disc CD at hand. Insert it in the tray
If you don’t have the recovery CD or DVD, go to Download alternative recovery disk for Lenovo.
- Power on your computer
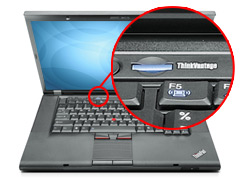
- When the computer starts to boot, press the F12 key. On Lenovo laptops you may need to click on the ThinkVantage button instead.
- At the Boot Menu, navigate using the arrow keys to the first option of the list: ATAPI CD (it can be ATAPI CD0). At this step you need to select the optical drive where you inserted the first disc.
- Hit Enter
- A progress bar should now appear that mentions “ThinkVantage Technologies”

The progress bar
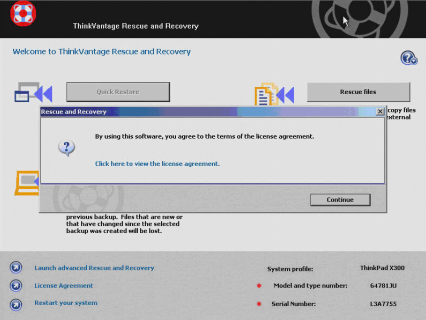
- When ThinkVantage Rescue and Recovery software loads, click Continue at the “By using this software, you agree to the terms of the license agreement” message
- Click on Full Restore
- Click Continue on the warning message
- Select Factory Restore option from the bottom left
- Click Restore
- Click Continue to confirm that you understand that all personal data will be lost during this process
- Click OK at the “Do not power off during this process” warning message
- Click Next
- Accept the terms and conditions by clicking the checkbox
- Click Next
- Insert the remaining CDs/DVDs when asked by the software
- When the process is complete, click Yes to restart the computer
- Your computer will restart and boot into Windows Vista. Wait for this process to finish
- When you see the Set Up Windows screen, the process is complete. You can continue setting up Windows Vista.

Recover Windows 7
The steps to recover a Windows 7 system using the ThinkVantage software are similar to those of Windows Vista:
- Insert your first Rescue & Recovery Startup/Boot Disc CD
If you don’t have the recovery CD or DVD, go to Download alternative recovery disk for Lenovo or follow the next set of instructions from below.
- Boot the computer and during the booting process, press the F12 key. On Lenovo laptops you may need to click on the ThinkVantage button instead

The ThinkVantage button on your laptop
- When the Boot Menu screen appears, go to your optical drive (usually at the top of the list, called ATAPI CD) and hit Enter
- The ThinkVantage Technologies name should appear. When the software loads, click Continue at the first window message
- Click on Full Restore and then click Continue at the warning message
- Make sure the Factory Restore option is selected at the bottom left
- Click Restore and then click Continue to confirm that you understand that all personal data will be lost during this process
- Click OK at the System will restart to Windows Recovery Environment message
Your computer will reboot
- Click Next to continue the recover and restore process
- Make sure the checkbox for the Terms and Conditions agremenet is checked
- Click Next
- Click Yes at the warning message about the data loss during this process
- Wait for the process to finish. When prompted to insert the next DVDs in the tray, do so.
- When the process is finished, restart your computer (or click Yes).
- Wait for Windows 7 to begin loading and when the Set Up Windows screen appears, the process is complete
- Continue setting up Windows 7
If you don’t have the DVD, but your computer still has the recovery partition intact, follow these steps:
- Boot your computer
- Press F11
- At the System Recovery Options screen follow the instructions on the screen to reach the Choose a recovery tool screen
- At the Choose a recovery tool screen, click on Lenovo Product Recovery
- Click Next, after you select your language
- Agree to the terms of the license agreement and then click Next
- Click Yes to confirm that you understand the data loss involved during this process
- Wait for the process to finish.
Recover Windows 8
You can restore a Lenovo computer with Windows 8 installed using the recovery USB created. The instructions are:
- Insert the USB recovery media in the USB port
If you don’t have the recovery USB, go to Download alternative recovery disk for Lenovo or continue with the the next set of instructions.
- Restart your computer
- Press F12 during booting, before or when the Lenovo logo appears
- After the system successfully boots, select your language
- Select your keyboard
- Select Troubleshoot
- Select Reset your PC
- Click Next
- Select Yes, if you also want to re-partition the drives or No, if you want to keep your existing partitions.A fresh, clean installation should have clean drives. If your hard disk is clean, you can choose any option
- Select Fully clean the drive
- Click Reset
- Wait for the process to finish. When it’s complete, the system will reboot into Windows 8.
- When the system reboots, remove the USB recovery media from your USB port
If you don’t have the recovery USB, but your computer still has the recovery partition intact you can follow these steps:
- Press the Novo button (on some models you can try pressing F12)
- Click on System Recovery
- Wait for the computer to boot into the recovery mode
- Follow the instructions on the screen to continue with this process
More Information
Support Links
- Easy Recovery Essentials for Windows – our repair and recovery disk.
It’s an easy-to-use and automated diagnostics disk. It’s available for Windows 8, Windows 7 and Windows Vista. It’s also available for Windows XP and Windows Server.
Read more at Windows Recovery Disks.
- The NeoSmart Support Forums, member-to-member technical support and troubleshooting.
- Get a discounted price on replacement setup and installation discs: Windows XP, Windows Vista, Windows 7, Windows 8.
Applicable Systems
This Windows-related knowledgebase article applies to the following operating systems:
- Windows XP (all editions)
- Windows Vista (all editions)
- Windows 7 (all editions)
- Windows 8 (all editions)
- Windows 8.1 (all editions)
- Windows Server 2003 (all editions)
- Windows Server 2008 (all editions)
- Windows Server 2012 (all editions)
Applicable Models
This Lenovo-related knowledge base article applies to the following computer models:
- ThinkPad series, like the ThinkPad Yoga, the ThinkPad Helix or any models from ThinkPad
- ThinkCentre series, like the M32, M73, M73z, M78, M83, M83 Pro, M93p, M93z
- IdeaCentre series, like the IdeaCentre K430 or IdeaCentre B540
- Flex series: Flex 2, Flex 15, Flex 14
- IdeaPad series: 11S, Y510p, Y410p, U430p
- Essentials series: G500, G700
- 11e series: 11e, Yoga 11e
- A series: A540, A730, A740
- B series: B350, B550, B750
- C series: C260, C650
- E series: E440, E540, E545, E93z
- G series: G40, G50-30, G50-70, G410, G500, G510, G710
- H series: H500, H530s
- K series: K450e
- L series: L440, L540
- Q series: Q190
- S series: S210, S215
- T series: T440, T440s, T440p, T540p
- U series: U430p
- W series: W540
- X series: X1, X140e, X240
- Y series: Y40, Y50, Y410p, Y510p
- Z series: Z40, Z50, Z510, Z710
Propose an edit
Related Articles
-
Disable Legacy Boot Mode and Enable UEFI
-
How To Reinstall Windows 10
-
Remove Dual Boot Menu – Fix for Windows
-
Windows won’t start – Guide for Windows XP, Vista, 7, 8, 10
-
Fix slow boot – Guide for Windows XP, Vista, 7, 8, 10
-
How to Reset PC BIOS/CMOS
Description: The original set to recover Windows 7 Professional 64 bit SP1 consists of 3 DVD discs 0A44006, 0A40707 and 0A40733, Laptop Lenovo ThinkPad T420.
Type Model: 4177, 4178, 4236, 4170
Compatible with ThinkPad T420s (4170), tested by me personally, it works 100%.
Data recovery disks supposedly fit all models of ThinkPad x200s, x200, x201, x220, x301, T400, T500, T410, T420s, T510, T520, W500, W510, W520,
Lenovo E120, E420, E520
(after installing the utility you want to run home updates from Lenovo — ThinkVantage ™ ® System Update, all of the missing drivers will be installed automatically). Note when burning these discs please burn them at THE SLOWEST SPEED. Thank you.
comment
Reviews
Reviewer:
Albion2402
—
favoritefavoritefavoritefavorite —
July 26, 2022
Subject:
how do i use this
this is a reat archive i just dont know how to use it and what to do with the .xml files. can someone pls help
Reviewer:
VitaliyS1500
—
favoritefavorite —
July 16, 2022
Subject:
ThinkPad Edge E525
I tested this recovery on this notebook and the Preparing the Hard disk. Probably E525, released also in 2011. From Windows 10, launch application named «Recovery» i have error «Cannot find the backup files». But thanks, you can upload this disc!
Reviewer:
jimmycozad
—
—
June 18, 2022
Subject:
Missing drivers
It’s been brought to my attention that some are missing drivers.
1 for PCI Serial port with VEN ID: 8086 DEV ID: 2A47 its a Mobile 4 Series Chipset AMT SOL Redirection
2. PCI Communications Controller with VEN ID: 8086 DEV ID: 2A44 its a Mobile 4 Series Chipset MEI Controller. Hope this helps
Reviewer:
btjtaylor
—
favoritefavoritefavoritefavoritefavorite —
June 17, 2022
Subject:
Great upload
Thanks for the great upload.
Works perfectly on the X200 laptops I tried it out on.
Be aware that it takes quite a long time to do the installation, I would estimate 2-3 hours, so make sure you have enough time to let it complete fully!
As per the other commenters I had a couple of serial devices not installed in device manager but nothing was actually broken — think it is the intel management engine components, or similar.
Reviewer:
Dimis7
—
favoritefavoritefavoritefavoritefavorite —
March 23, 2022
Subject:
Thinkpad X200s
Hi all,
Restored successfully on Lenovo x200s.
Need to boot with 0A44006_1.iso, then the installation will ask first to put 0A40707_2.1.iso, then the 0A40707_2.2.iso.
All hardware works fine except 2 devices:
PCI Serial port with VEN ID: 8086 DEV ID: 2A47
PCI Communications Controller with VEN ID: 8086 DEV ID: 2A44
Probably something to to with Intel AMT.
Reviewer:
Tech Guy137
—
favoritefavoritefavoritefavorite —
July 4, 2021
Subject:
Restored Successfully.
When I download the isos and burned them to dvds. The recovery went successfully but the reason why its not 5 stars because it failed to install the graphics driver but everything besides that went successfully
Reviewer:
axelirant
—
—
May 27, 2021
Subject:
usb bootable?
is it possible to boot this from a usb? my x200t has no dvd drive, and although I can buy one externally, it would be really simple if these 3 iso’s could just boot using Ventoy or something similar?
Reviewer:
crazydreamland
—
favoritefavoritefavoritefavorite —
October 21, 2020
Subject:
Iso install request
@jimmycozad
Hi and thank you
The install was good but when it came time for the 3rd dvd it didn’t recognize it I verified the iso files prior and after re-downloaded it via torrent and direct All copies identical, also the ip.cab file how are you suppsed to install them, I can see all the files inside no problem is there a specific method?
system boots up fine with only the first 2 dvd’s is the 3rd supposed to be installed, oh i’m installing on the T420 as is the proper model so curios about the 3rd actually being needed as i know office ect are in the swtool directory oh after setup when being asked about office is it supposed to ask me for my serial or should it be automatically inserted via your software provided.
any info on what i’m asking would greatly be appreciated
Thank You once again
Awaiting your response
Reviewer:
screamin
—
favoritefavoritefavorite —
March 31, 2020
Subject:
Thinkpad T410
Does not work with Thinkpad T410 boots but hangs at Preparing hard disk…….. Waited 2 hours and still nothing.
Reviewer:
justdancingsam
—
—
October 27, 2019
Subject:
Request
Can these be cracked so we can use these on computers not running Lenovo T420?
Reviewer:
ZapbuzZ
—
favorite —
August 5, 2019
Subject:
oem junk
tried it but its not as good as a windows 7 dvd