To choose a default printer:
-
Select Start > Settings .
-
Go to Bluetooth & devices > Printers & scanners > select a printer. Then select Set as default.
If you don’t see the Set as default option, the Let Windows manage my default printer option may be selected. You’ll need to clear that selection before you can choose a default printer on your own.
Open Printers & scanners
Your default can be the printer you last used. To turn on this mode:
-
Open Start > Settings > Bluetooth & devices > Printers & scanners.
Open Printers & scanners
-
Select the toggle next to Let Windows manage my default printer and verify that it says On.
To choose a default printer:
-
Select Start > Settings .
-
Go to Devices > Printers & scanners > select a printer > Manage. Then select Set as default.
If you don’t see the Set as default option, the Let Windows manage my default printer option may be selected. You’ll need to clear that selection before you can choose a default printer on your own.
Open Printers & scanners
Your default can be the printer you last used. To turn on this mode:
-
Open Start > Settings > Devices > Printers & scanners.
Open Printers & scanners
-
Select the checkbox beside Let Windows manage my default printer.
Download PC Repair Tool to quickly find & fix Windows errors automatically
Using Printers and identifying which was in use was easy with Windows 7. Upon opening the ‘Devices and Printers’ menu, one could easily check which printer was set to default – something that doesn’t happen in Windows 11/10. Windows 11/10 is smart. It has a feature that is set to ON by default and sets the default printer to the one used most recently at the user’s current location.
Suppose I am connected to my home network on my laptop and I give a command to print a document from my Canon printer, it will set the printer as default for my home network. Whenever I give a command to print any document while being connected to the home network after that, it will automatically command the Canon printer to print the document.
However, if I command to print a document while being connected to some other network, say office network, it won’t send the print instruction to the Canon printer but the printer I last printed from, when connected to the office network. This makes Windows 11/10 a smarter operating system.
However, some users might have different priorities and would like to change these settings, particularly when they need to set one single printer as the default printer. You can turn off the Let Windows manage my default printer automatically setting In Windows 11/10 via Settings, Group Policy or Registry. Let us see how to do it.
Windows 11
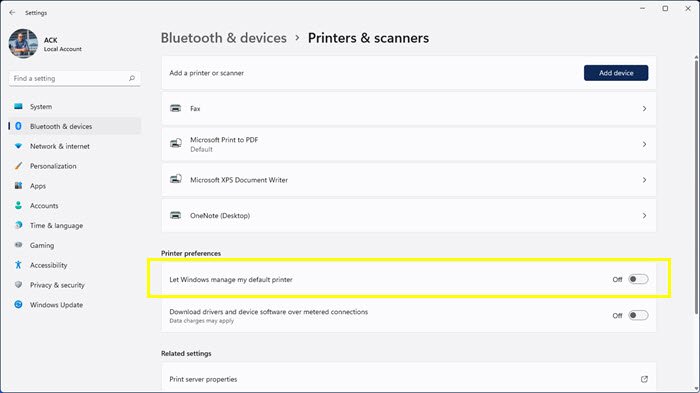
To Turn Off Let Windows manage my default printer setting in Windows 11:
- Open Settings
- Open Bluetooth and devices settings
- On the right side, select Printers and Scanners
- Scroll down a bit and locate Printer preferences section
- Turn the option saying ‘Let Windows manage my default printer’ to OFF.
Windows 10

To change the settings to manual in Windows 10, use the following steps:
- Click on the Start button and then click on the gear-like symbol which will open the Settings page.
- Among the tabs on the left, please click ‘Printers and Scanners‘.
- Turn the option saying ‘Let Windows manage my default printer‘ to OFF.
Using Group Policy
If these settings need to be changed for a larger domain controlled network, use the following steps:
1] Open the Group Policy Editor and navigate to the following location:
User Configuration > Administrative Templates > Control Panel > Printers
2] Among the list of policies, find the policy ‘Turn off Windows default printer management‘ and Enable it.
This changes the group policy regarding the printers for all systems attached to the domain. Once done, the group policy needs to be forced on all computers that were attached to the domain. The procedure for the same is as follows:
1] Right-click on the start button. Open Command Prompt (Admin).
2] Enter the command gpupdate /force in the command prompt window and restart the system.
Using Registry Editor
1] To open the Registry Editor, press Windows + R to open the run window.
2] Enter the command ‘regedit’.
3] Navigate to the following key:
HKEY_CURRENT_USERSoftwareMicrosoftWindows NTCurrentVersionWindows
4] On the right pane, right-click on the value New > DWORD.
5] This will create a new registry item DWORD (REG_DWORD). Rename it LegacyDefaultPrinterMode.
6] Double-click it to modify its Value data. Change the radio button to ‘hexadecimal’ and change the value data to 1.
Restart your Windows system.

Karan Khanna is a passionate Windows user who loves troubleshooting Windows 11/10 problems in specific and writing about Microsoft technologies in general.
- Remove From My Forums
-
Question
-
How can we completely disable / remove the Let Windows manage my default printer? We have created a GPO that affects the Current user and the GPO works when a gpupdate is ran, however when you restart Windows the setting is back on.
It seems that there is some sort of background Windows process that is turning this back on during the reboot and preventing the GPO from affecting this setting. The only way we have been able to get it to apply after a reboot is to then run another
gpupdate and if you have Settings — Devices box open while running the gpupdate you can actually watch the slide bar move.We are running Windows 10.0.10586 Enterprise with all of the latest updates through Feb 2016.
This is the registry setting:
[HKEY_CURRENT_USERSOFTWAREMicrosoftWindows NTCurrentVersionWindows]
«LegacyDefaultPrinterMode»=dword:00000001Is there a way to completely disable this feature?
Contents
- How to Set a Printer as the Default Printer in Windows 10
- Change the Default Printer in the Settings App
- Change the Default Printer via the Control Panel
- Change the Default Printer via the Print Dialog
- “How Do I Change the Default Printer in CMD?”
- How to Have Your Default Printer Switched Automatically Based on Your Location
- “Why Does My Default Printer Keep Changing in Windows 10?”
- “How Do I Permanently Set a Default Printer in Windows 10?”
- Fix 1: Turn Off ‘Let Windows Manage My Default Printer’ and Set a Default Printer Yourself
- Fix 2: Check the Printer Status
- Fix 3: Reinstall the Printer Drivers
- Fix 4: Modify Your Printer Settings in the Registry Editor
- Fix 5: Remove Old Printer Connections
- Remove Entries of Unwanted Printers from the Windows Registry
- Remove Unwanted Printers via Windows Settings
- Remove Unwanted Printers via Device Manager
- Fix 6: Install the Latest Windows Updates
- Fix 7: Create a New User Account
- Fix 8: Run a System Restore
- Conclusion

If you use more than one printer, Windows 10 automatically sets the one you used most recently as the default printer. However, a situation may arise where you would want to change the default printer. There are different methods you can use to achieve your aim, and that is what we will outline in this guide.
But that’s not all. Some users have reported that after setting a default printer, Windows keeps changing it. If you have encountered this issue, just keep reading since we’ve put together some easy solutions to help you fix it.
How to Set a Printer as the Default Printer in Windows 10
Here are the different methods available to you:
- Using the Settings app
- Using the Print dialog
- Using the Control Panel
- Using an elevated Command Prompt
Change the Default Printer in the Settings App
Follow the steps below to set your default printer:
- Press the Windows icon + I keyboard combination to invoke the Settings app. You could also open the Start menu and click the Settings icon.
- Click on Devices.
- Click on Printers and Scanners in the left pane.
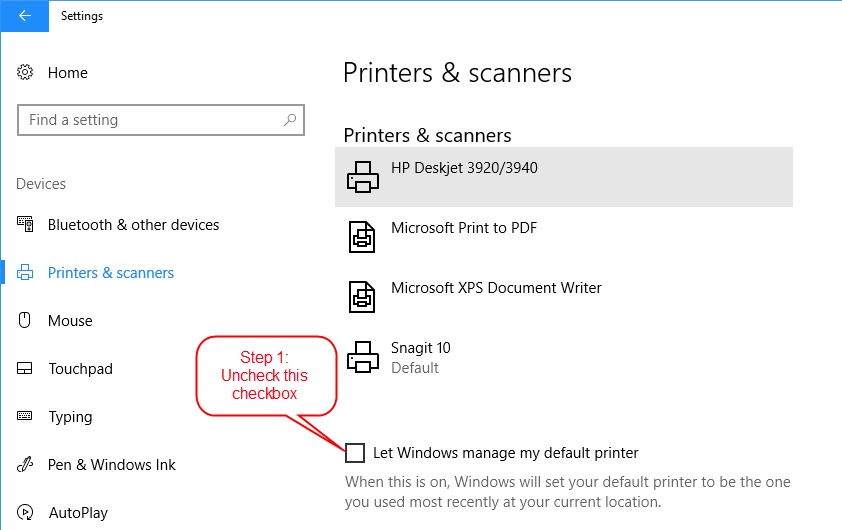
- On the right pane, click the toggle to turn off the ‘Let Windows manage my default printer’ option. Once you do so, Windows will no longer set a printer as the default printer automatically. This step is required before you can change your default printer.
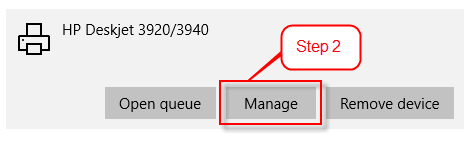
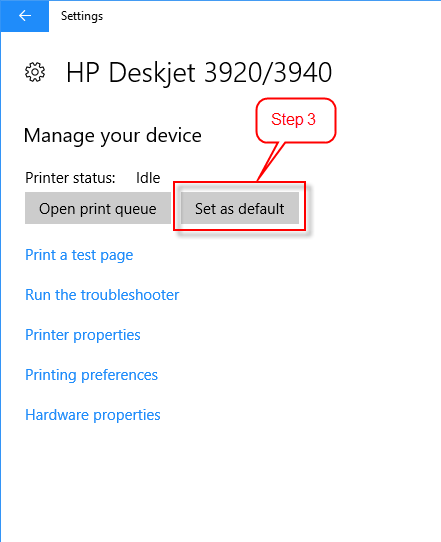
- Afterward, move to the Printers & scanners section and click on the printer you wish to set as default. Once you do, you will be presented with its options. Click the Manage button.
- On the new page that opens, you will find the ‘Set as default’ button. Click on it.
Note: If the ‘Set as default’ button is not available, it means that you did not follow Step 4. You have to stop Windows 10 from automatically choosing a default printer.
Once you have completed the above steps, the desired printer will now appear as the selected device when you try printing a document. The status will show “Default” in the printer list.
Change the Default Printer via the Control Panel
The Devices & Printers option can also be found in the Control Panel. Here’s how to access it:
- Open the Run box by pressing the Windows icon + R shortcut.
- Type ‘Control Panel’ into the text area and click OK or hit Enter on your keyboard.
Alternatively, you could type ‘Control Panel’ into the Start menu search bar and click on the option when it appears in the search results.
- Direct your attention to the ‘View: by’ drop-down in the top-right corner of the Control Panel window and make sure that it is set to ‘Small icons.’
- Locate ‘Devices and Printers’ in the list of options and click on it.
- Move to the Printers section on the new page that opens and right-click on the printer of your choice. Then click on ‘Set as default printer’ in the contextual menu.
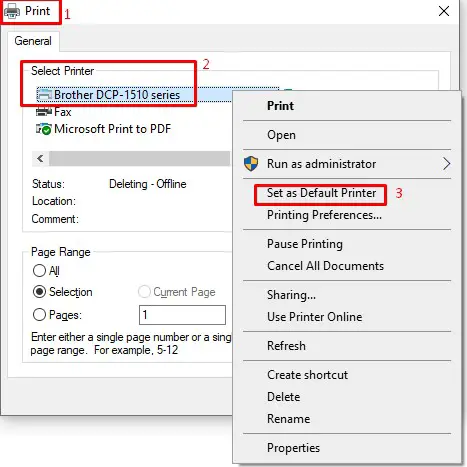
Change the Default Printer via the Print Dialog
Here’s what you have to do:
- Open Notepad and click on the File tab.
- Click on Print to access the Print dialog.
Tip: You can simply press Ctrl + P to quickly open the Print dialog after launching Notepad.
- Right-click on the printer you want to make the default printer and then click on the ‘Set as Default Printer’ option in the contextual menu.
- You will be presented with a warning that says that Windows will stop managing your default printer if you set this printer as default. Click the OK button to proceed. Your selected printer will now be the default printer.
“How Do I Change the Default Printer in CMD?”
This is easy to do. Follow the steps below:
- Open the Power User menu by pressing the Windows icon key + X keyboard combination.
- Click on Command Prompt (Admin).
- Confirm the action by clicking ‘Yes’ when the User Account Control (UAC) box appears on your screen.
- Once you are in the Command Prompt (Admin) window, copy and paste the following line and then hit enter to run it:
RUNDLL32 PRINTUI.DLL,PrintUIEntry /y /n “Printer name”
Note: Make sure that you replace “Printer name” in the above command with the name of the printer you want to set as your default printer. If you don’t know the name of the printer, open Notepad or Microsoft Word and press Ctrl + P to invoke the Print dialog. There, you will find the name of your printer.
How to Have Your Default Printer Switched Automatically Based on Your Location
As already mentioned, you can configure Windows 10 to manage your default printer automatically. The advantage is that the OS chooses a default printer based on your location. So, when you are in the office, the office printer is used as the default printer, and when you go home, your home printer is used.
To enable this setting, all you have to do is go to the Settings app (press the Windows icon + I shortcut) and click on Devices > Printers & Scanners. Then enable the option that says ‘Let Windows manage my default printer.’
Once you’ve allowed Windows to manage your default printer, the OS will always set the most recently used printer in a particular location as your default printer. So when you are at home, the last printer you used at home will be set as the default printer. And when you are in the office, the printer you last used there will be your default printer.
“Why Does My Default Printer Keep Changing in Windows 10?”
If Windows keeps changing your default printer, there are two reasons why that could happen:
- The first reason is that you’ve enabled the option that allows it to automatically manage your printers. So when you use another printer that is not the current default printer, Windows assumes that you now prefer that printer and, therefore, makes it the default printer.
- An unexpected error occurred, forcing the OS to default to another printer. Such errors include outdated or faulty printer software, corrupt registry entries, system bugs, broken printer cords, etc.
Whatever the case may be, there are several solutions you can use to resolve the issue and prevent Windows from changing your default printer.
“How Do I Permanently Set a Default Printer in Windows 10?”
- Turn off ‘Let Windows Manage My Default Printer’ and set a default printer yourself
- Check the printer status
- Reinstall the printer drivers
- Modify your printer settings in the Registry Editor
- Remove old printer connections
- Remove old entries from the Windows Registry
- Remove unwanted printers via Device Manager
- Remove unwanted printers via the Windows Settings app
- Install the latest Windows updates
- Create a new user account
- Run a system restore
Apply these fixes in the order presented so as to get rid of the issue as quickly as possible. Windows will no longer change your default printer by the time you have tried one or some of the solutions. We will now present all the necessary procedures.
Fix 1: Turn Off ‘Let Windows Manage My Default Printer’ and Set a Default Printer Yourself
When you use another printer, Windows automatically makes it the default device. Disabling the automatic printer management setting will stop the OS from making these changes. Afterward, you can then select the printer you want as default.
Follow these steps:
- Invoke the Settings app by pressing the Windows + I keyboard combination.
- Click on Devices on the Settings page.
- Click on Printers & Scanners in the left pane.
- In the right pane, click the toggle for the ‘Let Windows manage my default printer’ option to turn it off.
- Now, scroll to the section where your connected printers are displayed and click on the printer you want as default. Then click the Manage button that is displayed below it.
- Click the ‘Set as default’ button.
Afterward, Windows will no longer select a different printer as the default printer. However, if a change occurs again, then try the fixes that follow below.
Fix 2: Check the Printer Status
Windows will default to another printer if it detects an issue with your preferred printer. You need to check the status of the printer and see if it is powered on and online:
- Quickly open Devices and Printers by typing the name into the Start menu search bar.
- Locate your printer in the list of printers. Right-click on it and select ‘Set as Default.’ Once you have done that, the printer will have a green checkmark. Now click on the printer to select it and see the status. It should say ‘Ready.’
- If the printer is greyed out when you get to Step 2, it means that it is offline. Ensure that it is powered on and connected. If it is a wireless printer, see that it is connected to your wireless network. If it is a printer that is hooked up over a USB port, run the setup software and re-add the printer. Running the software will also fix any driver-related issues.
Also, check the USB and power cables and make sure that they are not disconnected or damaged. If there is a problem with these cables, the printer will be seen to have an issue and Windows will automatically default to another printer that works fine.
Fix 3: Reinstall the Printer Drivers
As mentioned earlier, Windows could be changing your default printer because it detects an issue. Thus, make sure that the software for all your printers is up to date and compatible. Begin by uninstalling the drivers and then install their updated versions. Follow these steps:
- Call up the Power User menu by pressing the Windows + X shortcut.
- Click on Device Manager in the menu.
- Once you are in the Device Manager window, locate your printer device and right-click on it. Then click on Uninstall Device from the contextual menu.
- Confirm the action by clicking on ‘Delete the driver software for this device’ and then click on Uninstall.
- Restart your PC and visit the website of your printer manufacturer. Search for the latest driver for your printer model and download and install it.
Tip: You can use an automatic driver updater tool to manage your driver software updates. For this, we recommend Auslogics Driver Updater. The tool will search the internet for the latest official drivers that are provided by the manufacturers of your printer. It then downloads and installs the drivers without any effort on your part.
Fix 4: Modify Your Printer Settings in the Registry Editor
If your default printer keeps changing, you can make a registry modification to resolve it. Here’s how:
- Bring up the Run accessory by pressing the Windows + R shortcut.
- Type ‘Regedit’ into the text field and click the OK button.
- Click the Yes button on the User Account Control prompt.
- Once you are in the Registry Editor window, create a backup first by clicking on ‘Computer’ in the left pane. Then click on the File tab and click Export. Enter a name for the backup file, select a location where it will be saved, and click the Save button.
- On the left pane, double-click on HKEY_CURRENT_USER to expand the options and then navigate to SOFTWARE > Microsoft > Windows NT > CurrentVersion > Windows.
- Once you get to Windows, double-click on LegacyDefaultPrinterMode in the left pane and set the Value Data to 1.
Afterward, set your default printer again.
Fix 5: Remove Old Printer Connections
If there are printers you don’t need or use anymore, removing them from Windows can help resolve the default printer changes.
Remove Entries of Unwanted Printers from the Windows Registry
Entries of printers you no longer use may remain in your registry. These entries can have a negative effect on Windows. It is advisable to remove them. Here’s how:
- Call up the Run dialog by pressing the Windows + R keyboard combination.
- Type ‘Regedit’ into the text field and hit Enter to open the Registry Editor.
- Click the Yes button on the User Account Control prompt.
- Create a backup of your registry by clicking on ‘Computer’ in the left pane and then click on the File tab. Enter a name for the backup file and save it in a safe location.
- Double-click on HKEY_USERS in the left pane of the Registry Editor window and then navigate to USERS_SID_HERE > Printers > Connections.
Note: Click on your own User SID to find the Printers folder. The SID is usually the longest one.
- Right-click on your old printer connections and select Delete.
- Afterward, navigate to the HKEY_USERS > USERS_SID_HERE > Printers > Settings key and delete the unwanted printer settings.
Warning: Making modifications to your registry can be risky. If you find the above steps challenging, it is best to use the Auslogics Registry Cleaner program to run a scan. The tool will automatically remove unwanted keys and entries from your registry without any risk of harm to your operating system.
Set your default printer again after you’ve removed the entries of old printers from your registry.
Remove Unwanted Printers via Windows Settings
Follow these easy steps:
- Open the Settings app by pressing the Windows + I keyboard combination.
- Click on Devices and then click on Printers & Scanners in the left pane.
- Scroll to the section on the right pane where your printers are listed. Select the printer you no longer need by clicking on it.
- Click the Remove Device button and then click ‘Yes’ to confirm the action.
Remove Unwanted Printers via Device Manager
You can also uninstall the drivers of unwanted printers via Device Manager:
- Open the Power User menu by pressing the Windows + X keyboard combination.
- Click on Device Manager in the list.
- Locate the unwanted device and right-click on it. Then select Uninstall Driver Software.
Fix 6: Install the Latest Windows Updates
System bugs can cause your default printer to keep changing even after you have made all the necessary configurations. Fortunately, Microsoft periodically releases updates that contain patches for various bugs, recent drivers for your hardware devices, and more. Installing these updates will help resolve not only the issue you are having with your printers but also other problems you are yet to recognize on your computer.
Windows 10 is configured by default to automatically download and install new updates. However, you can still check for updates whenever you desire by following the steps below:
- Open the Settings app: Go through the Start menu or press the Windows + I shortcut.
- Click on Updates & Security.
- Click on Windows Updates in the left pane and then click the Check for Updates button in the right pane to start the process. If any updates are found, Windows will download them.
- To complete the installation, restart your computer when prompted.
Fix 7: Create a New User Account
If you still can’t get past the issue, although that is quite unlikely at this point, another solution that can help is creating a new user account. Here’s how:
- Open Windows Settings by pressing the Windows icon + I shortcut and click on Accounts.
- Click on the Family & Other People section.
- Click on ‘Add someone else to this PC.’
- Enter the details of your second Microsoft account, or you can indicate that you do not have this person’s sign-in information by clicking on the related link.
- Click on ‘Add a user without a Microsoft account.’
- Follow the instructions as presented to complete the process.
When you are done, log in to the new account you created and see if the printer issue will continue. You can migrate your files to the account and use it instead of your old account.
Fix 8: Run a System Restore
The ‘Default printer keeps changing’ problem could be a result of recent updates or modifications you made on your computer. A good solution to that will be to perform a system restore to the last point when things worked normally:
- Go to the Start menu and type ‘System Restore’ into the search bar. Then click on the option from the search results.
- Click the System Restore button and then click Next when the System Restore page opens.
- Elect to show more restore points if available. Then choose a restore point with a date when you are sure Windows had no issues with your printers.
- Click ‘Next’ and follow the instructions presented to you to complete the restore process.
- Restart your computer afterward and then see if the ‘default printer keeps changing’ issue has been resolved.
Note: Keep in mind that performing a system restore will remove the programs you installed and undo the system settings you modified after the date of your selected restore point.
Conclusion
Now you know how to set your default printer if you have multiple printers. You can allow Windows 10 to manage your printers automatically. The OS will always set the last used printer as the default printer. Windows also manages your default printer based on your location. This means that when you have more than one printer at home, the one you used recently will be set as the default printer. Likewise, when you go to your place of work, the last printer that you used will also be set as the default printer.
We also discussed how to fix issues that cause your chosen printer not to remain the default printer. Since Windows 10 can manage your default printer automatically, issues may arise and cause your favorite printer to stop being the default printer. However, you can fix them by applying the helpful solutions we presented above.
We hope you’ve found this article worth your while. If you have any questions or remarks, please kindly share them with us through the comments section below. We will be glad to hear from you.
«Ил-2 Штурмовик» нового поколения — «Битва за Сталинград» и «Битва за Москву» #13
Оглавление:
- Позвольте Windows управлять моим принтером по умолчанию
Использование принтеров и определение того, что было в использовании, было легко с Windows 7. После открытия меню «Устройства и принтеры» можно было легко проверить, какой принтер был установлен по умолчанию — что-то, чего не происходит в Windows 10. Windows 10 — умный. У него есть функция, которая по умолчанию установлена в положение ON и устанавливает принтер по умолчанию на тот, который использовался совсем недавно в текущем местоположении пользователя.
Предположим, что я подключен к своей домашней сети на своем ноутбуке и даю команду распечатать документ с моего принтера Canon, он установит принтер Canon по умолчанию для моей домашней сети. Всякий раз, когда я даю команду для печати любого документа при последующем подключении к домашней сети, он автоматически прикажет принтеру Canon печатать документ.
Однако, если я прикажу распечатать документ при подключении к какой-либо другой сети, скажем, в офисной сети, он не отправит инструкцию печати принтеру Canon, а принтер, который я последний раз печатал при подключении к офисной сети. Это делает Windows 10 более разумной операционной системой.
Однако некоторые пользователи могут иметь разные приоритеты и хотели бы изменить эти параметры, особенно когда им нужно установить один принтер в качестве принтера по умолчанию. Вы можете отключить функцию «Разрешить Windows» управлять моим принтером по умолчанию, автоматически устанавливающим в Windows 10 через «Настройки», «Групповая политика» или «Реестр». Давайте посмотрим, как это сделать.
Чтобы изменить настройки в ручном режиме, выполните следующие действия:
1] Нажмите кнопку «Пуск», а затем нажмите на шестерню как символ который откроет страницу настроек.
2]. Среди вкладок слева нажмите « Принтеры и сканеры ».
3] Поверните параметр «. Позвольте Windows управлять моим принтер по умолчанию `до ВЫКЛ .

Использование групповой политики
Если эти параметры необходимо изменить для более крупной сети с контролируемой доменом, выполните следующие действия:
1] Откройте редактор групповой политики и перейдите к следующему местоположению:
Конфигурация пользователя > Административные шаблоны> Панель управления> Принтеры
2] В списке политик найдите политику « Отключить управление принтерами по умолчанию Windows » и «Включить».
Это изменяет групповую политику в отношении принтеры для всех систем, подключенных к домену. После завершения групповой политики необходимо принудительно на всех компьютерах, которые были прикреплены к домену. Процедура для него такова:
1] Щелкните правой кнопкой мыши на кнопке «Пуск». Откройте командную строку (Admin).
2] Введите команду gpupdate / force в окне командной строки и перезапустите систему.
Использование редактора реестра
1] Нажмите Windows + R, чтобы откройте окно выполнения.
2] Введите команду «regedit».
3] Перейдите к следующему ключу:
HKEY_CURRENT_USER Software Microsoft Windows NT CurrentVersion Windows
4]. правой панели щелкните правой кнопкой мыши на значении New> DWORD.
5] Это создаст новый элемент реестра DWORD (REG_DWORD). Переименовать его LegacyDefaultPrinterMode .
6] Дважды щелкните его, чтобы изменить его значения. Измените переключатель на «шестнадцатеричный» и измените данные значения на 1 .
Перезагрузите систему Windows 10.

How to set a default printer in Windows 10
- To choose a default printer, select the Start button and then Settings . Go to Devices > Printers & scanners > select a printer > Manage. Then select Set as default.
- In Windows 10, your default can be the printer you last used. To turn on this mode, open Start and select Settings > Devices > Printers & scanners.
To change the settings to manual, use the following steps: 1] Click on the Start button and then click on the gear like symbol which will open the Settings page. 2] Among the tabs on the left, please click ‘Printers and Scanners’. 3] Turn the option saying ‘Let Windows manage my default printer’ to OFF.Solution 2:
- Open the Registry Editor (Right mouse click Windows Start → Run → regedit)
- Navigate to this key: HKEY_CURRENT_USERSOFTWAREMicrosoftWindows NTCurrentVersionWindows.
- For name “LegacyDefaultPrinterMode” set the “Value data:” to “1” to return to the old Default printer behavior in Windows 10.
Resolution
- Navigate to Windows Start menu.
- Click “Settings”
- Click “Devices” in the Settings dialog.
- Make sure you are in the section “Printers & scanners”
- Disable the setting “Let Windows manage my default printer” by setting it to “Off”.
- Click the Print&Share printer ‘Print+Share’ and select “Set as default”.
How do I change my default printer on Windows 10?
Set the Default Printer in Windows 10
- Touch or click Start.
- Touch or click Control Panel.
- Touch or click Devices and Printers.
- Touch and hold or right-click the desired printer.
- Touch or click Set as default printer.
How do I change my default printer?
To change your default printer:
- Choose Printer and Faxes in the Control Panel (Start, Control Panel, Printers and Faxes).
- Right-click on the printer you want to make the default printer.
- From the context menu that opens up select Set as Default Printer.
How do I change the default printer for all users?
Defining default printer setting for all users (including network
- Open Start > Settings > Printers & Faxes.
- Right click printer, select Printing Preferences.
- Change the settings.
How do I manage printers in Windows 10?
Manage Default Printers in Windows 10. Launch Settings from the Start menu or press Windows key + I then click Devices. Select the Printers & Scanners tab then scroll down.
How do I set default programs in Windows 10?
Change default programs in Windows 10
- On the Start menu, select Settings > Apps > Default apps.
- Select which default you want to set, and then choose the app. You can also get new apps in Microsoft Store.
- You may want your .pdf files, or email, or music to automatically open using an app other than the one provided by Microsoft.
Why does my default printer keep changing Windows 10?
Default Printer keeps changing. From the WinX Menu, open Settings > Devices > Printers & scanners. Scroll down a bit till you see a setting Let Windows manage my default printer. When this setting is turned On, the default printer is the last used printer.
How do I change the default printer in Word 2016?
In order to change the printer settings you’ll need to follow these steps if you are using Word 2010, Word 2013, or Word 2016:
- Display the File tab of the ribbon.
- Click Print at the left side of the dialog box.
- Using the Printer drop-down list, select the printer you want to use.
- Click on the Printer Properties button.
Why does my default printer change automatically?
Default printer keeps changing randomly, after reboot, log off – According to users, their default printer keeps switching after reboot. This can be caused by your drivers, so be sure to update them. Default printer keeps switching, reverting back – Sometimes this issue can occur due to certain system bugs.
How do I change my default browser on Windows 10?
Here’s how to change your default browser in Windows 10.
- Navigate to Settings. You can get there from the Start menu.
- 2.Select System.
- Click Default apps in the left pane.
- Click Microsoft Edge under the “Web browser” heading.
- Select the new browser (ex: Chrome) in the menu that pops up.
How do I setup a printer on Windows 10?
Let’s take a quick look at how to add your wireless printer in Windows 10.
- Open Windows search by pressing Windows Key + Q.
- Type in “printer.”
- Select Printers & Scanners.
- Turn on the printer.
- Refer to the manual to connect it to your Wi-Fi network.
- Hit Add a printer or scanner.
- Select the printer from the results.
How to share printers without HomeGroup on Windows 10
- Open Settings.
- Click on Devices.
- Click on Printers & scanners.
- Under “Printers & scanners,” select the printer you want to share.
- Click the Manage button.
- Click the Printer properties link.
- Click on the Sharing tab.
- Check the Share this printer option.
How do I open Devices and Printers in Windows 10?
To view the devices available in Windows 10 follow these steps:
- Open Settings.
- Click Devices. The settings related to devices are shown.
- Click Connected Devices.
- Click Bluetooth, if it’s available.
- Click Printers & Scanners.
- Close Settings.
How do I change the default file associations in Windows 10?
Windows 10 uses Settings instead of Control Panel to make changes to file type associations. Right-click the Start button (or hit the WIN+X hotkey) and choose Settings. Scroll down a little and select Choose default apps by file type. Locate the file extension you want to change the default program for.
How do I set default programs in Windows 10 for all users?
How to set default apps on Windows 10 using Control Panel
- Open Settings.
- Click on System.
- Click on Default apps.
- Click on Set defaults by app.
- Control Panel will open on Set Default Programs.
- On the left, select the app you want to set as default.
Why can’t I change default apps in Windows 10?
It seems that the affected users can’t change Windows 10 default apps whatever they do.
Solution 4 – Rollback Windows 10
- Open Settings.
- Choose Update & Security.
- Select Recovery from the left pane.
- Click on the “Get started” button under the Go back to the previous version of Windows 10.
How do I change my printer to portrait?
Change mode in printer settings
- Open the Control Panel and then the Devices and Printers option.
- Find your printer in the Devices and Printers window and right-click the icon with your mouse.
- In the menu that appears, select Printing Preferences and find the option for Orientation in the preferences window.
What is a default printer?
A default printer is the printer all print jobs are sent to unless otherwise specified. Having a default printer prevents a program from asking the user what printer they want to use each time they print. The picture is an example of setting a printer as the default printer in Windows.
Why does my printer default to onenote?
Remove OneNote as the Default Printer. Right-click the printer device icon and then and click “Set as default printer” after the pop-up menu appears. Close the “Printers and Devices” window. Windows no longer uses the OneNote virtual printer as the default print device when printing from an application.
What is the default browser for Windows 10?
Change your default browser in Windows 10. Select the Start button, and then type Default apps. Under Web browser, select the browser currently listed, and then select Microsoft Edge or another browser.
What is the best Web browser for Windows 10?
Top 11 Web Browsers of 2019
- Google Chrome – Overall top web browser.
- Mozilla Firefox – Best Chrome alternative.
- Microsoft Edge – Best browser for Windows 10.
- Opera – Browser that prevents cryptojacking.
- Chromium – Open Source Chrome alternative.
- Vivaldi – A highly customizable browser.
How do you fix Google Chrome Cannot determine or set the default browser?
If you don’t see the button, Google Chrome is already your default browser.
- On your computer, click the Start menu .
- Click Control Panel.
- Click Programs Default Programs Set your default programs.
- On the left, select Google Chrome.
- Click Set this program as default.
- Click OK.
Photo in the article by “Wikipedia” https://en.wikipedia.org/wiki/Margin_(typography)
Setting up a particular printer as the default printer was a very easy task in Windows 7. But if you want to do it in Windows 10, it would be a bit difficult. Here on this page, we’ll give you a step-by-step guide on how to set up a default printer for Windows 10.
Sometimes we need to use multiple printers on a computer. We want to set a particular printer as the default printer. The default printer will be come up as the selected printer when you give print command. Sometimes, we need to change the default printer to another one as well. Please follow the following steps.
1. Setting up default printer in Windows 10 using control panel
You can pick your default printer is to use the Windows Control Panel. Open this, then choose “Devices and Printers” from the list of icons. You’ll see a new bunch of icons, which represent the hardware you have available. Look down a little to find the Printers section, then find the one that you want to set as the default. Right-click on this and read the menu that comes up. About halfway down there’s a line which says “Set as the default printer,” and you need to select that. If a confirmation box appears, press OK. Your new default printer is now set!
- Click the Start button.
- Click on the Control Panel (Gear Icon).
- Click on Devices
- Click on Printer & Scanners
- Do un-check the checkbox “Let Windows manage my default printer.”
- Click on the Printer you want to make as default
- Click on Manage
- Click on “Set as default.”
If the steps doesn’t work for you then go to the Microsoft official Instruction
Screenshots:
Most people who use Microsoft’s Windows 10 operating system will need to do at least a bit of printing. In older versions of Windows, setting up a printer could be awkward, but happily, this is no longer the case. The first thing you’ll need to do is to make sure that your printer is properly connected and switched on, so check all the necessary cables as well as sockets. If your printer uses wireless rather than a USB connection, check that as well.
There are four main ways to set default printer settings in Windows 10, and they all work well so select the one you find most comfortable to use.
2. Set the default printer using default settings
This one is pretty easy. First, go to Settings, and then select the icon marked Devices. On the left, you’ll see “Printers & scanners,” so click that. At the bottom right, there’s a checkbox called “Let Windows manage my default printer” – you’ll need to UNCHECK this box. Then, look in the “Printers & Scanners” section, which will list all the options you have for printing. Select the printer you want to use, then confirm by clicking on the “Set as default” button. That’s it – you’re done!
3. Set default printer through Command Prompt
This option works best if you like to have precise control over your hardware settings. Open the Command Prompt, and then type in “wmic printer get name,default” (without the quotes) and press Enter. Here is a list of all the printers that can be used with your PC. Look at the extreme left of each row and you’ll see either TRUE or FALSE – the one marked TRUE is your current printer. Find the one you want to set as default and note down its name. Then type “wmic printer where name=”blahblahblah” call setdefaultprinter” (using the printer name instead of “blahblahblah”) and your new printer will be set.
Letting Windows manage printers automatically
Open up Settings, then go to Devices. Click “Printers & Scanners” on the right, and you’ll get to the same screen that was mentioned in the “Using the Settings menu” section. Find the checkbox for “Let Windows manage my default printer” and CHECK it. It is the quickest way to set default printer in Windows 10, but it only works if you want your default printer to be the last one you used in your current location.
Did you notice your Default printer keeps changing by itself when you have multiple printers configured on your computer? This is because of Windows 10 new feature called “Let Windows manage my default printer” which sets your most recently used printer as the default automatically. While this can be useful for some users, many others might prefer to set the default printer manually. If you are looking to stop windows from changing the default printer, You can do this from Windows settings or using the Windows registry editor.
Prevent windows 10 from changing the default printer
When a device is changing on its own, it is usually because there is a setting On windows 10 PC that allows changing the device to the most suitable one that it deems worthy. Let’s follow the steps below to Turn off Windows manage my default printer Option.
- Press Windows + I to open Settings Window.
- Click on Devices then select Printer & Scanners.
- This interface lets you select the printer and set it as default, or remove the device.
- Select your printer, Click on Manage and Set as default.
- Now Scroll down a bit till you see a setting Let Windows manage my default printer.
- When this setting is turned On, the default printer is the last used printer.
- Make sure this option is unchecked.
Note: This option isn’t present in Windows 8’s Devices app, it’s new to Windows 10.

Set your default printer in Windows 10
Now go set your default printer. You will see the entire list of printers a little above this setting. Select the printer and click the Set as default button. It will show a green tick/checkmark.
- Windows 10 will not change it again, even if you use another printer.
- If it’s a wireless printer, make sure it is connected to your wireless network.
- The easiest way to do this is to re-do the wireless setup.
- If it’s wired over a USB Port, run the printer’s setup and re-add the printer. (this will automatically) install the drivers as well.
- Open Settings, then go into Devices > Printers and Scanners Set “Let Windows manage my default printer” to Off
Check your Sync settings
If the above setting enables automatically after some time, or after a restart then check your Sync settings. If the “Other Windows settings” option is enabled in the Sync settings page, Windows would sync your printer, mouse, keyboard and other settings.
Open Settings (WinKey + i), click Accounts, Sync your settings Disable the Other Windows settings toggle button.
Tweak Windows Registry to set the default printer
If due to some reason above solution didn’t work for you, Here windows registry tweak that helps to prevent windows to default printer keeps changing.
- Press Windows + R, type regedit and ok to open the windows registry editor.
- Backup Registry Database, then navigate to the following path.
- HKEY_CURRENT_USERSOFTWAREMicrosoftWindows NTCurrentVersionWindows
- Change the value of LegacyDefaultPrinterMode from the default 0 to 1.
- Having done this, Once Restart windows and set your default printer again.

Did these tips help to prevent windows from changing the default printer? Let us know on the comments below.
FAQ
- How do you change the default printer?
Open Control Panel and select Devices and Printers. Right-click printer and select Set as the default printer.
- How do I stop Windows from managing the default printer?
Turn Off the option Let Windows Manage Default Printer in Settings
- What happens if two printers have the same IP address?
If you have two printers on a network register with the same IP address, it may cause conflicts and may windows fails to print documents.
- How do I set the default printer as PDF?
Right-click the PDF printer icon listed under “Devices and Printers” and click “Set as default printer,”
Also read
- How to Fix Printer in Error State on Windows 10
- Windows 11 scanning and repairing drive C stuck at 100
- Use of CHKDSK, SFC, and DISM diagnostic tools in windows 11
- Solved: Print Spooler Keeps Stopping on Windows 11
- How to Increase Internet Connection Speed on Windows 11
Set default printer command line using different ways may come to you in handy. Using this method you can print your documents more quickly. This tutorial can help you in those situations where you do have multiple printers in your home or office and you want to select the default one. There are multiple ways set default printer and we are going to show you how to do it. Please read the post below.
Method 1 – Change default printer via Print dialog
Step 1: Open Microsoft Office Word or Notepad software.
Step 2: Click the File menu and then click the Print option to open the Print dialog. Also, you can use the shortcut Ctrl + P to open the Print dialog.
Step 3: Once you are here, right-click on the printer that you want to set as the default printer on your Windows 10 PC and then click Set as Default Printer option.
Set default printer
Step 4: Click OK button to set the selected printer as default.
Method 2: Use the Windows Settings to set default printer
Step 1: Press the shortcut by using Windows logo key + I together and click Devices.
Step 2:Select the Printers & scanners tab and click the printer you want to set as default. Click Manage.
Step 3:Click Set as default.
Step 4: You need to make sure that you need to stop Windows 10 from automatically managing your default printer. Turn back to the Printers & scanners tab and make sure you did NOT check Let Windows manage my default printer or you can simply turn off the Let Windows manage my default printer option.
Method 3: Set Default Printer Windows 10 via Control Panel
Step 1: Open Control Panel by typing the function name in Cortana’s search bar and then clicking the result.
Step 2: Select Devices and Printers on the window of Control Panel.
Step 3: Under the Printers section, right-click the printer you want to set default on Windows 10 and then click Set as default printer.
Method 4: Set Default Printer Command Line
Step 1: Run Command Prompt as administrator.
- Type Command Prompt in Cortana’s search bar,
- Right-click the most-matched item and then select Run as administrator from the menu.
Step 2: In order to get the list of all the printers installed on your machine, on the Command Line window, type the following command and then press the Enter key to run this command.
wmic printer get name,default
Step 3: Get default printer name by simple copy-paste
Step 4: Set default printer command line by typing the following command and then press the Enter key to run the command
wmic printer where name='yourprintername' call setdefaultprinter
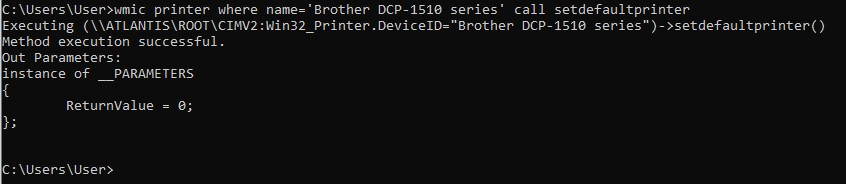
Set default printer command line
Method 5: Set default printer using Registry editor
Step 1:Press the shortcut by using the Windows logo key + R together to open the Run box.
Step 2: Type regedit and Run as Administrator and press Enter.
Step 3: Navigate to “ComputerHKEY_CURRENT_USERSoftwareMicrosoftWindows NTCurrentVersionWindows”. Alternatively you can simply copy and paste the text into the Registry Editor address bar and press Enter to go there directly.
Step 4: Double-click LegacyDefaultPrinterMode file and change the Value data into 1. Then click OK.
Method 6: Let Windows Manage my Default Printer
Step 1: Press the shortcut by using Windows logo key + I together and click Devices.
Step 2:Select the Printers & scanners
Step 4: Check the box with the option Let Windows manage my default printer option
Final conclusions
Dear followers of Get IT Solutions, in our step-by-step tutorial, we have provided all the possible methods on how to set default printer. We hope you will find this method helpful. Have you managed to solve it? Please let us know in the comments below.