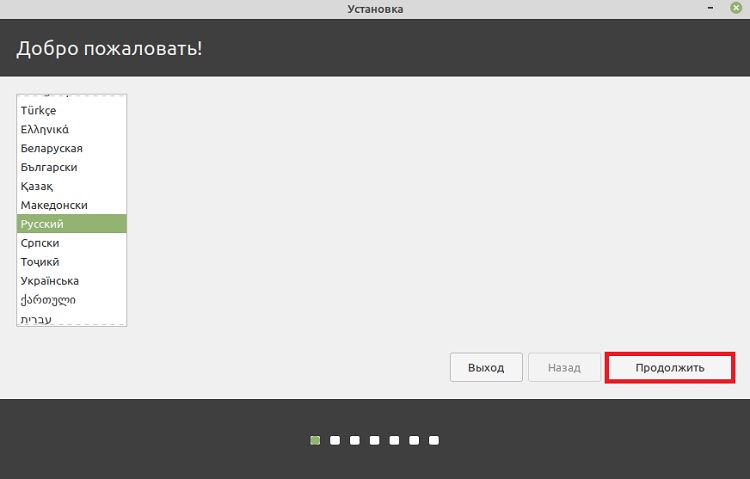
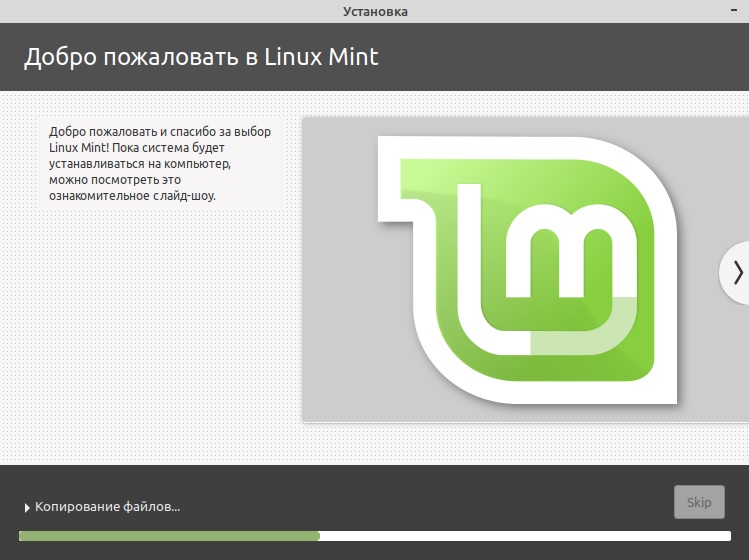
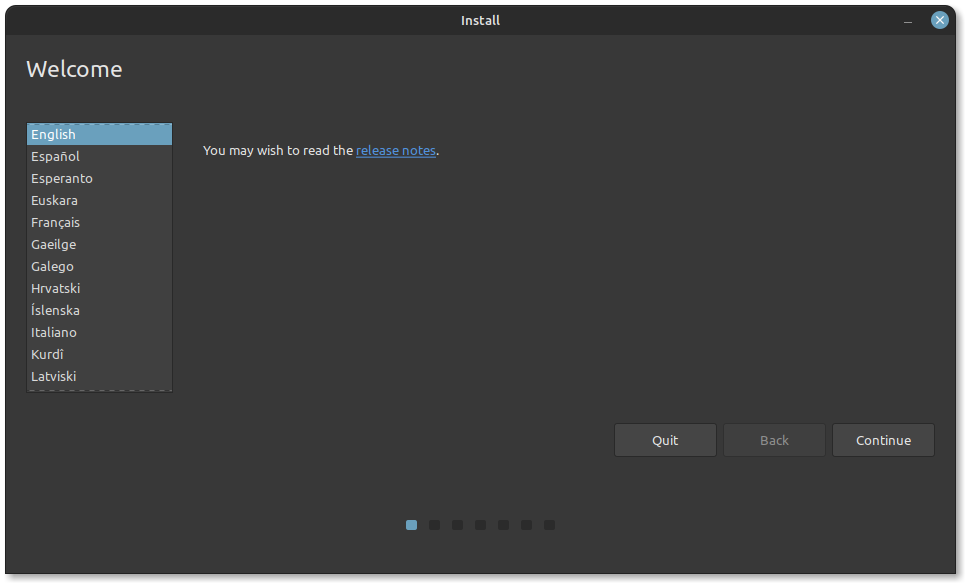
Brief: This guide shows you how to dual boot Linux Mint with Windows 10 and enjoy both Linux and Windows together in one system.
So you have decided to switch to Linux. Good decision! And if you chose to use Linux Mint, that’s even a better decision.
Linux Mint is one of the best Linux distributions for beginners. Using Linux Mint is fairly easy and installing Linux Mint is no rocket science either. In this tutorial, we’ll see how to install Linux Mint along side Windows 10.
Before that let me recap you a few things about installing Linux Mint. There are a few ways you can start using any Linux based operating system.
- Use Linux inside Windows in a virtual machine: This runs a Linux OS like any other application within Windows. This is also one of the safest ways to get a feel of Linux. However, this will utilize your system resources and if you have less than 4Gb of RAM, I won’t advise using it extensively.
- Use a live version of Linux: In this method, you put Linux on a USB or DVD and you boot from it. This is usually slow and your changes done to the Linux system are (normally) not saved. This is particularly useful if you just want to see what Linux feels like.
- Remove Windows and Linux: If you have backed up your data and have a recovery or installation disk of Windows ready with you or if you are determined that you are not going back to Windows, you can remove Windows completely and use only Linux.
- Install Linux alongside Windows: This method is called dual booting Linux with Windows. Here, you install Linux on a system that already has Windows. And when your system powers up, you can choose if you want to use Windows or Linux. This involves touching the disk partition and sometimes boot order. Absolute beginners often find it complicated but this is the best way to use Linux and Windows together in one system. And in this article, we’ll see how to dual boot Linux Mint with Windows 10.
Will dual booting Linux with Windows slow down your system?
I was asked this question several times in the Linux Users Group. So, the short answer is no. Dual booting Linux and Windows won’t slow your system in any way.
The only delay is in boot time that too because you get 10 seconds of buffer time to select between Linux and Windows. Once you have booted into either of Linux or Windows, it will work the same as if it is the only OS in the system. No impact on the usability of your system. Dual boot won’t slow down your system.
Install Linux Mint in dual boot with Windows:
Before we proceed to see the procedure to dual boot Linux Mint with Windows, let me give you some optional yet recommended safety instructions:
- Back up your data: You are going to touch disk partitions. Normally, it’s not a big issue but just in case if you touched wrong partition etc, you may lose data. So my advice is to back up your important files, documents, music, movies etc to an external disk or cloud, whichever suits you.
- Have a boot repair disk: If your boot gets messed up, you can try to repair it with boot repair disk. If you have an extra USB or CD, you can use that to create boot repair disk.
- Have a live or recovery disk of Windows ready: If your boot gets messed up and despite all efforts, you ended with an unbootable system, you can use the Windows disk to reinstall Windows.
I am not discouraging you. I am asking you to be prepared for the worst case scenario.
Remember that this article applies to computers that have Windows 10 already installed on the system. You are installing Linux Mint on an already installed Windows system, not the other way round.
I have created a detailed video tutorial on installing Linux Mint alongside Windows 10. You can refer to it if you want to see all the steps in even more details. I also advise you to subscribe to our YouTube channel for more Linux tutorials.
Follow the steps below to install Linux Mint in dual boot with Windows:
Step 1: Create a live USB or disk
Go to Linux Mint website and download ISO file. This ISO file is the disk image that you can burn to a USB or DVD.
There are several versions of Linux Mint available. The default is Cinnamon. If your computer supports 64 bit, go with 64 bit Linux Mint 19.3 Cinnamon. If you know about other desktop environments, you can make your mind and choose whichever Mint version you want.
Once you have downloaded the Linux Mint ISO, you need a tool to write the image to a disk. I recommend using a free tool called Universal USB Installer in Windows:
It’s an executable exe file. Just double click on it to run the software and browse it to the ISO. Make sure that you have your USB key plugged in:
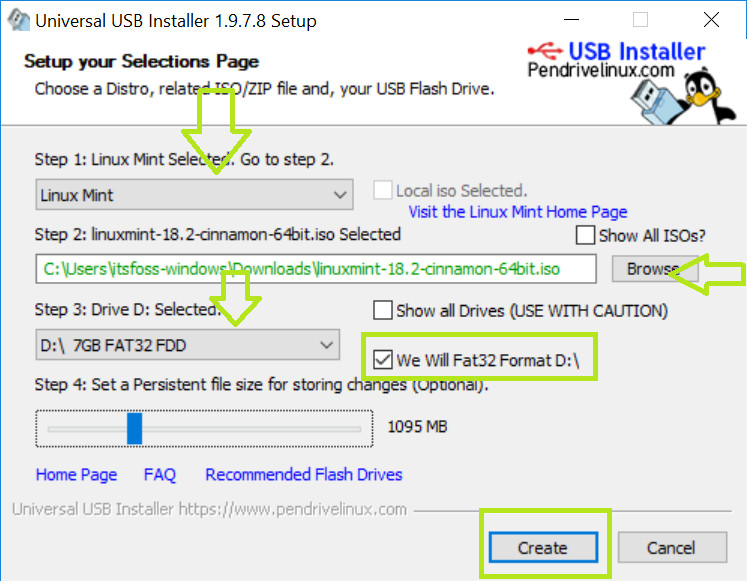
If you need more hints, here is a screenshot tutorial on how to create a live USB for Linux.
Step 2: Make a new partition for Linux Mint
This is where you have to be cautious. If you have multiple partitions (not the recovery ones), you can either use one of them or create a new partition from an existing partition. Your existing data will be safe if you have enough free space. Typically, you install Linux in under 10 Gb, however, if disk space if not a concern, I advise using 30-40Gb at least. This way you can have more space at your disposal for downloading and keeping various files.
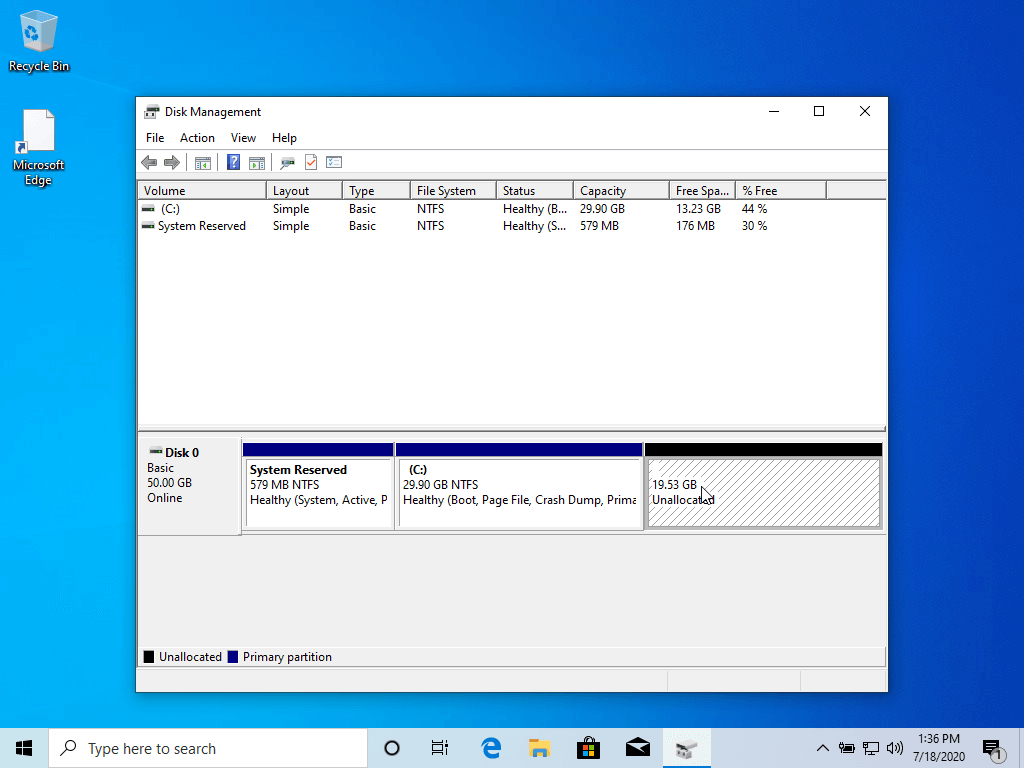
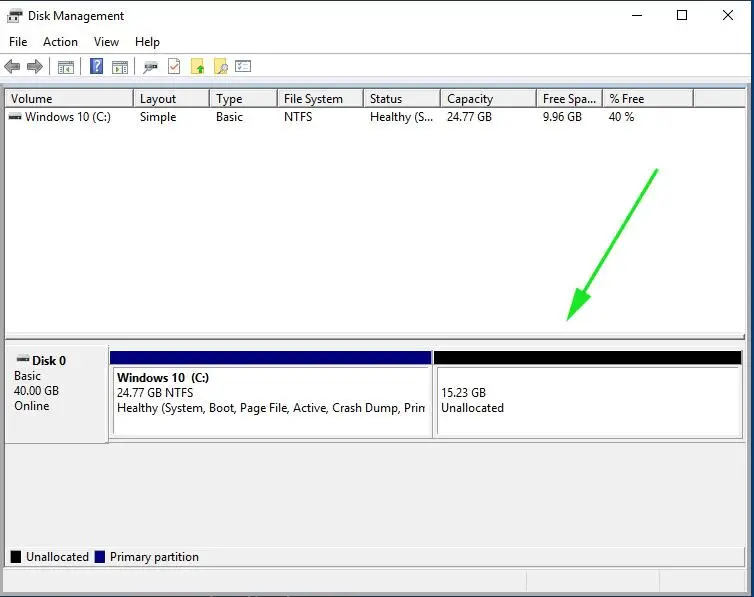
In Windows 10, go to start menu and type ‘partition’. This will bring up Disk Management utility. Now carefully select the disk in which you’ll make some free space by shrinking the volume:
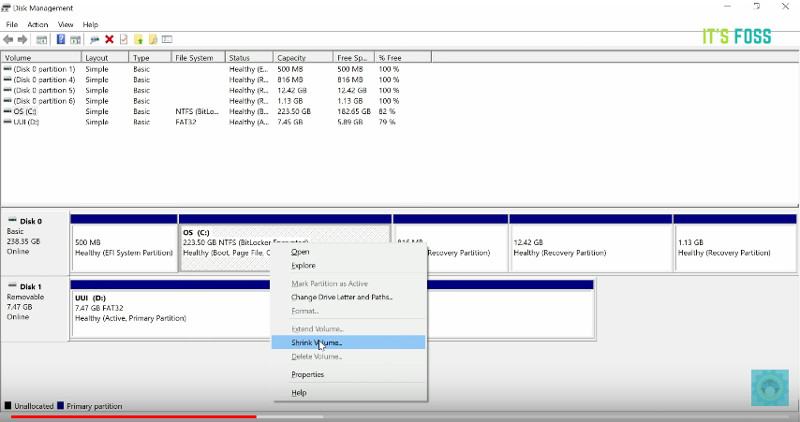
In my case, I only had the C Drive with 223Gb of space on it. So I shrunk it to make 110Gb of free partition on it. I recommend watch the video to see the exact steps you need more hint.
Step 3: Boot in to live USB
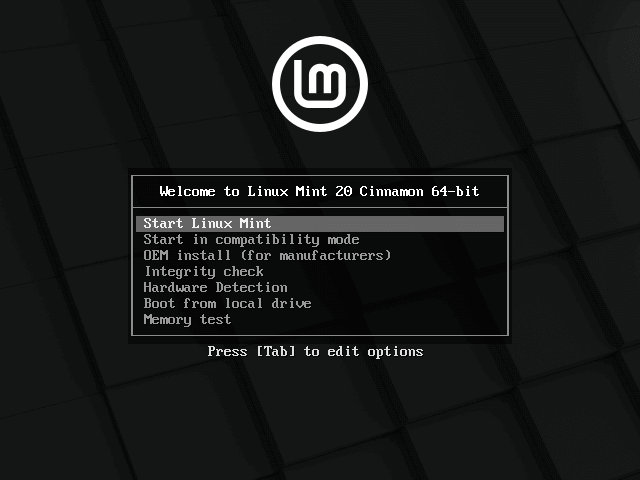
Plug the live USB or disk into the computer and restart the computer. While booting the computer press F10 or F12 function key (defers from computer to computer) to go to the boot menu. Now, choose the option to boot from USB or Removable Media.
Important Note: If your computer came with Windows 8 or Windows 8.1 and you upgraded your system to Windows 10, you may have to disable secure boot. Most modern system with Windows 10 should not need this step, especially with Linux Mint or Ubuntu.
Step 4: Start the installation
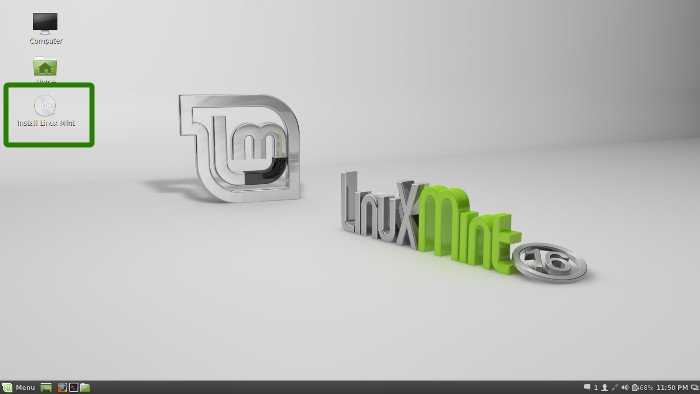
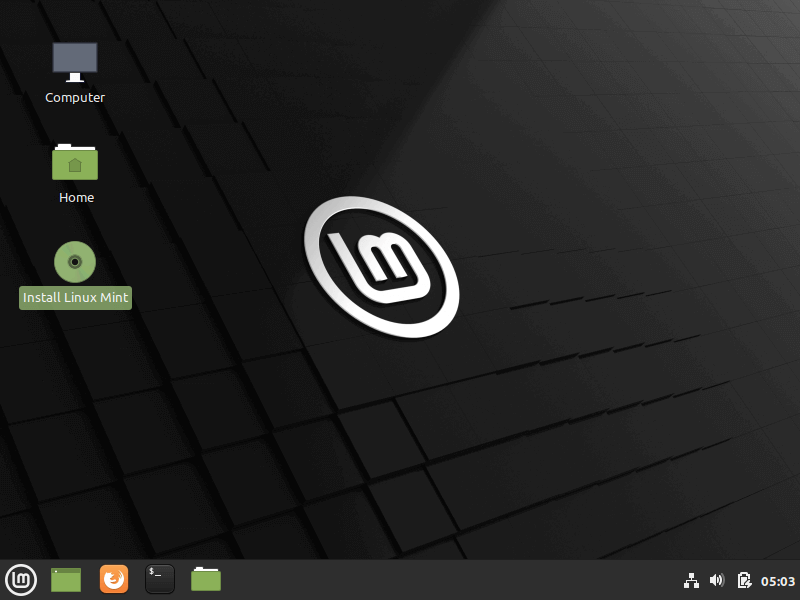
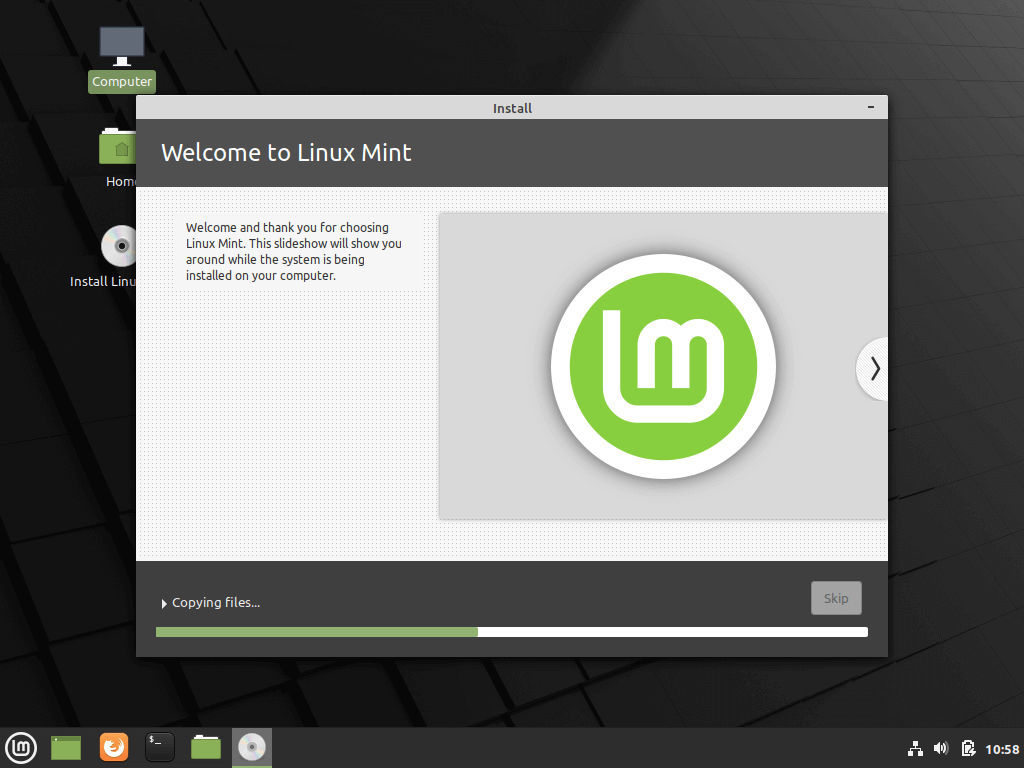
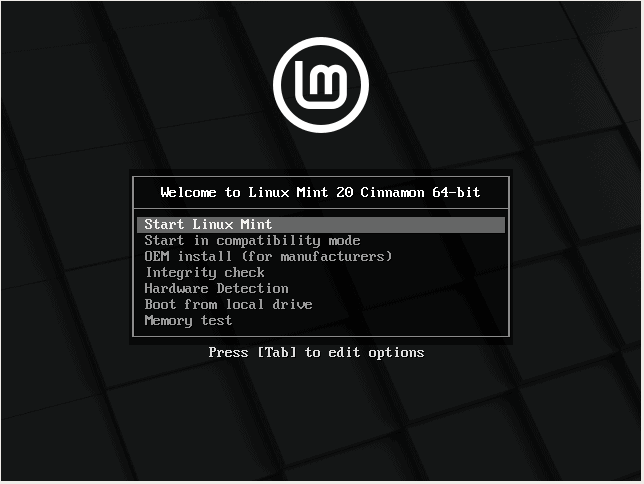
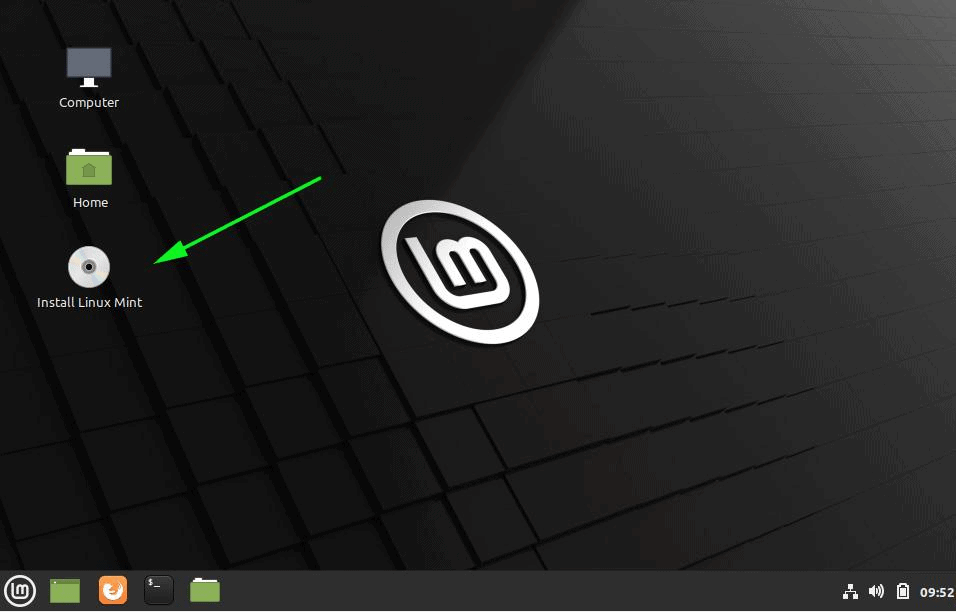
It takes some time to boot from the live USB or disk. Have some patience. Once it boots in to live disk, you’ll be provided to Try Linux Mint or Install Linux Mint. Even if you choose to try it, you can find the install option on the desktop:
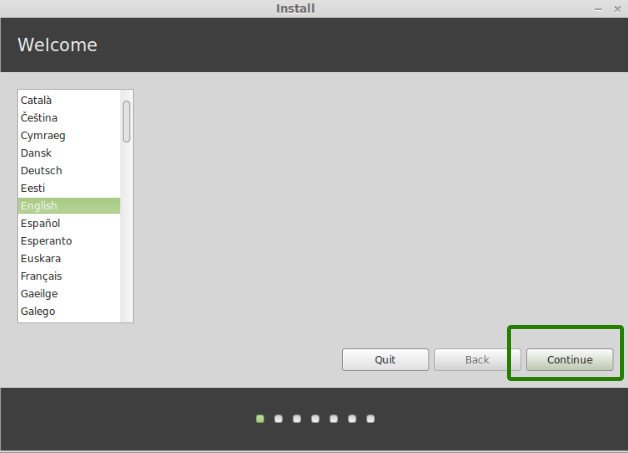
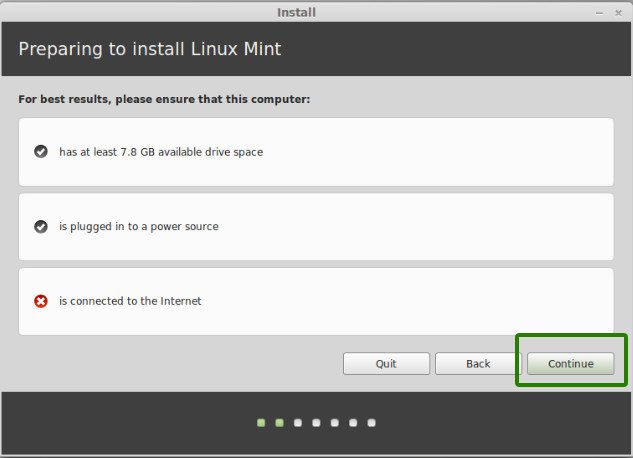
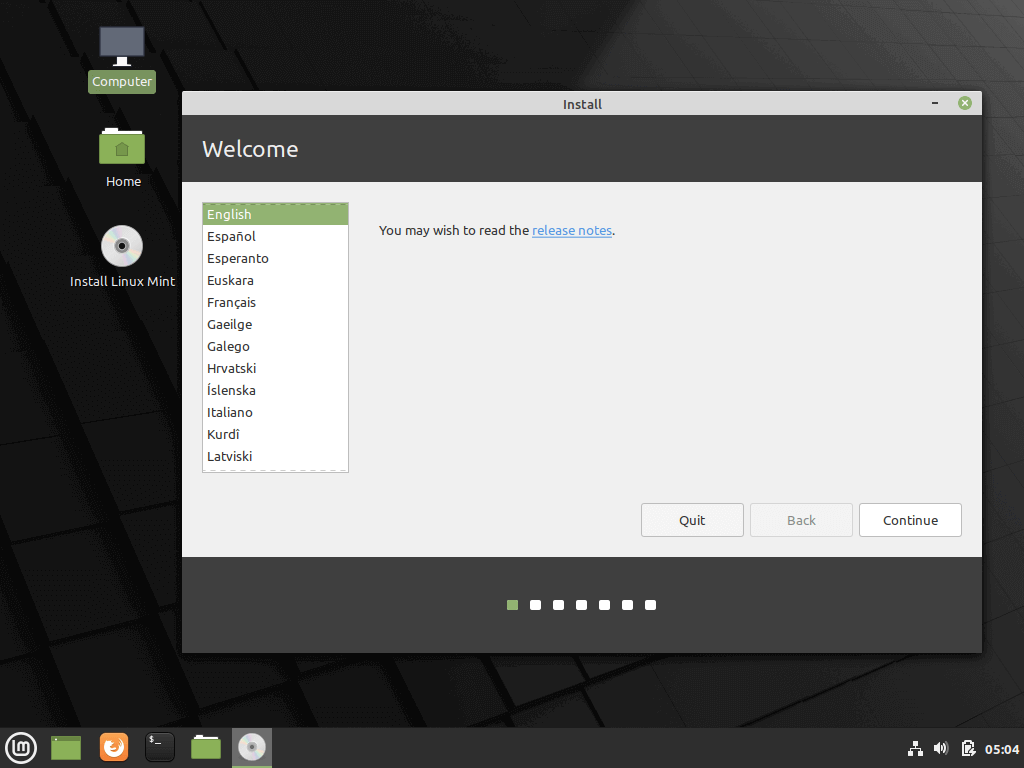
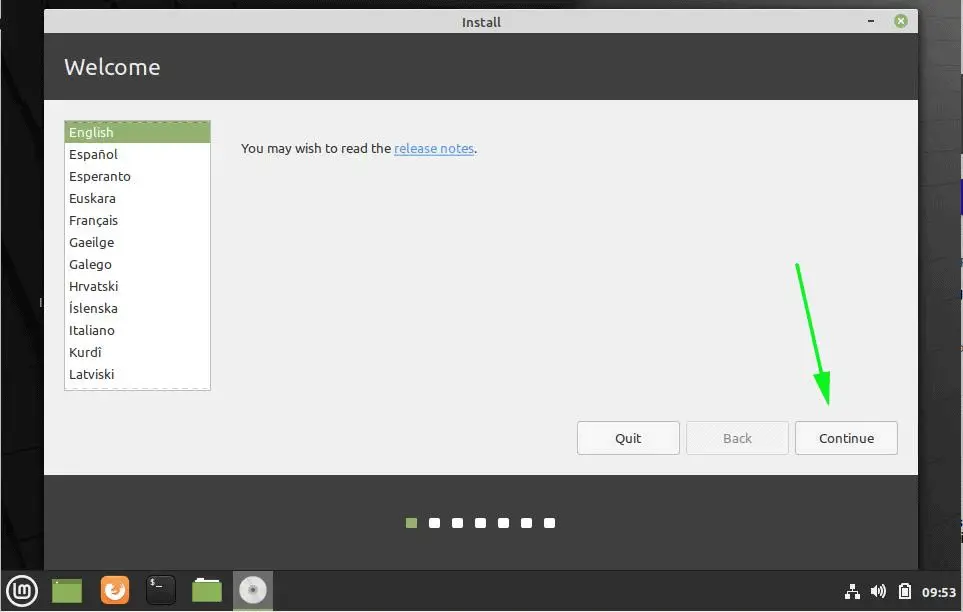
In next few screens, you’ll be asked to choose the language of the operating system. It will then do some checks on available space, battery and Internet connection.
Step 5: Prepare the partition
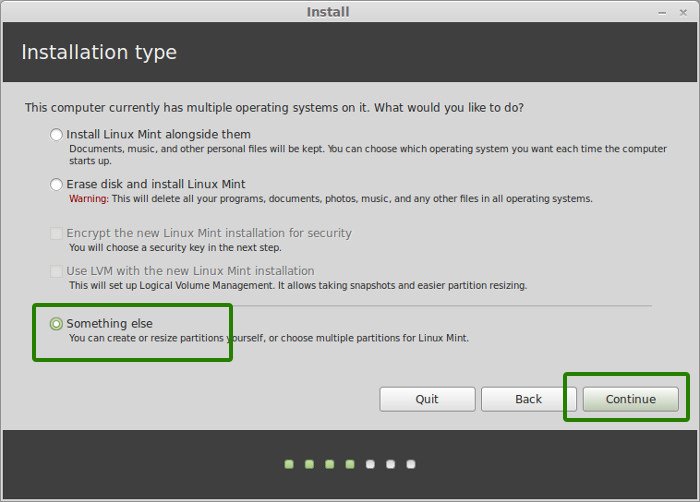
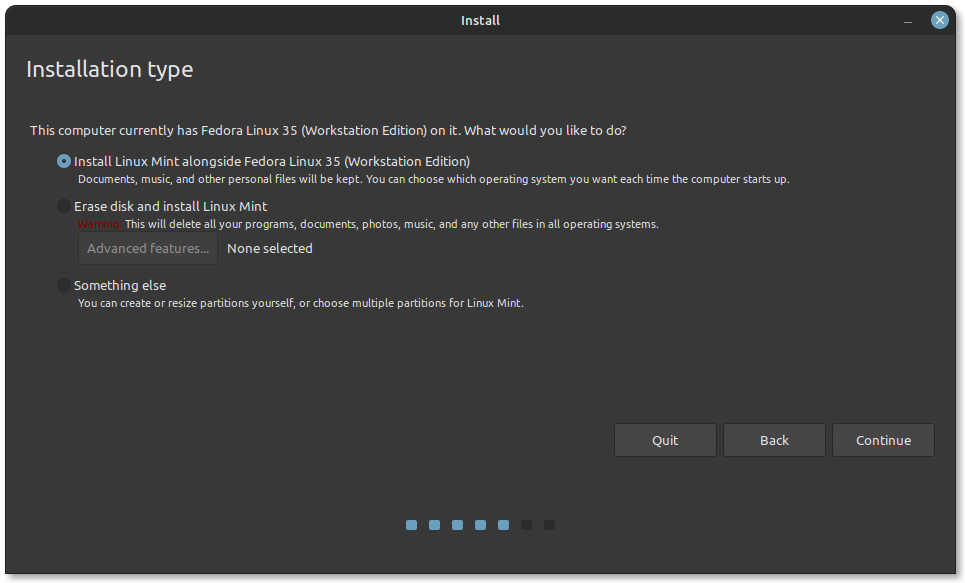
This is the most important part of the whole installation. Where to install Linux Mint?
If you see the option to Install Linux Mint alongside Windows, you can select that. Linux Mint will handle things on its own. If you do that, skip step 5 and step 6.
But as mentioned before, I prefer separate partitions for Windows and Linux. Windows is already installed here, we’ll prepare a new partition for Linux Mint. In the Installation Type window, choose Something Else:
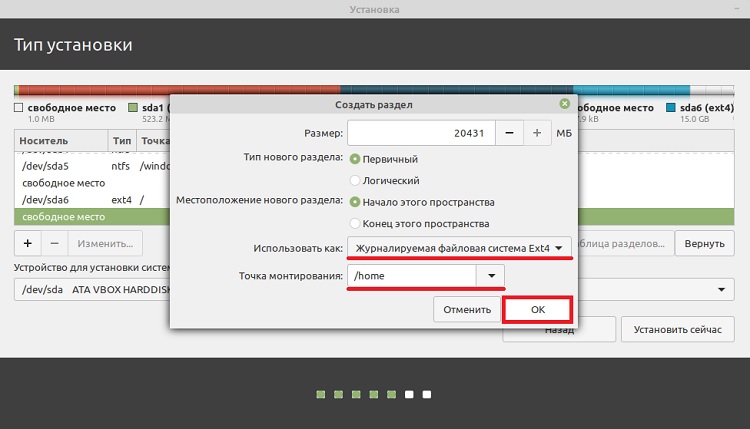
Step 6: Create root, swap and home
Since you already created a new partition in Windows, it’s time to install Linux Mint on it. Now, there are several ways to do it. But here, I’ll show you my favorite way and that is to have a Root, a Swap and a Home.
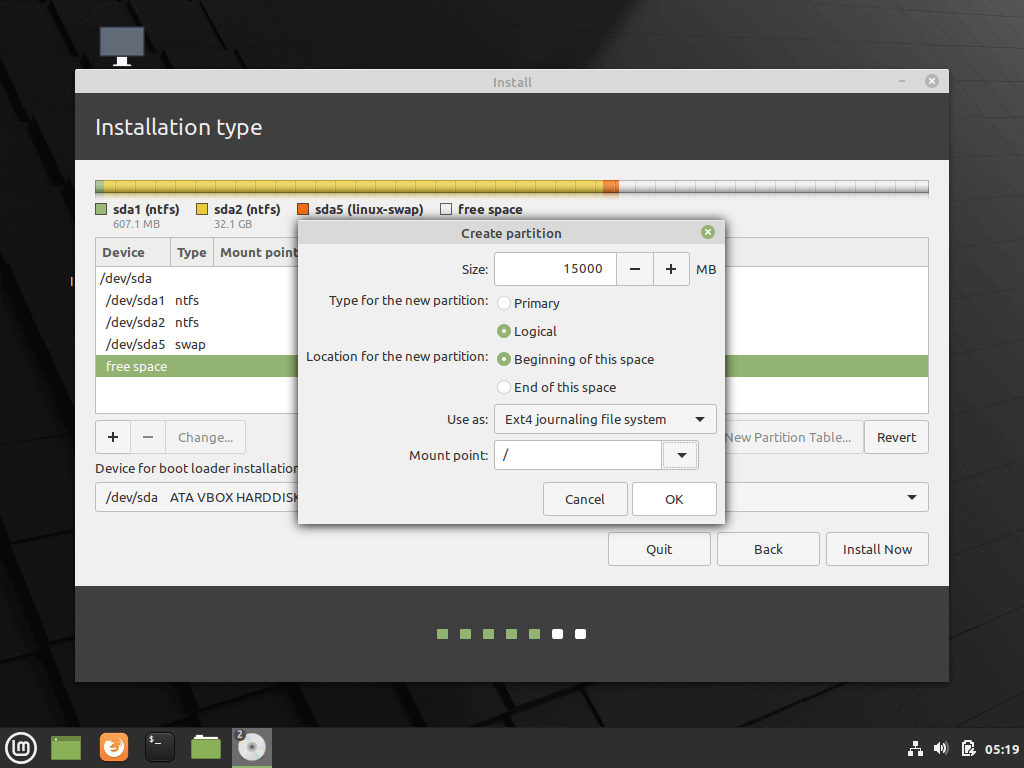
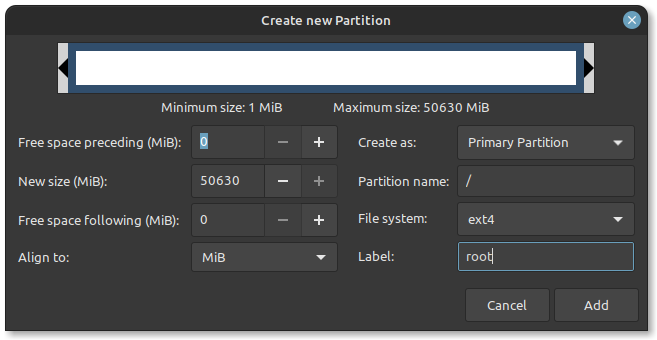
Create a root partition first. Choose the free space available and click on +.
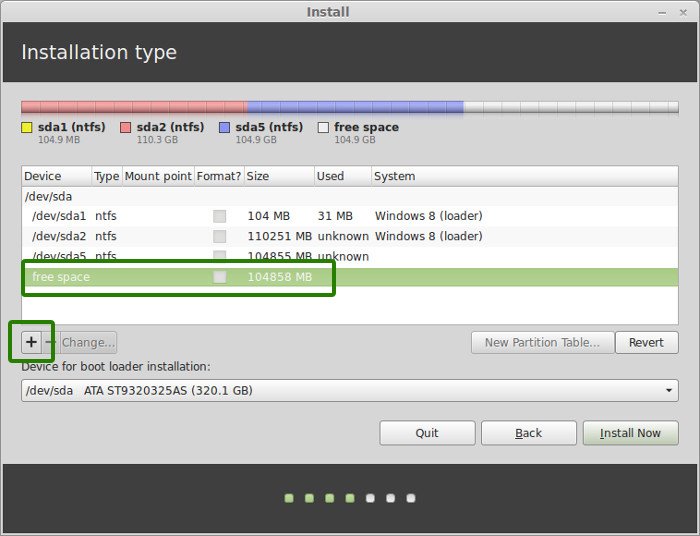
Here, choose the size of the root. Root is like your C drive in Windows. Installed software, updates and other system files are under this root partition. Home partition is for your personal documents, music, downloads etc.
If you have total 100 GB at disposal, give 30 GB to root. In any case, don’t give it less than 15 GB because if root runs out of space, your system will slow down and you’ll run into issues.
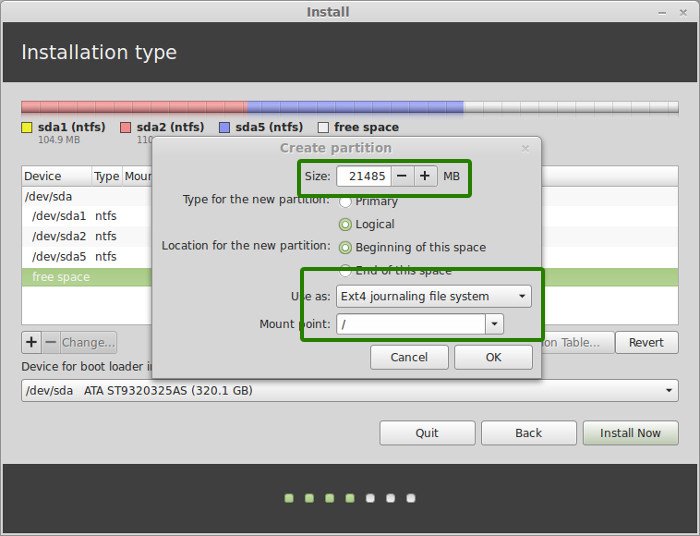
I opted to have 20 GB, choose ext4 file system, and mount point as / (i.e. root):
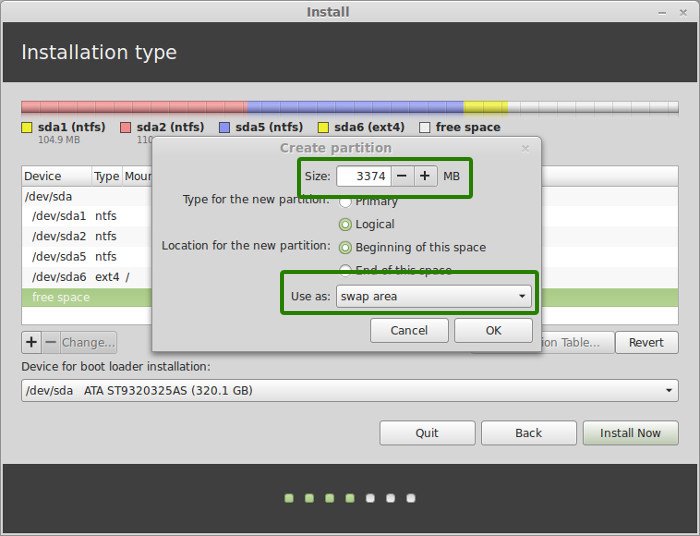
Now, next is to create the swap partition. Now the question is what should be the swap size for Linux Mint installation?
The answer depends upon your RAM size, your needs, available disk space and whether you would use hibernation or not. You can use the below suggestion:
- RAM less than 2 GB: Swap should be double the size of RAM
- RAM between 2 to 4 GB: Swap should be RAM size + 2 GB
- RAM between 6 GB to 8 GB: Swap should be size of RAM
- RAM more than 8 GB: Swap should be half the size of RAM or less
Don’t spend too much time thinking about swap. It is helpful for systems with less memory. For system with more than 8 GB of RAM and SSD, the less the swap, the better it is.
Newer version of Linux Mint utilize Swap file. It creates a special file under root and utilizes it as swap area. You can have both swap partition and swap file in a system.
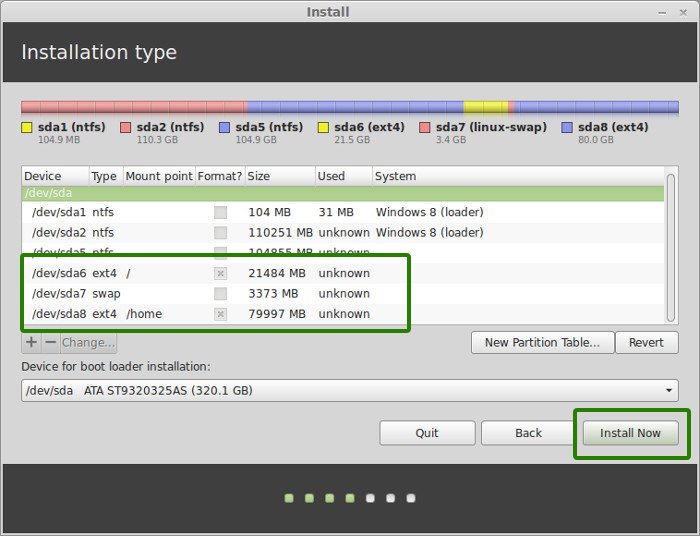
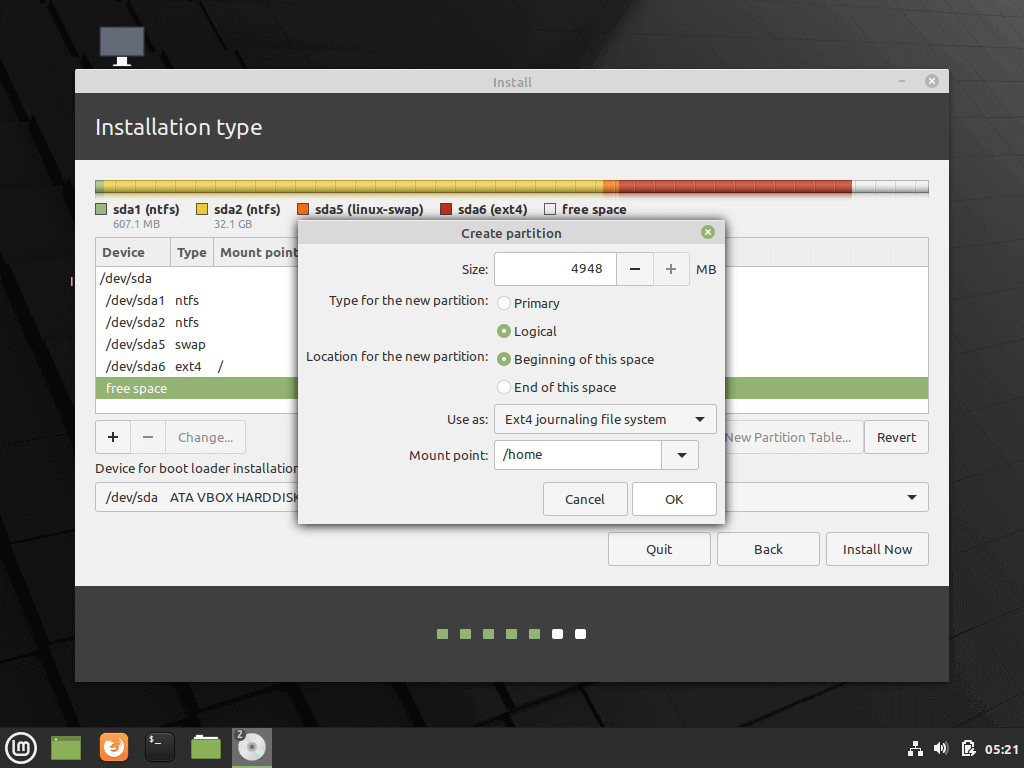
The next step is to create Home. Try to allocate the maximum size to Home because this is where you’ll be downloading and keeping the files.

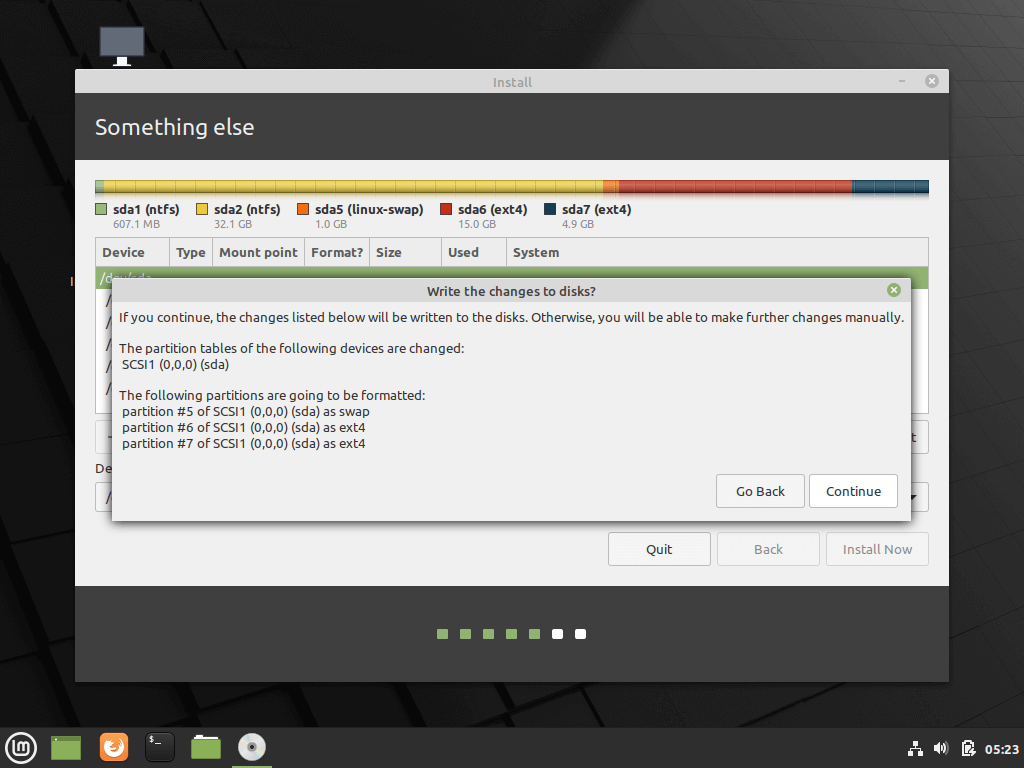
Once you have created Root, Swap and Home partitions, click on Install Now button.
Step 7: Follow the trivial instructions
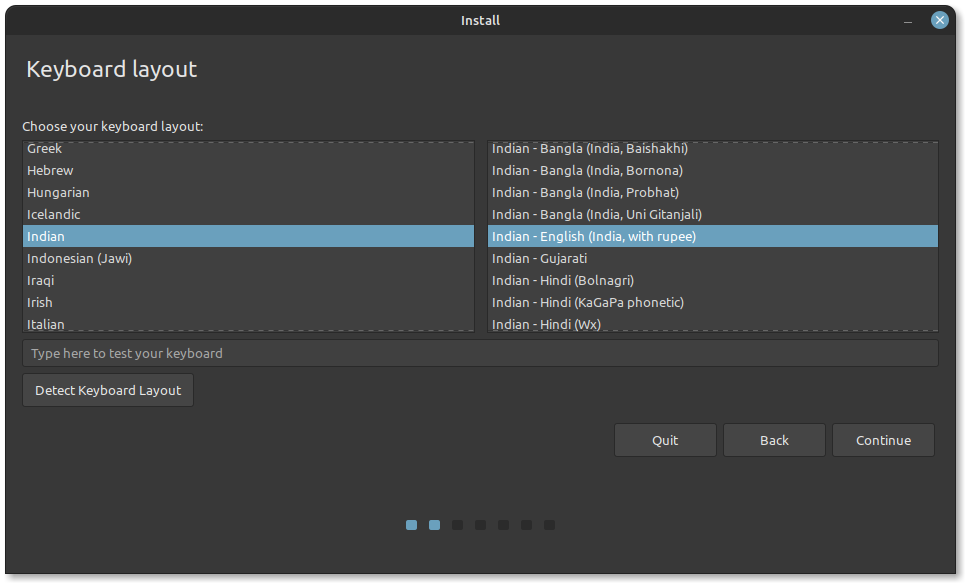
Technically, you have crossed the main hurdle if you reached this point successfully. Now you will be taken through a number of screens to select options like keyboard layout, login credentials etc. You don’t need to be a genius to figure out what to do here afterward. I have attached screenshots for reference purpose here.
Once the installation is over, you will be presented with the option to keep trying live version or to restart the system.
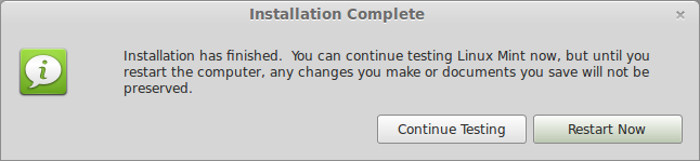
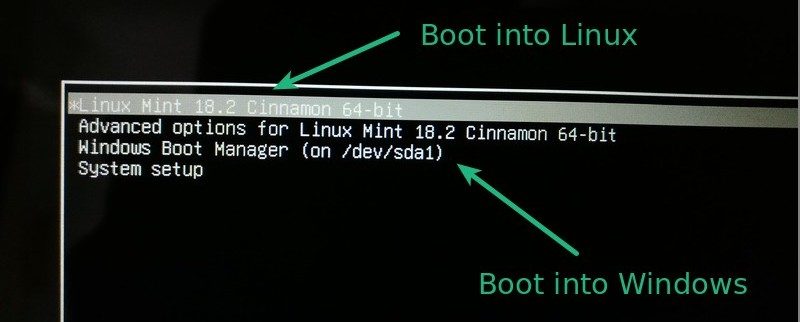
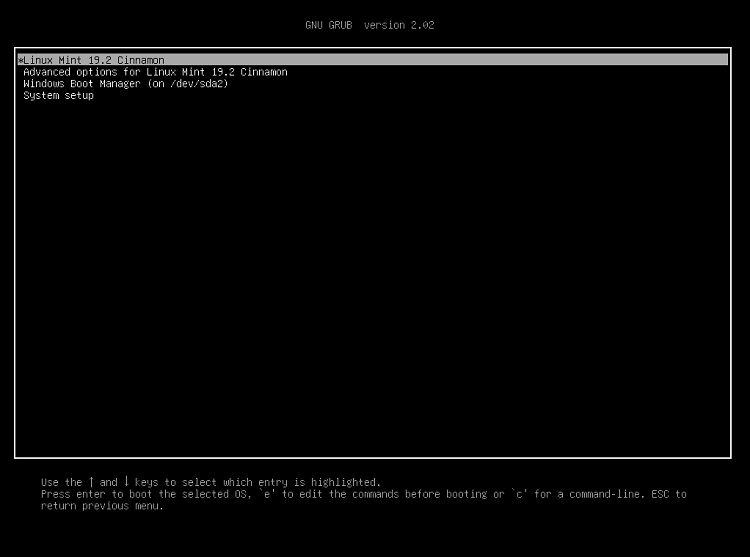
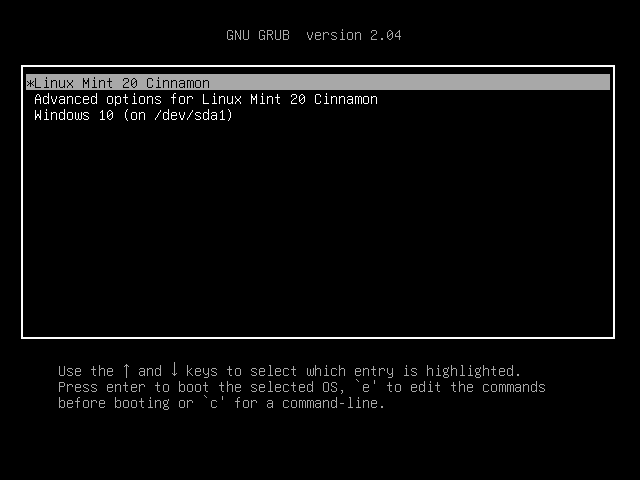
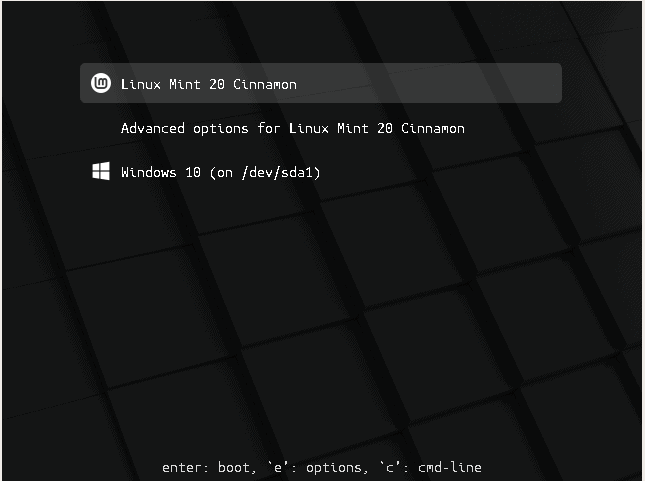
And that would be it. On next boot, you will see the option of Linux Mint on the grub screen. And thus you can enjoy the beautiful and beginner-friendly Linux distribution. I hope you found this guide to Linux Mint dual boot with Windows helpful.
Here are a few common troubleshoot you might have to do after dual booting Linux Mint:
- Fix Grub Not Showing For Windows 10 Linux Dual Boot
- Fix No Bootable Device Found Error After Installing Ubuntu
- error: no such partition grub rescue in Ubuntu Linux
- Fix Minimal BASH like line editing is supported GRUB Error In Linux
I strongly advise you to read things to do after installing Linux Mint so that you can have a good start.
If you want to remove, you can follow this guide to uninstall Linux Mint from Windows 8 dual boot.
If you have questions, suggestions or a word of thanks, feel free to drop a comment. Stay tuned for more Linux Mint tutorials. Ciao 

Всем привет! Сегодня я покажу, как установить дистрибутив Linux Mint рядом с Windows 10 на один компьютер, при этом в качестве примера я рассмотрю случай, когда на компьютере используется система UEFI.
Содержание
- Вводная информация
- Пошаговое описание установки Linux Mint рядом с Windows 10
- Шаг 1 – Скачивание установочного образа
- Шаг 2 – Создание установочного носителя
- Шаг 3 – Создание резервной копии данных и подготовка места для Linux Mint
- Шаг 4 – Загрузка с установочного носителя
- Шаг 5 – Запуск программы установки
- Шаг 6 – Выбор языка
- Шаг 7 – Выбор раскладки клавиатуры
- Шаг 8 – Параметры установки дополнительных приложений
- Шаг 9 – Разметка жёсткого диска
- Автоматический режим разметки
- Ручной режим разметки
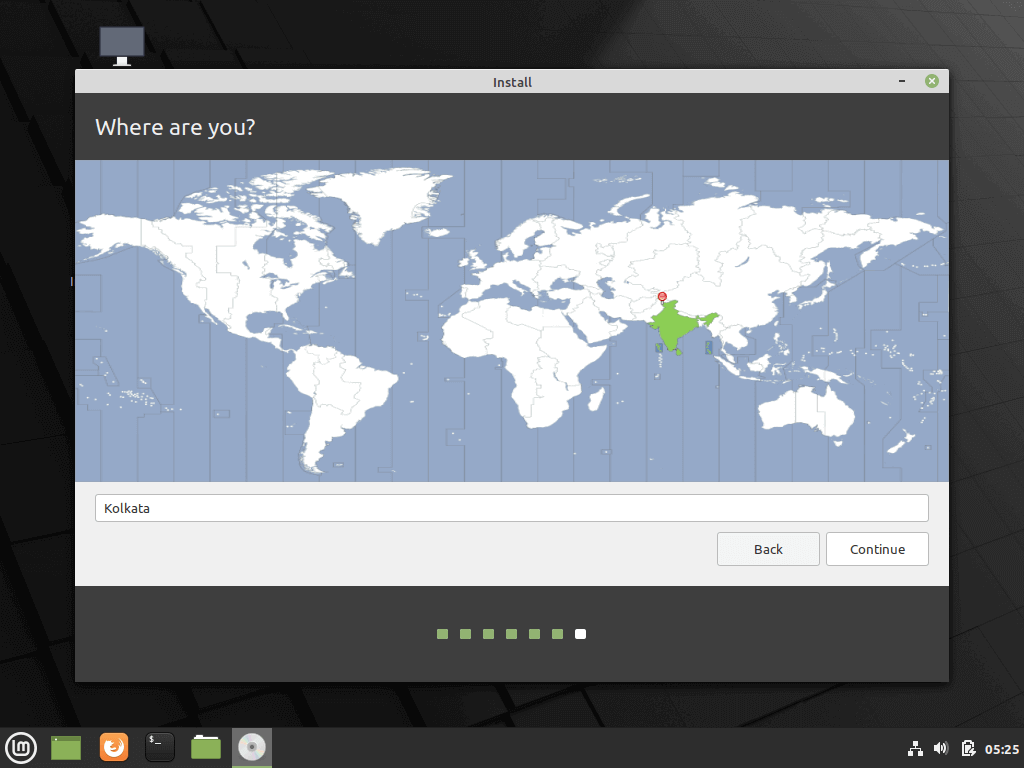
- Шаг 10 – Выбор часового пояса
- Шаг 11 – Создание учетной записи пользователя
- Шаг 12 – Завершение установки
- Загрузка системы
- Видео-инструкция
Вводная информация
В этом материале будет рассмотрен стандартный случай, когда на компьютере с UEFI, например, на ноутбуке, установлена операционная система Windows 10, в которой есть два раздела, т.е. диск C и D, а у Вас появилось желание попробовать Linux, в частности дистрибутив Linux Mint, и установить его на компьютер второй операционной системой. При этом Вам нужно, чтобы при включении компьютера у Вас была возможность выбора системы, в которую необходимо загрузиться.
Заметка! Linux Mint – бесплатный дистрибутив операционной системы Linux, предназначенный для обычных пользователей домашних компьютеров. Linux Mint отлично подходит начинающим пользователям Linux. Подробнее о том, какие дистрибутивы подходят начинающим, можете почитать в статье – Обзор лучших дистрибутивов Linux для новичков – ТОП 5
Сразу хотелось бы отметить, что, для того чтобы установить Linux Mint рядом с Windows 10 на компьютере с UEFI, не нужно выполнять никаких особых предварительных действий с существующими параметрами компьютера, в частности, нет необходимости отключать UEFI Secure Boot или включать режим Legacy.
Примечание! У всех конфигурация компьютеров разная, так же, как и разный опыт администрирования операционных систем, поэтому я не могу гарантировать, что все, что описано в этой статье поможет именно Вам выполнить установку Linux Mint, поэтому я настоятельно рекомендую Вам сделать резервную копию всех важных данных перед тем, как приступать к установке Linux Mint, для того чтобы в случае возникновения непредвиденных ситуаций избежать потери данных.
С другой стороны, процесс установки Linux Mint на компьютер рядом с Windows 10 очень простой, и в моем случае никакой потери данных не было. Также обязательно отмечу, что UEFI никак не усложняет процесс установки, а наоборот, наверное, даже упрощает, ведь загрузочный раздел уже есть (Windows 10 его создает) и нам необходимо просто установить загрузчик в этот раздел.
Полезные материалы по теме:
- Установка Linux Ubuntu – пример чистой установки Ubuntu на компьютер с BIOS;
- Установка Linux Lubuntu – пример чистой установки дистрибутива Lubuntu на компьютер с учетом особенностей UEFI и BIOS.
Итак, давайте перейдем к процессу установки.
Сейчас мы рассмотрим все шаги, которые необходимо выполнить, для того чтобы установить Linux Mint на компьютер рядом с Windows 10 с учетом того, что на компьютере используется UEFI.
Шаг 1 – Скачивание установочного образа
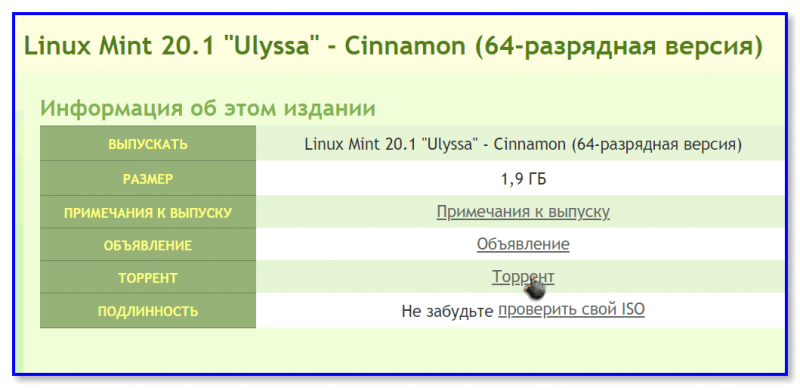
Для того чтобы установить дистрибутив Linux Mint, нужен установочный ISO образ, поэтому нам сначала необходимо скачать этот установочный ISO файл. Это можно сделать, конечно же, с официального сайта Linux Mint, вот страница загрузки – https://www.linuxmint.com/download.php
На этой странице всегда находятся ссылки на скачивание актуальных версий Linux Mint со всеми официально поддерживаемыми графическими оболочками (Linux Mint выпускается с графическим окружением Cinnamon, MATE и Xfce).
На момент написания статьи актуальной версией является Linux Mint 19.2, я буду скачивать и устанавливать редакцию с окружением Cinnamon.
После перехода на страницу просто нажимайте на ссылку напротив нужной редакции, а затем выбирайте способ загрузки, например, через торрент или с любого удобного для Вас зеркала.
Вот прямая ссылка на скачивание торрент файла – Linux Mint 19.2 Cinnamon 64-bit
Шаг 2 – Создание установочного носителя
После того как Вы загрузили установочный ISO образ Linux Mint, его необходимо записать на DVD диск или USB флешку, для того чтобы создать загрузочный установочный носитель, с которого и будет производиться установка.
Для этого существует много различных программ, например, в нашем случае отлично подойдет программа Rufus. Пример того, как можно запись ISO образ на флешку с помощью этой программы, можете посмотреть в статье – Создание загрузочной USB флешки в Windows с помощью Rufus.
Шаг 3 – Создание резервной копии данных и подготовка места для Linux Mint
Для того чтобы установить Linux Mint второй операционной системой на компьютер, необходимо свободное место на жестком диске, и здесь самый лучший вариант – это создать отдельный раздел для Linux Mint.
Если у Вас такая конфигурация, которую я описал выше, т.е. у Вас два диска: C и D, то Вам необходимо на диске D выделить свободное место достаточного размера. Если Вы не планируете использовать Linux Mint в качестве основной системы и хранить там много данных, то достаточно будет и 50 гигабайт.
Однако все важные данные, которые есть на диске D, лучше предварительно сохранить, например, на флешке или на внешнем жестком диске. Так как для создания отдельного раздела для Linux Mint необходимо от диска D «отсоединить» свободное незанятое место, т.е. по факту сжать диск D, так скажем, нужно физически уменьшить диск D и создать неразмеченное пространство, а именно эта процедура и может привести к потере данных.
В этой статье я покажу способ, который подразумевает сжатие диска D стандартными средствами самой программы установки Linux Mint, иными словами, никакие сторонние программы мы использовать не будем.
Однако если у Вас есть опыт сжатия дисков, будь то стандартной программой «Управление дисками» или любыми другими сторонними приложениями для работы с жесткими дисками, которые имеют такой функционал (Acronis и т.д.), то Вы можете сразу уменьшить диск D и создать неразмеченное пространство, а в процессе установки Linux Mint не выполнять действия, связанные с изменением размера диска D.
Таким образом, на текущий момент у Вас должно быть свободное место на диске D и копия важных данных.
Единственное, обязательно нужно запомнить размер диска D, так как хоть в системе вроде как и два раздела, но скрытых разделов, которые в системе не отображаются, на самом деле больше, поэтому чтобы ничего не перепутать в процессе создания разметки для Linux Mint, запоминаем общий размер диска D, чтобы четко идентифицировать его.
Шаг 4 – Загрузка с установочного носителя
Теперь, после того как установочный носитель мы подготовили, на диске D выделили свободное место, а также сделали резервную копию важных данных, можно переходить к самому процессу установки.
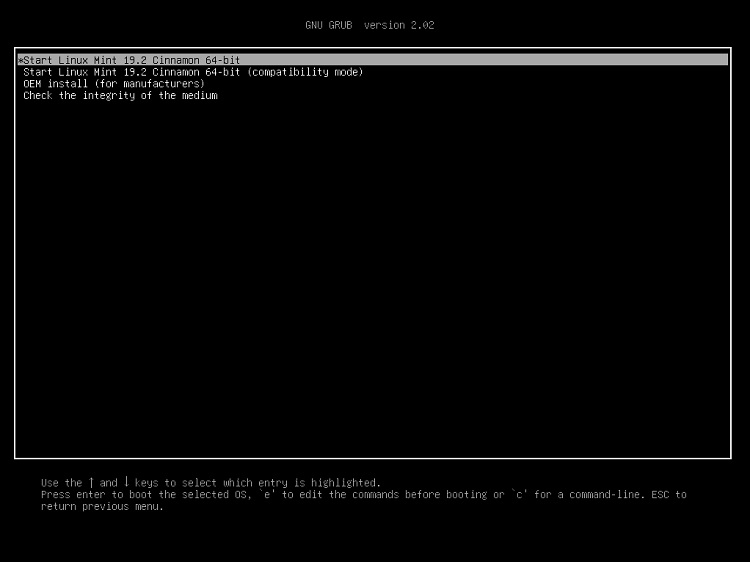
Сначала загружаемся с установочного носителя и попадаем в меню. Выбираем пункт «Start Linux Mint 19.2 Cinnamon 64-bit».
Шаг 5 – Запуск программы установки
В результате запустится Live версия Linux Mint. Кстати, Вы можете попробовать Linux Mint и без установки на жесткий диск компьютера.
На заметку! Начинающим пользователям Linux рекомендую почитать мою книгу «Linux для обычных пользователей» – в ней я максимально простым языком рассказываю про основы Linux и как пользоваться этой операционной системой без командной строки
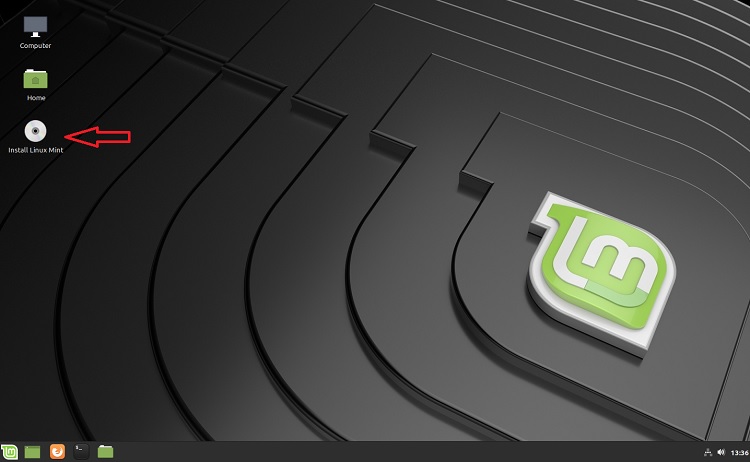
Для того чтобы запустить установку на жесткий диск, необходимо на рабочем столе кликнуть по ярлыку «Install Linux Mint».
Шаг 6 – Выбор языка
Запустится программа установки Linux Mint, сначала нам нужно выбрать язык, выбираем его и нажимаем «Продолжить».
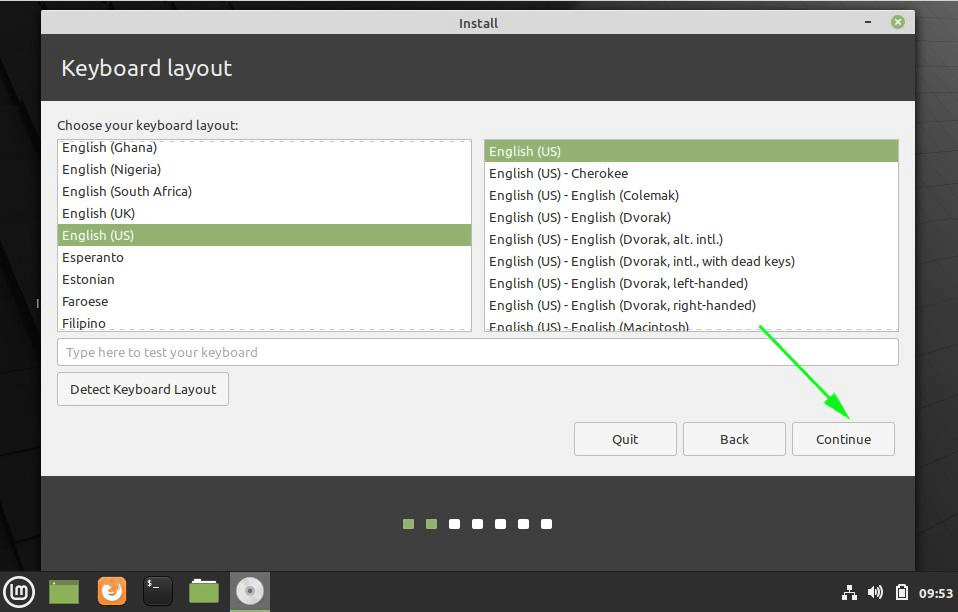
Шаг 7 – Выбор раскладки клавиатуры
Здесь нам нужно выбрать раскладку клавиатуры, по умолчанию она уже выбрана. Нажимаем «Продолжить».

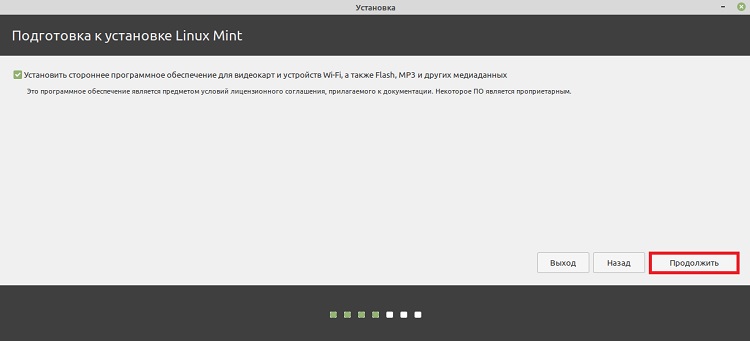
Шаг 8 – Параметры установки дополнительных приложений
На этом шаге мы можем поставить галочку для того, чтобы установить приложения, необходимые для работы некоторого оборудования (Wi-Fi и т.д.), а также для поддержки дополнительных медиа форматов.
Нажимаем «Продолжить».
Шаг 9 – Разметка жёсткого диска
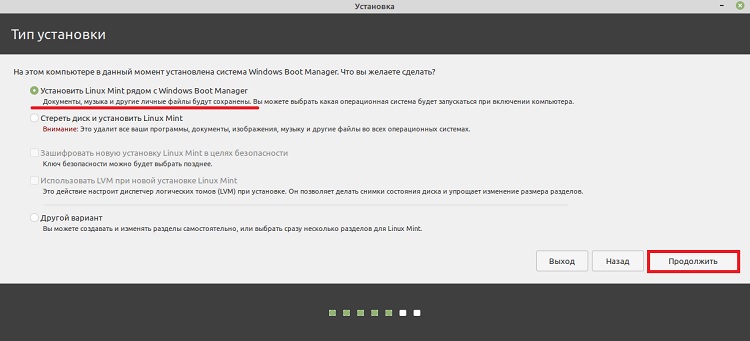
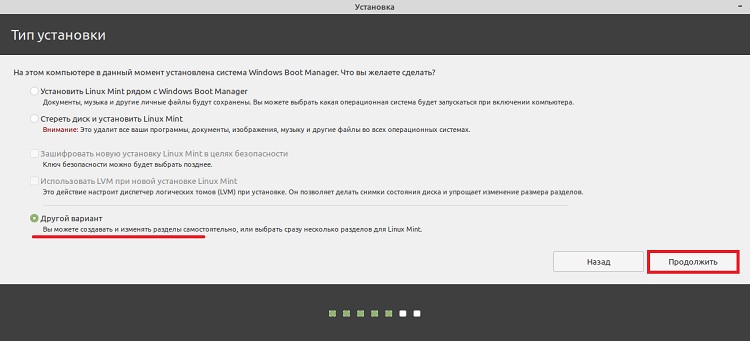
Теперь нам необходимо выполнить разметку жесткого диска. Программа установки предлагает нам несколько вариантов:
- Установить Linux Mint рядом с Windows Boot Manager – автоматический режим установки Linux Mint рядом с Windows 10, он нам подходит, однако в этом случае не будет создан домашний раздел home. Этот вариант лучше выбрать тем пользователям, которые не хотят заморачиваться с разметкой;
- Стереть диск и установить Linux Mint – в данном случае предполагается полное удаление всех данных с диска (включая Windows 10);
- Другой вариант – в этом случае разметку диска мы можем выполнить самостоятельно вручную. Данный вариант также нам подходит и является самым гибким в части разметки, рекомендуется более опытным пользователям.
Как я уже отметил, нам подходит два варианта, я для примера разберу оба.
Автоматический режим разметки
Выбираем первый пункт «Установить Linux Mint рядом с Windows Boot Manager» и нажимаем
«Продолжить».
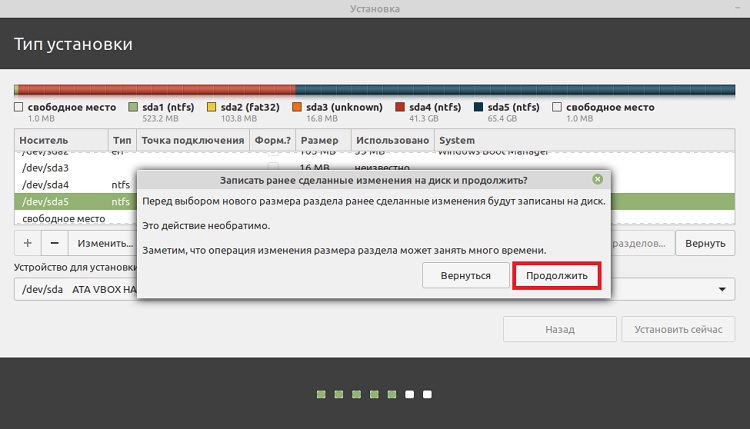
Программа автоматически выберет диск D (если он достаточного размера) и предложит сжать его и выделить место под Linux Mint. Если Вас предложенный размер не устраивает, Вы можете его изменить, для этого просто необходимо передвинуть в нужную сторону границу разделов.
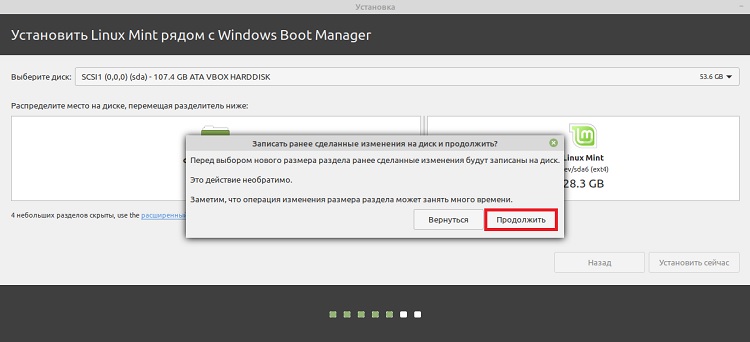
После этого нажимаем «Установить сейчас».
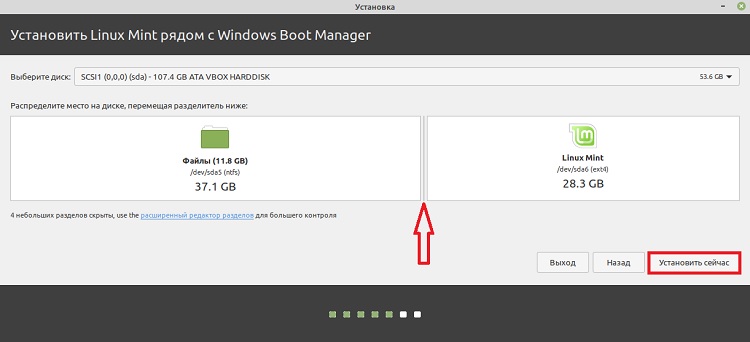
Далее соглашаемся с внесением изменений на диск и нажимаем «Продолжить».
На этом разметка диска в автоматическом режиме закончена.

Ручной режим разметки
Для того чтобы выполнить разметку диска вручную, необходимо выбрать пункт «Другой вариант» и нажать «Продолжить».
После этого отобразится список существующих разделов, здесь будет и раздел для загрузки EFI, и системный раздел для восстановления Windows, и другие разделы.
Нам нужно найти диск D, как я уже говорил ранее, это можно сделать, ориентируясь на размер разделов, после того как нужный раздел Вы найдете, выделите его и нажмите «Изменить» (не перепутайте с диском C!).
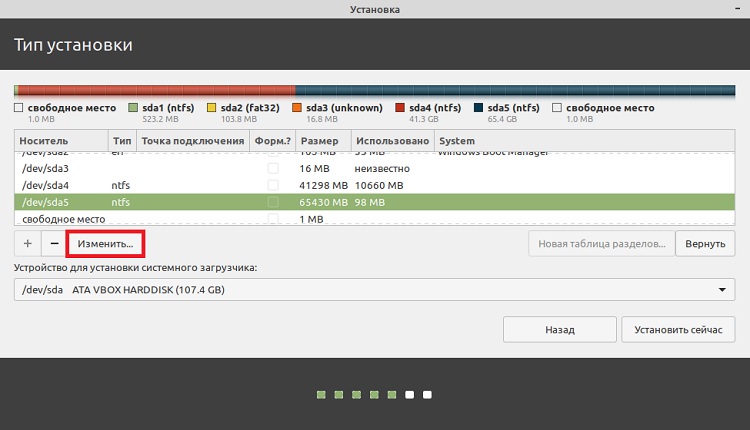
Затем нам нужно сжать этот раздел, для того чтобы образовалось неразмеченное пространство, т.е. свободное место для Linux Mint. Если Вы подготовили отдельный раздел заранее, то снова сжимать этот раздел не нужно, просто ищите в списке свободное место, которое Вы подготовили и переходите к созданию разделов для Linux Mint.
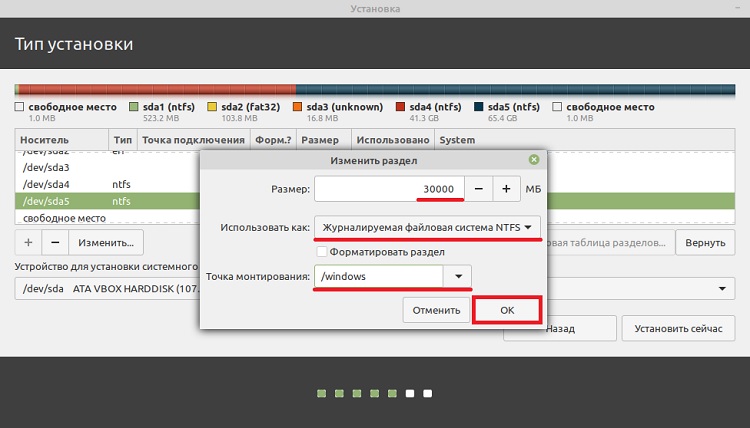
В поле размер укажите тот размер, который Вы хотите, чтобы у Вас остался на диске D, например, общий размер D минус 50 гигабайт. Только помните, что он не должен быть меньше уже занятого на диске пространства, иными словами, если на D около 100 гигабайт данных не нужно пытаться сжать его до 50 гигабайт.
У меня диск D небольшой, поэтому я под Linux Mint отдаю 35 гигабайт, а на D оставляю 30 гигабайт.
После этого можно сразу нажимать «ОК», но если Вы хотите, чтобы диск D был доступен из Linux Mint (и все файлы на нем), то Вы можете сразу примонтировать данный раздел.
Для этого укажите:
- Использовать как – журналируемая файловая система NTFS (если диск с NTFS);
- Точка монтирования – например, /windows, именно так данный диск будет отображаться в файловой системе Linux Mint;
Галочку «Форматировать раздел» ставить не нужно! так как если поставить, то Вы отформатируете диск D и все данные будут стерты.
Нажимайте «ОК».
Далее соглашаемся с внесением изменений на диск, нажимаем «Продолжить» и ждем окончания процесса сжатия диска.
После этого в списке разделов отобразится «Свободное место», которое мы можем использовать для создания разделов под Linux Mint.
Для этого выделяем свободное место и нажимаем на «Плюсик (+)».
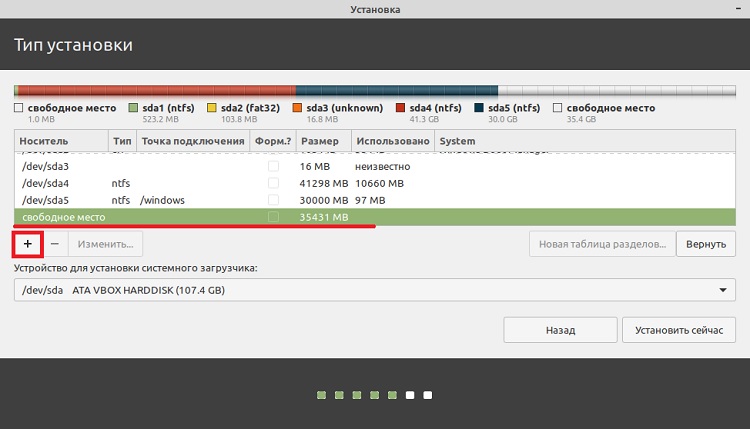
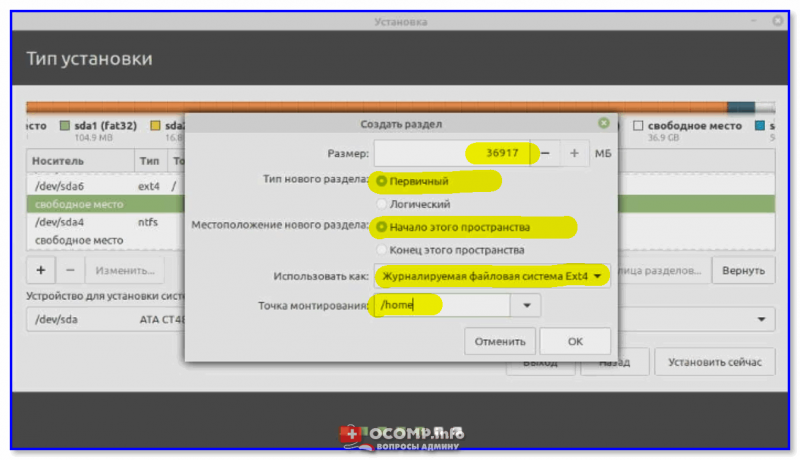
В данном случае нам необходимо создать точно такие же разделы, как если бы мы устанавливали Linux Mint на чистый диск, к таким относятся: корневой раздел для системы и домашний раздел для пользовательских данных. Раздел для подкачки SWAP создавать не требуется, так как теперь используется файл подкачки.
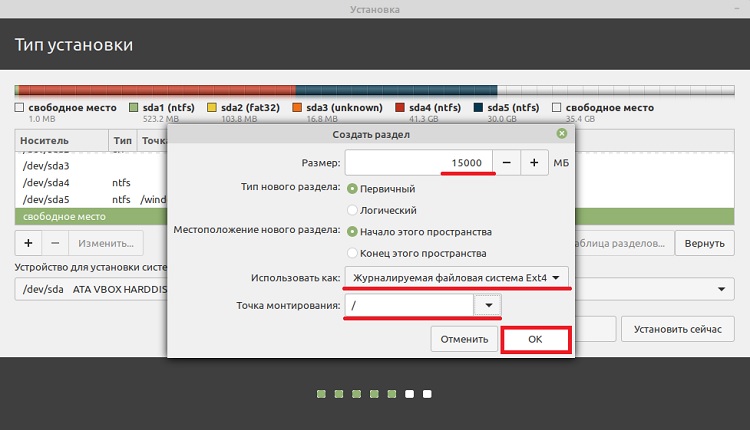
Сначала создаём корневой раздел:
- Размер – для корневого раздела нужно указывать как минимум 10-15 гигабайт, но лучше указывать больше;
- Тип нового раздела – указываем «Первичный»;
- Местоположение нового раздела – указываем «Начало этого пространства»;
- Использовать как – выбираем журналируемая файловая система Ext4, данная файловая система лучше всего подходит для корневого раздела;
- Точка монтирования – для корневого раздела указываем «/».
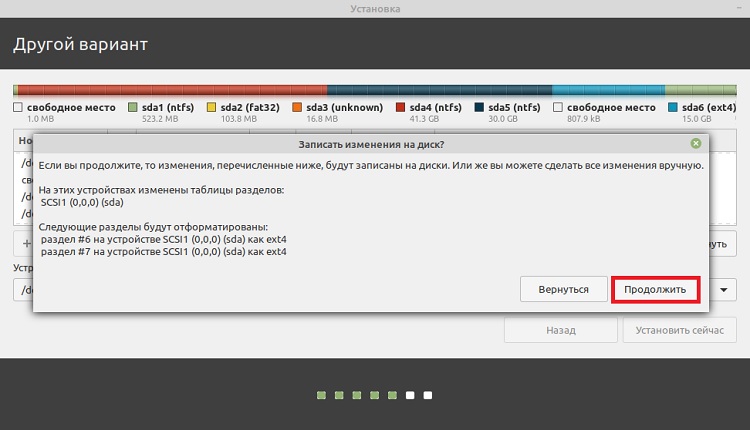
Нажимаем «ОК».
Корневой раздел создан, переходим к домашнему. Для этого точно также выбираем свободное место и жмем на плюсик.
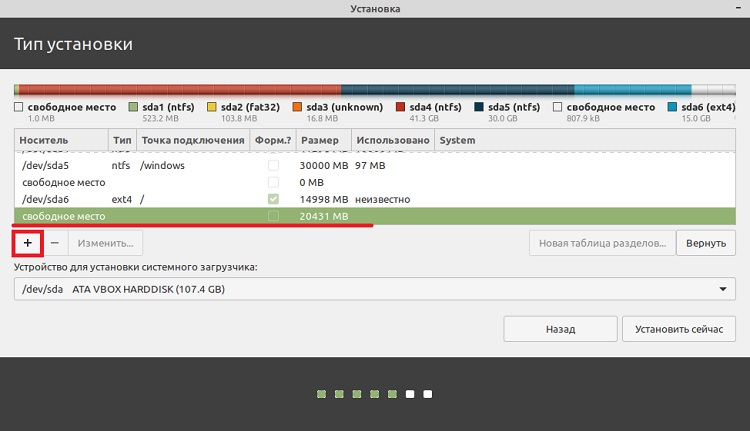
Для создания домашнего раздела указываем практически то же самое, только в качестве точки монтирования задаем «/home», а размер по возможности максимальный, иными словами, можете указать все оставшееся место.
Нажимаем «ОК».
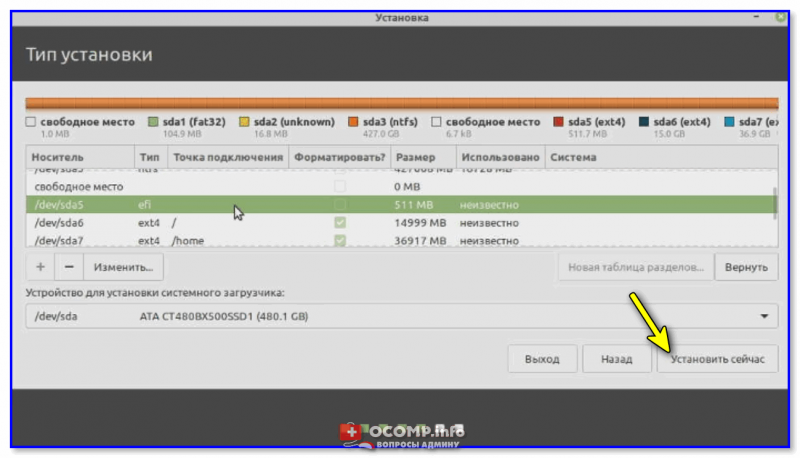
Разметка диска закончена, теперь нам осталось указать устройство для установки загрузчика Linux, т.е. раздел с EFI (раздел ESP). Этот раздел с файловой системой FAT32, Windows 10 его создаёт с размером около 100 мегабайт, поэтому его определить не составит труда, у меня это sda2, и он у меня так и называется «Windows Boot Manager».
После того как необходимые разделы для Linux Mint созданы и устройство для установки загрузчика указано, нажимаем кнопку «Установить сейчас».

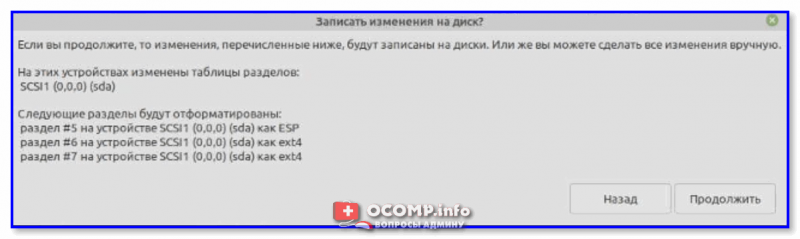
Соглашаемся с внесением изменений на диск и нажимаем «Продолжить».
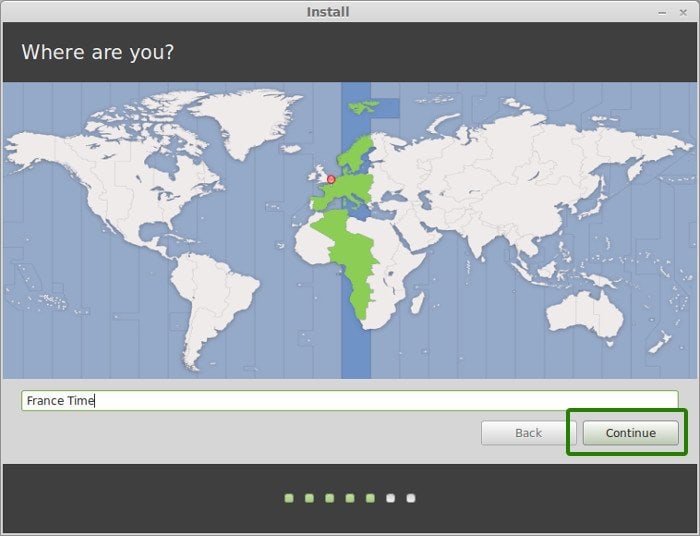
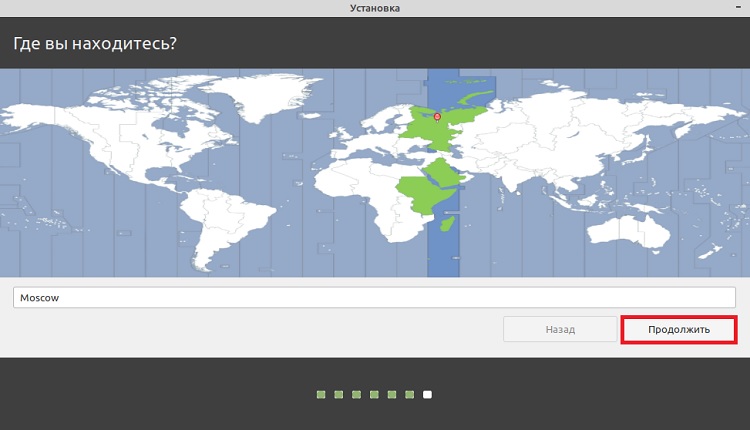
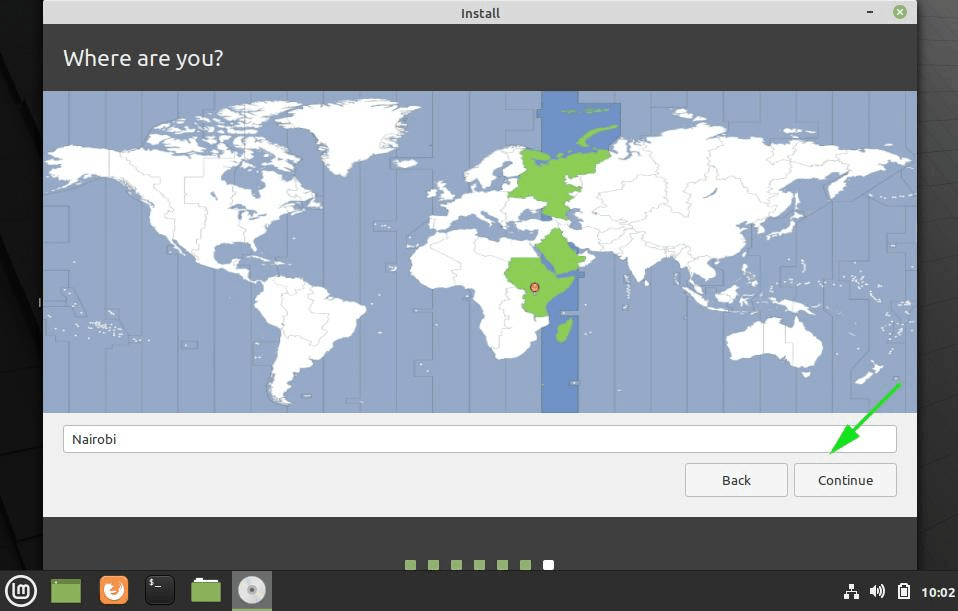
Шаг 10 – Выбор часового пояса
Затем, для того чтобы настроить часовой пояс, указываем свое местоположение, можно просто кликнуть в нужное место.
Нажимаем «Продолжить».
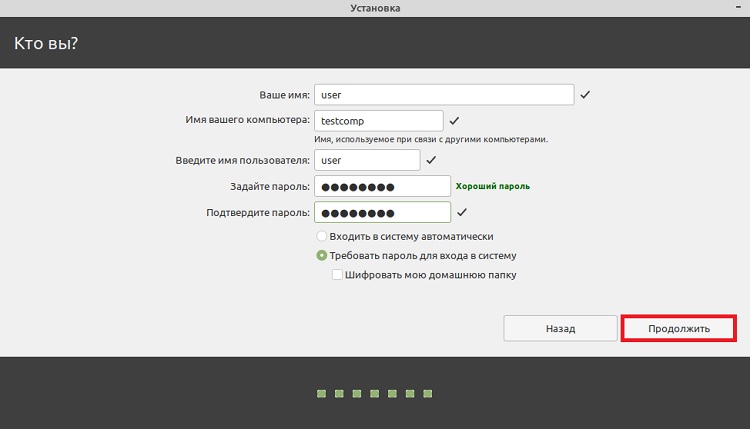
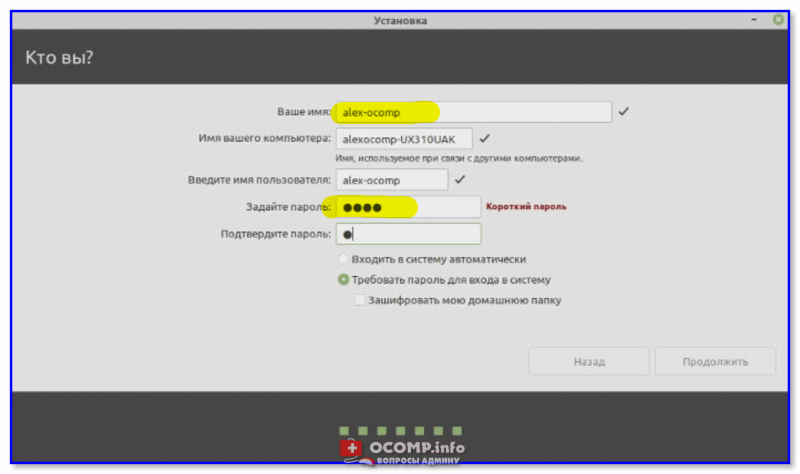
Шаг 11 – Создание учетной записи пользователя
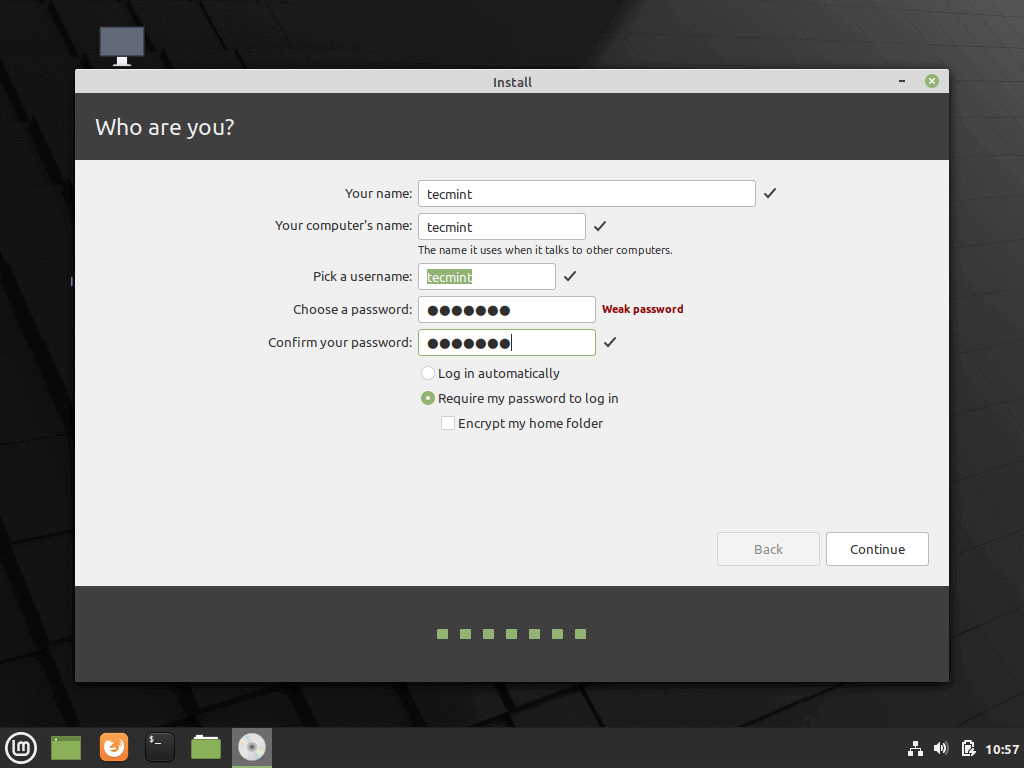
Нам осталось создать учетную запись пользователя, под которой мы будем работать, для этого вводим имя, логин, имя компьютера и пароль с его подтверждением. Если хотите входить в систему автоматически без ввода пароля, то поставьте галочку «Входить в систему автоматически».
После ввода данных нажимаем кнопку «Продолжить».
Установка началась, этот процесс будет длиться где-то минут 10.
Шаг 12 – Завершение установки
Установка будет завершена, когда появится соответствующее сообщение. Нажимаем «Перезагрузить».

Загрузка системы
Теперь, когда компьютер будет загружаться, у Вас будет появляться окно загрузчика GRUB, в котором Вы можете выбрать, в какую операционную систему Вам нужно загрузиться.
В моем случае:
- Linux Mint 19.2 Cinnamon – это как раз операционная система Linux Mint;
- Windows Boot Manager (на /dev/sda2) – это Windows 10.
Если ничего не выбрать в течение нескольких секунд, по умолчанию будет загружаться Linux Mint, однако можно сделать и так, чтобы по умолчанию загружалась Windows 10, и даже переименовать пункты меню для удобства, как это сделать, я подробно рассказывал в материале – Как изменить порядок загрузки операционных систем (Linux, Windows) в GRUB.
Видео-инструкция
На сегодня это все, мы с Вами рассмотрели процесс установки Linux Mint на компьютер с UEFI рядом с Windows 10, удачи Вам, пока!
Linux Mint 20 has been released in wild by the Linux Mint project development team as a new long term support edition which will receive support and security updates until 2025.
This tutorial will guide you on how you can install Linux Mint 20 in dual-boot with a variant Microsoft Operating System, such as Windows 8, 8.1 or 10, on machines with EFI firmware and a pre-installed version of Microsoft OS.
If you’re looking for a non-dual-boot installation on Laptop, Desktop, or Virtual Machine, you should read: Installation Guide of Linux Mint 20 Codename ‘Ulyana’.
Assuming that your laptop or desktop system comes pre-installed with Windows 10 or Windows 8.1 or 8 you should enter the UEFI menu and disable the following settings: Secure Boot and Fast Boot features.
If the computer has no pre-installed OS and you intend to use Linux and Windows in dual-boot, first install Microsoft Windows and then proceed with Linux Mint 20 installation.
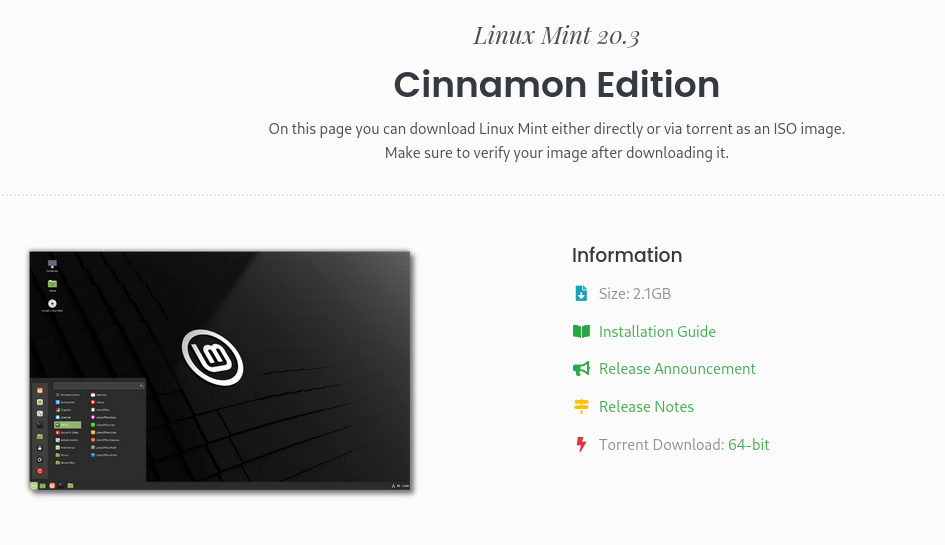
Download Linux Mint 20
- Linux Mint 20 ISO images – https://www.linuxmint.com/download.php
In case you own a UEFI computer stay away from the 32-bit version of Linux Mint because it will only boot and work with BIOS machines, while the 64-bit ISO image can boot with BIOS or UEFI computers.
Step 1: Shrink HDD Space for Dual-Boot
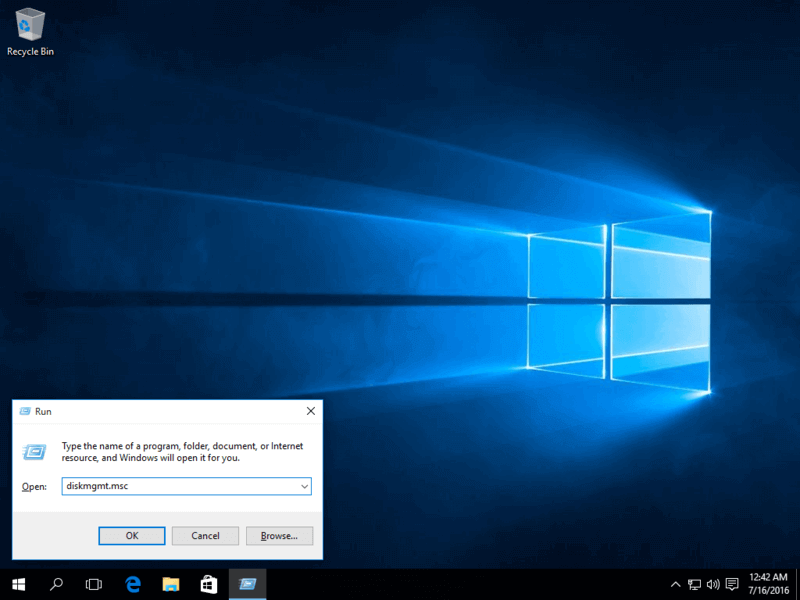
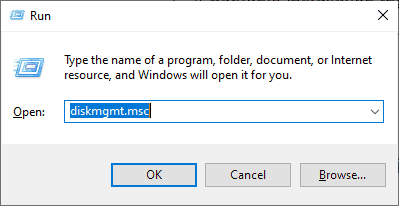
1. In case your computer comes pre-installed with Microsoft Windows on a single partition, logon to Windows system with a user who has administrator privileges, press [Win+r] keys to open run prompt and type the following command in order to open Disk Management tool.
diskmgmt.msc
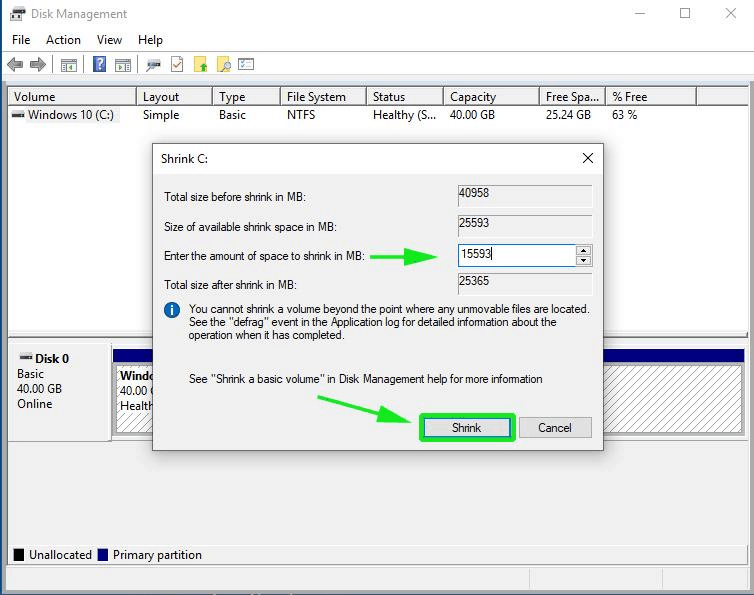
2. Right-click on C: partition and select Shrink Volume in order to resize the partition. Use a value best-suited for you, depending on your HDD size, on the amount of space to shrink MB field (minimum 20000 MB recommended) and hit Shrink button to start the process of resizing the partition.
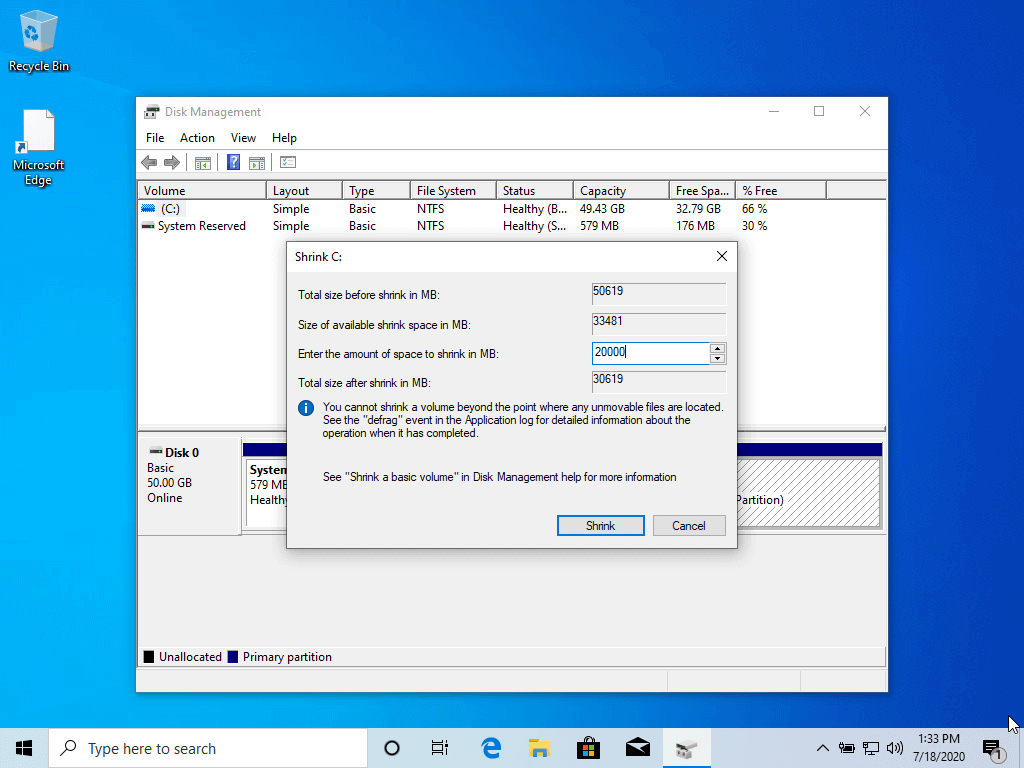
3. When the process finishes a new unallocated space will appear on the hard drive.
Close Disk Management utility, place Linux Mint DVD or USB bootable image in the appropriate drive, and reboot the computer in order to start with Linux Mint 20 installation.
In case you’re booting Linux Mint for installation from a USB dive in UEFI mode make sure you’ve created the bootable USB stick using a utility such as Rufus, which is UEFI compatible, otherwise your USB bootable drive won’t boot.
Step 2: Installation of Linux Mint 20
4. After reboot, press the special function key and instruct the machine firmware (UEFI) to boot-up from the appropriate DVD or USB drive (the special function keys usually are F12, F10 or F2 depending on the motherboard manufacturer).
Once the media boot-up a new screen should appear on your monitor. Choose Start Linux Mint 20 Cinnamon and hit Enter to continue.
5. Wait until the system loads into RAM in order to run in live-mode and open the installer by double-clicking on Install Linux Mint icon.
6. Choose the language you wish to perform the installation and click on the Continue button to proceed further.
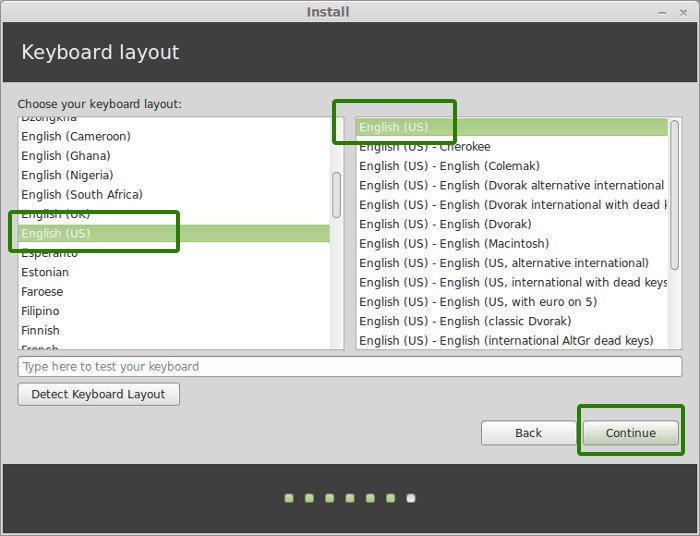
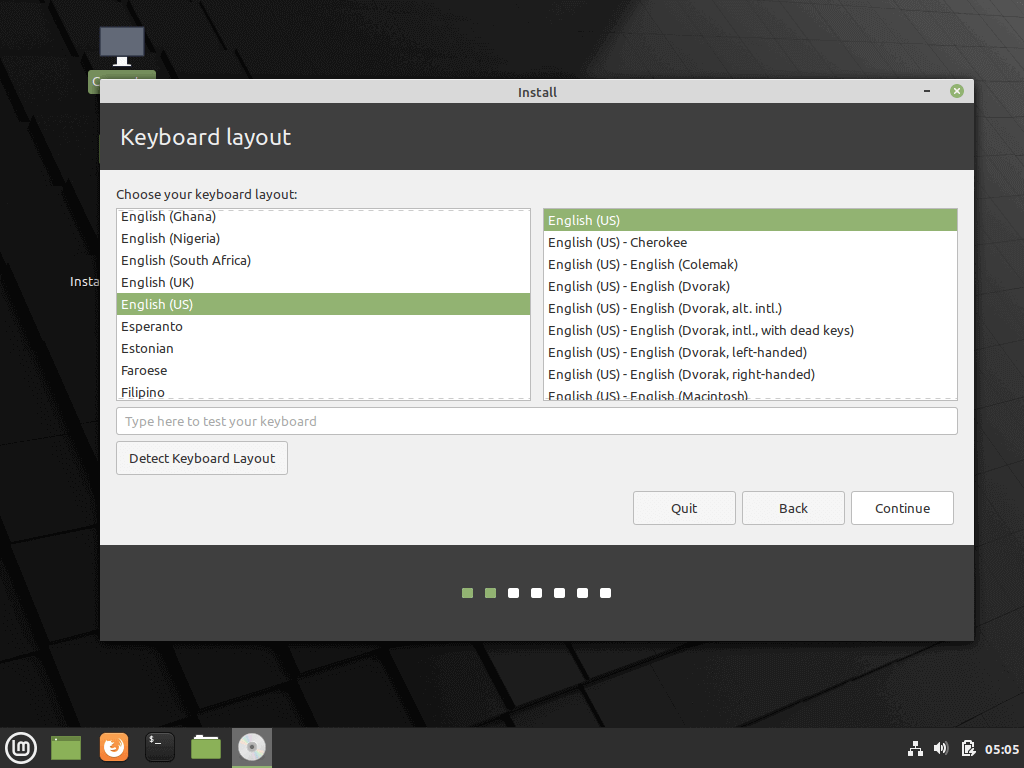
7. Next, you should select your keyboard layout and click on the Continue button.
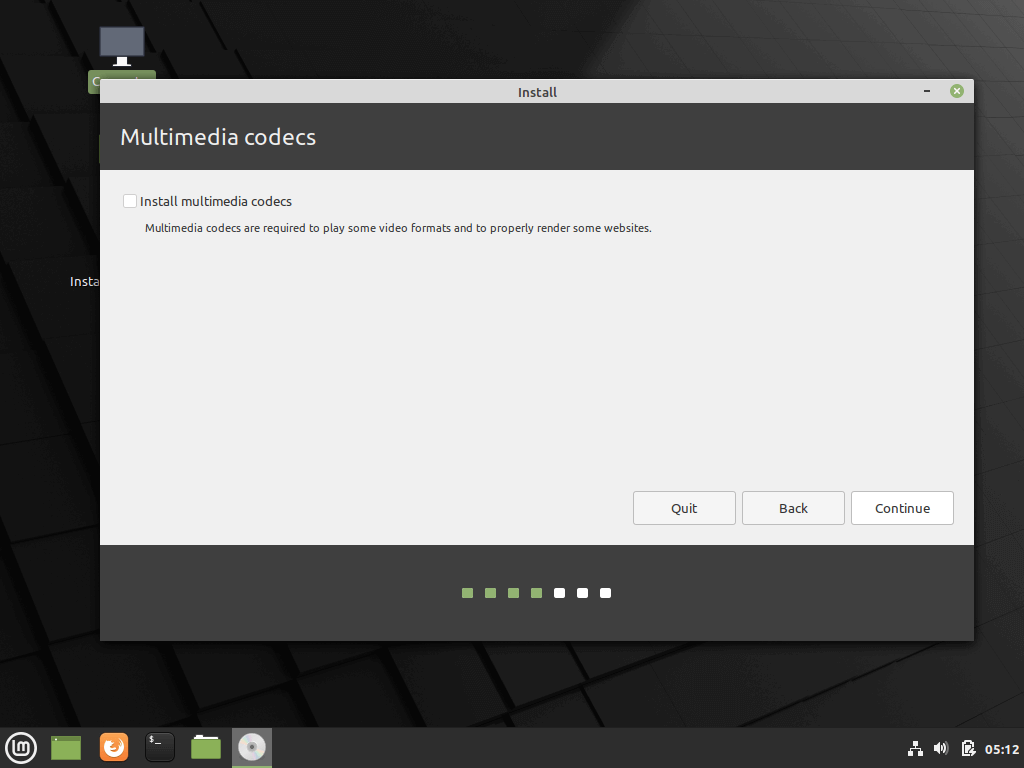
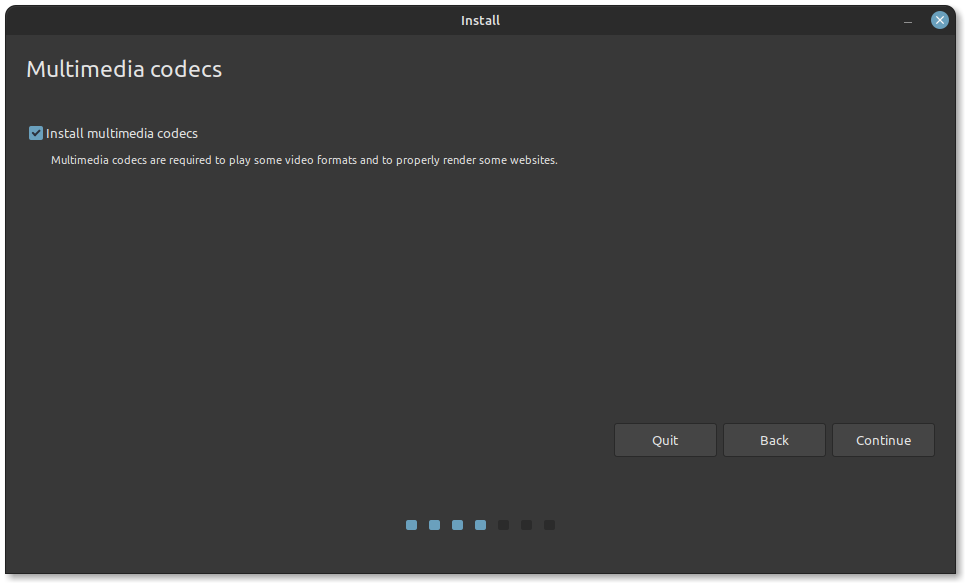
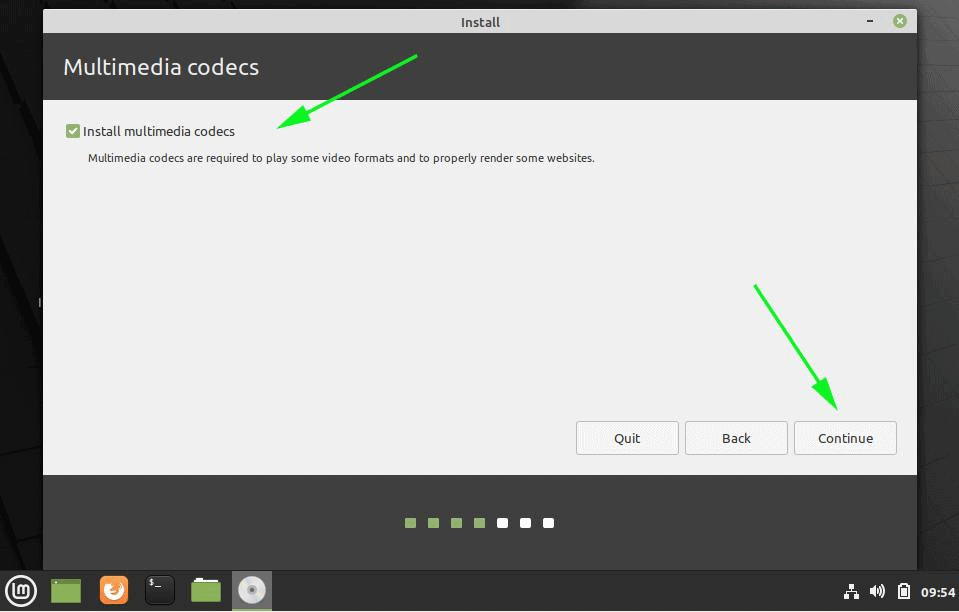
8. On the next screen hit on the Continue button to proceed further. Third-party software (multimedia codes) can be automatically downloaded and installed on this step by checking the check-box.
The recommendation would be to leave the box unchecked for the moment and manually install proprietary software later after the installation process completes.
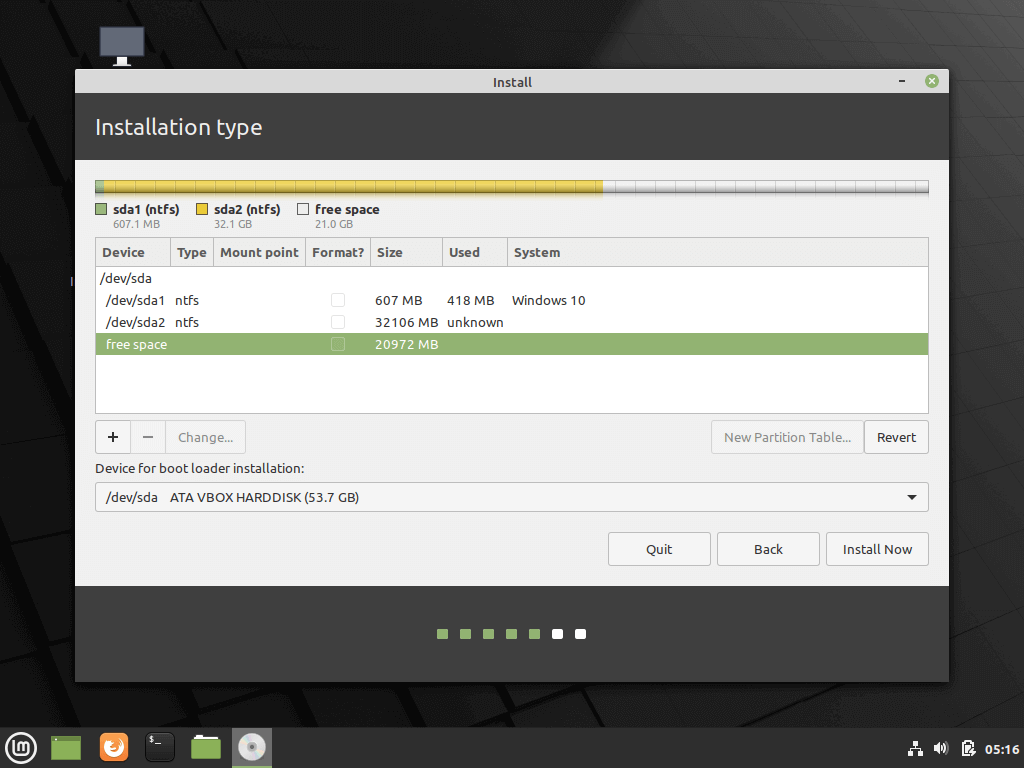
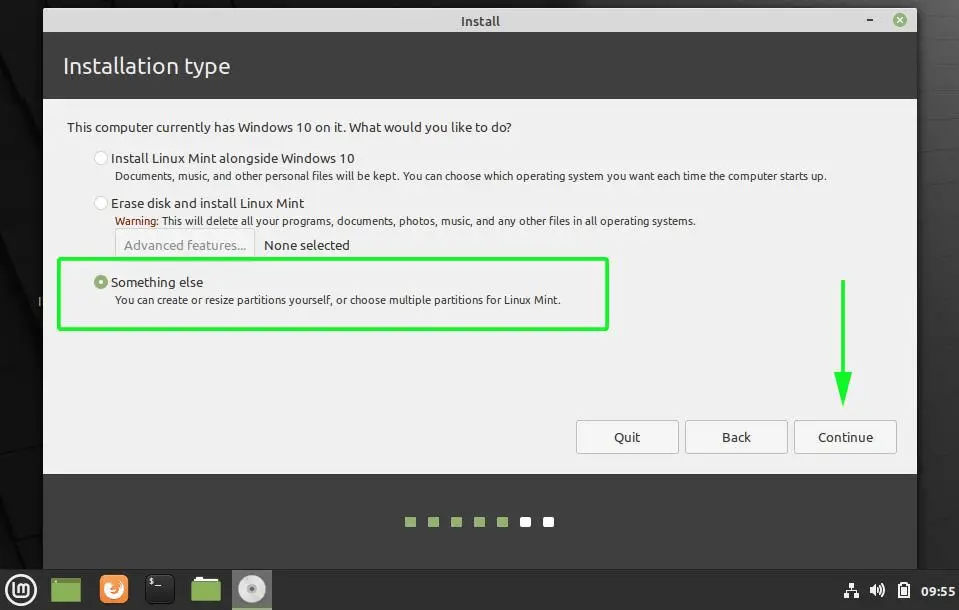
9. At the next screen, you can choose the Installation Type. If Windows Boot manager is automatically detected you can choose to Install Linux Mint alongside Windows Boot Manager. This option ensures that the HDD will be automatically partitioned by the installer without any data loss.
The second option, Erase disk and install Linux Mint, should be avoided for dual-boot because is potentially dangerous and will wipe out your disk.
For a more flexible partition layout, you should go with Something else option and hit on the Continue button to proceed further.

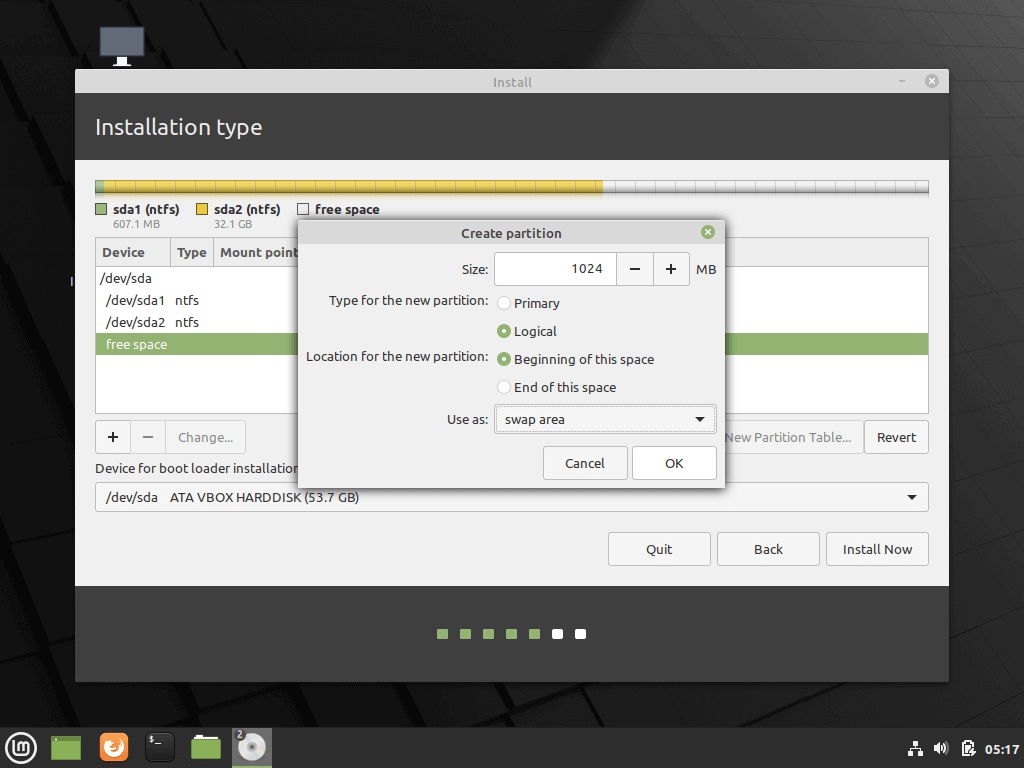
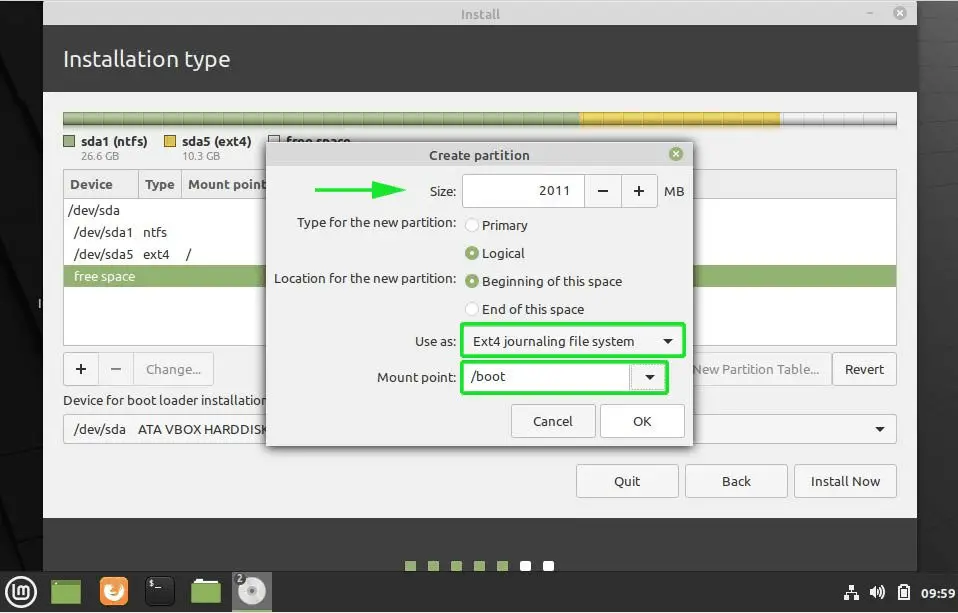
10. Now let’s create the partition layout for Linux Mint 20. I would recommend that you create three partitions, one for / (root), one for /home accounts data and one partition for swap.
First, create the swap partition. Select the free space and hit on the + icon below. On this partition use the following settings and hit OK to create the partition:
Size = 1024 MB
Type for the new partition = Primary
Location for the new partition = Beginning of this space
Use as = swap area
11. Using the same steps as above create the /(root) partition with the below settings:
Size = minimum 15 GB
Type for the new partition = Primary
Location for the new partition = Beginning of this space
Use as = EXT4 journaling file system
Mount point = /
12. Finally, create the home slice with the below settings (use all the available free space to create home partition).
Home partition is the place where all documents for user accounts will be stored by default, except the root account. In case of system failure, you can reinstall the operating system for scratch without touching or losing the settings and documents of all users.
Size = remaining free space
Type for the new partition = Primary
Location for the new partition = Beginning
Use as = EXT4 journaling file system
Mount point = /home
13. After finishing creating the partition layout, select the Windows Boot Manager as the device for installing the Grub boot loader and hit on Install Now button in order to commit changes to disk and proceed with the installation.
Next, a new pop-up window will ask you if you agree with committing changes to disk. Hit on Continue to accept changes and the installer will now start to write changes to disk.

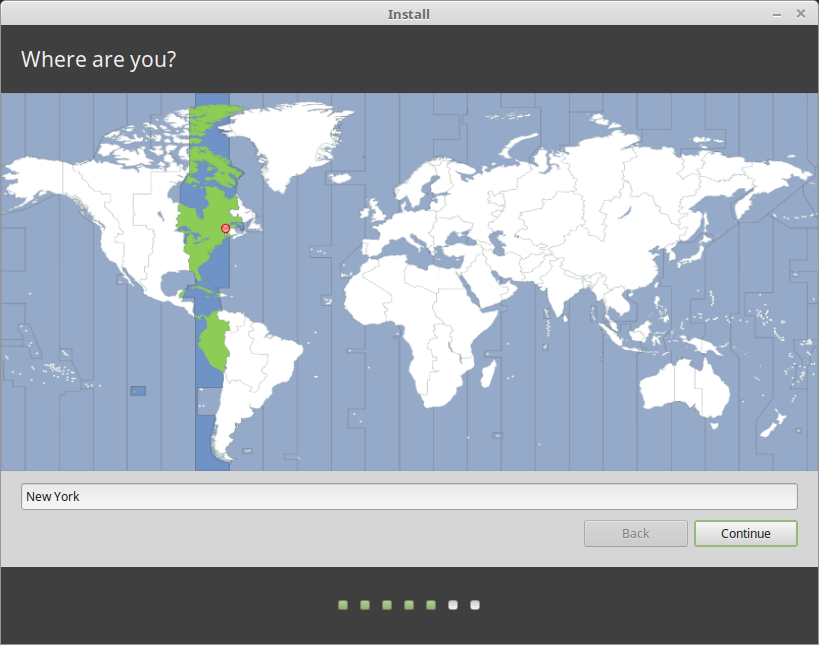
14. On the next screen choose your nearest physical location from the map and hit Continue.
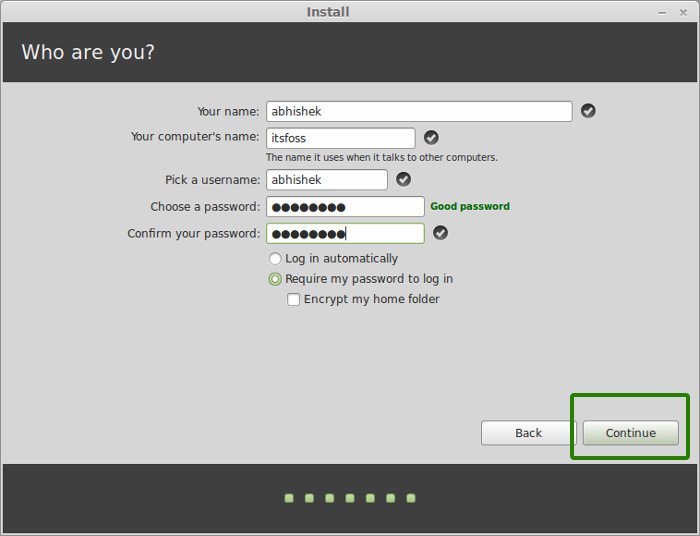
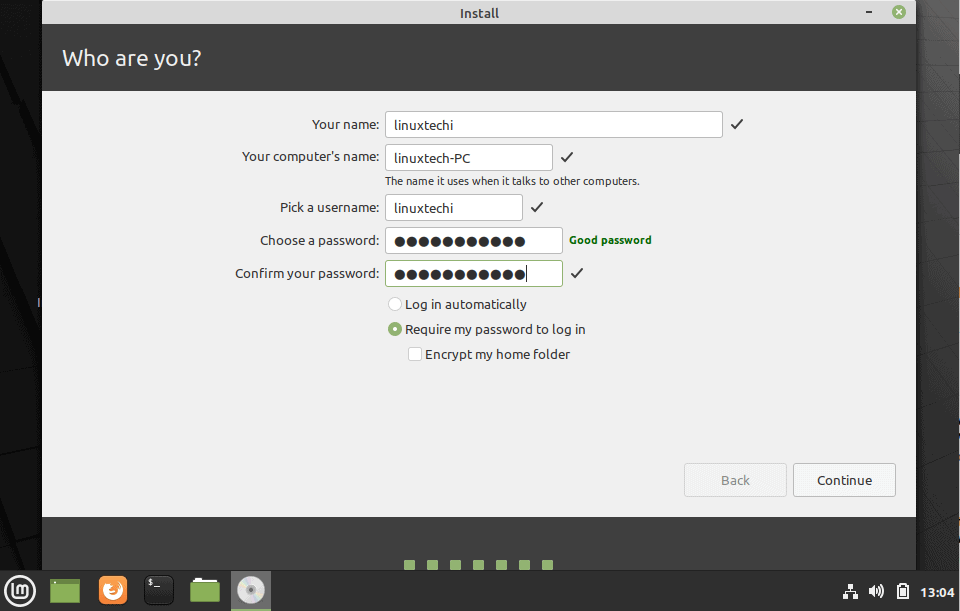
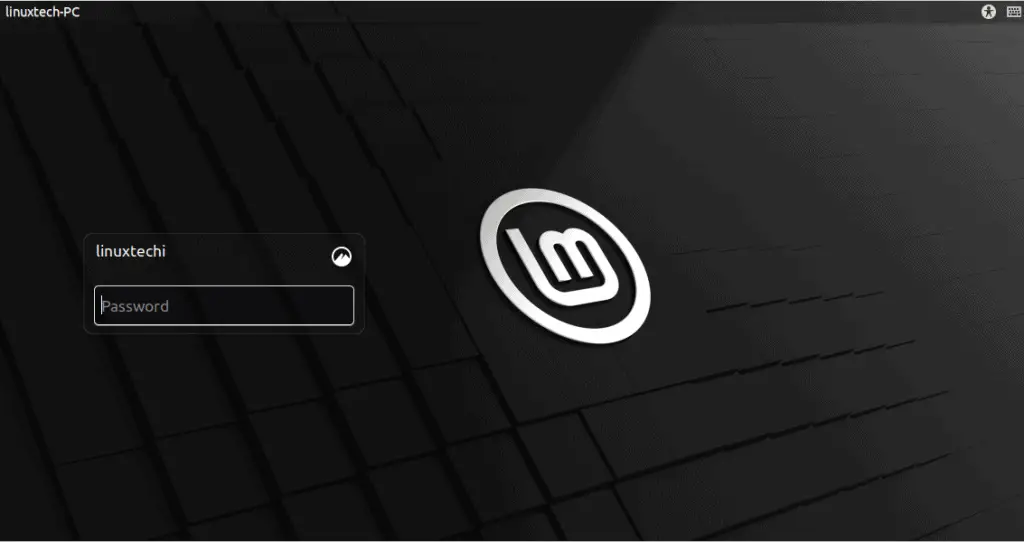
15. Enter a username and a password for the first account with root privileges, choose your system hostname by filling the computer’s name field with a descriptive value and hit Continue to finalize the installation process.
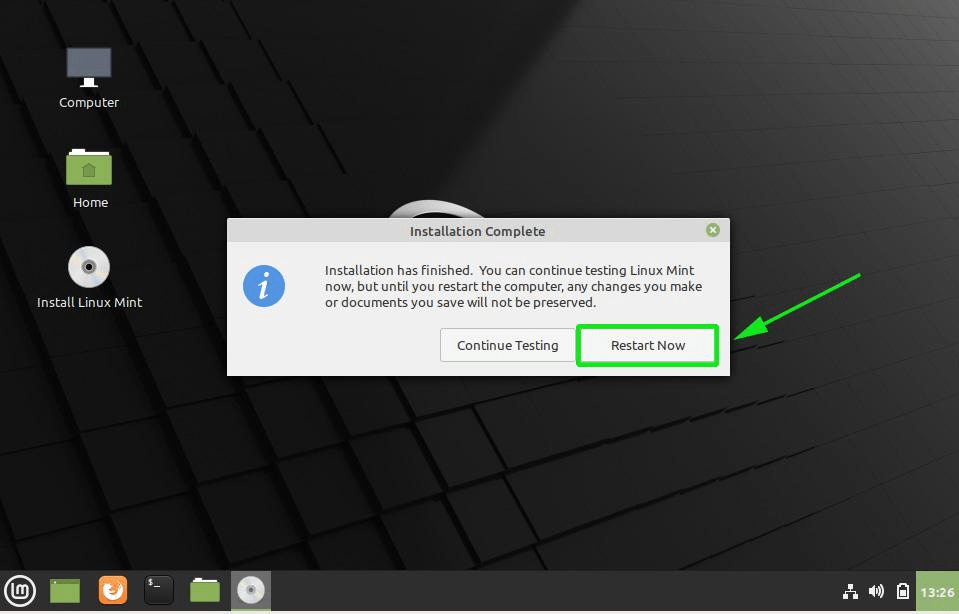
16. The installation process will take a while and when it reaches the final step it will ask you to hit on the Restart Now button to complete the installation.
17. After reboot, the system will first boot-up in Grub, with Linux Mint as the first boot option which will be automatically started after 10 seconds. From here you can further instruct the computer to boot in Windows or Linux.
On computers, with newer UEFI firmware the Grub boot loader won’t be displayed by default and the machine will automatically boot-up in Windows.
In order to boot into Linux, you must press the special function boot key after the restart and from there to further select what OS you wish to start.
In order to change the default boot order enter UEFI settings, select your default OS and save the changes. Review the vendor’s manual in order to detect the special function keys used for boot or for entering UEFI settings.
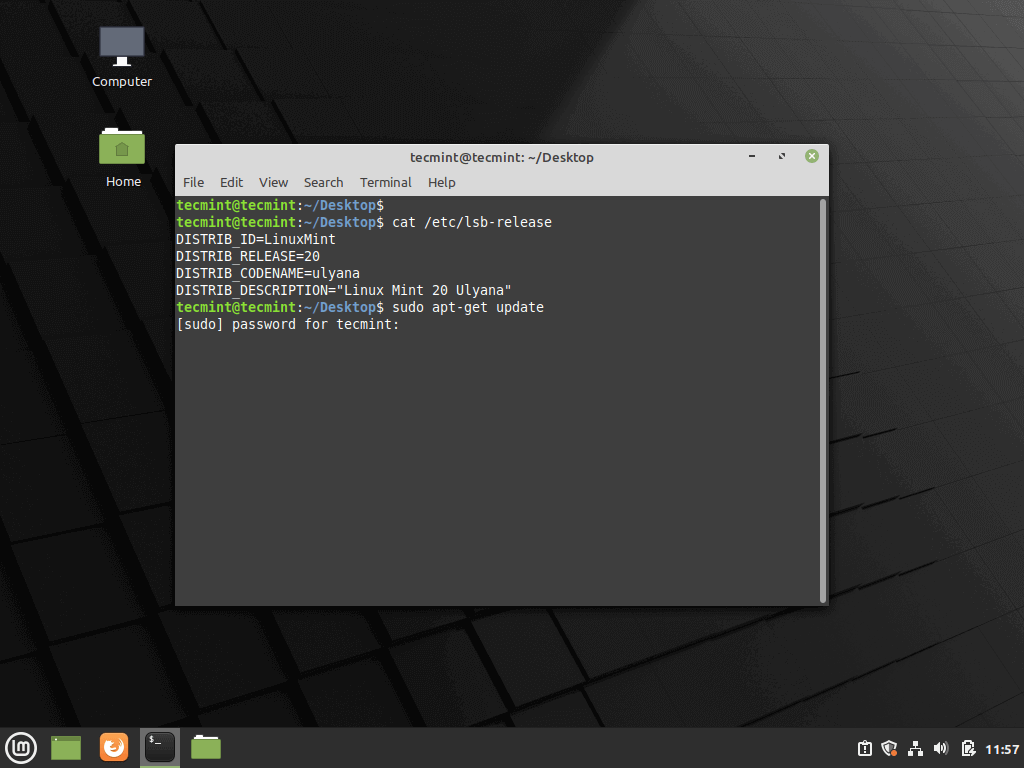
18. After the system finishes loading, log in to Linux Mint 20 by using the credentials created during the installation process. Fire-up a Terminal window and start the update process from the command line by running the following commands:
$ sudo apt-get update
$ sudo apt-get upgrade
That’s it! You have successfully installed the latest version of Linux Mint 20 on your device. You will find the Linux Mint platform to be very robust, fast, flexible, enjoyable, easy to use, with a ton of software required for a normal user already installed and very stable.
If You Appreciate What We Do Here On TecMint, You Should Consider:
TecMint is the fastest growing and most trusted community site for any kind of Linux Articles, Guides and Books on the web. Millions of people visit TecMint! to search or browse the thousands of published articles available FREELY to all.
If you like what you are reading, please consider buying us a coffee ( or 2 ) as a token of appreciation.

We are thankful for your never ending support.
Dual boot for Linux Mint 20.X(*) with EFI STUB loader + Windows 10
Linux configured with Full System Encryption (directory /boot included)
PC with UEFI firmware & HDD with GPT partitioning scheme
UEFI Boot Manager ‘systemd-boot’ equipped with Linux Extended Boot Partition (a.k.a. XBOOTLDR)
Author: Naldi Stefano (linux22 at Mint Forum)
First Release: October 2015
Last update: 15 November 2020
Version 3.0
(*) Works also with Ubuntu 20.04.X
Hits since 22/10/2016 
Other tutorials concerning Linux Mint with Full Disk Encryption, directory /boot included:
- LINUX MINT FDE FOR PC UEFI + HDD GPT, BOOTING WITH EFI STUB LOADER New !!!
- LINUX MINT FDE FOR PC BIOS + HDD MBR
- LINUX MINT FDE FOR PC BIOS + HDD GPT
- LINUX MINT FDE FOR PC UEFI + HDD GPT
- HOW TO ENABLE UEFI SECURE BOOT WITH YOUR OWN CUSTOM KEYS
Table of contents
GNU LICENSES
Disclaimer and acknowledgments
Useful links
Preface
INSTALLATION FOR PC WITH UEFI AND HDD WITH GPT, EFI STUB LOADER
Step 1 — Check your HDD and build a Linux Extended Boot Partition (a.k.a. XBOOTLDR)
Step 2 — Set up for Ubiquity configuration file ’07crypto_check_mountpoints’
Step 3 — Set up of HDD and partitions
Step 4 — Set up of the Linux FDE installation
Step 5 — Configuring the EFI STUB loader for the Linux FDE installation
Step 6 — Installing and configuring the ‘systemd-boot’ boot manager
Appendix A — Emergency tools — How to access your encrypted partition with your Live Linux
Appendix B — Emergency tools — How to reinstall EFI STUB loader after …
Appendix C — Enabling Secure Boot for both Linux FDE and Windows 10
Method α — Using the original Microsoft UEFI Secure Boot certificates of your PC UEFI platform
Method β — Using the original Microsoft UEFI Secure Boot certificates, downloaded from Microsoft repositories
Secure Boot check
Appendix D — Dual boot Linux Mint 20.X FDE + Windows 10 without XBOOTLDR partition
GNU Free Documentation License
Version 1.3, 3 November 2008
Dual boot for Linux Mint 20.X with EFI STUB loader + Windows 10
Linux Full System Encryption (directory /boot included)
PC with UEFI & HDD with GPT and ‘systemd-boot’ UEFI Boot Manager
Copyright (C) 2015 2016 2017 2018 2019 2020 2021 Naldi Stefano.
Permission is granted to copy, distribute and/or modify this document under the terms of the GNU Free Documentation License, Version 1.3 or any later version published by the Free Software Foundation; with no Invariant Sections, no Front-Cover Texts, and no Back-Cover Texts.
You should have received a copy of the «GNU Free Documentation License» along with this document.
If not, see < https://www.gnu.org/licenses/fdl.html >.
GNU GENERAL PUBLIC LICENSE
Version 3, 29 June 2007
Dual boot for Linux Mint 20.X with EFI STUB loader + Windows 10
Linux Full System Encryption (directory /boot included)
PC with UEFI & HDD with GPT and ‘systemd-boot’ UEFI Boot Manager
Copyright (C) 2015 2016 2017 2018 2019 2020 2021 Naldi Stefano.
This program is free software: you can redistribute it and/or modify it under the terms of the GNU General Public License as published by the Free Software Foundation, either version 3 of the License, or (at your option) any later version.
This program is distributed in the hope that it will be useful, but WITHOUT ANY WARRANTY; without even the implied warranty of MERCHANTABILITY or FITNESS FOR A PARTICULAR PURPOSE. See the GNU General Public License for more details.
You should have received a copy of the «GNU General Public License» along with this program.
If not, see < https://www.gnu.org/licenses/gpl.html >.
Disclaimer and acknowledgments
I wrote this guide/tutorial with the hope that it will be useful for everyone who need a dual boot Linux FDE (Full Disk Encryption) + Windows 10 installation. The solution here reported is EXPERIMENTAL and need a good experience with Linux and its installation. At the moment I have successfully experimented this solution with Linux Mint 20.X Cinnamon and Mate and Ubuntu 20.04, all 64 bit version.
This guide/tutorial comes with ABSOLUTELY NO WARRANTY.
Prior of all I must thank Matthew Bentley (https://bentley.link/secureboot), because his publications show very well the whole process of building and configuring a reliable EFI STUB loader for Linux systems. You can see that his solution was published on 12 May 2016, more than 4 year ago.
Another thanks go to Michal Krenek (Mikos) for its ‘cryptboot’ software package (https://github.com/xmikos/cryptboot). In a few pages he has condensed all we need to BUILD and RUN a working UEFI Secure Boot Linux installation.
Altought these two software solutions seem both developed for ArchLinux distros we can find within them the rights commands and advices for almost every Linux distribution.
Useful links
• https://bentley.link/secureboot
• https://wiki.archlinux.org/index.php/EFISTUB
• https://wiki.debian.org/EFIStub
• https://kernel-team.pages.debian.net/kernel-handbook/ch-update-hooks.html
• http://www.rodsbooks.com/efi-bootloaders/efistub.html
• https://wiki.archlinux.org/index.php/Dm-crypt/Encrypting_an_entire_system
• https://wiki.archlinux.org/index.php/Dm-crypt/Device_encryption#Keyfiles
• https://wiki.archlinux.org/index.php/Dm-crypt/System_configuration
• https://wiki.archlinux.org/index.php/Systemd-boot
• https://bbs.archlinux.org/viewtopic.php?id=158003
• http://blog.uncooperative.org/blog/2014/02/06/the-efi-system-partition/
• https://systemd.io/BOOT_LOADER_SPECIFICATION/
• https://systemd.io/BOOT_LOADER_INTERFACE/
• https://www.freedesktop.org/wiki/Software/systemd/systemd-boot/
• https://www.freedesktop.org/wiki/Specifications/BootLoaderSpec/
• https://wiki.gentoo.org/wiki/User:Sakaki/Sakaki’s_EFI_Install_Guide/Configuring_Secure_Boot
Preface
The 4 major difficulties dealing with Dual Boot Linux Full Disk Encryption + Windows 10 are:
— the correct configuration of the boot loader, normally GRUB, for stand alone Linux Full Disk Encryption, especially when also directory ‘/boot’ is encrypted
— the correct configuration of the GRUB Boot Loader for dual booting with Linux Full Disk Encryption + Windows 10, especially when also directory ‘/boot’ is encrypted
— the correct configuration of the GRUB Boot Loader when used on PCs with UEFI platform and Secure Boot enabled
— the current GRUB package, used in most Linux Distro’s, DO NOT support LUKS2 on Linux Full Disk Encryption when also directory ‘/boot’ is encrypted. Recently the GRUB package has been updated for LUKS2 support and some Distro’s are working for updating their latest builds but the update is still problematic and the LUKS2 support is guaranteed only if the —pbkdf option (Password-Based Key Derivation Function algorithm) is set to pbkdf2.
My previous solutions were developed using GRUB Boot Loader but every time I got a Linux Kernel update, a GRUB update, an initrd update or the most weird update I was forced to reinvent the wheel and search for a new correct configuration of GRUB, if possible.
Finally I have found 2 new tools, very spartan, very simple and very light that solved almost every major problem that I encountered dealing with GRUB and Dual Boot with Linux Full Disk Encryption + Windows 10.
The 2 tools are EFISTUB Boot Loader and ‘systemd-boot’ UEFI Boot Manager.
The first tool is EFISTUB Boot Loader, a very simple tool that turns a Linux kernel image into an EFI executable file which can be directly launched from the PC UEFI firmware. This tool, combined with the Linux command ‘objcopy’, can build a single composite EFI file containing the Linux kernel, a text file containing the Linux kernel’s command-line parameters and the initrd.img file.
This configuration can manage and boot up also LUKS2 encrypted partition, without any limitation.
This single efi file can be re-built automatically every time we get a Linux Kernel update and/or a initrd update.
The major disadvantage of EFISTUB+objcopy efi files is its size (almost 100 MB).
In dual boot systems with Linux Full Disk Encryption + Windows 10 this problem can be overcomed using a Linux Extended Boot Partition (a.k.a. XBOOTLDR) as a container for the composite EFI files produced by EFISTUB+objcopy tools.
The second tool is the ‘systemd-boot’ UEFI Boot Manager. Also this tool is a spartan, simple and extremely light executable efi file. Its configuration is done with simple text configuration files.
The major disadvantage of ‘systemd-boot’ UEFI Boot Manager is the lack of adequate documentation.
Lastly we can also sign these efi executable files with our own Custom Secure Boot keys and run them on PCs UEFI platforms with Secure Boot enabled.
I have used these tools for a while and I have never got the annoying problems encountered using GRUB.
The solution depicted in this tutorial, using XBOOTLDR partition, can be useful because the typical installation of Windows 10 create an ESP partition with size < 300MB. If reinstalling Windows 10 in your system with a greater ESP partition is contraindicated then putting the composite EFI file of almost 100 MB (produced by EFISTUB+objcopy tools) inside the ESP can be problematic. In this case the solution using XBOOTLDR partition can solve the problem.
For more details see: https://wiki.archlinux.org/index.php/Systemd-boot
If instead is possible installing Windows 10 with an ESP partition size ≥ 1GB you can choose the very simpler solution depicted in Appendix D (tutorial not yet ready).
The topic for this tutorial at the Mint Forum is:
https://forums.linuxmint.com/viewtopic.php?t=198077
You can download the latest version of this tutorial from my cloud storage. The zip file contains the tutorial in pdf format and a text file with all the Terminal commands listed inside it (for more reliable ‘Copy and Paste’ operations). The link to the zip file is:
Dual boot Linux Mint 20 FDE + systemd-boot + Windows 10 — EFISTUB on XBOOTLDR — Version 3.0
In this article, we are going to learn how can you dual boot windows 10 and Linux Mint and switch between them as per your needs. Although it is laced with many features, Linux isn’t perfect yet. You still might need your Windows installation because of some proprietary software programs or games that just cannot run on Linux.
Note: This only works if you install Windows 10 first, or you already have a Windows installation on your hardware first. You cannot install Linux Mint first and then Install Windows, Windows installer will simply remove your Linux Installation.
Let’s get right into the steps to dual boot windows 10 and Linux mint on your system. You can replace Linux Mint with Ubuntu and follow the partitioning section below.
1. Download Linux Mint ISO.
Go to Linux Mint’s official website, and download the edition of Mint that you prefer. No matter which edition you pick, the installation method will be the same. For the sake of this tutorial, I’m using Linux Mint – Cinnamon edition.
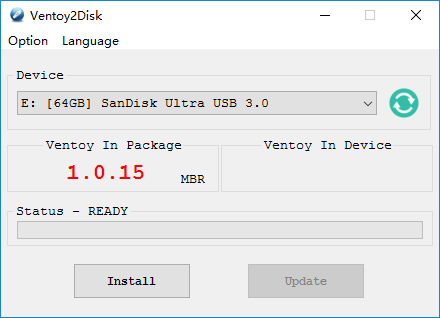
2. Create a bootable USB stick using Ventoy.
Pick any USB drive of at least 4 GB capacity and make sure that you have no important data in it, as this process will erase it. From Ventoy’s official GitHub page, download the latest version of the Ventoy-Windows.zip file.
Open your downloads folder and extract it there. Now, insert your Flash drive and open Ventoy2Disk.exe. Make sure that your USB stick is selected, if not, click on the refresh button, Now click on install.
3. Transfer the ISO file to the Flash Drive
Navigate to your Downloads folder and look for the Linux Mint ISO you just downloaded. Copy the ISO using Ctrl + C, now navigate to the Ventoy USB and simply paste it there by pressing Ctrl + V.
4. Disable Secure Boot
Check your Laptop/Motherboard manufacturer website for the key you need to press to access the BIOS menu. It is different for each manufacturer. Don’t worry if you can’t find it, it’s usually one of these keys – DEL, Esc, F2, F10 or F12.
Restart your PC and press the key which will lead you to the BIOS menu when the manufacturer logo comes on the screen. Navigate to ‘Boot Options’ using the arrow keys on your keyboard and there, disable ‘Secure Boot’, and using the F5 & F6 keys, change the boot priority order so that your Ventoy USB will be on top and hence booted first. Press F10 key to save and exit.
Now, on the next screen, select Linux Mint and press enter. In a few seconds, you will be greeted with Mint’s Cinnamon desktop interface
5. Free Up Space
Now, before we proceed to the installation, press the ‘Super’ key (or Windows key) on your keyboard look for software named GParted, and launch it. We have to free up some space where we will install Linux Mint.
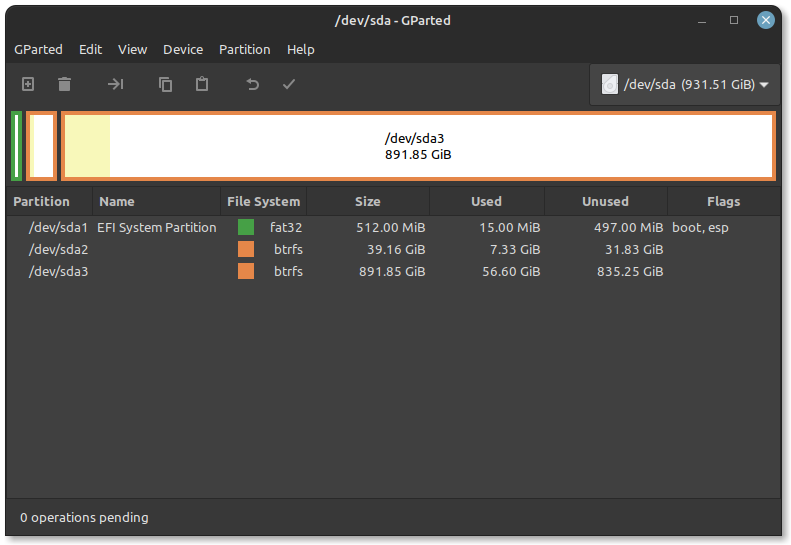
Select any partition and right click, resize your other partition so that you have at least 50 GB – 60 GB of unallocated disk space.
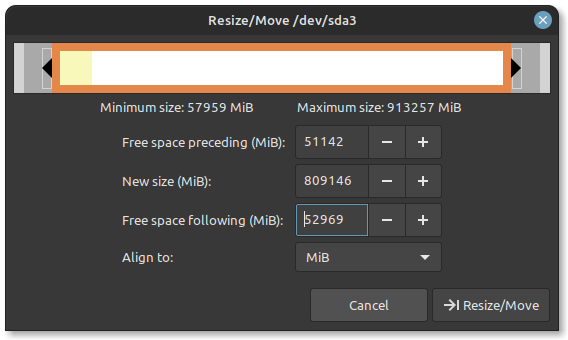
Click on Resize and hit apply changes, this process will take some time if the partition you are shrinking has any Data on it. Although not always, this process can corrupt your files.
When the process is complete, close GParted. Now we are ready to install Linux Mint on your device alongside Windows.
6. Begin Installation
Launch the Installer, select your Language and hit continue.
On this step, you need to select your keyboard layout.
If you are connected to the Internet, the Installer will give you an option to Install Multimedia codecs, click on the checkbox and hit continue.
In this step, if the installer detects your Windows installation, then great! Just hit continue, select the unallocated space we just created, and click on the Install button.
7. Drive Partitions For Dual Boot
For some reason, if the installer does not detect Windows, select ‘Something else’ as the installation type and hit continue.
Next, you’ll see an NTFS partition within the list. This is your Windows partition.
Make sure you do not make any modifications to these NTFS partitions as they will contain Windows system files unless you know exactly which drives are non-Windows drives.
We’ll only work on partitioning the unallocated spaces. So go ahead and right-click on the unallocated space and select create a partition.
I’m dedicating my full 50 GB to this partition, but if you want, you can also create a /home partition. Finally, when you are sure of the changes you are going to make, click on Install now.
8. Complete The Installation
Choose your Time-Zone in the next section and hit next.
Lastly, set up your Username and a desktop password. Click on continue. This installation will take 10-15 minutes from this point. The installer will then ask you to restart your PC and then remove your Installation media and press Enter.

9. Update your Installation
The next time you start your PC, the GRUB bootloader will ask you to pick between Linux Mint and Windows 10. Boot once into Linux mint, open Terminal, and type in the following commands to update your system.
$ sudo apt update && sudo apt full-upgrade
If you do not see Windows 10 or any other operating system that you have installed alongside Linux, go ahead and run the following command on your terminal:
Conclusion
You have successfully installed & updated Linux Mint 20.3 alongside Windows 10.
Linux Mint 20, also referred to as Ulyana, was released in June 2020 and packs with a basket of new features and enhancements to improve your overall user experience. If you have Windows 10 already on your PC and would like to reap the full benefits of the latest Mint release, you can install it alongside Windows 10.
Upon booting, you will be presented with the option of booting into either Linux Mint 20 or Windows 10. In this guide, we show you how to dual boot Windows 10 and Linux Mint 20.
Prerequisites
Before embarking on configuring the dual-boot setup, ensure that the following requirements are met:
- A bootable installation medium of Linux Mint 20 (Either USB or DVD)
- A fast and stable internet connection
Note : In Windows 10, we can make a bootable USB drive from ISO file using Rufus software. Use the following URL to download Linux Mint 20:
- Download Linux Mint 20
Step 1) Create a free partition on Windows for Linux installation
To start off, we need to partition the hard drive and create a separate partition for installation of Linux Mint. So, launch the disk management utility by pressing ‘Windows key + R’ to open the run dialogue. Then type diskmgmt.msc and hit ‘ENTER’.
The Disk Management utility lists all the hard drives attached to the PC and their partitions. In our example, we only have a single hard drive with one partition. We are going to shrink this partition and create a free partition for our Linux Mint 20 installation. Right click on the partition and select the ‘Shrink’ option

On the pop-up that appears, specify the amount of space that you’d like to shrink the partition to. In this case, we have allocated 15593 MB to the partition that we are going to install Linux Mint on. Once done, click on the ‘Shrink’ button to shrink the volume and create the free partition.
The unallocated space is now ready to be used for the installation of Linux Mint.
All you have to do now is to plug in your bootable USB drive and reboot your PC. Be sure to change the BIOS settings and assign your USB/DVD medium the highest boot priority. Thereafter, save the changes and once again, reboot your system.
Step 2) Begin the Installation of Linux Mint 20
Upon rebooting, a grub menu will be displayed with a list of options shown. Select the first option to begin the installation.
This ushers you to the Linux Mint 20 desktop. Mint gives you an option to try out Mint without necessarily installing it. You can explore the new look and various features. But since we are interested in installing Mint, simply click on the ‘Install Linux Mint’ icon as shown.
Step 3) Choose Language and Keyboard Layout
On the welcome page, select your preferred installation language and click on the ‘Continue’ button.
Next, select your keyboard layout as shown and click ‘Continue’.
Step 4) Choose to ‘Install multimedia codecs’ during the installation
In the this step, check off the ‘Install multimedia codecs’ checkbox to install the latest multimedia codecs to enable you to play specific video formats such as MPEG-4, AVI and WMA.
Step 5) Choose Installation type
This step gives you 3 options of how you’d like to install Linux Mint.
The first option allows you to Install Linux Mint alongside Windows 10. The installer will intelligently partition the hard drive to accommodate all the Linux partitions and reserve the NTFS partitions used by Windows 10. Select this option if you are not familiar with manual partitioning.
The second option – ‘Erase Disk and install Linux Mint’ – entirely erases the hard drive and lets you install Linux Mint. But that’s not what we want. We want to have a dual-boot setup where we shall have an option of booting into either Windows or Linux Mint upon rebooting. So steer clear from this option.
The last option ‘Something else’ , allows you to manually partition the hard drive. It gives you the flexibility to determine which partitions to create for your Mint installation and the disk space to assign those partitions. This opt is recommended for seasoned Linux users who are familiar with manual partitioning.
For this guide, we will go with this option since the first option is fairly easy. So click on ‘Something else’ and click the ‘Continue’ button.
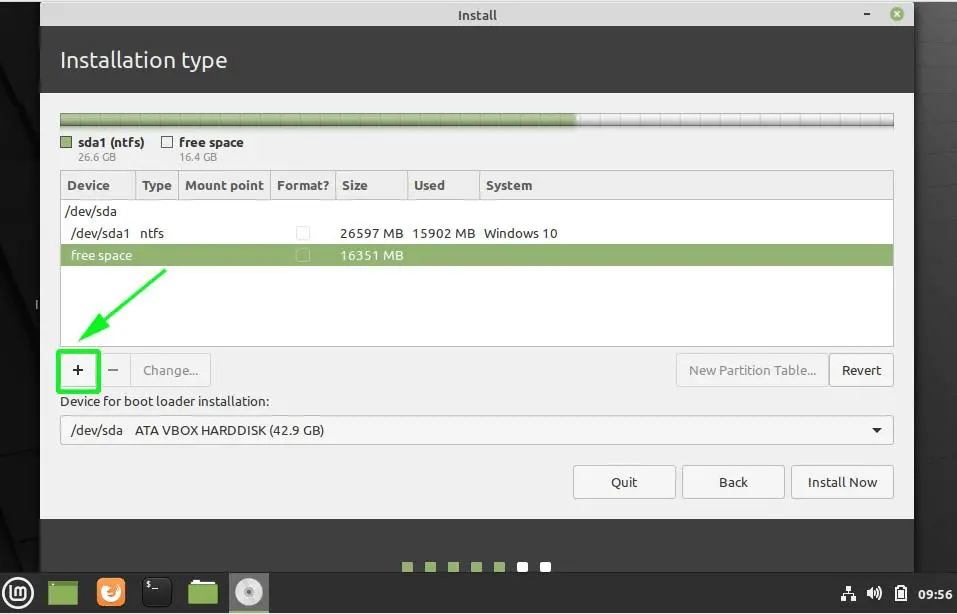
The next window will list all the partitions on your hard drive. As you will notice, you already have the Windows 10 NTFS partition and the free space we created earlier on by shrinking the hard drive.
We will use the free space to create partitions for Linux Mint 20. Therefore, select the free space entry and click on the plus sign [ + ] button.
We are going to create the following mount points (Partitions)
- Root partition – / – 10340 MB
- Boot partition – /boot – 2000 MB
- Swap filesystem – 4000 MB
On the ‘create partition’ pop-up, specify the size of the root partition, filesystem to be used and mount point ( / ). Then Click ‘OK’

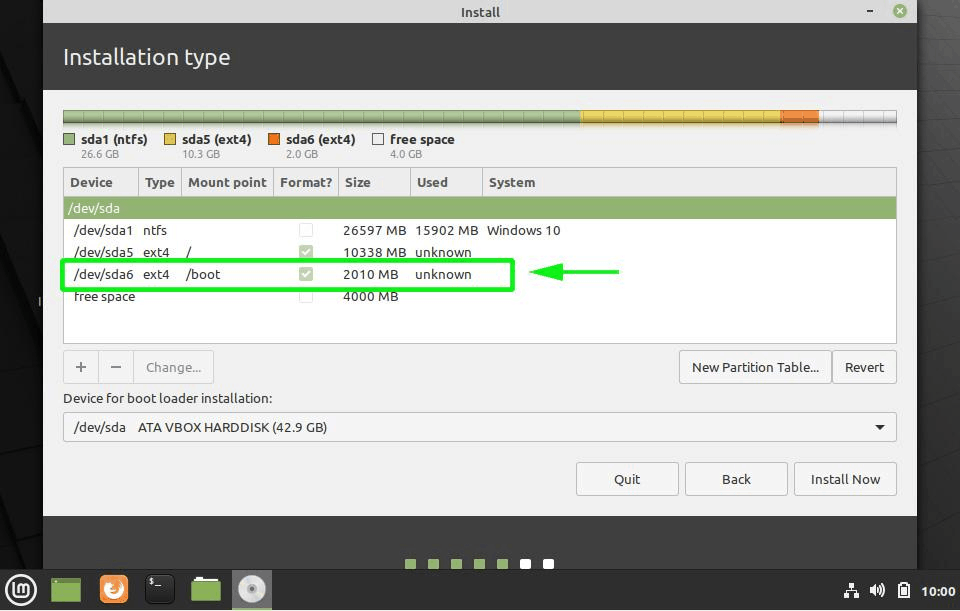
If you look closely, the root partition, labelled /dev/sda5 has been created.

To create the boot partition, repeat the same procedure by clicking the plus sign [ + ] and once again specifying the size of the partition, file system and choosing the partition type as /boot as shown.
The boot partition will be created labelled as /dev/sda6.
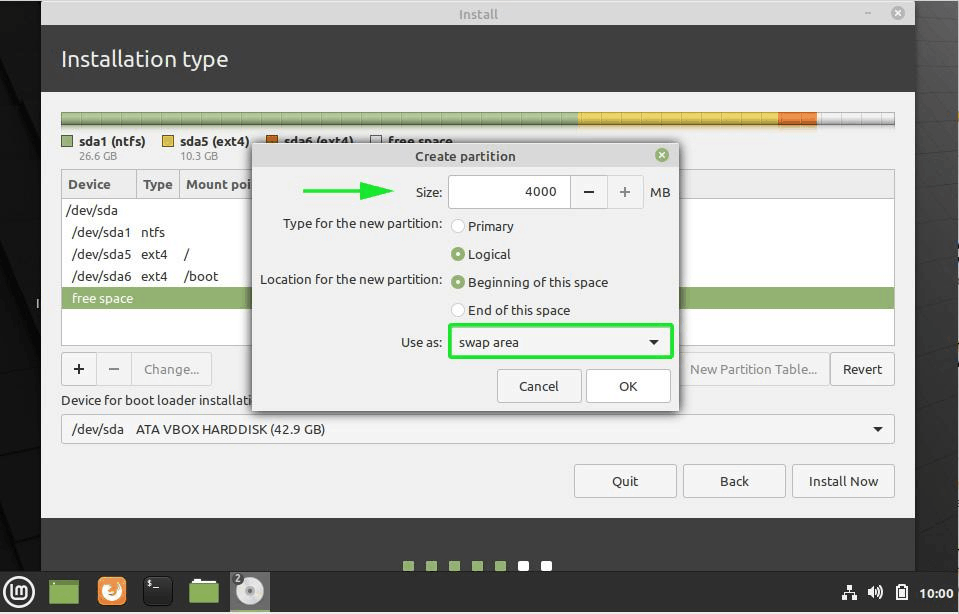
Finally create the swap filesystem. Swap is a virtual space that is created on the hard disk and comes in handy when the RAM is almost getting depleted. It supplements the RAM and avoids instances of processes getting killed when the RAM is overwhelmed.
The complete partition table should resemble what we have below with both Windows and Linux partitions. To proceed with the installation click the ‘Install Now’ button.
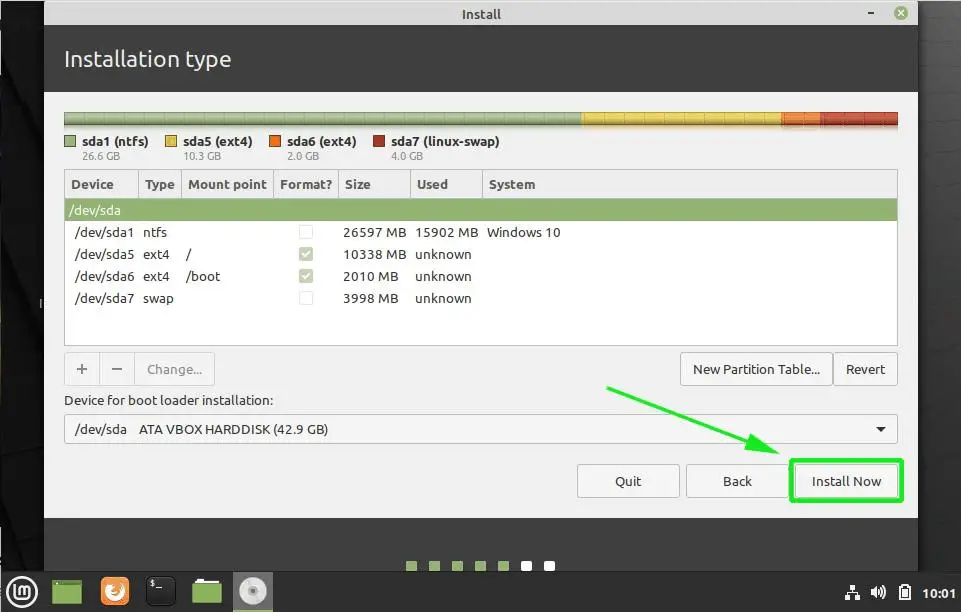
Next, you will be prompted to write changes to the disk. Click on the ‘Continue’ button to save the partitions on your hard drive.
Step 6) Choose your preferred language and user credentials
In this step, you will be required to select your location on the world map. If you are connected to the internet during the installation process, your location will be auto-detected. Otherwise, simply click on the world map provided to select your location and click on the ‘Continue’ button.
Thereafter, create a default user account by providing your username, your PC’s name and your preferred password. Then click ‘Continue’.
Step 7) Linux Mint 20 Installation begins
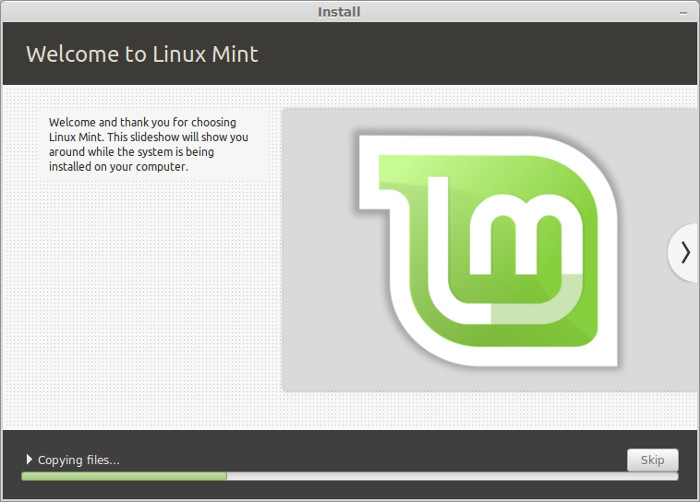
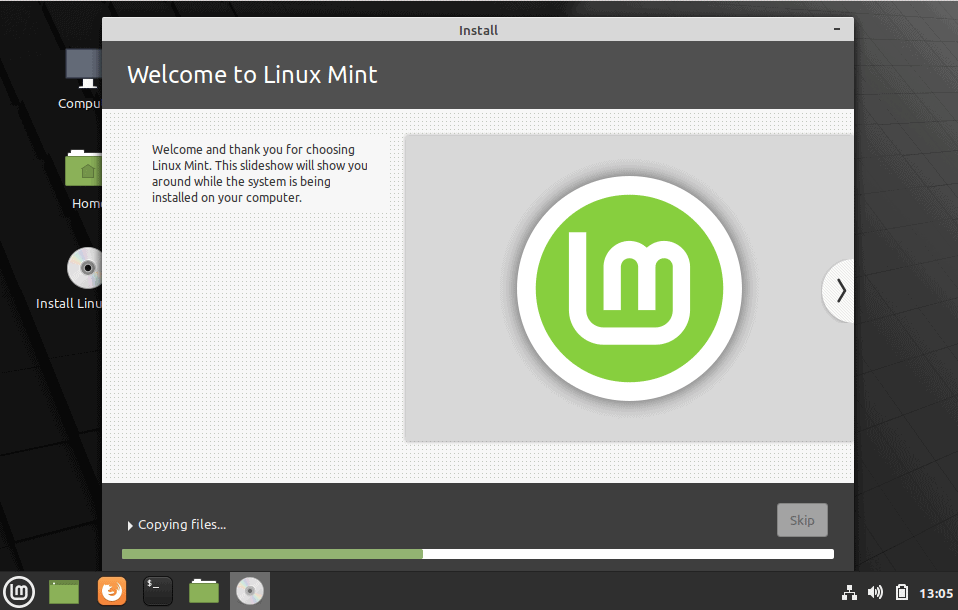
The installer will begin downloading, copying and installing software packages on your system. This will take a while, and this would be an awesome moment to take a break and grab a cup of tea.
Once the installation is complete, click on the ‘Restart Now’ button to reboot the system.
Step Choose Operating System to boot (Windows or Linux Mint 20)
 Choose Operating System to boot (Windows or Linux Mint 20)
Upon rebooting, notice that you now have 2 operating systems you can pick to boot into: Linux Mint 20 and Windows 10. Feel free to scroll up and down using the up/down arrow keys to select the OS you want to boot into.
To boot into Linux, simply hit ‘ENTER’
Provide your password and hit ‘ENTER’ to log into the system.
And this wraps up this guide on how to dual boot Windows 10 and Linux Mint 20. We do hope that you can now comfortably set up a dual boot system on your PC. Your feedback is much appreciated.
 Доброго времени суток!
Если вы никогда не пользовались Linux, но периодически о ней слышали что-нибудь хорошее, и загорелись желанием ее попробовать — то эта заметка для вас! ⚡
Что я буду здесь делать: установлю Linux на диск, на котором уже имеется Windows 10 (разумеется, без потери и удаления данных с него). И само собой будет сделано так, чтобы при включении компьютера была возможность выбирать нужную ОС. Заранее предупрежу, что это всё «не сложно», и на всё про всё потребуется мин. 15-20 времени (на современном ПК).
Итак, начнем?! 👌
*
Примечание: чтобы с диска ничего не пропало — необходимо повторить все мои шаги в аналогичном порядке (без импровизации 😉). Если вы не уверены в своих силах — сделайте бэкап важных данных.
*
Содержание статьи
- 1 Пошаговая установка Linux Mint
- 1.1 ШАГ 1: загрузка установочного ISO с Linux Mint
- 1.2 ШАГ 2: создание установочной флешки
- 1.3 ШАГ 3: подготовка диска под новую ОС
- 1.4 ШАГ 4: запуск установки (начало)
- 1.5 ШАГ 5: разбивка диска (ключевой момент ⚡)
- 1.6 ШАГ 6: завершение установки (пару слов о первых настройках)
- 1.6.1 Настройка параметров (экрана, Wi-Fi подкл. и пр.)
- 1.6.2 Установка приложений
- 1.7 ШАГ 7: как выбирать, какую систему загружать — Windows или Linux

→ Задать вопрос | дополнить
Пошаговая установка Linux Mint
ШАГ 1: загрузка установочного ISO с Linux Mint
Наверное, многие уже слышали, что версий Linux на самом деле много… В сегодняшней заметке я остановлюсь на Linux Mint. Почему?
Linux Mint (20.1) — рабочий стол (что будет видно сразу после загрузки ОС)
- эта ОС работает сразу же «из коробки» — в наличии есть все самое нужное: мультимедиа программы, офис, браузер, почтовый клиент и т.д.;
- она достаточно популярна и к ней много инструкций в сети;
- интерфейс ее графич. оболочки очень напоминает Windows (привыкание происходит быстро 😉);
- низкие системные требования: x64-процессор, ОЗУ 1 ГБ (я рекомендую не менее 4 ГБ!); 20 ГБ на диске;
- безопасна и надежна.
*
Загрузить Linux Mint можно по следующей ссылке: 👇
👉 Официальный сайт: https://linuxmint.com/download.php
*
Примечание: обратите внимание, что на сайте доступны три версии: Cinnamon, Mate, Xfce. В своем примере я буду использовать версию Cinnamon (Xfce — более «легкое» издание, рекомендуется для слабых машин).
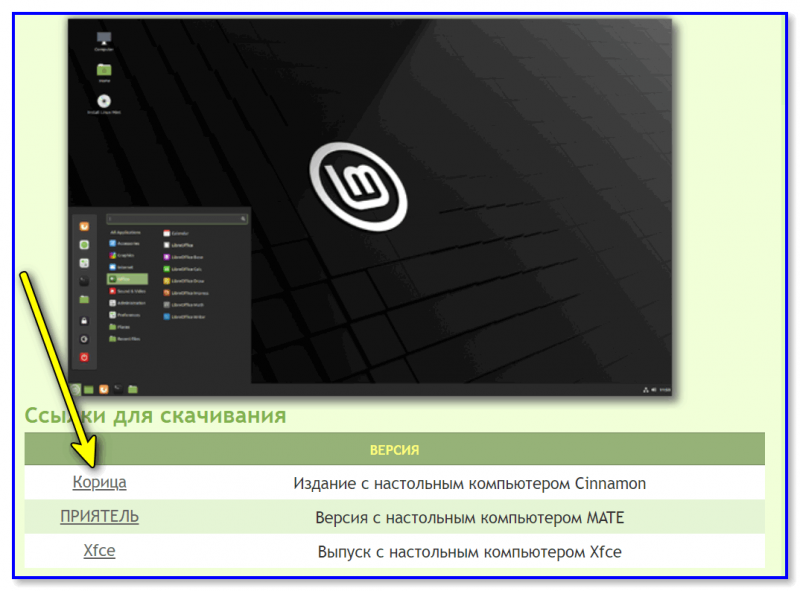
Выбираем версию «Корица» для начала… // Cinnamon
Загружать, кстати, лучше с помощью торрент-раздачи (в помощь: программы для загрузки торрентов).
Загрузка ISO-образа через торрент
*
ШАГ 2: создание установочной флешки
Будем считать, что установочный ISO-образ с Linux Mint у нас есть (загружен с офиц. сайта, ссылка была выше ☝).
Теперь нам нужно правильно записать ISO на флешку, чтобы не возникло вопросов при установке…
Рассмотрю, как это максимально просто сделать в Windows:
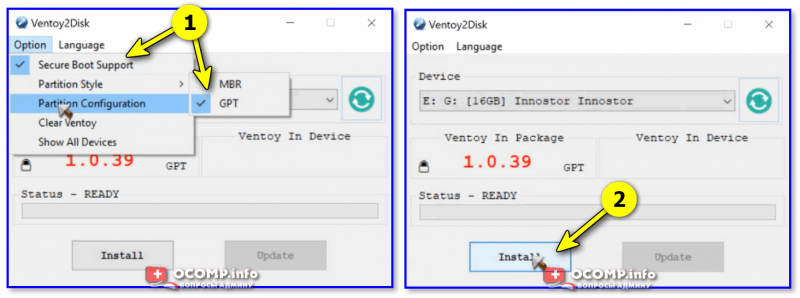
- сначала загрузите программу 👉 Ventoy (эта утилита для быстрого создания загрузочных флешек);
- затем подключите флешку к USB-порту и запустите Ventoy;
- в настройках утилиты укажите разметку «GPT» и «Secure Boot Support» (на современных ПК/ноутбуках это будет так*). Нажмите «Install» (флешка будет спец. образом отформатирована/подготовлена — все данные на ней будут удалены!);

Ventoy — подготовка флешки
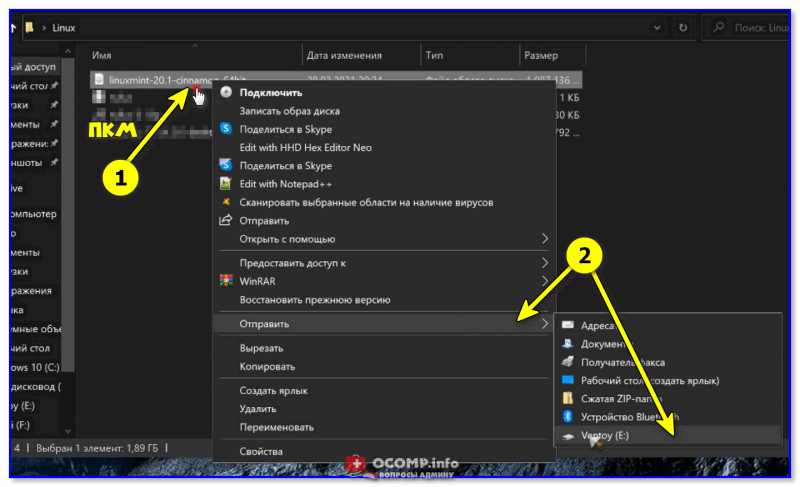
- далее просто скопируйте ISO-образ Linux Mint на флешку (не извлекая!). Можно нажать по ПКМ по ISO-файлу и выбрать «Отправить на Ventoy» прямо в проводнике (см. пример ниже 👇).

Отправить файл ISO на флешку (Ventoy)
- Всё! Флешка готова!
- 📌 Альтернативные способы создать загрузочную флешку с Linux при работе в Windows: https://ocomp.info/sozdanie-zagr-fleshek-s-linux.html.
*
ШАГ 3: подготовка диска под новую ОС
Теперь к главному…
Я буду исходить из того, что на вашем ПК есть один диск, на котором и установлена текущая ОС Windows 10. Также на этом диске есть свободное место, не менее 50-60 ГБ!
И чтобы нам ничего не удалить с этого диска — необходимо спец. образом подготовить под новую ОС место…
*
Для этого понадобиться 👉 программа «Управление дисками» (нажмите Win+R, и используйте команду diskmgmt.msc. Эта утилита встроена в Windows).
После ее запуска, нажмите правой кнопкой мыши (ПКМ) по тому «C:» (на котором и установлена Windows) — и выберите опцию «Сжать том». См. внимательно скрин ниже. 👇
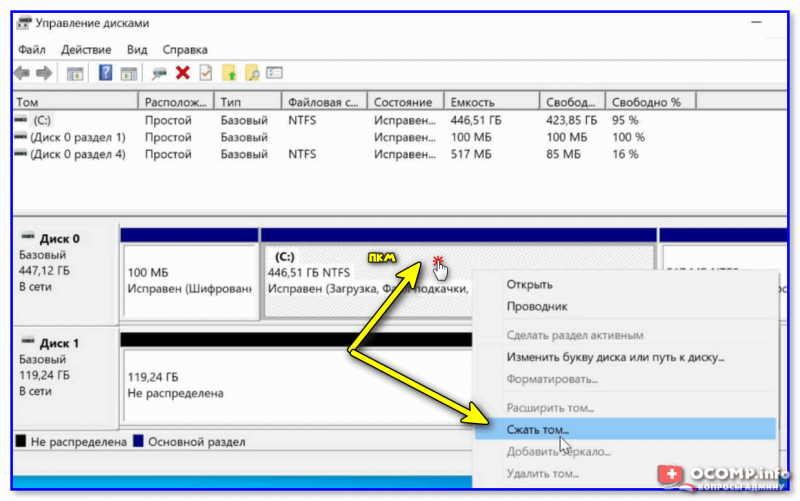
Сжимаем системный раздел с Windows (на нем много свободного места)
Далее укажите размер сжимаемого пространство (т.е. это место на диске мы выделим под новую ОС Linux Mint). В моем примере ∼50 ГБ (50 000 МБ). 👇
Выделять меньше — не рекомендую (т.к. останется мало места под установку доп. приложений и файлов в самой Linux — вы же с ней планируете поработать? 😉).
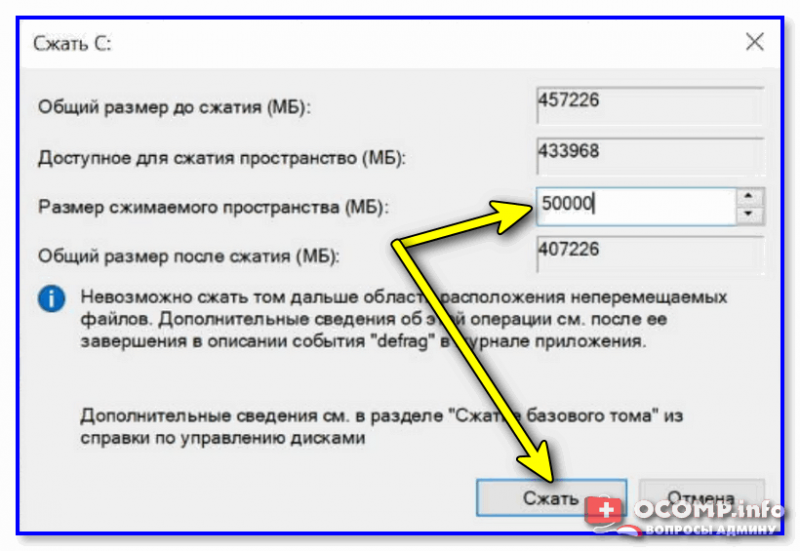
50000 МБ примерно равно 50 ГБ — этого хватит под Linux Mint
После вы должны увидеть, что на диске, помимо тома «C:» с Windows, появилось не распределенное место — размером 48,83 ГБ (запомните эти цифры — они будут нужны при установке Linux). 👇
Больше в «Управление дисками» ничего делать не нужно — утилиту можно закрыть и двигаться дальше!
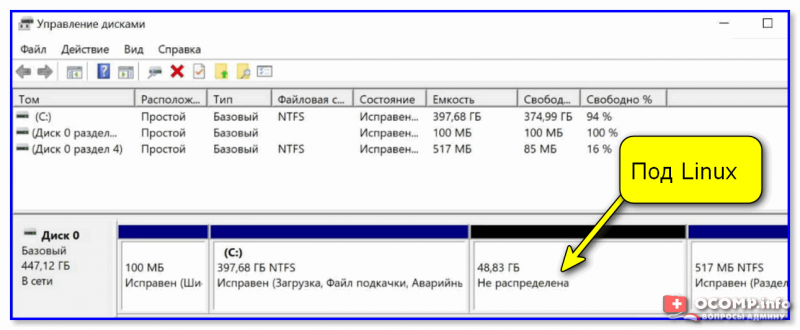
Раздел под Linux создан (не распределен!)
*
ШАГ 4: запуск установки (начало)
Выключаем ПК/ноутбук, подключаем к USB-порту нашу подготовленную флешку, и загружаемся с нее через Boot Menu (/настройки BIOS). Если вы не знаете как это сделать — см. ссылочку ниже в помощь!
*
👉 В помощь!
Как загрузиться с установочной USB-флешки или внешнего HDD
*
👉 Кстати, обратите внимание, что, если в загрузочном меню (Boot Menu)) у вас будет отображаться 2 строчки с флешкой — выбирайте строку с аббревиатурой UEFI!
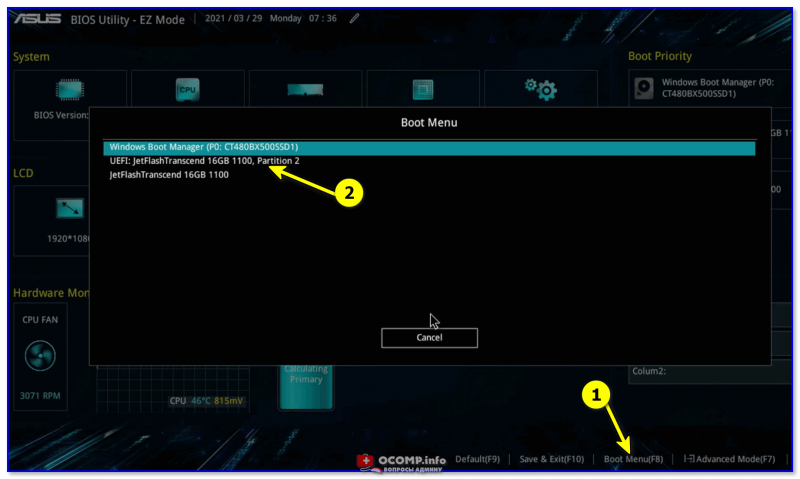
Загрузка с подготовленной флешки в Ventoy
Если вы создавали установочную флешку с помощью Ventoy (как я рекомендовал выше) — перед вами появиться меню с предложением выбрать нужный ISO-образ (в моем случае их несколько — разумеется, указываю Linux Mint и жму Enter…).
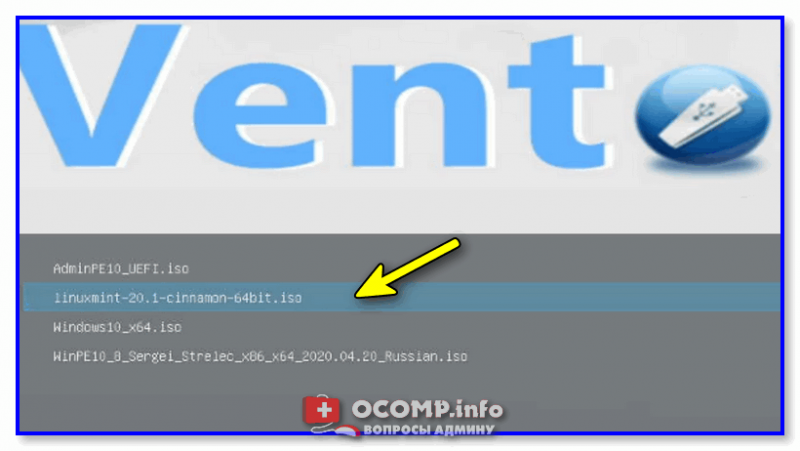
Выбор образа (данное меню будет, если вы подготовили флешку с помощью утилиты Ventoy)
Далее перед вами появиться меню с предложением выбрать вариант загрузки. Для нашего случая выбирать нужно первый — «Start Linux Mint…». 👇
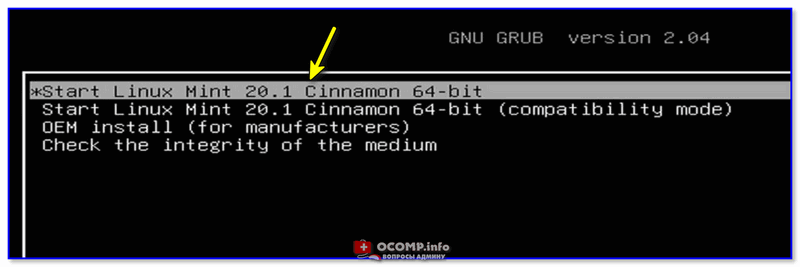
Start Linux Mint (первая строка)
Через 1-2 мин. перед вами появиться рабочий стол — уже можно начинать знакомиться Linux Mint! 😉
Для начала установки — нажмите по значку «Install Linux Mint» (он будет на рабочем столе).
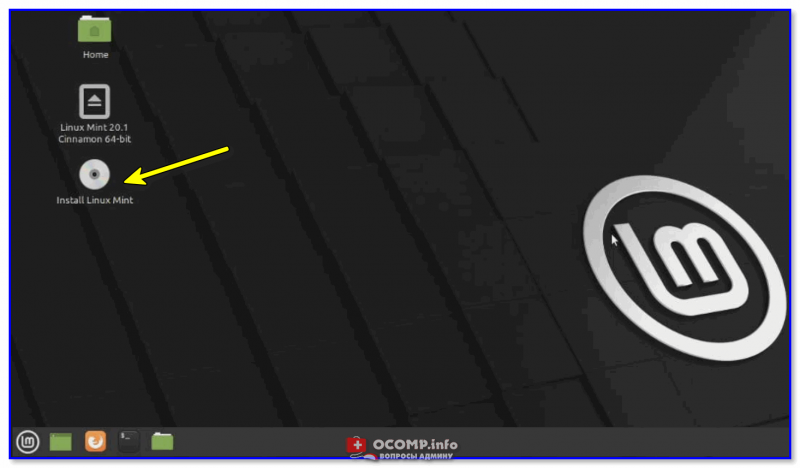
Install Linux Mint
Затем выберите язык, раскладку клавиатуры (см. пару скринов ниже 👇).
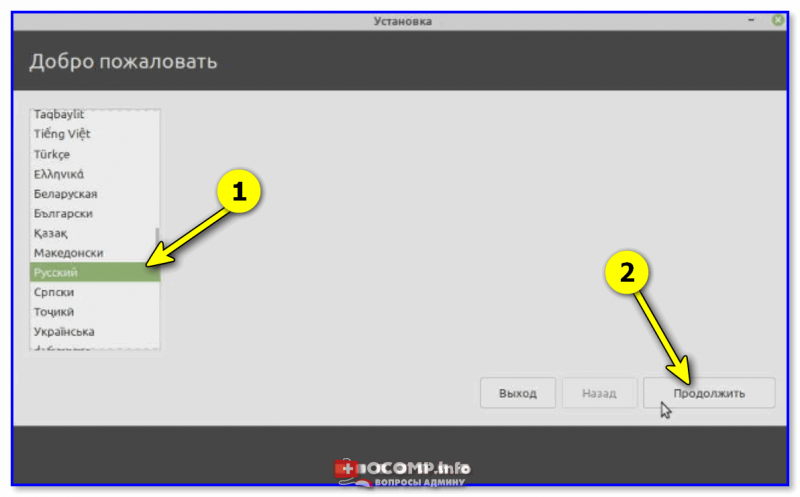
Есть поддержка русского — его и выбираем!
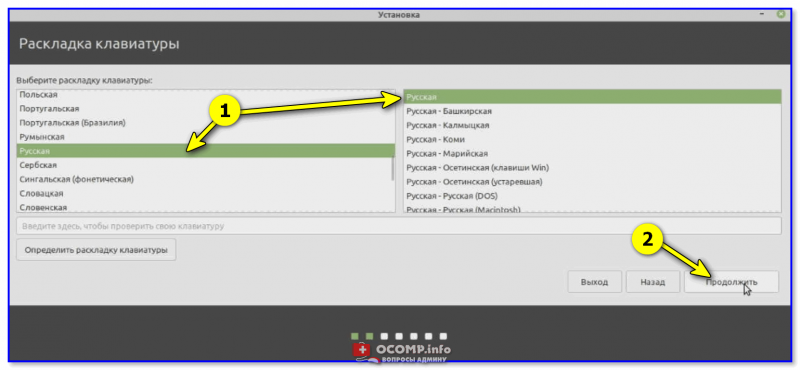
Выбор раскладки
Настройку беспроводной сети на данным этапе можно пропустить (чтобы не тратить время).
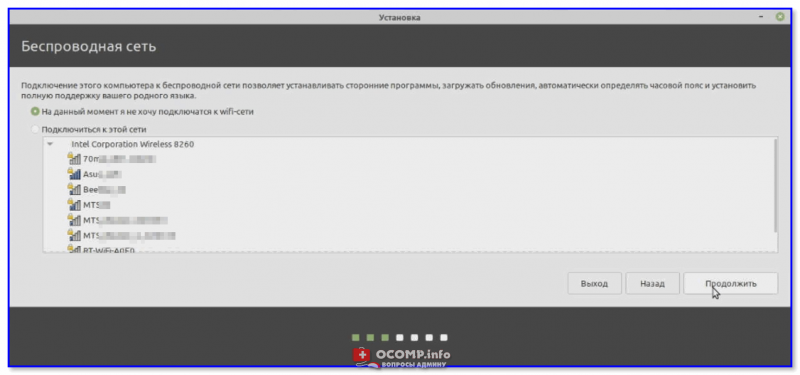
Подключение к Wi-Fi можно пропустить
На установку кодеков можно согласиться.
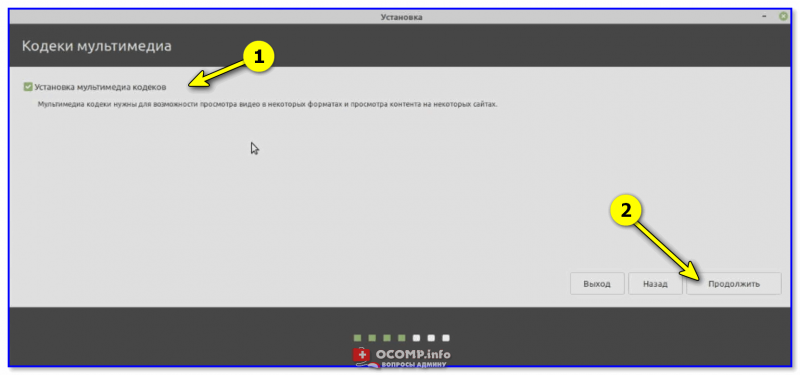
Кодеки мультимедиа
Если появится сообщение насчет смонтированных разделов — нажмите «Нет». 👇

Нет (насчет монтирования)
После этого должно появиться окно «Тип установки»! ⚡ Это важный момент, т.к. именно от него будет зависеть что будет с данными на вашем диске. Я вынес его в отдельный шаг, см. ниже.
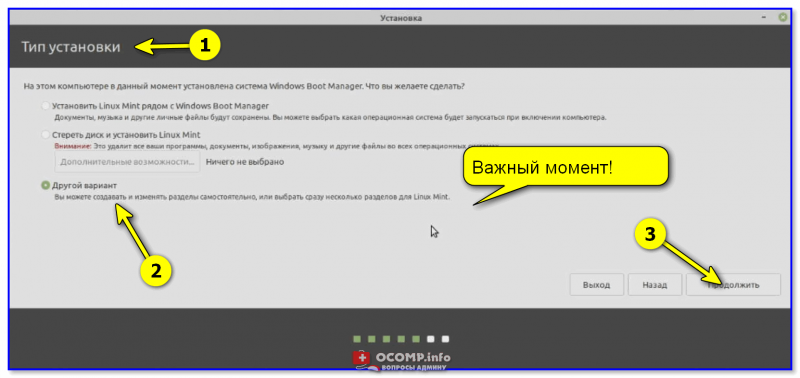
Тип установки — другой вариант
*
ШАГ 5: разбивка диска (ключевой момент ⚡)
Linux Mint на выбор предлагает несколько типов установки.
Я рекомендую выбрать 👉 «Другой вариант» и вручную самостоятельно всё указать (первые два типа установки в ряде случаев могут «затереть» вашу текущую ОС и данные).
Важно: ничего сложного здесь не будет, но имейте ввиду, что от некорректно-введенных значений (действий) можно легко удалить всю информацию на диске!
Тип установки — другой вариант
Итак, на следующем этапе установщик представит вашему взору довольно много различных томов. Среди них нам нужно найти тот, который мы заранее подготовили под Linux (в шаге 3). В моем случае он был равен 50 ГБ!
Находим это свободное место, выделяем его и нажимаем на «плюсик», см. скриншот ниже. 👇
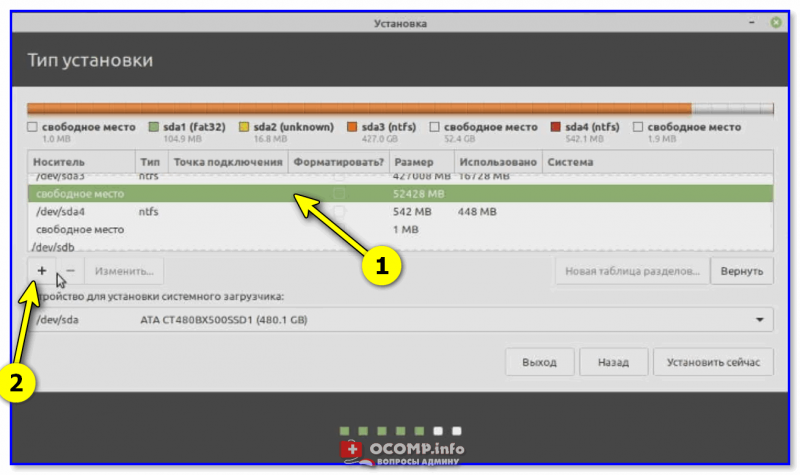
Свободное место — нажимаем на плюсик
Далее создаем раздел со следующими параметрами:
- размер: 512 МБ;
- тип нового раздела: первичный;
- местоположение нового раздела: начало этого пространства;
- использовать как: системный раздел EFI. 👇
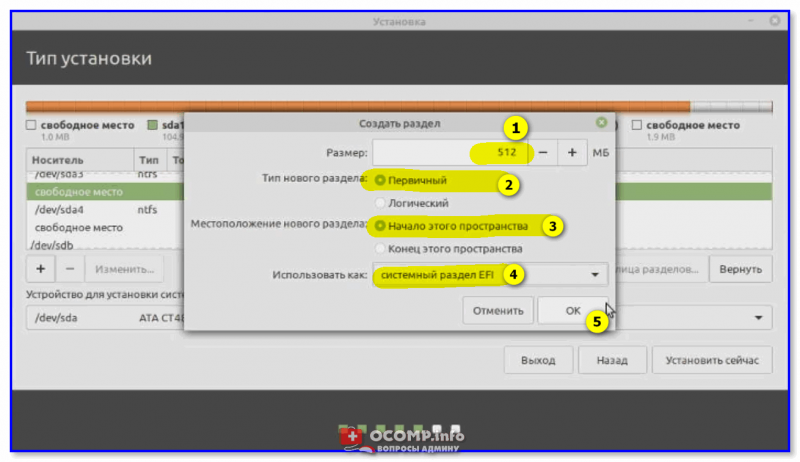
Создаем системный раздел EFI
Теперь снова находим «наше свободное место» (от которого уже мы отняли 512 МБ), выделяем его и нажимаем на «плюсик».
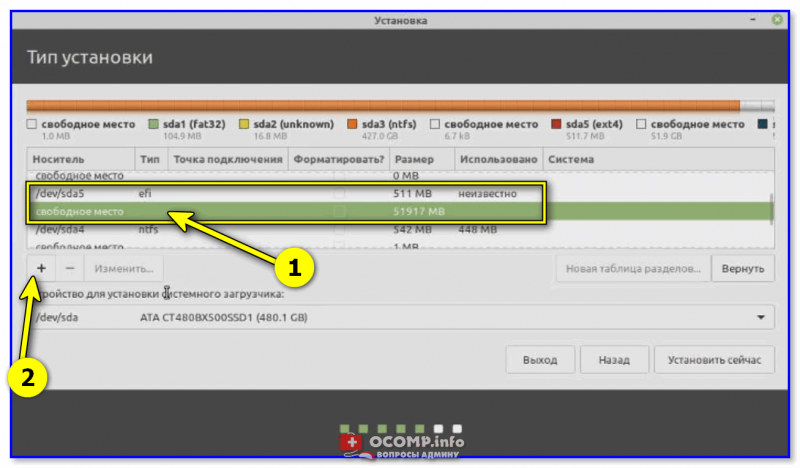
Свободное место — снова на плюсик
Далее создаем корневой раздел с параметрами:
- размер: 15 ГБ (или более);
- тип нового раздела: первичный;
- местоположение нового раздела: начало этого пространства;
- использовать как: журналируемая файловая система Ext4;
- 👉 точка монтирования: /
Всё нужное я выделил желтым цветом. 👇
Прим.: на этот раздел и будет установлена система!
Создание корневого раздела
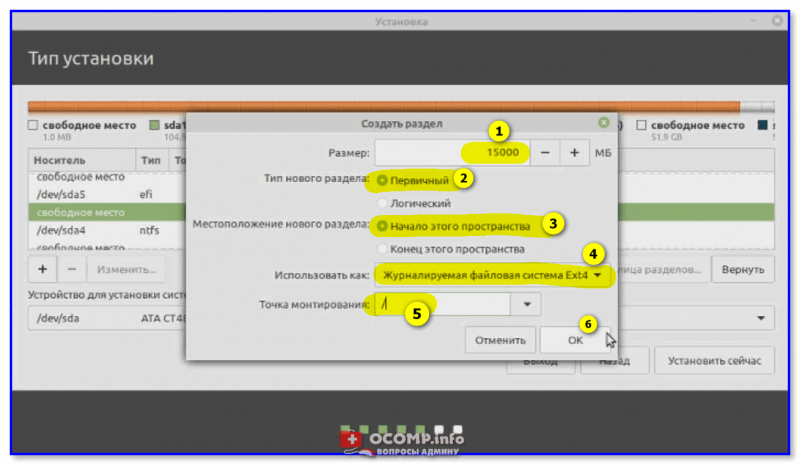
Снова находим «наше» оставшееся свободное место — в моем случае ~35 ГБ (т.к. 50 ГБ — 512 МБ — 15 ГБ), выделяем его и нажимаем на «плюсик».
Создание домашнего раздела
Задаем следующее:
- размер: не трогаем (сколько осталось — столько осталось. В моем случае около 35 ГБ);
- тип нового раздела: первичный;
- местоположение нового раздела: начало этого пространства;
- использовать как: журналируемая файловая система Ext4;
- 👉 точка монтирования: /home
Прим.: на этом разделе будет храниться все пользовательские данные (фильмы, картинки и т.д.). При последующей переустановке ОС — этот раздел можно оставить не тронутым, что очень удобно. 👌
Создание домашнего раздела — 2
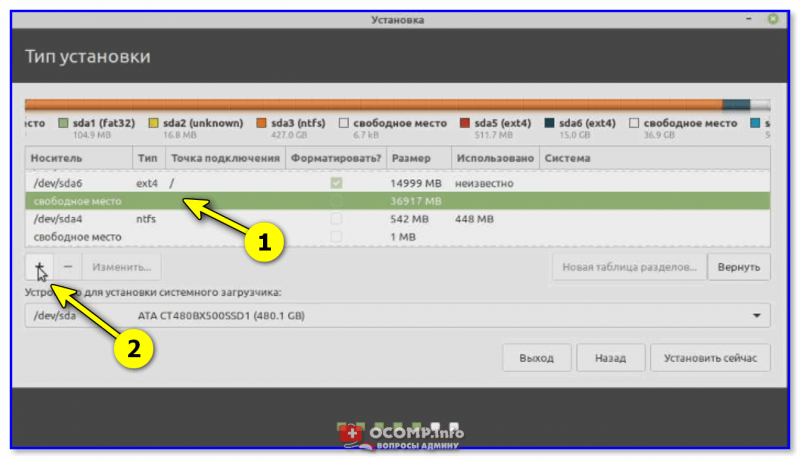
После «этих» приготовлений можно нажать кнопочку «Установить сейчас». См. пример ниже. 👇
👉 Обратите внимание — в самом низу окна указан диск, на который будет установлен загрузчик GRUB (в моем случае: «ATA CT480BX500…»). Указывается не определенный раздел, а диск целиком! Т.к. в нашем примере Linux устанавливается на единственный диск с Windows — на этом можно не заострять внимание.
Однако, если у вас несколько дисков в системе — необходимо выбрать тот, который идет первый в списке загрузок в BIOS (т.е. обычно тот, на котором стоит текущая Windows).
Установить сейчас
👉 Обратите внимание, что установщик нас уведомляет о том, что создано три новых раздела и на них будет записана информация. Осталось только согласиться и нажать «Продолжить».
Записать изменения на диск
Далее потребуется указать свой часовой пояс (здесь ничего сложного 😉).

Где вы находитесь
В следующем шаге задается имя администратора и пароль (рекомендую использовать латиницу! С русскими символами в дальнейшем могут возникнуть вопросы…).
Имя администратора и пароль
После дожидаемся конца установки… Как правило, копирование файлов происходит достаточно быстро: 5-10 мин…
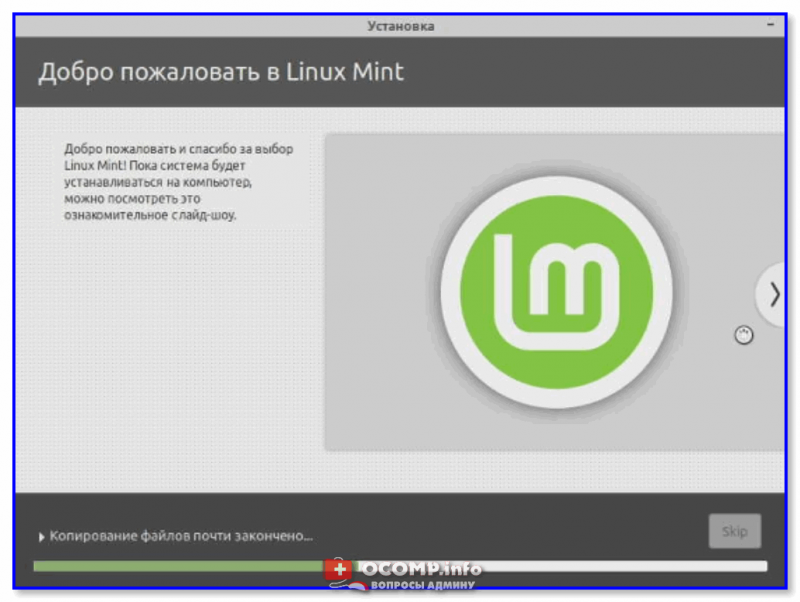
Установка Linux Mint
*
ШАГ 6: завершение установки (пару слов о первых настройках)
По завершению копирования всех файлов на диск — вы увидите сообщение, что установка завершена и требуется перезагрузка компьютера.
На этом этапе можно отключить загрузочную флешку от USB-порта, и согласиться с перезагрузкой… 👇
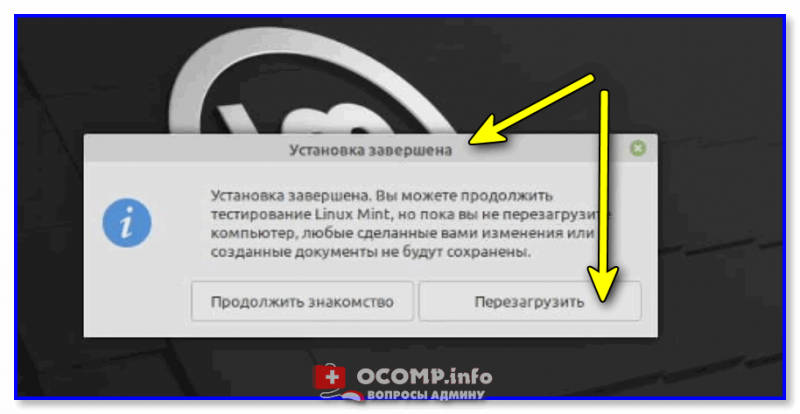
Установка завершена — перезагрузить
После перезагрузки у вас должно появиться окно с предложением выбрать ОС: будет доступна и только что установленная Linux Mint, и «старая» Windows. Разумеется, пока мы выбираем первый вариант. 👌
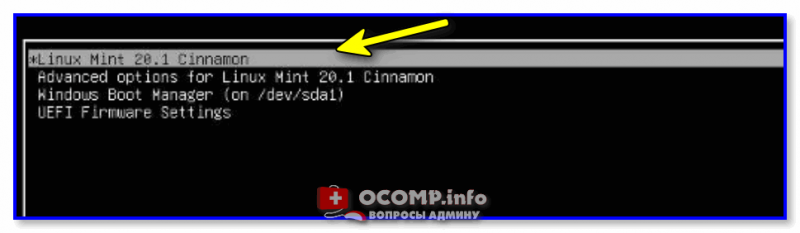
Выбор ОС при включении ПК
В общем-то, после этого перед вами появиться обычный рабочий стол с приветствием от разработчиков ОС. 👇
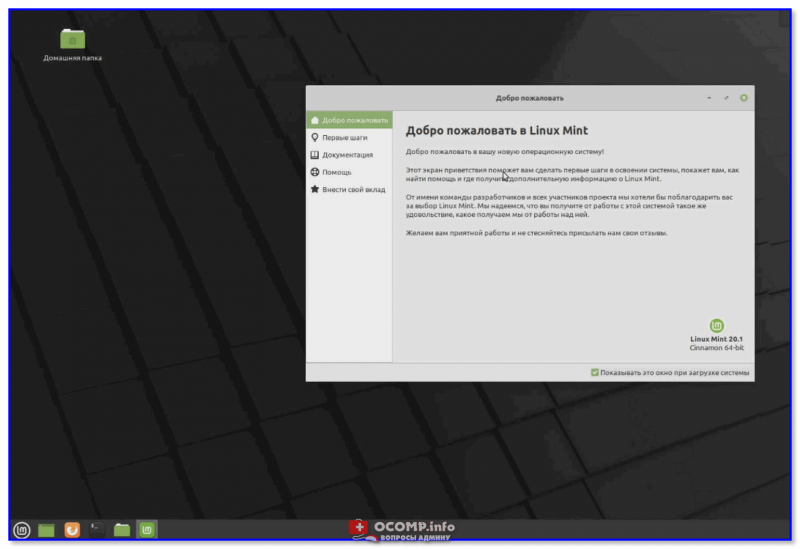
Добро пожаловать в Linux Mint
Пользоваться системой относительно не сложно — интерфейс очень напоминает классический от Windows. Открыв меню ПУСК — можно найти несколько десятков самых популярных программ для всех типовых задач: веб-браузер, проигрыватель медиа-файлов, текстовый редактор, и т.д. 👇
Такой же рабочий стол и меню ПУСК как в Windows 10
*
Настройка параметров (экрана, Wi-Fi подкл. и пр.)
Пожалуй, это первое, с чем возникают вопросы. Поэтому пару слов ниже…
Что касается подключения к сети Интернет — то обычно в Linux Mint все драйвера устанавливаются автоматически (в т.ч. и на сетевой адаптер).
Например, чтобы подключиться к Wi-Fi — вам будет достаточно кликнуть мышкой по значку сети рядом с часами (справа, внизу), выбрать нужную сеть и ввести пароль… 👇
Т.е. всё также, как в Windows — почти никаких отличий… 😉
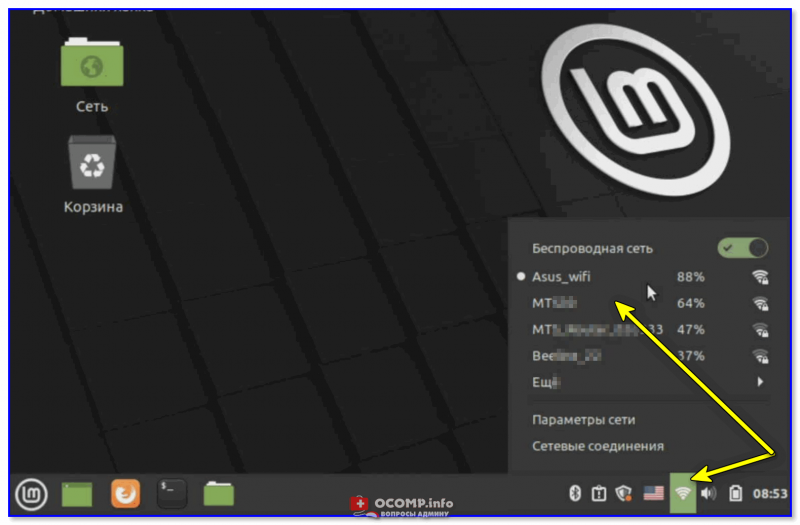
Подключиться к беспроводной сети
Что касается разрешения, масштабирования и пр. настроек экрана.
Нажмите по меню ПУСК, и откройте параметры системы (Центр управления). 👇
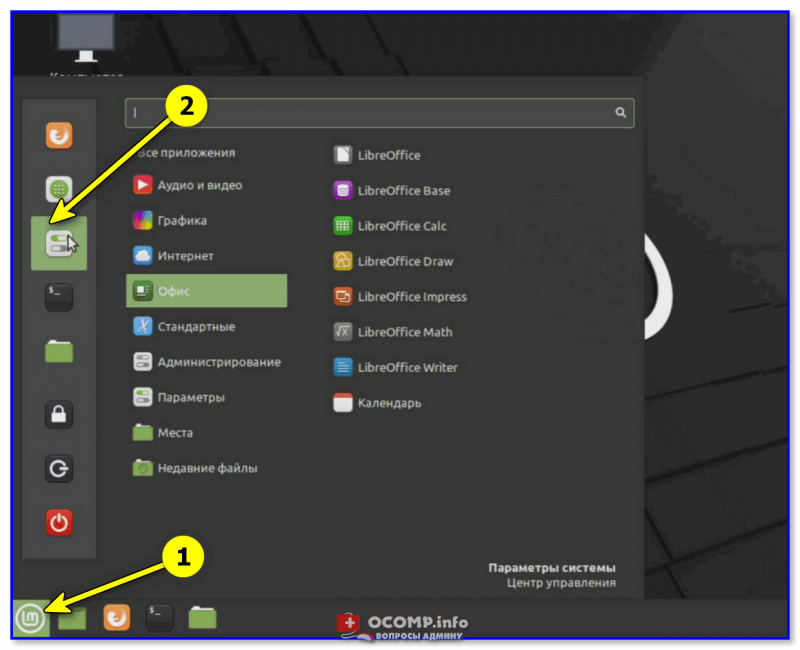
Параметры системы — Центр управления // Linux Mint
В открывшемся окне будут представлены сотни параметров, которые можно изменить: шрифты, темы, фоновые рисунки, эффекты, автозагрузка, дата и время и т.д. См. пример ниже. 👇
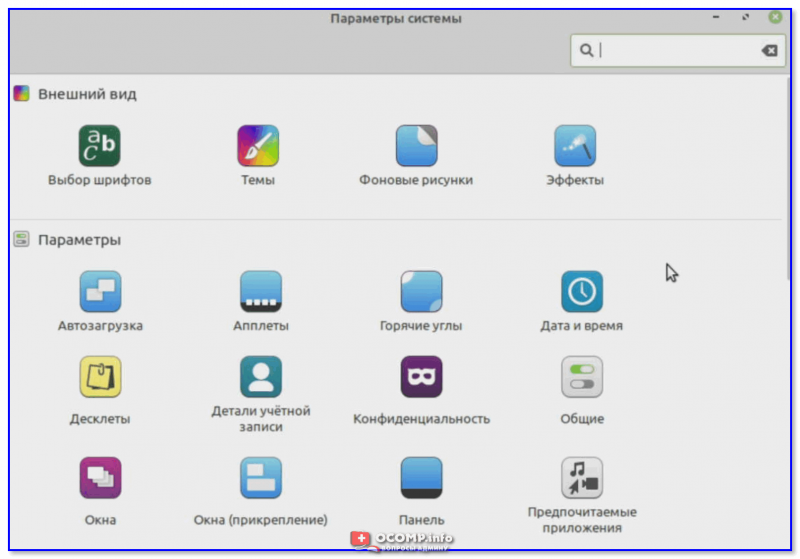
Параметры системы — Linux Mint
Если речь идет о настройке изображения — то нам понадобиться вкладка «Оборудование / экран».
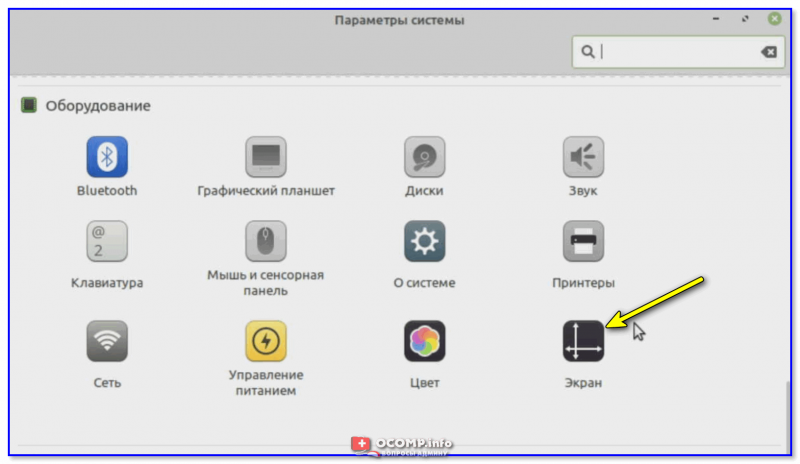
Экран — параметры ОС
Далее вручную можно указать разрешение, частоту обновления, масштабирование и пр. параметры. 👇 Теперь изображение должно стать комфортным!
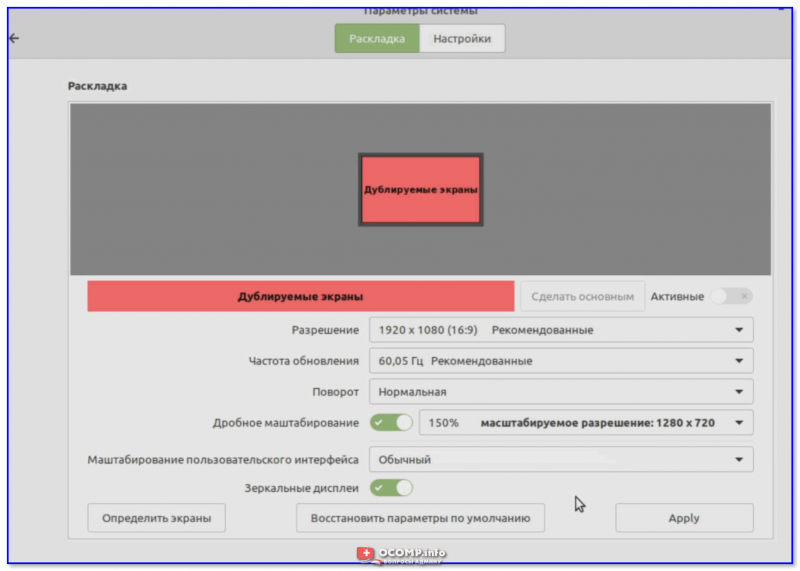
Разрешение, частота обновления, масштабирование и пр.
*
Установка приложений
Что касается установки приложений (программ) — то здесь всё тоже достаточно просто… (и для этого совсем не обязательно лезть в командную строку).
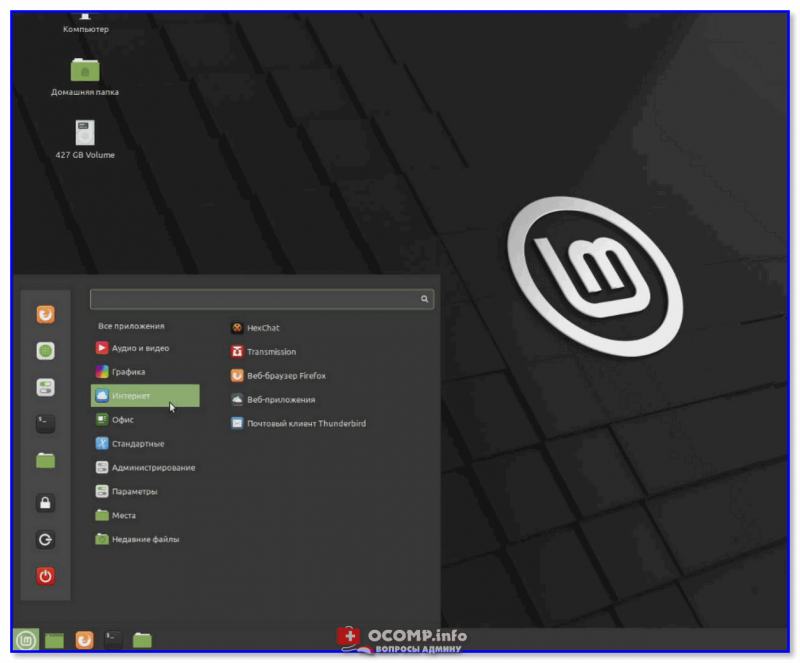
Допустим вам понадобился новый видеопроигрыватель. 😉
Сначала нужно открыть меню ПУСК и перейти в раздел «Менеджер программ».
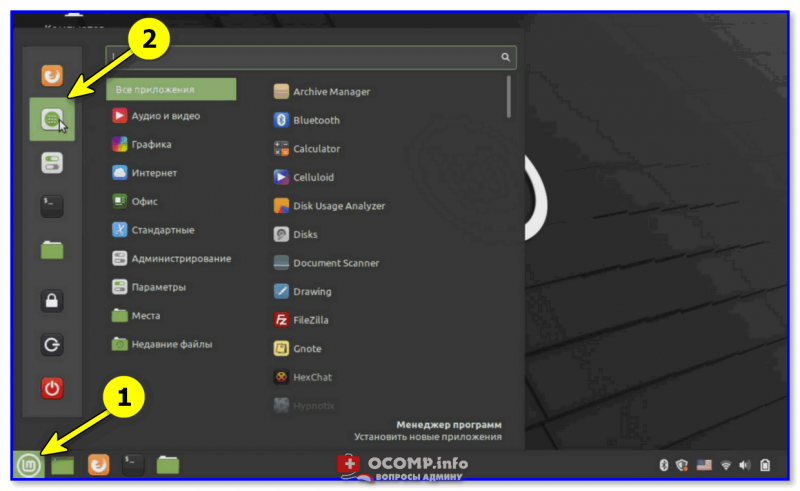
Менеджер программ
После открыть нужную категорию (прим.: все самые популярные приложения вынесены отдельно, и отображаются сверху).
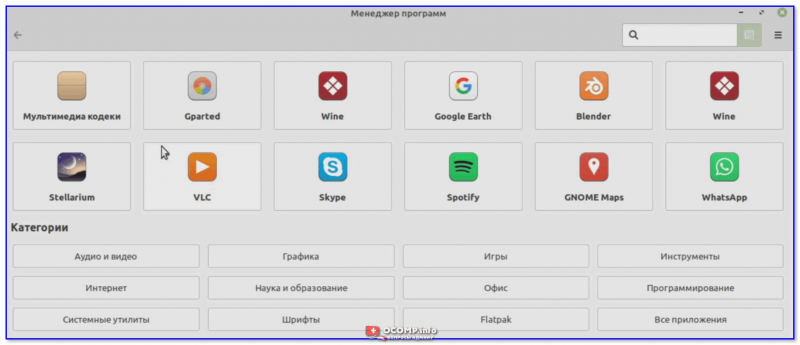
Большой список программ
Из списка аудио- и видео- приложений выбираем нужное и жмем кнопочку «Установить». Linux Mint в целях безопасности попросит ввести пароль администратора (который мы задавали при инсталляции ОС), а после произведет установку приложения…
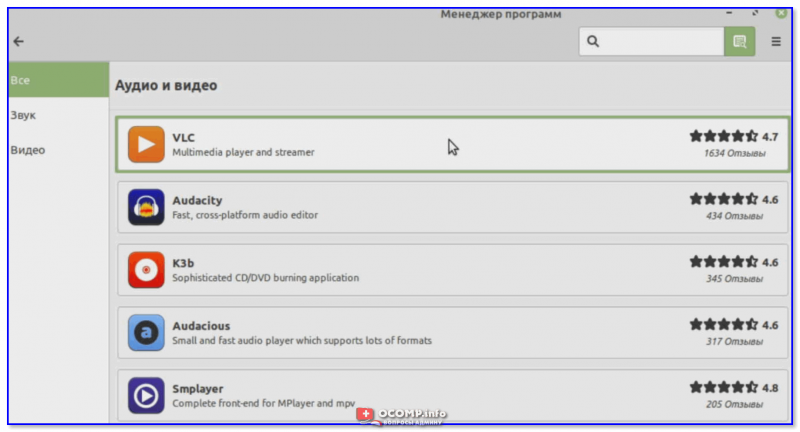
Выбираем нужное приложение и нажимаем кнопку установки!
Значок (ярлык) для запуска приложения появится в меню ПУСК…
*
ШАГ 7: как выбирать, какую систему загружать — Windows или Linux
Если вы всё сделали как в моем примере выше — то перед каждым включением компьютера у вас на неск. секунд будет появляться меню GRUB с предложением выбрать ОС.
Для загрузки Windows (например) выберите стрелочками пункт «Windows Boot Manager…» и нажмите Enter.
Выбор ОС при включении ПК
Если вдруг данное меню не появляется и автоматически начинает загружаться Linux (или Windows), а вам нужна другая ОС — зайдите 👉 в Boot Menu и вручную укажите какая система вам требуется…
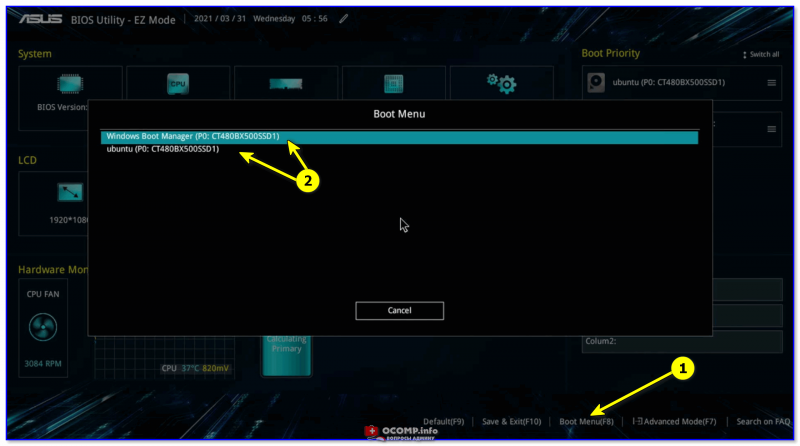
Boot Menu — выбор ОС
*
PS
Кстати, многие другие дистрибутивы Linux устанавливаются аналогично (по крайней мере, основанные на Ubuntu).
*
Дополнения по теме, — разумеется, приветствуются!
Удачи!
😉
Первая публикация: 2.04.2021
Корректировка: 18.05.2022


Полезный софт:
-
- Видео-Монтаж

Отличное ПО для создания своих первых видеороликов (все действия идут по шагам!).
Видео сделает даже новичок!
-
- Ускоритель компьютера

Программа для очистки Windows от «мусора» (удаляет временные файлы, ускоряет систему, оптимизирует реестр).
Requirements
This post will cover the process on how to dual boot Windows 10 and Linux Mint.
For this example, it is required that you have Windows 10 already installed. In most cases it is recommended to install a Linux distro after the Windows 10 installation, because of the bootloader. Linux bootloader will detect another operating system installed and add the other operating system in the bootloader entry – this process is done automatically by the GNU/Linux installation. Also this example will cover the process if you only have one partition on your HDD and check you PC how it boots(UEFI or Legacy) and make sure both OS are installed in the same mode.
Before starting the process I recommend to backup any important data you have.
Requirements for this process:
- Linux Mint bootable USB
- Free space on you HDD or second HDD(even better).
Bellow is a video tutorial for this process as well:
Creating partition for Linux Mint installation
First we will start with creating a new partition for the Linux Mint. For this step you can use any third party partition tool but in this example, we used windows disk management. So, first step is to run the disk management app by right clicking the start menu and then to choose option – Disk management.
When the app loads up, on the bottom of the app you will have a list of all your connected drives. We’re going to use and edit the Windows partition, which in most cases is a C: partition. You can also do the same step if you have another partition. Please do note that you need to have free space available on your partitions.

Select your partition, right click on it and select option – Shrink volume.
A prompt window will open in which you need to split the partition and allocate space to your new Linux Mint partition. In the field labelled – Enter the of amount of space to shrink in MB. You need to enter the size of new partition in megabytes. After that, click on the Shrink button and the partition is created.

Next step is to plug in your bootable Linux Mint USB on your PC, restart the PC and the boot the installation.
Linux Mint installation
The installation will boot the Live installation automatically. You will get the Cinnamon desktop. Run the – Install Linux Mint.
Installation setup window will start and prompt you with options. First screen is to choose the language. When you go to the next screen, it will ask you want to install third party software. This is optional, you can do it later, but if your PC/Laptop is connected on the internet, you can check the option and the installation will install all the necessary software right away automatically.

Now here comes the important step. Here we need to setup the dual boot option. This is setup for Linux Mint partitions. The screen will first offer you couple of options how to proceed with the installation and how the installation will install system on your PC. The most simple and easiest is the first option – Install Linux Mint alongside Windows. I usually go for the something else option, but that one has more steps and this time I want to cover how to install Linux Mint as simple as possible since this tutorial is for the beginners.

Formatting Linux Mint partition
So, select the first option – Install Linux Mint alongside Windows and click continue. The next screen will prompt you how will installation format the partition and how much of space will go for the system and how much for your personal files. The installation will automatically select your newly created partition which has free space. In the middle there is a graphical display of your partition – a green bar which has a separator line in the middle. Slide the separator how you want in order to allocate space to your system. Right side of the bar is for your system and the left is for personal files. If you want your system to have more space, slide the bar to the left to allocate more space to system.

When you finish with partitioning, click Install Now. Before it proceeds it will prompt you to be sure you want to continue with changes. Click on Continue again.

You will get another prompt that will ask you do you want to continue with writing changes to the disk. Again click continue.

Installation will now install the system. Installation will run in the background. While it’s running, it will offer you to finish with other part of the setup – user creation and etc.
Finishing up installation and user account creation
First it will ask you to choose your country.

On this screen you need to choose the keyboard language and choose the keyboard layout.

And on this screen you need to setup your user account and enter the computer name.

When finished, click continue. The installation will take same time.
You’ll get a prompt once the installation is finished. When you see it, remove the installation USB and restart the PC.

You need to have a bootloader menu like this when the PC starts to boot up. On this menu you will choose which OS you want to boot, Windows or Linux Mint.

Summary
To summarize the article – we have showcases the steps on how to dual boot Windows 10 and Linux Mint.
If you ever encountered with Linux distro Ubuntu, you probably noticed that Linux Mint installation is like from a Ubuntu. That’s why Linux Mint is based of Ubuntu. Disregarding that, Linux is still an excellent distro, favored by many and since it has a Windows like desktop environment, one of the best for beginners who transitioned from Windows and started to learn Linux.
That was the process. I hope you find it useful and the process was easy to follow. Thank your for your time.
Linux Mint 18.1 released with long-term support, Developers announced it would receive support & security update till 2021. Now everyone wants to try this Linux Mint project before installing OS entirely on their computer. If you are Linux User, then you know how to install Linux Mint on your computer. But If you are a Windows user and want to try this Linux Mint project & Don’t want to remove your pre-installed Windows 10 then the last option that remains is dual boot Linux Mint and Windows 10. I already have written all steps to Dual Boot Windows 10 with Ubuntu, And half of the process Dual boot Windows 10 alongside Linux Mint is Similar.
What is Linux Mint Operating System?
Linux Mint is a community-driven Linux distribution based on Debian and Ubuntu that strives to be a “Modern and comfortable operating system in terms of UI.” Linux Mint is a very powerful Operating System, and as I mentioned it’s based on Ubuntu, that’s why it’s easy to use.
Why Linux Mint Over Ubuntu?
Linux Mint provides all of the multimedia codecs and Linux software installed by default which means you Don’t need to update or install anything externally, You are up and running slightly quicker than with Ubuntu. There is two versions available of Linux Mint Mate and Cinnamon. And the Best thing is Linux Mint Mate version is somewhat similar to Windows; that’s why Windows user prefers Mate Version. Linux Mint Is More Familiar For Windows Users
Which Linux Mint Version Should I choose Mate or Cinnamon?
Before start choosing any of them to Dual boot with Windows 10, First understand the Difference and Basic knowledge about both versions. Concerning differences between the two, they have slightly different interfaces. The Cinnamon desktop environment has a GNOME3 look means. It provides basic functions like launching applications, switching between windows and it also has a widget engine.
The Mate desktop environment is menu-centric, which Windows users prefer. Mate also has a search bar in its menu like Windows. And visually the Mate menu is more front-and-center than the search. Mate or Cinnamon, Both desktops are tweakable, regarding layout and color. If you are a Windows user, then choose the Mate version, But If you are Linux (Ubuntu) user, then Cinnamon is the better choice for you.
UEFI or BIOS
Before Start Following Dual boot Linux Mint and Windows 10 Guide make sure your computer has Unified Extensible Firmware Version (UEFI). If you are using the BIOS version then this Guide is not for you.
To check your computer has a UEFI over a Standard BIOS, Simply Check System Information and you can find easily which Firmware version your system is using.
Create a Linux Mint USB Drive to Dual boot Linux Mint and Windows 10.
First Download Linux Mint ISO File go to Linux Mint Official Site. If you are Windows User Choose Mate Version.
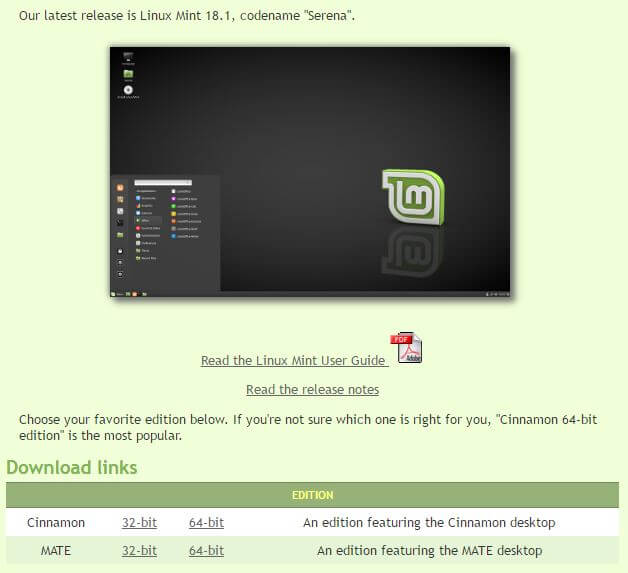
There is two version of Linux Mint Mate Available for 32-bit Machine and for 64-bit Machine. You Don’t need to confuse you can check your System Version Easily. Right, Click on My Computer/My PC then click on properties. After that, on System Properties Window you can find the version Easily.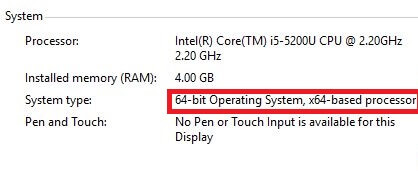
Now we need Software to Burn the Linux Mint ISO Files into a USB Drive. I already wrote a Guide on How to Burn ISO to USB Drive.
You can try the above Guide to Burn else Download Win32 Disk Imager & Install it on your computer. The installation Process is Similar to normal windows software Installation. If you are facing any issue while Installing you can comment.
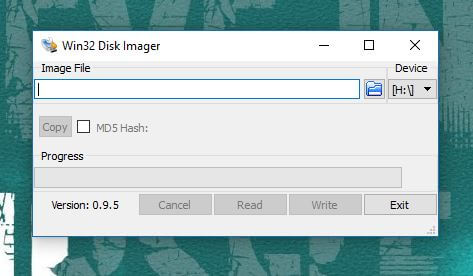
Now Connect your USB Drive and move, All important data into a safe palace, Because the writing process will Erase all your Data. To Format, a USB Drive Right Click on USB Drive click on Format.
Now After completing of Installation and formatting USB Drive, Now select the Linux Mint ISO File and then click on Write. The writing process will take few minutes.

After Creating USB Drive Now Shrink Windows 10 Partition If you want to install Linux Mint with Windows 10. You will get two Choices you can try Linux Mint or you can install it on your computer, for Installation you need a Drive, to Create one Follow this Article.
How to Create Windows 10 Partition to Make Space for Linux.
Turn Off Fast Boot.
If you have a UEFI bootloader then you need to Turn Off Fast Boot to Speed up Boot time. To turn Off Fast Boot Follow these instructions.
Right, Click on Start Button Select power Options.
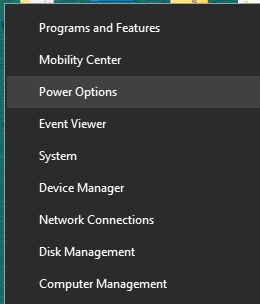
Now on Power Options Window on Left Side Bar Choose “Choose What Power Button Option Does”
Now on Next Window Click on Choose Settings that are currently Available to Enable Settings. Now under Shutdown settings unmark Turn on Fast Startup then click on Save Changes.
Done you Successfully Turn Off Fast Boot, Now It will Help you in speed up Boot-Time.
Now Create a Backup of Your Computer (Optional but Highly Recommended). Sometimes while Dual boot Linux Mint and Windows 10, the System crash due to some hardware issues.
Dual boot Linux Mint and Windows 10 (UEFI)
After Doing all the Above Process it’s time to Dual boot Linux Mint and Windows 10, To that, so connect your Bootable USB Drive to the Computer that you created using Win32 Disk Imager or Rufus.

Now Restart Your Computer when Computer starts to boot again Continually press Esc Key to enter into Start Menu. If Start Menu Doesn’t appear search on Google For Example “How to open Start Menu in HP Laptop”
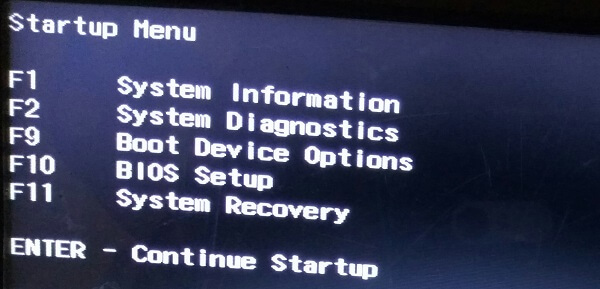
Now Press F9 to enter into Boot Device Option (Boot Device Option key may be Different on your computer)
Now Select the USB Drive that you Created to Dual Boot Linux Mint and Windows 10.
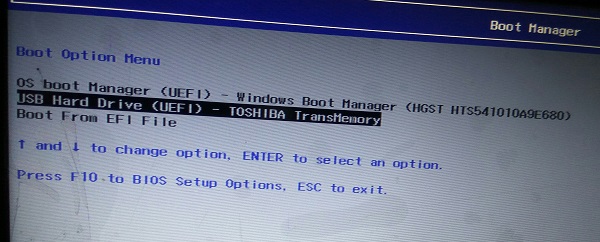
Now Linux Mint Installation Menu Will Appear Choose “Start Linux Mint 18.1 Mate 64Bit“.
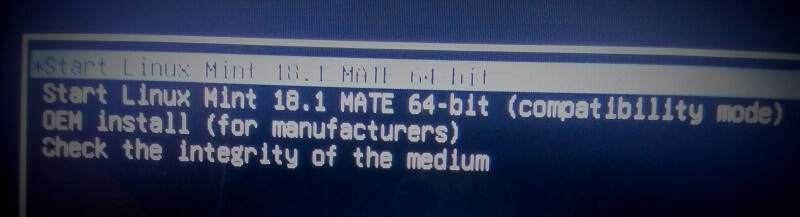
Now in a Few Minutes Linux Mint Will Start.
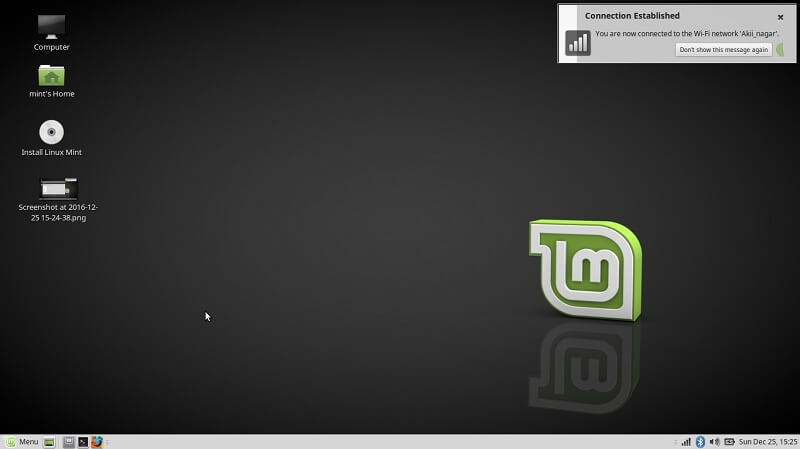
You can try Linux Mint, But If you want to install Linux Mint on Your HDD then you can Find “Install Linux Mint”
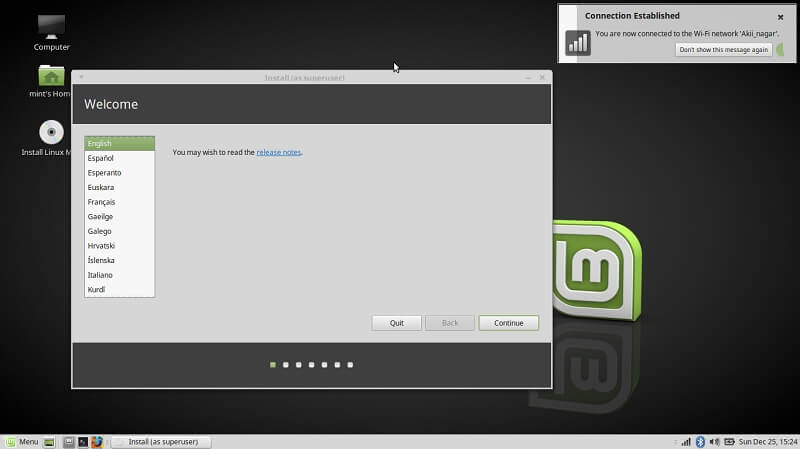
You can Install Linux Mint into that Drive you created using Shrink Windows 10 Partition. This is the Process to Dual boot Linux Mint and Windows 10. I wrote this article in Short-way Because I already wrote a complete Guide to Dual boot windows 10 and Ubuntu and this Guide is Slightly similar to that Guide. If Still, you facing any Issues in dual Boot Linux Mint alongside Windows 10 then you can comment. By Using this way you can dual boot any Linux OS.
Article Contents
- 0.1 What is Linux Mint Operating System?
- 0.2 Why Linux Mint Over Ubuntu?
- 0.3 Which Linux Mint Version Should I choose Mate or Cinnamon?
- 0.4 Create a Linux Mint USB Drive to Dual boot Linux Mint and Windows 10.
- 0.4.1 Turn Off Fast Boot.
- 1 Dual boot Linux Mint and Windows 10 (UEFI)