This tutorial will describe how you can join machines that run Linux Mint 17.1 OS to Windows 2012 Active Directory Domain Controller in order to authenticate remote accounts from AD back end identity provider to local Linux workstations with the help of SSSD service and Realmd system DBus service.
The System Security Services Daemon (SSSD) is a relative new service which provides cross-domain compatible methods for Active Directory users to authenticate to local machines using a combination of usernames and domain back end name to create the login identity, even if the Domain Controller goes offline (SSSD caches credentials).
REQUIREMENTS
- Windows Server 2012 configured as an Active Directory Domain Controller
- A Linux Mint 17.1 client machine which will be integrated to Windows PDC
Domain Settings:
- Domain Name:
caezsar.lan - Windows Server 2012 AD FQDN:
server.caezsar.lan - Windows Server 2012 AD IP Address:
192.168.1.130 - Linux Mint Hostname:
mint-desktop - Linux Mint IP Address: automatically assigned by DHCP
- Linux Mint first DNS IP Address: Manually assigned to point to AD PDC –
192.168.1.130
STEP ONE – Linux Mint Network Configuration
1. Before starting with installing the required services in order to integrate the local machine to the PDC Server, first we need to assure that Windows Domain Controller is reachable through DNS resolution on Linux Mint host by adding the DNS PDC IP Address on our Network Configuration. To achieve this goal, first open Network Settings, go to the Network Interface Card (in this case is the Wired Connection, but you can use a Wireless Connection also), open it for editing (hit the settings icon from bottom right) and add your PDC IP Address on IPv4 DNS filed (switch Automatic DNS to OFF) as illustrated in the following screenshots:
network settings
edit network interface settings
add DNS IP Address
If multiple Domain Controllers machines exists on your network then you can also add their IP Addresses on IPv4 DNS settings fields.
2. After you’re done, hit on Apply button and switch the edited Network Interface from ON to OFF and then back to ON in order to apply the new settings. After the network interface is started again, open a Terminal console and issue a ping command against your PDC domain name in order to verify if the settings are successfully applied and the domain name responds with the correct IP Address and FQDN of the PDC.
apply network settings
ping domain controller
If you want to avoid all this manual settings, then configure a DHCP server at your premises to automatically assign network settings, especially DNS entries, that will point to your Windows PDC IP Addresses needed for DNS resolution in order to reach the AD PDC.
STEP TWO – Install Required Software Packages
As presented at the beginning of this tutorial, in order to integrate a Linux Mint machine to an Active Directory Domain Controller you need to install the SSSD service along with the following software packages and dependency:
– SSSD service (responsible with back end realm authentication) with the following dependencies: sssd-tools (optional, but useful for sssd cache, user and groups manipulation), libpam-sss (PAM modules for local authentication) and libnss-sss (NSS modules for local DNS resolution)
– Realmd (system DBus service which manages domain integration and local resources permissions)
– The following Samba Modules: samba-common-bin and samba-libs (File sharing compatibility between Windows and Linux machines)
– Krb5-user (Client network authentication and communication with the PDC server)
– ADcli (Tools for joining domain and perform other actions on an AD)
– PackageKit (Linux cross-platform packages management for interoperabillity and user privileges for software installations)
3. Now, let’s start installing the above enumerated packages by opening a Terminal console on Linux Mint and issuing the following commands with sudo privileges:
First install Realmd and SSSD service:
sudo apt-get install realmd sssd sssd-tools libpam-sss libnss-sssinstall realmd and sssd service
4. Next install Samba modules (by default this modules might be already installed on your system):
sudo apt-get install samba-libs samba-common-bininstall samba modules
5. Last, install the other remained packages: krb5-user, adcli and packagekit. On krb5-user package, the installer will prompt you to enter the realm that will be used for Kerberos authentication. Use the name of the domain configured for your PDC with UPPERCASE (in this case the domain is CAEZSAR.LAN), then hit Enter key to continue further with the installation packages.
sudo apt-get install krb5-user adcli packagekitinstall kerberos, adcli and packagekit packages
Configure Kerberos realm
STEP THREE – Edit Configuration Files for SSSD, Realmd and PAM
6. Next step before starting joining Linux Mint to Windows Server AD PDC is to configure the local services for AD network authentication. By default the SSSD service has no configuration file defined on /etc/sssd/ path. In order to create a default configuration file for SSSD service, issue the following command to create and simultaneous edit the file:
sudo nano /etc/sssd/sssd.confSSSD configuration file excerpt:
[nss]
filter_groups = root
filter_users = root
reconnection_retries = 3

[pam]
reconnection_retries = 3

[sssd]
domains = CAEZSAR.LAN
config_file_version = 2
services = nss, pam

[domain/CAEZSAR.LAN]
ad_domain = CAEZSAR.LAN
krb5_realm = CAEZSAR.LAN
realmd_tags = manages-system joined-with-adcli
cache_credentials = True
id_provider = ad
krb5_store_password_if_offline = True
default_shell = /bin/bash
ldap_id_mapping = True
use_fully_qualified_names = False
fallback_homedir = /home/%d/%u
access_provider = ad
sssd configuration file
While editing the file make sure you replace domains, [domain/], ad_domain and krb5_realm parameters accordingly. Use the UPPERCASES as the above file excerpt suggests.
The fallback_homedir = /home/%d/%u parameter will cause the system to create home directories for all domain logged in users with the following path: /home/domain_name/domain_user, so practically all your domain users homes will be stored into a single directory named after your domain name on /home path. If you want to change this behavior so all domain users homes should be created as normal system users, /home/username, just remove %d variable and you’re done.
For other options and parameters concerning sssd.conf file run man sssd command.
After you finish editing the file, save it with CTRL+O , close it with CTRL+X and proceed further with the below instructions.
7. The next step is to create and edit a configuration file for Realmd in order to avoid some eventual package dependency problems by issuing the following command:
sudo nano /etc/realmd.confUse the following configurations for realmd file:
[service]

automatic-install = no
realmd conf file
After you add the above lines, save the file and close it.
8. The last file that you need to edit before joining the domain is the common-session PAM file. So, open this file for editing by running the below command and add the following line after the session optional pam_sss.so line in order for the system to automatically create home directories for the new authenticated AD users .
sudo nano /etc/pam.d/common-sessionAdd the following line as presented on the below screenshot:
session optional pam_mkhomedir.so skel = /etc/skel/ mask=0077PAM common-session file
After you have edited the file, save it and close it, and proceed to the next step in order to make Linux Mint a part of the Windows Domain Controller.
STEP FOUR – Join Linux Mint to Windows Server 2012 Active Directory Domain Controller
9. Before joining the Linux Mint client to Windows PDC, first issue the discovery command against your domain name in order to view the complete realm configurations and a package list of software that must be installed on the client machine before you enroll it in the realm.
sudo realm discover domain.tldrealm discover domain
10. If everything is correctly setup at the client side and the domain controller responds, issue the following command in order to integrate Linux Mint client machine to Windows Server 2012 AD PDC.
sudo realm join domain.tld -U domain_administrator --verbosejoin AD domain
Use the -U option to specify an Active Directory administrative user with privileges to add machines on the server and the --verbose option to get debug output in case something goes wrong with the integration process.
Once the command returns successfully status and ads Linux Mint to AD you can use the sudo realm list command to view full details and the default configurations for your domain.
list realm
To manage sssd service use the following command switches (you don’t need to manually start the sssd service because it’s automatically started by the realmd when the machine is enrolled to realm):
sudo service sssd status|start|stop11. To check if the machine appears on the Domain Controller, go to your Windows Server 2012, open Active Directory Users and Computers utility and search your Linux Mint hostname.
Active Directory Users and Computers
STEP FIVE – Log In on Linux Mint with Active Directory Accounts
12. To authenticate on Linux Mint with and an Active Directory user, first you need to add a permit rule on local policies in order to grant access for all realm users on local machine, by issuing the following command:
sudo realm permit --allTo grant access just for a specific AD user or group use the following command syntax:
sudo realm permit -u AD_usernamesudo realm permit -g AD_groupTo withdraw access for a user use the command with --x switch:
sudo realm permit domain --x domainAD_username13. To perform Terminal console command line authentications on Linux Mint host with an Active Directory account, use double backslashes to escape the backslash which separates the domain string from user, as shown in the below syntax (you can append the dot domain or use just the domain string):
su - domain.tld\AD_usernameor
su - domain\AD_usernameAD user login
ad user login without dot domain
14. To log in with an AD account on Linux using Putty or to perform Linux Mint MDM GUI logins use the following syntax:
domainAD_username

domain.tldAD_username
AD user Putty login
Ad user GUI login
15. In case you have issues with AD users authentication on Linux Mint Logon Screen, log in with a local user account and change the Login Window Theme from an HTML theme to a GDM theme, log out, hit Escape key is case the last logged in user appears on username Login filed and continue the authentication process with a AD account as presented above.
Use GDM theme
GDM login screen
STEP SIX – Add Root Permissions to AD Domain Admins Users
16. In case you want to allow all Active Directory Domain Admins to have full administrative permissions in order to execute any command with root privileges on the Linux Mint machine, open the local sudoers file for editing and add the following line:
sudo nano /etc/sudoersor
sudo visudoAdd this line after %sudo line:
%domain admins@domain.tld ALL=(ALL) ALLadd domain admins root privileges
17. In case you don’t want your Linux Mint machine to be a part of the domain anymore, issue the following command to leave the domain:
sudo realm leave domain.tld -U AD_admin_user --verboseleave AD PDC
That’s all! Now, the machine running Linux Mint 17.1 is integrated as a part of Windows Active Directory Domain Controller and can successfully replace your old Windows XP machine, for which Microsoft has stopped its support, but keep in mind that some features and, especially, a huge part of Active Directory Group Policy, don’t apply on Linux systems.
Как правильно задавать вопросы
Правильно сформулированный вопрос и его грамотное оформление способствует высокой вероятности получения достаточно содержательного и по существу ответа. Общая рекомендация по составлению тем: 1. Для начала воспользуйтесь поиском форума. 2. Укажите версию ОС вместе с разрядностью. Пример: LM 19.3 x64, LM Sarah x32 3. DE. Если вопрос касается двух, то через запятую. (xfce, KDE, cinnamon, mate) 4. Какое железо. (достаточно вывод inxi -Fxz в спойлере (как пользоваться спойлером смотрим здесь)) или же дать ссылку на hw-probe 5. Суть. Желательно с выводом консоли, логами. 6. Скрин. Просьба указывать 2, 3 и 4 независимо от того, имеет ли это отношение к вопросу или нет. Так же не забываем об общих правилах Как пример вот
-

alex_vag
- Сообщения: 8
- Зарегистрирован: 07 дек 2021, 09:14
- Контактная информация:
Ввод в домен
07 дек 2021, 09:31
Доброго времени суток.
Подскажите пожалуйста, как ввести Cinnamon в домен Windows?
Или может Mint лучше подходить для этих целей?
П.С. Очень желательно актуальные маны. Ибо полно устаревшей информации
-

WWolf
- Сообщения: 3371
- Зарегистрирован: 14 фев 2018, 00:51
- Решено: 22
- Откуда: Краснодар
- Благодарил (а): 1492 раза
- Поблагодарили: 1072 раза
- Контактная информация:

Ввод в домен
#2
07 дек 2021, 10:27
alex_vag писал(а): ↑
07 дек 2021, 09:31
Ибо полно устаревшей информации
что устарело?
-

rogoznik
- Сообщения: 9438
- Зарегистрирован: 27 июн 2017, 13:36
- Решено: 118
- Откуда: Нижний Тагил
- Благодарил (а): 707 раз
- Поблагодарили: 1814 раз
- Контактная информация:

Ввод в домен
#3
07 дек 2021, 10:46
alex_vag писал(а): ↑
07 дек 2021, 09:31
Cinnamon
Desktop Environment
alex_vag писал(а): ↑
07 дек 2021, 09:31
Mint
Дистрибутив(ОС)
DE в домен ввести не получится — т.к. это только пользовательское окружение
ОС — в домен ввести можно


-
alex_vag
- Сообщения: 8
- Зарегистрирован: 07 дек 2021, 09:14
- Контактная информация:
Ввод в домен
#4
07 дек 2021, 11:07
rogoznik писал(а): ↑
07 дек 2021, 10:46
ОС — в домен ввести можно
Отлично. Где можно посмотреть инфу «для чайников», как ввести именно эту ОС в домен?
Задача чтобы можно было работать с машины Linux с сетевыми ресурсами под Windows.
-
WWolf
- Сообщения: 3371
- Зарегистрирован: 14 фев 2018, 00:51
- Решено: 22
- Откуда: Краснодар
- Благодарил (а): 1492 раза
- Поблагодарили: 1072 раза
- Контактная информация:
Ввод в домен
#5
07 дек 2021, 11:11
-
alex_vag
- Сообщения: 8
- Зарегистрирован: 07 дек 2021, 09:14
- Контактная информация:
Ввод в домен
#6
07 дек 2021, 11:14
Да, видел.
Вопрос — этот вариант актуален для Cinnamon и Mate ?
Или только для одной из версий?
-
WWolf
- Сообщения: 3371
- Зарегистрирован: 14 фев 2018, 00:51
- Решено: 22
- Откуда: Краснодар
- Благодарил (а): 1492 раза
- Поблагодарили: 1072 раза
- Контактная информация:
Ввод в домен
#7
07 дек 2021, 11:16
alex_vag, с такими вопросами думаю не стоит вам лезть в доменные политики…
у вас даже основных понятий нет о линукс и с чем его едят…
-
alex_vag
- Сообщения: 8
- Зарегистрирован: 07 дек 2021, 09:14
- Контактная информация:
Ввод в домен
#8
07 дек 2021, 11:21
WWolf писал(а): ↑
07 дек 2021, 11:16
у вас даже основных понятий нет о линукс и с чем его едят…
Согласен, зашёл не с той стороны. Но, жизнь заставила, что-то делать надо. Остальное в процессе приложиться ![]()
-

ilikethat
- Сообщения: 434
- Зарегистрирован: 14 дек 2019, 01:46
- Решено: 9
- Благодарил (а): 101 раз
- Поблагодарили: 96 раз
- Контактная информация:

Ввод в домен
#9
07 дек 2021, 12:21
alex_vag, расскажите плиз, а какой сценарий использования такой машины на linux в домене windows?
Для чего Вы будите её использовать?
PS Когда ко мне приходят заказчики с бредовой задачей, начинаю спрашивать, зачем это нужно.
В большинстве случаев выясняется, что проблема одна, но для ее решения придумывается другое «гениально-гуманитарное» решение, которое и озвучивают мне.
-
alex_vag
- Сообщения: 8
- Зарегистрирован: 07 дек 2021, 09:14
- Контактная информация:
Ввод в домен
#10
07 дек 2021, 12:29
ilikethat писал(а): ↑
07 дек 2021, 12:21
Для чего Вы будите её использовать?
Рабочая станция, с доступом ко внутренним сетевым ресурсам Windows домена. Работа с файлами *.doc и *.xls + Запуск 1с (под Linux, без Wine).
-
ilikethat
- Сообщения: 434
- Зарегистрирован: 14 дек 2019, 01:46
- Решено: 9
- Благодарил (а): 101 раз
- Поблагодарили: 96 раз
- Контактная информация:
Ввод в домен
#11
07 дек 2021, 12:46
alex_vag, а зачем это делать на Linux?
-
alex_vag
- Сообщения: 8
- Зарегистрирован: 07 дек 2021, 09:14
- Контактная информация:
Ввод в домен
#12
07 дек 2021, 12:47
ilikethat писал(а): ↑
07 дек 2021, 12:46
а зачем это делать на Linux?
«Правомерное использование лицензионного П/О»… т.д.
-
ilikethat
- Сообщения: 434
- Зарегистрирован: 14 дек 2019, 01:46
- Решено: 9
- Благодарил (а): 101 раз
- Поблагодарили: 96 раз
- Контактная информация:
Ввод в домен
#13
07 дек 2021, 12:56
alex_vag,
О бесплатной 1с для Linux я не слышал.
Бесплатный LibreOffice прекрасно ставится на Windows.
То есть сэкономили на лицензии Windows 10 pro? Тысяч 7 рублей.
Гениально(С)
-
WWolf
- Сообщения: 3371
- Зарегистрирован: 14 фев 2018, 00:51
- Решено: 22
- Откуда: Краснодар
- Благодарил (а): 1492 раза
- Поблагодарили: 1072 раза
- Контактная информация:
Ввод в домен
#14
07 дек 2021, 13:04
ilikethat писал(а): ↑
07 дек 2021, 12:56
То есть сэкономили на лицензии Windows 10 pro? Тысяч 7 рублей.
Гениально(С)
ну тут может быть и нюанс — ты под санкциями и тебе винду не продают ![]()
ilikethat писал(а): ↑
07 дек 2021, 12:56
О бесплатной 1с для Linux я не слышал.
она полюбому куплена, а под линукс клиент уже штампуют на ура…
-
alex_vag
- Сообщения: 8
- Зарегистрирован: 07 дек 2021, 09:14
- Контактная информация:
Ввод в домен
#15
07 дек 2021, 13:11
WWolf писал(а): ↑
07 дек 2021, 13:04
ну тут может быть и нюанс — ты под санкциями и тебе винду не продают
Очень может быть….
WWolf писал(а): ↑
07 дек 2021, 13:04
она полюбому куплена, а под линукс клиент уже штампуют на ура…
Безусловно!
-
Chocobo
- Сообщения: 9953
- Зарегистрирован: 27 авг 2016, 22:57
- Решено: 214
- Откуда: НН
- Благодарил (а): 795 раз
- Поблагодарили: 2979 раз
- Контактная информация:

Ввод в домен
#16
07 дек 2021, 13:34
В соседнем топике недавно подтвердили актуальной данной ссылки
Так что должно быть норм.
alex_vag писал(а): ↑
07 дек 2021, 11:14
этот вариант актуален для
Этот вариант должен быть достоаточно актуален для Убунту, на которой в свою очередь базируется Linux Mint.
Графические окружения Mate/Cinnamon/Gnome и прочие тут участвуют в меньшей степени, все настраивается ниже уровнем.
Потом уже могут быть некоторые различия именно со стороны UI взаимодействия.
Что же касается сценариев использования, то возможно работа со сложными мсофисными документами не самая сильная сторона либры и похожих офисных пакетов, но это уже другая история)


-
alex_vag
- Сообщения: 8
- Зарегистрирован: 07 дек 2021, 09:14
- Контактная информация:
Ввод в домен
#17
07 дек 2021, 13:41
Chocobo писал(а): ↑
07 дек 2021, 13:34
Графические окружения Mate/Cinnamon/Gnome и прочие тут участвуют в меньшей степени, все настраивается ниже уровнем.
Пасиб! ![]()
Прошу не расценивать данный текст как статью. Пусть это будет черновик описания, как ввести Linux Mint в домен Windows.
Все началось с установки последней версии Ubuntu 14.04 и осознания факта того, что пакет likewise-open из него благополучно выпилили. Я как человек, который 2 года работал под Ubuntu в организации безо всяких доменов, был не готов в ритуальным пляскам с профессиональными музыкальными инструментами, поэтому поставил последний Mint, в котором замечательно likewise-open работает и никуда не пропал.
Сначала ставим типомудрого:
sudo apt-get install likewise-open
Если в имени домена есть .local, то меняем в файле /etc/nsswitch.conf строчку:
hosts: files mdns4_minimal [NOTFOUND=return] dns mdns4
на
hosts: files dns [NOTFOUND=return]
Иначе компутер будет ругаться, что не может заресолвить свое имя по адресу .local.
Начинаем процедуру входа в домен:
sudo domainjoin-cli join ctt.local jackyfox
ctt.local — это наш домен, а jackyfox — мой аккаунт AD с правами админа.
И на последок делаем администраторов домена sudo-юзерами, дописав в /etc/sudoers строчку:
%Администраторы^домена ALL=(ALL) ALL
Хинт. Чтобы узнать, в каких группах состоишь, набери в сосноли id

UPD: А в кедах, например, группа с именем домена получается:
%CTT\Администраторы^домена
В некоторых случаях приходится логиниться, прибавляя к имени пользователя и имя домена: CTTjackyfox. Избавиться от этого можно, добавив в файл /etc/samba/lwiauthd.conf стоку:
winbind use default domain = yes
Потом только службу не забудь перезапустить:
sudo service likewise restart
Ну, а ливнуть с серве… домена всегда можно командой:
sudo domainjoin-cli leave
Для ввода LinuxMint в домен Windows нужно скачать и установить пакет от команды PowerBroker Open project (ранее называлась Likewise Open). На странице загрузки заполняем регистрационную форму и получаем на почту ссылку на скачивание пакетов. Если вам нужна демо версия с полным функционалом то нужно поставить галочку в самом низу формы регистрации. Меня полностью устраивает функционал бесплатной версии.
По ссылке полученной на почту заходим на страницу скачивания пакетов. Скачиваем последний стабильный релиз под свою битность ОС.

В терминале переходим в директорию в которую был закачан пакет(у меня это /home/michael) и выдаем ему права на выполнение, затем устанавливаем.
# cd /home/michael
# sudo chmod +x pbis-open-8.5.0.153.linux.x86_64.deb.sh
# sudo ./pbis-open-8.5.0.153.linux.x86_64.deb.sh
На все вопросы отвечаем ‘yes’. После установки откроется окно ввода компьютера в домен.
Нужно ввести имя компьютера и название домена. Повторно запустить окно ввода в домен можно командой.
# sudo /opt/pbis/bin/domainjoin-gui
Нажать Join Domain и ввести учетные данные пользователя имеющего права на ввод в домен Windows в открывшемся окошке.
После ввода в домен нужно перезагрузить компьютер и можно входить с доменными учетными данными.
Как мне ввести в домен Ubuntu 20.04 | 18.04 к домену Windows? Могу ли я присоединить Debian 10 к домену Active Directory?
Эта статья была написана, чтобы показать вам, как использовать realmd для присоединения сервера или рабочего стола Ubuntu 20.04 | 18.04 / Debian 10 к домену Active Directory. Домен Active Directory является центральным узлом информации о пользователях в большинстве корпоративных сред.
Например, в инфраструктуре моей компании ключевым требованием является то, чтобы все пользователи прошли аутентификацию во всех системах Linux с учетными данными Active Directory. Это должно работать как для Debian, так и для дистрибутивов Linux на основе Red Hat.
В этом руководстве будет показано, как настроить SSSD для получения информации из доменов в одном лесу ресурсов Active Directory. Если вы работаете с несколькими лесами AD, это руководство может вам не подойти. Мы также пойдем дальше и настроим правила sudo для пользователей, которые входят в систему через AD. Вот схема, изображающая установку и как она работает.

Итак, выполните следующие действия, чтобы присоединиться к домену Ubuntu 20.04 | 18.04 / Debian 10 в Active Directory (AD).
Шаг 1. Обновите свой APT
Начните с обновления вашей системы Ubuntu / Debian Linux.
sudo apt -y update
Это важно, поскольку установка может завершиться ошибкой, если сервер установлен только что.
Для Ubuntu 20.04 | 18.04 добавьте следующие репозитории в файл sources.list
sudo tee -a /etc/apt/sources.list <<EOF

deb http://us.archive.ubuntu.com/ubuntu/ bionic universe

deb http://us.archive.ubuntu.com/ubuntu/ bionic-updates universe

EOF
Шаг 2. Задайте имя хоста сервера и DNS
Установите правильное имя хоста для вашего сервера с правильным доменным компонентом.
sudo hostnamectl set-hostname myubuntu.example.com
Подтвердите свое имя хоста:
$ hostnamectl

Static hostname: myubuntu.example.com

Icon name: computer-vm

Chassis: vm

Machine ID: 5beb7ac3260c4f00bcfbe1088f48b8c7

Boot ID: b2a0d9abe43b455fb49484dbaa59dc41

Virtualization: vmware

Operating System: Ubuntu 18.04.1 LTS

Kernel: Linux 4.15.0-29-generic

Architecture: x86-64
Убедитесь, что DNS настроен правильно:
$ cat /etc/resolv.conf
Ubuntu 20.04 | 18.04 поставляется с systemd-resolve, который вам нужно отключить, чтобы сервер мог напрямую обращаться к вашему сетевому DNS.
sudo systemctl disable systemd-resolved

sudo systemctl stop systemd-resolved
Если вы используете DHCP, вы можете обновить DNS-сервер вручную.
$ sudo unlink /etc/resolv.conf

$ sudo vim /etc/resolv.conf
Шаг 3. Установите необходимые пакеты
Для присоединения системы Ubuntu 20.04 | 18.04 / Debian 10 к домену Active Directory (AD) требуется ряд пакетов.
sudo apt update

sudo apt -y install realmd libnss-sss libpam-sss sssd sssd-tools adcli samba-common-bin oddjob oddjob-mkhomedir packagekit
Только после успешной установки зависимостей вы можете приступить к обнаружению домена Active Directory в Debian 10 / Ubuntu 20.04 / 18.04.
Шаг 4. Откройте для себя домен Active Directory в Debian 10 / Ubuntu 20.04 | 18.04
Команда realm discover возвращает полную конфигурацию домена и список пакетов, которые должны быть установлены для регистрации системы в домене.
$ sudo realm discover example.com

example.com

type: kerberos

realm-name: EXAMPLE.COM

domain-name: example.com

configured: no

server-software: active-directory

client-software: sssd

required-package: sssd-tools

required-package: sssd

required-package: libnss-sss

required-package: libpam-sss

required-package: adcli

required-package: samba-common-bin
Замените example.com своим действующим доменом AD.
Шаг 5. Присоединитесь к Ubuntu 20.04 | 18.04 / Debian 10 к домену Active Directory (AD)
Учетная запись администратора AD требуется для интеграции вашего компьютера Linux с доменом Windows Active Directory. Проверьте и подтвердите учетную запись администратора AD и пароль.
Команда realm join настроит локальный компьютер для использования с указанным доменом, настроив как локальные системные службы, так и записи в домене идентификации. У команды есть несколько параметров, которые можно проверить с помощью:
$ realm join --help
Базовое выполнение команды:
$ sudo realm join -U Administrator example.com

Password for Administrator:
Где:
Администратор — это имя учетной записи администратора, используемой для интеграции машины в AD.
example.com — это имя домена AD
Команда сначала пытается подключиться без учетных данных, но при необходимости запрашивает пароль.
Просмотр сведений о текущей области.
$ realm  list

example.com

type: kerberos

realm-name: EXAMPLE.COM

domain-name: example.com

configured: kerberos-member

server-software: active-directory

client-software: sssd

required-package: sssd-tools

required-package: sssd

required-package: libnss-sss

required-package: libpam-sss

required-package: adcli

required-package: samba-common-bin

login-formats: %U@example.com

login-policy: allow-realm-logins
В системах на основе RHEL домашний каталог пользователя будет создан автоматически. В Ubuntu / Debian вам необходимо включить эту функцию.
sudo bash -c "cat > /usr/share/pam-configs/mkhomedir" <<EOF

Name: activate mkhomedir

Default: yes

Priority: 900

Session-Type: Additional

Session:

required                        pam_mkhomedir.so umask=0022 skel=/etc/skel

EOF
Затем активируйте с помощью:
sudo pam-auth-update
Выберите <OK>

Убедитесь, что выбрано “activate mkhomedir” с помощью звездочки — [*]

Затем выберите <Ok>, чтобы сохранить изменения.
Ваш файл конфигурации sssd.conf находится в /etc/sssd/sssd.conf . При каждом изменении файла требуется перезагрузка.
Статус должен быть запущен.
$ systemctl status sssd
Если интеграция работает, должна быть возможность получить информацию о пользователе AD.
$ id jmutai@example.com

uid=1783929917(jmutai@example.com) gid=1784800513(domain users@example.com) groups=1783870513(domain users@example.com)
Шаг 6. Контроль доступа — Ограничьте до пользователя / группы
Доступ к зарегистрированному серверу можно ограничить, разрешив только определенных пользователей и группы.
Ограничение для пользователей
Чтобы разрешить пользователю доступ через SSH и консоль, используйте команду:
$ sudo realm permit user1@example.com

$ sudo realm permit user2@example.com user3@example.com
Разрешить доступ к группе — Примеры
$ sudo ream permit -g sysadmins

$ sudo realm permit -g 'Security Users'

$ sudo realm permit 'Domain Users' 'admin users'
Это изменит файл sssd.conf .
Если вместо этого вы хотите разрешить доступ всем пользователям, запустите:
$ sudo realm permit --all
Чтобы запретить доступ всем пользователям домена, используйте:
$ sudo realm deny --all
Шаг 7. Настройте доступ через Sudo
По умолчанию у пользователей домена не будет разрешения на повышение привилегий до root. Пользователям должен быть предоставлен доступ на основе имен пользователей или групп.
Давайте сначала создадим файл разрешений sudo.
$ sudo vi /etc/sudoers.d/domain_admins
Добавить одного пользователя:
user1@example.com ALL=(ALL) ALL
Добавить еще одного пользователя:
user1@example.com     ALL=(ALL)   ALL

user2@example.com     ALL=(ALL)   ALL
Добавить группу
%group1@example.com ALL=(ALL) ALL
Добавьте группу с пробелами.
%security users@example.com       ALL=(ALL)       ALL

%system super admins@example.com ALL=(ALL)       ALL
Шаг 8. Проверьте доступ по SSH
Получите доступ к серверу удаленно, поскольку пользователю AD разрешено входить в систему.
$ ssh user1@localhost

The authenticity of host 'localhost (::1)' can't be established.

ECDSA key fingerprint is SHA256:wmWcLi/lijm4zWbQ/Uf6uLMYzM7g1AnBwxzooqpB5CU.

ECDSA key fingerprint is MD5:10:0c:cb:22:fd:28:34:c6:3e:d7:68:15:02:f9:b4:e9.

Are you sure you want to continue connecting (yes/no)? yes

Warning: Permanently added 'localhost' (ECDSA) to the list of known hosts.
Это подтверждение того, что наша конфигурация прошла успешно.
Посетите вики-страницы realmd и sssd, чтобы узнать больше.
Содержание
- Linux в домене Active Directory
- Содержание
- Общая информация
- Проверка требований
- Установка Samba
- Настройка Samba
- Проверка работы и отладка
- Дополнительная настройка
- Доступ к Samba из Windows 7 и 2008 r2
- Работа над ошибками
- Winbind не запускается
- Ошибка получения билета Kerberos
- 🐧 Интеграция серверов Linux с Active Directory с помощью Samba, Winbind и Kerberos
- Шаг 1: Установите пакеты samba-winbind и kerberos.
- Шаг 2: Синхронизация времени.
- Шаг 3: Отредактируйте файл /etc/hosts.
- Шаг 4: Отредактируйте файл /etc/krb5.conf.
- Шаг 6: Теперь настройте Samba и Winbind.
- Шаг 7: Настройте файл /etc/nsswitch.conf для обработки аутентификации.
- Linuxoid
- OpenSource forever
- Подключаем Linux ПК к Active Directory при помощи realmd
- Как интегрировать Linux-машину в среду домена Windows AD (Active Directory)
- Шаг 1. Установка пакетов и подготовка
- Шаг 2. Настройка DNS
- Шаг 3. Обнаружение домена, присоединение к нему и проверка результата.
- Шаг 4. Последние настройки и авторизация.
- Integrate Linux Mint 19.1 to Windows Server 2019 Active Directory Domain Controller
Linux в домене Active Directory
Содержание
Общая информация
Если вам нужно просто предоставить сетевой доступ к ресурсам Linux компьютера, то смотрите статью Samba.
В этой статье мы опишем как подключить Linux компьютер к домену под управлением Microsoft Active Directory и сделать из него файловый сервер.
После выполнения этой инструкции мы будем иметь в сети файловый сервер под управлением ОС Линукс, входящий в домен Windows 2003 и ничем не отличающийся от файлового сервера под Windows. Пользователи домена смогут обращаться к его ресурсам под своими учётными записями. Доступ регулируется группами домена AD.
По этой инструкции настраивались Debian (4, 5), Ubuntu 9.10, создавалась она на основе официальной документации и многих рекомендаций и инструкций из Интернета. Остальные Linux’ы настраиваются сходным образом.
Проверка требований
Установка Samba
При настройке krb5-config лучше указывать IP адреса контроллеров домена, а не их DNS имена.
Настройка Samba
Мы описали два общих каталога:
В Ubunto testparm находится в пакете samba-common-bin
Всё, компьютер включен в домен, что можно проверить на контроллере. Даже если после приведённых строк получили следующие:
Проверка работы и отладка
Если нас не понимают, то подсказываем пароль для wbinfo и смотрим: список доменов в сети, информацию о домене WORKGROUP, список пользователей и групп домена:
Дополнительная настройка
Доступ к Samba из Windows 7 и 2008 r2
Начиная с этих версий параметры авторизации у MS поменялись. Скорее всего Samba вскоре это учтёт, а пока подружить системы можно изменив на Win7 свойства сетевой безопасности:
Работа над ошибками
Winbind не запускается
При запуске Samba обнаруживаем, что winbind не запустился:
В журнале log.winbindd обнаруживаем запись:
Видим, что добавлен «встроенный домен» (BUILTIN) и домен «название компьютера» (STORAGE), подключиться к домену AD не удалось.
Решение: Переподключить компьютер в домен. Удалять придётся с самого контроллера, т.к. комадна net ads leave скорее всего не поможет.
Ошибка получения билета Kerberos
При попытке получить билет Kerberos получили:
Решение: указать имя домена в другом регистре. Скорее всего нужны все заглавные
Источник
🐧 Интеграция серверов Linux с Active Directory с помощью Samba, Winbind и Kerberos
В этом руководстве мы обсудим, как интегрировать Linux-серверы (Centos/RHEL) с Windows Active Directory в целях аутентификации.
Выполните следующие шаги, чтобы интегрировать эти серверы с AD с помощью samba, winbind и Kerberos.
Шаг 1: Установите пакеты samba-winbind и kerberos.
Шаг 2: Синхронизация времени.
AD очень требователен к соответствию времени при аутентификации.
Поэтому время сервера linux и сервера AD должно быть синхронизировано с сервером ntp.
Используйте приведенную ниже команду для синхронизации времени сервера Linux с сервером ntp.
Чтобы сделать вышеуказанную конфигурацию постоянной, отредактируйте файл “/etc/ntp.conf” и просто замените то, что там есть, на один или несколько NTP-серверов в вашем домене, например:
Шаг 3: Отредактируйте файл /etc/hosts.
Шаг 4: Отредактируйте файл /etc/krb5.conf.
Шаг 5: Теперь протестируйте аутентификацию Kerberos.
Если он запросит пароль, введите пароль пользователя ad, если все в порядке, то мы получим приглашение, в противном случае перепроверьте файл krb5.conf.
Шаг 6: Теперь настройте Samba и Winbind.
Отредактируйте файл /etc/samba/smb.conf.
Шаг 7: Настройте файл /etc/nsswitch.conf для обработки аутентификации.
Шаг 8: Теперь перезапустите службы winbind и Samba.
Теперь присоединитесь к домену:
Если вышеуказанная команда сообщает “Join is OK”, проверьте winbind:
Команда для составления списка всех пользователей AD:
Шаг 9: Теперь проведите тестирование и попробуйте войти на сервер linux через учетные данные пользователя AD.


Anything in here will be replaced on browsers that support the canvas element
Источник
Linuxoid
OpenSource forever
Подключаем Linux ПК к Active Directory при помощи realmd
Не смотря на то что Linux и Windows уже не редкость в одной сети, интеграции из коробки до сих пор нет. Как нет и единого решения. Проект realmd упрощает подключение Linux систем к Active Directory.
Что у нас есть на сегодня? Microsoft для Windows Server 2008 R2 — 2012 R2 предлагает Identity Management for UNIX (Служба управления идентификацией UNIX), являющийся частью роли контроллера домена и позволяющий использовать для входа в Unix учетные записи Active Directory. Но в настоящее время он уже объявлен как устаревший. Большие возможности дает Configuration Manager, но и соответственно требует больших вложений. Сторонники Unix ориентируются на связку Samba (winbind) и Kerberos или на решения сторонних компаний (PowerBroker Identity Services, Centrify Server Suite, Quest Authentication Services). Первый бесплатен, рекомендуется многими специалистами как более правильные, но требуют тщательных настроек. Вторые вмешиваются в схему AD и требуют дополнительного лицензирования (PowerBroker имеет и OpenSource версию).
realmd (Realm Discovery, freedesktop.org/software/realmd) сервис D-Bus позволяющий производить настройку сетевой аутентификации и членства в домене (AD или IPA/FreeIPA) без сложных настроек. Информация о домене обнаруживается автоматически. Для аутентификации и проверки учетных записей realmd использует SSSD (через Kerberos и LDAP, fedorahosted.org/sssd) или Winbind. Версия 0.1 была представлена в конце июля 2012, на момент написания этих строк актуальной была 0.16.1. В настоящее время realmd интегрирован в kickstart, Центр управления GNOME и другие инструменты. Покажем подключение к домену example.org при помощи realmd на примере Ubuntu Linux 14.04 LTS, в других дистрибутивах все показанное будет отличаться только особенностями работы менеджера пакетов.
Перед началом настроек, необходимо настроить DNS, лучше всего когда в /etc/resolv.conf прописан сам контролер домена. Все что необходимо уже есть в репозитарии:
При конфигурировании krb5-user будет запрошена область по умолчанию, вводим имя домена в верхнем регистре — EXAMPLE.ORG.
 Конфигурирование пакета krb5-user
Конфигурационный файл /etc/realmd.conf не создается и действуют параметры по умолчанию. В результате может возникнуть конфликт имен, что приведет к ошибке при подключении. Чтобы избежать проблем следует его создать, такого содержания:
Файл на самом деле имеет множество полезных опций, но пока этого достаточно.
Сервисы SSSD ( System Security Services Daemon) также требуют настройки. Добавим фильтр учетных записей и количество попыток подключений:
В некоторых ситуациях следует добавить «use_fully_qualified_names = False».
Указываем права доступа:
Пробуем найти доступные домены:
Получаем тикет пользователя имеющего права администратора домена.
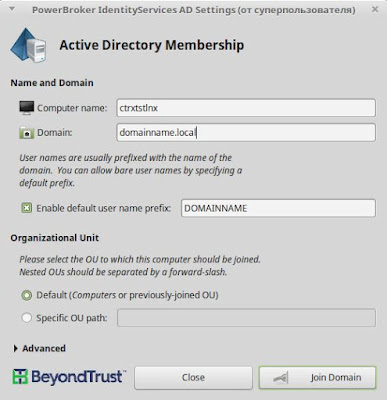
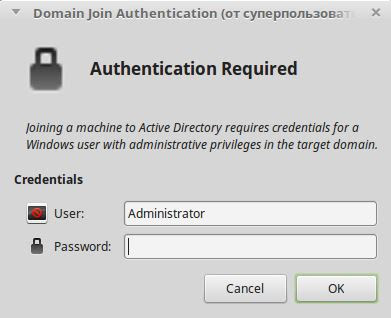
Подключаемся (рис.2). Для запуска понадобятся права root иначе получим сообщение «realm: Couldn’t join realm: Not authorized to perform this action».
 Подключаемся к Active Directory
Теперь если ввести «sudo realm list» получим полную информацию о домене, а в консоли «Active Directory Users and Computers» появится новый компьютер.  Информация о домене
 Вкладка Active Directory Users and Computers
Некоторые действия и информацию можно получить при помощи утилиты adsli.
Также стоит добавить новое правило в /etc/sudoers, чтобы доменный пользователь мог получать права администратора локального компьютера:
Перегружаем систему и регистрируемся как доменный пользователь «пользователь@домен».
Источник
Как интегрировать Linux-машину в среду домена Windows AD (Active Directory)

В этой статье будет описан процесс добавления Linux-машины (Ubuntu 20.04) в домен Windows AD.
Шаг 1. Установка пакетов и подготовка
Сначала обновите пакеты.
sudo apt updatesudo apt upgrade
После этого установите требуемые пакеты.
Далее мы настроим все инструменты. Вам требуется знать:
Шаг 2. Настройка DNS
Откройте конфигурационный файл netplan:
sudo nano /etc/netplan/*.yaml
Если вы видите там «dhcp4: true», то есть ваш DHCP-сервер настроен корректно, переходите к следующему шагу. Если вы настраиваете параметры сетевого подключения вручную, ознакомьтесь с примером настройки:
network:ethernets:enp0s3:addresses:- 192.168.0.15/24gateway4: 192.168.0.10nameservers:addresses: [192.168.0.1, 192.168.0.2]search:- office.localoptional: trueversion: 2
sudo netplan apply
Шаг 3. Обнаружение домена, присоединение к нему и проверка результата.
В первую очередь требуется обнаружить домен:
realm discover office.local
Вы увидите что-то подобное. Это означает, что настройки сети верны и машина получила ответ от домена. Если нет, вам необходимо проверить настройки сети, домен и работоспособность DNS.
office.localtype: kerberosrealm-name: OFFICE.LOCALdomain-name: office.localconfigured: no.
Затем присоединитесь к домену AD. Замените admin1 на имя администратора и укажите пароль.
Проверьте, возможен ли прием информации о пользователе AD. Замените user1 на имя пользователя вашего домена.
id user1@office.localuid=687821651(user1@office.local) gid=687800512(user1@office.local) groups=687800512(domain users@office.local)
Шаг 4. Последние настройки и авторизация.
Необходимо произвести настройку, чтобы в будущем каждый раз не добавлять имя домена к имени пользователя.
sudo nano /etc/sssd/sssd.conf
Измените значение use_fully_qualified_names на False. Перезагрузите и проверьте:
sudo systemctl restart sssdid useruid=687821651(user1@office.local) gid=687800512(user1@office.local) groups=687800512(domain users@office.local)
Теперь нужно настроить создание домашних каталогов для пользователей AD при входе в систему.
sudo nano /etc/pam.d/common-session#add this line in the end of filesession optional pam_mkhomedir.so skel=/etc/skel umask=077
Войдите в систему как пользователь AD.
su – userPassword:Creating directory ‘/home/user1@office.local’.user1@ubuntu-server:
Это означает, что вы успешно вошли в систему как пользователь AD.
Также вы можете разрешить авторизацию для некоторых пользователей и групп AD или же ограничить других. В приведенном ниже примере настроен запрет для всех пользователей, кроме user0, user1 и группы Main Admins.
Настройка пользователей AD для получения root-прав такая же, как и для локальных, но выполняется в другом файле.
sudo nano /etc/sudoers.d/admins
Добавьте к нему нужные строки. Например:
user ALL=(ALL) ALL%Domain\ Admins ALL=(ALL) ALL
Источник
Integrate Linux Mint 19.1 to Windows Server 2019 Active Directory Domain Controller

This tutorial will describe how you can join machines that run Linux Mint 17.1 OS to Windows 2012 Active Directory Domain Controller in order to authenticate remote accounts from AD back end identity provider to local Linux workstations with the help of SSSD service and Realmd system DBus service.
The System Security Services Daemon (SSSD) is a relative new service which provides cross-domain compatible methods for Active Directory users to authenticate to local machines using a combination of usernames and domain back end name to create the login identity, even if the Domain Controller goes offline (SSSD caches credentials).
REQUIREMENTS
Domain Settings:
STEP ONE – Linux Mint Network Configuration


edit network interface settings

add DNS IP Address
If multiple Domain Controllers machines exists on your network then you can also add their IP Addresses on IPv4 DNS settings fields.
2. After you’re done, hit on Apply button and switch the edited Network Interface from ON to OFF and then back to ON in order to apply the new settings. After the network interface is started again, open a Terminal console and issue a ping command against your PDC domain name in order to verify if the settings are successfully applied and the domain name responds with the correct IP Address and FQDN of the PDC.

apply network settings

ping domain controller
If you want to avoid all this manual settings, then configure a DHCP server at your premises to automatically assign network settings, especially DNS entries, that will point to your Windows PDC IP Addresses needed for DNS resolution in order to reach the AD PDC.
STEP TWO – Install Required Software Packages
As presented at the beginning of this tutorial, in order to integrate a Linux Mint machine to an Active Directory Domain Controller you need to install the SSSD service along with the following software packages and dependency:
– SSSD service (responsible with back end realm authentication) with the following dependencies: sssd-tools (optional, but useful for sssd cache, user and groups manipulation), libpam-sss (PAM modules for local authentication) and libnss-sss (NSS modules for local DNS resolution)
– Realmd (system DBus service which manages domain integration and local resources permissions)
– The following Samba Modules : samba-common-bin and samba-libs (File sharing compatibility between Windows and Linux machines)
– Krb5-user (Client network authentication and communication with the PDC server)
– ADcli (Tools for joining domain and perform other actions on an AD)
– PackageKit (Linux cross-platform packages management for interoperabillity and user privileges for software installations)
3. Now, let’s start installing the above enumerated packages by opening a Terminal console on Linux Mint and issuing the following commands with sudo privileges:
First install Realmd and SSSD service:
[terminal]
sudo apt-get install realmd sssd sssd-tools libpam-sss libnss-sss
[/terminal]

install realmd and sssd service
4. Next install Samba modules (by default this modules might be already installed on your system):
[terminal]
sudo apt-get install samba-libs samba-common-bin
[/terminal]

install samba modules
[terminal]
sudo apt-get install krb5-user adcli packagekit
[/terminal]

install kerberos, adcli and packagekit packages

Configure Kerberos realm
STEP THREE – Edit Configuration Files for SSSD, Realmd and PAM
6. Next step before starting joining Linux Mint to Windows Server AD PDC is to configure the local services for AD network authentication. By default the SSSD service has no configuration file defined on /etc/sssd/ path. In order to create a default configuration file for SSSD service, issue the following command to create and simultaneous edit the file:
[terminal]
sudo nano /etc/sssd/sssd.conf
[/terminal]
SSSD configuration file excerpt:
[terminal]
[nss]
filter_groups = root
filter_users = root
reconnection_retries = 3
[pam]
reconnection_retries = 3
[sssd]
domains = CAEZSAR.LAN
config_file_version = 2
services = nss, pam
[domain/CAEZSAR.LAN]
ad_domain = CAEZSAR.LAN
krb5_realm = CAEZSAR.LAN
realmd_tags = manages-system joined-with-adcli
cache_credentials = True
id_provider = ad
krb5_store_password_if_offline = True
default_shell = /bin/bash
ldap_id_mapping = True
use_fully_qualified_names = False
fallback_homedir = /home/%d/%u
access_provider = ad
[/terminal]

sssd configuration file
For other options and parameters concerning sssd.conf file run man sssd command.
7. The next step is to create and edit a configuration file for Realmd in order to avoid some eventual package dependency problems by issuing the following command:
[terminal]
sudo nano /etc/realmd.conf
[/terminal]
Use the following configurations for realmd file:
automatic-install = no
[/terminal]

After you add the above lines, save the file and close it.
[terminal]
sudo nano /etc/pam.d/common-session
[/terminal]
Add the following line as presented on the below screenshot:
[terminal]
session optional pam_mkhomedir.so skel = /etc/skel/ mask=0077
[/terminal]

PAM common-session file
After you have edited the file, save it and close it, and proceed to the next step in order to make Linux Mint a part of the Windows Domain Controller.
STEP FOUR – Join Linux Mint to Windows Server 2012 Active Directory Domain Controller
9. Before joining the Linux Mint client to Windows PDC, first issue the discovery command against your domain name in order to view the complete realm configurations and a package list of software that must be installed on the client machine before you enroll it in the realm.
[terminal]
sudo realm discover domain.tld
[/terminal]

realm discover domain
10. If everything is correctly setup at the client side and the domain controller responds, issue the following command in order to integrate Linux Mint client machine to Windows Server 2012 AD PDC.

Once the command returns successfully status and ads Linux Mint to AD you can use the sudo realm list command to view full details and the default configurations for your domain.

To manage sssd service use the following command switches (you don’t need to manually start the sssd service because it’s automatically started by the realmd when the machine is enrolled to realm):
[terminal]
sudo service sssd status|start|stop
[/terminal]
11. To check if the machine appears on the Domain Controller, go to your Windows Server 2012, open Active Directory Users and Computers utility and search your Linux Mint hostname.

Active Directory Users and Computers
STEP FIVE – Log In on Linux Mint with Active Directory Accounts
12. To authenticate on Linux Mint with and an Active Directory user, first you need to add a permit rule on local policies in order to grant access for all realm users on local machine, by issuing the following command:
[terminal]
sudo realm permit –all
[/terminal]
To grant access just for a specific AD user or group use the following command syntax:
[terminal]
sudo realm permit domain –x domainAD_username
[/terminal]
13. To perform Terminal console command line authentications on Linux Mint host with an Active Directory account, use double backslashes to escape the backslash which separates the domain string from user, as shown in the below syntax (you can append the dot domain or use just the domain string):
[terminal]
su – domain.tld\AD_username
[/terminal]
[terminal]
su – domain\AD_username
[/terminal]


ad user login without dot domain
14. To log in with an AD account on Linux using Putty or to perform Linux Mint MDM GUI logins use the following syntax:

AD user Putty login


STEP SIX – Add Root Permissions to AD Domain Admins Users
16. In case you want to allow all Active Directory Domain Admins to have full administrative permissions in order to execute any command with root privileges on the Linux Mint machine, open the local sudoers file for editing and add the following line:
[terminal]
sudo nano /etc/sudoers
[/terminal]
[terminal]
sudo visudo
[/terminal]
Add this line after %sudo line:
[terminal]
%domain admins@domain.tld ALL=(ALL) ALL
[/terminal]

add domain admins root privileges
17. In case you don’t want your Linux Mint machine to be a part of the domain anymore, issue the following command to leave the domain:

That’s all! Now, the machine running Linux Mint 17.1 is integrated as a part of Windows Active Directory Domain Controller and can successfully replace your old Windows XP machine, for which Microsoft has stopped its support, but keep in mind that some features and, especially, a huge part of Active Directory Group Policy, don’t apply on Linux systems.
Источник
Forum rules
Topics in this forum are automatically closed 6 months after creation.
-
alexwight
Linux Mint 19 + AD
Всем привет, первый раз играюсь с линуксом, поэтому практически нечего не знаю что где да как, мне нужно завести компьютер на Linux Mint 19 Tara в домен Windows, я понаходил статьи на старые версии линукса и там везде настройки или через likewise-open или чере samba + krb5-user, не то не то не выходит. Первое просто в репозитории отсутствует, второе вполне возможно что то делаю не так.
Расскажу по шагам что сделал
$ sudo nano /etc/hosts
#добавил ип адрес контроллера домена и имя сервера$ sudo nano /etc/nsswitch.conf
#добавил строку
hosts: files dns mdsn4$ sudo nano /etc/resolv.conf
#добавил пару строчек, первая имя сервера (ИП адрес АД) вторая search имя домена.local
что делать дальше, я паралельно буду искать инфуи буду рад любой помощи
Last edited by LockBot on Wed Dec 28, 2022 7:16 am, edited 1 time in total.
Reason: Topic automatically closed 6 months after creation. New replies are no longer allowed.
-
alexwight
Re: Linux Mint 19 + AD
Post
by alexwight » Thu Aug 09, 2018 12:34 am
Такс немного разобрался, поставил себе pbis-open с офф сайта, потом скачал Open sssh, и вроде все заработало, только вот проблема при выходе из сеанса локального юзера, не было никаких кнопок для входа другими пользователям.
Немного порылся в интерфейсе поклацал настройки нечего не спасло, потом установил все таки samba winbind krb5-user, настроил и появилась кнопка войти, но не какие логины не подходят не могу зайти под доменной учётной в систему.
Предварительно прописал в sudoers, админа домена. Пытаюсь войти через кнопку «войти» как просто через логин так и по типу логин@домен но все время пишет не правильный пароль, в общем в доменные учётки не пускает…
Я буду разбирать эту тему дальше но все же нужна помощь, если нужны логи отпишите как их сделать и я все пришлю).
-

Labuzhskiy
- Level 3

- Posts: 174
- Joined: Fri Aug 23, 2013 12:38 am
- Location: RU:ru


Re: Linux Mint 19 + AD
Post
by Labuzhskiy » Mon Aug 13, 2018 6:42 am
«Пытаюсь войти через кнопку «войти» как просто через логин так и по типу логин@домен но все время пишет не правильный пароль, в общем в доменные учётки не пускает… «
А с масками сети порядок? может в этом дело?
-
alexwight
Re: Linux Mint 19 + AD
Post
by alexwight » Mon Aug 13, 2018 8:59 am
Labuzhskiy wrote: ↑
Mon Aug 13, 2018 6:42 am
«Пытаюсь войти через кнопку «войти» как просто через логин так и по типу логин@домен но все время пишет не правильный пароль, в общем в доменные учётки не пускает… «
А с масками сети порядок? может в этом дело?
По идее порядок, сеть локальная все в одном ИП пуле ИП/24 , я попробую еще пару вещей, если у меня что то получится то я опишу в следующем посте настройку через krb5 + ldap
Была необходимость ввести в домен Windows машину с Ubuntu. Для этих целей обычно используют Samba и Winbind. Но возможен альтернативный вариант с sssd, краткое руководство по нему ниже.
Для примера будем использовать:
Домен = contoso.com
Контроллер домена = dc.contoso.com
Запускаем терминал Ubuntu:
1. Переключаемся под рута
sudo -i2. Устанавливаем необходимые пакеты
apt install sssd heimdal-clients msktutil3. Редактируем /etc/krb5.conf, в качестве отступов используется табуляция
[libdefaults]
	default_realm = CONTOSO.COM

[realms]
	CONTOSO.COM = {
		kdc = DC
		admin_server = dc.contoso.com
		default_domain = contoso.com
	}

[login]
	krb4_convert = true
	krb4_get_tickets = false

[domain_realm]
        .contoso.com = CONTOSO.COM
        contoso.com = CONTOSO.COM
4. Редактируем файл /etc/hosts, указываем FQDN для данного хоста:
127.0.0.1       localhost
127.0.1.1       <hostname>.contoso.com  <hostname>
5. Пробуем получить Kerberos ticket от имени администратора домена:
root@ubuntu:~# kinit YourDomainAdmin
YourDomainAdmin@CONTOSO.COM's Password:
Проверяем:
root@ubuntu:~# klist
Credentials cache: FILE:/tmp/krb5cc_0
        Principal: YourDomainAdmin@CONTOSO.COM

  Issued                Expires               Principal
Dec  1 15:08:27 2018  Dec  2 01:08:22 2018  krbtgt/CONTOSO.COM@CONTOSO.COM
Если тикет получен успешно, то теперь можно сгенерировать Kerberos principals для данного хоста, регистр важен:
msktutil -c -b 'CN=YourComputersOU' -s HOST/HOSTNAME.contoso.com -k /etc/sssd/HOSTNAME.keytab --computer-name HOSTNAME --upn HOSTNAME$ --server dc.contoso.com —user-creds-only

msktutil -c -b 'CN=YourComputersOU' -s HOST/HOSTNAME -k /etc/sssd/HOSTNAME.keytab --computer-name HOSTNAME --upn HOSTNAME$ --server dc.contoso.com --user-creds-only
Сейчас наш хост должен отобразиться в списке компьютеров в каталоге. Если все так — удаляем полученный Kerberos ticket:
kdestroy
6. Создаем файл /etc/sssd/sssd.conf со следующим содержимым:
[sssd]

services = nss, pam
config_file_version = 2
domains = contoso.com


[nss]

entry_negative_timeout = 0
debug_level = 3


[pam]

debug_level = 3


[domain/contoso.com]

debug_level = 3

ad_domain = contoso.com
ad_server = dc.contoso.com
enumerate = false

id_provider = ad
auth_provider = ad
chpass_provider = ad
access_provider = simple
simple_allow_groups = users #каким группам разрешено логиниться, через запятую. Есть ограничение — названия групп должны быть с маленькой буквы.
ldap_schema = ad
ldap_id_mapping = true
fallback_homedir = /home/%u
default_shell = /bin/bash
ldap_sasl_mech = gssapi
ldap_sasl_authid = <HOSTNAME>$
ldap_krb5_init_creds = true
krb5_keytab = /etc/sssd/<HOSTNAME>.keytab
Описание параметров конфигфайла sssd можно посмотреть тут
Устанавливаем права доступа для файла sssd.conf:
chmod 600 /etc/sssd/sssd.confПерезапускаем SSSD service
service sssd restart7. Редактируем настройки PAM
Плохое решение:
редактируем файл /etc/pam.d/common-session, после строки
session required pam_unix.soдобавляем строку
session required pam_mkhomedir.so skel=/etc/skel umask=0022Хорошее решение:
переопределить параметры через системные настройки PAM, вызываем
pam-auth-update
и отмечаем пункты sss auth и makehomdir. Это автоматически добавит
строчку выше в common-session и она не будет перезатерта при обновлении системы.
Теперь мы можем логиниться на машине доменными пользователями, которым разрешен вход.
P.S.: Можно дать права на использование sudo доменным группам. Используя visudo, редактируем файл /etc/sudoers, или лучше, как рекомендует maxzhurkin и iluvar, создаем новый файл в /etc/sudoers.d/ и редактируем его
visudo -f /etc/sudoers.d/ваш_файлдобавляем требуемую группу — например, Domain Admins (если в названии группы есть пробелы — их необходимо экранировать):
%Domain Admins ALL=(ALL) ALLP.S.S.: Спасибо gotch за информацию о realmd. Очень удобно — если не нужны специфические настройки, то ввод машины в домен занимает, по сути, три (как заметил osipov_dv четыре) команды:
1. Устанавливаем нужные пакеты:
sudo apt install realmd samba-common-bin samba-libs sssd-tools krb5-user adcli2. Редактируем файл /etc/hosts, указываем FQDN для данного хоста:
127.0.0.1       localhost
127.0.1.1       <hostname>.contoso.com  <hostname>
3. Проверяем, что наш домен виден в сети:
realm discover contoso.com4. Вводим машину в домен:
sudo realm --verbose join contoso.com -U YourDomainAdmin --install=/5. Редактируем настройки PAM
sudo pam-auth-updateДополнительный плюс данного варианта — сквозная авторизация на файловых ресурсах домена.
Для того чтоб при входе не указывать дополнительно к логину домен, можно добавить суффикс по умолчанию. В файле /etc/sssd/sssd.conf, в блоке [sssd] добавляем строку:
default_domain_suffix = contoso.comСодержание
- Linux в домене Active Directory
- Содержание
- Общая информация
- Проверка требований
- Установка Samba
- Настройка Samba
- Проверка работы и отладка
- Дополнительная настройка
- Доступ к Samba из Windows 7 и 2008 r2
- Работа над ошибками
- Winbind не запускается
- Ошибка получения билета Kerberos
- Linux Mint в домене Windows
- How to join a Linux system to an Active Directory domain
- Active Directory and the need for centralized access management
- More Linux resources
- Pre-requisites
- Packages to install
- Realmd (interacting with the domain)
- Further configuration
- SSSD (easier logins and dynamic updates)
Linux в домене Active Directory
Содержание
Общая информация
Если вам нужно просто предоставить сетевой доступ к ресурсам Linux компьютера, то смотрите статью Samba.
В этой статье мы опишем как подключить Linux компьютер к домену под управлением Microsoft Active Directory и сделать из него файловый сервер.
После выполнения этой инструкции мы будем иметь в сети файловый сервер под управлением ОС Линукс, входящий в домен Windows 2003 и ничем не отличающийся от файлового сервера под Windows. Пользователи домена смогут обращаться к его ресурсам под своими учётными записями. Доступ регулируется группами домена AD.
По этой инструкции настраивались Debian (4, 5), Ubuntu 9.10, создавалась она на основе официальной документации и многих рекомендаций и инструкций из Интернета. Остальные Linux’ы настраиваются сходным образом.
Проверка требований
- Проверяем что Samba собрана с поддержкой Kerberos:
- Также проверим что поддерживается LDAP
- Для корректной работы Samba в домене Windows 2003 нужны версии MIT Kerberos version >=1.3.1. Проверим:
- Для корректной работы с Windows 2008 серверами сама Samba должна быть достаточно свежая:
Установка Samba
- Устанавливаем сервер и клиент samba.
При настройке krb5-config лучше указывать IP адреса контроллеров домена, а не их DNS имена.
Настройка Samba
- Для подключения к домену Active Directory удобно использовать утилиту Likewise-Open.
- Для администрирования Samba удобно использовать SWAT или webmin, которые предоставляют веб интерфейс. Попасть на него можно по адресу http://server_address:901 и https://server_address:10000 соответственно, указав для соединения пользователя root. Но будьте осторожны — он полностью переписывает smb.conf и некоторые параметры может просто игнорировать. Лучше предварительно сделать резервную копию файла. Я сначала использовал SWAT, а затем дорабатывал конфигурационный файл /etc/samba/smb.conf руками. Вот, что осталось у меня не закоментированным (принтеры к этому серверу не подключены):
Мы описали два общих каталога:
- backup — доступ имеют только пользователи входящие в группу BackupGroup в Active Directory. Они могут создавать и удалять файлы/каталоги
- distrib — доступ имеют все пользователи входящие в группу DistribGroup в Active Directory
В приведённой конфигурации подразумевается, что eth0 — это сетевой интерфейс в локальную сеть, где домен имеет полное имя WORKGROUP.DOMAIN.LOCAL
- редактируем /etc/nsswitch:
- Проверим, что в /etc/hosts есть корректная запись для нашего сервера, также можно добавить записи для контроллеров доменов:
- Удаляем если есть (или переносим в резервные копии) файл /etc/samba/secrets.tdb и все файлы из /var/lib/samba/*.tdb
- Проверяем конфигурацию (не обязательно):
- testparm -s
В Ubunto testparm находится в пакете samba-common-bin
- Проверим как Samba-3 winbind общается с контроллером домена Active Directory посредством протокола Kerberos:
На рассхождение времени в секундах указывает строка «Server time offset: -5». Обратите внимание, что протокол Kerberos зависим от времени, и расхождение с часами контроллера домена допускается лишь незначительное, поэтому желательно настроить NTP клиент (см. статьи по настройке NTP). В Ubuntu это указывается в файле /etc/default/ntpdate:
- В Debian (и его сыновьях, таких как Ubuntu и внуках вроде Linux Mint) при установке пакета krb5-cofig сразу предлагается его настройка. Лучше всего попробовать работать с этими настройками, но если ничего предложено не было или мы хотим что-то изменить, то редактируем /etc/krb5.conf (я для более стабильной работы использовал ip адреса вместо имён серверов):
- Проверим работает ли Kerberos, постараемся получить билет и просмотреть его:
- Удалим полученный билет:
- Присоединяемся к домену:
Всё, компьютер включен в домен, что можно проверить на контроллере. Даже если после приведённых строк получили следующие:
Проверка работы и отладка
- Для удобства отладки сделаем ссылку на каталог журналов:
- Запускаем samba и winbind:
- Для проверки правильно ли подключение к домену можно посмотреть список пользователей и групп домена (не обязательно):
Если нас не понимают, то подсказываем пароль для wbinfo и смотрим: список доменов в сети, информацию о домене WORKGROUP, список пользователей и групп домена:
- Проверяем, как работает NSS. Команда getent показывает инфо о пользователе, который может быть как в домене, так и юниксовый:
- Теперь можно использовать ресурсы на линукс-сервере, на которые мы дали доступ, как обычные доменные ресурсы.
Дополнительная настройка
- Можно также сопоставить (но это не обязательно) локальные учётные данные и из домена Windows. Для сопоставления пользователей редактируем файл /etc/samba/smbusers.conf:
- для сопоставления (мапирования от англ. Map) групп домена и групп UNIX выполняем:
- После того как всё отлажено, можно понизить уровень записи в журнал до «1». В /etc/samba/smb.conf:
Доступ к Samba из Windows 7 и 2008 r2
Начиная с этих версий параметры авторизации у MS поменялись. Скорее всего Samba вскоре это учтёт, а пока подружить системы можно изменив на Win7 свойства сетевой безопасности:
Пуск — Панель управления — Администрирование — Локальная политика безопасности — Локальные политики — Параметры безопасности
- Сетевая безопасность: минимальная сеансовая безопасность для клиентов на базе NTLM SSP — убрать галочку с «Требовать 128-битное шифрование». Таких параметра два — выполнить для обоих
- Сетевая безопасность: уровень проверки подлинности LAN Manager — выбрать в списке пункт «Отправлять LM- и NTML-ответы»
Работа над ошибками
Winbind не запускается
При запуске Samba обнаруживаем, что winbind не запустился:
В журнале log.winbindd обнаруживаем запись:
Видим, что добавлен «встроенный домен» (BUILTIN) и домен «название компьютера» (STORAGE), подключиться к домену AD не удалось.
Решение: Переподключить компьютер в домен. Удалять придётся с самого контроллера, т.к. комадна net ads leave скорее всего не поможет.
Ошибка получения билета Kerberos
При попытке получить билет Kerberos получили:
Решение: указать имя домена в другом регистре. Скорее всего нужны все заглавные
Источник
Linux Mint в домене Windows
Прошу не расценивать данный текст как статью. Пусть это будет черновик описания, как ввести Linux Mint в домен Windows.
Все началось с установки последней версии Ubuntu 14.04 и осознания факта того, что пакет likewise-open из него благополучно выпилили. Я как человек, который 2 года работал под Ubuntu в организации безо всяких доменов, был не готов в ритуальным пляскам с профессиональными музыкальными инструментами, поэтому поставил последний Mint, в котором замечательно likewise-open работает и никуда не пропал.
Сначала ставим типомудрого:
Если в имени домена есть .local , то меняем в файле /etc/nsswitch.conf строчку:
Иначе компутер будет ругаться, что не может заресолвить свое имя по адресу .local.
Начинаем процедуру входа в домен:
ctt.local — это наш домен, а jackyfox — мой аккаунт AD с правами админа.
И на последок делаем администраторов домена sudo-юзерами, дописав в /etc/sudoers строчку:
Хинт. Чтобы узнать, в каких группах состоишь, набери в сосноли id
UPD: А в кедах, например, группа с именем домена получается:
В некоторых случаях приходится логиниться, прибавляя к имени пользователя и имя домена: CTTjackyfox . Избавиться от этого можно, добавив в файл /etc/samba/lwiauthd.conf стоку:
Потом только службу не забудь перезапустить:
Ну, а ливнуть с серве… домена всегда можно командой:
Источник
How to join a Linux system to an Active Directory domain
Posted: October 13, 2020 | by Edem Afenyo

Microsoft’s Active Directory (AD) is the go-to directory service for many organizations. If you and your team are responsible for a mixed Windows and Linux environment, then you probably would like to centralize authentication for both platforms. I’ll cover how to add Linux computers to an Active Directory domain.
Active Directory and the need for centralized access management
More Linux resources
Microsoft’s Active Directory, more popularly known as AD, has held the lion’s share of the market for enterprise access management for many years now. It is used by institutions and individuals the world over to centrally control access to resources belonging to the organization. It gives you the ability to manage users, passwords, resources such as computers, and dictate who has access to what. For some of you reading this write-up, especially those who work in large institutions, you have interacted with AD before. Usually, the interaction is using one set of login credentials to log in to any workstation in the organization. That is just the tip of a large iceberg.
Imagine a collection of 40 computer systems and 70 users in a firm. Some employees run shifts while others work regular hours. Some have access to printing; others don’t. The traditional way of working is to create local user accounts on each computer a user needs to access. Imagine the workload on the end-user support team. When a user changes his password for any reason, that user has to change the password on all computers he previously had access to, to keep things in sync. In no time, there will be mayhem. Now, imagine two members of the staff resign. I do not need to tell you the monotonous work that has to be repeated any time there’s a change to the staffing or any workstations. For IT teams, this is a nightmare. Time that could be used for innovative tasks is now spent reinventing the wheel. I have not even spoken about managing access to the printers.
This is where a directory service such as Active Directory thrives. It can literally be a lifesaver. With Active Directory, each user is uniquely created as an object in a central database, with a single set of credentials. Each computer system is also created as an object. Automatically, every user can access every workstation with that same set of credentials. Any account changes that need to be made are made once at the central database. Members of staff can access the printers using the same set of credentials. The printers’ authentication mechanism can be coupled with AD to achieve that. Happy users, happy IT team.
Using groups and organizational units, access to various resources can be tailored and maintained. It gets even better. This directory can store staff phone numbers, email addresses, and can be extended to store other information. What if someone resigns? No problem. Just disable the user’s account. That person’s access to all resources is nullified on the spot. The bigger the organization, the greater the need for centralized management. It saves time; it saves emotions.
At its heart, a directory service is just an organized way of itemizing all the resources in an organization while facilitating easy access to those resources. Basically, AD is a kind of distributed database, which is accessed remotely via the Lightweight Directory Access Protocol (LDAP). LDAP is an open protocol for remotely accessing directory services over a connection-oriented medium such as TCP/IP. AD is not the only directory service based on the x.500 standard, or that can be accessed using LDAP. Other directory services include OpenLDAP and FreeIPA. However, AD is a mature Windows-based service that comes incorporated with Windows Server systems. In other words, it’s going to be the automatic winner when your organization has many Windows systems. This is one of the reasons for its ubiquity. Directory services such as FreeIPA are Linux-based and provide an excellent service for a Linux stable. When the rubber hits the road, the choice boils down to which of the two you can set up quickly, given your current environment and your team’s skill set.
But what happens when you choose AD, and you have a few CentOS servers, and you do not want to maintain a separate set of credentials for your Linux users? That overhead is entirely avoidable. What you need to do is join the Linux servers to the AD domain, like you would a Windows server.
If that is what you need to do, then read on to find out just how to do it. It is possible to join a Windows system to a FreeIPA domain, but that is outside the scope of this article.
Pre-requisites
This article presupposes that you have at least some introductory-level experience with Active Directory, especially around user and computer account management. Aside from that, the following obvious requirements need to be met:
- An account in AD that has the privileges necessary to join a system to the domain.
- A Linux server (a CentOS 7 server was used for this demonstration).
- A Domain Controller.
- Ensure your Linux server knows how to find the domain controller via DNS.
To make this article easier on everyone, here’s a list of key details. This is how the lab I used for this write up is set up, so you should modify accordingly.
- AD Domain Name: Hope.net
- User account for joining the domain: fkorea (Fullname — Fiifi Korea)
- Linux server hostname: centy2
Packages to install
For this configuration, the essential package to install is realmd . Aside from realmd , there are a host of packages that need to be installed to make this work.
Realmd provides a simplified way to discover and interact with Active Directory domains. It employs sssd to do the actual lookups required for remote authentication and other heavy work of interacting with the domain. In the interest of brevity, I won’t dwell on the other packages in the list.
However, for those interested in the details, a quick Google search should be of great help.
Realmd (interacting with the domain)
Now that all packages have been installed, the first thing to do is to join the CentOS system to the Active Directory domain. We use the realm application for that. The realm client is installed at the same time as realmd . It is used to join, remove, control access, and accomplish many other tasks. Here is the expected syntax for a simple domain join:
The space between the user account and the domain account is not a typo. By inserting the corresponding details, we get the following command:
Supply the password when the prompt appears and wait for the process to end.

Don’t let the short absence of output deceive you. There are a number of operations that go on as part of the process. You can tack on the -v switch for more verbose output. However, the best way to check if the computer is now a member of the domain is by running the realm list command. The command attempts to display the current state of the server with regard to the domain. It is a quick and dirty way to know which groups or users can access the server.
Have a look at its output:

It is also quite trivial to place the newly-created AD computer object in a specific Organizational Unit (OU) from the onset. I’ll leave that for further reading, but, as a tip, you can consult the man page. Using the realm client, you can grant or revoke access to domain users and groups. A deep dive on using realmd in a more fine-grained way is enough to make another article. However, I will not be out of order to pick out a few parameters for your attention, namely client-software and the server-software. By now, you should understand why we had to install so many packages.
To leave the domain altogether, you need two words: realm leave
Further configuration
So now that the Linux server is part of the AD domain, domain users can access the server with their usual credentials. We are done, right? Wrong. «What’s the problem?» I hear you say.
Well, for starters, this is the barebones configuration to get you up and running. But the experience is clunky, to say the least. We need to configure the service further to give it a true AD feel. It should be just like logging on to a domain-joined Windows 10 workstation.
Secondly, there is the big elephant in the room for sysadmins called Dynamic DNS Updates (DynDNS). If it is not set up correctly, we create extra overhead by having to maintain DNS records manually. For an environment that relies heavily on DNS, that could be a problem. For Windows systems, joining a system to the domain means two entries are automatically managed and maintained on the DNS server. When IP addresses change, the change is automatically reflected in DNS. This means you can change the IPs of systems without incurring the cost of manual maintenance. This will only make sense to people who already take advantage of DNS in their environments. Aside from the noticeable productivity gains of automation, it helps to have both Windows and Linux environments working the same way.
The third issue is DNS Scavenging. In an Active Directory domain, DNS is usually provided by the Domain Controllers. Every system joined to the domain has an automatic DNS entry with a corresponding IP address. This is super convenient. Automatically, at a specified interval, stale DNS records are deleted to prevent misdirected packets and also take care of deleted computer objects. This is known as scavenging, and it is not turned on by default in AD. However, if it is turned on, we need to configure it. Typically, the scavenging interval is seven days. If, after that period, there has been no update to the record, it is deleted, unless it is a static record. For Windows systems, the Dynamic Updates feature is automatically set up. However, with Linux servers, a few modifications need to be made. Without doing that, we will have services going down after a while because their records are deleted from DNS, and no one knows how to reach their component parts.
Now that we know some of the potential issues we need to address, let’s take a look at some of the things we can tweak to deliver a more seamless experience to the end-user and the sysadmin.
SSSD (easier logins and dynamic updates)
sssd on a Linux system is responsible for enabling the system to access authentication services from a remote source such as Active Directory. In other words, it is the primary interface between the directory service and the module requesting authentication services, realmd . Its main configuration file is located at /etc/sssd/sssd.conf . As a matter of fact, this is the main configuration file we will modify.
Let’s have a look at its contents before configuration. Once you join the domain, it is immediately modified to contain the minimum information required for a successful logon. My file looked like this:

In order to solve all three of the problems I mentioned earlier, edit your file to look like the one below:

Most of the options are self-explanatory, and you can modify yours accordingly while we step through what some of the key options represent. More information on all the options can be obtained by checking the man page. I think it is well written. Just type man 5 sssd.conf at the command line. You can also view the man page for sssd_ad for further information.
First and foremost, the configuration file is separated into two sections. The global section, under [sssd] and the domain-specific options section, [domain/[domain name]].
The global section contains options that affect the general behavior of sssd , such as the version information and related services. One key parameter under this section is shown below:
- default_domain_suffix — Set this to the domain name if you do not want to have to type the full user account name when logging in. Instead of having to type fkorea@hope.net always, you can just type fkorea and the password. This helps a lot when you have a long domain name.
The domain-specific section contains parameters that are specific to the domain you have joined. Key parameters are:
- access_provider — Allows you to select a provider optimized and used for interacting with AD servers for authentication purposes. It should be set to ad . Other values that can be used here are ldap and ipa , assuming you use those directory services.
- id_provider — Allows you to select a provider optimized and used for interacting with AD servers for identification purposes. It should be set to ad .
- ad_hostname — This should be the fully qualified hostname of the server. It should be set if the system’s hostname is anything other than the fully qualified domain name. If this is not set and the sssd does not have access to the fully qualified hostname, dynamic updates will fail.
- ad_domain — This should be the full domain name ( hope.net in this case).
- cache_credentials — This enables AD users to log in when the domain controller is offline. When this is set to true, credentials are cached for a period such that authentication does not fail when the back end is offline. The period of storage is also configurable.
- fallback_homedir — This helps you set a home directory for AD users who do not have a home directory attribute in AD. This is different from the override_home parameter that works when a home directory is set in AD for users.
- dyndns_update — This enables dynamic DNS updates and accepts either true or false as a value. When dynamic updates are enabled, updates occur primarily under three conditions:
- When the Linux server restarts.
- When the provider comes online.
- When the refresh interval is due.
- dyndns_refresh_interval — This value is in seconds with a practical minimum of 60 seconds. It accepts integer values and has a default of 24 hours (86400s). In this example, we set it to 12 hours. If nothing else triggers an update, an update is regularly done between.
- dyndns_update_ptr — A boolean value that specifies whether the associated PTR record is to be updated in every update cycle. PTR records are used for reverse lookups, and unless there is a good reason, this should be set to true.
- dyndns_auth — Specifies whether the dynamic updates should be done securely or not. The setting depends on the mode accepted by AD. If AD is set to Accept Secure Updates Only, this value should be set to GSS-TSIG. If not, and you do not care for the security benefits of secure dynamic updates (despite the strong warning in AD), this value can be set to none.
Once the configuration is complete, restart sssd to apply settings immediately.
At this point, we are set. We can now login like we would at a Windows workstation or server.
Источник