
on
August 17, 2004, 12:00 AM PDT
A minimalist approach to creating a Linux print server for Windows clients
With Linux, a stripped-down 486 is all you need to handle the mundane tasks of print serving. However, throwing a Windows machine into the mix might cause problems. This article explains a way you can overcome those pesky printing problems.
A lot has been said and written about the adaptability of
Linux to mundane tasks such as file and print serving. Writers have related
anecdotes about Linux boxes running unattended for months (and for years with
no license upgrade costs). When I needed to add a third printer to my network
of seven test and development machines, I decided to take the plunge.
I had already gone the self-education route with Linux,
starting with an old Slackware CD and progressing through Red Hat versions 6.0,
7.3, and 9.0. I also have file servers and Web development machines running on
my network using Samba to integrate with Windows. How hard could a simple print
server be?
The hardware/software upgrade spiral
I started with an old 486 with a 450-MB hard drive and a
minimal install of Red Hat 6. I was able to set up the Samba shares necessary
for network printing fairly easily. This can be done by modifying the smb.conf
file or using the old SWAT tool and restarting SMB services. I could get the
printer to print a test page from the Linux machine, but could not get it to
make a noise from a Windows machine over the network.
After talking to some colleagues and doing some research on
the Internet, I became convinced that a newer distribution of Linux and CUPS
(Common UNIX Printing System) might be the answer. The old 486 motherboard was
swapped for a low-end Pentium, more RAM and a 1-GB drive. Red Hat 7.3 seemed
promising, but after all the setup chores the result was the same: Jobs
appeared to be there in the print queue, but no noises from the printer.
CUPS, BSD, printcap files, lpr, lpd—my head was beginning to
spin, and there were still the other two printers to consider. I was ready to
try Red Hat 9 on a 2-GB drive plus more RAM when I stopped myself. This was
exactly the sort of software/hardware upgrade vicious-circle scenario that I
was supposed to be avoiding. Why did I need all that power and complexity just
to handle a few lousy print jobs?
Nicholas Fong to the rescue
Luckily, a more concerted Web search turned up Nicholas
Fong’s wonderfully detailed Linux Print Server Project and the answer to my problems. Fong’s
pages offer a comprehensive manual for transforming a surplus 486 into a
dedicated print server running a very stripped-down Linux kernel. It was
exactly what I needed for this project.
The old 486 went back together using an old drive controller
card with a parallel port, a second parallel port on an old ISA card of
indeterminate lineage, a third parallel port on a newer ISA card from Lava Computer MFG Inc. that I
found for five bucks at a surplus store, and an old 10-Mbps ISA network card.
I went with a 250-MB hard drive and 16 MB of RAM, although
Fong includes instructions on building an extremely stripped-down machine with
no hard drive that boots from a floppy only. All the necessary files for
creating floppies to configure the network card and create a boot image on the
hard drive are included for download. However, you’ll need WinZip, WinImage, a Windows machine, and
some info about your router.
It works!
The print server uses Raw Socket API to send print jobs to
port 9100. This is the same technology used by HP’s Jetdirect network printers.
The IP address of the print server is set during the creation of the boot image
and network card configuration and depends on your brand of router. Because I
am using a D-Link router, the address of my print server is set as
192.168.0.252 (the router is 192.168.0.1). If I were using a LinkSys router,
the address of the print server would be created as 192.168.1.252 (the third
octet in the router address is 1 instead of 0).
The three parallel ports I have on my print server are
identified on the network as 192.168.0.252:9100, 192.168.0.252:9101, and
192.168.0.252:9102. It might take some fiddling with the BIOS setup and jumpers
on the cards, if so equipped, to get all three ports working with no conflicts.
Once that is done, I found it easiest to use trial and error to discover which
physical port corresponds to which IP address and port number and then label
them.
If you’re using Windows 98, you’ll need to download and
install AXIS Print Monitor and then create a local RAW AXIS printer port when
setting up a printer. If you’re using Windows 2000, you can use a local
Standard TCP/IP Port. For Red Hat 9, you’ll have to use System Settings | Printing
and select New in Printer Configuration. After naming the new printer, select Networked
Jetdirect for queue type, then enter the IP address of the print server under Printer
followed by the appropriate port number. Fong’s Web site lists a number of
other possible setup scenarios and gotchas.
Once all the setup is out of the way, the system performs
almost flawlessly. Throughput seems very fast and the printer starts up within
seconds, even when printing large jobs. The only problems I’ve had are with
Epson’s Print Status Monitor. It is unable to establish a two-way communication
with the printer and immediately reports a Communication Error, even though
printing continues. The simple solution is to turn off Epson’s Status Monitor
under Printer | Properties | Utility. I assume that most modern inkjet printers
with cartridge reporting software will behave in a similar manner.
If anything undesirable happens, the print server is so
simple that all you need to do is turn it off and then turn it on again. I have
mine connected to a KVM, but it is really unnecessary. No mouse is required, and
the machine will start up just fine without a monitor or keyboard attached,
although this may not be the case with all motherboards.
The spirit of open source
Nicholas Fong should be applauded for coming up with this
simple, inexpensive, low-tech solution to a common problem. In my mind, his
approach is the very essence of the whole open source concept. Afer this
experience, I’m looking forward to experimenting with and reporting on his
Linux Router Project.
-
Open source
Состояние перевода: На этой странице представлен перевод статьи CUPS/Printer sharing. Дата последней синхронизации: 13 июля 2018. Вы можете помочь синхронизировать перевод, если в английской версии произошли изменения.
Эта статья содержит инструкции по совместному использованию принтеров между системами, будь то между двумя системами GNU/Linux или между системой GNU/Linux и Microsoft Windows.
Создание класса для нескольких принтеров
‘Класс’ в CUPS имеет значение группы. Когда у вас есть несколько принтеров, подключенных к одному серверу CUPS, вы можете захотеть их сбалансировать (задания на печать автоматически помещаются в очередь для разных принтеров). Это также дает преимущество в том, что пользователи на удаленной машине работают с одним ‘принтером’. Что особенно полезно, когда один принтер вышел из строя, вы просто исключаете его из класса, но для конечных пользователей ничего не изменится — печать заданий, поставленных на другой принтер сервером CUPS, продолжает обрабатываться. Создание и управление классами можно выполнять из веб-интерфейса CUPS.
Внутри систем GNU/Linux
Сервер можно настраивать с помощью веб-интерфейса или путем ручного редактирования файла /etc/cups/cupsd.conf.
Смотрите статью CUPS (Русский) для настройки клиента.
Использование веб-интерфейса
Для доступа к странице администрирования CUPS, откройте в браузере адрес: http://localhost:631.
В верхней части находится вкладка Администрирование — кликните по ней, нажмите на кнопку добавления принтера, при этом будут автоматически определены подключенные принтеры. Если этого не произойдет, отключите принтер и подключите его снова.
После создания принтера зайдите в раздел Сервер и установите флажок напротив «Разрешить совместный доступ к принтерам, подключенным к этой системе». После клика по Сохранить, сервер будет перезапущен автоматически.
Для более детальной настройки вы можете отредактировать файл /etc/cups/cupsd.conf, нажав кнопку «Редактировать конфигурационный файл». Для получения дополнительной информации смотрите #Ручная настройка.
Ручная настройка
На сервере (тот, который управляет и подсоединён к принтеру) разрешите доступ к серверу, изменив строчки с тэгом Location. Например:
/etc/cups/cupsd.conf
<Location />
    Order allow,deny
    Allow localhost
    Allow 192.168.0.*
</Location>
...
Также убедитесь, что серверу для адресации доступен IP-адрес клиента:
/etc/cups/cupsd.conf
...
Listen <hostname>:631
...
Есть другие возможности для настройки, включая автоматические способы, которые детально описаны в Использование сетевых принтеров и cupsd.conf(5).
После внесения каких-либо изменений перезапустите службу org.cups.cupsd.
Если CUPS запускается с помощью активации сокета, создайте drop-in сниппет для org.cups.cupsd.socket, чтобы активация сокета работала и с удаленными подключениями:
/etc/systemd/system/org.cups.cupsd.socket.d/override.conf
[Socket]
ListenStream=631
Включение обнаружения
Чтобы включить отображение (обнаружение) общего принтера, необходимо установить Avahi и запустить его на сервере.
Если вам не нужно обнаружения принтера, тогда Avahi не требуется ни на сервере, ни на клиенте.
Чтобы включить отображение, выберите Показывать общие принтеры, подключенные к этой системе в веб-интерфейсе, или вручную включите Browsing и введите BrowseAddress:
/etc/cups/cupsd.conf
...
Browsing On
BrowseAddress 192.168.0.*:631
...
затем перезапустите службу org.cups.cupsd.
Обратите внимание, что «обнаружение» на сервере — другая вещь по сравнению с «обнаружением» на удаленном сетевом хосте. На сервере печати cupsd предоставляет поддержку протокола DNS-SD, который транслируется avahi-daemon. Служба cups-browsed не нужна на сервере печати за исключением, если будет транслироваться старый протокол CUPS’а, или если сервер печати также будет «обнаруживать» другие сетевые принтеры. На удаленном сетевом хосте служба cups-browsed требуется для «обнаружения» сетевой трансляции служб печати, а также запущенная служба cups-browsed будет автоматически запускать cupsd.
Служба org.cups.cupsd.service запускается автоматически при подключении USB-принтера, но это может быть не так для других типов подключений. Если cupsd не запущен, тогда avahi-daemon не транслирует службу печати, поэтому в этом
случае service-файл юнита systemd должен быть изменен при запуске во время загрузки, а затем служба снова должна
быть «включена/установлена» с новой зависимостью. Чтобы сделать это, отредактируйте раздел файла службы [Install], добавив зависимость WantedBy=default.target, а затем включите и запустите службу org.cups.cupsd.service.
Между GNU/Linux и Windows
Сервер Linux — клиент Windows
Общий доступ для клиентов Windows может быть достигнут, используя #Общий доступ с помощью Bonjour, #Общий доступ с помощью IPP или #Общий доступ с помощью Samba.
После настройки сервера установите драйвера для принтера на компьютере под управлением Windows. Если принтер сервера CUPS настроен на использование собственных драйверов вместо raw (raw — когда cups просто передает на принтер полученное задание для печати без какой-либо обработки), вы можете просто выбрать общий драйвер postscript для клиента Windows (например, ‘HP Color LaserJet 8500 PS’ либо ‘Xerox DocuTech 135 PS2’, либо ‘Microsoft PS Class driver’).
Общий доступ с помощью Bonjour
Службы печати Bonjour позволяет клиентам Windows легко подключаться к серверам печати Unix с включенным обнаружением.
Общий доступ с помощью IPP
Internet Printing Protocol является широко поддерживаемым стандартом среди операционных систем, который также прост в настройке. Он имеет функцию переадресации портов, туннелирования и т.д.
Примечание: Возможно, вам придется добавить Internet Printing Client в Windows (Панель управления > Программы > Включение или отключение компонентов Windows > Службы печати и документов)
Сначала, настройте сервер как описано в разделе #Внутри систем GNU/Linux.
На компьютере с Windows, перейдите в Панель управления > Просмотр устройств и принтеров и выберите в контекстном меню ‘Добавить принтер’. Если у вас Windows 10, нажмите кнопку «Принтер, который я хочу, не указан». Далее, выберите ‘Выбрать общий принтер по имени’ и тип расположения принтера:
http://hostname:631/printers/printer_name
(Где hostname — это имя хоста или IP-адрес сервера GNU/Linux, а printer_name — это имя подключенного принтера. Вы также можете использовать полное доменное имя сервера, если оно есть, но вам может потребоваться установить ServerAlias my_fully_qualified_domain_name в /etc/cups/cupsd.conf, чтобы это заработало).
Примечание:
- Диалоговое окно ‘Добавить принтер’ в Windows предлагает формат
http://computername/printers/printername/.printer, который Windows не примет. Вместо этого используйте синтаксис, предложенный выше. - Если вы используете прокси, тщательно проверяйте все использованные прокси исключения. Неправильная настройка здесь может привести к невозможности добавления принтера до следующей перезагрузки, даже если вы отключите прокси-сервер после этого (по крайней мере, в Windows 7).
Общий доступ с помощью Samba
Samba — реализация протокола обмена файлами Windows и принтерами, даже самых старых.
Обратите внимание, что общий доступ с помощью Samba обычно более сложный для настройки и сопровождения.
Для настройки Samba на сервере Linux, отредактируйте файл /etc/samba/smb.conf, это даст возможность предоставить общий доступ к принтерам. Файл smb.conf может содержать примерно следующее:
/etc/samba/smb.conf
[global]
workgroup=Heroes
server string=Arch Linux Print Server
security=user

[printers]
    comment=All Printers
    path=/var/spool/samba
    browseable=yes
    # разрешите это, чтобы пользователь 'гостевой учетной записи' мог пользоваться печатью.
    guest ok=no
    writable=no
    printable=yes
    create mode=0700
    write list=@adm root ваше_имя_пользователя
Этого должно быть достаточно для организации совместного доступа, но все-таки рекомендуется добавить для принтера отдельную запись:
/etc/samba/smb.conf
[ML1250]
    comment=Samsung ML-1250 Laser Printer
    printer=ml1250
    path=/var/spool/samba
    printing=cups
    printable=yes
    printer admin=@admin root ваше_имя_пользователя
    user client driver=yes
    # разрешите это, чтобы пользователь 'гостевой учетной записи' мог пользоваться печатью.
    guest ok=no
    writable=no
    write list=@adm root ваше_имя_пользователя
    valid users=@adm root ваше_имя_пользователя
Учтите, что при таких настройках, должна существовать учетная запись с правами доступа к принтеру. Для публичного принтера установите guest ok в yes, и удалите строку valid users. Для добавления учетных записей, создайте действующую учетную запись GNU/Linux, а затем установите на Samba-сервере пароль. Например:
# useradd ваше_имя_пользователя
# smbpasswd -a ваше_имя_пользователя
Затем перезапустите демон Samba:
Естественно, имеется множество дополнительных настроек сервера печати Samba, поэтому, для получения дополнительной информации, следует обратиться к справочной документации Samba и CUPS. Образцы и примеры можно посмотреть в файле smb.conf.example.
Сервер Windows — клиент Linux
Важно: Любые особые символы в URI принтера должны быть соответствующим образом процитированы, или, если в имени вашего принтера Windows или в пароле есть пробелы, тогда CUPS выдаст ошибку «lpadmin: Bad device-uri».
Например:
smb://BEN-DESKTOP/HP Color LaserJet CP1510 series PCL6
станет:
smb://BEN-DESKTOP/HP%20Color%20LaserJet%20CP1510%20series%20PCL6
Такая строка может быть получена в результате выполнения следующей команды:
$ python -c 'from urllib.parse import quote; print("smb://" + quote("BEN-DESKTOP/HP Color LaserJet CP1510 series PCL6"))'
Общий доступ с помощью LPD
В Windows 7, 8 и 10 имеется интегрированный LPD-сервер, то, возможно, будет намного проще использовать именно его, поскольку не придется для клиента устанавливать Samba, а на сервере — можно будет обойтись без сложных настроек. Это можно включить в разделе Службы печати и документов, находящего в Панель управления -> Программы -> Включение или отключение компонентов Windows. В свойствах принтера должен быть включен общий доступ. Используйте общее имя без особых символов, таких как пробел, запятые и др.
Затем, принтер можно будет добавить в CUPS просто выбрав протокол LPD. Адресс принтера будет выглядеть следующим образом:
# lpd://windowspc/имя_общего_принтера
Перед добавлением вам, скорее всего, понадобиться установить для своей модели принтера соответствующий драйвер. Драйвера Generic PostScript или RAW тоже должны работать.
Общий доступ с помощью IPP
Как и в предыдущем случае, для организации общего доступа к принтерам протокол IPP является предпочтительным, но он работает только с версиями Windows Server. Версия Windows Server (например Server 2016) включаюет поддержку IPP (функции «Службы печати и документов», служба «Интернет-печати»). Клиентские версии (например, Windows 10) включают поддержку только клиента IPP и не поддерживают совместный доступ через IPP.
Общий доступ с помощью Samba
Гораздо проще использовать стандартные возможности Windows по предоставлению общего доступа к принтерам с помощью Samba. Ручная настройка практически не требуется и все можно выполнить через бэкенд CUPS. Однако, как было замечено выше, в Windows могут возникнуть проблемы с аутентификацией и ограничением доступа.
На стороне сервера необходимо разрешить общий доступ к принтеру и убедится, что клиентские машины имеют к этому принтеру доступ.
В следующем разделе будут описаны настройки клиента с обоими (cupsd и smbd) запущенными демонами.
Настройка через веб-интерфейс
Samba CUPS бэк-енд должен быть включен по умолчанию, но если этого не происходит — введите следующую команду и перезапустите CUPS.
# ln -s $(which smbspool) /usr/lib/cups/backend/smb
Затем, просто зайдите в веб-интерфейс CUPS и добавьте новый принтер. В качестве устройства выберите «Windows Printer via SAMBA».
Для местоположения устройства, выберите:
smb://имя_пользователя:пароль@имя_хоста/имя_принтера
Или, если пароля нет:
smb://имя_пользователя@имя_хоста/имя_принтера
Убедитесь, что пользователь действительно имеет доступ к принтеру на компьютере Windows, и выберите соответствующие драйверы. Если компьютер находится в домене, убедитесь, что в имени пользователя присутствует домен:
smb://имя_пользователя:пароль@домен/имя_хоста/имя_принтера
Ручная настройка
При ручной настройке: остановите демон CUPS и добавьте свой принтер в /etc/cups/printers.conf, который, к примеру, может выглядеть так:
/etc/cups/printers.conf
<DefaultPrinter MyPrinter>
AuthInfoRequired username,password
Info My printer via SAMBA
Location In my Office
MakeModel Samsung ML-1250 - CUPS+Gutenprint v5.2.7        # <= для получения списка доступных моделей запустить 'lpinfo -m'
DeviceURI smb://username:password@hostname/printer_name   # <= URI сервера, выбирать согласно описания в предыдущем разделе
State Idle
Type 4
Accepting Yes
Shared No
JobSheets none none
QuotaPeriod 0
PageLimit 0
KLimit 0
AllowUser yourusername                                    # <= не забудьте изменить это
OpPolicy default
ErrorPolicy stop-printer
</Printer>
Перезапустите демон CUPS и распечатайте тестовую страницу.
Поиск URI для серверов печати Windows
Иногда имя хоста Windows (усеченно) меньше предстоящего точного URI устройства (расположение устройства) (Sometimes Windows is a little less than forthcoming about exact device URIs (device locations)). Если возникли проблемы с указанием правильного расположения устройства в CUPS, выполните следующую команду, чтобы вывести список всех общих ресурсов, доступных для определенного имени пользователя windows:
$ smbtree -U имя_пользователя_windows
В этом списке будет отображаться только общие URI для определенного имени пользователя Windows в локальной подсети локальной сети, если Samba настроен и работает правильно. Команда должна вернуть что-то вроде этого:
 WORKGROUP
	\REGULATOR-PC
		\REGULATOR-PCZ
		\REGULATOR-PCPublic
		\REGULATOR-PCprint$         	Printer Drivers
		\REGULATOR-PCG
		\REGULATOR-PCEPSON Stylus CX8400 Series	EPSON Stylus CX8400 Series
Здесь требуется первая часть последней строки — ресурс, соответствующий описанию принтера. Поэтому для печати на принтер EPSON Stylus введите:
smb://имя_пользователя:пароль@REGULATOR-PC/EPSON%20Stylus%20CX8400%20Series
как URI в CUPS.
Удаленное управление
Однажды сервер настроенный, как описано в #Внутри систем GNU/Linux, может также быть настроенным так, чтобы им можно было управлять удаленно. Добавьте разрешенные хосты в блок <Location /admin> в /etc/cups/cupsd.conf, используя тот же синтаксис, что и в #Ручная настройка. Обратите внимание, что доступны три уровня доступа:
<Location />           #доступ к серверу
<Location /admin>	#доступ к страницам администратора
<Location /admin/conf>	#доступ к файлам конфигурации
Чтобы дать удаленным хостам доступ к одному из этих уровней, добавьте оператор Allow в этот уровень. Оператор Allow может принимать одну или несколько форм, перечисленных ниже:
Allow from all
Allow from host.domain.com
Allow from *.domain.com
Allow from ip-address
Allow from ip-address/netmask
Allow from @LOCAL
Отрицательный оператор также может быть использован. Например, чтобы предоставить полный доступ ко всем хостам на локальных сетевых интерфейсах, отредактируйте /etc/cups/cupsd.conf:
# Ограничить доступ к серверу...
# По умолчанию возможны только локальные подключения
<Location />
   Order allow,deny
   Allow from @LOCAL
</Location>

# Ограничить доступ к страницам администратора...
<Location /admin>
   Order allow,deny
   Allow from @LOCAL
</Location>

# Ограничить доступ к файлам конфигурации...
<Location /admin/conf>
   AuthType Basic
   Require user @SYSTEM
   Order allow,deny
   Allow from @LOCAL
</Location>
![]() The factual accuracy of this article or section is disputed.
The factual accuracy of this article or section is disputed.![]()
Вам также может потребоваться добавить:
DefaultEncryption Never
Это должно помочь избежать ошибки: 426 — Upgrade Required when using the CUPS web interface from a remote machine.
Kerberos
Kerberos может использоваться для аутентификации пользователей, обращающихся к удаленному серверу CUPS. Это предполагает, что на вашем компьютере есть keytab, и ему понадобится билет для «HTTP». Вместо этого http://localhost:631 вы должны использовать https://host.example.co.uk:631 т.к. требуется шифрование для auth (следовательно, https), и требуется полное имя хоста, чтобы Kerberos/Negotiate могли работать. Кроме того, сервер должен быть настроен в /etc/cups/cupsd.conf, чтобы использовать DefaultAuthType Negotiate.
Если вы используете поддержку NSS в Samba winbind, вы можете добавить имя группы AD в /etc/cups/cups-files.conf — в следующем примере sysadmin может быть группой AD:
SystemGroup sys root sysadmin
Решение проблем
Общие советы по устранению неполадок смотрите в CUPS/Решение проблем.
Не удается отправить на печать из приложений GTK
Если ты получил сообщение getting printer information failed (ошибка получения информации о принтере), когда пытался отправить на печать из приложения GTK, тогда добавь эту строку в свой /etc/hosts:
# serverip some.name.org ServersHostname
Ошибки разрешений в Windows
Некоторые пользователи исправили ошибки ‘NT_STATUS_ACCESS_DENIED’ (Windows клиенты), используя несколько иной синтаксис:
smb://рабочая_группа/имя_пользователя:пароль@имя_хоста/имя_принтера
Другие операционные системы
Более подробную информацию о взаимодействии CUPS с другими системами печати можно найти в руководстве CUPS, например, на http://localhost:631/help/network.html
This tutorial will be showing you how to share a printer attached to an Ubuntu computer with Windows, macOS, and iOS clients on the same network. CUPS (Common Unix Printing System) is the default printing system on Linux, FreeBSD, and macOS. Your Linux desktop environment may have a dedicated printer configuration utility, but they all use CUPS under the hood.
CUPS printer can be shared on the network using several protocols, including:
- Bonjour + IPP: Bonjour, also known as mDNS/DNS-SD (multicast DNS/DNS service discovery), allows a computer to find services on the local network. IPP (Internet Printing Protocol) is the transport protocol.
- SMB: aka Samba, mainly used to share files and printers with Windows clients.
- AirPrint: Allows iPhone, iPad, and macOS clients to print over Wi-Fi.
Each protocol has its advantages and disadvantages. First, I will show you how to install and configure CUPS. Then we will learn how to share the CUPS printer via the above 3 protocols. I recommend using all 3 methods to share your printer, so users can find an available printer on the local network with minimal effort.
Step 1: Install and Configure CUPS on Ubuntu
Ubuntu desktop edition has CUPS pre-installed. If you use Ubuntu server edition, you need to run the following command to install CUPS from the default Ubuntu repository.
sudo apt install cups
Then start CUPS.
sudo systemctl start cups
Enable auto-start at boot time.
sudo systemctl enable cups
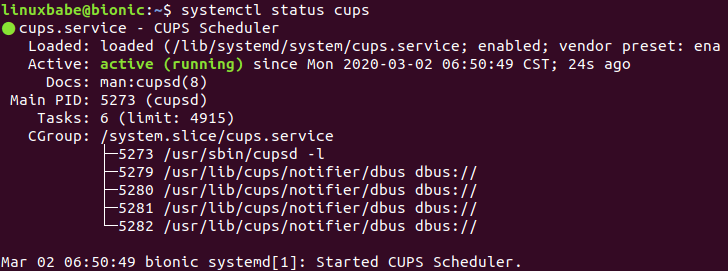
Check its status:
systemctl status cups
Sample output:
Next, edit the CUPS main configuration file with a command-line text editor like Nano.
sudo nano /etc/cups/cupsd.conf
First, we need to show shared printers on the local network. Find the following line.
Browsing Off
Change it to
Browsing On
so other computers in the same network can see printers connected to your Ubuntu computer.
By default, the CUPS web interface is only available at localhost:631. If you are running Ubuntu server edition, you may also want to make CUPS listen on all available network interface, so that you will be able to access the CUPS web interface from other computers. Find the following line.
Listen localhost:631
Change it to
Port 631
So CUPS will listen on all network interfaces. Then find the following lines.
<Location />
  Order allow,deny
</Location>
The above configuration allows access to the CUPS web interface from localhost only. To allow access from other computers in the same network, add Allow @LOCAL to the configuration like below.
<Location />
  Order allow,deny
  Allow @LOCAL
</Location>
Also add it for the /admin directory to allow remote administration from local network.
<Location /admin>
  Order allow,deny
  Allow @LOCAL
</Location>
You can also allow a particular IP address like so:
<Location />
  Order allow,deny
  Allow 192.168.0.101
</Location>
Save and close the file. Then restart CUPS for the changes to take effect.
sudo systemctl restart cups
Note that if you have enabled the UFW firewall on Ubuntu, you need to allow clients in the same network to access port 631 on your Ubuntu box. For example, my private network is using the 192.168.0.0 ~192.168.0.255 network range, so I run the following command.
sudo ufw allow in from 192.168.0.0/24 to any port 631
The CUPS web interface is available at https://IP-address-of-Ubuntu-box:631. We don’t need to use the web interface in this article, but if you want to use it, then you need to add your user account to the lpadmin group in order to make changes in the CUPS web interface.
sudo adduser your_username lpadmin
Step 2: Install Driver for Your Printer on Ubuntu
You need to install driver on Ubuntu, so it can recognize and use the printer. If you have an HP printer, you can easily install the driver with the following command.
sudo apt install hplip
I also recommend installing the printer-driver-gutenprint package, which provides CUPS drivers for Canon, Epson, HP and compatible printers.
sudo apt install printer-driver-gutenprint
If you have other printers, you can find drivers on openprinting.org.
After installing the driver, you may need to re-connect the printer to the USB port of your Ubuntu computer. To test if the driver is working correctly, you can create a text file on Ubuntu:
echo "LinuxBabe is awesome!" > file.txt
Then run the following command to print this text file from the command line.
lp file.txt
This is a very rudimentary method, so don’t worry about printing quality now.
Step 3: Share CUPS Printer via Bonjour/IPP Protocol
Installing Avahi-daemon
CUPS can announce its presence on the network via mDNS (multicast DNS) and DNS-SD (DNS Service Discovery) protocol, which is also known as Bonjour. In order to do that, you need to install and run avahi-daemon, which is a service similiar to the Apple Bonjour service that allows computers to automatically discover shared devices and services on the local network.
sudo apt install avahi-daemon
Start avahi-daemon.
sudo systemctl start avahi-daemon
Enable auto-start at boot time.
sudo systemctl enable avahi-daemon
Avahi-daemon listens on UDP port 5353. Open it in the firewall.
sudo ufw allow 5353/udp
IPP Driverless Printing
Bonjour is used to advertise the printer on the local network. To make clients and the CUPS server communicate with each other, IPP (Internet Printing Protocol) is needed. The advantage of IPP is that clients can use the shared printer without installing any driver on their own devices. CUPS supports IPP out of the box, so you don’t need to do anything else to share CUPS printer via IPP.
Step 4: Add Printer on Client Computers
macOS and Linux Clients
Because macOS and most Linux desktop distributions have CUPS installed as the default printing system, once you have enabled printer sharing via Bonjour/IPP on the Ubuntu box, macOS and Linux users in the same network can automatically use the printer. When they click the print option in applications (word processors, email readers, photo editors, and web browsers), the printer will be automatically available. They don’t have to explicitly add the printer. It’s magic.
If your Linux computer can’t find the printer, it’s possible that your system doesn’t have the ippfind command. Run the following command to install it on Debian-based Linux distribution.
sudo apt install cups-ipp-utils
On CentOS 8, run the following command.
sudo dnf install cups-ipptool
Then restart CUPS on the client computer.
sudo systemctl restart cups
Windows
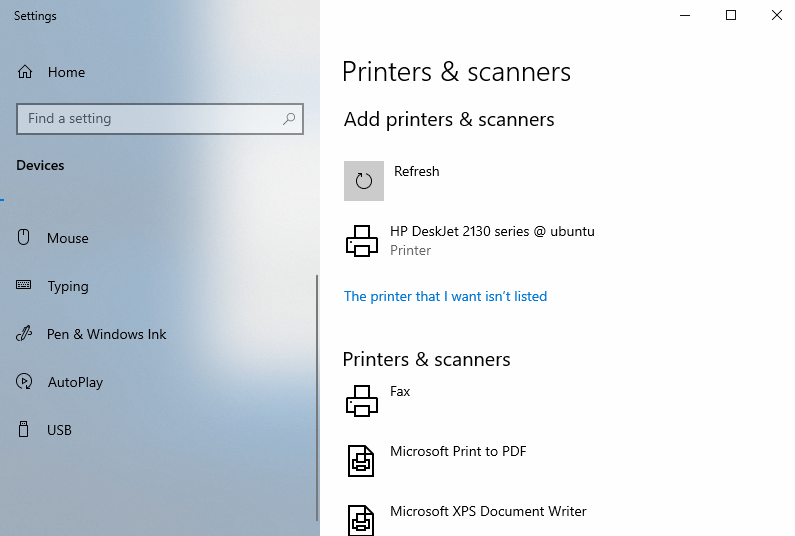
Windows 10 ships with an IPP client. Type in printer in the lower-left search bar and open Printers & Scanners. Then click the Add a printer or scanner button. It will scan available printers on the local network.
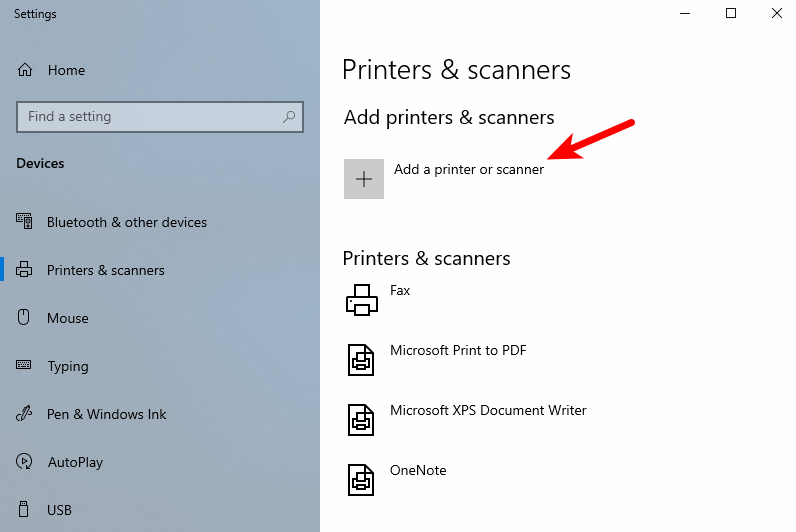
As you can see, it found my HP Deskjet printer. Select the found printer and click Add device. It will be added to the printer list in a few moments.
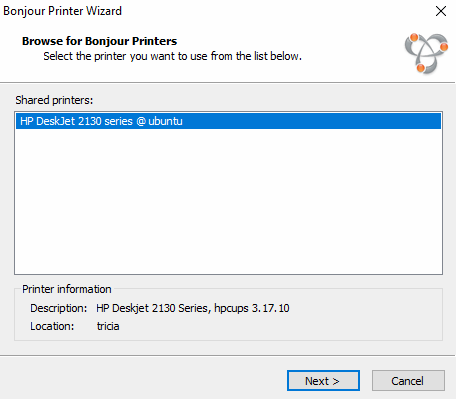
If you are using a different version of Windows that can’t add printer this way, then you can install the Bonjour Print services. Once installed, launch the Bonjour printer wizard. It will automatically scan available printers on the local network. As you can see from the screenshot, it found my HP printer.
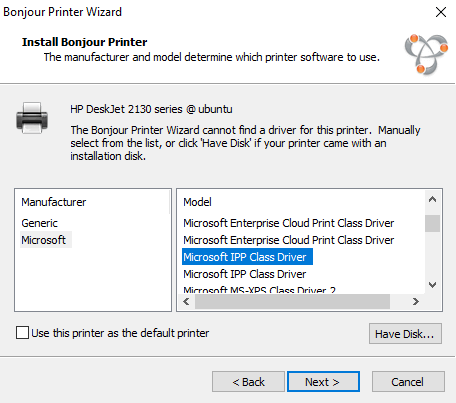
Click next, then you need to choose a driver for this printer. You can choose the Microsoft IPP class driver, which is installed on the system by default.
Click Next, and the printer will be added to your Windows system.
Manually Adding Printer on Linux
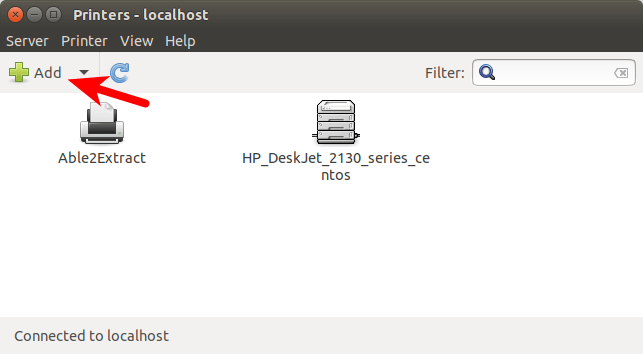
If for any reason you don’t see the printer, you can manually add one. To add a Bonjour-shared printer on desktop Linux, search your system settings or the application menu for the printer configuration utility. Click the Add button to add a new printer.
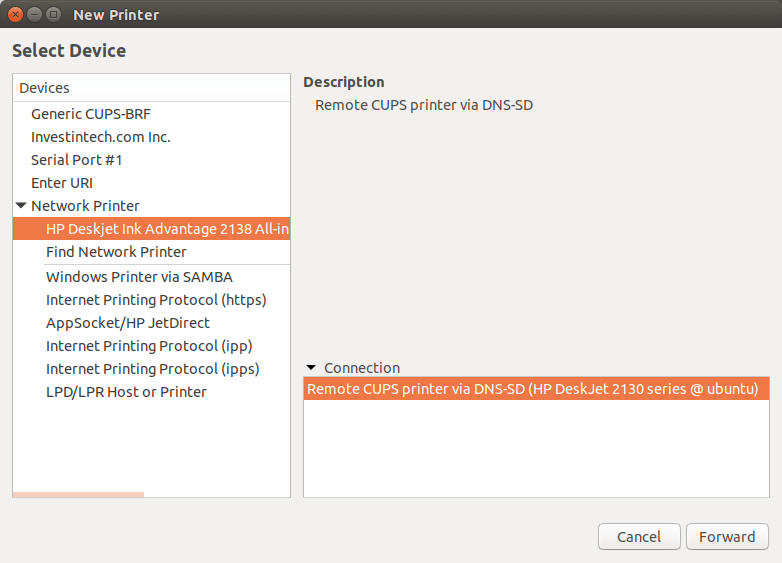
Then click Network Printer, and it would automatically scan available printers on the local network. As you can see, it found my HP Deskjet printer. Click the Forward button.
Then you can give the printer a name and description. I simply accept the default values. Click Apply and you are done.

Manually Adding Printer on macOS
To add a Bonjour-shared printer on macOS, go to system preferences -> Printers & Scanners. Click the plus (+) button to add a printer.
It would automatically scan available printers on the local network. As you can see, it found my HP Deskjet printer.

Click the Add button and it will appear in the printer list.
Step 5: Share CUPS Printer via Samba
Samba is a free and open-source SMB/CIFS protocol implementation for Unix and Linux that allows for file and print sharing between Unix/Linux and Windows machines in a local area network. It’s mainly used to share files and printer with Windows clients.
To install Samba on Ubuntu, simply run the following command in terminal.
sudo apt install samba samba-common-bin
To check if Samba service is running, issue the following commands.
systemctl status smbd

systemctl status nmbd
To start these two services, issue the following commands:
sudo systemctl start smbd

sudo systemctl start nmbd
Then edit the main configuration file.
sudo nano /etc/samba/smb.conf
It’s recommended to enable the spoolssd service when sharing printer. This will make Samba more efficient when there’s lots of printing jobs. Simply add the following two lines in the [global] section to enable the spoolssd service.
 rpc_server:spoolss = external
 rpc_daemon:spoolssd = fork
Next, go to the end of the file and you will see the [printers] section. In Nano text editor, you can jump to the end of a file by pressing Ctrl+W, then Pressing Ctrl+V. Find the following two lines.
browseable = no
guest ok = no
Change them to
browseable = yes
guest ok = yes
Save and close the file. Then restart Samba.
sudo systemctl restart smbd nmbd
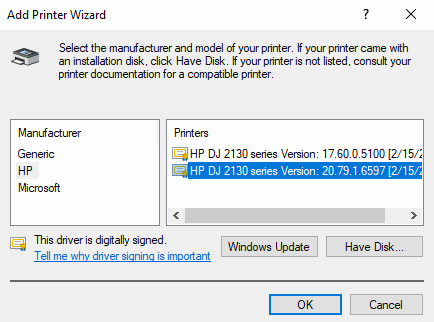
Adding a Samba-shared Printer in Windows.
Open file explorer, enter the IP address of the Ubuntu computer in the address bar like \192.168.0.110. The printer should now be listed.
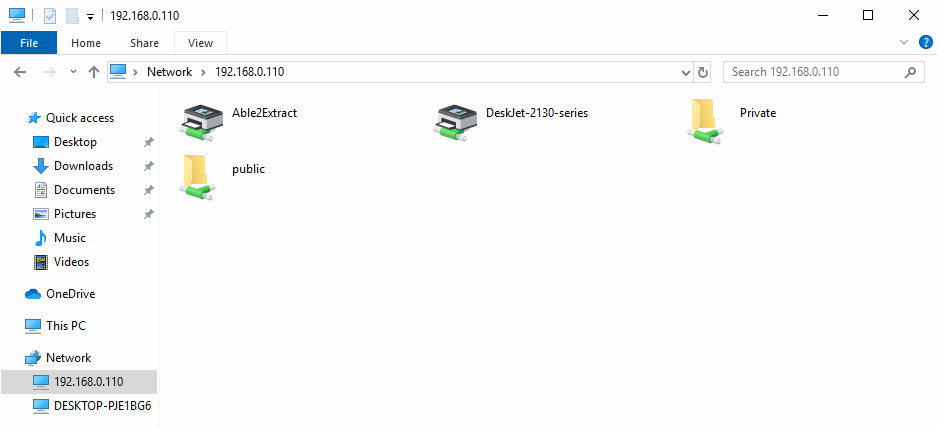
Double-click the printer to add it to your Windows system. Then click OK button to select a driver to install. After installing the driver, the printer will be added to your Windows system.
Step 6: Share CUPS Printer with iOS Clients via AirPrint
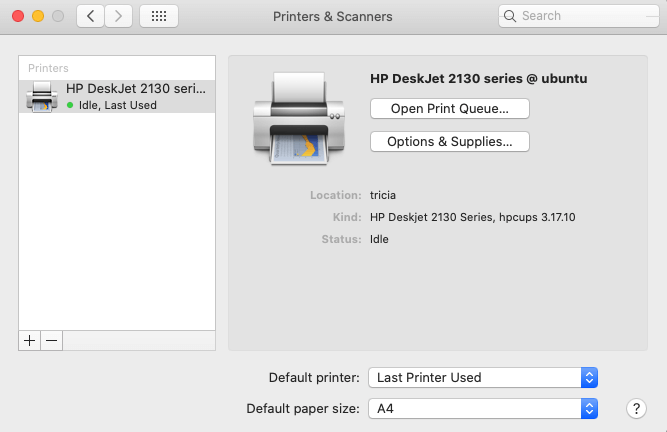
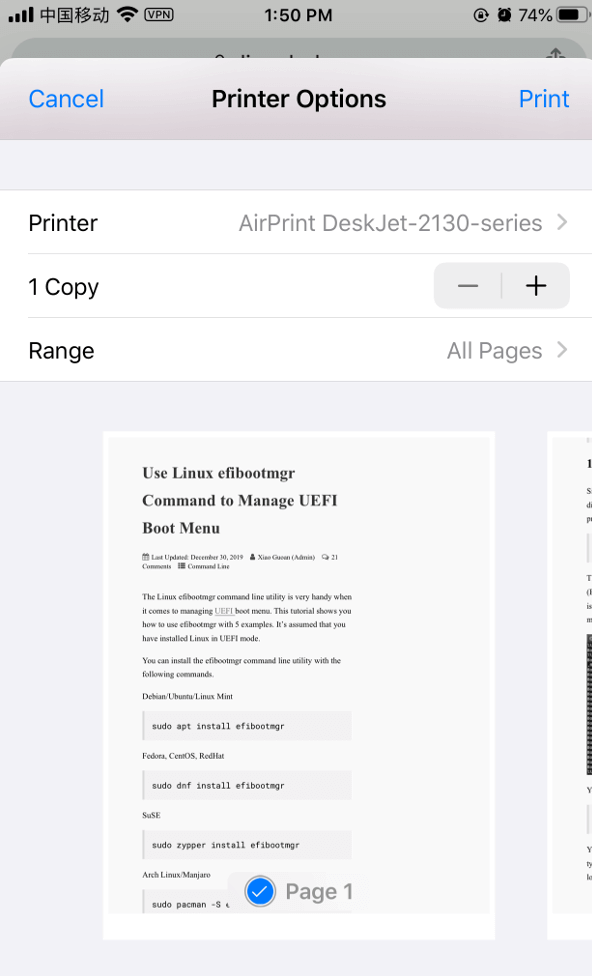
AirPrint allows iPhone, iPad, and macOS clients to print over Wi-Fi without installing driver software on the client devices. CUPS supports AirPrint, but avahi-daemon by default doesn’t announce AirPrint service on the local network. We need to create a .service file in the /etc/avahi/services/ directory for the printer with a Python script with the following command. My printer’s model is DeskJet 2130 series. Replace it with your own model name.
sudo nano /etc/avahi/services/AirPrint-DeskJet-2130-series.service
Add the following lines in the file.
<?xml version='1.0' encoding='UTF-8'?>
<!DOCTYPE service-group SYSTEM "avahi-service.dtd">
<service-group>
  <name replace-wildcards="yes">AirPrint DeskJet-2130-series @ %h</name>
  <service>
    <type>_ipp._tcp</type>
    <subtype>_universal._sub._ipp._tcp</subtype>
    <port>631</port>
    <txt-record>txtvers=1</txt-record>
    <txt-record>qtotal=1</txt-record>
    <txt-record>Transparent=T</txt-record>
    <txt-record>URF=none</txt-record>
    <txt-record>rp=printers/DeskJet-2130-series</txt-record>
    <txt-record>note=HP DeskJet 2130 series</txt-record>
    <txt-record>product=(GPL Ghostscript)</txt-record>
    <txt-record>printer-state=3</txt-record>
    <txt-record>printer-type=0x2900c</txt-record>
    <txt-record>pdl=application/octet-stream,application/pdf,application/postscript,application/vnd.cups-raster,image/gif,image/jpeg,image/png,image/tiff,image/urf,text/html,text/plain,application/vnd.adobe-reader-postscript,application/vnd.cups-pdf</txt-record>
  </service>
</service-group>
Save and close the file. Restart Avahi-daemon.
sudo systemctl restart avahi-daemon
Now iOS and macOS clients in the same network should be able to use your printer. The following screenshot shows my iPhone successfully found an AirPrint Printer.
Wrapping Up
I hope this tutorial helped you set up a CUPS print server on Ubuntu 20.04, 18.04 and 21.10. As always, if you found this post useful, then subscribe to our free newsletter to get more tips and tricks. And you may also want to read the following article to set up a Samba file share server.
- Set Up Samba Server on Ubuntu for File Sharing
Настройка с нуля принтсервера CUPS с доменной авторизацией и без нее в сети с разными ОС +20
Из песочницы, Системное администрирование, *nix, Настройка Linux
Рекомендация: подборка платных и бесплатных курсов Smm — https://katalog-kursov.ru/
Итак. Предположительно, сервис печати CUPS — это мощное решение, позволяющее организовать централизованное управление принтерами в компании. Так оно и есть, но в процессе настройки потребуется провести некоторое время в поисках решения в Google множества мелких неочевидных проблем, особенно, если ваша необходимость выходит за рамки стандартных мануалов по настройке.
В статье будет описана установка принтсервера CUPS на Ubuntu Server в сети с работающим доменом Active Directory, хотя его наличие совершенно не обязательно и инструкции по настройке взаимодействию с ним можно будет смело пропустить, его настройка, а также настройка клиентских машин Linux и Windows для взаимодействия с данным принт-сервером.
В инструкции домен будет именоваться example.com, сам принтсервер — cupsserver (cupsserver.example.com) с IP адресом 10.10.100.50, а клиентские машины linux1, linux2, linux3 и т.д для клиентских машин Linux и windows1, windows2, windows3 и т.д. для клиентских машин Windows соответственно.
Настройка принтсервера
В первую очередь мы настроим принтсервер, а точнее, настроим административный доступ на него, затем настроим печать на него, а затем опишем настройку клиентских машин.
Заходим на принтсервер любым удобным способом и обновим на нем пакеты:
root@cupsserver:~# apt update && apt uprgrade -y
Далее проверим, установлен ли CUPS на сервере:
root@cupsserver:~# which cupsd
Если вывод выглядит как то так:
/usr/bin/cupsd
то CUPS установлен, если вывода нет — устанавливаем CUPS:
root@cupsserver:~# apt install cups -y
Теперь настроим административный доступ к веб-интерфейсу CUPS. Все файлы конфигурации находятся по пути /etc/cups/. Для начала, на всякий случай сделаем резервные копии основных файлов конфигурации CUPS:
root@cupsserver:~# cp /etc/cups/cupsd.conf /etc/cups/cupsd.conf.original
root@cupsserver:~# cp /etc/cups/cups-files.conf /etc/cups/cups-files.conf.original
root@cupsserver:~# cp /etc/cups/cups-browsed.conf /etc/cups/cups-browsed.conf.original
Впрочем, если вы этого не сделали — не беда, образцы данных файлов по умолчанию лежат по пути /usr/share/cups. Также нужно упомянуть, что вы можете проверить любые добавленные опции в файлы конфигурации CUPS с помощью команды:
root@cupsserver:~# cupsd -t
Если вы что-то напутали, опечатались или использовали опцию, которая уже не поддерживается CUPS’ом, то вывод команды отразит данные ошибки.
Но приступим наконец к настройке. После любых изменений файлов в папке /etc/cups/ для получения эффекта необходимо перезапускать сервис CUPS:
root@cupsserver:~# service cups restart
или
root@cupsserver:~# systemctl restart cups
или
root@cupsserver:~# /etc/init.d/cups restart
А если вы отредактировали файл /etc/cups/cups-browsed.conf, то за него отвечает отдельный сервис cups-browsed, который тоже нужно перезапустить:
root@cupsserver:~# service cups-browsed restart
или
root@cupsserver:~# systemctl restart cups-browsed
или
root@cupsserver:~# /etc/init.d/cups-browsed restart
Выполним команду
root@cupsserver:~# nano /etc/cups/cupsd.conf
Первой незакомментированной опцией является
LogLevel warn
Она определяет минимальную информативность логов CUPS. Лог-файлы CUPS находятся по пути /var/log/cups/. На время установки, настройки и отладки принтсервера будет разумным перевести логгирование в debug-режим. Для этого изменим warn на debug2:
LogLevel debug2
По умолчанию CUPS слушает входящие подключения только от localhost, то бишь на loopback интерфейсе. Чтобы убедится в этом, можете выполнить команду
root@cupsserver:~# netstat -plutn
Одна из строк будет выглядеть приблизительно так:
tcp 0 0 127.0.0.1:631 0.0.0.0:* LISTEN 737/cupsd
Дальнейшие действия зависят от степени вашей паранойи. Вы можете добавить в блоке, который условно начинается с комментария #Only listen for connections from the local machine несколько строк с указанием IP адресов или подсетей, откуда CUPS’у будет позволено слушать подключения.
# Only listen for connections from the local machine.
Listen localhost:631
Listen /run/cups/cups.sock
#Слушать подключения с определенного IP адреса
Listen 10.10.100.67:631
#Слушать подключения с подсети бухгалтерии
Listen 172.16.0.0:631
Либо же вы можете разрешить CUPS’у слушать подключения со всех адресов
# Only listen for connections from the local machine.
Listen /run/cups/cups.sock
Port 631
Следующий момент настройки — это обнаружение сетевых и расшаренных принтеров.
# Show shared printers on the local network.
Browsing Off
BrowseLocalProtocols dnssd
На мой взгляд эта опция так и должна остаться выключенной, так как она определяет, будет ли рассылаться широковещательная информация по сети о подключенных к принтсерверу принтерах. А они ведь будут подключены к ней все. И соответственно у всех клиентских машин будут отображаться сразу все принтера. Наш принтсервер должен искать и обнаруживать все принтера в сети, но не рассылать их бездумно по всей сети.
Далее идут настройки аутентификации
# Default authentication type, when authentication is required...
DefaultAuthType Basic
Определяет права доступа к веб-интерфейсу CUPS, а также к его административной части. Чтобы пользователь user имел право на администрирование CUPS, его нужно добавить в системную группу lpadmin:
root@cupsserver:~# usermod -a -G lpadmin user
Вообще, группы, которым позволен административный доступ к CUPS, определяются в файле конфигурации cups-files.conf в блоке
# Administrator user group, used to match @SYSTEM in cupsd.conf policy rules...
# This cannot contain the Group value for security reasons...
SystemGroup lpadmin
Если вы хотите добавить некой группе пользователей Linux права на администрирование принтсервера, например printadmins, то просто добавьте их через пробел к lpadmin. Если группа доменная, то это немного сложнее и будет описано позже.
Теперь перейдем к блоку <Location />:
# Restrict access to the server...
<Location />
  Order allow,deny

</Location>
Order allow,deny означает, что запрещены подключения отовсюду, если специально не указано разрешение. То есть нужно добавлять IP-адреса, подсети, хосты или хосты по маске (*.example.com) в виде «Allow from [разрешенный адрес]«:
# Restrict access to the server...
<Location />
  Order allow,deny
 Allow from cupsserver                          # разрешение подключатся к самому себе по имени хоста
 Allow from cupsserver.example.com    # разрешение подключатся к самому себе по FQDN
 Allow from localhost                             # разрешение подключатся к самому себе через loopback интерфейс
 Allow from 10.10.100.*                        # Если хотите разрешить
 Allow from linux4.example.com           # доступ на печать с
 Allow from 172.168.5.125                   # определенных подсетей, IP или хостов
</Location>
Для полной уверености и отладки, можно оставить, пока не настроите все остальное, такую констукцию, которая позволит печать отовсюду:
# Restrict access to the server...
<Location />
  Order allow,deny
  Allow from all
</Location>
Приступим к настройке административного доступа к CUPS на принтсервере. Определитесь, с какого/каких IP и/или подсетей вы собираетесь подключаться к CUPS, и добавить их по аналогии с блоком <Location />:
# Restrict access to the admin pages...
<Location /admin>
  Order allow,deny
  Allow from localhost
  Allow from 10.10.100.*
  Allow from admin.example.com
</Location>

# Restrict access to configuration files...
<Location /admin/conf>
  Order allow,deny
  Allow from localhost
  Allow from 10.10.100.*
  Allow from admin.example.com
</Location>

# Restrict access to log files...
<Location /admin/log>
  Order allow,deny
  Allow from localhost
  Allow from 10.10.100.*
  Allow from admin.example.com
</Location>
Еще, по желанию, можно добавить язык интерфейса по умолчанию. Список доступных языков можно посмотреть с помощью команды:
root@cupsserver:~# ls /usr/share/cups/locale
Если нужная вам локализация, например ru, есть, то добавьте строчку в /etc/cups/cupsd.conf:
DefaultLanguage ru
Чтобы к вашему принтсерверу cupsserver.example.com можно было обращатся по его хосту (hostname), необходимо создать в папке /etc/cups/ файл client.conf с таким содержимым:
ServerName имя_хоста
Самым простым способом это можно сделать так:
root@cupsserver:/etc/cups# echo "ServerName $(cat /etc/hostname)" > /etc/cups/client.conf
Поскольку мы предполагаем, что в сети есть DNS сервер, то будет предпочтительным, чтобы можно было обращатся к принтсерверу по его доменному имени (cupsserver.example.com). Также серверу может быть присвоен CNAME псевдоним на DNS сервере, например print или cups. Чтобы принтсервер принимал подключения по таким обращениям, необходимо добавить такую строчку в файл /etc/cups/cupsd.conf:
ServerAlias cupsserver.example.com print cups
Если вы хотите, чтобы принтсервер примимал любые обращения, или не хотите заморачиваться, то можно добавить это:
ServerAlias *
Еще нужно взглянуть внутрь файла /etc/cups/cups-browsed.conf. Этот файл управляет тем, как принтсервер будет искать принтеры в сети и проводить широковещательную рассылку своих принтеров. Я предлагаю совершенно отключить опцию рассылки. Принтсервер будет искать принтера в сети, но с него принтеры на клиентские машины будут подключатся вручную. Ниже будет описано, почему. Пока же мы находим строку BrowseRemoteProtocols dnssd cups:
# Which protocols will we use to discover printers on the network?
# Can use DNSSD and/or CUPS and/or LDAP, or 'none' for neither.

BrowseRemoteProtocols dnssd cups
Благодаря этой опции принтсервер ищет расшаренные принтера в сети. Ее мы оставляем включенной, так как в наших интересах, чтобы принтсервер искал принтера в сети. Но нам совершенно не нужно, чтобы принтсервер рассылал вообще все подключенные к нему принтеры, иначе возникнет большая путаница. Для предотвращения такого сценария находим следующую опцию #BrowseLocalProtocols none и раскомментируем ее:
# Which protocols will we use to broadcast shared local printers to the network?
# Can use DNSSD and/or CUPS, or 'none' for neither.
# Only CUPS is actually supported, as DNSSD is done by CUPS itself (we ignore DNSSD in this directive).

BrowseLocalProtocols none
На этом настройку принтсервера приостанавливаем и переходим к настройке клиентких машин Windows и Linux. Требования к ним такие — позволять посылать на себя задания печати принтсерверу, и посылать задания на печать именно (и только) на принтсервер в случае необходимости печати на сетевой принтер.
В качестве примера настроим печать сквозь принтсервер между двумя клиентскими машинами с Linux (имя хоста linux1) и Windows 8 соотвественно (имя хоста windows1). Начнем с настройки windows1 в качестве приемника печати от принтсервера. У меня к нему подключен и штатно работает принтер Canon i-SENSYS MF4410. Имя принтера — Canon-MF4400. Самый простой способ, на самом деле, обеспечить печать с принтсервера на windows1 — перейти в Панель управления > Программы > Программы и компоненты > Включение или отключение компонентов Windows. Там мы включаем компонент Службы печати и документов > Служба печати LPD. Это позволит подключить данный принтер к принтсерверу с помощью адреса lpd://windows1/Canon-MF4400. Разумеется, назревает вопрос, почему бы не подключить с помощью SMB? Никто не запрещает. Если у вас отлажен данный метод, вы можете расшарить принтер таким образом, и подключить к принтсерверу по протоколу SMB. Инстукции по данному подключению, на мой взгляд, выходят за рамки данной статьи, которая и так выходит довольно объемной. Пока же считаем, что читатель успешно зашел по адресу http://cupsserver:631/admin нажал на кнопку «Добавить новый принтер» и следуя интуиции, логике и прочитатанным ранее мануалам успешно подключил принтер с windows1 по протоколу LPD к принтсерверу cupsserver[example.com] и страница принтера доступна по адресу http://cupsserver:631/printers/Canon-MF4400.
Теперь выполним аналогичную операцию на клиентской машине Linux c именем хоста linux1. Вообще, данная часть будет куда объемнее, так как у клиентской машины есть свой сервис CUPS и его тоже нужно настроить во многом так же, как и принтсервер, за исключением его подчиненной роли в организации печати.
Исправление ошибки обращения к CUPS через loopback по имени хоста
Есть неприятный момент. Если вы введете linux1 в домен, настроите на нем CUPS по этим инструкциям, то можете заметить абсурдную ситуацию, когда на WEB-интерфейс linux1 можно зайти снаружи, но на самом хосте этого сделать нельзя! И графические приложения для локальной настройки принтеров, вроде приложения system-config-printer в Linux Mint, отказываются работать. При попытке подключения на свой же CUPS по по адресу http://linux1:631/ будет сообщение «Запрещено» или «Bad Request». Это известная и толком не решенная на множестве форумов интернета проблема.
В большинстве инструкций по введению Linux в домен одним из пунктов является приведение файла /etc/hosts приблизительно к такому виду:
127.0.0.1       localhost
127.0.1.1    linux1.example.com linux1
# The following lines are desirable for IPv6 capable hosts
::1     ip6-localhost ip6-loopback
fe02::2 ip6-localnet
ff00::0 ip6-mcastprefix
ff02::1 ip6-allnodes
ff02::2 ip6-allrouters
Почему то CUPS не в силах ассоциировать обращение через 127.0.1.1, то есть через Loopback интерфейс, с именем хоста.
Исправляется эта ошибка двумя способами. Если в вашей сети IP адреса статичные, то в файле /etc/hosts.исправьте 127.0.1.1 на IP адрес внешнего сетевого интерфейса клиентской машины, например:
127.0.0.1       localhost
192.168.1.50   linux1.example.com linux1
Либо же, раз уж вы вводите Linux в домен, то это предполагает, что в вашей сети работает DHCP и DNS сервер Active Directory. В таком случае просто закомментируйте данную строчку:
127.0.0.1       localhost
# 127.0.1.1   linux1.example.com linux1
Разницы в работоспособности или проблем от данного действия пока обнаружено не было.
Настройка адресов прослушивания подключений к CUPS у клиентских машин Linux
Заходим на linux1 любым удобным способом. Редактируем файл /etc/cups/cupsd.conf:
user@linux1:~$ sudo nano /etc/cups/cupsd.conf
Находим, добавляем или изменяем в нем строки:
DefaultLanguage ru         # Если язык присутствует в папке /usr/share/cups/locale

ServerAlias linux1.example.com linux1 [CNAME псевдоним присвоенный на DNS сервере]
или
ServerAlias *              # Если неохота вникать в особенности

Listen /run/cups/cups.sock
Listen localhost:631           # Слушать localhost
Listen 10.10.100.50:631    # IP адрес нашего принтсервера.
Listen cupsserver:631        # Доменное имя принтсервера. Рекомендую чтобы его IP тоже был, на всякий случай
Listen linux1:631          #
или
Port 631                   # Будет слушать подключения со всех адресов
Listen /run/cups/cups.sock

Browsing off                          # Выключено. Машина будет посылать информацию только принтсерверу

DefaultAuthType Basic      # Без изменений. Есть вариант с авторизацией Kerberos, но там много подводных камней
Настройка адресов прослушивания подключений к CUPS
В предыдущем блоке мы настроили возможность подключения к CUPS. Теперь перейдем к настройке разрешений на доступ к печати, а также к административным страницам сервиса CUPS на хосте linux1. Вновь открываем, если закрыли, файл /etc/cups/cupsd.conf и переходим к редактированию блоков <Location />, <Location /admin>, <Location /admin/conf>, <Location /admin/log>:
# Restrict access to the server...
<Location />
  Order allow,deny        # Определяет политику доступа "Что не разрешено, то запрещено"
  Allow from localhost    # Позволяет печатать самой linux1
  Allow from linux1       # Печать на свое имя хоста. Проблемы этого действия описаны выше
  Allow from cupsserver   # Если CUPS нормально взаимодействует с DNS, то сработает. Увы, не всегда это так
  Allow from cupsserver.example.com   # FQDN принтсервера
  Allow from 10.10.100.50 # Разрешение на печать с IP принтсервера <b>cupsserver</b>
</Location>

# Restrict access to the admin pages...
<Location /admin>
  Order allow,deny        # Аналогично предыдущему
  Allow from localhost    # Необходимо для возможности добавлять принтеры
  Allow from linux1       # Аналогично предыдущему
  Allow from 10.10.101.71 # Предположим, это IP админа
  Allow from 10.20.50.*   # Предположим, это подсеть вашего IT отдела
  AuthType Default        # То есть CUPS спросит логин и пароль. Подробнее ниже
  Require user @SYSTEM    # Определение группы доступа к CUPS
</Location>

# Restrict access to configuration files...
<Location /admin/conf>
#Блок идентичен предыдущему
  Order allow,deny        # Аналогично предыдущему
  Allow from localhost    # Необходимо для возможности добавлять принтеры
  Allow from linux1       # Аналогично предыдущему
  Allow from 10.10.101.71 # Предположим, это IP админа
  Allow from 10.20.50.*   # Предположим, это подсеть вашего IT отдела
  AuthType Default        # То есть CUPS спросит логин и пароль. Подробнее ниже
  Require user @SYSTEM    # Определение группы доступа к CUPS
</Location>

# Restrict access to log files...
<Location /admin/log>
#Блок идентичен предыдущему
  Order allow,deny        # Аналогично предыдущему
  Allow from localhost    # Необходимо для возможности добавлять принтеры
  Allow from linux1       # Аналогично предыдущему
  Allow from 10.10.101.71 # Предположим, это IP админа
  Allow from 10.20.50.*   # Предположим, это подсеть вашего IT отдела
  AuthType Default        # То есть CUPS спросит логин и пароль. Подробнее ниже
  Require user @SYSTEM    # Определение группы доступа к CUPS
</Location>
Настройка раздачи и получения широковещательной рассылки сетевых принтеров
Еще у клиетской машины Linux, в данном случае linux1, необходимо отредактировать файл /etc/cups/cups-browsed.conf:
user@linux1:~$ sudo nano /etc/cups/cups-browsed.conf

  BrowseRemoteProtocols none # Пишем none чтобы не получить кучу принтеров автоматически.

  BrowseLocalProtocols cups  # Показывать подключеные принтеры в сеть. DNSSD указывать не надо, его директива в cupsd.conf

    BrowseOrder Allow,Deny             # Аналогично директиве Order в cupsd.conf - необходимо явно указать, куда МОЖНО посылать информацию о подключенных принтерах
  BrowseAllow 10.10.100.50           # IP принтсервера
  BrowseAllow cupsserver             # Имя хоста принтсервера
  BrowseAllow cupsserver.example.com # Полное доменное имя принтсервера
Настройка административного доступа
Еще пару слов по поводу административного доступа, как на WEB-интерфейс CUPS на принтсервере, так и на любой клиентской машине Linux. Даже при условии наличия 30-50 компьютеров нужно унифицировать авторизацию на CUPS, а не держать в голове или еще где пароли каждой машины. И это важно на всех Linux машинах, ведь чтобы добавить принтер на сервер, его сперва нужно установить локально. Я вижу несколько путей.
Первый — на каждой системе Linux создать пользователя printeradmin (например) и добавить в группу lpadmin:
user@linux1:~$ sudo usermod -a -G lpamin printeradmin
и авторизовываться на http://имя_хоста:631/admin c помощью его учетных данных.
Второй вариант практически идентичен и предлагает создать группу в системе, например, printersadmins, добавить туда требуемого администратора CUPS (printeradmin, user):
user@linux1:~$ sudo groupadd printersadmins
user@linux1:~$ sudo usermod -a -G printersadmins printeradmin
user@linux1:~$ sudo usermod -a -G printersadmins user
Затем нужно найти в файле /etc/cups/cups-files.conf строку
# Administrator user group, used to match @SYSTEM in cupsd.conf policy rules...
# This cannot contain the Group value for security reasons...
SystemGroup lpadmin
и добавить через пробел одну или несколько групп пользователей с правом администрировать CUPS.
# Administrator user group, used to match @SYSTEM in cupsd.conf policy rules...
# This cannot contain the Group value for security reasons...
SystemGroup lpadmin printersadmins somegroup
И наконец, третий вариант. Сделать администраторами принтсервера и CUPS’ов клиентских машин доменную группу пользователей. Для этого принтсервер и клиентские машины Linux должны быть присоединены к домену AD. Есть несколько методов подключения Linux к домену Windows, но, насколько я знаю, основные это подключение с помощью winbind и с помощью SSSD(realmd). Описание данных методов не входит в статью, поэтому остановлюсь только на моментах которые касаются конкретно CUPS’а.
Настройка использования доменных групп пользователей для администрирования CUPS
Каждый метод присоединения к системе централизованной авторизации в Linux создает специальный файл-«трубу» (pipe), сквозь который приложения могут посмотреть список пользователей домена. Чтобы так мог сделать CUPS, нужно разрешить ему использовать pipe в AppArmor’е для аутентификации пользователей. AppArmor — модуль безопасности Linux по управлению доступом. Ограничивает определенные программы набором перечисленных в его политиках файлов. Чтобы добавить CUPS’у право использовать пользователей и группы домена через winbindd, нужно добавить в файл /etc/apparmod.d/local/usr.sbin.cupsd такую строку:
/var/lib/samba/winbindd_privileged/pipe rw
Если Linux введен в домен через SSSD, то необходимо указать расположение его pipe в /etc/apparmod.d/local/usr.sbin.cupsd, добавив туда строку:
/var/lib/sss/pipes/private/pam rw
К тому же, в случае с SSSD это позволяет пройти аутентификацию (узнать кто заходит), но чтобы пройти авторизацию (узнать есть ли право у пользователя управлять CUPS) необходимо также добавить в файл конфигурации SSSD /etc/sssd/sssd.conf строку:
ad_gpo_map_interactive = +cups
Это, условно выражаюсь, дает CUPS’у право «заглядывать» в SSSD.
К тому же, в силу того, что CUPS теперь зависит от сервиса SSSD, нужно указать CUPS’у что он должен запускаться после SSSD, иначе он будет отваливаться при включении и его будет необходимо каждый раз включать вручную.
Добавим CUPS’у указание грузиться после SSSD. Отредактируем файл сервиса cups.service по пути /lib/systemd/system/, добавив инструкцию After в секцию [Unit]:
[Unit]
Description=CUPS Scheduler
Documentation=man:cupsd(8)
After=sssd.service
Таким образом CUPS настроен на Basic авторизацию через домен, то есть авторизацию с помощью ввода логина и пароля доменного пользователя с правом администрирования CUPS.
Авторизация может быть настроена и иначе, но принцип (pipe-файл) в целом универсален и есть шанс настроить и для LDAP, FreeIPA и прочих служб каталогов по аналогии.
Установка принтера в Linux
Установить принтер на Linux это часто специфическая задача, разная для разных марок и даже моделей. Поэтому не вижу смысла описывать установку принтера и примем за факт, что на хосте linux1 установлен принтер Kyocera-1024FP с именем Kyocera-1024FP, и страница принтера доступна по ссылке http://linux1:631/printers/Kyocera-1024FP.
Теперь, когда сервер и клиенские машины Linux настроены, к некоторым из них присоединены принтеры, а также есть машины на Windows, которым и с которых нужно печатать, и вся эта система должна быть стабильной и в случае, если на одном из ПК необходимо заменить принтер, то это не должно повлечь за собой перенастройку доброй половины всех ПК, если не всех. К тому же нужно как можно меньше проблем с драйверами. И это вполне возможно.
Группы принтеров (Classes)
Выше мы описывали подключение Canon-MF4400 c хоста windows1 через протокол LPD. Принтер все еще подключен и его статус можно посмотреть на странице http://cupsserver:631/printers/Canon-MF4400. А теперь обратим пристальное внимание на главную страницу администрирования cupsserver http://cupsserver:631/admin. На этой странице есть кнопка «Добавить группу» [Add Class]. Нажмем на нее. В ней вы увидите поля «Название», «Описание», «Расположение», аналогичные таким же при настройке обычного принтера. В нижнем же блоке вы увидите список всех подключенных к принтсерверу принтеров. Выберите Canon-MF4400 или любой который хотите, затем в поле «Название» впишите, например printer-windows1, «Описание» и «Расположение» на ваше усмотрение, и нажмите «Добавить группу».
Теперь у нас есть группа printer-windows1 с принтером Canon-MF4400 в ней. Страница этой группы доступна так же как и страница принтера Canon-MF4400 с оговоркой на немного другой путь — http://cupsserver:631/classes/printer-windows1.
Еще у нас все еще есть подключенный к linux1 принтер Kyocera-1024FP. Подключим его к принтсерверу по HTTP. Выбираем метод подключения «Протокол интернет печати (http)» [Internet Printing Protocol (http)], из списка драйверов выбираем марку «Generic», модель «IPP Everywhere». Называем его как угодно, мы назовем так же как на хосте linux1 — Kyocera-1024FP. Теперь принтер доступен на принтсервере по ссылке http://cupsserver:631/printers/Kyocera-1024FP. Аналогично настройке группы printer-windows1 создаем группу printer-linux1 c принтером Kyocera-1024FP в ней. Ее ссылка соответственно http://cupsserver:631/classes/printer-linux1.
Теперь подключим принтер Kyocera-1024FP с хоста linux1 через принтсервер cupsserver к хосту windows1 с системой Windows 8 на борту без какой либо дополнительной(!) установки драйверов. Для этого мы при подключении принтера выбираем «Выбрать общий принтер по имени». В общем случае мы пишем http://имя_принтcервера:631/classes/название_группы. В нашем конкретном случае — http://cupsserver:631/classes/printer-linux1. При запросе на выбор драйвера указываем марку «Generic», модель — «MS Publisher Imagesetter». Все подтверждаем далее, и имеем подключенный принтер с название вроде «printer-linux1 на http://cupsserver:631». Если до сих пор никаких ошибок и подводных камней при настойке не возникло, то попытка пробной печати приведет к успешной печати на Kyocera-1024FP.
Теперь подключим принтер Canon-MF4400 с хоста windows1 через принтсервер cupsserver к хосту linux1 с системой Linux на борту без какой либо дополнительной(!) установки драйверов. Для этого мы при подключении принтера действуем аналогично тому, как подключали Kyocera-1024FP к принтсерверу cupsserver. То есть при добавлении принтера на linux1 выбираем метод подключения «Протокол интернет печати (http)», в качестве расположения принтера (Canon-MF4400) ссылку на его группу на принтсервере — http://cupsserver:631/classes/printer-windows1. При запросе на выбор драйвера указываем марку «Generic», модель — «IPP Everywhere». Называем его как угодно, можно назвать так же как группу — printer-windows1. Теперь принтер доступен на linux1 по ссылке http://linux1:631/printers/printer-windows1, и мы уже можем отправлять на печать документы.
Главная прелесть данного метода в том, что если на любом из ПК заменяется принтер, заменяется сам компьютер, или то и другое сразу, то это никак не влияет на тех, кто был к ним подключен через группу на принтсервере. Единственная настройка производится на принтсервере — к принтсерверу подключается новый принтер, затем из группы, в которой состоял старый принтер, он удаляется, и добавляется новый принтер на замену старому. И никаких дополнительных настроек на любом количестве ПК, только на принтсервере и собственно ПК на котором меняли принтер. Драйвера «IPP Everywhere» и «MS Publisher Imagesetter» содержат большое количество настроек бумаги, печати и т.д., так что нет проблем настроить нужный вид печати через них.
Заключение
Тема слишком обширна, чтобы изложить сколько-нибудь подробно, и даже так статья вышла крайне объемной. Любые уточнения, указания на ошибки, нераскрытые вопросы и советы, данные в комментариях к данной статье, будут приняты во внимание и в случае необходимости включены в статью.
Contents
- Overview
- Background
-
Ubuntu print server
- Ubuntu print server compatible with Windows (Samba)
- Printing from Ubuntu
- Printing from Windows
- Troubleshooting
Overview
Ubuntu supports printer sharing over networks, so you can print from your Ubuntu machine, your Windows machine, etc, to another Ubuntu or Windows machine that has a printer attached (ie a «Ubuntu print server» or «Windows print server»).
Background

Ubuntu uses the Common UNIX Printing System («CUPS») to handle printing. CUPS uses the Internet Printing Protocol («IPP») as the basis for managing print jobs and queues. Other protocols are also supported (LPD, SMB, AppSocket a.k.a. JetDirect), some with reduced functionality.
CUPS printer configuration and management is handled by the Printer Admin utility launched from the Gnome menu — System -> Administration -> Printing (If the menu item does not exist you need to add the command system-config-printer to the menu). Also IPP provides web services so after you have configured CUPS appropriately, you can access the printers and jobs via your web browser.
When a locally attached printer is defined, eg using the Printer Admin utility, that printer is automatically published from this «print server» host to the network, depending on the server directives in the CUPS configuration file. A remote Ubuntu «client» host can then be able to see and use the printer attached to the server. The network printer automatically appears in the client’s Printer Admin utility. It simply pops up if CUPS is up and configured correctly and disappears if you stop CUPS at either the Print Server or your local machine.
Ubuntu print server
The Print Server is the Ubuntu computer that is directly connected to the printers.
-
On the server machine (the one the printer is attached to), open System -> Administration -> Printing (If the menu item does not exist you need to add system-config-printer to the menu). . This will open the Printer Configuration window.

-
Select Server in the menu bar, and then Settings. This will open the Basic Server Settings window.
- Check the second box:
Publish shared printers connected to this server If this computer acts as both a Print Server and a client (it does need access to a printer connected to another computer), select also the first box, «Show printers shared by other systems».
-
OK
-
Right click the printer and check the Shared option, if not checked yet
-
Check that users that you want to be able to use the printer are not excluded. See Properties>Access Control. The default settings may be set to «deny printing for everyone except …»


 .
.
But you might want to «allow printing for everyone».

Ubuntu print server compatible with Windows (Samba)
If your Ubuntu print server shall be able to work also with Windows clients, you must first make sure that the SAMBA package is installed (e.g. using Synaptic package manager). Then, do a little configuration change to SAMBA. In brief, you must uncomment the following lines in /etc/samba/smb.conf — open terminal and run:
gksudo gedit /etc/samba/smb.conf
In the [printers] section:
   browseable = yes
   guest ok = yes
When done, restart Samba:
sudo service smbd restart
sudo service nmbd restart
There is a dedicated page in the official documentation which gives more details.
Also, one would want to allow the following ports through a firewall (ufw for example) via:
sudo ufw allow 139/tcp
sudo ufw allow 445/tcp
sudo ufw allow 137/udp
sudo ufw allow 138/udp
For more on this, please see here.
Printing from Ubuntu
Now let’s configure the client (the Ubuntu computer from where you want to print):
-
System -> Administration -> Printing
-
Add — Network printer
-
Click Find network printer
- Specify the host IP address or name. (It may also work without, try) (IP address worked for me, hostname did not.)
-
Click Find
- Printers on the target machine should be found, no matter whether they are connected using CUPS or SAMBA.
- BUT if both protocols are available, e.g. because you have shared your printer on a Linux box both using CUPS and Samba, prefer CUPS (ipp://) over Samba (smb://), because you won’t be prompted to install a driver in general.
-
- You **may** be prompted to select a driver. Select your model in the list.
- (to be done) What to do if driver is not in the list

Printing from Windows
Once your Ubuntu print server is set up using SAMBA as described above, you can add the printer in Windows as follows:
- Start
- Devices and Printers
- Add a printer
- Add a network, wireless or Bluetooth printer
-
Click The printer that I want isn’t listed (unless a miracle happens)
-
Enter the address manually (\servernameMyPrinter). Be sure to respect uppercase/lowercase.


Note that searching or browsing for printers in Windows is notoriously unreliable, as it heavily depends on the network setup. Therefore, it is recommended to enter the printer address manually as shown.
Windows will then probably complain about a missing driver, and offer you to choose one manually. This is the easiest option, so select your printer manufacturer and model from the dialog box. (Alternatively, the Samba configuration could be improved so that the driver would be automatically downloaded.) If your printer model isn’t listed, you may try the «Generic» printer.
Tips: You can avoid intermediate SAMBA buffer using direct connection to CUPS/IPP Ubuntu server from Windows workstation. You should manually specify «http://hostname:631/printers/MyPrinter» IPP URL and select printer driver.
Windows print dialog window (Ctrl-P) can take long time (about 30 seconds) to appear. You can reduce the connection time to CUPS IPP printer by disabling option Automatically detect settings in «Control Panel/Internet Explorer -> Internet Options -> Connections -> LAN settings».
Troubleshooting
1. Bypassing firewall.
If there is an firewall either on print server or the client side, there might appear a communications problem. Use this command to update the firewall to get through.
iptables -A INPUT -p tcp —dport 631 -j ACCEPT
- This rule is used for IPP only. If you’re using other protocol, such as SAMBA, you have to adapt.
You might need to use this rule on both sides (server & client) if the firewall is being used on both of them. To apply this rule after each start/restart of the system, use /etc/rc.local .
2. Networking issues.
Be careful about using different network masks/subnets on your network where you would like to share the printer.
If the subnets differs, e.g. on the print server there would be a /24 (255.255.255.0) netwok mask configured, and e.g. on the clients there would be a /16 (255.255.0.0) network mask — perhaps provided by the DHCP server, this might cause a problem that clients won’t be able to detect any shared printer on the server, even if other communications between print server and clients would be possible (e.g. ICMP, ssh) and successful.
If such situation happens, you have to unify the network masks/subnets on all of your stations, e.g. use /24 (255.255.255.
3. IP address
Generally, it is a good idea to assign your print server a static IP address. Instead, using its host name is also possible, but functionality will then depend on proper configuration of your home router, name service, etc.
4. IPv6 Windows (since XP) can print over IPv6 to Ubuntu Linux (tested between Windows XP SP3 and Ubuntu Linux 8.10). Make sure both the Windows and Ubuntu have IPv6 connectivity. You should tick «Allow Printing from the Internet» on the Ubuntu machine. Then use the URL (which resolves to IPv6) of the Ubuntu machine as described above.
5. Mac OS X 10.5.
Will not find your network printer unless you go to the terminal and run cupsctl BrowseRemoteProtocols=cups (see the CUPS 1.4 documentation at http://www.cups.org/documentation.php/doc-1.4/sharing.html). After doing so, you may need to set the network printer as your default printer for it to show up in program «print» menus.
CategoryNetworking
Delivering Printer Drivers to Windows Clients
One critically important part of Samba
printer configuration is distributing drivers to Windows clients.
This task can be accomplished in several different ways. One approach
that requires little explanation is to use the driver CD-ROM that
came with the printer (or a generic PostScript driver for
Ghostscript-driven printers) to install the driver on all the
clients. This approach is simple enough on a small network, but it
becomes awkward when many clients are involved. For these cases,
SMB/CIFS provides mechanisms to help deliver drivers to many clients,
and Samba supports these mechanisms.
Warning
If you fail to configure Linux to deliver a Windows printer driver,
Windows NT/200x/XP clients may display spurious
“unable to connect” error messages.
To avoid this problem, set use
client
driver
=
Yes. However, you should
not use this option if you configure Linux to
deliver printer drivers to Windows NT/200x/XP clients.
You can take a middle ground. Instead of using the semiautomated
driver installation mechanisms described here, you can create an
ordinary file share that holds the printer drivers. You can then
install the drivers from that share on all the clients. This
procedure obviates the need to carry a CD-ROM around from one
computer to another, or to keep track of the CD-ROM for the benefit
of computers you add after setting up the printer.
Picking a Driver
The first task you must undertake in
driver installation is to select the drivers you want to install. To
a large extent, this decision depends on whether you share the
printer using a PostScript queue or a raw queue. (This difference is
moot, of course, in the case of PostScript printers.) In many cases,
though, you can choose between drivers from more than one source:
- OS drivers
-
Windows (and most other operating systems) ship with an array of
printer drivers. You may be able to select a driver from among those
that ship with the OS. This is true for both PostScript and
non-PostScript drivers. - Printer manufacturer drivers
-
Printer manufacturers invariably ship Windows drivers with their
printers. For older printers, you may need to check the
manufacturer’s web site to obtain drivers that can
work with more recent versions of Windows. - Adobe’s PostScript drivers
-
Adobe makes drivers for PostScript printers available from its
downloads page (http://www.adobe.com/support/downloads/).
These drivers are generic PostScript drivers that require PPD files
to operate. (Adobe makes these available for printers with Adobe
interpreters, as well.) They’re also licensed only
for printers that use PostScript interpreters written by Adobe. - The CUPS PostScript driver
-
A Windows PostScript driver is associated with the CUPS project.
Because you can install this driver from the Samba server computer
without the help of a Windows system, it’s
particularly simple to install, as described in Section 4.4.3.1. The CUPS driver works only
on Windows NT/200x/XP systems, however; if you need to deliver
drivers to Windows 9x/Me systems, you’ll need
another driver source, at least for those clients.
Because of the array of printers available today, I
can’t make a blanket recommendation for what driver
to use; any of the preceding classes of drivers might work well. In
fact, chances are any of them will work well with most printers, with
the exception of PostScript drivers if you already know you want to
share a non-PostScript printer raw.
Defining Necessary Shares
Samba 2.2 and later use a special file
share to deliver printer drivers. This share is defined as
[print$]. Ultimately, printer driver files will
reside in this share, but for the moment you must simply create it. A
typical [print$] share looks like this:
[print$]
   comment = Printer Driver Storage
   directory = /usr/share/samba/drivers
   browseable = No
   read only = Yes
   write list = gutenberg
The location of the shared directory is somewhat arbitrary, but the
key point is that it must exist. This directory must also be readable
to all those who might want to add printers to their machines.
You’ll typically give one or more users write access
to the share (gutenberg in this example). These
users are the printer administrators; they’re
authorized to add printer drivers to the share. Be sure that the
printer administrators have Linux write privileges to the location
you’ve chosen as the PRINT$ share
directory. You should also list these users on the
printer
admin line in the
[global] section of smb.conf:
printer admin = gutenberg
Before adding drivers, you must also define some printer shares. If
you want to share all the printers on the server, a
[printers] share, as described in the section
Section 4.5.4, should do nicely.
[printers]
   comment = All Printers
   path = /var/spool/samba
   printable = Yes
After you make these changes to smb.conf, you
must either wait a minute or two for Samba to discover and implement
the changes or force Samba to restart or reload its configuration
file.
Tip
Samba stores printer driver files in the PRINT$ share, but it stores information about
these files in Trivial Data Base (TDB) files located
elsewhere—typically in /var/cache/samba
and /var/cache/samba/printing. In theory, you
can edit these files with the help of Samba’s
rpcclient command, but unless
you’re an expert with this tool, doing so is
extremely tedious. In case of errors when installing printer drivers,
you may need to delete these files and start from scratch.
Installing the Driver on the Server
Once you’ve reconfigured
Samba with the PRINT$ share and one or more
printer shares, you can install Windows printer drivers in Samba. You
can perform this task from the Samba server, from another Linux or
Unix system, or from a Windows client. The CUPS driver can only be
installed from a Linux or Unix system, the Adobe PostScript driver
can be installed in either way, and most other drivers can be most
easily installed from a Windows client.
Installing drivers from Linux
CUPS ships with a program, called
cupsaddsmb
,
which can install Windows printer drivers on a Samba server computer.
This command’s syntax is as follows:
cupsaddsmb [-Hsamba-server] [-Usamba-user] [-hcups-server] [-v] {-a |printer-list}
In the simplest case, you can type cupsaddsmb
-a on the server system as the printer
administrator. The system defaults to installing the CUPS drivers
from localhost to localhost. The -a
parameter tells the program to add drivers for all available CUPS
printers. If you don’t share all these printers, you
must specify them individually. The -v parameter
increases the verbosity of the program’s output,
which can be handy for debugging problems.
Of course, cupsaddsmb can’t
conjure printer drivers out of thin air; you must place them
somewhere the program can find them before
executing the program. By default, cupsaddsmb
looks for drivers in /usr/share/cups/drivers.
These drivers can come from one of two sources:
- The CUPS PostScript drivers for Windows
-
These drivers can be found at http://www.cups.org/windows.php. The CUPS
documentation recommends using them. As of CUPS 1.1.20, though, these
drivers support only Windows NT/200x/XP. - The Adobe PostScript drivers for Windows
-
You can find Adobe’s drivers at http://www.adobe.com/support/downloads/.
These drivers support Windows 9x/Me as well as NT/200x/XP.
In either case, you must install driver files in
/usr/share/cups/drivers, but how you place them
there depends on the driver. In the case of the CUPS drivers, you
download a tarball from the CUPS web site, extract the tarball, and
run the cups-samba.install script from the
tarball. This script asks for confirmation and installs the files in
/usr/share/cups/drivers. You can then run
cupsaddsmb to install the drivers on the Samba
server.
The Adobe drivers, on the other hand, were designed to be installed
from a Windows system to a Windows system. They come in the form of a
Windows executable (.EXE) file. This file is a
self-extracting Microsoft Cabinet archive, which can be extracted in
Linux using the cabextract program. (Check your
distribution for this program, or visit http://freshmeat.net/projects/cabextract/ to
download the source code or a binary package.) When you extract the
drivers file, you must copy several files into
/usr/share/cups/drivers, as detailed in Table 4-1. Note that cupsaddsmb
expects these files to appear in all-uppercase, but some of them are
in lowercase or mixed case in the archive; you need to rename some of
the files to change their case. Also, these files are scattered about
in the Windows and WinNT
subdirectories. In my experience, this option works well for Windows
NT/200x/XP, but Windows 9x/Me tends to complain about a missing
.INF file when installing the drivers installed
in this way. If you run into this problem, you may need to install
Windows 9x/Me drivers another way.
Table 4-1. Adobe PostScript driver files
|
Windows 9x/Me |
Windows NT/200x/XP |
|---|---|
|
ADFONTS.MFM |
ADOBEPS5.DLL |
|
ADOBEPS4.DRV |
ADOBEPSU.DLL |
|
ADOBEPS4.HLP |
ADOBEPSU.HLP |
|
DEFPRTR2.PPD |
— |
|
ICONLIB.DLL |
— |
|
PSMON.DLL |
— |
Once you’ve installed the CUPS or Adobe driver
files, you can type cupsaddsmb
-a or whatever variant you need to type, given
your printer administration username and other variables. The program
should ask for your password on the Samba server, copy the driver
files, and configure the server to deliver the files to clients when
they connect, as described in Section 4.4.4.
Unfortunately, cupsaddsmb is rather delicate and
sometimes doesn’t work correctly. Likely problems
include missing driver files, an attempt to install drivers without
appropriate privileges on the server, and a mismatch of CUPS and
Samba printer names (cupsaddsmb assumes that these
names match). If you have problems, check these items. You may also
want to add the -v parameter and check your Samba
log files for clues to the cause of the problem.
Tip
Whenever possible, cupsaddsmb copies the PPD files
used by CUPS as part of the driver installation. Both the CUPS and
Adobe PostScript drivers for Windows use PPD files.
It’s possible, though, that the PPD file used by
CUPS for Linux clients will not work well from Windows. If you
suspect this is the problem, try replacing the PPD file on the Samba
server and then re-install the driver on the clients. Look for a PPD
file with your Windows PostScript driver package and copy it to the
name and location in which Samba looks for the PPD file for that
driver.
Installing drivers from Windows NT/200x/XP
In theory, any Windows driver can be
installed from Linux. The cupsaddsmb command
merely copies files to the server and issues a few commands using the
smbclient utility. You should be able to do the
same for any printer driver files. In practice, though, the task is
tedious without the help of cupsaddsmb, and it
only supports the CUPS and Adobe PostScript drivers. For this reason,
you may want to install some drivers from Windows clients. (This task
can be accomplished only from Windows NT/200x/XP clients; Windows
9x/Me doesn’t support this operation.) Doing so
employs the same facilities on the Samba server
cupsaddsmb uses, but the Windows
driver-installation tools use these features.
Tip
Some drivers, particularly for older printers, come with installation
programs that assume the printer will be connected locally or that
don’t support network installations. These drivers
can be very difficult to install on a network print server. If you
have such drivers and can’t find more
network-friendly updates, you may want to consider creating an
ordinary Samba file share in which you can place the installer. You
can then run the installer from each client that needs to use the
printer.
When installing drivers from Windows, you must take one extra step on
the Samba server computer. Windows printer drivers are installed in
fixed directories on the Samba server’s PRINT$ share. You must create these
directories and set their permissions so that the user adding the
drivers can write to them. Table 4-2 summarizes
the directories you must add.
Table 4-2. Windows driver directories in PRINT$ share
|
Client OS |
Directory name |
|---|---|
|
Windows 9x/Me |
|
|
Windows NT/200x/XP for x86 CPUs |
|
|
Windows NT for Alpha CPUs |
|
|
Windows NT for MIPS CPUs |
|
|
Windows NT for PowerPC CPUs |
|
Before proceeding, you should obtain the driver installation files.
If you choose to use a driver that ships with Windows, you need only
the Windows installation CD-ROM. Alternatively, you can download
drivers from the printer manufacturer, from Adobe, or conceivably
from some other source. Once you’ve obtained the
drivers, follow these steps on the Windows computer to install
drivers for the OS you’re running:
-
In My Network Places, browse to the Samba server on which the share
you want to install is located, and open the Printers and Faxes or
Printers folder. -
Right-click the printer you want to install and select Properties
from the resulting pop-up menu. If no driver is installed, Windows
asks if you want to install one. -
Click No in response to the question about installing a driver.
Clicking Yes will install a driver locally, not to the print server.
Windows now displays a Properties dialog box. -
Select the Advanced tab in the Properties dialog box.
-
Click the New Driver button in the Advanced tab of the Properties
dialog box. Windows launches an Add Printer wizard to help guide you
through the driver installation process. -
Click Next in the Add Printer wizard’s introductory
screen. The result is a dialog box in which you can select the make
and model of your printer from a list of standard Windows drivers, as
shown in Figure 4-3.
Figure 4-3. Windows ships with a large number of printer drivers
-
Select the driver for your printer from the list and click Next.
Alternatively, click Have Disk to point the wizard at driver files
you’ve obtained from another source.Tip
If you can’t find your printer in the list and
don’t have a disk, try using the Apple LaserWriter
IINT driver for monochrome PostScript printers or the QMS magicolor
driver for color PostScript printers. These drivers are fairly
generic and usually produce acceptable results. -
The Wizard informs you that you’re about to add
drivers. Click Finish to do so.
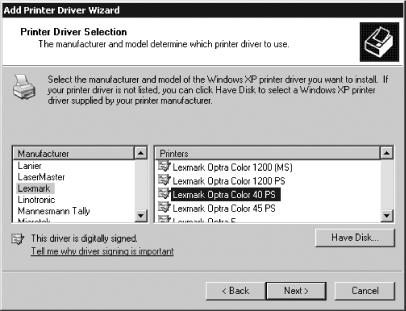
This procedure adds drivers for the OS that the client you used to
install them is running. If you want to add drivers for additional
operating systems, follow these steps.
-
Open the Properties dialog box for the printer in question, if
necessary. -
Click the Sharing tab in the Properties dialogue box.
-
Click the Additional Drivers button in the Sharing tab. This action
brings up an Additional Drivers dialog box, as shown in Figure 4-4.
Figure 4-4. You can install drivers for additional Windows OSs
-
Check the box next to the Windows version for which you want to
install drivers. -
Click OK. Windows will ask for the location of the drivers.
-
Enter the path to the driver files or browse to them. The system will
present a list of printers similar to that shown in Figure 4-3. -
Select the printer and click OK. Windows should install the
drivers.
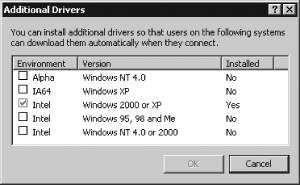
Installing Drivers on Clients
Windows printer drivers, by their very
nature, are Windows programs and so must be installed on Windows
print clients. Installing them on a Samba server merely makes the
drivers available for semiautomatic installation on Windows clients,
thus obviating the need to keep track of driver installation CD-ROMs
or files. Despite the fact that installing the drivers on the Samba
server simplifies client driver installation, this task
isn’t wholly automatic, at least not when using
SMB/CIFS printing. To install a driver on a Windows client, follow
these steps:
-
Browse to the print server that hosts the printer you want to add to
the computer. You should see an icon for the printer you want to add.
If you don’t, chances are the server is
misconfigured. -
Double-click the icon corresponding to the printer you want to add.
The result is a notice that you’re about to connect
to a printer and add a driver for it. -
Click Yes to continue the setup process. In some versions of Windows
(most notably Windows 9x/Me), you’ll be asked some
additional questions, such as whether you intend to print to this
printer from DOS programs.
If all goes well, you’ll see a dialog box
summarizing the progress as the client transfers files from the
server. An icon for the printer should then appear in your Printers
or Printers and Faxes window, which you can open from the Control
Panel. Windows 9x/Me asks if you want to print a test page during the
install process. You should probably do so to test the
printer’s operation, particularly on the first
client you install. If you skip this step during installation but
want to do so afterwards, right-click the printer icon in the
Printers or Printers and Faxes window and select Properties from the
resulting menu. This action opens a Properties dialog box. Click
Print Test Page from the General tab in this dialog box to print a
test page.
Tip
Under Windows NT/200x/XP, one reason you may not be able to print is
because the printer data in the Registry didn’t get
set correctly. You can set this data by setting the default page
orientation in the printer control dialog box.
Some Windows PostScript printer drivers generate PostScript that can
confuse Linux printer queues into thinking the file is plain text.
The result is a printout of PostScript commands, rather than the file
you’d intended to print. If this happens, you can
try several solutions.
-
Look for client-side options to disable a Ctrl-D before the print
job. This character, if present, can be the cause of problems. -
Look for client-side options to disable printer mode-setting
features. Some printer drivers generate special code to kick
dual-language printers into PostScript mode, but this code can have
the effect of confusing the Linux printer queue. -
Define a new raw printer queue on the Samba server and share the
printer using that queue rather than the normal queue used from
Linux. -
Change the driver used on the Windows client. If
you’ve installed it in Samba, this action requires
reinstalling the driver in Samba, which itself may require deleting
TDB files.
Get Linux in a Windows World now with the O’Reilly learning platform.
O’Reilly members experience live online training, plus books, videos, and digital content from nearly 200 publishers.
Печать на Windows принтер из Linux.
В этой статье я опишу настройку сервера печати LPD на Windows и последующую установку принтера на Linux.
На ПК с Windows, нужно открыть общий доступ к принтеру. Заходим в свойства принтера, и на вкладке Доступ, активируем опцию — Общий доступ к данному принтеру, с присвоением ему простого сетевого имени без пробелов и спецсимволов. В данном примере сетевое имя нашего принтера — AdminsPrint (выбирал не я:).

Далее, нужно установить компонент Windows, отвечающий за сетевую печать с Unix-like ОС. Пуск -> Панель управления -> Установка и удаление программ -> Установка компонентов Windows -> Другие службы доступа к файлам и принтерам в сети -> Состав -> Службы печати для Unix, ставим галочку и применяем. Система потребует у вас предоставить компакт диск с Windows, либо указать месторасположение установочных файлов Windows на жёстком диске или в сети.


Теперь нужно активировать сервер LPD и сделать его загрузку автоматической при старте операционной системы. Пуск -> Панель управления ->Администрирование -> Службы -> Сервер печати TCP/IP -> Пуск и там же сменить значение опции Тип запуска на Авто.


Если у вас установлен файерволл, то нужно открыть в нём доступ к TCP порту 515, через который и работает LPD. На этом настройка Windows сервера для печати из Linux, завершена!
На ПК с Linux, осталось только установить этот принтер по LPD, любым удобным вам способом, в зависимости от используемой в вашем дистрибутиве утилиты для управления принтерами, либо воспользоваться универсальным для всех дистрибутивов методом установки принтера через веб-интерфейс CUPS. Я опишу как стандартный для Xubuntu метод установки принтера с помощью утилиты system-config-printer, так и метод установки принтера через веб-интерфейс CUPS.
Самый важный момент при установке принтера, это правильно указать его URI. В нашем случае, URI принтера имеет следующий вид:
lpd://10.2.2.1/AdminsPrint
Где,
- lpd:// — используемый протокол печати;
- 10.2.2.1 — IP адрес Windows ПК, на котором установлен принтер;
- AdminsPrint — сетевое имя принтера (очереди) на данном ПК.
Итак, установка принтера с помощью утилиты system-config-printer:
В консоли, выполняем команду system-config-printer, либо Меню приложений -> Диспетчер настроек -> Оборудование -> Принтеры. В меню Сервер -> Новый -> Принтер. Введите адрес (URI), в нашем случае, это
lpd://10.2.2.1/AdminsPrint
Далее, выбираем драйвер, указываем любое, понятное вам имя принтера, распечатываем тестовую страницу. Всё, принтер установлен и печатает.


Альтернативный метод установки принтера — установка принтера через веб-интерфейс CUPS, работает в любом дистрибутиве Linux. Запускаем любой браузер (на скринах Firefox) и переходим к адресу:
Вкладка Administration -> Printers -> Add Printer. Авторизуемся под пользователем root. Выбираем опцию LPD/LPR Host or Printer-> Continue, в поле Connection вводим URI нашего принтера и кликаем Continue:
lpd://10.2.2.1/AdminsPrint
В строке Name вводим имя нашего принтера и кликаем Continue.
Далее, указываем марку и модель принтера и кликаем Add Printer. На следующей странице кликаем на Set Default Options. CUPS сообщит, что принтер успешно установлен.


Данный способ работает и с Windows 7 в качестве сервера и с другими дистрибутивами Linux в качестве клиентов. Модели и марки принтеров так же могут быть теоретически любые, я пробовал только модели от HP, проблем с ними нет. Единственное, что нужно учитывать — если ваш дистрибутив далеко не первой свежести, то возможно понадобиться дополнительно установить/обновить HPLIP (если у вас принтер от HP), а так же для некоторых моделей принтеров от HP требуется проприетарный плагин, который устанавливается отдельно.
Источник: http://yar4e-it.blogspot.ru