Adding new users or managing existing users in Windows 10 is usually a routine procedure. However, unlike the Professional and Enterprise editions, the Windows 10 Home Edition has slightly different settings that many users may have trouble finding.
If you are running Windows 10 Pro or Enterprise, you can access the Local Users and Groups console by going to Run –> lusrmgr. If you want to manage users in the Home edition the same way as in Pro or Enterprise, you will need to install lusrmgr separately.
Otherwise, follow this guide to manage local users in Windows 10 Home edition without installing anything.
Table of contents
- Manage Local Users in Windows 10 Home using Windows Settings
- Add New User (Microsoft ID)
- Add a new local User (Without Microsoft ID)
- Change Account Type
- Remove or Delete an Existing User Account
- How to use the Control Panel to manage local users in Windows 10 Home
- Change Account Name
- Change Account Type
- Add New User
- Change User Account Control Settings
- Change User Password
- Another way of managing users in Windows 10 Home edition
To begin, please navigate to the following path:
Start Menu -> Settings (Gear) Icon -> Accounts -> Family & Other Users

Add New User (Microsoft ID)
Click on Add a family member if you wish to create a new user from the family. This account will be linked to the current (main) account and can be managed as per their needs.
Click on Add someone else to this PC if you wish to add a new user to this computer that is not related to your family.

Add the new user’s registered email address or linked phone number and then click Next. Click Finish to exit.
Add a new local User (Without Microsoft ID)
If you wish to add a new user to the local machine without having to create or enter a Microsoft ID, simply follow the same steps as mentioned in Add New User (Microsoft ID) and continue from there.
Click on I don’t have this person’s sign-in information

On the next screen, click Add a user without Microsoft Account

Enter the Username and Password for the account to be created, create and answer the security questions, and then click Next.
The new user is now visible under Other users and can now login to their own account.
Change Account Type
You can also click on the user to manage it further.

If you wish to change the account type between Administrator and Standard, click on Change account type. Administrator account type has administrative privileges, while the Standard account type may require special permissions to perform several tasks.
Remove or Delete an Existing User Account
Click on Remove to delete the selected user account from the local computer (as shown in the image above).
How to use the Control Panel to manage local users in Windows 10 Home
Go to Run –> Control. This will open the Control Panel. Navigate to the following:
Control Panel –> User Accounts –> User Accounts
A window such as the one shown below would appear:

Change Account Name
To change the name of the selected user account, press Change your account name. Enter a new name of your choosing and then press Change Name to apply the change.

Change Account Type
If you wish to change your account from Administrator to Standard, or vice versa, click on Change your account type.
Add New User
If you wish to change the selected user and manage another account on the computer, press Manage another account.
A new window will popup where you may also add new users to the computer by clicking Add a new user in PC settings.

Change User Account Control Settings
By selecting Change User Account Control settings you can manage the administrative security of your system.
The settings can be made as per your requirements by adjusting the slider as shown in the image below.
The lowest level of security is at the bottom of the slider, while maximum protection can be set by dragging the slider at the top.

Change User Password
The simplest way to change the password of a logged-in user is simply by pressing Ctrl + Alt + DEL and then clicking Change a Password. However, this can only be done by providing the old Password.
If you wish to change the password of an existing account and are logged in from another account, perform the following:
Navigate to:
Control Panel –> User Accounts –> User Accounts
–> Manage another accoun
Select the profile whose password you wish to change.
Click on Change the password and enter the new password for that particular user account.
Another way of managing users in Windows 10 Home edition
Another way to manage the basics of existing local users and create new ones is by performing the following:
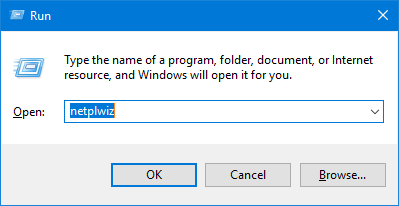
Go to Run –> netplwiz (or Run –> control userpasswords2). This will open the User Accounts window.

From this window, similar functions can be performed such as the ones mentioned earlier.
You can press Add to add new users to the computer, press Properties to edit the name or type of the selected user, or switch to the Advanced tab to manage passwords.
I wonder why Microsoft has limited access to user management in Windows 10 Home edition? Hopefully this article will make your job of managing users in Windows 10 Home easier.
Which method would you prefer for managing users on your system?
Also see:
Subhan Zafar is an established IT professional with interests in Windows and Server infrastructure testing and research, and is currently working with Itechtics as a research consultant. He has studied Electrical Engineering and is also certified by Huawei (HCNA & HCNP Routing and Switching).
August 15, 2017 updated by
Leave a reply »
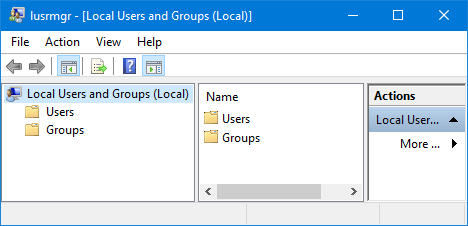
Local Users and Groups is a Microsoft Management Console (MMC) snap-in that lets you manage user accounts or groups, like creation/deletion of user accounts, resetting user password etc. In this post we’ll show you how to open Local Users and Groups MMC snap-in in Windows 10. Note: the Local Users and Groups MMC snap-in is not available in the Home edition of Windows 10.
Method 1: Open Local Users and Groups Snap-in from Computer Management
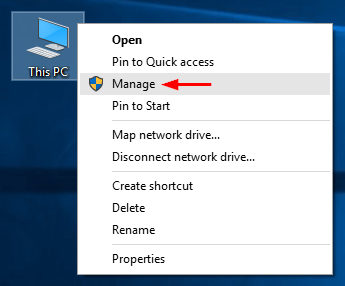
Right-click on This PC icon from your desktop, and then select Manage from the pop-up menu.
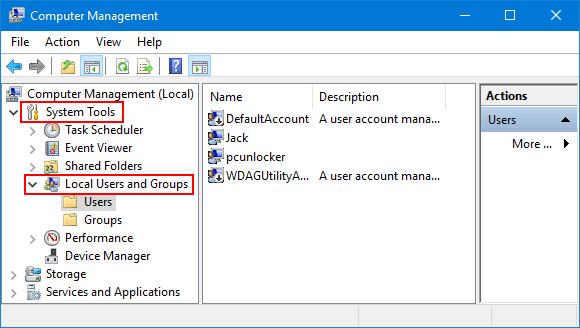
This should open Computer Management window. Expand “System Tools” in the left console tree and you can then access Local Users and Groups MMC snap-in.
Method 2: Open Local Users and Groups Snap-in via Run or Command Prompt
Press the Windows key + R to open the Run dialog box, or open the Command Prompt. Next type lusmgr.msc and hit Enter.
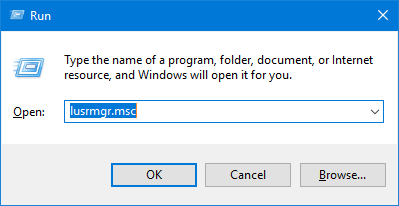
This will open the Local Users and Groups snap-in directly.
Method 3: Open Local Users and Groups Snap-in in User Accounts
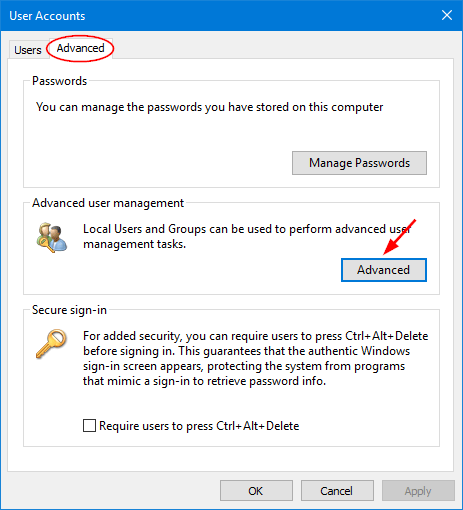
Press the Windows key + R to open the Run dialog box, type netplwiz and hit Enter.
When the User Accounts dialog box opens up, click the Advanced tab and then click the Advanced button. You now have the Local Users and Groups snap-in open.
Method 4: Open Local Users and Groups Snap-in via Cortana
Click the Cortana search box in the lower left of your screen, type lusmgr.msc and click it from the search result.
That’s it!
- Previous Post: Set Password to Never Expire for Domain Accounts in Windows Server
- Next Post: How to Disable Local Users and Groups (lusrmgr.msc) in Windows 10 / 8 / 7
- Blog>
- Windows 10>
- 5 Ways to Open Local Users and Groups in Windows 10
Sometimes, you may need to access Local Users and Groups to manage your users and groups or change some settings. But it seems that it is a hidden utility and not easy to find in Windows 10. If you have no idea how to open Local Users and Groups in Windows 10, check out this page.
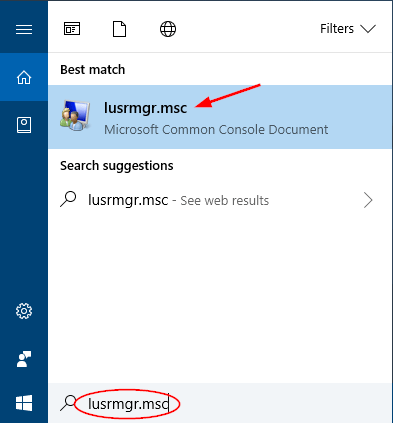
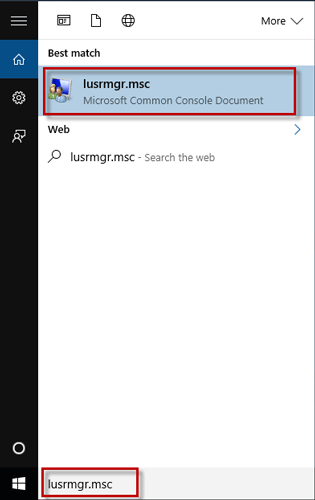
Way 1: using the Search box
Start typing lusrmgr.msc in the ”Search the web and Windows” box located on the left side of the taskbar, and then click on the lusrmgr.msc showing under the Best match. Then the Local Users and Groups window will open.
Way 2: using the Run dialog
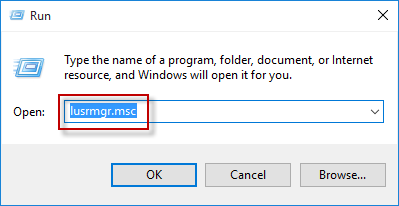
Step 1: Open the Run dialog by pressing Windows + R keys.
Step 2: Type lusrmgr.msc in the Open box, and click OK.
Way 3: from Computer Management
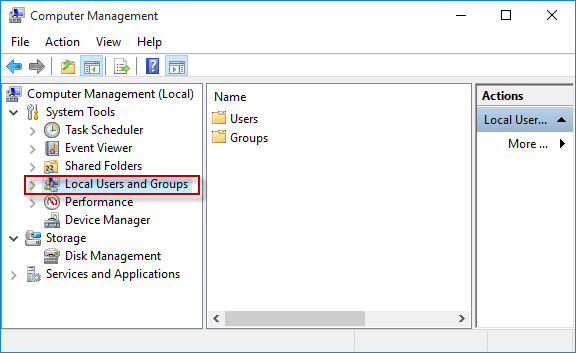
Step 1: Launch File Explorer, then right-click on This PC and select Manage. This will open the Computer Management.
Step 2: Expand the System Tools and then select Local Users and Groups.
Way 4: using Command Prompt
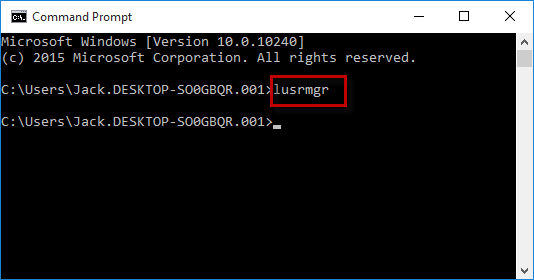
Step 1: Press Windows + X and then select Command Prompt to open a Command Prompt window.
Step 2: Type lusrmgr (or lusrmgr.msc) and press Enter key. This will open the Local Users and Groups.
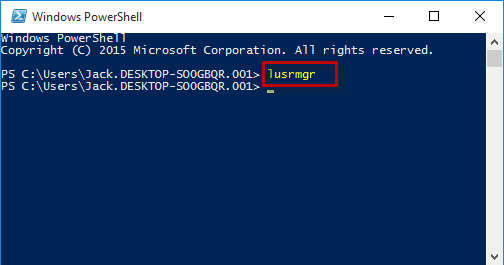
Way 5: using Windows PowerShell
Step 1: Start typing powershell in the Windows Start menu, and then click on the Windows PowerShell from the search result to open a Windows PowerShell window.
Step 2: Type lusrmgr (or lusrmgr.msc) and press Enter key.