Как установить и запустить сервер Nginx на Windows 10
Nginx — это веб-сервер, который очень популярен в Linux и BSD системах. Многие полагают, что установить Nginx на Windows 10 невозможно. Это совсем не так.
Согласно информации, размещенной на сайте Nginx, установка на Windows 10 возможна, но есть несколько ограничений производительности, которые пока не были устранены. К ним относятся только одно рабочее веб-приложение, отсутствие масштабируемости и возможные проблемы с UDP аутентификацией. На данный момент Nginx уже упоминал, что он решит все проблемы в своих будущих выпусках.
Чтобы успешно установить и запустить Nginx на Windows 10, выполните следующие действия.
Загрузите Nginx Server
Существует много загружаемых версий Nginx для Windows, но Nginx рекомендует использовать «mainline version». Однако, вы не найдете никаких проблем, если загрузите последнюю стабильную версию этой программы.
Выберите последний ZIP-файл и загрузите его в новую папку.

В качестве первого шага необходимо распаковать его. Вы можете использовать 7-Zip, WinRAR или любое другое популярное программное обеспечение для архивации.

После извлечения содержимого архива из первоначальной директории необходимо переместить папку, которая поставлялась со встроенной загрузочной копией. в «Program Files».

Мы запустим Nginx из этого места в качестве веб-сервиса по умолчанию.

Чтобы установить и запустить Nginx, выберите и дважды щелкните файл Nginx.exe.

На следующем шаге вам нужно проверить, была ли установка успешной. Для этого вы можете перейти в браузер по умолчанию и ввести «localhost». Если вы увидите следующее окно с сообщением об успешной установке и работе веб-сервера Nginx, то проблем с установкой в Windows 10 не было.

Чтобы остановить Nginx, вы можете завершить его из окна Диспетчер задач.

Запуск Nginx на компьютере с ОС Windows
Для запуска Nginx, вы должны использовать Internet Information Services (IIS), который является веб-сервером Microsoft, обслуживающим запрошенные HTML страницы или файлы. Вы можете включить его в меню Turn Windows Features On or Off в Панели управления. Проверьте необходимые поля для Web Management Tools и IIS Management Console.

Для включения IIS на вашем компьютере потребуется некоторое время.

Менеджер IIS Manager можно открыть непосредственно из меню Пуск. Здесь вы сможете получить доступ к веб-сайту по умолчанию, который обычно расположен по адресу «inetpub wwwroot». Он также известен как корень веб-приложения.
Полезно изменить физический путь этого корня в более подходящую папку. Я создал новую папку «Work» в C: и изменил физический путь на «C:Work».

После этого перейдите в папку Nginx, которую переименовали в файлах программы. Нажмите «Conf» и выберите «nginx.conf». Этот файл можно редактировать с помощью текстового редактора Notepad++.

В Notepad++ измените корень на отредактированный физический путь, о котором мы говорили выше.

Вы можете отредактировать файл index.html в корневой папке на отдельной вкладке. Измените текст на то, что вы хотите, чтобы веб-сервер отображался на экране.

Теперь снова запустите программу Nginx.exe и введите «localhost» в окне браузера. Веб-сервер Nginx выделит сделанные вами изменения.

На сайте ресурсов Nginx представлен полный список веб-приложений, которые можно использовать для запуска на Windows PC.
Вывод
Nginx является одной из ведущих компаний по разработке веб-серверов, которая, как ожидается, затмит Apache в будущем. Кроме того, он быстрее, может справляться с большим количеством параллельных задач и надежен. Подводя итог, можно сказать, что если у вас есть простой сайт, который вы хотите подключить к Nginx, вы можете сделать это прямо сейчас без каких-либо проблем.
Спасибо, что читаете! На данный момент большинство моих заметок, статей и подборок выходит в telegram канале «Левашов». Обязательно подписывайтесь, чтобы не пропустить новости мира ИТ, полезные инструкции и нужные сервисы.
Респект за пост! Спасибо за работу!
Хотите больше постов в блоге? Подборок софта и сервисов, а также обзоры на гаджеты? Сейчас, чтобы писать регулярно и радовать вас большими обзорами, мне требуется помощь. Чтобы поддерживать сайт на регулярной основе, вы можете оформить подписку на российском сервисе Boosty. Или воспользоваться ЮMoney (бывшие Яндекс Деньги) для разовой поддержки:
Заранее спасибо! Все собранные средства будут пущены на развитие сайта. Поддержка проекта является подарком владельцу сайта.
Версия nginx под Windows использует “родной” Win32 API (не эмуляцию Cygwin).
В настоящий момент в качестве методов обработки соединений используются
select() и poll() (1.15.9),
поэтому не стоит ожидать высокой производительности и масштабируемости.
В силу этого и ряда других известных проблем версия nginx под Windows
рассматривается пока как бета-версия.
На данный момент в ней доступна практически вся функциональность, что и
в версии nginx под UNIX, за исключением
XSLT-фильтра, фильтра изображений, модуля GeoIP и встроенного языка Perl.
Чтобы установить nginx/Windows, скачайте
дистрибутив последней основной версии (1.23.3),
поскольку основная ветвь nginx содержит все известные исправления.
Затем распакуйте дистрибутив, перейдите в каталог
nginx-1.23.3
и запустите nginx.
Вот пример для корневого каталога на диске C:
cd c:
unzip nginx-1.23.3.zip
cd nginx-1.23.3
start nginx
Чтобы увидеть процессы nginx, запустите утилиту командной строки
tasklist:
C:nginx-1.23.3>tasklist /fi "imagename eq nginx.exe"

Image Name           PID Session Name     Session#    Mem Usage
=============== ======== ============== ========== ============
nginx.exe            652 Console                 0      2 780 K
nginx.exe           1332 Console                 0      3 112 K
Один из процессов главный, другой — рабочий.
Если nginx не запускается, нужно искать причину в
в файле лога ошибок logserror.log.
Если же лог-файл не создался, то причину этого следует искать
в Windows Event Log.
Если вместо ожидаемой страницы выводится страница с ошибкой, нужно также
искать причины ошибки в файле logserror.log.
nginx/Windows использует каталог, в котором он был запущен, в качестве
префикса для относительных путей в конфигурации.
В вышеприведённом примере префиксом является
C:nginx-1.23.3.
Пути в конфигурационном файле должны задаваться в UNIX-стиле с использованием
прямых слэшей:
access_log   logs/site.log;
root         C:/web/html;
nginx/Windows работает как стандартное консольное приложение (не сервис)
и управляется при помощи следующих команд:
nginx -s stop быстрое завершение nginx -s quit плавное завершение nginx -s reload изменение конфигурации,
запуск новых рабочих процессов с новой конфигурацией,
плавное завершение старых рабочих процессовnginx -s reopen переоткрытие лог-файлов
Известные проблемы
-
Хоть и возможен запуск нескольких рабочих процессов, только один из них
реально работает. - Проксирование по UDP не поддерживается.
Возможные усовершенствования в будущем
- Запуск в виде сервиса.
-
Использование портов завершения ввода-вывода (I/O completion ports)
в качестве метода обработки соединений. - Использование нескольких рабочих нитей внутри одного рабочего процесса.
-
Скачиваем отсюда https://nginx.org/ru/download.html и распаковываем куда-нибудь.
-
Дальше читаем тут https://nginx.org/ru/docs/windows.html
ВНИМАНИЕ: командуstart nginxобязательно даем прямо из каталога, в котором лежит nginx.exe, в противном случае при дальнейшей работе будут ошибки (все пути в конфигурации прописаны как относительные, только поменяв их все, можно запускать откуда угодно).
Вообще рекомендуется держать консоль открытой в этом каталоге до самого конца выполнения инструкций, однако для работы nginx это необязательно — если её закрыть, он продолжит работать. -
Открываем http://localhost/ — должно заработать.
Установка PHP
-
Скачиваем с https://windows.php.net/download (ZIP-архив Non Thread Safe x64), замечаем номер в «VC(число)» — понадобится на следующем шаге.
Прописываем каталог в PATH. -
Открываем командную строку, запускаем
php -v.
Должно выскочить окно с надписью «The program can’t start because VCRUNTIME140.dll».
Если запуск прошел без ошибок, пропускаем следующий пункт. -
Ищем на странице загрузки из п.1 в левой колонке ссылку на VC нужного номера. Скачиваем x64.exe, устанавливаем.
После этого возвращаемся на предыдущий пункт. На этот раз команда должна показать версию php.
Конфигурация локального сайта в nginx
-
Выбираем локальное имя хоста (как
localhost, только какое-то другое, например,mysite) и каталог, где будут находиться его файлы (например,D:sitesmysite). -
В конец файла
(каталог nginx)/nginx.confперед последней закрывающей скобкой добавляем раздел:server { listen 80; server_name mysite; root D:sitesmysite; } -
В консоли, находясь в каталоге nginx.exe, даем команду
nginx -s reload, чтобыnginxперечитал конфигурацию. -
Открываем файл
C:WindowsSystem32Driversetchosts, добавляем строчку127.0.0.1 mysiteФайл защищен системой ото всех пользователей, кроме администратора, поэтому перед записью понадобится открыть его свойства и дать там нужные права и потом вернуть, как было.
-
Открываем в браузере ссылку http://mysite/ (обязательно с
http://, иначе браузер станет отправлять в поисковые системы). Должна отобразиться страница 404 от nginx.
Налаживание взаимодействия nginx и PHP
-
В раздел
serverконфигурации добавляем такие строки:location ~.php$ { fastcgi_pass 127.0.0.1:9123; fastcgi_param SCRIPT_FILENAME $document_root$fastcgi_script_name; include fastcgi_params; }(
9123— номер порта, можно выбрать какой-нибудь другой)Из консоли даем команду
nginx -s reload. -
В консоли переходим в каталог, куда распакован PHP. Даем команду
php-cgi.exe -b 127.0.0.1:9123Закрывать окно консоли нельзя, иначе интерпретатор PHP перестанет работать.
Можно прописать путь к каталогу PHP в системной переменной
PATHи запускать его без указания полного пути. -
Создаем файл
D:sitesmysitetest.phpсо следующим содержимым:<?php echo "This is PHP script on mysite";Открываем http://mysite/test.php — текст должен отображаться.
Взаимодействие налажено!
См. также https://www.nginx.com/resources/wiki/start/topics/examples/phpfastcgionwindows/
PHP: ini-файл и модули расширений
Вышеуказанные процедуры позволяют успешно запустить и использовать PHP, однако он будет «голым» — без расширений (в т.ч. таких необходимых, как mysqli, mbstring и др.) и без настроек, т.к. он не прочитает ни одного ini-файла.
PHP может автоматически загрузить файл php.ini из нескольких каталогов. Первое место, где он станет его искать — рядом с php.exe. В пакете есть файл php.ini-development. Нужно создать рядом его копию с именем php.ini, открыть и внести следующие изменения:
-
Раскомментировать строку
extension_dir = "ext"— в результате PHP станет искать модули расширений в подкаталогеextрядом сphp.exe
(относительный путь интерпретируется именно от exe-, а не от самого ini-файла)Проверяем, подключился ли файл, с помощью команды
php --ini. Результат должен быть примерно следующим:Configuration File (php.ini) Path: C:Windows Loaded Configuration File: {каталог с дистрибутивом PHP}php.ini Scan for additional .ini files in: (none) Additional .ini files parsed: (none)Вторая строчка говорит о том, что ini-файл успешно загрузился.
На первую строчку (про С:Windows) внимания обращать не следует, т.к. ini-файла по указанном адресу нет.
-
Найти нужные расширения и раскомментировать строки, где они подключаются. Например,
extension=mysqliи т.д.Все расширения перечислены рядом, и найти нужные среди них несложно. Рекомендуется включить следующие:
- curl
- fileinfo
- gd2
- mbstring
- exif
- mysqli
- soap
Просмотреть список подключенных расширений можно, дав команду
php -m. Непустой изначально список после вышеописанной манипуляции пополнится.
PHP загружает расширения при запуске exe-файла интерпретатора. Если нужно подключить новое, следует остановить php-cgi.exe (или php.exe соответственно) и запустить его заново.
PHP и MySQL
Чтобы установить связь между PHP и MySQL, не требуется никаких специальных действий, кроме собственно создания соединения (разумеется, должен быть включен соответствующий модуль, например, mysqli).
Проверить соединение можно так:
echo "Connecting to MySQL server... ";

// $host = 'localhost'; // если соединяемся через named pipe (аналог Unix-сокета),
$host = ".";            // то в качестве хоста указываем "."
$user = "someone";
$password = "a password";
$mysqli = new mysqli($host, $user, $password);

if ($mysqli->connect_error)
	echo $mysqli->connect_error;
else
	echo "Connected successfully!";
Об установке и минимальной настройке MySQL под Windows см. здесь.
Неудобства работы под Windows
-
в путях файловой системы используется обратный слэш (
), а не прямой (/) — типаD:sitesmysite...вместо/sites/mysite/..., что влияет, в частности, на содержимое констант__DIR__и__FILE__;
как следствие, весь код, рассчитанный на разбор пути по слэшу, перестаёт работать -
невозможно установить русскую локаль с UTF-8:
setlocale(LC_ALL, 'rus')всегда приводит к использованию windows-1251, и изменить это никак не получается
Installing a web server using a distribution package like XAMPP, and WinNMP are probably the easiest solution to make your localhost server works. But what if we wanted to make it from scratch? and avoid duplication whenever we install a composer, laravel and other development kit. Also, you’re free to upgrade them whenever a new version comes out.
The guide has been updated to run on the latest Windows 11, it should work on Windows 10, 8 and 7.
Table of Contents
- Nginx
- PHP
- MySQL
- Using Installer
- Using Zipped
- Add them to PATH environment
- Wrap Up
If you’re not running the latest Windows 11, you need to install the version of VC_Redist you can get it from at https://support.microsoft.com/en-us/topic/the-latest-supported-visual-c-downloads-2647da03-1eea-4433-9aff-95f26a218cc0, then look for Visual Studio 2015, 2017 and 2019, then download your either vc_redist.x86.exe or vc_redist.x64.exe. If you don’t have that, you’ll get this error message when using the PHP.
The code execution cannot proceed because VCRUNTIME140.dll was not found. Reinstalling the program may fix this problem.or if you have a lower version of VC_Redist installed, you’ll get this error.
'vcruntime140.dll' 14.0 is not compatible with this PHP build linked with 14.16 in Unknown on line 0 - Google SearchThat’s for installing the prerequisite. Let’s now install the latest version of NGINX 1.19.6 + PHP 8.0+ MySQL 8.0.22.
To install nginx, you need to download it from http://nginx.org/en/download.html. Select the Mainline version zip files. Currently, it’s nginx/Windows-1.19.6.
Once downloaded, create a folder in your computer. You may follow our naming convention or create your own. In our case we create a folder at C:WebServer.
After created a folder, create again a folder for our Nginx. It should be C:WebServernginx.
Unzip the downloaded nginx-1.19.6.zip at C:WebServernginx folder.
It’s all good for now, we can discuss later how we activate it.
PHP
To get binaries installation for PHP on Windows, you can grab it at https://windows.php.net/download/.
Then at the PHP 8.0, download the VS16 x64 Non Thread Safe zip file, so we can use it alongside with our Nginx and MySQL.

If you want to use the older version, PHP 7.4, download the VC15 x64 Non Thread Safe zip file.

Once downloaded, create a folder C:WebServerphp and extract the file at C:WebServerphp
MySQL
There are two ways to install MySQL by its installer or via zip. Both has pros and cons. Installing using its installer is easier and will not allow you to set things. Advantage of using the zipped version is its portability, you can easily transfer everything in a new computer.
Using Installer
To install MySql, you can downloaded the installer version at https://dev.mysql.com/downloads/installer/. Pick the mysql-installer-web-community-8.0.23.0.msi.

Run the installation, and when you are asked to what to install. Just install MySQL Server, other module is not needed.
You’ll then asked to set your MySQL password. Just fill up the form and when finish, the MySQL will run automatically.
We also suggest to start MySQL when windows start.
Using Zipped
You can download the zipped version at https://dev.mysql.com/downloads/mysql/. Scroll down and look for Windows (x86, 32 & 64-bit), ZIP Archive.

Once done, create a folder and unzipped the downloaded file at C:/WebServer/mysql.
Launch a command prompt as a Administrator and we can now initialize the MySQL setup.
cd C:/WebServer/mysql/bin
mysqld --initialize-insecure
You can then run the mysql using this command. Make sure to Allow Access when it asked for permission.
cd C:/WebServer/mysql/bin
mysqld --console
You need to open a new command prompt window to login to our MySQL. (Do not close the previous command prompt or else you’ll get an error saying ‘error 2003 (HYOO): Can’t connect to MySQL server on ‘localhost’ (10061))
cd C:/WebServer/mysql/bin
mysql -u root
In MySQL 8.0 and above, the default authentication plugin is caching_sha2_password which not allow you to connect to the mysql using the default native login in php. Most users will get this error message saying “Connection failed: The server requested authentication method unknown to the client”. To enable it back to native, we have to set your root password with mysql_native_password.
ALTER USER 'root'@'localhost' IDENTIFIED WITH mysql_native_password BY '';
FLUSH PRIVILEGES;
Add them to PATH environment
In order for us to call nginx, php and MySQL straight from the command line or Windows Powershell without going to its directory, this is needed for other module like Laravel and Composer. We need to add it in the PATH directory.
In the Search bar (Cortana) in your Windows taskbar, just search Edit the system environment variables.

At the bottom, Click the Environment Variables.

Then, you can either add both on User Variables for YOUR_USERNAME or System variables path. Look for Path then click Edit.

Now, we have to add these directories. If you use the installer for MySQL, no need to add the C:WebServermysqlbin.
C:WebServernginx
C:WebServerphp
C:WebServermysqlbin
Once done, click OK.
To see if it works, try running these commands using the Windows Powershell or Command Prompt.
php -v
mysqld -V
nginx -v
You should get these output.
PHP 8.0.1 (cli) (built: Jan  5 2021 23:43:33) ( NTS Visual C++ 2019 x64 )
Copyright (c) The PHP Group
Zend Engine v4.0.1, Copyright (c) Zend Technologies

Ver 8.0.22 for Win64 on x86_64 (MySQL Community Server - GPL)

nginx version: nginx/1.19.6
You cannot call yet the nginx -t at the command prompt, because this will cause an error which are looking for files on its relative directory. We can discuss this later on how to get rid of this using a batch command file.
nginx: [alert] could not open error log file: CreateFile() "logs/error.log" failed (3: The system cannot find the path specified)
2020/02/27 11:43:49 [emerg] 400#7148: CreateFile() "C:WebServer/conf/nginx.conf" failed (3: The system cannot find the path specified)
nginx: configuration file C:WebServer/conf/nginx.conf test failed
Wrap up
Now that we already added them to path. Let’s do some finishing touch.
To make PHP communicate with our MySQL. At C:WebServerphp, we need to add the module in our PHP. First, rename the php.ini-production to php.ini file
After renaming it, open the php.ini file, search for extension=/path/to/extension/mysqli.so and uncomment the line by removing the semi-colon “;”, then change its value to our mysqli dll (Unfortunately, we need to manually add the exact path of the dll because it is causing error when just using the default extension name).
; When the extension library to load is not located in the default extension
; directory, You may specify an absolute path to the library file:
;
extension=C:WebServerphpextphp_mysqli.dll
You can then also enable other module extension (DLLs) that are needed for your program. Like the following that are needed for WordPress.
extension=C:WebServerphpextphp_curl.dll
extension=C:WebServerphpextphp_pdo_mysql.dll
extension=C:WebServerphpextphp_mbstring.dll
extension=C:WebServerphpextphp_gd.dll
extension=C:WebServerphpexthp_soap.dll
We also need to edit our loadable extensions module to avoid PHP Warning for our MySQL. Search and find the ;extension_dir = "ext" then uncomment and replace the value with extension_dir = "c:WebServerphpext". (Credits to Mohamed for this tip)
; Directory in which the loadable extensions (modules) reside.
; http://php.net/extension-dir
;extension_dir = "./"
; On windows:
extension_dir = "c:WebServerphpext"
In the next step, we will be making a batch file. But there is a problem, running nginx and php-cgi in the batch command line will not allow us to execute the next line of code. Simply because the program is not yet closed for it to proceed on to the next line.
In order for us to run each lines of code of our batch file, we need to hide the command prompt windows by using RunHiddenConsole, you can download this at their official website (https://redmine.lighttpd.net/attachments/660/RunHiddenConsole.zip).
At C:WebServernginx, unzip the RunHiddenConsole.zip.
Then still at C:WebServernginx, we need to create a batch file called C:WebServernginxmyserver.bat. This is where we will start and stop our nginx and php-cgi by using a single command line. Add the following code. (Thank you to Mohamed for enhancing this code).
@echo off
cd C:WebServernginx


IF "%1" == "stop" (
	GOTO STOPSERVER
)else IF "%1" == "start" (
	GOTO STARTSERVER
)else (
	echo Use these commands:
	echo.
	echo myserver start
	echo myserver stop
)
GOTO END

:STARTSERVER
QPROCESS * | find /I /N "mysqld.exe">NUL
IF "%ERRORLEVEL%"=="0" (
	echo MYSQLD is already running.
)else (
	RunHiddenConsole.exe mysqld --console
	echo MYSQLD is now running.
)

QPROCESS * | find /I /N "nginx.exe">NUL
IF "%ERRORLEVEL%"=="0" (
	echo NGINX is already running.
)else (
	RunHiddenConsole.exe nginx
	echo NGINX is now running.
)

QPROCESS * | find /I /N "php-cgi.exe">NUL
IF "%ERRORLEVEL%"=="0" (
	echo PHP-CGI is already running.
)else (
	RunHiddenConsole.exe php-cgi -b 127.0.0.1:9000
	echo PHP-CGI is now running.
)

echo.
echo To stop, type "myserver stop"

GOTO END

:STOPSERVER

QPROCESS * | find /I /N "mysqld.exe">NUL
IF "%ERRORLEVEL%"=="0" (
	taskkill /F /IM mysqld.exe>NUL
	echo MYSQLD ended successfully.
)else (
	echo MYSQLD is not running
)

QPROCESS * | find /I /N "nginx.exe">NUL
IF "%ERRORLEVEL%"=="0" (
	::nginx -s stop
	taskkill /F /IM nginx.exe>NUL
	echo NGINX ended successfully.
)else (
	echo NGINX is not running
)

QPROCESS * | find /I /N "php-cgi.exe">NUL
IF "%ERRORLEVEL%"=="0" (
	taskkill /F /IM php-cgi.exe>NUL
	echo PHP-CGI ended successfully.
)else (
	echo PHP-CGI is not running
)

:END
After that, you can now use these commands for starting and stopping your server at the Command Prompt.
- myserver start – It will start Nginx, and PHP
- myserver stop – It will stop all instances of Nginx and PHP
But before running the commandline above, we have to edit some blocks on our C:/WebServer/nginx/conf/nginx.conf.
First we have to make sure index.php is been recognized by our nginx. find the location / {} block and change it with the following:
        location / {
            root   html;
            index  index.php index.html index.htm;
        }
Next is we have to make sure nginx know where to run the php files. Find and uncomment the block that says location ~ .php$ {}, the one that says “pass the PHP scripts to FastCGI server listening on 127.0.0.1:9000”. Change it with the following:
        location ~ .php$ {
            	root           html;

    		fastcgi_pass   127.0.0.1:9000;
    		fastcgi_index  index.php;
    		fastcgi_param  SCRIPT_FILENAME  $document_root$fastcgi_script_name;
    		include        fastcgi_params;
        }
Once everything is good. Create a file in C:WebServernginxhtmltesting.php. Then write this sample PHP codes with MySQL connection checker (Make sure to fill up your MySQL login, the default username is root).
<?php
	echo "PHP works!<br/><br/>";

	$servername = "localhost";
	$username = "root";
	$password = "";

	// Create connection
	$conn = mysqli_connect($servername, $username, $password);

	// Check connection
	if (!$conn) {
	    die("Connection failed: " . mysqli_connect_error());
	}
	echo "Connected to MYSQL successfully";


?>
Then at the command prompt. Let’s start our server. (Do not forget to Allow Access when Windows Defender Firewall is asking for permission.)
myserver startYou should get example output below.
MYSQLD is now running.
NGINX is now running.
PHP-CGI is now running.

To stop, type "myserver stop"
Now to really check its indeed running. Check at your browser and access https://localhost/testing.php.
PHP works!

Connected to MYSQL successfullyВ этой статье мы разберём, как установить Nginx на Windows 10 и запустить его, также эта инструкция подойдёт для Windows 7 и Windows 8.
Ещё перед этой статьи, прочитаете «Как установить Apache на Windows»,это если вам нужен будет Apache.
Скачать Nginx:
Перед тем как установить, нужно скачать Nginx, переходите по этой ссылки, там скачаете архив с ним.

Как видите я скачал стабильную версию, и вам тоже рекомендую так именно её, так как, основной могут быть баги.
После того как скачали, открываем архив и папку внутри, перемешаем в папку которую вам надо, но я рекомендую в «Program Files», иначе придётся ещё добавлять Nginx в директиву «path».
Установка и запуск Nginx:
После того, как вы переместили, заходите в папку и Nginx и запускаем файл «nginx.exe», по двойному клику левой кнопки мыши.

Тут стоит сказать, что при установки у вас не чего не появится и это может смутить, но чтобы убедится, видите в адресную строку браузера «http://localhost/», должно появится вот это.

Если у вас именно это, то значит всё работает так как надо.
Nginx запуск на Windows 10:
Единственное что стоит сказать, при перезагрузки компьютера или выключение и включение, сервер перестают работает, чтобы это исправить, есть два способа, первый через встроенный Windows server, но его я не буду, так как, он достаточно сложный и на мой взгляд не очень удобный, второй, это просто отправить на рабочий стол, в качестве ярлыка файл «nginx.exe».

Теперь вы можете спокойно запускать его с рабочего стола.
Настройка Nginx:
Последние что стоит рассказать, это то, как его настроить что бы было ещё удобрение, для этого заходим в папку со сервером и там переходим в «conf», и открываем файл «nginx.conf».
Единственное, что стоит в нём изменить, это грубо говоря массив «location», который указывает настройки для стартовой страницы сервера, надо изменить значение у ключа «root», в качестве значения используете путь до папки с вашим сайтом.
|
location / { root C:UsersusernameDocumentsproject; index index.html index.htm; } |
После этого всё должно удобно работать.
Вывод:
В этой статье вы прочитали как установить Nginx на Windows 10 и более ранние, начиная от Windows 7, думаю у вас всё получилось.
Подписываетесь на соц-сети:
Оценка:
Загрузка…
Также рекомендую:
Nginx is a web server that is very popular with Linux and BSD systems. It can also be installed on Windows 10. However, there are a few performance limitations in Windows that have not been mitigated so far, but the developers will address these problems in a future release. To install and run Nginx successfully on Windows, follow the steps below.
Download the Nginx Server
There are many download versions of Nginx for Windows, and Nginx recommends using the “mainline version.” However, you will not find any issues if you download its most recent stable version for Windows.
Select the version you want and download its zip file to your PC.

As a first step, you need to extract the new folder. You can use 7-zip, WinRAR or any other popular compression software.

After extracting the file contents in the original folder, you have to move the entire folder that came with the built-in download copy into the “Program Files.” We can either move or cut-paste this extracted folder.

We will run Nginx from this location as a default web service program.
Installing Nginx
To install and run Nginx, select and double-click the Nginx.exe file. It has now been activated for further use. You may run into a Windows Defender block screen while running the Nginx server, which has to be allowed by you.

In the next step, you need to verify whether the installation has been successful. For this, go to your default browser and type localhost. Microsoft Edge is the browser used in the below example. If you see a screen saying the Nginx web server is successfully installed and working, it means there were no problems with your Nginx installation in Windows.

To stop Nginx, you can end it from the Task Manager window.

Running Nginx on Your Windows PC
To run Nginx, you have to use Internet Information Services (IIS), which is a Microsoft web server that serves requested HTML pages or files. You can enable it in “Turn Windows Features On or Off” in the Control Panel. Check the required fields for “Web Management Tools” and “IIS Management Console.”

It will take a while for IIS to be enabled on your computer as the changes are applied.

You can open IIS Manager directly from the Start menu. Always open it in Administrator mode.

Here, you will be able to access the default website, which is usually located at “inetpub wwwroot.” This is also known as the web application root. You can look for it in File Explorer through a simple search.

It is helpful to change the physical path of this root to a more desirable folder. I created a new “Work” folder in C: and changed the physical path to “C:Work.” When you double-click on the “default web site” option in IIS Manager, it should lead to this new folder. Alternatively, you can right-click the menu and select “explore” for the same result.

After this, go to the Nginx folder that you renamed in the Program files. Click “Conf” and select “nginx.conf.” This file can be edited using the Notepad++ text editor, but you can use any other editor such as Atom or Visual Studio Code.

In Notepad++, find the location of the root and change it from the default html.

As shown here, change the root to the edited physical path which we discussed above.

You can edit the index.html file in the root folder in a separate tab. Change the text to what you want the web server to display on the screen.

Exit the Nginx.exe program using “End Task.” Open and run the “nginx.exe” file in Admin mode.
Type localhost in a browser window. The Nginx web server will highlight the edits you made.

Example Application of Nginx in Windows
The Nginx resources site has a full list of web server applications which you can use to run various applications on Windows PC.
For example, you can use Nginx in Windows to link to a webpage such as a customer login page. Once you make the configuration changes in the “nginx.conf” file, your end users will be able to access the login page on their end.
Go back to the “nginx.conf” file shared in the previous section. Instead of “localhost,” you need a domain name for the server to access. “index.html” is a command used to point to any static html page.

In the next step, go to “location” and modify the text using an “api,” followed by a proxy server added with an “http” ping. This should point to any login page you want this page to direct to.

Save the file and run the “Nginx.exe” program in Admin mode. For this login page to look nice to the end user, you should have previously configured the web server in an IDE program like Eclipse.
Frequently Asked Questions
1. What are the basic commands in operating Nginx for Windows 10?
On Windows, Nginx can be run as a standard console app. For managing it, the following simple commands are frequently used:
nginx -s stop |
Rapid shutdown |
nginx -s quit |
Graceful shutdown |
nginx -s reload |
Changing configuration, starting new worker processes with a new configuration, graceful shutdown of old worker processes |
nginx -s reopen |
Reopening log files |
2. What is the role of IIS Webserver in Nginx applications in Windows?
IIS is Microsoft’s native web server which supports HTTP, HTTPS, SMTP, and other protocols, and is not enabled in Windows as default. When Nginx is installed in Windows, it handles the live traffic based on changes made in nginx.conf files. For this, Nginx has to connect internally to an enabled IIS and then cache its response for any future requests.
Nginx’s biggest strength is that it is used at the front end before high load dynamic sites. Imagine tens of thousands of your website users downloading an important video file from IIS at the same time. It can become painfully slow. if you have a very powerful front-end server like Nginx handling the traffic instead, the request is processed faster. Check the “running Nginx on Windows PC” section for more details on IIS webserver’s role.
3.How Does Nginx Run in Windows?
Nginx supports multiple applications in Windows, such as web server, load balancer, mail proxy, and more. To run them in Windows, all desired changes are affected from various strings modified in the “nginx.conf” file in the Windows installation folder. To know more about Nginx commands, including the documentation, visit this link.
Nginx is one of the leading web server companies today. Also, it is faster, can handle more concurrent issues and is reliable. To summarize, if you have a simple website you want to connect to Nginx, you can do it right now without any problems. Read on to check out the comparison of Nginx to OpenLiteSpeed.

Sayak Boral
Sayak Boral is a technology writer with over eleven years of experience working in different industries including semiconductors, IoT, enterprise IT, telecommunications OSS/BSS, and network security. He has been writing for MakeTechEasier on a wide range of technical topics including Windows, Android, Internet, Hardware Guides, Browsers, Software Tools, and Product Reviews.
Subscribe to our newsletter!
Our latest tutorials delivered straight to your inbox
Recently, I got my wife an Asus ROG 15-Inch Gaming laptop as a development machine (so that I can have a machine to use when I feel like gaming). Since the Nginx server is one of my favorite servers for building web applications, it is something that I will always setup first when I get a new development machine.
I will set up my Nginx server to listen on port 80 and serve as a reverse proxy to web applications listening on other port numbers. And since the ROG GL552VW-DH74 15-Inch Gaming laptop came with Windows 10, this post documents the steps that I went through to set up Nginx server on Windows 10.
Downloading a copy of Nginx
The first thing that I did was to download a copy of Nginx for Windows. To do so, I go to the Nginx download page and click on the link labelled as nginx/WindowsXXX located under the section named Stable version. As of this writing, I downloaded nginx/Windows-1.10.2 and unzipped the contents to D:servers. This will create the folder D:serversnginx-1.10.2 which contains everything that is needed for me to run Nginx on Windows 10.
Starting Nginx for the first time
To test whether the copy of Nginx that I had downloaded is working, I opened up command prompt and typed the following commands:
cd /d D:serversnginx-1.10.2
nginx
Running the above commands triggered the following dialog box:
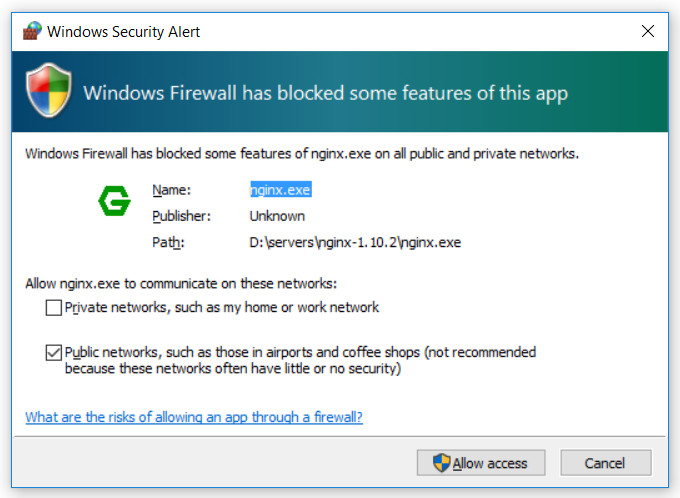
I clicked on the Allow Access button to get my Windows 10 firewall to associate port 80 to my Nginx server. I then opened up my browser and type localhost in the location bar and saw the following message:

Stopping Nginx server
Once I had ensured that my Nginx server is able to run in my Windows 10 machine, I opened up another command prompt and typed the following commands to stop the Nginx server:
cd /d D:serversnginx-1.10.2
nginx -s stop
Setting up Nginx server to start automatically when Windows 10 starts
Having to open up the command prompt to start Nginx every time I do my development work is cumbersome. Hence, I proceeded to set up my Nginx server to start automatically whenever my Windows 10 starts. Since the Nginx binary is not a windows service executable, I set it up to start automatically via the common Startup folder.
To do so, I created a shortcut of the nginx.exe binary and copied it to C:ProgramDataMicrosoftWindowsStart MenuProgramsStartUp. This will ensure that my Nginx server starts automatically whenever I log into my Windows 10 machine.
Restarting Nginx server
To restart my Nginx server on my Windows 10, I open up my Windows prompt and type the following commands:
cd /d D:serversnginx-1.10.2
nginx -s stop
nginx
For convenience, I created a .bat file that contains the above commands on the desktop so that I can quickly restart my Nginx server when I need to do so in the future.

About Clivant
Clivant a.k.a Chai Heng enjoys composing software and building systems to serve people. He owns techcoil.com and hopes that whatever he had written and built so far had benefited people. All views expressed belongs to him and are not representative of the company that he works/worked for.