Mac Dock for Windows
There are a lot of people who are interested in Mac and some of them want to change the windows they use to look like Mac. This dock is one of the best available for people who are interested.It works like a Nexus Doc but has a Mac taskbar and some Mac animations. This software is not a hacker system and does not require a system restart. It must open the running program, complete customized settings and disguise itself as Mac OS. It will start automatically after boot. Then you can enjoy the animation effect of Mac OS at any time.
How to install this Mac Dock
For windows 10 and windows 11
Requirements:
- OS:Windows 10 (version 1809 and higher), supports Windows 11
- Processor:Dual-core processor 1.2GHz
- Memory:2 GB RAM
- Graphics:Support DirectX11 graphics card, 512M video memory
- DirectX:Version 11
- Storage:20 MB available space
- Additional Notes:VC++2019 runtime library 32 and 64 bit .NET framework 4.8
Download
×
Download Page
MyDockFinder
Windows 10/11
55MB
Are you new to Windows customization?
Follow the steps given on this post page and I always recommend Creating a Restore Point before starting the customization. If you have any other doubts comment below.
Continue
For windows 7,8 and windows 8.1
Requirements:
- OS:Windows 7,Windows 8 and Windows 8.1(Win7 Home Basic is not available)
- Processor:CPU: 1GHz and above Dual Thread
- Memory:2 GB RAM
- Graphics:Support DirectX11 graphics card, 512M video memory
- DirectX:Version 9
- Storage:20 MB available space
- Additional Notes:VC++2019 runtime library 32 and 64 bit .NET framework 4.5
Download
×
Download Page
MyDockFinder
Windows 7 / 8 / 8.1
62.3MB
Are you new to Windows customization?
Follow the steps given on this post page and I always recommend Creating a Restore Point before starting the customization. If you have any other doubts comment below.
Continue
You may have shifted from a Mac device to a Windows PC or you adore the macOS interface and its simplicity to navigate. MacOS dock is highly customizable, therefore keeping your device easy to use and free from clutter. Taskbar is an inseparable part of Windows OS, however missing the charm of Dock in Mac. Multiple third-party developers have designed Mac like docks for Windows users. Vice versa, users willing to use Windows interface in macOS also have the options. In this article, we have compiled a list of applications on how to add a Mac like dock in Windows PC. They may be paid or free, depending on the purpose of use.
Most of the applications have copied the macOS interface, and others have added several customization options. You can install these apps and run on your Windows desktop or laptop like any other program.
1. ObjectDock
ObjectDock software is one of the first Mac dock programs developed for Windows. It is a product of Stardock developed alongside other productivity tools. Its fancy and fully customizable interface makes it stand out from the rest. Just like the Mac dock, it gives quick access to your applications and files. Equally important, you can enable auto-hide of the dock and locate it by moving the mouse over its position.

Here are the few features of ObjectDock.
- Easy to use settings page that you can use to create a smart interface easy to access using multiple docks.

- Show dots under running applications, show all running applications or show minimized windows.
- Add quick shortcuts for email, music player or document editor.

- You can customize effects, color, position, and the size of the dock.
- Create and easily customize tabbed docks of your applications and files.
- Enjoy the fancy animated effects of icons.
- Customize your dock with large number of available skins or download additional skins.

- You can easily drag and drop the applications to launch.
- Add magnification with different effects similar to Mac Dock when hovering mouse over the items.

- Enable loading the dock at startup and disable Windows taskbar.
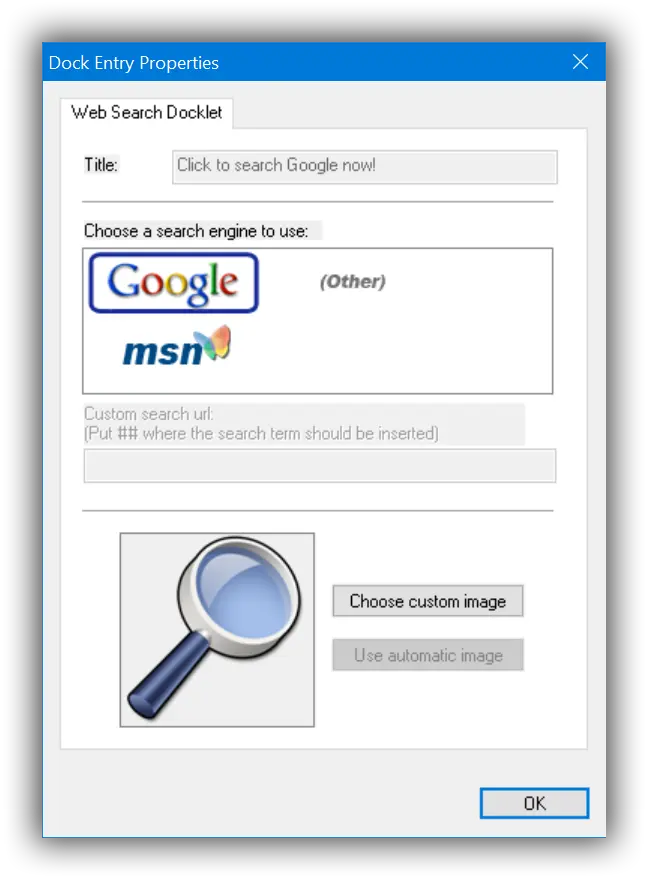
- ObjectDock also allows you to add custom widgets called Docklets. You can add a search box and start typing the keywords right from the dock. It will open Google or the set search engine with your default browser.
Currently, it comes with a 30-day free trial version and around $6 for the paid version. Although it is not yet modified to support Windows 10, it worked well for us. It works best with Windows 7 and 8.
2. Winstep Nexus
Winstep Nexus dock is free for personal use, but there is the ultimate package with additional features. It supports all Windows versions ranging from Windows 2000 version to Windows 10 version. It is one of the continually developed dock software receiving updates frequently.

Have a look at some of the Winstep Nexus free version features.
- Extensive customization capabilities ranging from the docking behavior, magnification size, set hotkeys to run Winstep Nexus features et cetera.
- Built-in clock alarm to help you run your errands in a scheduled manner. However, the free version comes with a one alarm clock support with the Nexus ultimate having unlimited alarms and task scheduler support.
- It is configurable with multiple monitors and high DPI support, meaning you can place the docks in any section of the screens.
- It’s capable of running all UWP apps for Windows 10 and other previous versions ordinarily.
- It is a smooth replacement of the system tray and taskbar capable of displaying all applications either one by one or in a group.
- For visual captivation, the Nexus free version supports built-in animated icons. They are easy to use with a drag and drop support to any position of the screen.
You can launch the software to try it out for fully customizable Mac experience in your Windows PC.
3. XWindows Dock
Maybe you want a fully packed dock with fewer customization. XWindows Dock is easy to use, but it is not feature-packed. The dock interface is a complete clone of the Mac OS dock. You can add icons and remove them as you wish, but it is not as fancy as the Winstep Nexus dock.
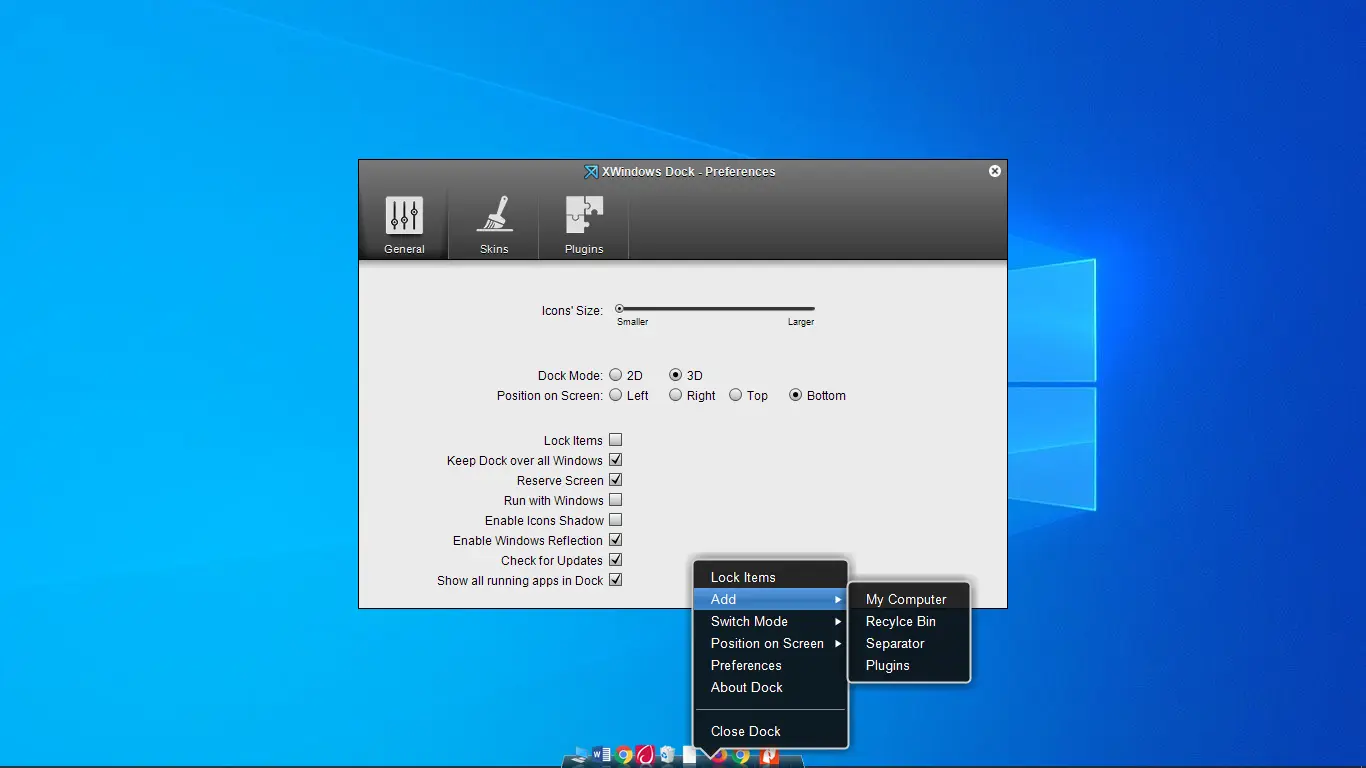
XWindows Dock is entirely free and supported by almost all Windows versions. It worked well in our Windows 10, but the problem came in its positioning. You have to hide the taskbar for it to be visible. Also, you have to reduce the dock size for it to display the dock apps fully.
It is almost a decade since its last update, which means in case of any other release, the software may be faulty. Meanwhile, if you are looking for a simple dock for your PC, then XWindows will serve you well.
4. Aqua Dock
Improve your productivity using this free and simple yet fully functional dock application. Spruce up your Windows PC looks without installing a new theme. Besides, you can launch your apps quickly.
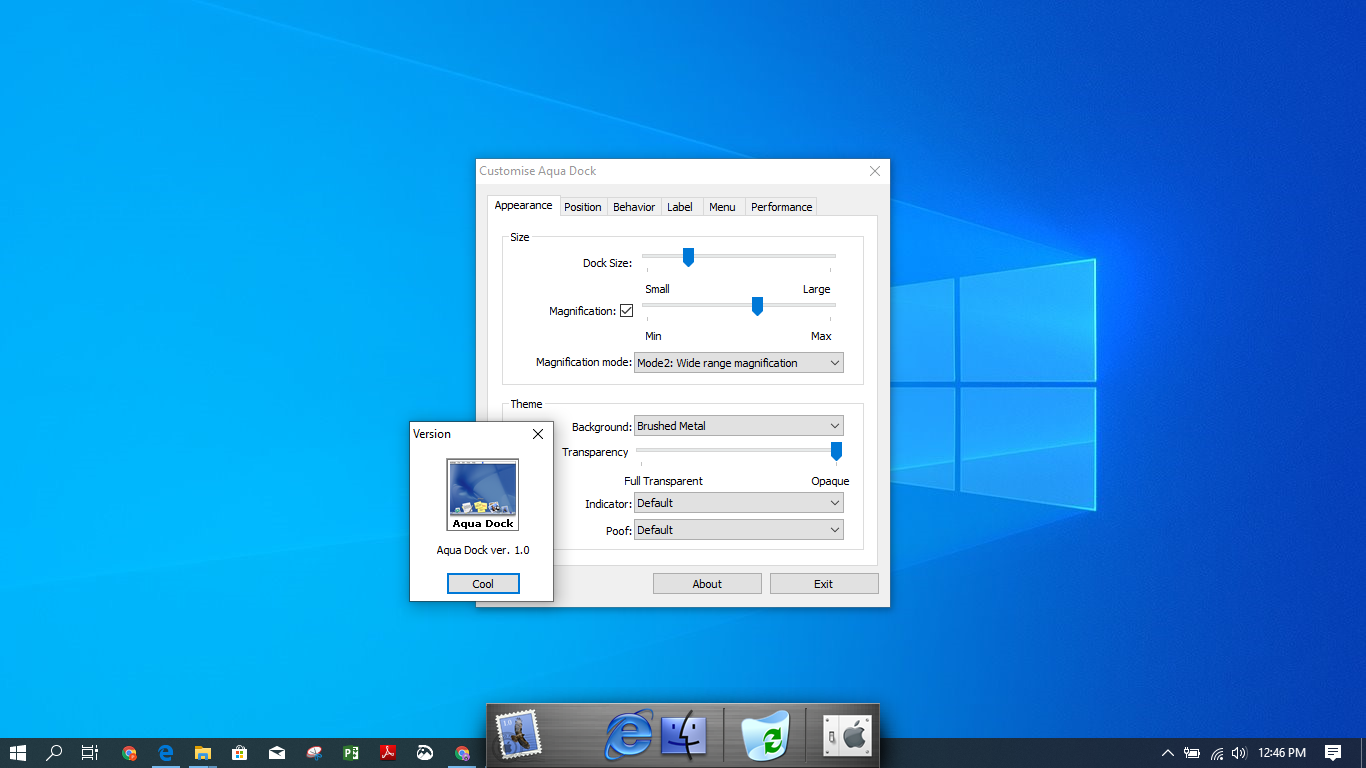
When setting up, you can leave the dock floating over the taskbar or choose to hide the taskbar. Also, you can move it to whichever position of the screen you wish. The dock can be made transparent to appear only when needed. Make it visible on one monitor only in case you are using many.
Aqua Dock icons are animated and can enlarge when highlighted. Further, the dock can be resized by just moving the window margins. To add custom icons on the dock, drag, and drop, and it will be configured with its added icon. Aqua Dock is ideal to use for Windows XP or later.
5. RocketDock
RocketDock is another super easy Mac-like dock configurable with your Windows PC. Although it has been neglected in terms of updates for many years, users still love it. If you were after a free dock, then RocketDock should work out for you.

Apart from being a basic dock, it has multiple customization features. You can customize the application icons, the font style, and the positioning of the dock. You can make it float or hide and locate it by moving the cursor over its position.
Despite it being a bit outdated, it is supported by multiple Windows versions. In our Windows 10 PC, it worked just fine. Users who need extra skins can opt to use ObjectDock skins that are easily compatible. It is not the one for you if you are looking for a fancy dock.
Add Mac Like Dock in Windows PC
Now you can proceed to add a Mac-like dock in your Windows PC and break the Windows monotony. We have selected the best options available either for personal or professional use. All the docks listed are suitable for you who are looking for a paid or an unpaid alternative.
macOS-style dock for Windows 10

Because using macOS daily I also want my Windows to look as minimal as possible. Dock is something I’m just used to instead of bulky start menus. This is why I tried to replicate it with Adobe Photoshop as close as possible. The dock is fully designed by me, following macOS Design Guidelines.
macOS Big Sur Dock
macOS Dock for Windows 10
Original Reddit thread: My Windows 10 is now perfect
Download
Settings
Theme: Dev X custom (SecureUxTheme ThemeTool)
Dock theme: macOS (Winstep Xtreme)
Font: Selawik + Segoe UI (Winaero Tweaker or Font Changer)
Taskbar: TaskbarX transparent -100000 offset
Please note: You might have to set indicator separately from settings.
Tweak other settings according to your personal preferences.
Apps needed
These are the minimum requirement if you want to achieve the completely minimal view with the dock included.
- Winstep Xtreme (commercial)
- TaskbarX (open source)
- SecureUxTheme (open source)
Optional apps for more mac-like experience
These apps are optional but make your Windows 10 to look and behave even more like macOS.
- GrenShot (open source)
- QuickLook (open source)
- WinXCorners (open source)
- WinDynamicDesktop (open source)
Extra apps
With these you can hide and disable stuff that are not needed and polish your Windows 10 even further.
- AltSnap (open source)
- 7+ Taskbar Tweaker (open source)
- Ultimate Windows Tweaker (freeware)
- Winaero Tweaker (freeware)
- FlipIt (open source)
- EarTrumpet (open source)
- Ribbon Disabler (freeware)
- TaskbarCustomizer (open source)
- PowerToys (open source)
Microsoft redesigned the taskbar in Windows 11, with the most notable taskbar change being its centralized icons. Those centralized icons make Windows 11’s taskbar more comparable to the macOS Dock.
However, the revamped taskbar still isn’t the same as the centralized Mac Dock, which doesn’t run across the entire desktop. If you want a true Mac-style Dock on Windows, you can add a more genuine Apple Macintosh Dock with the Winstep Nexus or RocketDock software.
Add a Mac-style Dock to Windows 10 and11 With Winstep Nexus
Winstep Nexus is a very cool software package with which you can add a Mac-style Dock to Windows, from XP to 11. That software has both freeware and paid versions. The freeware package retains all the animated mouse and live icon effects from Nexus Ultimate. Here is how you can install the freeware Winstep Nexus:
- First, open the WinStep Nexus webpage.
- Click the blue Download button for WinStep Nexus to save the ZIP archive.
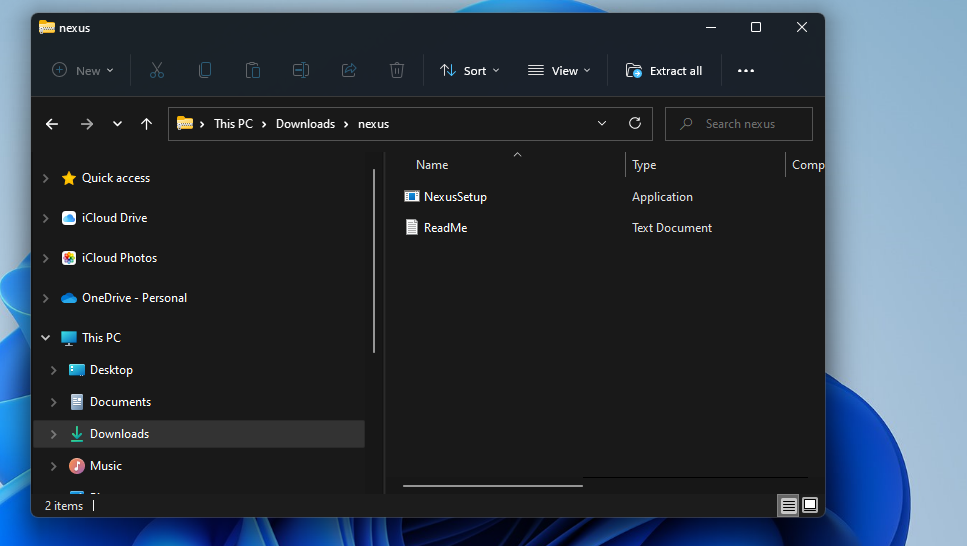
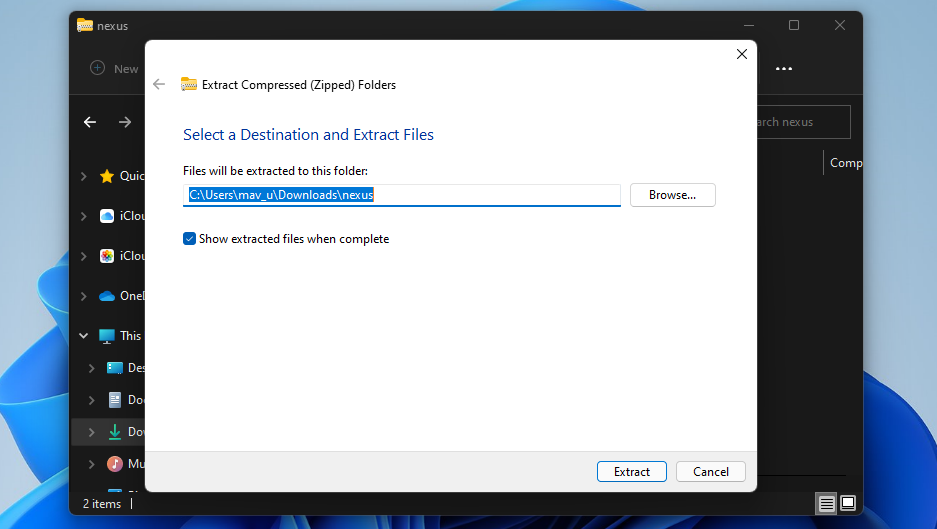
- Select the Nexus ZIP file, and click the Extract all button.

- Click Browse to choose an extraction path for Nexus.
- Select the Show extracted files option.

- Press the Extract button.
- Thereafter, double-click NexusSetup to open the installer.
- Then select the I accept the agreement option and choose an installation directory within the setup wizard to install the software.
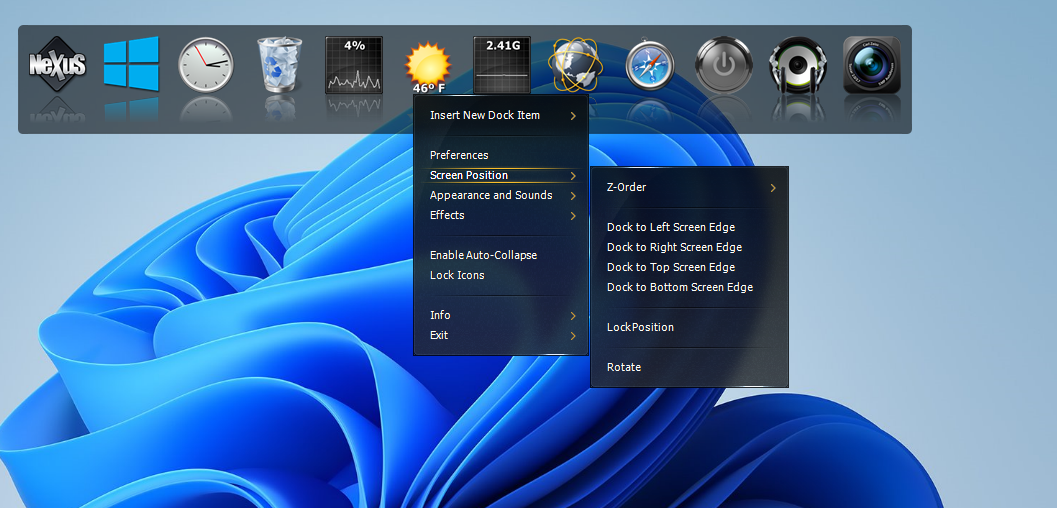
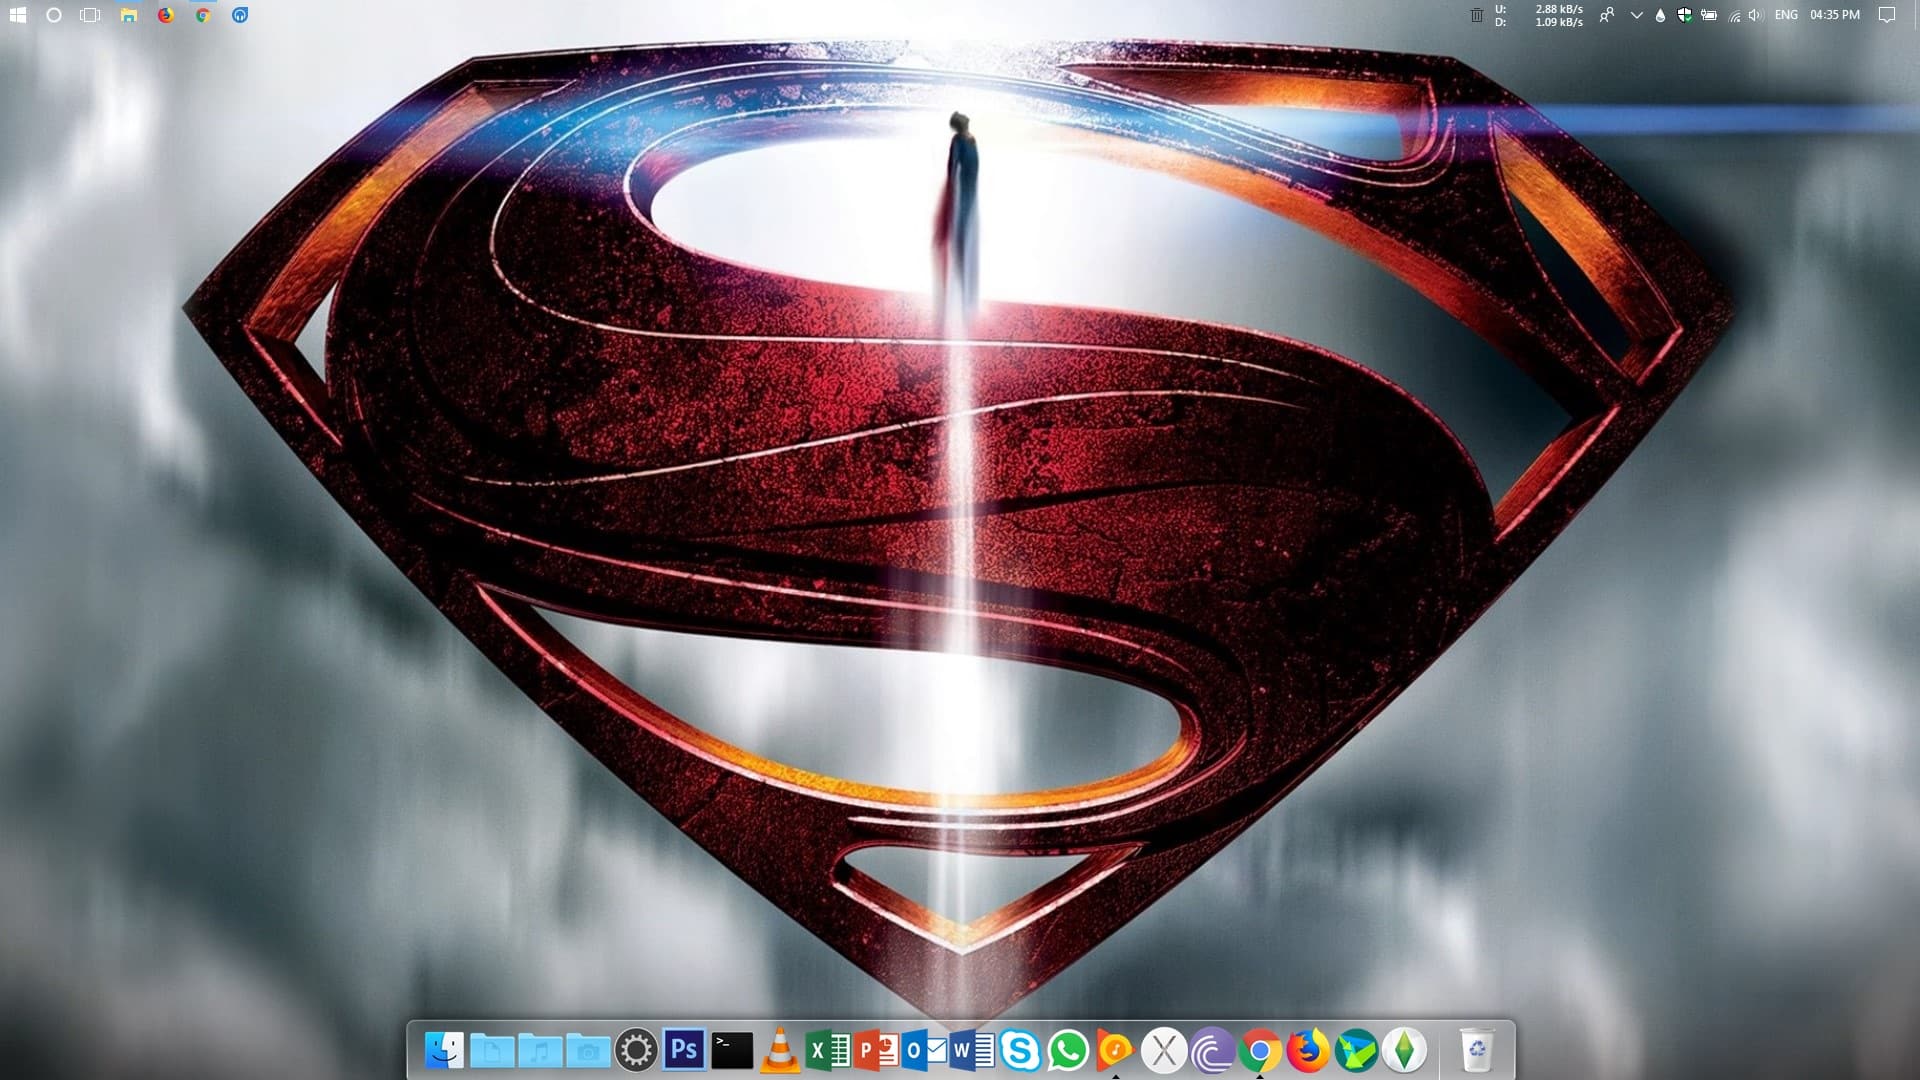
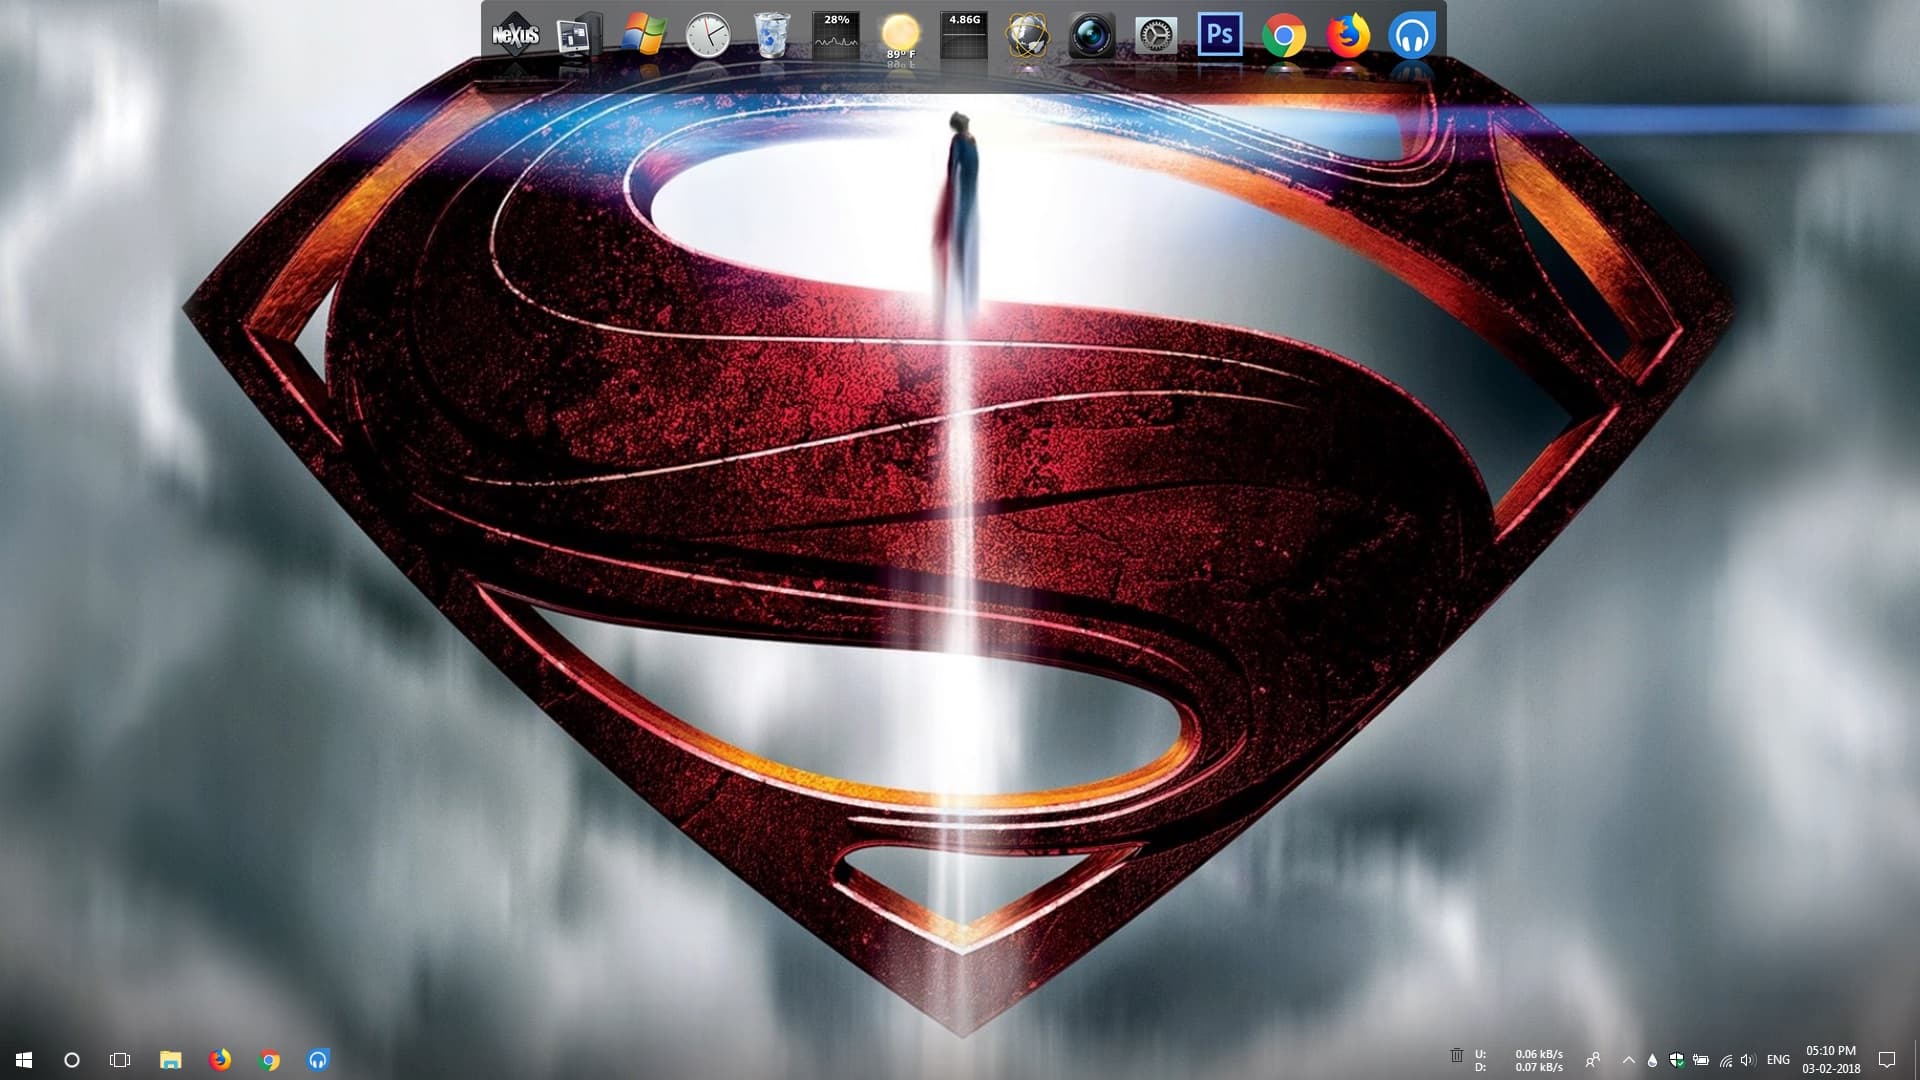
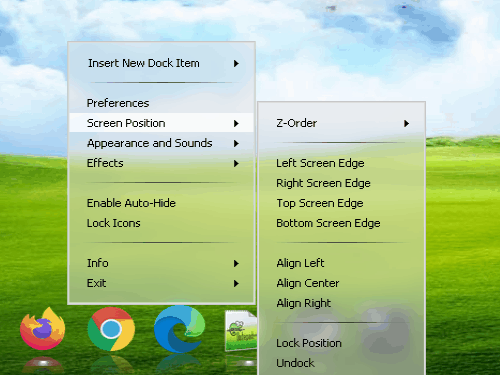
After installing, the Winstep Nexus Dock should automatically appear at the top of your desktop as in the screenshot directly below. That’s a good place to keep it, but you can change the position of the Nexus Dock by right-clicking it and selecting Screen position. Select a left, right, top, or bottom option on the menu.
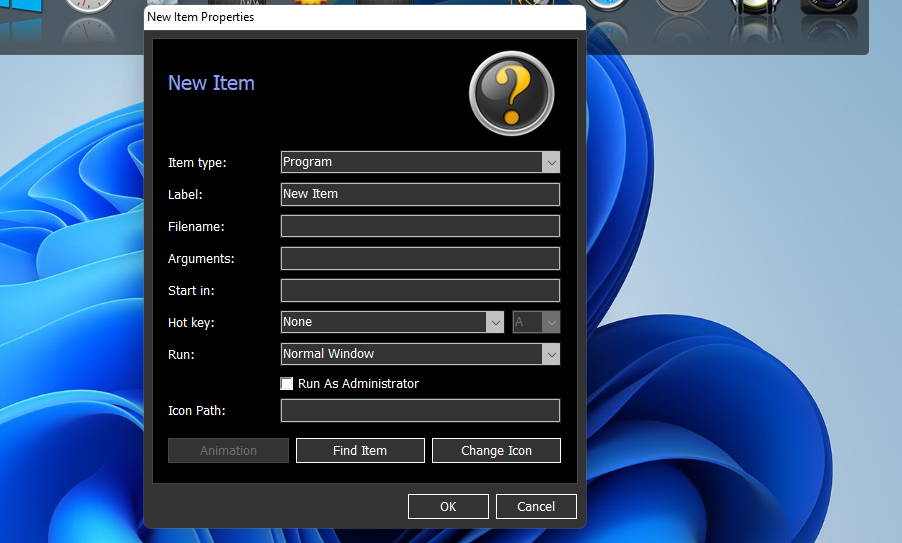
To add software shortcuts to the Nexus Dock, right-click it and select Insert New Dock Item > Item. Select Program on the Item type drop-down menu.
Click Find Item to select a program to include on the Dock. You can also select a Hotkey option there to assign a keyboard shortcut to the program. Click OK to add the software shortcut.
The Winstep Nexus Dock has some really flashy effects that put Windows 11’s taskbar to shame. To change those effects, click the Nexus button on the Dock. Then select the Effects tab shown directly below.
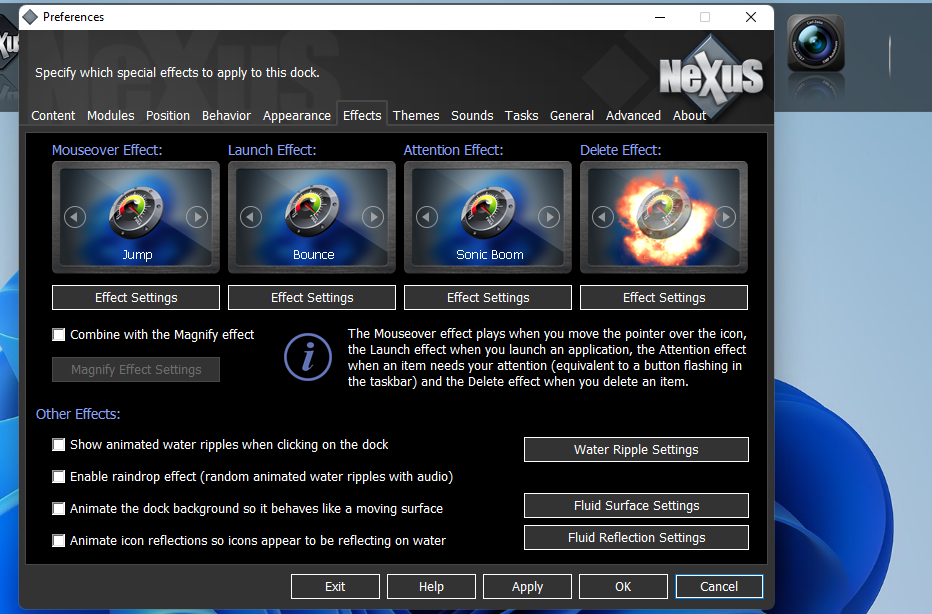
That tab includes options for mouseover, launch, attention, and delete effects. Click an effect there to choose from a wide variety of alternative ones. You can further configure selected effects by clicking the Effect settings button.
Press the OK button on the selection window, and select Apply to change it.
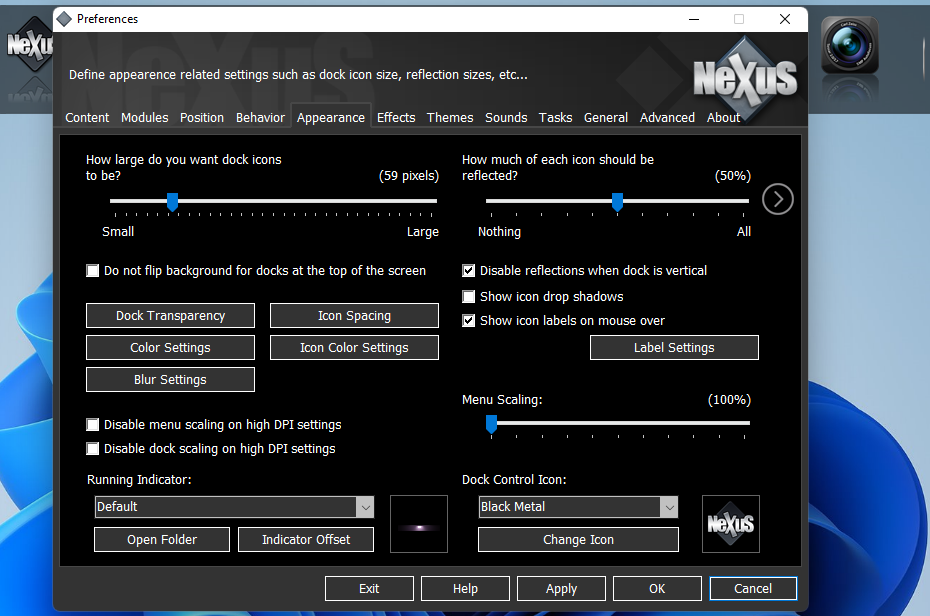
You can configure the icon size and transparency for WinStep Nexus Dock on the Appearance tab. Drag the bar’s slider on that tab to the left or right to reduce or expand the icon size.
Press the Dock Transparency button to bring up a window with transparency bars. Then you can drag those bar’s sliders right to add transparency.
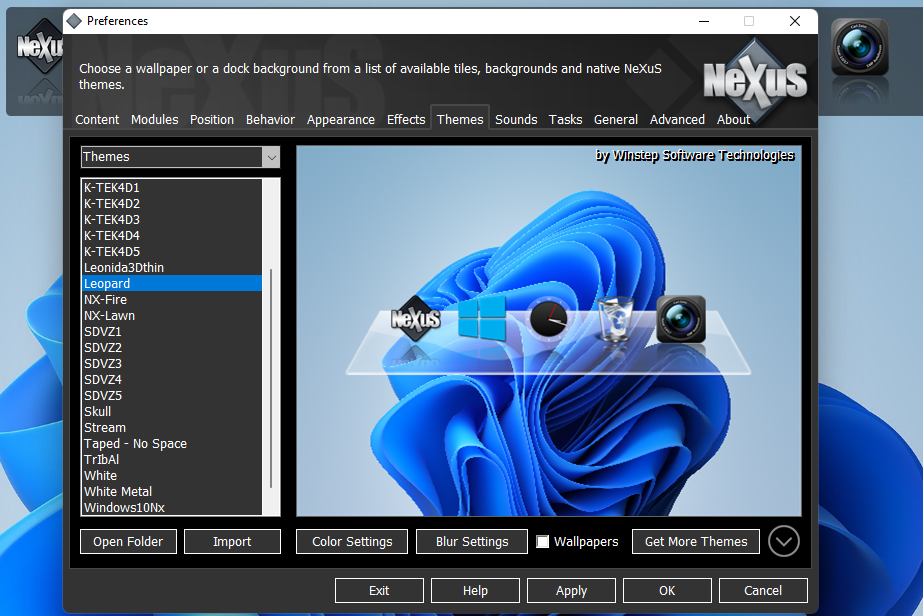
WinStep Nexus Dock also includes a variety of different themes. To select an alternative theme, click the Themes tab. Choose a different theme on that tab, and click Apply to save the new settings.
If you want to include minimized windows on the Winstep Nexus Dock, select the Content tab in the Preferences window. Click the Show running applications in this dock checkbox there, which will also select the Minimize windows to the dock option. Select Apply to confirm the new options.
Add a Mac-style Dock to Windows With RocketDock
RocketDock is an alternative to Winstep Nexus Dock, which is also freely available. It’s quite an old program, but RocketDock is still compatible with the latest Windows desktop platform. This is how you can download and install RocketDock in Windows 11.
- Open the RocketDock page on Softpedia.
- Click the Download Now option there to save the setup wizard.
- Bring up File Explorer’s window, and select the folder you downloaded RocketDock to.
- Double-click RocketDock-v1.3.5 to open its setup wizard.
- Choose a language on the drop-down menu, and click the OK button.
- Press the Next button, and select the I accept the agreement option.

- Select a folder path to install software at.
- Click the Next buttons, and select Install to finish.
- Then open RocketDock if it doesn’t appear on your desktop automatically after installing.

RocketDock is positioned at top of the desktop by default. You can change its position much the same as WinStep Nexus Dock by right-clicking RocketDock and selecting Screen Position. Then choose Top, Left, Bottom, Right on the submenu.

To add software shortcuts to RocketDock, right-click the dock and select Add item and File. Select a program or other file within the Open window. Press the Open button to add the item. You can always remove shortcuts you add by right-clicking them and selecting Delete items.
Like WinStep Nexus, RocketDock has a variety of different theme styles for you to choose from. To select a different one, click the Dock Settings button on RocketDock. Click the Style tab on the left side of the Dock Settings window that opens. There you can choose alternative styles by clicking the Theme drop-down menu.
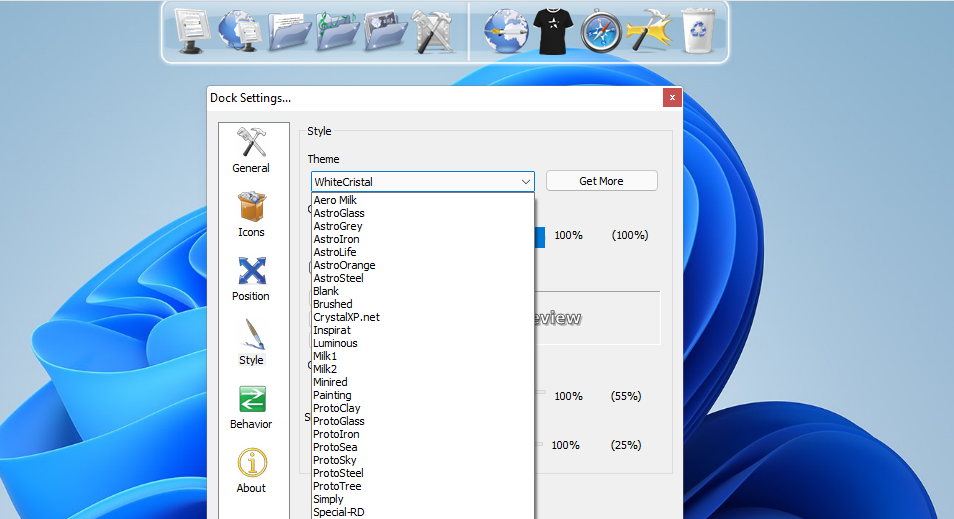
You can also customize the dock’s icons by selecting the Icons tab. Click the Hover Effect drop-down menu there to choose different zoom effects. Drag the Size bar’s slider left and right to make the icons smaller or bigger. You can also increase or decrease icon transparency by dragging the Opacity bar’s slider.
![]()
To include minimized app windows on RocketDock, select the General tab. That tab includes a Minimize windows to the Dock setting. Select that option, and click OK to apply it.
Make Windows More Like Mac With a Sleek New Dock
Winstep Nexus and RocketDock are two of the best freeware software packages for adding Mac-style Docks to Windows. Both include a wide range of configuration settings and lots of nice effects you just don’t get on the Windows taskbar.
They’re great extensions to the taskbar that provide lots more space for software shortcuts. So, check them out if you want to make Windows more like Apple Mac platforms or simply need somewhere to stick more shortcuts.
The concept of an app launcher or a dock on a Windows desktop might seem redundant to some. This is especially true for Windows 10. Yet, app launchers or MacOS like docks have been quite in demand over the years on Windows. This, in turn, has led many developers to take on the challenge and deliver a good experience to users on Windows. While Mac OS docs don’t offer a lot to the Windows 10 desktop in terms of features, they do add a layer of convenience. Not to mention they look much fancier than a start menu.
A dock also manages to allow you to add many apps folders or files on your desktop without making it look cluttered. There’s also the added functionality that you can access these usually from anywhere without having to minimize currently open windows. There are quite a few docks available on Windows, and some of them are quite good. Good, but if your needs are limited to looks or simply an app launcher that complements the Windows taskbar. Here are two MacOS docs for your Windows 10 PC that should satisfy your needs.
The following 2 Mac OS like docks hugely resembles the one found on Apple’s computers. Try them to easily access your favorite apps. These docks not only look beautiful but are also highly customizable. You should also check out these cool Windows taskbar tips and tricks for a better experience.
Rocket dock – Simple and elegant
Rocket dock has been one of the most popular dock options for Windows. The development on Rocket dock seemingly ceased years ago and there are no new features added. To be honest, it could actually use some more features. But there’s a good side to this apparent lack of features. It makes Rocket dock one of the simplest docks available for Windows. It does still have some of the basic features you might want in your dock. These include the ability to change individual icons, change the position of the dock, place it behind open windows or on top of them, etc. You can also adjust the quality of icons depending upon your hardware.
I’d suggest not changing a lot in the icon settings though since the default animation and zoom settings are quite ideal. The animations are so smooth with Rocket dock that it often feels like an integrated part of the system. It also has themes and the internet is full of them, the dock being so popular. The best place to find these is the Rocket dock’s official website. You can also extend the functionality using docklets, also available on the website. You can also let minimized windows appear on the dock if you wish to use it like the Mac OS dock. This functionality seems broken and is often not reliable though especially as long as there is a taskbar.
Also, Rocket dock will always overlap with open windows. That is, Windows will either slide over or under it, depending on your preferences. Unlike some other docks or the taskbar, Rocket dock cannot allocate a dedicated space for itself.
Winstep Nexus Dock – Feature-packed, not so simple
There’s a distance between the land and the sky, as you may have noticed. I’m not getting philosophical here, but that’s exactly the distance, or difference between Nexus dock and Rocket dock. Although both of these are essentially docks, Nexus dock is perhaps the best there is for Windows. It has so many features that you’d just skip over many of them even if I did type them all out. As a result, though, it is not the easiest, most user-friendly dock around. Launching apps and adding them to the dock still works pretty much the same as any other dock. There is a bit of a learning curve if you wish to customize the dock to look and behave as you want.
Don’t miss: Best Free Icon Packs for Windows 7, 8 and 10
It has everything Rocket dock has, such as themes and docklets, and in greater numbers even. It also has numerous features and fancy animations that Rocket dock does not have. Appearance settings such as icon reflections, icon launch animations, close animations, delete animations, the duration of these animations, you can micromanage everything. All of this does come at a price though. While there is a free version too, you’d have to shell out a few bucks for the Ultimate version which has all the features. I’ve used Nexus dock for a long long time before Windows 10 came along, and I’ve customized it to my heart’s desire. It even has a start menu button!
In case you’re wondering, minimizing Windows to the dock is not reliable on this one either but it works sometimes at least. To wrap up, if you wanted to replace the taskbar entirely, you can depend on the Nexus dock. Winstep Nexus is one of the best Mac OS docks for Windows 10 out there.
- Winstep Nexus download
Содержание
- Как в Windows 10 поместить значки панели задач в центре (как в macOS)
- Скачать CenterTaskbar для Windows 10
- Респект за пост! Спасибо за работу!
- партнёры блога
- telegram
- Реклама
- Последние
- Рубрики
- СЧЕТЧИКИ
- РЕКЛАМА И ДОНАТЫ
- Социальные сети
- 4 Free Beautiful macOS Theme And Skin Pack For Microsoft Windows 10
- ↓ 01 – macOS Sierra for all Windows OS
- ↓ 02 – macOS Transformation Pack
- ↓ 03 – Yosemite UX Pack
- ↓ 04 – macOS Sierra SkinPack
- How to make Windows 10 look like Mac [SUPER EASY]
- How to make your PC look like a mac?
- Download a Mac SkinPack
- Download the Mac OS Transformation Pack
- MAC-related features on Windows
- Question: Q: windows taskbar for mac?
- All replies
- Устанавливаем Mac OS на PC
- Особенности установки
- Подготовка загрузочной флешки OS X
- Создание загрузочной флешки
- Установка macOS
- Настройка
- Используем виртуальную машину
- Заключение
- Видео по теме
Как в Windows 10 поместить значки панели задач в центре (как в macOS)
Если вы хотите настроить панель задач в Windows 10, то вам нужна FalconX. Но если все, что вам нужно, это поместить иконки в центр панели задач, то можно попробовать CenterTaskbar.
Приложение портативное и не требует установки. Когда вы запустите CenterTaskbar, в системном трее появится новая иконка, а значки в панели задач переместятся в центре.
Как это работает? В документации на странице проекта программы сказано, что она использует фреймворк Windows UI Automation для мониторинга изменений, внесенных в иконки панели задач. CenterTaskbar будет определять изменения и динамически корректировать «положение по центру».
Щелкните правой кнопкой мыши по значку в трее, чтобы получить доступ к настройкам приложения. В меню доступны три варианта. Первый — «CenterTaskbar», и он выделен серым цветом. Цифра рядом в скобках указывает на частоту обновления монитора.

Программа не понимает, когда вы подключаете второй монитор. Для этого необходимо нажать кнопку «Scan for Screens», чтобы обновить позицию.

«Start with Windows» установит автоматическую загрузку программы при включении компьютера.
CenterTaskbar весит всего 106KB. Программа не создает INI-файл в папке, из которой вы его запускаете. Она не вносит никаких изменений в реестр и не записывает данные в папку USER. Приложение имеет открытый исходный код.
Скачать CenterTaskbar для Windows 10
Спасибо, что читаете! Подписывайтесь на мои каналы в Telegram, Яндекс.Мессенджере и Яндекс.Дзен. Только там последние обновления блога и новости мира информационных технологий.
Респект за пост! Спасибо за работу!
Хотите больше постов? Узнавать новости технологий? Читать обзоры на гаджеты? Для всего этого, а также для продвижения сайта, покупки нового дизайна и оплаты хостинга, мне необходима помощь от вас, преданные и благодарные читатели. Подробнее о донатах читайте на специальной странице.
Заранее спасибо! Все собранные средства будут пущены на развитие сайта. Поддержка проекта является подарком владельцу сайта.
партнёры блога

telegram
Реклама
Последние
Рубрики
Непонятно как с той абракадабры скачивать
Вообще-то разместить значки панели задач в центре в Windows 10 можно и без установки сторонних программ.
СЧЕТЧИКИ
РЕКЛАМА И ДОНАТЫ
Социальные сети
©2016-2022 Блог Евгения Левашова. Самое интересное и полезное из мира ИТ. Windows 10, Linux, Android и iOS. Обзоры программ и веб-сервисов. Статьи о мотивации и продуктивности.
Использование материалов разрешается с активной ссылкой на levashove.ru. 
Данный блог является личным дневником, содержащим частные мнения автора. В соответствии со статьей 29 Конституции РФ, каждый человек может иметь собственную точку зрения относительно его текстового, графического, аудио и видео наполнения, равно как и высказывать ее в любом формате. Блог не имеет лицензии Министерства культуры и массовых коммуникаций РФ и не является СМИ, а, следовательно, автор не гарантирует предоставления достоверной, не предвзятой и осмысленной информации. Сведения, содержащиеся в этом блоге не имеют никакого юридического смысла и не могут быть использованы в процессе судебного разбирательства. Автор блога не несёт ответственности за содержание комментариев к его записям.
Источник
4 Free Beautiful macOS Theme And Skin Pack For Microsoft Windows 10
Before you proceed with downloading and installing these skin transformation themes for Microsoft Windows, do note that there are risks involved such as the possibility of making your system unbootable or crash frequently.
Always create a new restore point in the event things go bad. As for system requirements, there is a possibility these skins might significantly slow down your computer, I highly recommend you not to use these skins unless you know what you are doing. Test it out on a dummy PC.
↓ 01 – macOS Sierra for all Windows OS

Fully working finderbar. Each button which is highlighted blue is functional. Of course only if the matching stuff is available on your computer. In example: You can only use the button “Apple software update, if there is any Apple software installed on your computer. Or you can only use the flying windows if you are on Vista or Windows7.
↓ 02 – macOS Transformation Pack

macOS Transformation Pack 4.0 will transform your Windows 10/8/7/Vista/XP user interface to macOS, including Login Screen, Themes, Wallpapers, Cursors, Fonts, Sounds, Icons, Dock, Finderbar, Dashboard, Spaces, Launchpad and more.
↓ 03 – Yosemite UX Pack

Yosemite UX Pack will give you all new OS X Yosemite user experiences combined with iOS 8 graphics such as theme, wallpapers, and new OS X features combined altogether in single package working on Windows 7/8/8.1/10 without touching system files at all so it won’t have such risk to harm your system at all. In this package, you’ll have the best user experiences that greatly resembles real OS X Yosemite from the Windows side without modifying system files.
↓ 04 – macOS Sierra SkinPack

If you are bored with the default Microsoft Windows XP, Vista, 7 and 8 theme layout design, why not skin your Windows to look like Apple’s macOS Sierra? macOS Sierra SkinPack will transform your Windows 8.1/8/7/Vista/XP user interface to macOS Sierra, including macOS’s Boot Screen, Login Screen, Themes, Icons, Wallpapers, Sounds, Fonts, Dock, Dashboard, Spaces, Launchpad and more.
Источник
How to make Windows 10 look like Mac [SUPER EASY]


If you like the Mac interface or if you used it before but you would like to also stay with your Windows 10 operating system, you now have the possibility to make your Windows 10 look like Mac with the help of a few apps.
In this manner, you’ll make your PC look like a Mac with just a couple of clicks and a Mac theme for Windows 10.
The desktop will look exactly like a Mac but your operating system will still function under Windows 10. Also, you can have access to all the Windows 10 features as you did before.
With no changes in the functionality department, you’ll just make Windows feel like Mac.
Making your Windows desktop look like Mac OS can be done very easily and in just a couple of minutes of your time.
You will only have to carefully follow the tutorial posted below and you will be ready to use your new apple theme for Windows 10.
How to make your PC look like a mac?
Download a Mac SkinPack
Download the Mac OS Transformation Pack
You can also download and install the Mac OS transformation pack. With the help of this tool, you can make Windows feel like Mac.
The pack includes a great number of changes, but it’s easy to install and use. It brings Mac themes, wallpapers, as well as new OS X features to your Windows computer.
There are other interesting MAC-related things that you can do on a Windows PC. We will show you the most popular and used MAC features on Windows PCs. Here they are:
Now that you have your Windows 10 Mac OS skin up and running on your PC, you can start testing it and see if it fits your needs.
Don’t hesitate to write us below if you are unable to install the Mac theme for Windows on your PC, and we’ll be sure to help you succeed.
Источник
Question: Q: windows taskbar for mac?
hey is there a program which creates a windows taskbar for a mac?
i want to beable to navigat through my OPEN windows as easily as windows, and i expose is annoying.
Imac G5 Rev B, Mac OS X (10.4.1)
Posted on Dec 25, 2005 4:38 AM
Loading page content
Page content loaded
Dec 25, 2005 4:48 AM
). Also you can click and hold on any icon in the Dock and chose the window you want.
As far as a «task bar» for Mac, if you go to to VersionTracker and enter «task bar» in search there are some third party utilities that may help (or hurt).
Dec 25, 2005 5:05 AM
Yes hold the Apple key (or Command key as it’s called) plus Tab will immediatly bring up a graphic that you can «tab» again to switch immediatly to the running program of your choice.
The Apple key plus ` will switch between windows of the application your in.
Installing third party «hacks» is not advised for newbie users of Mac OS X as Apple changes things and a OS update can cripple the operating system.
Don’t ever install anything requiring your admin password unless you completely trust the corporation supplying the software.
Don’t give a admin password to any program ran off a music cd.
Dec 25, 2005 7:20 AM
Also, you may want to check out Peter Maurer’s Witch:
I think it’ll do what you’re looking for.
FP iMac G4 700 Mac OS X (10.4.3) 200 GB Firewire External
Dec 25, 2005 10:11 AM
This may not be what you want but. If you select the icon of the program and hold your mouse button down, a list will appear showing the open windows of the app.
Dec 25, 2005 10:47 AM
I agree with the original poster that expose, although nice looking, isn’t as effetive as windows’ taskbar.
If i have 3 AIM windows open, i want to be able to see a separate AIM icon at the bottom of the screen for each of my 3 AIM windos. I don’t want to have to right click the AIM icon on the dock and then choose which window I’m looking for. One click is much better than 2.
Expose also requires 2 actions (the expose button, then clicking the desired window) not to mention the time it takes to look at each miniaturized window to decide which window is the actual window I’m looking for.
With a taskbar, it’s easy to keep a mental note of which icon corresponds to which window.
Any other suggestions besides Witch and any other action requiring more than one button and/or click?
Источник
Устанавливаем Mac OS на PC
Использовать macOS можно не только на макбуке, но и на обычном компьютере с Windows. Далее расскажем, как установить macOS на ПК и какие программы для этого потребуются. После этого вы сможете использовать все возможности «яблочной» операционной системы.
Особенности установки
Всего существует несколько способов для того, чтобы поставить macOS на обычный ПК. Каждый имеет свои особенности, поэтому внимательно ознакомьтесь с ними и выберите нужный:
Во всех случаях для установки операционной системы понадобится дистрибутив. 
Если собираетесь поставить OS X в качестве основной или дополнительной ОС, то придется создать загрузочную флешку или использовать уже готовый диск с macOS.
Подготовка загрузочной флешки OS X
Загрузочная флешка — обычный Flash накопитель, на который записывается дистрибутив с операционной системой. В нашем случае это будет OS X. Создавать ее можно из-под Windows или другого компьютера (на Linux или Mac). Во всех случаях способы будут отличаться. Чтобы создать флешку с macOS на PC Windows, выполните следующие действия:
После того, как все необходимые файлы и программы загружены, можно переходить к следующему этапу — созданию загрузочной флешки. Для этого дополнительно понадобится USB-накопитель с объемом памяти не менее 8Гб.
Создание загрузочной флешки
Установка macOS X состоит из нескольких этапов, один из которых — создание загрузочной флешки или диска. Без этого поменять операционную систему не получится. Поэтому далее расскажем, как ее сделать с помощью бесплатной утилиты BootDiskUtility:
Дождитесь завершения операции. Как только операционная система будет записана, то флешку можно будет использовать в качестве загрузочной для установки macOS.
Если хотите установить macOS на Windows в качестве второй операционной системы, то полностью форматировать диск не нужно.
Установка macOS
Установка операционной системы macOS на PC начинается с создания загрузочной флешки. Поэтому, когда USB-носитель готов, можно переходить к следующему этапу. Чтобы начать установку, выполните следующие действия:
В зависимости от технических характеристик компьютера и других особенностей операционной системы, как правило, процесс занимает не более 20 минут. Теперь вы знаете, как установить на компьютер macOS вместо Windows 10 и что для этого нужно.
Настройка
Установка операционной системы macOS X на PC это не только загрузка, но и настройка ОС. После того как распаковка закончится, необходимо правильно произвести конфигурацию основных параметров.
Для этого выполните следующие действия:
Большую часть указанных параметров сможете изменить на macOS позже, через меню «Настройки». Для этого может потребоваться ввести данные учетной записи администратора и Apple ID. При необходимости настроить синхронизацию, резервное копирование.
Используем виртуальную машину
Если установка операционной системы macOS на ПК в качестве основной или дополнительной не подходит, то использовать возможности макбука можно через виртуальную машину. Для этого выполните следующие действия:
Установка дистрибутива macOS с флешки занимает не более 40 минут. Но если не планируете использовать операционную систему слишком активно, то можно обойтись образом в виртуальной машине. С помощью виртуальной машины сможете загружать и другие ОС.
Заключение
В данной статье рассказывалось о том, как установить macOS на ПК, воспользовавшись необходимыми программами. Существует несколько вариантов установки, а каким воспользоваться — решать вам. Надеемся наша статья поможет быстрее и легче осуществить задуманное.
Видео по теме
Источник
Download PC Repair Tool to quickly find & fix Windows errors automatically
Do you want to use the macOS Dock on Windows 10? In this article, we will show you how you can get the macOS-style Dock on Windows 10 operating system. For this, you have to download and install Winstep Nexus on your system. This software is free for personal use.

Winstep Nexus lets you add macOS Dock on Windows 10 operating system. After installing the software, run it to get the macOS Dock on your desktop. If you hide your desktop icons and Taskbar, you will make your PC screen looks like an Apple desktop.
This freeware offers a lot of features. We will describe some of these features here. Let’s have a look:
- How to change the position of macOS Dock.
- How to remove and add programs to the Dock.
- How to change the theme of the Dock.
- How to change the appearance of the macOS Dock.
1] How to change the position of macOS Dock
When you launch Nexus for the first time, it will appear on the top of the screen. To change its position, right-click on the Dock and click Screen Position. Now, select the position on the desktop where you want the Dock to appear. The Rotate option will align the Dock vertically. You can use this feature if you want to place the Dock either on the left side or on the right side of the desktop.
You can also change its location by dragging it.
The Lock Position option is similar to the Lock the Taskbar in Windows 10. If you want the Dock to always appear on the top of all the apps, click on the Z-Order and select Always on Top.
2] How to remove and add programs to the Dock
By default, you will not get your favorite programs pinned on the Dock. Let’s see how you can add a program to the Dock.
Follow the below-listed steps:
- Right-click on the Dock and go to “Insert New Dock Item > Item.” This will open a new window.
- Select Program from the Item type drop-down menu.
- Copy the path where the program is installed on your computer. For this, right-click on the desktop icon of the program in Windows 10 and select Open file location. Click on the address bar of the File Explorer window and copy the entire path.
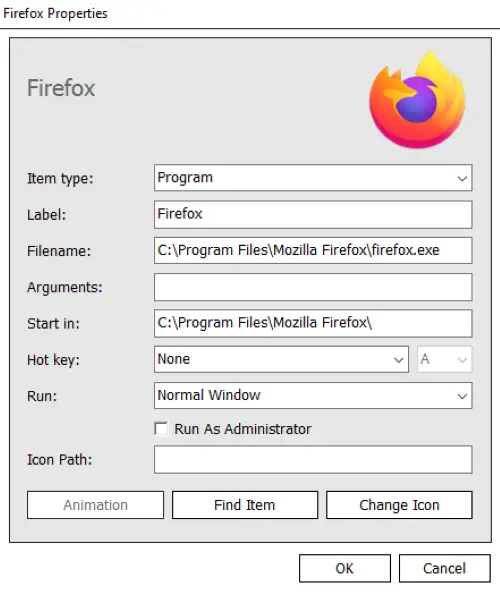
- Paste this path into the box adjacent to the Filename. After that, you have to write “application name.exe” followed by a backward slash. You will get the application file name at the location where it is installed. For example, if you want to add Firefox to the Dock, you have to paste its installation path and type
firefox.exeat the end of it. Similarly, if you want to add Edge, you have to typemsedge.exe. - When you are done, click OK.
To remove a particular program from the Dock, right-click on it and select Remove from Dock.
3] How to change the theme of the Dock
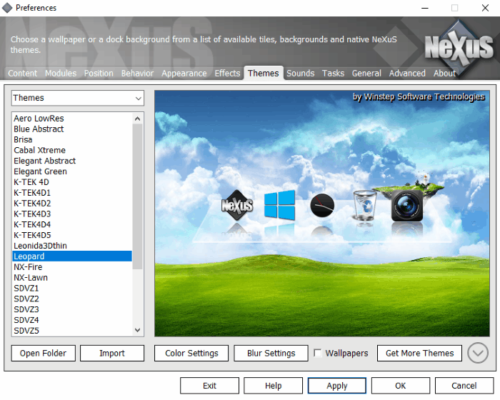
To change the theme of the Dock, right-click on it and select Preferences. Now, in the Preferences window, click on the Themes tab and select your favorite theme from the list. If you want to change the wallpaper, select Wallpaper from the drop-down menu under the Themes tab. The software also shows you the preview of the selected theme or wallpaper.
TIP: You can also make Windows 11 Taskbar look like Mac Dock.
4] How to change the appearance of the macOS Dock
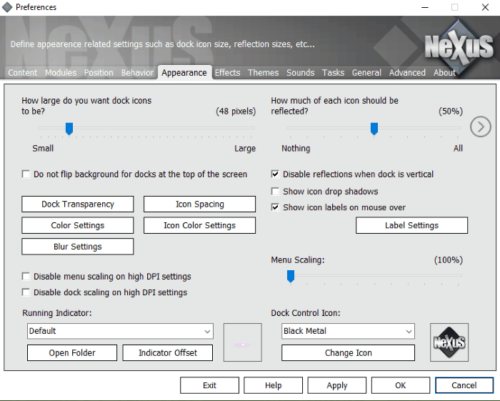
Launch the Preferences window by right-clicking on the Dock. Click on the Appearance tab. Here, you can:
- Make the Dock transparent by clicking on the Dock Transparency button.
- Vary the space among the icons by clicking on the Icon Spacing button.
- Change the color of the icons and the Dock base.
Apart from the above options, several more customization options are available in the Appearance section of the Dock.
To disable the Nexus, right-click on the Nexus in the system tray and select Exit. Alternatively, you can also right-click on the Dock and select “Exit > Exit Nexus.” If you do not want Nexus to run on Windows startup, disable it from the Startup tab of the Task Manager.
That’s it. We have explained commonly used features of the Dock. You can explore more features in the Dock Preferences. We hope you liked the article.
You can download the software from Winstep.net.
Read next: Best Gaming Browsers for Windows 10 PC.

Nishant is a tech enthusiast who loves writing about technology and gadgets. He has completed B.Tech. Apart from writing, he likes to spend his time on his plantation.
Возможно, вы перешли с устройства Mac на ПК с Windows или вам нравится интерфейс macOS и его простота в навигации. Док-станция MacOS обладает широкими возможностями настройки, поэтому ваше устройство будет простым в использовании и свободным от беспорядка. Панель задач является неотъемлемой частью ОС Windows, однако в Mac отсутствует очарование Dock. Многие сторонние разработчики создали Mac как док-станцию для пользователей Windows. И наоборот, пользователи, желающие использовать интерфейс Windows в macOS, также имеют возможность. В этой статье мы составили список приложений о том, как добавить Mac-подобную док-станцию на ПК с Windows. Они могут быть платными или бесплатными, в зависимости от цели использования.
Большинство приложений скопировали интерфейс macOS, а другие добавили несколько параметров настройки. Вы можете установить эти приложения и запустить их на рабочем столе Windows или ноутбуке, как и любую другую программу.
1. ObjectDock
ObjectDock software — одна из первых док-программ Mac, разработанных для Windows. Это продукт Stardock, разработанный вместе с другими инструментами повышения производительности. Его модный и полностью настраиваемый интерфейс выделяет его среди остальных. Как и док-станция Mac, она обеспечивает быстрый доступ к вашим приложениям и файлам. Не менее важно, что вы можете включить автоматическое скрытие док-станции и найти ее, наведя указатель мыши на ее позицию.
Вот несколько возможностей ObjectDock.
- Простая в использовании страница настроек, которую можно использовать для создания интеллектуального интерфейса, к которому легко получить доступ с помощью нескольких док-станций.
- Отображать точки под запущенными приложениями, отображать все запущенные приложения или отображать свернутые окна.
- Добавьте быстрые ярлыки для электронной почты, музыкального проигрывателя или редактора документов.
- Вы можете настроить эффекты, цвет, положение и размер док-станции.
- Создавайте и легко настраивайте док-станции с вкладками для ваших приложений и файлов.
- Наслаждайтесь красивыми анимированными эффектами иконок.
- Настройте док с большим количеством доступных скинов или загрузите дополнительные скины.
- Вы можете легко перетащить приложения для запуска.
- Добавляйте увеличение с различными эффектами, как в Mac Dock, при наведении курсора мыши на элементы.
- Включите загрузку док-станции при запуске и отключите панель задач Windows.
- ObjectDock также позволяет добавлять пользовательские виджеты, называемые доклетами. Вы можете добавить поле поиска и начать вводить ключевые слова прямо из док-станции. Он откроет Google или установленную поисковую систему с вашим браузером по умолчанию.
В настоящее время он поставляется с 30-дневной бесплатной пробной версией и около 6 долларов за платную версию. Хотя он еще не модифицирован для поддержки Windows 10, у нас он работал хорошо. Лучше всего он работает с Windows 7 и 8.
2. Winstep Nexus
Винстеп Нексус док-станция бесплатна для личного использования, но есть идеальный пакет с дополнительными функциями. Он поддерживает все версии Windows, от версии Windows 2000 до версии Windows 10. Это одно из постоянно разрабатываемых программ док-станций, которые часто получают обновления.
Ознакомьтесь с некоторыми функциями бесплатной версии Winstep Nexus.
- Обширные возможности настройки, начиная от поведения стыковки, размера увеличения, набора горячих клавиш для запуска функций Winstep Nexus и так далее.
- Встроенный будильник, который поможет вам выполнять свои дела по расписанию. Тем не менее, бесплатная версия поставляется с поддержкой одного будильника, а Nexus Ultimate имеет неограниченное количество будильников и поддержку планировщика задач.
- Его можно настроить для работы с несколькими мониторами и поддержкой высокого разрешения, то есть вы можете разместить док-станции в любом разделе экранов.
- Обычно он способен запускать все приложения UWP для Windows 10 и других предыдущих версий.
- Это плавная замена панели задач и панели задач, способная отображать все приложения либо по одному, либо в группе.
- Для визуального впечатления бесплатная версия Nexus поддерживает встроенные анимированные значки. Они просты в использовании благодаря поддержке перетаскивания в любое положение экрана.
Вы можете запустить программное обеспечение, чтобы попробовать полностью настроить Mac на своем ПК с Windows.
3. Док-станция XWindows
Возможно, вам нужна полностью упакованная док-станция с меньшими возможностями настройки. Док-станция XWindows проста в использовании, но лишена функциональности. Интерфейс док-станции — это полный клон док-станции Mac OS. Вы можете добавлять значки и удалять их по своему усмотрению, но это не так нарядно, как док Winstep Nexus.
XWindows Dock полностью бесплатен и поддерживается почти всеми версиями Windows. Он хорошо работал в нашей Windows 10, но проблема заключалась в его позиционировании. Вы должны скрыть панель задач, чтобы она была видна. Кроме того, вам нужно уменьшить размер док-станции, чтобы она отображала приложения док-станции полностью.
Прошло почти десять лет с момента последнего обновления, а это значит, что в случае любого другого выпуска программное обеспечение может быть неисправным. Между тем, если вы ищете простую док-станцию для своего ПК, то XWindows вам пригодится.
4. Аква-док
Повысьте продуктивность работы с помощью этого бесплатного и простого, но полнофункционального приложения для док-станции. Придайте красоту своему ПК с Windows, не устанавливая новую тему. Кроме того, вы можете быстро запускать свои приложения.
При настройке вы можете оставить док-станцию плавающей над панелью задач или выбрать скрытие панели задач. Кроме того, вы можете переместить его в любое желаемое положение на экране. Док можно сделать прозрачным, чтобы он отображался только при необходимости. Сделайте это видимым на одном мониторе только в том случае, если вы используете много.
Аква Док значки анимированы и могут увеличиваться при выделении. Кроме того, размер док-станции можно изменить, просто перемещая поля окна. Чтобы добавить пользовательские значки в док-станцию, перетащите мышью, и она будет настроена с добавленным значком. Aqua Dock идеально подходит для Windows XP или более поздних версий.
5. RocketDock
RocketDock — еще одна очень простая док-станция в стиле Mac, настраиваемая с помощью ПК с Windows. Несмотря на то, что на протяжении многих лет им пренебрегали обновлениями, пользователям он все еще нравится. Если вам нужна бесплатная док-станция, то RocketDock должен работать для вас.
Помимо того, что он является базовой док-станцией, он имеет несколько функций настройки. Вы можете настроить значки приложений, стиль шрифта и расположение док-станции. Вы можете заставить его плавать или скрыть и найти его, наведя курсор на его позицию.
Несмотря на то, что он немного устарел, он поддерживается несколькими версиями Windows. На нашем ПК с Windows 10 он работал нормально. Пользователи, которым нужны дополнительные скины, могут использовать легко совместимые скины ObjectDock. Он не для вас, если вы ищете причудливую док-станцию.
Добавить Mac Like Dock на ПК с Windows
Теперь вы можете приступить к добавлению док-станции в стиле Mac на свой ПК с Windows и нарушить монотонность Windows. Мы выбрали лучшие варианты для личного или профессионального использования. Все перечисленные док-станции подходят для вас, кто ищет платную или бесплатную альтернативу.
Радостная новость для фанатов интерфейса яблочного мака: тема оформления, а точнее сразу несколько визуальных стилей по версиям, адаптированные для Windows. В набор входят такие версии как: Mac OS caesar, leopard, mnml, nuala (+black), plastic pulse и promate. Каждая из них является облегченной копией, без точного повторения внешнего вида конкурента.
UPD 07.09.2020: Выход из беты, обновление файлов архива с добавлением компонентов, изменение превью.
UPD 05.09.2020: Багфиксы, исправления известных проблем и добавления новых версий — с панелью команд и без нее.
Поддержка версий Windows 10: 22H2, 21H2, 21H1, 2009, 2004, 1909, 1903
- Скачайте и распакуйте архив mac_osx_themes_for_windows_10_by_niivu_de4niqv.zip с помощью 7zip.
- Если Вы устанавливаете темы первый раз: пропатчите систему с помощью UltraUXThemePatcher.
- Переместите файлы *.theme, а также папку с содержанием ресурсов *.msstyles по адресу: C:WindowsResourcesThemes.
- Нажмите в пустой области на рабочем столе и выберите пункт «Персонализация» в контекстном меню.
- Перейдите в раздел «Темы» и примените добавленную тему.
- Установка завершена!
Обратите внимание! Для установки кнопки пуск, панели быстрого доступа и других ресурсов Вам потребуются специальные программы. Ссылки на них указаны в блоке «Дополнения». Чтобы узнать версию системы, нажмите сочетание клавиш «Win+R» (где «win» — это кнопка с логотипом windows на клавиатуре), а затем в окне «Выполнить» введите команду «winver» и нажмите Enter (или кнопку «ОК»).