1. Overview
With a bootable Ubuntu USB stick, you can:
- Install or upgrade Ubuntu
- Test out the Ubuntu desktop experience without touching your PC configuration
- Boot into Ubuntu on a borrowed machine or from an internet cafe
- Use tools installed by default on the USB stick to repair or fix a broken configuration
This tutorial will show you how to create a bootable USB stick on Microsoft Windows using Rufus.
For most users we recommend balenaEtcher instead of Rufus which is simpler to use and also available on MacOS and Ubuntu. Instructions are now included in the primary Install Ubuntu Desktop tutorial.
Creating a bootable Ubuntu USB stick from Microsoft Windows is very simple and we’re going to cover the process in the next few steps.
Alternatively, we also have tutorials to help you create a bootable USB stick from both Ubuntu and Apple macOS.

2. Requirements
You will need:
- A 4GB or larger USB stick/flash drive
- Microsoft Windows XP or later
- Rufus, a free and open source USB stick writing tool
- An Ubuntu ISO file. See Get Ubuntu for download links

Take note of where your browser saves downloads: this is normally a directory called ‘Downloads’ on your Windows PC. Don’t download the ISO image directly to the USB stick! If using Windows XP or Vista, download version 2.18 of Rufus.
3. USB selection
Perform the following to configure your USB device in Rufus:
- Launch Rufus
- Insert your USB stick
- Rufus will update to set the device within the Device field
- If the Device selected is incorrect (perhaps you have multiple USB storage devices), select the correct one from the device field’s drop-down menu

You can avoid the hassle of selecting from a list of USB devices by ensuring no other devices are connected.
4. Select the Ubuntu ISO file
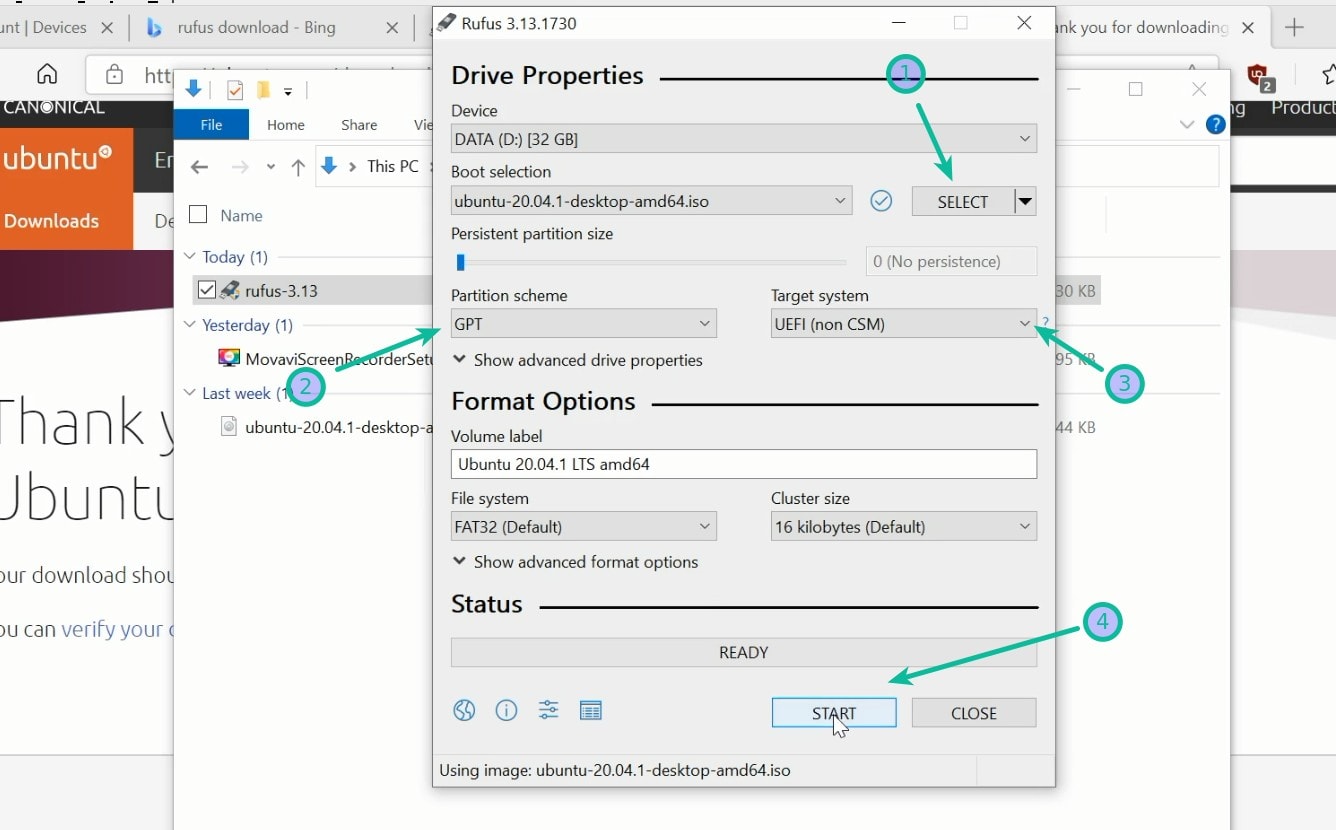
To select the Ubuntu ISO file you downloaded previously, click the SELECT to the right of “Boot selection”. If this is the only ISO file present in the Downloads folder you will only see one file listed.
Select the appropriate ISO file and click on Open.

5. Write the ISO
The Volume label will be updated to reflect the ISO selected.
Leave all other parameters with their default values and click START to initiate the write process.
6. Additional downloads
You may be alerted that Rufus requires additional files to complete writing the ISO. If this dialog box appears, select Yes to continue.

7. Write warnings
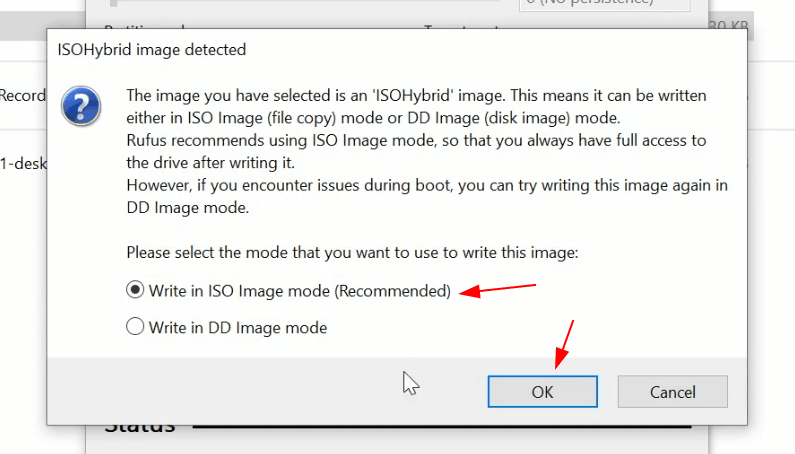
You will then be alerted that Rufus has detected that the Ubuntu ISO is an ISOHybrid image. This means the same image file can be used as the source for both a DVD and a USB stick without requiring conversion.
Keep Write in ISO Image mode selected and click on OK to continue.

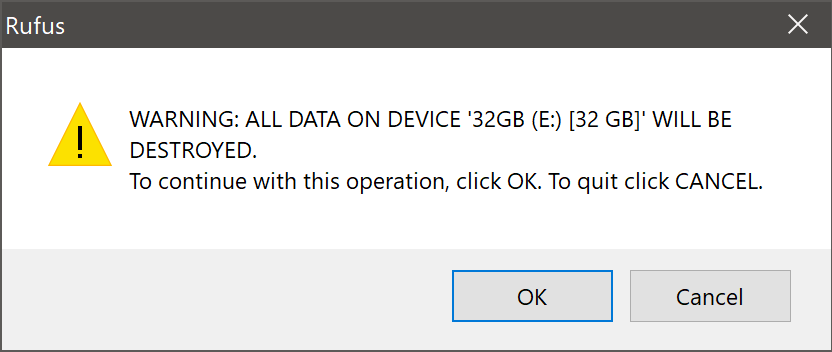
Rufus will also warn you that all data on your selected USB device is about to be destroyed. This is a good moment to double check you’ve selected the correct device before clicking OK when you’re confident you have.
If your USB stick contains multiple partitions Rufus will warn you in a separate pane that these will also be destroyed.
8. Writing the ISO
The ISO will now be written to your USB stick, and the progress bar in Rufus will give you some indication of where you are in the process. With a reasonably modern machine, this should take around 10 minutes. Total elapsed time is shown in the lower right corner of the Rufus window.

9. Installation complete
When Rufus has finished writing the USB device, the Status bar will be filled green and the word READY will appear in the center. Select CLOSE to complete the write process.

Congratulations! You now have Ubuntu on a USB stick, bootable and ready to go.
To use it you need to insert the stick into your target PC or laptop and reboot the device. It should recognise the installation media automatically during startup but you may need to hold down a specific key (usually F12) to bring up the boot menu and choose to boot from USB.
For a full walkthrough of installing Ubuntu, take a look at our install Ubuntu desktop tutorial.
Finding help
If you get stuck, help is always at hand:
- Ask Ubuntu
- Ubuntu Forums
- IRC-based support
Was this tutorial useful?
Thank you for your feedback.
![]()
Download Article
![]()
Download Article
Whether you want to install Linux on your PC from a flash drive or just boot into a portable version of Linux, you can easily create a bootable Linux USB flash drive in Windows 10. We’ll show you how to download the software you’ll need to create your Linux USB drive, how to make the drive bootable, and how to make your PC boot from the flash drive instead of your hard drive.
-

1
Download an ISO image of Ubuntu (or your preferred Linux flavor). To boot into Linux from a USB drive, you’ll need to download a file that contains an «image» of the Linux installation media. You can download the ISO for any flavor of Linux you want to install, including Debian and Linux Mint, and the process to create a bootable USB drive will be similar.
- To download an ISO of Ubuntu, head over to https://ubuntu.com/download/desktop and click the Download link next to the latest stable version. Ubuntu is a good option if you want to try out Linux without installing it—once you boot from the flash drive, you’ll be able to choose an option to try before you install.[1]
- To download a Debian ISO, go to https://www.debian.org/download. The download will start automatically.
- You can get the Linux Mint ISO from https://linuxmint.com/download.php. Just click the Download button next to the version you want to install.
- If you just want to try out Linux without installing it on your hard drive, try Puppy Linux, which allows you to boot right into a functional Linux desktop. You can download a Puppy Linux ISO from https://puppylinux.com/index.html#download.
- To download an ISO of Ubuntu, head over to https://ubuntu.com/download/desktop and click the Download link next to the latest stable version. Ubuntu is a good option if you want to try out Linux without installing it—once you boot from the flash drive, you’ll be able to choose an option to try before you install.[1]
-
2
Install Rufus on your PC. Rufus is free software that allows you to create bootable USB drives from ISO images.[2]
Go to https://rufus.ie and click the Rufus link under «Download» toward the bottom of the page to download the installer.- When the download is complete, double-click the file that begins with «rufus» and ends with «exe» and follow the on-screen instructions to install.
- Once Rufus is installed, you’ll find it in your Windows menu. Launch Rufus if it doesn’t start automatically after the installation.
Advertisement
-
3
Insert your USB flash drive into an available USB port. You’ll want to use a blank USB drive, as everything on the drive will be deleted. Back the drive up before you continue if necessary.
-
4
Open Rufus and select your USB flash drive in Rufus. If multiple external drives are connected to your PC, Rufus may select the wrong drive. Click the proper drive in the «Device» menu if it’s not accurate.
-
5
Select FreeDOS from the «Boot selection» menu. It’s just under the Device selector. This tells Rufus to make the drive bootable.[3]
- The default options for «Partition scheme» and «Target system» are filled in automatically and you won’t need to change them.
-
6
Click the Select button and choose the ISO you downloaded. This button is to the right of the «Boot selection» menu. You should find the ISO in your default download folder, which is usually called Downloads.
-
7
Leave the other parameters in place and click START. This begins the process of writing the ISO image to the flash drive.
- If Rufus prompts you to download an additional file to write the ISO, click Yes to continue.[4]
- If Rufus prompts you to download an additional file to write the ISO, click Yes to continue.[4]
-
8
Select «Write in ISO image mode (Recommended)» and click OK. This option will appear when the «ISOHybrid image detected» window appears. This just means you can use the same ISO on a bootable DVD or USB drive as needed.
-
9
Click OK to create your bootable USB drive. This involves erasing the data on the drive and copying the necessary files for making the drive bootable. You’ll see a Status bar at the bottom of the window once the process begins.
- When the drive is ready, the status bar will say «READY.» At this point, you’ll have a bootable Linux USB drive.


Advertisement
-
1
Reboot your PC with the USB drive attached. If you’ve already set your PC to boot from USB, your computer will immediately boot into Linux once it comes back up.
- If your PC boots back into Windows 10 instead, continue with this method.
- skip to step 5. Otherwise, the steps to get to the BIOS are going to be different depending on your motherboard—you’ll usually press a key immediately after the PC restarts, which is usually F2, F10, or Del. Search for your PC model and «BIOS setup key» to find your key. Alternatively, try the following steps to boot into the BIOS from Windows 10:
- Press Windows key + i to open Settings.
- Click Update & Security.
- Click Recovery in the left panel.
- Click Restart now under «Advanced startup.»
- On the «Choose an option» screen, click Troubleshoot.
- Click UEFI Firmware Settings and then click Restart. The PC will boot into the BIOS or UEFI.
-
2
Locate the Boot menu. Once the computer boots into the BIOS, look for a menu called Boot, Boot Order, or Boot Options. You might have to enter a menu called Advanced, System, Storage, or Configuration to find it. What you’re looking for a list of boot devices, such as «Hard Drive» and «Removable Device» in order.
-
3
Set the USB drive or «Removable Storage» to be first in the boot order. You may have to select an item called «1st boot device» or similar to bring up a list of options. The goal is to make your USB drive or removable media the first item in the list so your PC tries to boot from devices that are connected to it.
-
4
Save and exit the BIOS. You’ll usually do this by pressing the F10 key or by selecting an option called Save & Exit. Once saved, your PC will reboot.
-
5
Install and run Linux. When your PC boots from the flash drive, you’ll be prompted to choose some regional and keyboard settings. If you made an Ubuntu drive, you can choose Try Ubuntu without installing to use the live version of Ubuntu, or install it on your hard drive. Regardless of the version of Linux you want to install, the remaining steps will be simple—follow the on-screen instructions to get started!
- If you’re installing Puppy Linux, you’ll boot right into a functional Linux desktop without having to install.


Advertisement
Ask a Question
200 characters left
Include your email address to get a message when this question is answered.
Submit
Advertisement
-
Any time the flash drive is connected to your PC upon reboot, your PC will try to boot from it before it boots from your hard drive. If you don’t want to boot from the USB drive the next time you reboot, remove the drive before rebooting.
Thanks for submitting a tip for review!
Advertisement
About This Article
Article SummaryX
1. Download the ISO image.
2. Install Rufus.
3. Insert a blank USB drive.
4. Use Rufus to flash the ISO to the drive.
5. Go into the BIOS and set the USB drive as first in the boot order.
6. Reboot into Linux.
Did this summary help you?
Thanks to all authors for creating a page that has been read 46,165 times.
Is this article up to date?
 Всем доброго времени!
Сегодня хочу рассмотреть довольно типичную ситуацию: на вашем ПК установлена ОС Windows (работает), но появилось желание (необходимость) попробовать также и Linux (так сказать, сравнить их собственноручно 😉).
Разумеется, одним из первых действий будет подготовка загрузочного носителя (как правило флешки). Однако, здесь могут быть «нюансы», т.к. не все утилиты для создания загрузочных флешек с Windows подойдут и для текущей задачи.
Собственно, именно поэтому в этой заметке я выделил несколько утилит (и показать скрины настроек записи), которые позволяют решить этот вопрос (также отмечу, что приложения я отобрал бесплатные, макс. простые в работе, и совместимые с большинством дистрибутивов Linux).
И так…
👉 В тему!
Установка Linux Mint «рядом» с Windows 10 (без потери данных!). Пошаговая инструкция для начинающих
*
Содержание статьи
- 1 Подготовка установочной флешки (с Linux)
- 1.1 Ventoy
- 1.2 Rufus
- 1.3 Etcher

→ Задать вопрос | дополнить
Подготовка установочной флешки (с Linux)
Ventoy
Офиц. сайт: https://www.ventoy.net/
Эта утилита хороша тем, что она позволяет легко и макс. быстро создавать универсальные мультизагрузочные флешки сразу с несколькими ISO-образами (на моей флешке, например, есть и Windows 10, и LiveCD, и Linux Mint, и пр.).
Как с ней работать:
1) после ее загрузки и запуска, выберите тип разметки (для современных ПК*, обычно, GPT) и установите флажок на пункт «Secure Boot Support» (защищенная загрузка, актуально также для новых устройств). Вот здесь подробнее о GPT, MBR…
2) После нажмите по кнопке «Install» — через несколько минут флешка будет специальным образом подготовлена (все данные с нее будут удалены!).
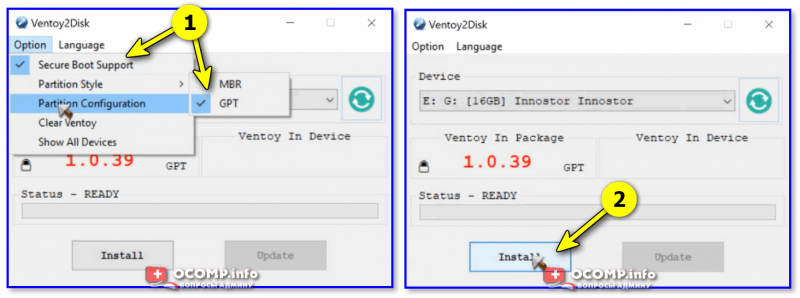
Ventoy — подготовка флешки (настройки)
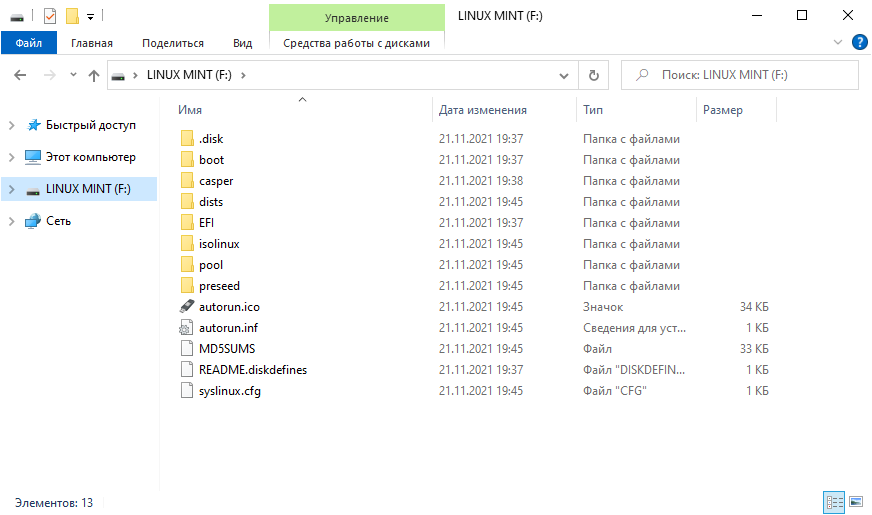
3) Ну и последний штрих: на эту флешку нужно просто скопировать все нужные ISO-образы (никак не меняя их и не извлекая!). В своем примере ниже — я через проводник «отправил» нужный ISO на флешку.
Примечание: разумеется, скопировать можно столько ISO, сколько поместиться на вашу флешку!
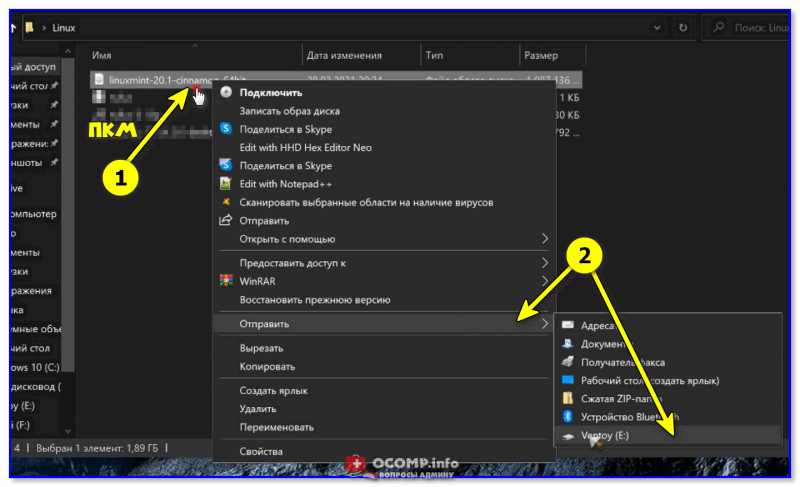
Отправить файл ISO на флешку (Ventoy)
Удобно?! 😉
Важно: флешки, подготовленные в Ventoy, могут не работать с некоторыми ноутбуками и моноблоками. Например, я с таким сталкивался на ноутбуках HP и Dell (само собой, не со всеми моделями…).
*
Rufus
Офиц. сайт: https://rufus.ie/ru/
Эта утилита отличается от предыдущей своей функциональностью: здесь гораздо больше настроек и всяких флажков (что может запутать). Однако с ее помощью можно подготовить загрузочный носитель для любого «капризного» ноутбука/ПК/моноблока!
Как пользоваться:
1) подключите флешку к USB-порту (предварительно скопировав всё нужное с неё) и запустите Rufus.
2) Далее в окне Rufus выберите флешку и образ ISO, который хотите записать (стрелки 1, 2 на скрине ниже 👇).
3) Задайте схему раздела и прошивку (GPT / UEFI для новых ПК*) и нажмите «Start».
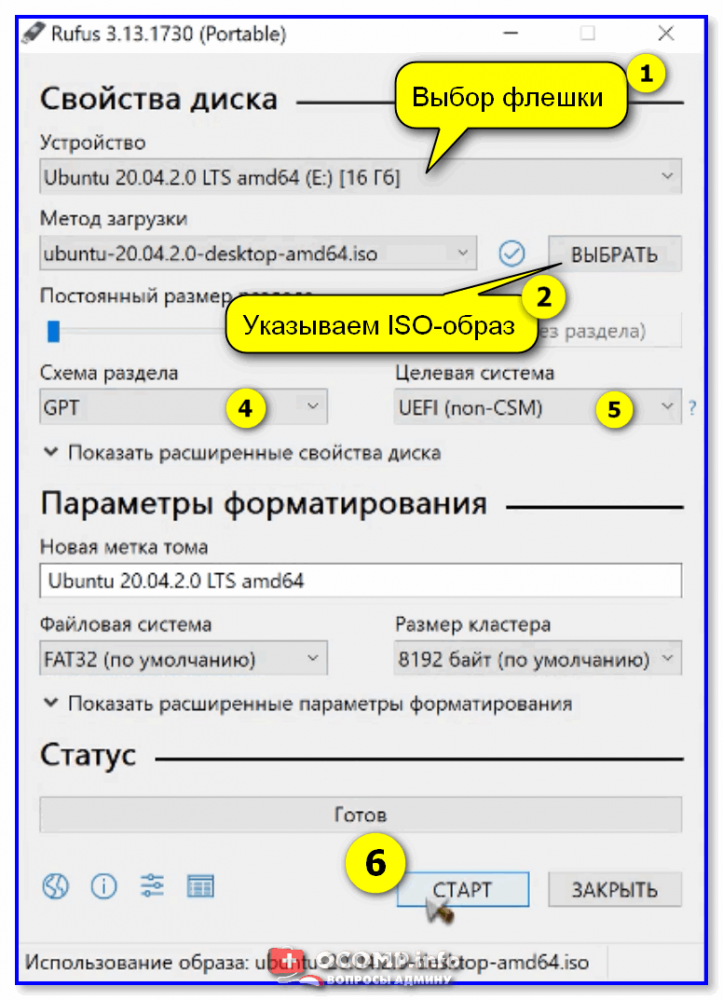
Rufus — настройки записи Ubuntu
Если появится сообщение о «гибридном» ISO — рекомендую выбрать вариант «Записать в режим DD-образа». 👇
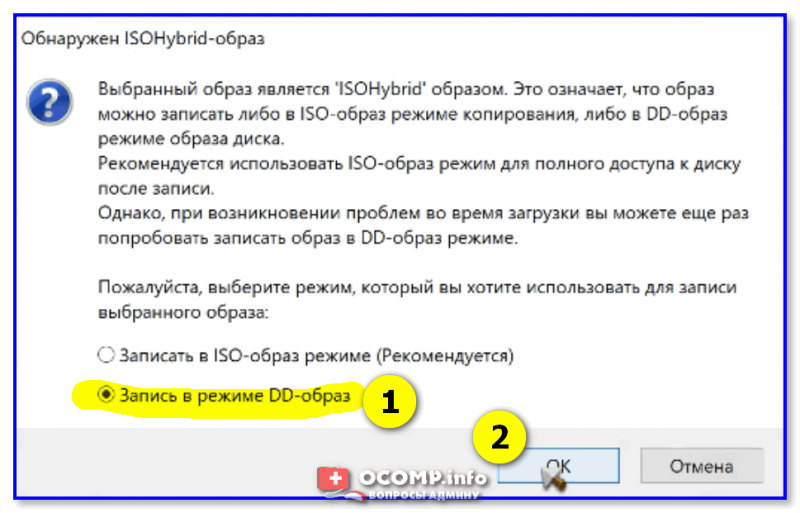
DD-образ
Когда статус записи дойдет до 100% и появится сообщение «Готов» — утилиту можно закрыть и приступить к использованию флешки…
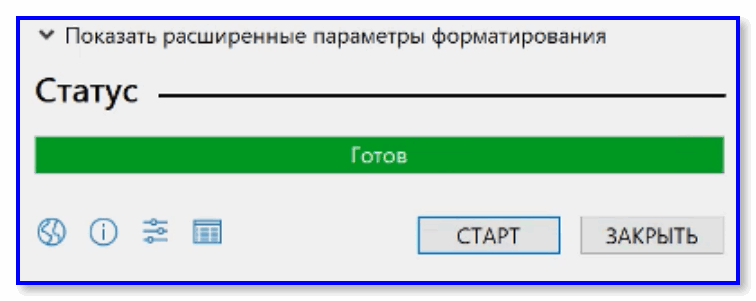
Флешка готова!
*
Etcher
Офиц. сайт: https://www.balena.io/etcher/
Etcher — приложение хорошо тем, что все «параметры» записи оно определяет автоматически (вам же останется только выбрать ISO, флешку и нажать «Старт»). С одной стороны — такой подход хорош, с другой — не дает гибкости…
Кстати, Etcher можно использовать в Windows, Linux, macOS.
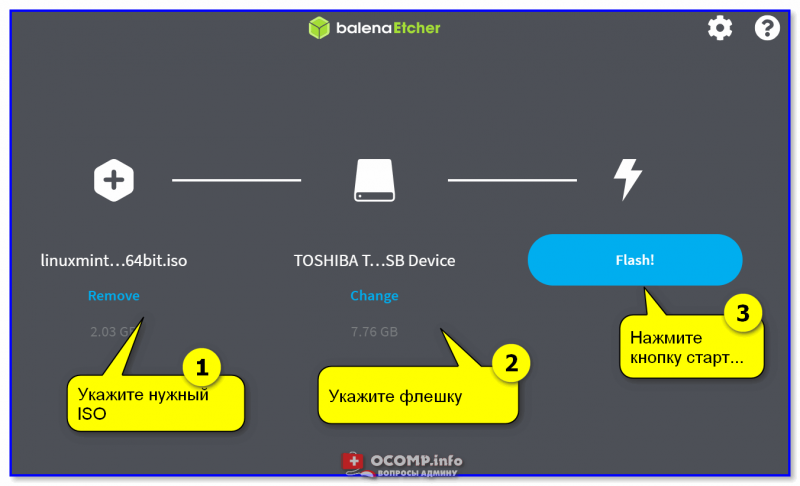
Etcher — всего три действия!
Процесс записи отображается в меню слева: при достижении 100% флешка будет готова!
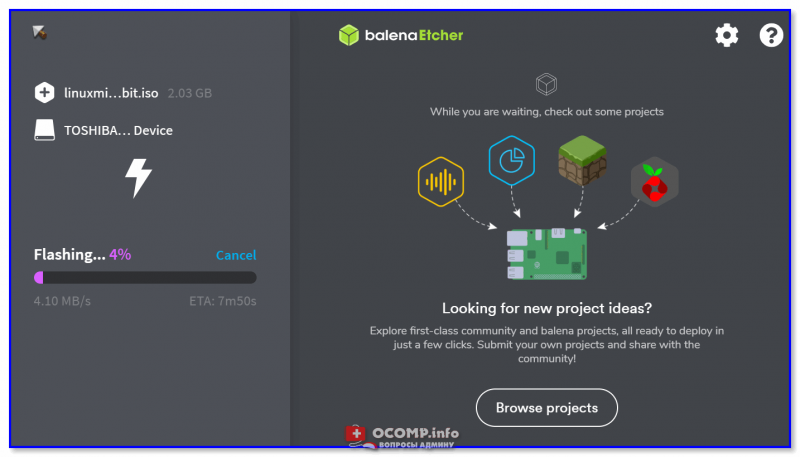
Процесс подготовки флешки в Etcher
*
Дополнения по теме — приветствуются!
Всем успехов!
👋


Полезный софт:
-
- Видео-Монтаж

Отличное ПО для создания своих первых видеороликов (все действия идут по шагам!).
Видео сделает даже новичок!
-
- Ускоритель компьютера
Программа для очистки Windows от «мусора» (удаляет временные файлы, ускоряет систему, оптимизирует реестр).
В этой статье, максимально просто и понятно объясняется как делается загрузочная флешка для Linux Ubuntu из под Windows 10, также эта инструкция подойдёт и для других версий Windows, начиная с Windows 7, про XP, не чего не могу сказать.
Также смотрите статью: Стоит ли переходить с Windows на Linux.
Программа для создания загрузочной флешки:
Для этого нам нужна какай нибудь программа, лично мне больше всего нравится UNetbootin, на мой взгляд она наиболее удобная, поэтому рекомендую её (Ссылка на программу).
Там вы нажимаете кнопку «Загрузить (Windows)», и программа скачивается, не важно какая у вас Винда.

Загружаем образ Ubuntu:
Что бы загрузить образ системы, для этого заходим по ссылки (Ссылка для скачивания), и нажимаем Download, возле системы 18.04, также можете скачать и 19.04, разницы нет.

Делаем загрузочную флешку:
После того как всё загрузили и скачали, запускаем программу UNetbootin, в ней выбираем диструбутив Linux который нужен, в нашем случаи это Ubuntu, дальше выбираем версию Ubuntu.


Я выбираю версию «18.04_Live_x64», потому что скачал такую версию, если вы скачали более позднюю версию, например 19.04, то выбирайте «Daily_Live_x64», или без x64, если скачали 32 битную систему.
Если же вы всё-таки скачали более ранию версию, то тогда скачиваете «Версия_которую_вы_скачал_Live_x64», и также без x64, если у вас разрядность ПК 32 бита.
Выбираем сам образ который скачали, для этого нажимаем на кнопку «…», в открывшемся окне заходим в папку где хранится наш образ и выбираем его, нажимаем открыть.

После чего выбираем флешку из которой надо сделать загрузочную, как вы можете видеть, у меня автоматически она подобралась, но если вам надо то можете сами выбрать какая флешка нужна.

Нажимаем «OK», ждём когда создастся загрузочная флешка.
Когда всё закончилось, нажимаем «Выход» и теперь вы можете использовать эту флешку для установки Windows на свой компьютер.

Вывод:
Теперь когда всё закончилось, можете установить Linux на ваш компьютер, как видите не очень сложно делается загрузочная флешка linux Ubuntu из под windows 10, также ещё раз напомню, что вам не обязательно иметь именно Windows 10, подойдёт и семёрка, и не обязательно именно Ubuntu, такое можно сделать с любым другим дистрибутивом Linux.
В будущем я ещё расскажу как установить Linux на компьютер и рядом с Windows, поэтому подписываетесь на соц-сети, что бы не пропустить, если вам это интересно.
Подписываетесь на соц-сети:
Оценка:
Загрузка…
Также рекомендую:

Наступило утро, поэтому пора приступить к созданию загрузочной USB флешки с операционной системой Linux Mint.
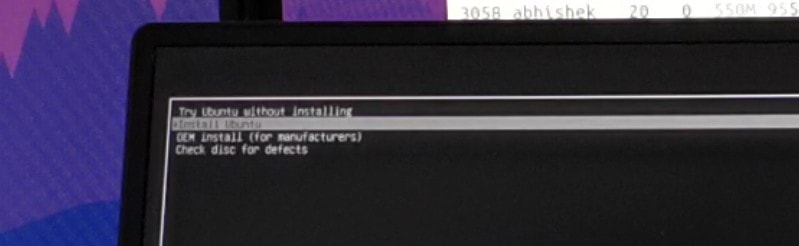
С помощью такой флешки вы можете… а что можете? Непонятно, не нашёл документации по тому, что же именно позволяет сделать загрузочная флешка Linux Mint. Заглянем в будущее и посмотрим на загрузочное меню:
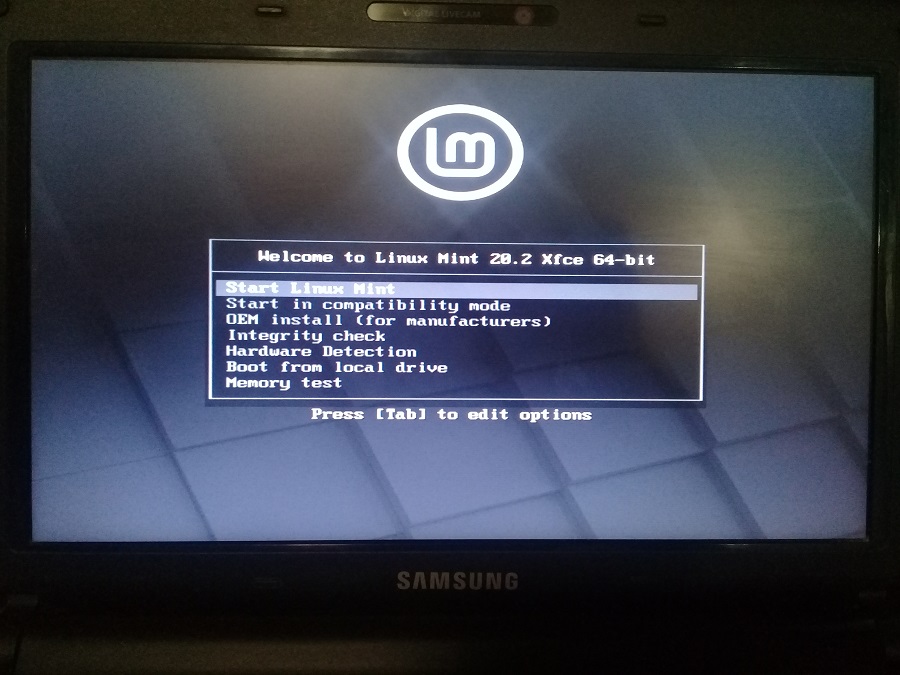
Стало понятнее, с помощью такой флешки вы можете:
- Попробовать поработать в Linux Mint не устанавливая её на компьютер.
- Загрузить Linux Mint на чужом компьютере.
- Загрузить Linux Mint в режиме совместимости.
- Установить Linux Mint (Подсказка: для этого нужно сначала запустить. Start Linux Mint).
- Использовать загрузочный образ и встроенные утилиты для реанимации компьютера.
- Протестировать оперативную память.
- Проверить целостность диска.
- Выполнить OEM установку Linux Mint.
- И обнаружить устройства компьютера.
- Ещё если нажать Tab, то можно отредактировать опции, но это уже дебри.
Создавать загрузочную USB флешку будем в Windows 10.
Дистрибутив Linux Mint
Скачиваем ISO образ Ubuntu с официального сайта.
https://linuxmint.com
Download.
https://linuxmint.com/download.php
Есть несколько редакции Linux Mint:
- Cinnamon Edition — самая популярная версия Linux Mint. Полный функционал.
- MATE Edition — с рабочим столом MATE, использует меньше ресурсов и более стабилен, чем Cinnamon.
- Xfce Edition — облегчённая версия с меньшим функционалом, самая стабильная.
Я выбираю Xfce Edition.
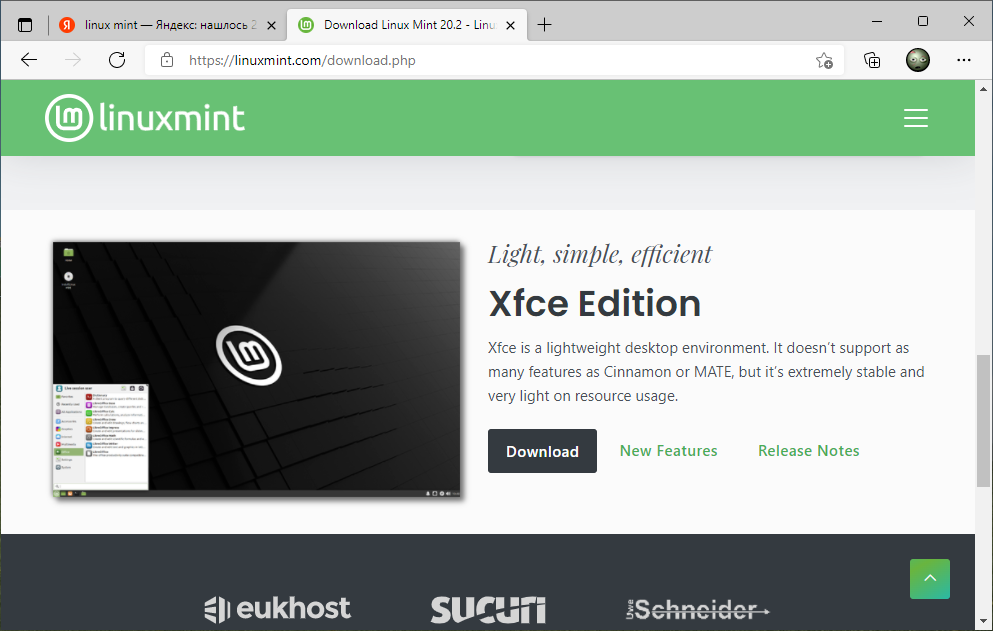
Download.
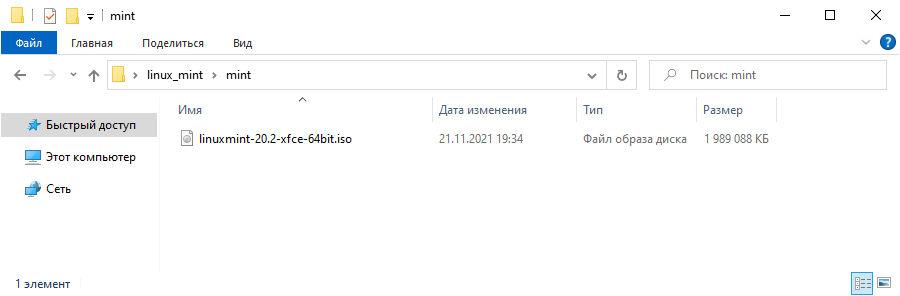
Я скачиваю linuxmint-20.2-xfce-64bit.iso.
Создание загрузочной USB флешки с помощью Rufus
Имеется официальная инструкция:
https://linuxmint-installation-guide.readthedocs.io/ru/latest/burn.html
В инструкции предлагают для создания загрузочного образа воспользоваться программой Etcher. Ни разу этой программой не пользовался, да и не хочется ничего устанавливать, поэтому будем создавать USB-диск с помощью Rufus.

Я скачиваю Portable версию, чтобы не заморачиваться с установкой.
Создание загрузочной USB флешки
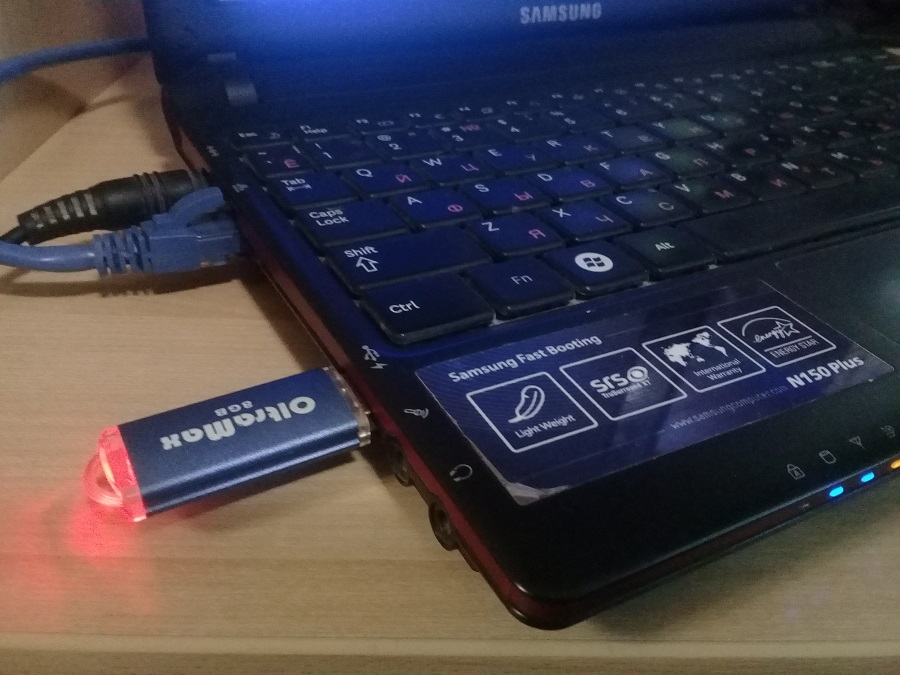
Устанавливаем USB флешку в компьютер. Про объём в официальной инструкции ничего не говорится.
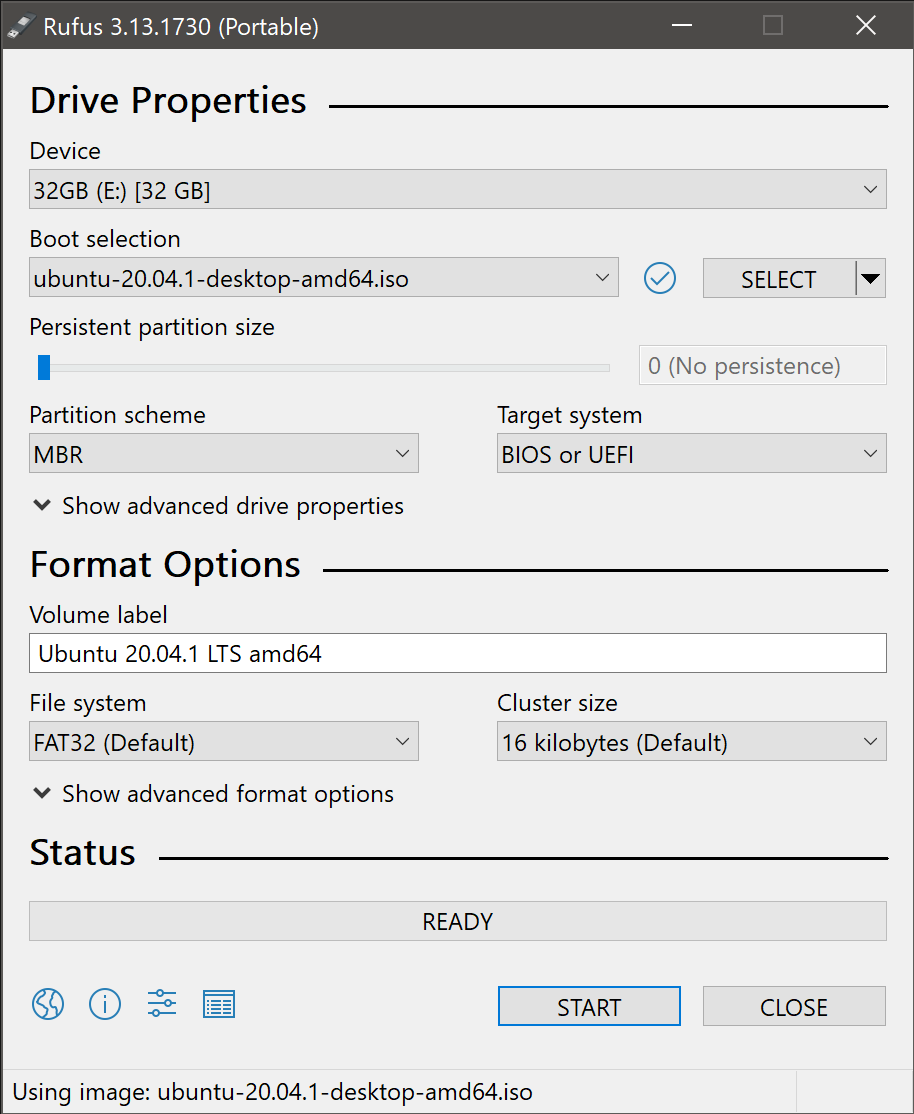
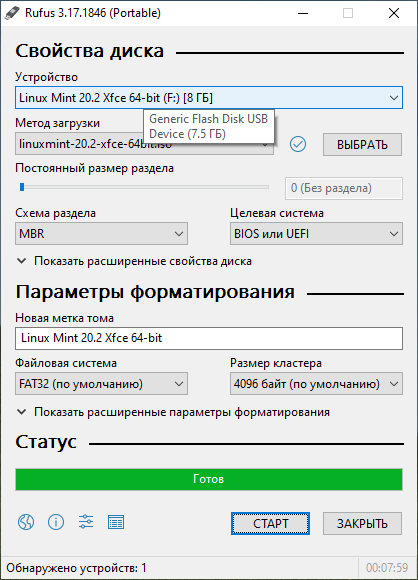
Запускаем Rufus. В поле Устройство выбираем нужную USB флешку. Нажимаем кнопку ВЫБРАТЬ и выбираем ISO образ с Linux Mint. В поле Метод загрузки отобразится название ISO файла.
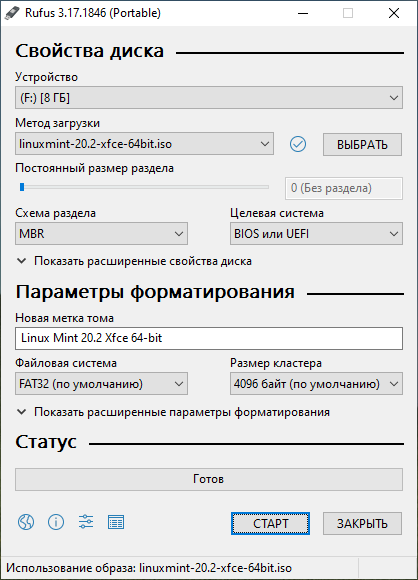
Остальные параметры устанавливаем как на картинке:
- Схема раздела — MBR.
- Целевая система — BIOS или UEFI.
- Файловая система — FAT32.
- Размер кластера — 4096 байт.
Нажимаем СТАРТ.
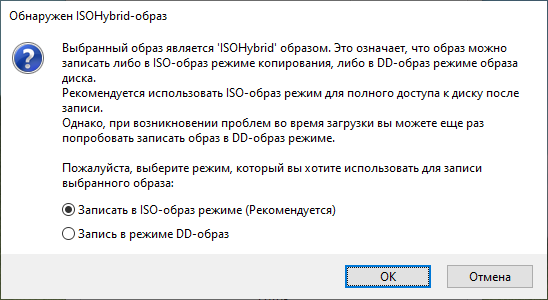
Нам сообщают о том, что выбранный ISO образ — ISOHybrid, его можно записывать двумя способами. Оставляем способ по умолчанию: Записать в ISO-образ режиме (Рекомендуется). OK.
Для записи образа программе Rufus потребуются дополнительные файлы, разрешаем скачать их из интернета.

Все данные на USB флешке будут уничтожены. ОК.
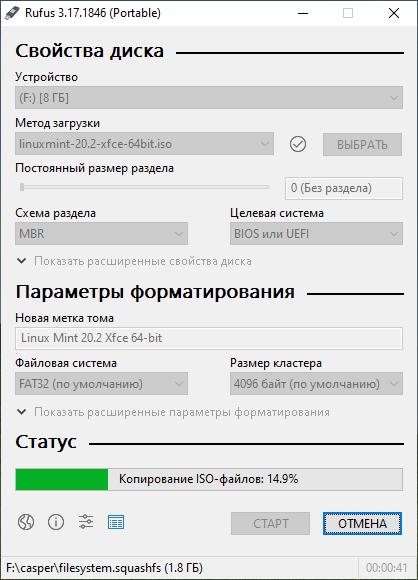
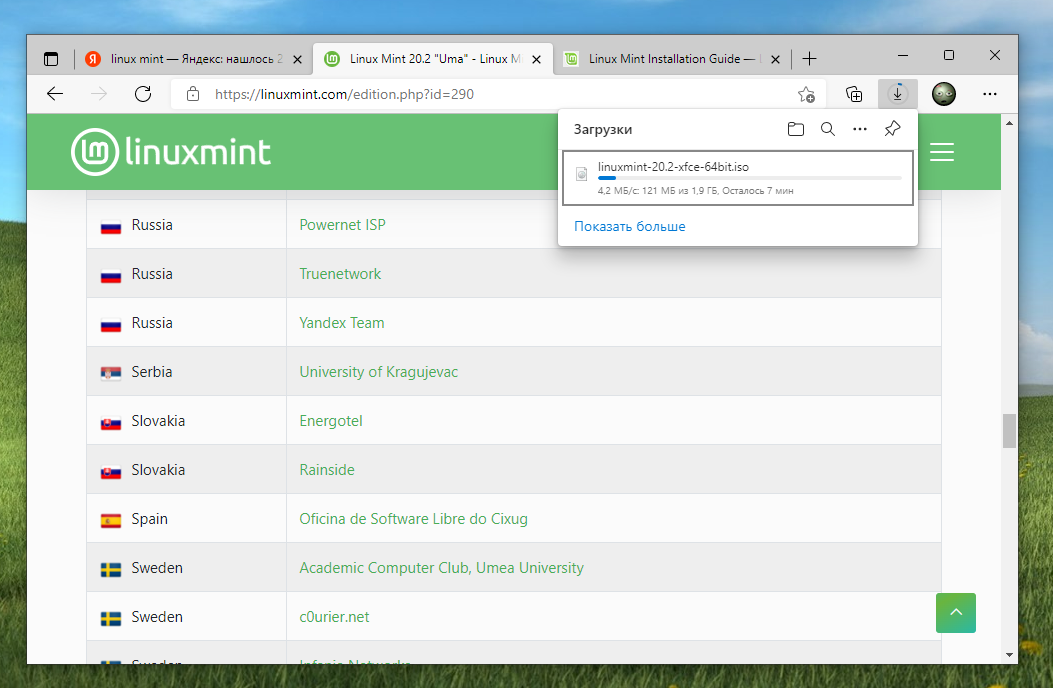
Начинается создание загрузочной USB флешки. Rufus стирает все разделы на флешке, создаёт новые разделы и файловую систему. Прогресс отображается в виде зелёной полосы в разделе Статус. На создание образа уходит примерно 10 минут.
Статус — Готов. Нажимаем ЗАКРЫТЬ.
Поздравляем! Мы создали загрузочную USB флешку с операционной системой Linux Mint.
Brief: The tutorial shows the steps to create a bootable Ubuntu USB in Windows. Instructions are valid for all versions of Ubuntu Linux and Windows.
One of the first few steps for installing Ubuntu is to create bootable USB of Ubuntu.
There are several free live USB creation tools available in Windows. You may use any of these free applications.
In this tutorial, I’ll show two methods using two different applications for creating live Ubuntu USB:
- Rufus (recommended)
- Universal USB Installer
With a live USB, you can try Ubuntu without installing it on your computer. You can, of course, use the same live USB to install Ubuntu on a computer as well.
Let’s see the methods in detail.
Creating a live bootable Ubuntu USB in Windows
Before you start creating the bootable USB, let’s see get the essentials first.
Getting things ready
Make sure that you have the following:
- A USB key (pen drive) with at least 4 GB of size with no important data on it (the USB key will be formatted)
- Internet connection to download Ubuntu ISO (this could be done on any computer)
- It would be a good idea to know if your system uses MBR or GPT (Rufus will create live USB accordingly)
- You should also check if your system uses UEFI or legacy BIOS
Download Ubuntu ISO
ISO is basically an image file. You download this single file of around 2.4 GB and it consists of an “image” of Ubuntu Linux. You then use a tool to extract the content of the ISO file in a such a manner that you can boot the Ubuntu operating system from the USB itself.
Go to the Ubuntu website and choose the version of your choice. You may choose Ubuntu LTS if you do not want to upgrade your system every six to nine months.
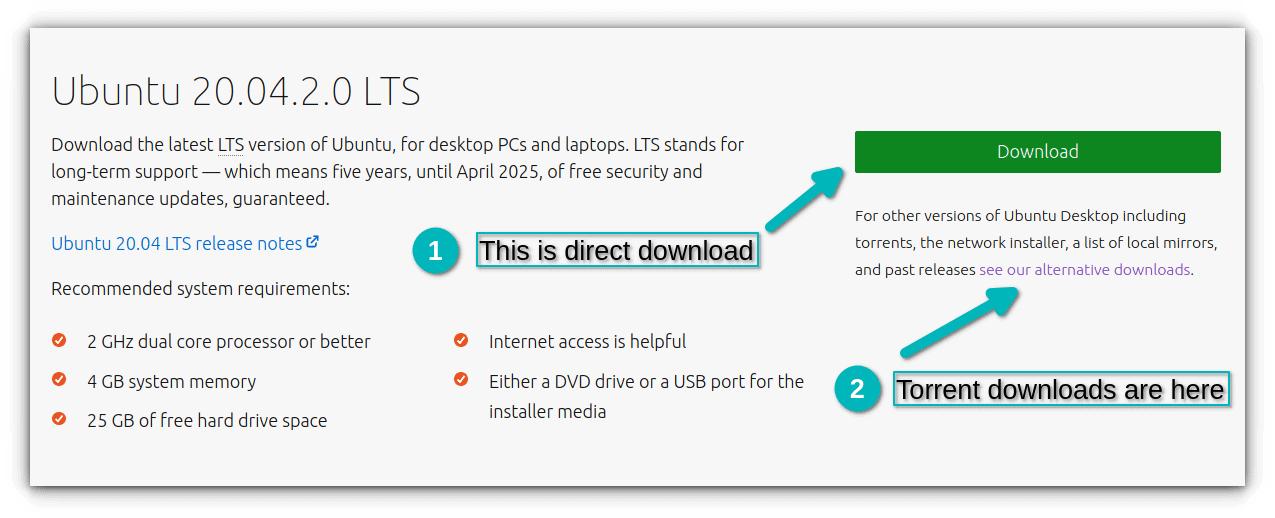
You can also download Ubuntu via torrents from the alternative downloads link located on the same page.
Method 1: Make a live Ubuntu USB with Rufus (recommended)
Rufus is an excellent free and open source tool for making bootable Linux USB disks. On Windows, I prefer and recommend using Rufus.
If you prefer videos to text, I have made this video to show the steps in action.
Step 1: Download Rufus
Go to the website of Rufus and download the .exe file:
This is an exe file so you do not need to install Rufus. Just double-click on it to run it.
Step 2: Creating the live Ubuntu USB
Plug in your USB key (pen drive) to the computer. Now double click on the download Rufus exe file which should be in the Downloads folder.
When you run Rufus with the USB plugged in, it automatically recognizes it. If there are more than one USB keys plugged in, please ensure to select the correct USB under Device.
It may also automatically find the Ubuntu ISO. If not, you can always browse to the ISO by clicking on the SELECT button.
I hope you have checked the partitioning scheme and BIOS type as I mentioned in the prerequisite section. Based on that, select the Partition Scheme and Target System in Rufus.
Everything looks good? Hit the START button.
You may be asked to choose how to write the image. Choose ‘Write in ISO Image mode’:
It will take a few minutes to complete the process. You’ll see a green signal when the live USB is ready.
I’ll show you how to boot from the live USB in a moment. Let’s see another method of creating bootable Linux USB.
Method 2: Using Universal USB Installer for making bootable Linux USB
Go to the project website and download the latest version of Universal USB Installer.
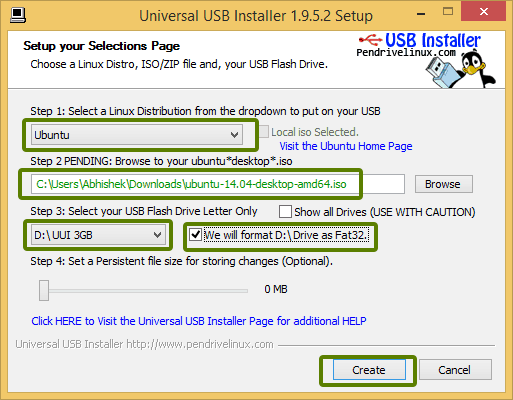
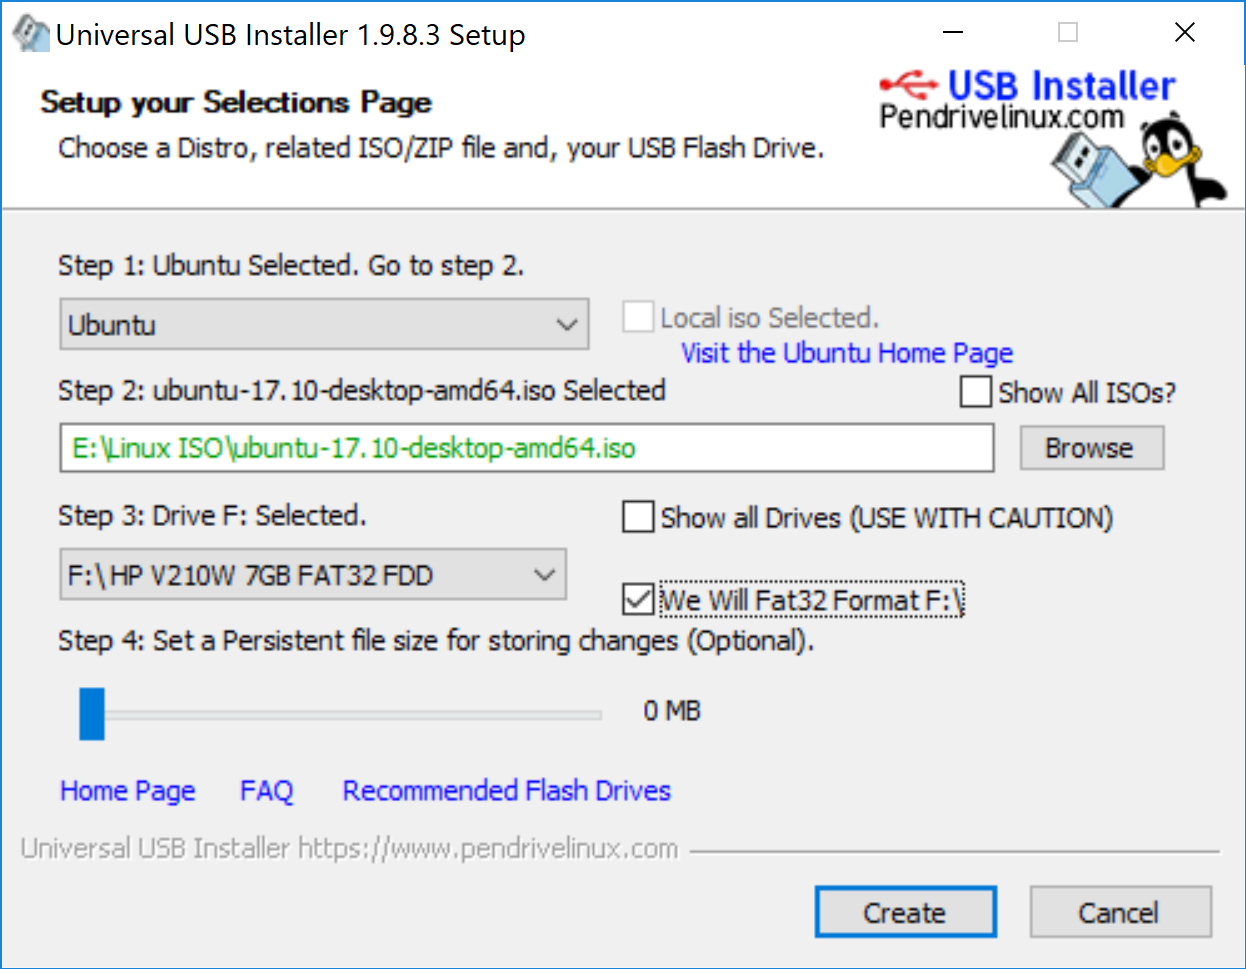
Plugin the USB drive in the computer and run Universal USB Installer. You need to do the following things now:
- Select Ubuntu under step 1
- Browse to the location of downloaded Ubuntu ISO in Step 2 section
- In Step 3, select the USB drive and also check the option to format it.
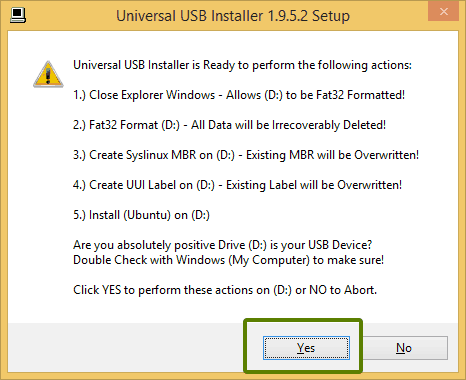
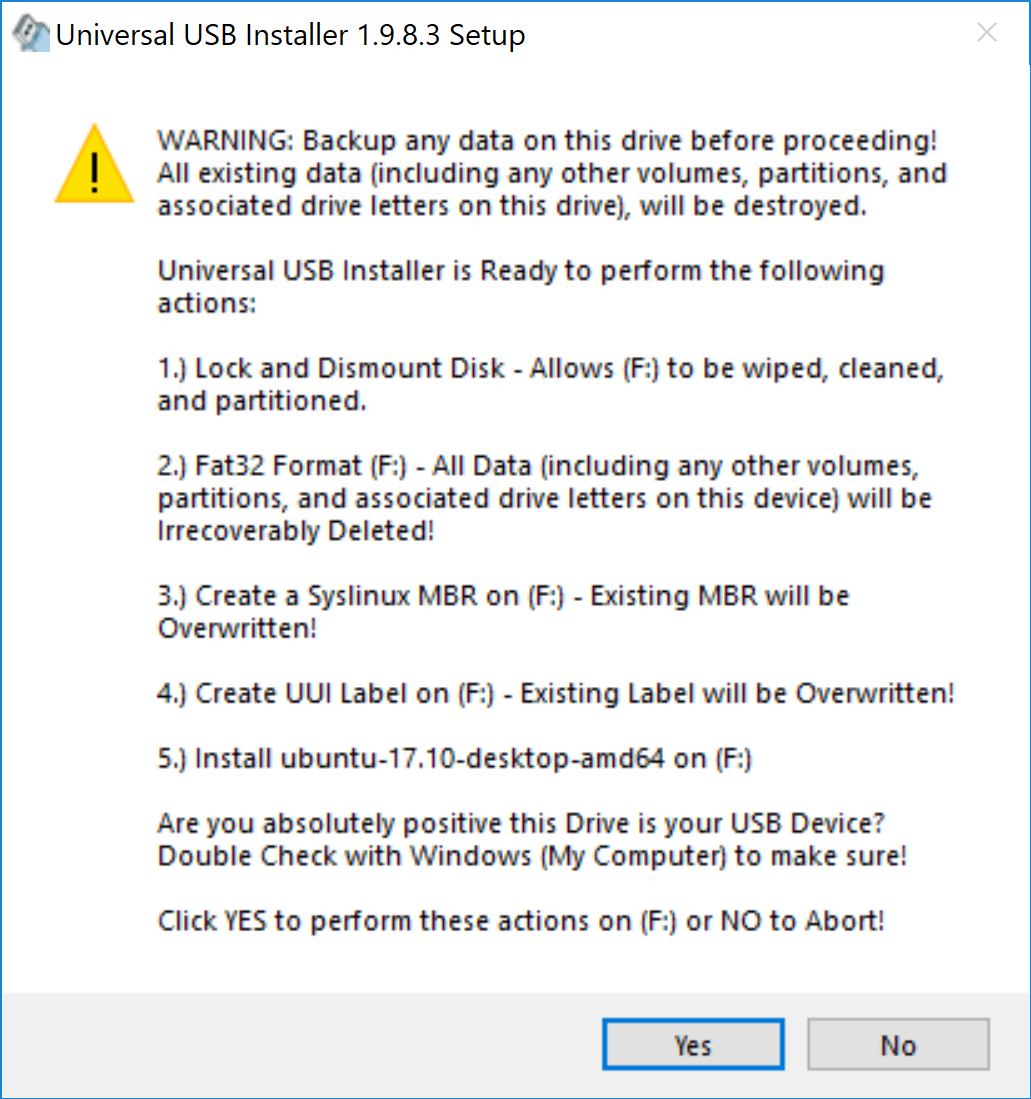
It will present you with obvious warnings, click Yes.
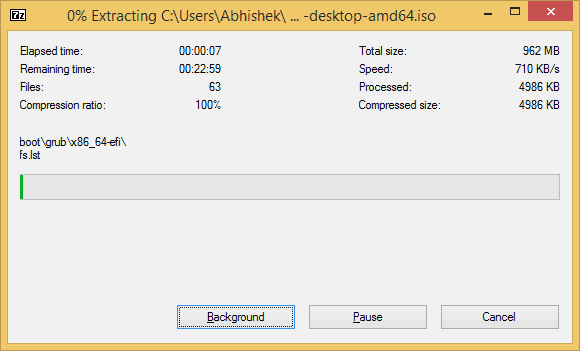
Wait for sometime for the process to complete. You can push it to background, if you like.
That said, your Ubuntu USB should be created in few minutes.
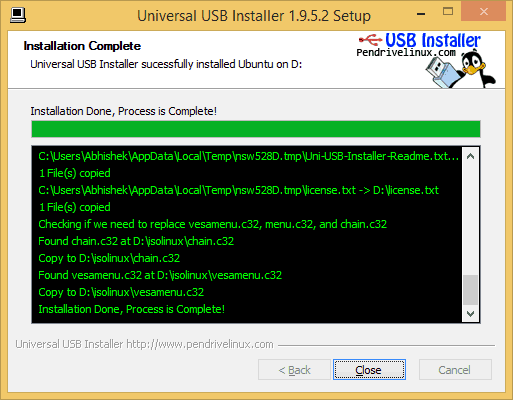
That’s it.
How to boot from live Ubuntu USB
Once the live USB is created, you can proceed with testing Ubuntu in live mode. The bootable USB can be used on any system, not only on the one where you created it.
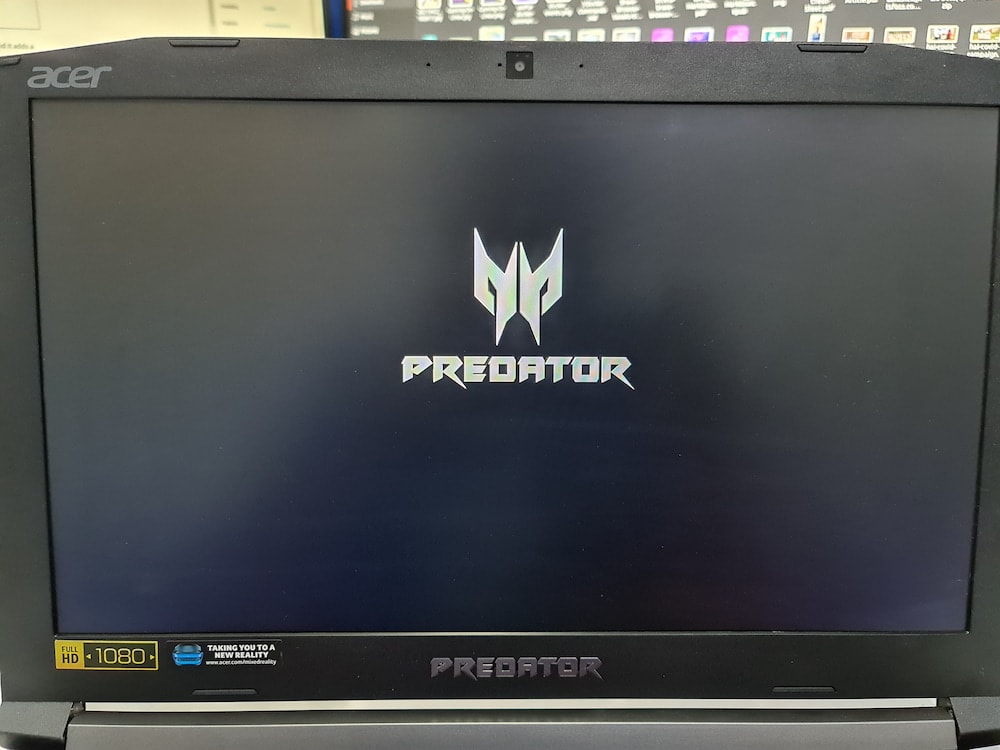
Plug in the live USB on the desired computer. What you need to do is restart or power on your computer.
At the screen that shows the logo of your system manufacturer, press the F2 or F10 or F12 key. You may try pressing all of them one by one if you are not sure of the key. But be quick when you do that otherwise it will boot into the operating system.
This key is different for different brand of computers. Some may even use Esc or Del keys for this purpose.
In some rare cases, you may have to access the UEFI boot settings from within Windows.
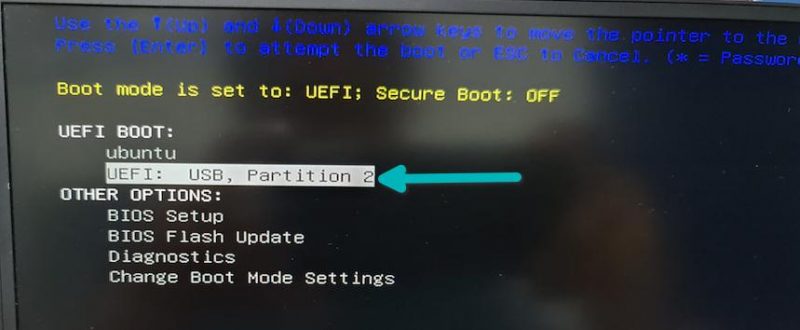
In the BIOS settings, normally, you should see a screen like this. Here, you use the arrow keys to move down to USB option and press enter to boot from the USB. Please note that the screen may look different in different systems.
If things go right, you should see a screen like below that gives you the option to “Try Ubuntu without installing” and “Install Ubuntu”. Both methods will provide you the option to install Ubuntu.
I prefer choosing “Try Ubuntu without installing”. That’s the live mode, and you can take the look and feel of the system. If you like it, you can choose to install Ubuntu. Note that if you make any changes to the live Ubuntu system like saving some files or installing applications, your changes will be lost if you boot from the live USB again.
Please keep in mind that some systems may not allow you to boot from a bootable USB. If you see some error (like PCIe initialization on Dell systems) or cannot boot from the USB, you should disable secure boot and the try booting from the USB again.
Considering that you are just starting, I advise to follow this beginner’s guide to Ubuntu and learn how to use Ubuntu. Let me know if you need some help.
Как сделать загрузочный USB-накопитель для ОС Linux?
Приветствую, любители Линукса!
Как и ОС Windows, ОС Linux также может быть загрузочной с USB-накопителя для установки Linux в вашей системе.
Linux — это операционная система с открытым исходным кодом или ОС Linux, это свободно распространяемая кроссплатформенная операционная система, основанная на Unix.
Linux имеет множество разновидностей.
Популярные дистрибутивы ОС Linux включают Ubuntu, Debian, Fedora, open SUSE и Red Hat.
ОС Linux поддерживает многозадачность, то есть несколько программ, работающих одновременно, многопользовательские, многоплатформенные, многопроцессорные и т. д.
Накопители UBS просты в использовании, компактны по размеру и обладают достаточной емкостью.
В наши дни существует тенденция устанавливать операционную систему с помощью USB-накопителей, потому что USB-накопители имеют больший срок службы, чем CD / DVD, и для установки ОС не требуется записывающее устройство DVD.
В нашем предыдущем посте мы также объяснили как удалить разделы в Linux — небольшой гайд для начинающих.
Метод 1: Использование Universal USB Installer (только для Windows)

Universal USB Installer — лучший вариант для создания загрузочного USB различных операционных систем, включая Windows, Unix, Linux и различные разновидности Unix и Linux.
Кроме того, он совместим с каждой версией Windows, такой как Window XP, Window Vista, Window 7, Window 8-10.
Universal USB Installer — это Live Linux USB Creator, который позволяет вам выбрать один из нескольких дистрибутивов Linux для установки на USB-накопитель.
Для работы с этим программным обеспечением не требуются специальные знания.
Universal USB Installer прост в использовании.
Выберите дистрибутив Live Linux, файл ISO, флэш-накопитель и нажмите «Установить».
Это программное обеспечение portable — кликаете 2 раза и оно запускается, поэтому нет необходимости устанавливать это программное обеспечение и требуется ему всего 1,05 МБ места.
Нам нужно только поместить исполняемый файл программного обеспечения где-нибудь на компьютере и дважды щелкнуть его, чтобы запустить его всякий раз, когда мы хотим создать загрузочный USB.
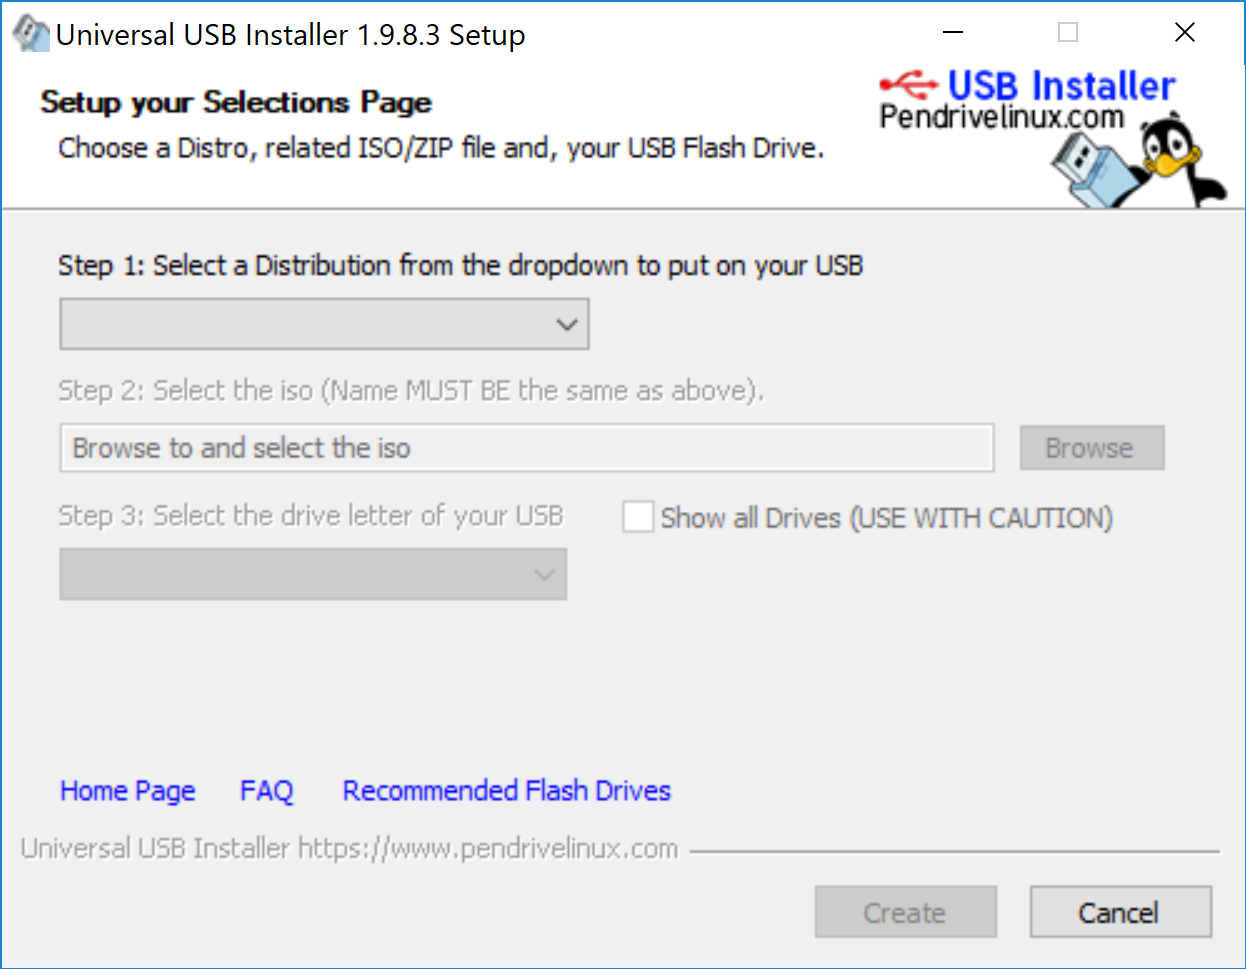
Шаги по созданию загрузочного USB с помощью Universal USB Installer
Шаг 1: Выберите дистрибутив Linux из раскрывающегося списка или другую ОС, которую вы хотите загрузить на свой USB-накопитель.
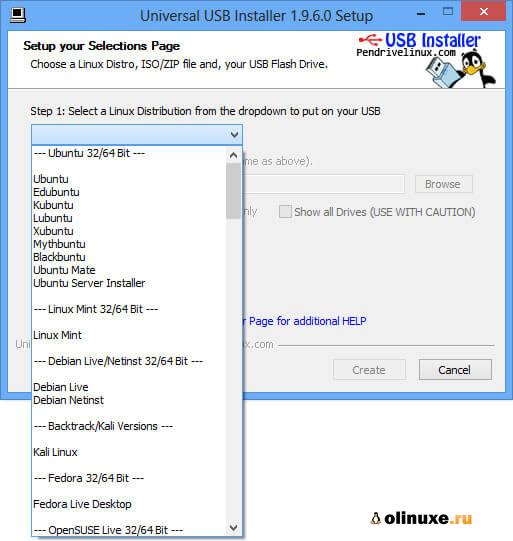
Шаг 2: Просмотрите ISO или Zip-файл ОС в вашей системе.
Шаг 3: Выберите свой USB-накопитель из раскрывающегося списка.
Шаг 4: Нажмите на кнопку «Создать».
Метод 2: Использование Linux Live USB Creator (LiLi) (только для Windows)

Linux Live USB Creator — отличный инструмент, который используется для установки различных компиляций, дистрибутивов и версий Linux на USB-накопитель.
Lili USB Creator, ранее известный как Ubuntu Live Creator, может создать USB-накопитель Linux из исходного образа ISO или компакт-диска.
Кроме того, он может загрузить для вас образы IMG или ISO.
Lili USB Creator может установить на него Portable Virtualbox.
Затем вы можете либо загрузить установку Linux изнутри Windows, эмулированную с помощью Virtualbox на USB, либо загрузиться с USB изначально.
Шаг 1: Загрузите Linux Live USB Creator и распакуйте архив на свой компьютер.
Шаг 2: Запустите LiLi USB Creator.exe из папки Linux Live USB Creator.
Выполните шаги 1–5 из меню.
После завершения у вас должен быть Portable Linux Distribution.
И вы можете носить его с собой в кармане для работы на любом ПК с эмуляцией Virtual box Portable или загрузиться с него.
Способ 3: mintStick (только для Linux)
mintStick по умолчанию установлен в Linux Mint.
Это загрузочный USB-инструмент, предлагаемый Linux и многими другими дистрибутивами Linux.
Шаги по созданию загрузочного USB с помощью mintStick:
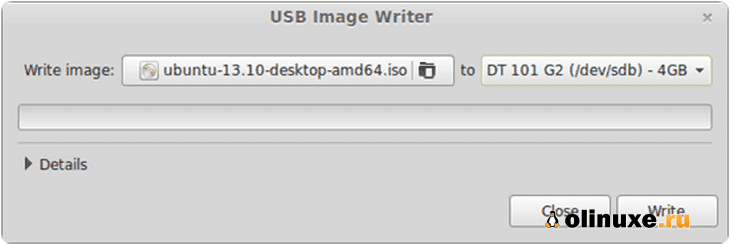
Шаг 1. Запустите USB Image Writer из меню.
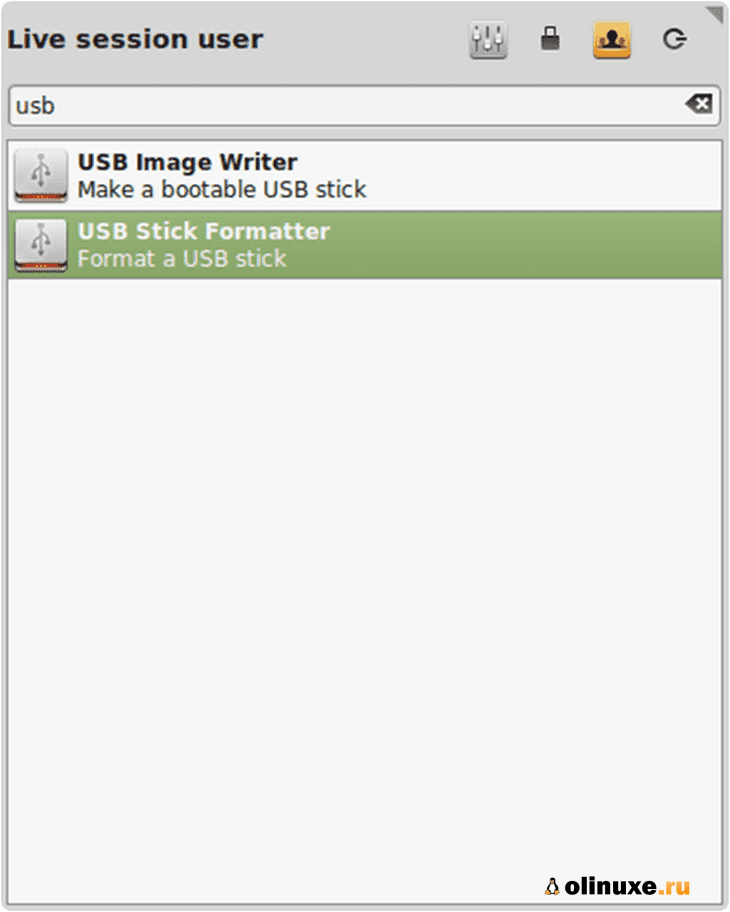
Шаг 2. Выберите свой ISO-образ.
Шаг 3. Выберите свое USB-устройство.
Шаг 4. Нажмите «Записать на устройство».
Метод 4: Использование терминала (только для Linux)
Это не требует усилий, просто зайдите в терминал и введите:
sudo dd if=~/Desktop/linuxmint.iso of=/dev/sdx oflag=direct bs=1048576
Здесь ‘~/Desktop/linuxmint.iso’ — это расположение и имя загруженного образа (в этом примере он находится на рабочем столе).
В то время как ‘/dev/sdx’ является целевым USB-накопителем.
В случае, если ваша система не поддерживает ‘oflag = direct’.
Затем вы можете оставить его, так как он предназначен для ускорения процесса.
Но, если вы не знаете путь к целевому USB-диску, запустите эту команду и определите папку назначения.
sudo fdisk -l
Предупреждение: убедитесь, что вы указали правильный путь к устройству, потому что этот процесс удалит все данные, которые были на устройстве до этого.
Помните, что нельзя включать целое число для USB-накопителя, например, ‘/dev/sdx1’, потому что тогда оно будет относиться к существующему разделу на этом диске, а не к самому диску.
После того, как USB был правильно создан с помощью ‘dd’, должен появиться следующий результат:
sudo dd if=~/Desktop/linuxmint.iso of=/dev/sdb oflag=direct bs=1048576
706+1 records in
706+1 records out
740601856 bytes (741 MB) copied, 91.7024 s, 8.1 MB/s
В заключение, мы считаем, что этот пост будет полезен для вас.
Не забудьте также поделиться этим со своими друзьями.
Для получения любой помощи, пожалуйста, не стесняйтесь писать нам в комментариях ниже.
До скорых встреч! Заходите!
Подписаться на обновления блога!
Creating a USB Bootable RUNT Linux; This walk through illustrates how to install, boot, and run RUNT Linux from a USB flash drive. RUNT is a super super tiny and very basic Linux distro. It is recommended for intermediate to advanced users who prefer to do work without using a graphical interface like X. Beware that by default it does not feature a GUI, it uses a text only based interface.

Distribution Home Page: http://runt.mybox.org/
Persistent Feature: Unknown
What you’ll need:
- USB Flash Pen Drive
- Runt Linux
- A running Windows 8/10 (to perform the install)
- Universal USB Installer
How to create a RUNT Bootable USB Flash Drive using UUI
- Download and launch the Universal USB Installer,
- 1.) Select Runt Linux from the drop down. 2.) Browse to your .zip file. 3.) Select your Flash Drive. 4.) Click Create.

- Once the Installation has finished, restart your PC and set your BIOS or Boot Menu to boot from the USB device, save your changes and reboot.

Save your BIOS settings. On the next reboot, you should have a successful launch of RUNT Linux.
Login name for RUNT: Root
Pass: No password set by default
Use the runthelp or diskhelp commands to get started using RUNT.
We will explain how to add a GUI login and other modules to this distro later.
Notes: If you need to create a boot floppy (no USB boot option in BIOS), run mkfloppy.bat from the runtutil directory.
If you would like to learn about Linux, the first thing you have to do is install the Linux OS on your system.It can be achieved in two ways either go with virtualization applications like Virtualbox, VMWare, etc, or install Linux on your system.
If you are preferring to move from windows OS to Linux OS or planning to install Linux operating system on your spare machine then you have to create a bootable USB stick for that.
We had wrote many articles for creating bootable USB drive on Linux such as BootISO, Etcher and dd command but we never get an opportunity to write an article about creating Linux bootable USB drive in windows. Somehow, we got a opportunity today to perform this task.
In this article we are going to show you, how to create a bootable Ubuntu USB flash drive from windows 10.
These step will work for other Linux as well but you have to choose the corresponding OS from the drop down instead of Ubuntu.
Step-1: Download Ubuntu ISO
Visit Ubuntu releases page and download a latest version. I would like to advise you to download a latest LTS version and not for a normal release.
Make sure you have downloaded the proper ISO by performing checksum using MD5 or SHA256. The output value should be matched with the Ubuntu releases page value.
Step-2: Download Universal USB Installer
There are many applications are available for this but my preferred application is Universal USB Installer which is very simple to perform this task. Just visit Universal USB Installer page and download the app.
Step-3: How to create a bootable Ubuntu ISO using Universal USB Installer
There is no complication on this application to perform this. First connect your USB drive then hit the downloaded Universal USB Installer. Once it’s launched you can see the interface similar to us.
Step-1:Select Ubuntu OS.Step-2:Navigate to Ubuntu ISO downloaded location.Step-3:By default it’s select a USB drive however verify this then check the option to format it.
When you hit Create button, it will pop-up a window with warnings. No need to worry, just hit Yes to proceed further on this.
USB drive partition is in progress.

Wait for sometime to complete this. If you would like to move this process to background, yes, you can by hitting Background button.
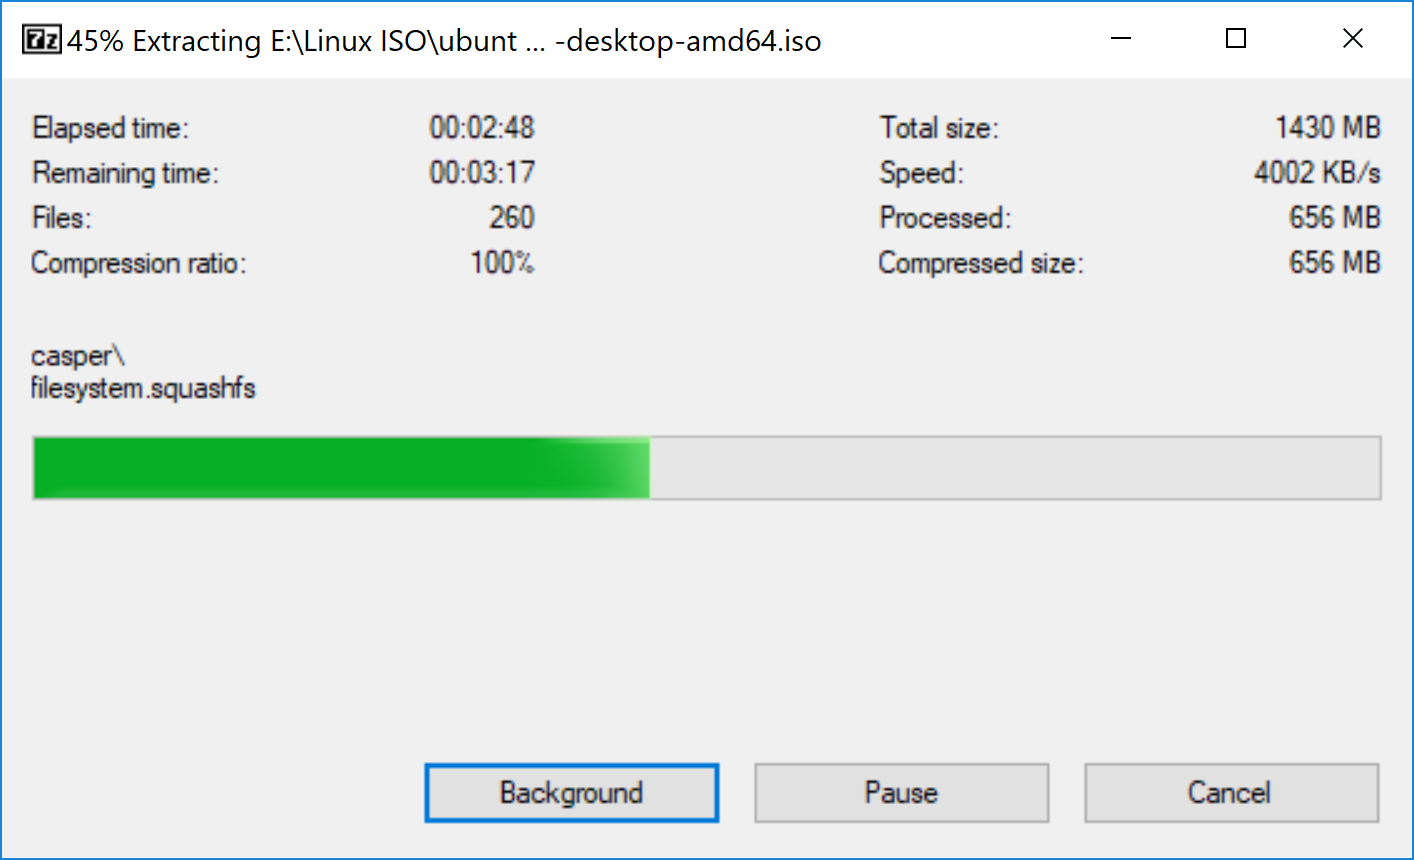
Yes, it’s completed.
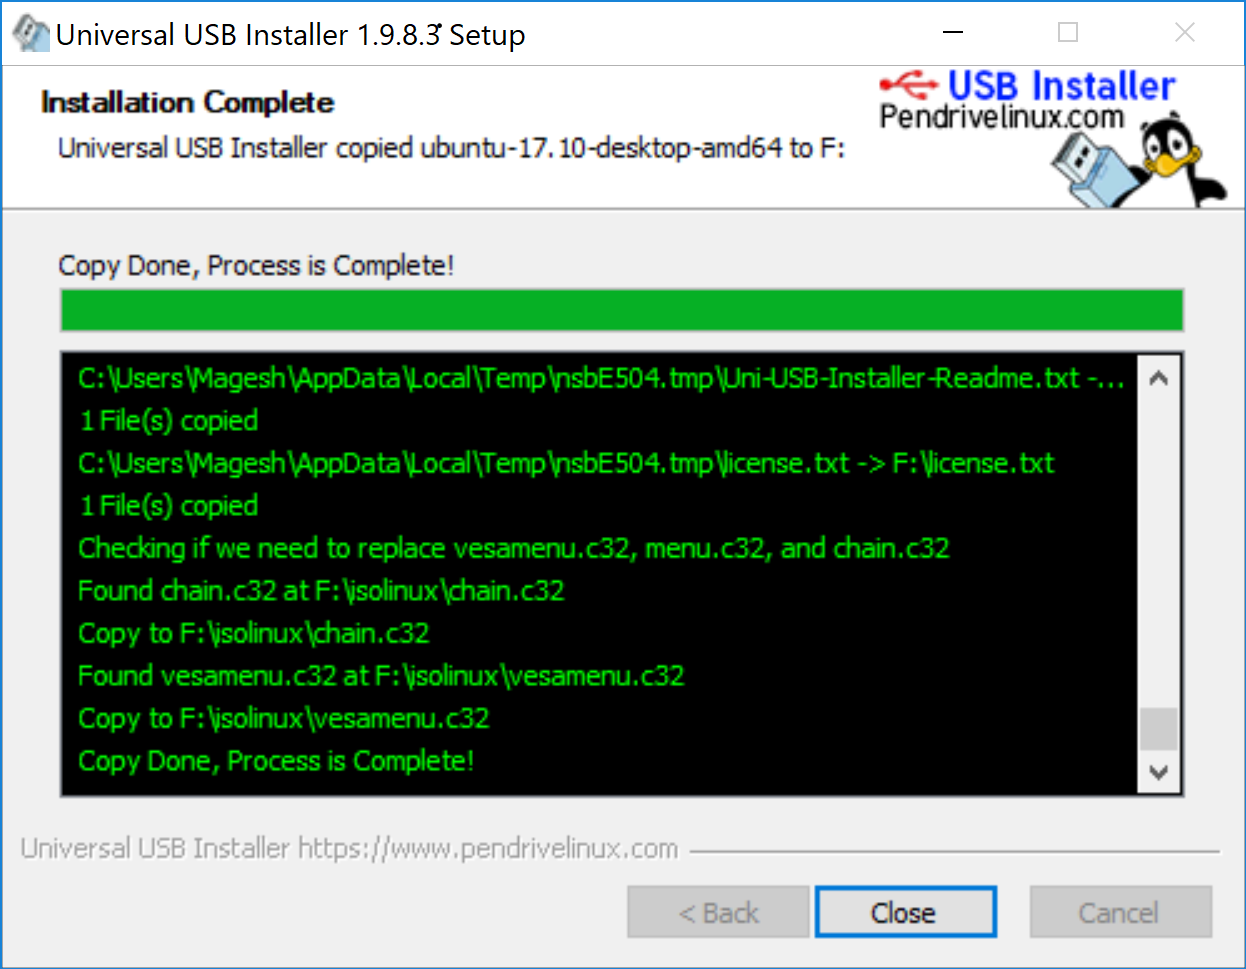
Now you are ready to perform Ubuntu OS installation. However, it’s offering a live mode also so, you can play around it if you want to try before performing the installation.