The last release of Mac OS doesn’t have the option to create a bootable USB from Bootcamp like previous versions, and it is a problem because that require uses other tools.
I am updating this post today Dec 12, 2018. The reason is that I was only using UNetbootin to create the bootable USB, I will leave guide as a second method since it still working, and I will explain to you how you can create the bootable Windows USB without extra software.
The first step for both methods requires to format your USB device to NTFS, this is the default filesystem, alternative you can use ExFAT but the installation could fail.
Format USB to ExFAT (Under your own risk)
In order to boot from the USB, you need to format the USB to ExFAT, you can do it using Disk Utility (it comes with MacOS).
This step is the same for both methods. You need to show all the devices in Disk Utility» before to start the process.

Select your USB device in the list (not the partition), right click and then click on the Erase option:

In the next screen make sure you select these two options:
- Format: ExFAT
- Scheme: Master Boot Record
Click the Erase button.

If for some reason it fails, probably is because MacOS still using the USB, just repeat the steps, but if you see a screen similar to above screen is because the operation is successful.

Format USB with the terminal
You also can format the USB from the terminal, but you have to take care to use the correct device because, if you use the wrong name you will lose everything.
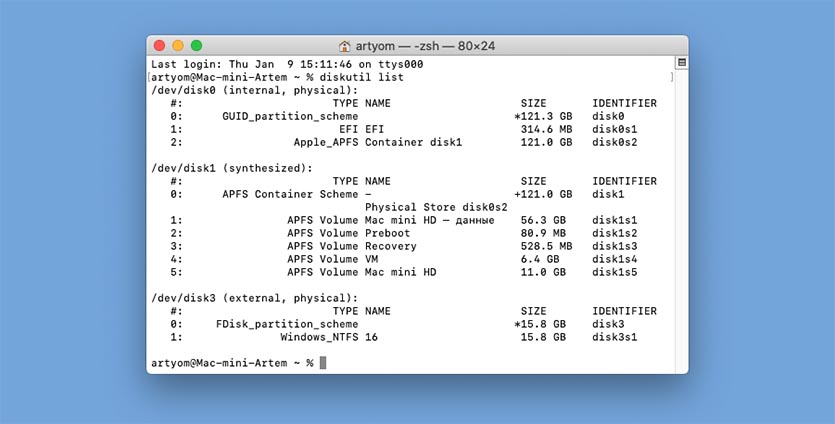
With this command you can list the device on MacOS:
diskutil list
This is an example, my USB is the disk2:

This command is to format the USB, the last parameter is the the USB:
diskutil eraseDisk ExFAT "WINDOWS10" MBRFormat disk2

Copy Windows files to USB — Method 1
This process is very easy doesn’t require to install other software, and they are just a few steps:
Open Windows ISO
Just double click on the ISO image, MacOS mount the image automatically.

Copy files
Now you only need to copy the files and paste them to the USB.
Command + ASelect all files.Command + CCopy files.- Go to your USB
Command + Vpaste the files.

This process could fail if you are using a USB with FAT32 because the file install.win is over 4GB, if this is the case try to open the terminal and copy paste the files from there (no always works. Try to follow the instructions to format the USB in ExFAT, NTFS works for some BIOS).

This is the command to copy the files from the ISO to the USB:
cp -rp /Volumes/CCCOMA_X64FRE_EN-US_DV9/* /Volumes/WINDOWS10/
And that is all, now you can try boot from the USB.
UNetbootin — Method 2
I will show you how you can use UNetbootin to create a bootable USB, it can be used no only for Mac but for Windows and Linux distributions too.
UNetbootin is free software and it is also available for Windows and Linux.
Check the path name of your USB Disk.
Always in Disk Utility, select the new partition that we created in the previous step, and click on the information button, it will give you the information about the new partition.

You also can use the terminal and the command diskutil to see the list of drives:
diskutil list
Download UNetbootin:
-
Download the
dmgdirectly from the Website.
And copy theappto the/Applicationfolder. -
I prefer to use homebrew to install applications, you can check this article for more information: Installing Applications on Mac with Homebrew:
brew cask install --appdir="/Applications" unetbootin
Makes the USB booteable
Open UNetbootin and you only need select 3 options:
- Diskimage and ISO
- Now we need open the ISO Windows image that is on our computer.
- Select your USB device on UNetbootin.
- Click on the OK, button and wait to the process end it will take a time.

NOTES:
- I tested other tools like
ddandEtcherbut they are not working because Windows requires extra steps, for the moment this is the only easy tool that I know that works if you are on Windows try Rufus. - Some users reported that UNetbootin is not working, if after to format the USB drive and change the block size is not working for you try another Drive with enough space.
 В этой инструкции подробно о том, как сделать загрузочную флешку Windows 10 на Mac OS X для последующей установки системы либо в Boot Camp (т.е. в отдельный раздел на Mac) либо на обычный ПК или ноутбук. Способов записи загрузочной флешки Windows в OS X не так и много (в отличие от Windows-систем), но те, что имеются, в принципе достаточны для того, чтобы выполнить задачу. Также может быть полезным руководство: Установка Windows 10 на Mac (2 способа).
Для чего это может пригодиться? Например, у вас есть Mac и ПК, который перестал загружаться и потребовалось переустановить ОС или же использовать созданную загрузочную флешку как диск восстановления системы. Ну и, собственно, для установки Windows 10 на Mac. Инструкция по созданию такого накопителя на ПК доступна здесь: Загрузочная флешка Windows 10.
Запись загрузочного USB с помощью Ассистент Boot Camp
В Mac OS X присутствует встроенная утилита, предназначенная для создания загрузочной флешки с Windows и последующей установки системы в отдельный раздел на жестком диске или SSD компьютера с последующей возможностью выбора Windows или OS X при загрузке.
Однако, загрузочная флешка с Windows 10, созданная таким образом, успешно работает не только для этой цели, но и для установки ОС на обычные ПК и ноутбуки, причем загрузиться с нее можно как в режиме Legacy (BIOS), так и UEFI — в обоих случаях все проходит успешно.
Подключите USB накопитель с емкостью не менее 8 Гб к вашему Macbook или iMac (а, возможно, и Mac Pro, мечтательно добавил автор). После чего начните набирать «Boot Camp» в поиске Spotlight, либо запустите «Ассистент Boot Camp» из «Программы» — «Утилиты».
В ассистенте Boot Camp выберите «Создать диск установки Windows 7 или новее». К сожалению, снять отметку «Загрузить последнее ПО поддержки Windows от Apple» (оно будет загружаться из Интернета и занимает не мало) не получится, даже если флешка вам нужна для установки на ПК и это ПО не нужно. Нажмите «Продолжить».

На следующем экране укажите путь к ISO образу Windows 10. Если у вас такового нет, то самый простой способ скачать оригинальный образ системы описан в инструкции Как скачать ISO Windows 10 с сайта Microsoft (для загрузки с Mac полностью подходит второй способ, с использованием Microsoft Techbench). Также выберите подключенную флешку для записи. Нажмите «Продолжить».

Останется только дождаться, когда будет завершено копирование файлов на накопитель, а также загрузка и установка ПО от Apple на тот же USB (в процессе могут запросить подтверждение и пароль пользователя OS X). По завершении вы можете использовать загрузочную флешку с Windows 10 практически на любом компьютере. Также вам покажут инструкцию, как загрузиться с этого накопителя на Mac (удерживать Option иди Alt при перезагрузке).
Загрузочная флешка UEFI с Windows 10 в Mac OS X
Есть еще один простой способ записи установочной флешки с Windows 10 на компьютере Mac, правда этот накопитель подойдет только для загрузки и установки на ПК и ноутбуках с поддержкой UEFI (и включенной загрузкой в режиме EFI). Впрочем, это могут почти все современные устройства, выпущенные в последние 3 года.
Для записи данным способом, также, как и в предыдущем случае нам потребуется сам накопитель и образ ISO, смонтированный в OS X (кликните по файлу образа дважды, и он смонтируется автоматически).
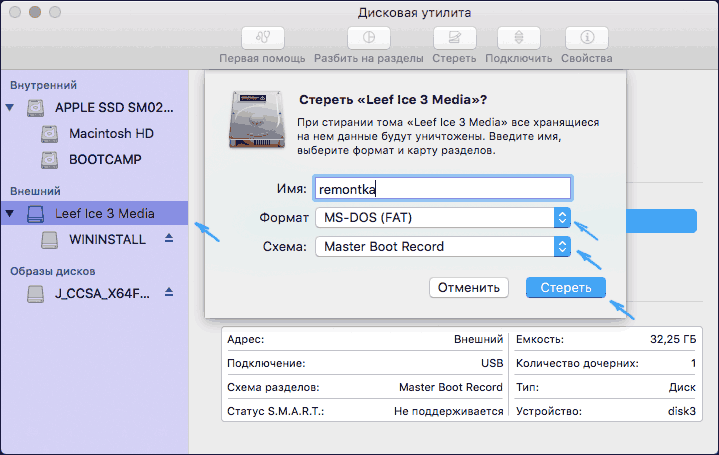
Флешку потребуется отформатировать в FAT32. Чтобы сделать это, запустите программу «Дисковая утилита» (с помощью поиска Spotlight или через Программы — Утилиты).
В дисковой утилите выберите слева подключенную флешку, а затем нажмите «Стереть». В качестве параметров форматирования используйте MS-DOS (FAT) и схему разделов Master Boot Record (и имя лучше задать на латинице, а не на русском). Нажмите «Стереть».
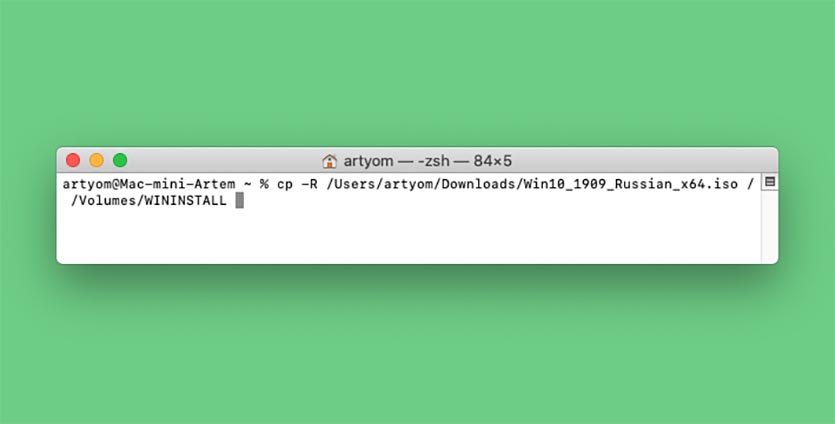
Последний шаг — просто скопировать все содержимое подключенного образа с Windows 10 на флешку. Но есть один нюанс: если пользоваться для этого Finder, то у многих возникает ошибка при копировании файла nlscoremig.dll и terminaservices-gateway-package-replacement.man с кодом ошибки 36. Решить проблему можно, копируя эти файлы по одному, но есть способ и проще — использовать Терминал OS X (запустите его так же, как запускали предыдущие утилиты).
В терминале введите команду cp -R путь_к_смонтированному_образу/ путь_к_флешке и нажмите Enter. Чтобы не писать и не угадывать эти пути, вы можете написать только первую часть команды в терминале (cp -R и пробел в конце), затем перетащить на окно терминала сначала диск с дистрибутивом Windows 10 (значок с рабочего стола), добавив к прописавшемуся автоматически пути слэш «/» и пробел (обязательно), а потом — флешку (здесь добавлять ничего не нужно).

Какая-либо строка прогресса не появится, просто нужно будет подождать, когда все файлы будут переписаны на флешку (это может занять до 20-30 минут на медленных USB накопителях), не закрывая Терминал, пока в нем снова не появится приглашение к вводу команд.

По завершении вы получите готовый установочный USB накопитель с Windows 10 (структура папок, которая должна получиться, показана на скриншоте выше), с которого можно либо установить ОС, либо использовать восстановление системы на компьютерах с UEFI.
Операционная система Windows более капризная и менее стабильная, чем macOS от Apple. Открытость ОС, отсутствие встроенной системы резервного копирования и большое количество вредоносного ПО часто приводят к необходимости перестанавливать Windows.
При наличии второго Windows-компьютера под рукой создать загрузочную флешку не составит никакого труда.
? Спасибо re:Store за полезную информацию. ?
Сейчас расскажем, как выйти из ситуации, когда есть только рабочий Mac.
В тему: как создать загрузочную флешку macOS в Windows
Еще несколько лет назад создать загрузочную флешку можно было при помощи стандартной утилиты Boot Camp, которая предназначена для быстрой установки Windows на Mac.
Приложение подготавливало загрузочную флешку, записывало на нее установщик Windows и заливало драйвера для корректной работы всех модулей Mac. Использовать такую флешку можно было не только на компьютерах Apple, с ее помощью можно было установить Windows на любой подходящий компьютер.
С недавнего времени разработчики macOS переработали утилиту и вместо создания загрузочной флешки она сразу же начинает установку системы на отдельный раздел Mac.
К счастью, есть и другой достаточно простой способ задать флешку для установки Windows.
Как создать загрузочную флешку Windows
1. Для начала потребуется образ с операционной системой. Скачать его можно прямо с официального сайта Microsoft.
Образ Windows 10 занимает чуть более 5 Гб дискового пространства, на скачивание обычно уходит от 15 до 30 минут.
2. Далее понадобится флешка объемом 8 ГБ и более, которая будет отформатирована в формате Fat32.
Можно воспользоваться приложением Дисковая утилита или сделать все в Терминале.
3. В Терминале выполняем следующую команду:
diskutil list
Видим перечень внутренних и внешних накопителей на Mac. Находим нужный по объему и запоминаем его номер. Далее вводим команду:
sudo diskutil eraseDisk FAT32 WININSTALL MBRFormat /dev/disk3
FAT32 — нужная нам файловая система;
WININSTALL — метка флешки после форматирования (можно указать любое имя);
disk3 — номер подключенного накопителя, который будем форматировать.
Вводим пароль администратора, ждем несколько секунд и получаем готовую чистую флешку.
4. Остается лишь скопировать содержимое образа с Windows 10 на флешку.
Для этого монтируем образ и вводим в Терминале такую команду:
cp -R расположение_образа/ расположение_флешки
Чтобы вручную не прописывать длинные пути, нужно лишь ввести начало команды “cp -R “, а затем перетянуть образ на окно Терминала из Finder. Путь к нему пропишется автоматически.
Теперь пишем “/ ” (без кавычек с пробелом) и перетаскиваем в Терминал флешку из Finder.
5. Копирование займет определенное время. Никакого статуса при этом отображаться не будет. Об окончании процесса можно судить по светящемуся диоду на флешке (во время копирования он будет мигать).
Можно просто подождать около 20 минут.
Теперь флешку можно использовать для загрузки на компьютерах и ноутбуках с поддержкой UEFI. К сожалению, для старых Windows-ПК такой способ не подойдет.

 (85 голосов, общий рейтинг: 4.46 из 5)
🤓 Хочешь больше? Подпишись на наш Telegram.
![]()
iPhones.ru
Сделать это проще, чем флешку macOS из Windows.
- macOS,
- windows,
- инструкции,
- Маки
![]()
Артём Суровцев
@artyomsurovtsev
Люблю технологии и все, что с ними связано. Верю, что величайшие открытия человечества еще впереди!
Most new PCs don’t come with DVD drives anymore. So it can be a pain to install Windows on a new computer.
Luckily, Microsoft makes a tool that you can use to install Windows from a USB storage drive (or «thumbdrive» as they are often called).
But what if you don’t have a second PC for setting up that USB storage drive in the first place?
In this tutorial we’ll show you how you can set this up from a Mac.
Step 1: Download the Windows 10 ISO file
You can download the ISO file straight from Microsoft. That’s right — everything we’re going to do here is 100% legal and sanctioned by Microsoft.
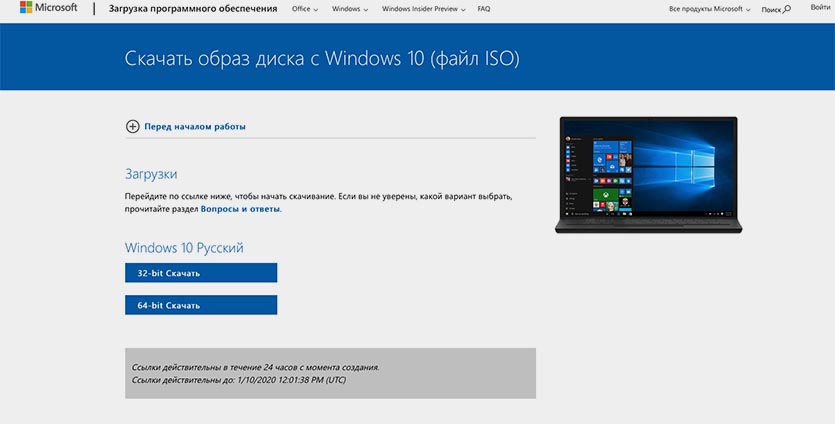
You can download Windows 10 directly from Microsoft for free using this link. If you visit the link using a Windows device, you’ll be redirected to the Windows Media Creation Tool like this:
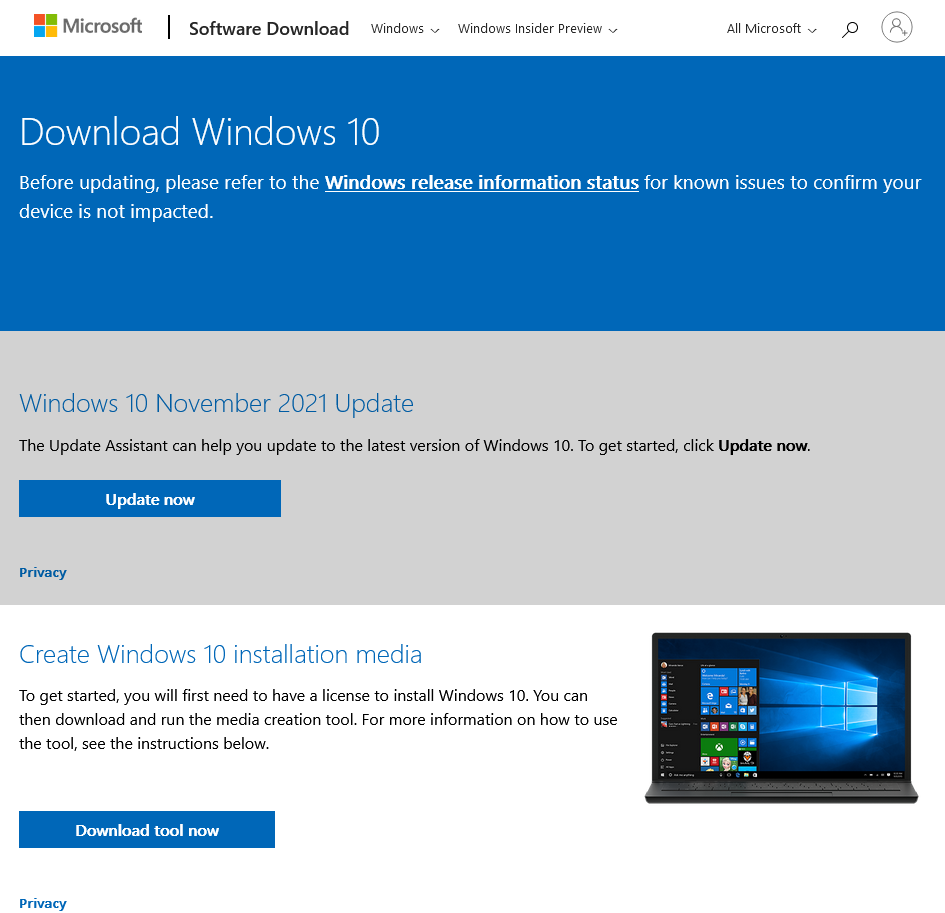
If you visit the same link from a non-Windows device, such as a Mac or a Linux device or any smartphone, you’ll land on the official ISO download page:
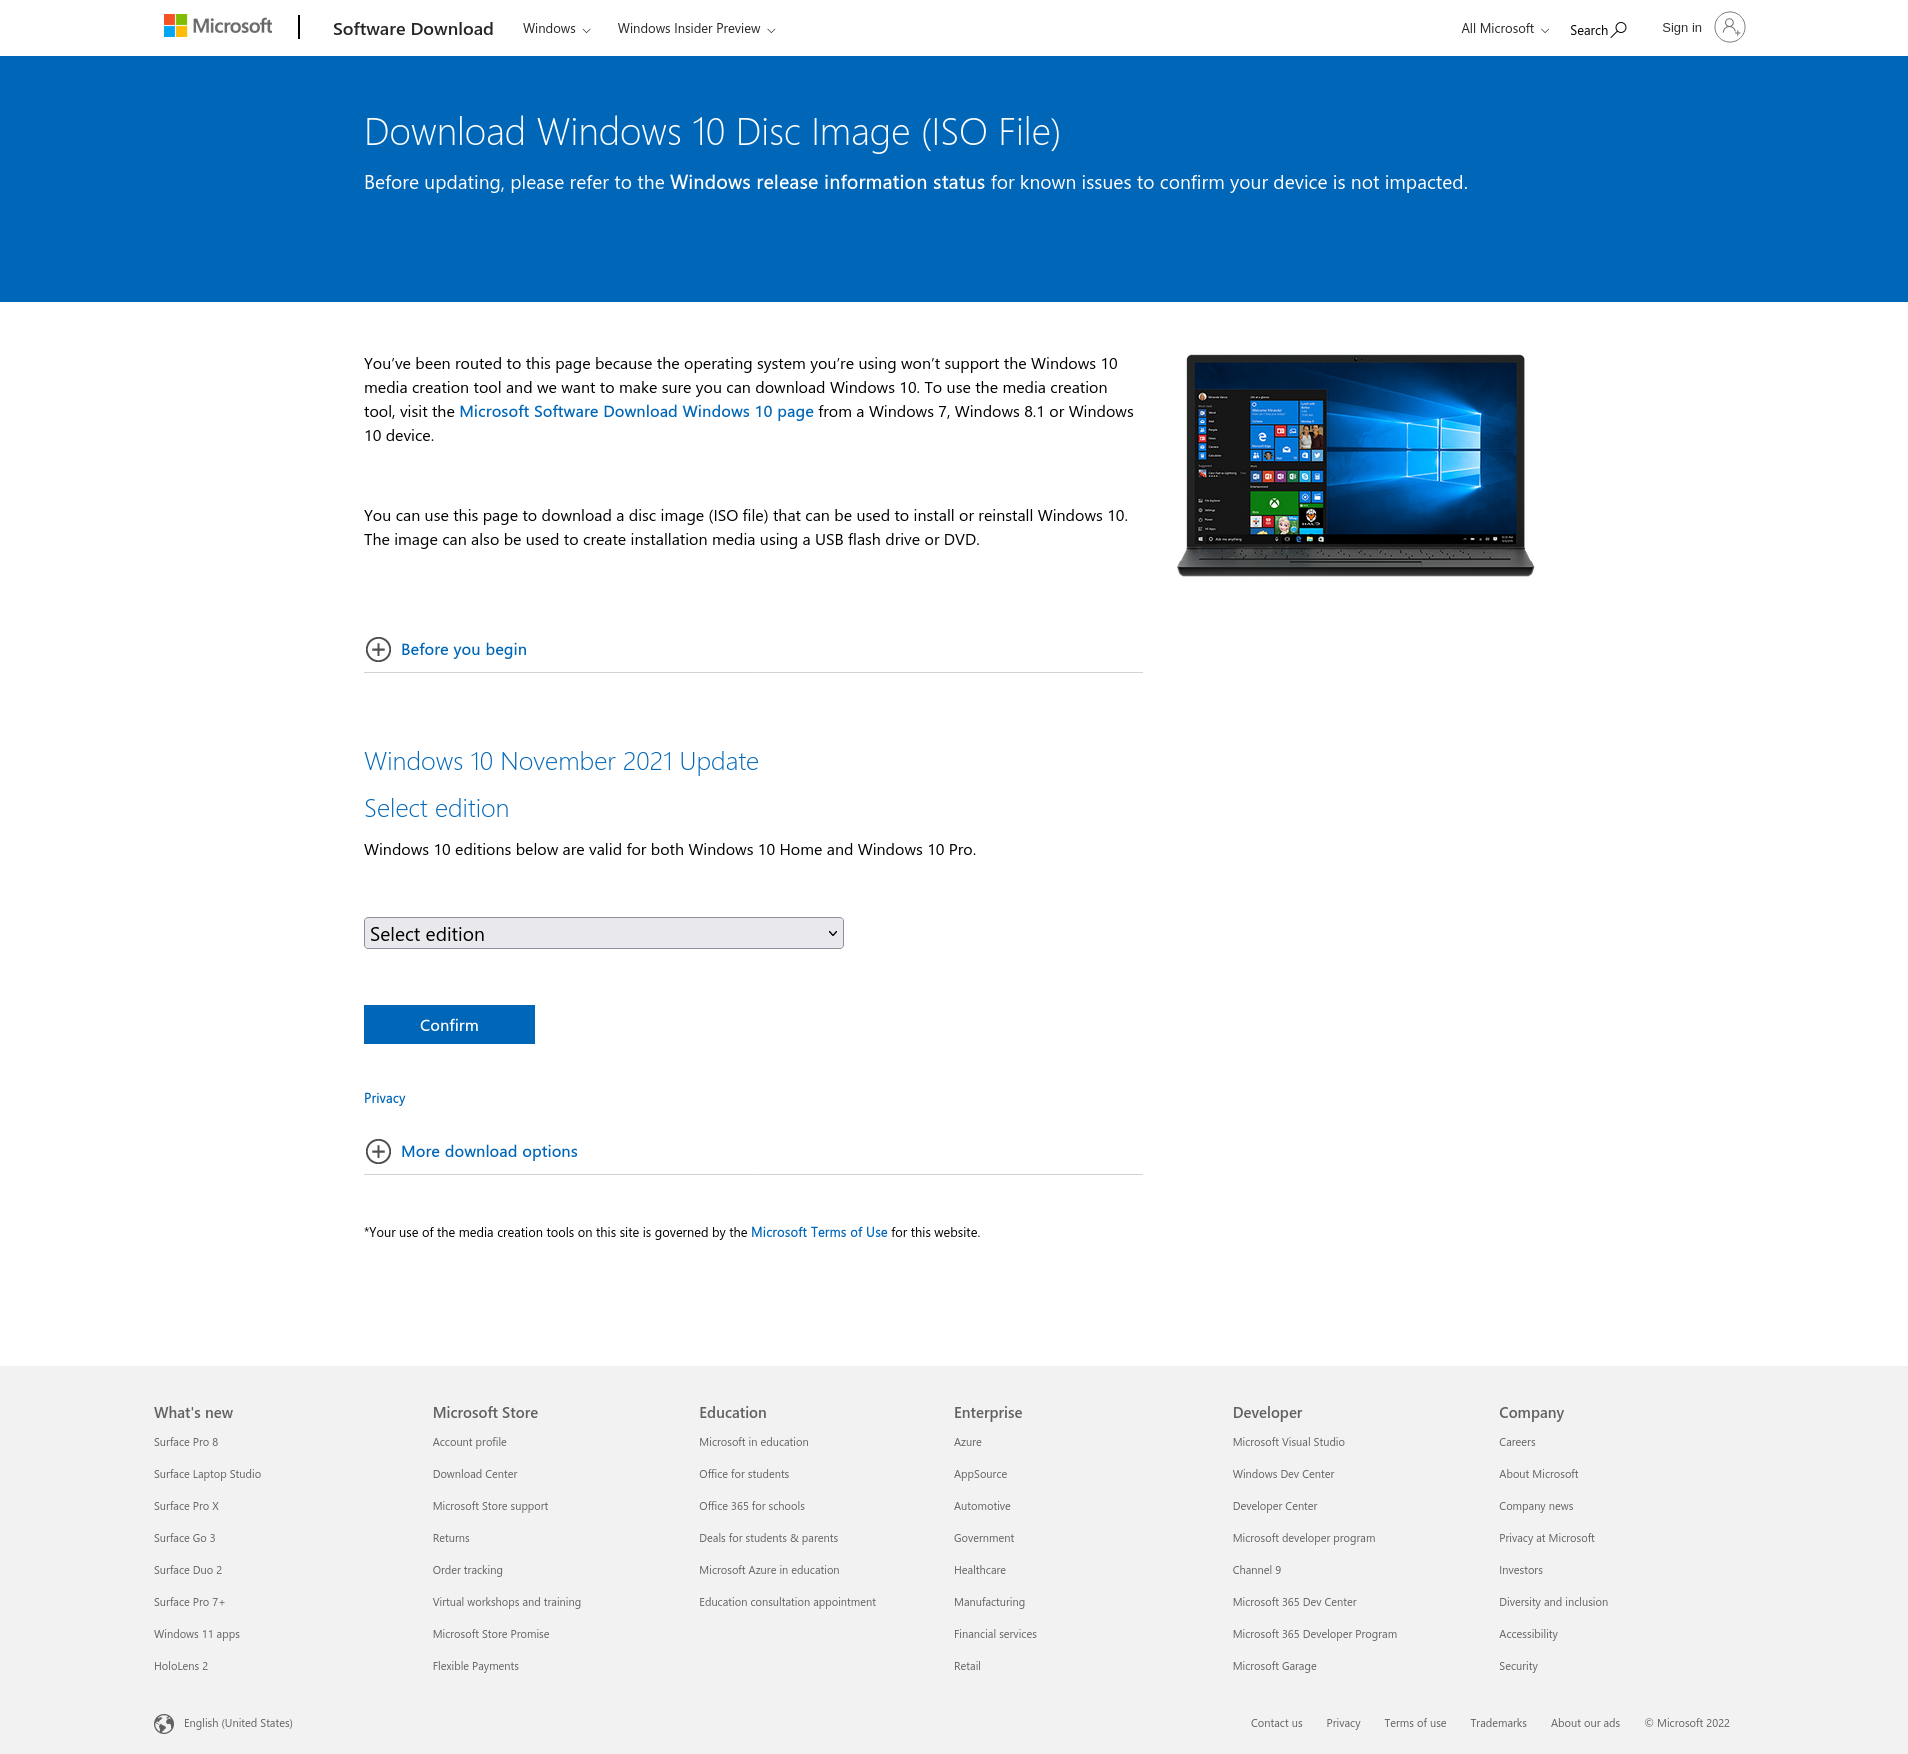
Select your desired edition from that drop-down and hit Confirm.
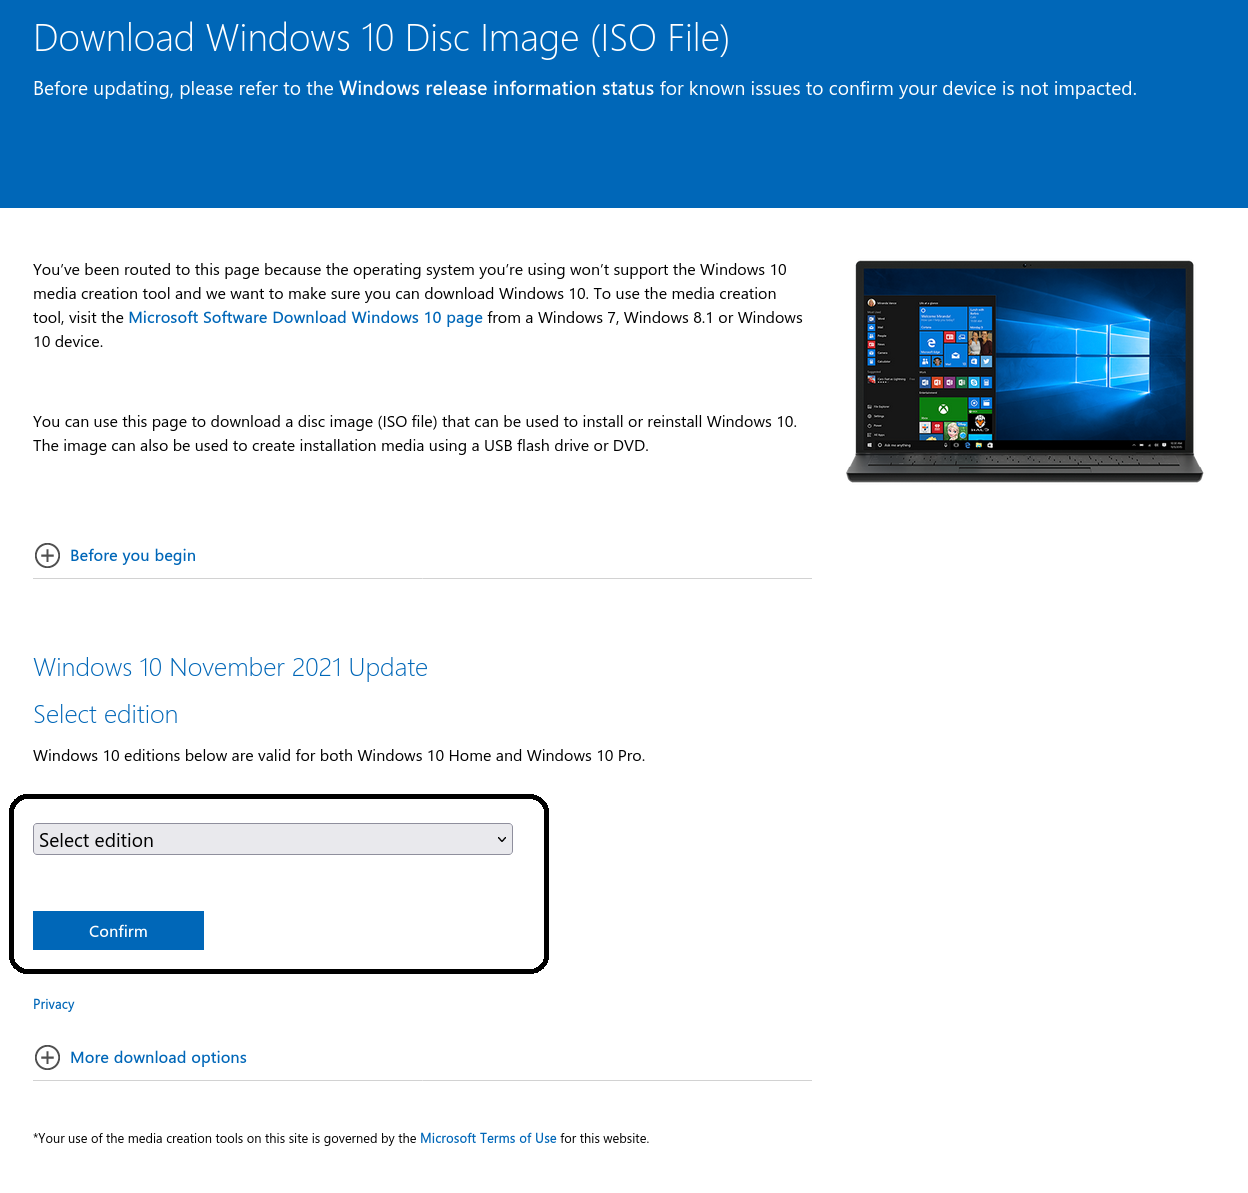
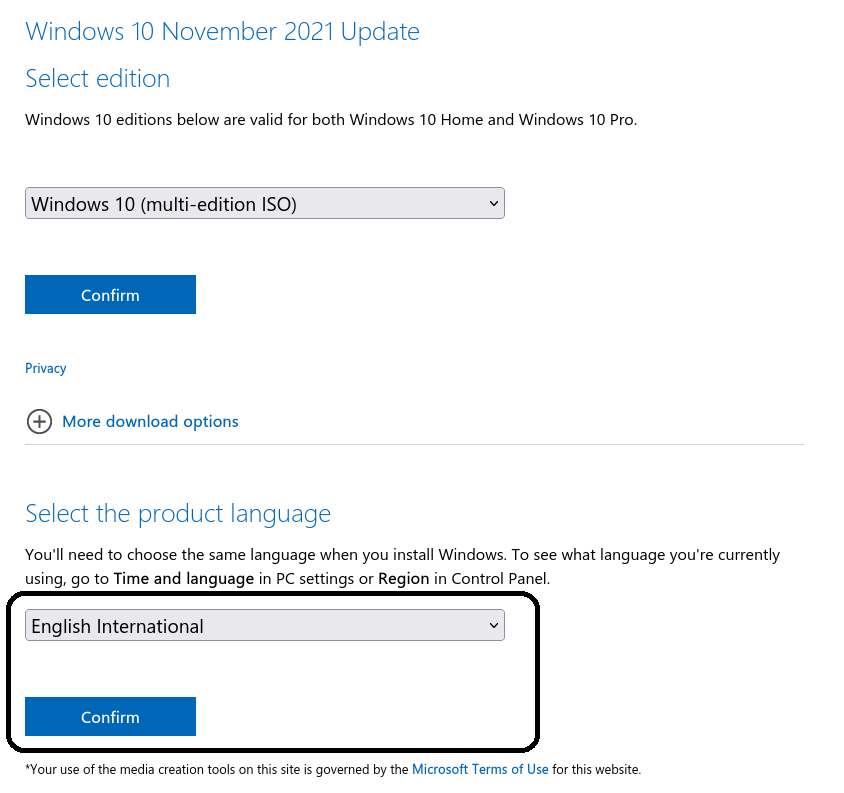
At this time, Windows 10 (multi-edition ISO) was the only one available. Once you’ve confirmed your edition, you’ll get another drop-down that lets you pick a language. Pick the one you want and hit the Confirm button.
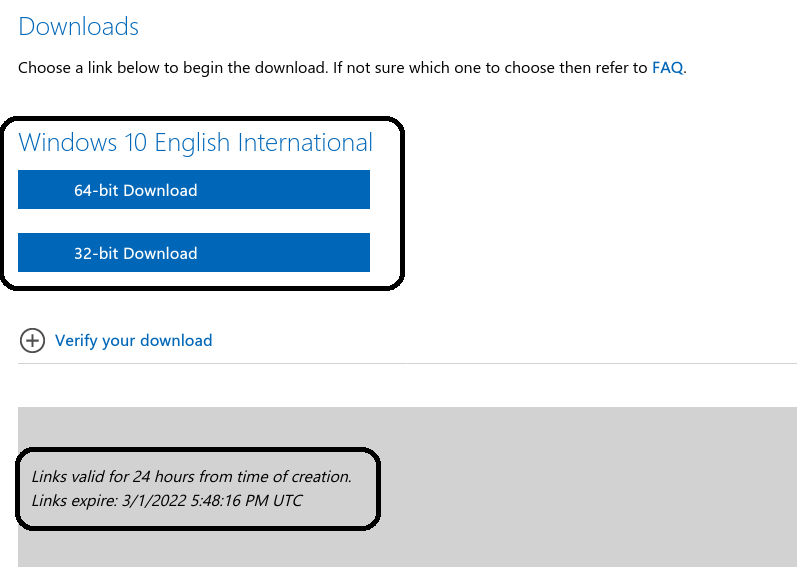
Once you’ve confirmed your language, you’ll get two download links, one for the 64-bit edition, and the other one for the 32-bit edition. Both links are valid for 24 hours and the page will also show when they expire.
If you don’t know how to decide between 64-bit and 32-bit, here’s what you should do. If you have a processor that supports 64-bit architecture and you have more than 4GB of RAM, go with the 64-bit one. 32-bit operating systems have a 4GB RAM limit.
To figure out whether your processor supports 64-bit architecture or not, head over to a website like WikiChip, and search for your processor model.
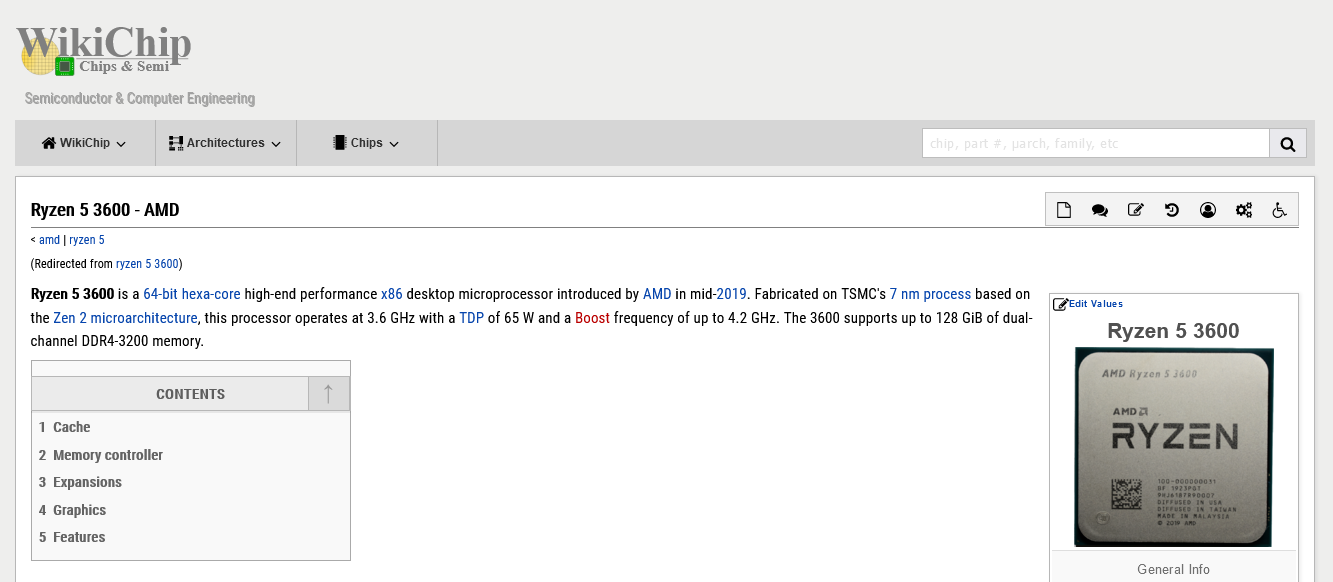
As you can see in the screenshot above, my Ryzen 5 3600 supports 64-bit architecture. I also have 16GB of RAM which is a lot more than 4GB, so I’ll go for the 64-bit edition.
Step 2: Insert your USB storage drive into your Mac
The ISO file is only about 5 gigabytes, but I recommend you use a USB drive with at least 16 gigabytes of space just in case Windows needs more space during the installation process.
I bought a 32 gigabyte USB drive at Walmart for only $3, so this shouldn’t be very expensive.
Stick your USB drive into your Mac. Then open your terminal. You can do this using MacOS Spotlight by pressing both the ⌘ and Space bar at the same time, then typing «terminal» and hitting enter.
Don’t be intimidated by the command line interface. I’m going to tell you exactly which commands to enter.
Step 3: Use the diskutil command to identify which disk your USB drive is mounted on
Open Mac Spotlight using the ⌘ + space keyboard shortcut. Then type the word «terminal» and select Terminal from the dropdown list.
Paste the following command into your terminal and hit enter:
diskutil list
You will see output like this (note — your Mac’s terminal may be black text on a white background if you haven’t customized it).
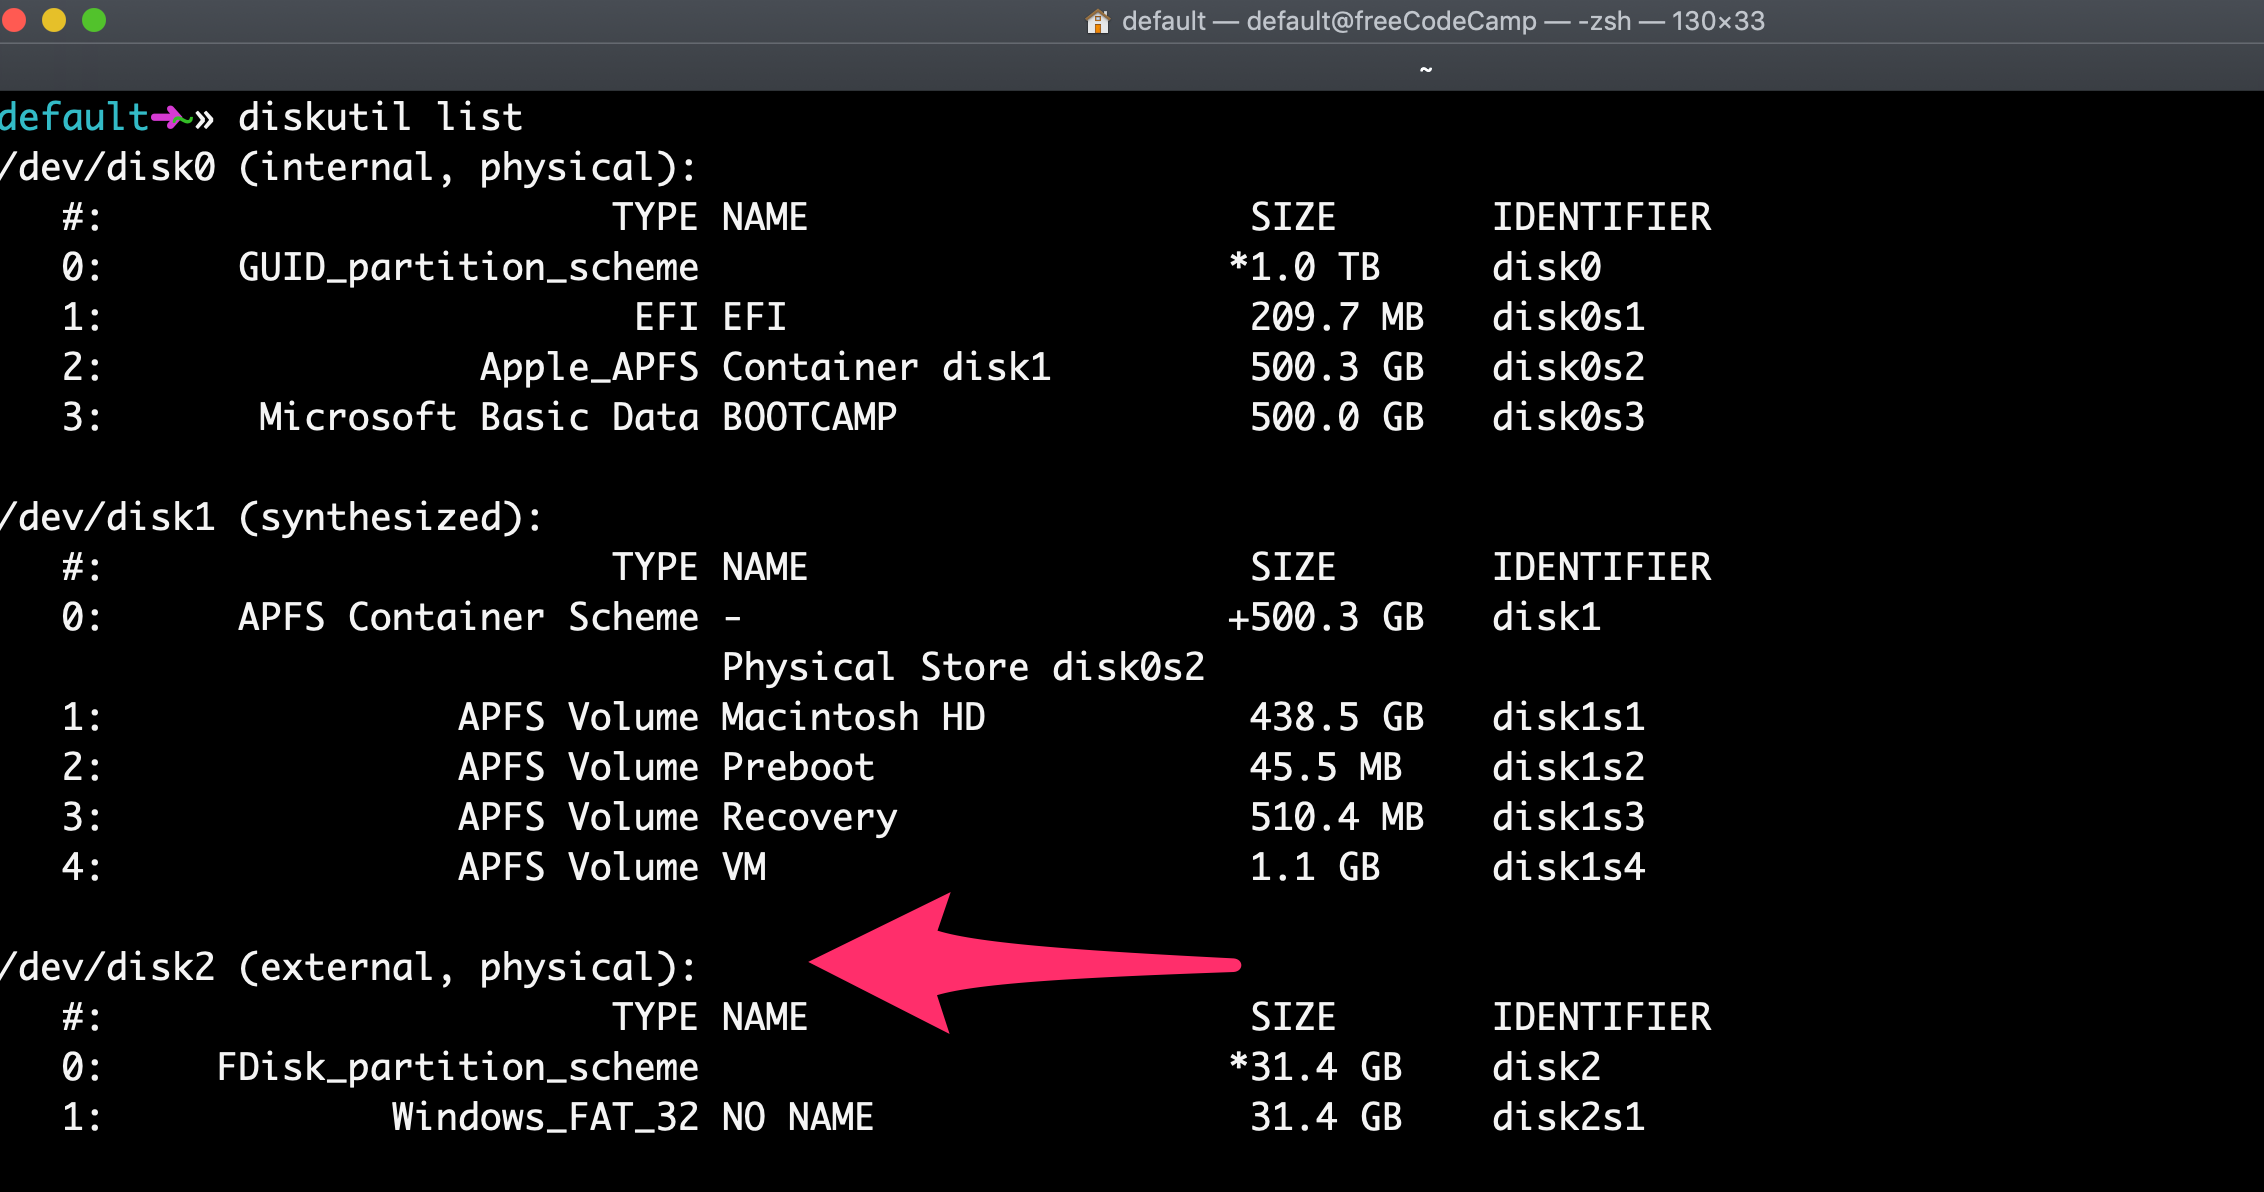
Copy the text I point to here. It will probably be something like
/dev/disk2.
Step 4: Format your USB Drive to work with Windows
Next format your USB drive to Windows FAT32 format. This is a format that Windows 10 will recognize.
Note that you should replace the disk2 with the name of the your drive from step 3 if it wasn’t disk2. (It may be disk3 or disk4).
Run this command using the correct disk number for your USB:
diskutil eraseDisk MS-DOS "WIN10" GPT /dev/disk2
Then you’ll see terminal output like this.
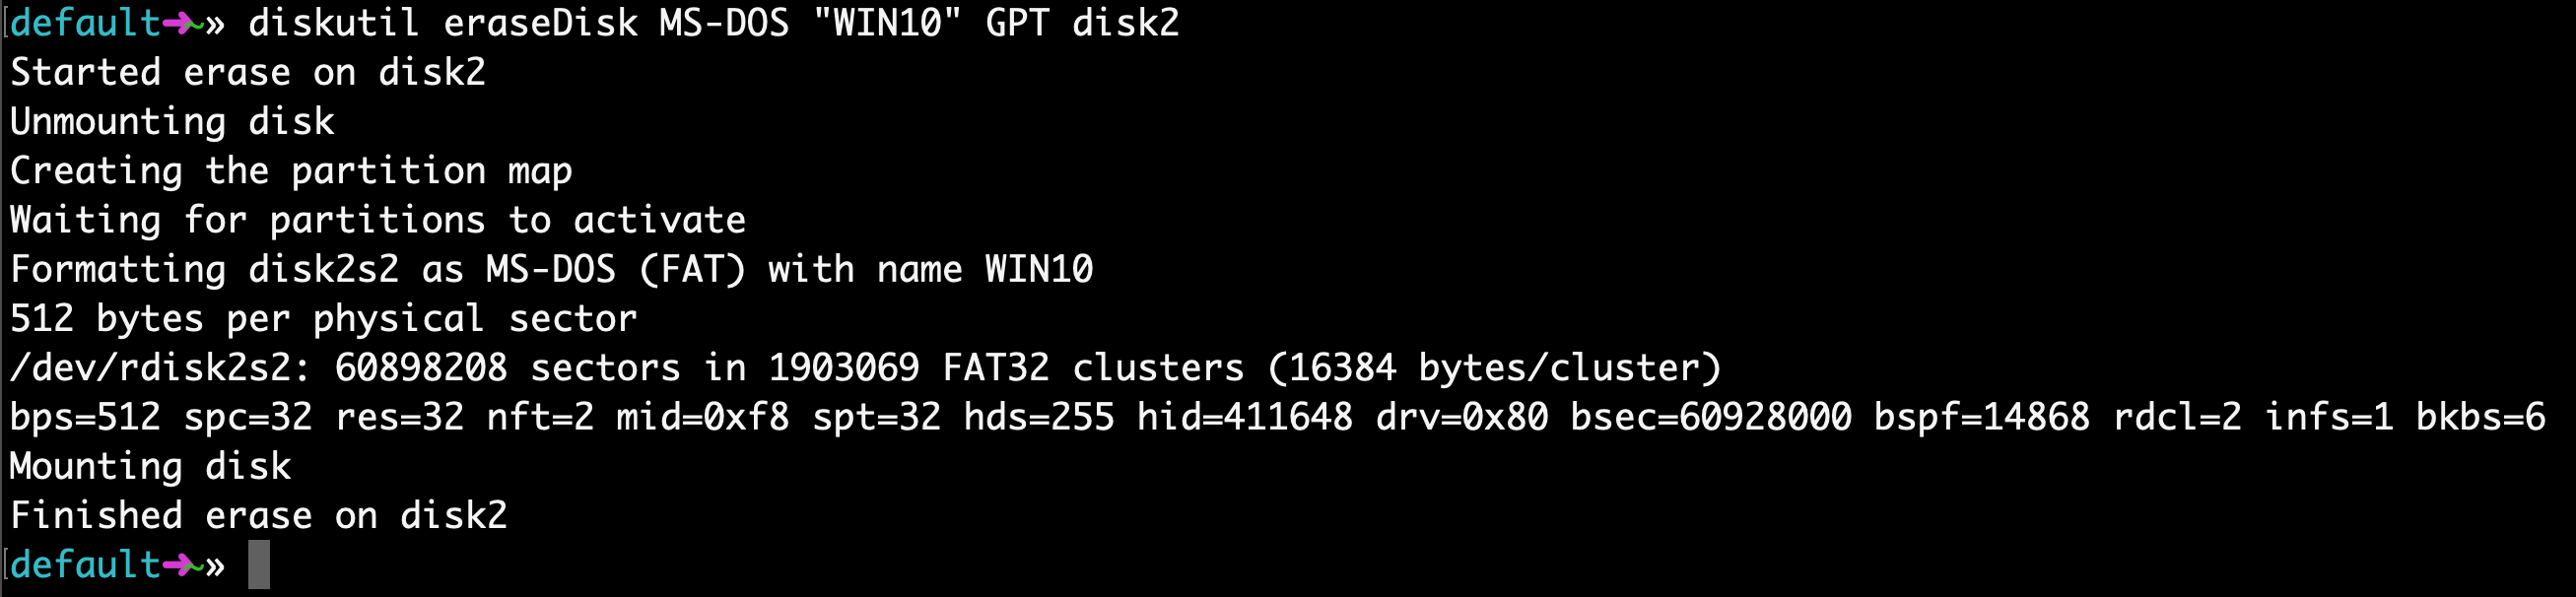
This will probably only take about 20 seconds on a newer computer, but may take longer on an older computer.
Note that for some hardware, you may instead need to run this command, which uses the MBR format for partitioning instead of GPT. Come back and try this command if step 7 fails, then redo steps 5, 6, and 7:
diskutil eraseDisk MS-DOS "WIN10" MBR /dev/disk2Step 5: Use hdiutil to mount the Windows 10 folder and prepare it for transfer.
Now we’re going to prep our downloaded ISO file so we can copy it over to our USB drive.
You will need to check where your downloaded Windows 10 ISO file is and use that. But your file is probably located in your ~/Downloads folder with a name of Win10_1903_V1_English_x64.iso.
hdiutil mount ~/Downloads/Win10_1903_V1_English_x64.iso
Step 6: Copy the Windows 10 ISO over to your USB Drive
Update April 2020: One of the files in the Windows 10 ISO – install.wim – is now too large to copy over to a FAT-32 formatted USB drive. So I’ll show you how to copy it over separately.
Thank you to @alexlubbock for coming up with this workaround.
First run this command to copy over everything but that file:
rsync -vha --exclude=sources/install.wim /Volumes/CCCOMA_X64FRE_EN-US_DV9/* /Volumes/WIN10
Then run this command to install Homebrew (if you don’t have it installed on your Mac yet):
/usr/bin/ruby -e "$(curl -fsSL https://raw.githubusercontent.com/Homebrew/install/master/install)"
Then use Homebrew to install a tool called wimlib with this terminal command:
brew install wimlib
Then go ahead and create the directory that you’re going to write the files into:
mkdir /Volumes/WIN10/sources
Then run this command. Note that this process may take several hours, you may see 0% progress until it finishes. Don’t abort it. It will use wimlib to split the install.wim file into 2 files less than 4 GB each (I use 3.8 GB in the following command), then copy them over to your USB:
wimlib-imagex split /Volumes/CCCOMA_X64FRE_EN-US_DV9/sources/install.wim /Volumes/WIN10/sources/install.swm 3800
Once that’s done, you can eject your USB from your Mac inside Finder. Note that Windows will automatically rejoin these files later when you’re installing.
Step 7: Put your USB into your new PC and start loading Windows
Congratulations — your computer now should boot directly from your USB drive. If it doesn’t, you may need to check your new PC’s BIOS and change the boot order to boot from your USB drive.
Windows will pop up a screen and start the installation process.
Enjoy your new PC, and your newly-installed copy of Windows.
Learn to code for free. freeCodeCamp’s open source curriculum has helped more than 40,000 people get jobs as developers. Get started
Creating a Bootable Window 8 ISO from Mac was quite easy back then where Mac OS X was in the trend. Later, Mac OS Mojave came into the picture, and the in-built Boot Camp Assistant is no longer supported.
Therefore the process to create Windows 10 bootable USB on Mac for pc from ISO became much more complex and tricky. However, irrespective of the process complexity, Since you are reading this guide, you don’t have to worry about the complexity of the process to burn ISO to USB windows 10 using Mac.
In this guide, I have listed 4 different ways to create a windows 10 bootable USB from ISO on a Mac device. Besides this, we have briefly explained why you should have a bootable windows 10/8 USB ready with you.
Let’s begin with the explanation first.
Part One: Why to Create Windows 10/8/7 Bootable USB on Mac is Tough?
There could be a situation where your Windows system is compromised due to some virus attack or sudden malware attack. Therefore, it’s always handy to have an extra bootable USB lying around so that in the future, if anything goes wrong, you have Windows available with you.
But the thing is, creating a windows bootable USB from ISO on mac is quite tough. If you are doing it for the first time, you might end up getting different unknown errors.
Because Mac Computers have a different architecture than Windows Computers. Mac computers have got some discrepancies that make them vulnerable while operating on different files especially, the files that are created for Windows OS in the first place.
Apart from this, an ISO Image file contains fragmented and archive files compressed from an optical disk. In order to burn them to a USB, i.e., creating a bootable USB from ISO, segregation of the image files is required.
Part Two: How to Create Windows 10/8/7 Bootable USB on Mac
Before you jump on the 4 ways to create a windows USB on Mac, Let me tell you that there are some pre-requisites of these methods.
All of them are listed below:
- Windows 10/8 ISO file.
- USB Flash Drive of at least 16 GB Memory
You can either ask a friend for the ISO file or instead, you can directly download the required ISO file from Microsoft’s portal.
Now, let’s move to the different ways to create windows bootable usb on mac:
Method 1: Create Windows 10/8/7 Bootable USB on Mac Using “Boot Camp Assistant”
Earlier, I have told you the after the release of macOS Mojave and later, Boot Camp Assistant is no longer supported but if you are using an older version of macOS on your Mac device, this method will be ideal for you.
Follow the below-mentioned steps carefully:
- Insert USB Flash Drive.
-
Now run Bootcamp Assistant, select the box for «Create a Windows 7 or later version install disk» and uncheck «Install Windows 7 or later version.» Click Continue to go for the next step.

- If you have the ISO file in your system, Boot Camp Assistant will automatically detect it, If it doesn’t then you can browse it.
-
Once the ISO file is located, you need to select the USB Flash Drive.
- Once the Destination Drive is selected, click on “Continue”.
-
A new process will begin, you have to wait until it terminates successfully.
- Once the process is completed, now click «Quit» to exit the app and then «Eject» the USB drive from your Mac.

That’s how you are going to create a bootable USB disk using Mac’s Boot Camp Assistant. Maybe you also want to know how to create windows 10 bootable usb on mac without bootcamp, Please read on, because the following three methods can help you to create bootable windows usb on mac effectively.
You may also like: How to Free Download Boot Camp and Install Windows 10 on Your Mac
Method 2: Create Windows 10/8/7 Bootable USB on Mac Using “PassFab 4Winkey”
If you are looking for a precise tool which can create windows 10 bootable usb on mac for pc without bootcamp, and it will reduce maximum hustle, PassFab 4Winkey is an incredible option for you. Though it’s paid, it is worth every penny spent.
Apart from creating Bootable USBs, PassFab 4WinKey has other features like using this tool, you can reset the Windows Admin Password. Overall, it’s a great package. Since we are only talking about Bootable USBs in this guide, we will strictly focus on it only. Before we begin with the steps, it is recommended to download and install the tool.
-
After installing the software on an accessible computer, launch it and insert a Windows password disc. It can be a CD/DVD or USB.
-
Click «Next» and wait for a minute until the password disk burned successfully.
That’s how you create a bootable USB from ISO using PassFab 4Winkey. The ISO image has been automatically downloaded from the tool itself. Therefore you don’t have to look around for the Windows ISO file.
Video Tutorial about How to Create Bootable Windows USB on Mac
Method 3: Create Windows 10/8/7 Bootable USB on Mac Using “UNetbootin”
Before jumping on into the process, let me explain to you the UNetBootin tool. It is a free, open-source utility application that enables you to create boot windows USB from Mac in just a few clicks.
Before we begin with steps, you must Download and Install UNetBootin from its official website.
Follow the steps to avoid random/ unwanted errors:
- Insert a USB drive that is empty.
-
Navigate to “Disk Utility” on your Mac Device.
- In the disk utility dialogue, select the “USB stick” and click on the “info” (i) button on the top right corner of the dialogue.
- Remember the “Device Name”, as you have to use it in the future.
-
Launch the “UNetBootin” Application”.
-
Click on the “DiskImage” option, and select the ISO file.
- Click on the “Type List” option, and select “USB Drive”.
-
In Drive: Column, enter the “Drive Name” that you had remembered in Step 4.
Warning:
Make sure you have entered the correct Drive Name, otherwise you’ll end up getting errors or formatting one your local drive.
-
At last, Click on the “OK” button.
The process of creating a bootable USB will automatically start and it will take a few minutes to terminate successfully.
Though UNetBootin is one of the best utility tools for Mac, but we can’t say it’s the perfect tool. There could be situations where the tool might throw some error without any actual issue.
If you want to create a windows 10 bootable USB on Mac without any errors and don’t want to pay for any tools, you could go with the 4th Method i.e using Terminal. But it also has few disadvantages.
Method 4: Create Windows 10/8/7 Bootable USB on Mac Using “using Terminal”
In this process, you have to write a few lines of code to complete the process successfully.
Don’t worry, you don’t have to go through different internet guides to find the code. I have it all here for you.
- Connect the USB Drive to the Machine.
-
Launch “Terminal” and Hit the following command:“diskutil list”
- You’ll see a list of drives that are connected to your Mac device, find the USB, and remember its “IDENTIFIER” Value aka Device Name.
-
Hit the following Query, just change the device_name with your Device’s Name.
diskutil eraseDisk MS-DOS «WIN10» GPT device_name
-
In this step, you need to have the address of your ISO file. Once you have it, hit the following command to mount the ISO file.
hdiutil mount ~filelocation
- Don’t get confused with the location, otherwise Terminal will throw an error.
-
Once you have mounted the ISO file, hit the following.
cp — rp /Volumnes/ESD-ISO/* /Volumes/WIN10
-
The above step could take a couple of minutes, once it is completed, you have to unmount the ISO Image. Run the following command:
hdiutil unmount /Volumes/ESD-ISO
Here, you are formatting the USB drive and naming it «WIN10». Be very careful with the device name. The wrong entry could format your Mac’s local drive.
In the above command, replace “filelocation” with the actual location of your file include the name of the extension. For instance, if your file is located in the downloads folder then your file location will be :/Download/Windows-10.iso
With this command, you are telling the terminal to copy the ISO file in the USB drive and it will automatically make it executable.
That’s all, you have successfully created a bootable USB drive and you can use it for installing windows on any device now.
Teminal is very suitable for making Windows 10 bootable USB on Mac, but if you enter the wrong command, all data on the selected drive will be erased and all data will disappear within a few seconds. Therefore, this is not an ideal solution for beginners who are not familiar with the technical staff.
Part Three: Additional Tips
Apart from these methods, I wanted to discuss a few most asked questions here.
Q1: Is it safe to Install Windows on a Macbook?
The majority of the readers ask me this question and I want to tell all of them that it is completely safe to install Windows on a Macbook. Actually, I have seen people using Windows on a Macbook. Most developers use Windows in Virtual Machine on their Macbook.
Q2: Is it possible to create a bootable USB using Disk Utility?
Yes, it was possible back in the days when MacOS X was used. In the latest macOS versions, this feature of the Disk Utility application is removed due to security reasons. Therefore if you are using an older version of Mac, you can use Disk Utility as well.
Final Notes
So, these were the 4 Best methods to create a bootable USB drive using a Mac device. All these methods are tried and tested, therefore each of them is reliable.
You can pick any of these at your convenience and desire. But if you want to the easiest method to create Windows USB on Mac, PassFab 4winkey is your ideal choice! Certainly if you came across some error that is bothering you, do let us know in the comments below. We will solve it together.
COMMENT
If you have a Mac system but want to run Windows on that system, you will need to create Windows 10 bootable USB on Mac for PC. Even if the Mac system uses Mac OS, you can still run Windows on it this way. Also, if you have got a new PC this way, you can install Windows on it.
In a case wherein the hard drive on the PC has been replaced, you will have to reinstall Windows on it. These are just some reasons as to why you may have to create bootable Windows 10 USB on Mac. This article will detail five different methods to create bootable USB Windows 10 on Mac.
- Part 1: Can You Create a Windows Bootable USB on Mac?
- Part 2: [5 Methods] How to Create Windows 10 Bootable USB on Mac Mojave?
- A Bonus Tip: The Professional Way to Recover Data from Windows 10 Bootable USB
Recover Data from Crashed or Unbootable Mac in 3 MINUTES!!! [2023 New]
Part 1: Can You Create a Windows Bootable USB on Mac
Wondering about, can you create a Windows bootable USB on Mac? You can easily do this with the help of the methods listed out in this article. Follow these methods to easily make bootable USB Mac Windows 10. These methods will answer all your questions about how to make a Windows 10 bootable USB on Mac.
[5 Methods] How to Create Windows 10 Bootable USB on Mac Mojave
Method 1: Make Windows Bootable USB Mac with PassFab 4WinKey
Thinking about how do I create a bootable USB drive for Mac easily? PassFab 4WinKey is an incredible tool that can be used to make Windows bootable USB on Mac. It can be used for several other purposes as well, like for removing or resetting the Windows Admin password. You can know how to create Windows 10 bootable USB on Mac using this tool by following the steps given below.
- After installing the program on your system, launch it, and insert a USB to it.
-
Click on “USB Flash Drive” from the main interface and then on “Burn”.
Pic. Select «USB Flash Drive» -
Once done, click on “OK” on the pop-up window.
Pic. ISO files have been generated successfully

This is how simple it is to make bootable Windows 10 USB Mac with the help of this tool.
Method 2: Use UNetbootin to Install USB Driver on Mac
UNetbootin is a Windows 10 USB tool Mac that is completely free to use and can be used in a scenario wherein you have to make bootable USB Windows 10 on Mac system. For this, you need to keep a USB with the .iso file downloaded in it. Follow the steps below to know how you can use this program to know how to make a bootable USB Windows 10 on Mac.
- Connect the USB drive with the .iso file to your Mac system.
- From “Disk Utility,” click on your USB drive.
- Click on “Disk Image” and then on the “…” icon and select the .iso file that you have downloaded.
- Select “USB Drive” from the drop-down menu in front of “Type” and also select the name of your USB drive.
-
Once done, click on “OK”.
Pic. UNetbootin Steps
Wait for a few minutes, and the USB would be formatted to a bootable drive.
Method 3: Use Boot Camp Assistant on Mac
If you wish to know how to make a bootable USB Windows 10 on Mac using Boot Camp Assistant, read on. You will need to have a USB drive with a storage capacity of 16 GB or more for this method to work. You can use the following steps to know how to make a Windows 10 bootable USB on Mac using Bootcamp Assistant.
- After inserting the USB drive into your Mac system, launch “Boot Camp Assistant”.
-
Only check “create a Windows 7 or later version install disk” and ignore all other options and then click on “Continue”.
Pic. Boot Camp Assistant Step 1 -
Download the .iso file from a trusted source, which will be detected automatically by Boot Camp Assistant and then click on “Continue”.
Pic. Boot Camp Assistant Step 2 -
After Boot Camp Assistant is done, check if USB deive has been renamed WININSTALL. Tap «Quit» to close app and then eject the USB drive.
Pic. Boot Camp Assistant Step 3
After a few minutes, the process would have been completed. However, you cannot use this method if you have macOS Mojave or other later versions of macOS.
Method 4: Use Terminal to Make Bootable USB on Mac
This is the most complicated method out of all the methods described above and, therefore, must only be used as a last resort. You will need a USB drive for this method to work. Use the steps given below to create a Windows 10 bootable USB on Mac using Terminal.
- After connecting the USB drive to your Mac system, open Terminal.
- Key in “diskutil list” and press “Enter” key to see the list of connected drives and findyour USB drive’s name.
- Run the command “diskutil eraseDisk MS-DOS “WINDOWS10” GPT<drive name>@”.
- Download the .iso file on your Mac system.
- Key in the command “hdiutil mount ~/Downloads/WINDOWS10IMAGE.iso” to mount .iso image.
- Key in the command “cp -rp /Volumes/MOUNTED-ISO/* /Volumes/WINDOWS10/”.
- Run the command “hdiutil unmount/Volumes/MOUNTED-ISO” and then close Terminal.
Eject your USB drive, and the process would be complete.
Method 5: Use Disk Utility to Create USB on Mac
-
Put USB drive into your Mac system and launch Disk Utility.
Pic. Disk Utility - On the left, right-click on the chosen USB drive and format it with MS-DOS (FAT).
-
Drag the .iso file to the USB drive. This step will start the writing process of the .iso file on USB.
Pic. Create USB on Mac by Disk Utility
A Bonus Tip: The Professional Way to Recover Data from Windows 10 Bootable USB
Although most of the above methods to create Windows 10 bootable USB Mac are pretty straight forward, while executing these steps, you may end up losing some important data from the Windows bootable USB. If this happens, don’t be tensed. With the help of Tenorshare 4DDiG Data Recovery, you can recover lost data from USB drive on Mac easily. Here’s how you can do this.
Buy Tenorshare 4DDiG with coupon code: 4DART30OFF to enjoy 30% OFF now!
-
Firstly download and install Tenorshare 4DDiG Data Recovery. Run the program, get your USB drive where you lost data from connected to your PC and then choose it to Start.
-
After you previously click on Scan, 4DDiG immediately scans your selected USB drive all around to dig out the lost data. Also, you can pause or stop the scanning at any time so long as you’ve found your desired files to retrieve.
-
4DDiG supports to preview and recover various file types like photos, videos, audios, documents and more. You can select your desired files based on category, preview them to get the detailed info and then click on Recover to get back them from your USB drive.
Conclusion:
With the help of the above methods, you can easily create Windows 10 bootable USB on Mac High Sierra. The methods involving Terminal and Disk Utility are pretty complicated, while the other methods are fairly easy and effective. If, during the process, you accidentally lose out on some files and data, you can make use of Tenorshare 4DDiG for Mac Data Recovery to recover these files easily. It is recommended that to use 4DDiG to recover lost data on windows 10, if you need.


It’s fairly easy to create bootable USB installation media for Windows 10 when using Microsoft’s Media creation tool. Unfortunately this tool is not available for macOS. This post explains you how to do this without using a Windows-based PC or VM and without using BootCamp assistant. This can come in handy when trying to install Windows on your mac or when there is simply only an Apple Mac available and you need to boot the Windows installer for various reasons.
YouTube Video
If you are interested, I also created a YouTube video from this blogpost. If you prefer classic text, you can just follow the rest of this article:
Introduction
Unfortunately, since some time, it became a bit more complicated to create this USB drive from macOS. The main reason for this is because macOS supports only FAT32 as filesystem that is compatible with Windows (and ExFat but that causes issues to boot from). FAT32 has a file size limit of 4GB while the installation ISO now contains one file that is larger.
To overcome this, we will need to use a tool, Wimlib, which is able to split this file in two parts. More about this later.
In case you’re looking for the instructions to create a bootable USB drive to install Windows 11 instead, have a look at the following article: https://jensd.be/1740/windows/create-a-bootable-windows-11-installation-usb-on-macos
Download the Windows 10 ISO
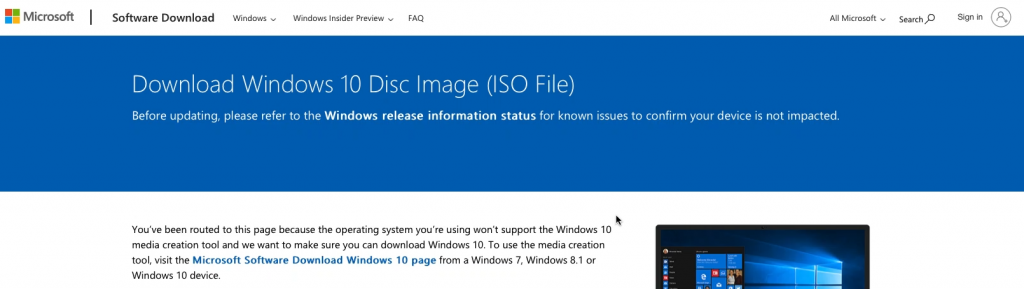
Let’s start by downloading the ISO from Microsoft. This can be done from: https://www.microsoft.com/en-us/software-download/Windows10ISO. When you open this link on macOS, it should show you the ability to download the ISO rather than the Media Creation tool, which is shown when opening the same on a Windows-based PC.
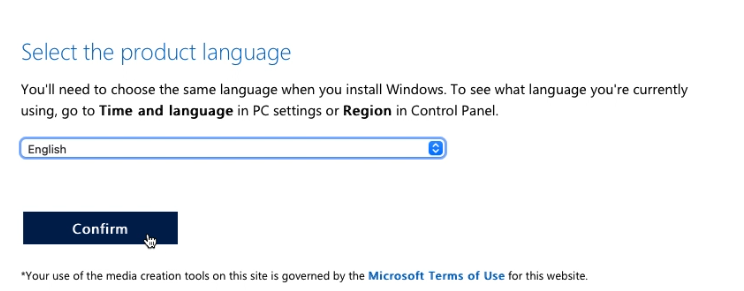
Choose for Windows 10, then select the preferred language, go for the “64-bit Download” and wait for the download to complete to get the .iso file on your Mac:
Prepare the USB drive
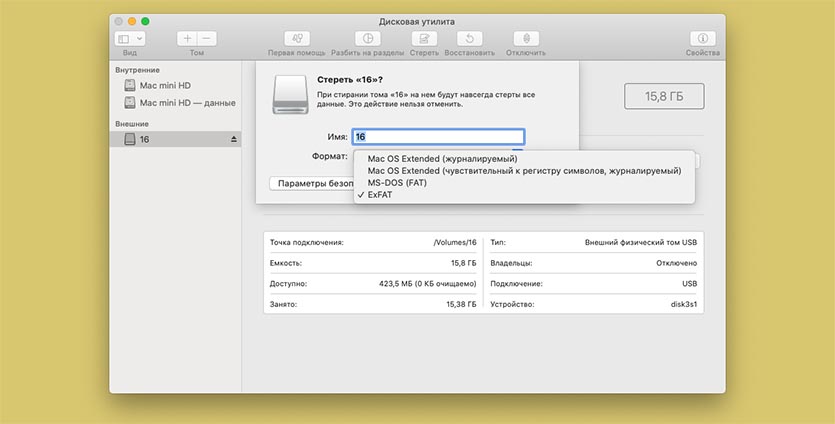
While the ISO is downloading, we can prepare our USB drive. You will need one that is at least 8GB. Insert the drive in your Mac and start Disk Utility.
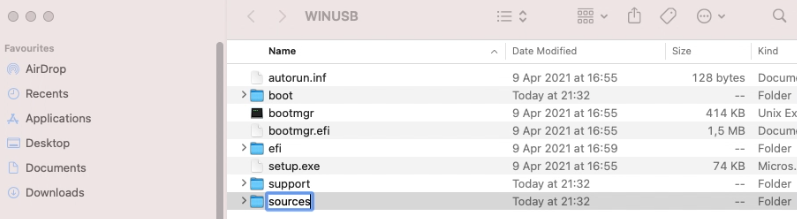
In Disk Utility, choose to show all devices:
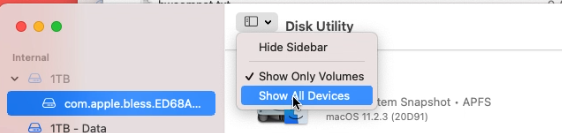
Then, on the left side, select your USB drive from the list and click Erase on the top right menu. In the dialog, enter a name for the drive (WINUSB here), choose to format as “MS-DOS (FAT)” and “Master Boot Record” as scheme. Finally click “Erase” to complete the process.

Copy all smaller files to the USB drive
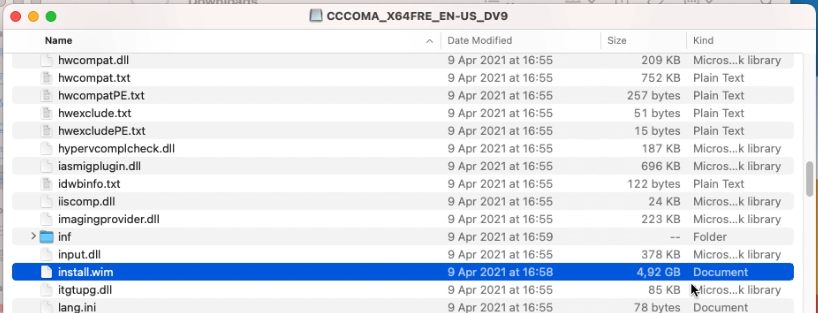
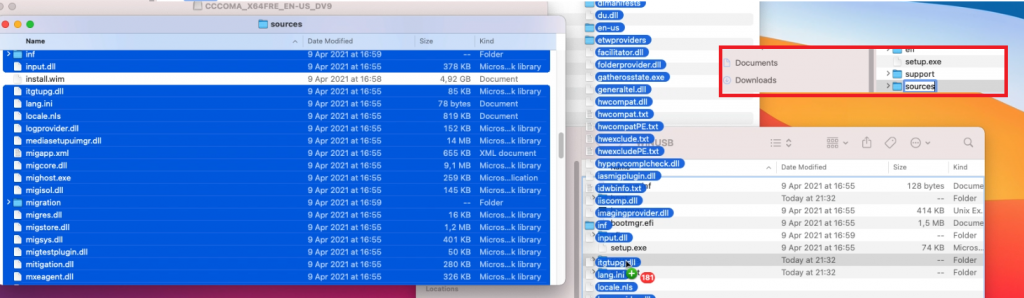
After the previous step, our USB drive is prepared. Once the ISO file is download as well, double click the ISO file to mount it. Then open it in Finder. As you can see, the sources folder contains one large file: install.wim which is over 4GB and will not fit on the FAT32-formatted USB drive:
We will take care of that later so for now, copy all remaining files to the USB drive using Finder.
I typically start by copying all separate files and folders, except for the sources folder:
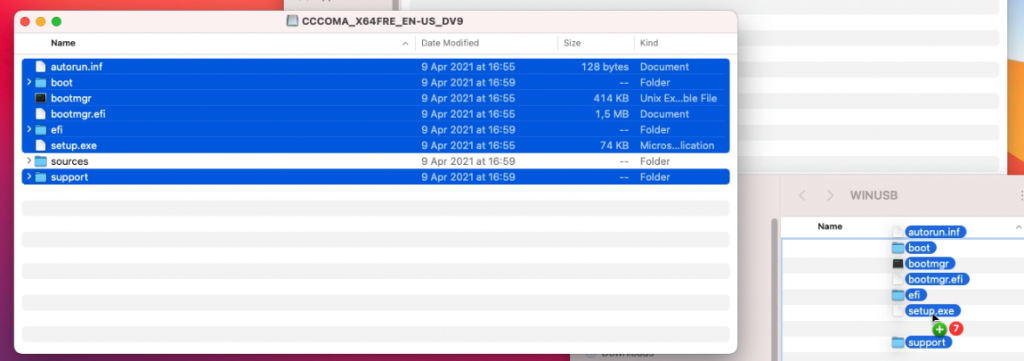
Then I create the sources folder and copy all files from sources with the exception of install.wim:
Prepare to split install.wim
So far things were pretty straightforward and if it wouldn’t be for that large file it would be a piece of cake. Unfortunately we have to work around that by splitting the file in two parts, smaller than the limit of our file system on the USB drive.
To accomplish this, we can use Wimlib (https://wimlib.net/). This is a tool that is developed to work with, and modify, .wim files. The easiest way to get this installed on your Mac is by using Brew (https://brew.sh/).
So, as just mentioned, we start by installing Brew. As is instructed on the Brew website, copy and paste the mentioned line in a terminal and execute it.
user@users-iMac ~ % /bin/bash -c "$(curl -fsSL https://raw.githubusercontent.com/Homebrew/install/HEAD/install.sh)" ==> Checking forsudoaccess (which may request your password). Password: ==> This script will install: /usr/local/bin/brew /usr/local/share/doc/homebrew ... ==> Next steps: Runbrew helpto get started Further documentation: https://docs.brew.sh user@users-iMac ~ %
Once Brew is installed, we can use it to install Wimlib:
user@users-iMac ~ % brew install wimlib
 ==> Downloading https://ghcr.io/v2/homebrew/core/openssl/1.1/manifests/1.1.1k
...
==> Installing wimlib
==> Pouring wimlib--1.13.4.big_sur.bottle.tar.gz
🍺  /usr/local/Cellar/wimlib/1.13.4: 65 files, 2.7MB
user@users-iMac ~ %
Split install.wim and get it on the USB drive
Now that we have Wimlib installed, we can use it to split the large install.wim file and copy it to our USB drive. In the same or a new Terminal session, execute the following:
user@users-iMac ~ % wimlib-imagex split /Volumes/CCCOMA_X64FRE_EN-GB_DV9/sources/install.wim /Volumes/WINUSB/sources/install.swm 4000
Splitting WIM: 4654 MiB of 4654 MiB (100%) written, part 2 of 2
Finished splitting "/Volumes/CCCOMA_X64FRE_EN-GB_DV9/sources/install.wim"
In the command above, we told to execute the wimlib-imagex tool (part of Wimlib) and passed some arguments:
- “split” to indicate that we want to split this larger file
- “/Volumes/CCCOMA_X64FRE_EN-GB_DV9/sources/install.wim” which is the source file to split. Keep in mind that the name under /Volumes depends on the ISO name so you need to adjust this accordingly. Just do ls /Volumes from the terminal to see what is there.
- “/Volumes/WINUSB/sources/install.swm” the destination of where the split files should end. As with the ISO name, here WINUSB is the volume label I gave to my USB drive when erasing it with Disk Utility. Adjust this as well when you chose something different earlier.
- 4000 the max. size of the destination file, so the file will be split in a part of 4000MB and the rest.
After this command completes, you can see that now two files were created on the USB drive:

The Windows 10 installer knows how to deal with these and will just work fine.
That should be all you need to create a bootable USB drive for Windows 10 installation.
(Optionally) download Windows 10 drivers for your Mac
If you plan to use the USB drive, which you created with the above steps, on a regular PC then you can skip this step. If you, on the other hand, plan to use this for installation on a Mac, it is a good idea to go through these additional steps.
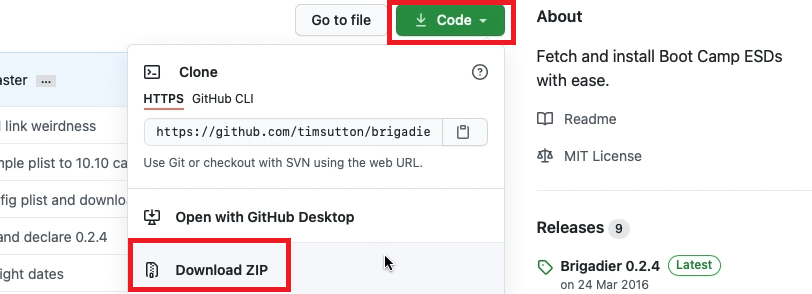
The goal of this is to fetch the necessary drivers for use on Mac. As I did from Windows in a previous article, I will use Brigadier for this. Brigadier, which is basically a script, works just from macOS directly as well.
From the author’s Github page: https://github.com/timsutton/brigadier, click the green Code button then choose to “Download ZIP”
Once the file is downloaded, open a fresh Terminal session and navigate to the “brigadier-master” in your Downloads folder, then simply execute it using ./brigadier:
user@user-iMac ~ % cd Downloads/brigadier-master
user@user-iMac brigadier-master % ./brigadier
Using Mac model: iMac13,1
...
Expanding flat package...
Extracting Payload...
Extracted to /Users/user/Downloads/brigadier-master/BootCamp-041-84821/WindowsSupport.dmg
user@user-iMac brigadier-master %
As you can see in the output, executing brigadier automatically detected the model identifier of the mac which we executed this on. If you want to download the required drivers for another model, you can simply pass it using the –model parameter. The files got downloaded as a subfolder of brigadier-master as WindowsSupport.dmg
All that is left to do is to navigate to the folder using Finder, then to open WindowsSupport.dmg to mount it and to copy those files to the USB drive:
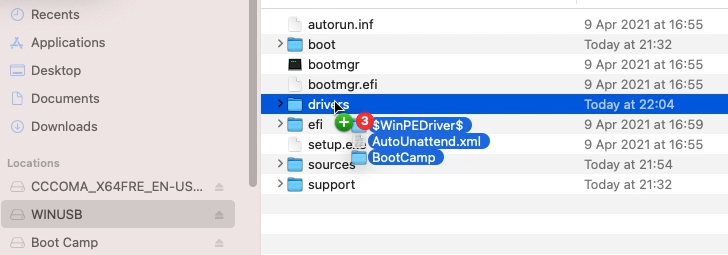
After going through the installation, executing BootCamp/setup.exe will install most of the required drivers or at least enough to continue the rest of the driver installation using Windows update.
Boot from the USB drive
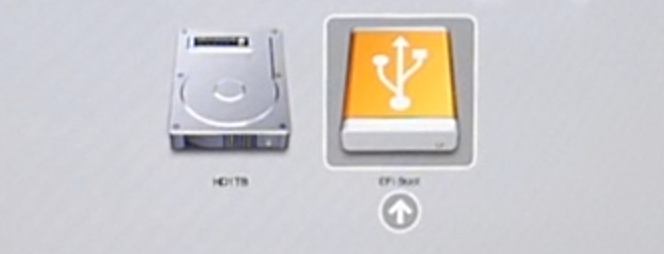
As the final step, now that the USB drive is prepared, with or without additional drivers for your Mac, you can boot from it.
On a regular PC, this is usually done by pressing a key at BIOS time to bring up a boot menu (F11 is often used for this) or, for some older BIOS, by changing the boot order from the BIOS setup.
On a Mac, you can choose to boot from USB by holding down the Alt key on boot and to select the USB drive from the boot loader: