Home » Download » How To Make Windows 11 Look Like macOS
macOS is a popular operating system like Windows OS & Linux OS. But many Windows users can’t afford MacBook because all the Apple products are very expensive. The main problem comes when you still want the look of macOS but also want the same functionality as Windows PC. This is possible, yes you can customize Windows OS to make it look like macOS. There is much third-party software available on the Internet which you can download and install it.
Is Third-Party Software Safe?

Well, not all third-party software is safe. If you install third-party software from an unknown website then there is a higher chance that your computer might get infected with a virus. Also, sometimes antivirus gives false positive alerts even if the software is safe to run. Always make sure that the software is from a trusted source and sometimes if the software is not from a company and is created by an individual user then make sure that it is open-source. Following this way, your computer will be safe and your pc will not be infected by a virus.
How To Make Windows Look Like macOS?
If you follow my videos available on YouTube and also follow my articles then you might know that I already made 3 posts on Windows to macOS with deep customizations and this is the 4th post. Maybe in the future, I will write more articles. All the tutorials are easy if you follow them closely. Also, I mentioned in my other videos that I always create a System Restore point before customizing Windows Operating System. Also make sure to back up all your documents, photos, and other data to a portable hard disk or cloud storage like google drive or onedrive. This way even if your system crashes you can use the system restore point to go back in time. This is unlikely to happen but to be safer.
macOS Transformation Pack
![]()
It’s very easy to download and install macOS Transformation Pack and make your windows look like macOS. This single software contains plenty of bundled software like a theme pack, rainmeter, cursor, RocketDock, wallpapers, fonts, icon pack, and settings, which changes your Windows User Interface after installation. Your windows operating system will not become macOS. It only changes the user interface to make it look like macOS and also if you show it to other people, then they will not be able to tell whether it’s Windows or macOS.
Note: I will not suggest you this because Microsoft releases windows update every month and also Windows 11 was released on 5th October 2021 and macOS Transformation Pack 5.0 was last updated on May 2019. So it is very highly possible that if you install this then your system will not boot.
Rainmeter
Rainmeter is a very popular software that adds widgets to your desktop. There are many active developers who develop rainmeter widgets every month. If you are a developer then you can also create your own skin. Most of the widgets are available on DeviantArt and also you can search for rainmeter widgets on google. Rainmeter is open-source, it’s free to download, and also it comes with GNU General Public License v2. In this tutorial, I will be using rainmeter to add a menu bar and sidebar.
The Easiest and Manual Way
Well, the easiest way to make windows 11 look like macOS is to manually install each software one by one. All the software in this tutorial is tested and safe. So you don’t have to worry, also you can scan each program with your own antivirus software. I will only use Rainmeter, Rainmeter Skins like Droptop Four and BigSur RC1 for Rainmeter, and RoundedTB.
After installing Rainmeter, Droptop Four Skin, and BigSur RC1 for Rainmeter then the only thing you need to download is RoundedTB which is available for free on Microsoft Store.
Watch the video full tutorial for the setup and make sure to comment with your opinion below 🙂

Самая лучшая тема MacOS для Windows 11. Она полностью изменяет интерфейс Операционной системы, в том числе и иконки. С ней, вы получите красоту и элегантность MacOS и работоспособность и совместимость Windows. Она является идеальным выбором для тех, кому не хватает денег на новую технику компании Apple. Сама тема предоставляется в двух вариантах — темном и светлом. Для установки не потребуется никаких дополнительных программ. Все находится в архиве. Что делает установку данной темы очень легкой.
Как установить темы
- Скачайте и распакуйте архив macos_for_windows_by_niivu_dewgzkn.zip с помощью 7zip.
- Если Вы устанавливаете темы первый раз: пропатчите систему с помощью UltraUXThemePatcher.
- Переместите файлы *.theme, а также папку с содержанием ресурсов *.msstyles по адресу: C:WindowsResourcesThemes.
- Нажмите в пустой области на рабочем столе и выберите пункт «Персонализация» в контекстном меню.
- Перейдите в раздел «Темы» и примените добавленную тему.
- Установка завершена!
Обратите внимание! Для установки кнопки пуск, панели быстрого доступа и других ресурсов Вам потребуются специальные программы. Ссылки на них указаны в блоке «Дополнения».
Содержимое архива
+ macOS for Windows — niivu — UPDATED — DECEMBER 18 2021
+ 7TSP Icons Themes
— 7tsp macOS blue.7z.remove
— 7tsp macOS Dark Mode.7z.remove
— 7tsp macOS Light Mode.7z.remove
— 7tsp macOS Regular.7z.remove
+ Folder Thumbnail Remover
- disable_folder_thumbs.reg
- enable_folder_thumbs.reg
- Reload Icons.exe.remove
— READ ME.txt
+ Dock
+ macOS Day
- Background.ini
- bg.png
- sep.png
- Separator.ini
— macOS Indicator.png
+ macOS Night
- Background.ini
- bg.png
- sep.png
- Separator.ini
- READ — niivu.rtf
+ Stardock Curtains (windows 10)
— macOS day.CurtainsStyle
— macOS day II.CurtainsStyle
— macOS night..CurtainsStyle
— macOS night II.CurtainsStyle
+ StartAllBack or StatIsBack
+ Orbs
- apple dark taskbar.svg
- apple light taskbar.svg
- dark taskbar.svg
- light taskbar.svg
- macindows.png
+ Styles
- MAC DAY SAB.msstyles
- MAC NIGHT SAB.msstyles
+ Tools
— Read.txt
— RemoveAddressBar.exe.remove
+ Windows Themes (windows 10 or 11)
+ macOS
- macOS dark (mica).msstyles
- macOS dark.msstyles
- macOS dark II.msstyles
- macOS day (mica).msstyles
- macOS day.msstyles
- macOS day II.msstyles
+ Shell
+ NormalColor
— shellstyle.dll
+ Wallpapers
+ dark
— macOS dark.jpg
— macOS dark niivu.png
+ day
— mac OS Big Sur niivu.png
— macOS day.jpg
— macOS day niivu.png
— macOS dark (mica).theme
— macOS dark.theme
— macOS dark II.theme
— macOS day (mica).theme
— macOS day.theme
— macOS day II.theme

Почему все хотят именно macOS, чем windows то не устраивает, этот вопрос беспокоит меня уже давно, причем не праздное любопытство меня терзает, работая с двумя операционными системами начинаешь понимать что если не вдаваться в технические аспекты всё одно и то же, разумеется macOS более стабильна но это по большей части обусловлено тем фактом что производитель железа и программного ПО один и тот же и имеет возможность подогнать одно под другое в отличии от операционки windows где по сути приходится подгонять софт под разных производителей да и к тому же имея богатый опыт работы с этими двумя осями можно смело сказать что они имеют как свои уникальные достоинства так и специфические недостатки и наверное правы те кто подходит к выбору исключительно с прагматической точки зрения ну а если хочется немного визуального разнообразия то тема macOS for Windows 11 в состоянии удовлетворить большинство страждущих тем более в архиве есть почти всё что потребуется для трансформации визуального стиля windows 11 в аналог яблочного продукта включая иконки и прочие прибамбасы.

- 1533загрузок
- 5 842просмотров
- 1комментов
JoinLog In
Deviation Actions
More by vinithkumar


From the DeviantArt Shop


![[RELEASE] VALORANT XWIDGET SKIN](https://images-wixmp-ed30a86b8c4ca887773594c2.wixmp.com/f/f2e34596-67a3-441a-bcd3-926b0617aff2/dea25r7-c38365b0-46ba-43ab-ab2e-c7ea269e4bf6.png/v1/crop/w_92,h_92,x_3,y_0,scl_0.038333333333333,q_70,strp/_release__valorant_xwidget_skin_by_unfinishstory_dea25r7-92s.jpg?token=eyJ0eXAiOiJKV1QiLCJhbGciOiJIUzI1NiJ9.eyJzdWIiOiJ1cm46YXBwOjdlMGQxODg5ODIyNjQzNzNhNWYwZDQxNWVhMGQyNmUwIiwiaXNzIjoidXJuOmFwcDo3ZTBkMTg4OTgyMjY0MzczYTVmMGQ0MTVlYTBkMjZlMCIsIm9iaiI6W1t7ImhlaWdodCI6Ijw9MjQwMCIsInBhdGgiOiJcL2ZcL2YyZTM0NTk2LTY3YTMtNDQxYS1iY2QzLTkyNmIwNjE3YWZmMlwvZGVhMjVyNy1jMzgzNjViMC00NmJhLTQzYWItYWIyZS1jN2VhMjY5ZTRiZjYucG5nIiwid2lkdGgiOiI8PTI2ODgifV1dLCJhdWQiOlsidXJuOnNlcnZpY2U6aW1hZ2Uub3BlcmF0aW9ucyJdfQ.8cPIpW95WuLSAzXGb55WWfuC2Ga5WZBL-WcE_DENSuo)

![]()

Suggested Collections
Windows Themes


Cursors


Windows 10


Suggested Deviants
angelessey


protheme
![]()

![]()
Cleodesktop


You Might Like…

![]()


![]()


Published: Oct 25, 2021
By
vinithkumar
48K Views
Badge Awards
3
windows11iconswindows11themeswindows11visualstyle
Location Tamilnadu, madurai
Description
My Current Windows 11 Theme
Hello friends I used niivu Windows 11 theme to make my Windows 11 look like MacOS, I wanted to share about it with you so I am uploading the screenshots here
It works on Windows 10 Builds 1903+ & Windows 11
 Requirements
 Requirements
- Wallaper — Dark and Light
- Patched System — UltraUXThemePatcher
- Theme — BIB3 for Windows for dark mode and LIT3 for Windows for light mode
- Icon — Big Sur 2 Windows 10 Themes
- Use 7TSP GUI 2019 Edition to change the icon
- Hide libraries — OldNewExplorer
- Win7 Commend bar — StartAllBack for Windows 11
- Move Windows Titlebar Buttons to Left Side
- Use My Dock Finder for dock and Icons for this are in Big Sur 2
- Rainmeter and Clock Skin
How to Customize
- See This Video youtu.be/VOX3bNyW-8s
Thanks and credits

 niivu for icon and theme Tihiy for StartAllBack
Thanks 
Image details
Image size
1920x1080px 1.1 MB
© 2021 — 2023 vinithkumar
Comments28
Join the community to add your comment. Already a deviant? Log In
mukarrammasoodi89
6 hours ago
i can’t install it
Пользователи Windows во все времена любили кастомизировать операционную систему под себя и всячески менять внешний вид стандартных элементов интерфейса. Особой популярностью пользуются темы оформления (так называемые паки), которые одним махом превращают “винду” в Linux, macOS или какую-нибудь мобильную операционную систему.
Я и сам лет 15 назад всячески “украшал” рабочий стол своего Windows-PC, перенося на него диковинную док-панель из мира OS X.
В тему: все новшества Windows 11 в одной статье
Сегодня кастомизация вышла на новый уровень. Вместо самостоятельной сборки из нескольких слабо совместимых между собой утилит и ручной замены системных файлов появились комплексные решения, которые делают все в автоматическом режиме.
Одним из таких решений мы и воспользуемся сегодня, чтобы превратить Windows 11 (или Windows 10 при желании) в операционную систему Apple.
Как настроить внешний вид Windows в стиле macOS
Для простоты и удобства воспользуемся комплексным решением от китайских разработчиков. Они выпустили утилиту MyDockFinder, которая маскирует большинство элементов рабочего стола Windows и добавляет недостающие модули из macOS вроде док-панели или меню Launchpad.
Не стоит переживать насчет содержимого утилиты. Её исходный код доступен на GitHub, а коммерческая версия приложения даже продается в Steam за 277 руб.
Для проверки работоспособности и ознакомления рекомендуем воспользоваться сборкой с GitHub, а в дальнейшем при желании отблагодарить создателей всегда сможете купить MyDockFinder в Steam.
1. Скачайте приложение MyDockFinder с GitHub.
2. Распакуйте загруженный архив и перенесите его на системный диск. Желательно, чтобы в названии пути не встречалась кириллица.
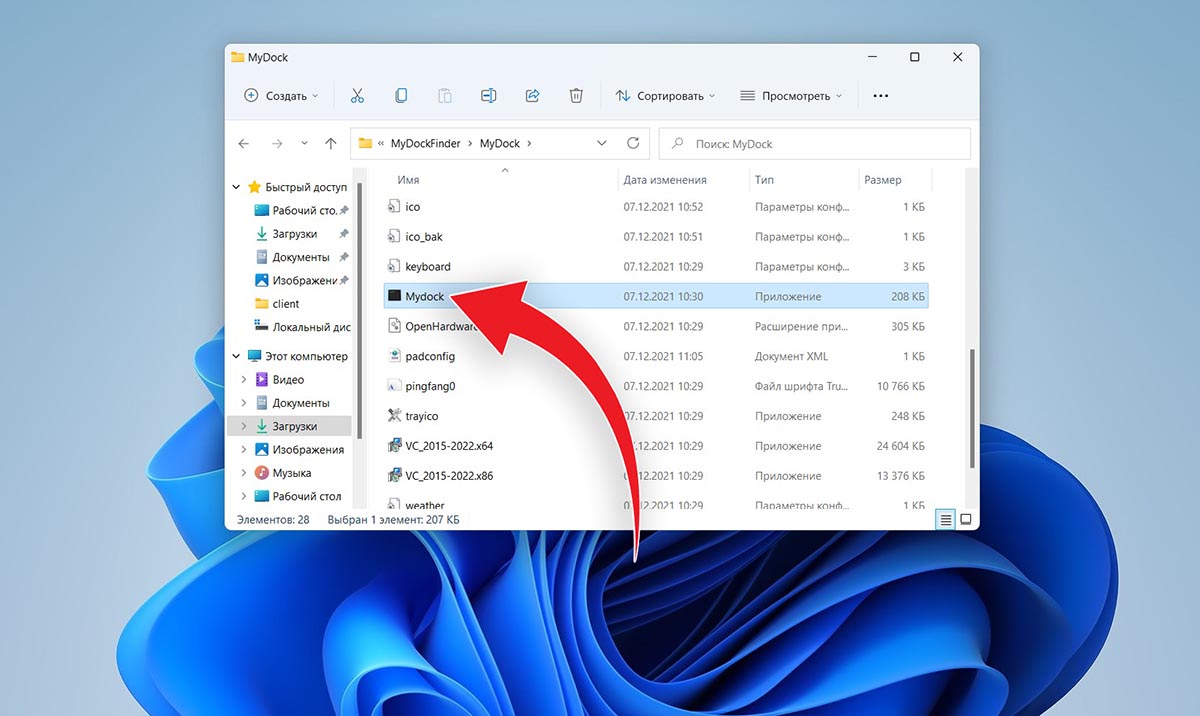
3. Запустите приложение Mydock. Еще в данной папке расположен установщик Microsoft Visual C++. Запустите его, если еще не устанавливали данный пакет библиотек. Они необходимы для полноценной работы MyDockFinder.
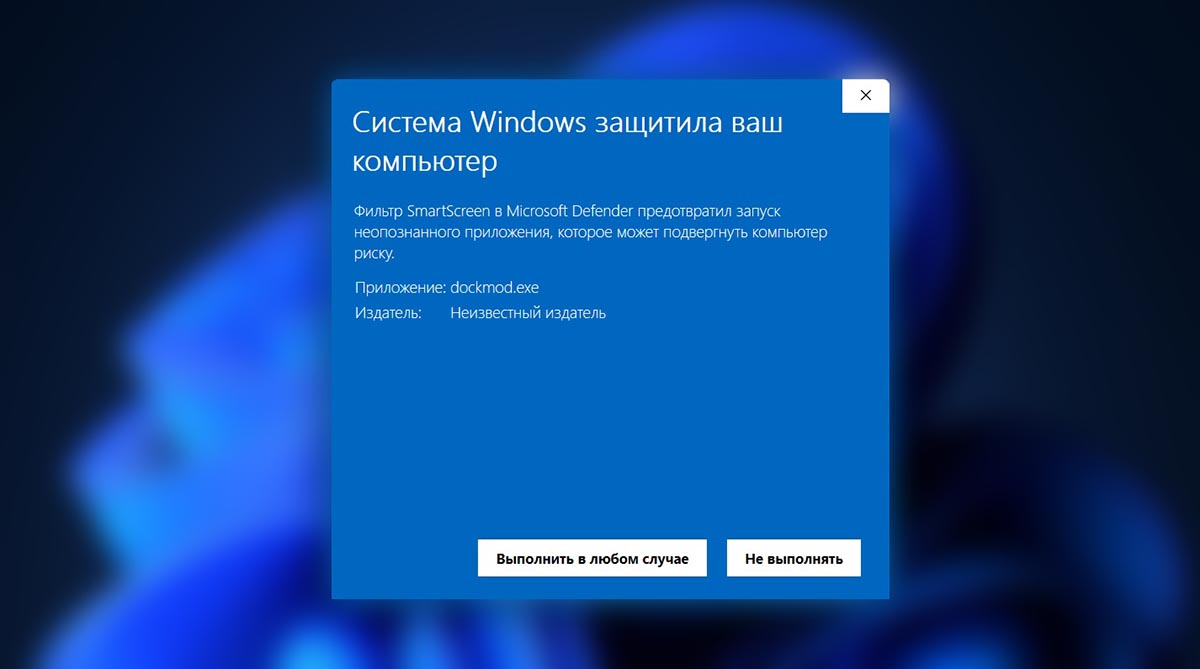
4. Выдайте необходимые разрешения при первом запуске приложения.
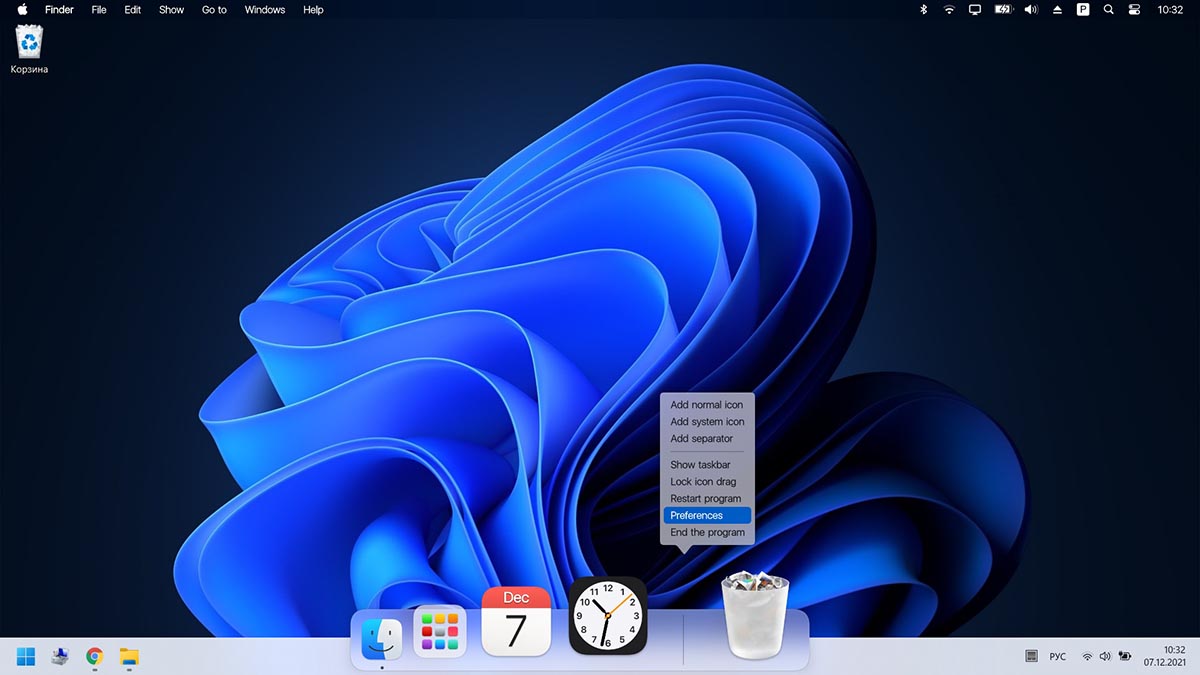
5. Сразу же увидите узнаваемые элементы операционной системы macOS: док-панель и строку меню. В верхнюю панель переехали все иконки и индикаторы из трея Windows.
Для перехода к параметрам приложения нужно вызвать контекстное меню в месте разделительной панели Дока и выбрать пункт Preferences.
6. Настроек у приложения MyDockFinder даже больше, чем у аналогичных элементов в macOS.
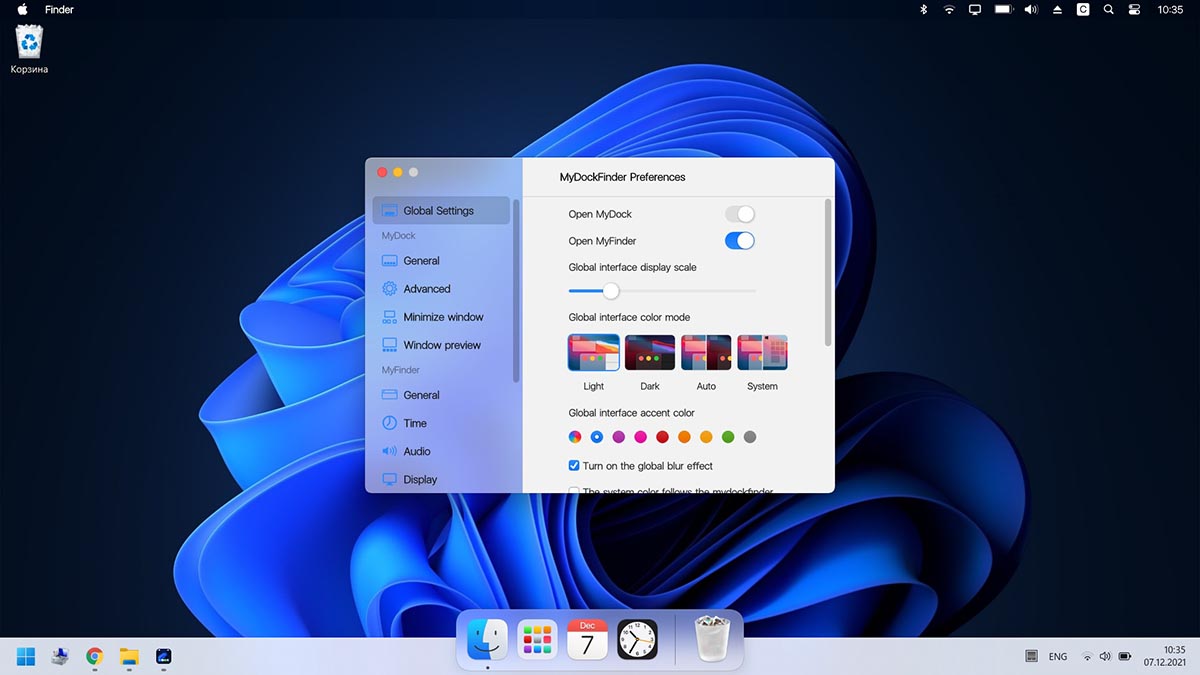
В разделе параметров Global settings указывается размер элементов интерфейса, тема оформления, цветовой акцент и возможность автоматического запуска утилиты при старте системы.

7. В меню General можно изменить размер Док-панели, включить или отключить увеличение иконок при наведении и задать ряд других дополнительных настроек.
Как и в оригинальной macOS панель с иконками может располагаться у нижнего края экрана или у одной из боковых граней.
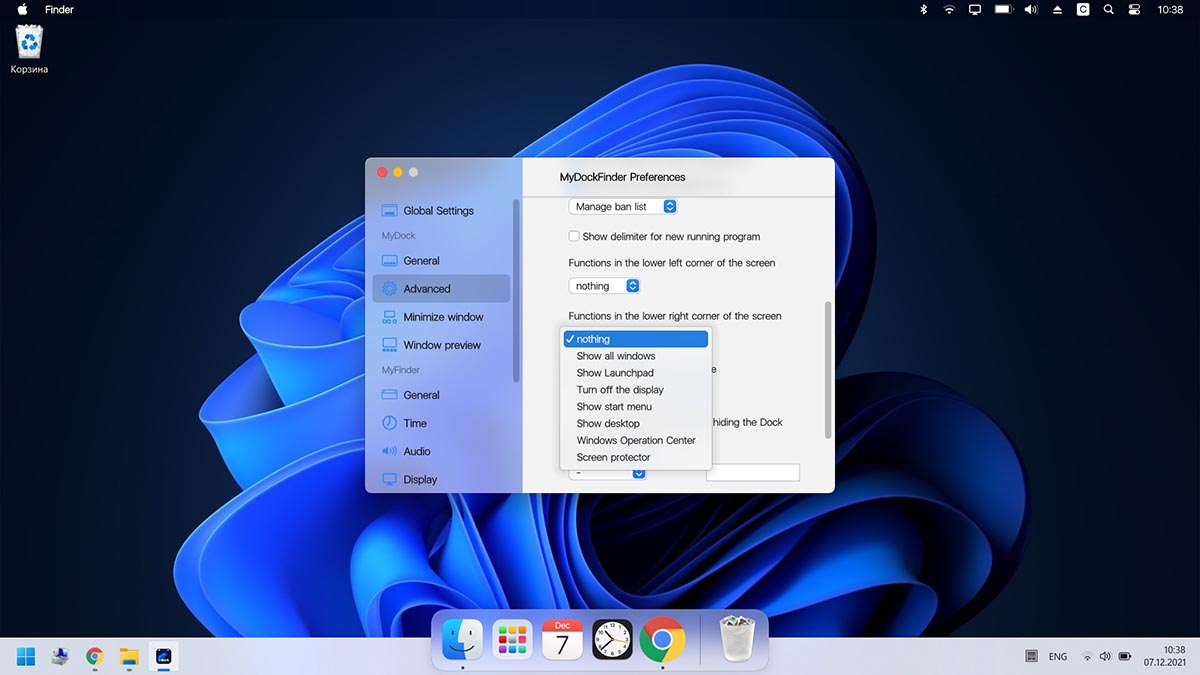
8. В блоке настроек Advanced есть аналог фишки Активные углы, который позволяет задать действия при наведении курсора в выбранную область рабочего стола.
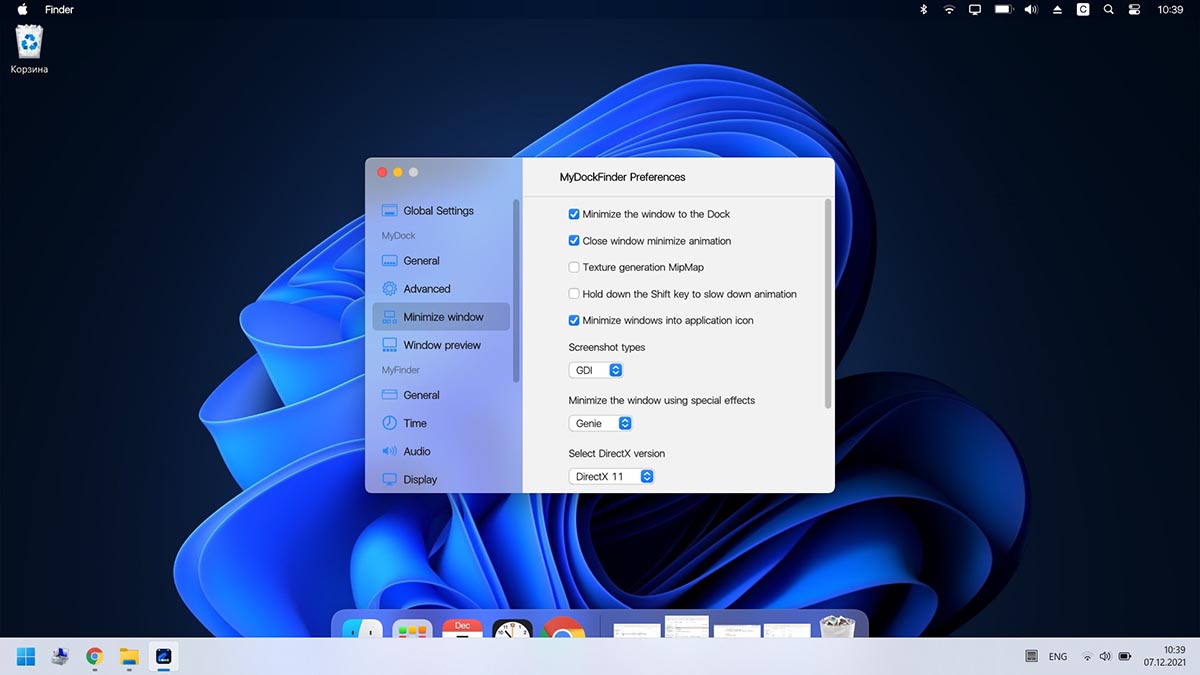
9. В разделах Minimize window и Window Preview настраивается поведение окон и приложений в док-панели. Можно настроить привычную для Windows группировку окон или скрывать их в иконку приложения, как в macOS.
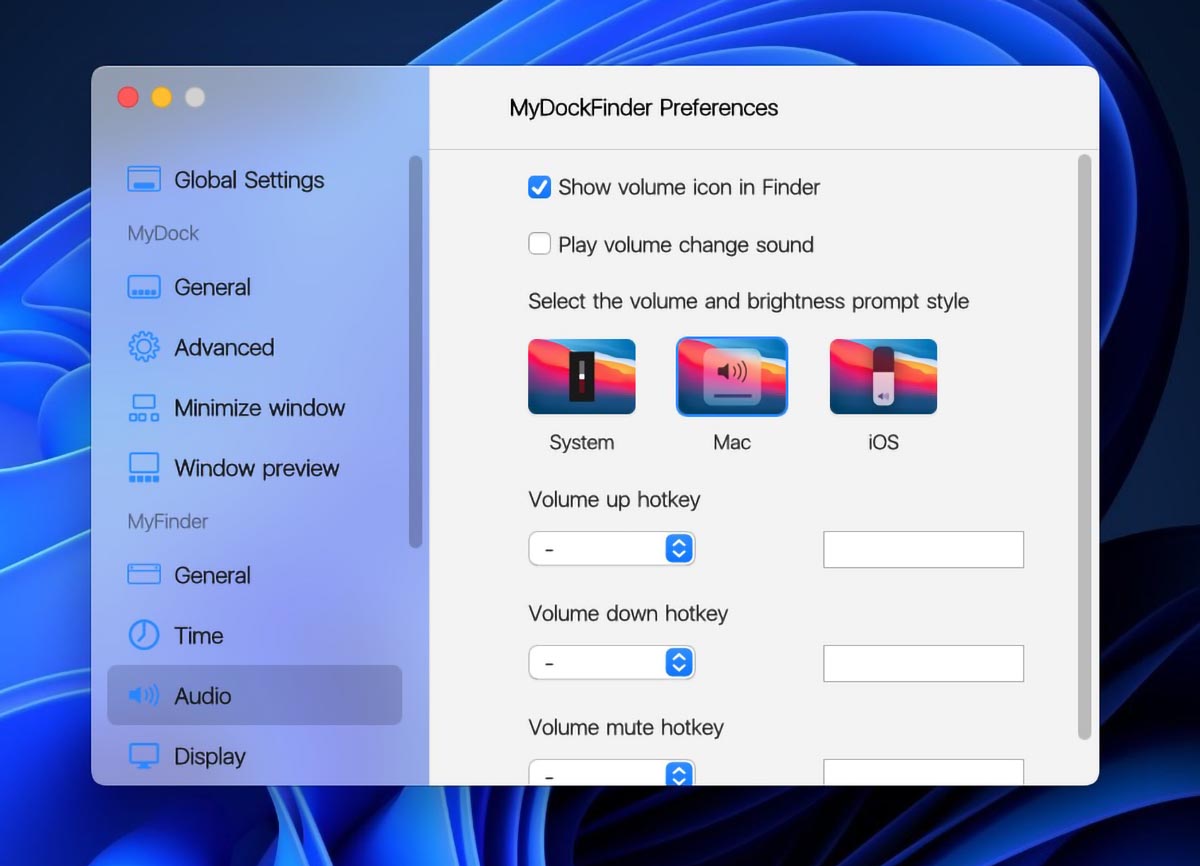
10. Особого внимания заслуживает блок параметров Audio. Здесь можно изменить стандартную графику для регулировки уровня громкости компьютера. Можно оставить классический Windows-индикатор, стандартное меню из macOS или минималистичный боковой слайдер из iOS.
Здесь же можно назначить клавиши управления громкостью при отсутствии мультимедийных кнопок на клавиатуре.
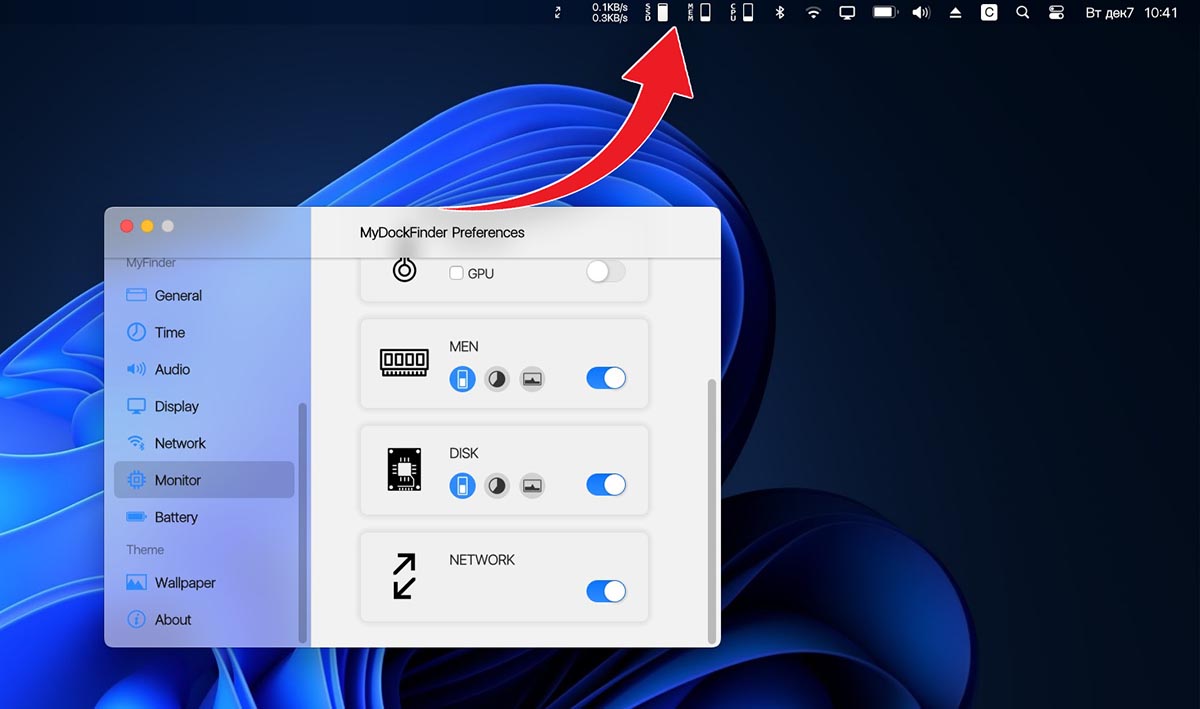
11. Раздел настроек Monitor позволяет добавить в строку меню системные индикаторы. Прямого аналога данной фишке в macOS нет, но разработчики явно вдохновлялись утилитой iStat Menus.
Можно вывести индикатор загруженности процессора, оперативной памяти, видеоадаптера и свободное место на накопителе.

12. После настройки всех элементов останется найти и установить подходящие обои. Не забудьте перезагрузить компьютер для вступления в силу новых параметров.
В качестве финального штриха можете отключить отображение системных иконок на рабочем столе ОС. Чаще всего там остается мусорная корзина. Отключаются иконки по пути Системные настройки – Персонализация – Темы – Параметры значков рабочего стола.
После перезагрузки рабочий стол вашего Windows-компьютера будет на 99% походить на новую macOS Monterey.
Как работать в Windows после установки MyDockFinder
Как видите, приложение для изменения внешнего вида операционной системы является комплексным и переносит не только док-панель, но и ряд других элементов macOS.
Во-первых, вы получаете удобную строку меню, в которой содержатся все настройки утилиты и некоторые параметры запускаемых приложений. К сожалению, перенести все пункты меню разных программ в верхний бар невозможно.
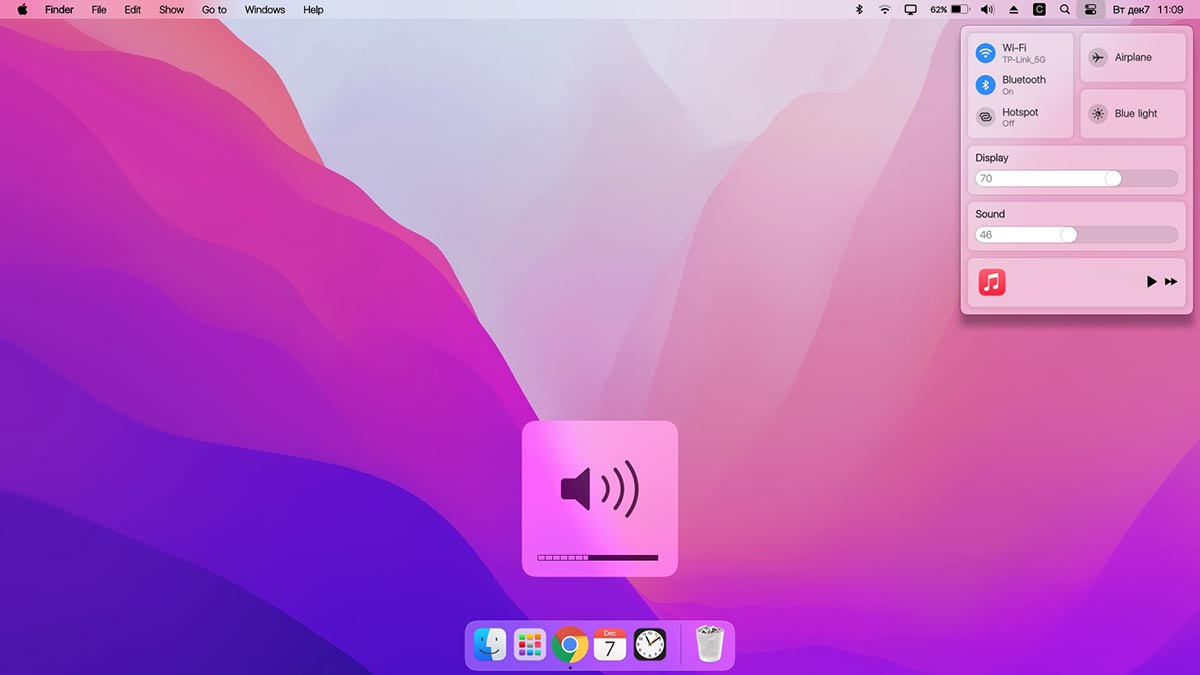
Во-вторых, строка меню в стиле macOS является более функциональным аналогом трея из Windows. Здесь предусмотрены всплывающие меню для разных системных индикаторов вроде Wi-Fi, Bluetooth, индикатора громкости и т.п.
Особого внимания заслуживает Пункт управления, который с первого взгляда не отличить от оригинального “яблочного”. Все элементы здесь функционируют и управляют параметрами системы.
В-третьих, MyDockFinder заменяет некоторые системные меню и диалоговые окна, которые начинают выглядеть более эстетично и не выбиваются из общей стилистики.
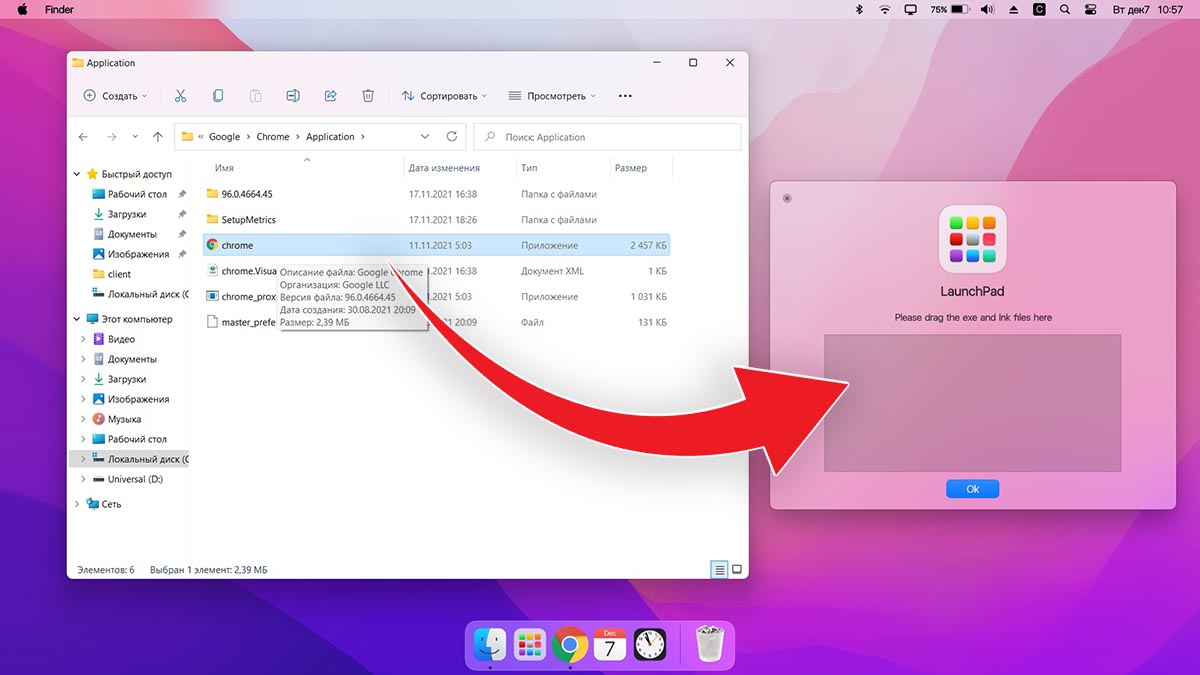
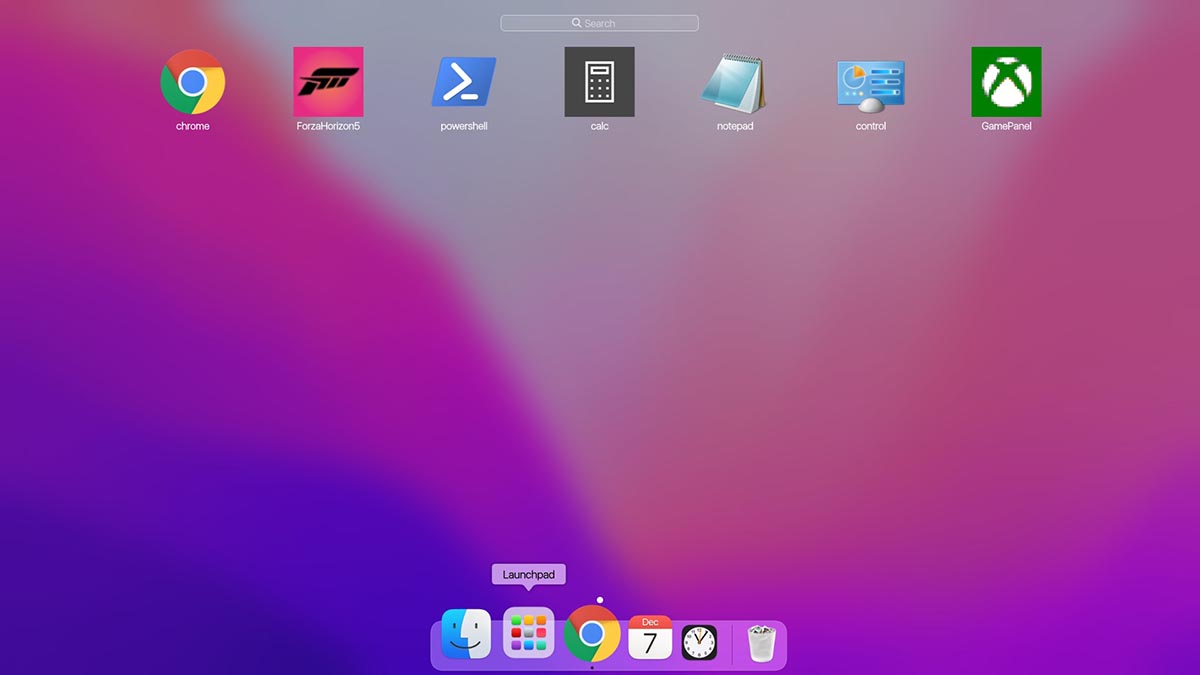
В-четвертых, появляется некий аналог Launchpad. Сюда придется вручную перенести ярлыки нужных вам приложений. Можете поискать программы в папке Program Files либо выполнить общий поиск файлов *.exe на системном диске и перетянуть в меню нужные.
После настройки меню выглядит с точно как родной “ланчпэд” из macOS. Вы сможете в любой момент отредактировать набор приложений в нем.
В-пятых, основные элементы операционной системы Windows будут доступны из нового интерфейса. Так при запуске Finder будет открываться привычный файловый менеджер от Microsoft, вместо поиска Spotlight в строке меню будет запускаться глобальный поиск по Windows, а нажатие на одноименную кнопку откроет стандартное меню Пуск.
Не забывайте и о скрытых пунктах меню за индикатором , там есть стандартное меню выключения и перезагрузки компьютера, доступ к системным параметрам и Microsoft Store.
Лично мне понравилось приложение MyDockFinder. Это качественная комплексная утилита для изменения операционной системы Windows “все в одном”. Единое приложение меняет большое количество элементов и делает систему максимально схожей с macOS.
Вам не придется устанавливать с десяток приложений, менять системные файлы и возиться с подстройкой элементов. Все параметры задаются в одном понятном меню настроек, а фишки не конфликтуют друг с другом. Удаляется MyDockFinder быстро и беспроблемно. Нужно просто отключить утилиту из контекстного меню и удалить содержащую все файлы папку.
Если вы большую часть времени работаете с macOS, но периодически заглядываете в Windows – можете смело устанавливать MyDockFinder, чтобы быстрее адаптироваться в данной операционной системе.

 (41 голосов, общий рейтинг: 4.44 из 5)
🤓 Хочешь больше? Подпишись на наш Telegram.
![]()
iPhones.ru
Если очень хочется macOS, но не можется.
- macOS,
- macOS Monterey,
- windows,
- Windows 11,
- приложения,
- Технологии,
- Это интересно
![]()
Артём Суровцев
@artyomsurovtsev
Люблю технологии и все, что с ними связано. Верю, что величайшие открытия человечества еще впереди!
Are you one of those guys who loves to work on the Windows platform but loves the MacOS look? You are at the right place, my friend. In this guide, we are going to show you step-by-step how you can make your windows 11 look like macOS. Let’s hop on to this exciting customization now!

How to convert your Windows 11 PC into a Mac
In order to achieve a proper Mac look, we will need obviously, need some software. Below are the names of the software that we would need to make our windows look like macOS. We have also provided you with the links to download the software. Along with the link we are going to show how you can use this software to make your Windows look like macOS. Let’s get started.
Attention Windows Users!!
Facing issues on your Windows PC every now and then? We would recommend you use the Restoro PC Repair tool.
It is a one-stop solution to repair common computer errors, protect your Windows PC from data loss, malware, hardware failure, Registry issues, BSOD errors, etc. and optimize your PC for maximum performance in just three simple steps:
- Download Restoro Tool that comes with Patented Technologies (see patents here).
- Install and click on Start Scan to find the issues on your Windows PC.
- Finally, click on Repair All to fix the issues.
475,131 readers have downloaded Restoro this month.
1. MyDockFinder: To get the macOS Dock
MyDockFinder is a good-to-go software for getting the macOS desktop look along with the famous dock and the finder on the top.

Although this software is paid for now. It used to be free. I manage to get my hands on that free software release. I have provided you with the link from where you can download this software for free. Let’s start with how you can download and customize our desktop:
Step 1: Click on this link to download MyDockFinder. Just clicking on this link will download MyDockFinder.

Step 2: Once downloaded, hop on to the location where you have downloaded it and extract it.

Step 3: Select a Destination and Extract Files pop-up appears. Click on Extract.

Step 4: After the file is successfully extracted, open it and got yo the lang folder there.

Step 5: Here, select and delete the file by the name Chinese to remove the Chinese language from the app.

Step 6: One thing we need to do here for our convenience is to make a Folder in the Local Disk C so that we don’t have to put all the customization files at different locations. We will place all the customization software here just to organize our work.
Double Click on Local Disk C.

Step 7: Make a new folder named “Tweaks“(You can name it as per your choice).

Step 8: Now, move the MyDockFinder folder that we just extracted to the Tweaks folder.

Step 9: Now, open the MyDockFinder folder and click on Dock_64 to run MyDockFinder app.

Step 10: Upon running the Dock_64 file, the Windows Defender prompt will open. Here, click on More info and select Run anyway. Do this as many times as it appears without worrying that it will do any harm to your PC.

Step 11: Immediately after running the MyDockFinder app, you’ll see the macOS Application lock at the bottom of your desktop.

Step 12: But the problem is that the Windows Taskbar is still there. To solve this, right-click on the dock and click on the Hide taskbar option. Doing so will hide the Windows default Taskbar.

At the top right corner, you see what you see.

Also this status bar.

Step 13: Right-click on the dock and then click on Preferences.

Step 14: On the MyDockFinder Preferences pop-up. In the Global Settings tab check the box Auto start at boot so that it will become part of the system and will start automatically.

There is so much customization available in MyDockFinder that it is impossible for me to show all of them in this article. So try clicking on another option and start customizing your Dock to your liking.
2. Dynamic Dekstop: To get the macOS Dynamic Wallpapers
Another thing we need to set up here is the cool feature of dynamic wallpaper which changes its appearance as per the time of the day. Do the following to apply the same:
Step 1: Click on this link and download an appropiate WinDynamicDesktop app version for your PC from Github.

Step 2: Once WinDynamicDesktop is downloaded open it.

Step 3: In the Select Setup Install Mode prompt click on Install for all users option.

Step 4: In the User Account Control Prompt click on Yes to allow the installation.

Step 5: In the Setup Wizard Follow the on-screen steps and install it.

Step 6: After getting installed it will automatically launch. Select the language and click on OK.

Step 7: You’ll now see the Configure Schedule windows on your screen. Here, enter your location so that it can determine sunrise and sunset time automatically, and press OK. You can also set your own sunrise and sunset time manually.

Step 6: In the select theme wizard select the dynamic wallpaper that you want to apply and click on the Apply button.

Step 7: The wallpaper will be downloaded and applied on your Windows 11 PC.

Isn’t it beautiful! This is the dynamic wallpaper that has been applied. You can download any wallpaper you like from the list.

3. macOS Cursor: To get the iconic macOS black cursor
Another important thing to change is the cursor. Unlike white macOS has a black cursor and rainbow-colored loading things instead of a blue ring. Follow the below steps to do the same:
Step 1: Click on this link to download the macOS cursor app from GitHub.

Step 2: Once downloaded, navigate to the location where you have downloaded it. Right-click on it and select Extract All to extract the contents of the downloaded ZIP file.

Step 3: Open the Extracted macOS cursor folder and then click on the Dierra and newer folder to get the cursor of macOS High Sierra or later.

Step 4: Navigate to the No Shadow folder. You can also open With Shadow folder if you want to apply the macOS cursor with shadow.

Step 5: Now open the Normal folder. You can also open the Large or XtraLarge folders if you want to use a large or extra large cursor.

Step 6: In the normal folder look for the install file. Right-click on it, select Show more options, and select the Install option.

Step 7: As you click on install Open File – Security Warning prompt appears. Here without any doubt click on Open.

Step 8: Proceed with Yes on the User Account Control prompt.

Step 9: Once installation is done, it’s time to apply the cursor. Search for mouse settings in the search bar of the start menu and click on Open.

Step 10: Under the Related settings section, click on the Additional mouse settings option.

Step 11: On the Mouse Properties window that appears, switch to the Pointers tab and select the macOS Cursor – No Shadow Newer in the Scheme drop-down list. Click on OK to save the changes.

And there you go. After successfully executing the above steps, you’ll see that your Windows 11 cursor has been transformed into the one that macOS offers.
4. ThemeTool: To get the macOS theme
Now your whole desktop will look like macOS. But if you open any other window then it will give you the feel of Windows 11. So in our next customization, we are going to change our theme which will make all the windows look like macOS along with layout, font, and window buttons (minimize, maximize & close).
Step 1: Click on this link to download the ThemeTool from GitHub.

Step 2: After downloading, navigate to the download location and move it from there to Local Disk C.

Step 3: Once the ThemeTool is placed in Local Disk C, right-click on it and run it as administrator.

Step 4: Click on Yes to agree to the ThemeTool license.

Step 5: You’ll now see the SecureUxTheme ThemeTool dialog box. Here, checkmark the following boxes
- Hook systemSettings
- Hook LogonUI
and then click on the Install button.

After the successful installation, you’ll be asked to reboot the system. Click on Yes to do so.

Step 6: Now it’s time to download light and dark macOS themes to patch in the Secure theme tool.
- Lite Theme
- Dark Theme
Step 7: Navigate to the place where you have downloaded the themes and extract them.

Step 8: Once extracted, open the LIT3 for Windows folder, navigate to Windows Themes and look for the LIT3 MAC NA.theme & LIT3 MAC.theme files.

Step 9: Move both these files to Local Disk C > Windows > Resources > Themes.

Step 10: Similarly, move the BIB3DM MAC NA.theme & BIB3DM MAC.theme files from the BIB3 for Windows > Windows Themes folder to Local Disk C > Windows > Resources > Themes.
Step 11: Once the theme files from both folders are moved to the Themes folder of Windows, Open the ThemeTool app.
Step 12: Select the LIT3 MAC option from the top left list of themes and then click on the Patch button. Do the same for the BIB 3DM MAC, BIB3DM MAC, LIT3 MAC No Addressbar options and Patch it.

Step 13: Let’s try the light theme first. Click on LIT3 MAC and then on Apply.

See for yourself. Now your Whole window has started to look like Mac. See those three colored buttons in the top right corner. The whole look is now like macOS except for the icons and three buttons(minimize, maximize & close) on the left side of the title bar.

Additional customizations
By now, you should have Windows 11 whose interface looks a lot like macOS. But if you want to make your windows completely look like macOS then you can carry forward this customization even further.
This customization includes all the icons and the shifting of minimize, maximize and close buttons on the left side just like in the macOS.
Download the zip file (Make windows 11 look like macOS) from here to customize other things.
1. To change all icons like MacOS
To make you feel more that you are using change all the system icons to that of macOS as follows:
Step 1: Extract the zip file that you downloaded by right-clicking on Show more options > 7zip > Extract here.

Step 2: Go to the 7TSP Icon Theme folder from the extracted folder.

Step 3: Here, right-click on the 7tsp.exe file and select Run as administrator.

Step 4: Click on Yes on the 7tsp Build Agreement.

Step 5: Seven Theme Source Pather dialog box appear. Click on Add a Custom Pack.

Step 6: Then select the 7tsp Big Sur LightMode.7z file from the same folder you just extracted.

Step 7: Now click on Start Patching.

Step 8: On the patch system prompt click on Yes.

Step 9: Once done, reboot your PC by clicking on Yes.

Open This PC and see all the icons that have been converted to macOS icons.

2. To shift the minimize, maximize and close buttons on the left
This is the last customization we need to do to get a complete feel of macOS. We will not transfer minimize, maximize & close buttons from the top right side to the top left side. Follow the below-mentioned steps to do the same:
Step 1: Open the extracted folder Make Windows 11 Look like macOS and go to Move LeftSider folder.

Step 2: When the Leftsider folder opens. Drag the Leftsider folder to the Move Here file with the drive icon located alongside.

Step 3: Now double-click on the Move Here file to open it.

Step 4: You’ll now find yourself in the Local Disk C of your PC. Here, open the LeftSider folder.

Step 5: Launch the leftsider.exe file by double-clicking on it. As soon as you do that the three buttons will move on to the left side.

Step 6: It’s time to move the leftsider.exe to the startup folder so that it can start automatically every time you open your PC.
For this press Windows + R keys on the keyboard. A Run dialog box appears. Type shell:startup command and hit Enter.

Step 7: The startup folder appears here Paste the shortcut of the Leftsider.exe

It’s done. Your Windows 11 PC is now fully converted into macOS. Enjoy!
Note: Do create a backup of your device before proceeding to the customizations. In case you wish to go back to your default Windows appearance or in case things go south.
Bottom Line
That was pretty simple, right? I hope I was able to explain all the steps to you as easily as possible. I hope you enjoyed converting your Windows into MacOS (look-wise). Please let us know if you have any difficulty following any steps or if any broken links we will fix that as soon as possible. See you soon!
Also Read:
- Fix: macOS Ventura cannot be installed on Macintosh HD
- Fix: An error occurred while installing the selected updates
- Fix: An Error Occurred Preparing the Software Update
- 3 Ways to fix Blurry text on External Monitor on Mac
- Fix fileproviderd or filecoordinationd high CPU usage on Mac
- How to Enable Dark Mode in Microsoft Outlook on Mac
- Fix: Orange or Green dot (Mic or Camera) stuck on macOS
- iPhone messages keep indexing? Try these fixes!
- Spotify Crossfade not Working? Try these 9 fixes!
- 3 Ways to adjust brightness of External Monitor on Mac
A small tutorial on how to make Windows 11 look like macOS
Patch Your Windows 11 step-1
- First, download & install UltraUXThemePatcher
Change MacOS Theme step-2
- Download the BIB3 theme (for Dark Theme Users) or LIT3 theme (for Light Theme Users)
- Extract the theme zip file (use WinRAR or 7 Zip)
- Open the BIB3 or LIT3 folder and open the Theme folder in it. Copy all the file
- Paste the copied file (C: Windows Resources Themes)
- Right-click on the desktop and click personalize in your context menu
- Click on the theme section on the personalize page
- In it, choose the Mac theme for BIB3 or LIT3 that you use
Removing Ribbon Menu From Explorer step-3
- Download OldNewExplore and Extract
- enable only the following settings:
- ✓ Use classical drive grouping in This PC
- ✓ Use libraries; hide folders from This PC

Install Mac Icons For Windows11 step-4
- Download the Big Sur 2
- Extract the theme zip file (use WinRAR or 7 Zip)
- Open the Big Sur 2 folder and open the 7TSP Icon theme folder in it.
- Select the icon to suit your theme (Dark or Light). Delete the last word in its name, remove
- Then download the icon patcher 7TSP GUI 2019 Edition
- Extract the 7TSP GUI zip file
- Rename 7tsp GUI v0.6(2019).ee to 7tsp GUI v0.6(2019).exe (.ee to .exe)
- Then open the 7tsp application and click add a custom pack
- Select the 7tsp icon on the Big Sur 2 and Click Start Patch
- Restart after the icon installation process
Improve Windows 11 File Explorer UI step-5
- Download & Install the Startallback
- Then open the Startallback application
- Click on explorer and change the settings as shown in the image below

Close Button Move To Left Side step-6
- Download & Extract the Leftsider
- Copy the LeftSider Folder and paste it to Local Disk-C
- And open the LeftSider folder. Create a shortcut to the leftsider application and copy it
- Paste the copied shortcut file into the startup folder
- Run it (Double Click)
macOS Dock Setup step-7
- Download & Extract the My Dock Finder
- Then open the My dock Finer folder and install VC_2015-2022.x64 and VC_2015-2022.x86
- Run the My Dock application in the same folder
- I have shown in the video above how to add a dock icon to it and the backup file for that is in the video description
Desktop Customize step-8
- Download & Install the Rainmeter application
- Unload all unnecessary skin
- Then Download & Install this Rainmeter skin
Conclusion
Hopefully, now your Windows 11 will look like a Mac. This site has a lot of customization so share it with your friends if you like it.
-
March 26, 2020 -
9:24 am -
9 Comments -
Windows 10

macOS Theme are about to change the look of your windows desktop theme to mac!
Operating System Support:
Windows 10 : 1903, 1909, 20H1, 20H2
Note : First it is recommended you make a System Restore point before continuing.
how to use:
1- to use this theme first you need to install UXTheme Patcher
2- Copy theme files to C:WindowsResourcesThemes
3- Open Settings > Personalization > Themes > Select the theme.
4- Install OldNewExplorer to remove the ribbon.
-
10, 7, 7tsp, 8, 8.1, Appearance, apple, black, blinds, brico, bricopack, color, colors, customization, custopack, dark, eight, gui, hyperdesk, icon, iconpack, iconpackager, icons, installer, interface, ipack, light, linux, my, mycolor, MyColors, os, pack, pakager, patch, patcher, Premium, remix, Secure, Secure UxTheme, SecureUxTheme, seven, shell, shellpack, skin, skinpack, skins, stardock, style, suite, theme, themepack, themes, transform, transformation, ubuntu, Ultra UXTheme Patcher, Ultra UXThemePatcher, UltraUXTheme Patcher, UltraUXThemePatcher, update, ux, ux theme, uxstyle, uxtheme, UXTheme Patch, UXTheme Patcher, uxthemepatcher, uxthemepatcher for windows, visual, visual style, visualstyle, vs, win, windowblinds, windows, windows10, windows10theme, windows10themes, winodws 10
… Related Posts …
9 Comments
-

sjk210 April 17, 2020 at 11:44 pm
How do I remove the icons on this theme! I do not want this theme anymore but the icons are still here and they are not going away.
-
Memma June 4, 2021 at 3:59 pm
just use the restore point u have set it before
-
-
-
Nitish Kumar Yadav June 14, 2021 at 12:49 am
-
Nitish Kundu June 25, 2021 at 2:16 pm
Not getting downloaded . tried various times..
-
raghav June 30, 2021 at 10:54 am
-
-
raghav June 30, 2021 at 10:55 am
i am clicking on download so much time but download was not starting
-
Utsav Shah June 30, 2021 at 2:01 pm
I’m not able to download it.
-
NurullahYilmazTR July 7, 2021 at 2:38 pm


Leave a Reply
This site uses Akismet to reduce spam. Learn how your comment data is processed.