
Download MariaDB products and tools for development and production
-
Free
MariaDB Community
-
MariaDB Enterprise
-
Cloud
-
Repo Setup
-
Connectors
-
Tools
-
Enterprise Server
-
Xpand
-
MaxScale
-
ColumnStore
-
ColumnStore Cluster Manager
-
Monitoring
-
Shell
MariaDB Enterprise Server: Enhanced, hardened and secured for mission-critical applications
MariaDB Enterprise Server is a hardened version of MariaDB Community Server built for production deployments. It undergoes extensive QA, is configured for production by default and includes enterprise features to improve operating efficiency at scale and support the most secure environments. MariaDB Enterprise Server is available to all subscription customers.
Interested in an Enterprise subscription? Contact us to get started.
MariaDB Xpand: Distributed SQL for unlimited read, write and storage scaling
Xpand takes elasticity, scale and high availability to another level. Deployed with MariaDB MaxScale or as a Storage Engine with MariaDB Enterprise Server it is MariaDB’s Distributed SQL implementation, providing a single highly consistent database distributed across multiple nodes. With distributed storage and query processing for high throughput read/write workloads Xpand allows database administrators to scale out on demand, and as much as needed. It handles the most demanding workloads – whether it’s the result of exponential growth, peaks such as Black Friday or a shift to online/mobile customer engagement.
Interested in an Enterprise subscription? Contact us to get started.
MariaDB MaxScale: The world’s most advanced database proxy, firewall and query router
MariaDB MaxScale is an essential component of MariaDB Enterprise. It not only provides mission-critical applications with enterprise features including automatic failover, data masking and denial-of-service protection, it supports workload-based query routing for hybrid transactional/analytical processing.
Interested in an Enterprise subscription? Contact us to get started.
MariaDB ColumnStore: Distributed, columnar storage and processing for scalable analytics
MariaDB ColumnStore extends MariaDB Server with distributed storage and massively parallel processing to support scalable, high-performance analytics. It can be deployed in addition to InnoDB to accelerate analytical queries, or for hybrid transactional and analytical processing (HTAP), or as a standalone columnar database for interactive, ad hoc analytics at scale. ColumnStore can optionally use object storage services in public or private clouds to lower costs and store an unlimited amount of data.
Interested in an Enterprise subscription? Contact us to get started.
MariaDB ColumnStore Cluster Manager
Cluster Manager API (CMAPI) is a RESTful server that allows the clustering of multinode ColumnStore deployments
Interested in an Enterprise subscription? Contact us to get started.
SkySQL Remote Observability Service
MariaDB Remote Observability Service provides monitoring and alerting capabilities for private data center management and data planes. The service provides single-pane-of-glass, comprehensive SkySQL monitoring capabilities not only for SkySQL deployments but also for MariaDB deployments on-premises or in private clouds.
MariaDB Shell: Administer and troubleshoot your MariaDB products
MariaDB Shell is a unified command line interface that provides all the critical tools you need to troubleshoot and administer your MariaDB products. It is flag compatible, has a friendly interface and serves as a 100% replacement for mariadb-admin. Many of the commands should be familiar to mariadb-admin users. New features include the ability to warm in-memory storage engine caches, collect environment and performance data and create a report to track database trends.
These tools are currently available and labeled as “Development (non-production)”. Software designated as “Development (non-production)” or “Technical Preview” should not be used for production workloads.
This download is only available to users with a MariaDB Enterprise subscription. Contact us to learn more.
Introducing SkySQL: the ultimate MariaDB cloud
The first database-as-a-service (DBaaS) to bring the full power of MariaDB to the cloud, and for transactions (row), analytics (columnar) or both (row+columnar), SkySQL combines cloud ease of use and groundbreaking innovations with the enterprise features and world-class support MariaDB on-premises customers enjoy and rely on. Designed for a hybrid and multi-cloud future, and built on Kubernetes, SkySQL is the DBaaS the world has been waiting for.
For SkySQL API tools, click here
Sign up for SkySQL today and get a $500 credit towards your service including ticketed support.


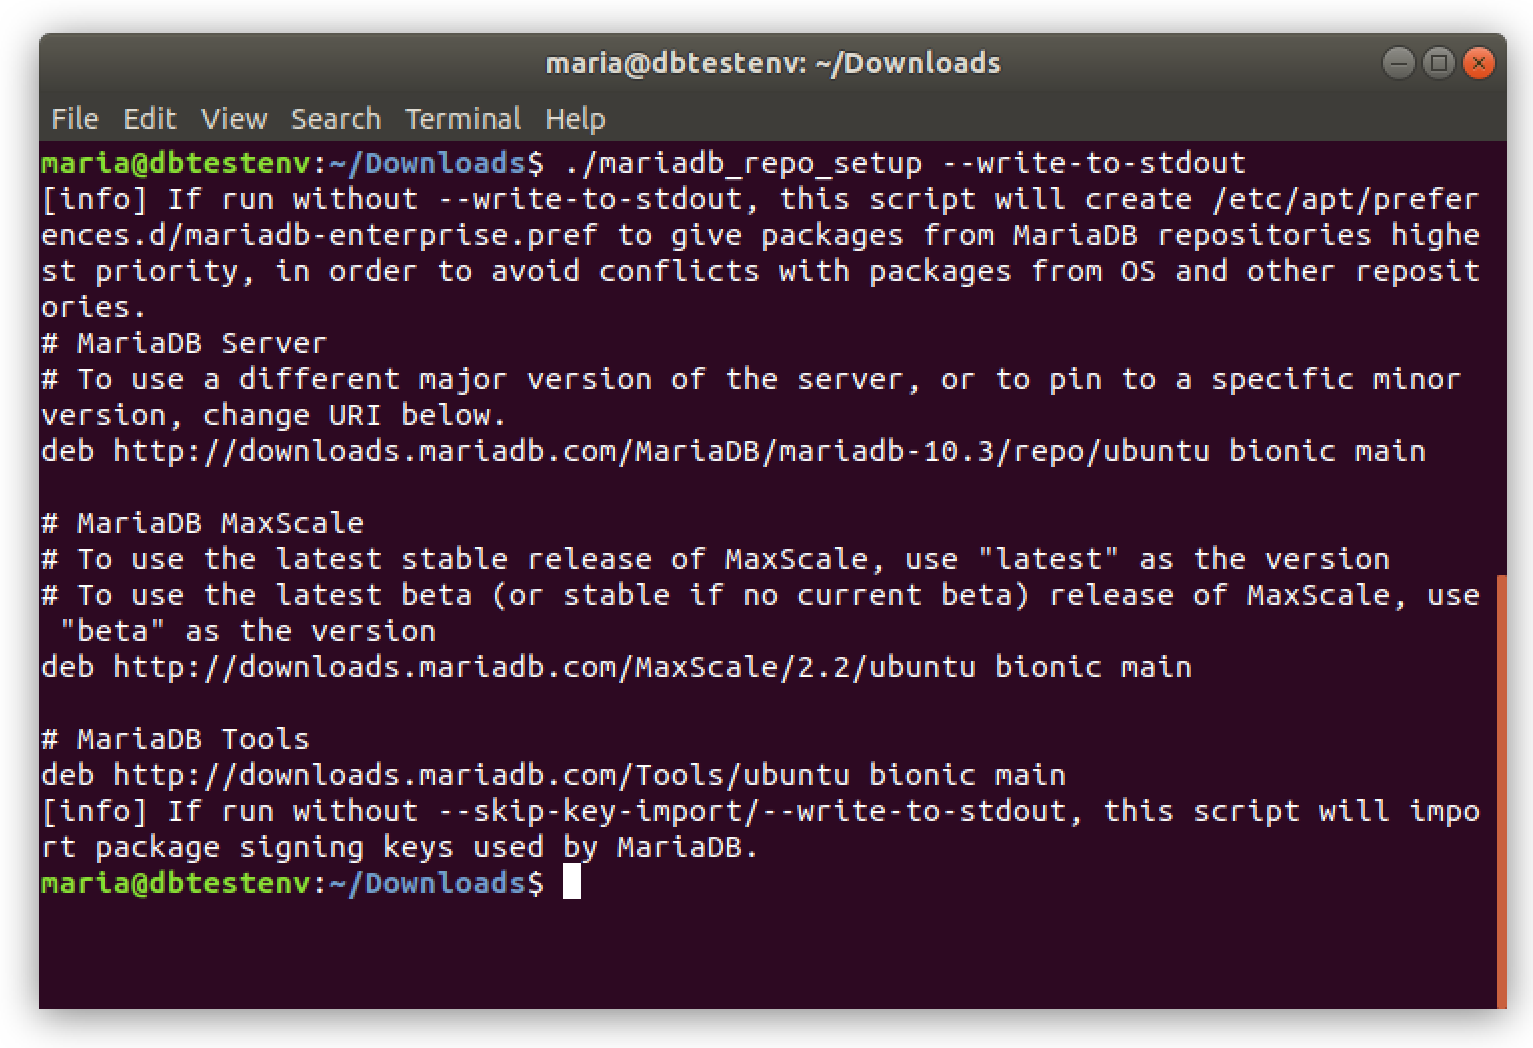
MariaDB may be deployed for production environments using native package management tools apt and yum.
As Debian and Ubuntu users (apt) and CentOS, RHEL, Fedora, and SuSE users (yum) you may use our universal configurator to set up your production server’s MariaDB package repository configuration. Once configured, you can use your native (apt/yum) package management tools to install and update MariaDB software.
-
Data Access
-
Data Analysis
Lightweight, advanced connectors for high-performance data access and data streaming.
MariaDB Connector/C is a high-performance client library with advanced functions, bulk operations, asynchronous/non-blocking APIs and multiple options for encrypted connections via TLS/SSL. MariaDB Connector/C is LGPL.
Native, modern adapters for fast data analysis.
Power BI Adapter
MariaDB adapter for Microsoft Power BI enables quick analysis and aggregation of data natively in MariaDB, rapidly delivering result sets for interactive reports that are highly visual and easy to share.
Product Features
Want to learn more about the features in your download or explore more MariaDB products?
Learn More
MariaDB Services
From support to best practices, MariaDB can assist you and your team to get the very best out of MariaDB.
Learn More
MariaDB Server is one of the most popular database servers in the world. It’s made by the original developers of MySQL and guaranteed to stay open source. Notable users include Wikipedia, WordPress.com, and Google.
It turns data into structured information in a wide array of applications, ranging from banking to websites. It is an enhanced, drop-in replacement for MySQL. MariaDB is used because it is fast, scalable, and robust, with a rich ecosystem of storage engines, plugins, and many other tools that make it very versatile for a wide variety of use cases.
The app is developed as open-source software and as a relational database, it provides an SQL interface for accessing data. The latest versions of Maria DB also include GIS and JSON features.
MariaDB Server began its life as a fork of MySQL, inheriting the strong performance and the legacy Relational DBMS capabilities that made the ecosystem so popular in the first place. In the years since this fork, differences have begun to emerge between these platforms, as It has advanced as a leader in its own right.
These differences translate into advantages, many of which are specific to users, including enhancements to the optimizer, window functions, system and application-time period versioned tables, replication and clustering support, and support for new storage engines like ColumnStore, MyRocks, Spider, and Aria.
In the interest of providing a superior product, the Server utilizes its own testing suite for evaluating new features and patches. This suite includes many more tests and bugs found in these tests are fixed before the code ships. Furthermore, the tests are run against several configurations of Maria DB Server 64 bit, to better test the feature in different environments, and are not run when the feature is not available in the given configuration.
It includes a number of new features and extensions. When the community submits patches or features that are found to be useful, safe, and stable, every effort is made to integrate them with and include in the program.
Download MariaDB (64-bit) Latest Version
Summary: in this tutorial, you will learn step by step how to download and install MariaDB on your system.
Download MariaDB
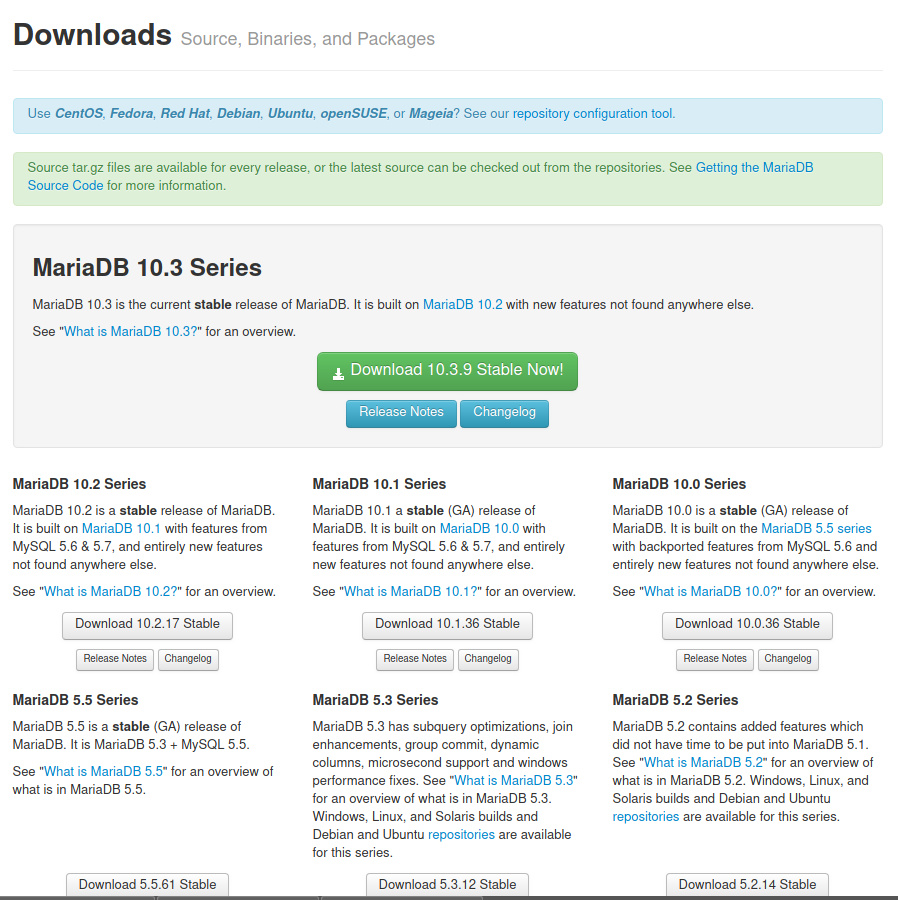
To download MariaDB, you go to the download page and select the latest version to download:
Download MariaDB
To install MariaDB on Windows, you follow these steps:
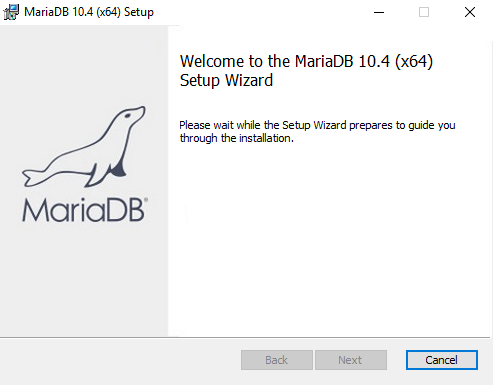
Step 1. Start installation
Double-click the installer to start the installation process.
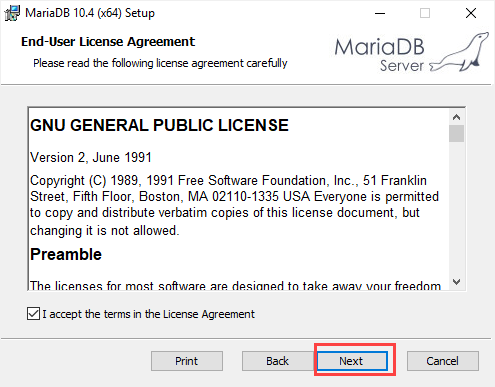
Step 2. Accept the end-user license agreement
Read the end-user license agreement and click the Next button:
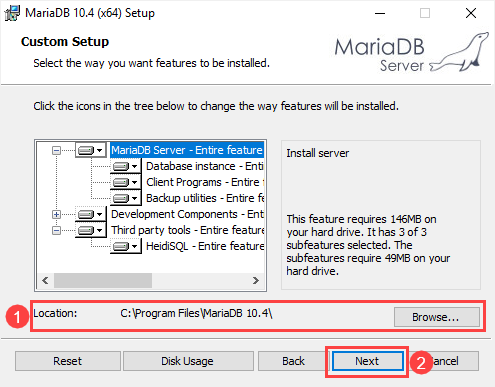
Step 3. Select features
Choose the directory that stores the MariaDB files and click the Next button. The default location on Windows is C:Program FilesMariaDB 10.4.
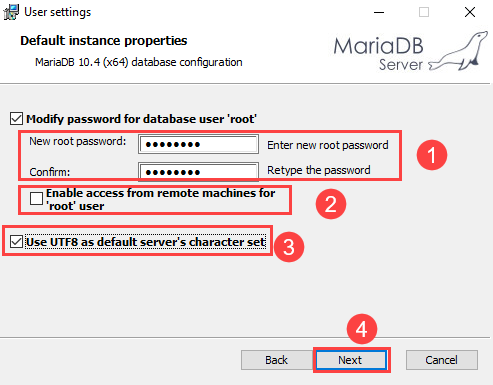
Step 4. Set root’s password
Type a password for the root user account. You will use this password to connect to MariaDB later. The root user is the default user of the MariaDB, which has all privileges.
If you don’t want the root user to login from a remote machine, you need to uncheck the Enable access from remote machines for 'root' user checkbox.
The Use UTF8 as the default server's character set option allows you to use the UTF8 as the default character set when you create new databases and tables.
Once you complete selecting all options, click the Next button to go to the next step.
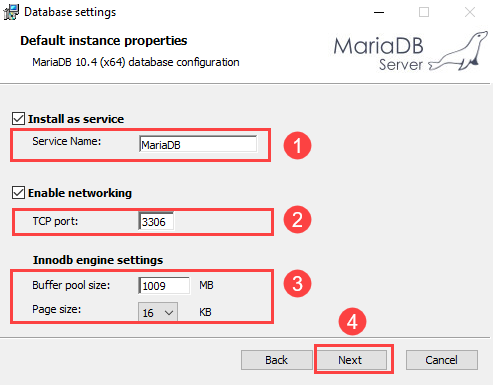
Step 5. Configure Database
In this step:
First, install MariaDB as a service by selecting the Install as service option. It allows you to rename the service name.
Second, configure the port for the MariaDB. By default, MariaDB uses 3306 port. However, you can change it to your port if you want.
Third, specify the parameters for the Innodb engine including buffer pool size and page size. 16KB page size is suitable for most databases.
Finally, click the Next button to go to the next step.
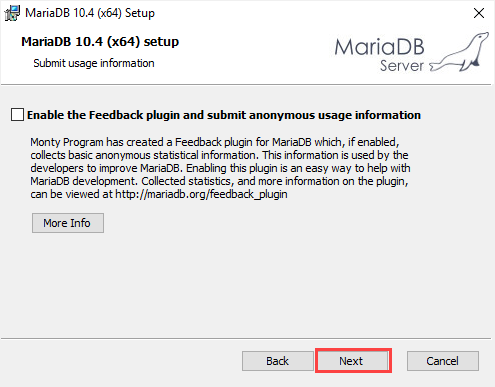
Step 6. Submit usage information
If you want to submit anonymous usage information so that MariaDB developers can improve the system, check the checkbox and click the Next button.
Step 7. Ready to install MariaDB
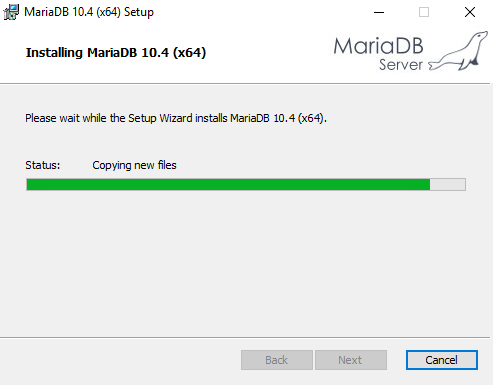
Click the Install button to start installing MariaDB
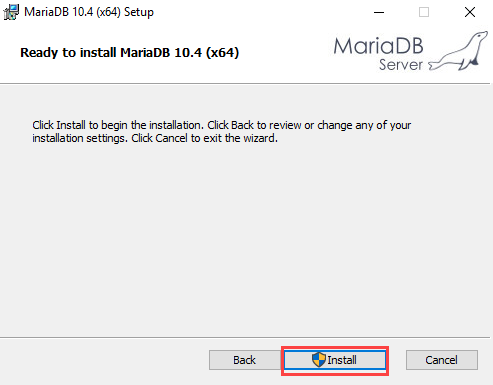
It will take a few minutes depending on the system.
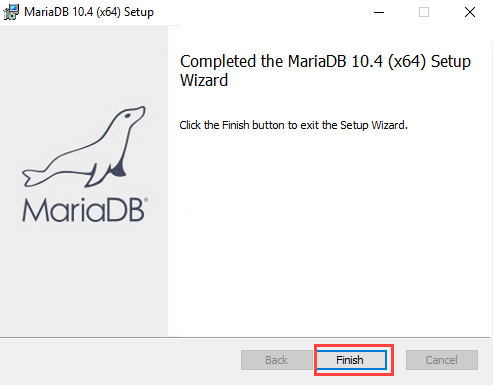
Step 8. Complete the MariaDB setup
Click the Finish button to complete MariaDB setup
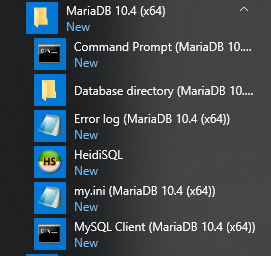
You can find the MariaDB tools in the startup menu:
In this tutorial, you have learned step by step how to install MariaDB on Windows.
Was this tutorial helpful ?
Что лучше MariaDB или MySQL?
MariaDB — это форк, то есть ответвление кода системы управления базами данных MySQL. Разработчики MariaDB утверждают, что их программа является полным аналогом MySQL, но в ней исправлены ошибки, добавлены новые функции, а сама программа сделана более открытой.
Напомню, что у MySQL есть бесплатная Community версия, а также есть версия с платным кодом. Что касается MariaDB, то авторы реализовали все возможности MySQL в виде открытого и бесплатного кода при этом сохранив совместимость с базами данных, созданными в MySQL.
В настоящее время MariaDB очень стремительно набирает популярность — в некоторых дистрибутивах Linux она заменяет MySQL, либо предлагается как альтернатива. Также я обратил внимание, что хостинг провайдеры стали переходить на MariaDB.
В общем, MariaDB широко используется и её можно считать проверенной и надёжной СУБД, поскольку в настоящее время она действительно широко распространена.
Что выбрать, MariaDB или MySQL, переходить ли с MySQL на MariaDB? На самом деле, для домашнего компьютера особой разницы нет. Вы можете выбрать любую из этих СУБД. Я упомянул, что в MariaDB реализованы платные функции MySQL, кроме того, в ней добавлены новые движки хранения данных — ещё больше подробностей и отличий в этой статье. Но для подавляющего большинства пользователей эти функции являются экзотическими, либо просто не применимыми, поскольку рассчитаны для оптимизации супер тяжёлой нагрузки. Поэтому, выбор между MariaDB или MySQL на локальном веб-сервере это исключительно дело вкуса.
MariaDB работает на разных операционных системах, в том числе на Windows. Для Windows имеются официальные бинарные файлы. Чтобы скачать последнюю версию, перейдите по ссылке https://downloads.mariadb.org/mariadb/:
На этой странице вы увидите много разных серий, но если на это нет специфичных причин, просто скачайте версию из последней серии — для этого нажмите зелёную кнопку.
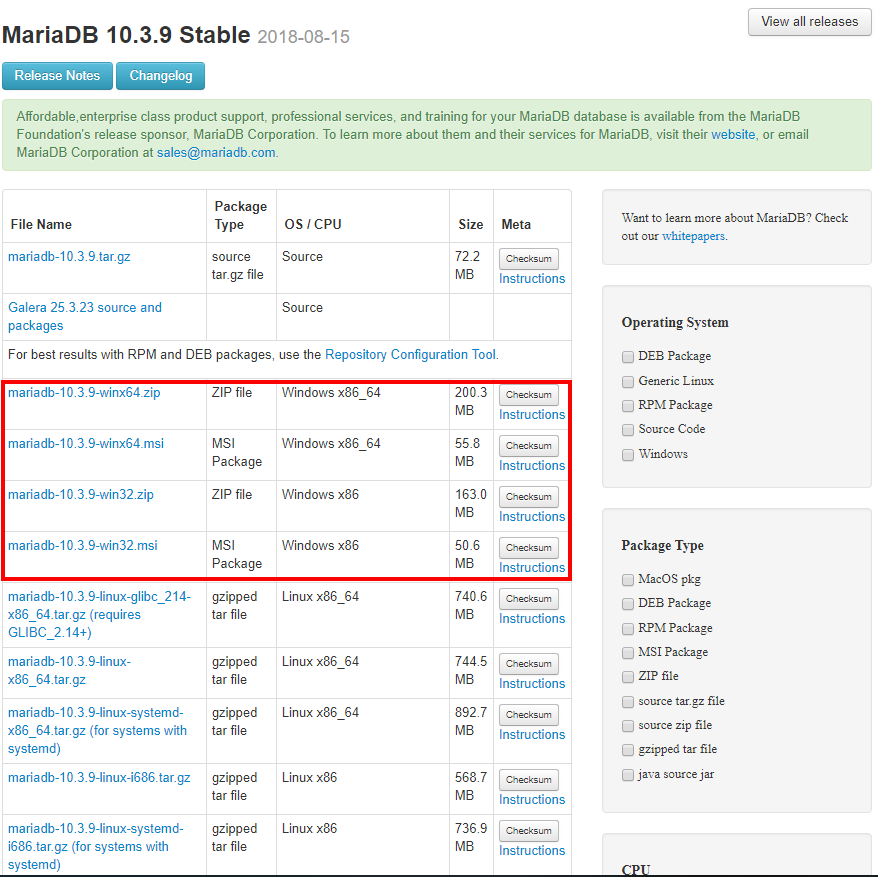
Версии MariaDB под Windows содержат в названии win, всего для скачивания доступно четыре файла. Они различаются битностью:
- x64 — 64-битная версия
- 32 — 32-битная версия
И способом развёртывания:
- .zip — архив с MariaDB
- .msi — установщик MariaDB
Битность выберите в соответствии с вашей операционной системой. Что касается скачивать архив или установщик, то я бы рекомендовал первый вариант, поскольку я размещаю исполнимые файлы и файлы данных в разных папках — это удобно при создании резервных копий. Также можно, например, вынести базы данных на отдельный диск.
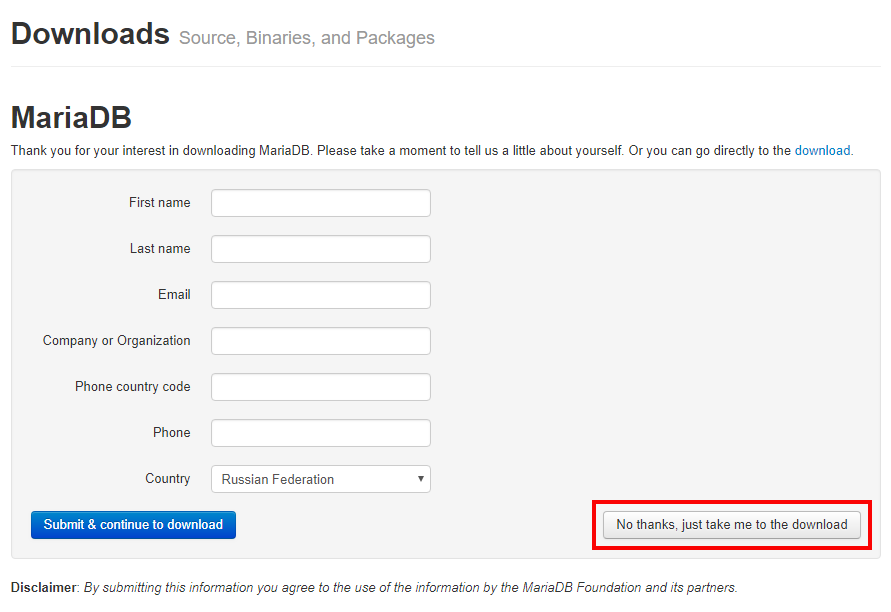
Вы можете ввести данные о себе, либо просто нажать кнопку «No thanks, just take me to the download» для начала загрузки:
Как установить MariaDB в Windows
Я покажу на конкретном примере — у вас, может быть, будет другое расположение СУБД и баз данных, поэтому вам нужно будет подредактировать команды — заменив пути на свои.
Итак, я хочу, чтобы исполнимые файлы были размещены в папке C:Serverbinmariadb, для этого я распаковываю скаченный архив и папку C:Serverbinmariadb-10.3.9-winx64 я переименовываю в C:Serverbinmariadb.
Теперь по умолчанию мои базы данных размещались бы в папке C:Serverbinmariadbdata, но я не хочу размещать базы данных в том же каталоге, что и исполнимые файлы — так я могу делать резервные копии исполнимых файлов или резервные копии баз данных независимо друг от друга. Поэтому я в папке C:ServerdataDB создаю новую подпапку data для файлов баз данных. То есть получается была создана папка C:ServerdataDBdata.
В папке с СУБД (у меня это C:Serverbinmariadb) создайте файл my.cnf и скопируйте в него:
[mysqld]
datadir="c:/Server/data/DB/data/"
Обратите внимание, что у меня путь до файлов баз данных c:/Server/data/DB/data/, если у вас другое значение, то вставьте его.
Для установки и запуска службы откройте командную строку от имени администратора:
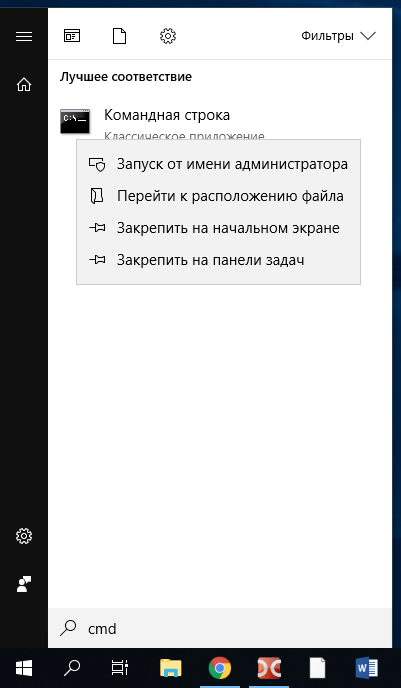
и выполните команды:
C:Serverbinmariadbbinmysql_install_db.exe --datadir=C:ServerdataDBdata
C:Serverbinmariadbbinmysqld --install
net start mysql
Дополнительную информацию вы найдёте в статье «Установка MariaDB в Windows. Переход с MySQL на MariaDB в Windows».
Связанные статьи:
- Как обновить MySQL (100%)
- Как обновить MariaDB в Windows (100%)
- Как сделать резервную копию баз данных MySQL (MariaDB) в Windows без phpMyAdmin (100%)
- Как сбросить пароль root MySQL или MariaDB в Windows (100%)
- Как в phpMyAdmin поменять настройки экспорта по умолчанию (100%)
- localhost (RANDOM — 50%)
In this MariaDB tutorial, we will learn, how to install MariaDB in windows, Linux, and Ubuntu. Also, we will see how to uninstall MariaDB step by step on different Operating Systems like Windows, Linus, Ubuntu, etc.
Additionally, we will cover the following topics
- Downloading MariaDB
- MariaDB Installation and Configuration on Windows
- MariaDB installation on Linux step by step
- MariaDB installation in Ubuntu
- Uninstall MariaDB from Windows
- Uninstall MariaDB from Linux
- Uninstall MariaDB from Ubuntu
- MariaDB Installation error setup wizard ended prematurely error
Downloading MariaDB
To download MariaDB, go to the official page and select the latest version to download: Download MariaDB
The MariaDB software is managed by the MariaDB Foundation whose headquarters is in Finland and the United States Of America.
MariaDB Installation and Configuration on Windows
Let us see step by step how to start the installation of MariaDB in Windows operating system.
To start the installation of MariaDB on Windows, you need to follow these steps:
Step 1 – Double-click on the installer to start the installation process.

Step 2 – Accept the End-User Agreement and click the Next button.

Step 3 – Select the way we want to start the installation of the features and choose the directory that stores the MariaDB files and click on the Next button. The default location on windows is C:Program Files MariaDB 10.6

Step 4 – Create a password for the Root user account. You will later use this password to access MariaDB Server. The root user is the default user which has all the privileges
If you don’t want the root user to log in from remote machines, uncheck the Enable access from remote machines for 'root' user
The Use UTF8 as default server's character set the option allows us for using the UTF8 character set while creating new databases and tables.
Once you select all the options, click on the Next button to go to the next step.

Step 5 – In this step:
Firstly, install MariaDB as a service by clicking on Install as service and it will allow you to change the name of the service.
Secondly, you need to configure the port for the MariaDB. By default, it uses 3306 but you can change the port if you want.
Thirdly, specify the parameters InnoDB engine including Buffer pool size and Page size. 16KB is suitable for most of the databases.
Finally, click on the Next button to go on to the next step.

Step 6 – Click Install to start the installation.

It may take a few minutes to complete depending upon the system.

Step 7 – Click on the Finish button to complete the MariaDB installation.

Now, you can find MariaDB tools in the Start menu.
This is how to start the installation of MariaDB on windows OS.
Read How to Create Table in MariaDB
MariaDB installation on Linux step by step
Now, let us see how to start the installation of MariaDB on Linux.
To start the installation of MariaDB on Linux, you need to follow these steps:
Step 1 – Check the Linux version by using the below command before we download MariaDB.
ALTER TABLE gadgets
ALTER COLUMN location TYPE VARCHAR,
ALTER COLUMN description TYPE VARCHAR;
Step 2 – Create or edit already existing MariaDB.repo using the below command.
# vi /etc/yum.repos.d/MariaDB.repoAfter running this command, we will see whether there is any content inside that repo if there is no content in it. Then, you need to copy the below commands in that file.
[mariadb]
name = MariaDB
baseurl = http://yum.mariadb.org/10.2/centos7-amd64
gpgkey=https://yum.mariadb.org/RPM-GPG-KEY-MariaDB
gpgcheck=1
Save the file with:wq!
Step 3 – Now, install the MariaDB Server and MariaDB Client using this command.
# sudo yum install MariaDB-server MariaDB-clientThis may take time depending upon the machine.
After the completion of the installation, if you want to check whether the service has started or not. To check this you need to use #cd/var and #cd/lib commands. If mysql is present then the installation went right.
Step 4 – To start the MariaDB service, use the below command.
# sudo systemctl start mysqlNow you can use the below command to see whether the service has started or not.
# sudo systemctl status mysqlStep 5 – Run the secure installation by using the below command to configure the root password and other features. Then, you can set a new root password and other features.
# sudo mysql_secure_installationStep 6 – Now, login to MariaDB using Root using the below command.
# mysql -uroot -pThe installation of MariaDB in Linux has been completed.
Read MariaDB Vs SQL Server
MariaDB installation in Ubuntu
Let us see, how to start the installation of MariaDB in Ubuntu.
There are two ways in Ubuntu by which we can install MariaDB
- Install MariaDB using Ubuntu Repository
- Install MariaDB using MariaDB Repository
Installing MariaDB using Ubuntu Repository
For installing MariaDB Server in Ubuntu using the Ubuntu repository, follow the given steps provided below:
Step 1 – In this, we need the package index to be updated. For that, you need to run the statement.
sudo apt updateYour packages are updated after executing this command.
Step 2 – After the list of packages has been up-to-date, you should now start installing MariaDB by running the statement.
sudo apt install mariadb-serverWe may be asked to enter the credentials for the user.
Step 3 – Service of MariaDB will automatically start. However, we can check the status after executing the below query.
sudo systemctl status mariadbThe status will be running and active.
To check the MariaDB version that is installed, you can execute the below statement.
mysql -VThe output of the statement will be the MariaDB version installed and it is the confirmation that we have installed MariaDB successfully on Ubuntu.
Install MariaDB using MariaDB Repository
MariaDB repositories have the latest MariaDB version. Before initiating the process of installation, we must have a look at the MariaDB official website and verify the latest MariaDB version.
To start the installation of MariaDB in Ubuntu using the MariaDB repository, follow the steps provided below:
Step I – In this step, you need to run the below command for adding the GPG key of MariaDB with Ubuntu.
sudo apt-key adv --recv-keys --keyserver hkp://keyserver.ubuntu.com:80 0xF1656F24C74CD1D8Step II – After the key is imported, execute the statement for adding the repository of MariaDB.
sudo add-apt-repository 'deb [arch=amd64,arm64,ppc64el] http://mirrors.accretive-networks.net/mariadb/repo/10.3/ubuntu bionic main'If we encounter an error stating “add-apt-repository command not found”, we need to start the installation of the “software-properties-common” packages.
Step III – Before the installation of any other packages present in the repositories of MariaDB, we should keep the package lists updated. For this, you need to execute the below statement.
sudo apt updateStep IV – After adding the repository, we need to execute the below command to start the installation of the package of MariaDB.
sudo apt install mariadb-serverStep V – Although, the service automatically starts, to check the status, execute the below statement.
sudo systemctl status mariadbThe status will be running and active.
Step VI – To verify the MariaDB version installed on our PC, we need to run the below command and it will also ensure that the installation is completed successfully.
mysql -VRead How to Grant User Access to a MariaDB Database
Uninstall MariaDB from Windows
There are several methods to uninstall MariaDB from Windows. Some of them are mentioned below.
Method 1
When any new piece of program is installed on your computer, that program is added to the list of Programs and Features. You can uninstall the program from that list. To uninstall MariaDB from your computer follow the steps
Step 1 – Press the Windows and X keys together to open a menu and click on Apps and Features at the top of the menu.

Step 2 – Then, Setting Window will open, and in that window, you need to click on Programs and Features present in the top-right corner.

Step 3 – You will see the list of programs installed on your computer. You need to select MariaDB and then click on Uninstall Button.

Method 2
In this method, you only need to go to the installation file of MariaDB and find uninstall.exe or unins000.exe. Then, you need to double-click on it and follow the wizard to uninstall MariaDB.
Method 3
In this method, you need not uninstall MariaDB manually as it does not remove it completely. So, it’s recommended that you uninstall MariaDB with a trusted third-party uninstaller that can identify and remove all files of MariaDB.
Note – If nothing works, then we can uninstall MariaDB via System restore by choosing a Restore point. But, you need to backup your data that was created or installed on your computer after the installation of MariaDB.
Read How to Create Database in MariaDB
Uninstalling MariaDB in Linux
Step 1 – For uninstallation of MariaDB in Linux CentOS, you need to run the below command
sudo yum remove MariaDB-server MariaDB-clientWhen you don’t have a MariaDB client, then you run the above command without MariaDB-client.
Step 2 – The process of uninstallation does not erase the data directory /var/lib/mysql. For future use, we can leave it for further use. Otherwise, we can remove it by using the below command.
sudo rm -r /var/lib/mysqlUninstall MariaDB from Ubuntu
To delete MariaDB completely from your computer, you need to follow these steps.
Step 1 – Before the process of uninstallation, you need to see the status of MariaDB and the version of MariaDB by running the statement.
systemctl status mariadbStep 2 – In this step, you need to run the purge command to erase the package of MariaDB.
apt purge "mariadb*" -yStep 3 – Now, run the autoremove command to completely delete the configuration files.
apt autoremove -yStep 4 – To verify that the uninstallation is successfully completed, you need to check the status of the MariaDB service.
systemctl status mariadbThe output of this command will ensure you the uninstallation of the MariaDB service.
Read: MariaDB Not Between
MariaDB Installation error setup wizard ended prematurely error
Here we will illustrate 2 methods to resolve the MariaDB Installation error setup wizard ended prematurely error.
First method
This kind of problem occurs in the system while installing the MariaDB application because some of the libraries don’t exist in the system that MariaDB uses. So before installing MariaDB make sure that the Microsoft Visual C++ 2015-2019 Redistributable existing in your system.
- If not, download the setup file from Microsoft’s official website. And install it before installing the MariaDB.

- Go to the installed app section of your windows system, check that the above application is installed or not as shown in the below images.

Now follow the below steps to install the MariaDB.
- First double-click on the MariaDB setup to begin the installation and as a window appear for installation click on
Nextbutton.

- Accept the
End-User License Agreementby checking the marked box and clicking onNextbutton.

- Leave everything as default and click on
Nextbutton.

- Now as a window appear for
User setting, then enter the new password for the user in the box in front of the fieldNew root password. - And again enter the same password to confirm that password in front of the field
Confirm. Click onNextbutton to proceed with the installation.

- A window
Database settingappears to set the service name and port. Make changes according to your need otherwise leave it as default and click on Next the button.

- Click on
Installbutton to install the MariaDB in the below picture.

- Click on
Finishthe button to complete the installation.

Second method
If the above steps don’t work then follow these steps.
- Press
Windows key + Rand type the below command in that box and hit Enter.
services.msc
- Then
Servicea window appears that contain all the running services on your system, then scroll down and search for the service nameWindows Installerand click onStartbutton to start this service.

- After starting the service
Windows Installer, open thecommand-lineas an administrator by clicking onRun as administrator.

- As the command-line opens, type the below command one by one and hit the
Entera button from your keyboard.
msiexec /unreg
msiexec /regserver
- After running the above command in the command line, restart your computer. Then again open the command-line as an administrator by clicking on
Run as administrator. Type the below command.
regsvr32 vbscript.dll
After running the above steps, Now install the MariaDB on your system.
This is how to solve the MariaDB installation error.
You may like the following MariaDB tutorials:
- How to create a user in MariaDB
- MariaDB DATEDIFF Function
- MariaDB Create Sequence
In this tutorial, we have learned about the installation and uninstallation of MariaDB. Additionally, we have covered the following topics
- Downloading MariaDB
- MariaDB Installation and Configuration on Windows
- MariaDB installation on Linux step by step
- MariaDB installation in Ubuntu
- Uninstall MariaDB from Windows
- Uninstall MariaDB from Linux
- Uninstall MariaDB from Ubuntu
- MariaDB Installation error setup wizard ended prematurely first method
- MariaDB Installation error setup wizard ended prematurely second method
I am Bijay having more than 15 years of experience in the Software Industry. During this time, I have worked on MariaDB and used it in a lot of projects. Most of our readers are from the United States, Canada, United Kingdom, Australia, New Zealand, etc.
Want to learn MariaDB? Check out all the articles and tutorials that I wrote on MariaDB. Also, I am a Microsoft MVP.