|
На сайте c 31.03.2018 |
08.09.2018 20:01
Здравствуйте. После самовольного обновления Windows Marvelous Designer вылетает через пару секунд после запуска (или при попытке повернуть во viewport простой прямоугольник). Ошибку не пишет, просто закрывается. Программу переустанавливала, версию меняла. Никак. Есть идеи? |

|
На сайте c 16.02.2015 |
08.09.2018 20:58
CLO3D а Marvelous будет вылетать. По разным причинам. почините эту, будет другая. Сам сижу на Win 10 и Marvelous 7 более менее стабильно, но вылеты бывают. Пока спасает автобеки, но если случиться, что не спасут, тут же перейду на CLO3D |

|
На сайте c 31.03.2018 |
08.09.2018 22:05
Сделала откат Windows — все заработало. Видимо не совместимо с обновлениями было. А в чем разница между этими программами? |
|
На сайте c 16.02.2015 |
08.09.2018 22:18
Цитата alla.gribal: А в чем разница между этими программами? Marvelous это урезанная CLO3D |
|
На сайте c 06.05.2014 |
08.09.2018 22:39
Ошибки фиксируются в журнале событий, от админа п робовали запускать программу? |

|
На сайте c 31.03.2018 |
08.09.2018 23:54
Цитата shinodem: Ошибки фиксируются в журнале событий, от админа п робовали запускать программу? Да, и совместимость меняла и устранение проблем запускала. Помог только откат обновлений виндоус. |
|
Репутация: 0
На сайте c 31.03.2010 |
18.09.2018 20:27
Здравствуйте. Проблема с вылетом Marvelous остаётся причем установил CLO3D тоже самое вылетает также не сказав ничего и не выдав ошибки ..просто сворачивает программу. Расскажите как справились с проблемой. пробовал удалить все обновление винды (W10) не помогло..Пробовал поставить Marvelous 6 то же не помогло вылетает как и 7. |
|
На сайте c 31.03.2018 |
18.09.2018 20:32
Цитата utesov: Здравствуйте. Проблема с вылетом Marvelous остаётся причем установил CLO3D тоже самое вылетает также не сказав ничего и не выдав ошибки ..просто сворачивает программу. Расскажите как справились с проблемой. пробовал удалить все обновление винды (W10) не помогло..Пробовал поставить Marvelous 6 то же не помогло вылетает как и 7. Мне помог именно откат обновлений, я их не удаляла. |
|
Репутация: 0
На сайте c 01.12.2017 |
14.10.2018 18:16
тоже самое,отката обновлений нет,а удаление не помогает.. |
|
На сайте c 07.06.2018 |
08.11.2018 22:27
Мне вроде помог запуск от имени администратора, ошибок стало гораздо меньше, самовольно закрываться и сворачиваться перестал |

|
На сайте c 06.12.2018 |
07.05.2019 21:05
User settings — Graphic Options — Use VBOs (снять галочку). Должно решить проблему |
|
На сайте c 31.08.2016 |
13.07.2019 22:23
В общем … снял галочку Use VBOs и запустил в режиме совместимости с Windows7( у самого десятка MD 8 ) и пока работает без нареканий… возможно галочку Use VBOs снимать и не нужно , я её когда снял все ровно вылетала … Удачи |

|
На сайте c 16.04.2008 |
17.07.2019 12:58
Dmytriy888 Хз, что это значит, но вроде помогло. Спасибо) |

|
На сайте c 31.07.2019 |
18.09.2019 19:02
В общем программа так же вылетала при малейшем нажатии на любой объект, есть такая функция запустить с графическим процессором, помогло |

|
На сайте c 18.02.2019 |
23.11.2019 16:38
Попробуйте при первом запуске Marvelous (у меня 8 версия) по мимо выбора языка и управления, открыть графические настройки ( чуть ниже нужно развернуть список) там снять галочку о которой писали выше VBOS и поставить 32x. Боюсь сглазить, но сейчас не было вылета. Уже часа полтора-два работаю. В совместимость с 7 или 8 виндой не переводил. Язык русский стоит и управление от 3ds max’a. |

|
Репутация: 0
На сайте c 30.12.2011 |
21.12.2019 20:37
Gleb#29подтверждаю,,,работает,,,с галочкой работой, даже без совместиости. Спасибо. |


|
На сайте c 12.01.2016 |
03.08.2020 17:13
Спасибо! Помогло!!! Цитата Dmytriy888: User settings — Graphic Options — Use VBOs (снять галочку). Должно решить проблему |


Обновление (05.11.2018): ВАЖНО! всё содержание этой статьи применимо к 3-тей, 4-той, к 5-той версии Marvelous Designer и к 6-той, к седьмой и восьмой версиям.
Обновление (22.01.2015): добавил картинку (в конце статьи), где искать параметр Number Of CPU In Use, который отвечает за количество ядер, которые принимают участие в симуляции ткани (по умолчанию там стоит значение 4). И если у вас больше, чем четыре логических (не физических) ядер, то нужно этот параметр увеличить.
Обновление (03.04.2014): добавил исследований по новым параметрам.
В этой статье я поделюсь теми наблюдениями (ставшие для одних советами, а для других были до этих пор секретами 😉 ), которые помогли мне более эффективно симулировать одежду в Marvelous Designer 3 (MD3).
Наверное, это многих раздражает, что MD3 не использует во время симуляции все ядра на 100%. И если вы уже нашли параметр Number Of CPU In Use (картинка, где его искать в конце статьи) и поставили там значение, равное количеству логических ядер у вас на компе, а ядра всё равно не загружаются на 100%, то продолжайте читать. А если еще не нашли, то сначала найдите и порадуйтесь разнице 🙂 , а потом тоже продолжайте читать.
Оказывается, ядра начнут загружаться максимальнее, если уменьшить расстоянием между частицами (Particles distance), что означает, что мы увеличим количество полигонов.
В теории, кажется, что если увеличивать количество частиц до определённого момента, то можно достичь увеличения качества симуляции бесплатно, за счёт неиспользуемых ядер. Но проделав эксперименты, я доказал, что это не так. Смотрите сами.
Исследование параметра Particles distance.

Это график зависимости времени симуляции в MD3 от количества полигонов на ткани.
Эксперимент я проделывал вот на такой одежде на настройках Complete:

В обычном состоянии (когда нету никаких глюков, выворотов, взрывов и запутываний ткани) для вышеприведённой одежды с расстоянием между частицами (Particles distance) 5 мм, MD3 кушает 1.4 ГБ оперативки и 40% процессора (спецификация моего компа) на всём процессе симуляции.
Таким образом, я выяснил, что чем больше полигонов в одежде, тем больше процессора и тем больше оперативной памяти кушает Marvelous Designer 3.
Причём зависимость (как вы видите на графике выше) степенная
Y = 1400/X2.6,
где
- Y — время симуляции.
- X — расстояние между частицами.
- 1400 — это коэффициент для моей одежды (у вас он будет другим).
Т.е., если грубо, то расстояние между частицами нужно умножить само на себя три раза, чтобы понять на сколько увеличится время симуляции.
К примеру, если расстояние между частицами было 10 и, соответственно, время симуляции Y = 1400/(10*10*10) = 1,4 секунды, то, при уменьшении расстояния между частицами в два раза (до 5), время симуляции одного кадра возрастёт до Y = 1400/(5*5*5) = 11 секунд!
Время выросло в восемь(!) раз, хотя расстояние между частицами уменьшили только в двое.
Вывод: с параметром Particles distance нужно быть осторожным.
Влияние параметра Number of Simulation на скорость симуляции.
В настройках качества симуляции есть параметр Number of Simulation, который отвечает за количество проделанных симуляций за один кадр. По умолчанию там стоит значение 5. Это значит, что между каждым кадром MD3 будет симулить поведение вашей одежды пять раз. Потом он эти поведения усредняет и показывает вам усреднённое значение.
Таким образом, накручивание этого параметра помогает (в теории) избавится от мелкого дрожания 3D ткани. На практике это тоже есть, но эффект очень незначителен (или просто у меня попадались такие случаи, что я разница была не очень большой).
Вот график зависимости скорости симуляции одежды от параметра Number of Simulation.

Формула получается линейная:
Y = 0.95*X + 5,
где
- Y — время симуляции.
- X — количество симуляций (Number of Simulation).
- 5 — коэффициент для моей одежды (у вас он будет другим).
Вывод: количество симуляций — это и есть ИМЕННО КОЛИЧЕСТВО симуляций. Т.е. если было 5, а вы сделали 10 (увеличили в два раза), то и время симуляции увеличится в 2 раза.
Влияние параметра Self Collision Iteration Count на скорость и качество симуляции одежды.
Похоже, что Self Collision Iteration Count — это самый неоднозначный параметр.
Во-первых, его значение можно поставить от 1 до 10, но MD3 не запоминает значение этого параметра выше 5. (и это также видно на графике ниже)
Во-вторых, его увеличение не всегда приводит к улучшению симуляции, а иногда даже наоборот.
График скорости имеет приблизительно логарифмический вид. Это значит, что сначала время симуляции растёт, а потом, начиная с некоторого значения — перестаёт расти, как бы сильно вы этот параметр не увеличивали:

По идее, этот параметр призван улучшить симуляцию в тех местах, где ткань взаимодействует сама с собой. И поскольку увеличение этого параметра даётся нам почти даром, то я очень часто накручивал его до максимума. Но потом понял, что качество симуляции от этого не выигрывает.
Ткань начинает импульсивно взрываться, если есть места, где ткань зажуёт меш аватара (в подмышках или в локте), при накрученном параметре Self Collision Iteration Count до 5 и больше. А при Self Collision Iteration Count 1 такого не происходит. Т.е. эти ошибки заживывания ткани игнорируются.
А на практике, обычно, так и бывает — куча проникновений меша в меш. Поэтому, чтобы ткань не взрывалась, пытаясь вытащить себя из себя же, я держу этот параметр на единице.
На видео ниже видны такие взрывы:
Вывод: параметр количества самопроникновений стоит накручивать (максимум — это 5, дальше можете не увеличивать, я думаю, что больше пяти он физически не работает), только если вам все другие методы не помогли и вы уверены, что у вас аватар не зажёвывает ткань.
Почему MD3 зависает и как с этим бороться.
Я заметил, что когда с тканью случается глюк (её где-то между мешем защемило и она начинает запутываться или её «рвёт» слишком резкое движение аватара), то программа вешает всю систему (т.е. все ядра работают на 100%), а еще бешено и непрерывно растёт потребление оперативной памяти.
Если вы видите подобные симптомы у себя, то можете сразу убивать процесс MD3_Personal_x64.exe. Шанс, что вы сможете остановить такую симуляцию почти нулевой.
Чтобы избежать этого, нужно тщательно следить за кучей факторов. Я приведу некоторые из них. Наиболее глючные сверху.
- чтобы ткань на защемляло между мешем;
- если происходит защемление, то чтобы параметр Self Collision Iteration Count был равен 1;
- чтобы аватар никакой своей частью не двигался очень резко;
- чтобы совпадал номер слоя для соприкасающейся ткани;
- чтобы не было большой разницы плотности полигонов соприкасающихся тканей;
- чтобы не использовались без крайней необходимости параметры Srinkage Weft и Warp (сжатие и расстяжение ткани по горизонтали и вертикали);
- чтобы не использовался без крайней необходимости параметр эластичности (бывает лучше сильно завысить силу трения, чем стянуть одежду резинкой).
Number Of CPU In Use (сколько ядер использует MD4 для симуляции)
Обязательно поставьте параметр Number Of CPU In Use равным количеству логических ядер в вашей системе. К примеру, у меня вот такой процессор. В нём 6 физических ядер, но 12 логических. Соответственно, я выставляю Number Of CPU In Use = 12. Поскольку, по умолчанию, там стоит число 4:
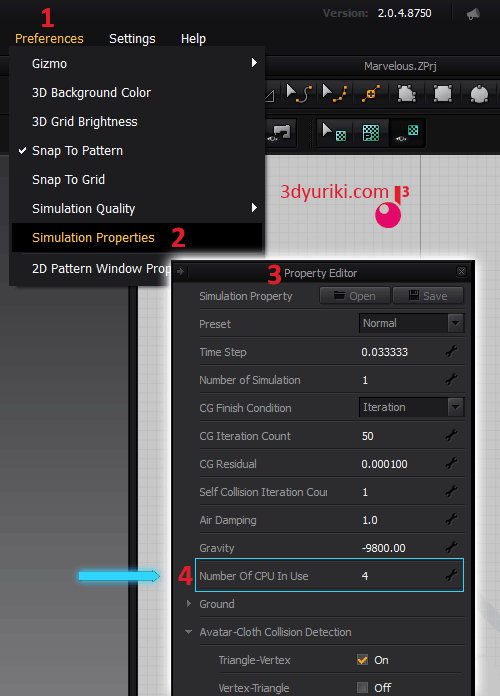
Чтобы найти параметр Number Of CPU In Use, нужно в меню Preferences нажать Simulation Properties, тогда откроется панель Property Editor, где он и находится.
Статья еще пишется. Заходите позже, чтобы узнать все секреты 😉
P.S. Девушка на заглавной картинке сделана мексиканским 3D художником Carlos Ortega Elizalde в Marvelous Designer 2 и Maya 2013 (текстуры в Mudbox, а рендер — Mental Ray). Оригинал смотрите там.
Подпишитесь на обновление блога (вот 3 причины для этого).
Вам понравилась статья? Хотите отблагодарить автора? Расскажите о ней друзьям.
Или подпишитесь на обновление блога по E-Mail.

Marvelous Designer – программа от разработчика CLO Virtual Fashion Inc для дизайнеров одежды. Необыкновенно реалистичный конструктор моделирования одежды.
Утилита:
- реалистично передает структуру ткани;
- выстраивает модели в 3D формате;
- имеет широкий инструментарий, что очень точно обтекает формы модели в виртуальном режиме.
Скачать бесплатно Marvelous Designer 12 Personal 7.1.143.41692 + crack
Инструкция по активации
- Перед установкой рекомендуется удалить все предыдущие версии, почистив реестр. Отключить интернет и антивирус. Установить программу
- Поместить файлы из папки Crack с заменой в папку с программой
[свернуть]
Пароль ко всем архивам: 1progs
С помощью интегрированных лекал, шаблонов, принятых видов швов, 3D драпировки и формате ламинального шитья можно создать модель разной сложности. Приложение содержит опцию анимации, с которой можно взаимодействовать в любое время производственного процесса. С помощью анимации модель и ее позу можно перемещать в любое удобное положение.
В качестве манекена можно использовать базовый шаблон или же загрузить модель из другой программы, где та была предварительно создана. После того как определен вид ткани, программа выбирает реальные функции ткани, такие как намокание, плотность, сминаемость, растяжимость.
Утилита позволяет чертить кривые, совмещать части, работает с резинкой. Для этого приложения нужны мощные системные возможности. Скачать приложение на русском языке бесплатно можно на этой странице.
Аналоги программы вы всегда можете найти в наших подборках:
Всем добрый вечер!
Аватар при смене поз пробивает ткань рукой, а при проходке рвет.
Оперативку поднял до 16гб — не помогает.
Где-нибудь в физических свойствах ткани это настраивается?
Это совершенно отдельная стихия)))
Поскольку ,так получилось,что в основном,в последнее время занимаюсь , именно анимированием,и просчетом одежды в движении, могу вставить свои пять копеек.)))
Во-первых, с родными аватарами Клоши, практически нету проблем. Грех жаловаться.
Ну а если,все-таки придется иметь дело, со сторонней анимацией, и сторонними аватарами соответственно, надо выбирать, более качественные, моушены, где конечности аватара,при движении имеют , минимум прикосновения к телу.
А если все-таки, каким -то образом, не удается найти таковых, и неизбежно надо отработать именно этот моушен, то важно осознать, что в итоге ,на выходе ценен,только конечный результат, конечное видео.) И не стоит пытаться копаться в настройках ткани Клоши,для решения проблем..есть другие редакторы. У Клоши,в приоритете,несколько иная задача.
В проблемных случаях, я лично останавливаю , и запускаю режим симуляции именно в том моменте , затем просчитываю, в другом слое, начиная с того момента. Важно получить чистый просчет ,именно в низкой плотности, добавляя плотность,только в исключительных случаях, поскольку чем ниже плотность, и просчет шустрее . Потом можно ,и лучше запечь текстур у, в том же Браше, с Hi-poly, и для анимации самое то,если планируется серьезный рендер.У кого с железом порядок, в принципе проблем не должно быть с высокой плотностью. Мой I7 -4770 c 16-ГБ в принципе неплохо справляется.

Новости и Статьи
Программы
Игры
Драйверы
Техника
Форум
Логин
Windows
Android
Apple iOS
Mac OS
Мультимедиа
»
Графика
»
Редакторы 3D
»
Marvelous Designer 10
»
Вопросы
Форум
![]()
Скачать
Версия для
Windows
- Главное
-
Отзывы
(1 )
-
Вопросы
(3 )
-
Обсуждение
(1 )
-
Ссылки
(2 )
Вопросы и ответы по «Marvelous Designer 10»
Задать вопрос
Новые
Популярные Обсуждаемые Без ответов С плохими ответами
Что значит срок действия лицензии истек? Я же качала бесплатную программу?
11.09.2021 18:04
132
Гость
1
Подскажите пожалуйста, где регистрироваться, чтобы войти в программу?
05.09.2021 10:17
96
катерина
1
Здравствуйте, спасибо за удобное скачивание программ. У нас 64-разрядная система, есть ли Marvelous для нее?
06.11.2019 09:25
33
Гость Ксения
2
Задать вопрос
Repetitor3d.ru
3d графика и дизайн

Проблемы при установке 3ds max: 8 основных причин с решениями
Возникли проблемы с установкой 3d max? Спешим на помощь: мы выделили 8 основных причин, по которым программа не хочет устанавливаться, и описали решения.
Ошибка 1603
Наиболее часто при установке 3д макс на операционную систему Windows возникает ошибка 1603. Причем относится она не к продукту Autodesk, а к самой операционной системе, и может появляться при установке абсолютно любых программ на виндовс. Ниже перечислены основные причины, по которым можно столкнуться с ошибкой 1603.
Нет прав администратора
Пользователь, с учетной записи которого ведется установка, не обладает доступом администратора. Чтобы установка любых программ проходила без ошибок, заходим в Панель управления — Учетные записи и меняем тип учетной записи на «Администратор».

Папка Windows Temp переполнена
Эта папка содержит временные файлы, помогающие софту устанавливаться и запускаться. Возможно, на момент установки, каталог Temp переполнен или включает в себя файлы, конфликтующие с установочными файлами 3d-редактора. Чтобы почистить папку Temp:
- Кликаем ПКМ на диск, на который установлена ОС, выбираем «Свойства», жмем кнопку «Очистка диска».

- Отмечаем галочкой временные файлы и жмем ОК.


Недостаточно места на диске
Еще одной причиной, почему не устанавливается 3d max, может быть недостаточное количество места. Причем свободное место должно быть не только на диске, на который ведется установка, но и на корневом — оно требуется для распаковки файлов. Проверьте, возможно, не хватает места на диске C. Поздние версии 3d max в среднем весят около 3 Гб, но для установки нужно не меньше 6 Гб.

Файлы были повреждены при извлечении
Иногда правильному извлечению файлов мешают другие программы. Перед тем как устанавливать софт, следует закрыть все вкладки браузера, текстовые редакторы, запущенные утилиты, и, самое главное, программы-антивирусы.
Отключено создание краткого имени файлов
Иногда 3д макс выдает ошибку при установке, потому что на компьютере не включена возможность создания сокращенного имени файла. Включить эту функцию можно таким образом:
- Прописываем в строке поиска кнопки пуск «Regedit». Запускаем редактор реестра.
- Выбираем HKEY_LOCAL_MACHINE — SYSTEM — CurrentControlSet — Control – FileSystem. Открываем файл NtfsDisable8dot3NameCreation.
- Прописываем значение «0», жмем Ок. Изменения вступят в силу после перезапуска системы.


После того как 3d-редактор успешно установился, лучше вернуть исходное значение реестра по тому же принципу.
Другие проблемы при установке
Есть и другие причины, почему программа может не устанавливаться.
Устаревшее «железо»
Старое «железо» работает на 32-битных ОС, современные же программы требуют более высокой разрядности. Так, версии 3д макс, начиная с 2014, рассчитаны исключительно на 64-битные системы Windows. Потому перед установкой рекомендуем ознакомиться системными требованиями для работы в 3ds maх.
«Битый» архив
Если у вас не получается установить 3ds max, возможно, еще на этапе скачивания произошла ошибка и какие-то компоненты просто не докачались. На данный момент есть отличная возможность пользоваться полностью официальной версией программы, с которой не должно возникнуть никаких проблем при скачивании и установке. Рекомендуем попробовать поставить студенческую версию. Как установить лицензионный софт бесплатно читайте тут.

Проблема с Windows
Если все перечисленные решения не помогли вам программу установить и спокойно работать с ней, быть может, поможет полная переустановка ОС. Если ваш ноутбук или стационарный компьютер уже давно «зарос» мусором и ошибками, то именно это и мешает правильной установке. Способ радикальный, но довольно верный, и многим помогает, если ничего другое не работает.
Источник
как установить 3ds max на Windows 10?
![]()
кто что знает? помогите
вылетает при запуске, в логах ‘LICENSING ERROR’

![]()
![]()

Возможно проблема с FLEXnet Licensing Service. Проверьте запущена ли эта служба

В папке, той что делает ПО народным, есть readme.* открываете его и по пунктам ставите. Если что-то не работает, повторяете с первого пункта до тех пор, пока не начнет работать так, как Вам нужно. Если не можете, покупаете лицензию и задаете вопросы разработчикам.
Попробуйте другую сборку.
![]()

а зачем вам 2018? ставьте уж 2019, его можно поставить с офсайта, месяц проработает исправно, потом можно и крякнуть если что

ссылку не подскажу, так как пользуюсь 2016-м )
Возможно, но, для меня, если установочники разного объема — это разные сборки, водной из них что-то удалено.
Источник
Windows 10 и 3ds max, совместимость.

Такая же тема была. Неделю мучился. Потом обновления пришли, и эта ошибка пропала.

Ребят, нужна помощь!
Проблема такая: на работе и дома с недавнего времени стоит WINDOWS 10, макс не вылетает, все работает в штатном режиме, НО постоянно слетают хоткеи, настройки интерфейса и боковые кнопки, и что еще хуже, все пути к текстурам и матам, т.е, через каждые 2-4 дня макс обнуляется до дефолтного состояния, и это очень сильно напрягает. У кого было что-то подобное и есть ли идеи как решить?


Так то в Win 10 все 4 окна к краям прикрепляются. Почему все про 2 пишут?


Ребят, нужна помощь!
Проблема такая: на работе и дома с недавнего времени стоит WINDOWS 10, макс не вылетает, все работает в штатном режиме, НО постоянно слетают хоткеи, настройки интерфейса и боковые кнопки, и что еще хуже, все пути к текстурам и матам, т.е, через каждые 2-4 дня макс обнуляется до дефолтного состояния, и это очень сильно напрягает. У кого было что-то подобное и есть ли идеи как решить?
Да, возможно может помочь решение , купить лицуху  . А так, ждите пока не придумают решение таких проблем. Сам столкнулся со многими проблемами при 10-ке. Да забыл сказать, на 10-ке не рекомендую ставить старые версии любых прог, ставьте самые последние. Рекомендую поставить 2016 макс или выше ). Да и в 10-ке винда работает с самой прогой, поэтому кряк может слитать постоянно, а вот потом уже после этого крякнуть будет большая проблема.
На работе лицензия Windows 10 и 3dsMax 2016 — проблема эта встречается, как решить не знаю, но особо не парюсь.
Пару раз в месяц 5-7 минут на перенастройку дефолта — уже привычно
На работе лицензия Windows 10 и 3dsMax 2016 — проблема эта встречается, как решить не знаю, но особо не парюсь.
Пару раз в месяц 5-7 минут на перенастройку дефолта — уже привычно
Печально тогда, на 7-ке конечно у меня проблем не было с максами. А вот с 10-ой прям не знаю что сказать, косяки за косяками.А я думал, что если лицуха, то проблемы с максом не должны быть, оказывается это не так 
strictdes4ydoSaxap на работе весь софт лицензионный, дома винда лицуха, макс нет, но косяки одни и те же


ох. Андроид свой молотком разбей или айфон, — а то он каждый метр твоего местоположения в пространстве мониторит и все твои личные данные на серверах гуглдрайв и клауд лежат, и это норм. Майкрософт, тоже думает о будущем своем, что старая модель монетизации уже не работает, она думает как денег заработать и развивать свой продукт. Ой да что я говорю ерись то какую, -нет же, она снимает тебя селфикамерой пока ты сидишь на толчке, а потом, а потом выложит в интернет!)
*это я к тому,что хватит кошмарить народ, всякими пугалками. Если так страшно, используйте линукс.
**гугл, эпл, майкрософт — все сотрудничают с АНБ, если они не сотрудничают с какими-то другими организациями, это лишь значит, что вашу жопу в душе увидит англоговорящий сотрудник, да и то потому что вы подписали видео «запрещенная тер. организация привет!».
***намного страшнее лазить в свой онлайн банк с галкой «сохранить пароль».

Mozart:
Слив базы
Пожизненный бан

Да я вон 4 папки в семёрке открыл, а вы про две тут)
Кстати, а процессор быстрее на 10ке не стал работать?
зачем так насиловать диск? разбивая его на части для разных потребностей? игры музыка и прочее? не пробовали на одном диске создать так же эти 4 папки? это же в разы удобнее если чо под музыку уходит место больше удалив ненужную игру освобождаете места. а тут у вас сколько сделали столько сделали. давно я такого маразма не видел))))

Перешел на вин 10 давно, сейчас стоит билд 1511 ,установлен макс 15 и 17, все прекрасно рендерится, все модельки в моем профиле делал под 10, не вижу сырости продукта о котором все только и пишут.
ps: встроенный защитник, и прочую ненужную фигню отключаю.
![]()
![]()

Поздравляю, вы сами создали себе проблему. Верните семёрку и не парьтесь.

![]()

Добрый вечер! Имеется проблема с 10-кой и Максом 2016, но сюда подходит любой софт.
Не сохраняются файлы на диск D: через меню Сохранить как.
А если точнее, то не сохраняются никуда кроме папок Users и внешних накопителей.
Приходится сохранять на рабочий стол, а потом копировать куда необходимо, но с правами Администратора.
Я так подозреваю, что проблема кроется в том, что макс запускается без прав админа.
Кто нибудь сталкивался с такой проблемой? И как ее решить?


Пытаюсь перейти на Windows 10 — Дубль №2. Проблема с UAC/Drag&Drop/Run as Administrator.
Что-бы не создавать новую тему. Процитирую.
Skorpionchik
Да-уж. Когда запускаю — 3Ds Max 2014, Photoshop CC 2015.5, ZBrush, PixPlant, UVLayout, Marvelous Designer, Google Chrome, Daemon Tools, да и вообще любой другой софт — «От Имени Администратора (Run as Administrator. )», то отваливается жизненно важная функция «Drag&Drop» файлов. Как исправить ?
На просторах интернета просто вагоны таки-же вопросов, кучи всяких вариантов решений (пробовал, не помогает). Вот хоть убейся а перетягивать файлы-сцен, текстуры, скрипты, файлы-геометрии — тупо нельзя из-за запуска «От имени администратора».
Получается сейчас есть несколько вариантов.
1.) Оставить UAC включенным. Но тогда возникают проблемы с некоторым софтом и его частями. Например (просто пример). В 3Ds Max-е без «Запуска от имени Администратора» НЕ работает «SigerShaders Material 2.5» а в Photoshop отваливается часть плагинов NikCollection и Topaz Labs.
2.) Отключить UAC через реестр. Отвал всего функционала Metro, половина ПО системы не запускается (даже калькулятор с пейнтом, едрить) + назойливые ошибки.
3.) Оставить UAC включенным. И запускать софт «От имени адмитристратора», теряя функцию «Drag&Drop» файлов.
Как-же быть с этой чертовой десяткой и всей этой телегой ?
Ну как починить SigerShaders, я еще нагуглил, но с остальным как быть — без понятия.
* Go to C:/Program Files/Autodesk/3ds Max 2014/Scripts/VMPP, right click vmpp.ini > Properties and then in the Security tab select all users one by one and give them full control of this file. No need to run max as admin now! *
P.S. Само собой всякие полу-меры, откат до предыдущих версий ОС, держать две ОС на компе — все это меня не интересует. Ищу именно решение проблемы с сохранением функционала ОС который привязан к UAC-у.
P. P. S. Проблема настолько обсуждаемая что среди сотен однообразных вопросов и ответов что по Русско-язычному региону поиска что по Англо-язычному региону поиска — найти (нагуглить) что-то путевое не могу. HELP 🙂 !
Источник
Here are some tips how to resolve and troubleshoot common Marvelous Designer issues that may arise.
If you go through all the Marvelous Designer tutorials in step-by-step workshops, you’ll see how to troubleshoot any issues that arise when making clothes.
However, if you didn’t purchase the workshops, or need quick reference, here’s a page with solutions for different common issues, common questions and some Marvelous Designer how to tips.
(As well as some links on the bottom to articles on how to export and work with MD clothes in other 3D programs.)
For any software related issues such as bugs, crashes etc, you must contact the Marvelous Designer support.
We cannot and do NOT handle such technical software issues.
Marvelous Designer Garment Files: How to Import a PSP / PPS / PREFS file?
“The fabric presets file is in PSP format. I don’t know how to open it or view it.”
PSP files are an MD fabric physical property preset. They control how the fabric hangs, simulates, and animates (from soft silk to hard leather).
You can use these presets for any garment, in any project, in any version of MD (above MD4).
The icons for these files are sometimes displayed as a file called “PREFS”. Some people call them PPS or PSP. It’s the same thing.
Please read our quick tip on importing Marvelous Designer Physical Property Presets into the program.
Watch our free tutorials on how to create clothing from patterns (including tracing patterns and importing physical property presets for the clothing).
If you are a total beginner we suggest you get our Mastering Marvelous Designer course for help using the program and to learn all about making clothes of any type. Garment Files are a ‘cheat’ to save lots of time and also help when learning to use MD but always best to have a strong fundamental understanding of how things work.
More info:
- Please read the text file that comes with your other Garment zip files:
https://cgelves.com/prod2del/md-garms/___GarmentFiles-Tuts-Tips-Resources-Troubleshooting.txt - Search our blog – use the search box at top right of the site.
Before scrolling down the page the main nav bar shows a ‘FInd it!’ so type your query into it and hit the enter key to find related posts and articles. - Browse through our blog categories/topics – there’s a lot of useful info to be found in there!
Questions to do with purchased Marvelous Designer Garment Files
What do I do with that ‘purewhite.jpg’ image file?
Often when I want to apply a shirring strip or a fabric weave to a part of the clothing without
effecting the color of the clothes, I first load in the ‘purewhite.jpg’ image as a texture and then apply
the Normal map over that. (You must load in some texture in order to apply a Normal map).
This way you can have a normal effect without the clothes colors changing.
If you’d like to apply a different texture, feel free to do so!
What do I do with that ‘transparency.png’ image file?
It is used as a texture on the Material Side (In the Fabric Property Editor) to hide visible edge lines when
using a PNG texture with transparency to create effects on the bottom of a clothing piece like lace, trims or torn edges.
TIP: What to do with clothes which have symmetry
Most of the time for shirts/ dress tops / jackets, I have two pattern pieces for the front which are
symmetric to each other. This is good if you need to make changes to the shirt, since any changes on the
left will reflect on the right.
Once you are happy with the design/fit, I recommend that you right click on the center line of one of the
symmetric patterns and select ‘symmetric merge’.
Then you wont have a visible connection running through the center of your garments and also any textures
you apply will not stop at the center line.
(Also a good idea if you’re using the MD garment as a sculpting base to symmetric merge front and back
pattern pieces before exporting to Zbrush to avoid any visible connections in the cloth.)
Why don’t I see a Normal Map option in MD?
In order to have the Normal Map option in the fabric Property Editor, you need to turn this on in the User Settings.
From the top dropdown menu go to’ Settings -> User Settings’ and in the popup go to ‘Graphic Options’ and check the box near ‘Use Normal Map’.
You’ll need to restart MD for the changes to take effect and then you shall have the normal map options in the fabric settings.
A Normal Map is applied but I see no effect?
When loading in a normal map into some versions of MD, the program turns the Normal map Intensity down to 0.
(Also sometimes happens when loading a garment file into an earlier version of MD.)
Solution:
Check the Intensity slider of the Normal Map under the Fabric property editor.
If the intensity is at 0, there will be no effect. Raise it to 1 or 2 to see the Normal
effect. (Or even to -1 or -2 to invert the effect).
(Make sure you have ‘Use Normal/Bump’ activated in your ‘User Settings’ in the program in order to use a Normal map!)
Why is there no ‘NormalBump Effect’ in MD5 latest version?
In the latest update they changed the name in the User Settings from NormalBump Effect to Normal Map. It’s still the same thing.
Why are Physical property presets not working?
In MD5 version 2.3.110 there was a BUG that whatever physical property preset got imported in did not do anything and changing any of the sliders did not do anything either. This sometimes happens in new MD releases.
This bug was fixed, however, if you encounter it again in any future version, please email it to their support and developers (Ryan@Clo3D.com) and downgrade back to an earlier version of MD5 that works.
How to RESIZE clothes without ruining them or having to re-simulate?
See the links to tutorials in the section “How to fit garments to different avatars” below.
If you resize/stretch the pattern pieces themselves, the garment will become distorted. It won’t be simulated anymore.
The pattern pieces will look exploded or distorted (or in the best case, flat pattern pieces hovering in the air).
You’ll need to layer all the pieces again over each other in the right way, simulate, tug at the clothes, pluck fabric out when it gets sucked in… all that time-consuming work.
BETTER OPTION: Try to first use the shrink weft/warp to fit the garment to your avatar. This usually does the trick (even in cases where the avatar looks extremely different – much bigger, smaller, wider – than the one the garment was modeled on).
When you use shrink weft/warp, the clothes remain the way they were simulated and just shrink or expand without needing to be re-simulated (or at least, not much).
Best option!
For tutorials, see the links in the section below.
Can’t resize patterns. Error: «Click within the Pattern’s Boundaries»
This error has to do with 2D graphics on the patterns.
For instance, if a pair of pants has many 2D graphics to create the effect of stitch lines and you try to resize the pants, then you may see this error.
When you try to shrink pattern pieces, the 2D graphics are left behind out of the pattern’s boundaries (they don’t shrink with the patterns). And Marvelous Designer doesn’t like it when the 2D graphics ‘fall off’ the pattern.
2D graphics must always be within the pattern’s boundaries.
Solutions:
- Either use shrink weft/warp to resize the garment to fit your avatar without changing the actual patterns (best).
- OR select all the 2D graphics and delete them before resizing the garment’s patterns (and then add them back later).
Instead of the 2D graphics, if you need stitches you could use the MD stitch tool to add real stitches, or add the stitches as a texture later when you texture paint your garment (in a program like Substance painter).
The 2D graphics are a nice way to make stitches in MD without a lot more polys (their stitch tool adds a lot more polys).
Also, if you have an older version of MD before they introduced the stitch tool, then 2D graphics is a great way to add fake stitches onto the garment.
Instead of resizing the pattern pieces:
It’s best to first try the Shrink weft/warp to fit the garment to a new avatar than to resize the pattern pieces themselves.
If you resize the patterns, the clothes are no longer stimulated and you have to arrange and simulate the patterns all over again.
For more info on Shrink weft/warp see our free tutorials on how to fit garments to different avatars.
You’ll find links to tutorials in the section “How to fit Garments to different Avatars?”
How to Speed up Simulation (when fitting/editing Garments)
If you don’t have a very powerful computer, trying to fit a garment you just imported in which has a very low
particle distance or many layers onto a different avatar can take a long time, explode your clothes or crash
the program.
(Please watch the free video tutorials in the section above “How to fit Garments to different Avatars?” to learn how to easily modify garments without long simulation time or crashing MD.)
Quick TIP:
1. In most cases, after importing a garment you want to fit to your avatar, it is best to first raise the particle distance (PD) on all the pattern pieces (Ctrl A to select all the pattern pieces), then raise the PD in the Property Editor tab (you may want to note down what the PDs for all the different pattern pieces were before doing this).
Before simulating if the pattern pieces are sticking into your avatar’s skin, its best to separate the
pattern pieces (pull them out of your avatars skin if they are inside it) and arrange them around your
avatar. Make sure patterns that should be on top like pockets, collars, buttons etc, are on top.
2. Simulate.
3. If your avatar has a very different body shape than the MD avatar that the garment was modeled on, you
may need to stretch some parts, or shrink them to make the garment fit.
(Sometimes just using the Shrink-weft, Shrink-warp does a very good job and other times a few quick changes
to the pattern is what’s needed.)
4. Then once you are happy with the way the garment hangs, go back into the Property editor and lower all
the PDs back to whatever setting they were (or even lower if you want more detail and your computer can
handle it).
And once again, please watch our free video tutorials. It will help you and save you a lot of time! 
«I simulate and NOTHING happens» OR: «Clothes take FOREVER to simulate»
Issues:
“I simulate, pluck at the clothes, and nothing happens”
“I simulate, pluck at the clothes and after several minutes a spike appears on the garment”
Cause of the problem:
Your computer may not have enough power to simulate a garment at a very low Particle Distance (PD).
Our garments usually have a low PD (some garments have a different size PD on different patterns).
You need a low PD to capture all the fine wrinkles and detail.
However, when you’re working with a garment (editing it, fitting it to another avatar, tugging at it etc.) you’ll need to raise the PD to something that your computer can handle.
The higher the PD is, the less detail you’ll have in the garment.
Don’t worry. As soon as you have it looking the way you want, you can lower the PD again to capture all the nice wrinkles. Lower the PD when you’re ready to export the garment.
TIP: To change the entire garment’s PD, do CTRL + A to select all the pattern pieces.
Then type in the PD size you want and it will change on all the pattern pieces at the same time.
TIP: You don’t need to have the same PD on all the pattern pieces. Use a low PD on pattern pieces where you need a lot of detail and a higher PD on patterns which are underneath, stiff, or don’t need much detail.
How to Change the Shape of the Avatar?
In Older versions of Marvelous Designer, they had a feature they have in CLO3D where you could customize the Avatar. Unfortunately, they removed this awesome feature.
Here’s a post with alternatives and resources for customizing your Avatars for MD.
What happened to the Shirring on my Waistband?
If you bought one of our Marvelous Designer garment files and see that the waistband should have sheering but when you import it it doesn’t have shirring, (or if you made your own garment with shirring but it’s suddenly gone) here are some possible reasons why:
- You may have moved the shirring texture by mistake with the texture transform tool, and need to readjust the position/ scale of the shirring normal map.
Solution: reload the shirring normal map and/or shirring texture into your Fabric settings in MD, or adjust it’s scale/position. - You may have deleted the shirring normal map or moved it into a different folder and therefore Marvelous Designer can’t find it. Solution: move the normal map back into the correct folder with your garment file or reload the shirring normal map into your Fabric settings in MD.
TIP: If you use the Edit Texture tool to scale down a fabric (example: a floral texture), it will not only scale down the shirring normal map but also the floral texture.
If you want the texture to stay the same and just scale down the shirring normal map, then go into the Fabric ‘Property Editor’ -> ‘Texture Transformation’, and adjust the scale of the normal map there by entering a number into the width and height box.
(All this is covered in the video tutorials in our workshops.)
What is shirring?
It’s this effect of an elastic gathered looking waistband:

Ribbons always untie when doing catwalk animation…
This happened a lot in older versions of Marvelous Designer.
Try using the great new Solidify Tool in Marvelous Designer 6, to more or less “freeze” the ribbon parts, so they don’t change/ untie during animation.
Note: Solidify is different than the Freeze function which Freezes the pattern in 3D space (and will stay in that exact place even when your avatar walks off ripping the clothes off her). See this tutorial video below how to use the Solidify Feature in Marvelous Designer 6.
Clothes keeps sliding down off Avatar — How to make clothes stick?
If a bodice, top, open jacket, waistband etc., keeps slipping down your avatar’s body (during animation or simulation), you can prevent this by either making it fit tighter, adding elastic or by raising the Friction settings. Friction makes the cloth ‘stick’ to the avatar and prevents it from sliding down.
The higher the Friction is the more it will stick to the avatar or underlying layers.
To raise the Fabric Friction, go into the Fabric settings and in the Property Editor raise the Friction Coefficient.
Friction Coefficient will only effect that part of the clothes that has that fabric applied. So you can make one part like an open jacket stick to the avatar while the other clothing items do not.
If your clothing item is still slipping down even after raising the Fabric Friction, click on the Avatar (right-click in older versions and select ‘Avatar Properties’) and in the Property Editor raise the Avatar Friction, Static Friction and / or Kinect Friction until the cloth stops sliding down avatar’s body.
Pants / Skirts / Waistbands fall down during Animation
Solution 1: Select your waistband/ belt, and turn on Elastic. Play with the elastic ratio and strength until the belt/waistband holds tight.
Solution 2: Alternatively, raise the ‘Friction Coefficient’ (In the physical property settings of the Fabric) which will make the cloth ‘stick’ to the avatar.
Solution 3: Before animating, use the Pin Box tool to pin the entire waistband/belt/ clothing part. Right click on the pinned area and select ‘Attach Pin To Avatar’. (Or right click on the cloth and select from the pop-up menu ‘Pin -> Attach All Pins to Avatar’).
IMPORTANT! If you don’t attach pins to Avatar the clothes will stay pinned in the air and tear off when Avatar walks!
Make sure that you first lower the Particle Distance to whatever you want it to be before pinning it, since if you first pin it and then lower the PD later, you will get some weird lumpy results in your fabric. The lower the PD is when you pin it, the less you’ll see the pins.
Piping Explodes / Jerks / Shakes
There are a few reason why piping may be giving you issues. Either your computer is not strong enough and the software is having a hard time to simulate it. Or there is an issue with the simulation because of a bug.
Or you sewed the piping onto the edge of a pattern that is sewing to another pattern!
Here are some troubleshooting tips:
1. Right click on the piping and select ‘Refresh all Pipings’.
2. If that doesn’t help, click on the piping, remember the settings, then delete the piping line and make a new piping line. That should solve it in most common cases.
3. The other option if piping is misbehaving itself, is to create ‘fake’ piping. This works on clothes with a setting in the thickness rendering that is higher than 1mm.
To create fake piping, delete the piping completely and use the ‘curved side geometry’ option on the pattern, along with an internal line that runs along the edge of the garment with a fold angle that goes inwards to cheat and create a ‘fake’ piping look.
(see the last video in the mens’ double breasted coat tutorial series – in the Jackets workshop).
4. In some rare cases, if the cloth keeps reacting badly to the piping, you may need to delete the piping lines, pose and simulate the cloth and then add the piping in the end with simulation turned off. However, this will only work for still renders and not if you need to animate the clothes.
Parts of Piping vanish / swallowed by Fabric
Often if you create piping along the edge of a pattern or pattern layer that is sewn down onto another pattern, the piping gets swallowed up into the underlying pattern, parts of the piping vanish, it shudders, becomes thin in some parts etc.
Solution: Creating Piping along an internal line that sits almost on the edge is the best way to avoid such issues and still looks almost exactly the same like piping along edge of the pattern.
I have a horrible seam line in the middle…
If you turn off “Show Seams” (see screenshot) you will not see this seam.
Hide Seams Option in Marvelous Designer software.

Marvelous Designer – Hide Seam
Clothes created in Marvelous Designer will not export with that seam you see.
HOWEVER, if you apply any textures (apart from a flat color) you will see where the center seam is as the textures will stop there.
The best thing to do, is you create your shirts/ dresses from 2 halves with symmetry and then when you’re done and happy with your result, right click on the center seam and say “Merge” or “Symmetric Merge” (you can now also merge patterns which don’t have symmetry applied).
The two halves will become one and there will no longer be any seam in the center.
Make sure to run a quick simulation to smooth out any lumps from the merge.
Symmetric patterns issue: My textures are stopping at the center seam
If you bought our garment file pack, you’ll see I made most of my Marvelous Designer shirts, jackets, tops, from two symmetric pattern pieces for the front and 2 for the back.
This is useful because you need to make changes to the garment to fit your avatar or to look different, when you make changes on the left the changes will be reflected on the right and the clothing will remain symmetric. (Clothing without symmetry can cause issues with sewing, bunching up along seams, lumpy lop-sided garments etc. unless you understand how to keep the seams the same length to avoid issues.)
However, if you apply a texture to a shirt with symmetric patterns, the textures will end in the center along the seam and won’t repeat nicely across the front of the shirt.
Solution: Once you’re done making any necessary modifications to the garment’s look or to fit the garment to your model, right-click on the center line of one of the symmetric patterns and select ‘Merge’ or ‘symmetric merge’ (depending on your version of MD).

How to Merge Symmetric Patterns
When the symmetric patterns are merged, you won’t have a visible seam running down the center of your garments and also any textures you apply will no longer stop at the center line.

How to attach hard imported objects (like buckles and other props) to an Avatar during animation?
If you import additional avatars or props such as a belt buckle, buttons, zipper pullers etc and then animate your clothes in MD, you’ll find that the imported objects do not follow the Avatar and remain hanging in the air where you positioned them. Unfortunately, in this current version of MD, it is impossible to attach or glue objects onto an Avatar. The only way to have the objects follow the animated Avatar, is to first animate your avatar in your 3D program of choice, attach / parent your prop objects to the Avatar in your 3D program and then import the animated Avatar with the props as part of it into MD.
Then after creating your clothes, when you record a cloth animation, the extra prop parts won’t be left behind.
How to create an internal line along the curved or straight edge of pattern?
Please watch tutorial #11 in the beginners course to see how to use the Offset feature to do exactly this.
(In short: to create the internal line along curved edge or any other edge, right click with the Edit Pattern tool on that segment line and select ‘Offset as Internal line’ and type in the distance you want it to be at.)
Avatar skin is coming through tight sleeves / stockings / bodysuit
1. You can raise the avatar skin offset to push the sleeves or stockings a bit away from the body. Right click on the avatar and select from the popup menu ‘avatar properties’ (in the latest minor update to MD5 you just need to left click on the avatar) and then change the skin offset in the Property Editor tab.
2. You can change the thickness simulation of the sleeves/ stockings, which will give them some more thickness and usually helps offset them a bit more from the avatar’s body.
(Note: As long as you leave the thickness rendering the same, and just change the thickness simulation you will not see a notable difference in the way the clothes look.)
3. You can make the sleeves or stockings a bit looser by stretching them to the width a small bit at a time.
4. You can raise the Fabric Friction/ Avatar Friction settings to make the stockings/ sleeves cling to the avatar’s body. This way you can pull at the fabric until the Avatar’s skin is no longer showing and then because of the Friction that’s making it ‘cling’ to the avatar’s body it is less likely that when the Avatar’s pose changes or in animation that the skin will show through again.
Layers that should be underneath are coming through top layers
Select the layer that should be on top, go into the Property editor and give it a layer number. If you have many layers, then the bottom one will be 0, the one on top of it will be 1, the next over that one will be 2 and the one over all the others will be 3. (And so on if you have more layers than 4).
Most of the time that solves it, in some cases you may have to ‘reset 3D Arrangement’ (right click on a pattern in the 3D garment window and select that option from the popup menu) and simulate it again.
If it’s only a small part of the fabric that is stuck beneath another layer, most of the time you can simply pull at it to get it out, add some pins to hold part of it in place and then tug at the rest to draw it out.
How can I round the edges of a fabric without doing the Layerclone Method?
If you have a fabric that has some thickness usually it does not look so nice to have the default straight ‘cut’ looking fabric edges. Or if you have buttons you’re making in MD then sharp straight edges look real awful.
To round off the edges nicely, use the Curved Side Geometry option found in the Property Editor to round the ‘cut’ looking edges of fabric. Experiment with different strength values to get the desired effect.
If you want a thick garment or a cuff/ jacket bottom with a soft rounded bottom and wrinkles, you may want to use the layercloning method instead as shown in several of my jacket tutorials in the Jackets Workshop and in the hoodie tutorial in the Shirts Workshop.
Student Question: Why does Layercloning not make rounded edges like in your video?
Student Question:
“When I layerclone the patterns, they didn’t round at the end, they stay flat. You said in the video that if I make the particles distance low it will round, but for me it didn’t round, it stays two flat parts.
How I can solve this issue?”
[student sewed a very thin strip along the bottom edge of his jacket]
Solutions:
As for layer-cloning patterns to make the edges have a rounded ‘doubled’ look, this is mostly good for cuffs and jacket/sweater bottoms that have enough fabric to the height in order to have the rounded bottom effect.
Layercloning is great for quilting, soft sweater fabrics, cuffs with internal lines as well as leather cuffs, in short anything that has enough fabric to it to see the effect.
If the pattern is very short (in the height), then layercloning it will not round the edge up just because there isn’t enough fabric to round up and it will have no effect.
With a very short pattern, to make the edges round, instead of using the layerclone, use the Curved Side Geometry option found in the Property Editor (I have a tutorial on this in the beginners course video #24). Curved Side Geometry makes a nice rounded edge (this is what I also use for buttons and fabric edges such as hat edges or other thicker fabrics).
If you have a pattern with enough height to it and it still is stiff and not rounding up then here are some tips:

Example of Layerclone Effect on Sweater Bottom
The rounded bottom effect depends on your physical property settings, if your settings are too stiff then the pattern will stay ‘flat’ and stiff. Cotton does a good job mostly when used on layercloned patterns like for sweater cuffs, sweater bottoms, like in my hoodie example etc.
Another thing you may want to try with your layerclone is to change the seam folding angle of the seam that runs along the bottom edge where the two patterns are sewn together.
The Folding angle of the bottom seam can cause it to fold inwards or outwards, have a ‘sharp ironed’ edge or more of a rounded edge. (Note that layercloned patterns are automatically sewn all around to each other with one seam-line, so therefore as you’ll see in one of my jacket tutorials, I sometimes delete that one seam and then segment sew top to top, side to side, bottom to bottom etc. Then I can control fold angles of individual segment seams).
And remember, as you’ll see in the Jacket quilting tutorials, to create more wrinkles on the cuffs / bottom jacket strips, I usually scale the outer layerclone up slightly more than the other layerclone. Try scaling it only to the width or only to the height or to both width and height and you’ll see it has a different effect.
Scaling to the width makes more vertical wrinkles, whereas scaling to the height makes more horizontal wrinkles. The more you scale one layerclone the more wrinkles you’ll get.
A little scaling makes some fabric wrinkles and usually makes the edges more rounded, again also depending on your physical property settings.
Student Question: Jacket goes Flying when Applying Pressure to Jacket Layerclones to make Stuffing/ Padding
One of my students came to me a with an issue. Here is his question and below are my answers that helped him resolve this issue.
Question: “I’m working on a jacket, same as you made in the jackets workshop.
For some reason the jacket keeps flying when I use folds, elastic and pressure, so i start pinning it and it made it look ugly 
I changed the fabric properties, made it heavy, but it kept flying
I would like to ask you about your technique to solve this issue please.”
Solutions:
There may be a few reasons that a jacket goes flying instead of puffing up:
- The most common reason for this issue, is that when you layercloned the jacket you did not flip the Normals of one of the layers so that when you add pressure the jacket wants to fly. (Remember, to inflate something, you need to have both inner sides facing inwards, if you have one inside side facing in and one inside side facing out it won’t puff up, it will blow away instead).
- If it is not the Normals that aren’t flipped the right way, then maybe your physical property presets are contradicting and causing it to fly. It happened to me once in the beginning too – I made the physical properties too stiff in one setting and too soft in another and the thing went crazy and was wobbling and flapping like a dying bird. Try to apply a default preset from MD (or one of my presets if you bought the patterns and physical property presets pack) and see if it still flies. If it doesn’t fly with a different preset then that shows it was the physical property presets and you’ll need to play with your settings to get it right.
- The most likely solutions are 1 and 2 but if those don’t help, then try applying less pressure, or pressure only on one layer.
- Another option is to make the inner layer stiffer and the outer layer softer and that helps it keep its shape more.
- Sometimes making the bottom strip stiff (stretch weft, bending weft etc) does the trick.
- It could be a bug. Trying saving the project, shutting MD, opening it again. if you create a new test project and make a similar garment does it do the same thing?
How to Make Stitches, Seams, or Trims/Lace?
To make stitches on your clothes you can either:
- Create a stitch texture PNG in Photoshop and then overlay it onto the clothes in Marvelous Designer using the 2D graphic tool.For straight stitches that go along the bottoms of shirts, sides of pants, sleeve bottoms etc, you can use a small repeating texture and then simply stretch it out with the Pattern Transform tool and adjust the scale of the texture with the Texture Transform tool.
For curved stitches or pants fly etc, you can use one of our free stitch brushes for Photoshop and stroke along a path.
See this tutorial how to make stitches and use them in Marvelous Designer.
To change stitches’ colors click on the stitches and then in the Property Editor you can change color, opacity etc. Here’s a tutorial how to add decorative trims to clothes in MD (same thing can be done to add curved stitches). - Export your clothes to a program like ZBrush and sculpt the stitches there. (See the MD to ZBrush Workflow tutorial)
- Export the clothes to a program like Substance Painter and paint stitches on the maps (best solution I think – See the MD to SP workflow tut.)
Have other suggestions? I’d love to hear them.
Visible colored line along edges of trims/lace on garment
“I’m using a PNG texture (like torn edges or lace) with transparency for texturing the clothes, and I see a colored/textured line along the edge of the pattern. How do I get rid of that ugly line?”
Every cloth has thickness in MD. Even if you place a texture with transparency on your fabric, the texture won’t effect the thick ‘sides’ of your cloth automatically. Which results in a colored line or textured line along the ‘edges’ of your cloth. Like this this example below:

Solution:
1. Click on the Fabric that is applied to that pattern.
2. In the Fabric Property Editer go to the ‘Side’ Option and turn OFF ‘Use Same Material as Front’.
3. Load in a blank transparent PNG image with nothing but transparency.
Now you should no longer see any line along the edges of your patterns.
Sometimes when exporting to render, you may still see a thin line along the edge of the pattern, in that
case, either export without thickness, or if you need thickness on some other part of your clothing, lower
the “thickness rendering” setting on the pattern piece with the texture that has the edge line to something like 0.10,
(do not lower the thickness simulation or you will have very unpleasant results if you simulate at such a
thin setting (i.e. cloth going into avatar body etc.)
I stretched the patterns and the trims don’t reach the edges!
Use your pattern transform tool to stretch the 2D graphic (of the trims) as wide / tall as you need it to be.
After stretching the trims, they’ll look distorted, so in order to fix that, take your texture transform tool, click on the stitch 2D graphic and scale the seamless stitch texture (or trim) until it is no longer distorted.
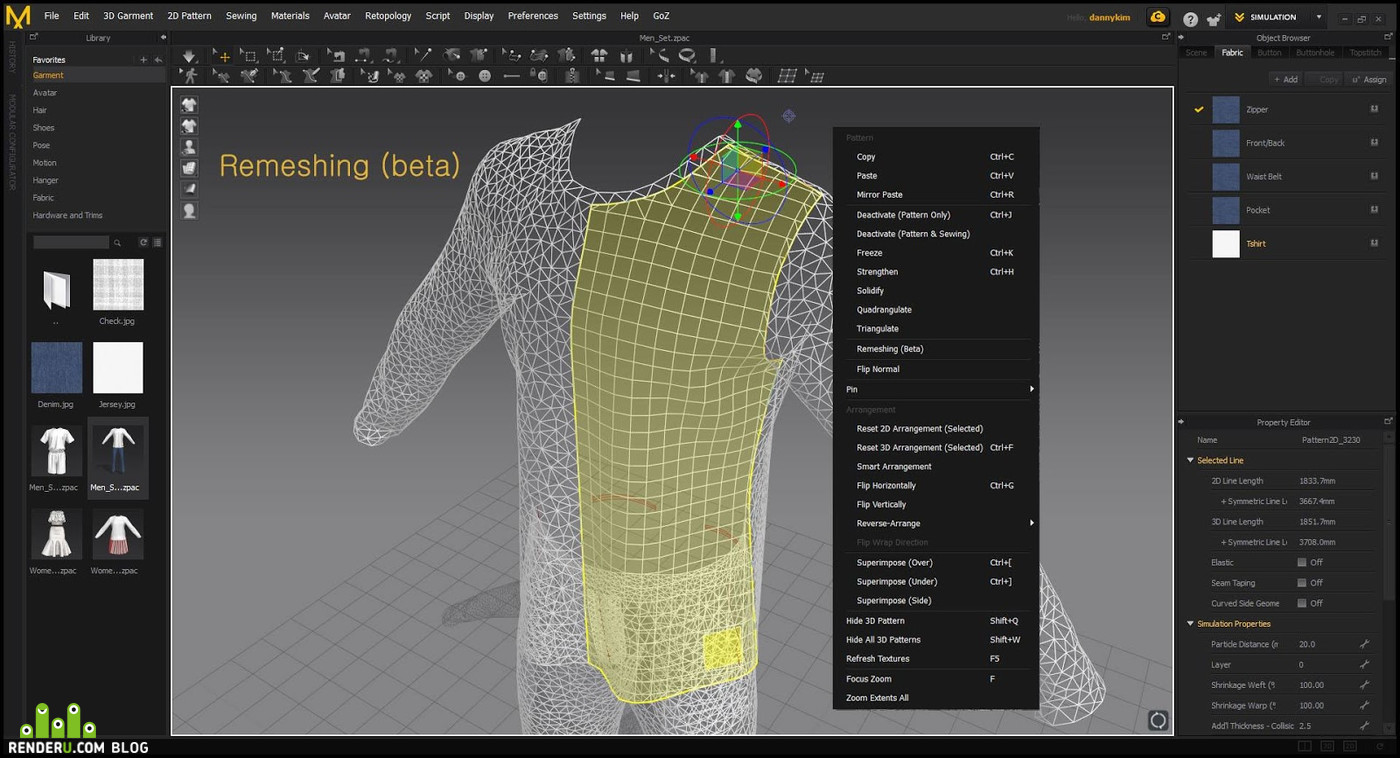
How to turn mesh into Quads?

Marvelous Designer Dress Quadrangulate
Ctrl A to select all the patterns, then right click on the garment in the 3D Garment window and select ‘Quadrangulate.’
After a little bit of thinking, MD will convert the tris into quads.
(If you have a very very low PD it can take quite a while depending on your computer or even crash so best to turn it into quads at a PD of around 10 or 15).
How to get UVs for Clothes?
Export the clothes with ‘Unified UV Coordinates’ checked. Before export you can use the UV tool to draw out the border of the UV map.
See the tips to do with UVs in this MD to Substance Painter tutorial. By assigning different materials in MD you can control what parts of the clothes go on what maps, how many maps are created, separate into different maps or have all the mesh parts on one map.
Tips for making Gloves
Of all the clothing items one can make in Marvelous Designer, gloves are the trickiest and hardest to make and usually best to model in another 3D program like ZBrush. However if you are determined to make gloves in MD and come across issues such as fingers popping out of the glove, here are some tips:
- To make the glove sit tighter/closer to the Avatar’s skin you need to lower the Avatar’s skin offset. If you lower it too much the Avatar’s skin will start coming through the glove so play with it to get the right balance.
- The best pose for making gloves is to have the fingers straight and spread apart so you can easily drape and simulate the glove. Later you can pose the hand.
Next, if the fingers start popping out of the glove here are a few things you can do:
- Raise the Avatar’s Friction and/or the cloth Friction much higher to make the glove ‘stick’ to the Avatar’s skin more and prevent the fingers from sliding out of the glove.
- Raise the Fabric thickness / thickness simulation a tiny bit to give the glove more thickness and avoid bits of Avatar’s skin from coming out.
- Once you get all the fingers in place, draw a pin box over that part and pin it in place to keep it from moving when you drag at the other parts of the glove to arrange it.
Tip: Always keep several older versions of MD software as a backup
Sometimes the developers are too eager and too fast to release a minor update, and there may be some bugs in it. So I recommend that you always keep several versions of MD software downloads on your computer so if a new version has a bug, you can quickly downgrade back to the previous working version until they fix the bugs.
(Note: If you discover a bug you need to email it to their support.The developers usually fix their bugs anything between 2 days to 2 weeks after a bug gets reported.)