Вы все в значительной степени знакомы с процедурой создания загрузочного носителя Windows 10 на компьютерах с операционной системой Windows. В этом посте мы покажем вам процедуру создания загрузочного USB / CD с Windows 10 на компьютерах с операционной системой Linux.
Все слишком известный процесс создания загрузочного USB / CD с Windows 10 с помощью Media Creation Tool (MCT) работает только в операционной системе Microsoft, Windows 10. Следовательно, необходимо показать вам, как выполнить то же действие на компьютере с Linux.
Некоторые могут спросить, действительно ли этот учебник необходим. Ответ на этот вопрос — да. Эта процедура для создания загрузочного носителя Windows 10 на компьютере с Linux будет полезна, если, например, ваш рабочий компьютер с Windows 10 упаковывается, и вам нужно подготовить другой компьютер на лету, но все компьютеры, к которым у вас есть доступ, — все Машины Linux, на которых вы не можете создать загрузочный носитель Windows 10 обычным способом. Итак, это ценные технические ноу-хау, которые вы должны иметь в своем наборе.
Для успешного создания загрузочного USB для Windows 10 в Linux вам потребуется следующее;
- Флешка
- Компьютер под управлением ОС Linux
- Windows 10 ISO
- WoeUSB, простой инструмент, который позволяет вам создать свой собственный установщик Windows USB-накопитель из образа ISO или реального DVD.
Примечание . Если вы загружаетесь в устаревшем режиме (BIOS) и эта процедура не работает, вместо создания загрузочного USB-устройства используйте загруженный ISO-образ и запишите его на DVD-диск, а затем продолжите загрузку компьютера с Windows 10 с него. после того, как вы убедились, что сначала установите BIOS для загрузки с DVD-привода.
1] Во-первых, вам нужно установить WoeUSB
Если вы используете Ubuntu или дистрибутив на основе Ubuntu, такой как Linux Mint , сначала добавьте PPA с помощью следующей команды:
sudo add-apt-repository ppa:nilarimogard/webupd8
Если вы получили сообщение о том, что «add-apt-repository» не найден, перейдите к установке с помощью следующей команды:
sudo apt install software-properties-common
Затем снова запустите указанную выше команду « add-apt-repository ».
Если следующая команда « apt install woeusb » не работает, потому что она не может найти пакет, сделайте это вручную, используя следующую команду:
sudo apt update
Затем установите WoeUSB с помощью этой команды:
sudo apt install woeusb
В Fedora установите с помощью команды:
dnf install WoeUSB
На OpenSUSE вы можете получить WoeUSB отсюда.
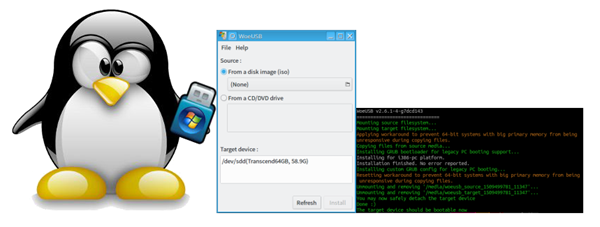
2] Приступить к созданию загрузочного USB
Подключите USB и запустите WoeUSB GUI из меню запуска. Если вы не можете найти его там, вызовите его с помощью этой команды:
woeusbgui & disown
Если на вашем USB-устройстве есть файловая система, она будет автоматически смонтирована операционной системой. Откройте браузер файлов и размонтируйте его, нажав на стрелку извлечения рядом с ним.
Теперь выберите поле в поле « Из образа диска (iso)» и перейдите в папку, в которую вы загрузили ISO-образ Windows.
Далее в разделе « Файловая система» выберите переключатель для NTFS .
Наконец, в разделе «Целевое устройство» нажмите на свое USB-устройство.
Нажмите «Установить» и дождитесь завершения процесса. Не закрывайте приложение и не извлекайте USB-устройство, пока не получите сообщение об успешном завершении операции.
И вот как вы можете создать загрузочный USB для Windows 10 на компьютере с Linux.
Media Creation tool — никак.
Но ты можешь скачать iso образ и записать его при помощи unetbootin или другого аналогичного инструмента
Скачайте образ Windows, запишите его на флешку через dd/balena/wonusb/etc.
Чтобы с сайта MS скачать не media creation tool, а нормальный ISO — смените в браузере User Agent на например Mac — Opera, через расширение или f12 -> 3 точки -> more tools -> network conditions. Далее выбрать в списке нужный UA.
Возможно через WINE пойдёт, но это не точно. Не пробовал, а под рукой бубунты нет.
Ventoy вам в помощь.
Ставится в Ubuntu.
Работает в режимах:
— в GUI GTK/Qt
— Web GIU
— так и в консоли/терминале CLI
Всё работает на УРА!
Единственный нюанс установщика Windows — ФС флешки (будет 2 раздела, тот который первый и самый большой нужно в NTFS отформатировать)
Установка утилиты создания загрузочных USB-носител…
uNetBootin-ом вряд ли получится записать Виндошный установочник.
dd — да
Содержание
- Как создать загрузочный USB для Windows 10 в Linux
- Сделать загрузочную Windows 10 USB на Linux
- 1] Во-первых, вам нужно установить WoeUSB
- 2] Приступить к созданию загрузочного USB
- How to create a Windows 10 USB installation media on Linux
- Загрузочная флешка для Windows 10 и Ubuntu
- Как скачать и обновить Windows из России, наплевав на санкции
- Выводы
- Скачать Windows 11 оригинальный образ для любого компьютера
- Как скачать и установить Windows 11 на любой ПК?
- Скачиваем оригинальный образ Windows 11 с помощью Universal Media Creation Tool без проверки компьютера на наличие модуля TPM 2.0 и Secure Boot
Как создать загрузочный USB для Windows 10 в Linux
Вы все в значительной степени знакомы с процедурой создания загрузочного носителя Windows 10 на компьютерах с операционной системой Windows. В этом посте мы покажем вам процедуру создания загрузочного USB / CD с Windows 10 на компьютерах с операционной системой Linux.
Все слишком известный процесс создания загрузочного USB / CD с Windows 10 с помощью Media Creation Tool (MCT) работает только в операционной системе Microsoft, Windows 10. Следовательно, необходимо показать вам, как выполнить то же действие на компьютере с Linux.
Некоторые могут спросить, действительно ли этот учебник необходим. Ответ на этот вопрос — да. Эта процедура для создания загрузочного носителя Windows 10 на компьютере с Linux будет полезна, если, например, ваш рабочий компьютер с Windows 10 упаковывается, и вам нужно подготовить другой компьютер на лету, но все компьютеры, к которым у вас есть доступ, — все Машины Linux, на которых вы не можете создать загрузочный носитель Windows 10 обычным способом. Итак, это ценные технические ноу-хау, которые вы должны иметь в своем наборе.
Сделать загрузочную Windows 10 USB на Linux
Для успешного создания загрузочного USB для Windows 10 в Linux вам потребуется следующее;
- Флешка
- Компьютер под управлением ОС Linux
- Windows 10 ISO
- WoeUSB, простой инструмент, который позволяет вам создать свой собственный установщик Windows USB-накопитель из образа ISO или реального DVD.
Примечание . Если вы загружаетесь в устаревшем режиме (BIOS) и эта процедура не работает, вместо создания загрузочного USB-устройства используйте загруженный ISO-образ и запишите его на DVD-диск, а затем продолжите загрузку компьютера с Windows 10 с него. после того, как вы убедились, что сначала установите BIOS для загрузки с DVD-привода.
1] Во-первых, вам нужно установить WoeUSB
Если вы используете Ubuntu или дистрибутив на основе Ubuntu, такой как Linux Mint , сначала добавьте PPA с помощью следующей команды:
Если вы получили сообщение о том, что «add-apt-repository» не найден, перейдите к установке с помощью следующей команды:
Затем снова запустите указанную выше команду « add-apt-repository ».
Если следующая команда « apt install woeusb » не работает, потому что она не может найти пакет, сделайте это вручную, используя следующую команду:
Затем установите WoeUSB с помощью этой команды:
В Fedora установите с помощью команды:
На OpenSUSE вы можете получить WoeUSB отсюда.
2] Приступить к созданию загрузочного USB
Подключите USB и запустите WoeUSB GUI из меню запуска. Если вы не можете найти его там, вызовите его с помощью этой команды:
Если на вашем USB-устройстве есть файловая система, она будет автоматически смонтирована операционной системой. Откройте браузер файлов и размонтируйте его, нажав на стрелку извлечения рядом с ним.
Теперь выберите поле в поле « Из образа диска (iso)» и перейдите в папку, в которую вы загрузили ISO-образ Windows.
Далее в разделе « Файловая система» выберите переключатель для NTFS .
Наконец, в разделе «Целевое устройство» нажмите на свое USB-устройство.
Нажмите «Установить» и дождитесь завершения процесса. Не закрывайте приложение и не извлекайте USB-устройство, пока не получите сообщение об успешном завершении операции.
И вот как вы можете создать загрузочный USB для Windows 10 на компьютере с Linux.
Источник
How to create a Windows 10 USB installation media on Linux
I suppose this might work for Windows 7/8 as well.
This method also uses command line tools. For the most easiest way suitable for beginners try using unetbootin or on the Windows platform try using Rufus.
This is how to do it:
- Obtain the Windows ISO image file by any of the legal channels. As of today (2016) Microsoft offers them for free on their website.
- Have an USB mass storage device, such as an USB thumb drive or USB hard disk. The minimum device capacity depends on the ISO file size. 8GB should suffice, sometimes 4GB.
- Prepare the USB drive to be able to start an operating system on it. This probably is the hardest part. The boot sector of the USB device needs to carry a program that finds an operating system and initiates the loading of it. On IBM compatible PCs traditionally the first 446 bytes are reserverd for that purpose. The remaining of the first 512 bytes hold the partition table that stores information about all partitions on the respective drive. The syslinux package provides several boot loaders, install it.
# dnf install syslinux
# apt install syslinux
4. It contains the mbr.bin image of a generic boot loader. A typical place for the file is /usr/lib/syslinux/bios/mbr.bin .Write the mbr.bin to the first data sector of the USB drive. You need to find out the device name of your USB drive, e.g. using
Then write the image. I assume /dev/sdd is the USB drive
dd bs=440 count=1 conv=notrunc if=/usr/lib/syslinux/bios/mbr.bin of=/dev/sdd
5. Create an NTFS partition as primary partition on the USB drive. Be sure to set the BOOT flag of that partition. This is crucial or the boot loader won’t start the OS on that partition. It must be big enough to hold all files of the Windows 10 ISO image. A size of 5 to 6 Gb should do. You can use e.g. gparted to create the partition.
6. Mount the new partition and also the Windows ISO image. Use your favourite file manager to do so, or the command line like
fuseiso -p /ISO/Win10_1511_x64.iso /run/media/Win10ISO
7. Finally copy all files from the Windows ISO onto the USB partition.
Источник
Загрузочная флешка для Windows 10 и Ubuntu
13 декабря 2019
Загрузочная флешка нужна для установки или переустановки операционной системы на ПК или ноутбук. Раньше для этих целей использовались CD- и DVD-диски, сейчас оптических приводов становится все меньше, поэтому USB-накопители — самый оптимальный вариант. Требований в данном случае всего два: наличие USB-порта и достаточная емкость флеш-носителя.
Рассмотрим в этом обзоре несколько простых способов как создать загрузочную флешку для самых популярных операционных систем — Windows 10 и Ubuntu.
Загрузочная флешка Windows 10
Утилита Media Creation Tool
Media Creation Tool — официальное приложение, которое скачивается с сайта Microsoft и используется для установки лицензионной версии Windows. Для создания загрузочного носителя потребуется флешка емкостью не менее 8Гб.
Источник: microsoft.com
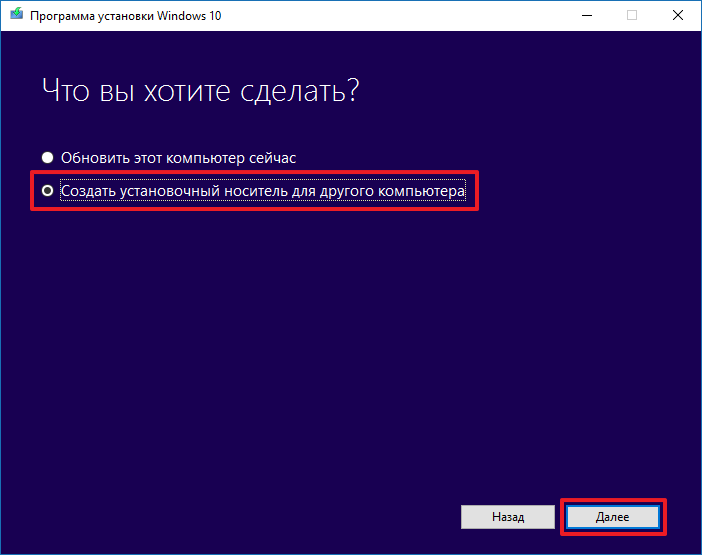
2. Принимаем лицензионное соглашение и выбираем пункт «Создание установочного носителя для другого компьютера».
Источник: microsoft.com
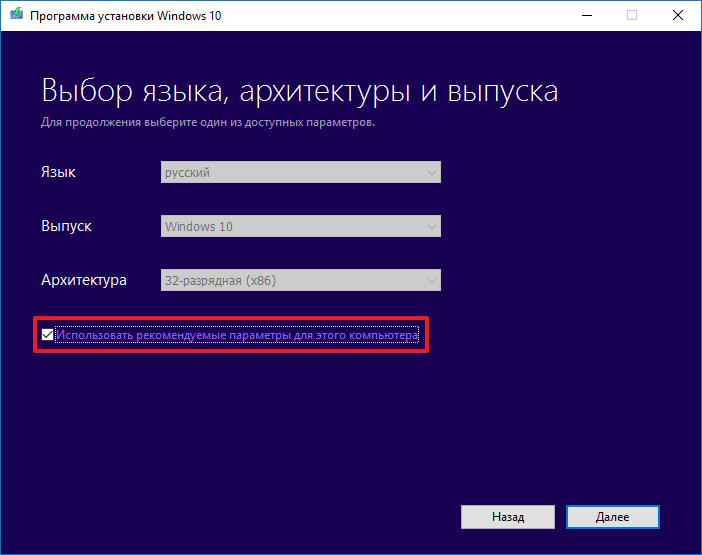
3. Устанавливаем параметры вручную или оставляем рекомендуемые. Если система просто переустанавливается, «Выпуск» и «Архитектура» выбираются автоматически, т. е. можно использовать рекомендуемые параметры.
Источник: microsoft.com
4. Выбираем носитель
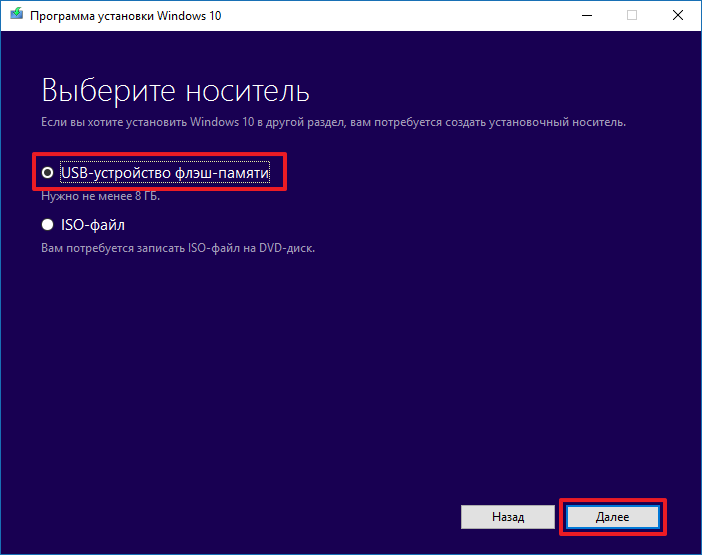
Источник: microsoft.com
5. После выбора флеш-памяти из списка обнаруженных USB-устройств, начнется загрузка образа Windows, затем — его проверка, на финальном этапе — «Создание носителя Windows». После завершения процесса появится окно «USB-устройство флеш-памяти готово» — загрузочную флешку можно использовать.
Программа UltraISO удобна, если ISO-образ операционной системы уже скачан на жесткий диск. Утилита платная, но создать загрузочную флешку Windows можно и в Trial-версии UltraISO.
1. Устанавливаем утилиту. После запуска заходим в меню «Файл», нажимаем «Открыть» и выбираем образ с дистрибутивом. Если образ был записан на оптический диск, выбираем пункт «Открыть CD/DVD».

Источник: lumpics.ru
2. В меню «Самозагрузка» нажимаем «Записать образ жесткого диска». 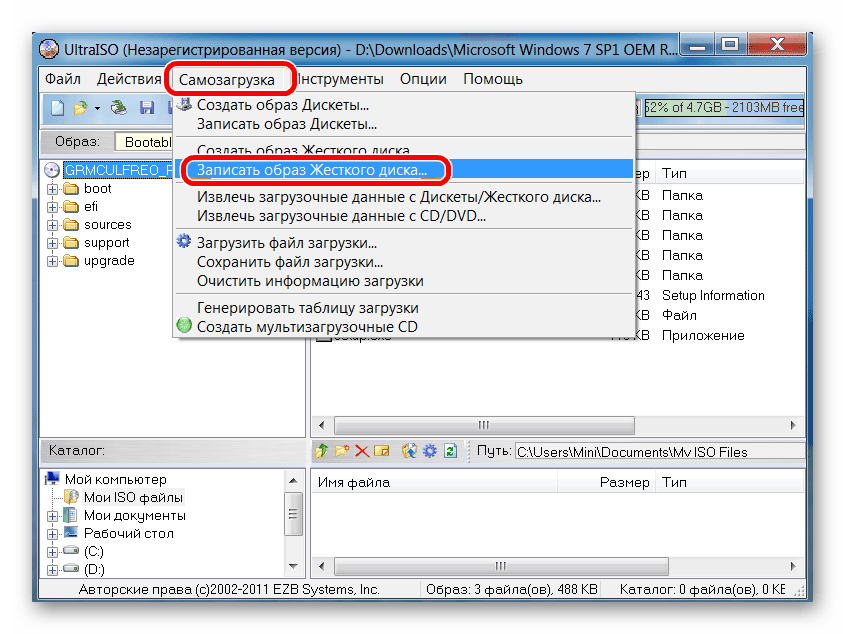
Источник: lumpics.ru
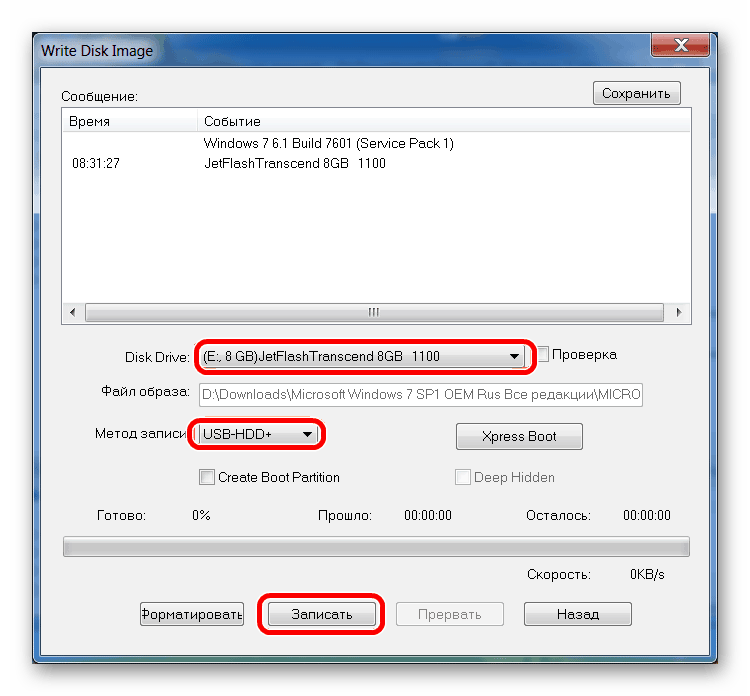
3. В окне Write Disk Image, в поле Disk Drive необходимо выбрать флеш-накопитель, который будет использоваться в качестве загрузочного. Рекомендуемый метод записи — USB HDD+.
Источник: lumpics.ru
По завершении процесса записи загрузочная флешка будет готова.
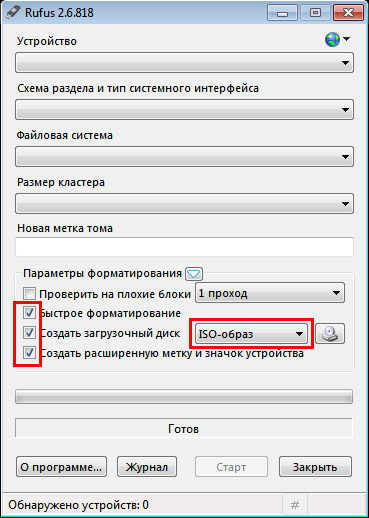
Простая и бесплатная альтернатива UltraISO.
1. Устанавливаем последнюю версию Rufus.
2. После запуска появится окно, в котором нужно выбрать необходимые параметры записи.

Источник: user-life.ru
На новых ПК, которые используют прошивку UEFI, а не BIOS, в поле «Схема раздела…» необходимо выбрать «GPT для компьютеров с UEFI». В противном случае можно использовать настройки по умолчанию.
3. Нажимаем «Старт» и ждем готовности загрузочного флеш-носителя.
Загрузочная флешка Ubuntu
Ubuntu — бесплатная операционная система на ядре Linux. Популярна в силу простоты, удобства и наличия всех необходимых приложений, включая браузер, текстовый редактор, программы для работы с фото, видео и пр. Разберем типичный сценарий — создание загрузочной флешки Ubuntu в ОС Windows.
Образ Ubuntu занимает чуть менее 2Гб, т. е. в качестве загрузочной подойдет флешка соответствующей емкости. Оптимальный инструмент — все та же утилита Rufus. При этом процедура создания загрузочной флешки Ubuntu практически не отличается от таковой для Windows. Выбирая параметры, необходимо поставить галочки напротив пунктов, указанных на рисунке ниже, а также выбрать правильный ISO-образ:
Источник: losst.ru
Предлагаем поделиться в комментариях своим опытом создания загрузочных флешек — советами, лайфхаками, болями и т. д.
Источник
Как скачать и обновить Windows из России, наплевав на санкции
Компания Microsoft приступила к реализации ввода ограничений в отношении пользователей из России и Беларуссии. Правда, ещё не известно, как скоро в этих странах компьютеры под управлением Windows лишаться возможности легального обновления. Однако уже сейчас достоверно известно, что скачивание официального образа системы с сайта Microsoft не недоступно. В этом материале вы узнаете, как скачать и обновить официальную версию Windows 10/11 без использования VPN и продолжить наслаждаться системой, наплевав на санкции.
Конечно, идеальным вариантом было бы отказаться от использования Windows и спокойно перейти на Linux. Однако бывают моменты, когда нужна именно Windows. Для получения возможности скачивания и обновления ОС воспользуемся магией Open Source.
MediaCreationTool — это бесплатная утилита с открытым исходным кодом, которая позволяет пользователю в два клика скачивать и обновлять Windows 10/11, а также создавать загрузочную USB-флешку с выбранными параметрами для последующей установки ОС.
1. Скачиваем и распаковываем файлы программы в любое место.

2. Запускаем файл MediaCreationTool.bat от имени администратора и выбираем желаемую версию ОС.
3. Выбираем, что мы хотим сделать:
- Auto upgrade: обновить ОС.
- Create ISO: скачать готовый ISO-образ системы.
- Create USB: создать загрузочную USB-флешку в автоматическом режиме с последующей установкой ОС.
- Select: выбрать образ ОС с желаемыми параметрами через утилиту MediaCreationTool.
4. После выбора желаемых настроек автоматом запустится Media Creation Tool, которая предложит начать стандартную установку системы.
5. Следуем рекомендациям установщика и дожидаемся окончания записи ОС.
Выводы
Вот, собственно, и всё. Не воспользовавшись даже самым простым VPN, мы выполнили установку и обновление официальной версии операционной системы Windows. Конечно, с таким отношением к пользователям из России и Белоруссии отпадает всё желание пользоваться продуктами компании Microsoft. Но пока есть желание, можно быть уверенным, что никакие санкции не смогут помешать уверенному пользователю, если он чего-то захочет.
Источник
Скачать Windows 11 оригинальный образ для любого компьютера

Как скачать и установить Windows 11 на любой ПК?
С выходом новой операционной системы Windows 11, появились и новые проблемы, так как для того чтобы установить Windows 11 необходим компьютер с поддержкой TPM 2.0 и Secure Boot, иначе после проверки компьютера установка будет прекращена, появится предупреждение «Windows 11 не может быть запущена на этом ПК» или «This PC can’t run Windows 11».
Скачать образ операционной системы Windows 11 вы можете официально и совершенно бесплатно на сайте Microsoft, но вот при установки может выйте предупреждение о несоответствии вашего компьютера к требованиям для этой системы.
Требования для операционной системы Windows 11 крайне жесткие, но и здесь их можно спокойно обойти, и установить новенькую систему Windows 11 даже на старый бабушкин компьютер!
Есть несколько способов, как можно обойти данную проверку и установить Windows 11 на компьютер без TPM 2.0 и Secure Boot.
Сегодня мы будем говорить не как обойти проверку, используя реестр или заниматься нудной работой с подменой файлов и прочее, ведь наверное для каждого будет удобно просто скачать уже готовый оригинальный образ Windows 11 (файл ISO) где отсутсвует проверка компьютера перед установкой, а значит вам его можно ставить точно так, как и обычную по требованиям Windows 10, которая подойдет для любого компьютера или ноутбука.
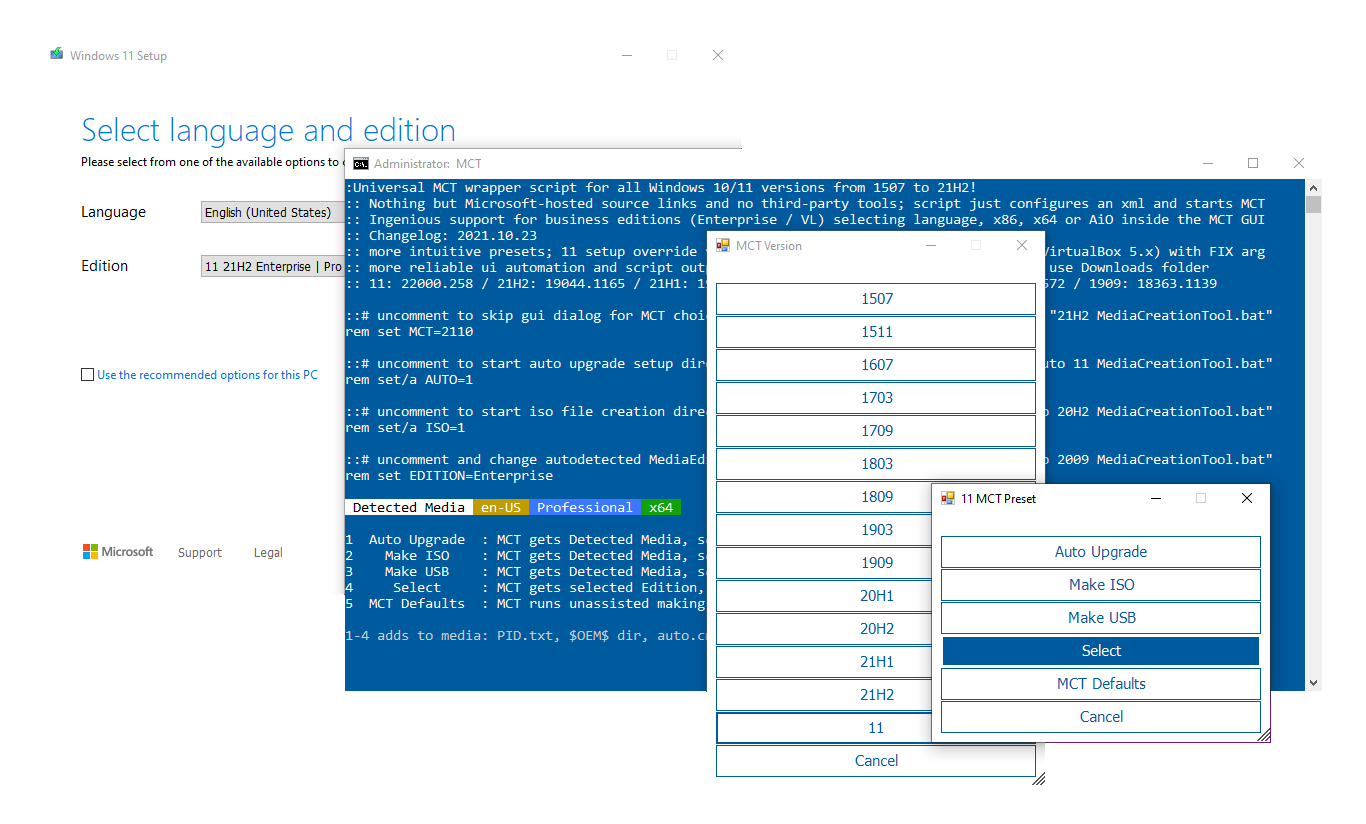
Скачиваем оригинальный образ Windows 11 с помощью Universal Media Creation Tool без проверки компьютера на наличие модуля TPM 2.0 и Secure Boot
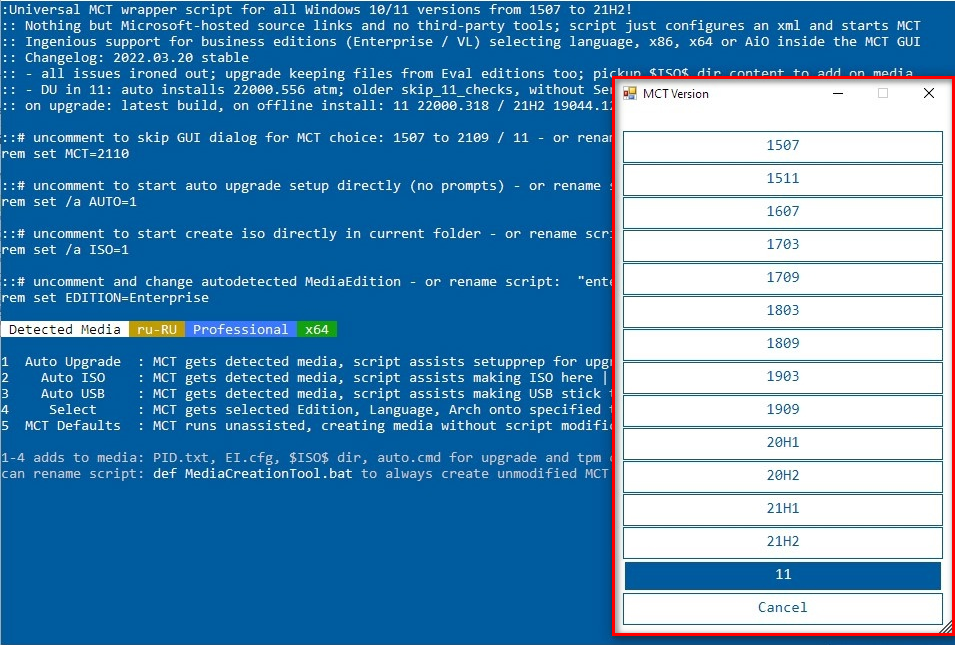
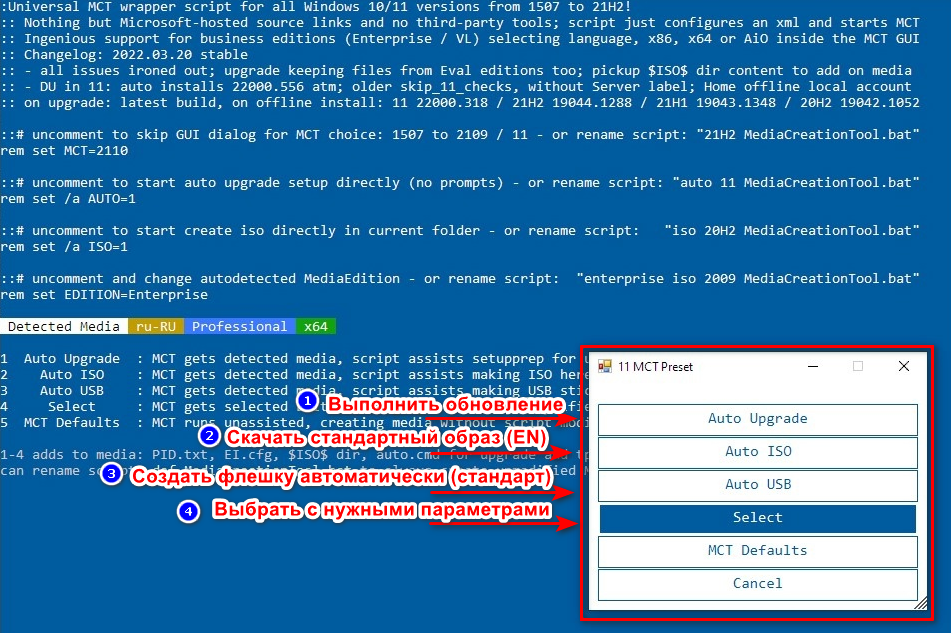
Universal Media Creation Tool — это скрипт позволяющий скачивать любые версии Windows 10 и Windows 11 без проверки на совместимость компьютера.
Для того чтобы скачать Universal Media Creation Tool нужно перейти на официальную страницу GitHub-AveYo , нажать на кнопку «Code» и выбрать «Download ZIP» (Рис.1)
Скачанный архив (Рис.2)
Распаковать в любую папку (Рис.3)
Открыть папку и запустить файл «MediaCreationTool.bat» (Рис.4)
Может появится предупреждение системы SmartScreen. В этом случае нужно нажать на кнопку «Подробнее» и потом «Выполнить в любом случае». В результате появится командная строка и меню со списком версий Windows 10, где нужно выбрать пункт под номером «11«, который обозначает Windows 11 (Рис.5)
Далее будет меню со списком действий (Рис.6).
 (Рис.6)
- Auto Setup — автоматическая установка выбранной версии;
- Create ISO — создание iso-файла в папке C:ESD;
- Create USB — создание загрузочной USB флешки;
- Select in MCT — ручной выбор в интерфейсе утилиты Media Creation Tool.
Если вам необходимо скачать образ ISO и записать сразу на флешку, сделать её загрузочной, то выбираем пункт Create USB.
Для этого вставьте в USB разъем флешку (не менее 8 Гб), нажимаем на Create USB, далее пойдет процесс скачивания и подготовки установочной флешки в автоматическом режиме. Просто выполняйте все действия как на картинках (Рис.7-14).
 (Рис.7)
  (Рис.8)
  (Рис.9)
  (Рис.10)
  (Рис.11)
  (Рис.12)
  (Рис.13)
  (Рис.14)
Теперь ваша загрузочная флешка с Windows 11 готова! Можно спокойно приступать к установке новой системы Windows 11, не волнуясь за проверку вашего компьютера на наличие модуля TPM 2.0 и с функцией Secure Boot.
Если вы хотите просто обновиться с Windows 10 до Windows 11 — выбераем пункт Auto Setup.
Чтобы скачать готовый образ (iso-файл) без создания загрузочной флешки, выбираем пункт Create ISO. При выборе этого пункта скачается оригинальный образ Windows 11, но без функции проверки компьютера на наличие модуля TPM 2.0 и с функцией Secure Boot.
Источник
Downloading and Creating a Windows 11 UEFI Bootable USB, Windows 10 UEFI or Legacy USB or Windows 8.1 UEFI or Legacy USB
Table of contents
- Downloading and Creating a Windows 11 UEFI Bootable USB, Windows 10 UEFI or Legacy USB or Windows 8.1 UEFI or Legacy USB
- Video
- Linux Kernel 5.15.1
- Direct Download Links
- Windows 10 Mainstream Channel ISO
- Windows 8.1 ISO
- Windows 7 ISO
- Windows 10 Mainstream Channel ISO
- Checking Installation ISO Checksums
- Creating a Windows 8.1, Windows 10 or Windows 11 UEFI Bootable USB
- Checking your Install.wim File Size
- Software Install
- Splitting the Install.wim File into < 4.0 GB Install.swm Files
- Formatting a USB Flash Drive using GParted
- Copying Windows Setup Files
- Enabling a UEFI Boot with Secure Boot
- Checking your Install.wim File Size
- Creating a Windows 10 Legacy Bootable USB
- Software Install
- Unmounting any Partitions using GParted
- Using WoeUSB to Create a Bootable USB Flash Drive
- Software Install
- Creating a Windows 10 UEFI Bootable USB with Driver Slipstream
Video
Linux Kernel 5.15.1
Linux Kernel 15.5.1 contains a new NTFS Driver alleviating previous issues where large files such as the install.wim file from Windows installation media got corrupted. To update to the latest kernel and create a UEFI Bootable USB the more proper way follow my instructions in:
This updated guide will also work for a Windows 8.1 and Windows 10 UEFI Bootable USB. It does not cover a Legacy Boot.
Direct Download Links
The Windows 10 Media Creation Tool is an application it cannot run on Linux… When the Windows 10 software download page is accessed on a browser in Linux direct downloads will instead be listed. Direct downloads are also listed by default for Windows 11 Insider Preview ISOs and for the Windows 8.1 ISOs.
Windows 10 Mainstream Channel ISO
Windows 10 was marketed to be compatible with computers that came with Windows 7 or Windows 8.1 however currently supported Windows 10 Builds are only optimised for computers with Solid State Drives (SSDs). If it is easy to access the internals of your system to replace the drive ensure your system has a SSD before reinstalling Windows.
On a system with a mechanical Hard Drive (HDD) you will experience continuous 100 % Disk Usage on Windows 10 Builds past Version 1709 which is no longer supported. You will likely get better performance on Linux Zorin OS 16 (a Linux distro with a Windows like user interface) or an older version of Windows i.e. Windows 8.1 or Windows 7 (End of Life).
Windows 8.1 ISO
Windows 8.1 has reached end of mainstream support but still has extended support.
Product Key Warning: The Windows 8.x Setup is designed to automatically input a Windows 8 or Windows 8.1 OEM Embedded Product Key. However these ISOs are not multi-edition and it is easy to install the wrong Windows edition i.e. Windows 8.1 (Home) opposed to Windows 8.1 (Home) Single Language. The wrong Edition will not inform you have the Product Key of another Edition. Also there are no «with Bing» edition ISOs and Windows 8 is not compatible with Windows 7 product Keys. This is discussed in much more detail in my Windows 8.1 Installation Guide.
Windows 7 ISO
Windows 7 has reached end of extended support and the only ISO available is the Dell Windows 7 Skylake ISO which requires the Dell OS Recovery Tool, a Windows application that cannot be ran in Linux.
The user interface of Microsoft’s website for the Windows 8.1, Windows 10 or Windows 11 Insider Preview direct downloads is very similar.

You will prompted to select your «Edition». This actually displays the version as the ISO is a multi-edition ISO which covers all OEM and Retail Licenses:

Once you have selected Windows 10 select Confirm:

Next you will need to select the Language:

Note:
- English International = English (UK)
- English = English (US)

Once you have made your selection, select Confirm:

You will be presented a 64 Bit and a 32 Bit Download Link (64 Bit only for Windows 11). When you highlight these download links you will see the direct download links to Microsoft’s servers and a time limited download token:

On the download page, there will be an option to verify your Download. These are not available for the Windows Insider Preview ISOs. Clicking this will display the SHA256 checksum for each ISO:


Checking Installation ISO Checksums
Open the Downloads folder.

Right click the ISO and select rename. Select the name plus the .iso extension:

Select Copy:

Once you have copied the file name including the extension, press [Esc] to cancel the rename. Now right click an empty space in the Downloads folder and select «Open in Terminal»:

Type in the command:
sha256sum
Followed by a space and then paste the ISO name.

Then press [↵]:

The checksum will display:

You can right click the checksum and select copy:

Then in your browser select [Ctrl] + [ f ] and paste the ISO Checksums. It should find a match. If it does not your ISO is corrupt and you will need to redownload it:

Unfortunately the Windows 10 Download page has no instructions in creating installation media.
Creating a Windows 8.1, Windows 10 or Windows 11 UEFI Bootable USB
All systems manufactured in 2012 or later have a UEFI BIOS with Secure Boot. Windows 8.1 and 10 installation media should be setup to accommodate these technologies for optimal performance. These technologies and other requirements are mandatory for Windows 11.
Only 64 Bit Operating Systems are supported with a UEFI Boot.
A GPT partition scheme allows more than 4 partitions on a SSD/HDD which means there are multiple recovery partitions created during the Windows install making the Windows 10 Boot more robust. A MBR partition scheme on the other hand only had one boot partition which could get easily corrupted rendering the Windows 10 OS Unbootable.
Secure Boot prevents malicious code from Booting up before Windows 10, allowing only signed code to Boot. This allows windows 10 and its inbuilt security to Boot before ransomware. Older Windows versions such as Windows XP and Windows 7 were commonly crippled by ransomware as they did not use Secure Boot.
Checking your Install.wim File Size
A Windows 8.1/10/11 UEFI Bootable USB needs to use the GPT Partition Scheme with a FAT32 Partition in order to Pass Secure Boot. The FAT32 file system unfortunately has an upper limit of 4.0 GB and there is usually an install.wim file on the direct download links ISO which exceeds 4.0 GB (this depends on the Windows 10 Version and Language). As a result most Linux Bootable USB utilities will either truncate the install.wim giving incomplete installation media or format the partition as NTFS meaning the Bootable USB won’t pass Secure Boot.
Right click the ISO file:

Select Open with Disk Image Mounter:

You should see the ISO shown to the left hand side. Select it:

Select the Sources folder:

Scroll down and look for the install.wim file. Right click it:

And select Properties:

If the file size exceeds 4.0 GB (4,294,967,296 Bytes) then it exceeds the upper limit for the FAT32 file format. There are theoretically three ways to proceed:
- Create a USB with a single NTFS Partition and temporary Disable Secure Boot to install Windows.
- Create a USB with multiple partitions; a FAT32 Boot Partition and a NTFS Install Partition.
- Create a USB with a single FAT32 Partition and split the install.wim file to install.swm files that are less than 4.0 GB chunks.
In practice, Linux doesn’t work very well with the Windows NTFS format and large files and truncates the install.wim when copying it to the USB even though this file format supports larger file sizes. Therefore the only working procedure I found was to split the install.wim into 2 install.swm files and use a single FAT32 partition.
We will copy the install.wim to the downloads folder and split it.
If it does not exceed this limit you shouldn’t copy the install.wim over to the Downloads folder or attempt to split it.

Right click the install.wim file:
And select Copy:

Then go to your Downloads folder, right click an empty space and select Paste:

This is a large file and may take several minutes to copy. A progress bar will display on the file icon in the side panel as well as a small progress piechart indicating the progress of the copy.

Software Install
We need two pieces of software:
- wimtools: wimtools allows use of some equivalent commands to dism gives in Windows when it comes to wim files. In our case we want to split the wim file into swm files.
- GParted: GParted can be thought of as an equivalent to Disk Management in Windows.
We will install these programs using the terminal. You can use the shortcut key [Ctrl] + [Alt] + [ T ] to open the terminal in Linux:

We will type in the commands:
sudo apt-get update
Let’s break this down:
- sudo is an abbreviation for super user do and can be thought of running as an administrator in Windows.
- apt is an abbreviation for advanced package tool.
- apt-get means we will look at the official repositories only.
- update means we will update the official repositories.

Because the command began with sudo we will be prompted to input our password in order to proceed (this is the Linux equivalent of a User Account Control Prompt):

Once we have input our password it will check to make sure the advanced package tool is update to look for the official repositories.

We will then use the commands to install wimtools and gparted respectively:
sudo apt-get install wimtools
sudo apt-get install gparted
Splitting the Install.wim File into < 4.0 GB Install.swm Files
The wimtools library is command line based. To use a command type in:
wimlib-imagex

This will print a list of available commands. The command of interest is:

We will type in:
wimlib-imagex split Downloads/install.wim Downloads/install.swm 4000

Once the split is done, a new command line prompt will display:

You will have the split install.swm files:

Formatting a USB Flash Drive using GParted
Insert your 16 GB USB Flash Drive and launch GParted:

GParted needs to run as a super user. You will get an authentication required popup (equivalent to a User Account Control Prompt). Type in your password and select Authenticate:

To the top right select the drop down arrow:

Select your 16 GB USB Flash Drive:

Next we need to right click any partitions.

to make sure they are not mounted in the file explorer. If they are select Unmount (if Unmount is already grayed out they are not mounted). Repeat for all partitions on the USB Flash Drive.

Select Device and then Create New Partition Table:

Select a GPT Partition Table and select Apply:

Right click the Unallocated space:

Select New:

Change the File System to FAT32 and add an optional Label. I advise using something like 20H2 to reflect the version of Windows 10 in the installation media. Then select Add:

Select Apply:

Select Apply:

Then select Close. You may now also close GParted.

Remove the USB Flash Drive from the USB port and reinsert it. Ubuntu should automatically mount the blank FAT32 Partition on the GPT Partition Table of the USB Flash Drive.

Copying Windows Setup Files
In this stage we are essentially manually copying all the setup files from the ISO to the Bootable USB. If the install.wim exceeds 4.0 GB, we will copy everything across except this file and in its place use the 2 install.swm files.
Mount the Windows 10 ISO and press [Ctrl] + [ a ] to select all files. Then hold down the [Ctrl] key and highlight the sources folder. Then drag all the other folders across to copy them:

You will be informed when the copy operation is complete:

Now right click an empty space on the USB Flash Drive and select New Folder:

Name the folder sources

Open up the Sources folder on the USB and the ISO:


Press [Ctrl] + [ a ] to select all.

Then scroll down until you find the install.wim file. Hold [Ctrl] and left click it. You will now have selected all files except the install.wim:

Copy all the files across to the Sources folder on the USB:

You will be notified when they are copied across:

Now go to the Downloads folder and select the install.swm and install2.swm files and copy them to the USB:

These are large files and it may take a while to copy them across. You will be informed when they are copied.

The Windows 10 UEFI Bootable USB is now complete. This Bootable USB will pass a UEFI BIOS with Secure Boot.
Enabling a UEFI Boot with Secure Boot
If you have installed an old Linux distribution that doesn’t support a UEFI Boot with Secure Boot you should look at enabling these technologies. You can do so by accessing the Boot Menu. In a Dell PC Power Down your Computer. Then Power it up and press [F12].
Look for the Line consisting of Boot Mode. If there is no mention of Boot Mode or UEFI/Legacy on your Boot Menu, it is likely you have a Legacy Only BIOS and should Create a Legacy Only USB (see below). The Windows 10 UEFI Bootable USB will be unable to Boot on an older system:

The Boot Mode should be set to UEFI and Secure Boot should be On.

If it is you can press [↓] to select your Bootable USB and then press [↵] to Boot from it.

If the technologies are not enabled, press the [↓] until you get to Change Boot Mode Settings and then press [↵]:

Select Change Boot Mode Settings:

Set UEFI Boot Mode, Secure Boot On:

Select Yes:

Select Apply:

Creating a Windows 10 Legacy Bootable USB
PCs manufactured before 2010 have a Legacy Only BIOS and do not support a UEFI Boot. To install Windows 10 on these PCs you need to create a Legacy Bootable USB. A Legacy USB must be used for a Windows 10 32 Bit Install.
Software Install
We need two pieces of software:
- GParted: GParted can be thought of as an equivalent to Disk Management in Windows.
- WoeUSB: A discontinued utility which can create Windows Legacy Bootable USB Flash Drives.
We will install these programs using the terminal. You can use the shortcut key [Ctrl] + [Alt] + [ T ] to open the terminal in Linux:

We will type in the commands:Generic HighlightingEnlighterJS Syntax Highlighter
Let’s break this down:
- sudo is an abbreviation for super user do and can be thought of running as an administrator in Windows.
- apt is an abbreviation for advanced package tool.
- apt-get means we will look at the official repositories only.
- update means we will update the official repositories.

Because the command began with sudo we will be prompted to input our password in order to proceed (this is the Linux equivalent of a User Account Control Prompt):

Once we have input our password it will check to make sure the advanced package tool is update to look for the official repositories.

We will then use the commands to install woeusb and gparted respectively:
sudo add-apt-repository ppa:tomtomtom/woeusb
sudo apt install woeusb
sudo apt-get install gparted
WoeUSB is not included in the official APT software repository and we need to add an additional third party repository. To install we use apt install which looks in the official and added third party repositories opposed to apt-get install which only looks in the official repository.
Unmounting any Partitions using GParted
Insert your 16 GB USB Flash Drive and launch GParted:
GParted needs to run as a super user. You will get an authentication required popup (equivalent to a User Account Control Prompt). Type in your password and select Authenticate:
To the top right select the drop down arrow:
Select your 16 GB USB Flash Drive:
Next we need to right click any partitions.
to make sure they are not mounted in the file explorer. If they are select Unmount (if Unmount is already grayed out they are not mounted). Repeat for all partitions on the USB Flash Drive.
Once all partitions are unmounted you can close GParted.
Using WoeUSB to Create a Bootable USB Flash Drive
Launch WoeUSB:

To the top, select the Load ISO button:

Select your Windows 10 ISO and select Open:

Since the install.wim exceeds 4.0 GB, the NTFS file system must be used (this must be used for a Legacy USB irregardless). Select NTFS:


Now select your USB Flash Drive:

Then select «Install». N.B. this refers to making a Bootable USB and not installing Windows 10:

Since this utility needs to be ran as a super user to create a new MBR Partition Table and FAT32 format on your USB flash drive you will get a Authentication required pop up. Input your password and select Authenticate:

WoeUSB will create the Legacy Bootable USB. When it is finished it will state «Installation suceeded!» i.e. the Bootable USB is created.

You now have a Windows 10 Legacy Bootable USB.
Creating a Windows 10 UEFI Bootable USB with Driver Slipstream
It’s been reported on the Dell forums that some users are having difficulties installing Windows 10 on an XPS 13 7390 and the Windows installation media needs to be updated to incorporate the Windows 10 Driver Pack in order to install. Unfortunately the wimlib library is unable to perform the driver slipstream and a Windows OS must be used. If you have no additional Windows computer available you can use the Windows 10 ISO you downloaded to create a temporary unlicensed virtual machine using VMware or VirtualBox.
Follow the instructions in Creating a Windows 10 UEFI Bootable USB
- Checking your Install.wim File Size
- Software Install
- ⁝
- Formatting a USB Flash Drive using GParted
- Copying Windows Setup Files
- Enabling a UEFI Boot with Secure Boot
For section 3, create your VM. Instructions for creating a VM in VMware are below:
Go to the sources folder of the mounted ISO (in Windows or in Ubuntu) and Copy the install.wim.

Paste it directly to C: (in your Windows VM)

Select Continue to allow permissions:

Right click the install.wim and select Properties:

Ensure Read Only is not checked then select Apply:

Then select Continue:

We need to use PowerShell to split the install.wim file into multiple install.swm files that are less than 4 GB.
For select business models (OptiPlex, Latitude, Precision and XPS) you also have the option to download the Dell Driver Cab and we can slipstream this into the install.wim using a handful of lines of code. You will also need to download and install 7-zip in order to extract the drivers folder.
This guide focuses more on the Dell systems but it will also work with the Lenovo Business model if you rename the extracted folder Drivers and move it to the C: Drive the procedure will be identical.
On the Dell website select your model and then select Windows 10 64 Bit under Operating System and then Systems Management under category.

Select the Driver Pack and select Download:

You will need to extract these drivers. I recommend using 7zip for this.

Right click the CAB file and select 7-Zip and then Extract to » «:

You may get the Warning «There are some data after the end of the payload data». You can ignore this and select Close:

Open the extracted folder:

Select the model:

Select the Win10 folder:

You should now have an x64 folder.

Right click this folder and select rename, rename the folder
Drivers

Copy this folder directly to:C:

You should now have the following:

Now right click the start button and select Windows PowerShell (Admin):

Accept the User Account Control Prompt:

Copy the following command:Dism /Get-WimInfo /WimFile:C:install.wim

Right click the file and select run as administrator. Select your index. I will select index 6 for Windows 10 Pro.

Copy and paste in the following command to create a temporary folder:
mkdir C:WinTemp
Copy the following command (amending the index to desired) to extract the index of the install.wim to the temporary folder:
Dism /Mount-WIM /WimFile:C:install.wim /index:6 /MountDir:C:WinTemp
Type in the following command to add the drivers to this folder:
Dism /Image:C:WinTemp /Add-Driver /Driver:C:Drivers /Recurse
Type in the following command to commit the changes:
Dism /Unmount-WIM /MountDir:C:WinTemp /Commit
Type in the following to remove the temporary folder:
rmdir C:WinTemp
Type in the following to get the updated information about the install.wim
Dism /Get-WimInfo /WimFile:C:install.wim
Type in the following to split the install.wim into multiple install.swm files:
Dism /Split-Image /ImageFile:C:install.wim /SWMFile:C:install.swm /FileSize:4000

You may now close down the Powershell Prompt:

Now copy install.swm and install2.swm:

From your VM to your Ubuntu downloads folder. Follow the remaining instructions in Creating a Windows 10 UEFI Bootable USB:
- Checking your Install.wim File Size
- Software Install
- ⁝
- Formatting a USB Flash Drive using GParted
- Copying Windows Setup Files
- Enabling a UEFI Boot with Secure Boot

- Remove From My Forums
-
Question
-
On my machine, which runs on
Linux Mint 17, i have visited
the https://www.microsoft.com/hu-hu/software-download/windows10 website
and clicked the Download Tool
(32 bit version) link. An
around 3 GB file was downloaded.
The question is whether may use
this file for installation of Windows 10 after having
to burn to a DVD in the same way,
as if after downloading Windows Media
Creation Tool?
Answers
-
-
Marked as answer by
zotya62
Tuesday, August 4, 2015 7:45 AM
-
Marked as answer by
All replies
-
I know these sites. The question precisely is
that whether on Linux host it
can be used the download link? -
-
Proposed as answer by
techguy52
Tuesday, December 20, 2016 10:10 PM
-
Proposed as answer by
-
No body here has any idea on how to do this, because they don’t run a Linux. I on the other hand do run a Ubunta 16.04. Their are softwares you can download under Ubuntu Software or what ever system you’re using (Your Linux — Software)*. Their are ways to
mount .ISO to DVD Drive as well as ,ways to mount usb’s to reformat them to be able to act as a boot.Either look up UNetbootin, or type in .ISO and read the descriptions. If you need more help, Than I’ll need to know what system you run. Go to System settings & details.
-
Edited by
H1G7n3Sky_aka_High-In-The-Sky
Sunday, January 22, 2017 10:01 PM
-
Edited by
-
On linux you should install Unetbootin. Last time I worked with Mint it was derived from Debian.
On Debian if your distribution includes the official repo for Unetbootin, enter the command «sudo apt-get install unetbootin» after the install if you don’t have, then install gparted using the same command.
Format the partition accordingly to your filesystem and that you intend to run Windows OS.
If Unetbootin is not an option for reason XYZ — please use the following command carefully!
«dd if=/(path/to/windows-ISO of=/dev/sdx» <— just replace path/to/windows-ISO with the directory your ISO is located. And of course gparted or fdisk -l will indicate the correct partition you are looking for, be sure to double check and check
again before changing ‘sdX’ to the correct extension IE SDA(1,2,3,)/SDB(1,2,3)Of course remove quote marks before running the command, DD and apt-get always require root — so just throw in a SUDO before initial commands.
Windows usus NTFS so be sure to format a partition correcly
-
This has me thinking.
If you have virtual machine-ware, and your BIOS has the option for virtualization you maybe able to load and install the windows operating system to a virtual hard disk image and then copy the entire filesystem to a hard drive, mount and then issue a simple
DD command to burn to contents of the cloned hard disk image as to an ISO file you can set to boot on removable media for ease of installation.I’ll try this myself, I currently have myself a copy of 64-bit Windows 10 ISO I will post results before testing with 32-bit.
-
sudo add-apt-repository ppa:gezakovacs/ppa sudo apt-get update sudo apt-get install unetbootinYou have to be somewhat familiar with terminal commands to use Linux. Familiarize yourself
on how to add repositories via terminal because this is the easiest way you're going to install
software. Use this app (unetbootin) it's useful for all Linux distros, you can use it for any
windows variant as well.
Make sure your usb is formatted correctly.
Good luck!
-
Proposed as answer by
Highimjosh
Friday, August 17, 2018 5:01 PM
-
Proposed as answer by
 Если вам по той или иной причине потребовалась загрузочная флешка Windows 10 (или другой версии ОС), при этом на имеющемся компьютере в наличии только Linux (Ubuntu, Mint, другие дистрибутивы), вы сравнительно легко можете записать её.
В этой инструкции пошагово о двух способах создать загрузочную флешку Windows 10 из Linux, которые подойдут как для установки на UEFI-системе, так и для того, чтобы установить ОС в Legacy режиме. Также могут пригодиться материалы: Лучшие программы для создания загрузочной флешки, Загрузочная флешка Windows 10.
Загрузочная флешка Windows 10 с помощью WoeUSB
Первый способ создания загрузочной флешки Windows 10 в Linux — использование бесплатной программы WoeUSB. Созданный с её помощью накопитель работает и в UEFI и в Legacy режиме.
Для установки программы используйте следующие команды в терминале
sudo add-apt-repository ppa:nilarimogard/webupd8
sudo apt update
sudo apt install woeusb
Если эти команды не сработали, попробуйте такой вариант:
wget mirrors.kernel.org/ubuntu/pool/universe/w/wxwidgets3.0/libwxgtk3.0-0v5_3.0.4+dfsg-3_amd64.deb
sudo dpkg -i libwxgtk*_amd64.deb
sudo apt update
sudo apt --fix-broken install
sudo apt install woeusb
После установки порядок действий будет следующим:
- Запустите программу.
- Выберите ISO образ диска в разделе «From a disk image» (также, при желании, можно сделать загрузочную флешку с оптического диска или смонтированного образа).
- В разделе «Target device» укажите флешку, на которую будет записан образ (данные с неё будут удалены).

- Нажмите кнопку Install и дождитесь завершения записи загрузочной флешки.

- При появлении ошибки с кодом 256 «Source media is currently mounted», размонтируйте образ ISO с Windows 10.

- При ошибке «Target device is currently busy», размонтируйте и отключите флешку, затем снова подключите её, обычно помогает. Если не сработало, попробуйте предварительно отформатировать её.


На этом процесс записи завершен, можно использовать созданный USB накопитель для установки системы.
Создание загрузочной флешки Windows 10 в Linux без программ
Этот способ, пожалуй, ещё проще, но подойдет только в том случае, если вы планируете загружаться с созданного накопителя на UEFI-системе и устанавливать Windows 10 на GPT диск.
- Отформатируйте флешку в FAT32, например, в приложении «Диски» в Ubuntu.

- Смонтируйте образ ISO с Windows 10 и просто скопируйте всё его содержимое на отформатированную флешку.


Загрузочная флешка Windows 10 для UEFI готова и с неё можно без проблем загрузиться в EFI-режиме.