This blog post covers how you can create a bootable USB media drive to install Windows Server 2019 on a physical server. This blog post will not use any third-party tools; it only uses built-in tools that you can find on Windows 10 or Windows Server. Depending on your system you will need it to install it on a BIOS system or a UEFI based system, which is slightly different since UEFI will use GPT disks and BIOS will use an MBR disk. Here is how you create a USB Drive for a Windows Server 2019 installation.
Getting ready to create a USB Drive for a Windows Server 2019 Installation
First, you will need to have all the prerequisites in place.
- Download the Windows Server 2019 ISO File
- A USB Drive with at least 8GB size
Windows Server 2019 USB Thumb Drive for UEFI (GPT) systems
To create the USB drive to install Windows Server 2019 on a UEFI (GPT system, you do the following steps:
- The at least an 8GB USB drive has to be formatted in FAT32
- The USB needs to be GPT and not MBR
- Copy all files from the ISO to the USB drive
This is it, and here is how you do it. First, plug in your USB drive to your computer.
Open a PowerShell using the Run as Administrator option. You will need to change the path of the Windows Server 2019 ISO, and you will need to replace the USB Friendly Name in the script.
REMINDER: The following commands will wipe the USB Drive completely. So backup everything before you run through the PowerShell.
# Define Path to the Windows Server 2019 ISO
$ISOFile = "C:TempWindowsServer2019.iso"

# Get the USB Drive you want to use, copy the friendly name
Get-Disk | Where BusType -eq "USB"

# Get the right USB Drive (You will need to change the FriendlyName)
$USBDrive = Get-Disk | Where FriendlyName -eq "Kingston DT Workspace"

# Replace the Friendly Name to clean the USB Drive (THIS WILL REMOVE EVERYTHING)
$USBDrive | Clear-Disk -RemoveData -Confirm:$true -PassThru

# Convert Disk to GPT
$USBDrive | Set-Disk -PartitionStyle GPT

# Create partition primary and format to FAT32
$Volume = $USBDrive | New-Partition -UseMaximumSize -AssignDriveLetter | Format-Volume -FileSystem FAT32 -NewFileSystemLabel WS2019

# Mount iso
$ISOMounted = Mount-DiskImage -ImagePath $ISOFile -StorageType ISO -PassThru

# Driver letter
$ISODriveLetter = ($ISOMounted | Get-Volume).DriveLetter

# Copy Files to USB
Copy-Item -Path ($ISODriveLetter +":*") -Destination ($Volume.DriveLetter + ":") -Recurse

# Dismount ISO
Dismount-DiskImage -ImagePath $ISOFile
After that, you can safely remove the USB drive and use it to boot your server from.
Important:
If Install.wim is larger than 4GB, you cannot copy the file to the drive, because of the FAT32 based partition limitation. The solution for this is to split the wim file into smaller files.
split wim file using dism (you may have to change the drive letters):
dism /Split-Image /ImageFile:e:sourcesinstall.wim /SWMFile:k:sourcesinstall.swm /FileSize:4096
Windows Server 2019 USB Thumb Drive for BIOS (MBR) systems
To create the USB drive to install Windows Server 2019 on BIOS (MBR) systems, you can follow these steps:
- The at least an 8GB USB drive has to be formatted in NTFS
- USB drive needs to us MBR
- The partition needs to be set active
- Copy all files from the ISO to the USB Drive
This is it, and here is how you do it. First, plug in your USB drive to your computer.
Open a PowerShell using the Run as Administrator option. You will need to change the path of the Windows Server 2019 ISO, and you will need to replace the USB Friendly Name in the script.
REMINDER: The following commands will wipe the USB Drive completely. So backup everything before you run through the PowerShell.
# Define Path to the Windows Server 2019 ISO
$ISOFile = "C:TempWindowsServer2019.iso"

# Get the USB Drive you want to use, copy the friendly name
Get-Disk | Where BusType -eq "USB"

# Get the right USB Drive (You will need to change the FriendlyName)
$USBDrive = Get-Disk | Where FriendlyName -eq "Kingston DT Workspace"

# Replace the Friendly Name to clean the USB Drive (THIS WILL REMOVE EVERYTHING)
$USBDrive | Clear-Disk -RemoveData -Confirm:$true -PassThru

# Convert Disk to MBR
$USBDrive | Set-Disk -PartitionStyle MBR

# Create partition primary and format to NTFS
$Volume = $USBDrive | New-Partition -UseMaximumSize -AssignDriveLetter | Format-Volume -FileSystem NTFS -NewFileSystemLabel WS2019

# Set Partiton to Active
$Volume | Get-Partition | Set-Partition -IsActive $true

# Mount ISO
$ISOMounted = Mount-DiskImage -ImagePath $ISOFile -StorageType ISO -PassThru

# Driver letter
$ISODriveLetter = ($ISOMounted | Get-Volume).DriveLetter

# Copy Files to USB
Copy-Item -Path ($ISODriveLetter +":*") -Destination ($Volume.DriveLetter + ":") -Recurse

# Dismount ISO
Dismount-DiskImage -ImagePath $ISOFile
After that, you can safely remove the USB drive and use it to boot your server from to install Windows Server 2019.
If you have any questions, please let me know in the comments.
Tags: BIOS, Boot from USB, Format Disk, gpt, Install USB Drive, Install Windows Server 2019, installation, iso, MBR, Microsoft, Mount ISO, PowerShell, UEFI, USB, USB Drive, USB media drive, USB Windows Server 2019, Windows Server, Windows Server 2019 Last modified: November 22, 2021
About the Author / Thomas Maurer

Thomas works as a Senior Cloud Advocate at Microsoft. He engages with the community and customers around the world to share his knowledge and collect feedback to improve the Azure cloud platform. Prior joining the Azure engineering team, Thomas was a Lead Architect and Microsoft MVP, to help architect, implement and promote Microsoft cloud technology.
If you want to know more about Thomas, check out his blog: www.thomasmaurer.ch and Twitter: www.twitter.com/thomasmaurer
Содержание
- ИТ База знаний
- Полезно
- Навигация
- Серверные решения
- Телефония
- Корпоративные сети
- Создание загрузочного USB накопителя для установки Windows Server 2019
- Зачем создавать загрузочный USB?
- Создание USB загрузочной флешки с Windows Server 2019
- Использование Rufus
- Подготовка инсталляционного USB носителя вручную
- Использование OSDBuilder для кастомизации образа
- Заключение
- Загрузочная флешка windows сервер 2019
- Чистая установка windows server 2019
- Загрузочная флешка windows сервер 2019
- Create a USB Drive for Windows Server 2019 Installation
- Getting ready to create a USB Drive for a Windows Server 2019 Installation
- Windows Server 2019 USB Thumb Drive for UEFI (GPT) systems
- Important:
- Windows Server 2019 USB Thumb Drive for BIOS (MBR) systems
- About the Author / Thomas Maurer
- Related Posts
- Azure Arc enabled Server – Store AWS instance metadata as Azure tag
- Install Sysinternals from the Microsoft Store
- DP-420 Study Guide Microsoft Azure Cosmos DB Developer
- AZ-305 Exam Study Guide Azure Solutions Architect Certification
- 68 Replies to “Create a USB Drive for Windows Server 2019 Installation”
ИТ База знаний
Полезно
— Онлайн генератор устойчивых паролей
— Онлайн калькулятор подсетей
— Руководство администратора FreePBX на русском языке
— Руководство администратора Cisco UCM/CME на русском языке
— Руководство администратора по Linux/Unix
Навигация
Серверные решения
Телефония
FreePBX и Asterisk
Настройка программных телефонов
Корпоративные сети
Протоколы и стандарты
Создание загрузочного USB накопителя для установки Windows Server 2019
Загружаемся с флешки
USB-устройства уже полностью вытеснили оптические носители из работы. Сюда же можно отнести и хранение дистрибутивов ОС. USB-устройства во многом превосходят оптические носители по скорости и их легко использовать для установки операционных систем. В наши дни они удобны и крайне недороги. Кроме того, существует множество инструментов для взаимодействия с USB-накопителями и создания на них дистрибутивов ОС. Установить Windows Server 2019 с USB-накопителя очень просто. В этой статье изучим некоторые способы создания USB-накопителя для установки Windows Server 2019.

Зачем создавать загрузочный USB?
Создание USB загрузочной флешки с Windows Server 2019
Рассмотрим три различных метода создания загрузочного USB
Перед тем как выбрать метод установки, нужно загрузить образ диска. Если в компании не приобретена подписка Visual Studio, можно загрузить ISO образ из Центра загрузки и оценки Microsoft.
Использование Rufus
Раньше приходилось использовать какую-либо утилиту для записи ISO-образа на оптический носитель. Теперь Rufus предоставляет практически те же функции, но позволяет записать ISO-образ на USB-накопитель. Программа обладает простым интерфейсом на русском языке и имеет портативную версию. Загрузить программу можно с сайта Rufus.

При записи программа предупредит, что все данные на USB устройстве будут удалены!

Подготовка инсталляционного USB носителя вручную
Внимание! Все данные на USB носителе в процессе использования diskpart будут удалены.

Следующим шагом подключим ISO образ в систему. Для этого, щелкнем правой кнопкой мыши по ISO файлу и выберем «Подключить». Затем выделите все файлы в смонтированном образе и скопируйте их на целевой USB-накопитель.


Чтобы обойти ошибку, связанную с ограничением файловой системы FAT32, разделим файл install.wim на несколько файлов не превышающих размер 4 Гб.
И это действие можно выполнить двумя способами. Первый, используя бесплатную программу GImageX для работы c wim файлами. В ней переходим на вкладку Split, указываем файл install.wim и папку, в которую нужно записать новые файлы.

С помощью dism можно добавлять и удалять: роли и компоненты, обновления и драйвера. Более подробно написано в этой статье.
Использование OSDBuilder для кастомизации образа
OSDBuilder это модуль PowerShell, с его помощью возможно создать свой, с настроенными предварительно параметрами, ISO образ. Как и Dism, OSDBuilder позволяет выполнять автономное обслуживание операционной системы Windows, включая и Windows Server 2019. Для этого создается файл ответов, называемый задачей, которая позволяет автоматизировать обслуживание автономного образа. С помощью командлета New-MediaUSB создается загрузочный USB носитель.
При установке и импорте модуля OSDBuilder может возникнуть ошибка, т.к. операционной системе по умолчанию запрещено запускать ненадежные сценарии PowerShell.

Изменив политику выполнения скриптов, команда импорта модуля завершится без ошибки.
С полным списком команд и последовательностью работы можно ознакомиться на сайте проекта.
Заключение
Онлайн курс по Linux
Мы собрали концентрат самых востребованных знаний, которые позволят тебе начать карьеру администратора Linux, расширить текущие знания и сделать уверенный шаг к DevOps
Источник
Загрузочная флешка windows сервер 2019
И добрый день! Очень рад вас вновь видеть, уважаемые читатели и гости IT блога Pyatilistnik.org. На дворе уже 2019 год, а это значит, что Microsoft готова нас с вами перевести на новый продукт в серверном сегменте. В прошлый раз я вам рассказывал, как производится установка Windows Server 2016. Данная операционная система заимела очень хорошую оценку, это вам не десятка и Microsoft тут особо не экспериментирует, это же корпоративный сегмент, приносящий основные дивиденды. Сегодня я вам покажу, процесс установки Windows Server 2019 Standard, и мы разберем что нового в данной ОС. Уверен, что вам будет интересно.
Чистая установка windows server 2019
Когда речь идет, о сервере, то ни один уважающий себя администратор, не будет производить обновление одной версии на другую, это вам не клиентские операционные системы, где например, Windows 7 обновляли до Windows 10. Так как это сервер, то и у него ответственность иная, он предоставляет пользователям и клиентам сервисы компании, нужные для бизнес процесса или получения прибыли, поэтому тут все серьезнее.
Правильнее производить чистую установку на виртуальную машину или физический сервер, и уже потом на него переводить (мигрировать) нужные вам сервисы со старого сервера, причем за счет нововведений Windows Server 2019.
Из подготовительных действий вам нужно выполнить три действия :
Я буду производить инсталляцию на тестовом стенде, поэтому у меня это будет простое монтирование ISO в виртуальную машину, вы же должны выбрать удобный для себя метод. Первым делом, когда вы вставили загрузочное устройство, вам в BIOS нужно выставить загрузку с него, так называемый приоритет загрузки.
Когда все сделано как нужно, то после перезагрузки сервера у вас появится сообщение, о выборе загрузки с диска с дистрибутивом, в виде сообщение «Press any key to boot from CD or DVD» вам нужно успеть нажать «Enter», для того чтобы попасть в мастер установки.

После того, как у вас пробежит белый ползунок загрузки мастера установки, у вас появится приветственное окно «Установка Windows», где вам покажут, что это Windows Server 2019 и предложат выбрать три пункта, которые напоминаю, будут распространятся только на интерфейс мастера инсталляции:

После чего можете смело нажимать «Далее». На следующем окне мастера установки Windows Server 2019 Standard у вас будет две кнопки. Собственно кнопка «Установка» и ссылка на инструменты восстановления системы. Начнется подготовка «Начало установки».

Далее от вас потребуют указать, какую операционную систему систему вы выбираете, на выбор будет четыре варианта, два с графическим интерфейсом, а два в режиме ядра (Core), но разница только в редакции Standard или Datacenter. Выбираем нужную и нажимаем «Далее».

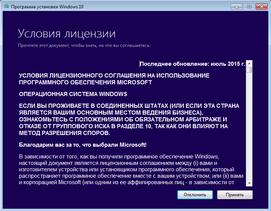
Теперь если вы совсем упоротый, то полностью изучаем и читаем условия лицензии, после чего их принимаем, ставя соответствующую галку «Я принимаю условия лицензии».

Теперь у вас будет самый важный шаг, вы по сути на развилке:

Теперь остался последний подготовительный этап, и заключается он в том, что вам необходимо разметить диск для установки системы. В момем примере, это SSD диск, размеров в 40 гб, в виде незанятого пространства и я просто нажимаю далее. Если у вас уже имеются разделы, то нужно выбрать куда вы будите ставить, обчно делают резервную копию данных, после чего удаляют не нужные разделы.

Ну и собственно начинается сам процесс установки виндоус. У вас на первом этапе, мастер инсталляции Windows Server 2019 скопирует с дистрибутива необходимые файлы на локальный диск, после чего начнет их извлечение, а уже потом начнет установку компонентов и обновлений. Как только он это сделает сервер первый раз перезагрузиться, по сути ему больше не нужно будет иметь подключенного загрузочного устройства с дистрибутивом системы.

Вот так вот будет выглядеть завершающий этап

Потребуется еще одна перезагрузка.

Теперь начинается подготовительный этап, где будет определено ваше оборудование и произведены для него настройки

Когда все будет закончено, у вас появится окно «Настройка параметром», где вас попросят указать два раза пароль для учетной записи Администратор, напоминаю, что тут действует правило стойкости пароля.

Через мгновение перед вами будет экран аутентификации, нажимаем волшебное сочетание клавиш CTRL+ALT+DELETE

Вводим пароль администратора и логинимся в систему.

Перед вами будет рабочий стол, для примера я зайду в окно «о системе», где мы видим, что установлена Windows Server 2019 Standard 1809 Сборка 17763.107

Когда вы попадете на рабочий стол 2019 сервера, то у вас автоматически будет запущено окно диспетчера серверов, как это было и ранее, но тут появился новый нюанс, в виде окна с подсказкой, где компания Microsoft вас уведомит, что появился новый инструмент управления серверами, под названием Windows Admin Center, это кросплатформенный комбайн управления серверами из браузера, думаю он станет через лет пять, основным инструментом для системного администратора, о нем я напишу отдельную статью (Настройка Windows Admin Center)

В диспетчере серверов, у вас все так же будут три вкладки:
Вот так вот выглядит окно управления локальным сервером, тут все по старому, здесь вы можете выполнить действия:

Перед вами список ролей Windows Server 2019, в данной версии операционной системы их 20.

Вот подробный список компонентов в Windows Server 2019
Источник
Загрузочная флешка windows сервер 2019
В этой статье мы рассмотрим детально как установить Windows Server 2019 и самую первичную настройку, что нужно сделать сразу после установки системы. Как детально настроить Windows Server 2019 читайте в нашей следующей статье.
3) Далее Вам нужно загрузиться с флешки из под биоса для начала самой установки. Краткая инструкция как загрузиться с флешки.
4) Теперь после того, как Вы загрузились с флешки, приступаем к началу установки.

Выбираем язык операционной системы, выберем русский.


Далее выбираем желаемую редакцию Windows Server 2019 для установки. В данной статье мы установим версию Standard, но Вы можете выбрать другую версию, к примеру Datacenter. Порядок установки в ней аналогичный.
А так же, обязательно выбираете дистрибутив с «Возможности рабоче стола», иначе у Вас система установится без графической оболочки и управление операционной системой будет только из под консоли.

Принимаем условия лицензирования.

Далее, выбираем выборочную установку, т.к мы устанавливаем систему с нуля.

После у Вас будет меню выбора диска куда установить систему. На нашем примере только один диск, у Вас же их может быть больше. Выбираете нужный диск для установки и нажимаем «Далее».

И теперь начинается непосредственно сама установка, ожидайте ее окончание.

Во время установки система перезагрузится несколько раз.

После завершения установки Вам нужно будет задать пароль для учетной записи администратора. Пароль лучше задавать латинскими буквами с цифрами.


Далее заходим под учетной записью администратора в систему.


После активации переходим снова в меню «Свойства системы» и проверяем все ли активировалось. Если да, то переходим к загрузке актуальных обновлений.


Нажимаем на кнопку «Проверить наличие обновлений».

Загружаем обновления, после устанавливаем их. После установки нужно перезагрузить систему.

На этом все. Установка и первичная настройка закончена. Как детально настроить Windows Server 2019 читайте в нашей следующей статье.
Источник
Create a USB Drive for Windows Server 2019 Installation

This blog post covers how you can create a bootable USB media drive to install Windows Server 2019 on a physical server. This blog post will not use any third-party tools; it only uses built-in tools that you can find on Windows 10 or Windows Server. Depending on your system you will need it to install it on a BIOS system or a UEFI based system, which is slightly different since UEFI will use GPT disks and BIOS will use an MBR disk. Here is how you create a USB Drive for a Windows Server 2019 installation.
Getting ready to create a USB Drive for a Windows Server 2019 Installation
First, you will need to have all the prerequisites in place.
Windows Server 2019 USB Thumb Drive for UEFI (GPT) systems

To create the USB drive to install Windows Server 2019 on a UEFI (GPT system, you do the following steps:
This is it, and here is how you do it. First, plug in your USB drive to your computer.
Open a PowerShell using the Run as Administrator option. You will need to change the path of the Windows Server 2019 ISO, and you will need to replace the USB Friendly Name in the script.
REMINDER: The following commands will wipe the USB Drive completely. So backup everything before you run through the PowerShell.
After that, you can safely remove the USB drive and use it to boot your server from.
Important:
If Install.wim is larger than 4GB, you cannot copy the file to the drive, because of the FAT32 based partition limitation. The solution for this is to split the wim file into smaller files.
split wim file using dism (you may have to change the drive letters):
Windows Server 2019 USB Thumb Drive for BIOS (MBR) systems

To create the USB drive to install Windows Server 2019 on BIOS (MBR) systems, you can follow these steps:
This is it, and here is how you do it. First, plug in your USB drive to your computer.
Open a PowerShell using the Run as Administrator option. You will need to change the path of the Windows Server 2019 ISO, and you will need to replace the USB Friendly Name in the script.
REMINDER: The following commands will wipe the USB Drive completely. So backup everything before you run through the PowerShell.
After that, you can safely remove the USB drive and use it to boot your server from to install Windows Server 2019.

If you have any questions, please let me know in the comments.


Azure Arc enabled Server – Store AWS instance metadata as Azure tag

Install Sysinternals from the Microsoft Store

DP-420 Study Guide Microsoft Azure Cosmos DB Developer

AZ-305 Exam Study Guide Azure Solutions Architect Certification
Sorry forgot to remove it from the PowerShell Comment. Copy Past error 🙂 I used the script for a ISO where the install.wim was larger than 4GB, in that case you need to split it first before you can copy it.
I thought that Windows Server 2019 was supposed to fit on one single-layer DVD. The original release did, because I actually made such a DVD. The fixed one seems to be just a little too big, which strikes me as being sloppy. Burning a DVD is a lot easier than typing Powershell commands!
Sometimes 🙂 But there are a lot of servers out there, which do not have a DVD drive anymore 🙂
Plus, it an USB drive is way faster 🙂 DVD is so 2003 😉
We could also just use Rufus to burn the iso to a usb to make it bootable. kinda does all of this for you. right?
Absolutely 🙂 If you don’t want to spend time and you can install software on your device, then yes 🙂
After the instalation I want turn back my pen drive to a normal Pen Drive (removable), how I can do this? You can help me?
You can just format the drive again 🙂
I am not able to convert my USB drive to GPT. I searched and found this Microsoft article that states, “You cannot use the GPT partition style on removable media.” (https://docs.microsoft.com/en-us/windows-server/storage/disk-management/change-an-mbr-disk-into-a-gpt-disk)
I checked with the Microsoft Product Group, this was a mistake in the documentation. It is now fixed!
You should be able to use GPT on your USB Drive!
Thank you for the post which worked well. However I cannot get 2019 to boot after the I initial installation and I am starting to suspect every thing. I get a flashing cursor and 4hat is it. Can 2019 run in bios mode? Previously I have just played on a hyperv session with 2019.
Thanks for this – very helpful
Thanks. But, common mistake in second script: comments do not match the code.
Unfortunately, this fails for me on WS2016:
+ CategoryInfo : NotSpecified: (StorageWMI:ROOT/Microsoft/Windows/Storage/MSFT_Disk) [Initialize-Disk], CimException
+ FullyQualifiedErrorId : StorageWMI 41001,Initialize-Disk
What might be wrong?
Did you run the clear command to clean up the USB stick from all existing partitions etc?
You should look up the SerialNumber:
as the FriendlyName often is truncated:
Number Friendly Name Serial Number
—— ————- ————-
2 Generic ST… 000000000540
3 Generic ST… 000000000541
4 Generic ST… 000000000542
5 Generic ST… 000000000543
6 Generic ST… 000000000544
7 Verbatim S… AA00000000000489
No. 7 is really Verbatim STORAGE N GO. Not that easy, if you didn’t know.
Hi, Thomas! Thanks for sharing your scripts. I slightly modified each to make them a bit more universal. Take a look: http://www.hyper-v.io/create-bootable-usb-windows-server-2019-installation/
HI, Will this above method work for windows 7
Yes, I haven’t tried it, but it should work the same way 🙂
At this point, I also could still not run the Initialize-Disk command but it didn’t seem to be necessary, so I continued without it.
After all of these issues and tweaks, it worked for me with the “Windows Server 2019 (updated March 2019)” ISO from MSDN.
I got a little stuck in this guide as PowerShell refused to Initialize-Disk because the disk had already been initialized. Ended up sorting it with diskpart and the rest went smooth
diskpart> select disk N
diskpart> clean
diskpart> convert gpt
Hi Andrew
Sorry, it looks like I misunderstood your question. You can create a Windows 7 USB drive like this. However, if you want to run these commands you need at least Windows 8 or higher, because the PowerShell Storage Module, is only available in Windows 8 or higher.
what a totally unnecessary bunch of steps.
use a linux computer.
fdisk /dev/sda > delete partitions, make one partition, write
dd status=progress if=/pathTOiso of=/dev/sda (dont include the partition number, write to whole disk)
make sure partition is under 32GB
Hi Andrew I get this error when I enter the copy-item command, any idears?
+ CategoryInfo : WriteError: (install.wim:FileInfo) [Copy-Item], IOException
+ FullyQualifiedErrorId : CopyDirectoryInfoItemIOError,Microsoft.PowerShell.Commands.CopyItemCommand
Sorry not Andrew, meant Thomas 🙂
HI
I get a 0xc0000021a stop error when attempting to boot from a Windows Server 2019 USB I created with rufus
I am about to receive my new server and will give it a try. One question, how is this going to work if install.wim is removed? Are there any additional steps to perform for the installation? Seems as if the meat of the OS is missing from the USB drive.
Oh, I see, there is still a comment that says install.wim will not be copied. This is not the case, install.wim will be copied with that script. Just didn’t, just forgot to update the comment in the script. You should definitely have install.wim copied by this script.
I removed the mention in the comment.
As I suspected, I am getting an error that install.wim does not exist. How is this script supposed to work? I followed the steps, created the bootable drive, the install starts, and I am getting an error that this file is missing.
I get the same error that Darren has:
+ CategoryInfo : NotSpecified: (:) [Copy-Item], NotSupportedException
+ FullyQualifiedErrorId : System.NotSupportedException,Microsoft.PowerShell.Commands.CopyItemCommand
+ CategoryInfo : NotSpecified: (:) [Copy-Item], NotSupportedException
+ FullyQualifiedErrorId : System.NotSupportedException,Microsoft.PowerShell.Commands.CopyItemCommand
But I found the USB disk wasn’t given a drive letter, so it didn’t know where to copy it to. Manually gave it one and edited the destination and it worked.
Not ideal as I make many of these, but it worked.
Also edited the top part to give a gridview out of USB disks, I did nick the idea from somewhere else but can’t for the life of me remember.
That might be half my other problem though.
I also get the following error:
+ CategoryInfo : WriteError: (install.wim:FileInfo) [Copy-Item], IOException
+ FullyQualifiedErrorId : CopyDirectoryInfoItemIOError,Microsoft.PowerShell.Commands.CopyItemCommand
It seems script is not working. It starts copying the installation files from the ISO image and stops when it is trying to copy the WIM.
In order to be fair, it might not be the script. I also tried with another method using diskpart and I also get an error when trying to copy WIM
So there must be an error in the ISO file. It is strange because the same mistake happened to other people too. Also I used this ISO to install Windows 2019 server on a Hyper-V host as a virtual machine without any problems
I think the reason for the problem was the following: Install.wim file is 4,2GB. FAT32 is not compatible with files larger than 4GB. When a script or any command tries to copy the file from the ISO to the USB the error shows up.
I tried the second method ntfs and mbr and it created the USB without errors
This is great an all but this assumes everyone knows how to create and run a script in powershell. A short explanation on how to do that would help. I open powershell and don’t know what to do. Am I supposed to copy/past your text into a notepad file and name it a certain way and then run that? Assume we are all novices with powershell.
Hi thank you for the article, I want to make it UEFI compatible but my iso Install.wim file is over 4 gb how can I accomplish it?
I have seen you talk about splitting the the file to copy it. What do I have to add to the script?
You can use the following dism command to split the WIM file. Make sure you change the driveletters:
dism /Split-Image /ImageFile:e:sourcesinstall.wim /SWMFile:k:sourcesinstall.swm /FileSize:4096
I have spent the entire day reading different google searches and still have not succeeded in making a bootable usb WS2019 device.
Is there any persons that could assist me by email?
To split the WIM file you can use the following command (I added it to the blog post):
dism /Split-Image /ImageFile:e:sourcesinstall.wim /SWMFile:k:sourcesinstall.swm /FileSize:4096
If you run Windows 7, you can use my guide for Windows Server 2016, since that one is based on the dism.exe file. https://www.thomasmaurer.ch/2016/10/create-a-usb-stick-for-windows-server-2016-installation/
I hope that helps you 🙂
That is not correct, during initialize-disk you set the PartitionStyle, you don’t need to run it before. When you follow the instructions and clean the disk fully before.
Did you see the notice in the blog where it says important? There you find instructions to split the WIM file, so it will fit on the USB drive with FAT32.
dism /Split-Image /ImageFile:e:sourcesinstall.wim /SWMFile:k:sourcesinstall.swm /FileSize:4096
Update: Oh I see you did, sorry 🙂 Happy it worked for you!
Might be useful to just add the dism to the script where if the copy fails due to install.wim file size, run dism from newly mounted iso to the drive letter of the usb being formatted. THEN unmount the iso.
Just think you might get less push back from the confused peanut gallery.
Great script though!
Good idea! will see if I can find some time to add it 🙂
Источник
Windows Server

Muhammad FaizanSeptember 9, 2020 — Last Updated: December 14, 2020
0 2,326 2 minutes read

Muhammad Faizan
Hi, My name is Muhammad Faizan and i have spent last 15 years working as System Administrator mainly with Microsoft Technologies. I am MCSE, MCTP, MCITP, certified professional. I love scripting and Powershell is the scripting language i am in love with.
-
Website
-
Facebook
Related Articles
Содержание
- Media Creation Tool для Windows
- Отзывы о программе Media Creation Tool
- Media Creation Tool для Windows
- Функционал Media Creation Tool
- Download Windows 10
- Windows 10 October 2020 Update
- Create Windows 10 installation media
| Оценка: |
4.07 /5 голосов — 93 |
| Лицензия: | Бесплатная |
| Версия: | 10.0.19041.572 | Сообщить о новой версии |
| Обновлено: | 21.10.2020 |
| ОС: | Windows 10, 8.1, 8, 7 |
| Интерфейс: | Английский, Русский |
| Разработчик: | Microsoft Corporation |
| Категория: | Обновления, патчи |
| Загрузок (сегодня/всего): | 52 / 132 381 | Статистика |
| Размер: | 18,56 Мб |
| СКАЧАТЬ |

Windows 10 Media Creation Tool — фирменная утилита от Microsoft Corporation, позволяющая создавать загрузочные образы операционной системы Windows 10 без использования ключа продукта непосредственно с сервера компании. Эта программа значительно упростила получение нужной Вам версии ОС Windows, не требуя сложных настроек и предоставляя возможность выбора необходимой архитектуры.
Для получения полностью легального образа системы потребуется интернет-соединение, а также носитель — USB-флешка или DVD-диск. После запуска утилиты выберите язык ОС, тип издания (домашняя, Pro и др.) и архитектуру (32-bit или 64-bit). А далее просто определите, куда записать образ операционки. Если выберите DVD-диск, то будет создан ISO-образ, а при выборе USB flash drive загрузочная флешка создастся даже без предварительного ISO-образа. Далее все проходит в автоматическом режиме — Вам останется только дождаться окончания процедуры установки.
Кроме этого, вы можете использовать Media Creation Tool для обновления системы до последней версии Windows 10 непосредственно на вашем компьютере без создания загрузочного носителя.
Win Updates Disabler — бесплатный и простой в использовании инструмент для управления.
Media Creation Tool — бесплатный инструмент от компании Microsoft с помощью которого можно легко.
Windows Update MiniTool — альтернатива стандартному Windows Update. С ее помощью вы в любой момент сможете.
Microsoft Windows XP Service Pack 3 — официальный пакет обновления 3 (SP3) для Windows XP содержит все ранее.
Show or hide updates — специальная утилита от Microsoft для ручного отключения установки выбранных патчей для новейшей операционной системы Windows 10.
Windows XP Service Pack 3 — третий официальный сборник обновлений Windows XP собрал в себя все сервисные.
Отзывы о программе Media Creation Tool
Liliya про Media Creation Tool 10.0.18362.418 (1909) [03-03-2020]
костя про Media Creation Tool 10.0.18362.1 (1903) [14-12-2019]
мне пишет не хватает компанента
7 | 2 | Ответить
Sli про Media Creation Tool 10.0.17763.1 (1809) [12-01-2019]
Мне интересно. Зачем качать программу с сомнительного сайта, если можно скачать напрямую с сайта разработчика?
8 | 24 | Ответить
Крот в ответ Sli про Media Creation Tool 10.0.17763.1 (1809) [17-01-2019]
Walter Sullivan в ответ Sli про Media Creation Tool 10.0.19041.572 [12-01-2021]
эта утилита с сайта microsoft и разработана ими
| | Ответить
Иван про Media Creation Tool 10.0.17763.1 (1809) [27-10-2018]
И ещё ребят. Это создателям сайта. Обновите скрины. Когда летом ставил винду действительно можно былы выбрать выпуск про или домашняя. Поэтому и писало что 3 гб надо всего. Сейчас скачал и выбора не даёт. Только просто 10 и все. Все выпуски я так понял. Поэтому и 8 требует.
5 | 10 | Ответить
Иван про Media Creation Tool 10.0.17763.1 (1809) [27-10-2018]
Почему это она на 7 не работает. Винда прекрасно встала на флешку будучи на 7
8 | 3 | Ответить
Поддерживаемые ОС Windows 10/8/7/Vista/XP Разрядность 32 bit, 64 bit, x32, x64 Для устроиств компьютер Язык интерфейса Русский Последнее обновление 2019 Тип распространения Бесплатный Разработчик Microsoft Официальный сайт www.microsoft.com
|
|
|
| Версия | Платформа | Язык | Размер | Формат | Загрузка |
|---|---|---|---|---|---|
 Media Creation Tool Media Creation Tool |
Windows | Русский | 19,3MB | .exe | |
| * скачайте бесплатно Media Creation Tool для Windows, файл проверен! |
Media Creation Tool или MCT (Медиа креатион тул) – программное обеспечение для создания загрузочных образов операционных систем Windows 7 и выше. Microsoft разработали эту утилиту для упрощения установки разных версий их ОС.
Функционал Media Creation Tool
Утилита подходит для обновления операционной системы или ее установки с нуля. Для работы с программой нужно надежное подключение к интернету: в зависимости от задачи нужно будет скачать файлы размером от 4 до 8 ГБ.
После запуска открывается окно с минималистичным дизайном, где в формате вопрос-ответ задаются нужные настройки. Благодаря этой простой схеме, с MCT справятся даже неопытные пользователи.
В первом окне отображается лицензионное соглашение. После его принятия пользователь выбирает, какую задачу надо решить: обновить текущую версию ОС или создать чистую копию для установки с нуля.
Если выбрать первый вариант, то операционная система обновится до последней доступной версии. При желании пользователь может сменить язык интерфейса или сборку, например, перейти с Домашней на Бизнес или Про версию операционной системы.
При создании загрузочного диска же откроется новое диалоговое окно, где нужно указать необходимые параметры.
Из выпадающих списков можно выбрать язык интерфейса, версию и разрядность операционной системы. Доступна загрузка обеих архитектур – х32 и х64.
Дальше остается выбрать носитель, на котором будет записан установочный пакет:
- – USB. В большинстве случаев понадобится флешка объемом от 8 ГБ. Установочные файлы сразу загружаются на USB;
- – DVD. В этом случае предварительно создается ICO образ пакета, который сохраняется на жестком диске ПК. Его потом нужно самостоятельно записать на DVD.
После этого запускается процесс скачивания.
Плюсы использования Media Creation Tool:
- 1. Простота. Пользователь просто выбирает параметры и запускает процесс. Все остальное делается автоматически;
- 2. Скорость. Обычно загрузка файлов и сборка образа занимает всего 1.5-2 часа;
- 3. Безопасность. Все файлы скачиваются с серверов Microsoft и не несут никакой угрозы для ПК.
Интерфейс утилиты переведен на русский язык. Программа доступна на Windows 7 и выше.
Последняя версия – Media Creation Tool 10.0.17763.1 – вышла в октябре 2018 года.
Download Windows 10
Before updating, please refer to the Windows release information status for known issues to confirm your device is not impacted.
Windows 10 October 2020 Update
The Update Assistant can help you update to the latest version of Windows 10. To get started, click Update now.
To get started, you will first need to have a license to install Windows 10. You can then download and run the media creation tool. For more information on how to use the tool, see the instructions below.

Here’s when to use these instructions:
- You have a license to install Windows 10 and are upgrading this PC from Windows 7 or Windows 8.1.
- You need to reinstall Windows 10 on a PC you’ve already successfully activated Windows 10.
If you are installing Windows 10 on a PC running Windows XP or Windows Vista, or if you need to create installation media to install Windows 10 on a different PC, see Using the tool to create installation media (USB flash drive, DVD, or ISO file) to install Windows 10 on a different PC section below.
Note: Before you install Windows 10, check to make sure your PC meets the system requirements for Windows 10. We also recommend going to the PC manufacturer’s website for any additional info about updated drivers and hardware compatibility.
- Select Download tool, and select Run. You need to be an administrator to run this tool.
- On the License terms page, if you accept the license terms, select Accept.
- On the What do you want to do? page, select Upgrade this PC now, and then select Next.
After downloading and installing, the tool will walk you through how to set up Windows 10 on your PC. All Windows 10 editions are available when you select Windows 10, except for Enterprise edition. For more information on Enterprise edition, go to the Volume Licensing Service Center.
- If you don’t have a license to install Windows 10 and have not yet previously upgraded to it, you can purchase a copy here: https://www.microsoft.com/en-us/windows/get-windows-10.
- If you previously upgraded to Windows 10 on this PC and you’re reinstalling it, you don’t need to enter a product key. Your copy of Windows 10 will automatically activate later using your digital license.
Follow these steps to create installation media (USB flash drive or DVD) you can use to install a new copy of Windows 10, perform a clean installation, or reinstall Windows 10.
Before you download the tool make sure you have:
- An internet connection (internet service provider fees may apply).
- Sufficient data storage available on a computer, USB or external drive for the download.
- A blank USB flash drive with at least 8GB of space or blank DVD (and DVD burner) if you want to create media. We recommend using a blank USB or blank DVD, because any content on it will be deleted.
- When burning a DVD from an ISO file, if you are told the disc image file is too large you will need to use Dual Layer (DL) DVD Media.
Check a few things on the PC where you want to install Windows 10:
- 64-bit or 32-bit processor (CPU). You’ll create either a 64-bit or 32-bit version of Windows 10. To check this on your PC, go to PC info in PC settings or System in Control Panel, and look for System type.
- System requirements. Make sure the PC meets the system requirements for Windows 10. We also recommend going to the PC manufacturer’s website for additional info about updated drivers and hardware compatibility.
- Language in Windows. You’ll need to choose the same language when you install Windows 10. To see what language you’re currently using, go to Time and language in PC settings or Region in Control Panel.
- Edition of Windows. You should also choose the same edition of Windows. To check what edition you’re currently running, go to PC info in PC settings or System in Control Panel, and look for Windows edition. Windows 10 Enterprise isn’t available in the media creation tool. For more info, go to the Volume Licensing Service Center.
- Microsoft Office products. If you just purchased a new device that includes Office 365, we recommend redeeming (installing) Office before upgrading to Windows 10. To redeem your copy of Office, please see Download and install Office 365 Home, Personal, or University on your PC. For more information, check How to upgrade to Windows 10 on new devices that include Office 365.
If you have Office 2010 or earlier and choose to perform a clean install of Windows 10, you will need to locate your Office product key. For tips on locating your product key, check Find your Office 2010 product key or Enter the product key for your Office 2007 program.
Using the tool to create installation media:
- Select Download tool now, and select Run. You need to be an administrator to run this tool.
- If you agree to the license terms, select Accept.
- On the What do you want to do? page, select Create installation media for another PC, and then select Next.
Select the language, edition, and architecture (64-bit or 32-bit) for Windows 10. This table will help you decide which edition of Windows 10 you’ll choose:
| Your current edition of Windows | Windows 10 edition |
|---|---|
| Windows 7 Starter Windows 7 Home Basic Windows 7 Home Premium Windows 7 Professional Windows 7 Ultimate Windows 8/8.1 Windows 8.1 with Bing Windows 8 Pro Windows 8.1 Pro Windows 8/8.1 Professional with Media Center Windows 8/8.1 Single Language Windows 8 Single Language with Bing Windows 10 Home Windows 10 Pro |
Windows 10 |
| Windows 8/8.1 Chinese Language Edition Windows 8 Chinese Language Edition with Bing |
Windows 10 Home China |
- USB flash drive. Attach a blank USB flash drive with at least 8GB of space. Any content on the flash drive will be deleted.
- ISO file. Save an ISO file to your PC, which you can use to create a DVD. After the file is downloaded, you can go to location where the file is saved, or select Open DVD burner, and follow the instructions to burn the file to a DVD. For more info about using an ISO file, see Additional methods for using the ISO file to install Windows 10 section below.
After completing the steps to install Windows 10, please check that you have all the necessary device drivers installed. To check for updates now, select the Start button, and then go to Settings > Update & Security > Windows Update, and select Check for updates. You may also wish to visit your device manufacturer’s support site for any additional drivers that may be needed.
Note: Drivers for Surface devices may be found on the Download drivers and firmware for Surface page.
Before you install Windows 10, it’s a good idea to save any work and back up your PC before you start. If you used the media creation tool to download an ISO file for Windows 10, you’ll need to burn it to a DVD before following these steps.
- Attach the USB flash drive or insert the DVD on the PC where you want to install Windows 10.
- Restart your PC.
If your PC does not automatically boot to the USB or DVD media, you might have to open a boot menu or change the boot order in your PC’s BIOS or UEFI settings. To open a boot menu or change the boot order, you’ll typically need to press a key (such as F2, F12, Delete, or Esc) immediately after you turn on your PC. For instructions on accessing the boot menu or changing the boot order for your PC, check the documentation that came with your PC or go to the manufacturer’s website. If you do not see the USB or DVD media device listed within the boot options, you may need to reach out to the PC manufacturer for instructions for temporarily disabling Secure Boot in your BIOS settings.
If changing the boot menu or order doesn’t work, and your PC immediately boots into the OS you want to replace, it is possible the PC had not fully shut down. To ensure the PC fully shuts down, select the power button on the sign-in screen or on the Start menu and select Shut down.
If you downloaded an ISO file for Windows 10, the file is saved locally at the location you selected. If you have a third-party DVD burning program installed on your computer that you prefer to use for creating the installation DVD, that program might open by going to the location where the file is saved and double-clicking the ISO file, or right-click the ISO file, select Open with and choose your preferred DVD burning software.
If you want to use the Windows Disk Image Burner to create an installation DVD, go to the location where the ISO file is saved. Right-click the ISO file and select Properties. On the General tab, click Change and select Windows Explorer for the program you would like to use to open ISO files and select Apply. Then right-click the ISO file and select Burn disc image.
If you want to install Windows 10 directly from the ISO file without using a DVD or flash drive, you can do so by mounting the ISO file. This will perform an upgrade of your current operating system to Windows 10.


Before you can install Windows Server 2019 on physical hardware, you’ll need boot media that contains all the files necessary to install Windows Server. Boot media generally comes in two forms: as a DVD or USB drive. As most modern server hardware comes without a DVD drive, in this article, I’ll show you how to create a bootable USB drive containing the Windows Server 2019 media.
Get the Windows Server 2019 .iso file
If you don’t have access to the Windows Server 2019 .iso directly from Microsoft or a partner, you can download an evaluation version from Microsoft’s website here. Regardless of where you obtain your installation media, save the .iso file to C:UsersPublicDownloads.
Create a bootable USB drive
Before starting, you will need a USB drive with a capacity of at least 8GB. We will wipe the entire contents of the USB drive during the creation process, so make sure any valuable data is backed up. Because most modern server hardware uses UEFI instead of BIOS, we’ll create a bootable USB drive using a GUID Partition Table (GPT). UEFI-based systems cannot be booted from Master Boot Record (MBR) drives.
We’ll use Windows 10 to create the bootable USB drive. Connect the USB drive to your system and then follow the instructions below.
- Type powershell in the Search box in the bottom left of the taskbar. Make sure that Windows PowerShell is highlighted in the search results, and in the pane on the right of the Search panel, click Run as Administrator.
- Give consent or enter an administrator username and password as prompted.
- Find your downloaded Windows Server .iso file in C:UsersPublicDownloads and rename it WindowsServer2019. To rename a file, select it in File Explorer (WIN+E) and then press F2. Make sure the file is called ‘windowsserver2019.iso’ and not ‘windowsserver2019.iso.iso’.
Now let’s put the full path of the downloaded file into a variable ($isopath):
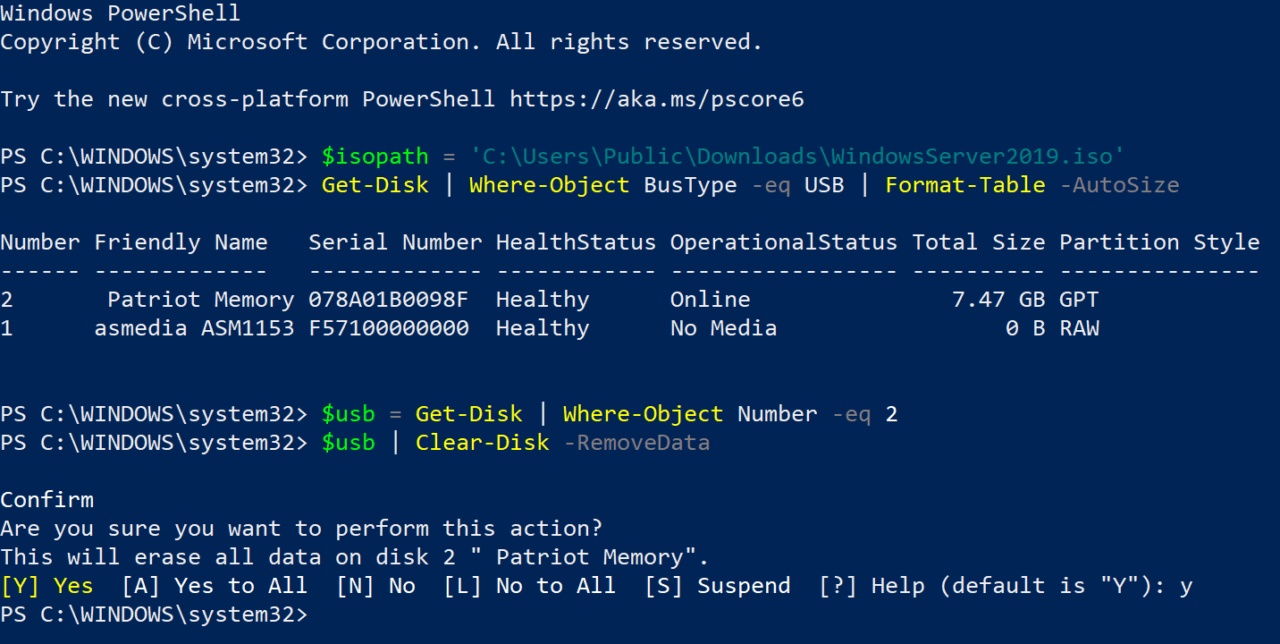
$isopath = 'C:UsersPublicDownloadsWindowsServer2019.iso'
Before we can format the USB drive, we need to establish the disk number Windows has assigned it. Run the command below to list all the USB drives attached to your device:
Get-Disk | Where-Object BusType -eq USB | Format-Table -AutoSize
I know that my USB drive is called ‘Patriot Memory’, so it is disk number ‘2’. Let’s create an object ($usb) for disk ‘2’. You should replace -eq 2 with the number of your USB drive.
$usb = Get-Disk | Where-Object Number -eq 2
Now, we’re going to delete all the data on the USB drive using Clear-Disk. Type y and press ENTER to confirm you want to delete all data on the drive. This is a good time to double-check that you have the correct disk number!
$usb | Clear-Disk -RemoveData
Format the USB drive
Now let’s make sure the disk is configured with a GUID Partition Table so that we can use it to boot UEFI systems.
$usb | Set-Disk -PartitionStyle GPT
Create a new volume on the drive using New-Partition. When prompted in the Format USB Drive dialog, format the volume using FAT32. You must use FAT32. Optionally, give the drive a volume name in the Volume label field. Click Start to format the USB drive. Click OK in the warning dialog to confirm that formatting the drive will erase all data.
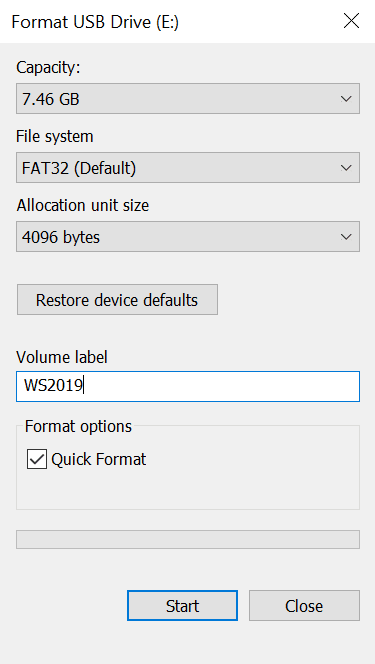
$volume = $usb | New-Partition -UseMaximumSize -AssignDriveLetter
Close the Format USB Drive dialog once formatting is complete.
Copy the Windows Server 2019 media files to the USB drive
Now that we have configured the USB drive so that it can be used to boot our server hardware, all that’s left to do is copy the Windows Server media files to the USB drive. Let’s start by mounting the downloaded Windows Server .iso file to a drive in Windows 10.
$mount = Mount-DiskImage -ImagePath $isopath -StorageType ISO
Windows will assign the new mounted drive a letter. We can use Get-Volume to get the assigned drive letter:
$drive = ($mount | Get-Volume).DriveLetter
Now, let’s copy the entire contents of the mounted .iso file to the UBB disk using Copy-Item:
Copy-Item -Path ($drive +":*") -Destination ($volume.DriveLetter + ":") -Recurse
If Copy-Item exits with an error, it’s because it failed to copy the largest file, install.wim, to the USB drive. FAT32 has a file limit of 4GB and install.wim might be larger than the limit. To solve the problem, we can use the Windows 10 DISM tool to split the install.wim file into two smaller files: install.swm and install2.swm.

First, we’ll need to create the two new files on our local disk. In this example, I’ve chosen to create them in C:UsersPublicDownloads. Note that you may need to replace ‘f’ in ‘f:sourcesinstall.wim’ with a different drive letter. Windows might have assigned a different drive letter to your mounted .iso file. You can check the drive letter Windows assigned by opening File Explorer (WIN+E).
dism /Split-Image /ImageFile:f:sourcesinstall.wim /SWMFile:C:UsersPublicDownloadsinstall.swm /FileSize:4096

Now, let’s copy the two new files, install.swm and install2.swm, to our USB drive:
Copy-Item -Path C:UsersPublicDownloadsinstall.swm -Destination ($volume.DriveLetter + ":sourcesinstall.swm")
Copy-Item -Path C:UsersPublicDownloadsinstall2.swm -Destination ($volume.DriveLetter + ":sourcesinstall2.swm")
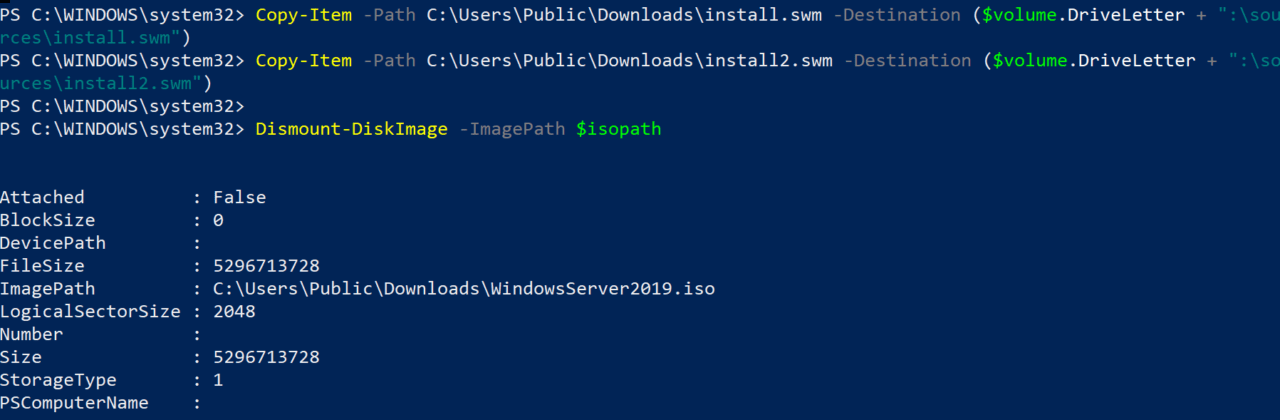
Finally, all that’s left to do is to unmount the Windows Server .iso file from our local device using Dismount-DiskImage:
Dismount-DiskImage -ImagePath $isopath
And that is it! Now you have a bootable USB drive that you can use to install Windows Server 2019 on modern server hardware.
Want to learn how to download windows server 2019 ISO file, how to create a Bootable Windows Server 2019 USB Flash drive, and how to install Windows Server 2019?
Download ing file ISO:
So we’ll also download the ISO file for the Windows Server 2019 Essentials version. We click on the Windows Server 2019 Essentials tab and move forward by clicking continue after filling in the required areas under start your evolution according to our own information.

Enter preliminary information for downloading Windows Server 2019 ISO
We click on the download button by selecting languages, and the ISO file starts to descend, and we don’t forget this. We take note of the product key under the Preinstall information tab.

Make language selection and obtain windows server 2019 key to download windows server 2019 ISO
Create a bootable Windows Server 2019 USB Flash drive
Now let’s create a bootable USB flash drive with the ISO file we have. We can do this in two different ways. One is diskpart, which is a windows command system tool and the other is Rufus, a completely free program. We’re going to practice here in both ways. You can choose which method it sounds easier for you. After the USB Flash Drive is plugged into the computer’s USB port, we start trading.
Create a bootable USB Flash drive with Rufus :
Let’s create a Windows Server 2019 USB Flash drive that can first be booted with the Rufus program.
We visit the official website of Rufus and download the latest version of the Rufus program. After the download is complete, we open the Rufus program.
-
The Flash Driver must have arrived automatically in the Device section. If necessary, we can select the correct flash drive here with the down arrow sign.
-
We select the ISO file with the select button.
-
Under the Image Option tab, we are greeted by two options. We will proceed by selecting Standard Windows Installation. With Windows To Go option, you should also know that you have a chance to create a portable operating system with you running on the USB Flash Drive.
-
We click the Start button without making changes to other settings.
-
The incoming warning screen tells us that all information on the USB Flash Drive will be deleted. We start creating a Bootable WUSB Flash drive by clicking the OK button.
-
After the process is complete, we close the Rufus program with the close button. We’re safely removing the USB Flash drive from the computer. And now we have a Bootable USB Flash drive.

Rufus and Bootable Windows Server 2019 USB creation stages
Create a bootable USB Flash drive with diskpart:
By opening the Windows start menu, we type diskpart and press enter, and the Windows command system tool diskpart welcomes us.

Opening the program to create bootable Windows Server 2019 USB media with Diskpart
-
we display all disks with the list disk command. Based on the results, we find the USB flash drive disc number.
-
We select the USB flash drive with select disk command. Since our USB Flash Drive is number 3, we use the number 3.
-
we clean the USB flash drive with the clean command.
-
Create part pri command with usb flash drive we create a new primary partition.
-
We select the section that we create with the select part 1 command.
-
Format fs=fat32 quick command format the partition.
-
We are active in this section with the active command.
-
We are exiting Diskpart with the exit command.

Diskpart Bootable Windows Server 2019 USB creation stages
We open our ISO file by double-clicking. We start the copy to usb flash drive with the option to select all files and folders and right-click.

Diskpart Bootable Windows Server 2019 USB creation stages
After the copy ing estuation is finished, we securely remove the USB Flash drive from the computer. And now we have a bootable USB Flash drive.
Windows Server 2019 Setup
1. We boot our computer with the bootable Windows Server 2019 USB flash drive.
2. In the first window, we set our preferences for language, time and keyboard. We’re moving forward by clicking the Next button.
3. We are moving forward by clicking the Install Now button in the incoming window.
4. If activated is on the Windows screen, you can enter license information or choose to enter later. We’re going to the next window by clicking on a product key here I don’t have.
5. We click the next button by confirming the license terms in the incoming window i Accept The License Terms.

Windows Server 2019 USB boot, language and region options, enter a product key, and continue the installation of Windows Server 2019 by agreeing to license agreement
6. If we were installing Windows Server 2019 Standard, we would have met the windows installation type options window with operating system options instead. If we pay attention here, we’ll see that there are Standard, Datacenter, and Desktop Experience options.
The biggest difference between Windows Server 2019 Standard and Windows Server 2019 Datacenter is virtualization. With a Windows Server 2019 Datacenter license, you can create only 2 virtual machines with the Windows Server 2019 Standard license. Of course, by obtaining additional licenses, the number of virtual machines on Windows Server 2019 Standard can be increased, but Windows Server 2019 Datacenter provides a huge cost advantage for the license.
Another option, the concept of Desktop Experience, means that the operating system to be installed on us will be installed with the familiar graphical interface. If installation is done without the Desktop Experience option, it will meet us with a Windows Server Operating system that we can manage with command lines.
We will now resume the Windows Server 2019 setup process from where we left off. If we were installing on an existing operating system, we would prefer upgrade. We click Custom because we have performed a new Windows Server 2019 installation process.
7. We see our disk information on the screen where we determine where to install Windows Server 2019. Disk partitioning can be performed with the New button. However, we do not choose to partition for the disk here, and we start the Windows Server 2019 Setup process directly with the next button.

Differences between Windows Server 2019 Standard Edition and Datacenter. Desktop Experience concept. Windows Server 2019 installation options and start disk settings and setup
8. Once the computer restarts, we come across the window where we need to set a password for the Administrator account. And we’re moving forward by setting a strong password.
9. After the settings are applied, we look forward to the completion of the setup process by entering our password again. And we have now completed the Windows Server 2019 Installation process. Welcomes us to the Windows Server 2019 desktop.
10. If your computer is connected to a network, this warning screen will appear. We click Yes to communicate with other computers and devices on the network.

Windows Server 2019 Installation final stages Administrator password creating, login, and making network settings
11. After the installation process for Windows Server 2019, the first thing we need to do is download all updates and install them.

Run Windows Update after Windows Server 2019 Setup.