- Remove From My Forums
-
Вопрос
-
У меня есть сервер 2008 R2. Есть телек LG 42LE5500. Есть медиацентр Egreat 33a и ноутбук, на котором торренты качаюцца и раздаюцца. Так вот на EG33a винт 1,5 террабайта расшарен с фильмами (в основном HD и другого высокого
качества), на ноуте дисочек на 500 Гб разшарен, там всякие только что появившиеся новинки DVDRip. Так вот телеку нужен медиасервер в сети. К нему прилагался диск с Nero медиасервером. Все бы хорошо, но этот неровский медиасервер не видит сетевых дисков. Вот
я и хочу на Server 2008 настроить медиасервер. Пробую с помощью Media Services. Пока глухо.
Может у кого есть опыт? Можно ли такое сделать или надо использовать какое-то еще ПО?Спасибо.
Ответы
-
Или же можно от семерки Media Server прикрутить к 2008?
нет, ничего не выйдет. Там несколько взаимосвязанных служб, «прикрутить» не удастся.
А зачем? чем не устраивает имеющийся вариант?!
у Вас «выпадает» только медиацентр Egreat 33a — DLNA, как я понял, он не поддерживает, а телевизор не может обращаться к сетевым дискам…
-
Помечено в качестве ответа
3 мая 2011 г. 7:30
-
Помечено в качестве ответа
Install streaming media server on windows server 2008R2 server
Streaming media servers are divided into dynamic and static. Static is an on-demand service. Commonly used are major video websites. Dynamic live broadcast services. Online live broadcast of websites will be applied to such services!
The winserver 2008 server does not bring its own streaming role. Need to update the service, download windows media server according to the system version
Download and run the MSU file as a streaming media service role. Please follow these steps:
- Please visit the following Microsoft website:
- For the 32-bit version of Windows Server 2008, download the following file:
Windows6.0 KB934518 x 86 Server.msu
For the 64-bit version of Windows Server 2008, download the following file:
Windows6.0 KB934518 x 64 Server.msu
flow media services
<?xml:namespace prefix = o ns = «urn:schemas-microsoft-com:office:office» />
installationwindows mediaAfter the service, open the new

Select on-demand

Create a folder with a local drive letter and place the file

Select to this folder

Can choose to play in a loop

Finish creating

Open media player for testing
Mss://server IP+on-demand point name+filename
2Create a broadcast (live) streaming media
Select Advanced Create, select Live, and the content isPush:*

installationwindows media Encoder new session

Point the output to the server and select the publishing point


The components of the streaming media service are actually very simple. This article only introduces the application under winserver2008. The operation can actually be built by QvodPlayer server!
Reprinted at: https://blog.51cto.com/donglihui/422870
Intelligent Recommendation

Build nginx streaming media server (Windows)
Build a streaming media server (Windows) 1 Introduction This article will adopt the method of building nginx streaming media server to support live broadcast of rtmp protocol and support live broadcas…

Docker Install OSSRS Streaming Media Live Server
Docker Install OSSRS Streaming Media Live Server In the outside world, if you want to realize live function. Common ways are: OSSRS official website:http://ossrs.net/srs.release/releases/ Official doc…

windows server 2008R2 set up ftp server
Reprinted address: https: //www.cnblogs.com/liguo-rong/p/8026966.html First, install the ftp service 1, openServer ManagerFigure: 2, right-clickCharacterFigure: 3, click Add roles, there will be added…
More Recommendation

Windows Server 2008R2 server IIS installation steps
be careful: Add ASP.NET, .NET Extensibility, CGI, ISAPI extensions, ISAPI filters, remove the directory browser (since most sites use less.) If you need to use the ASP check ASP, if needed SHTM need t…

Windows Server 2008R2 Redirection (WWW Server
Windows Server 2008R2 Redirection (WWW Server) WWW server installation Website release and management Master the use of domain names Operation purpose:Download the school official website home page, a…

Streaming media server construction
One, environmental preparation 1, ffmpeg 2, pcre-8.40.tar.gz 3, zlib-1.2.11 4, nginx-rtmp-module-1.2.0 5, nginx-1.12.2.tar.gz 6, OpenSSL_1_1_0g.tar.gz 7, spawn-fcgi-1.6.4.tar.gz ——–f…

[SRS] Streaming Media Server
Article Directory Preface installation Push stream Pull stream Preface The coursework needs to build a video streaming server. At first, I used nginx+rtmp and found that I was stunned by the delay. Ok…
Accessing Your Server When You’re Away From Home
Want to control your server and services from away from home? I did and here’s how I achieved it.
Setting Up A Static Hostname for your Home Network
To access your server from outside of your home network you need to know your network’s unique address on the internet, this is done using an IP address that is assigned to you by your ISP. Sadly this IP address isnt always the same, it is ‘dynamic’* and can change at any time.
Thankfully there is a solution to this problem of not being able to know for certain your IP address when you’re away from home, you can use a free hostname service which can assign a non-changing address to your changing IP address. So, for example, instead of 80.3.229.20 (an IP address) you can access myServer.dyndns.com
I use and recommend DynDNS, a totally free, spam free service which is very well supported. Create and verify an account on their site.
On the first page you see after you have verified your account you will be presented with various paid account options, the free option is below all of these.

On the following page you get to choose the address for your network. Choose carefully, you might be typing it in regularly in the future! I am of the opinion shorter is better.

Leave ‘Host with IP address’ selected.
Fill in your current IP address, this is given to you below the text box. This will be correct if you are on the same network, even if you are not on the same computer.

‘Proceed to Checkout’ then ‘Activate Services’ on the next two pages. You should then see that your new address was ‘Successfully Activated’

Now you have your address you need to make sure it is updated when your IP address changes. Many routers support DynDNS and can do this update automatically so I suggest you google ‘DynDNS your_router_name’ to see if you can take that route.
Alternatively you can download a tiny DynDNS client which will sit on your server and handle the IP updates. Download it from: http://dyn.com/support/clients/
When installing ensure you leave ‘start with Windows’ checked, this ensures the tool is always running so it can update your IP address if it changes.

However I suggest you Uncheck the ‘Dyn Internet Guide’ which is an unrequired tool of no use.

Log in to the application when it loads.

Select your hostname in the ‘My Hosts’ window, click ‘Apply’ and you now have a hostname that will update for you automatically!
*Some ISP’s will allow you to have a static IP address but it usually costs extra.
Setting A Static IP Address in Windows Server 2008 R2
Now that we have a static address for your home network we can access the router from anywhere. We now need to have any requests forwarded by our router to the correct machine (in this case our HP Microserver). To do this we setup rules in the router to forward certain requests to certain machines. To do this we need to know the IP address of the server so we will make it static.
Firstly we’ll find out the current IP address of the box, we’ll use this and set it as the permanent IP address.
In the Start menu search box type ‘cmd’ and press enter. In the command window that opens type ‘ipconfig’ and press enter.
In the results you will see the current ‘IPv4 Address’, ‘Subnet Mask’ and ‘Default Gateway’. You will need these later!

In the Start menu search box type ‘Network connections’ and click the result ‘View Network Connections’

In the window that opens, right click on the ‘Local Area Connection’ and select ‘Properties’

Select ‘Internet Protocol Version 4 (TCP/IPv4)’ and press ‘Properties’

Select ‘Use the following IP address’ and fill in the details as you saw them in the command window earlier. Take note of the IP address for later.
In the DNS section I like to use the third party service from http://www.opendns.com/ You can use the same values as my image or go to the site for yourself and you will see them at the bottom of the page.

Click ‘Validate Settings Upon Exit’ and click OK.
Your server now has a static IP (in this case mine is using 192.168.0.13)
Setting Up Port Forwarding On Your Router
This will vary substantially by router so you may need to google for a specific guide for your router. I am using a Virgin Media Super Hub.
To access your router you need to put the IP address into your browser. The address is the ‘default gateway’ you used earlier, quite often it will be 192.168.0.1
Log in to your router, if you dont know the login details they may be written on the router itself, if not, google for the defaults.
The area you are looking for in the settings is ‘Port Forwarding’, this may be under ‘Advanced Settings’ section if there is one.
The way port forwarding works is that any requests for a specific port can be routed to the machine which hosts the service on that port. I have the following rules set up, depending on which applications you use you may only want some of these:
| Port | Application |
| 3389 | Remote Desktop |
| 5000 | CouchPotato |
| 8081 | SickBeard |
| 8080 | sabNZBd |
| 9091 | Transmission |

Now! Combining all of the above steps you should be able to access any services hosted on your server from anywhere in the world!
In the windows ‘Remote Desktop Connection’ you can simply type your dyndns address (myServer.dyndns.com) and hit connect!
For other services type you dyndns address followed by the port number into your browser eg:
myServer.dyndns.com:5000 for CouchPotato
myServer.dyndns.com:8080 for sabNzbd etc
I STRONGLY advise you to set up a strong username and password for any service you expose over the internet otherwise anyone will be able to access them and mess with your business!
IT professionals will quickly recognize that the installation process for Windows Media Services on Windows Server 2008 R2 is not as simplistic as it was with previous Windows Server operating systems. In the past, an IT professional would simply add the Windows Media Services component through Add and Remove Programs as it was included with the base Windows Server operating system. With Windows Server 2008 R2, more steps are involved in the installation process. Windows Media Services is no longer included with the Windows Server 2008 R2 family of operating systems, as it is offered as a separate out-of-band download. Therefore, IT professionals will need to download the Microsoft Update Standalone (MUS) package from the Microsoft website and install it on Windows Server 2008 R2. Unlike Windows Server 2008, there is only one MUS package that needs to be downloaded for all editions of Windows Server 2008 R2. After the installation is complete, the next step is to add the Streaming Media Services role in Server Manager.
Downloading the Windows Media Services Source Files
As mentioned earlier, the first step when installing the Windows Media Services role on Windows Server 2008 R2 is to obtain the Windows Media Services for Windows Server 2008 R2 installer files from the Microsoft website.
The out-of-band Windows Media Services installation files for Windows Server 2008 R2 can be obtained from the Windows Media Services 2008 website at http://www.microsoft.com/windows/windowsmedia/forpros/serve/prodinfo2008.aspx.
Conducting the Windows Media Services Installation
To install the Windows Media Services role on a Windows Server 2008 R2 system, perform the following steps:
|
1. |
Obtain the appropriate Streaming Media Services installer file from the Microsoft website. |
|
2. |
Click Download and run the installation immediately by clicking Open in the File Download dialog box or click Save to download the file to your computer. The latter choice allows you to conduct the installation at a later time. Note If the incorrect installation file is selected, the Windows Update Standalone Installer will provide a warning message to indicate the update does not apply to your system |
|
3. |
After the installation for Windows Media Services is complete, click Start, Administrative Tools, Server Manager. If Server Manager was running during the install, close and reopen it to display the newly available role. |
|
4. |
Select Add Roles by right-clicking Roles in Server Manager, which is located in the left pane. |
|
5. |
On the Select Server Roles screen, install the role by selecting Streaming Media Services in the Roles section, and then click Next. |
|
6. |
Review the messages in the Streaming Media Services screen, and click Next. |
|
7. |
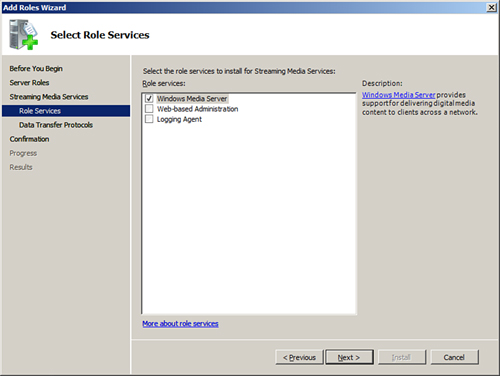
Select the desired Streaming Media Services role services to install. The role services options include Windows Media Server, Web-based Administration, and Multicast and Logging Agent. For this example, Windows Media Server was selected, as illustrated in Figure 1. Click Next to continue. Figure 1. Selecting the role services to install for Streaming Media Services
|
|
8. |
Select the data transfer protocol for streaming media content, and then click Next. The two options available are as follows:
|
|
9. |
Confirm the installation selections, and click Install to install the selected roles, role services, and features. |
|
10. |
To complete the installation, review the installation results, and then click Close. |
Configuring Windows Media Services
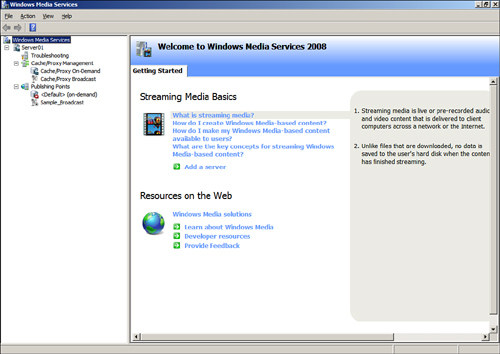
After being installed, the services for Windows Media Services are set to start automatically. The next step is to configure Windows Media Services to meet the video and audio publishing requirements of your organization. To do so, launch the Windows Media Services MMC administration tool by selecting Start, All Programs, Administrative Tools, Windows Media Services. You will see a screen similar to the one shown in Figure 2. The Getting Started tab includes informational items on Streaming Media Basics and Resources on the Web. In addition, if you select the server in the left pane, additional Getting Started tabs can be found in the right pane.
Figure 2. The Windows Media Services MMC administration tool.
- Windows Media Services
- Windows Server 2008 R2
Related Articles
Configuring Streaming Media Server is quite easy. After installation you should not do anything else only open Start Menu -> Administrative Tools -> Windws Media Services
First Step should be to check the possible problems of server. As you can see on the picture below there is no any red cross on the icon of the Server (MS likes things like that) and there is no any pictogram on the Troubleshoot title. If there was a problem then there would be a red cross or a yellow triangle in corner of the icons.

Then click on the name of the server and check the Getting Started tab on the right side of the right pane. Start the Test My Server

If you get a test streaming then your machine have been installed successfully.

Now change to the Properties tab beside the Getting Started tab.
For quick start no need to modify the basic settings. For each configuration item you can find help. This short description can help you to get a short description about the configuration element but it is recommended to use the extended help which can be found the bottom of the pane. (Small blue icon with a question mark.)
The most important thing for the quick start: How can you make Publishing Points?
Right click on the Publishing Points option and choose the Add Publishing Point (Wizard)…
Tick “Do not show this Welcome page again” on if you do not want to face with it all time.
Next conversation panel will give you chance to you to determine the name of a publishing point. This name will be the name of your published name so it is recommended to be a related name to your content.

Following panel is more interesting. You can choose four different type of your stream type.
1. Encoder (a live stream) – This solution is good if you want to transmit a radio station from a http:// source
2. Playlist (a mix of files and/or live streams that you can combine into a continuos stream) – There is no need any other definition. If you want to mix your sources you should choose this option.
3. One file (useful for a broadcast of an archived file) –
4. Files (digital media or playlists) in a directory – This solution is recommended when you have lot of music files and you want them put into one folder to play continously.

Broadcast and On-demand publishing point are types of a Publishing Point.
As you can see on the picture below Broadcast publishing point will provide you a classic radio stream where the client cannot adjust the streamed content.
On-demand publishing point is a different aproaching: the best example maybe the youtube. The client can adjust the streamed media content on demand.

Существует два типа серверов потокового мультимедиа: динамический и статический. Статический — это услуга по запросу. Обычно используются основные видеосайты. Динамический — это услуга прямой трансляции. К этой услуге будет применяться онлайн-трансляция веб-сайтов!
Сервер winserver 2008 не имеет собственной роли потокового мультимедиа. Необходимо обновить службу, загрузить сервер Windows Media в соответствии с версией системы
Загрузите и запустите файл MSU в качестве роли службы потокового мультимедиа. Пожалуйста, следуйте инструкциям ниже:
- Посетите следующий веб-сайт Microsoft:
- Для 32-разрядной версии Windows Server 2008 загрузите следующий файл:
Windows6.0 KB934518 x 86 Server.msu
Для 64-разрядной версии Windows Server 2008 загрузите следующий файл:
Windows6.0 KB934518 x 64 Server.msu
услуги потокового медиа<?xml:namespace prefix = o ns = «urn:schemas-microsoft-com:office:office» />
1. Статическая потоковая передача
установкаwindows mediaПосле службы откройте новый

Выбрать по запросу

Создайте папку с буквой локального диска и поместите файл в

Выберите в эту папку

Дополнительное воспроизведение петли

Полное создание

Откройте медиаплеер для проверки
mss: // IP-адрес сервера + имя по запросу + имя файла
2, Создание вещательных (прямых) потоковых медиа
Выберите расширенное создание, выберите прямую трансляцию, контентPush:*

установкаwindows media Кодировщик Создать новую сессию

Направьте вывод на сервер, выберите точку публикации

Подсказка после применения


Компоненты службы потокового мультимедиа на самом деле очень просты. В этой статье представлены только приложения для winserver2008. Операция может быть реализована через сервер QvodPlayer!