I am getting an error when I try to access my NTFS drive from ubuntu.
Unable to access “My Drive”

Error mounting /dev/sda6 at /media/ubuntu/Media Center: Command-line `mount -t "ntfs" -o "uhelper=udisks2,nodev,nosuid,uid=1000,gid=1000,dmask=0077,fmask=0177" "/dev/sda6" "/media/rolindroy/Media Center"' exited with non-zero exit status 14: The disk contains an unclean file system (0, 0).
Metadata kept in Windows cache, refused to mount.
Failed to mount '/dev/sda6': Operation not permitted
The NTFS partition is in an unsafe state. Please resume and shutdown
Windows fully (no hibernation or fast restarting), or mount the volume
read-only with the 'ro' mount option
Any help would be greatly appreciated!
asked May 7, 2014 at 15:00
2
If you can’t access the drive, execute the following command:
sudo ntfsfix /dev/sdXY
where XY is the partition
e.g sda2 or sdb1
Then, mount with:
sudo mount -o rw /dev/sdXY /mounting point
Mounting point can be local or external drive (like a USB drive), e.g. /media/YourUserName/MountingPointName.
answered Dec 28, 2014 at 20:56
Muddassir NazirMuddassir Nazir
4,3416 gold badges23 silver badges39 bronze badges
13
I solved the problem with shutdown
Windows by cmd
shutdown /s
This is because Windows 8 and 10 offer a «Fast Startup» option that depends on a «non-complete» shutdown
You can disable fast startup by following these steps under «Power Options»
https://itsfoss.com/solve-ntfs-mount-problem-ubuntu-windows-8-dual-boot/
abu_bua
10.1k10 gold badges41 silver badges60 bronze badges
answered Feb 16, 2015 at 14:08
GhazzawiGhazzawi
5774 silver badges2 bronze badges
6
If you have access to booting and mounting the drive under Windows, do as the message indicates and remove it from the hibernation or fast restarting, or any other special state. You would have to do those things by booting into Windows.
You may also run chkdsk on it from Windows.
If you don’t have immediate boot access under Windows for the drive, do as the message says and mount it as read only.
Then access the drive and copy the important data. You can then repair the drive under Ubuntu by reformatting the partition and bring the backed up data back.
Mounting drive as read only:
$ sudo mount -o ro /dev/[partition /media/[mounting point]
Another option is to repair the disk under Ubuntu with ntfsfix:
$ ntfsfix /dev/[partition]
answered May 7, 2014 at 15:16
L. D. JamesL. D. James
24.4k9 gold badges66 silver badges115 bronze badges
1
This is because your «Windows» system is in a intermediate state, may be its in hibernation mode or not full shutdown, try a system restart on your windows and shutdown the system fully and check the mount on your Ubuntu, it should work.
answered Dec 8, 2014 at 11:06
vembutechvembutech
3,1261 gold badge11 silver badges11 bronze badges
This should be because your «Windows» system is in a intermediate state (not a full shutdown of system before powering off the hard drive, like using hibernation for example).
Restart on Windows, shutdown down system fully and it should work.
If you try this on a command line term session, you should have this kind of explanation
Do:
sudo mount -o ro /dev/[partition /media/[mounting point]
The output will be:
The NTFS partition is in an unsafe state.
Please resume and shutdown Windows fully (no hibernation or fast restarting),
or mount the volume read-only with the `ro` mount option.
Kaz Wolfe
33.4k18 gold badges109 silver badges168 bronze badges
answered Sep 11, 2014 at 18:04
Log on to windows and then restart to Ubuntu. Works for me! But seriously I don’t know whether there is a permanent solution to that.
answered May 7, 2014 at 15:21
ganezdragonganezdragon
2741 gold badge3 silver badges13 bronze badges
2
Problem: The NTFS partition is in an unsafe state error in Ubuntu
I dual boot Ubuntu 14.04 with Windows. After upgrading to Windows 8, I often see an error “The NTFS partition is in an unsafe state. Please resume and shutdown Windows fully” when I try to mount the NTFS partitions in Ubuntu. The full text of error is as following:
Error mounting /dev/sda5 at /media/itsfoss/01BC76G7Z2628FB0: Command-line `mount -t “ntfs” -o “uhelper=udisks2,nodev,nosuid,uid=1000,gid=1000,dmask=0077,fmask=0177” “/dev/sda5” “/media/itsfoss/01BC76G7Z2628FB0″‘ exited with non-zero exit status 14: The disk contains an unclean file system (0, 0).
Metadata kept in Windows cache, refused to mount.
Failed to mount ‘/dev/sda5’: Operation not permitted
The NTFS partition is in an unsafe state. Please resume and shutdown
Windows fully (no hibernation or fast restarting), or mount the volume
read-only with the ‘ro’ mount option.
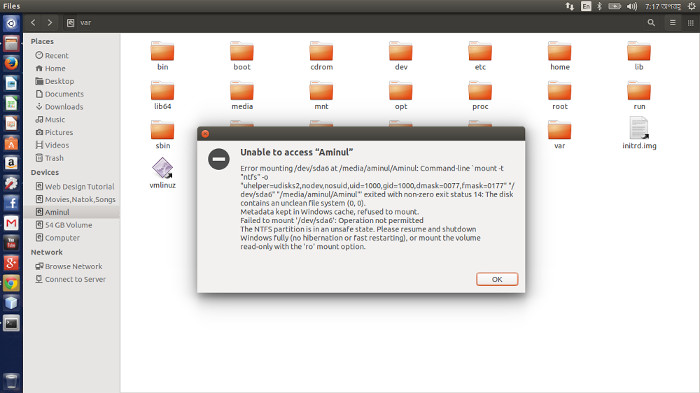
Quick Fix to mount Windows partition immediately
Read the error again. Just the second line which reads: Error mounting /dev/sdXY….
Note the /dev/sdXY thing. XY should be replaced with the error you see in your system. Now open terminal and use the following command:
sudo ntfsfix /dev/sdXYwhere XY is the troublesome partition shown in the error. For example sda2 or sdb1 or sda5 (as in picture above). ntfsfix is already installed in Ubuntu systems.
Reason: Fast Startup feature of Windows 8 and Windows 10
Microsoft introduced a new feature in Windows 8 and 10 to reduce the boot time in otherwise slow Windows OS. This feature is called Fast Startup. In normal shut down process, power is removed from all components such as CPU, RAM, CD-Rom and hard disks. But in fast start up, Windows 8 saves some system information such as caching the registry etc to a file during shutdown. Part of the metadata about the state of all mounted partitions at the time of
But in fast start up, Windows 8 saves some system information such as caching the registry etc to a file during shutdown. Part of the metadata about the state of all mounted partitions at the time of turn-off, is among these system information. This reduces the boot time of the Windows 8 but it creates the trouble for Ubuntu.
Since the information about the NTFS partition is stored in Windows 8, this prevents Ubuntu to mount them as mounting them in Linux will alter the metadata of the partitions. This is why it is in protected mode and you cannot mount it (without being root).
Permanent Solution: Disable Fast Startup in Windows 8 and Windows 10
Temporary solution of this problem will be to boot in to Windows and restart it. Restarting is different from shutdown and it should release the partition metadata from the stored system information. But this will only be a temporary solution because when you use Windows 8 or 10 next time, you’ll face the same problem again.
Permanent solution would be to disable the fast startup in Windows 8/10. This will increase your Windows boot time so it is up to you if you prefer it. If you use Windows more frequently and you have probably set Window as default OS in dual boot with Ubuntu, then you should avoid this solution. But if you more of a Linux guy and use Windows occasionally then you can disable fast startup in Windows 10 without thinking twice.
How to disable fast startup in Windows 8 and 10:
If you know how to go around Windows, use the following path to disable fast startup.
Go to Control Panel > Hardware and Sound > Power Options > System Setting > Choose what the power buttons do and uncheck the Turn on fast startup box.
Alternatively, here is the detailed process along with some picture to help you to disable fast startup in Windows. First search for Power Option along with Settings filter in start screen of Windows 8.
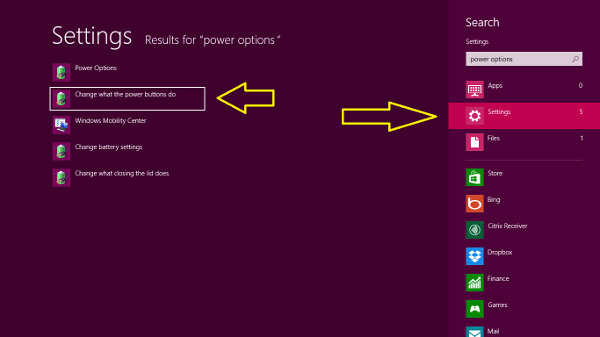
Make sure that you have admin rights:
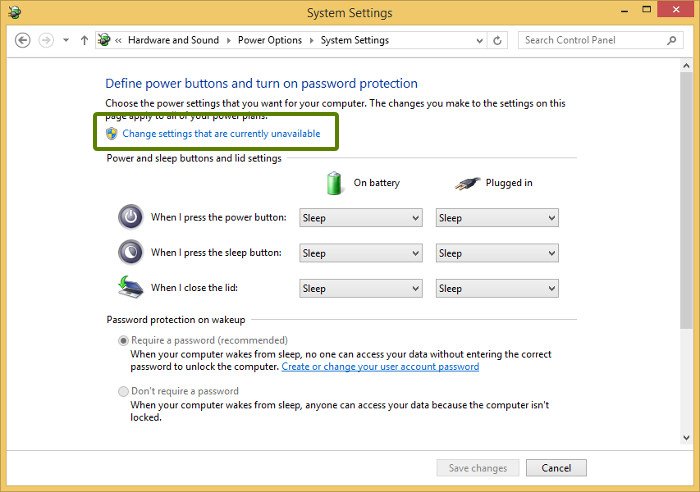
Scroll down a bit in power options to look for Turn on fast startup option and uncheck this box.
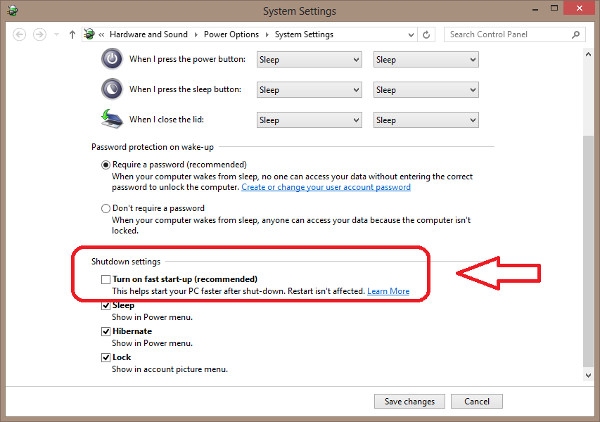
That’s all. Next time you try to mount NTFS partition in Ubuntu, you should not see the NTFS partition is in an unsafe state error.
Though the tutorial is meant for Ubuntu, the same tutorial should also help all other Linux distributions such as Linux Mint, elementary OS etc.
Any questions and suggestions? Feel free to hit the comment box.
Ссылки по теме
- File systems
- mount (Русский)
NTFS-3G — свободная реализация файловой системы NTFS с поддержкой записи и чтения данных. Для упрощения разработки и обеспечения лучшей переносимости NTFS-3G использует драйвер файловой системы FUSE.
Contents
- 1 Установка
- 2 Ручное монтирование
- 3 Настройка
- 3.1 Стандартные настройки
- 3.2 Linux-совместимые права доступа
- 3.3 Разрешение доступа пользователю/группе
- 3.4 Основные параметры NTFS-3G
- 3.5 Монтирование разделов от имени обычного пользователя
- 3.6 NTFS-config
- 4 Изменение размера раздела NTFS
- 5 Решение проблем
- 5.1 Повреждённая файловая система NTFS
- 5.2 Metadata kept in Windows cache, refused to mount
- 5.3 Отказ в монтировании
- 5.4 Форматирование в NTFS
- 5.5 Не учитывается umask при создании файлов
- 6 Смотрите также
Установка
Установите пакет ntfs-3g, доступный в официальных репозиториях.
Ручное монтирование
Вручную примонтировать раздел с NTFS можно двумя способами. Традиционный:
# mount -t ntfs-3g /dev/*раздел-с-NTFS* /{mnt,...}/*директория*
При этом тип файловой системы (в данном случае ntfs-3g) явно сообщать необязательно. По умолчанию команда mount будет использовать программу /usr/bin/mount.ntfs, которая является символьной ссылкой на /usr/bin/ntfs-3g и появляется после установки пакета ntfs-3g.
Второй способ — напрямую вызвать ntfs-3g:
# ntfs-3g /dev/*раздел-с-NTFS* /*директория*
Настройка
Можно настроить автоматическое монтирование разделов NTFS, или заранее указать параметры монтирования и делать это вручную в удобное для вас время. Настройки задаются в файле fstab или с помощью правил udev.
Стандартные настройки
При использовании стандартных настроек разделы с NTFS будут монтироваться при загрузке системы, если директория, родительская по отношению к той, куда происходит монтирование, имеет соответствующие права доступа.
Добавьте эти строки в файл /etc/fstab:
# <file system>   <dir>		<type>    <options>             <dump>  <pass>
/dev/*NTFS-part*  /mnt/windows  ntfs-3g   defaults		  0       0
Linux-совместимые права доступа
Как правило, права доступа в Linux устанавливаются как 755 для директорий и 644 для файлов. Если вы часто используете NTFS-раздел, рекомендуется использовать эти права доступа и на нём. Следующий пример показывает, как можно присвоить такие права разделу для работы с ним из-под непривилегированного пользователя:
# Монтировать системный раздел Windows с Linux-совместимыми правами доступа, т. е. 755 для директорий (dmask=022) и 644 для файлов (fmask=133)
UUID=01CD2ABB65E17DE0 /run/media/user1/Windows ntfs-3g uid=user1,gid=users,dmask=022,fmask=133 0 0
Разрешение доступа пользователю/группе
Через файл /etc/fstab можно передать драйверу ntfs-3g и другие параметры монтирования, например разрешить доступ на чтение данных определённому пользователю или группе. Чтобы дать доступ к разделу пользователям, входящим в группу users, можно использовать следующие параметры:
/dev/*NTFS-partition* /mnt/windows ntfs-3g gid=users,umask=0022 0 0
В этом случае запись данных на раздел будет возможна только для пользователя root. Чтобы разрешить запись от имени непривилегированных пользователей, нужно указать, кому из них следует дать такой доступ. Для этого используйте параметр uid с именем пользователя:
/dev/*NTFS-partition* /mnt/windows ntfs-3g uid=*имя_пользователя*,gid=users,umask=0022 0 0
Если у вас однопользовательская система, для большего удобства можно дать себе полный доступ к разделу:
/dev/*NTFS-partition* /mnt/windows ntfs-3g uid=*имя_пользователя*,gid=users 0 0
Основные параметры NTFS-3G
В большей части случаев для работы должно хватить параметров, описанных выше. Далее описываются параметры, общие для многих файловых систем Linux. Полный список параметров конфигурации ntfs-3g можно посмотреть здесь
[umask](/index.php/Umask "Umask")

umask — команда командного интерпретатора, позволяющая автоматически присваивать нужные права доступа при создании новых файлов. Стандартные значения umask в Arch Linux для root и обычных пользователей — 0022. При этом новые директории получают права 755, а новые файлы — 644. Дополнительную информацию о umask можно найти [здесь](http://www.cyberciti.biz/tips/understanding-linux-unix-umask-value-usage.html).

noauto

Если установлен параметр `noauto`, соответствующий раздел не будет монтироваться автоматически при загрузке системы.

uid

Идентификационный номер пользователя. Позволяет дать полный доступ к разделу определённому пользователю. Идентификатор пользователя можно определить с помощью команды `id`.

fmask и dmask

Похожи на `umask`, но задают права доступа к файлам и директориям отдельно.
Монтирование разделов от имени обычного пользователя
По умолчанию, ntfs-3g требует права суперпользователя для монтирования разделов, даже если добавить параметр «uid» в /etc/fstab (со причинами можно ознакомиться здесь). Чтобы иметь возможность монтировать раздел от имени обычного пользователя, выполните следующие шаги:
Если опция uid отсутствует в /etc/fstab, добавьте её:
/dev/*NTFS-partition* /mnt/windows ntfs-3g uid=*имя_пользователя*,gid=users 0 0
Убедитесь, что пользователю разрешена работа с соответствующим устройством. Проще всего сделать это, добавив пользователя в группу disk с помощью следующей команды:
# gpasswd -a username disk
Примечание: Для применения изменённых настроек может понадобиться перезагрузка
Далее, необходимо обеспечить пользователю доступ к директории, в которую монтируется раздел. Если вы собираетесь монтировать раздел от имени обычного пользователя, есть смысл поставить его владельцем точки монтирования:
# chown *user* /mnt/*точка_монтирования*
Кроме того, необходимо использовать драйвер ntfs-3g со встроенной поддержкой FUSE. Пакет ntfs-3g из официальных репозиториев не имеет его поддержки, поэтому можно установить пакет ntfs-3g-fuse из AUR.
При выполнении этих условий у вас должна появиться возможность монтировать разделы NTFS без прав суперпользователя.
Примечание: Для демонтирования разделов могут понадобиться права суперпользователя. От имени обычного пользователя можно попробовать команду fusermount -u /mnt/*точка_монтирования*. Если вместо параметра uid в /etc/fstab вы используете параметр users, как монтирование, так и демонтирование разделов должно работать от имени обычного пользователя с помощью команд mount и umount.
NTFS-config
Программа ntfs-config может помочь вам в настройке параметров работы с разделами NTFS, если другие способы не сработали.
Изменение размера раздела NTFS
Примечание: Перед редактированием разделов обязательно делайте резервную копию важных данных!
Некоторые пользователи с установленной системой Windows хотели бы оставить её при установке Arch Linux. Часто для того, чтобы освободить место на диске под установку Arch Linux, возникает необходимость изменить размер системного раздела, на котором установлена Windows. Эту задачу можно выполнить одним из двух способов:
-
Воспользоваться встроенным в Windows средством управления разделами. Для его запуска нажмите Win+R, введите в появившееся окно diskmgmt.msc и нажмите Enter. Кликните по разделу, размер которого нужно уменьшить, правой кнопкой мыши, и выберите в меню пункт Сжать том. Укажите количество места, которое нужно освободить, и нажмите OK. После завершения операции за изменённым разделом появится свободное место, в котором можно будет создать необходимые разделы в процессе установки системы.
-
Воспользоваться сторонним LiveCD. Для этого скачайте ISO-образ любого диструбитива, в состав которого входят ntfs-3g и gparted (например, Ubuntu), либо образ специализированной системы для работы с разделами (например, GParted, Parted Magic или SystemRescueCD), и запишите его на компакт-диск или USB-накопитель с помощью программы UNetbootin или Rufus, после чего загрузитесь с подготовленного носителя. Дальнейшие инструкции можно получить в документации к используемому дистрибутиву.
Для изменения размера NTFS-раздела из существующей системы Arch Linux установите пакеты ntfs-3g и gparted и запустите программу gparted. Если в системе отсутствует графический пользовательский интерфейс, можно использовать программу parted, входящую в состав пакета parted.
Решение проблем
Повреждённая файловая система NTFS
Если в файловой системе NTFS есть ошибки, ntfs-3g смонтирует её в режиме «только чтение». Для штатного исправления файловой системы NTFS загрузите Windows и запустите chkdsk (chkdsk /F).
Для коррекции файловой системы NTFS без использования Windows установите пакет ntfsprogs, доступный в официальных репозиториях.
Для исправления файловой системы NTFS раздел должен быть отмонтирован. Пример ремонта NTFS-раздела /dev/sda2:
# umount /dev/sda2
# ntfsfix /dev/sda2
Mounting volume... OK
Processing of $MFT and $MFTMirr completed successfully.
NTFS volume version is 3.1.
NTFS partition /dev/sda2 was processed successfully.
# mount /dev/sda2
Если всё прошло без ошибок, раздел будет доступен для записи.
Metadata kept in Windows cache, refused to mount
Если вместе с Arch Linux на компьютере используется Windows 8, при монтировании системного раздела может возникнуть следующая ошибка:
The disk contains an unclean file system (0, 0).
Metadata kept in Windows cache, refused to mount.
Failed to mount '/dev/sdc1': Operation not permitted
The NTFS partition is in an unsafe state. Please resume and shutdown
Windows fully (no hibernation or fast restarting), or mount the volume
read-only with the 'ro' mount option.
Проблема вызвана новой функцией Windows 8 под названием «быстрый запуск». Когда эта функция включена, часть метаданных файловых систем всех используемых разделов при загрузке восстанавливается к тому состоянию, в котором они находились при завершении работы Windows. В результате изменения содержимого разделов, совершённые из Linux, могут быть утеряны. Это может произойти с любым разделом жёсткого диска, когда работа Windows завершается выбором пункта «Выключить» или «Гибернация». Однако, завершение работы Windows с помощью пункта «Перезагрузка» не должно вызывать таких проблем.
Чтобы получить возможность беспроблемно записывать данные на раздел из других операционных систем, убедитесь, что функция «быстрый запуск» отключена. Для этого загрузите Windows и выполните следующую команду в командной строке, запущенной от имени администратора:
Чтобы проверить текущее значение параметра, зайдите в Панель управления -> Оборудование и звук -> Электропитание -> Действия кнопок питания. Флажок Включить быстрый запуск должен быть снят либо отсутствовать.
Отказ в монтировании
Если, даже следуя этому руководству, вам не удаётся примонтировать раздел NTFS, попробуйте отредактировать файл /etc/fstab, указав UUID вместо имён устройств для всех разделов NTFS. С примером можно ознакомиться здесь.
Форматирование в NTFS
Важно: Всегда внимательно проверяйте правильность имени устройства.
# mkfs.ntfs -L myCoolDiskName /dev/sdc1
На современных устройствах большого объема такой способ может занять много времени. Для быстрого форматирования используйте команду:
# mkfs.ntfs -Q -L myCoolDiskName /dev/sdc1
Примечание: При использовании такого способа форматирования этапы перезаписи содержимого раздела нулями и проверки поверхности диска будут пропущены.
Не учитывается umask при создании файлов
Если в /etc/fstab указана опция монтирования permissions, разделы NTFS-3G смогут имитировать работу с привычной системой прав доступа Linux. Однако, при создании файлов вплоть до версии 2014.2.15-1 не учитывается umask пользователя.
Как решение, используйте ABS для пересборки NTFS-3G без поддержки ACL (--enable-posix-acls):
PKGBUILD
build() {
	cd "${srcdir}/${_pkgname}-${pkgver}"
	./configure
		--prefix=/usr
		--sbin=/usr/bin
		--mandir=/usr/share/man
		--disable-ldconfig
		--disable-static
		--with-fuse=external
		--enable-extras

	make
}
Смотрите также
- http://www.tuxera.com/community/ntfs-3g-manual — Официальное руководство по NTFS-3G
Совсем недавно Kali Linux обновилась до версии 2.0, а Windows обновилась до версии 10. На предыдущей конфигурации (Kali Linux 1.1.* и Widnows 8.1) у меня не возникало проблем с монтированием разделов Widnows, когда я загружался в Kali (например, с флешки). При сохранении документа я просто выбирал желаемый диск, он автоматически монтировался.
Сегодня при попытке сохранить документ из Kali в Windows, у меня возникла следующая ошибка:

Я подумал, не хочет монтироваться автоматически, смонтируем вручную.
Для начала создадим точку монтирования. По сути, нам нужно создать пустой каталог. Этот каталог может быть где угодно, но обычно выбирают директорию media или mnt. Я выбрал media.
mkdir /media/d
Этой командой я создал директорию d (d, потомучто я буду монтировать диск D).
Теперь нам нужно узнать, какие диски доступны для монтирования, это делается командой
fdisk -l

Смотрим:
root@WebWare:~# fdisk -l

Disk /dev/sda: 119,2 GiB, 128035676160 bytes, 250069680 sectors
Units: sectors of 1 * 512 = 512 bytes
Sector size (logical/physical): 512 bytes / 512 bytes
I/O size (minimum/optimal): 512 bytes / 512 bytes
Disklabel type: gpt
Disk identifier: 874EC308-F387-4E51-A748-CC0800244FE8

Device         Start       End   Sectors  Size Type
/dev/sda1       2048   1026047   1024000  500M Windows recovery environment
/dev/sda2    1026048   1640447    614400  300M EFI System
/dev/sda3    1640448   1902591    262144  128M Microsoft reserved
/dev/sda4    1902592 200898559 198995968 94,9G Microsoft basic data
/dev/sda5  200898560 247971839  47073280 22,5G Windows recovery environment
/dev/sda6  247971840 250068991   2097152    1G Windows recovery environment

Disk /dev/sdb: 698,7 GiB, 750156374016 bytes, 1465149168 sectors
Units: sectors of 1 * 512 = 512 bytes
Sector size (logical/physical): 512 bytes / 4096 bytes
I/O size (minimum/optimal): 4096 bytes / 4096 bytes
Disklabel type: dos
Disk identifier: 0x92cda70e

Device     Boot Start        End    Sectors   Size Id Type
/dev/sdb1          63 1465147454 1465147392 698,7G  7 HPFS/NTFS/exFAT

Partition 2 does not start on physical sector boundary.


Disk /dev/sdc: 14,8 GiB, 15837691904 bytes, 30932992 sectors
Units: sectors of 1 * 512 = 512 bytes
Sector size (logical/physical): 512 bytes / 512 bytes
I/O size (minimum/optimal): 512 bytes / 512 bytes
Disklabel type: gpt
Disk identifier: 2645C2D4-61FC-44C0-9870-3C7240FBA80C

Device        Start      End  Sectors  Size Type
/dev/sdc1        34  5119999  5119966  2,5G EFI System
/dev/sdc2   5120000  5122047     2048    1M BIOS boot
/dev/sdc3   5122048 29779967 24657920 11,8G Linux filesystem
/dev/sdc4  29779968 30930943  1150976  562M Linux swap
Устройство /dev/sda это, судя по его разделам (Windows recovery environment, EFI System, Microsoft reserved, Windows recovery environment), диск C. Мне он не нужен.
Устройство /dev/sdc, судя по размерам разделов, их названиям (Linux), и типу (swap), это флешка, с которой я загрузился. Она мне тоже не интересна.
Остаётся диск /dev/sdb1, его размер (698,7G) соответствует моему диску D. Его и монтируем.
Команда монтирования достаточно простая
mount диск_для_монтирования точка_монтирования
В моём случае диск для монтирования — /dev/sdb1, точка монтирования — /media/d:
mount /dev/sdb1 /media/d

The NTFS partition is in an unsafe state. Please resume and shutdown. Windows fully (no hibernation or fast restarting), or mount the volume
Набираю и вижу следующее:
root@WebWare:~# mount /dev/sdb1 /media/d
The disk contains an unclean file system (0, 0).
Metadata kept in Windows cache, refused to mount.
Failed to mount '/dev/sdb1': Операция не позволена
The NTFS partition is in an unsafe state. Please resume and shutdown
Windows fully (no hibernation or fast restarting), or mount the volume
read-only with the 'ro' mount option.
Как говориться, нежданчик. Теперь понятно, что и автоматическое монтирование не произошло по этой же причине.
Есть несколько способов решить эту проблему, я для себя выбрал такой:
ntfsfix /dev/sdb1

Вместо /dev/sdb1 вставьте путь до вашего диска, который не хочет монтироваться.
root@WebWare:~# ntfsfix /dev/sdb1
Mounting volume... The disk contains an unclean file system (0, 0).
Metadata kept in Windows cache, refused to mount.
FAILED
Attempting to correct errors...
Processing $MFT and $MFTMirr...
Reading $MFT... OK
Reading $MFTMirr... OK
Comparing $MFTMirr to $MFT... OK
Processing of $MFT and $MFTMirr completed successfully.
Setting required flags on partition... OK
Going to empty the journal ($LogFile)... OK
Checking the alternate boot sector... OK
NTFS volume version is 3.1.
NTFS partition /dev/sdb1 was processed successfully.
Пробуем ещё раз:
mount /dev/sdb1 /media/d
Больше сообщений об ошибке не было, а на рабочем столе появился ярлычок смонтированного диска:

Чтобы размонтировать, нужно набрать команду umount, а после неё точку монтирования ИЛИ источник. В моём случае эти команды равнозначны:
umount /dev/sdb1
umount /media/d
Другие варианты решение проблемы с The disk contains an unclean file system (0, 0). Metadata kept in Windows cache, refused to mount
- Один из пользователей предлагает:
Если у вас есть возможность загрузиться в Windows, то сделайте так, как предлагает сообщение, т. е. удалите его из гибернации или быстрого рестарта (или любого другого специального состояния). Также запустите chkdisk для этого диска (из Windows).
Если нету доступа к загрузке Windows для этого диска, то сделайте как говорит сообщение и смонтируйте его только для чтения.
Получив доступ к диску, скопируйте важные данные. Теперь вы можете отремонтировать его под Linux, отформатировав раздел и вернув на него резервные копии данных.
Монтирование диска только для чтения:
sudo mount -o ro /dev/[раздел /media/[точка монтирования]
- Также есть мнение, что достаточно загрузиться в Windows и выключить его. Некоторые говорят о «полном выключении».
NTFS-3G is an open source implementation of Microsoft NTFS that includes read and write support. NTFS-3G developers use the FUSE file system to facilitate development and to help with portability.
Installation
Install the ntfs-3g package.
Manual mounting
Two options exist when manually mounting NTFS partitions. The traditional:
# mount /dev/your_NTFS_partition /mount/point
The mount type ntfs-3g does not need to be explicitly specified in Arch. The mount command by default will use /usr/bin/mount.ntfs which is symlinked to /usr/bin/ntfs-3g after the ntfs-3g package is installed.
The second option is to call ntfs-3g directly:
# ntfs-3g /dev/your_NTFS_partition /mount/point
See ntfs-3g(8) for the available options.
Formatting
Warning: As always, double check the device path.
# mkfs.ntfs -Q -L diskLabel /dev/sdXY
Note: -Q speeds up the formatting by not zeroing the drive and not checking for bad sectors.
Configuring
Your NTFS partition(s) can be setup to mount automatically, or pre-configured to be able to mount in a certain way when you would like them to be mounted. This configuration can be done in the static filesystem configuration (fstab) or by the use of udev rules.
Default settings
Using the default settings will mount the NTFS partition(s) at boot. With this method, if the parent folder that it is mounted upon has the proper user or group permissions (e.g. /run/media/<username>/), then that user or group will be able to read and write on that partition(s).
/etc/fstab
# <file system>		<dir>		<type>	<options>	<dump>	<pass>
/dev/NTFS-part		/mnt/windows	ntfs-3g	defaults	0	0
Linux compatible permissions
Permissions on a Linux system are normally set to 755 for folders and 644 for files. It is recommended to keep these permissions in use for the NTFS partition as well if you use the partition on a regular basis. The following example assigns the above permissions to a normal user:
# Mount internal Windows partition with linux compatible permissions, i.e. 755 for directories (dmask=022) and 644 for files (fmask=133)
/dev/NTFS-partition  /mnt/windows  ntfs-3g uid=userid,gid=groupid,dmask=022,fmask=133 0 0
Alternatively, if the Windows permissions do matter to you, you can use the ntfsusermap(8) command to map Windows users to Linux ones. ntfs-3g will handle the translation of these permissions.
Allowing group/user
In /etc/fstab you can also specify other options like those who are allowed to access (read) the partition. For example, for you to allow people in the groupid group to have access:
/dev/NTFS-partition /mnt/windows ntfs-3g gid=groupid,umask=0022 0 0
By default, the above line will enable write support for root only. To enable user writing, you have to specify the user who should be granted write permissions. Use the uid parameter together with your user id to enable user writing:
/dev/NTFS-partition /mnt/windows ntfs-3g uid=userid,gid=groupid,umask=0022 0 0
If you are running on a single user machine, you may like to own the file system yourself and grant all possible permissions:
/dev/NTFS-partition /mnt/windows ntfs-3g uid=userid,gid=groupid 0 0
Basic NTFS-3G options
For most, the above settings should suffice. Here are a few other options that are general common options for various Linux filesystems. For a complete list, see ntfs-3g(8) § OPTIONS.
- umask
- umask is a built-in shell command which automatically sets file permissions on newly created files. For Arch Linux, the default umask for root and user is 0022. With 0022 new folders have the directory permissions of 755 and new files have permissions of 644. You can read more about umask permissions here.
- fmask and dmask
- Like
umaskbut defining file and directory respectively individually. - noauto
- If
noautois set, NTFS entries in/etc/fstabdo not get mounted automatically at boot. - uid
- The user id. This allows a specific user to have full access to the partition. Your uid can be found with the
idcommand.
The following option is specific to ntfs-3g only:
- windows_names
- prevents files, directories and extended attributes to be created with a name not allowed by windows.
Allowing user to mount
By default, ntfs-3g requires root rights to mount the filesystem if it is a block device, even with the user option in /etc/fstab. See ntfs-3g-faq for details. The user option in the fstab is still required.
Note:
- The ntfs-3g package does not have internal FUSE support. Rebuild the package using ABS to enable FUSE support.
- The full explanation is that «user» and «users» work via a setuid
mountnot dropping its setuid privilege so that the block device can be used without root. However, ntfs-3g has a hard-coded restriction in ntfs-3g that bails on setuid if an external libfuse is used. - There is no good technical reason for not allowing setuid for external FUSE besides a mistrust of the library. This patch removes the said restriction.
- The full explanation is that «user» and «users» work via a setuid
- There seems to be an issue with unmounting rights, so you will still need root rights if you need to unmount the filesystem. You can also use
fusermount -u /mnt/mountpointto unmount the filesystem without root rights. Also, if you use theusersoption (plural) in/etc/fstabinstead of theuseroption, you will be able to both mount and unmount the filesystem using themountandumountcommands.
For non-blockfiles like normal images, ntfs-3g on the command-line should work out-of-the-box with normal user privileges as the underlying FUSE calls are redirected to the setuid-root fusermount when direct kernel interaction is unavailable.
Resizing NTFS partition
Note: Please ensure you have a backup before attempting this if your data is important!
Most systems that are purchased already have Windows installed on it, and some people would prefer not wipe it off completely when doing an Arch Linux installation. For this reason, among others, it is useful to resize the existing Windows partition to make room for a Linux partition or two. This is often accomplished with a Live CD or bootable USB thumb drive.
For Live CDs the typical procedure is to download an ISO file, burn it to a CD, and then boot from it. InfraRecorder is a free (as in GPL3) CD/DVD burning application for Windows which fits the bill nicely. If you would rather use a bootable USB media instead, see USB flash installation media for methods to create bootable USB stick.
There are a number of bootable CD/USB images avaliable. This list is not exhaustive, but is a good place to start:
- GParted — Small bootable GNU/Linux distribution for x86 based computers. It enables you to use all the features of the latest versions of the GParted application. Does not include additional packages System Rescue CD may incorporate, and disk encryption schemes may not be supported.
- http://gparted.sourceforge.net/ || gparted
- Parted Magic — Very good complete hard disk management solution. With the Partition Editor you can re-size, copy, and move partitions. You can grow or shrink your C: drive. Create space for new operating systems. Attempt data rescue from lost partitions.
- https://partedmagic.com/ ||
Note that the important programs for resizing NTFS partitions include ntfs-3g and a utility like (G)parted or fdisk, provided by the util-linux package. Unless you are an «advanced» user it is advisable to use a tool like GParted to perform any resize operations to minimize the chance of data loss due to user error.
If you already have Arch Linux installed on your system and simply want to resize an existing NTFS partition, you can use the parted and ntfs-3g packages to do it. Optionally, you can use the GParted GUI after installing the GParted package. At the core of the resizing is the ntfsresize(8) command.
Troubleshooting
Compressed files
When mounting an NTFS filesystem for Windows 10, and reading files or directories, you may
- see broken symbolic links to ‘unsupported reparse point’, or
- see the error message
cannot access some_file: Input/output error(in this case you seeCould not load plugin /usr/lib64/ntfs-3g/ntfs-plugin-80000017.so: Successin the journal).
The reason for this are NTFS reparse points, and that NTFS-3G does not support some types of reparse points by default. NTFS-3G plugins may be used to provide compatibility with a part of the features defined by the following reparse points
- System compression
- Deduplicated files
- OneDrive files
See this page for further details.
System compression a.k.a. «Compact OS» compresses certain files. There are two possible workarounds for System compression.
You may install the NTFS-3G plugin ntfs-3g-system-compressionAUR. Currently only reading is supported by this plugin, but not writing, i.e. creating or updating files is not supported.
Alternatively, disable the System compression feature in Windows 10
C:WINDOWSsystem32> compact.exe /CompactOS:never
Damaged NTFS filesystems
If an NTFS filesystem has errors on it, NTFS-3G will mount it as read-only. To fix an NTFS filesystem, load Windows and run its disk checking program, chkdsk.
Note that ntfsfix can only repair some errors. If it fails, chkdsk will probably succeed.
To fix the NTFS file system, the device must already be unmounted. For example, to fix an NTFS partition residing in /dev/sda2:
# umount /dev/sda2
# ntfsfix /dev/sda2
Mounting volume... OK
Processing of $MFT and $MFTMirr completed successfully.
NTFS volume version is 3.1.
NTFS partition /dev/sda2 was processed successfully.
# mount /dev/sda2
If all went well, the volume will now be writable.
Garbled Chinese file name under Windows partition
See Localization/Simplified Chinese#Garbled Chinese file name under Windows partition.
Metadata kept in Windows cache, refused to mount
When dual booting with Windows 8 or 10, trying to mount a partition that is visible to Windows may yield the following error:
The disk contains an unclean file system (0, 0).
Metadata kept in Windows cache, refused to mount.
Failed to mount '/dev/sdc1': Operation not permitted
The NTFS partition is in an unsafe state. Please resume and shutdown
Windows fully (no hibernation or fast restarting), or mount the volume
read-only with the 'ro' mount option.
The problem is due to a feature introduced in Windows 8 called «fast startup». When fast startup is enabled, part of the metadata of all mounted partitions are restored to the state they were at the previous closing down. As a consequence, changes made on Linux may be lost. This can happen to any NTFS partition when selecting «Shut down» or «Hibernate» under Windows 8 or 10. Leaving Windows by selecting «Restart», however, is apparently safe.
To enable writing to the partitions on other operating systems, be sure fast startup is disabled. This can be achieved by issuing as an administrator the command:
powercfg /h off
You can check the current settings on Control Panel > Hardware and Sound > Power Options > System Setting > Choose what the power buttons do. The box Turn on fast startup should either be disabled or missing.
Deleting Windows hibernate metadata
As an alternative to above clean shutdown method, there is a way to completely destroy NTFS metadata that was saved after hibernating. This method is only feasible if you are not able or unwilling to boot into Windows and shut it down completely. This is by running ntfsfix provided by ntfs-3g.
# ntfsfix /dev/your_NTFS_partition
Warning: Please note that this method means that the saved Windows session will be completely lost. Use this option under your own responsibility.
Mount failure
If you cannot mount your NTFS partition even when following this guide, try using the UUID instead of device name in /etc/fstab for all NTFS partitions. See fstab#File system UUIDs for an example.
Windows mount failure
Windows will not recognize a NTFS partition that does not have a corresponding partition type. A common pitfall when creating an NTFS partition to work with Windows is forgetting to set the partition type as NTFS. See fdisk or one of the partitioning tools.
Beta features and releases
There is a web page on «advanced features», maintained by Jean-Pierre André, one of the NTFS-3G authors. It provides:
- Documentation on handling of NTFS features in NTFS-3G, including:
- Symlinks, junctions, and other reparse points
- Extended attributes (xattrs) as an interface for ADS streams and special NTFS attributes
- Security and permission, including POSIX mapping and ACL mapping
- Plugins for parsing special reparse points.
Information provided in the documentation apply to the Tuxera version (2017.3.23) too. The system-compression and dedupe plugins work with the Tuxera version, but the onedrive plugin requires a tweak of the plugin-loading system only available in advanced releases.
The web page is certainly written by J.-P. André. An older version of the page is found on tuxera.com; it has a link to the OpenIndiana page, which in turn links to J.-P. André’s site.
See also
- ntfs-3g(8)
Ошибка монтирования NTFS разделов при загрузке Linux на самом деле возникает не только в Linux.
The disk contains an unclean file system (0, 0).
Metadata kept in Windows cache, refused to mount.
Failed to mount ‘/dev/sda*’: Operation not permitted.
The NTFS partition is in an unsafe state.
Please resume and shutdown Windows fully (no hibernation or fast restarting), or mount the volume read-only with the ‘ro’ mount option.
Собственно, решение кроется в самой ошибке. «Проблема» была замечена ещё в Windows 8 Developer Preview. И связана она именно с процессом выключения компьютера из OS Windows. И хотя в Windows 8.1 процесс был немножечко подправлен, в ней так же возникают проблемы при использовании на ПК более одной операционной системы. Microsoft не лукавили, обещая в восьмой линейке более быструю загрузку, нежели в предыдущих версиях Windows. Но с реализацией вилы, как всегда. При чём это затрагивает не только Linux, но и саму Windows. Если у вас две Windows (8.1 и более ранняя, на пример, для старых игр), то после выключения ПК из Windows 8/8.1 и последующем его включении, вы можете обнаружить, что загрузчик Windows благополучно минует шаг выбора операционных систем и начинает грузить Windows 8.1. Загрузка же Linux плюётся ошибками при монтировании NTFS разделов, если у вас указано автоматическое монтирование оных при загрузке. После перезагрузки Windows такого не случается. А всё потому, что выключение ПК начиная с Windows 8 имеет хитрую особенность: Это нечто среднее между «стандартным» выключением и гипернацией. Пользовательские сессии при этом закрываются, а сессия ядра — нет. Это и обеспечивает «быструю» загрузку операционной системы при включении. О чём нам и сообщает Linux при попытке примонтировать NTFS раздел: «Metadata kept in Windows cache, refused to mount».
Откройте панель управления и перейдите в «оборудование и звук», далее «Настройки питания», далее следует выбрать настройки кнопки «питания» в левой части окна. После чего изменить настройки. Уберите галку с рекомендованной «быстрой загрузки» и при выключении ПК он будет выключаться как положено — закрывая все сессии. Соответственно, если ваши NTFS разделы на самом деле не содержат ошибок, то проблем с их монтирование больше не будет. Так же и Windows загрузчик будет предоставлять выбор, в том случае, если у вас не одна Windows на ПК.
___
Tatyana K.
My computer has two drives, a boot drive and a storage drive and I’m running Ubuntu 18.04. However, for some reason my storage drive is unusable.
$ ls
'$RECYCLE.BIN'   _SMSTaskSequence  'System Volume Information'
$ mkdir new_folder
mkdir: cannot create directory ‘new_folder’: Read-only file system
$ sudo mkdir new
[sudo] password for ncw135:
mkdir: cannot create directory ‘new’: Read-only file system
I then ran
$ sudo mount -o remount,rw,uid=1000,gid=1000 /media/ncw135/DATA/
base on this question which has changed the error message to
$ cd /media/ncw135/DATA/  # i.e. the storage drive
/media/ncw135/DATA$ mkdir new
$ mkdir: cannot create directory ‘new’: No such file or directory
/media/ncw135/DATA$
Any ideas on how to fix this problem? Thanks
Edit — Progress
I tried to mount the drive somewhere else and got the following:
$ sudo mount /dev/sda2 ~/storage/
The disk contains an unclean file system (0, 0).
Metadata kept in Windows cache, refused to mount.
Falling back to read-only mount because the NTFS partition is in an
unsafe state. Please resume and shutdown Windows fully (no hibernation
or fast restarting.)
I’m getting the following error message:
Metadata kept in Windows cache, refused to mount.
Failed to mount '/dev/mapper/veracrypt8': Operation not permitted
The NTFS partition is in an unsafe state. Please resume and shutdown
Windows fully (no hibernation or fast restarting), or mount the volume
read-only with the 'ro' mount option.
I’m aware that this problem has something to do with Windows’ hibernation/fast startup, and is similar to this question and answer: https://askubuntu.com/questions/145902/unable-to-mount-windows-ntfs-filesystem-due-to-hibernation/. However, I’ve already tried those solutions, and have had no success. I can mount the partition just fine in Windows, and I can mount it in read-only mode in Linux.
I have Windows 10 and Linux Mint 18 installed. The partition in question does not have an operating system on it, and is the only partition on its disk.
What I’ve tried:
- Disabling Fast Startup in Windows
- Mounting the partition in Windows, then triggering a reboot from Windows and going into Linux instead of back into Windows
- Checking that there are no Windows page files set up on the partition.
- Disabling hibernation in Windows with
powercfg /h off. - Checking that there is no
hiberfile.syson the partition (both from Windows with system files shown and from Linux in read-only mode). - Telling Veracrypt in Linux to use
-t ntfs-3g -o remove_hiberfileas its mount options. - Unlocking (but not mounting) the partition with Veracrypt in Linux, then trying the command
sudo mount -t ntfs-3g -o remove_hiberfile /dev/mapper/veracrypt8 /media/veracrypt8.
asked Aug 20, 2016 at 22:32
This happens when Windows hibernation data is present on encrypted partition itself (not on partition containing encrypted volume file).
This solution should work in every distro, just make sure you have ntfsfix installed.
- Mount VeraCrypt volume with «Filesystem -> Do not mount» option checked (click «Options» button to see this option when asked for password).
screenshot - Right-click volume on the list and select «Properties». «Virtual Device» property shows the device you need to fix using ntfsfix.
-
Run the following command:
sudo ntfsfix [virtual-device]
Where [virtual-device] is the path you have seen under «Virtual Device», for example «/dev/mapper/veracrypt1».
- Remount VeraCrypt volume, unchecking «Do not mount» option.
answered Sep 17, 2016 at 20:09
4
Если у вас на компьютере установлены две операционные системы: Linux и Windows 8, 8.1 или 10 и вы захотите примонтировать системный раздел Windows, чтобы скопировать оттуда или записать туда файлы, то, скорее всего, столкнетесь с ошибкой.
В современных системах такие разделы монтируются в режиме только для чтения по умолчанию, но если вам надо туда что-то записать, то придется немного поработать. В этой статье мы поговорим о том как подключить диск Windows в Linux.
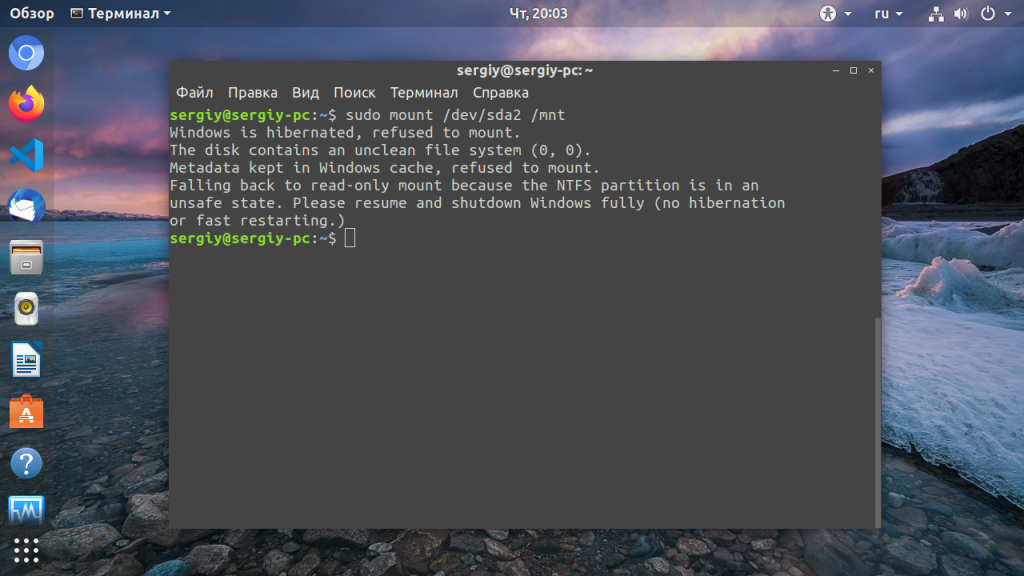
Скорее всего, если вы попытаетесь примонтировать раздел Windows, утилита mount выдаст вот такое сообщение: Error mounting: windows is hibernated refused to mount и примонтирует его только для чтения:
Это связано с использованием в новых версиях Windows алгоритма гибридной загрузки с использованием гибернации, которая и мешает вам получить доступ к вашим файлам.
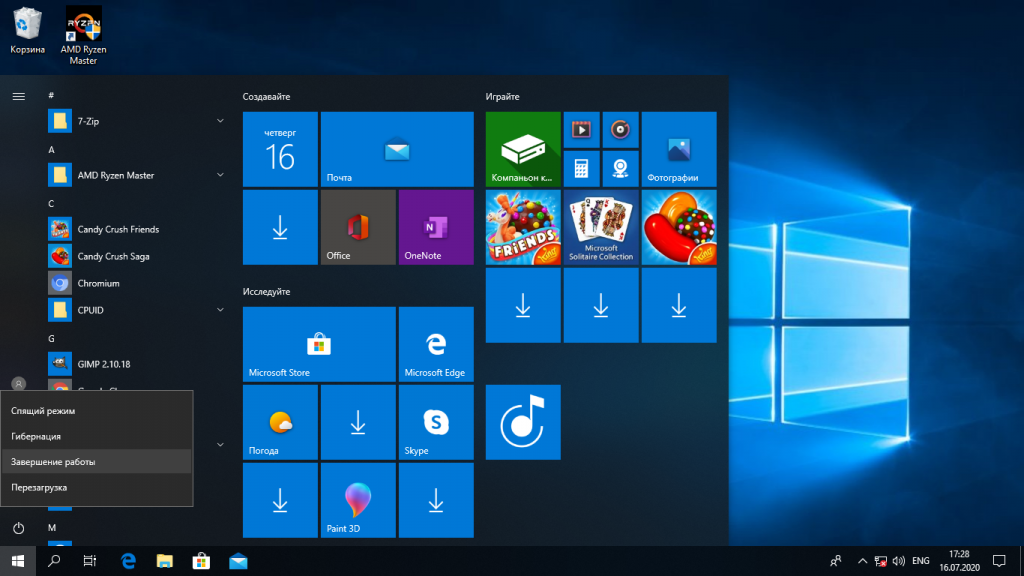
Такое сообщение может сбить вас с толку. Обычно мы выключаем компьютер, с помощью пункта Завершение работы в меню Пуск. Никаких упоминаний о гибернации там нет, но Linux утверждает система находиться в режиме гибернации. А дело в том, что современные версии Windows используют гибернацию по умолчанию для ускорения загрузки.
Когда вы выключаете современную операционную систему Windows, она выключается не полностью, часть системных процессов сохраняются на диск, чтобы загрузка выполнялась быстрее. Это ускоряет процесс загрузки, но и имеет недостаток при использовании Linux.
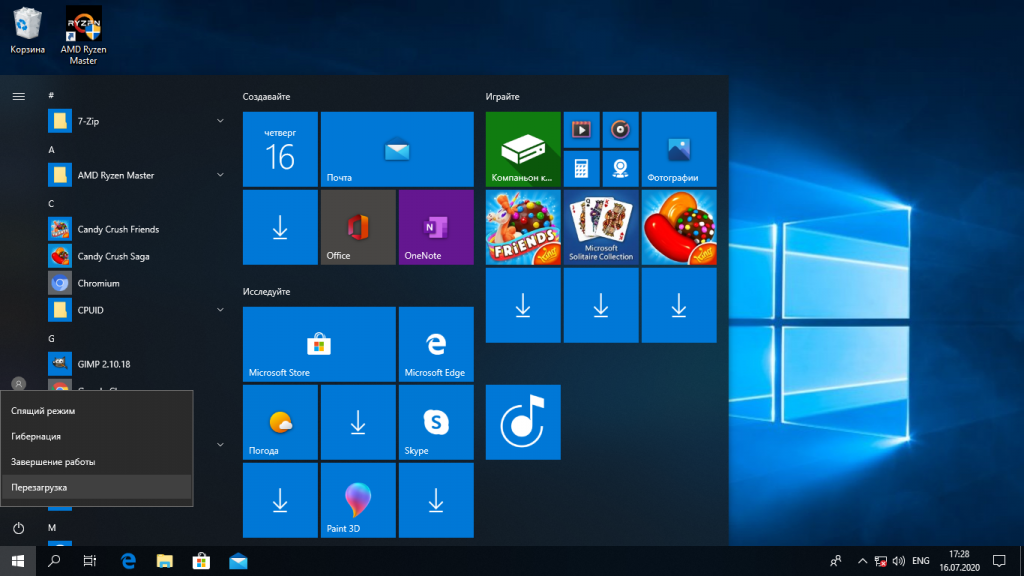
Чтобы исправить эту проблему можно загрузить Windows и отключить гибридную загрузку. Единственным недостатком такого метода будет замедление загрузки системы. Она будет загружаться приблизительно с такой же скоростью, как Windows 7. Но зато вы сможете выполнить подключение раздела Windows в Linux. Ещё можно войти в Windows и перезагрузить компьютер, при выборе этой опции гибернация не используется.
1. Перезагрузка Windows
Windows не использует гибридную загрузку во время перезагрузки. Если выбрать пункт перезагрузка, то сохраненное начальное состояние будет стерто и создано новое.
Поэтому если в следующий раз захотите перейти в систему Linux из Windows — выбирайте пункт перезагрузка. Так система не уйдет в гибернацию и у вас не возникнет ошибок во время монтирования раздела Windows в Linux.
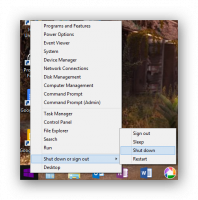
2. Выключение с клавишей Shift
Если вам нужно именно выключить компьютер есть еще один способ. Когда выбираете пункт меню выключить удерживайте нажатой клавишу Shift. Тогда система тоже не будет использовать гибернацию и полностью выключиться.
3. Отключение гибридной загрузки
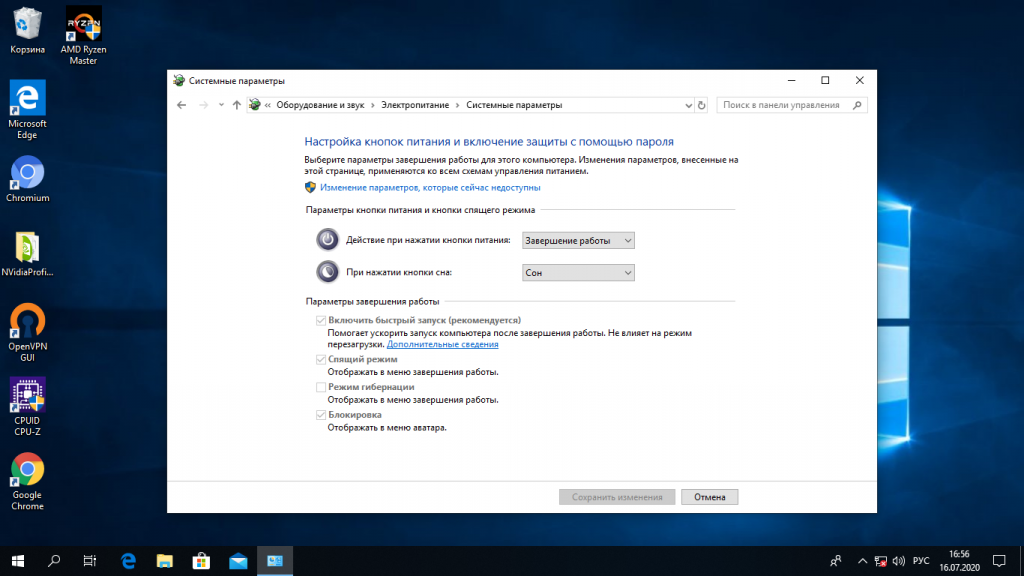
Если вы не хотите думать какую кнопку нажимать и что делать при каждой перезагрузке Windows, можно полностью отключить гибридную загрузку. Но тогда Windows будет загружаться медленнее. Это также может понадобиться если аппаратное обеспечение компьютера не поддерживает гибридную загрузку. После ее отключения вы сможете легко выполнять монтирование разделов Windows в Linux без каких-либо ошибок в режиме как для чтения так и для записи.
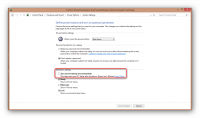
Для этого загрузитесь в Windows, откройте панель управления, откройте пункт Оборудование и звук. В разделе Электропитание выберите Изменение параметров, которые сейчас недоступны:
В открывшимся окне кликните по ссылке Изменить параметры, которые сейчас недоступны, затем пролистайте вниз и снимите галочку с пункта Включить быстрый запуск:
Затем нажмите кнопку Сохранить изменения.
4. Удаление файла Hiberfile.sys утилитой диски
Вместо перенастройки Windows, можно автоматически удалять файл гибернации каждый раз когда вам нужно выполнить монтирование разделов Windows в Linux. Конечно, после такой процедуры система будет загружаться медленнее, но потом она снова создаст файлы гибридной загрузки и продолжит использовать быстрый запуск. Это идеальный вариант если вы нечасто пользуетесь системным разделом Windows и не хотите терять скорость загрузки.
Но имейте в виду, что если вы действительно отправите компьютер в режим гибернации оставив открытыми программы и не сохраненные данные, то Linux все равно удалит реальный файл гибернации вместе со всеми вашими данными. Разницу между видами гибернации определить невозможно.
Для удаления файла hiberfile.sys достаточно добавить опцию монтирования файловой системы ntfs remove_hiberfile. Этот же совет вы можете видеть когда пытаетесь монтировать системный раздел с помощью ntfs3g.
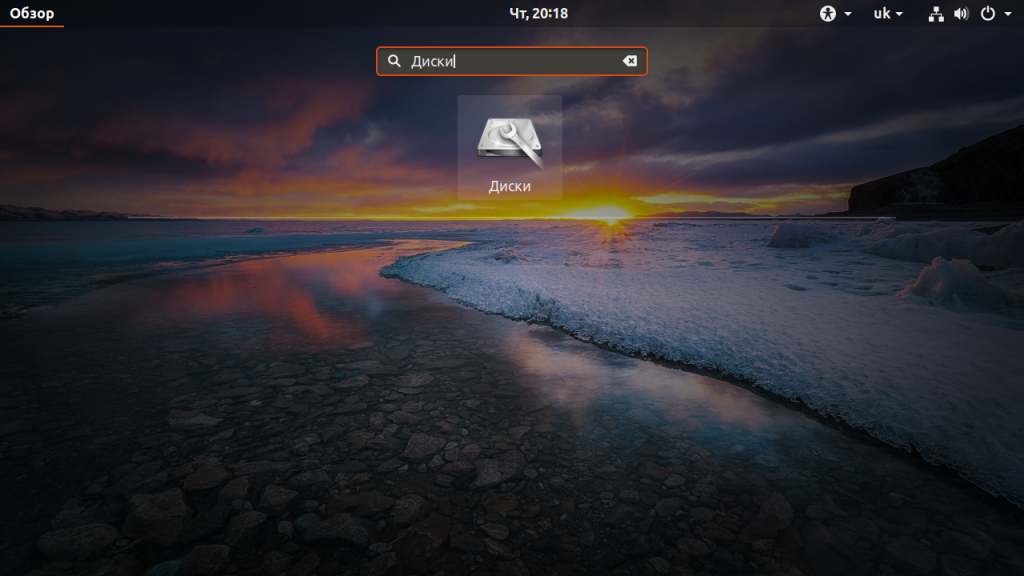
В Ubuntu и других дистрибутивах с оболочкой Gnome это можно сделать с помощью утилиты Диски:
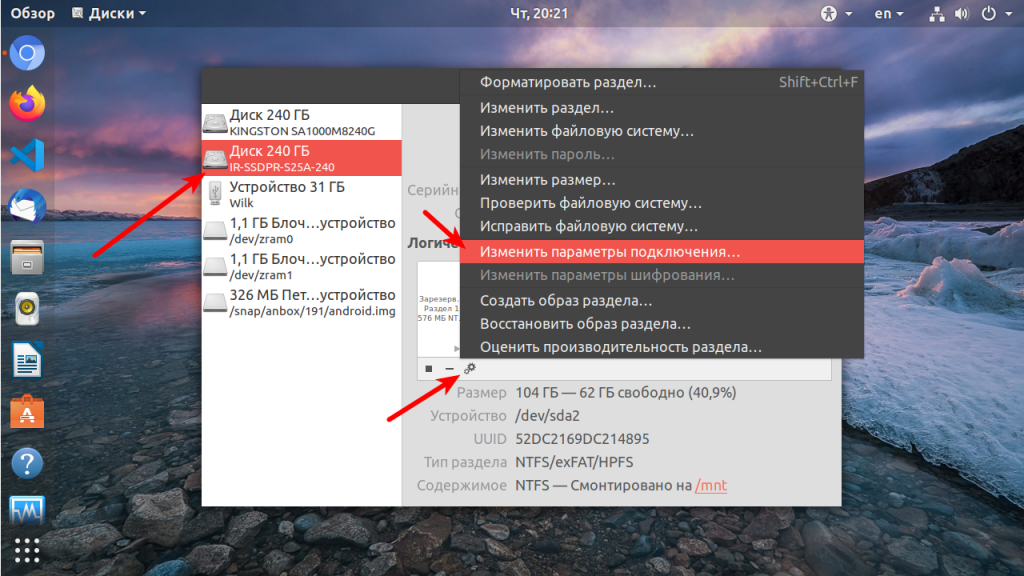
В правой части окна программы выберите жесткий диск с Windows, затем выберите системный раздел Windows. Кликните по кнопке с шестерней и выберите Изменить параметры подключения:
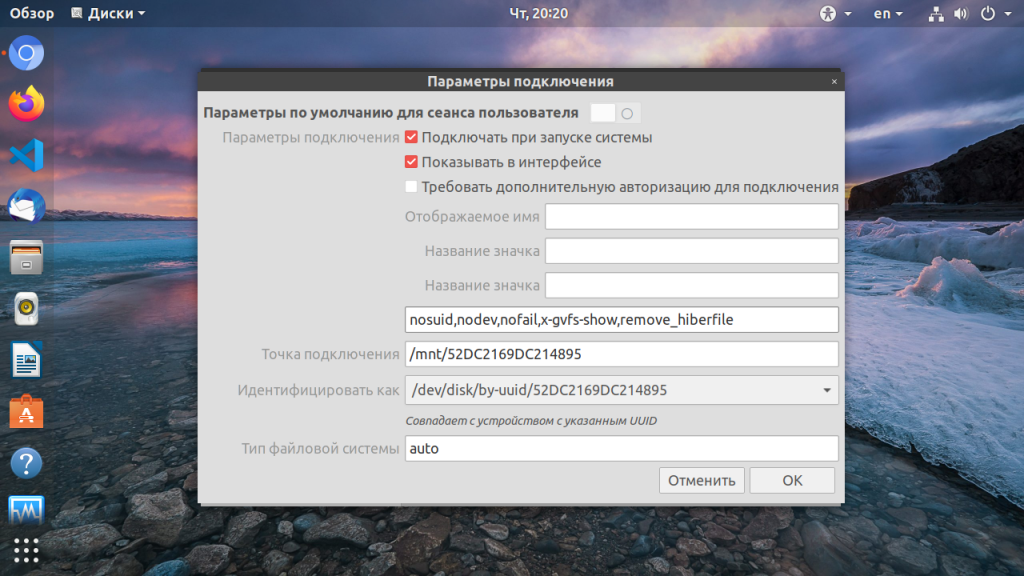
Переключите выключатель Automatic Mount Options в положение Off, затем вставьте следующую строку в конец опций монтирования внизу окна:
,remove_hiberfile
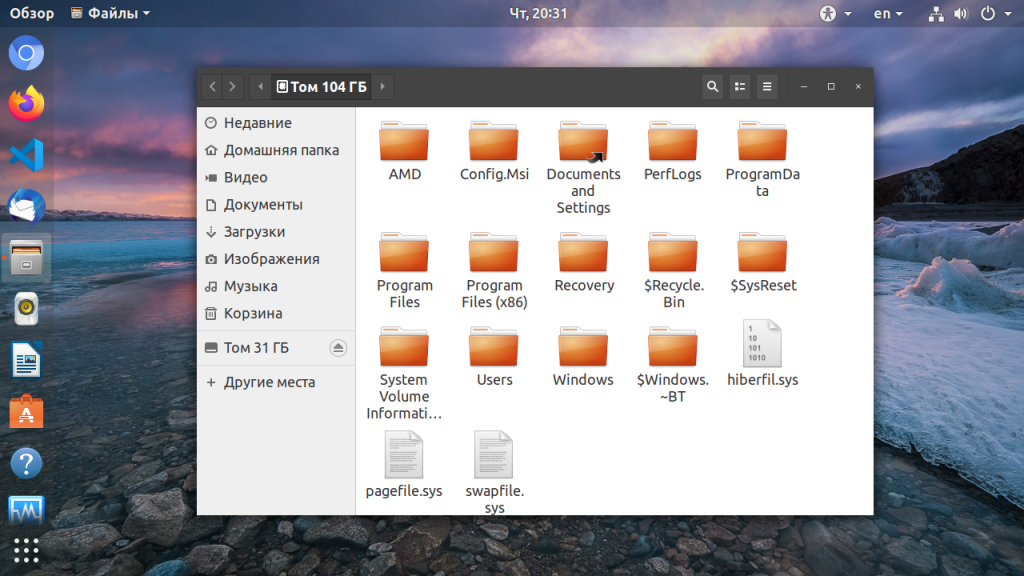
Нажмите OK и введите свой пароль. Теперь можете попробовать примонтировать системный раздел Windows в файловом менеджере Nautilus. Как видите, монтирование выполняется успешно, без каких-либо ошибок. Если файл гибернации был включен система его попросту удалит.
5. Удаление файла hiberfile.sys утилитой mount
Если вам нужно просто один раз подключить Windows раздел в Linux, несмотря на ошибку error mounting windows is hibernated и не настраивая никаких автоматических опций воспользуйтесь утилитой mount. Команде нужно передать имя системного раздела Windows включить ту же самую опцию, например:
mount -o defaults,rw,remove_hiberfile -t ntfs /dev/sda2 /mnt/ntfs
Здесь /dev/sda2 — раздел диска с Windows, а /mnt/ntfs — точка монтирования.
Эти действия необходимы, только если вам нужен доступ для записи файлов на системный раздел Windows. Если же вам просто нужно просмотреть или скопировать тот или иной файл можно выполнить монтирование разделов windows в Linux в режиме только для чтения. Например:
mount -o defaults,ro -t ntfs /dev/sda1 /mnt/ntfs
В Linux можно монтировать системные разделы в режиме только чтение, даже когда система Windows в гибернации.
Выводы
Независимо от того какой способ вы выбрали, в результате вы должны получить возможность подключить раздел Windows для чтения и записи:
Использование нескольких систем на одном компьютере — очень часто практикуется новичками. Обмен файлами между двумя системами — нормальное явление, а поэтому вы очень часто будете сталкиваться с этой ошибкой. Но эта статья поможет вам решить ее раз и навсегда. Если остались вопросы, пишите в комментариях!
Статья распространяется под лицензией Creative Commons ShareAlike 4.0 при копировании материала ссылка на источник обязательна .

