Когда вы звоните по Skype, вы часто используете веб-камеру для общения с другими людьми. S
В преддверии веб-камер пользователи Windows 10 сообщили о некоторых проблемах с Microsoft LifeCam, и сегодня мы собираемся исправить эти проблемы.
Проблемы с Microsoft LifeCam: быстрое решение
Если у вас нет ни времени, ни навыков, ни терпения для того, чтобы выполнять каждый из перечисленных ниже шагов, мы рекомендуем вам попробовать быстрое решение, которое может помочь вам: использовать программное обеспечение сторонней веб-камеры.
Мы настоятельно рекомендуем использовать CyberLink Youcam 7. Являясь одним из лидеров на рынке, этот инструмент обладает высокой надежностью и совместим со всеми моделями камер.
Это работает для нас, и это также бесплатно. Требуется регистрация на официальном сайте, но регистрация бесплатной версии занимает не более 30 секунд. Если это решение работает на вашем ПК, вы можете использовать этот инструмент на всех своих камерах и забыть о любых подобных проблемах.
Следуйте инструкциям ниже:
1. Скачайте и установите бесплатную версию CyberLink Youcam 7 с официального сайта на вашем ПК.
2. Откройте его из папки установки. Перейдите в нижнюю панель и найдите значок Youcam. Нажмите здесь.

3. В меню выберите «Запустить PerfectCam» 4. Зарегистрируйтесь на 90-дневную пробную версию, нажав «Зарегистрироваться».

4. Зарегистрируйтесь на официальной странице и проверьте свой адрес электронной почты для ссылки подтверждения.

5. Войдите в PerfectCam, чтобы начать.

6. После входа в систему запустите PerfectCam и откройте Skype. В главном окне Skype выберите Конфиденциальность> Звонки> Настройки видео.
На этой странице выберите CyberLink Web Camera Filter (в нашем случае ищите PerfectCam) из выпадающего меню Select Webcam. Нажмите кнопку Готово, чтобы сохранить изменения и включить CyberLink YouCam (PerfectCam).
Примечание. Если у вас установлена новая версия Skype, решение этой проблемы будет намного проще. Вот шаги, чтобы следовать:
1. Откройте Skype> нажмите «Профиль пользователя» в левом верхнем углу (значок с изображением вашего аватара). Нажмите «Настройки».

2. После этого нажмите раскрывающееся меню «Видео» и выберите Cyberlink PerfectCam.

3. Попробуйте сделать несколько тестовых звонков. Это решение сработало для нашей тестовой команды с первой попытки. Не забудьте снять крышку веб-камеры, если она у вас есть.
Если это быстрое исправление не сработало, воспользуйтесь приведенными ниже решениями.
Решение 1 — переустановите Skype
Если ваша Microsoft LifeCam не работает со Skype, попробуйте переустановить Skype в Windows 10. Для этого выполните следующие инструкции:
- Откройте « Настройки» и перейдите в « Система»> «Приложения и компоненты».

- Найдите Skype в списке, выберите его и нажмите кнопку Удалить.
- Чтобы убедиться, что Skype полностью удален, загрузите Skype Removal Tool и запустите его на своем компьютере. Этот инструмент должен полностью удалить все следы Skype с вашего компьютера.
- После удаления Skype просто загрузите последнюю версию и установите ее.

Решение 2. Попробуйте установить драйверы LifeCam и программное обеспечение LifeCam в режиме совместимости
Некоторые приложения не будут работать должным образом в Windows 10, поэтому вам придется запускать их в режиме совместимости.
Что касается проблем с LifeCam, иногда лучше загрузить для них программное обеспечение / драйверы для Windows 8 или даже Windows 7 и установить их в режиме совместимости.
Пользователи сообщают, что веб-камера LifeCam работает нормально после установки драйверов / программного обеспечения в режиме совместимости для Windows 8 / Windows 7.
Чтобы запустить определенное приложение в режиме совместимости в Windows 10, выполните следующие действия:
- Щелкните правой кнопкой мыши файл, который вы хотите запустить, и выберите Свойства.
- Перейдите на вкладку « Совместимость » и установите флажок « Запустить эту программу в режиме совместимости для».
- Из списка выберите Windows 8 или Windows 7. Возможно, вы захотите поэкспериментировать с другими вариантами, если опция Windows 8 или Windows 7 не работает для вас.
- Нажмите Применить и ОК.
- Попробуйте снова запустить приложение.
Следует отметить, что вам нужно включить режим совместимости для драйверов и программного обеспечения LifeCam, чтобы решить эту проблему.
Решение 3. Удалите драйверы LifeCam и убедитесь, что приложения имеют доступ к вашей камере
- Откройте Диспетчер устройств, нажав Windows Key + X и выбрав Диспетчер устройств из списка.
- Когда откроется Диспетчер устройств, найдите драйвер LifeCam, щелкните правой кнопкой мыши и выберите « Удалить».
- Теперь откройте Настройки> Конфиденциальность.
- Выберите Камера на левой панели.
- В разделе « Параметры камеры» убедитесь, что параметр « Разрешить приложениям использовать мою камеру» включен.
- После этого перезагрузите компьютер.

Решение 4 — Удалите прикладное программное обеспечение LifeCam и драйверы LifeCam
- Перейдите в Настройки> Система> Приложения и функции.
- Найдите программное обеспечение LifeCam и удалите его.
- Теперь зайдите в Диспетчер устройств и удалите драйверы LifeCam.
- После удаления драйверов нажмите кнопку « Сканировать на предмет изменений оборудования».
- Это должно установить драйверы по умолчанию на вашем компьютере и исправить проблемы LifeCam.

Пользователи сообщают, что Windows 10 автоматически устанавливает версию 4.25 драйвера LifeCam, и если это произойдет, вам, возможно, придется откатиться к предыдущей версии драйвера с помощью диспетчера устройств.
Для этого выполните следующие инструкции:
- Откройте диспетчер устройств и найдите драйвер LifeCam.
- Щелкните правой кнопкой мыши и выберите драйвер отката.
Решение 5 — Запустите программное обеспечение камеры
Это звучит как необычное решение, но некоторым пользователям удалось исправить проблемы LifeCam со Skype, запустив приложение Camera. Чтобы запустить приложение Камера, следуйте этим инструкциям:
- Нажмите клавишу Windows + S и введите « Камера».
- Из списка результатов выберите Камера.
- Если ваша камера работает правильно, вы должны увидеть картинку.
- Теперь закройте приложение « Камера» и попробуйте использовать LifeCam со Skype.

Microsoft LifeCam может быть хорошей веб-камерой, но у нее есть определенные проблемы с Windows 10.
Что касается проблем, большинство из них можно решить путем обновления драйверов или переустановки Skype.
Если вы хотите четко видеть своих близких во время видеозвонка, вам нужна надежная и современная веб-камера. Для ПК с Windows 10 и 11, Лайфкам студия — лучший выбор для семейных видеозвонков или групповых видеоконференций. Это одна из лучших веб-камер от Microsoft, которую вы можете найти для своего ПК.
LifeCam Studio использует технологию ClearFrame для детального изображения с технологией TrueColor, которая улучшает качество видео. Он оснащен сенсором Full HD 1080p и высококачественным микрофоном. Вы также можете поворачивать веб-камеру на 360 градусов.
 Кредит изображения: Майкрософт
Но некоторые пользователи сообщили, что их Студия Microsoft LifeCam камера не работает на ПК с Windows 10 или 11. Время от времени звук камеры случайно перестает работать. Если у вас возникла та же проблема с веб-камерой на компьютере с Windows, вы можете устранить ее с помощью нескольких решений и обходных путей, приведенных ниже.
& Волмарт!
Одной из причин, по которой веб-камера LifeCam Studio не работает на вашем ПК с Windows 10 или 11, являются поврежденные драйверы. Также может быть ошибка с портом USB или проблема с совместимостью. Вы можете попытаться решить проблему, следуя приведенным ниже методам.
 Кредит изображения: Майкрософт
Решение № 1. Выполните устранение неполадок оборудования и устройств
- Щелкните меню «Пуск» и откройте панель поиска.
- Войдите в Терминал Windows.
- Выберите Терминал Windows из результатов поиска.
- В верхнем меню нажмите стрелку вниз.
- Выберите «Командная строка».
- Введите msdt.exe -id DeviceDiagnostic.
- Теперь следуйте инструкциям, основанным на исправлениях, рекомендованных средством устранения неполадок.
Решение № 2. Измените настройки веб-камеры на ПК с Windows 11.
- Откройте меню «Настройки» на ПК с Windows 11.
- С левой стороны выберите Конфиденциальность и безопасность.
- С правой стороны перейдите к разрешениям приложений.
- Щелкните Камера.
- Найдите Разрешить приложениям доступ к вашей камере и включите кнопку.
Решение № 3. Перезагрузите компьютер с Windows 11.
Другое решение — перезагрузить компьютер и проверить, исправляет ли он ошибку. Иногда быстрый перезапуск обновляет процессы вашего компьютера и устраняет проблемы на этом пути. Щелкните правой кнопкой мыши меню «Пуск». Выберите Завершение работы или выход. Щелкните Перезагрузить.
Решение № 4. Попробуйте другой USB-порт
Отключите LifeCam Studio от текущего порта и подключите его к другому. Возможно, проблема связана с используемым USB-портом. Если вы можете подключиться ко второму, вам нужно будет проверить и отремонтировать другой порт.
<
Решение № 5. Обновите драйверы камеры
- Щелкните правой кнопкой мыши кнопку «Пуск», чтобы открыть меню.
- Выберите Диспетчер устройств.
- Перейдите в раздел «Камера» или «Устройства обработки изображений».
- Ищите LifeCam Studio.
- Теперь щелкните по нему правой кнопкой мыши.
- Выберите Обновить драйвер.
- Щелкните Автоматический поиск драйверов.
Решение № 6. Переустановите новые драйверы в LifeCam Studio.
- Перейдите в Диспетчер устройств.
- Перейдите в раздел «Камера» или «Устройства обработки изображений».
- Найдите LifeCam Studio и щелкните по нему правой кнопкой мыши.
- Выберите Удалить устройство.
- Щелкните Удалить.
- Перезагрузите компьютер.
- Найдите обновленную версию драйверов LifeCam Studio и установите ее.
Решение № 7. Обновите ПК с Windows 11.
- Запустите меню настроек.
- Перейдите в Центр обновления Windows.
- Щелкните Проверить наличие обновлений.
- Выберите Загрузить и установить, если доступны обновления.
- Перезагрузите компьютер.
Какое решение помогло вам исправить ошибку в веб-камере Microsoft LifeCam Studio? Вы можете поделиться своими ответами в разделе комментариев ниже.
by Matthew Adams
Matthew is a freelancer who has produced a variety of articles on various topics related to technology. His main focus is the Windows OS and all the things… read more
Updated on February 14, 2022
- A LifeCam Studio not working issue can be related to faulty USB ports, outdated drivers, and camera settings among other things.
- To fix the problem, some users might need to change certain Windows 10 camera settings.
- Changing port connections and unplugging other devices are also recommended in order to solve these Microsoft LifeCam inconveniences.
- Note that hardware troubleshooters and driver updater software might also come in handy.
XINSTALL BY CLICKING THE DOWNLOAD FILE
This software will repair common computer errors, protect you from file loss, malware, hardware failure and optimize your PC for maximum performance. Fix PC issues and remove viruses now in 3 easy steps:
- Download Restoro PC Repair Tool that comes with Patented Technologies (patent available here).
- Click Start Scan to find Windows issues that could be causing PC problems.
- Click Repair All to fix issues affecting your computer’s security and performance
- Restoro has been downloaded by 0 readers this month.
LifeCam Studio is a Microsoft webcam for Windows PCs. As it’s a Microsoft camera, users expect it to work fine with Windows platforms.
However, numerous users have said in Microsoft’s support forum that they need to fix LifeCam Studio cameras not working in Windows 10.
If that’s happening to you as well, rest assured that there are quite a few solutions that you can try to apply. Just take a closer look at the below tips.
How to fix a LifeCam Studio webcam that’s not working?
1. Update your PC’s USB port and camera drivers
It’s recommended to scan your PC with driver updater software to identify outdated or faulty USB ports or webcam drivers.
A driver updater utility will show you all the devices you need to update drivers for. Then you quickly update drivers for devices with the driver updater software.
Some of the most common Windows errors and bugs are a result of old or incompatible drivers. The lack of an up-to-date system can lead to lag, system errors or even BSoDs.
To avoid these types of problems, you can use an automatic tool that will find, download, and install the right driver version on your Windows PC in just a couple of clicks, and we strongly recommend DriverFix. Here’s how to do it:
- Download and install DriverFix.
- Launch the application.
- Wait for DriverFix to detect all your faulty drivers.
- The software will now show you all the drivers that have issues, and you just need to select the ones you’d liked fixed.
- Wait for DriverFix to download and install the newest drivers.
- Restart your PC for the changes to take effect.

DriverFix
Drivers will no longer create any problems if you download and use this powerful software today.
Disclaimer: this program needs to be upgraded from the free version in order to perform some specific actions.
2. Run the Hardware and Devices troubleshooter
- First, make sure your LifeCam Studio camera is connected to your PC.
- Press the Windows + S key combination to open a search box.
- Type cmd within the search utility.
- Click Command Prompt in the search tool.
- Next, input this command and hit Enter: msdt.exe -id DeviceDiagnostic
- Click Advanced in the Hardware and Devices troubleshooter to select an Apply repairs automatically checkbox.

- Select the Next button to resolve hardware issues with the troubleshooter.

3. Plug the LifeCam camera into different USB ports
Your camera might work fine when connected with a different USB port. Try plugging your Lifecam camera into alternative USB ports on your PC.
Also, make sure you plug the Lifecam directly into the PC without any kind of USB hub. Aside from that, you should also unplug any superfluous USB devices.
Some PC issues are hard to tackle, especially when it comes to corrupted repositories or missing Windows files. If you are having troubles fixing an error, your system may be partially broken.
We recommend installing Restoro, a tool that will scan your machine and identify what the fault is.
Click here to download and start repairing.
The mouse is one notable exception, but make sure you unplug things like external hard drivers, USB hubs, etc.
4. Make sure the LifeCam webcam is enabled
- Right-click your Start button and select the Device Manager shortcut on the menu.
- Next, click the View menu.

- Select Show hidden devices option.
- Double-click the Imaging devices category, which usually includes Microsoft LifeCam Studio cameras. However, double-click the Camera category if you can’t find it in Imaging devices.
- Then right-click your LifeCam camera and select the Enable device option if that webcam is disabled.

5. Uninstall the LifeCam to reinstall it
- Open the Device Manager window as outlined within the previous resolution.
- Click Show hidden devices option on the View menu.
- Find your LifeCam camera listed in Imaging devices or Camera.
- Right-click the LifeCam device and select Uninstall device. If there are multiple LifeCam devices listed, uninstall all of them.

- Thereafter, restart Windows; and then plug your LifeCam webcam into your PC to reinstall it.

6. Check your PC’s camera settings in Windows 10
- To open Settings, press the Windows and I keys at the same time.
- Click Privacy in Settings.
- Select the Camera tab shown directly below.

- Toggle the Allow apps to access your camera option on if it’s disabled.
- Also, enable the listed camera apps you need to utilize LifeCam Studio with.

7. Reinstall Skype
- Open the Settings window.
- Next, click Apps to open the Settings tab shown directly below.

- Select the Skype app listed there.
- Click the Uninstall option.

- Then select Uninstall again to confirm.
- Restart Windows 10 when you’ve uninstalled Skype.
- Click the Get Skype for Windows button on that app’s download page.
- Reinstall Skype with the installer you just downloaded.


You can uninstall Skype more thoroughly with third-party uninstaller software. Many third-party uninstallers will uninstall software and all residual files for them so no leftovers remain.
Then, it is ideal to manage your files and programs on your PC using efficient uninstalling software that is capable of wholly removing problematic applications.

NOTE
This resolution is more specifically for fixing LifeCam Studios not working with Skype.
8. Edit the registry
- First, you’ll need to launch Run with the Windows + R hotkey for that accessory.
- To open the Registry Editor, type the following in Run and hit Enter:
regedit - Open this key in Registry Editor:
ComputerHKEY_LOCAL_MACHINESOFTWAREWOW6432NodeMicrosoftWindows Media FoundationPlatform
- Next, right-click an empty space on the right side of the Registry Editor and select New > DWORD (32-bit) Value. Then type EnableFrameServerMode as the new DWORD’s title.
- Open this registry key within the window:
ComputerHKEY_LOCAL_MACHINESOFTWAREMicrosoftWindows Media FoundationPlatform - Then right-click within the right half of the Registry Editor (which includes the Platform key strings) and select the New and DWORD options. Give the DWORD an EnableFrameServerMode title.

- Reboot your desktop or laptop.


This resolution is mainly for users who need to fix LifeCam Studio webcams after Windows 10 build updates break them.
It was originally a fix for the Windows 10 Anniversary update breaking webcams. Users have confirmed this resolution can fix LifeCam Studio issues.
9. Update Windows 10
- Launch Settings by clicking its Start menu button.
- Select Update & Security to open the tab shown in the screenshot directly below.

- If pending updates are available, you might be able to click an Install now button to update Windows 10.
- Press the Check for updates button if Settings doesn’t display any pending updates.
- Click the View optional updates button to see optional driver updates as shown directly below.

- Select any optional driver updates listed, and click the Download and install option.
- It’s also recommended you update Windows 10 to the latest build version. Click the Download and Install option for a Windows 10 build update if there is one available.


The above resolutions might be enough to fix LifeCam Studio webcams not working for most users. If those resolutions aren’t enough, you can get in touch with a support agent via the Microsoft Contact Us page for more troubleshooting guidance.
And if you still happen to suspect a driver-related issue, just take a closer look at this guide dedicated to Microsoft LifeCam software and drivers.
Hardware troubleshooters might also come in handy for fixing LifeCams not working in Windows 10. Just let us know which method worked for you in the comments area below.
![]()
Newsletter
by Matthew Adams
Matthew is a freelancer who has produced a variety of articles on various topics related to technology. His main focus is the Windows OS and all the things… read more
Updated on February 14, 2022
- A LifeCam Studio not working issue can be related to faulty USB ports, outdated drivers, and camera settings among other things.
- To fix the problem, some users might need to change certain Windows 10 camera settings.
- Changing port connections and unplugging other devices are also recommended in order to solve these Microsoft LifeCam inconveniences.
- Note that hardware troubleshooters and driver updater software might also come in handy.
XINSTALL BY CLICKING THE DOWNLOAD FILE
This software will repair common computer errors, protect you from file loss, malware, hardware failure and optimize your PC for maximum performance. Fix PC issues and remove viruses now in 3 easy steps:
- Download Restoro PC Repair Tool that comes with Patented Technologies (patent available here).
- Click Start Scan to find Windows issues that could be causing PC problems.
- Click Repair All to fix issues affecting your computer’s security and performance
- Restoro has been downloaded by 0 readers this month.
LifeCam Studio is a Microsoft webcam for Windows PCs. As it’s a Microsoft camera, users expect it to work fine with Windows platforms.
However, numerous users have said in Microsoft’s support forum that they need to fix LifeCam Studio cameras not working in Windows 10.
If that’s happening to you as well, rest assured that there are quite a few solutions that you can try to apply. Just take a closer look at the below tips.
How to fix a LifeCam Studio webcam that’s not working?
1. Update your PC’s USB port and camera drivers
It’s recommended to scan your PC with driver updater software to identify outdated or faulty USB ports or webcam drivers.
A driver updater utility will show you all the devices you need to update drivers for. Then you quickly update drivers for devices with the driver updater software.
Some of the most common Windows errors and bugs are a result of old or incompatible drivers. The lack of an up-to-date system can lead to lag, system errors or even BSoDs.
To avoid these types of problems, you can use an automatic tool that will find, download, and install the right driver version on your Windows PC in just a couple of clicks, and we strongly recommend DriverFix. Here’s how to do it:
- Download and install DriverFix.
- Launch the application.
- Wait for DriverFix to detect all your faulty drivers.
- The software will now show you all the drivers that have issues, and you just need to select the ones you’d liked fixed.
- Wait for DriverFix to download and install the newest drivers.
- Restart your PC for the changes to take effect.
DriverFix
Drivers will no longer create any problems if you download and use this powerful software today.
Disclaimer: this program needs to be upgraded from the free version in order to perform some specific actions.
2. Run the Hardware and Devices troubleshooter
- First, make sure your LifeCam Studio camera is connected to your PC.
- Press the Windows + S key combination to open a search box.
- Type cmd within the search utility.
- Click Command Prompt in the search tool.
- Next, input this command and hit Enter: msdt.exe -id DeviceDiagnostic
- Click Advanced in the Hardware and Devices troubleshooter to select an Apply repairs automatically checkbox.
- Select the Next button to resolve hardware issues with the troubleshooter.
3. Plug the LifeCam camera into different USB ports
Your camera might work fine when connected with a different USB port. Try plugging your Lifecam camera into alternative USB ports on your PC.
Also, make sure you plug the Lifecam directly into the PC without any kind of USB hub. Aside from that, you should also unplug any superfluous USB devices.
Some PC issues are hard to tackle, especially when it comes to corrupted repositories or missing Windows files. If you are having troubles fixing an error, your system may be partially broken.
We recommend installing Restoro, a tool that will scan your machine and identify what the fault is.
Click here to download and start repairing.
The mouse is one notable exception, but make sure you unplug things like external hard drivers, USB hubs, etc.
4. Make sure the LifeCam webcam is enabled
- Right-click your Start button and select the Device Manager shortcut on the menu.
- Next, click the View menu.
- Select Show hidden devices option.
- Double-click the Imaging devices category, which usually includes Microsoft LifeCam Studio cameras. However, double-click the Camera category if you can’t find it in Imaging devices.
- Then right-click your LifeCam camera and select the Enable device option if that webcam is disabled.
5. Uninstall the LifeCam to reinstall it
- Open the Device Manager window as outlined within the previous resolution.
- Click Show hidden devices option on the View menu.
- Find your LifeCam camera listed in Imaging devices or Camera.
- Right-click the LifeCam device and select Uninstall device. If there are multiple LifeCam devices listed, uninstall all of them.
- Thereafter, restart Windows; and then plug your LifeCam webcam into your PC to reinstall it.
6. Check your PC’s camera settings in Windows 10
- To open Settings, press the Windows and I keys at the same time.
- Click Privacy in Settings.
- Select the Camera tab shown directly below.
- Toggle the Allow apps to access your camera option on if it’s disabled.
- Also, enable the listed camera apps you need to utilize LifeCam Studio with.
7. Reinstall Skype
- Open the Settings window.
- Next, click Apps to open the Settings tab shown directly below.
- Select the Skype app listed there.
- Click the Uninstall option.
- Then select Uninstall again to confirm.
- Restart Windows 10 when you’ve uninstalled Skype.
- Click the Get Skype for Windows button on that app’s download page.
- Reinstall Skype with the installer you just downloaded.
You can uninstall Skype more thoroughly with third-party uninstaller software. Many third-party uninstallers will uninstall software and all residual files for them so no leftovers remain.
Then, it is ideal to manage your files and programs on your PC using efficient uninstalling software that is capable of wholly removing problematic applications.
NOTE
This resolution is more specifically for fixing LifeCam Studios not working with Skype.
8. Edit the registry
- First, you’ll need to launch Run with the Windows + R hotkey for that accessory.
- To open the Registry Editor, type the following in Run and hit Enter:
regedit - Open this key in Registry Editor:
ComputerHKEY_LOCAL_MACHINESOFTWAREWOW6432NodeMicrosoftWindows Media FoundationPlatform - Next, right-click an empty space on the right side of the Registry Editor and select New > DWORD (32-bit) Value. Then type EnableFrameServerMode as the new DWORD’s title.
- Open this registry key within the window:
ComputerHKEY_LOCAL_MACHINESOFTWAREMicrosoftWindows Media FoundationPlatform - Then right-click within the right half of the Registry Editor (which includes the Platform key strings) and select the New and DWORD options. Give the DWORD an EnableFrameServerMode title.
- Reboot your desktop or laptop.
This resolution is mainly for users who need to fix LifeCam Studio webcams after Windows 10 build updates break them.
It was originally a fix for the Windows 10 Anniversary update breaking webcams. Users have confirmed this resolution can fix LifeCam Studio issues.
9. Update Windows 10
- Launch Settings by clicking its Start menu button.
- Select Update & Security to open the tab shown in the screenshot directly below.
- If pending updates are available, you might be able to click an Install now button to update Windows 10.
- Press the Check for updates button if Settings doesn’t display any pending updates.
- Click the View optional updates button to see optional driver updates as shown directly below.
- Select any optional driver updates listed, and click the Download and install option.
- It’s also recommended you update Windows 10 to the latest build version. Click the Download and Install option for a Windows 10 build update if there is one available.
The above resolutions might be enough to fix LifeCam Studio webcams not working for most users. If those resolutions aren’t enough, you can get in touch with a support agent via the Microsoft Contact Us page for more troubleshooting guidance.
And if you still happen to suspect a driver-related issue, just take a closer look at this guide dedicated to Microsoft LifeCam software and drivers.
Hardware troubleshooters might also come in handy for fixing LifeCams not working in Windows 10. Just let us know which method worked for you in the comments area below.
![]()
Newsletter
На чтение 2 мин. Просмотров 888 Опубликовано 03.09.2019
Когда вы звоните по Skype, вы часто используете веб-камеру для общения с другими людьми. Говоря о веб-камерах, пользователи Windows 10 сообщили о некоторых проблемах с Microsoft LifeCam , и сегодня мы собираемся исправить эти проблемы.
Как исправить проблемы Microsoft LifeCam в Windows 10?
Проблемы Microsoft LifeCam: быстрое решение
Если у вас нет ни времени, ни навыков, ни терпения, чтобы выполнять все перечисленные ниже действия, мы рекомендуем вам попробовать быстрое решение, которое может помочь вам: использовать программное обеспечение сторонней веб-камеры.
Мы настоятельно рекомендуем использовать CyberLink Youcam 7 . Являясь одним из лидеров на рынке, этот инструмент обладает высокой надежностью и совместим со всеми моделями камер.
Это работает для нас, и это также бесплатно. Требуется регистрация на официальном сайте, но регистрация бесплатной версии занимает не более 30 секунд. Если это решение работает на вашем ПК, вы можете использовать этот инструмент на всех своих камерах и забыть о любых подобных проблемах.
Следуйте инструкциям ниже:
1. Загрузите и установите бесплатную версию CyberLink Youcam 7 с официального веб-сайта на своем ПК.
2. Откройте ее из папки установки. Перейдите в нижнюю панель и найдите значок Youcam. Нажмите здесь.

3. В меню выберите «Запустить PerfectCam’4». Чтобы подписаться на 90-дневную пробную версию, нажмите «Зарегистрироваться».

4. Зарегистрируйтесь на официальной странице и проверьте свой адрес электронной почты для ссылки для подтверждения.

5. Войдите в PerfectCam, чтобы начать.

6. После входа в систему запустите PerfectCam и откройте Skype. В главном окне Skype выберите Конфиденциальность> Звонки> Настройки видео. На этой странице выберите CyberLink Web Camera Filter (в нашем случае ищите PerfectCam) из выпадающего меню Select Webcam. Нажмите кнопку Готово, чтобы сохранить изменения и включить CyberLink YouCam (PerfectCam).
Содержание
- 1 Возможности
- 2 Захват изображений
- 3 Запись видео/аудио
- 4 How To Fix Microsoft LifeCam Issues On Windows 10?

Microsoft LifeCam – продвинутый драйвер для ряда веб-камер высокого разрешения. Скачать его следуют владельцам следующих моделей:
- HD 3000;
- VX 1000;
- VX 800;
- HD 5000;
- VX 3000;
- VX 800;
- VX 2000.
Для инсталляции программного продукта и его функционирования необходимо наличие платформы. Net Framework 3.5 или совместимой. Установщик предложит выполнить ее инсталляцию в автоматическом режиме для 64 bit и 32 bit-ной ОС.
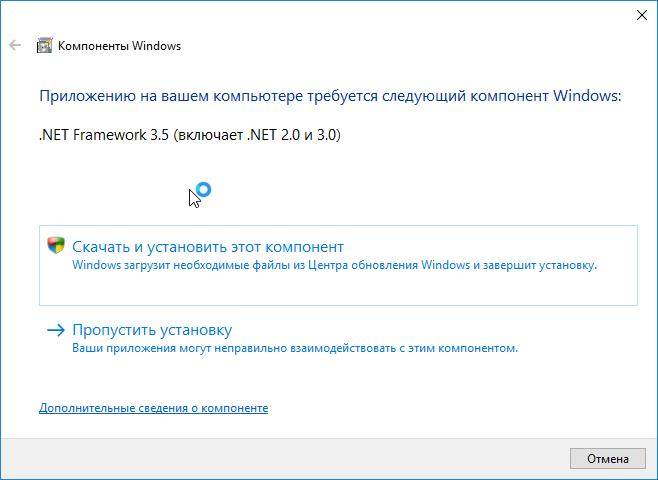
Обрате внимание, что драйвер инсталлируется только при наличии подключения к интернету и не поддерживает локальную установку, хотя работать приложение будет и в случае отключения от интернета компьютера на:
- Windows 7;
- Windows 8.1;
- Windows 10.
Причем ширина пропускного канала должна обеспечивать передачу аудио и видео без задержек.
Возможности
После инсталляции ПО для компьютера и подключения к нему камеры с соблюдением всех рекомендаций (достаточное освещение рабочего места, оптимальное расстояние от объектива до лица, правильная фокусировка) можно приступать к работе.
Функционал программы разделен на три составляющие:
- создание фотоснимков;
- запись звука с микрофона, входящего в комплект поставки;
- захват видео с последующим сохранением в файл на HDD ноутбука.
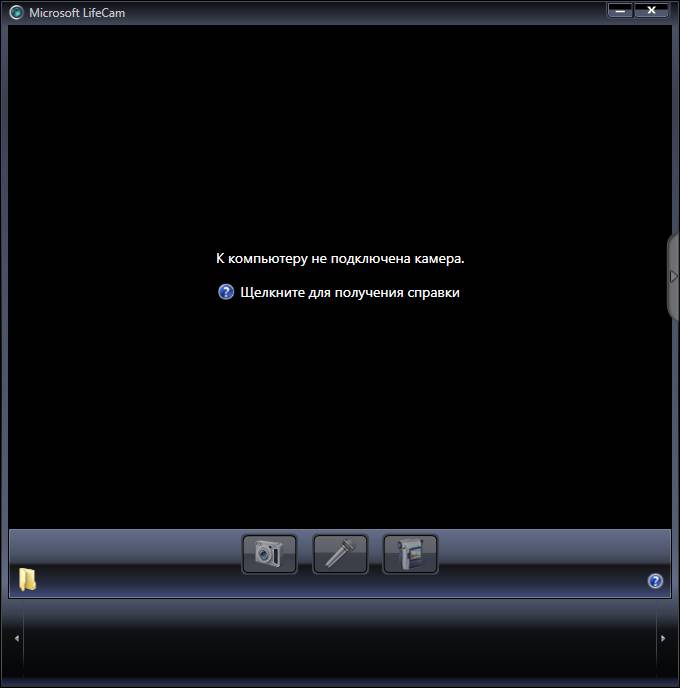
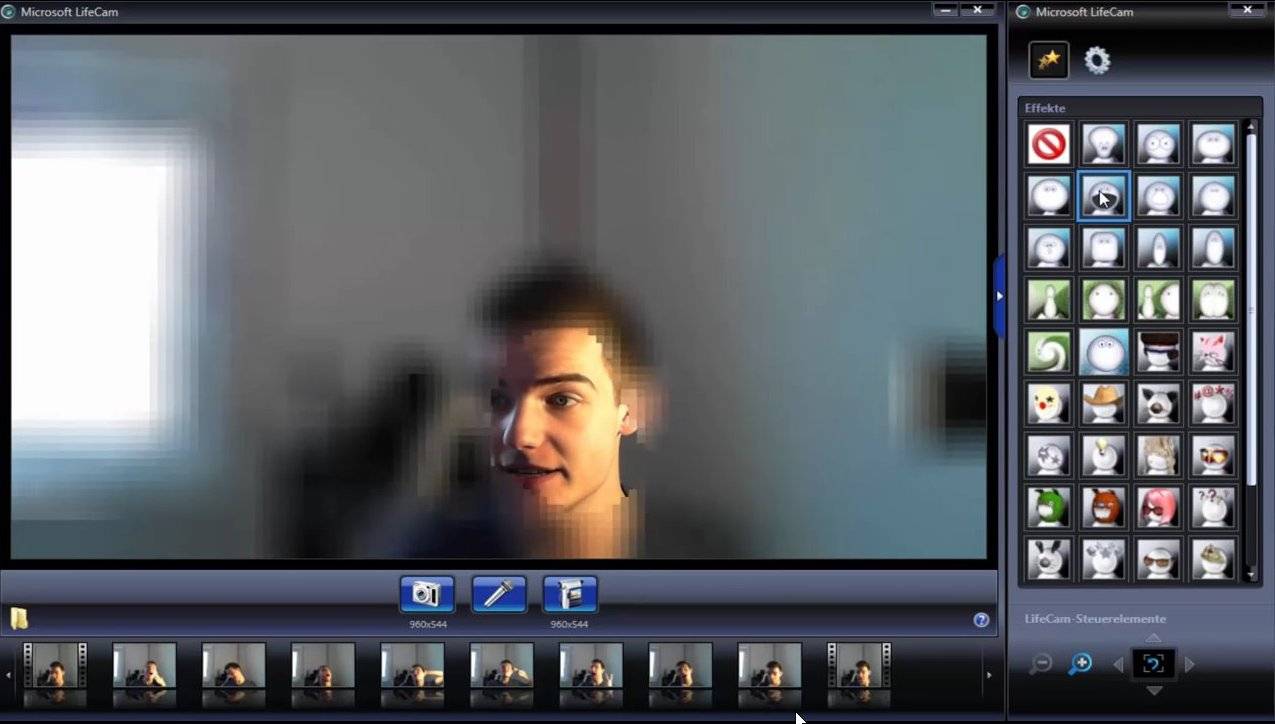
Центральную часть окна занимает фрейм, где отображается так называемое интерактивное потоковое видео или, проще говоря, то, что видит камера. Оно выполняет несколько функций, главные из которых: настройка позиционирования устройства, оценка качества видео и проверка работоспособности камеры. Используя интерактивный поток, выполняется программная и аппаратная (изменение положения) настройка девайса для удобной эксплуатации.
Захват изображений
Первая функция драйвера позволяет использовать web-камеру в качестве фотоаппарата. Клик по первой клавише в центральной нижней части окна откроет интерфейс создания снимков. Для захвата текущего изображения следует еще раз кликнуть по иконке с миниатюрой фотоаппарата. Она выполняет функцию спуска. Полученные снимки отображаются в нижнем фрейме в виде миниатюр, а хранятся эти файлы в каталоге «Изображения» в папке с профилем пользователя на системном томе.
Запись видео/аудио
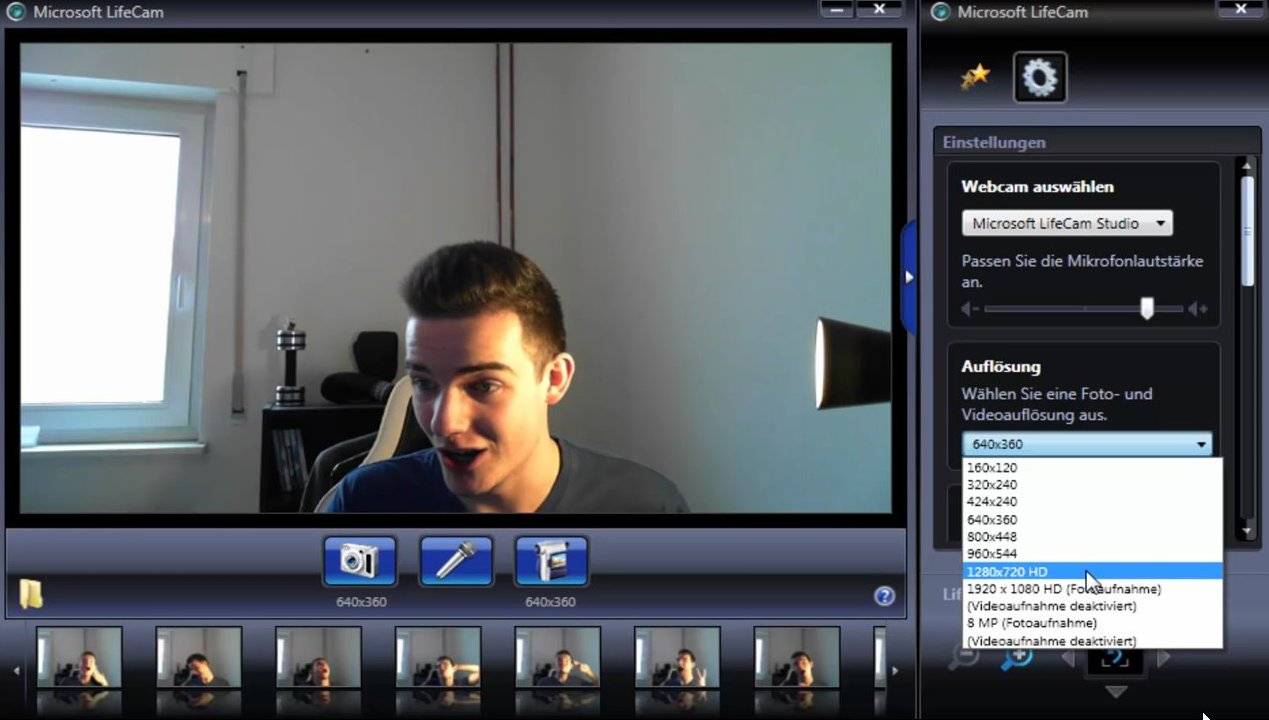
Посредством LifeCam можно записывать видео и/или звук, указав параметры выходящего файла: яркость и разрешение видео вплоть до FullHD, аудиокодек, громкость. Улучшение изображения осуществляется посредством функции TrueColor.
Существенно разнообразить видеоряд помогут различные эффекты, применяемые только к лицу или всей картинке и наложения в виде шляп, очков, ушей, носа. Их количество небольшое, а скачать бесплатно новые футажи нельзя.
</ul>
When you make Skype calls, it’s not uncommon that you use the webcam to communicate with other people. S
peaking of webcams, Windows 10 users have reported some issues with Microsoft LifeCam, and today we’re going to fix those issues.
How To Fix Microsoft LifeCam Issues On Windows 10?
Microsoft LifeCam Issues: Quick fix
If you don’t have the time or the skills and patience to follow each and every step listed below, we recommend you try a quick fix that might work for you: using a third party webcam software.
We would strongly suggest using the CyberLink Youcam 7. Being one of the leaders on the market, this tool is highly reliable and compatible with all camera models.
It worked for us and it’s also free. It requires a sign up on the official website but it doesn’t take more than 30 seconds to register for a free version. If this solution works on your PC, you can use this tool on all your cameras and forget about any such issues.
Follow the steps below:
1. Download and install CyberLink Youcam 7 free version from the official website on your PC. 2. Open it from the installation folder. Go to the bottom bar and find Youcam icon. Click on it.
3. From the menu select ‘Launch PerfectCam’4. Sign up for a 90-day trial by clicking on ‘Sign Up’.
4. Sign up on the official page and check your email address for the verification link.
5. Sign in PerfectCam in order to start.
6. After signing in, let PerfectCam launch and open Skype. In the Skype main window, select Privacy > Calls > Video Settings.
In this page, select CyberLink Web Camera Filter (in our case, look for PerfectCam) from the Select Webcam drop-down menu. Click the Finish button to save your changes and enable CyberLink YouCam (PerfectCam).
Note: If you have the new Skype version, fixing this issue much easier. Here are the steps to follow:
1. Open Skype > click ‘User profile’ in the left top corner (the icon with your avatar image). Click on ‘Settings’.
2. After that click on ‘Video’ drop-down menu and select Cyberlink PerfectCam.
3. Try to make some test calls. This solution worked for our test team from the first try. Don’t forget to remove your webcam cover, if you have one.
If this quick fix didn’t work for you, use the solutions below.
We’ve written extensively on webcam issues in Windows 10. Check out this guide for more information.
Solution 1 – Reinstall Skype
If your Microsoft LifeCam isn’t working with Skype, try reinstalling Skype on Windows 10. To do that follow these instructions:
- Open Settings and go to the System > Apps and Features.
- Find Skype on the list, select it, and click the Uninstall button.
- To make sure that Skype is completely uninstalled, download Skype Removal Tool and run it on your computer. This tool should completely remove all traces of Skype from your computer.
- After Skype has been uninstalled, just download the latest version and install it.
Solution 2 – Try installing LifeCam drivers and LifeCam software in Compatibility mode
Certain applications won’t work properly in Windows 10, so you’ll have to run them using the Compatibility mode.
As for LifeCam issues, sometimes it’s better that you download Windows 8 or even Windows 7 software / drivers for it, and install them in Compatibility mode.
Users have reported that LifeCam webcam works normally after installing drivers / software in Compatibility mode for Windows 8 / Windows 7.
To run certain application in Compatibility mode on Windows 10, do the following:
- Right click the file you wish to run and choose Properties.
- Go to Compatibility tab and check Run this program in compatibility mode for.
- From the list choose Windows 8 or Windows 7. You might want to experiment with other options if Windows 8 or Windows 7 option doesn’t work for you.
- Click Apply and OK.
- Try running the application again.
We should mention that you’ll have to turn on Compatibility mode for both drivers and LifeCam software in order to fix this issue.
Solution 3 – Uninstall LifeCam drivers and make sure that apps are allowed to access your camera
- Open Device Manager by pressing Windows Key + X and choosing Device Manager from the list.
- When Device Manager opens, find your LifeCam driver, right click and choose Uninstall.
- Now open Settings > Privacy.
- Choose Camera from the left pane.
- In Camera options make sure that Let apps use my camera is turned on.
- After doing that, restart your computer.
Make sure everything gets deleted with the best driver removal tools!
Solution 4 – Remove LifeCam application software and LifeCam drivers
- Go to Settings > System > Apps and Features.
- Find LifeCam software and uninstall it.
- Now go to Device Manager and uninstall LifeCam drivers.
- After you’ve uninstalled the drivers, click the Scan for hardware changes button.
- This should install default drivers on your computer and fix LifeCam issues.
Users report that Windows 10 automatically installs version 4.25 of LifeCam driver, and if that happens, you might have to roll back to the previous version of driver by using Device Manager.
To do that, follow these instructions:
- Open Device Manager and find LifeCam driver.
- Right click it and choose Rollback driver.
Solution 5 – Run Camera software
This sounds like a unusual solution, but some users have managed to fix LifeCam issues with Skype by running Camera app. To run Camera app, follow these instructions:
- Press Windows Key + S and type Camera.
- From the list of results choose Camera.
- If your camera is working properly you should see the picture.
- Now close the Camera app and try using LifeCam with Skype.
Microsoft LifeCam might be a good webcam, but it has certain issues with Windows 10.
Regarding the issues, most of them can be solved by updating your drivers or by reinstalling Skype.
Ask a question Quick access
-
Question
-
- I have tried more than once to install my new hd-3000 camera software to no avail. Have tried to run as Windows 7 and 8 with no success. I have Windows 10 and have had no trouble install other software. Going to Microsoft site provides me with no download as the camera document states.
- Moved byTuesday, April 17, 2018 3:37 PMRelocated
Monday, April 16, 2018 8:22 PM Reply | Quote
Answers
- Check out these helpful resources for product support: Hardware support Call: 1-800-Microsoft 1-800-642-7676
Carey Frisch
- Proposed as answer byFriday, May 17, 2019 6:11 PM
- Marked as answer byFriday, May 17, 2019 6:17 PM
Sunday, May 5, 2019 4:21 AM Reply | Quote
All replies
-
Hi ,
Please download and install the drivers from here https://www.microsoft.com/accessories/en-us/d/lifecam-hd-3000
Even if it says Windows 7 they are good also for Windows 10.
Regards
Simon
If you find that my post has answered your question, please mark it as the answer. If you find my post to be helpful in anyway, please click vote as helpful. Regards Simon Disclaimer: This posting is provided AS IS with no warranties or guarantees, and confers no rights.
- Marked as answer byTuesday, April 17, 2018 1:05 PM
- Unmarked as answer byTuesday, April 17, 2018 1:05 PM
- Proposed as answer byTuesday, April 2, 2019 9:58 PM
Monday, April 16, 2018 9:44 PM Reply | Quote
-
What is the model of your cpu? What is the error message when you install camera on windows 7 and 8?
I am not sure if the reason why you can’t use hd-3000 camera software on both windows 7 and windows 8 is caused by the model of your hardware.
You can try to install the driver in compatibility mode.
You can refer to:
https://answers.microsoft.com/en-us/windows/forum/windows_10-hardware-winpc/lifecam-hd-3000-windows-10/ce1bb335-ce92-4261-8579-ba9845e1dffb?auth=1
Please remember to mark the replies as answers if they help. If you have feedback for TechNet Subscriber Support, contact tnmff@microsoft.com.
Tuesday, April 17, 2018 2:22 AM Reply | Quote
- This approach presented me with ‘LifeCam doesn’t work on this version of Windows’. I am running Windows 10 Home.Tuesday, April 17, 2018 1:14 PM Reply | Quote
-
- Locate and right-click on the driver setup file on your PC and click on Properties.
- Click on the compatibility tab, check the box Run this program in compatibility mode for, select Windows 8.1/7 operating system from the drop down menu and proceed with the installation. Once this is done, restart the computer for the effective changes to take place.
Simon
If you find that my post has answered your question, please mark it as the answer. If you find my post to be helpful in anyway, please click vote as helpful. Regards Simon Disclaimer: This posting is provided AS IS with no warranties or guarantees, and confers no rights.
Tuesday, April 17, 2018 1:37 PM Reply | Quote
- I tried compatibility mode and still get ‘LifeCam does not work on this version of Windows message’Tuesday, April 17, 2018 2:00 PM Reply | Quote
- This is a Windows 10 issueTuesday, April 17, 2018 3:20 PM Reply | Quote
- where was this moved to?Tuesday, April 17, 2018 5:25 PM Reply | Quote
-
Hi,
What is the driver version did you install?
You can install all the updates to make your system up to date, update your firmware.
To do further research, it is suggested that you can provide the setuppi.dev.log, which is located at C:WindowsINF.
Please remember to mark the replies as answers if they help. If you have feedback for TechNet Subscriber Support, contact tnmff@microsoft.com.
Wednesday, April 18, 2018 6:29 AM Reply | Quote
- Microsoft system updates are scheduled to run automaticallyWednesday, April 18, 2018 12:28 PM Reply | Quote
- Sorry,but I do not see ‘setuppi.dev.logWednesday, April 18, 2018 7:00 PM Reply | Quote
-
setupapi.dev.log
Please remember to mark the replies as answers if they help. If you have feedback for TechNet Subscriber Support, contact tnmff@microsoft.com.
Thursday, April 19, 2018 1:14 AM Reply | Quote
- All I see is …setupapi.dev & .ev1 & .ev2 & .ev3 & .offline & .setup & .upgrade …. no .logThursday, April 19, 2018 1:23 PM Reply | Quote
- That is what I require, I guess.
Please remember to mark the replies as answers if they help. If you have feedback for TechNet Subscriber Support, contact tnmff@microsoft.com.
Friday, April 20, 2018 1:07 AM Reply | Quote
- What should I do at this point?Friday, April 20, 2018 5:29 PM Reply | Quote
- As a reminder, this is Windows 10 HomeSunday, April 22, 2018 1:02 PM Reply | Quote
-
Hi,
What if you use the build-in camera app that comes with windows 10 in the app list and from the link below , seems that it can work. The LifeCam driver may be automatically installed.
https://answers.microsoft.com/en-us/windows/forum/windows_10-hardware/windows-10-software-for-microsoft-lifecam-hd-3000/20822502-f31d-4edf-b60e-898026d03bc5
I am running windows 10 enterprise and I can’t run the software even in compatible mode,but it can work in Windows 7.Below is the screen shot.
Please remember to mark the replies as answers if they help. If you have feedback for TechNet Subscriber Support, contact tnmff@microsoft.com.
Thursday, April 26, 2018 2:25 AM Reply | Quote
The minute I click ‘learn more’ I am directed to a forum. The screenshot of the ‘Welcome to LifeCam…..’ appears in the background for a splitting second. Therefore, I am unable to proceed further.
Thursday, April 26, 2018 12:29 PM Reply | Quote
What if you plug the device and open Camera App, seeing if the camera can work.
Since there is not driver for Windows 10 and 8, I am not sure that if it can be used stably in Windows 10 system.
It is suggested that you can contact Answer Forum, since we have limited resource about the device:
https://answers.microsoft.com/en-us/
And you can also contact the Microsoft by calling the number shown in the webpage
Call: 1-800-Microsoft
1-800-642-7676
https://www.microsoft.com/accessories/en-us/products/webcams/lifecam-hd-3000/t3h-00011#techspecs-connect
Please remember to mark the replies as answers if they help. If you have feedback for TechNet Subscriber Support, contact tnmff@microsoft.com.
Friday, April 27, 2018 1:16 AM Reply | Quote
Nothing seems to work. Guess I will return the camera and try another. Regret that since my older LifeCam camera (which doesn’t work well in 10) was great. Thanks much for your help.
Larry
Friday, April 27, 2018 12:18 PM Reply | Quote
Please remember to mark the replies as answers if they help. If you have feedback for TechNet Subscriber Support, contact tnmff@microsoft.com.
- Edited bySaturday, April 28, 2018 1:20 AM
Saturday, April 28, 2018 1:20 AM Reply | Quote
I too have this problem. In previous updates to windows 10 all I had to do was unplug the camera, restart the computer and plug it back in but after this latest update it doesn’t work at all and I get the error message above in both windows 10 home and pro. I downloaded that windows 7 driver and it didn’t work «doesn’t work in windows 10». I ran it in administrator mode, I ran it in troubleshooting mode and it decided on windows XP Sp3! still didn’t work. Clearly there is no compatible driver for Microsoft’s own camera (which is still for sale) on this latest version of windows 10! I had the same thing with my surface pro 3- for several updates of windows 10 it was reporting a Bluetooth serial port emulator was incompatible and I actually had to uninstall and disable this device for several updates to even install the updates. This latest update has finally fixed that problem. I can understand it is difficult to keep updating drivers for old legacy hardware, but why are there problems with Microsoft’s own hardware devices, when these devices are not old and still in use?
We have two of these cameras, but fortunately we mainly use them with all in one computers whose inbuilt cameras work fine and are adequate to the job, even if lower definition than the LifeCam.
pidasms
Tuesday, September 25, 2018 12:49 AM Reply | Quote
After the latest windows 10 update the lifecam 3000 now installs normally and works!
I suggest you just unplug the camera, delete its entry from device manager, run a registry cleaner to delete its entry there, restart the computer, run windows 10 update to install the latest updates, restart the computer, then plug the lifecam back in and it should work ( until the next incompatible windows 10 update!).
Meanwhile my much older Logitech camera has worked with each update so if I buy a new camera guess which brand it will be?
pidasms
Tuesday, January 8, 2019 8:43 PM Reply | Quote
- I have tried more than once to install my new hd-3000 camera software to no avail. Have tried to run as Windows 7 and 8 with no success. I have Windows 10 and have had no trouble install other software. Going to Microsoft site provides me with no download as the camera document states.
Tuesday, April 2, 2019 9:57 PM Reply | Quote
Exactly same problem.
Install says — not compatible with win 10. Learn more sends to a non existing page.
Wednesday, April 3, 2019 8:02 AM Reply | Quote
not helpfull at all.
Saturday, May 4, 2019 5:21 PM Reply | Quote
Carey Frisch
- Proposed as answer byFriday, May 17, 2019 6:11 PM
- Marked as answer byFriday, May 17, 2019 6:17 PM
Sunday, May 5, 2019 4:21 AM Reply | Quote
pidasms
Saturday, June 22, 2019 7:08 AM Reply | Quote
Используемые источники:
- https://snelwilcox.com/drajvera/microsoft-lifecam.html
- https://windowsreport.com/microsoft-lifecam-windows-10/
- https://social.technet.microsoft.com/forums/en-us/c65c6a76-34ea-464e-baa1-686541d99fad/lifecam-hd3000-windows-10
Get the latest drivers for your webcam device
by Milan Stanojevic
Milan has been enthusiastic about technology ever since his childhood days, and this led him to take interest in all PC-related technologies. He’s a PC enthusiast and he… read more
Updated on November 14, 2022
Reviewed by
Alex Serban

After moving away from the corporate work-style, Alex has found rewards in a lifestyle of constant analysis, team coordination and pestering his colleagues. Holding an MCSA Windows Server… read more
- You will not need to do much if you are running Windows 10 or 11 since all the necessary drivers are integrated with the OS.
- By installing other MS products like Skype, you can get drivers to run the MS LifeCam device.

XINSTALL BY CLICKING THE DOWNLOAD FILE
This software will repair common computer errors, protect you from file loss, malware, hardware failure and optimize your PC for maximum performance. Fix PC issues and remove viruses now in 3 easy steps:
- Download Restoro PC Repair Tool that comes with Patented Technologies (patent available here).
- Click Start Scan to find Windows issues that could be causing PC problems.
- Click Repair All to fix issues affecting your computer’s security and performance
- Restoro has been downloaded by 0 readers this month.
In this article, let us discuss Microsoft LifeCam software and show you how to download and use it.
When you make Skype calls, it’s not uncommon for you to use the webcam to communicate with others.
Regarding webcams, Windows 10 users have reported some issues with Microsoft LifeCam, and today we’re going to fix those issues.
Is Microsoft LifeCam plug-and-play?
Yes, LifeCam Cinema HD is a (PnP) plug-and-play camera. And for most users, it is already prepared for use with Windows 10.
After you connect it, Windows will set everything up for you, including downloading the required drivers. This means it is ready to be used from the minute it is connected to a Windows 10 device.
Microsoft LifeCam cameras may now be used with Windows 10 or later without additional firmware, software, or drivers.
Note that there may be a rare instance where your PnP devices will not be detected, but these can easily be fixed.
How do I install LifeCam drivers?
1. Use a dedicated driver software
There are various third-party tools that you can use to install the latest drivers on your Windows computer automatically. However, professional driver updater software is one of the most efficient options.
You need to know from the start that a professional tool makes updating drivers simple, even for newbies. The Microsoft Lifecam software will always work perfectly if you keep an updated driver.
More precisely, you can use an automatic tool to find, download, and install the correct driver version on your Windows PC in just a couple of clicks, and we strongly recommend DriverFix.

DriverFix
DriverFix will find, locate and install any needed driver, including drivers for LifeCam.
2. Install Skype
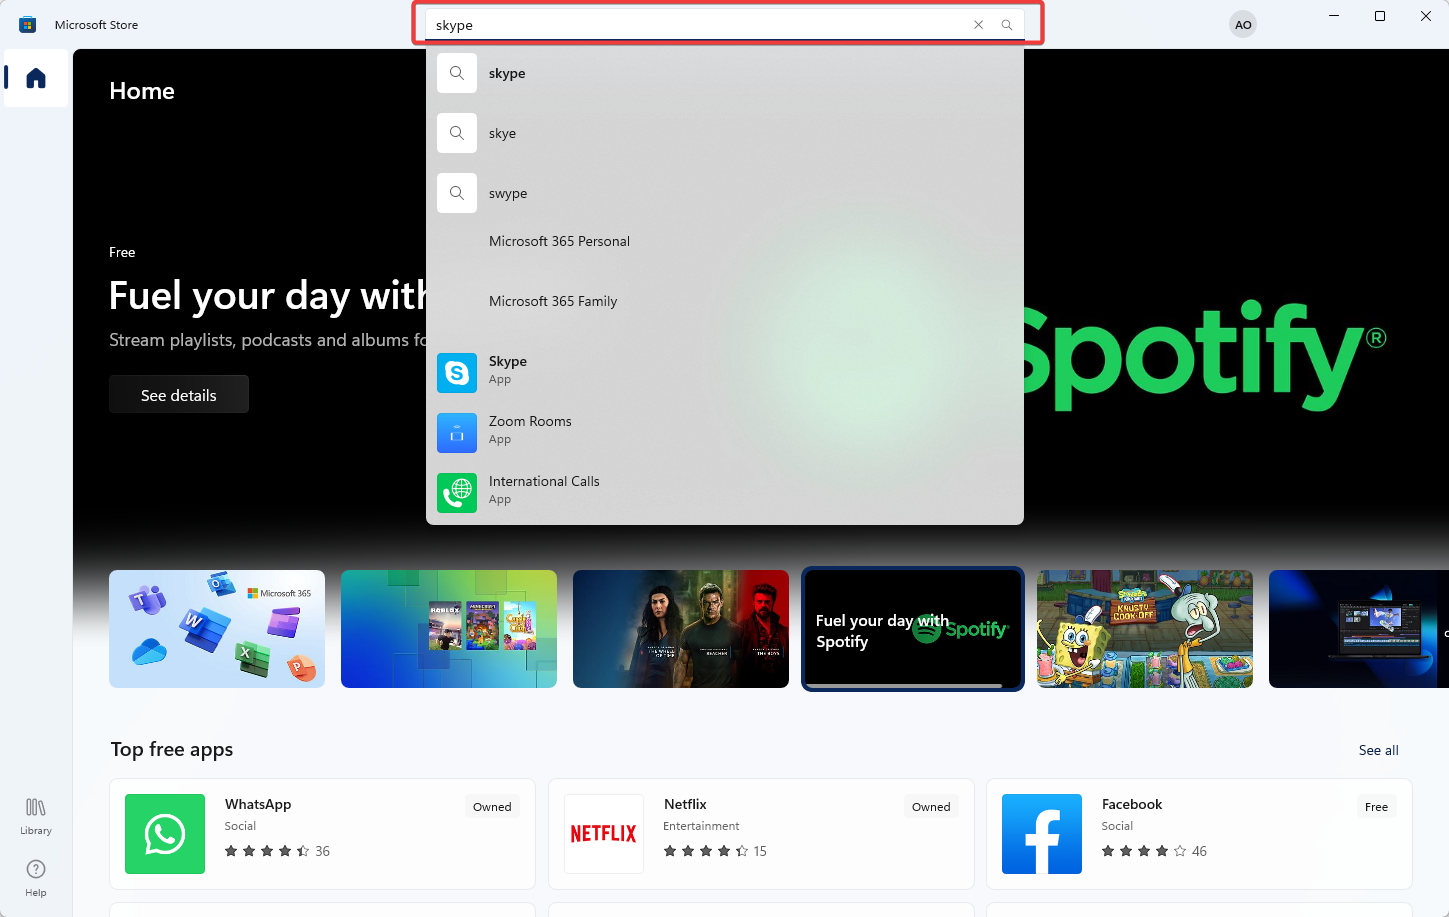
- Open the Microsoft Store app and search for Skype.

- Once found, click on Install.

- Wait for the installation to complete, and the necessary drivers to run a LifeCam device should have also been installed.

- I2C HID Device Driver Download & Install on Windows 11
- Download and Install Bcm20702a0 Driver in Windows 10
- How to Download & Install CH340 Driver on Windows 10?
- Download & Install the Canon LBP2900B Driver for Windows 11
- Windows Camera App Error Code 0xa00f4244 NoCamerasAreAttached
On Windows 10 and 11, you will not need to install drivers for the Microsoft Lifecam HD-3000 since the OS software already caters to this. However, in the rare case you may need drivers, we recommend using any of the suggestions in this guide.
Let us know what worked for you in the comments below.
![]()
Newsletter
We know that the Microsoft LifeCam series USB camera does not provide Windows 10 driver, so after upgrading Windows system to Windows 10 or 11, the LifeCam HD-3000 or VX-3000 camera out of work on any applications. Here are the solutions.
Solutions:
- 1: Change USB ports
- 2: Open Camera Application
- 3: Uninstall the USB Root Hub
- 4: Install LifeCam Driver in Compatible Mode
- 5: Uninstall and Reinstall Skype
Solution 1: Change USB ports
At first, make sure your LifeCam can work properly. And plugging it to other USB ports or other computer in case of plugging into an error USB port or LifeCam broken problem. If all the USB ports works well, but the LifeCam cannot detected or not working, following next steps.
Related: Fixed: USB Ports Not Working on Windows 10/11
Solution 2: Open Camera Application
Sometimes, if you doesn’t open the camera permission, this function cannot be used by your internal or external camera. So turn it on.
Click Start Menu > Setting > Privacy > Camera to turn on this option: Let apps use my camera hardware.
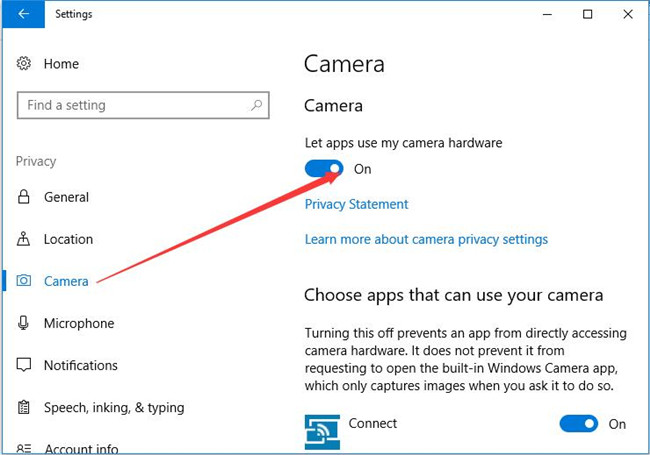
After that, run a applications such as SKype to test if the LifeCam can work or not.
Solution 3: Uninstall the USB Root Hub
After your insert the LifeCam to Windows 10, but it cannot be recognized, maybe you can uninstall the USB root hub to fix it.
1. Goes to Device Manager.
2. Expand Universal Serial Bus Controller and find USB Root Hub.
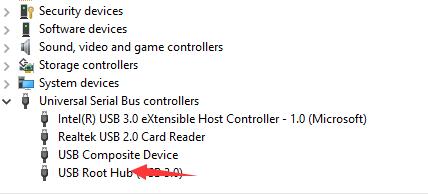
3. Right-click it and select Uninstall.
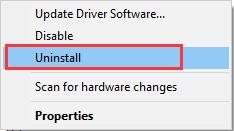
4. Uninstalling them one by one.
5. Restart Computer. This will make Windows system automatically search the LifeCam HD-3000 or LifeCam VX-5000 drivers and then install it.
So your Microsoft LifeCam can detected by Windows 10 and work properly on Windows 10 now.
Solution 4: Install LifeCam Driver in Compatible Mode
Sometimes, the driver error will cause the problem. Because there is no Windows 10 driver, if you are using Microsoft LifeCam HD-3000, you need to install the HD LifeCam in compatible mode.
1. You should download the Windows 7 LifeCam drivers from here.
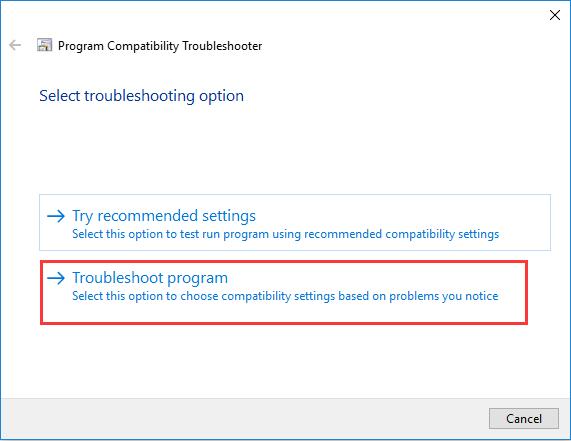
2. On your computer, right-click it and choose Troubleshoot compatibility. Windows 10 will start to detect the webcam problem.
3. Click Troubleshoot program.
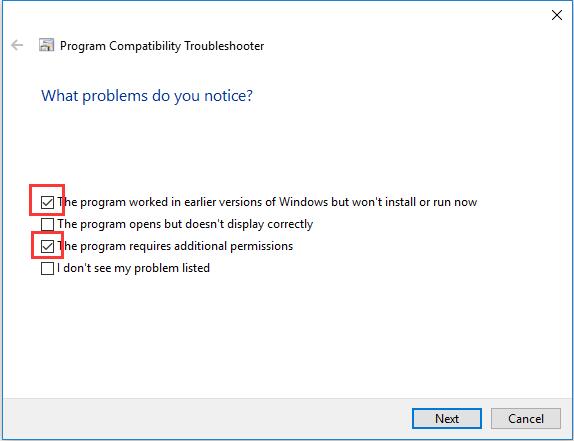
4. Check these two options: The program worked in earlier versions of Windows but won’t install or run now and The program requires additional permissions.
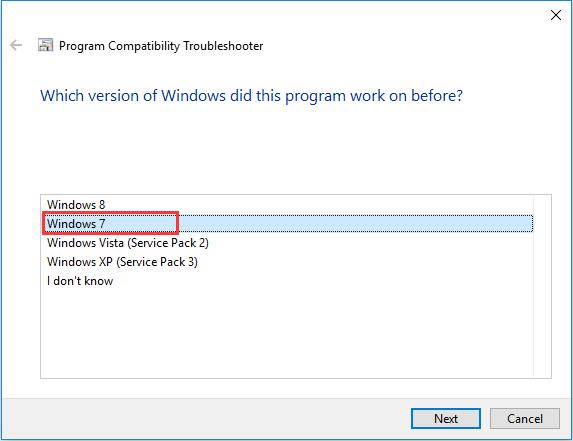
5. Choose Windows 7. If the previous Windows version is Windows 8, you need to choose Windows 8.
6. Follow the next steps to install this program on Windows 10.
Now your LifeCam can work properly on Windows 10. And this can also applies to LifeCam VX-3000.
Solution 5: Uninstall and Reinstall Skype
There is another condition that your LifeCam cannot work on Skype suddenly, you can fix it by the next steps.
1. Download the Skype Removal Tool to remove all the related Skype traces.
2. Download the latest version of Skype and reinstall it.
After that, you will find the LifeCam can use again.
Tips:
If you have the driver problem with your computer, you can try to use Driver Booster to help you find, download and update all the drivers for Windows 10 system. The Driver Booster will scan all your hardware devices including your External Lifecam devices.
1. Download, install and run Driver Booster on Windows 11 or 10.
2. Click Scan.

3. Find your Microsoft Lifecam device driver, and click Update. After that, your Lifecam driver will update to the latest version. And now, you can enjoy your LifeCam.
More Articles:
We Cannot Find Your Camera on Windows 10/11
Fix Logitech Webcam C920 Not Working on Windows 10/11
Skype Camera Not Working on Windows 10/11