Updated: 12/30/2021 by
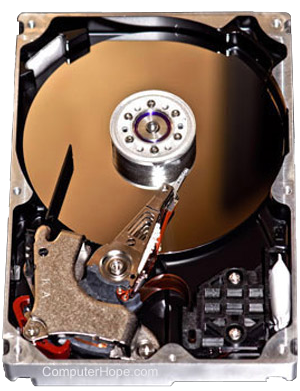
ScanDisk can improve the performance of your hard drive and help maintain the Windows filesystem. Review the ScanDisk steps below for your version of Windows.
Tip
Close all open programs, web browsers, etc. before performing a disk scan to ensure that disk activity is minimal while the disk is being scanned.
Tip
If you are using an old version of Windows (Windows 95, 98, and ME), boot the computer to Safe Mode before running ScanDisk.
Windows 11
Method 1: Using the error checking tool
Follow these steps to scan your drive from the Windows File Explorer.
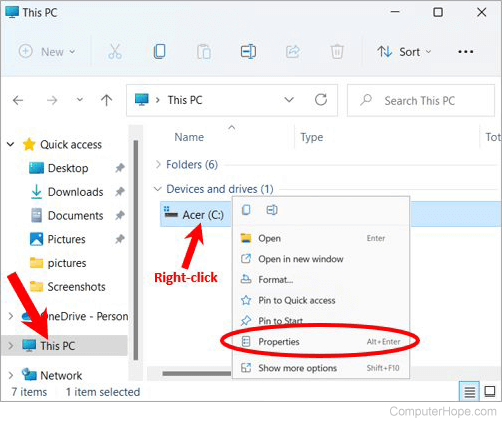
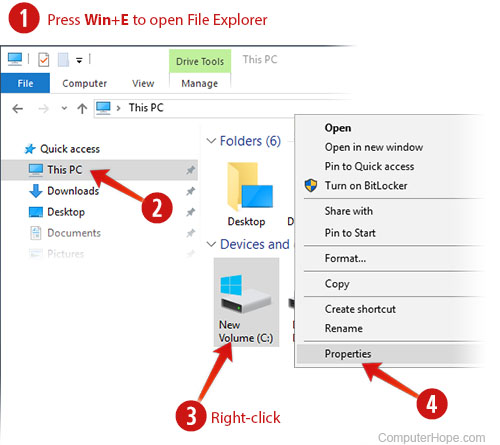
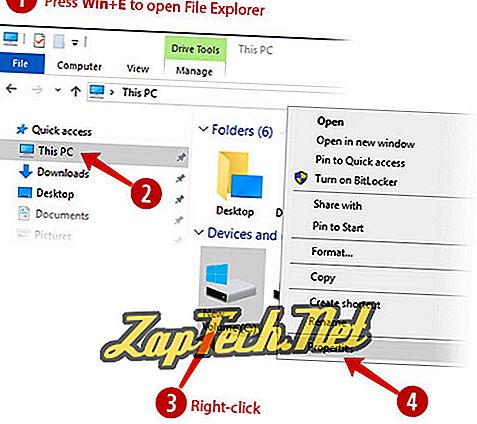
- Open a File Explorer window by pressing Windows key+E on your keyboard.
- In the File Explorer window, click This PC in the left navigation pane.
- In the Devices and drives section on the right side of the window, right-click the drive you want to scan and select Properties.
Note
If you don’t see the Properties option in the right-click menu, click Show more options to view an expanded menu, and then select Properties in that menu.
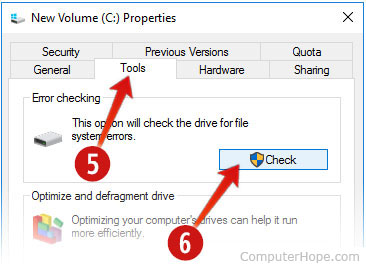
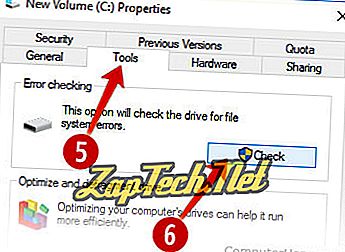
- In the Properties window, click the Tools tab.
- In the Error checking section, click the Check button.
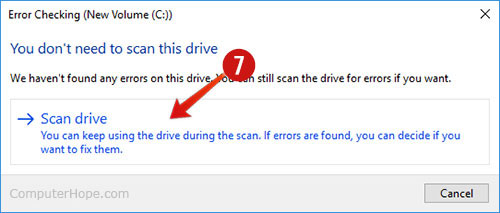
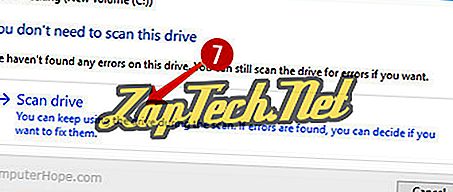
- In the Error checking window, click Scan drive.
Depending on your system, the scan can take anywhere between 15 minutes and a few hours.
Method 2: Using SFC /SCANNOW
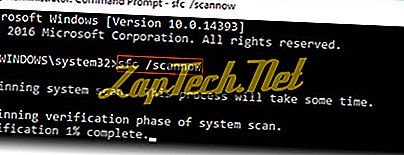
SFC (System File Checker) is a command-line tool that scans for corrupted files and resources on your system. Follow these steps to scan your drive with SFC.
- Press Windows key+X to open the Power User Tasks Menu.
- Select Windows Terminal (Admin).
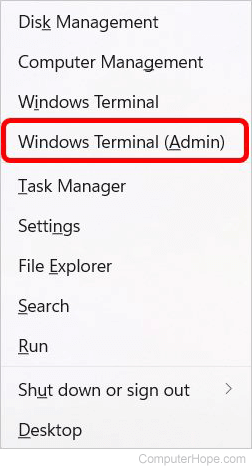
- After the User Account Control prompt appears, click Yes.
- In the Windows Terminal window, click the down arrow at the top of the window, to the right of the Administrator: Windows PowerShell tab.
- In the drop-down menu that appears, select Command Prompt to change the Windows Terminal to a command prompt instead of PowerShell.
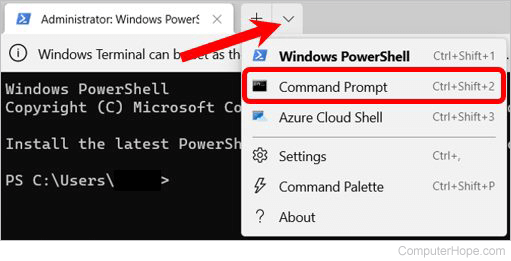
- At the Command Prompt, type sfc /scannow and press Enter.

Note
Do not close the command prompt window until the scan reports that it has completed. Depending on your system, the scan can take anywhere between 15 minutes and a few hours.
Tip
If you receive the message «Windows Resource Protection could not perform the requested operation,» boot your computer in Safe Mode and repeat the steps above.
Windows 10
Method 1: Using the error checking tool
Follow these steps to scan your drive from the Windows File Explorer.
- Open a File Explorer window by pressing Windows key+E on your keyboard.
- In the File Explorer window, click This PC in the left navigation pane.
- In the Devices and Drives section on the right side of the window, right-click the drive you want to scan and select Properties.
- In the Properties window, click the Tools tab.
- Under Error checking, click Check.
- In the Error checking window, click Scan drive.
Depending on your system, the scan can take anywhere between 15 minutes and a few hours.
Method 2: Using SFC /SCANNOW
SFC (System File Checker) is a command line tool that scans for corrupted files and resources on your system. Follow these steps to scan your drive with SFC.
- Press Windows key+X to open the Power User Tasks Menu.
- Select Command Prompt (Admin).
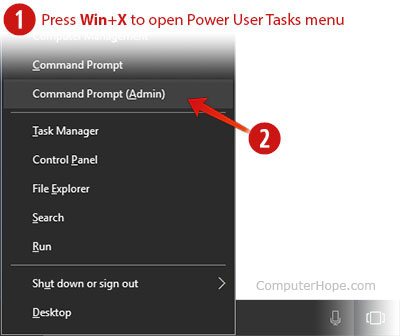
- After the User Account Control prompt appears, click Yes.
- At the Command Prompt, type sfc /scannow and press Enter.
Note
Do not close the command prompt window until the scan reports that it has completed. Depending on your system, the scan can take anywhere between 15 minutes and a few hours.
Tip
If you receive the message «Windows Resource Protection could not perform the requested operation,» boot your computer in Safe Mode and repeat the steps above.
Windows 8
To scan your hard disk for errors, we recommend following these steps.
- Open a File Explorer window by pressing Windows key+E on your keyboard.
- In the File Explorer window, click This PC in the left navigation pane.
- Under Devices and Drives on the right side of the window, right-click the drive you want to scan and select Properties.
- In the Properties window, click the Tools tab.
- Click the Check button in the Error Checking section.
- Click Scan Drive. If Windows needs to restart the computer to perform the scan, it lets you know.
Windows 7, Vista, XP, and 2000
To run ScanDisk, follow these steps.
- Double-click My Computer.
- Highlight a local hard drive by clicking it once.
- Right-click the highlighted local drive and select Properties.
- Click the Tools tab and click Check Now to check the drive for errors.
- The computer needs to restart to run ScanDisk without getting interrupted.
Windows 95 and 98
To run ScanDisk from Windows 95 and 98, follow the steps below.
- Click the Start button.
- Click the Run option, type ScanDisk in the Run box, then press Enter.
- In the ScanDisk window, select the drive that you want to be checked.
- Choose the Standard or Thorough option. We recommend you run a Standard scan first. If you encounter issues with ScanDisk using the Standard scan, run the Thorough scan instead.
- Click start to begin ScanDisk.
Note
Windows 95 OSR2 and Windows 98 run ScanDisk automatically if the computer is shut down improperly. They do this to check if the hard drive encountered issues when the computer was improperly shutdown.
Windows NT
Windows NT is not shipped with ScanDisk. However, various third-party companies offer utilities to verify your disk integrity.
Windows 3.x and MS-DOS
ScanDisk is available in MS-DOS versions 6.2 and later. If you are running MS-DOS 6.2 or 6.22 and would like to run ScanDisk, follow the steps below.
- If you are in Windows 3.x, click File and then Exit to get to the MS-DOS prompt.
- At an MS-DOS prompt, run:
CD DOS
- At the C:DOS> prompt, run:
SCANDISK
Note
Some computer manufacturers have changed the installation of ScanDisk to C:WINDOWS. If ScanDisk is not found in the DOS directory, try:
CD WINDOWS
SCANDISK
Updated: 12/30/2021 by
ScanDisk can improve the performance of your hard drive and help maintain the Windows filesystem. Review the ScanDisk steps below for your version of Windows.
Tip
Close all open programs, web browsers, etc. before performing a disk scan to ensure that disk activity is minimal while the disk is being scanned.
Tip
If you are using an old version of Windows (Windows 95, 98, and ME), boot the computer to Safe Mode before running ScanDisk.
Windows 11
Method 1: Using the error checking tool
Follow these steps to scan your drive from the Windows File Explorer.
- Open a File Explorer window by pressing Windows key+E on your keyboard.
- In the File Explorer window, click This PC in the left navigation pane.
- In the Devices and drives section on the right side of the window, right-click the drive you want to scan and select Properties.
Note
If you don’t see the Properties option in the right-click menu, click Show more options to view an expanded menu, and then select Properties in that menu.
- In the Properties window, click the Tools tab.
- In the Error checking section, click the Check button.
- In the Error checking window, click Scan drive.
Depending on your system, the scan can take anywhere between 15 minutes and a few hours.
Method 2: Using SFC /SCANNOW
SFC (System File Checker) is a command-line tool that scans for corrupted files and resources on your system. Follow these steps to scan your drive with SFC.
- Press Windows key+X to open the Power User Tasks Menu.
- Select Windows Terminal (Admin).
- After the User Account Control prompt appears, click Yes.
- In the Windows Terminal window, click the down arrow at the top of the window, to the right of the Administrator: Windows PowerShell tab.
- In the drop-down menu that appears, select Command Prompt to change the Windows Terminal to a command prompt instead of PowerShell.
- At the Command Prompt, type sfc /scannow and press Enter.
Note
Do not close the command prompt window until the scan reports that it has completed. Depending on your system, the scan can take anywhere between 15 minutes and a few hours.
Tip
If you receive the message «Windows Resource Protection could not perform the requested operation,» boot your computer in Safe Mode and repeat the steps above.
Windows 10
Method 1: Using the error checking tool
Follow these steps to scan your drive from the Windows File Explorer.
- Open a File Explorer window by pressing Windows key+E on your keyboard.
- In the File Explorer window, click This PC in the left navigation pane.
- In the Devices and Drives section on the right side of the window, right-click the drive you want to scan and select Properties.
- In the Properties window, click the Tools tab.
- Under Error checking, click Check.
- In the Error checking window, click Scan drive.
Depending on your system, the scan can take anywhere between 15 minutes and a few hours.
Method 2: Using SFC /SCANNOW
SFC (System File Checker) is a command line tool that scans for corrupted files and resources on your system. Follow these steps to scan your drive with SFC.
- Press Windows key+X to open the Power User Tasks Menu.
- Select Command Prompt (Admin).
- After the User Account Control prompt appears, click Yes.
- At the Command Prompt, type sfc /scannow and press Enter.
Note
Do not close the command prompt window until the scan reports that it has completed. Depending on your system, the scan can take anywhere between 15 minutes and a few hours.
Tip
If you receive the message «Windows Resource Protection could not perform the requested operation,» boot your computer in Safe Mode and repeat the steps above.
Windows 8
To scan your hard disk for errors, we recommend following these steps.
- Open a File Explorer window by pressing Windows key+E on your keyboard.
- In the File Explorer window, click This PC in the left navigation pane.
- Under Devices and Drives on the right side of the window, right-click the drive you want to scan and select Properties.
- In the Properties window, click the Tools tab.
- Click the Check button in the Error Checking section.
- Click Scan Drive. If Windows needs to restart the computer to perform the scan, it lets you know.
Windows 7, Vista, XP, and 2000
To run ScanDisk, follow these steps.
- Double-click My Computer.
- Highlight a local hard drive by clicking it once.
- Right-click the highlighted local drive and select Properties.
- Click the Tools tab and click Check Now to check the drive for errors.
- The computer needs to restart to run ScanDisk without getting interrupted.
Windows 95 and 98
To run ScanDisk from Windows 95 and 98, follow the steps below.
- Click the Start button.
- Click the Run option, type ScanDisk in the Run box, then press Enter.
- In the ScanDisk window, select the drive that you want to be checked.
- Choose the Standard or Thorough option. We recommend you run a Standard scan first. If you encounter issues with ScanDisk using the Standard scan, run the Thorough scan instead.
- Click start to begin ScanDisk.
Note
Windows 95 OSR2 and Windows 98 run ScanDisk automatically if the computer is shut down improperly. They do this to check if the hard drive encountered issues when the computer was improperly shutdown.
Windows NT
Windows NT is not shipped with ScanDisk. However, various third-party companies offer utilities to verify your disk integrity.
Windows 3.x and MS-DOS
ScanDisk is available in MS-DOS versions 6.2 and later. If you are running MS-DOS 6.2 or 6.22 and would like to run ScanDisk, follow the steps below.
- If you are in Windows 3.x, click File and then Exit to get to the MS-DOS prompt.
- At an MS-DOS prompt, run:
CD DOS
- At the C:DOS> prompt, run:
SCANDISK
Note
Some computer manufacturers have changed the installation of ScanDisk to C:WINDOWS. If ScanDisk is not found in the DOS directory, try:
CD WINDOWS
SCANDISK

Если вы беспокоитесь о производительности вашего жесткого диска или хотите периодически выполнять обслуживание вашей файловой системы Windows, ознакомьтесь с методами, приведенными ниже для вашей версии Windows.
Совет: Закройте все открытые программы, веб-браузеры и т. Д. Перед выполнением сканирования диска, чтобы обеспечить минимальную активность диска во время сканирования диска.
Совет. Если вы используете очень старую версию Windows, включая Windows 95, 98 и ME, вам следует загрузить компьютер в безопасном режиме перед запуском ScanDisk.
Выполните следующие действия для сканирования вашего диска из проводника Windows.
- Откройте окно проводника, нажав клавишу Windows + E на клавиатуре.
- В окне «Проводник» щелкните « Этот компьютер» в левой панели навигации.
- В разделе « Устройства и накопители » в правой части окна щелкните правой кнопкой мыши диск, который вы хотите сканировать, и выберите « Свойства» .
- В окне « Свойства» выберите вкладку « Инструменты ».
- В разделе «Проверка ошибок» нажмите « Проверить» .
- В окне проверки ошибок нажмите Сканировать диск .
В зависимости от вашей системы сканирование может занять от 15 минут до нескольких часов.
Способ 2: использование SFC / SCANNOW
SFC (Проверка системных файлов) — это инструмент командной строки, который сканирует поврежденные файлы и ресурсы в вашей системе. Выполните следующие действия для сканирования вашего диска с помощью SFC.

- Появится приглашение контроля учетных записей. Нажмите Да .
- В командной строке введите sfc / scannow и нажмите Enter.
Примечание. Не закрывайте окно командной строки, пока сканирование не сообщит, что оно завершено. В зависимости от вашей системы сканирование может занять от 15 минут до нескольких часов.
Совет. Если вы получили сообщение «Средство защиты ресурсов Windows не может выполнить запрошенную операцию», загрузите компьютер в безопасном режиме и повторите описанные выше действия.
Windows 8
Чтобы проверить жесткий диск на наличие ошибок, мы рекомендуем выполнить следующие действия.
- Откройте окно проводника, нажав клавишу Windows + E на клавиатуре.
- В окне «Проводник» щелкните « Этот компьютер» в левой панели навигации.
- В разделе « Устройства и накопители» в правой части окна щелкните правой кнопкой мыши накопитель, который хотите сканировать, и выберите « Свойства» .
- В окне « Свойства» перейдите на вкладку « Инструменты ».
- Нажмите кнопку « Проверить» в разделе « Проверка ошибок ».
- Нажмите Сканировать диск . Если Windows потребуется перезагрузить компьютер для выполнения сканирования, она сообщит вам об этом.
Windows 7, Vista, XP и 2000
Чтобы запустить ScanDisk, выполните следующие действия.
- Дважды щелкните Мой компьютер .
- Выделите локальный жесткий диск, нажав на него один раз.
- Щелкните правой кнопкой мыши выделенный локальный диск и выберите « Свойства» .
- Перейдите на вкладку « Инструменты » и нажмите « Проверить сейчас», чтобы проверить диск на наличие ошибок.
- Компьютер должен быть перезагружен, чтобы запустить ScanDisk без прерывания.
Windows 95 и 98
Чтобы запустить ScanDisk из Windows 95 и 98, выполните следующие действия.
- Нажмите кнопку Пуск .
- Выберите параметр « Выполнить», введите ScanDisk в поле «Выполнить» и нажмите клавишу «Ввод».
- В окне ScanDisk выберите диск, который вы хотите проверить.
- Выберите стандартный или тщательный вариант. Рекомендуется сначала запустить стандартное сканирование . Если у вас возникают проблемы со ScanDisk при использовании стандартного сканирования, вместо этого запустите тщательное сканирование .
- Наконец, нажмите Пуск, чтобы начать ScanDisk.
Примечание. Windows 95 OSR2 и Windows 98 автоматически запускают ScanDisk, если компьютер выключается неправильно. Они делают это, чтобы проверить, не возникли ли проблемы с жестким диском при неправильном выключении компьютера.
Windows NT
Windows NT не поставляется со ScanDisk. Однако различные сторонние компании предлагают утилиты, которые можно использовать для проверки целостности вашего диска.
Windows 3.x и MS-DOS
ScanDisk доступен в MS-DOS версии 6.2 и выше. Если вы используете MS-DOS 6.2 или 6.22 и хотите запустить ScanDisk, выполните следующие действия.
- Если вы находитесь в Windows 3.x, нажмите « Файл», а затем « Выход», чтобы перейти к приглашению MS-DOS.
- В командной строке MS-DOS выполните:
CD DOS
- В командной строке C: DOS> запустите:
SCANDISK
Примечание. Некоторые производители компьютеров изменили установку ScanDisk на C: WINDOWS . Если ScanDisk не найден в каталоге DOS, попробуйте:
CD WINDOWS
SCANDISK
ScanDisk Windows — программа для проверки и исправления жёсткого диска
- О программе ScanDisk
- ScanDisk для разных верcий Windows
ScanDisk — это диагностическая утилита, включенная в MS-DOS и Windows 95, 98, Windows ME (Windows 2000-х). Она проверяет на ошибки и восстанавливает файловую систему жёсткого диска.
Используя программу ScanDisk Windows для проверки и восстановления диска, можно проверить целостность носителей (в том числе жёстких дисков и дискет), а также исправить большинство возникающих проблем.

Программа Scandisk
Примечание:
- В операционных системах Windows XP, Vista, 7, 8, 10 для запуска программы проверки диска используется команда chkdsk.
Совет:
- Для версий Windows, поддерживающих запуск scandisk из командной сторки, не выполняйте проверку жёсткого диска с запущенной на ней ОС Windows. Перезагрузите компьютер и в безопасном режиме через командную строку командной строки запустите ScanDisk.
ScanDisk для разных верcий Windows
-
Для Windows XP и позже
-
Windows 98 и MЕ версий (Windows 2000-х)
-
MS-DOS 6.2
Проверка диска на ошибки для Windows ХР, Vista, Windows 7, 8, 10

Проверка жесткого диска на ошибки Windows 7
Команда ScanDisk для этих версий ОС Windows для вызова её из командной строки уже не применяется и снова заменена командой chkdsk.
Если Вы хотите просто проверить диск на ошибки (без ремонта диска), используйте команду chkdsk. Запустите программу из командной строки следующим образом:
Нажмите одновременно клавиши Windows + R (вызов командной строки) и введите в поле chkdsk. Нажмите Выполнить.
После перезагрузки компьютера начнётся процесс сканирования диска.
- Где найти результаты ScanDisk?
Как сканирование совместить с ремонтом системы Вы найдёте по этим ссылкам:
- Как проверить и отремонтировать диск в Windows 10
- Как проверить и отремонтировать диск в Windows 7, 8 или XP и Vista
Проверка и ремонт диска программой ScanDisk для Windows 95, 98 и MЕ версий (Windows 2000-х)
Для решения различных задач в программе ScanDisk при запуске её из командной строки предусмотрен следующий порядок написания команды (синтаксис):
Scandisk [ drive: | volume_name | /all] [/checkonly | /autofix [/nosave] | /custom] [/fragment] [/surface] [/mono] [/nosave] [/nosummary]
Расшифровка синтаксиса:
|
drive: |
Буква диска, который вы хотите проверить. |
|
volume_name |
Объём_имя.
Изменение размера файла журнала до указанной величины в Кб. Если размер не указан, выводится текущее значение размера. |
|
/all |
Проверка и ремонт сразу всех локальных дисков. |
|
/checkonly |
Только проверка диска на наличие ошибок, но без исправления ошибок. |
|
/autofix |
Автоматическое исправление ошибок.
Сохраняет повреждённые кластеры по умолчанию в виде файлов в корневом каталоге диска. Нельзя использовать совместно с /checkonly или /custom. |
|
/nosave |
Удаляются все повреждённые кластеры, найденные программой ScanDisk. Можно использовать с /autofix. |
|
/custom |
Запускает ScanDisk, используя параметры в разделе [custom] файла ScanDisk.ini.
Нельзя использовать совместно с /autofix или /checkonly. |
|
/fragment |
Проверяет отдельные файлы фрагментации.
Необходимо указать диск, путь и имя файла. Нельзя использовать любые другие переключения. |
|
/surface |
Автоматически проверяет поверхность диска после других проверок.
При использовании совместно с /custom, будут отменены любые настройки /surface в разделе [Custom] ScanDisk.ini. |
|
/моно |
Использует монохромное изображение дисплея вместо цветного. |
|
/nosummary |
Предотвращает полноэкранное отображение сводки после каждой проверки.
Используется с /autofix для предотвращения порчи дискеты. |
Пример: Для проверки ошибок на локальном жёстком диске C: и их автоматического исправления в командную строку надо ввести команду scandisk c:/autofix
Выполнять от имени администратора.
Проверка и ремонт диска программой ScanDisk для MS-DOS 6.0 и более ранних версий
Scandisk [ drive: | drive:pathfilename | volume_name | /all] [/checkonly | /autofix [/nosave] | /custom] [/fragment] [/surface] [/mono] [/nosave] [/nosummary]
Расшифровка синтаксиса:
|
drive: |
Буква диска, который вы хотите проверить. |
|
drive:pathfilename |
Диск, папка, имя файла, которые вы хотите просканировать. |
|
volume_name |
Объём_имя. Изменение размера файла журнала до указанной величины в Кб. Если размер не указан, выводится текущее значение размера. |
|
/all |
Проверка и ремонт сразу всех локальных дисков. |
|
/checkonly |
Только проверка диска на наличие ошибок, но без исправления ошибок. |
|
/autofix |
Автоматическое исправление ошибок. Сохраняет повреждённые кластеры по умолчанию в виде файлов в корневом каталоге диска.
/autofix не может быть использован с /checkonly или /custom. |
|
/nosave |
Удаляются все повреждённые кластеры, найденные программой ScanDisk.
Можно использовать с /autofix. |
|
/custom |
Запускает ScanDisk, используя параметры в разделе [custom] файла ScanDisk.ini.
Нельзя использовать с /autofix или /checkonly. |
|
/fragment |
Проверяет отдельные файлы фрагментации.
Необходимо указать диск, путь и имя файла. Нельзя использовать любые другие переключения. |
|
/surface |
Автоматически проверяет поверхность диска после других проверок.
При использовании совместно с /custom будут отменены любые настройки /surface в разделе [Custom] ScanDisk.ini. |
|
/моно |
Использует монохромное изображение дисплея вместо цветного. |
|
/nosummary |
Предотвращает полноэкранное отображение сводки после каждой проверки.
Используется с /autofix для предотвращения порчи дискеты. |
Пример: Для проверки ошибок на локальном жёстком диске C: и их автоматического исправления в командную строку надо ввести команду scandisk c:/autofix
Выполнять от имени администратора.
_____________________
- Проверка и ремонт жесткого диска. Программы Microsoft Chkdsk и ScanDisk