I had planned installation of SQL Server Express 2014 on Windows 10 PRO OS. During this, I encountered minor road blocks, which I overcame to install SQL Server Express 2014. This article summarizes the step by step process of installing it.
These steps are not confined to SQL Server Express 2014, they are almost similar to other SQL Server Express like 2012, 2008 R2, 2008.
What is Microsoft SQL Server 2014 Express?
MSDN defines it as Microsoft SQL Server 2014 Express is a free, feature-rich edition of SQL Server that is ideal for learning, developing, powering desktop, web & small server applications, and for redistribution by ISVs.
SQL Server 2014 Express can be installed on Windows 10/ Windows 8.1/ Windows 7. These steps are almost similar for any SQL Server Express edition installation on any Windows OS.
Step 1 – Download SQL Server 2014 Express Edition
In this very first step, there was minor road block, from where to download SQL Server installation? Naturally, you will open Download SQL Server Express 2014 link. I tried downloading it, but it wasn’t working. Then, I found this link — The 12 step process to download Microsoft SQL Server Express 2014.
Oh !! 12 steps to be followed for downloading, then think of its installation. Scott Hanselman made our life easy by writing this post Download SQL Server. It has not only 2014 edition but SQL Server 2012, 2008 R2. Everyone just download it from this link, save your time.
I choose this “Express with Advanced Services (SQLEXPRADV)” option because of my need for:
- Reporting Services
- Full Text Search
- Full version of SQL Server 2014 Management Studio which gives us SQL Profiler
- It gives almost full working SQL Server database system with lots of tools
Download it from Scott’s blog link for Download SQL Server, I used 64 bit download (32 bit also available). It’s around 1+GB. This will take time to download, meanwhile let’s see briefly what are other editions of SQL Server 2014 Express.
LocalDB (SqlLocalDB)
LocalDB is a lightweight version of Express that has all its programmability features, yet runs in user mode and has a fast, zero-configuration installation and short list of pre-requisites. It can be bundled with Application and Database Development tools like Visual Studio or embedded with an application that needs local databases.
Express (SQLEXPR)
Express edition includes the SQL Server database engine only. Best suited to accept remote connections or administer remotely.
Express with Tools (SQLEXPRWT)
This package contains everything needed to install and configure SQL Server as a database server including the full version of SQL Server 2014 Management Studio. Choose either LocalDB or Express depending on your needs above.
SQL Server Management Studio Express (SQLManagementStudio)
This does not contain the database, but only the tools to manage SQL Server instances, including LocalDB, SQL Express, SQL Azure, full version of SQL Server 2014 Management Studio, etc. Use this if you already have the database and only need the management tools.
Step 2 – Extraction of Downloaded Installation EXE
This is fairly simple, double-click downloaded file “SQLEXPRADV_x64_ENU.exe“; it will extract all install files to directory where EXE is present, you can change that also.
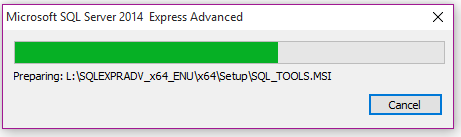
Extraction of downloaded SQL Server 2014 Installation file.
Step 3 – Run Setup, Start Installation and Accept Terms
After extraction of EXE, run the Setup and click “New SQL Server Stand alone installation…” from window open. You should and must “Accept terms”.
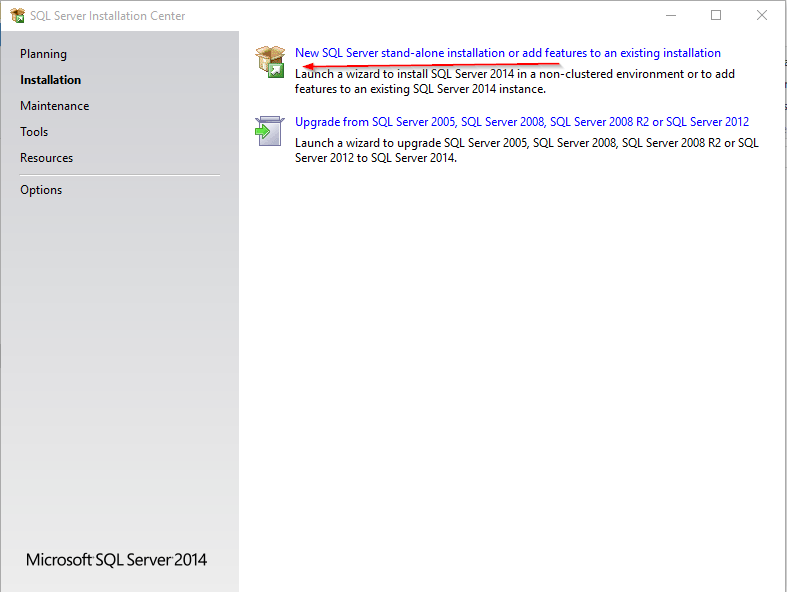
Start window of installation process.

Accept License Terms
Step 4 – Install Rules and Disable Installed ANTI VIRUS Software
Setup or Install Rules identify potential problems that might occur for SUCCESSFUL installation of SQL Server Express 2014 edition. All rules passed but “Windows Firewall” gives a warning.
“Windows Firewall” warning is related to ANTI VIRUS installation might block enabling ports, settings for SQL Server to use.
DON’T FORGET TO DISABLED ANTI VIRUS PROGRAM. It will save time during the installation process.
I have an anti-virus program with full protection, not thinking much I moved ahead without disabling. Installation was not progressing and was struck at point for hours. So Please Disable IT NOW.
Others might not come across this issue based on anti-virus program and its protection levels, but still do disable it.
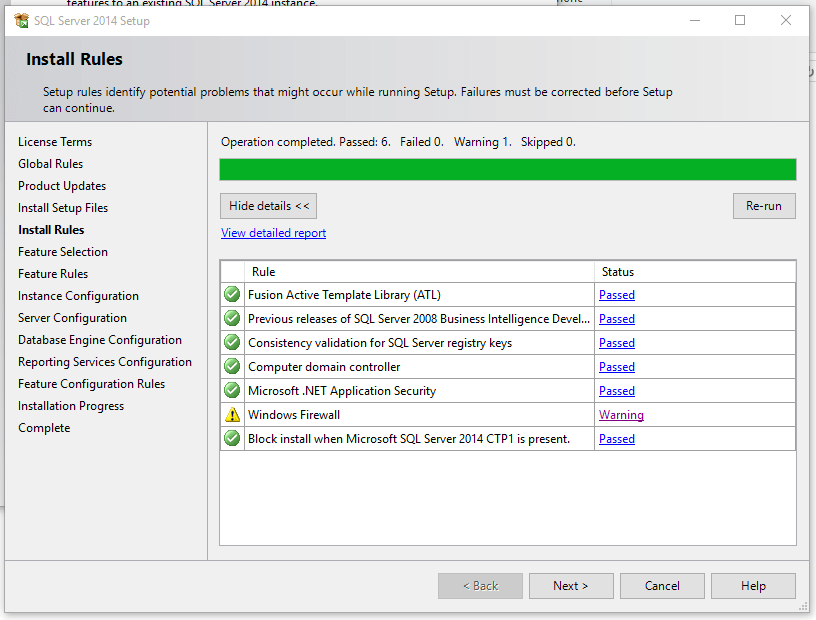
Install Rules with Windows Firewall warning
Step 5 – Feature Selection
In this step, we can select the features that need to be installed, SQL Server gives us the option Database Engine, Reporting Services (only if you had downloaded appropriate version), Client Tools for connectivity and SQL Management Tools (do select SQL Profiler)
It also displays disk space requirements, make sure you have enough disk space before installation.
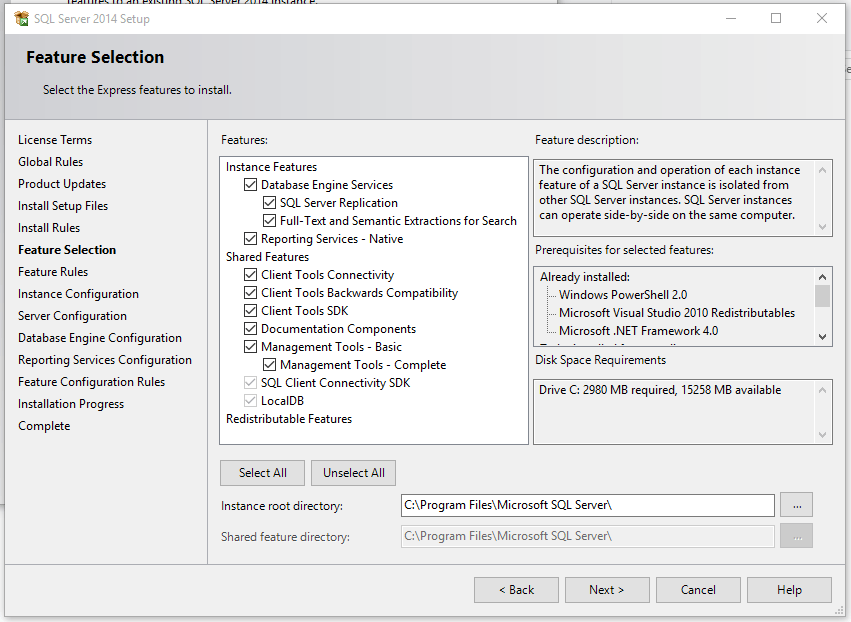
Features Selection
Step 6 – Rule “Microsoft .NET Framework 3.5 SP1” Required
I was installing SQL Server 2014 on fresh Windows 10 installation, it’s obviously that .NET Framework is not found. But SQL Server installation needs .NET 3.5 SP1 for proceeding. It is one of the requirements in Hardware and Software Requirements for Installing SQL Server 2014. We face this error as shown:
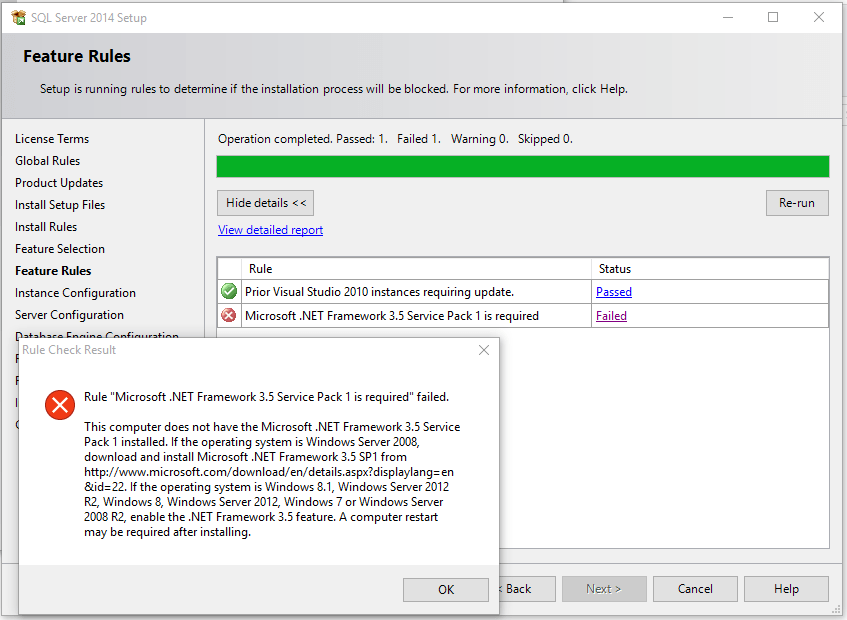
Rule “Microsoft .NET Framework 3.5 SP1” required
Two ways we can install .NET 3.5 framework – Download the .NET Framework 3.5 SP1 or Install using “Windows Features”as shown in images below
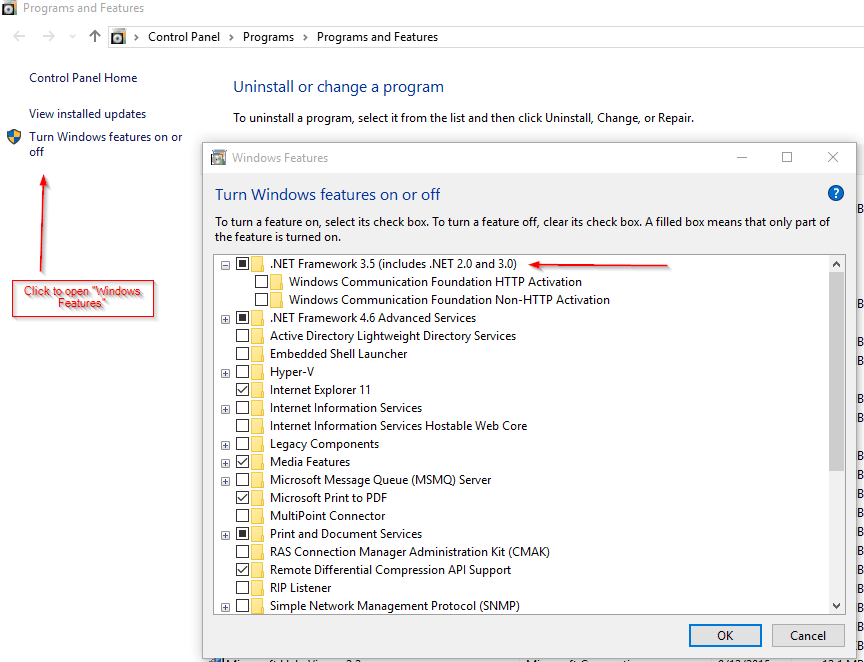
Enable .NET Framework 3.5 from ‘Turn Windows feature on or off’.
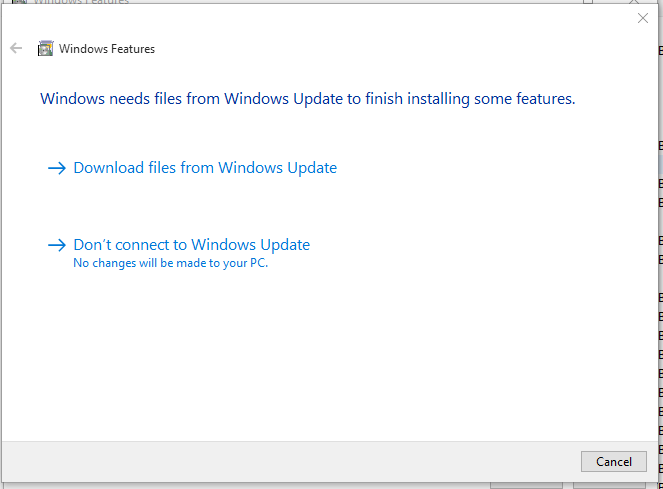
Download files from Windows Update.
Restart the machine to ensure everything is properly installed (Recommended) and then run “Features Rule” to verify that it’s ready to proceed installation.

Verified Microsoft .NET Framework 3.5 SP1 exists.
Step 7 – Instance and Server Configuration Settings
We are installing “SqlExpress” edition, it’s better to keep NAMED instance as “SQLEXPRESS” itself and proceed further.

Instance Configuration
Server Configuration is important as it deals with account names under which database engine runs. It’s better not to play around with these settings. Click NEXT to go ahead.
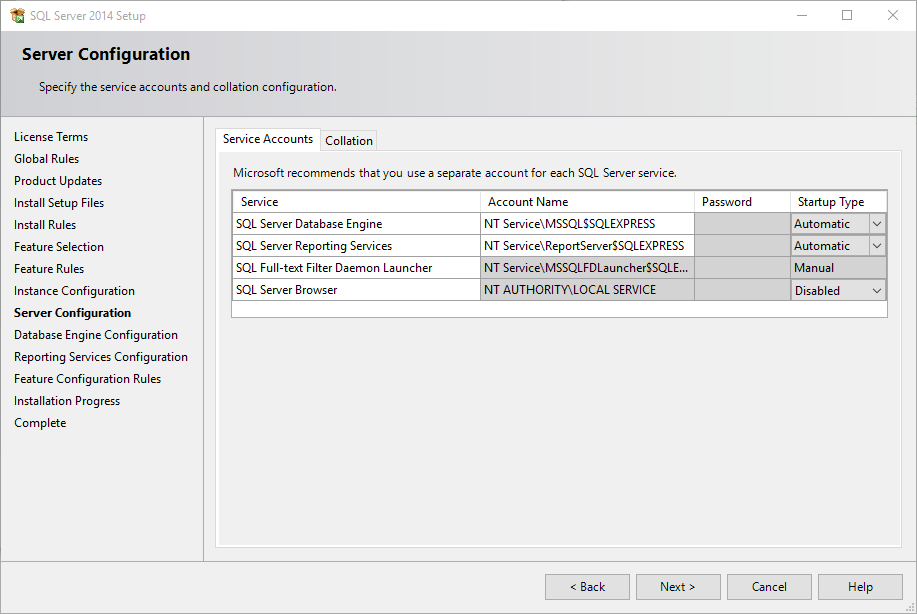
Server Configuration.
Step 8 – Database Engine Configuration
It’s the heart and soul of your SQL Server installation process, database engine is one which does all the work. It’s mainly split into “Server Configurations”, “Data Directories”, “User Instances” and “FILESTREAM”.
Server Configurations deal with “Who can get access to the database engine?”. We have “Windows mode” and “Mixed mode” type of authentication.
Use Mixed Mode authentication mode so that we can Windows mode and sa ‘SQL Server System administrator’ account.

Database Engine Configuration.
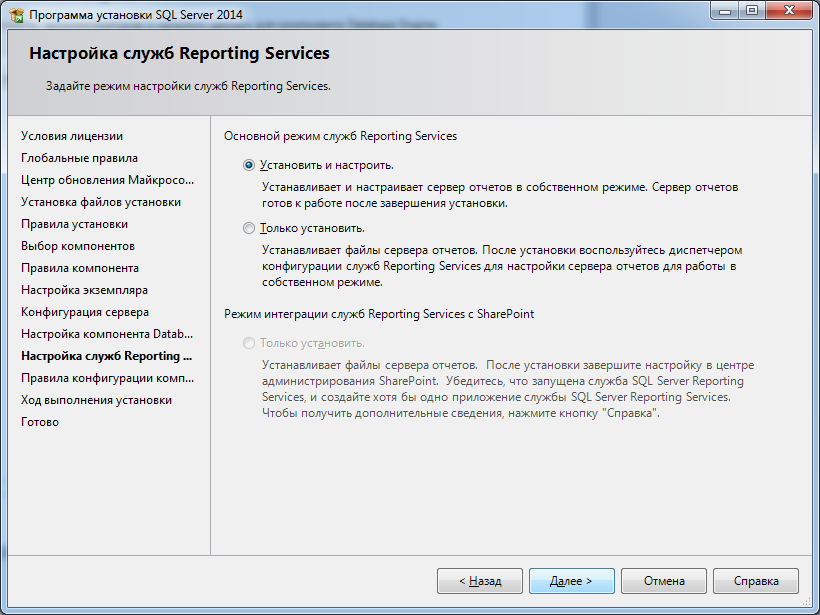
Since we are installing Reporting Services along with SQL Server Express, select “Install and Configure” so that it starts operational.

Reporting Service Configurations.
Step 10 – Installation Progress and Completion
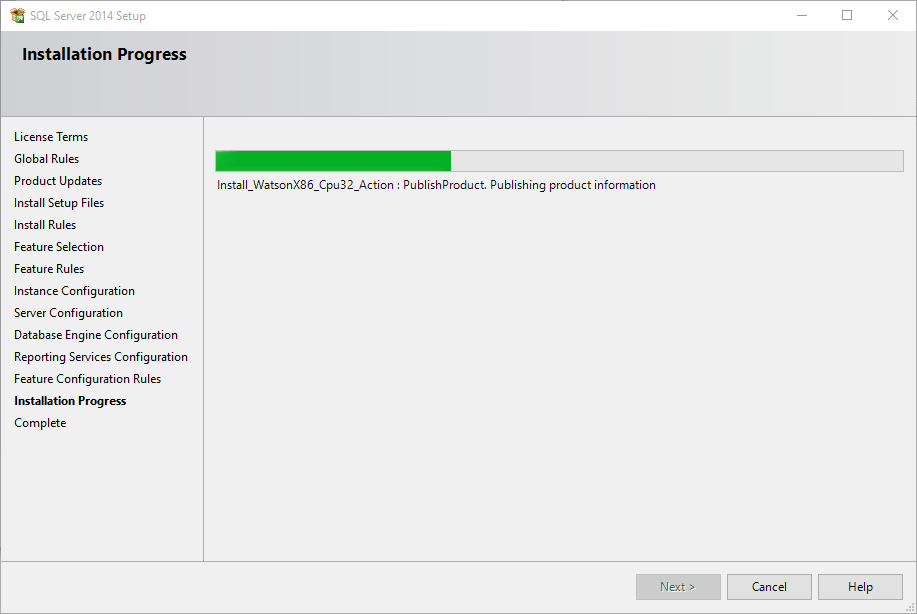
Installation in progress.
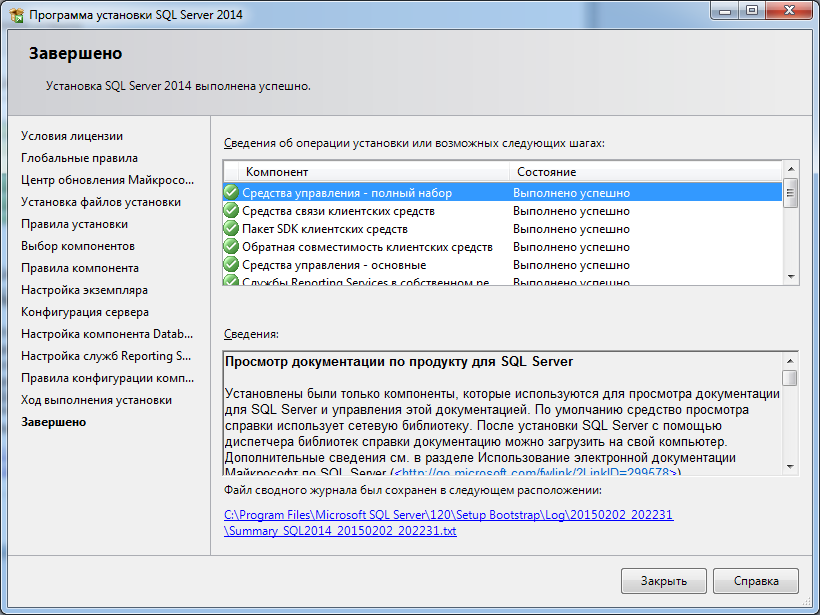
Database engine, reporting service, management tools etc. are successfully installed.
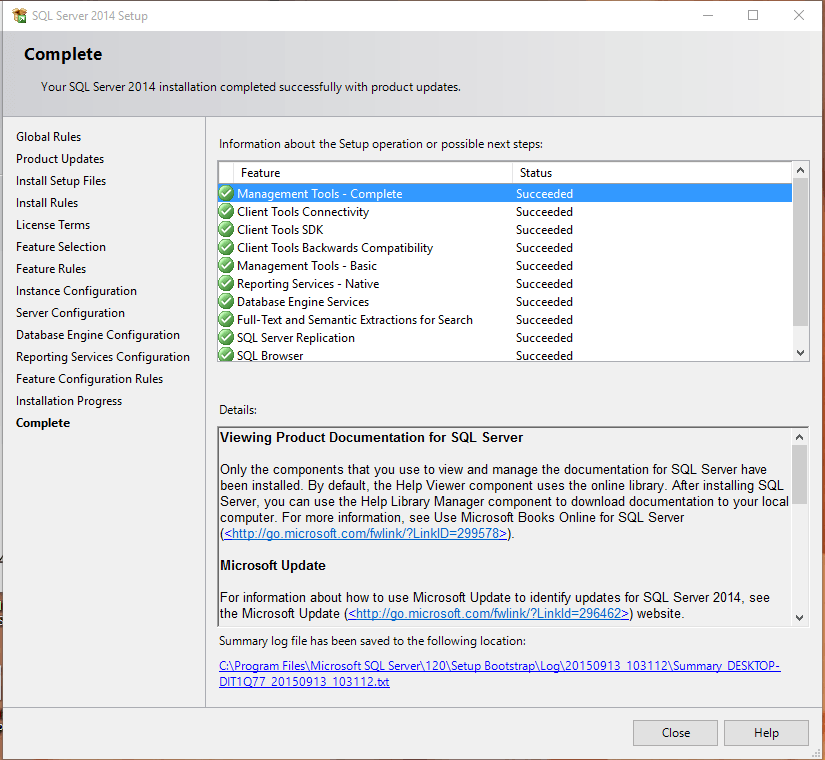
Sql Server Installation Completed.
Step 11 – Connecting to Installed Sql Server Express using Management Tools
After installation, let’s open “SQL Server Management Studio” from Program files directory.
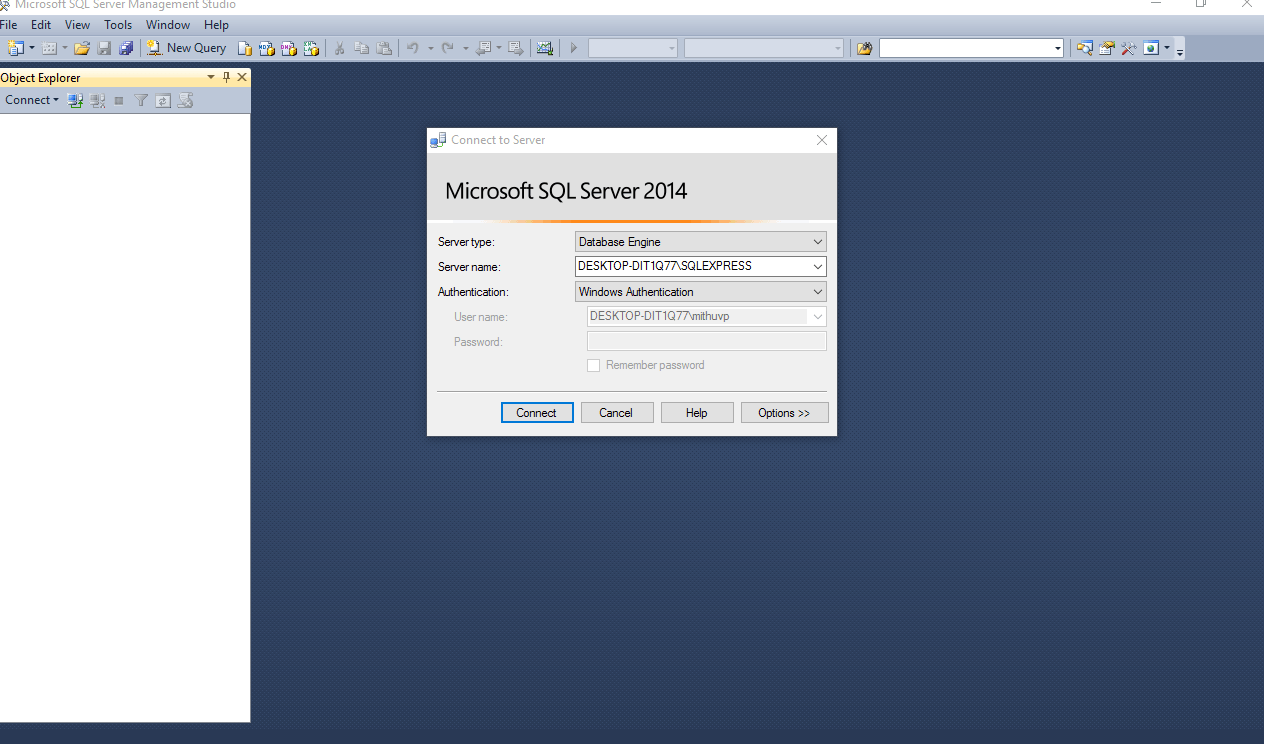
Connecting to SQL Server Express using Windows Authentication.

Connecting to SQL Server Express using Mixed Mode Authentication.
It’s a bit time-consuming but still installation process is clear and simple.
The post Installation of SQL Server Express 2014 on Windows 10 appeared first on Mithunvp.com.
CodeProject
Table of Contents
- Introduction
- Preparation
- Installation, Step By Step
- Connecting to the Server
- Resources & More Information
- See Also
Introduction
This article provides a step-by-step procedure for installing a new instance of SQL Server 2014, using the SQL Server setup installation wizard. The SQL Server Installation Center provides a single feature tree for installation of all SQL Server components,
so that you do not have to install them individually.
In this tutorial, we will show the default installation of all the features available in the SQL Server Enterprise version. You may find that in your version you don’t have all those features available. It is highly recommend to read all the comments in
this article before you start the installation.
* Before you start, it’s highly recommend to check hardware and software requirements for Installing SQL Server 2014 (here).
Preparation

For local installations, you must run Setup as an administrator. If you install SQL Server from a remote share, you must use a domain account that has read and execute permissions on the remote share.
It is best to install the server from a DVD or from a mounted ISO file which behaves as a CD/DVD. In this case, once you double click the DISK icon the autorun.inf file is used by the AutoRun and AutoPlay components of Microsoft Windows operating systems.
This will start the installation using the configuration in the autorun.inf file. If AutoRun is disabled on your server, you may double click setup.exe to start the installation. To install from a network share, locate the proper
folder on the share, and then double-click setup.exe.
Installation, Step By Step
1. Upon starting the installation, you will get this window:

We will discuss the Planning and Installation sections of the setup program.
* It is highly recommended to go over the documentation and guides in the Planning section:
- Hardware and Software Requirement
- Security Documentation
- Online Release Notes
- How to Get SQL Server Data Tools
- System Configuration Checker
- Install Upgrade Advisor
- Online Installation Help
- How to Get Started With SQL Server 2014 Failover Clustering
- How to Get Started With PowerPivot for SharePoint Standalone Server Installation
2. Choose the Installation section in order to start the installation:

3. Enter the product key and click Next:

4. You have to accept the license term in order to continue.
It is highly recommend NOT to ask in the forum a question regarding Licensing. The MSDN forum interface is not for this, and good people that want to help you, can make mistakes with Licensing. It is recommend to use the direct phone number to reach the
people that can give you the official answer 
Licensing questions: call
1-800-426-9400, Monday through Friday, 6:00 A.M. to 6:00 P.M. (Pacific Time) to speak directly to a Microsoft licensing specialist.

5. Mark the check box in order to use Microsoft Update to check for an update after you finished the installation, and then click Next.

6. The SQL Server installation program checks your machine to make sure it meets the hardware and software requirements to install SQL Server. If you get any Errors in the results, please use the link in the error message to
get more information.
Do not move to the next step if you get any errors in this report!

7. Choose the first option in order to install SQL Server, and then select which features to install. We are going to choose our features manually in the next step. Click Next to continue:

8. In this step, you can choose what features to install. It is highly recommend NOT to choose all the features on a production server if you don’t need them. Choose only the features that you need or might need. Conversely you might want to select all using
a development server in order to give you more flexibility in your development environment. Once you choose to use another feature you will be able to add it in production later on.

9. SQL Server allows you to install multiple instances of the same version or different versions of the server. Make sure you choose a name that will help you in the future to recognize the instance which you are working with. Theoretically you can use any
instance name that you want.
* Remember the name of the instance!
You will need to use this name every time that you want to connect to the server.

10. Security is important for every product and every business. By following simple best practices, you can avoid many
security vulnerabilities. SQL Server works as a group of services in the background. In this step you can select the service accounts for the SQL Server actions. Each service in SQL Server represents a process or a set of processes to manage authentication
of SQL Server operations with Windows. Each service can be configured to use its own service account. For more information you can read this
article. Once you configure this step move to the collation tab!

11. SQL Server supports several collations. A collation encodes the rules governing the proper use of characters for either a language, such as Hebrew or Polish, or an alphabet,
such as Latin1_General (the Latin alphabet used by western European languages). Typically, you should choose a SQL Server collation that supports most languages commonly used by users at your organization. Select the collation and press next.

12. SQL Server can operate in one of two security (authentication) modes: (a) Windows Authentication mode which allowed a user to connect through an operating system user account. or (b) Mixed Mode which allowed users to connect to an instance of SQL Server
using either Windows Authentication or SQL Server Authentication.

13. By default SQL Server uses the system operation disk Thus it is highly recommended to use the best practice according to your specific system and usage. Separating the LOG files from the data files can improve performance significantly. The system database
tempDB is used extensively by SQL Server. This database is rebuilt each time the server is restarted. (See this article for details about TempDB
Understanding
Logging in Tempdb. Is Tempdb Recreated or Rebuilt after SQL Server Starts?) It is highly recommended to use a fast disk for this database. It is best
practice to separate data, transaction logs, and tempdb for environments where you can guarantee that separation. There are important points to considerate and this article is not covering them at the moment. For small systems you can use the default
configuration and later on change as needed.

14. FILESTREAM enables SQL Server-based applications to store unstructured data, such as documents and images, on the file system. FILESTREAM integrates the SQL Server Database Engine with an NTFS file system by storing varbinary(max) binary large object
(BLOB) data as files on the file system.

15. An instance of Analysis Services is a copy of the msmdsrv.exe executable that runs as an operating system service. Each instance is fully independent of other instances on the same server, having its own configuration settings, permissions, ports, startup
accounts, file storage, and server mode properties. Server mode is a server property that determines which storage and memory architecture is used for that instance. In this step you can add windows users in order to give them administrative permissions for
the Analysis Service. It is highly recommended to add the machine Administrator as well as other users who will need to manage this service. You can get more information in
this link. Move to the Data Directories for next step.

16. As mentioned in step 13 the data directories can have significant influence on the server performance. You can get more information on this issue in
this forum discussion. Press Next to continue the installation configuration.

17. Choose if you want to install and configure the Reporting Service or just Install, which mean you will need to configure it later on.

18. Before you install and use the Microsoft SQL Server Distributed Replay feature, you should review the important security
information
in this link.

19. When installing the Microsoft SQL Server Distributed Replay features, consider the following:
- You can install the administration tool on the same computer as the Distributed Replay controller, or on different computers.
- There can only be one controller in each Distributed Replay environment.
- You can install the client service on up to 16 (physical or virtual) computers.
- Only one instance of the client service can be installed on the Distributed Replay controller computer. If your Distributed Replay environment will have more than one client, we do not recommend installing the client service
on the same computer as the controller. Doing so may decrease the overall speed of the distributed replay. - For performance testing scenarios, we do not recommend installing the administration tool, Distributed Replay controller service, or client service on the target instance of SQL Server. Installing all of these features on the
target server should be limited to functional testing for application compatibility. - After installation, the controller service, SQL Server Distributed Replay controller, must be running before you start the Distributed Replay client service on the clients.
- Make sure that the computers that you want to use meet the requirements that are described in the topic Distributed Replay Requirements.
- Before you begin this procedure, you create the domain user accounts that the controller and client services will run under. We recommend that these accounts are not members of the Windows Administrators group. For more information,
see the User and Service Accounts section in the Distributed Replay Security topic.

20. That is all The SQL Server Installation program will show us a report of all our configuration (steps 1-19). Once you select Next, the installation will start.

Hopefully everything went well and you should get a final report which indicates the successful completion of each installed service.
You are now ready to connect to the server
Connecting to the Server
Open the new SSMS application which we have just installed (in step 8 we choose which features to install, If you have chosen Management Tools it includes the SQL Server Management Studio).

During step 9 we choose an instance name for our new installation. We told you to Remember the name of the instance. Now it is time to use it.
Start the SSMS application and use the information as shown in the image above in order to connect the server. You should replace the «XXX» text with the instance name that you choose.
* For any question regarding the installation you can use the MSDN forums (English Forum,
Hebrew Forum).
Resources & More Information
- Hardware and Software Requirements for Installing SQL Server 2014
http://msdn.microsoft.com/en-us/library/ms143506(v=sql.120).aspx
- Guidelines on choosing Service Accounts for SQL Server Services:
http://support.microsoft.com/kb/2160720 - Security Considerations for a SQL Server Installation:
http://technet.microsoft.com/en-us/library/ms144228.aspx - Authentication Modes:
http://technet.microsoft.com/en-us/library/aa905171(v=sql.80).aspx - Database Engine Configuration — Data Directories:
http://msdn.microsoft.com/en-us/library/cc281941(v=sql.120).aspx - Understanding Logging in Tempdb. Is Tempdb Recreated or Rebuilt after SQL Server Starts?:
http://social.technet.microsoft.com/wiki/contents/articles/23604.understanding-logging-in-tempdb-is-tempdb-recreated-or-rebuilt-after-sql-server-starts.aspx - FILESTREAM (SQL Server):
http://technet.microsoft.com/en-us/library/gg471497.aspx - Analysis Services Instance Management:
http://msdn.microsoft.com/en-us/library/hh230806.aspx - Data Directories Recommendations — Forum discussion:
http://social.msdn.microsoft.com/Forums/sqlserver/en-US/c454375e-046d-4ccd-a496-cb5725748681/sql-2012-data-directories-recommendations - Distributed Replay Security:
http://technet.microsoft.com/en-us/library/ff878263.aspx - Install Distributed Replay (Setup):
http://msdn.microsoft.com/en-us/library/gg471548.aspx - MSDN English Forum:
http://social.msdn.microsoft.com/Forums/sqlserver/en-US/home?forum=sqlgetstarted - MSDN Hebrew Forum:
http://social.technet.microsoft.com/Forums/he-IL/home?forum=sqlhe - Install SQL Server 2012 from the Installation Wizard (Setup):
http://msdn.microsoft.com/en-us/library/ms143219.aspx
See Also
- SQL Server 2014 Portal
-
Эта информация была полезна?
0
m
n
0 -
‘
Требования к аппаратному обеспечению
Минимальные:
Процессор: Intel (или совместимый) 2000 МГц или выше;
Память: 4 ГБ или более;
Жесткий диск: 20 ГБ или более.
Рекомендуемые:
Процессор: Intel Core i7 3000 МГц или выше;
Память: 4 ГБ или более;
Жесткий диск: 100 ГБ или более.
Требования к программному обеспечению
Необходимо наличие установленных пакетов:
- Microsoft .NET Framework 3.5 SP1 (просто включить в списке компонентов ОС);
- Microsoft .NET Framework 4 + Языковой пакет (в Windows 8, Server 2012 и более поздних входит в состав ОС);
- Windows PowerShell 2.0 (просто включить в списке компонентов ОС при наличии там такого пункта).
Поддерживаемые операционные системы:
- Windows 7 SP1,
- Windows Server 2008 R2 SP1,
- Windows 8,
- Windows Server 2012,
- Windows 8.1,
- Windows Server 2012 R2.
Более подробную информацию можно найти на сайте корпорации Microsoft.
Примечание. Бесплатную версию Microsoft SQL Server 2014 Express Edition можно скачать на сайте корпорации Microsoft:
- SQLEXPRADV_x64_RUS.exe – для 64-разрядных ОС;
- SQLEXPRADV_x86_RUS.exe – для 32-разрядных ОС или установки в режиме WOW64.
Внимание! Для установки ПО «Альта-ГТД» необходимо скачивать именно редакцию «Express с расширенными службами»!
Установка Microsoft SQL Server 2014
- Запустить программу-установщик с правами администратора на данном компьютере.
- В разделе «Планирование» нажать пункт «Средство проверки конфигурации» и убедиться, что все проверки будут успешно пройдены:
- Нажать на раздел «Установка» и затем пункт «Новая установка изолированного экземпляра SQL Server или добавление компонентов …»:
- Прочитать лицензию, установить галочку «Я принимаю условия…» и нажать кнопку «Далее»:
- Нажать кнопку «Далее»:
- Если компьютер не подключен к интернету, то может выводиться ошибка – просто нажать кнопку «Далее»:
- Выбрать компоненты для установки (рекомендуется воспользоваться кнопкой «Выделить все») и нажать кнопку «Далее»:

Внимание! Для нормального функционирования ПО «Альта-ГТД» требуется установить компонент «Полнотекстовый и семантический поиск»! Кроме того, для управления самим SQL Server необходимо установить компонент «Средства управления — основные»! Также настоятельно рекомендуется установить «Средства управления – полный набор», если такой пункт доступен (он включает утилиту SQL Server Profiler, полезную для диагностики возможных проблем с производительностью SQL Server).
- Выбрать опцию «Экземпляр по умолчанию» и нажать кнопку «Далее»:

- Выбрать опции, как показано на рисунке, и перейти на закладку «Параметры сортировки»:
Примечание. Если Вы хотите использовать «SQL Server Agent» (встроенный планировщик заданий, в бесплатную версию не входит) для выполнения регулярного резервного копирования файлов БД на другой компьютер в своей локальной сети (рекомендуется) и Ваша сеть построена с использованием домена Windows NT, то необходимо завести в Вашем домене отдельную учетную запись для SQL Server Agent и предоставить ей права на соответствующие ресурсы (более подробную информацию можно найти в справочной системе SQL Server). При такой конфигурации, в этом окне необходимо в поля «Имя учетной записи» и «Пароль» ввести имя созданной учетной записи (вида ДОМЕНИМЯ) и ее пароль, как минимум для службы «SQL Server Agent».
- Выбрать опции, как показано на рисунке, и нажать кнопку «Далее»:
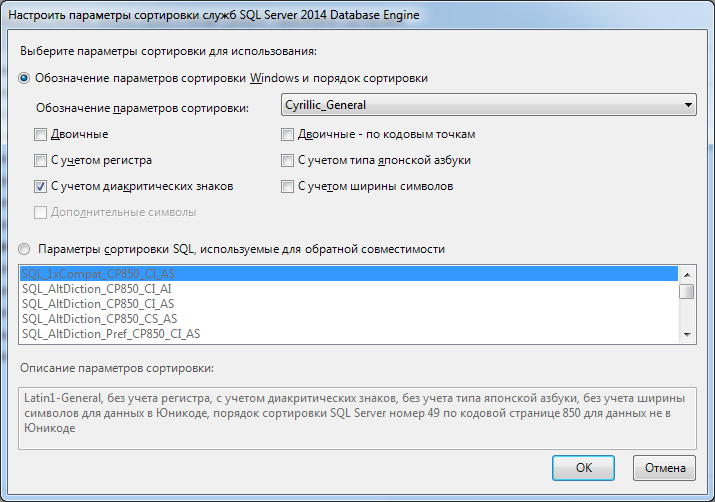
Примечание. Чтобы изменить опцию нажмите расположенную рядом кнопку «Настройка» и установите параметры, как показано на следующем рисунке:
Внимание! Данную настройку нельзя будет изменить после установки. Будьте внимательны!
- Выбрать опцию «Смешанный режим» и задать пароль для встроенной учетной записи администратора «sa» (эта учетная запись обладает максимальными правами доступа ко всем функциям и объектам на SQL-сервере). Дополнительно можно указать учетные записи пользователей Windows или целые группы пользователей Windows, которые должны обладать максимальными правами доступа к SQL Server (например, встроенную группу «Администраторы»). Затем перейти на закладку «Каталоги данных»:
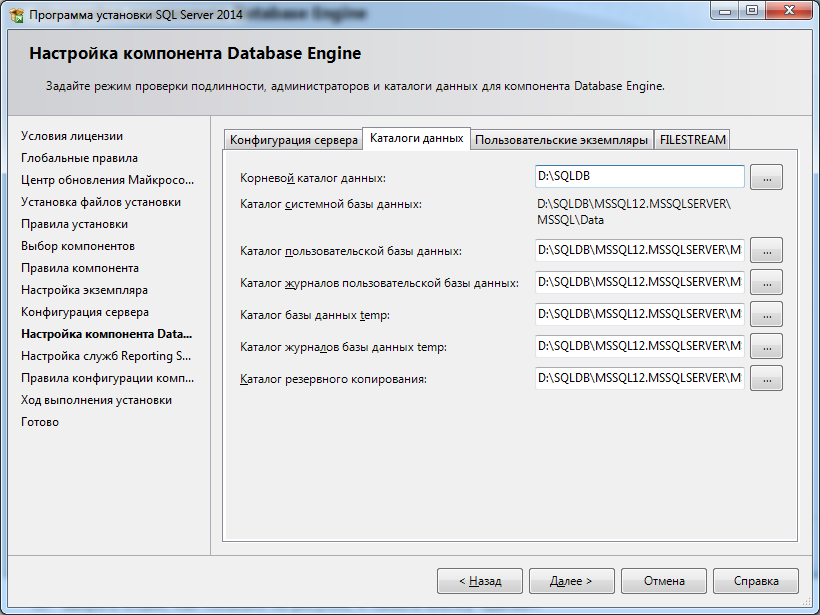
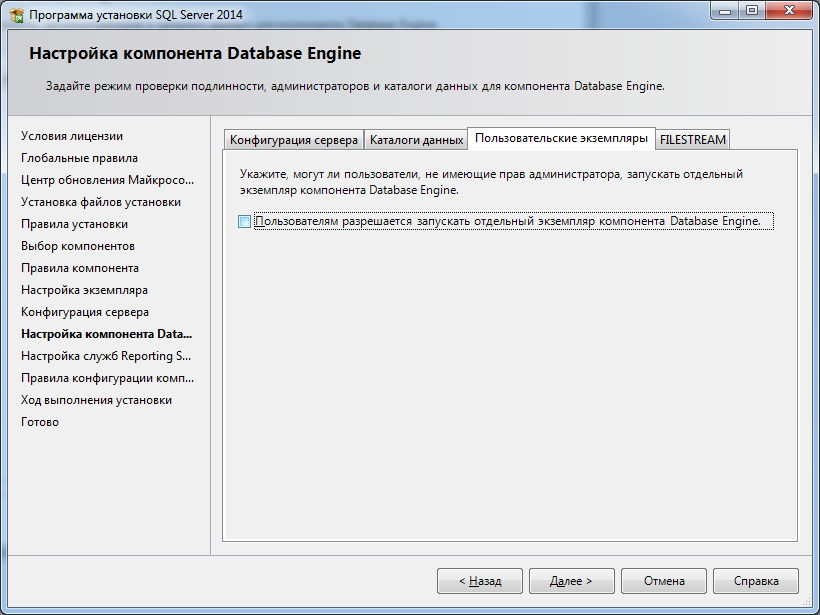
- В поле «Корневой каталог данных» ввести путь к папке, где будут размещаться файлы баз данных (рекомендуется использовать отдельный от ОС физический диск), и перейти на закладку «Пользовательские экземпляры»:
- Выбрать опции, как показано на рисунке, и нажать кнопку «Далее»:
- Выбрать опции, как показано на рисунке, и нажать кнопку «Далее»:
- После завершения установки нажать кнопку «Закрыть»:
Дальнейшие шаги следует выполнять только, если требуется обеспечить
доступ к SQL Server с других компьютеров в сети!
- Запустить утилиту «Диспетчер конфигурации SQL Server» (Пуск→Все программы→Microsoft SQL Server 2014→Средства настройки→Диспетчер конфигурации SQL Server). В разделе «Сетевая конфигурация SQL Server»→«Протоколы для …» нажать правой кнопкой мыши на строке «TCP/IP» и в контекстном меню выбрать пункт «Свойства»:
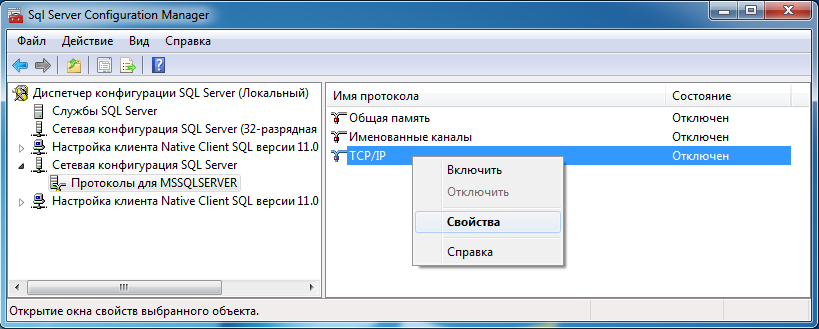
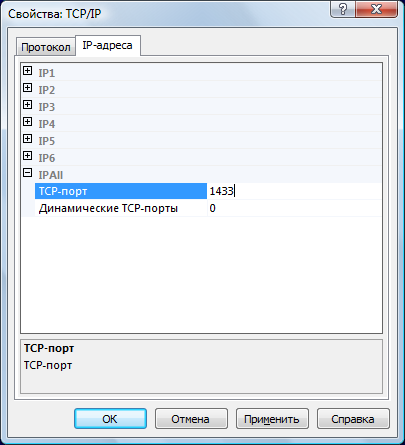
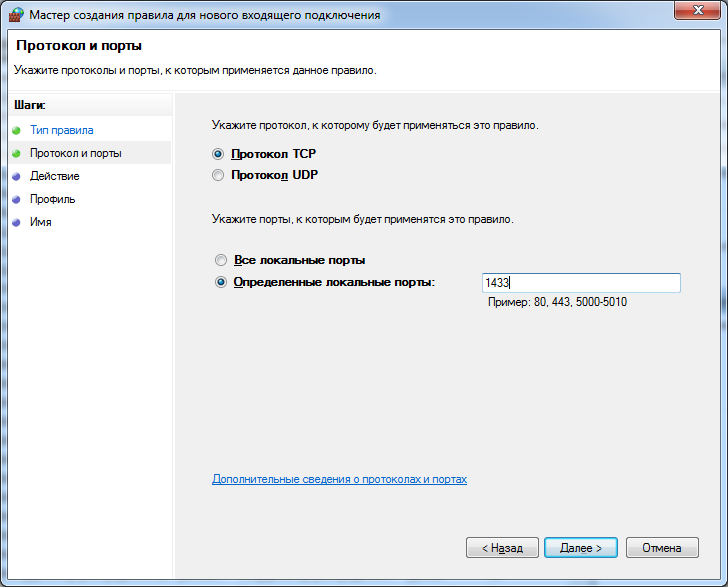
- На закладке «Протокол» установить параметр «Включено» = «Да», а на закладке «IP-адреса» в разделе «IPAll» параметр «TCP-порт» = «1433». Затем нажать кнопку «ОК»:
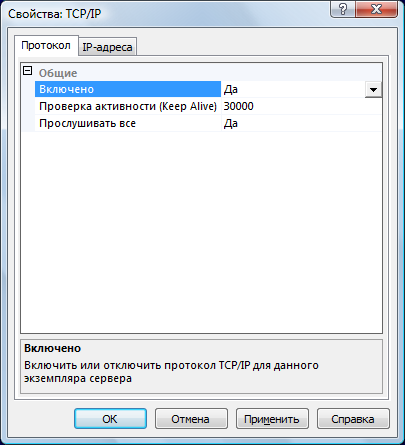
Примечание. Аналогичным способом настоятельно рекомендуется отключить все остальные протоколы, кроме TCP/IP.
- В разделе «Службы SQL Server» нажать правой кнопкой мыши на строке «SQL Server (…)» и в контекстном меню выбрать пункт «Перезапустить» (этот пункт можно пропустить, если Вы перезагрузите компьютер после завершения остальных настроек):

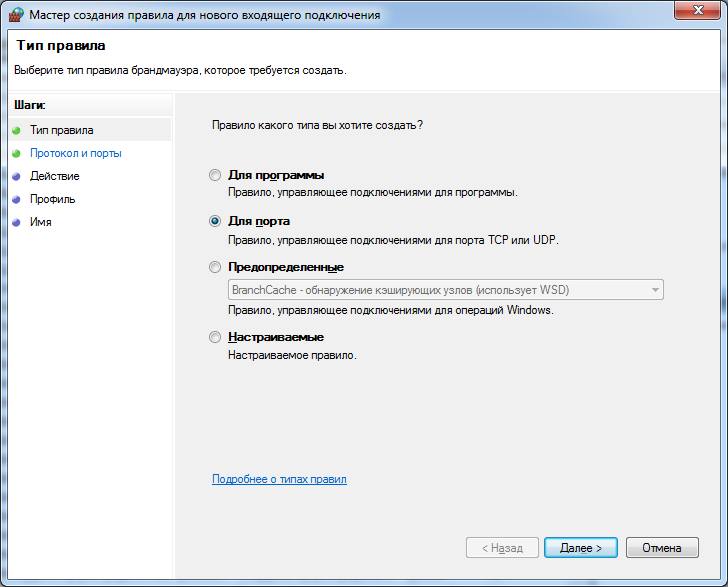
- Если на компьютере установлен какой-либо FireWall, то в нем необходимо разрешить входящие соединения по протоколу TCP/IP на порт 1433 (для подключения к SQL Server с других компьютеров), а также по протоколу UDP на порт 1434 (для того чтобы другие компьютеры могли обнаруживать данный экземпляр SQL Server). В стандартном «Брандмауэре Windows» (Панель управления→Брандмауэр Windows) для этого необходимо в разделе «Дополнительные параметры→Правила для входящих подключений» дважды «Создать правило»:
a) Выбрать вариант «Для порта» и нажать кнопку «Далее»:
b) Выбрать протокол TCP (на второй раз – UDP), ввести номер порта 1433 (на второй раз – 1434) и нажать кнопку «Далее»:
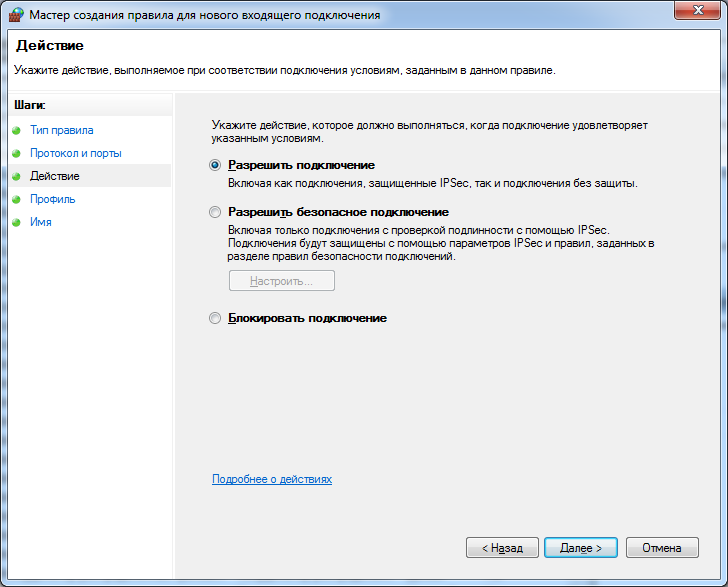
c) Выбрать «Разрешить подключение» и нажать кнопку «Далее»:
d) Рекомендуется снять галочку «Публичный», затем нажать кнопку «Далее»:

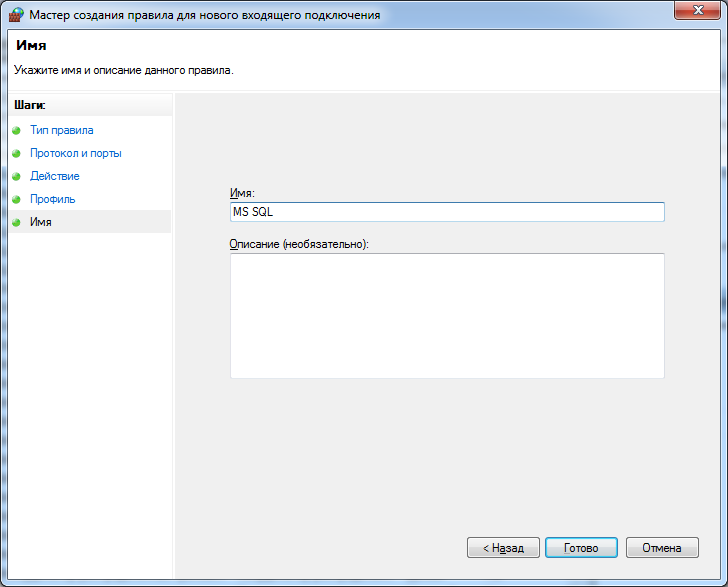
e) Ввести любое имя и нажать кнопку «Готово»:
- После завершения установки и настройки рекомендуется перезагрузить компьютер, особенно если на шаге 15 появлялось сообщение:
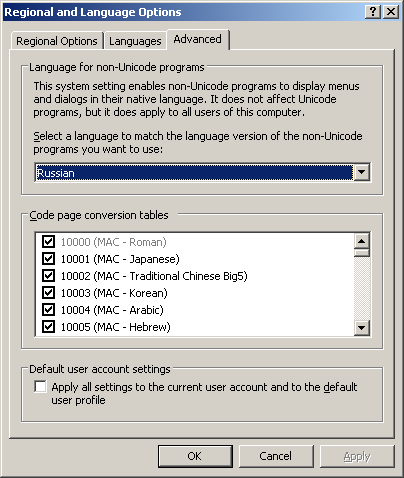
ВНИМАНИЕ! При установке SQL Server на НЕ русскоязычную ОС Windows необходимо в «Control Panel»→«Regional and Language Options» на закладке «Advanced» поставить язык «Russian» в параметре «Language for non-Unicode programs», затем перезагрузить компьютер:
-
Эта информация была полезна?
0
m
n
0 -
‘
Руководство по установке SQL Express
- Шаг 1. Загрузите SQL Server Express. Посетите страницу загрузки SQL Server Express на официальном сайте Microsoft. …
- Шаг 2: Запустите установку. …
- Шаг 3: Выберите тип установки. …
- Шаг 4. Следуйте инструкциям на экране для установки SQL Server Express. …
- Шаг 5. Проверьте подключение к SQL Server Express.
Как установить SQL Server 2014 Express Edition?
Шаги по установке Microsoft SQL Server Express 2014
- Шаг 1: Щелкните загруженный файл и запустите файл.
- Шаг 2: Примите условия лицензии и нажмите Далее.
- Шаг 3. На экране выбора функции оставьте значения по умолчанию.
- Шаг 4: На экране конфигурации экземпляра выберите «Именованный экземпляр», назовите нужную базу данных и щелкните.
Как загрузить SQL Server 2014 Express?
Шаги
- Перейдите на страницу загрузки Microsoft SQL Server 2014 Express.
- Нажмите «Загрузить» и в появившемся окне прокрутите вниз, пока не увидите «MgmtStudio 32BITSQLManagementStudio_x86_ENU.exe», и установите флажок рядом с именем (выберите этот вариант независимо от используемой ОС).
Может ли SQL Express работать в Windows 10?
Microsoft SQL Server 2005 (выпускная версия и пакеты обновления) и более ранние версии SQL Server не поддерживаются в Windows 10, Windows Server 2016, Windows Server 2012 R2, Windows Server 2012, Windows 8.1 или Windows 8.… Для получения информации о том, как обновить SQL Server, см. Обновление до SQL Server.
Могу ли я скачать SQL Server бесплатно?
SQL Server 2019 Экспресс — это бесплатная версия SQL Server, идеально подходящая для разработки и производства настольных, веб-приложений и небольших серверных приложений.
Как узнать, установлен ли SQL Express?
Проверьте реестр Windows на компьютере, где установлен SQL Server Express:
- Щелкните Пуск> Все программы> Стандартные> Командная строка.
- В командной строке введите regedit.exe.
- Проверьте следующий ключ реестра: HKEY_LOCAL_MACHINESYSTEMCurrentControlSetservicesMSSQL $ Примечание:
Как запустить SQL Server 2014 после установки?
Чтобы получить доступ к диспетчеру конфигурации SQL Server через Диспетчер компьютеров, выполните следующие действия:
- Нажмите клавишу Windows + R, чтобы открыть окно «Выполнить».
- Введите compmgmt. msc в поле Открыть :.
- Нажмите кнопку ОК.
- Разверните «Службы и приложения».
- Разверните Диспетчер конфигурации SQL Server.
Как загрузить и установить SQL Server 2014 в Windows 10?
Установка SQL Server Express 2014 в Windows 10
- Шаг 1. Загрузите SQL Server 2014 Express Edition. …
- Шаг 2 — Извлечение загруженного файла Installation Exe. …
- Шаг 3 — Запустите установку, начните установку и примите условия. …
- Шаг 4 — Установите правила и отключите установленное антивирусное программное обеспечение. …
- Шаг 5 — Выбор функции.
Как запустить SQL Server 2014?
В диспетчере конфигурации SQL Server на левой панели щелкните Службы SQL Server. В области результатов щелкните правой кнопкой мыши SQL Server (MSSQLServer) или именованный экземпляр, а затем выберите «Пуск», «Остановить», «Приостановить», «Возобновить» или «Перезапустить».
Как открыть SQL Server Express 2014?
Microsoft SQL Server 2014 Express edition — это бесплатная многофункциональная версия SQL Server, которая идеально подходит для обучения, разработки и поддержки настольных, веб-приложений и небольших серверных приложений. Выбирать вариант, основанный на вашем клиенте Windows. Нажмите кнопку «Далее», файлы будут загружены.
Является ли SQL Server 2014 Developer Edition бесплатным?
Microsoft объявила, что выпуск SQL Server 2014 Developer Edition будет доступен бесплатно участникам Visual Studio Dev Essentials.
Какой SQL Server лучше всего подходит для Windows 10?
Скачать Sql Server для Windows 10 — лучшее программное обеспечение и приложения
- Среда SQL Server Management Studio Express. …
- SQL Server 2019, экспресс-выпуск. …
- dbForge SQL Полный экспресс. …
- dbForge SQL завершен. …
- Конструктор запросов dbForge для SQL Server. …
- SQLTreeo SQL server желаемая конфигурация состояния. …
- Драйвер Devart ODBC для SQL Server.
Как установить Microsoft SQL Express?
Установить Microsoft SQL Server Express
- Подключитесь к серверу Windows с помощью подключения к удаленному рабочему столу.
- В меню «Пуск» откройте Internet Explorer. …
- Загрузите одну из версий SQL Server Express из этого списка. …
- Прокрутите вниз и нажмите «Выполнить», чтобы начать загрузку SQL Server.
- Щелкните Да, чтобы начать установку.
Как запустить SQL в Windows 10?
Запустите служебную программу sqlcmd и подключитесь к экземпляру SQL Server по умолчанию.
- В меню «Пуск» выберите «Выполнить». В поле Открыть введите cmd и нажмите кнопку ОК, чтобы открыть окно командной строки. …
- В командной строке введите sqlcmd.
- Нажмите Ввод. …
- Чтобы завершить сеанс sqlcmd, введите EXIT в командной строке sqlcmd.
-
Question
-
I can’t install sql server 2014 on windows 10. It won’t go furthur than «Initializing Windows Installer Actions». What can I do?
All replies
-
-
Edited by
Tuesday, August 4, 2015 10:44 AM
-
Proposed as answer by
Lydia ZhangMicrosoft contingent staff
Wednesday, August 5, 2015 6:01 AM
-
Edited by
-
Using the slipstream method I get this error
The following error has occurred:

Attempted to perform an unauthorized operation.

Click 'Retry' to retry the failed action, or click 'Cancel' to cancel this action and continue setup.

For help, click: http://go.microsoft.com/fwlink?LinkID=20476&ProdName=Microsoft%20SQL%20Server&EvtSrc=setup.rll&EvtID=50000&ProdVer=12.0.4100.1&EvtType=0x88792597%25400xBB814387
This is the summary.txt
Overall summary:
  Final result:                  Failed: see details below
  Exit code (Decimal):           -2068119551
  Start time:                    2015-08-05 23:04:37
  End time:                      2015-08-05 23:19:19
  Requested action:              Install

Setup completed with required actions for features.
Troubleshooting information for those features:
  Next step for SQLEngine:       SQL Server Setup was cancelled before this feature could be installed. Uninstall this feature, and then run the setup process again.
  Next step for Replication:     SQL Server Setup was cancelled before this feature could be installed. Uninstall this feature, and then run the setup process again.
  Next step for Conn:            SQL Server Setup was cancelled before this feature could be installed. Uninstall this feature, and then run the setup process again.
  Next step for Adv_SSMS:        SQL Server Setup was cancelled before this feature could be installed. Uninstall this feature, and then run the setup process again.
  Next step for SDK:             SQL Server Setup was cancelled before this feature could be installed. Uninstall this feature, and then run the setup process again.
  Next step for BC:              SQL Server Setup was cancelled before this feature could be installed. Uninstall this feature, and then run the setup process again.
  Next step for SSMS:            SQL Server Setup was cancelled before this feature could be installed. Uninstall this feature, and then run the setup process again.
  Next step for Writer:          SQL Server Setup was cancelled before this feature could be installed. Uninstall this feature, and then run the setup process again.
  Next step for Browser:         SQL Server Setup was cancelled before this feature could be installed. Uninstall this feature, and then run the setup process again.


Machine Properties:
  Machine name:                  LAPTOPRUBEN
  Machine processor count:       4
  OS version:                    Windows 8
  OS service pack:
  OS region:                     United States
  OS language:                   Nederlands (Nederland)
  OS architecture:               x64
  Process architecture:          64 Bit
  OS clustered:                  No

Product features discovered:
  Product              Instance             Instance ID                    Feature                                  Language             Edition              Version         Clustered  Configured
  SQL Server 2014      SQLEXPRESS           MSSQL12.SQLEXPRESS             Database Engine Services                 1033                                      12.0.2000.8     No         Yes
  SQL Server 2014      SQLEXPRESS           MSSQL12.SQLEXPRESS             SQL Server Replication                   1033                                      12.0.2000.8     No         Yes
  SQL Server 2014                                                          Management Tools - Basic                 1033                 Express Edition      12.0.2000.8     No         Yes
  SQL Server 2014                                                          Management Tools - Complete              1033                 Express Edition      12.0.2000.8     No         Yes
  SQL Server 2014                                                          Client Tools Connectivity                1033                 Express Edition      12.0.2000.8     No         Yes
  SQL Server 2014                                                          Client Tools Backwards Compatibility     1033                 Express Edition      12.0.2000.8     No         Yes
  SQL Server 2014                                                          Client Tools SDK                         1033                 Express Edition      12.0.2000.8     No         Yes

Package properties:
  Description:                   Microsoft SQL Server 2014
  ProductName:                   SQL Server 2014
  Type:                          RTM
  Version:                       12
  Installation location:         C:UsersRubenDownloadsSQLEXPRWT x64 ENUSQLEXPRWT_x64_ENUx64setup
  Installation edition:          Express

  Slipstream:                    True
  SP Level                       1

Product Update Status:
  Success: KB 3058865

Product Updates Selected for Installation:
  Title:                         Service Pack 1
  Knowledge Based Article:       KB 3058865
  Version:                       12.1.4100.0
  Architecture:                  x64
  Language:                      1033

  Update Source:                 C:UsersRubenDownloadsSQLServer2014SP1


User Input Settings:
  ACTION:                        Install
  ADDCURRENTUSERASSQLADMIN:      true
  AGTSVCACCOUNT:                 NT AUTHORITYNETWORK SERVICE
  AGTSVCPASSWORD:                *****
  AGTSVCSTARTUPTYPE:             Disabled
  ASBACKUPDIR:                   Backup
  ASCOLLATION:                   Latin1_General_CI_AS
  ASCONFIGDIR:                   Config
  ASDATADIR:                     Data
  ASLOGDIR:                      Log
  ASPROVIDERMSOLAP:              1
  ASSERVERMODE:                  MULTIDIMENSIONAL
  ASSVCACCOUNT:                  <empty>
  ASSVCPASSWORD:                 <empty>
  ASSVCSTARTUPTYPE:              Automatic
  ASSYSADMINACCOUNTS:            <empty>
  ASTEMPDIR:                     Temp
  BROWSERSVCSTARTUPTYPE:         Disabled
  CLTCTLRNAME:                   <empty>
  CLTRESULTDIR:                  <empty>
  CLTSTARTUPTYPE:                0
  CLTSVCACCOUNT:                 <empty>
  CLTSVCPASSWORD:                <empty>
  CLTWORKINGDIR:                 <empty>
  COMMFABRICENCRYPTION:          0
  COMMFABRICNETWORKLEVEL:        0
  COMMFABRICPORT:                0
  CONFIGURATIONFILE:
  CTLRSTARTUPTYPE:               0
  CTLRSVCACCOUNT:                <empty>
  CTLRSVCPASSWORD:               <empty>
  CTLRUSERS:                     <empty>
  ENABLERANU:                    true
  ENU:                           true
  ERRORREPORTING:                false
  FEATURES:                      SQLENGINE, REPLICATION, CONN, BC, SDK, SSMS, ADV_SSMS
  FILESTREAMLEVEL:               0
  FILESTREAMSHARENAME:           <empty>
  FTSVCACCOUNT:                  <empty>
  FTSVCPASSWORD:                 <empty>
  HELP:                          false
  IACCEPTSQLSERVERLICENSETERMS:  true
  INDICATEPROGRESS:              false
  INSTALLSHAREDDIR:              C:Program FilesMicrosoft SQL Server
  INSTALLSHAREDWOWDIR:           C:Program Files (x86)Microsoft SQL Server
  INSTALLSQLDATADIR:             <empty>
  INSTANCEDIR:                   C:Program FilesMicrosoft SQL Server
  INSTANCEID:                    SQLEXPRESS2
  INSTANCENAME:                  SQLEXPRESS2
  ISSVCACCOUNT:                  NT AUTHORITYNetwork Service
  ISSVCPASSWORD:                 <empty>
  ISSVCSTARTUPTYPE:              Automatic
  MATRIXCMBRICKCOMMPORT:         0
  MATRIXCMSERVERNAME:            <empty>
  MATRIXNAME:                    <empty>
  NPENABLED:                     0
  PID:                           *****
  QUIET:                         false
  QUIETSIMPLE:                   false
  ROLE:                          AllFeatures_WithDefaults
  RSINSTALLMODE:                 DefaultNativeMode
  RSSHPINSTALLMODE:              DefaultSharePointMode
  RSSVCACCOUNT:                  <empty>
  RSSVCPASSWORD:                 <empty>
  RSSVCSTARTUPTYPE:              Automatic
  SAPWD:                         <empty>
  SECURITYMODE:                  <empty>
  SQLBACKUPDIR:                  <empty>
  SQLCOLLATION:                  Latin1_General_CI_AS
  SQLSVCACCOUNT:                 NT ServiceMSSQL$SQLEXPRESS2
  SQLSVCPASSWORD:                <empty>
  SQLSVCSTARTUPTYPE:             Automatic
  SQLSYSADMINACCOUNTS:           LAPTOPRUBENRuben
  SQLTEMPDBDIR:                  <empty>
  SQLTEMPDBLOGDIR:               <empty>
  SQLUSERDBDIR:                  <empty>
  SQLUSERDBLOGDIR:               <empty>
  SQMREPORTING:                  false
  TCPENABLED:                    0
  UIMODE:                        AutoAdvance
  UpdateEnabled:                 true
  UpdateSource:                  C:UsersRubenDownloadsSQLServer2014SP1
  USEMICROSOFTUPDATE:            false
  X86:                           false

  Configuration file:            C:Program FilesMicrosoft SQL Server120Setup BootstrapLog20150805_230230ConfigurationFile.ini

Detailed results:
  Feature:                       Database Engine Services
  Status:                        Failed: see logs for details
  Reason for failure:            An error occurred during the setup process of the feature.
  Next Step:                     SQL Server Setup was cancelled before this feature could be installed. Uninstall this feature, and then run the setup process again.

  Feature:                       SQL Server Replication
  Status:                        Failed: see logs for details
  Reason for failure:            An error occurred during the setup process of the feature.
  Next Step:                     SQL Server Setup was cancelled before this feature could be installed. Uninstall this feature, and then run the setup process again.

  Feature:                       Client Tools Connectivity
  Status:                        Failed: see logs for details
  Reason for failure:            An error occurred during the setup process of the feature.
  Next Step:                     SQL Server Setup was cancelled before this feature could be installed. Uninstall this feature, and then run the setup process again.

  Feature:                       Management Tools - Complete
  Status:                        Failed: see logs for details
  Reason for failure:            An error occurred during the setup process of the feature.
  Next Step:                     SQL Server Setup was cancelled before this feature could be installed. Uninstall this feature, and then run the setup process again.

  Feature:                       Client Tools SDK
  Status:                        Failed: see logs for details
  Reason for failure:            An error occurred during the setup process of the feature.
  Next Step:                     SQL Server Setup was cancelled before this feature could be installed. Uninstall this feature, and then run the setup process again.

  Feature:                       Client Tools Backwards Compatibility
  Status:                        Failed: see logs for details
  Reason for failure:            An error occurred during the setup process of the feature.
  Next Step:                     SQL Server Setup was cancelled before this feature could be installed. Uninstall this feature, and then run the setup process again.

  Feature:                       Management Tools - Basic
  Status:                        Failed: see logs for details
  Reason for failure:            An error occurred during the setup process of the feature.
  Next Step:                     SQL Server Setup was cancelled before this feature could be installed. Uninstall this feature, and then run the setup process again.

  Feature:                       SQL Writer
  Status:                        Failed: see logs for details
  Reason for failure:            An error occurred during the setup process of the feature.
  Next Step:                     SQL Server Setup was cancelled before this feature could be installed. Uninstall this feature, and then run the setup process again.

  Feature:                       SQL Browser
  Status:                        Failed: see logs for details
  Reason for failure:            An error occurred during the setup process of the feature.
  Next Step:                     SQL Server Setup was cancelled before this feature could be installed. Uninstall this feature, and then run the setup process again.

Rules with failures:

Global rules:

Scenario specific rules:

Rules report file:               C:Program FilesMicrosoft SQL Server120Setup BootstrapLog20150805_230230SystemConfigurationCheck_Report.htm
-
Hello,
This seems to be an issue related to permissions.
Please now share with us the Detail.txt log file created by SQL Server setup. The following article may help you locate
the file on disk:https://msdn.microsoft.com/en-us/library/ms143702(v=sql.120).aspx
We should look for access denied messages or similar errors inside that file.Hope this helps.
Regards,
Alberto Morillo
SQLCoffee.com-
Edited by
Alberto MorilloMVP
Wednesday, August 5, 2015 10:13 PM
-
Edited by
-
Here’s a part of the detail.txt
(01) 2015-08-05 23:18:54 Slp: Sco: Attempting to create base registry key HKEY_LOCAL_MACHINE, machine
(01) 2015-08-05 23:18:54 Slp: Sco: Attempting to open registry subkey
(01) 2015-08-05 23:18:54 Slp: Sco: Attempting to open registry subkey SOFTWAREMicrosoftMicrosoft SQL Server
(01) 2015-08-05 23:18:54 Slp: Sco: Attempting to replace account with sid in security descriptor (A;CI;KR;;;[SQLServer2005SQLBrowserUser$LAPTOPRUBEN])
(01) 2015-08-05 23:18:54 Slp: ReplaceAccountWithSidInSddl -- SDDL to be processed:  (A;CI;KR;;;[SQLServer2005SQLBrowserUser$LAPTOPRUBEN])
(01) 2015-08-05 23:18:54 Slp: Sco: Account name to be translated into SID: SQLServer2005SQLBrowserUser$LAPTOPRUBEN
(01) 2015-08-05 23:18:54 Slp: Sco: Attempting to get account sid for user account SQLServer2005SQLBrowserUser$LAPTOPRUBEN
(01) 2015-08-05 23:18:54 Slp: Sco: Attempting to get sid for user account SQLServer2005SQLBrowserUser$LAPTOPRUBEN
(01) 2015-08-05 23:18:54 Slp: Sco: GetSidForAccount normalized accountName SQLServer2005SQLBrowserUser$LAPTOPRUBEN parameter to SQLServer2005SQLBrowserUser$LAPTOPRUBEN
(01) 2015-08-05 23:18:54 Slp: Sco: Account name is translated into: S-1-5-21-1703713227-2820447181-303424437-1004
(01) 2015-08-05 23:18:54 Slp: Sco: Final security descriptor:  (A;CI;KR;;;S-1-5-21-1703713227-2820447181-303424437-1004)
(01) 2015-08-05 23:18:54 Slp: Sco: Attempting to set security descriptor (A;CI;KR;;;S-1-5-21-1703713227-2820447181-303424437-1004)
(01) 2015-08-05 23:18:54 Slp: Sco: Attempting to normalize security descriptor (A;CI;KR;;;S-1-5-21-1703713227-2820447181-303424437-1004)
(01) 2015-08-05 23:18:54 Slp: Sco: Adding 'D:' DACL identifier to the input security descriptor (A;CI;KR;;;S-1-5-21-1703713227-2820447181-303424437-1004)
(01) 2015-08-05 23:18:54 Slp: Sco: Attempting to replace account with sid in security descriptor D:(A;CI;KR;;;S-1-5-21-1703713227-2820447181-303424437-1004)
(01) 2015-08-05 23:18:54 Slp: ReplaceAccountWithSidInSddl -- SDDL to be processed:  D:(A;CI;KR;;;S-1-5-21-1703713227-2820447181-303424437-1004)
(01) 2015-08-05 23:18:54 Slp: ReplaceAccountWithSidInSddl -- SDDL to be returned:  D:(A;CI;KR;;;S-1-5-21-1703713227-2820447181-303424437-1004)
(01) 2015-08-05 23:18:54 Slp: Sco: Attempting to normalize security descriptor D:(A;CI;KR;;;S-1-5-21-1703713227-2820447181-303424437-1004)
(01) 2015-08-05 23:18:54 Slp: Sco: Attempting to replace account with sid in security descriptor D:(A;CI;KR;;;S-1-5-21-1703713227-2820447181-303424437-1004)
(01) 2015-08-05 23:18:54 Slp: ReplaceAccountWithSidInSddl -- SDDL to be processed:  D:(A;CI;KR;;;S-1-5-21-1703713227-2820447181-303424437-1004)
(01) 2015-08-05 23:18:54 Slp: ReplaceAccountWithSidInSddl -- SDDL to be returned:  D:(A;CI;KR;;;S-1-5-21-1703713227-2820447181-303424437-1004)
(01) 2015-08-05 23:18:54 Slp: Prompting user if they want to retry this action due to the following failure:
(01) 2015-08-05 23:18:54 Slp: ----------------------------------------
(01) 2015-08-05 23:18:54 Slp: The following is an exception stack listing the exceptions in outermost to innermost order
(01) 2015-08-05 23:18:54 Slp: Inner exceptions are being indented
(01) 2015-08-05 23:18:54 Slp:
(01) 2015-08-05 23:18:54 Slp: Exception type: Microsoft.SqlServer.Configuration.Sco.ScoException
(01) 2015-08-05 23:18:54 Slp:     Message:
(01) 2015-08-05 23:18:54 Slp:         Attempted to perform an unauthorized operation.
(01) 2015-08-05 23:18:54 Slp:     HResult : 0x84bb0001
(01) 2015-08-05 23:18:54 Slp:         FacilityCode : 1211 (4bb)
(01) 2015-08-05 23:18:54 Slp:         ErrorCode : 1 (0001)
(01) 2015-08-05 23:18:54 Slp:     Data:
(01) 2015-08-05 23:18:54 Slp:       WatsonData = Microsoft SQL Server
(01) 2015-08-05 23:18:54 Slp:       DisableRetry = true
(01) 2015-08-05 23:18:54 Slp:     Inner exception type: System.UnauthorizedAccessException
(01) 2015-08-05 23:18:54 Slp:         Message:
(01) 2015-08-05 23:18:54 Slp:                 Attempted to perform an unauthorized operation.
(01) 2015-08-05 23:18:54 Slp:         HResult : 0x80070005
(01) 2015-08-05 23:18:54 Slp:         Stack:
(01) 2015-08-05 23:18:54 Slp:                 at System.Security.AccessControl.Win32.GetSecurityInfo(ResourceType resourceType, String name, SafeHandle handle, AccessControlSections accessControlSections, RawSecurityDescriptor& resultSd)
(01) 2015-08-05 23:18:54 Slp:                 at System.Security.AccessControl.NativeObjectSecurity.CreateInternal(ResourceType resourceType, Boolean isContainer, String name, SafeHandle handle, AccessControlSections includeSections, Boolean createByName, ExceptionFromErrorCode exceptionFromErrorCode, Object exceptionContext)
(01) 2015-08-05 23:18:54 Slp:                 at Microsoft.SqlServer.Configuration.Sco.SqlRegistrySecurity..ctor(ResourceType resourceType, SafeRegistryHandle handle, AccessControlSections includeSections)
(01) 2015-08-05 23:18:54 Slp:                 at Microsoft.SqlServer.Configuration.Sco.SqlRegistrySecurity.Create(InternalRegistryKey key)
(01) 2015-08-05 23:18:54 Slp:                 at Microsoft.SqlServer.Configuration.Sco.InternalRegistryKey.SetSecurityDescriptor(String sddl, Boolean overwrite)
(01) 2015-08-05 23:18:54 Slp: ----------------------------------------
(01) 2015-08-05 23:19:19 Slp: User has chosen to cancel this action
(01) 2015-08-05 23:19:19 SQLBrowser: SQL Server Browser Install for feature 'SQL_Browser_Redist_SqlBrowser_Cpu32' failed with cancel exception: Microsoft.SqlServer.Configuration.Sco.ScoException: Attempted to perform an unauthorized operation. ---> System.UnauthorizedAccessException: Attempted to perform an unauthorized operation.
   at System.Security.AccessControl.Win32.GetSecurityInfo(ResourceType resourceType, String name, SafeHandle handle, AccessControlSections accessControlSections, RawSecurityDescriptor& resultSd)
   at System.Security.AccessControl.NativeObjectSecurity.CreateInternal(ResourceType resourceType, Boolean isContainer, String name, SafeHandle handle, AccessControlSections includeSections, Boolean createByName, ExceptionFromErrorCode exceptionFromErrorCode, Object exceptionContext)
   at Microsoft.SqlServer.Configuration.Sco.SqlRegistrySecurity..ctor(ResourceType resourceType, SafeRegistryHandle handle, AccessControlSections includeSections)
   at Microsoft.SqlServer.Configuration.Sco.SqlRegistrySecurity.Create(InternalRegistryKey key)
   at Microsoft.SqlServer.Configuration.Sco.InternalRegistryKey.SetSecurityDescriptor(String sddl, Boolean overwrite)
   --- End of inner exception stack trace ---
   at Microsoft.SqlServer.Configuration.Sco.InternalRegistryKey.SetSecurityDescriptor(String sddl, Boolean overwrite)
   at Microsoft.SqlServer.Configuration.Sco.SqlRegistryKey.SetSecurityDescriptor(String sddl, Boolean overwrite)
   at Microsoft.SqlServer.Configuration.SqlBrowser.SqlBrowserPrivateConfigBase.SetSecurityDescriptorByLocation(String sRegLocation, RegistryView regView, String sSddl, Boolean bOptional)
   at Microsoft.SqlServer.Configuration.SqlBrowser.SqlBrowserPrivateConfigBase.ApplyRegPermissions(XmlNodeList xmlNodeListRegPermissions, Dictionary`2 dictionaryGroups, Dictionary`2 dicLocationFragments)
   at Microsoft.SqlServer.Configuration.SqlBrowser.SqlBrowserPrivateConfig.ApplyRegCommonPermissions(XmlElement xmlRootPermissions, Dictionary`2 dictionaryGroups, Dictionary`2 dicLocationFragments)
   at Microsoft.SqlServer.Configuration.SqlBrowser.SqlBrowserPrivateConfig.ApplyPermissions(String sXmlPermissionsFile, String sBrowserPrincipal)
   at Microsoft.SqlServer.Configuration.SqlBrowser.SqlBrowserPrivateConfig.ConfigStaticProperties(SqlBrowserPublicConfig publicConfigSqlBrowser)
   at Microsoft.SqlServer.Configuration.SqlBrowser.SqlBrowserPrivateConfig.ExecConfigNonRC(SqlBrowserPublicConfig publicConfigSqlBrowser)
   at Microsoft.SqlServer.Configuration.SqlBrowser.SqlBrowserPrivateConfig.SelectAndExecTiming(ConfigActionTiming timing, Dictionary`2 actionData, PublicConfigurationBase spcbPublicConfig)
   at Microsoft.SqlServer.Configuration.SqlBrowser.SqlBrowserPrivateConfigBase.ExecWithRetry(ConfigActionTiming timing, Dictionary`2 actionData, PublicConfigurationBase spcbPublicConfig).
(01) 2015-08-05 23:19:19 SQLBrowser: The last attempted operation: Adding access control entry '(A;CI;KR;;;[SQLServer2005SQLBrowserUser$LAPTOPRUBEN])' to registry key 'SOFTWAREMicrosoftMicrosoft SQL Server' in view 'Wow6432' in order to configure the SQL Server Browser service..
(01) 2015-08-05 23:19:19 Slp: Configuration action failed for feature SQL_Browser_Redist during timing ConfigNonRC and scenario ConfigNonRC.
(01) 2015-08-05 23:19:19 Slp: Attempted to perform an unauthorized operation.
(01) 2015-08-05 23:19:19 Slp: The configuration failure category of current exception is ConfigurationFailure
(01) 2015-08-05 23:19:19 Slp: Configuration action failed for feature SQL_Browser_Redist during timing ConfigNonRC and scenario ConfigNonRC.
(01) 2015-08-05 23:19:19 Slp: Microsoft.SqlServer.Configuration.Sco.ScoException: Attempted to perform an unauthorized operation. ---> System.UnauthorizedAccessException: Attempted to perform an unauthorized operation.
(01) 2015-08-05 23:19:19 Slp:    at System.Security.AccessControl.Win32.GetSecurityInfo(ResourceType resourceType, String name, SafeHandle handle, AccessControlSections accessControlSections, RawSecurityDescriptor& resultSd)
(01) 2015-08-05 23:19:19 Slp:    at System.Security.AccessControl.NativeObjectSecurity.CreateInternal(ResourceType resourceType, Boolean isContainer, String name, SafeHandle handle, AccessControlSections includeSections, Boolean createByName, ExceptionFromErrorCode exceptionFromErrorCode, Object exceptionContext)
(01) 2015-08-05 23:19:19 Slp:    at Microsoft.SqlServer.Configuration.Sco.SqlRegistrySecurity..ctor(ResourceType resourceType, SafeRegistryHandle handle, AccessControlSections includeSections)
(01) 2015-08-05 23:19:19 Slp:    at Microsoft.SqlServer.Configuration.Sco.SqlRegistrySecurity.Create(InternalRegistryKey key)
(01) 2015-08-05 23:19:19 Slp:    at Microsoft.SqlServer.Configuration.Sco.InternalRegistryKey.SetSecurityDescriptor(String sddl, Boolean overwrite)
(01) 2015-08-05 23:19:19 Slp:    --- End of inner exception stack trace ---
(01) 2015-08-05 23:19:19 Slp:    at Microsoft.SqlServer.Configuration.Sco.InternalRegistryKey.SetSecurityDescriptor(String sddl, Boolean overwrite)
(01) 2015-08-05 23:19:19 Slp:    at Microsoft.SqlServer.Configuration.Sco.SqlRegistryKey.SetSecurityDescriptor(String sddl, Boolean overwrite)
(01) 2015-08-05 23:19:19 Slp:    at Microsoft.SqlServer.Configuration.SqlBrowser.SqlBrowserPrivateConfigBase.SetSecurityDescriptorByLocation(String sRegLocation, RegistryView regView, String sSddl, Boolean bOptional)
(01) 2015-08-05 23:19:19 Slp:    at Microsoft.SqlServer.Configuration.SqlBrowser.SqlBrowserPrivateConfigBase.ApplyRegPermissions(XmlNodeList xmlNodeListRegPermissions, Dictionary`2 dictionaryGroups, Dictionary`2 dicLocationFragments)
(01) 2015-08-05 23:19:19 Slp:    at Microsoft.SqlServer.Configuration.SqlBrowser.SqlBrowserPrivateConfig.ApplyRegCommonPermissions(XmlElement xmlRootPermissions, Dictionary`2 dictionaryGroups, Dictionary`2 dicLocationFragments)
(01) 2015-08-05 23:19:19 Slp:    at Microsoft.SqlServer.Configuration.SqlBrowser.SqlBrowserPrivateConfig.ApplyPermissions(String sXmlPermissionsFile, String sBrowserPrincipal)
(01) 2015-08-05 23:19:19 Slp:    at Microsoft.SqlServer.Configuration.SqlBrowser.SqlBrowserPrivateConfig.ConfigStaticProperties(SqlBrowserPublicConfig publicConfigSqlBrowser)
(01) 2015-08-05 23:19:19 Slp:    at Microsoft.SqlServer.Configuration.SqlBrowser.SqlBrowserPrivateConfig.ExecConfigNonRC(SqlBrowserPublicConfig publicConfigSqlBrowser)
(01) 2015-08-05 23:19:19 Slp:    at Microsoft.SqlServer.Configuration.SqlBrowser.SqlBrowserPrivateConfig.SelectAndExecTiming(ConfigActionTiming timing, Dictionary`2 actionData, PublicConfigurationBase spcbPublicConfig)
(01) 2015-08-05 23:19:19 Slp:    at Microsoft.SqlServer.Configuration.SqlBrowser.SqlBrowserPrivateConfigBase.ExecWithRetry(ConfigActionTiming timing, Dictionary`2 actionData, PublicConfigurationBase spcbPublicConfig)
(01) 2015-08-05 23:19:19 Slp:    at Microsoft.SqlServer.Configuration.SqlBrowser.SqlBrowserPrivateConfig.Install(ConfigActionTiming timing, Dictionary`2 actionData, PublicConfigurationBase spcbPublicConfig)
(01) 2015-08-05 23:19:19 Slp:    at Microsoft.SqlServer.Configuration.SqlConfigBase.SlpConfigAction.ExecuteAction(String actionId)
(01) 2015-08-05 23:19:19 Slp:    at Microsoft.SqlServer.Configuration.SqlConfigBase.SlpConfigAction.Execute(String actionId, TextWriter errorStream)
(01) 2015-08-05 23:19:19 Slp: The following is an exception stack listing the exceptions in outermost to innermost order
(01) 2015-08-05 23:19:19 Slp: Inner exceptions are being indented
(01) 2015-08-05 23:19:19 Slp:
(01) 2015-08-05 23:19:19 Slp: Exception type: Microsoft.SqlServer.Configuration.Sco.ScoException
(01) 2015-08-05 23:19:19 Slp:     Message:
(01) 2015-08-05 23:19:19 Slp:         Attempted to perform an unauthorized operation.
(01) 2015-08-05 23:19:19 Slp:     HResult : 0x84bb0001
(01) 2015-08-05 23:19:19 Slp:         FacilityCode : 1211 (4bb)
(01) 2015-08-05 23:19:19 Slp:         ErrorCode : 1 (0001)
(01) 2015-08-05 23:19:19 Slp:     Data:
(01) 2015-08-05 23:19:19 Slp:       WatsonData = Microsoft SQL Server
(01) 2015-08-05 23:19:19 Slp:       DisableRetry = true
(01) 2015-08-05 23:19:19 Slp:       HelpLink.EvtType = 0x88792597@0xBB814387
(01) 2015-08-05 23:19:19 Slp:       EMBResult = Cancel
(01) 2015-08-05 23:19:19 Slp:       Feature = SQL_Browser_Redist_SqlBrowser_Cpu32
(01) 2015-08-05 23:19:19 Slp:       Timing = ConfigNonRC
(01) 2015-08-05 23:19:19 Slp:       SQL.Setup.FailureCategory = ConfigurationFailure
(01) 2015-08-05 23:19:19 Slp:       WatsonConfigActionData = INSTALL@CONFIGNONRC@SQL_BROWSER_REDIST
(01) 2015-08-05 23:19:19 Slp:       WatsonExceptionFeatureIdsActionData = System.String[]
(01) 2015-08-05 23:19:19 Slp:     Stack:
(01) 2015-08-05 23:19:19 Slp:         at Microsoft.SqlServer.Configuration.Sco.InternalRegistryKey.SetSecurityDescriptor(String sddl, Boolean overwrite)
(01) 2015-08-05 23:19:19 Slp:         at Microsoft.SqlServer.Configuration.Sco.SqlRegistryKey.SetSecurityDescriptor(String sddl, Boolean overwrite)
(01) 2015-08-05 23:19:19 Slp:         at Microsoft.SqlServer.Configuration.SqlBrowser.SqlBrowserPrivateConfigBase.SetSecurityDescriptorByLocation(String sRegLocation, RegistryView regView, String sSddl, Boolean bOptional)
(01) 2015-08-05 23:19:19 Slp:         at Microsoft.SqlServer.Configuration.SqlBrowser.SqlBrowserPrivateConfigBase.ApplyRegPermissions(XmlNodeList xmlNodeListRegPermissions, Dictionary`2 dictionaryGroups, Dictionary`2 dicLocationFragments)
(01) 2015-08-05 23:19:19 Slp:         at Microsoft.SqlServer.Configuration.SqlBrowser.SqlBrowserPrivateConfig.ApplyRegCommonPermissions(XmlElement xmlRootPermissions, Dictionary`2 dictionaryGroups, Dictionary`2 dicLocationFragments)
(01) 2015-08-05 23:19:19 Slp:         at Microsoft.SqlServer.Configuration.SqlBrowser.SqlBrowserPrivateConfig.ApplyPermissions(String sXmlPermissionsFile, String sBrowserPrincipal)
(01) 2015-08-05 23:19:19 Slp:         at Microsoft.SqlServer.Configuration.SqlBrowser.SqlBrowserPrivateConfig.ConfigStaticProperties(SqlBrowserPublicConfig publicConfigSqlBrowser)
(01) 2015-08-05 23:19:19 Slp:         at Microsoft.SqlServer.Configuration.SqlBrowser.SqlBrowserPrivateConfig.ExecConfigNonRC(SqlBrowserPublicConfig publicConfigSqlBrowser)
(01) 2015-08-05 23:19:19 Slp:         at Microsoft.SqlServer.Configuration.SqlBrowser.SqlBrowserPrivateConfig.SelectAndExecTiming(ConfigActionTiming timing, Dictionary`2 actionData, PublicConfigurationBase spcbPublicConfig)
(01) 2015-08-05 23:19:19 Slp:         at Microsoft.SqlServer.Configuration.SqlBrowser.SqlBrowserPrivateConfigBase.ExecWithRetry(ConfigActionTiming timing, Dictionary`2 actionData, PublicConfigurationBase spcbPublicConfig)
(01) 2015-08-05 23:19:19 Slp:         at Microsoft.SqlServer.Configuration.SqlBrowser.SqlBrowserPrivateConfig.Install(ConfigActionTiming timing, Dictionary`2 actionData, PublicConfigurationBase spcbPublicConfig)
(01) 2015-08-05 23:19:19 Slp:         at Microsoft.SqlServer.Configuration.SqlConfigBase.SlpConfigAction.ExecuteAction(String actionId)
(01) 2015-08-05 23:19:19 Slp:         at Microsoft.SqlServer.Configuration.SqlConfigBase.SlpConfigAction.Execute(String actionId, TextWriter errorStream)
(01) 2015-08-05 23:19:19 Slp:     Inner exception type: System.UnauthorizedAccessException
(01) 2015-08-05 23:19:19 Slp:         Message:
(01) 2015-08-05 23:19:19 Slp:                 Attempted to perform an unauthorized operation.
(01) 2015-08-05 23:19:19 Slp:         HResult : 0x80070005
(01) 2015-08-05 23:19:19 Slp:         Stack:
(01) 2015-08-05 23:19:19 Slp:                 at System.Security.AccessControl.Win32.GetSecurityInfo(ResourceType resourceType, String name, SafeHandle handle, AccessControlSections accessControlSections, RawSecurityDescriptor& resultSd)
(01) 2015-08-05 23:19:19 Slp:                 at System.Security.AccessControl.NativeObjectSecurity.CreateInternal(ResourceType resourceType, Boolean isContainer, String name, SafeHandle handle, AccessControlSections includeSections, Boolean createByName, ExceptionFromErrorCode exceptionFromErrorCode, Object exceptionContext)
(01) 2015-08-05 23:19:19 Slp:                 at Microsoft.SqlServer.Configuration.Sco.SqlRegistrySecurity..ctor(ResourceType resourceType, SafeRegistryHandle handle, AccessControlSections includeSections)
(01) 2015-08-05 23:19:19 Slp:                 at Microsoft.SqlServer.Configuration.Sco.SqlRegistrySecurity.Create(InternalRegistryKey key)
(01) 2015-08-05 23:19:19 Slp:                 at Microsoft.SqlServer.Configuration.Sco.InternalRegistryKey.SetSecurityDescriptor(String sddl, Boolean overwrite)
(01) 2015-08-05 23:19:19 Slp: Watson Bucket 2
 Original Parameter Values

(01) 2015-08-05 23:19:19 Slp: Parameter 0 : SQL Server 2014@RTM@

(01) 2015-08-05 23:19:19 Slp: Parameter 1 : Microsoft.SqlServer.Configuration.Sco.InternalRegistryKey.SetSecurityDescriptor

(01) 2015-08-05 23:19:19 Slp: Parameter 2 : System.Security.AccessControl.Win32.GetSecurityInfo

(01) 2015-08-05 23:19:19 Slp: Parameter 3 : Microsoft.SqlServer.Configuration.Sco.ScoException@1211@1

(01) 2015-08-05 23:19:19 Slp: Parameter 4 : System.UnauthorizedAccessException@-2147024891

(01) 2015-08-05 23:19:19 Slp: Parameter 5 : SqlBrowserConfigAction_install_ConfigNonRC

(01) 2015-08-05 23:19:19 Slp: Parameter 6 : INSTALL@CONFIGNONRC@SQL_BROWSER_REDIST

(01) 2015-08-05 23:19:19 Slp: Parameter 7 : Microsoft SQL Server

(01) 2015-08-05 23:19:19 Slp: Parameter 8 : Microsoft SQL Server

(01) 2015-08-05 23:19:19 Slp:
 Final Parameter Values

(01) 2015-08-05 23:19:19 Slp: Parameter 0 : SQL Server 2014@RTM@

(01) 2015-08-05 23:19:19 Slp: Parameter 1 : 0xF18EC0FC

(01) 2015-08-05 23:19:19 Slp: Parameter 2 : 0x88792597

(01) 2015-08-05 23:19:19 Slp: Parameter 3 : 0xD3BEBD98@1211@1

(01) 2015-08-05 23:19:19 Slp: Parameter 4 : 0xBB814387

(01) 2015-08-05 23:19:19 Slp: Parameter 5 : SqlBrowserConfigAction_install_ConfigNonRC

(01) 2015-08-05 23:19:19 Slp: Parameter 6 : 0x38FF7D50

(01) 2015-08-05 23:19:19 Slp: Parameter 7 : 0xA08E07CB

(01) 2015-08-05 23:19:19 Slp: Parameter 8 : 0xA08E07CB
My account has admin rights and the setup was executed with the admin rights.
-
I get same issue, but when I install SQL Management Studio I am able to get this from the installation log.
[2894:2BBC][2015-08-06T13:06:56]i325: Registering dependency: {7061c100-4d31-408d-87c7-906fe2d7325f} on package provider: {8F72E2D4-1E48-4534-8DB8-1E8E012899C6}, package: SqlSupport_KatmaiRTM
[2894:2BBC][2015-08-06T13:06:56]i323: Registering package dependency provider: {3A9BC09C-3726-48DB-9CE2-7A22AE890371}, version: 13.0.400.91, package: sql_common_core
[2894:2BBC][2015-08-06T13:06:56]i301: Applying execute package: sql_common_core, action: Install, path: C:ProgramDataPackage Cache{3A9BC09C-3726-48DB-9CE2-7A22AE890371}v13.0.400.91sql_common_core_msisql_common_core.msi, arguments: ‘ MSIFASTINSTALL=»7″
AddLocal=»Client_Components_CNS,CommonFiles,Connectivity_CNS»‘
[2894:2BBC][2015-08-06T13:07:02]e000: Error 0x80070643: Failed to install MSI package.
[2894:2BBC][2015-08-06T13:07:02]e000: Error 0x80070643: Failed to execute MSI package.
[2470:3660][2015-08-06T13:07:02]e000: Error 0x80070643: Failed to configure per-machine MSI package.
[2470:3660][2015-08-06T13:07:02]i319: Applied execute package: sql_common_core, result: 0x80070643, restart: None
[2470:3660][2015-08-06T13:07:02]e000: Error 0x80070643: Failed to execute MSI package.
[2894:2BBC][2015-08-06T13:07:02]i318: Skipped rollback of package: sql_common_core, action: Uninstall, already: AbsentI have tried as Admin, different installers etc. but always stops during installation. Using Windows 10, was OK when using 8.1 ?
-
Hello,
Did you upgraded to Windows 10 having SQL Server 2005 installed on that computer? There seems to be some remnants of a
SQL Server 2005 installation and SQL Server 2014 is having trouble accessing registry keys. Please manually uninstall SQL Server 2005 using the following article and then try to install SQL Server 2014 again.https://support.microsoft.com/en-us/kb/909967
Please make sure the Windows account used to install SQL Server have permissions to access SOFTWAREMicrosoftMicrosoft SQL Server registry key.Hope this helps.
Regards,
Alberto Morillo
SQLCoffee.com-
Edited by
Alberto MorilloMVP
Thursday, August 6, 2015 12:45 PM
-
Edited by
-
This is a new machine, it was running 8.1 until the 29th and during that period I installed SQL Management Studio 14, which installed and ran well. I upgraded to Win 10.0 and had some issues so uninstalled and tried to re-install which is when the problems
occurred.I have never had 2005 on this machine.
I was able to install an old SQL 2008 SQL Management studio which ran OK, I then uninstalled and tried 14 again but no go, I then tried to re-install 2008 Management studio and it refused. It looks like something is getting stuck and not removed when the
app is uninstalled which prevents a re-install ? -
In addition, when I cancel the Landing page hangs up and the only way I can close is using Task Manager, after which Task Manager itself locks !
-
This is exact the same problem with me. I had to reset my pc because of a crash, so it was new before the upgrade. First thing I installed was VS2015 and used the sql server on my server at home. But because the connection is slow (I’m on vacation) I tried
to install the sql server on my laptop. And I have to kill the task manager with process explorer because it likes to lock itself.Microsoft still cannot make their OS bugfree.
-
I started with clean Windows 10 install, and as above SQL Server 2014 Developer x64 hangs during «Initializing
Windows Installer Actions».This happens with both standard and sp1 versions and running as Administrator.
I also tried uninstalling all SQL Server components from my VS2015 install, then logging in using hidden
Administrator account in Windows 10, but SQL Server 2014 install still hangs at same point
«Initializing Windows Installer Actions».
This shows the problem isn’t due to permissions!I can do nothing now until Microsoft come out with a fix for Windows 10 … maybe I will go back to Windows
7 as it actually worked. Windows 10 still seems buggy as I also get boot errors occasionally and then Windows 10 does an automatic repair. It also keeps notifying me that my disk needs checked for error despite the fact I checked it with another tool and it
is fine. Hopefully all the bugs will be fixed soon, as I quite like Windows 10./*
Update 2015/11/29: Just tried running the installer again today … it now appears to be working! Well done Microsoft for finally fixing Windows 10 :=).
*/-
Edited by
NBrus
Sunday, November 29, 2015 11:25 AM
Update
-
Edited by
-
Same problem…
I make a update from Windows 7 to Windows 10 Home.
I did install VS2015 and when y tried to make the SQL Server Express 2014 installetion, same error… the installetion stop in «Initializing Windows Installer Actions» i wait from 12hours (i go to sleep) and nothing happend, freeze it in this point.
HELP PLEASE !
![]() В данной статье подробно рассмотрим процесс установки MS SQL Server 2014 в MS Windows Server 2012 (актуально и для других ОС семейства Windows). В целом процесс мало отличается от установки SQL-сервера 2012 или 2008. Благодаря удобной программе установки необходимо всего лишь идти по шагам мастера, периодически выбирая те или иные параметры. Однако, есть некоторые нюансы. Итак:
В данной статье подробно рассмотрим процесс установки MS SQL Server 2014 в MS Windows Server 2012 (актуально и для других ОС семейства Windows). В целом процесс мало отличается от установки SQL-сервера 2012 или 2008. Благодаря удобной программе установки необходимо всего лишь идти по шагам мастера, периодически выбирая те или иные параметры. Однако, есть некоторые нюансы. Итак:
0. Оглавление
- Что понадобится
- Установка .NET Framework 3.5
- Установка SQL Server 2014
- Настройка Брандмауэра Windows для MS SQL Server 2012
- Администрирование SQL Server 2014
1. Что понадобится
- Компьютер соответствующий минимальным системным требованиям для работы с SQL Server 2014. Подробно о требовании к оборудованию и операционной системе читайте здесь.
- Права локального администратора на компьютере.
- Установочный диск Microsoft SQL Server 2014, или образ диска (скачать можно, например, на официальном сайте, версия Express).
- Действующий ключ продукта (не обязательно) для необходимой редакции MS SQL Server 2014.
2. Установка .NET Framework 3.5
Прежде всего необходимо установить компоненту .NET Framework версии 3.5 с пакетом обновления SP1. О том как это сделать можно прочитать в статьях:
- Установка компоненты .NET Framework 3.5 в Microsoft Windows Server 2012 R2
- Установка компоненты .NET Framework 3.5 в Microsoft Windows Server 2008 R2
Также требуется и компонента .NET Framework 4.0, но она, как правило, уже присутствует в свежеустановленной Windows Server.
3. Установка SQL Server 2014
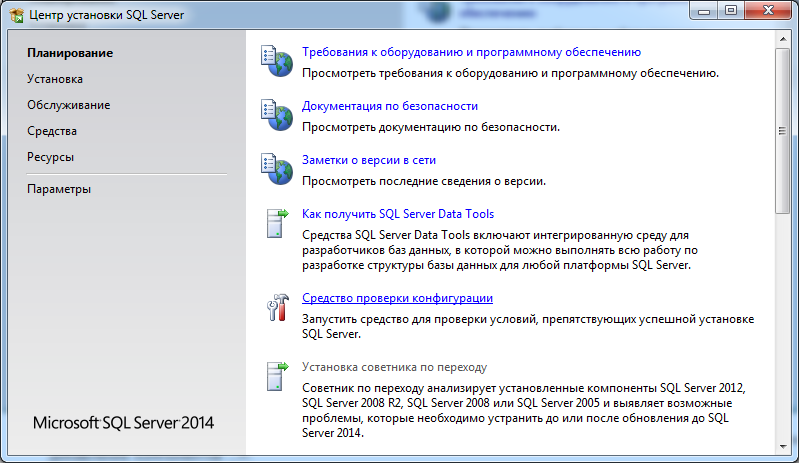
Запускаем файл «setup.exe» с установочного диска.

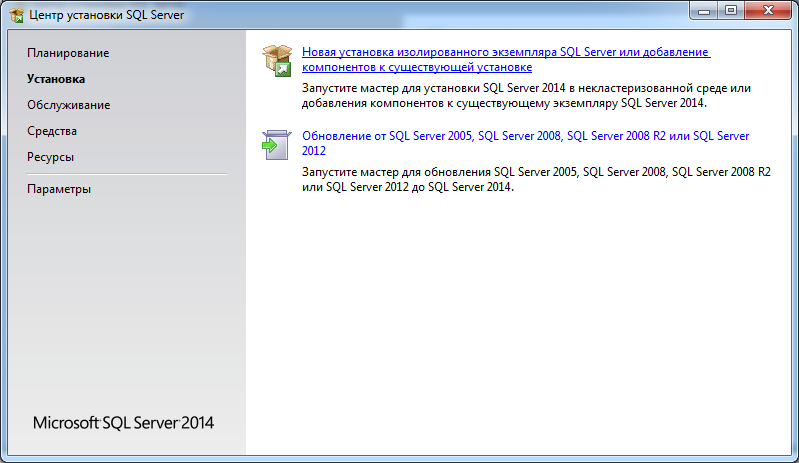
Откроется «Центр установки SQL Server» (SQL Server Installation Center), переходим на вкладку «Установка» (Installation) и нажимаем на «Новая установка изолированного экземпляра SQL Server или добавление компонентов к существующей установке» (New SQL Server stand-alone installation or add features to an existing installation).

Запустится «Программа установки SQL Server 2014» (SQL Server 2014 Setup).
На первом шаге потребуется ввести ключ продукта (если он у вас есть) или выбрать свободный выпуск SQL Server. Это может быть:
- Evaluation Edition — полный набор компонентов, с ограничением использования в 180 дней.
- Express Edition — бесплатная версия с ограниченным функционалом.
В зависимости от введенного ключа, будет выбрана для установки соответствующая данному ключу редакция MS SQL Server 2014.
Ключ продукта можно будет ввести в любое время, после установки SQL Server. О том как это сделать читайте в статье Изменение версии или ввод ключа Microsoft SQL Server 2012.
После выбора параметров нажимаем «Далее» (Next).

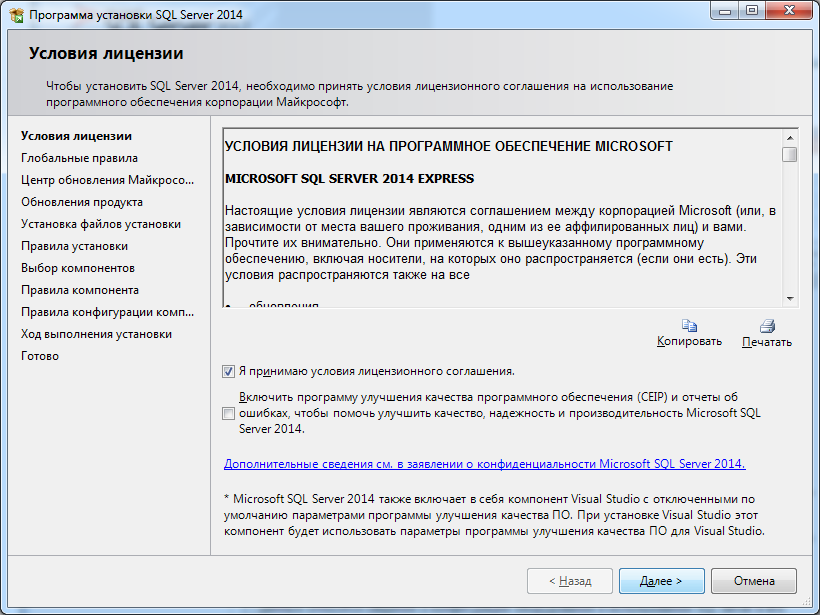
Затем принимаем условия лицензионного соглашения, соглашаемся (или нет) на передачу данных об использовании компонентов в корпорацию Microsoft. Жмем «Далее» (Next).

Убеждаемся что нет проблем, которые могут возникнуть во время установки и, если все ОК, нажмем «Далее» (Next). Если все же имеются какие-либо проблемы, необходимо устранить их и повторить процедуру проверки нажав кнопку «Включить заново» (Re-run).

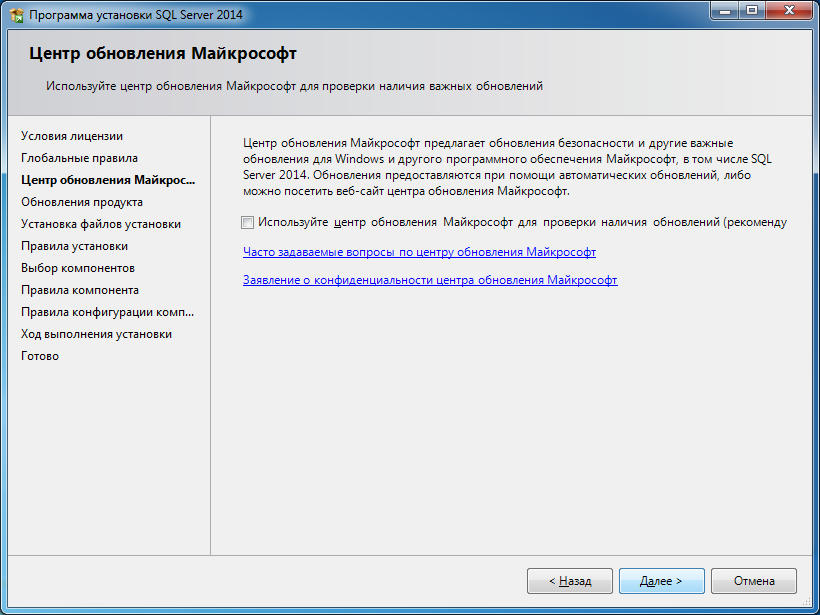
На следующем шаге предлагается проверить наличие обновлений программы установки с помощью центра обновления Майкрософт. Для этого устанавливаем флаг «Используете цент обновления Майкрософт для проверки наличия обновлений (рекомендуется)» и нажимаем «Далее» ().

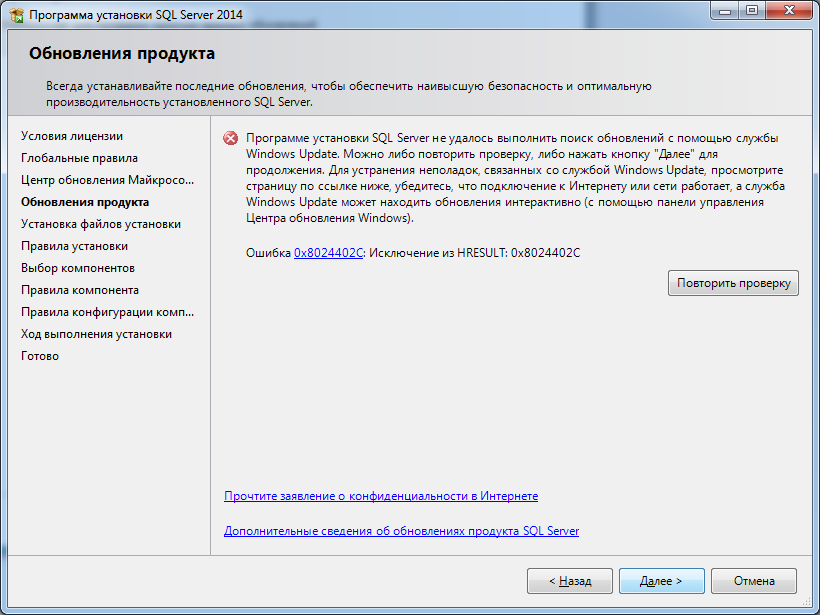
После скачивания обновлений и установки файлов установки, переходим непосредственно к самой установке MS SQL Server 2014. Снова запускается проверка необходимых требований. Обратим внимание на предупреждение программы о том, что Брандмауэр Windows включен. Позже мы еще вернемся к этому вопросу. Если все требования выполнены, нажимаем «Далее» (Next), в противном случае добиваемся выполнения всех правил и запускаем проверку снова с помощью кнопки «Включить заново» (Re-run).

Вариант установки выбираем «Установка компонентов SQL Server» (SQL Server Feature Installaion) и нажимаем «Далее» (Next).

Теперь необходимо выбрать компоненты для установки. Для большинства случаев (например для работы и администрирования кластера серверов 1С:Предприятие), вполне достаточно установки компонент:
- Службы компонента Database Engine (Database Engine Services)
— непосредственно самой службы MS SQL Server
- Средства управления — основные (Management Tools — Basic)
- Средства управления — полный набор (Management Tools — Complete)
— и программы «Среда SQL Server Management Studio» для администрирования SQL Server
Все компоненты всегда можно доставить / удалить, просто снова запустив установку SQL Server. Выбрав необходимые компоненты, нажимаем «Далее» (Next).

В очередной раз запускается проверка требований для установки выбранных на предыдущем шаге компонент (набор требований зависит от устанавливаемых компонент). Например, если заранее не установить платформу Microsoft .NET Framework 3.5, то увидите соответствующую ошибку. Запуск проверки снова осуществляется с помощью кнопки «Включить заново» (Re-run). После удовлетворения всех требований нажимаем «Далее» (Next).

Теперь необходимо ввести имя именованного экземпляра SQL Server или оставить имя экземпляра по умолчанию. На одном изолированном сервере возможно устанавливать до 50 именованных экземпляров MS SQL Server 2014 и до 25 в отказоустойчивом кластере при использовании общего диска кластера (ссылка). Экземпляр по умолчанию (идентификатор MSSQLSERVER) может быть только один. Определившись с именем (Named instance) и идентификатором (Instance ID) экземпляра SQL Server или выбрав экземпляр по умолчанию нажимаем «Далее» (Next).

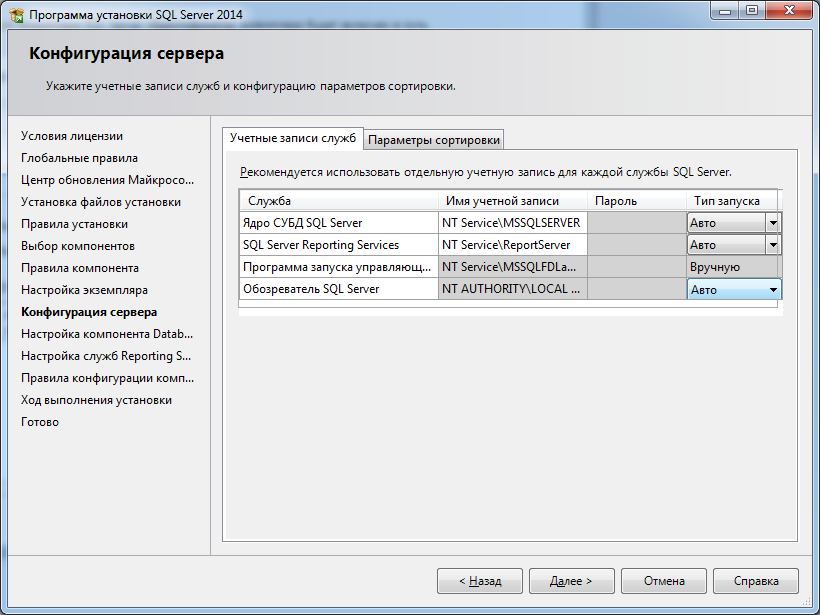
Теперь выберем режим запуска служб SQL Server. Здесь можно задать учетную запись Windows из под которой будут запускаться различные службы SQL Server, выбрав ее в столбце «Имя учетной записи» (Account name) и введя пароль для этой учетной записи в столбце «Пароль» (Password) напротив соответствующей службы.
В некоторых случаях (например, при необходимости обращения к сетевым ресурсам) есть смысл запускать Агента SQL (SQL Server Agent) из под доменной учетной записи.

Рекомендую также поменять параметр запуска Агента SQL Server (SQL Server Agent) на «Авто» (Automatic) (для того чтобы отрабатывали регламентированные задания агента SQL). Далее перейдем на вкладку «Параметры сортировки» (Collation).

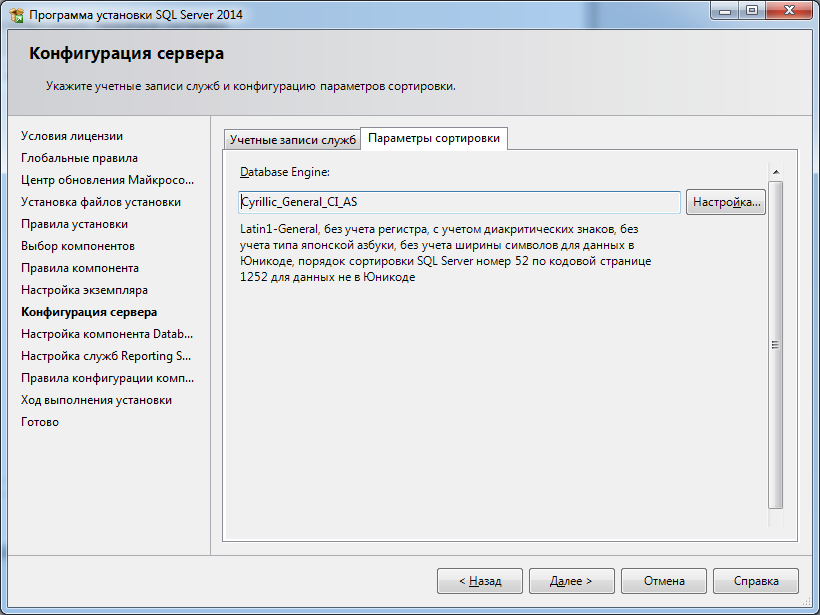
Здесь необходимо определиться с параметрами сортировки баз данных по умолчанию.
Для большинства программ, которые будут работать с SQL сервером (например для систем 1С:Предприятие) достаточно выбрать «Cyrillic_General_CI_AS».
Указав параметры сортировки нажимаем «Далее» (Next).

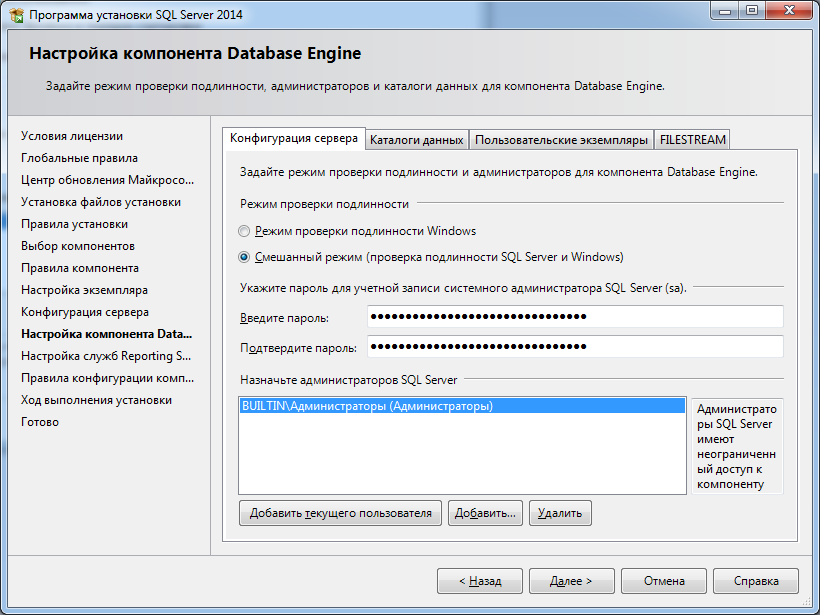
Теперь следует выбрать режим проверки подлинности (Authentication Mode). В зависимости от способа подключения к SQL Server можно выбрать «Режим проверки подлинности Windows» (Windows authentication mode) или «Смешанный режим» (Mixed Mode) — в этом случае будут использоваться оба режима.
В случае выбора «Смешанного режима» (Mixed Mode) потребуется вести пароль на встроенную учетную запись «sa».
Здесь же сразу можно добавить администраторов SQL Server из числа имеющихся пользователей домена или локального компьютера с помощью кнопок «Добавить текущего пользователя» (Add Current User) и «Добавить…» (Add..).
Для того, чтобы позже не забыть введенный при установке пароль, рекомендую использоваться специальные менеджеры паролей, например бесплатную программу KeePass.
Установив все параметры переходим на вкладку «Каталоги данных» (Data Directories).

Здесь можно выбрать каталог хранения баз данных (Data root directory). Для большинства случаев рекомендуется придерживаться следующих правил:
- Если в конфигурации сервера присутствует RAID-массив из жестких дисков (что крайне рекомендуется для сервера баз данных), разумно расположить файлы данных именно на нем.
- Для увеличения производительности рекомендуется разнести файлы баз данных и файлы журналов баз данных на разные диски (если есть такая возможность).
- Каталог системной базы данных temp и каталог журналов базы temp желательно вынести на быстрый SSD диск, это даст ощутимый прирост производительности SQL Server.
- Есть также смысл изменить каталог резервного копирования, выбрав физический диск, отличный от диска с файлами баз данных.
Указав необходимые пути, переходим на вкладку «FILESTREAM».

Если на данном SQL-сервере в будущем планируется хранить неструктурированные данные, например большие документы, изображения, видеофайлы и пр., и для хранения таких файлов будет использоваться хранилище FILESTREAM, то необходимо также настроить соответствующие параметры на данной вкладке. В противном случае, оставляем настройки без изменений и нажимаем «Далее» (Next).

В очередной раз убеждаемся что процесс установки не будет заблокирован, исправляем ошибки, если они имеют место быть, и нажимаем «Далее» (Next).

Проверяем все введенные на предыдущих шагах параметры. Обратим внимание, что значение всех введенных параметров будет сохранено в файле конфигурации ConfigurationFile.ini. При повторной установке SQL Server данный файл можно указать в качестве параметра для программы установки, в этом случае установка SQL Server пройдет в автоматическом режиме, а настройки будут взяты из конфигурационного файла. Данный способ можно использовать, если необходимо быстро установить несколько экземпляров SQL Server с одинаковыми параметрами, или для «бэкапа» параметров принятых во время установки текущего экземпляра.
Нажимаем «Установить» (Install), для запуска процесса установки SQL Server.

Дожидаемся окончания установки, убеждаемся, что все компоненты установлены успешно и завершаем работу мастера нажав на кнопку «Закрыть» (Close).

Установка Microsoft SQL Server 2014 завершена.
4. Настройка Брандмауэра Windows для MS SQL Server 2012
Как уже было замечено выше, если предполагается работа с SQL сервером программ, расположенных на других компьютерах в сети, то на самом сервере, где запущена служба SQL Server необходимо настроить Брандмауэр Windows для работы SQL Server. Подробно об этом можно прочитать здесь.
5. Администрирование Microsoft SQL Server 2014
Для администрирования (добавления баз данных, пользователей и пр.) используется программа «SQL Server Management Studio». В Microsoft Windows Server 2012 R2 данную программу можно найти в списке всех программ.

В Microsoft Windows Server 2008 R2 в меню «Пуск» (Start) — «Microsoft SQL Server 2014» — «Среда SQL Server Management Studio».

Для подключения к службе Database Engine SQL Server в поле «Имя сервера» (Server name) указываем строку соединения ь в формате:
- <АдресСервера> — имя или IP адрес сервера для экземпляра по умолчанию
- <АдресСервера><ИмяЭкземпляра> — для именованного экземпляра SQL Server
- <ИмяПсевдонима> — если применяются псевдонимы SQL Server
В случае проверки подлинности Windows (Windows Authentication), используются данные текущей учетной записи Windows.
Выбираем режим проверки подлинности. Для проверки подлинности SQL Sever указываем имя пользователя и пароль (пользователь по умолчанию — sa, пароль задавался при установке SQL Server). Нажимаем «Соединить» (Connect).

Среда SQL Server Management Studio — основная среда для разработки и администрирования SQL Server.
