Пока некоторые читатели (да что уж там, и писатели — например, я) наслаждались в отпуске теплыми летними денечками, известный автор нашего англоязычного блога Адам Бертрам подготовил краткий обзор Windows Storage Spaces. В него он включил, в частности, сведения о настройке Windows Storage Spaces на популярных конфигурациях. Перевод его статьи я и предлагаю вашему вниманию.
Во многих дата-центрах и серверных фермах для хранения данных используются HDD и SSD. Статистика, однако, сообщает о том, что после трёх лет работы 10% дисков становятся негодными.
Конечно, те организации, которые заботятся о целостности и сохранности своих данных, держат руку на пульсе, а также отслеживают и другие факторы риска — будь то человеческий фактор, железо или софт. И тут тем, кто работает с Windows-инфраструктурой, могут помочь Windows Storage Spaces. Ведь их RAID-подобная функциональность (то, что мы видим в File Explorer как виртуальные диски) весьма полезна в деле обеспечения резерва мощностей хранения.

Гибкие возможности масштабирования тоже привлекательны: можно объединить 3 и более драйвов в единый сторадж-пул и затем формировать на его основе “стораджики” нужного размера. А поскольку при работе с пулом формируются и сохраняются дополнительные копии для ваших данных, то проблемы с одним из дисков не приведут к потере всего и вся. А если понадобилось больше места? Просто добавь воды еще дисков в пул.
Storage Spaces для Windows 10
— Он забирается на самую высокую сосну и оттуда планирует.
— Ага, простите, что планирует?
— Он прыгает и планирует.
(“День радио”)
Даже если сценарий развертывания, который вы хотите воплотить, входит в число самых популярных, и инструкция к нему коротка и вроде даже сходу понятна, этап подготовки и планирования все равно никто не отменял. Итак:
Если вы используете дисковые пространства Storage Spaces на машине с Windows 10, то рекомендуется обеспечить наличие минимум 2 дисков помимо системного. Эти диски могут быть как встроенными, так и внешними. Поддерживаются SSD; можно комбинировать SATA, USB и SAS.
Количество дисков рассчитывается исходя из того, какой метод обеспечения отказоустойчивости вы хотите применить. Есть вот такие варианты:
-
Simple (простой) — требует наличия минимум двух дисков. Хоть этот метод и дает хорошую производительность, но ничем вам не поможет в случае отказа. Его можно использовать, например, если вы настраиваете storage space для хранения временных данных (например, файлов видео-рендеринга, файлов-черновиков в графических редакторах, и так далее).
-
Mirror (зеркальный) — позволяет сохранять несколько копий данных на случай отказа. Так, Two-way mirror spaces хранят две копии данных, и с ними вы переживете отказ одного из дисков. Для их организации потребуется минимум два диска. Three-way mirror spaces позволят пережить отказ двух дисков, а для их организации потребуется минимум пять. Зато хранить в таких storage spaces можно самые разнообразные данные.
-
Parity (с контролем четности) — рекомендуется для хранения архивных и стриминговых данных. Хранят несколько копий на случай отказа. Если вы хотите обеспечить отказоустойчивость в случае проблемы с одним диском, то в сценарии с Parity spaces вам понадобится минимум три диска, а на случай проблемы с двумя — минимум семь дисков.
После того, как вы все рассчитали и подготовили, можно организовать собственно Storage Spaces. Для этого в Windows 10 нужно выполнить вот такие шаги:
-
Проверить, что диски, которые вы планируете задействовать, у вас подключены.
Важно! Если вы укажете, что в сторадж-пул хотите включить размеченный диск, имейте в виду, что Windows безвозвратно удалит все разделы и файлы на нём. До начала работы сделайте резервную копию всего, что вам дорого на этом диске!
-
Для простоты в поле поиска в панели задач вводим Storage Spaces и из полученного списка выбираем Storage Spaces.
-
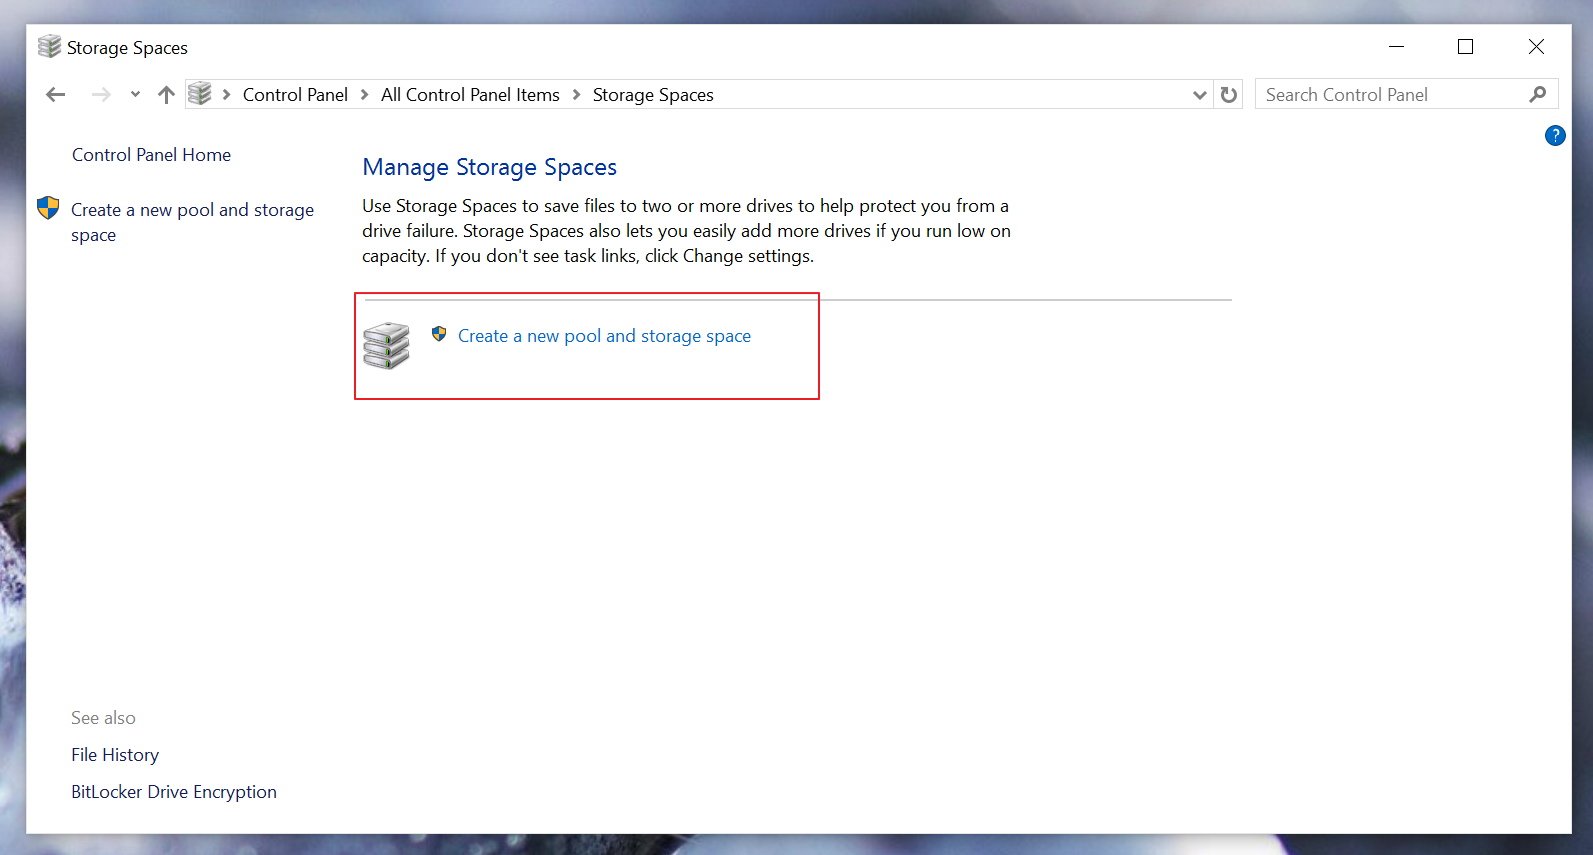
Кликаем Create a new pool and storage space.
-
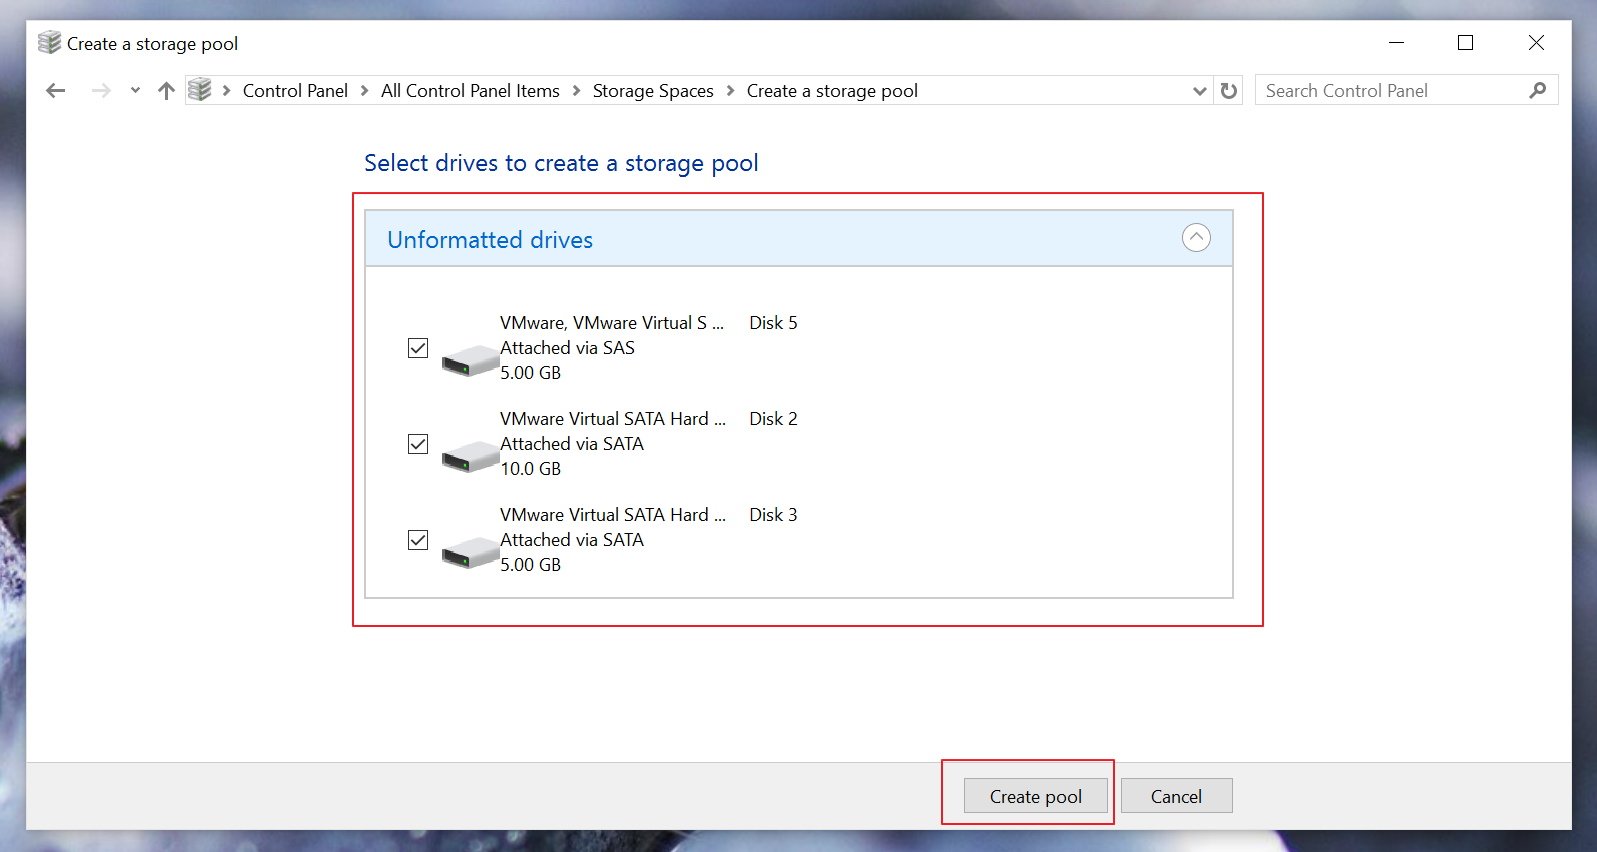
Выберем нужные нам диски и затем кликнем Сreate new storage pool.
-
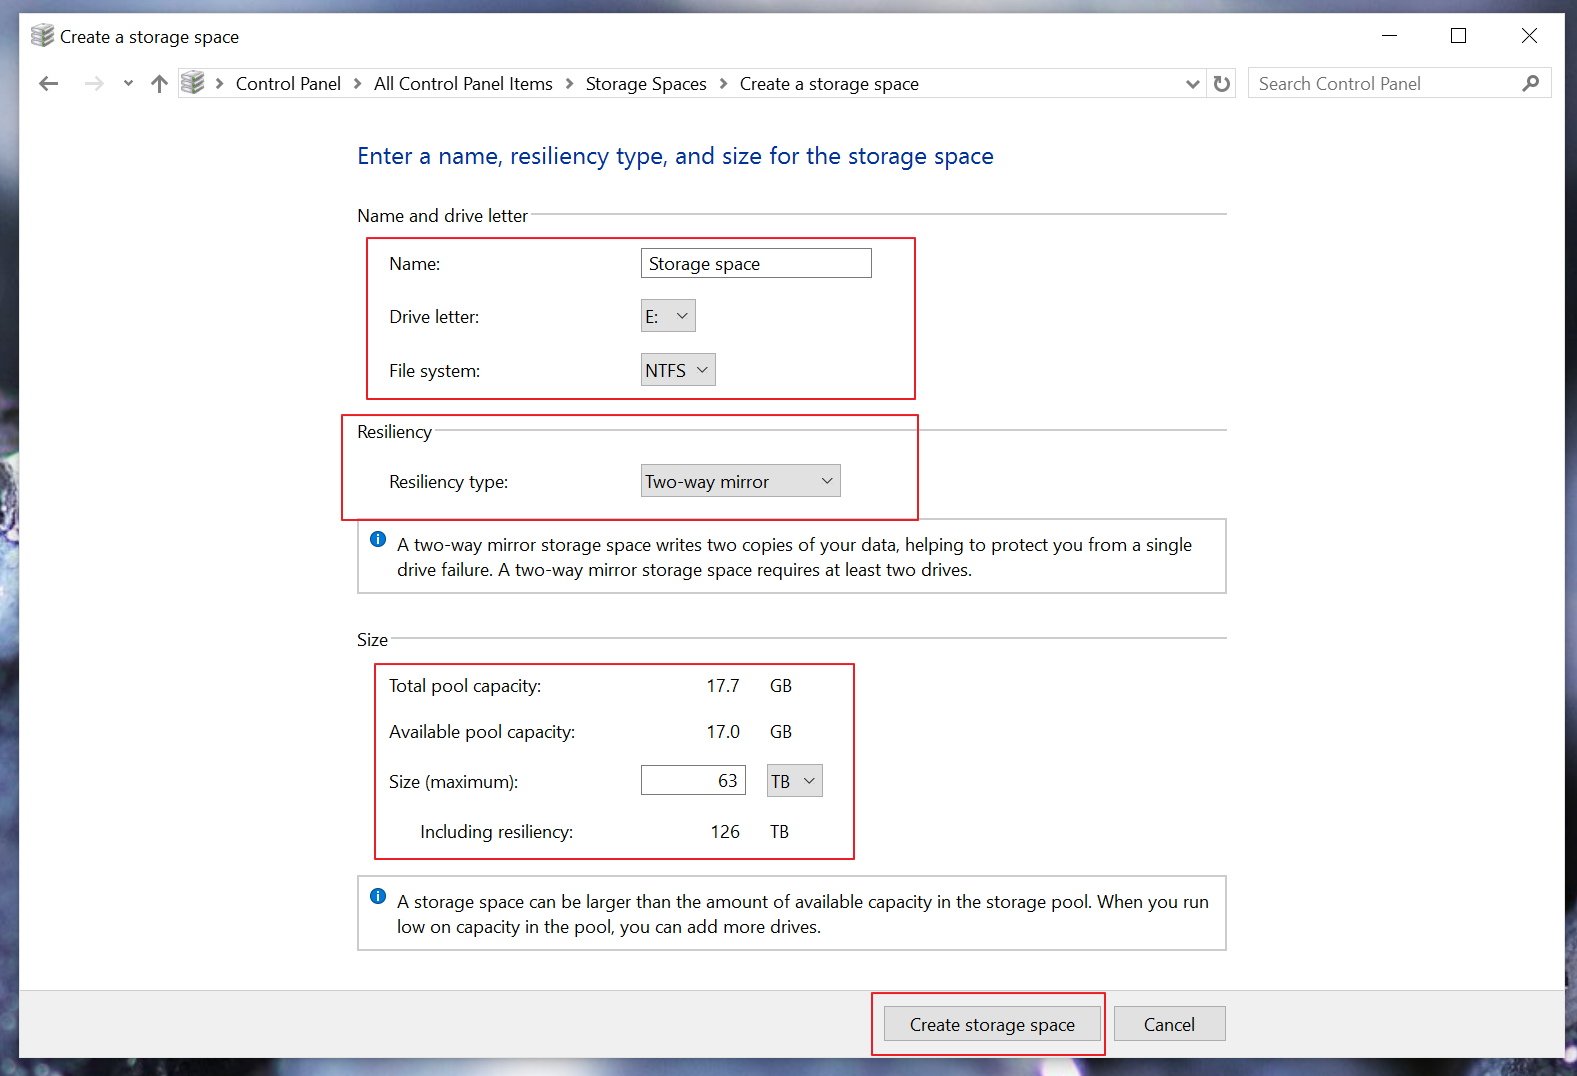
Указываем имя, буквенное обозначение и файловую систему для нового сторадж пула.
-
На случай сбоя рекомендуется выбрать метод обеспечения отказоустойчивости (Resiliency) как одну из следующих опций: Two-way mirror, Three-way mirror или Parity.
Важно! Помните про количество дисков, которые потребуются в каждом из указанных вариантов, о чем мы говорили выше. Если, допустим, вы предпочтете Two-way mirror, то для нового storage space будет создаваться две копии данных. Так что для такого сценария понадобится минимум два диска (помимо системного).
-
Затем задайте максимальный размер стораджа для Storage Spaces.
Примечание: Можно указать значение, превышающее размер сторадж-пула — когда место будет заканчиваться, вы просто добавите еще один диск.
-
Когда с настройками покончено, нажимаем Create storage space.
Оптимизация работы
Рекомендуется своевременно оптимизировать работу с дисками. Вот что советует делать Microsoft:
При добавлении новых дисков в существующий пул рекомендуется оптимизировать использование диска. При этом некоторые данные будут перемещены на новый диск, чтобы оптимизировать использование емкости пула. Это стандартное действие при добавлении нового диска в обновленный пул в Windows 10: флажок Optimize to spread existing data across all drives будет установлен по умолчанию.
Однако если вы сняли этот флажок или добавили диски до обновления пула, вам нужно вручную оптимизировать использование диска. Для этого в поле поиска на панели задач введите Storage Spaces, выберите Storage Spaces из списка результатов поиска, а затем щелкните Optimize drive usage.
Автономный сервер
Если у вас один отдельно взятый сервер, то для настройки на нем дисковых пространств Storage Spaces есть подробная инструкция от Microsoft, на русском языке и даже с картинкой. Storage Spaces поддерживаются для Windows Server 2019, Windows Server 2016, Windows Server 2012 R2 и Windows Server 2012.
Обратите внимание: до начала настройки нужно обеспечить наличие одного или нескольких пулов, а также проверить конфигурацию на соответствие ряду требований (они перечислены в разделе «Предварительные условия»).
На базе сторадж-пула можно создать несколько виртуальных дисков. (Windows идентифицирует их как обычные диски, которые могут быть отформатированы.)
Для их создания можно использовать File and Storage Services; в настройках можно указать thin provisioning либо fixed provisioning, а также размер. Дополнительные настройки можно задать с помощью команд PowerShell.
Кластеры и Storage Spaces Direct
Если вы работаете с кластером и используете для каждой его ноды СХД с прямым подключением (DAS), то Storage Spaces Direct могут оказаться вполне разумным и эффективным вариантом по сравнению с NAS и SAN. Storage Spaces Direct отличаются хорошей масштабируемостью и возможностями управления. Технология Storage Spaces работает наряду с кэшированием, RDMA и поддержкой СХД для разных уровней (tiers). Помимо этого, поддерживаются диски NVMe.
Storage Spaces Direct поддерживаются для Windows Server 2019 Datacenter, 2016 Datacenter и Insider Preview Builds. Можно создать конвергентное или гипер-конвергентное пространство.
Вкратце, основные этапы развертывания Storage Spaces Direct — это:
-
Развертывание Windows Server — установка и настройка ОС, добавление доменных учеток, настройка ролей и необходимых фич.
-
Настройка сети (этот этап не относится к сценарию развертывания Storage Spaces Direct на виртуальных машинах).
-
Конфигурация собственно Storage Spaces Direct — очистка дисков и разделов, настройка кластеров, настройка Storage Spaces Direct, создание томов, развертывание необходимых виртуальных машин.
-
Для конвергентной инфраструктуры — развертывание масштабируемых файловых серверов, настройка ролей, создание шар, настройка ограниченного делегирования Kerberos.
Все эти этапы очень подробно описаны здесь (на русском языке).
Возможен сценарий, при котором все физические диски содержатся в enclosures с общим доступом — это т.н. JBOD enclosure. Такая инфраструктура должна соответствовать требованиям Windows Certification, а также включать в себя идентичные SAS HBA (имеющие сертификацию Storage Spaces). Такие диски в кластере не должны иметь встроенную функциональность RAID.
Storage Spaces vs. RAID
Как водится, у Windows Storage Spaces и RAID есть свои преимущества и свои недостатки. Об этом уже написана не одна сотня строк (например, здесь). Вкратце:
-
У RAID есть два аспекта: аппаратный и программный — а Windows Storage Spaces, так сказать, является software-driven, настраивается целиком через графический интерфейс или командную строку.
-
Для программных RAID, как и для Storage Spaces отсутствуют ограничения по числу сокетов (у традиционных RAID они есть).
-
ОС по-разному “видит” диски в RAID и в Storage Spaces — диски RAID предстают как цельный юнит (даже если у физических дисков разная емкость), что может приводить к неоптимальному использованию свободного пространства. Для Storage Spaces такой проблемы нет, так как есть доступ к отдельным дискам.
-
Если говорить о производительности, то RAID 0 превосходит Storage Spaces с режимом simple mode примерно вдвое. Однако на скоростях 4K они уже сравнимы. RAID 1 быстрее выполняет последовательные операции чтения, зато Storage Spaces в режиме two-way mirror mode вдвое быстрее выполняет операции записи, нежели RAID 1. Что касается hardware RAID, то операции чтения и записи для них гораздо быстрее, чем Storage Spaces в режиме parity mode.
Ссылки
Общие сведения о дисковых пространствах Storage Spaces
Развертывание Storage Space Direct
Дисковые пространства в Windows 10
Кейс о развертывании Storage Space Direct компанией-провайдером Veeam
Microsoft Storage Spaces Controller SCSI & RAID Devices Drivers
![]()
Special offer. See more information about Outbyte and unistall instrustions. Please review Outbyte EULA and Privacy Policy
Windows XP, XP 64-bit, Vista, Vista 64-bit, 7, 7 64-bit, 11, 10, 8, 8.1
Microsoft Storage Spaces Controller Windows drivers were collected from official vendor’s websites and trusted sources. This software will let you to fix Microsoft Storage Spaces Controller or Microsoft Storage Spaces Controller errors and make your stuff work. Here you can download all latest versions of Microsoft Storage Spaces Controller drivers for Windows devices with Windows 11, 10, 8.1, 8, and 7 (32-bit/64-bit). You can download all drivers for free. We check all files and test them with antivirus software, so it’s 100% safe to download. Get the latest WHQL certified drivers that works well.
This page is available in other languages:
Deutsch |
Español |
Italiano |
Français |
Indonesia |
Nederlands |
Nynorsk |
Português |
Русский |
Українська |
Türkçe |
Malay |
Dansk |
Polski |
Română |
Suomi |
Svenska |
Tiếng việt |
Čeština |
العربية |
ไทย |
日本語 |
简体中文 |
한국어
Storage Spaces helps protect your data from drive failures and extend storage over time as you add drives to your PC. You can use Storage Spaces to group two or more drives together in a storage pool and then use capacity from that pool to create virtual drives called storage spaces. These storage spaces typically store two copies of your data so if one of your drives fails, you still have an intact copy of your data. If you run low on capacity, just add more drives to the storage pool.
You need at least two extra drives (in addition to the drive where Windows is installed). These drives can be internal or external hard drives, or solid state drives. You can use a variety of types of drives with Storage Spaces, including USB, SATA, and SAS drives.
-
Add or connect the drives that you want to group together with Storage Spaces.
-
Go to the taskbar, type Storage Spaces in the search box, and select Storage Spaces from the list of search results.
-
Select Create a new pool and storage space.
-
Select the drives you want to add to the new storage space, and then select Create pool.
-
Give the drive a name and letter, and then choose a layout. Two-way mirror, Three-way mirror, and Parity can help protect the files in the storage space from drive failure.
-
Enter the maximum size the storage space can reach, and then select Create storage space.
-
Simple spaces are designed for increased performance, but don’t protect your files from drive failure. They’re best for temporary data (such as video rendering files), image editor scratch files, and intermediary compiler object files. Simple spaces require at least two drives to be useful.
-
Mirror spaces are designed for increased performance and protect your files from drive failure by keeping multiple copies. Two-way mirror spaces make two copies of your files and can tolerate one drive failure, while three-way mirror spaces can tolerate two drive failures. Mirror spaces are good for storing a broad range of data, from a general-purpose file share to a VHD library. When a mirror space is formatted with the Resilient File System (ReFS), Windows will automatically maintain your data integrity, which makes your files even more resilient to drive failure. Two-way mirror spaces require at least two drives, and three-way mirror spaces require at least five.
-
Parity spaces are designed for storage efficiency and protect your files from drive failure by keeping multiple copies. Parity spaces are best for archival data and streaming media, like music and videos. This storage layout requires at least three drives to protect you from a single drive failure and at least seven drives to protect you from two drive failures.
After you upgrade to Windows, we recommend that you upgrade your existing pools. With an upgraded pool, you can optimize drive usage and remove drives from pools without affecting the pool’s protection from drive failure.
Note: Upgraded pools aren’t compatible with previous versions of Windows.
When you add new drives to an existing pool, it’s a good idea to optimize drive usage. This will move some of your data to the newly added drive to make the best use of the pool’s capacity. It’ll happen by default when you add a new drive to an upgraded pool in Windows you’ll see a check box for Optimize to spread existing data across all drives selected when you add the drive. However, if you cleared that check box or added drives before upgrading a pool, you’ll need to manually optimize drive usage. To do so, type Storage Spaces in the search box on the taskbar, select Storage Spaces from the list of search results, and then select Optimize drive usage.
If you created a pool in Windows or upgraded an existing pool, you’ll be able to remove a drive from it. The data stored on that drive will be moved to other drives in the pool, and you’ll be free to use the drive for something else.
-
Go to the taskbar, type Storage Spaces in the search box, and select Storage Spaces from the list of search results.
-
Select Change settings > Physical drives to see all the drives in your pool.
-
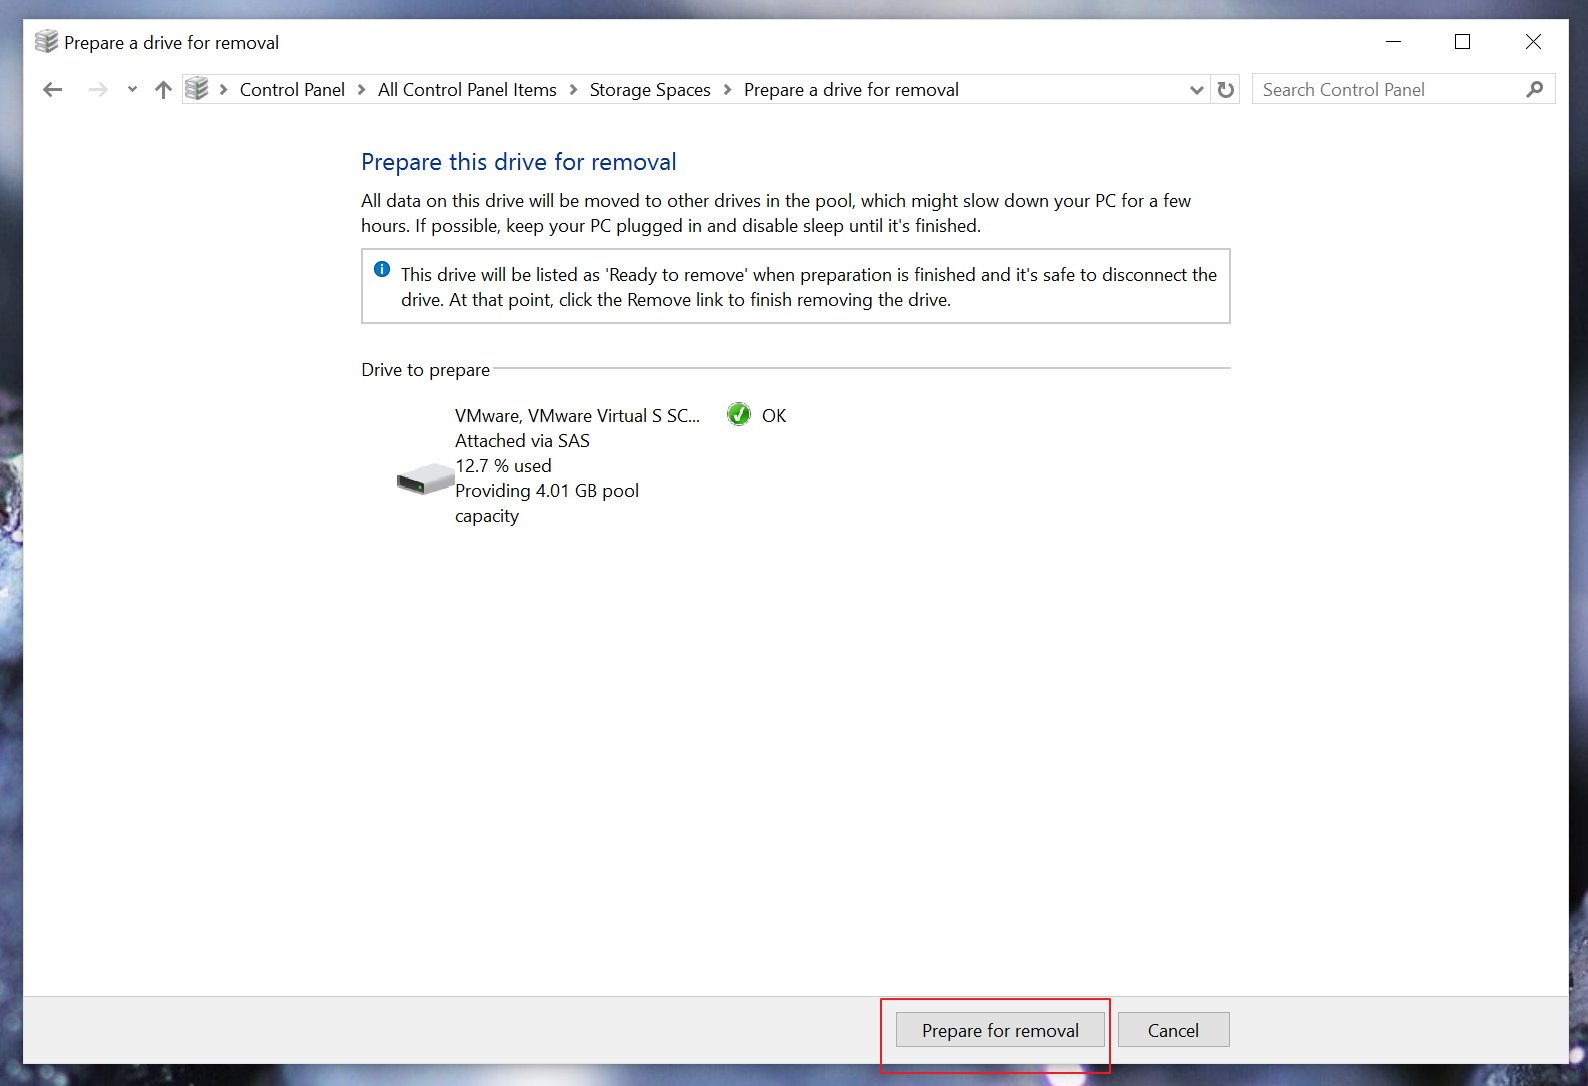
Find the drive you want to remove and select Prepare for removal > Prepare for removal. Leave your PC plugged in until the drive is ready to be removed. This could take several hours, depending on how much data you have stored there.
-
(Optional) To speed up drive preparation, prevent your PC from going to sleep. Select Start > Settings > System > Power & battery > Screen and sleep. Next to When plugged in, put my device to sleep after select Never.
-
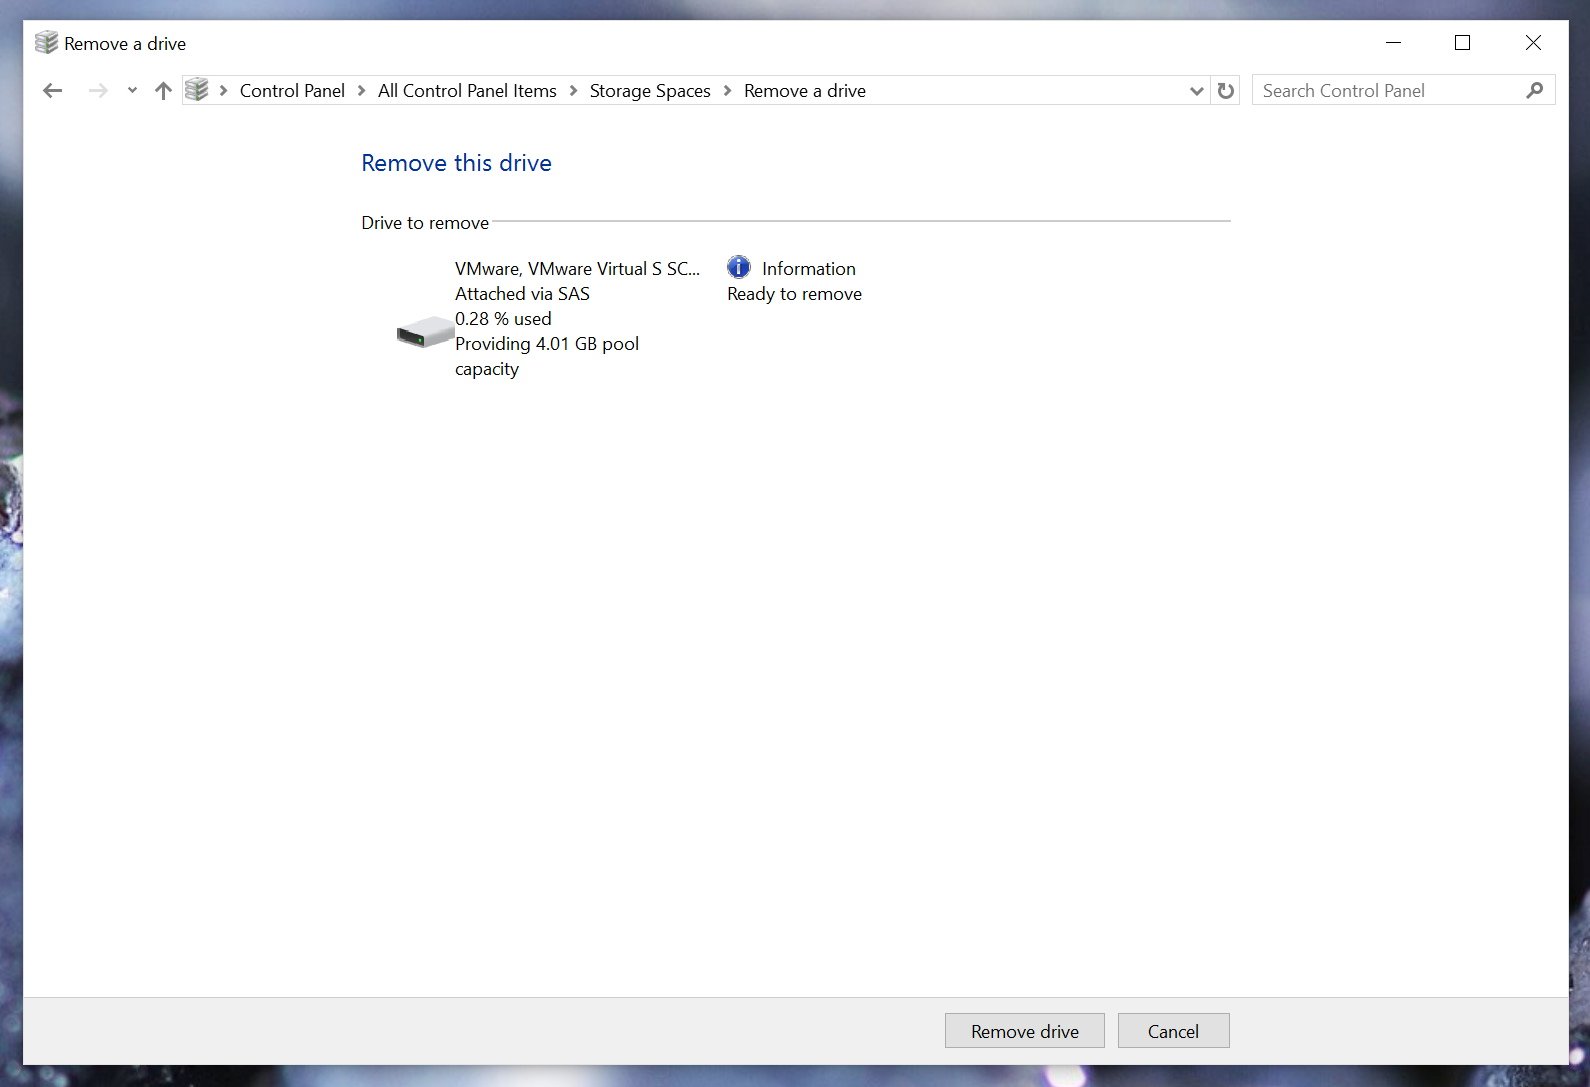
When the drive is listed as Ready to remove, select Remove > Remove drive. Now, you can disconnect the drive from your PC.
Note: If you run into problems when you try to prepare the drive for removal, it might be because you don’t have enough free space in the pool to store all the data from the drive you want to remove. Try adding a new drive to the pool that’s as large as the drive you plan to remove and then try again.
Storage Spaces helps protect your data from drive failures and extend storage over time as you add drives to your PC. You can use Storage Spaces to group two or more drives together in a storage pool and then use capacity from that pool to create virtual drives called storage spaces. These storage spaces typically store two copies of your data so if one of your drives fails, you still have an intact copy of your data. If you run low on capacity, just add more drives to the storage pool.
You need at least two extra drives (in addition to the drive where Windows is installed). These drives can be internal or external hard drives, or solid state drives. You can use a variety of types of drives with Storage Spaces, including USB, SATA, and SAS drives.
-
Add or connect the drives that you want to group together with Storage Spaces.
-
Go to the taskbar, type Storage Spaces in the search box, and select Storage Spaces from the list of search results.
-
Select Create a new pool and storage space.
-
Select the drives you want to add to the new storage space, and then select Create pool.
-
Give the drive a name and letter, and then choose a layout. Two-way mirror, Three-way mirror, and Parity can help protect the files in the storage space from drive failure.
-
Enter the maximum size the storage space can reach, and then select Create storage space.
-
Simple spaces are designed for increased performance, but don’t protect your files from drive failure. They’re best for temporary data (such as video rendering files), image editor scratch files, and intermediary compiler object files. Simple spaces require at least two drives to be useful.
-
Mirror spaces are designed for increased performance and protect your files from drive failure by keeping multiple copies. Two-way mirror spaces make two copies of your files and can tolerate one drive failure, while three-way mirror spaces can tolerate two drive failures. Mirror spaces are good for storing a broad range of data, from a general-purpose file share to a VHD library. When a mirror space is formatted with the Resilient File System (ReFS), Windows will automatically maintain your data integrity, which makes your files even more resilient to drive failure. Two-way mirror spaces require at least two drives, and three-way mirror spaces require at least five.
-
Parity spaces are designed for storage efficiency and protect your files from drive failure by keeping multiple copies. Parity spaces are best for archival data and streaming media, like music and videos. This storage layout requires at least three drives to protect you from a single drive failure and at least seven drives to protect you from two drive failures.
After you upgrade to Windows, we recommend that you upgrade your existing pools. With an upgraded pool, you can optimize drive usage and remove drives from pools without affecting the pool’s protection from drive failure.
Note: Upgraded pools aren’t compatible with previous versions of Windows.
When you add new drives to an existing pool, it’s a good idea to optimize drive usage. This will move some of your data to the newly added drive to make the best use of the pool’s capacity. It’ll happen by default when you add a new drive to an upgraded pool in Windows you’ll see a check box for Optimize to spread existing data across all drives selected when you add the drive. However, if you cleared that check box or added drives before upgrading a pool, you’ll need to manually optimize drive usage. To do so, type Storage Spaces in the search box on the taskbar, select Storage Spaces from the list of search results, and then select Optimize drive usage.
If you created a pool in Windows or upgraded an existing pool, you’ll be able to remove a drive from it. The data stored on that drive will be moved to other drives in the pool, and you’ll be free to use the drive for something else.
-
Go to the taskbar, type Storage Spaces in the search box, and select Storage Spaces from the list of search results.
-
Select Change settings > Physical drives to see all the drives in your pool.
-
Find the drive you want to remove and select Prepare for removal > Prepare for removal. Leave your PC plugged in until the drive is ready to be removed. This could take several hours, depending on how much data you have stored there.
-
(Optional) To speed up drive preparation, prevent your PC from going to sleep. Type Power and sleep in the search box on the taskbar, then select Power & sleep settings. Under When plugged in, PC goes to sleep after, select Never.
-
When the drive is listed as Ready to remove, select Remove > Remove drive. Now, you can disconnect the drive from your PC.
Note: If you run into problems when you try to prepare the drive for removal, it might be because you don’t have enough free space in the pool to store all the data from the drive you want to remove. Try adding a new drive to the pool that’s as large as the drive you plan to remove and then try again.
Need more help?
-
Главная -
Драйверы
-
Контроллеры
-
Контроллеры Microsoft
- Microsoft Storage Spaces Controller

-
Microsoft Storage Spaces Controller
Версия:
6.11.4.100
(05 фев 2019)
Файл *.inf:
cht4sx64.inf
Windows Vista, 7, 8, 8.1, 10
В каталоге нет драйверов для Microsoft Storage Spaces Controller под Windows.
Скачайте DriverHub для автоматического подбора драйвера.
Драйверы для Microsoft Storage Spaces Controller собраны с официальных сайтов компаний-производителей и других проверенных источников.
Официальные пакеты драйверов помогут исправить ошибки и неполадки в работе Microsoft Storage Spaces Controller (контроллеры).
Скачать последние версии драйверов на Microsoft Storage Spaces Controller для компьютеров и ноутбуков на Windows.
Версия: 1.3.7.1452 для Windows 7, 8, 10 и 11
Бесплатное ПО
В комплекте идет опциональное ПО
- Yandex Browser
- Opera Browser
- Avast Free Antivirus
- World of Tanks
- World of Warships
 SSD-диски все еще дороги. Цена на них постепенно понижается, но на единицу хранения они пока еще не могут конкурировать с традиционными HDD. Последние, кстати, вовсе не собираются сдавать свои позиции. И дело не только во все увеличивающихся объемах хранения и снижающейся стоимостью записи на HDD. Традиционные HDD обеспечивают куда большую надежность хранения данных на протяжении длительного времени и существенно большую износостойкость в плане записи. И эти свойства HDD появились не вчера, их планомерно развивали в течение десятилетий. К надежности хранения данных на HDD можно привести множество примеров, когда в различных НИИ и замшелых банках все еще используются жесткие диски выпущенные десятки лет тому назад. И при этом они полностью сохранили свою работоспособность. Кстати, ленточные накопители тоже остались у дел, в тех же банках, финансовых компаниях, замшелых НИИ. Магнитные ленты отлично выполняют функции по архивному хранению информации, например, резервных копий и по самой минимальной стоимости при высочайшей надежности.
Но есть у HDD и неоспоримые недостатки. Это все, что связано со временем доступа и вообще скоростью чтения и записи данных. Конечно, HDD почти что космические ракеты, если сравнить их с решениями на магнитной ленте, но скорости HDD, в нынешних реалиях, все равно недостаточно. По сути, это самый медленный компонент современного ПК. Именно по этой причине на свет появились SSD. Они лишены механической части и соответственно недостатков, связанных со временем доступа и скоростями чтения/записи. В SSD все эти операции происходят «мгновенно» и с максимально доступной производительностью.
А можно ли совместить достоинства HDD и SSD дабы нивелировать их недостатки? Как оказывается можно. Еще до появления SSD обычные HDD уже оснащались крупными буферами из оперативной памяти для ускорения операций чтения-записи. Данная технология помогала лишь отчасти, в основном для операций связанных с записью данных, либо на очень медленных компьютерах, где интерфейс не мог переварить поставляемый жестким диском объем данных. Чуть позже появились комбинации, когда HDD дооснащался еще и небольшим встроенным SSD. SSD-часть в этом случае использовалась как SSD-кэш. Большой популярности подобные решения не нашли, так как объемы SSD встраивались небольшие, а износу они подвергались существенному. Но производители пошли дальше.
На сцену вышла концепция, декларирующая ранжирование данных на дисковом массиве по важности быстрого доступа к ним. Ведь какие-то фотографии с позапрошлогоднего отпуска, можно вполне себе хранить хоть на ленте, а вот файл динамичной игры должен подгружать как можно быстрее. В этой стезе засветилась корпорация Intel, разработавшая совместно с Micron новый вид памяти для твердотельных дисков. Для конечного потребителя новинка предстала под торговой маркой Optane и предназначалась как раз для ускорения операций ввода-вывода традиционных HDD. Иначе работала как «умный» SSD-кэш. Да, кстати, объемы Optane-дисков, как правило, были небольшими, а стоимость соответствовала амбициям электронных гигантов.
Но технологии не стоят на месте, а неумолимо приближаются к технологической сингулярности. Усилиями многих производителей SSD-диски становятся все дешевле и быстрее. И вот в некоторых компьютерах есть только просто SSD-диск и больше ничего. Но, а в мощных рабочих станциях, игровых ПК, да и в большинстве ПК, что стоят на производствах, в офисах и просто по домам разнокалиберных граждан, по-прежнему присутствуют HDD. И вроде бы компьютеры не старые, вполне рабочие, но дисковая подсистема основанная на HDD оставляет желать лучшего, а выкинуть вполне еще рабочий HDD на терабайт, ну просто, рука не поднимается. Но и тут есть решение. Можно использовать технологию по созданию автоматических tiered drives (или иерархичных дисков, лучшего русскоязычного термина я не подобрал). В основе технологии tiered drives лежит объединение быстрых, но небольших SSD-дисков, и медленных, но надежных и объемных HDD-дисков, в один виртуальный пул, тем самым устраняя недостатки каждой из технологий хранения данных.
Автоматичность в случае с tiered drivers означает, что система сама, самостоятельно, без всякого AI, SMS и регистраций, будет определять, какие данные следует помещать на быструю часть (SSD), а какие разумнее оставить на HDD. В некоторых реализациях можно дополнительно «привязывать» те или иные файлы к быстрой части виртуального пула или медленного. Кроме того, некоторые производители дополнительно оснащают свои программные решения по организации tiered drives еще и дополнительным кэшем в оперативной памяти, для еще большей производительности. Но, прежде чем перейти к разбору программным продуктов «без SMS и регистраций», необходимо разобраться в отличиях между SSD-cache, RAID-массивами и tiered drives.
SSD-cache – простой механизм по прозрачному кэшированию данных на быстром SSD-диске перед их записью на медленный HDD-диск, либо аналогичное кэширование данных при чтении. Все зависит от реализации. Технология интересная, но особого признания не нашла в силу очень узкой специализации. Небольшое количество данных она запишет быстро, а вот с чем покрупнее никакого преимущества уже не будет.
RAID-массив — механизм объединения нескольких физических дисков в единый пул. Способ объединения зависит от потребности, но в основном используется в промышленных системах хранения данных, где требуется высокая надежность хранения и низкий процент отказов с нулевым простоем. Как правило в массив объединяются одинаковые по характеристикам диски.
Tiered drive — механизм разделения данных на требующих и не требующих быстрого доступа с соответствующим местом хранения на SSD или HDD.
AMD StoreMI
Мое первое знакомство с tiered drives началось с AMD StoreMI. Еще с первой версии, перелицованной enmotus FuzeDrive. Перейдя с Intel на платформу AMD, я с удовольствием обнаружил, что весь мой парк старых HDD можно безболезненно использовать с моим новым ПК, а заодно и ускорить их до самого доступного максимума при помощи освободившихся SATA SSD (а основными рабочими дисками у меня стали NVME PCI накопители).
Первая версия StoreMI имела существенные ограничения, так, например, можно было использовать для создания tiered drive SSD размером не более 256 Гб. Хорошо, что у меня был именно такой диск. Система tiered drive собралась оперативно, скорость работы с HDD выросла до адекватных показаний, все бегало и приятно урчало. Но локальный праздник жизни был омрачен двумя факторами:
- Система падала из-за StoreMI при высокой нагрузке. Например, при копировании данных с HDD на tiered drive от StoreMI.
- Спустя некоторое время AMD убрала StoreMI первой версии из открытого доступа, а никакой замены не предложила. Другими словами, если вам потребовалось восстановить систему, в которой присутствует tiered drive StoreMI, то все данные вы потеряете на этом диске, так как подключиться к нему никак.
В качестве дополнительного удобства я несколько раз получал заблокированный tiered drive, так как StoreMI не могла проверить свою лицензию. Ну и полностью отсутствующая поддержка по продукту означала, что использовать его можно только на свой страх и риск. Из плюсов, что были в первой версии StoreMI, можно отметить лишь наличие дополнительно кэша в оперативной памяти, что несколько ускоряло работу всей связки.
Чуть позже AMD выпустила вторую версию StoreMI уже без всяких ограничений на объемы дисков и прочей ереси в виде лицензий. Вторая версия оказалась несовместимой с первой. Провести апгрейд — нельзя. По всей видимости это связано с тем, что вторая версия StoreMI уже была написана без специалистов enmotus. Интерфейс хоть и стал чуть более лицеприятным, но все также отдавал Delphi.
Вторую версию StoreMI я установил на свой второй компьютер, первую установить я на него не успел, апгрейд закончился позже, чем появилась обновленная StoreMI. Установку удалось завершить далеко не с первой попытки. Пришлось ждать около полугода, пока появятся исправления и StoreMI наконец-то заработает и на моем втором ПК.
Вообще, драйвера дисковых подсистем штука до крайности важная. Они не должны содержать никаких ошибок, а их код должен быть «вылизан» программистами и тестировщиками до последнего байта. Ведь малейшая, даже самая крохотная ошибка в программном обеспечении дисковой подсистемы способна привести к краху ценных данных. Ваших данных. И именно по этой причине, мы меняем программное обеспечение как перчатки, но все еще продолжаем работать с файловыми системами, разработанными в прошлом веке. Лучше оставаться на проверенной системе, хоть и чуть медленнее, чем терять свои данные.
Но вернемся к StoreMI второй версии. Через некоторое время использования я с удивлением заметил, что некоторые фотографии, которые я синхронизирую с компьютером оказываются испорченными. Хотя на всех других устройствах они открываются и читаются без особых проблем. Фотографии, как не трудно догадаться, хранятся как раз на диске StoreMI. Дабы отвести напрасные мысли о ненадежности второй версии StoreMI, я решил переустановить Windows.
Но, после первой же перезагрузки после установки второй версии StoreMI (и даже без создания tiered drive) моя установка Windows становилась полностью неработоспособной. UEFI (BIOS) напрочь отказывался видеть загрузочный диск, а инсталляционная утилита Windows не обнаруживала никаких признаков установленной операционки для восстановления. Проведя подряд 7 переустановок операционной системы, я окончательно убедился, что проблема как раз в StoreMI от AMD.
В общем, пришлось идти, искать альтернативу. Ведь к хорошему быстро привыкаешь.
enmotus FuzeDrive
Естественным первым порывом стало желание посмотреть на родную утилиту для организации tiered drives от производителя первой версии StoreMI. Ведь она худо, но все же продолжала работать, тянуть мой домашний комп.
Неоспоримым преимуществом FuzeDrive является наличие RAM-кэша, который дополнительно ускоряет операции записи в системе. Данные сначала записываются в быструю оперативную память, а потом уже отправляются на tiered-диск по мере возможности. Но мой опыт работы с первой версией StoreMI, проблемы с лицензией и аварийные остановки операционные системы при высокой нагрузке на дисковую подсистему несколько охладили мой пыл в отношении FuzeDrive. Пошли искать альтернативу дальше.
ROMEX PrimoCache
Альтернативой FuzeDrive для Windows можно считать PrimoCache от ROMEX. Утилита PrimoCache — применяется как продвинутое решение для кэширования данных при чтении или записи с медленных устройств. В качестве быстрых устройств, используемых для кэширования, в PrimoCache можно применять ОЗУ, SSD-диск и даже Flash-диски. Кстати, в Windows уже есть технология по ускорению медленных накопителей за счет использования кэширования на USB Flash-дисках. Но решение ReadyBoost, опять же, не стало популярным. Ускорение за счет USB-флешки медленного HDD, установленного в медленном компьютере, обычно приводило к еще большим тормозам, так как на обработку данных с Flash-дисков тратились дополнительные ресурсы, которых и так было мало.
Но вернемся к PromiCache. Тут следует учитывать, что это именно кэш, т.к. данные всегда проходят через «быстрое» устройство.
Благодаря такому активному кэшированию при помощи PrimoCache можно получать фантастические скорости общения с жестким диском. Еще одним преимуществом PrimoCache можно считать отсутствие необходимости в переносе данных с «медленного» носителя перед включением его кэширования. Т.е. установка утилиты — максимально безопасна. Кстати, PrimoCache можно скачать на попробовать, в приложении присутствует «триальный» период.
К сожалению, никакой функции по ранжированию данных по иерархии хранения в PrimoCache нет, поэтому ее не следует рассматривать как прямого конкурента StoreMI или FuzeDrive.
При дальнейшем исследовании можно обнаружить, что на рынке присутствует некоторое количество RAM-cache утилит, предоставляющих примерно один и тот же сервис под разными названиями. Не будем их всех перечислять, а перейдем сразу к герою настоящей статьи, а именно…
Служба Storage Spaces появилась в Windows Server 2012 как способ объединения физических дисков в единые пулы, на основе которых могут быть организованы виртуальные диски. Данная же технология мигрировала с Windows Server 2012 и на Windows 8.
Изначально в Storage Spaces были доступны следующие варианты объединения:
- Simple — дисковое пространство всех дисков объединяется в одно.
- Two-way mirror — обычное зеркалирование данных по дискам, всего хранится две копии.
-
Three-way mirror — усиленное зеркалирование данных по дискам, всего хранится три копии.
Получался эдакий аналог программного RAID встроенного в операционную систему. Позже, с выходом Windows Server 2012 R2 появились дополнительные виды объединения дисков:
- Parity — хранение данных с избыточной информацией необходимой для восстановления. Данные «размазываются» сразу по нескольким дискам и в случае выхода из строя части дисков, данные все равно можно будет восстановить благодаря избыточности.
- Tiered — как раз интересующий нас случай с поддержкой иерархического хранения и сегрегации данных на быстрые и медленные носители.

Состояние дисковой подсистемы после создания Tiered Drive из двух дисков
Последняя редакция также была перенесена в десктопные решения. Создание и управление пулами дисков и виртуальными дисками под Windows 10 (Widows 8 рассматривать уже не будем по причине старости) доступно через апплет (оснастку) Storage Spaces, либо через команды в среде Windows PowerShell. К сожалению, в оснастке Storage Spaces доступны все варианты создания объединения, за исключением Tiered. Он доступен только через команды в PowerShell.
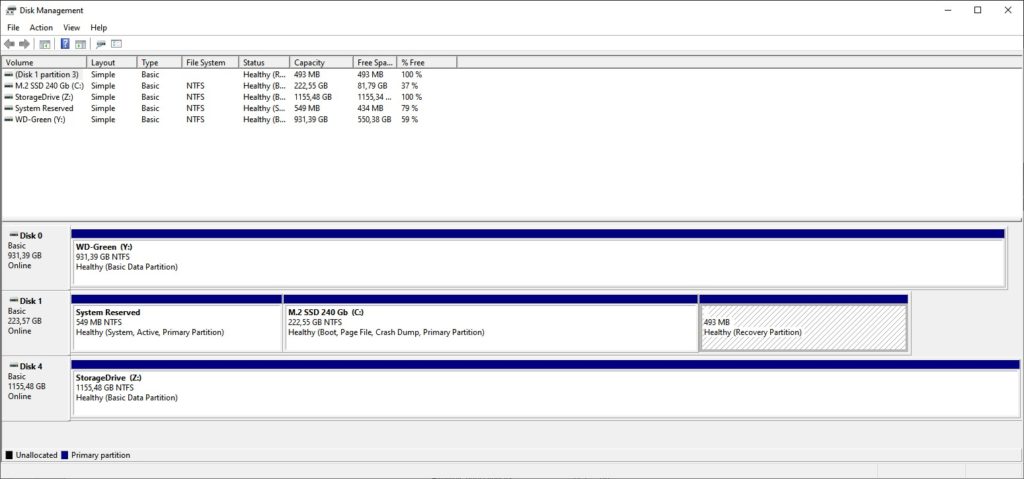
Как выглядит созданный виртуальный диск в оснастке Disk Management
Как работает механизм сегрегации данных в tiered варианте объединения? Новые данные обычно записываются на HDD, а затем, если к ним часто и много обращаются, то перемещаются уже на SSD. Если же системе требуется записать большое количество небольших и случайных изменений данных, то такие изменения записываются в первую очередь на SSD (используется механизм кэширования на SSD), с последующим перенесением на HDD если это необходимо. Все перемещения между слоями (иерархиями) дисков происходят либо автоматически (если такая опция была выбрана при создании пула дисков), либо во время обслуживания виртуального диска (та самая дефрагментация), либо командами через PowerShell.
Можно ли добавлять диски к пулу после его создания? Да, можно. Причем проделать эту процедуру можно уже в оснастке Storage Spaces. В целом Windows позволяет добавлять в пул более, чем достаточное количество дисков. Общее пространство можно разделять между различными виртуальными дисками. Виртуальные диски можно делать даже больше, чем есть физического места для хранения. В случае исчерпания свободного места на диске он переводится в режим Read Only до тех пор, пока не будет добавлен новый диск в пул дисков.
При использовании хранения данных одновременно на нескольких дисках увеличивается вероятность потери данных по причине выхода из строя накопителя или сразу нескольких. Опытные системные администраторы сразу же упомя́нут, что ценные данные вообще-то нужно периодически резервировать на сменных носителях (те самые магнитные ленты) и хранить их в отдельном помещении или лучше здании (городе, стране и т.п.). Но можно попробовать поднять надежность хранения данных и в случае использования tiered disk при использовании Storage spaces. Во-первых, совершенно никто не мешает организовать аппаратное зеркалирование на уровне UEFI (BIOS) и включать в пул дисков уже зеркалированные диски. Во-вторых, согласно документации от Microsoft, создав пул из hdd и sdd (и соответственно tiered drive) у нас есть возможность создавать на его основе и так называемые вложенные (nested) виды объединения, которые уже могут зеркалироваться или иметь избыточность. Однако, данное действие имеет смысл только при наличии действительно достаточного количества физических дисков для организации зеркалирования или избыточности.
Кстати, даже при использовании обычного tiered объединения некоторые диски можно исключать из пула для их замены (однако, для их замены они должны быть настроены в системе как извлекаемые (hot swap)).
Итак, для добавления своего tiered пула в Windows 10 можно воспользоваться либо командами в PowerShell (в документации Microsoft достаточно подробно описана пошаговая процедура создания tiered drive через PowerShell), либо воспользоваться скриптами win10-storage-spaces от freemansoft специально предназначенными для автоматизации создания Tiered Storage.
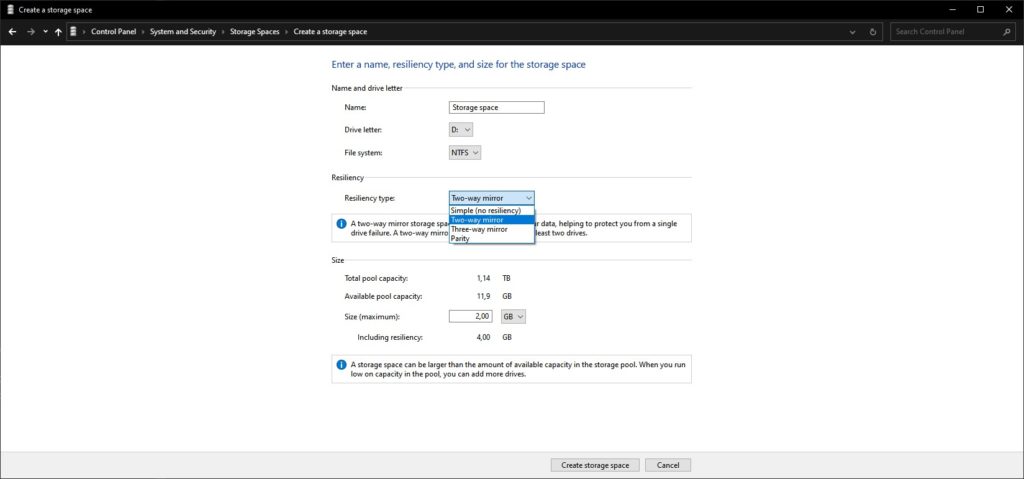
Возможность создания Nested Drives на свободном месте Storage Spaces
Процедура использования скриптов достаточно проста, требуется подредактировать скрипт создания пула, изменить наименование пула и виртуального диска, подумать над буквой, которая будет назначена виртуальному диску. Затем освободить диски от разделов и запустить скрипт создания. Он автоматически добавит в пул все свободные от разделов диски, исправит неверные или отсутствующие идентификаторы у HDD-дисков, создаст один виртуальный диск по всему размеру всех подключенных дисков.
Если вдруг, по каким-то причинам, касающимся безопасности, скрипт не будет исполняться, то необходимо изменить настройки безопасности для скриптов и запустить процедуру заново.
После создания пула им уже можно управлять через оснастку Storage Spaces. Например, в пул можно добавить еще дисков. Однако, если изначально у нас создавался tiered пул на двух дисках (т.е. сформирован Simple пул), то его нельзя будет переконвертировать в Two-way Mirror пул, хотя можно будет организовать Nested Two-way Mirror диск при создании нового виртуального диска.
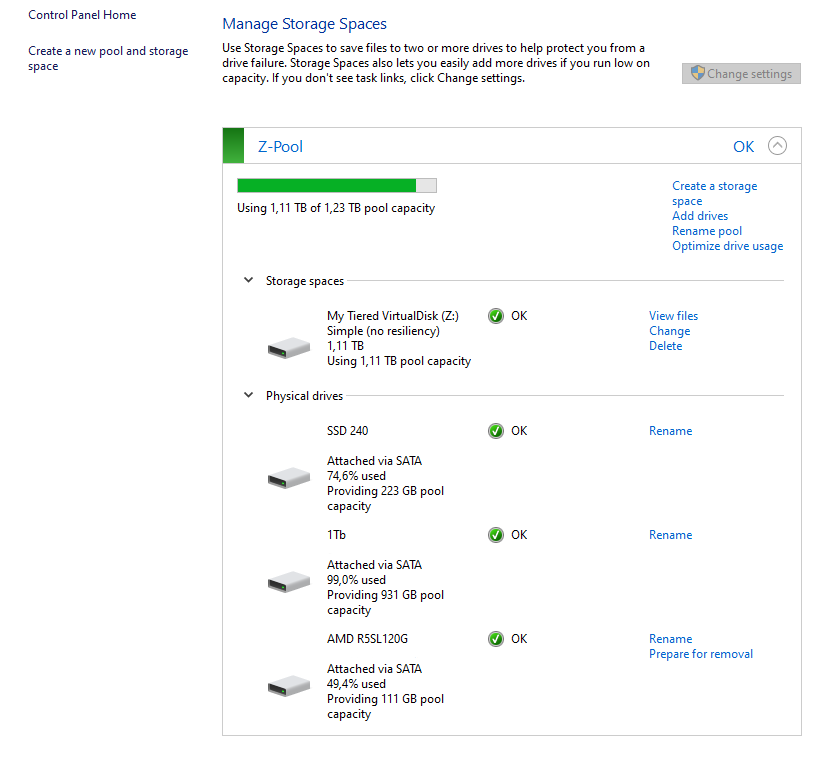
Storage Spaces после добавления в пул еше одного SSD и проведения оптимизации
При добавлении нового физического диска в пул система сразу предлагает провести оптимизацию. Я добавил к системе еще один 120 Гб SSD-диск (к уже добавленному 240 Гб SSD и 1 Тб HDD) и после оптимизации я получил загрузку в 74% 240 Гб SSD и 50% от 120 Гб SSD. Таким образом, на обоих SSD осталось примерно поровну не назначенного в пул места. И именно это место я могу использовать в качестве пространства для создания нового Storage Space (по сути, это и есть виртуальный диск).
После добавления нового диска и оптимизации можно провести изменение размера виртуального диска. Осуществить эту операцию через оснастку Storage Spaces нельзя, система возвращает ошибку. Дело в том, что легкого способа увеличить размер виртуального диска не существует. Проблема кроется в том, как организуются пулы в Storage Spaces. Все дело в так называемом Number of Columns, а именно в количестве физических дисков, на которых физически располагается виртуальный диск. И для успешного изменения размера виртуального диска необходимо добавить в пул количество диско равное Number of Columns. Звучит немного странно, но таковы ограничения. Однако, в моем случае, Tiered disk создался с пустым количеством Columns, т.к. у меня, при создании пула был только один SSD и один HDD. В общем и целом, мне не удалось увеличить размер общего пула после добавления дополнительного SSD-диска в пул. Тем не менее, оба диска работают в пуле совместно. О проблемах с увеличением или уменьшением места в Storage Pool сообщают пользователи и серверных операционных систем. Не помогает в том числе и ручное создание пулов с несколькими разнокалиберными дисками. Так что экспериментировать со Storage Spaces еще есть куда.
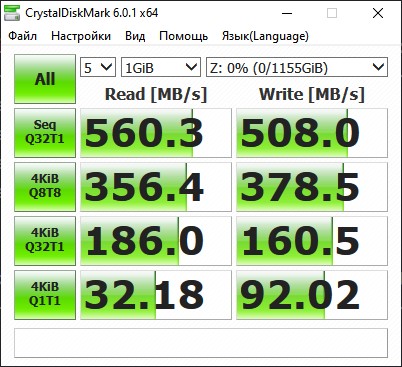
Данные по работе виртуального диска (отображается производительность моего SSD-диска)
Для измерения полученного результата можно воспользоваться как обычными средствами типа Crystal Disk Mark или же использоваться специализированное средство от Microsoft DiskSpd. Disk Mark, как и положено будет давать результаты с SSD-диска, так как он первым воспринимает удар синтетической цифровой стихии, а DiskSpd дает более интересный результат, но его нужно еще правильно интерпретировать.
Полезные ссылки:
- Intel Optane
- RAID
- AMD StoreMI
- enmotus FuzeDrive
- Delphi
- ROMEX PrimoCache
- Статья на Habr об использовании Storage Spaces
- Storage Spaces на Microsoft Docs
- Описание утилиты DiskSpd и ее репозиторий на GitHub
- Использование DiskSpd
- Скрипты win10-storage-spaces
- Страница на GitHub Joe Freeman-а, автора скриптов по автоматизации
- Оригинальная запись блога Nils Schimmelmann-а, который провел изыскания по включение tiered pool в Win10
- Настройка политики запуска скриптов в PowerShell
- Использование tiering на LVM под Linux при помощи LVM-Cache
- Storage Spaces: Understanding Storage Pool Expansion
- Cannot Extend Simple Virtual Disk in Windows Server 2012 R2
- Storage Spaces: Understanding Storage Pool Expansion
- ReadyBoost

Windows 10 is an operating system that delivers a lot of new features and improvements, including a new breed of apps that run across devices, a new web browser built for the modern web, a unified Store, improvements on security, and an updated, but yet familiar user interface.
The operating system also includes many familiar features found in Windows 7 and Windows 8.1. One of these features is Storage Spaces. This feature was originally introduced in Windows 8.x and let you group different types of drives, such as traditional rotating platters hard drives and Solid State Drives into a single storage pool, which then you can use to create «storage spaces».
What are Storage Spaces?
Storage Spaces are technically virtual drives that appear in File Explorer as normal local storage, and each storage space you create can be less, equal, or greater to the amount of the physical capacity available in the storage pool.
Storage Spaces support some drive technologies, including ATA, SATA, SAS and USB drives. Getting started with the feature only requires one or more drives, in addition to the drive where you have Windows installed.
You don’t even have to use all the available drives to create storage spaces. For example, if you have three drives of 100GB each, you could only use two to create a «storage pool». Once you have a new pool, you can create a 200GB virtual drive that represents the total amount of space available, or you can provision and create a 1000GB virtual drive (storage space).
Of course, if you have a storage space of 1000GB that was created in a pool with 200GB of available physical storage, you can only store 200GB worth of data. However, as the drives begin to fill up, you will be notified to add more drives to accommodate more available space.
Also, you’re not limited to one storage space per storage pool; you can create as many spaces as allowed by the available space. Let me explain. While you can create storage spaces of virtually any size, each time you create a new virtual drive, you will be using a small portion of the physically available storage, and eventually, you will run out of space as you keep creating more storage spaces.
Why Storage Spaces?
Although, there are not many scenarios where everyday users will be using this feature, «Storage Spaces» has numerous benefits. For example, you can use storage spaces to create a large network drive instead of sharing multiple drives in your network, which is cleaner and more efficient.
If you have different USB drives that you can connect to your computer to save your data, you can combine the drives into a single logical drive, which enables you to organize all your data in a single place — and no more asking yourself: «In which drive did I save those photos?»
Perhaps the most important aspect of Storage Spaces isn’t the ability to group different drive technologies with different sizes, but the ability to configure different types of data protection.
Resiliency
Storage Spaces supports four types of resiliency:
- Simple: A simple storage space writes one copy of your data and does not protect you from driver failures. This option requires, at least, one drive, and each new additional drive adds another point of failure.
- Two-way mirror: This option writes two copies of your data on the drives, which can protect your data from a single driver failure. Two-way mirror requires a least two drives.
- Three-way mirror: This option works similar to the two-way mirror, but it writes three copies of your data on the drives, which will help you to protect your data from two simultaneous drive failures. Three-way mirror requires, at least, three drives.
- Parity: Similar to the standard RAID 5 technology, Parity for a storage space writes your data with parity information on the available driver to help you protect your data from a single driver failure. This option requires a least three drivers.
The resiliency type you need will mainly depend on what you’re trying to accomplish. If you’re only interested in available space and drive speed, you could use the «Simple (no resiliency)» option. If you want to protect your data from drive failure, you can go with one of the two mirror types, but remember that the more copies of your data get written to disk, it will consume more storage. If you like a balance of available space and speed, then you should use the «Parity» option.
Here’s something else to keep in mind. You can always make a storage space larger, but you cannot make the available space smaller. Every time you make a change it will cost you a quarter of a gigabyte of the available physical space, as such, you should plan in advance how large you want to make the storage space. Currently, the operating system allows a maximum of 63TB per storage space.
How to setup Storage Spaces
Now that you have a little background on Storage Spaces for Windows, below we’ll go through how to use and manage the feature.
How to create a storage pool and storage space
1- Connect all the drives you want to participate on Storage Spaces.
2- Open Start, do a search and open Storage Spaces.
3- Click the link Create a new pool and storage space.
4- Select the drives you want to be part of the pool and click Create Pool. It’s important to note that all the data currently on the drives will be erased during the process.
5- Now, it’s the time to create the storage space (virtual drive), choose a descriptive name, as it will get confusing if you don’t. Then choose the drive letter and file system — for most people NTFS will be fine, but you always REFS (Resilient File System).aspx){.nofollow}, which is a new «local file system. It maximizes data availability, despite errors that would historically cause data loss or downtime. Data integrity ensures that business-critical data is protected from errors and available when needed.»
6- Pick the resiliency type you want to use for this particular storage space.
7- Select the size you want to allocate. Remember that you can pick any size you want. It doesn’t matter if you don’t have the available physical space as you will get an alert when it’s time to add more storage.
8- Click the Create storage space button to complete the process.
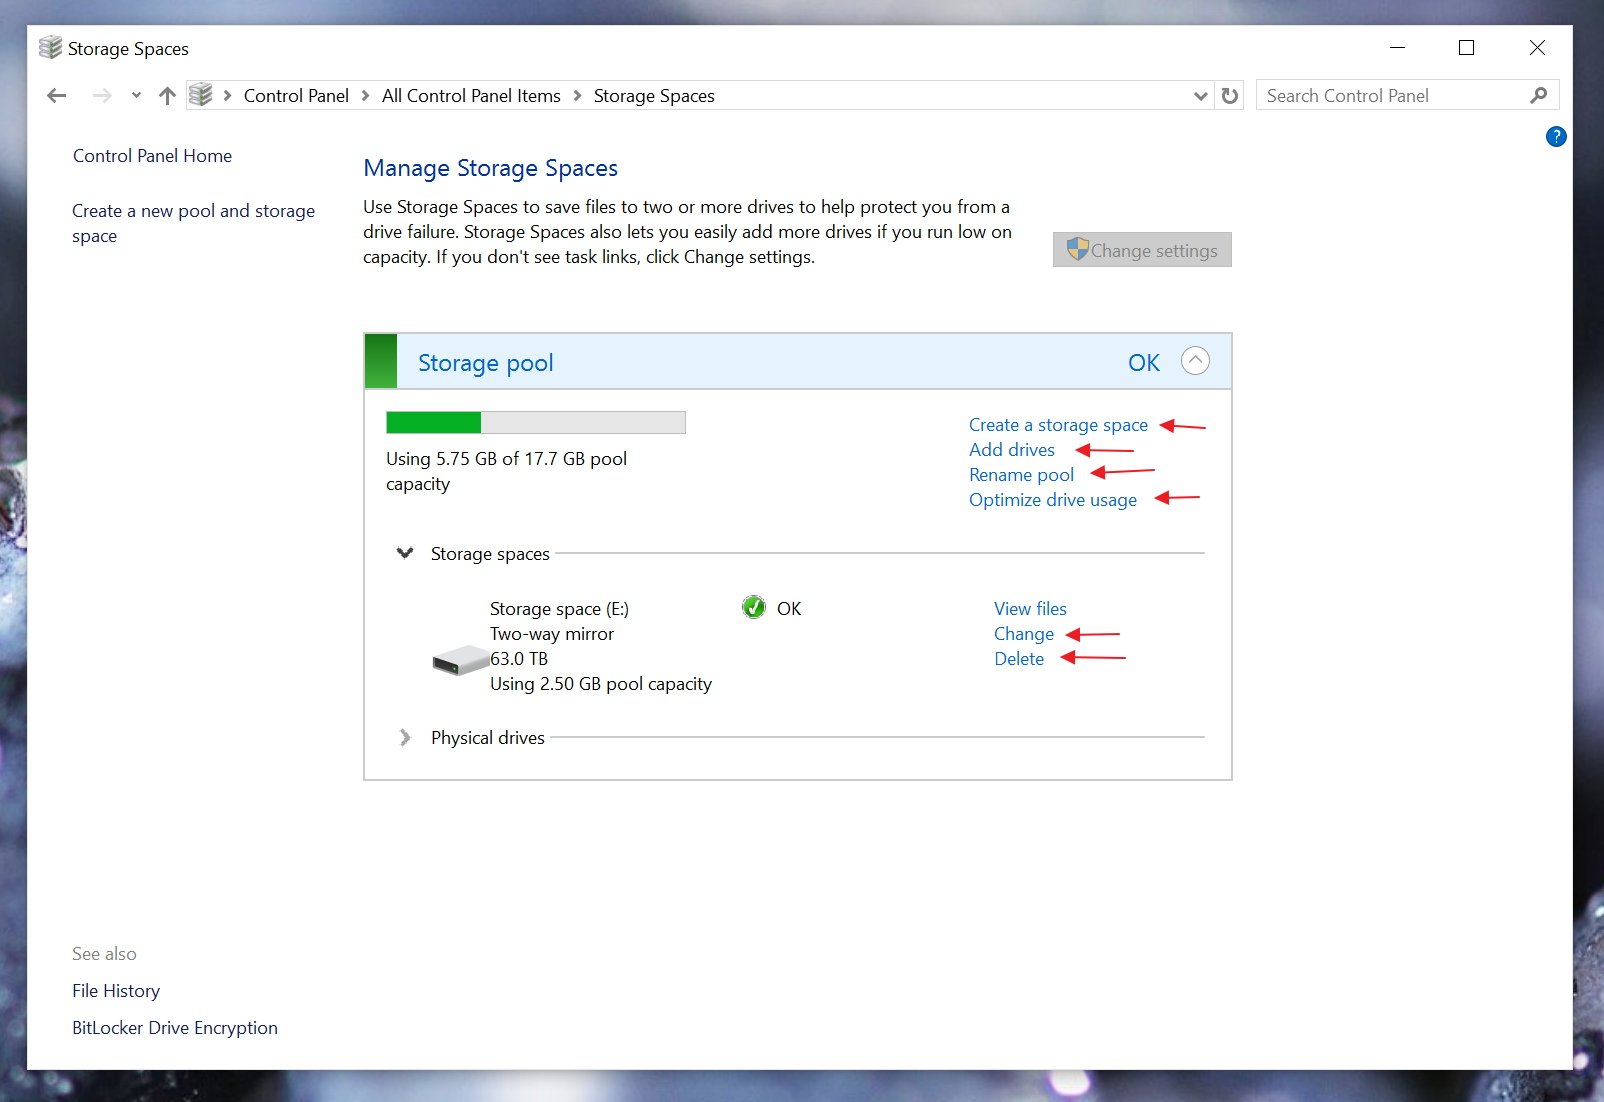
Now that you have created the storage space, in «Manage Storage Spaces» you can now view some useful information, such as physical storage usage, information about the storage space and from the participating physical drives.
How to create multiple storage spaces
1- If you want to create a second storage space, open Start, do a search and open Storage Spaces.
2- Click the Create a storage space link under the storage pool.
3- Choose your preferences (remember to pick a descriptive name).
4- Click the Create storage space button to complete the process (refer to the previous image).
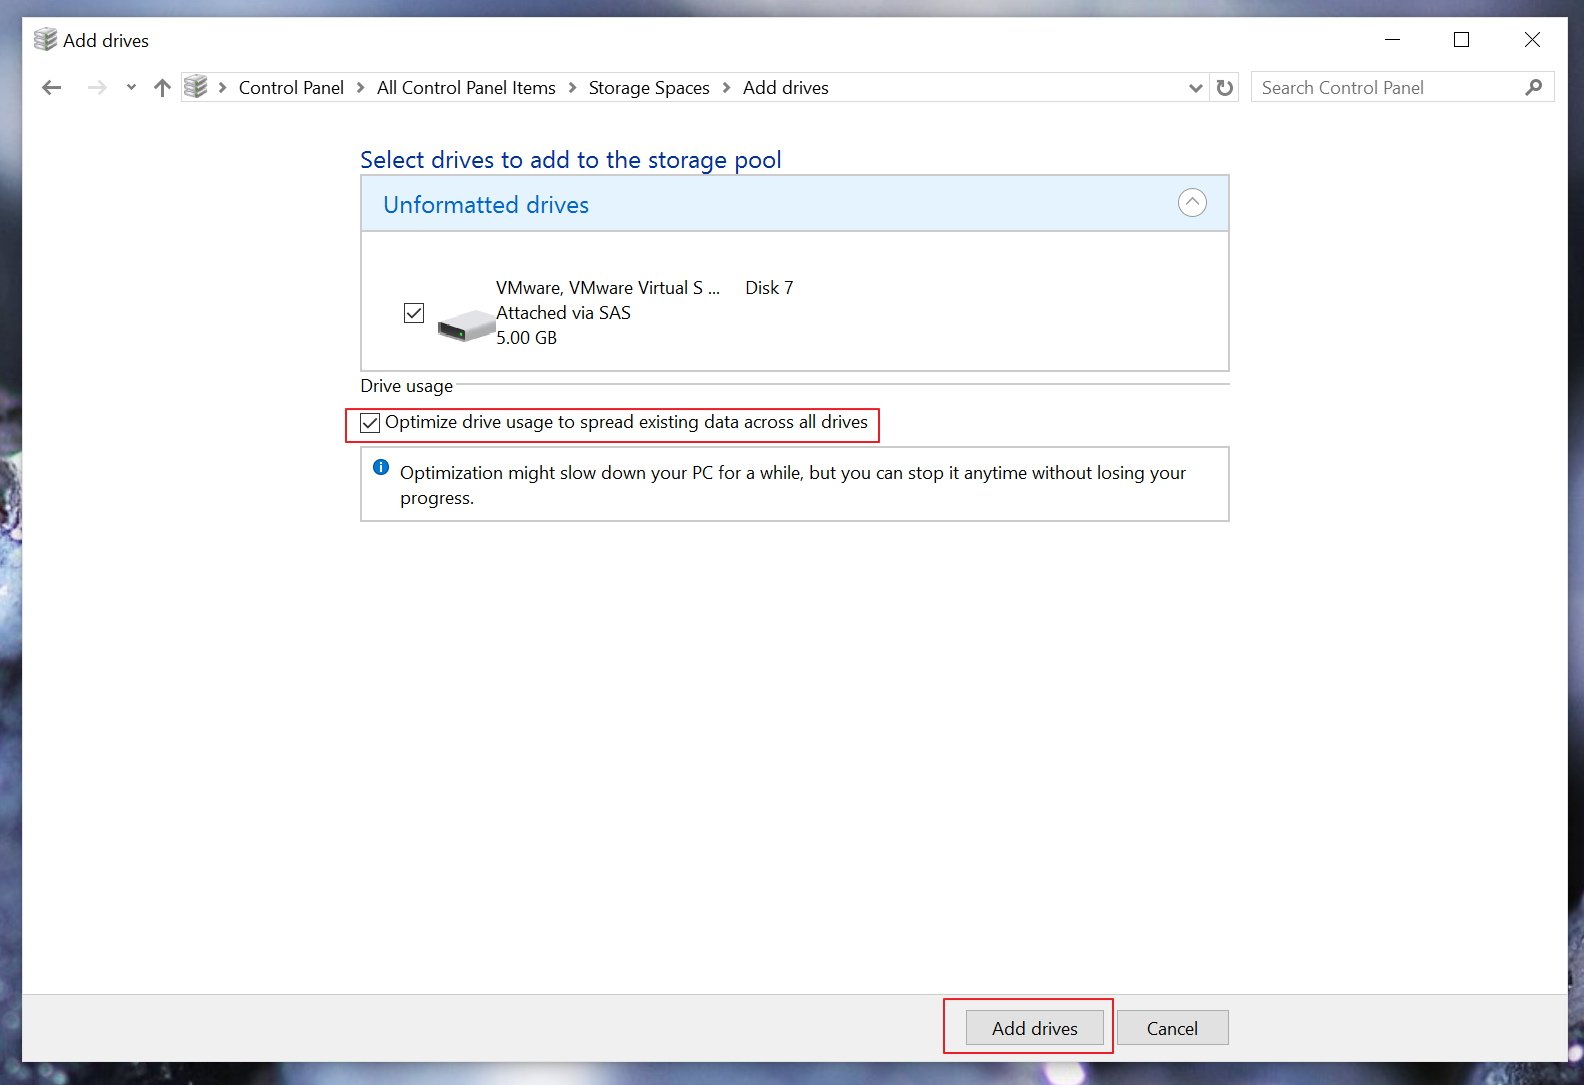
How to add new drives to a storage pool
At any time, you can always add more drives to the pool to expand a storage space — just follow the steps below:
1- While in «Manage Storage Spaces» click the Add drives from the storage pool.
2- The available drives you can add will appear, select the one you want, and click the Add drives button. You will also notice the Optimize drive usage to spread existing data across all drives, make sure this option is enabled as well.
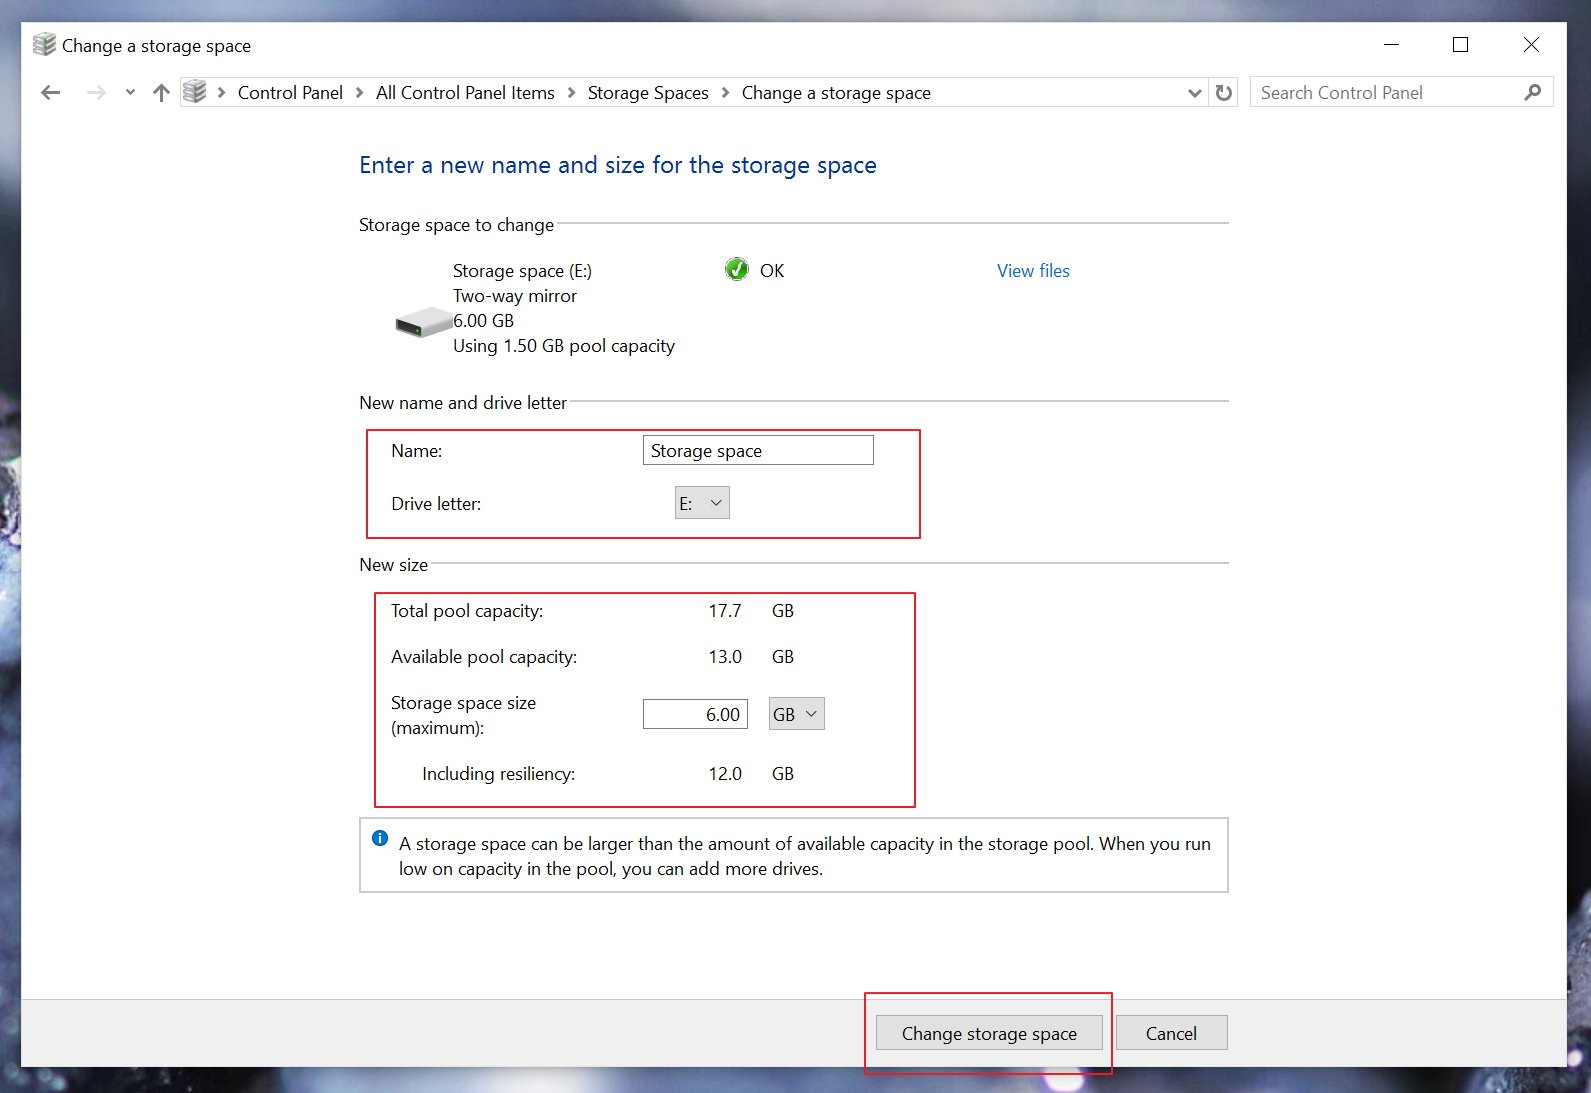
How to change the size of a storage space
1- Open Start, do a search and open Storage Spaces.
2- Under the storage space you want to modify, click the Change option.
3- From this page, you can change the name of the «space», drive letter, and size. Make your changes, and click the Change storage space button to complete the process.
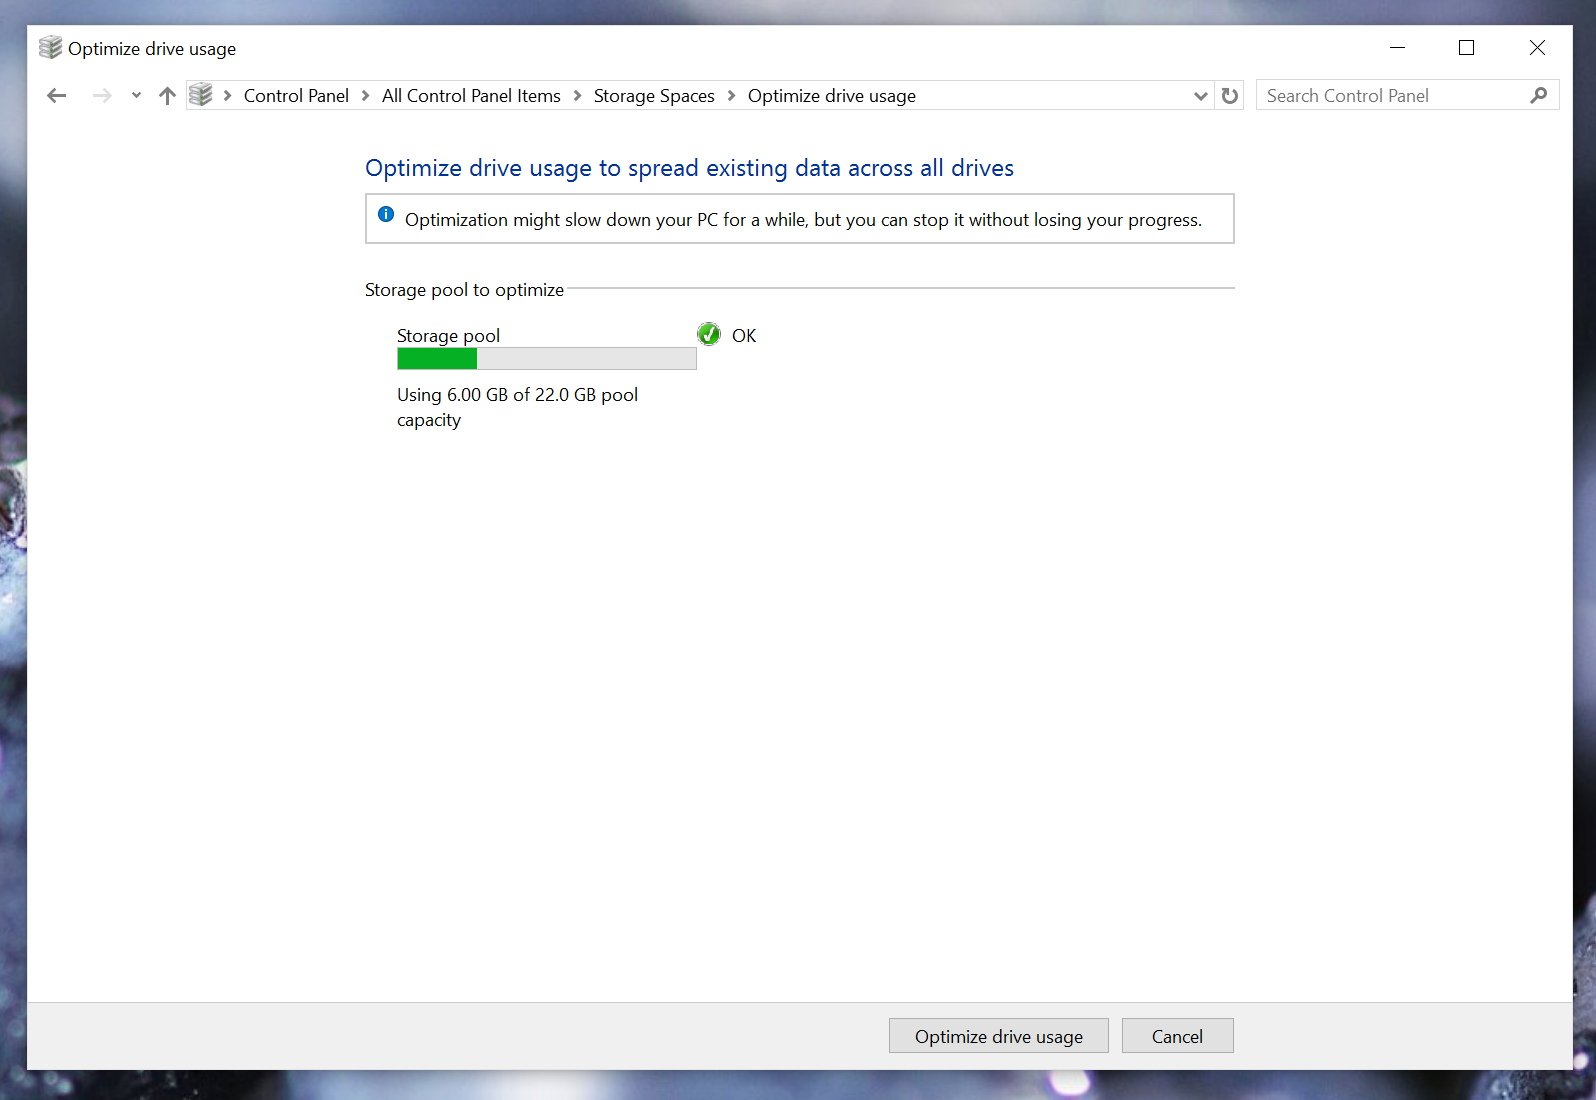
How to optimize drive usage
While «Storage Spaces» remains pretty much unchanged since Windows 8.1, Microsoft is adding a new feature to optimize drive usage in Windows 10. This feature is useful when you add new drives to an existing pool, as it will move some data to the newly added drive to better utilize the drives in the pool and capacity.
The optimization happens by default when you add a new drive to an existing pool, when you select the Optimize drive usage to spread existing data across all drives option. However, if you didn’t check the option or drives were added before upgrading the pool, you need to perform an optimization manually.
1- While in Storage Spaces click the Optimize drive usage from the storage pool.
2- Click the Optimize drive usage button. Keep in mind that this process in intensive, as such you may notice your PC being slow for a while.
How to properly remove a drive in use
When you have a Storage Space configured, you cannot just disconnect a drive out of the blue, as it may cause data loss and other problems.
Fortunately, Windows 10 includes a mechanism to remove a drive properly from a pool, by moving the data on that drive other drives in the pool, and then you can disconnect the drive from your computer, or you can use to store something else.
Follow the step below to remove a drive from a pool:
1- Open Start, do a search and open Storage Spaces.
2- On the storage pool expand Physical drives.
3- Click the Prepare for removal option.
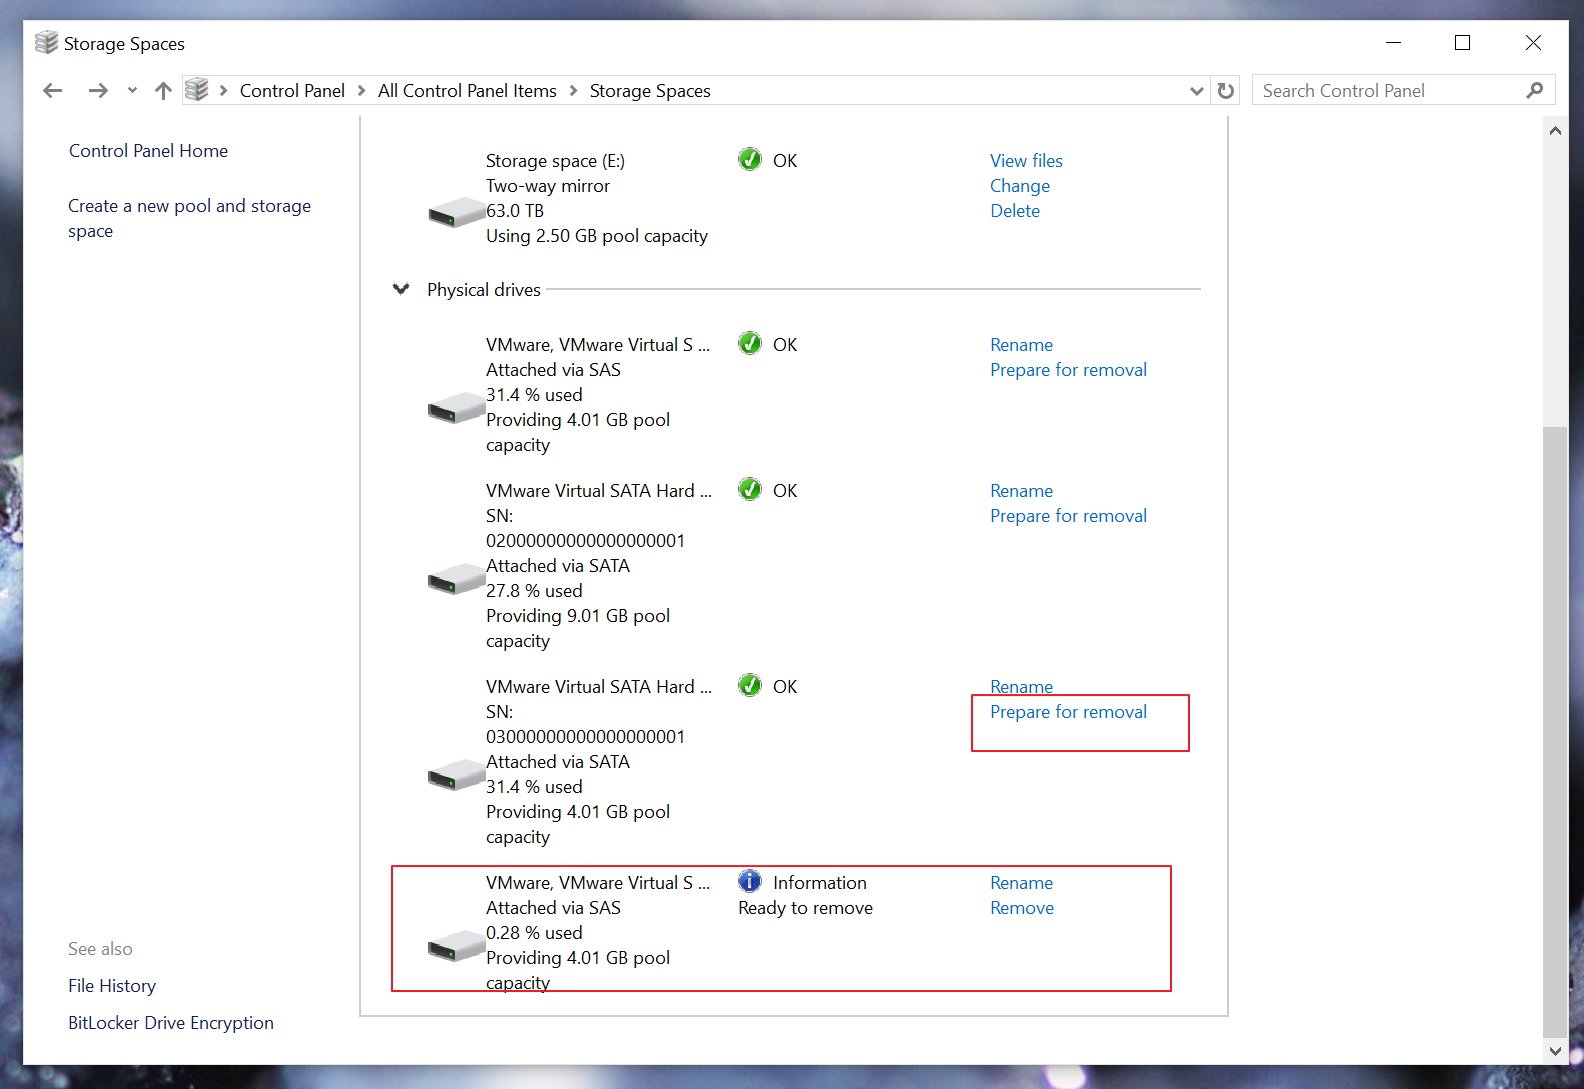
4- Make you’re removing the correct drive and then click the Prepare for removal button.
5- Once again locate the drive you want to remove and click the Remove button (refer to the image in step number three).
6- Finally, click the Remove drive button to complete the process.
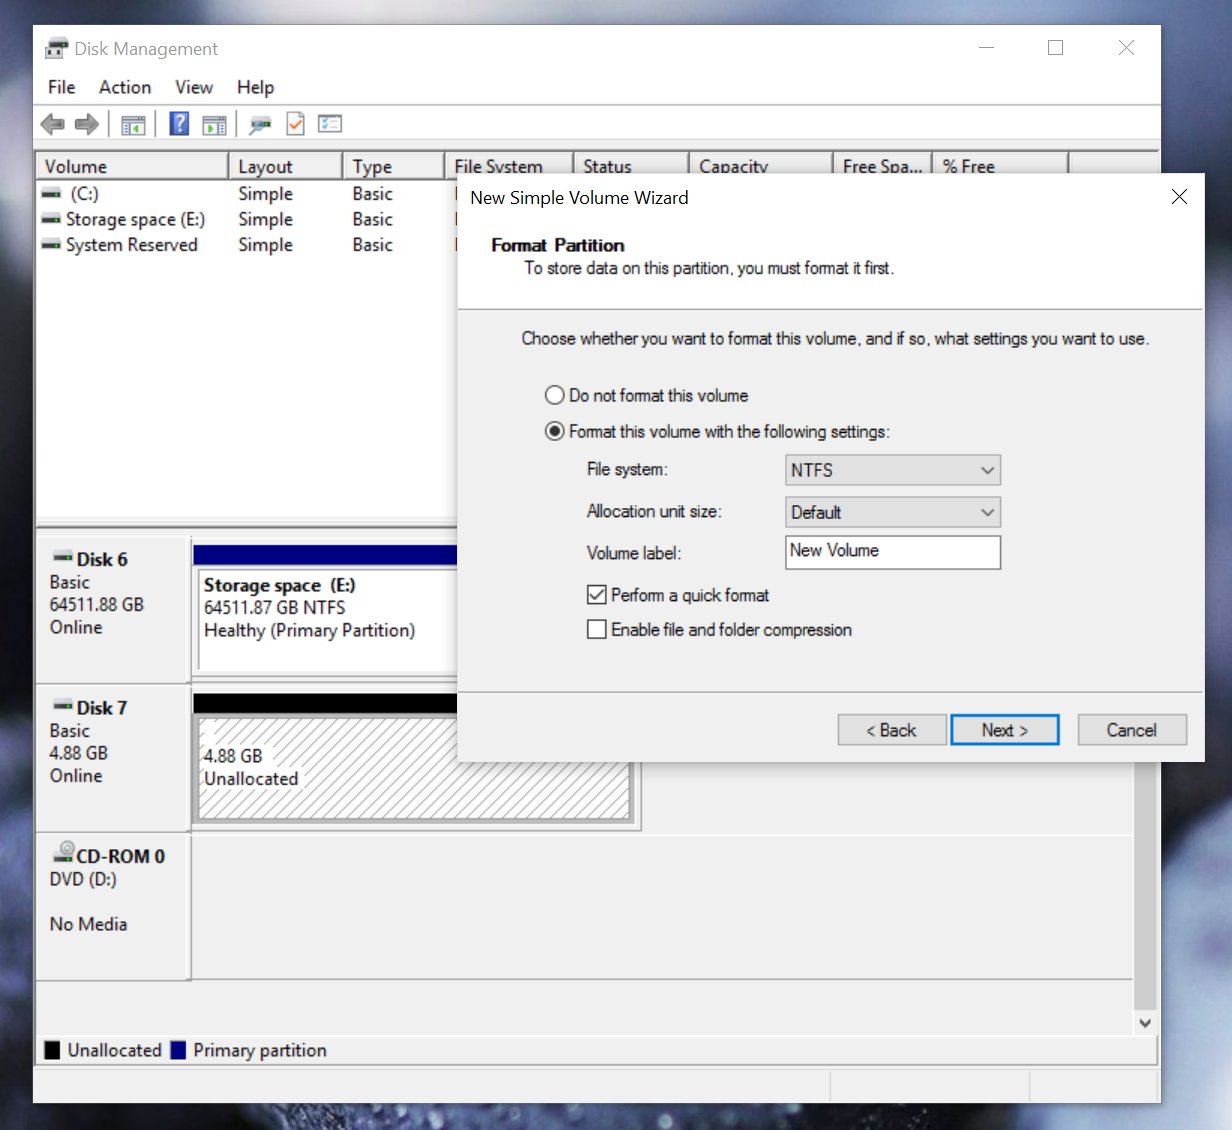
It’s important to note that after you remove the drive, it won’t be accessible through File Explorer. You’ll need to open Disk Management and reformat the drive in question.
1- Simply, right-click the Start button, and click Disk Management, locate the drive with the «Unallocated» label.
2- Right-click the drive, select New Simple Volume and follow the on-screen instructions to format the drive using NTFS file system and performing a quick format.
Now the removed drive should be usable again.
How to delete a Storage Space
If you no longer need a storage space, you can easily delete it. Simply follow the steps below:
1- Open Start, do a search and open Storage Spaces.
2- Under «Storage Spaces» click the Delete option next to the «space» you no longer need. It’s important to note that that deleting a storage space permanently deletes the data it contains. The only way to recover is by using a previously made backup.
3- Once you’re ready, click the Delete storage space.

How to delete a Storage Pool
You cannot delete a storage pool that contains a storage space. You first need to remove all the storage spaces created in a pool properly. Only then the option to delete the pool will be available.
1- Open Start, do a search and open Storage Spaces.
2- Click the Delete pool on the storage pool you want to remove.

3- Then click the Delete pool to complete the process.
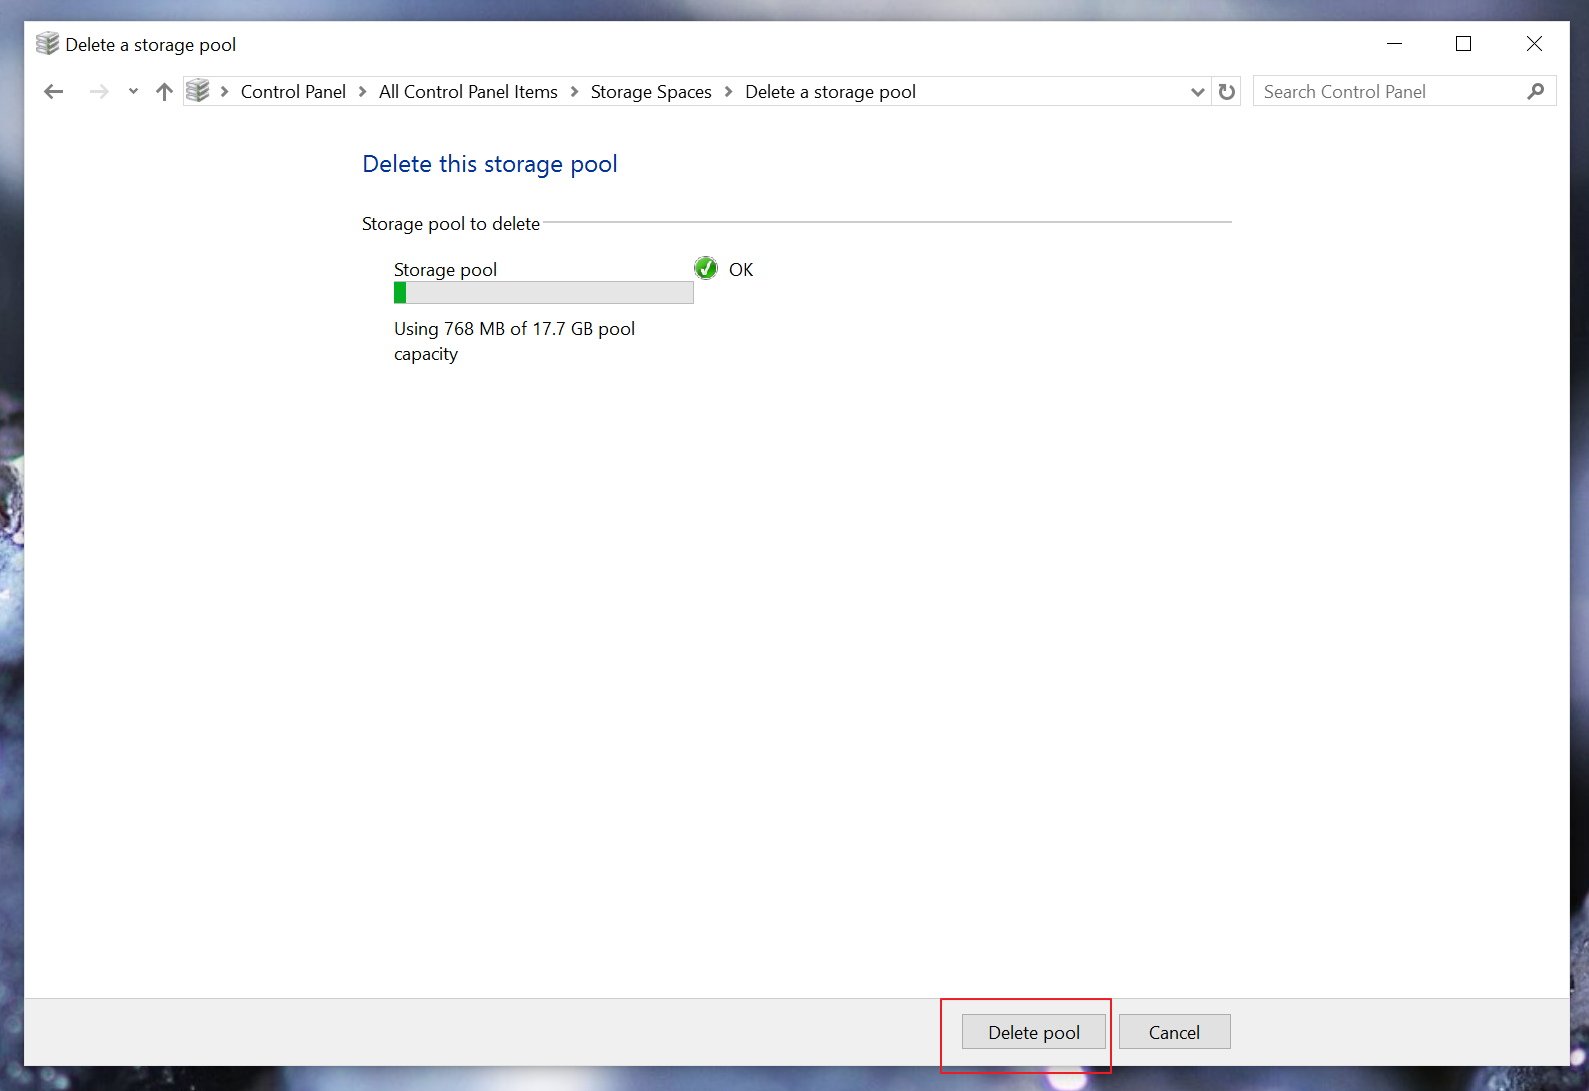
Once you delete the pool, the participating drive will be reinstated to your system, but again, as I have mentioned in the steps, the drives won’t be visible in File Explorer until you manually reformat each drive through Disk Management.
Additional information
- Once set, you cannot change the storage space resiliency or file system.
- Yes, you can add more drives and upgrade a storage space on-demand without disrupting access and affecting data already in the «space».
- At any time, you can rename a pool or space.
- Storage Spaces is available in Windows 10 Pro and Windows 10 Home.
- The drive has to be around 5GB of size to be available in Storage Spaces.
Wrapping things up
By now, you should be able to use and manage Storage Spaces in Windows 10. If it was a bit confusing, just remember that with Storage Spaces for Windows, you can create one or more pools with the available drives on your system. In each pool, you can create one or more storage spaces (a virtual drive) of any size as available storage. You can always add more drives and upgrade the space as necessary.
Note: If all the options appear grayed out after creating a Storage Space, this is because you need Administrator Rights. To enable this feature simply click the Change settings button in the top-right corner of the settings page.
More resources
If you want to read more about Windows 10, make sure you check these resources:
- Windows 10 on Windows Central – All you need to know
- Windows 10 help, tips, and tricks
Do you use Storage Spaces in Windows 10? What’s the primary reason you use the feature? Tell us your story in the comments below.
Get the best of Windows Central in in your inbox, every day!
Mauro Huculak is technical writer for WindowsCentral.com. His primary focus is to write comprehensive how-tos to help users get the most out of Windows 10 and its many related technologies. He has an IT background with professional certifications from Microsoft, Cisco, and CompTIA, and he’s a recognized member of the Microsoft MVP community.
This topic discusses common questions about Storage Spaces on Windows Server 2012 R2, Windows Server 2012, Windows 8.1, and Windows 8. For basic info about Storage Spaces, see
Storage Spaces Overview. For design info, see
Software-Defined Storage Design Considerations Guide. For performance information, see
Storage Spaces — Designing for Performance.
Table of Contents
- How can I manage Storage Spaces?
- What are the recommended configuration limits?
- What are the best uses of simple, mirror, and parity spaces?
- What types of drives can I use with Storage Spaces?
- What types of storage arrays can I use with Storage Spaces?
- Enclosure Awareness Support — Tolerating an Entire Enclosure Failing
- What are the resiliency levels provided by Enclosure Awareness?
- What types of storage spaces can I use with a failover cluster?
- What properties can I change after creating a storage space?
- How does Windows let me know of a disk failure?
- How does Storage Spaces respond to errors on physical disks?
- What information will Storage Spaces put in the Event log?
- How do I replace a physical disk?
- What are columns and how does Storage Spaces decide how many to use?
- Example 1: A Two-Column Simple Space
- Example 2: A Three-Column Parity Space
- Example 3: A Two-Column Two-Way Mirror Space
- Controlling the Number of Columns
- Why do I have a low capacity warning even though I still have unused pool capacity?
- A two column, two-way mirror space that uses thin provisioning in a four disk pool
- How do I increase pool capacity?
- What happens to Storage Spaces when moving physical disks between servers?
- How do I check Storage Spaces resiliency health in a failover cluster?
- How do I know repairing a storage space starts and successfully completes?
- What happens if I run out of physical capacity on a thinly provisioned storage space?
- See Also
How can I manage Storage Spaces?
There are three ways to manage Storage Spaces and associated storage pools and drives:
- The Storage Spaces item in Control Panel Available in Windows 10, Windows 8.1 and Windows 8, you can use the Storage Spaces item in Control Panel to easily create and maintain storage spaces and their associated storage
pools. The Storage Spaces item in Control Panel provides simple but powerful control over tasks a user might want to perform. - The File and Storage Services section of Server Manager Available in Windows Server, you can use Server Manager to create and manage storage spaces (also referred to as virtual disks) and their associated storage pools
on the Storage Spaces subsystem as well as on non-Microsoft storage subsystems. Server Manager provides support for performing all of the tasks administrators commonly perform with Storage Spaces. - The Storage module in Windows PowerShell Available in Windows and Windows Server, you can use the cmdlets included in the Storage module to create and manage storage spaces (also referred to as virtual disks) and their
associated storage pools on the Storage Spaces subsystem as well as on non-Microsoft storage subsystems. Windows PowerShell provides comprehensive support for managing Storage Spaces.
What are the recommended configuration limits?
The following are the recommended configuration limits for Storage Spaces:
For clustered storage pools:
- Up to 80 physical disks in a clustered storage pool (to allow time for the pool to fail over to other nodes)
- Up to four storage pools per cluster
For non-clustered storage pools:
- Up to 240 physical disks in a non-clustered Windows Server 2012 R2 storage pool (4 x 60 disk JBOD); you can, however, have multiple pools of 240 disks
- In Windows Server 2012, you can have up to 160 physical disks in a storage pool; you can, however, have multiple pools of 160 disks.
For both clustered and non-clustered pools:
- Up to 480 TB of capacity in a single storage pool
- Up to 64 storage spaces in a single storage pool
- Up to 10 TB per virtual disk when using persistent VSS snapshots and the Volsnap VSS system provider
What are the best uses of simple, mirror, and parity spaces?
Storage Spaces offers simple spaces, mirror spaces, and parity spaces, each with unique characteristics.
- Simple spaces are designed for increased performance when resiliency isn’t very important. They are best suited for temporary data, such as video rendering files, image editor scratch files, and intermediary compiler object files. Simple
spaces require a minimum of one physical disk. - Mirror spaces are designed for increased performance and increased resiliency. Two-way mirror spaces can tolerate one disk failure and three-way mirror spaces can tolerate two disk failures. They are well suited to storing a broad range
of data, from a general-purpose file share to a VHD library. When a mirror space is formatted with the Resilient File System (ReFS), Windows offers automatic data integrity maintenance. This is a layer of resiliency is above and beyond the resiliency achieved
from maintaining multiple data copies to tolerate drive failure.Mirror spaces require at least two disks (per tier if you use storage tiers) to protect you from a single disk failure. To protect
a virtual disk from two simultaneous disk failures, you need at least three disks (per tier), with a minimum of five disks total in the pool to maintain pool metadata.
- Parity spaces are designed for capacity efficiency and increased resiliency. Parity spaces are best suited for archival data and streaming media, such as music and videos. This storage layout requires at least three disks to protect you
from a single disk failure and at least seven disks to protect you from two disk failures.
For details on how to design mirror and parity spaces for maximum reliability and performance, including how to use journal disks to improve parity write performance, see the
Software-Defined Storage Design Considerations Guide.
 Note Note
|
|---|
| Storage Spaces cannot be used to directly host the Windows startup disk or page file (though virtual hard disks can be safely stored in a storage space). Storage Spaces is not a disaster recovery or data replication solution, nor is it a substitute for regular backups. |
What types of drives can I use with Storage Spaces?
You can use commodity drives attached via Serial-Attached SCSI (SAS), Serial ATA (SATA), PCI-Express, M.2, U.2, or USB. Storage layers that abstract the physical disks are not compatible with Storage Spaces. This includes VHDs and pass-through disks in a
virtual machine, and storage subsystems that layer a RAID implementation on top of the physical disks. iSCSI and Fibre Channel controllers are not supported by Storage Spaces.
RAID adapters, if used, must be in non-RAID mode with all RAID functionality disabled. Such adapters must not abstract the physical disks, cache data, or obscure any attached devices including enclosure services provided by attached just-a-bunch-of-disks
(JBOD) devices. Storage Spaces is compatible only with RAID adapters that support completely disabling all RAID functionality.
| Note
|
|---|
| Consumers can use USB drives with Storage Spaces, though USB 2 drives might not offer a high level of performance. A single USB 2 hard drive can saturate the bandwidth available on the shared USB bus, limiting performance when multiple drives are attached to the same USB 2 controller. When using USB 2 drives, plug them directly into different USB controllers on your computer, do not use USB hubs, and add USB 2 drives to a separate storage pool used only for storage spaces that do not require a high level of performance. |
What types of storage arrays can I use with Storage Spaces?
Storage arrays that provide direct connectivity to the physical disks they house and do not layer RAID implementations or abstract the disks in any way are compatible with Storage Spaces. Such arrays are also known as Just a Bunch of Disks (JBOD).
For Storage Spaces to identify disks by slot and leverage the array’s failure and identify/locate lights, the array must support SCSI Enclosure Services (SES) version 3. For a list of compatible arrays, see the
Windows Server Hardware Catalog.
Enclosure Awareness Support — Tolerating an Entire Enclosure Failing
To support deployments that require an added level of fault tolerance, Storage Spaces supports associating each copy of data with a particular JBOD enclosure. This capability is known as enclosure awareness. With enclosure awareness, if one enclosure fails
or goes offline, the data remains available in one or more alternate enclosures.
To use enclosure awareness with Storage Spaces, your environment must meet the following requirements:
- JBOD storage enclosures must support SCSI Enclosure Services (SES).
- Storage spaces must use the mirror resiliency type if you’re using Windows Server 2012:
- To tolerate one failed enclosure with two-way mirrors, you need three compatible storage enclosures.
- To tolerate two failed enclosures with three-way mirrors, you need five compatible storage enclosures.
What are the resiliency levels provided by Enclosure Awareness?
The following table lists the maximum simultaneous fault tolerance of solutions that have enclosure awareness enabled:
| Resiliency type | Three enclosures | Four enclosures |
|
Simple |
Not supported |
Not supported |
|
Two-way Mirror |
1 enclosure; or 1 disk* |
1 enclosure; or 1 disk* |
|
Three-way Mirror |
1 enclosure + 1 disk*; or 2 disks* |
1 enclosure + 1 disk*; or 2 disks* |
|
Single Parity |
Not supported |
Not supported |
|
Dual Parity |
Not supported |
1 enclosure + 1 disk*; or 2 disks* |
* per pool
What types of storage spaces can I use with a failover cluster?
Storage Spaces on Windows Server 2012 R2 supports creating a clustered storage pool when using mirror spaces, parity spaces, and simple spaces. Windows Server 2012 doesn’t support parity spaces on clustered storage pools. To cluster Storage Spaces, your
environment must meet the following requirements:
- All storage spaces in the storage pool must use fixed provisioning.
- Two-way mirror spaces must use three or more physical disks.
- Three-way mirror spaces must use five or more physical disks.
- Parity spaces are supported on Windows Server 2012 R2, but not Windows Server 2012.
- All physical disks in a clustered pool must be connected via SAS.
- All physical disks must support persistent reservations and pass the failover cluster validation tests.
Note: The SAS JBOD must be physically connected to all cluster nodes which will use the storage pool. Direct attached storage that is not connected to all cluster nodes is not usable for clustered pools with Storage Spaces.
What properties can I change after creating a storage space?
Upon creating a storage space, certain fundamental properties are locked in place. These fundamental properties include the provisioning type (thin or fixed), the resiliency type (simple, mirror, or parity), the number of columns the storage space striping
requires, and the striping interleave.
After creating a storage space, you can change properties that do not affect fundamental characteristics, such as the size of the storage space and its name.
How does Windows let me know of a disk failure?
When a disk failure occurs, Windows displays information on the disk failure in the following locations:
- The taskbar
- The Action Center
- The Storage Spaces Item in Control Panel (on Windows 8.1 and Windows

- The Storage Pools section of the File and Storage Services role in Server Manager (on Windows Server)
- The Windows PowerShell cmdlet Get-PhysicalDisk

How does Storage Spaces respond to errors on physical disks?
Physical disks often experience errors of varying severity, from errors that the disk can transparently recover from, without interruption or data loss; to errors that are catastrophic and can cause data loss. For more information, see
How Storage Spaces responds to errors on physical disks.
What information will Storage Spaces put in the Event log?
To help with administration, Storage Spaces will log certain events in the Event log. For more information on the events logged by Storage Spaces, see the following:
- Storage Spaces Event 100
- Storage Spaces
Event 102 - Storage Spaces Event 103
- Storage Spaces Event 104
- Storage Spaces Event 200
- Storage Spaces Event 201
- Storage Spaces Event 202
- Storage Spaces Event 203
- Storage Spaces Event 300
- Storage Spaces Event 301
- Storage Spaces Event 302
- Storage Spaces
Event 303 - Storage Spaces Event 304
- Storage Spaces Event 306
- Storage Spaces
Event 307 - Storage Spaces
Event 308
How do I replace a physical disk?
If you are using the Storage Spaces item in Control Panel, replacing a physical disk is as simple as clicking the command to remove the old disk. After that, you can immediately disconnect the disk. In the background, Storage Spaces leverages resiliency
to reconstruct your data. Disk removal has three prerequisites:
- All storage spaces that depend on the disk are resilient and healthy (removing the disk will not succeed if a simple space depends on the disk). You can discover which storage spaces depend on a physical disk by piping the Get-PhysicalDisk
cmdlet to Get-VirtualDisk. For example:Get-PhysicalDisk -FriendlyName PhysicalDisk1 | Get-VirtualDisk
You can check the resiliency and health of your storage spaces by using the Get-VirtualDisk cmdlet. A storage space is resilient when ResiliencySettingName is either Mirror or Parity and healthy when HealthStatus is Healthy.
- The pool has at least as much unused capacity on other disks as the amount of data the old disk hosts. This ensures that the storage spaces can be reconstructed with a replacement disk. If the usage type of the disk is manual, then the
storage spaces that depend on the disk must have sufficient unused capacity on other disks in their list of disks they can use. In both cases, the unused capacity must be on disks that do not already host an extent of the same stripe as the old disk. This
can be satisfied by first adding the new disk to the pool, and, if applicable, adding it to the storage spaces’ lists of disks that they can use.Tip
You can check for unused capacity on disks the affected storage spaces are not using by subtracting AllocatedSize from Size, as reported by the Get-PhysicalDisk command. - If the pool is clustered, removing the disk would not cause the pool to have fewer than three disks, if the pool does not contain any three-way mirror spaces, or fewer than five disks, if the pool contains a three-way mirror space.
 Tip
Tip
If you are using Windows PowerShell, you must perform following procedure to remove the old disk, assuming that you meet the prerequisites for removing a physical disk.
Removing a physical disk by using Windows PowerShell
-
Open a Windows PowerShell session as an administrator.
-
Type the following command, replacing <diskname> with the friendly name of the disk:
Set-PhysicalDisk -FriendlyName <diskname> -Usage Retired
If the pool is clustered, you will need to run this command on the cluster node which has the cluster resource for the pool online.
-
Type the following command for each storage space that depended on the old disk, replacing <virtualdiskname> with the friendly name of the storage space:
Repair-VirtualDisk -FriendlyName <virtualdiskname>
If the pool is clustered, run this command on the cluster nodes that have the individual storage spaces’ cluster resource online and then run it again on the cluster node that has the pool’s cluster resource online.
-
Prior to performing step 5, you must wait for all active repair jobs to complete. To monitor the status of repair jobs, type the following command:
-
Type the following command:
Remove-PhysicalDisk -FriendlyName <diskname>
The above command did not work in my Windows Server 2012 R2 Essentials.
You have to do this in 2 steps. First give the disk to be removed a name and then remove;
example;
PS C:> $PDToRemove = Get-PhysicalDisk -Friendlyname "PhysicalDisk25"
PS C:> Remove-PhysicalDisk -PhysicalDisks $PDToRemove -StoragePoolFriendlyName "DemoPool"
-
Physically disconnect the old disk.
What are columns and how does Storage Spaces decide how many to use?
Besides offering resiliency to drive failures, Storage Spaces also offers increased performance by striping data across multiple disks. Storage Spaces describes a
stripe via two parameters, NumberOfColumns and
Interleave.
- A stripe represents one pass of data written to a storage space, with data written in multiple stripes (passes).
- Columns correlate to underlying physical disks across which one stripe of data for a storage space is written.
- Interleave represents the amount of data written to a single column per stripe.
The NumberOfColumns and Interleave parameters, which are accessible via Windows PowerShell or WMI, determine the width of the stripe (stripe_width = NumberOfColumns * Interleave). The stripe width determines how much data
and parity (in the case of parity spaces) Storage Spaces writes across multiple disks to increase performance available to apps.
Example 1: A Two-Column Simple Space
A simple example is a two-column simple space, which offers striping with no resiliency.
For the first stripe of data in this example, Storage Spaces writes 256 KB (the default Interleave value) to the first disk (column) in the storage pool, then 256 KB of data to the second disk in the pool. This yields a stripe width of 512 KB (2 columns
* 256 KB interleave).
Example 2: A Three-Column Parity Space
Another example is a three-column parity space (with a 256 KB stripe interleave), the simplest form of a parity space.
For the first stripe of data in this example, Storage Spaces writes 256 KB of data to the first disk (column), 256 KB of data to the second disk, and 256 KB of parity to the third disk. This yields a stripe size of 768 KB (3 columns * 256 KB of interleave).
As more data is written to the parity space, it rotates the column for the parity information among all three disks.
Example 3: A Two-Column Two-Way Mirror Space
Another example is a two-column two-way mirror space. Mirror spaces add a layer of data copies below the stripe, which means that a two-way mirror space duplicates each individual column’s data onto two disks.
For the first stripe of data in this example, Storage Spaces writes 256 KB of data to the first column, which is written in duplicate to the first two disks. For the second column of data, Storage Spaces writes 256 KB of data to the second column, which
is written in duplicate to the next two disks. The column-to-disk correlation of a two-way mirror is 1:2; for a three-way mirror, the correlation is 1:3.
Controlling the Number of Columns
You can control the number of columns and the stripe interleave when creating a new storage space by using the Windows PowerShell cmdlet
New-VirtualDisk with the NumberOfColumns and
Interleave parameters.
Each type of storage space has a minimum number of stripe columns which translates to a minimum number of physical disks, given their column-to-disk correlation (below).
|
Resiliency type |
Minimum number of columns |
Column-to-disk correlation |
Minimum number of disks |
Maximum column count |
|
Simple (no resiliency) |
1 |
1:1 |
1 |
N/A |
|
Two-way mirror |
1 |
1:2 |
2 |
N/A |
|
Three-way mirror |
1 |
1:3 |
5 |
N/A |
|
Single Parity |
3 |
1:1 |
3 |
8 |
| Dual Parity | 7 | 1:1 | 7 | 17 |
Due to striping, a storage space simultaneously allocates capacity from as many disks as its stripe requires. Therefore, when increasing pool capacity, you can usually achieve optimal pool capacity utilization when you add disks in multiples of the number
of disks the storage space needs. For example, adding disks in multiples of four might provide optimal capacity utilization for a pool comprised of two-column, two-way mirror spaces (2 columns + 2 data copies = 4 disks per stripe).
Note Storage Spaces in Windows Server 2012 R2 and earlier by default uses the largest column count possible given the number of disks you have and the resiliency type you select. This is useful for environments with a small number of disks
where you want to maximize performance and don’t have to replace disks very often. However, in environments with a large number of disks, use a column count number one less than the maximum. This allows Storage Spaces to automatically repair virtual disks
following a disk failure or after you retire a disk.
Why do I have a low capacity warning even though I still have unused pool capacity?
Storage Spaces provides advance notification of thinly provisioned storage spaces when the storage pool does not have enough capacity spread among a sufficient number of disks to continue to write new data. The default warning point is 70% capacity utilization.
To learn when Storage Spaces will generate a warning, consider the following example.
A two column, two-way mirror space that uses thin provisioning in a four disk pool
Two of the disks have 1TB capacity and two have 2TB capacity. Because a two column, two-way mirror space needs four disks (number_of_disks = NumberOfColumns * NumberOfDataCopies), it will evenly consume all four disks as it writes new data. When capacity
utilization of the two 1TB disks reaches 70%, Storage Spaces will warn of a low capacity condition. Even though the entire pool has 3.2TB free capacity, the thinly provisioned space will soon not be able to write any more data because the 1TB disks are nearly
fully consumed.
You can easily keep individual storage spaces’ low capacity warning synchronized with each other and with the pool by following the guidance in the next section, “How do I increase pool capacity?” from the moment of creating the pool and through all subsequent
expansions of the pool.
How do I increase pool capacity?
Storage Spaces can usually use the additional capacity from even a single additional drive. However, for optimal capacity utilization, consider the number of columns your storage spaces have and add disks in multiples of that number.
For example, consider a pool which has a four-column simple space, a one-column, two-way mirror space, and an eight-column parity space. The four-column simple space suggests you expand pool capacity in sets of four disks. The one-column, two-way mirror
space suggests you expand pool capacity in sets of two disks (for mirror spaces, you have to multiple the number of columns by the number of copies). The eight-column parity space suggests you expand pool capacity in sets of eight disks. In this example, you
would want to expand pool capacity in sets of eight disks as eight is a common multiple of the number of columns of each of the storage spaces in the pool.
What happens to Storage Spaces when moving physical disks between servers?
Storage Spaces records information about pools and storage spaces on the physical disks that compose the storage pool. Therefore, your pool and storage spaces are preserved when you move an entire storage pool and its physical disks from one computer to
another.
Windows Server 2012 starts storage that could potentially be shared with a cluster in a safe state. For Storage Spaces, that means the first time Windows connects to a storage pool, the pool starts as read-only and the storage spaces will start in a detached
state. To access your data, you must set the storage pool to read-write and then attach the storage spaces.
These steps do not apply to Windows 8 – storage pools start as read-write and storage spaces start as attached.
How do I check Storage Spaces resiliency health in a failover cluster?
The health of each storage space is available only from the cluster node that has the cluster resource for the storage space in the online state. Use Failover Cluster Management to discover which node has the cluster resource for a storage space in the online
state. Then use the Storage Pools section of the File and Storage Services role in Server Manager to view the health of the appropriate storage space.
You can also use the Get-VirtualDisk cmdlet on the node that has the cluster resource online to retrieve the storage space’s properties. The resiliency health of the storage space is noted in the storage space’s properties. To view the health status of a
storage pool, use the Get-StoragePool cmdlet on the cluster node that has the cluster resource for the pool in the online state.
How do I know repairing a storage space starts and successfully completes?
For the repair operation to complete successfully, the pool must have at least as much unused capacity as data to be repaired. If the storage space has a list of disks to use, then the unused capacity must reside on those disks. Unused capacity must reside
on disks which do not already host an extent of the stripe to be repaired. Because repair happens over time, this requirement must be continuously fulfilled for a successful repair completion.
For a quick check on whether repair is successfully progressing, use the Get-VirtualDisk cmdlet to look at the storage space’s
OperationalStatus. While repair is successfully progressing, OperationalStatus will be
In Service. When repair successfully completes, OperationalStatus is
OK. If repair is unable to continue, OperationalStatus returns to
Degraded.
What happens if I run out of physical capacity on a thinly provisioned storage space?
Since the storage space is thinly provisioned, allocation of new capacity occurs as needed. Once capacity is exhausted, there is no room to properly manage files on the storage space and there is a risk of data loss due to file corruption. To protect against
that, Windows takes the storage space offline – removing the storage space from the view of anything that was writing and thereby keeping your files safe. Once the pool has more drives, you can bring the storage space back online and continue running.
When additional drives are not immediately available, you can try to just bring the storage space back online and get to your files until additional drives are available. However, sometimes applications, or the file system itself, may continue writing once
the storage space is online. If that happens, then Windows’ safety measures will again protect your files by taking the storage space offline.
If additional drives are not immediately available and the storage space cannot remain online, then can still get to your files by using PowerShell to temporarily make your storage space read-only.
Get-VirtualDisk –Friendlyname name_of_your_space | Get-Disk | Set-Disk –IsReadOnly $true
Get-VirtualDisk –Friendlyname name_of_your_space | Get-Disk | Set-Disk –IsOffline $false
If you do that, then you will want to switch your storage space back to read-write once your storage pool has additional drives. You can use PowerShell to do that as well.
Get-VirtualDisk –Friendlyname name_of_your_space | Get-Disk | Set-Disk –IsOffline $true
Get-VirtualDisk –Friendlyname name_of_your_space | Get-Disk | Set-Disk –IsReadOnly $false
Get-VirtualDisk –Friendlyname name_of_your_space | Get-Disk | Set-Disk –IsOffline $false
Finally, if you do not add more drives to the storage pool (the control panel will tell you the minimum number of drives to add), then Windows will protect the files which are already on the storage space by taking the storage space offline. Adding new
drives to the storage pool provides the additional capacity the storage space needs. You will be able to bring your storage space back online and continue to copy new files into it.
See Also
- File and Storage Services
- Storage Spaces Overview
- Storage Management Overview
- Modifying a Storage Pool that has a Read-Only Configuration
- Provide cost-effective storage for Hyper-V workloads by using Windows Server (2012 R2)
- Provide cost-effective storage for Hyper-V workloads by using Windows Server: planning and design guide
(2012 R2)