In this post, we will show you how to disable or enable Virtualization-based Security (VBS) in Windows 11/10. You can follow these steps to turn on VBS if you find that Virtualization-based Security is not enabled on your computer.
Virtualization-based Security creates a secure and isolated region of memory from the regular operating system, allowing users to host various security solutions. While checking the status of Virtualization-based security in the System Information wizard, you might find it Not enabled in Windows 11/10. If so, here is everything you need to know about this security functionality, whether you should disable or enable it, its requirements, etc.

What is Virtualization-based Security (VBS) in Windows 11
Virtualization-based Security of VBS is a security functionality included in Windows 11, allowing users to prevent unsigned drivers, codes, software, etc., from residing in the memory of your system. That being said, it creates an isolated regime, which works as an additional security layer to protect your system. For your information, it works alongside Core isolation and Memory integrity.
The problem begins when it starts consuming more than usual resources. As it requires running in the background continuously, you must provide a lump sum of CPU resources for a smoother experience. It works fine when you do not game or run multiple high-performance apps simultaneously on mid-range hardware.
Should I disable Virtualization-based Security (VBS) in Windows 11?
Disabling Virtualization-based Security in Windows 11 frees up some resources, making your PC a lot smoother for gaming, but the security takes a beating for sure. If you think you do not need such a feature or want to compromise it with your gaming performance, you can undoubtedly disable Virtualization-based Security or VBS.
However, if you want to make your PC more secure in exchange for some resources, you can keep it running. Nonetheless, if the status is Not enabled, this article will let you turn it on.
If Virtualization-based Security is not enabled in Windows 11/10, then use one of these methods:
- Using Windows Security
- Using Registry Editor
To learn more about these steps, continue reading.
How to enable Virtualization-based Security (VBS) in Windows 11/10
1] Using Windows Security
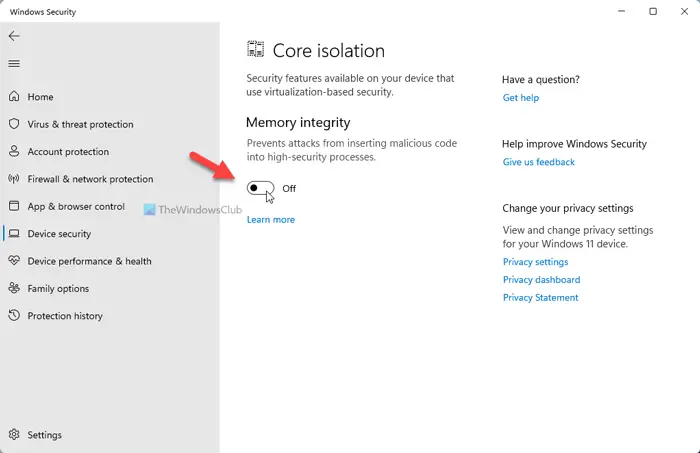
It is probably the easiest way to enable or disable Virtualization-based Security in Windows 11. In other words, you need to enable Core isolation to get it done. For that, do the following:
- Search for windows security in the Taskbar search box.
- Click on the individual search result.
- Switch to the Device security tab.
- Click on the Core isolation details option.
- Toggle the Memory integrity button to turn it on.
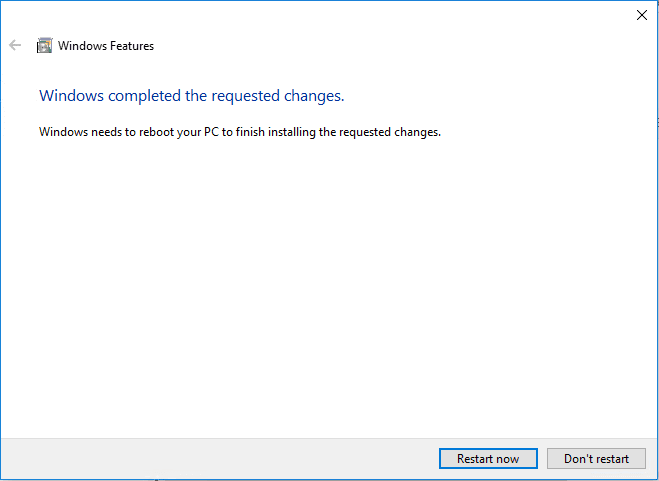
- Restart your computer.
After restarting, you can open the System Information window to find the status. However, if you want to disable Virtualization-based Security in Windows 11, you need to check if it is turned on. If so, toggle the same button to disable the feature.
2] Using Registry Editor
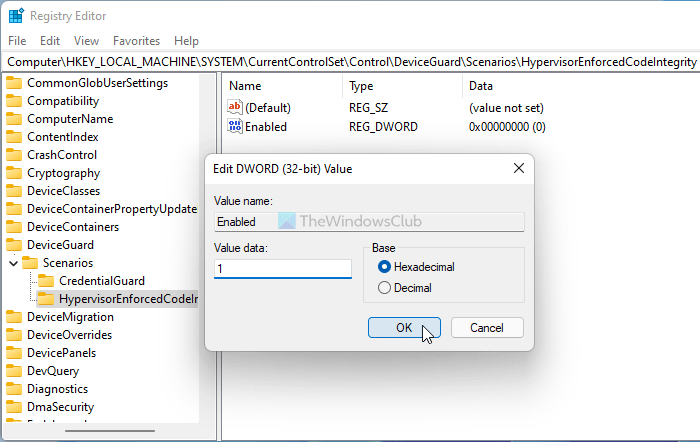
To turn on Virtualization-based Security in Windows 11 using Registry Editor, do the following:
Press Win+R to open the Run prompt.
Type regedit > press the Enter button > click the Yes option.
Go to-
HKEY_LOCAL_MACHINESYSTEMCurrentControlSetControlDeviceGuardScenariosHypervisorEnforcedCodeIntegrity
Right-click on HypervisorEnforcedCodeIntegrity > New > DWORD (32-bit) Value.
Name it as Enabled.
Double-click on it to set the Value data as 1.
Click the OK button.
Close all windows and restart your computer.
After that, you can find it enabled. However, if you want to disable Virtualization-based Security in Windows 11, you need to set the Value data as 0.
What are the requirements for VBS in Windows 11?
If the Virtualization-based Security is not enabled even after following the aforementioned guides, you need to check if your computer complies with the system requirements:
- x64 CPU
- SLAT or Second Level Address Translation
- Intel VT-D or AMD-Vi
- Trusted Platform Module 2.0
- SMM protection supported firmware
- UEFI memory reporting
- Security MOR 2
- HVCI or Hypervisor Code Integrity
How to check if VBS is enabled?
To check if VBS is enabled, you need to search for System Information in the Taskbar search box and click on the individual search result. Then, find out the Virtualization-based security section and check the status on the right side. You can find either Enabled or Not enabled.
Read: How to disable VBS?
How to disable VBS in Windows 11?
As mentioned in the post, to disable VBS in Windows 11, you need to open Windows Security. Then, switch to the Device security tab, and click on the Core isolation details. Following that, toggle the Memory integrity button to turn it off.
Hope this guide helped.
With version 6.7, VMware added support for the Windows 10 virtualization-based security (VBS) feature to the vSphere suite. Microsoft’s VBS is also available for Windows Server 2016 operating systems (OSes).
Contents
- What is Virtualization-based Security (VBS)?
- What are the restrictions on VBS-enabled VMs?
- What are the vSphere requirements for VBS?
- How do you enable VBS?
- Final words
- Author
- Recent Posts

Vladan Seget is an independent consultant, professional blogger, vExpert 2009-2021, VCAP-DCA/DCD and MCSA. He has been working for over 20 years as a system engineer.
What is Virtualization-based Security (VBS)?
VBS uses hardware and software virtualization features to enhance Windows system security by creating an isolated, hypervisor-restricted, specialized subsystem.
Basically, Microsoft is using a Windows role (or component) called the Hyper-V role, which boots the OS. This hypervisor allows Microsoft to isolate some sensitive information in places that would normally be accessible to the OS. Here we can think of cached credentials and such things.
Most modern systems have a Trusted Platform Module (TPM) 2.0 device built into the hardware. However, someone had to do it in software. And this is the goal. To give you an idea, here is a screenshot from a VMware blog post.

Microsoft VBS
As you can see, the Windows 10 virtual machine (VM) has a hypervisor role active and has the credentials stored elsewhere.
What are the restrictions on VBS-enabled VMs?
VBS is only usable on Windows 10 and Windows Server 2016, and vSphere features exist that are not compatible with VBS:
- VMware Fault Tolerance (FT)
- vSphere PCI passthrough
- vSphere hot add for CPU or memory
What are the vSphere requirements for VBS?
As mentioned above, VBS is only available as of vSphere 6.7. The requirements for working with VBS are:
- A VM with virtual hardware 14
- Hardware virtualization and an input/output memory management unit (IOMMU) exposed to the VM
- Secure boot enabled
- EFI firmware
- 64-bit CPU
- Intel VT-d or AMD-Vi ARM64 system memory management units (SMMUs)
- TPM 2.0
How do you enable VBS?
In the VMware vSphere client, first connect to vSphere and select the VM for which you want to enable VBS.
- Shut down the VM and tick the Enable box next to Virtualization Based Security under VM Options.

Enabling VBS
Note: The VM has to be booting EFI (not BIOS) to satisfy the requirements. If you are creating new Windows 10 or Windows 2016 VMs, you should make sure you are selecting UEFI firmware before installing. After installing the system, it is pretty difficult to switch.
And once the VM is up and running, we’ll need to activate the Hyper-V role. You can do this through a simple command appwiz.cpl, which automatically brings up the window where we select Add/Remove Turn Windows features on and off. Once there, we can look for the Hyper-V section and check the box Hyper-V Hypervisor.

Enabling the Hyper V Hypervisor
If you want to add a Hyper-V role on Windows Server 2016, you’ll use the Add roles and features wizard within your Server Manager.
Once you’re done, it’ll ask you to reboot the system.
Let’s continue after the VM comes up.
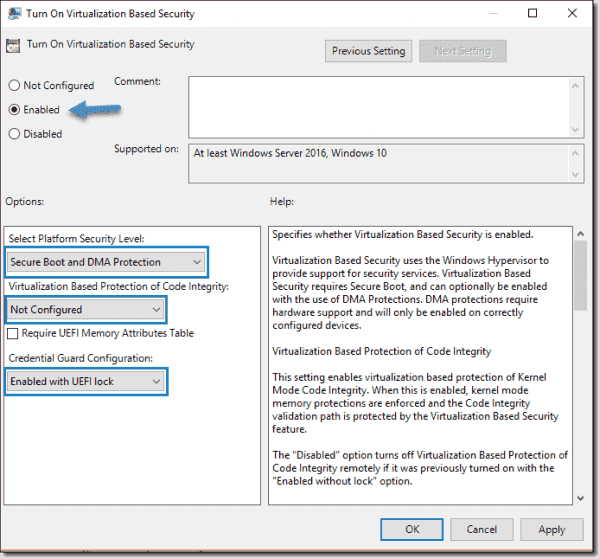
- In the VM, open gpedit.msc and browse to:
Computer Configuration > Administrative Templates > System > Device Guard > Turn On Virtualization Based Security. Set it to Enable and configure the options as follows:
- Select Platform Security Level: Secure Boot and DMA Protection
- Virtualization Based Protection of Code Integrity: Enabled with UEFI lock
- Credential Guard Configuration: Enabled with UEFI lock
If you want to be able to turn off Windows Defender Credential Guard remotely, choose Enabled without lock.
Credential Guard configuration
If you want to activate VBS for multiple systems, you can do this via Group Policy in your domain.
Final words
I think there will be further expansion of VBS in Windows Server 2019. It is a great feature that helps protect Windows against malware and all kinds of attacks where credentials are involved.
Subscribe to 4sysops newsletter!
VMware vSphere 6.7 has brought this feature in collaboration with Microsoft. It is great to see that these two giants now work hand in hand on features that improve security.
You can enable Microsoft virtualization-based security (VBS) on existing virtual machines for supported Windows guest operating systems.
Prerequisites
Enabling VBS is a process that involves first enabling VBS in the virtual machine then enabling VBS in the guest operating system.
Note: New virtual machines configured for Windows 10, Windows Server 2016, and Windows Server 2019 on hardware versions less than version 14 are created using Legacy BIOS by default. If you change the firmware type of a virtual machine from Legacy BIOS to UEFI, you must reinstall the guest operating system.
Intel hosts are recommended. See the vSphere Security documentation for information about acceptable CPUs and VBS best practices.
For more information about activating VBS on virtual machines on AMD platforms, see the VMware KB article at https://kb.vmware.com/s/article/89880.
The virtual machine must have been created using hardware version 14 or later, UEFI firmware, and one of the following supported guest operating systems:
- Windows 10 (64) bit or later releases
- Windows Server 2016 (64 bit) or later releases
Procedure
- Click Virtual Machines in the VMware Host Client inventory.
- Right-click a virtual machine in the list and select Edit settings from the pop-up menu.
- On the VM Options tab, enable or disable VBS for the virtual machine.
- Select the Enable Virtualization Based Security check box to enable VBS for the virtual machine.
- Deselect the Enable Virtualization Based Security check box to disable VBS for the virtual machine.
When you enable VBS, several options are automatically selected and become dimmed in the wizard.
- Click Save.
 Безопасность на основе виртуализации, Virtualization based security или VBS — функция Windows 11 и Windows 10, предотвращающая выполнение потенциально опасного кода в памяти компьютера, изолируя его. Функция полезная, но по некоторым отзывам её отключение может повысить производительность в играх, а некоторые программы могут не запускаться, если она включена.
В этой инструкции описаны способы отключить безопасность на основе виртуализации. Далее рассмотрено отключение Virtualization Based Security в редакторе локальной и групповой политики, а также альтернативные методы, если отключение этими способами не помогло.
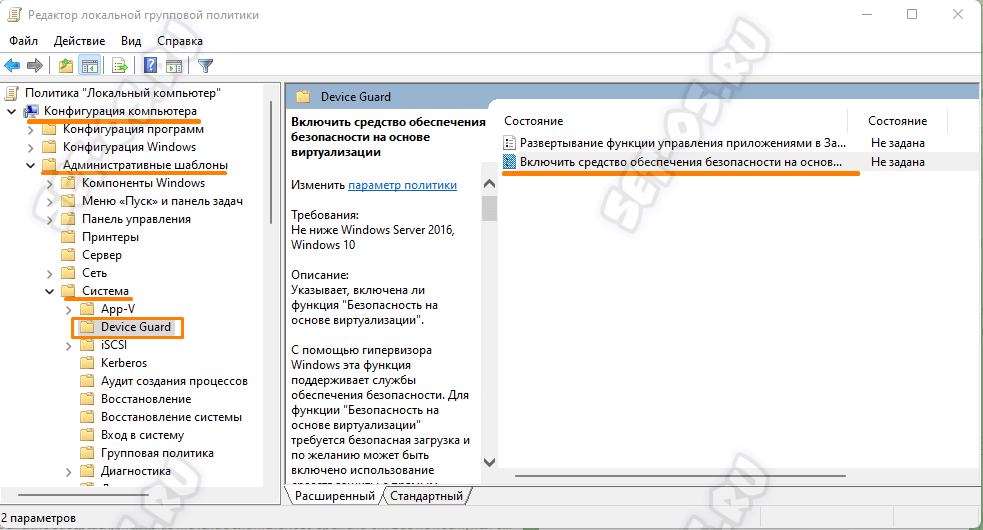
Как отключить безопасность на основе виртуализации в редакторе локальной групповой политики или редакторе реестра
Основной способ отключения Virtualization Based Security — настройка соответствующей политики в Windows. Если у вас установлена Pro или Enterprise версия системы, можно использовать редактор локальной групповой политики:
- Нажмите правой кнопкой мыши по кнопке «Пуск», выберите пункт «Выполнить», введите gpedit.msc и нажмите Enter.
- В редакторе локальной групповой политики перейдите к разделу «Конфигурация компьютера» — «Административные шаблоны» — «Система» — «Device Guard». Дважды кликните по пункту «Включить средство обеспечение безопасности на основе виртуализации» в правой панели.

- Установите значение «Отключено» и примените настройки.

- Перезагрузите компьютер.


В случае, если на вашем компьютере установлена домашняя редакция Windows, можно использовать редактор реестра:
- Нажмите клавиши Win+R на клавиатуре, введите regedit и нажмите Enter.
- Перейдите к разделу реестра
HKEY_LOCAL_MACHINESystemCurrentControlSetControlDeviceGuard
- Нажмите правой кнопкой мыши в пустом месте правой панели редактора реестра и создайте новый параметр DWORD с именем EnableVirtualizationBasedSecurity и установите значение 0 для него.

- При наличии такого параметра, дважды нажмите по нему и измените значение на 0.
- Перезагрузите компьютер.

В результате функция VBS будет отключена. Если несмотря на это какая-то программа требует отключить Virtualization Based Security для своей работы, используйте далее описанные методы.
Дополнительные методы отключения Virtualization Based Security
Если предыдущий вариант не помог, и какая-то программа при запуске требует отключить VBS, можно использовать дополнительные подходы. Учитывайте, что при их использовании также будут отключены другие встроенные функции виртуализации Windows 11 и Windows 10 (на базе Hyper-V):
- Запустите командную строку от имени администратора, введите команду
bcdedit /set hypervisorlaunchtype off
и нажмите Enter. После этого перезагрузите компьютер.
- Откройте окно «Программы и компоненты» в панели управления или с помощью Win+R — appwiz.cpl, нажмите «Включение или отключение компонентов Windows» слева, отключите компоненты «Application Guard в Microsoft Defender», «Hyper-V», «Платформа виртуальной машины», нажмите «Ок» и перезагрузите компьютер после удаления компонентов.


Обычно один из этих способов помогает решить проблемы, связанные с включенной функцией безопасности на основе виртуализации. Если вам требуется узнать текущий статус функции, вы можете нажать клавиши Win+R, ввести команду msinfo32 и нажать Enter.

В разделе «Сведения о системе» внизу списка вы найдете пункт «Безопасность на основе виртуализации» с нужной информацией.

Функция Безопасность на основе виртуализации (Virtualization Based Security или VBS) появилась ещё в Windows 10 и позже перекочевала в Windows 11. Смысл её работы в том, что VBS изолирует потенциально опасный код в памяти компьютера, предотвращая его выполнение напрямую в операционной системе. С точки зрения безопасности — Функция полезная. Но вот если у Вас слабый или игровой компьютер, то рекомендуется отключить безопасность на основе виртуализации в Windows для повышения производительности. Так же есть ряд приложений, которые вообще отказываются запускаться, если VBS включена.
В этой инструкции я покажу как выключить функцию Virtualization Based Security, используя редактор локальной и групповой политики Windows 11, а так же включить его обратно, при необходимости. А ещё расскажу про альтернативные способы, если вдруг через политики это сделать не получится.
Проверка состояния функции «Безопасность на основе виртуализации»
Прежде чем думать как отключить функцию — сначала проверьте работает ли она вообще. Как это сделать? Нам поможет инфопанель msinfo32.
Нажмите клавиши Win+R, введите команду «msinfo32» и нажмите на «Enter».
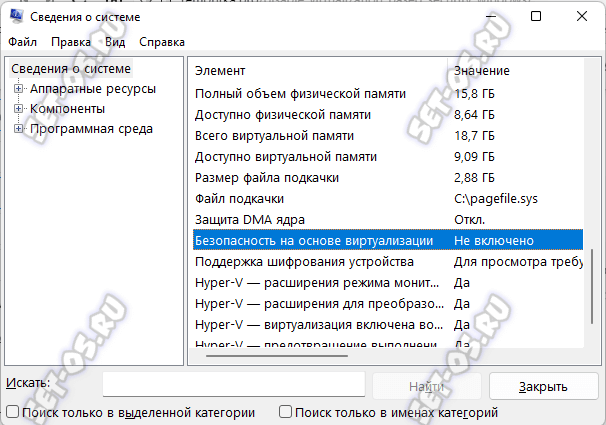
В разделе «Сведения о системе» прокрутите страничку вниз, где найдете пункт «Безопасность на основе виртуализации» — там будет указан текущий статус работы функции. Если стоит «Не включено», то и выключать не придётся!
Управляем Virtualization Based Security через групповые политики
Самый главный способ отключить Безопасность на основе виртуализации (Virtualization Based Security) — это настройка соответствующей групповой политики в Windows. Для этого надо открыть редактор групповых политик. Нажимаем правой кнопкой мыши по кнопке «Пуск» и выбираем пункт «Выполнить», вводим команду gpedit.msc и нажимаем клавишу «Enter».
Дальше, в редакторе локальной групповой политики надо открыть раздел «Конфигурация компьютера» ⇒ «Административные шаблоны» ⇒ «Система» ⇒ «Device Guard». В правой части окна кликните дважды по пункту «Включить средство обеспечение безопасности на основе виртуализации».
Чтобы отключить VBS Windows 11 — поставьте флажок на значение «Отключено» и нажмите кнопку «ОК».
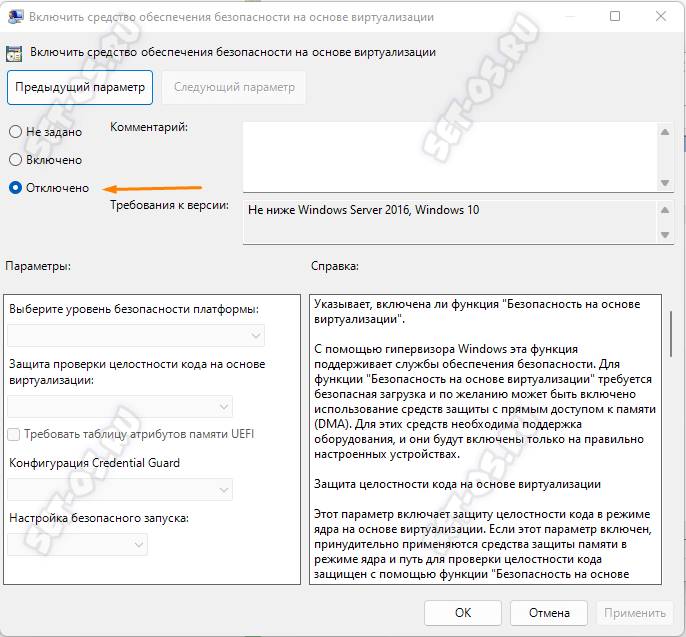
После этого нужно будет перезагрузить компьютер.
Если вдруг потребуется снова Virtualization Based Security включить, то опять открываем эту политику и ставим значение «Включено»:
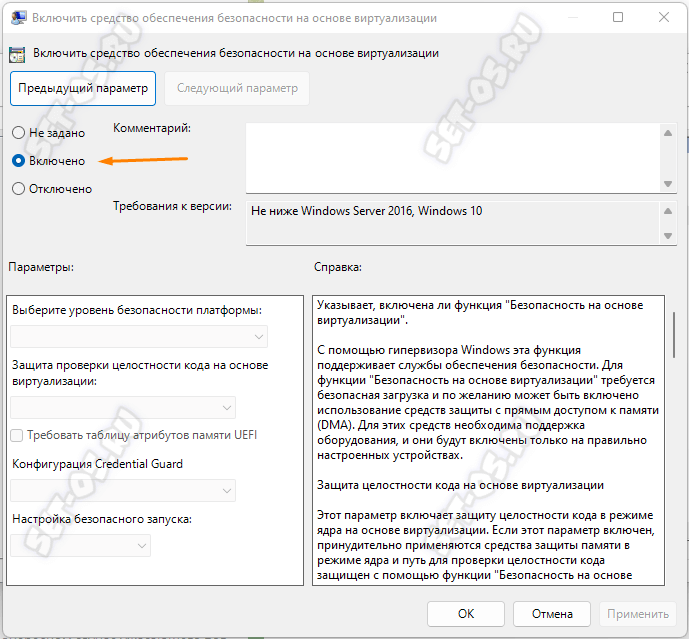
После этого нужно будет опять перезагрузить компьютер.
Windows 11 Home Edition
Для тех, у кого на ПК установлена домашняя версия Windows — Home Edition — в которой нет доступа к редактору групповых политик, тоже есть выход! Можно использовать редактор реестра! Чтобы его открыть — нажмите клавиши Win+R на клавиатуре, в появившемся окне «Выполнить» введите команду «regedit» и нажмите клавишу Enter.
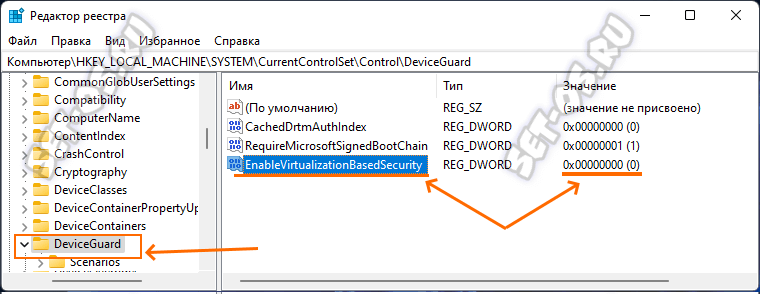
Перейдите вот в этот раздел реестра:
HKEY_LOCAL_MACHINE System CurrentControlSet Control DeviceGuard
После этого в правой части окна редактора надо нажать правой кнопкой мыши в пустом месте и через открывшееся меню создайте новый параметр DWORD с именем EnableVirtualizationBasedSecurity. Установите значение параметра равным «0». Если там уже есть такой параметр, то дважды кликните по нему и измените значение на «0».
Перезагрузите свой компьютер и проверьте работу функции через msinfo32.
Прочие способы отключить Virtualization Based Security
Если с редактором групповых политик у Вас есть какие-то сложности, то можно воспользоваться альтернативными способами.
Внимание! Использование альтернативных способов приведёт не только отключит Безопасность на основе виртуализации, но и саму виртуализацию на базе Hyper-V в Windows 11 и Windows 10. Обязательно учтите это!
Командная строка
Запустите командную строку от имени Администратора и введите команду:
bcdedit /set hypervisorlaunchtype off
Нажмите клавишу «Enter», чтобы выполнить её. Вот так:

После этого перезагрузите компьютер.
Отключение компонентов Windows 11
Отключить виртуализацию в Windows можно через раздел «Программы и компоненты». Для этого с помощью комбинации клавиш Win+R открываем окно «Выполнить», вводим команду: appwiz.cpl и нажимаем на кнопку «ОК». В открывшемся окне кликаем на ссылку «Включение или отключение компонентов Windows»:
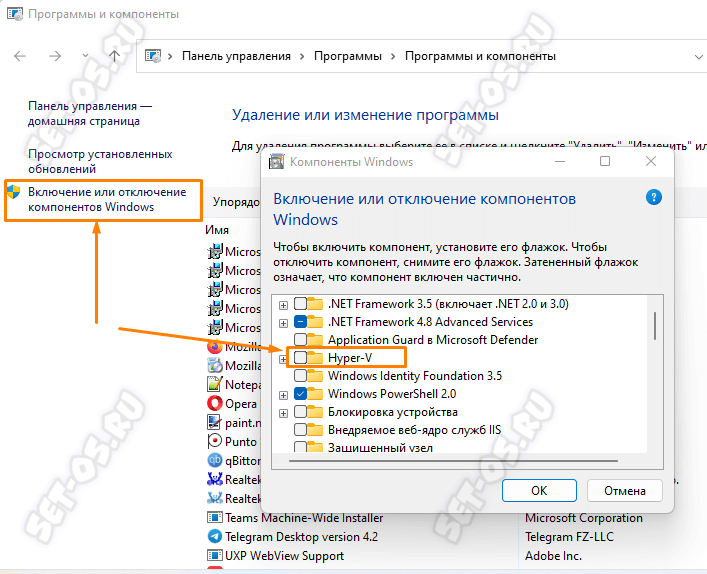
В появившемся окне «Компоненты Windows» найдите и отключите компоненты «Application Guard в Microsoft Defender», «Hyper-V», «Платформа виртуальной машины». Нажмите на кнопку «Ок». Перезагрузите компьютер.

on
July 19, 2021, 1:25 PM PDT
How to activate virtualization-based security and core isolation in Windows 10
Give your PC a little extra security. HVCI and VBS are available in 64-bit versions of Windows 10, but you must turn them on manually. We show you how.

Many of the hardware and software security features Microsoft lists as absolute requirements for a successful Windows 11 installation are already available as options in Windows 10. In some cases, getting these more advanced levels of security is just a matter of turning them on, particularly on newer PCs. One of the more powerful of these security features is the Hypervisor-Protected Code Integrity protocol.
Also known as memory integrity or core isolation protocols, HVIC uses virtualization-based security systems to strengthen code integrity policy enforcement. Recently purchased computers running 64-bit versions of Windows 10 will likely have HVIC up and running by default, but for security’s sake you should check out your system settings to be sure.
SEE: From data to devices: Strengthen your cyber defenses with these security policies (TechRepublic Premium)
How to activate VBS and HVCI in Windows 10
To check if VBS and HVIC are active and running on your Windows 10 personal computer, we will have to delve deeply into the Settings menu. Click or tap the Start Button and select Settings (gear icon). From the Settings menu select Update & Security and then select Windows Security from the navigation bar located in the left windowpane, as shown in Figure A.
Figure A

On this screen, click Device Security from the list of items in the right windowpane. As you can see in Figure B, this Settings screen deals with several advanced Windows 10 security protocols.
Figure B

To check the status of HVIC we want to drill down on core isolation, so click the Core Isolation Details link to reveal the details page shown in Figure C.
Figure C

If your Windows 10 PC is capable, it is a good idea to turn the memory integrity features on. Just toggle the switch to the “on” position. After answering a security check, you will have to restart your PC for the protocols to take effect.
Why activate VBS and HVIC?
VBS uses Hyper-V to create and isolate a secure memory region from the operating system, which is used to protect Windows 10 and Windows 11 from security vulnerabilities introduced by legacy support. HVCI takes advantage of VBS to check all kernel-mode drivers and binaries to prevent unsigned drivers and system files from being loaded into system memory. The security protocols also work with application code, catching malware before too much harm can be done.
SEE: Microsoft’s new security tool will discover firmware vulnerabilities, and more, in PCs and IoT devices (TechRepublic)
Unfortunately, HVIC and VBS are only available on systems running 64-bit versions of Windows 10 (and eventually Windows 11). Those of you running 32-bit systems will have to upgrade your software and possibly your hardware to access these core isolation security features. These features also require an updated input-output memory management unit. This is why so many older PCs have been failing the Windows 11 capability tests.
Microsoft’s hard line on updated hardware with advanced security features as a prerequisite for Windows 11 comes in direct response to recent high-profile cyberattacks involving ransomware and other malicious activity. Unfortunately, we are in an arms race with cyber criminals, and it is increasingly difficult for normal everyday users to keep up. If your PC is capable, HVIC and VBS can help stave off at least some of the more common attacks.
Also See
-
Photos: Windows 11 features you need to know
(TechRepublic) -
Microsoft may launch Windows 10 desktop-as-a-service this summer
(TechRepublic) -
Windows 11: Understanding the system requirements and the security benefits
(TechRepublic) -
How virtualisation is changing Windows application security
(TechRepublic) -
How to activate TPM 2.0 and Secure Boot in Windows 10
(TechRepublic) -
IT email templates: Security alerts
(TechRepublic Premium) -
Windows 11 has advanced hardware security. Here’s how to get it in Windows 10 today
(ZDNet) -
Must-read coverage: Windows 10
(TechRepublic on Flipboard)
-
Microsoft
-
Security
-
Software
-
Virtualization
Содержание
- Virtualization-based Security (VBS)
- Enable virtualization-based protection of code integrity
- HVCI Features
- How to turn on HVCI in Windows 10
- Windows Security app
- Enable HVCI using Intune
- Enable HVCI using Group Policy
- Use registry keys to enable virtualization-based protection of code integrity
- For Windows 10 version 1607 and later
- For Windows 10 version 1511 and earlier
- Validate enabled Windows Defender Device Guard hardware-based security features
- AvailableSecurityProperties
- InstanceIdentifier
- RequiredSecurityProperties
- SecurityServicesConfigured
- SecurityServicesRunning
- Version
- VirtualizationBasedSecurityStatus
- PSComputerName
- Troubleshooting
- How to turn off HVCI
- HVCI deployment in virtual machines
- Безопасность на основе виртуализации
- Связанные темы
- Включение функции защиты целостности кода на основе виртуализации
- Функции HVCI
- Как включить HVCI в Windows 10
- Безопасность Windows приложение
- Включить HVCI с помощью Intune
- Включить HVCI с помощью групповой политики
- Использование разделов реестра для включения защиты целостности кода на основе виртуализации
- Для Windows 10 версии 1607 и более поздней версии
- Для Windows 10 версии 1511 и более ранней версии
- Проверка включенных аппаратных функций безопасности Device Guard в Защитнике Windows
- AvailableSecurityProperties
- InstanceIdentifier
- RequiredSecurityProperties
- SecurityServicesConfigured
- SecurityServicesRunning
- Version
- VirtualizationBasedSecurityStatus
- PSComputerName
- Диагностика
- Отключение HVCI
- Развертывание HVCI в виртуальных машинах
Virtualization-based Security (VBS)
Virtualization-based security, or VBS, uses hardware virtualization features to create and isolate a secure region of memory from the normal operating system. Windows can use this «virtual secure mode» to host a number of security solutions, providing them with greatly increased protection from vulnerabilities in the operating system, and preventing the use of malicious exploits which attempt to defeat protections.
One such example security solution is Hypervisor-Enforced Code Integrity (HVCI), commonly referred to as Memory integrity, which uses VBS to significantly strengthen code integrity policy enforcement. Kernel mode code integrity checks all kernel mode drivers and binaries before they’re started, and prevents unsigned drivers or system files from being loaded into system memory.
VBS uses the Windows hypervisor to create this virtual secure mode, and to enforce restrictions which protect vital system and operating system resources, or to protect security assets such as authenticated user credentials. With the increased protections offered by VBS, even if malware gains access to the OS kernel the possible exploits can be greatly limited and contained, because the hypervisor can prevent the malware from executing code or accessing platform secrets.
Similarly, user mode configurable code integrity policy checks applications before they’re loaded, and will only start executables that are signed by known, approved signers. HVCI leverages VBS to run the code integrity service inside a secure environment, providing stronger protections against kernel viruses and malware. The hypervisor, the most privileged level of system software, sets and enforces page permissions across all system memory. Pages are only made executable after code integrity checks inside the secure region have passed, and executable pages are not writable. That way, even if there are vulnerabilities like a buffer overflow that allow malware to attempt to modify memory, code pages cannot be modified, and modified memory cannot be made executable.
VBS requires the following components be present and properly configured.
Please notice that TPM is not a must requirement, but we highly recommend to implement TPM.
Источник
Enable virtualization-based protection of code integrity
Applies to
This topic covers different ways to enable Hypervisor-protected code integrity (HVCI) on Windows 10. Some applications, including device drivers, may be incompatible with HVCI. This can cause devices or software to malfunction and in rare cases may result in a blue screen. Such issues may occur after HVCI has been turned on or during the enablement process itself. If this happens, see Troubleshooting for remediation steps.
Because it makes use of Mode Based Execution Control, HVCI works better with Intel Kaby Lake or AMD Zen 2 CPUs and newer. Processors without MBEC will rely on an emulation of this feature, called Restricted User Mode, which has a bigger impact on performance.
HVCI Features
How to turn on HVCI in Windows 10
To enable HVCI on Windows 10 devices with supporting hardware throughout an enterprise, use any of these options:
Windows Security app
HVCI is labeled Memory integrity in the Windows Security app and it can be accessed via Settings > Update & Security > Windows Security > Device security > Core isolation details > Memory integrity. For more information, see KB4096339.
Enable HVCI using Intune
Enabling in Intune requires using the Code Integrity node in the AppLocker CSP.
Enable HVCI using Group Policy
Use Group Policy Editor (gpedit.msc) to either edit an existing GPO or create a new one.
Navigate to Computer Configuration > Administrative Templates > System > Device Guard.
Double-click Turn on Virtualization Based Security.
Click Enabled and under Virtualization Based Protection of Code Integrity, select Enabled with UEFI lock to ensure HVCI cannot be disabled remotely or select Enabled without UEFI lock.

Click Ok to close the editor.
To apply the new policy on a domain-joined computer, either restart or run gpupdate /force in an elevated command prompt.
Use registry keys to enable virtualization-based protection of code integrity
Set the following registry keys to enable HVCI. This provides exactly the same set of configuration options provided by Group Policy.
Among the commands that follow, you can choose settings for Secure Boot and Secure Boot with DMA. In most situations, we recommend that you choose Secure Boot. This option provides Secure Boot with as much protection as is supported by a given computer’s hardware. A computer with input/output memory management units (IOMMUs) will have Secure Boot with DMA protection. A computer without IOMMUs will simply have Secure Boot enabled.
In contrast, with Secure Boot with DMA, the setting will enable Secure Boot—and VBS itself—only on a computer that supports DMA, that is, a computer with IOMMUs. With this setting, any computer without IOMMUs will not have VBS or HVCI protection, although it can still have WDAC enabled.
All drivers on the system must be compatible with virtualization-based protection of code integrity; otherwise, your system may fail. We recommend that you enable these features on a group of test computers before you enable them on users’ computers.
For Windows 10 version 1607 and later
Recommended settings (to enable virtualization-based protection of Code Integrity policies, without UEFI Lock):
If you want to customize the preceding recommended settings, use the following settings.
To enable VBS
To enable VBS and require Secure boot only (value 1)
To enable VBS with Secure Boot and DMA (value 3)
To enable VBS without UEFI lock (value 0)
To enable VBS with UEFI lock (value 1)
To enable virtualization-based protection of Code Integrity policies
To enable virtualization-based protection of Code Integrity policies without UEFI lock (value 0)
To enable virtualization-based protection of Code Integrity policies with UEFI lock (value 1)
For Windows 10 version 1511 and earlier
Recommended settings (to enable virtualization-based protection of Code Integrity policies, without UEFI Lock):
If you want to customize the preceding recommended settings, use the following settings.
To enable VBS (it is always locked to UEFI)
To enable VBS and require Secure boot only (value 1)
To enable VBS with Secure Boot and DMA (value 3)
To enable virtualization-based protection of Code Integrity policies (with the default, UEFI lock)
To enable virtualization-based protection of Code Integrity policies without UEFI lock
Validate enabled Windows Defender Device Guard hardware-based security features
Windows 10 and Windows Server 2016 have a WMI class for related properties and features: Win32_DeviceGuard. This class can be queried from an elevated Windows PowerShell session by using the following command:
The Win32_DeviceGuard WMI class is only available on the Enterprise edition of WindowsВ 10.
Mode Based Execution Control property will only be listed as available starting with Windows 10 version 1803.
The output of this command provides details of the available hardware-based security features as well as those features that are currently enabled.
AvailableSecurityProperties
This field helps to enumerate and report state on the relevant security properties for Windows Defender Device Guard.
| Value | Description |
|---|---|
| 0. | If present, no relevant properties exist on the device. |
| 1. | If present, hypervisor support is available. |
| 2. | If present, Secure Boot is available. |
| 3. | If present, DMA protection is available. |
| 4. | If present, Secure Memory Overwrite is available. |
| 5. | If present, NX protections are available. |
| 6. | If present, SMM mitigations are available. |
| 7. | If present, Mode Based Execution ControlВ is available. |
| 8. | If present, APIC virtualization is available. |
InstanceIdentifier
A string that is unique to a particular device. Valid values are determined by WMI.
RequiredSecurityProperties
This field describes the required security properties to enable virtualization-based security.
| Value | Description |
|---|---|
| 0. | Nothing is required. |
| 1. | If present, hypervisor support is needed. |
| 2. | If present, Secure Boot is needed. |
| 3. | If present, DMA protection is needed. |
| 4. | If present, Secure Memory Overwrite is needed. |
| 5. | If present, NX protections are needed. |
| 6. | If present, SMM mitigations are needed. |
| 7. | If present, Mode Based Execution Control is needed. |
SecurityServicesConfigured
This field indicates whether the Windows Defender Credential Guard or HVCI service has been configured.
| Value | Description |
|---|---|
| 0. | No services configured. |
| 1. | If present, Windows Defender Credential Guard is configured. |
| 2. | If present, HVCI is configured. |
| 3. | If present, System Guard Secure Launch is configured. |
| 4. | If present, SMM Firmware Measurement is configured. |
SecurityServicesRunning
This field indicates whether the Windows Defender Credential Guard or HVCI service is running.
| Value | Description |
|---|---|
| 0. | No services running. |
| 1. | If present, Windows Defender Credential Guard is running. |
| 2. | If present, HVCI is running. |
| 3. | If present, System Guard Secure Launch is running. |
| 4. | If present, SMM Firmware Measurement is running. |
Version
This field lists the version of this WMI class. The only valid value now is 1.0.
VirtualizationBasedSecurityStatus
This field indicates whether VBS is enabled and running.
| Value | Description |
|---|---|
| 0. | VBS is not enabled. |
| 1. | VBS is enabled but not running. |
| 2. | VBS is enabled and running. |
PSComputerName
This field lists the computer name. All valid values for computer name.
Another method to determine the available and enabled Windows Defender Device Guard features is to run msinfo32.exe from an elevated PowerShell session. When you run this program, the Windows Defender Device Guard properties are displayed at the bottom of the System Summary section.
Troubleshooting
A. If a device driver fails to load or crashes at runtime, you may be able to update the driver using Device Manager.
B. If you experience software or device malfunction after using the above procedure to turn on HVCI, but you are able to log in to Windows, you can turn off HVCI by renaming or deleting the SIPolicy.p7b file from the file location in step 3 above and then restart your device.
C. If you experience a critical error during boot or your system is unstable after using the above procedure to turn on HVCI, you can recover using the Windows Recovery Environment (Windows RE). To boot to Windows RE, see Windows RE Technical Reference. After logging in to Windows RE, you can turn off HVCI by renaming or deleting the SIPolicy.p7b file from the file location in step 3 above and then restart your device.
How to turn off HVCI
Run the following command from an elevated prompt to set the HVCI registry key to off:
Restart the device.
To confirm HVCI has been successfully disabled, open System Information and check Virtualization-based security Services Running, which should now have no value displayed.
HVCI deployment in virtual machines
HVCI can protect a Hyper-V virtual machine, just as it would a physical machine. The steps to enable WDAC are the same from within the virtual machine.
WDAC protects against malware running in the guest virtual machine. It does not provide additional protection from the host administrator. From the host, you can disable WDAC for a virtual machine:
Источник
Безопасность на основе виртуализации
Безопасность на основе виртуализации (VBS) использует функции виртуализации оборудования для создания и изоляции защищенного региона памяти от обычной операционной системы. Windows может использовать этот «виртуальный безопасный режим» для размещения ряда решений по обеспечению безопасности, предоставляя им значительно повышенную защиту от уязвимостей в операционной системе и предотвращая использование вредоносных эксплойтов, пытающихся предотвратить защиту.
Одним из таких примеров решения безопасности является Hypervisor-Enforcedная целостность кода (обязательная политика HVCI), которая, как правило, называется целостностью памяти, которая использует VBS для значительного усиления применения политики целостности кода. Целостность кода в режиме ядра проверяет все драйверы и двоичные файлы режима ядра перед их запуском и предотвращает загрузку неподписанных драйверов или системных файлов в системную память.
VBS использует гипервизор Windows для создания этого виртуального безопасного режима, а также для обеспечения ограничений, которые защищают критически важные ресурсы системы и операционной системы или защищают активы безопасности, например учетные данные пользователя, прошедшего проверку подлинности. Благодаря расширенным средствам защиты, предоставляемым VBS, даже если вредоносная программа получает доступ к ядру ОС, возможные эксплойты могут быть значительно ограничены и храниться, так как гипервизор может препятствовать выполнению кода или доступу к секретам платформы.
Аналогично, настраиваемая политика целостности кода в пользовательском режиме проверяет приложения перед их загрузкой и запустит только исполняемые файлы, подписанные известными, утвержденными подписавшими. ОБЯЗАТЕЛЬНАЯ политика HVCI использует VBS для запуска службы целостности кода в безопасной среде, обеспечивая более надежную защиту от вирусов и вредоносных программ ядра. Гипервизор, самый Привилегированный уровень программного обеспечения системы, устанавливает и применяет разрешения страницы во всей системной памяти. Страницы становятся исполняемыми только после прохождения проверки целостности кода в защищенной области, а исполняемые страницы недоступны для записи. Таким образом, даже если существуют уязвимости, например переполнение буфера, которые позволяют вредоносным программам пытаться изменить память, кодовые страницы не могут быть изменены, а измененная память не может быть сделана исполняемой.
Для VBS необходимо, чтобы были установлены и правильно настроены следующие компоненты.
Обратите внимание, что доверенный платформенный модуль не обязательно должен быть обязательным, но мы настоятельно рекомендуем реализовать TPM.
| Требования к оборудованию | Сведения | ||||||||||||||||||||||||||||||||||||||||||||||||||||||||||||||||||||||
|---|---|---|---|---|---|---|---|---|---|---|---|---|---|---|---|---|---|---|---|---|---|---|---|---|---|---|---|---|---|---|---|---|---|---|---|---|---|---|---|---|---|---|---|---|---|---|---|---|---|---|---|---|---|---|---|---|---|---|---|---|---|---|---|---|---|---|---|---|---|---|---|
| 64-разрядный ЦП. | для обеспечения безопасности на основе виртуализации (VBS) требуется низкоуровневая оболочка Windows, которая поддерживается только на 64-разрядных процессорах IA с расширениями виртуализации, включая Intel VT-X и AMD-v. | ||||||||||||||||||||||||||||||||||||||||||||||||||||||||||||||||||||||
| преобразование адресов второго уровня (SLAT); | VBS также требует, чтобы поддержка виртуализации процессора включала преобразование адресов второго уровня (SLAT), Intel VT-x2 с расширенными таблицами страниц (EPT) или AMD-v с быстрым индексированием виртуализации (РВИ). | ||||||||||||||||||||||||||||||||||||||||||||||||||||||||||||||||||||||
| Иоммус или Сммус (Intel VT-D, AMD-VI, ARM64 Сммус) | Все устройства ввода-вывода, поддерживающие DMA, должны находиться за IOMMU или СММУ. IOMMU можно использовать для повышения устойчивости системы от атак с использованием памяти. | ||||||||||||||||||||||||||||||||||||||||||||||||||||||||||||||||||||||
| доверенный платформенный модуль (TPM) 2.0; | Достаточно доверенных платформенных или дискретных микропрограмм. Дополнительные сведения см. в разделе доверенный платформенный модуль (TPM) (TPM) 2,0. | ||||||||||||||||||||||||||||||||||||||||||||||||||||||||||||||||||||||
| Поддержка встроенного по для защиты SMM | системное встроенное по должно соответствовать рекомендациям по усилению защиты кода SMM, описанным в спецификации Windows «таблица мер по снижению безопасности» (вмст). спецификация WSMT содержит сведения о таблице ACPI, которая была создана для использования с операционными системами Windows, поддерживающими функции безопасности на основе виртуализации Windows (VBS). Встроенное по должно реализовывать защиту, описанную в спецификации WSMT, и устанавливать соответствующие флаги защиты, как описано в спецификации, чтобы сообщить о соответствии требованиям к операционной системе. | ||||||||||||||||||||||||||||||||||||||||||||||||||||||||||||||||||||||
| Отчеты о памяти Единый интерфейс EFI (UEFI) | Встроенное по UEFI должно соответствовать следующему формату отчетов карт памяти и правилам выделения памяти, чтобы обеспечить совместимость с VBS.
Связанные темыДополнительные сведения о Hyper-V см. в статье Hyper-V в Windows Server 2016 или Знакомство с Hyper-V в Windows 10. Дополнительные сведения о гипервизоре см. в статье Спецификация гипервизора. Источник Включение функции защиты целостности кода на основе виртуализацииОбласть применения В этом разделе освещаются различные способы обеспечения целостности кода с защитой гипервизора (HVCI) на Windows 10. Некоторые приложения, включая драйверы устройств, могут быть несовместимы с HVCI. Это может привести к сбою устройств или программного обеспечения, а в редких случаях может привести к синему экрану. Такие проблемы могут возникать после включения службы HVCI или непосредственно во время самого процесса активации службы. В этом случае см. действия по устранению неполадок. Так как используется управление выполнением на основе режима, HVCI лучше работает с процессорами Intel Kaby Lake или AMD Zen 2 и более новыми. Процессоры без MBEC будут полагаться на эмуляцию этой функции под названием Ограниченныйрежим пользователя, которая оказывает большее влияние на производительность. Функции HVCIКак включить HVCI в Windows 10Чтобы включить HVCI на Windows 10 устройствах с вспомогательным оборудованием на предприятии, используйте любой из этих параметров: Безопасность Windows приложениеHVCI помечена **** целостностью памяти в приложении Безопасность Windows, и к **** нему можно получить доступ с помощью Параметры Update & Security Безопасность Windows Security > **** > **** > **** > Core isolation. > **** Дополнительные сведения см. в kB4096339. Включить HVCI с помощью IntuneВключение в Intune требует использования узла целостности кода в CSP AppLocker. Включить HVCI с помощью групповой политикиИспользуйте редактор групповой политики (gpedit.msc) для редактирования существующего GPO или создания нового. Перейдите к компьютерной > конфигурации административных шаблонов > Системная > гвардия устройства. Дважды щелкните кнопку Включив безопасность на основе виртуализации. Нажмите кнопку Включено и в статье Защита целостности кода на основе виртуализации выберитеВключено с помощью блокировки UEFI, чтобы обеспечить удаленное отключение HVCI или выбрать включенную без блокировки UEFI.
Нажмите кнопку Ок, чтобы закрыть редактор. Чтобы применить новую политику на компьютере, подключимом к домену, перезапустите или запустите в gpupdate /force командной подсказке. Использование разделов реестра для включения защиты целостности кода на основе виртуализацииУстановите следующие значения разделов реестра для включения HVCI. При этом доступен тот же набор параметров конфигурации, что и при использовании групповой политики. Для следующих команд можно выбрать параметры для безопасной загрузки и безопасной загрузки с DMA. В большинстве случаев рекомендуем выбирать параметр Безопасная загрузка. Этот параметр обеспечивает безопасную загрузку, а уровень защиты ограничен только оборудованием конкретного компьютера. Компьютер с модулями управления памятью ввода-вывода (IOMMU) обеспечит безопасную загрузку с защитой DMA. На компьютере без IOMMU будет включена обычная безопасная загрузка. Если же выбрать параметр Безопасная загрузка и защита DMA, безопасная загрузка— и сама функция VBS— будет включаться только на компьютерах, поддерживающих DMA, то есть оснащенных модулями IOMMU. При использовании этого параметра на компьютерах без модулей IOMMU не будет включаться защита VBS или HVCI, но на них можно будет по-прежнему включать WDAC. Все драйверы в системе должны поддерживать функцию защиты целостности кода на основе виртуализации. В противном случае может произойти сбой в системе. Рекомендуем испытать эти функции на группе тестовых компьютеров, прежде чем включать их на компьютерах пользователей. Для Windows 10 версии 1607 и более поздней версииРекомендуемые параметры (для включения политик защиты целостности кода на основе виртуализации без блокировки UEFI): Если вы хотите настроить предыдущие рекомендуемые параметры, используйте следующие параметры. Включение безопасности на основе виртуализации Включение VBS и использование только безопасной загрузки (значение 1) Чтобы включить VBS с безопасной загрузкой и DMA (значение 3) Включение VBS без блокировки UEFI (значение 0) Включить VBS с блокировкой UEFI (значение 1) Включение политик защиты целостности кода на основе виртуализации Включение политик защиты целостности кода на основе виртуализации без блокировки UEFI (значение 0) Включить защиту политик целостности кода на основе виртуализации с помощью блокировки UEFI (значение 1) Для Windows 10 версии 1511 и более ранней версииРекомендуемые параметры (для включения политик защиты целостности кода на основе виртуализации без блокировки UEFI): Если вы хотите настроить предыдущие рекомендуемые параметры, используйте следующие параметры. Включение VBS (функция всегда заблокирована на UEFI) Включение VBS и использование только безопасной загрузки (значение 1) Чтобы включить VBS с безопасной загрузкой и DMA (значение 3) Включение политик защиты целостности кода на основе виртуализации (с блокировкой UEFI по умолчанию) Включение политик защиты целостности кода на основе виртуализации без блокировки UEFI Проверка включенных аппаратных функций безопасности Device Guard в Защитнике WindowsВ Windows10 и Windows Server 2016 есть класс WMI для свойств и функций, связанных с Device Guard: Win32_DeviceGuard. Этот класс можно запросить из сеанса Windows PowerShell с повышенными привилегиями с помощью следующей команды: Класс WMI Win32_DeviceGuard доступен только в версии Windows10 Корпоративная. Свойство Mode Based Execution Control будет перечислены как доступное только с Windows 10 версии 1803. Выходные данные этой команды включают сведения о доступных аппаратных функциях безопасности, а также о включенных на данный момент прочих функциях. AvailableSecurityPropertiesЭто поле помогает регистрировать состояние соответствующих свойств безопасности Device Guard в Защитнике Windows и сообщать о нем.
InstanceIdentifierСтрока, уникальная для конкретного устройства. Допустимые значения определяются классом WMI. RequiredSecurityPropertiesВ этом поле содержится описание свойств безопасности, необходимых для включения средства обеспечения безопасности на основе виртуализации.
SecurityServicesConfiguredВ этом поле указано, настроен ли Credential Guard в Защитнике Windows или служба HVCI.
SecurityServicesRunningВ этом поле указано, работает ли Credential Guard в Защитнике Windows или служба HVCI.
VersionВ этом поле указана версия данного класса WMI. Единственным допустимым значением на данный момент является 1.0. VirtualizationBasedSecurityStatusВ этом поле содержатся сведении о включении и выполнении VBS.
PSComputerNameВ этом поле указано имя компьютера. Все допустимые значения имени компьютера. Другим методом определения доступных и включенных функций Device Guard является запуск msinfo32.exe из одного из сеансов PowerShell высшего уровня. При запуске этой программы свойства Device Guard в Защитнике Windows отображаются в нижней части раздела System Summary. ДиагностикаА. Если драйверу устройства не удается загрузиться или его работа завершается сбоем во время выполнения, можно обновить драйвер с помощью диспетчера устройств. Б. Если после описанной выше процедуры включения HVCI возникают сбои программного обеспечения или устройства, но вы можете войти в Windows, можно отключить HVCI, переименовав или удалив файл SIPolicy.p7b из его расположения, указанного в шаге 3, а затем перезапустить устройство. В. При возникновении критической ошибки во время загрузки или при нестабильной работе системы после использования описанной выше процедуры включения HVCI, можно восстановить нормальную работу с помощью среды восстановления Windows (Windows RE). Инструкции по загрузке среды восстановления Windows см. в разделе Технический справочник по Windows RE. После входа в Windows RE можно отключить HVCI, переименовав или удалив файл SIPolicy.p7b из его расположения, описанного в шаге 3, и перезагрузить устройство. Отключение HVCIЗапустите следующую команду из приподнятой подсказки, чтобы завести ключ реестра HVCI: Чтобы убедиться в успешном отключении HVCI, откройте «Сведения о системе» и проверьте параметр Запущенные службы защиты на основе виртуализации, в котором теперь не должно отображаться значение. Развертывание HVCI в виртуальных машинахHVCI может защитить виртуальную Hyper-V, как и физический компьютер. Действия, позволяющие включить WDAC, одинаковы из виртуальной машины. WDAC защищает от вредоносных программ, запущенных в гостевой виртуальной машине. Средство не обеспечивает дополнительную защиту от администратора узла. С хоста можно отключить WDAC для виртуальной машины: Источник Adblock |


One of the many areas of VMware vSphere 6.7 that has seen fantastic improvements has been in the realm of security. VMware has shown they are diligently committed to continuing to strive for excellence when it comes to tomorrow’s security needs in the enterprise datacenter. There are really big security features with vSphere 6.7 – notably including – TPM 2.0 support for ESXi, Virtual TPM 2.0 for VMs, support for Microsoft Virtualization Based Security, and multiple syslog targets. One of the really cool security features that I have been anxious to try out is the support for Microsoft Virtualization Based Security. What is Microsoft Virtualization Based Security and what are its security benefits? How do we go about enabling Windows 10 Virtualization Based Security with vSphere 6.7 in a virtual machine?
What is Microsoft Virtualization Based Security?
Microsoft Virtualization Based Security or VBS by its definition from Microsoft uses hardware virtualization features to create and isolate a secure region of memory from the normal operating system. In essence, Microsoft is using its hypervisor, Hyper-V, to boot the operating system. Additionally this underlying hypervisor allows Microsoft to be able to protect certain extremely sensitive pieces of information that would normally reside in the operating system itself, such as cached credentials, but instead, with Virtualization Based Security enabled, Microsoft is using the hypervisor as a restricted memory space where sensitive information such as credentials can be stored instead of the operating system itself.
However, as probably stood out in the description above, Virtualization Based Security uses “hardware virtualization features…” to implement this new security layer. If you are running a virtual machine, we are not exposing the hardware virtualization features. However, that is where VMware vSphere 6.7 comes into play here and really shines. With VMware vSphere 6.7, VMware has worked very closely with Microsoft to virtualize these “hardware” features that VBS expects to be present, so that in a virtual machine, these features can be turned on without issue. The ESXi hypervisor presents these features to the underlying guest operating system such as Windows 10 so VBS can successfully run. How cool is that?!
The VBS features are able to run because VMware has enabled the following features in ESXi 6.7 to be presented to the guest operating system in the virtual machine:

- Nested virtualization
- IOMMU
- EFI firmware
- Secure Boot
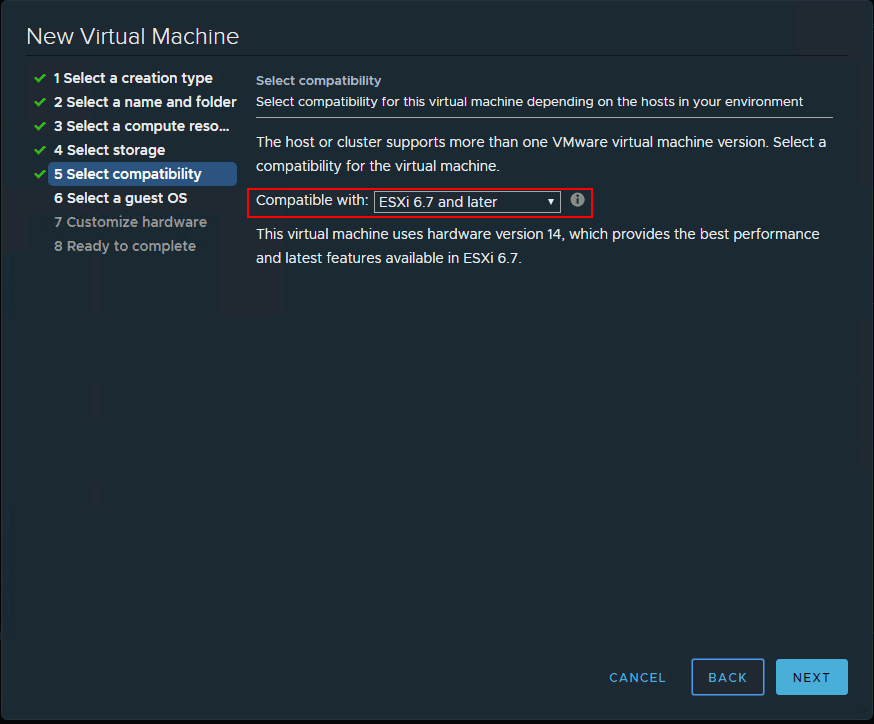
Below, I am creating a Windows 10 Pro virtual machine in a nested ESXi 6.7 vSphere environment. Here I am choosing the ESXi 6.7 and later compatibility level (which I believe is a requirement, however, will update the post if I find otherwise).
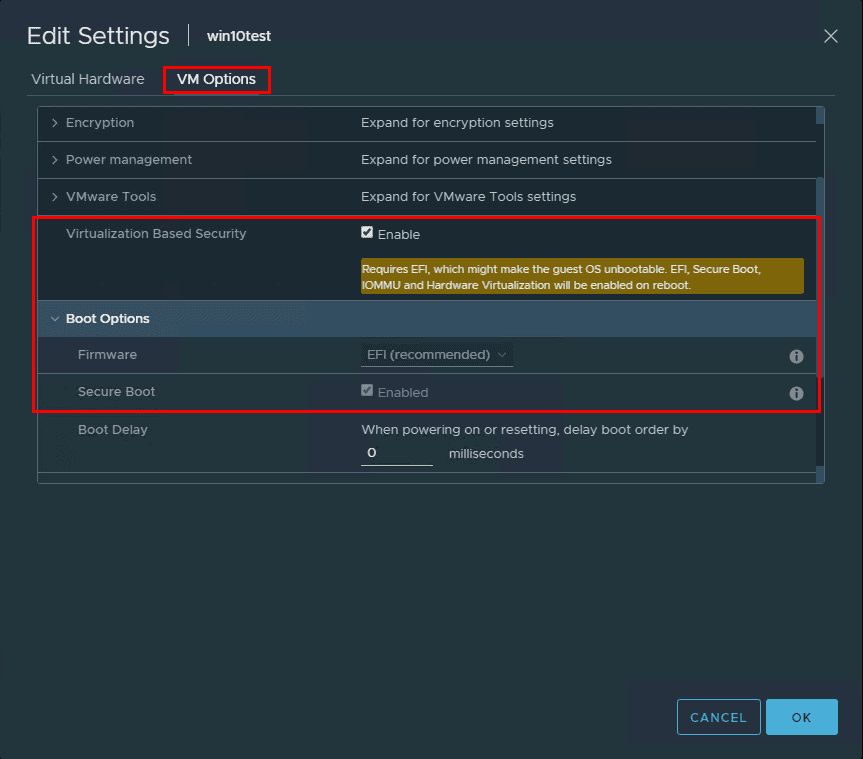
After creating the new Windows 10 VM and installing Windows, I powered off the virtual machine (powering off is required to enable the feature) and configured the VM for Virtualization Based Security. This is accomplished with a single checkbox! Right click a virtual machine choose Edit Settings >> VM Options. You will see the Virtualization Based Security option. Click the checkbox to Enable. Note the message that is displayed when the checkbox is enabled.
Requires EFI, which might make the guest OS unbootable. EFI, Secure Boot, IOMMU and Hardware Virtualization will be enabled on reboot.
Now, after booting the Windows 10 Pro 1803 VM back up, let’s go through the steps to enable Virtualization Based Security. The next two steps can be done in either order, however, I like to enable the group policy setting first for VBS and then enable Hyper-V in Windows 10 so that after the feature is enabled, the one reboot is all that needs to take place. In my testing, these appear to be able to be done in either order.
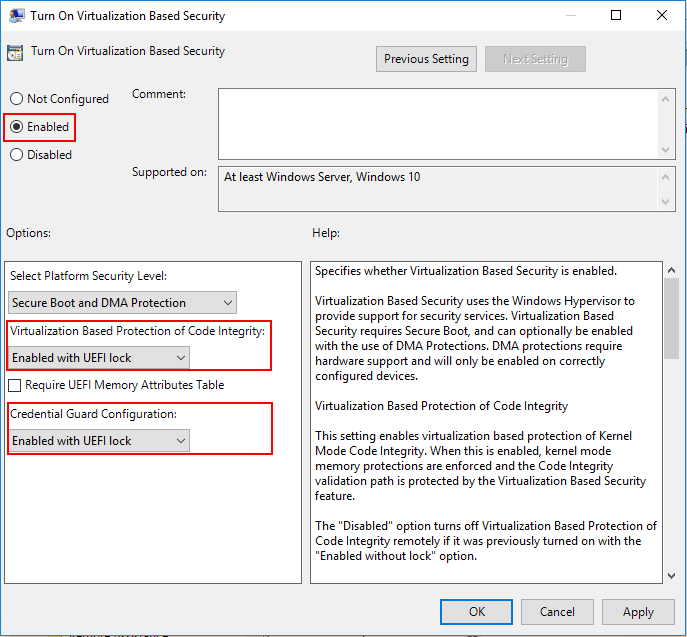
To navigate to the Group Policy setting that needs to be enabled, open up the local group policy editor by typing gpedit.msc in a run menu. Navigate to Computer Configuration >> Administrative Templates >> System > Device Guard >> Turn On Virtualization Based Security. Set the policy to Enabled. We will also set the following settings:
- Select Platform Security level: Secure Boot and DMA Protection
- Virtualization Based Protection of Code Integrity: Enabled with UEFI lock
- Credential Guard Configuration: Enabled with UEFI lock
If you want to be able to enable or disable this setting remotely choose the Enabled without UEFI lock option.
Now that we have the option turned on in vSphere 6.7 and the group policy entry set for the Windows 10 Pro 1803 virtual machine, we enable the Hyper-V hypervisor in Windows. An easy way to get to the Turn Windows features on or off is the appwiz.cpl command. Choose the Hyper-V checkbox then select only the Hyper-V Platform and Hyper-V Hypervisor options. You can enable the Hyper-V Management Tools if you want, however, they are not needed for VBS.

After enabling the Hyper-V feature, you will be asked to restart Windows.

Verifying Virtualization Based Security Is Enabled in Windows 10
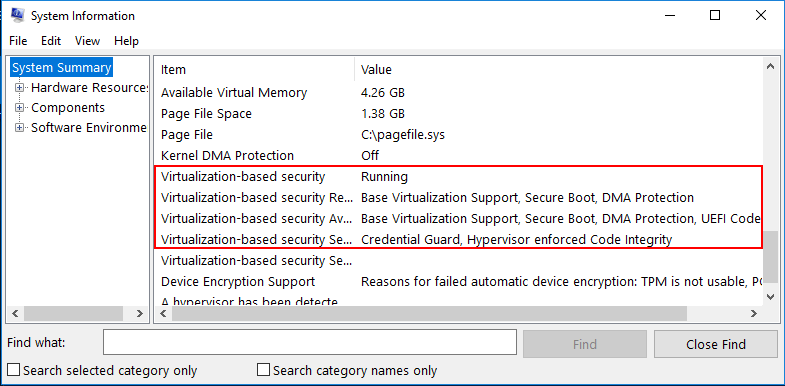
To verify that Virtualization Based Security is enabled in our Windows 10 Pro 1803 workstation, we can use the msinfo32.exe command. Simply type it at a run or search menu and we will take a look at the entries presented. Notice under the System Summary node, if you scroll down, you will see the entries highlighted below. Notably, we want to see the following:
- Virtualization-based security is Running
- Virtualization-based security services configured – Credential Guard, Hypervisor enforced Code Integrity
Takeaways
Enabling Windows 10 Virtualization Based Security with vSphere 6.7 is a great way to make sure that running Windows 10 or Windows Server 2016 virtual machines are even further protected with secure memory areas being restricted. This makes attacks such as “pass the hash” exponentially more difficult to exploit. VMware has made turning this feature on extremely easy with vSphere 6.7. Literally a single checkbox enables all the needed hardware emulated features to allow Windows 10/Server 2016 to be able to setup in VBS mode using Hyper-V in a nested configuration within vSphere 6.7. Check out these and other great security enhancements with vSphere 6.7. A great resource is the VMware security blog with Mike Foley. Check that out here: https://blogs.vmware.com/vsphere/2018/04/introducing-vsphere-6-7-security.html