Антивирусная программа Microsoft Defender регулярно сканирует устройство, чтобы обеспечить его безопасность. Мы стараемся это делать в те моменты, когда вы не пользуетесь устройством, чтобы не мешать вашей работе. Вы также можете установить любое удобное время и периодичность проверки, проводимой антивирусной программой Microsoft Defender.
-
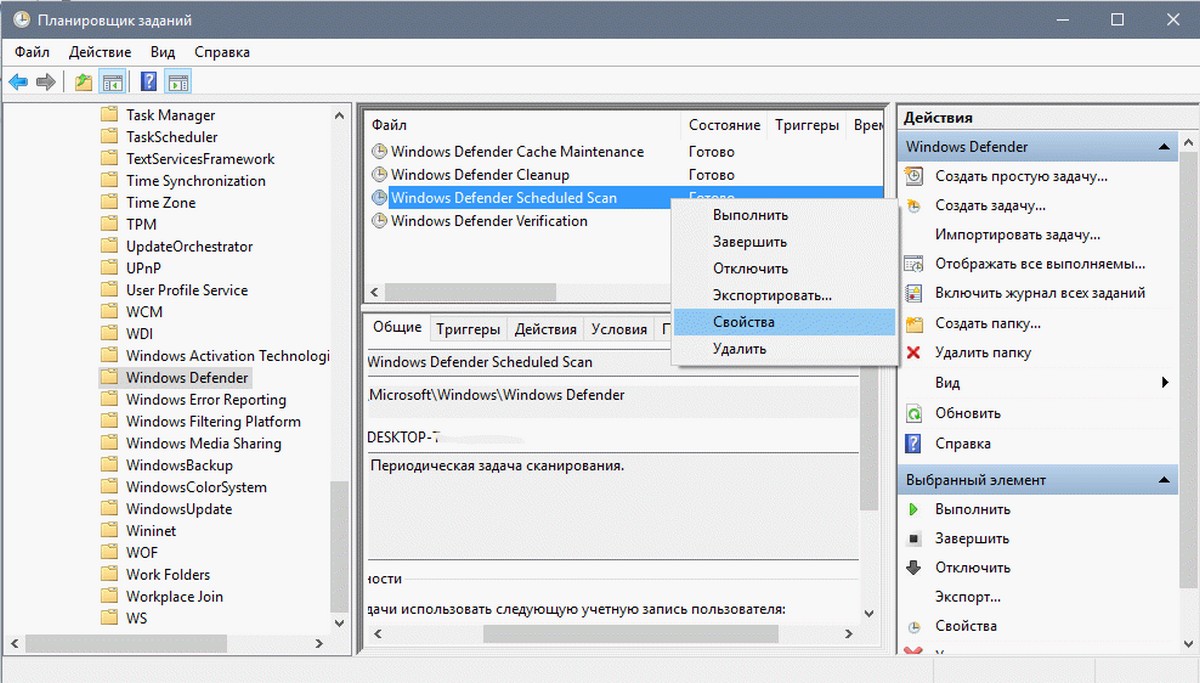
В поле поиска на панели задач введите Планировщик заданий и откройте приложение.
-
На левой панели разверните узел Библиотека планировщика заданий > Microsoft > Windows, а затем прокрутите вниз и выберите папку Windows Defender.
-
На центральной панели дважды щелкните пункт Windows Defender Scheduled Scan.

-
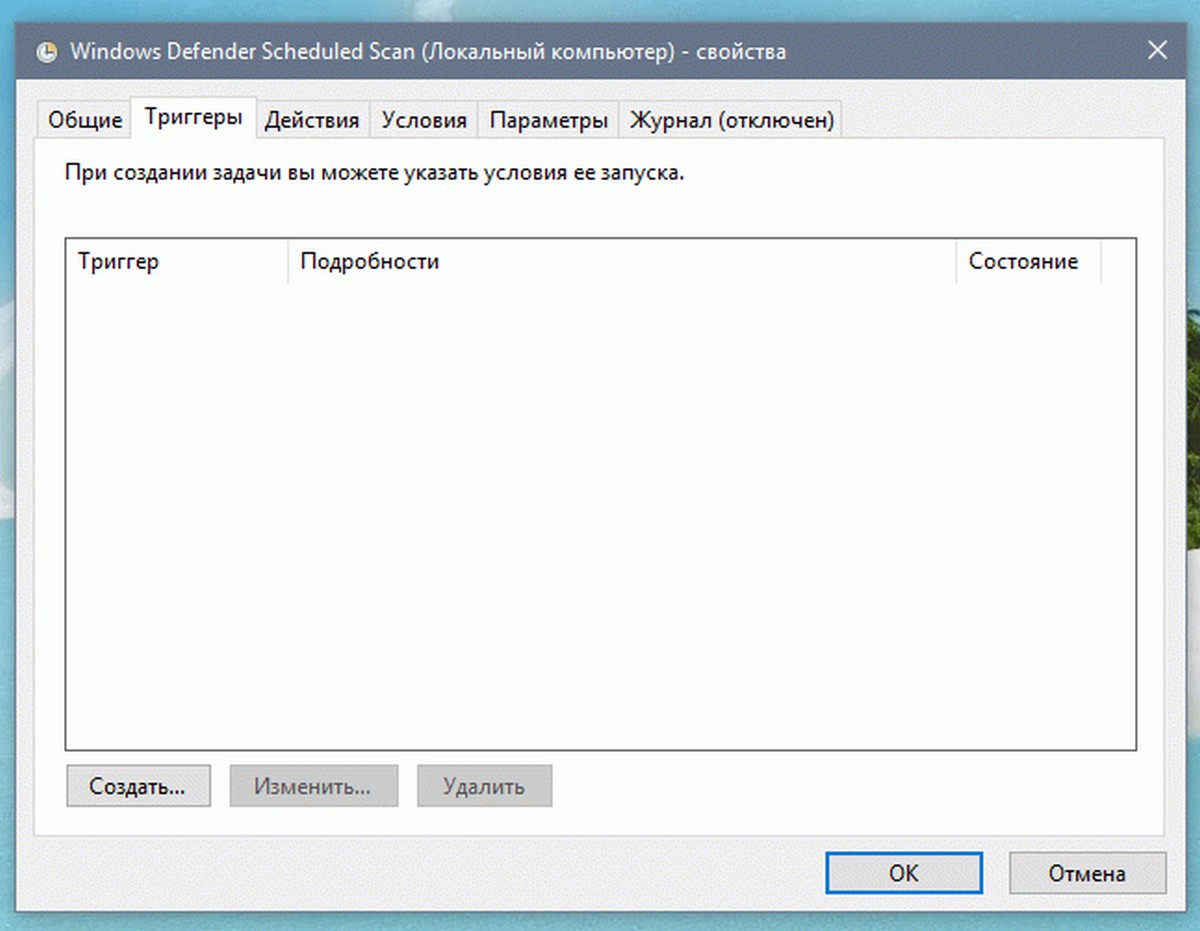
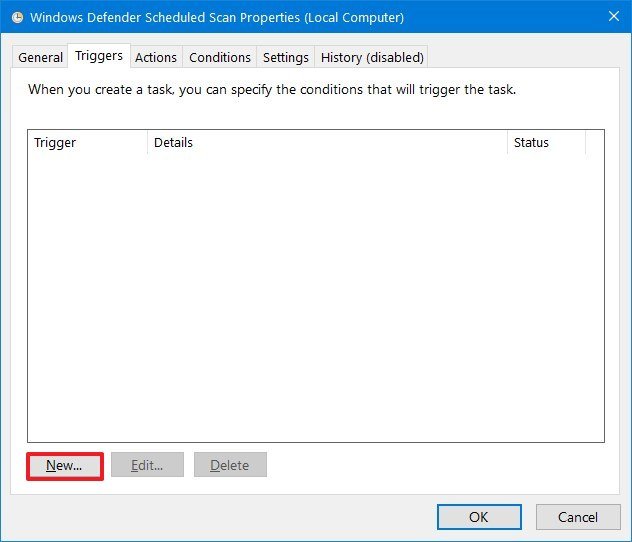
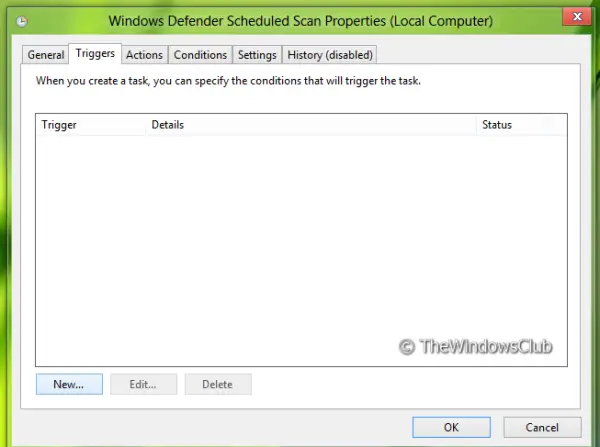
В окне Свойства запланированной проверки Защитником Windows (локальный компьютер) откройте вкладку Триггеры, перейдите в нижнюю часть окна и выберите Новый.
-
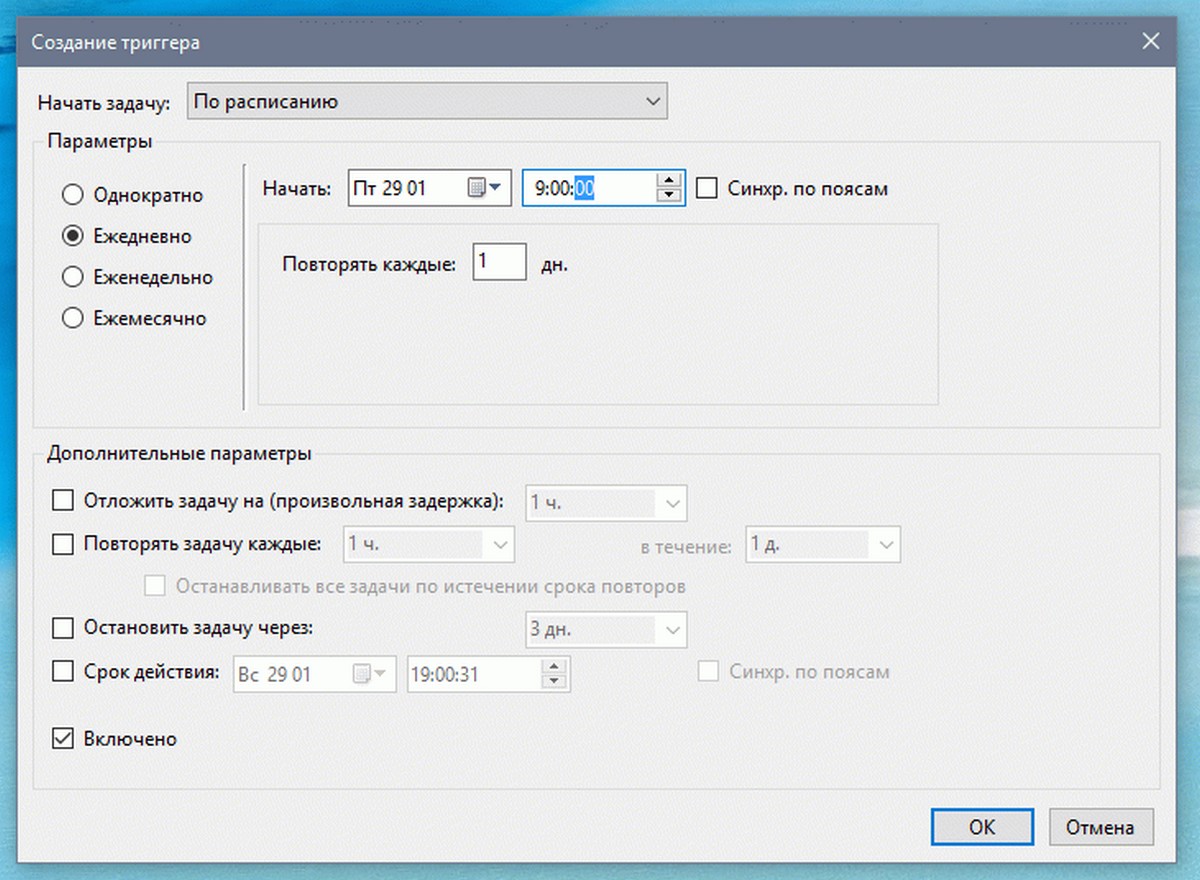
Укажите периодичность проверок и желаемое время начала.
Нужна дополнительная помощь?
Не так давно многие пользователи задавались вопросом как удалить Windows Defender в Windows 10, пользователи которых устраивает базовая зашита от Microsoft продолжают пользоваться Защитником Windows. Новые данные, опубликованные в AV-Test показывают неплохие результаты защиты от вредоносных программ,вирусов и шпионского ПО в последних версиях Windows.
В Windows 10 — Защитник Windows не имеет настроек сканирования по расписанию в интерфейсе программы, как же тогда настроить Сканирование по расписанию для быстрой или полной проверки системы?
Быстрое сканирование выполняется ежедневно (система сама решает когда) одновременно с обновлениями компонентов Windows или другими задачами.
Если все же вы не хотите полагаться на то когда система решит запустить сканирование, или Сканирование Windows Defender запускается не в самый подходящий для вас момент, а возможно что автосканирование не запускается вовсе и вы видите предупреждение что ваш ПК давно не проверялся, вы можете настроить автоматическое сканирование на наличие вредоносных программ по расписанию в Windows 10.
Защитник Windows 10 настройка Сканирования по расписанию.
1. Воспользуйтесь Поиском Windows 10, наберите в строке поиска “Планировщик заданий”

- В открывшимся окне планировщика, с левой стороны перейдите по следующему пути-
Библиотека планировщика заданий->Microsoft->Windows->Windows Defender
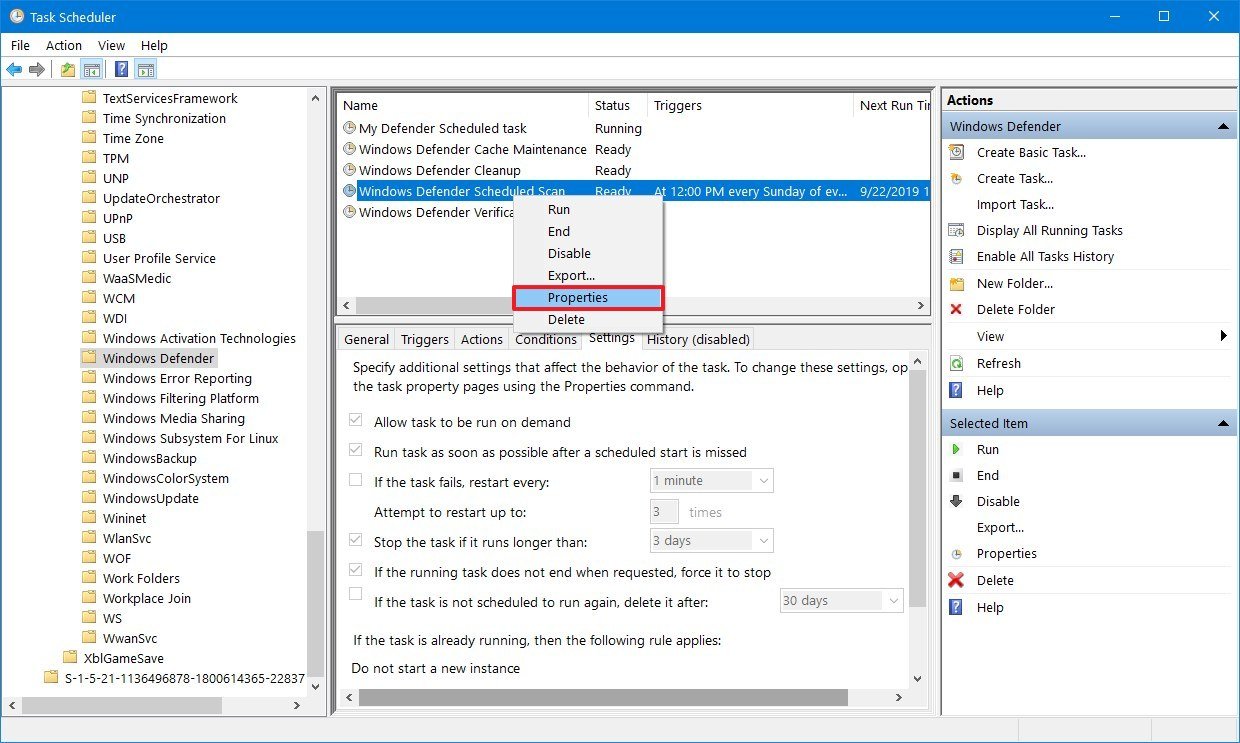
Вы должны увидеть Периодическую задачу сканирования с именем- Windows Defender Scheduled Scan
- Откройте задачу Windows Defender Scheduled Scan, двойным кликом или с помощью правой кнопки мыши выбрав в контекстном меню- Свойства.
В свойствах задачи для Защитника Windows нам нужны две вкладки Триггеры и Действия.
- Триггеры
Вкладка триггеры позволяет нам настроить условия запуска нашей задачи
Выберите Создать
Настроим выполнение задачи «Сканирование Windows Defender» ежедневно в 9.00 утра и
нажимаем кнопку ОК.
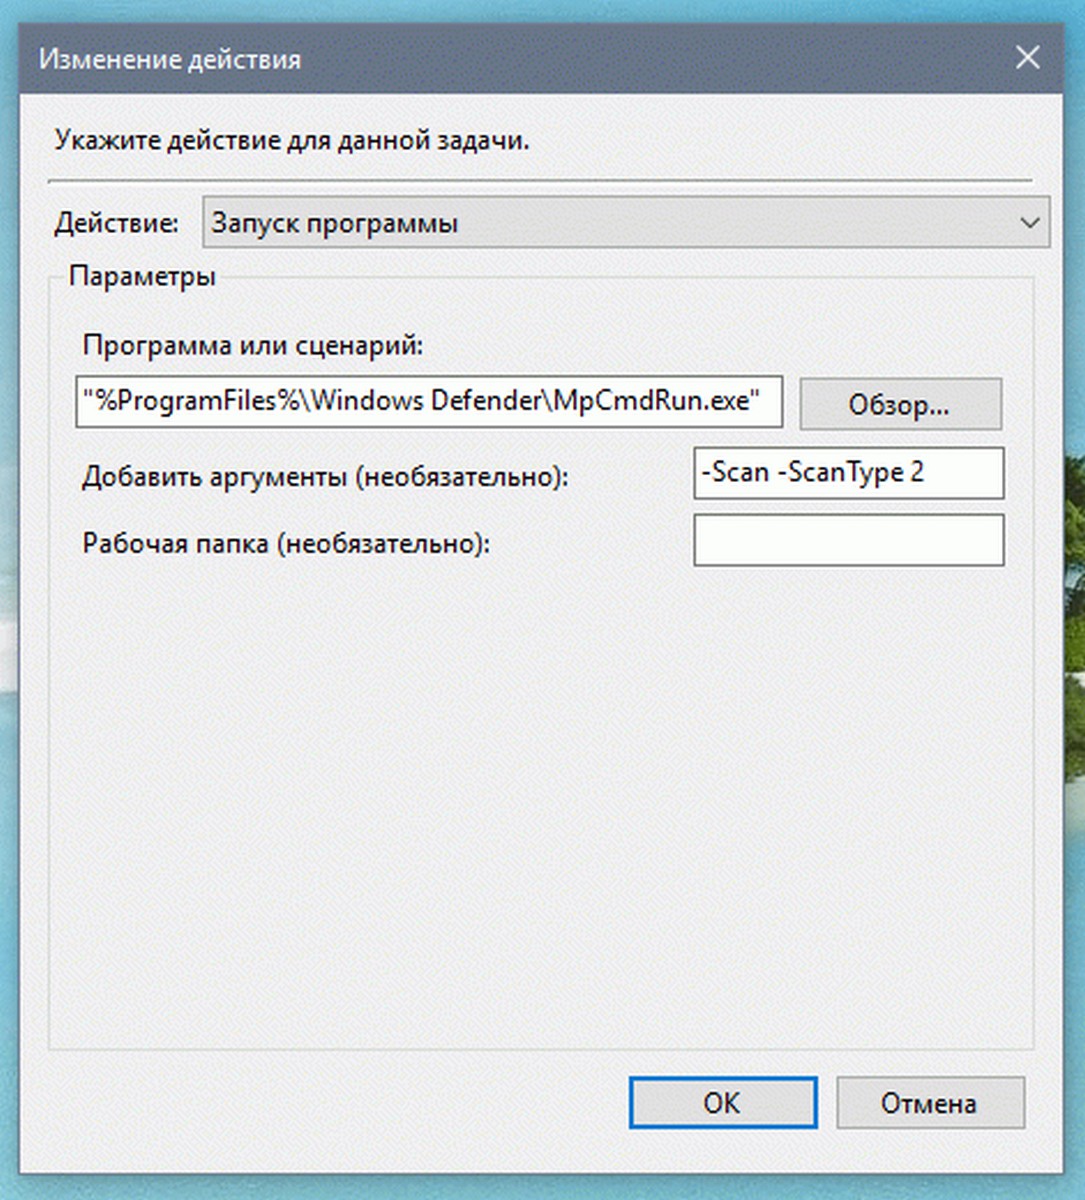
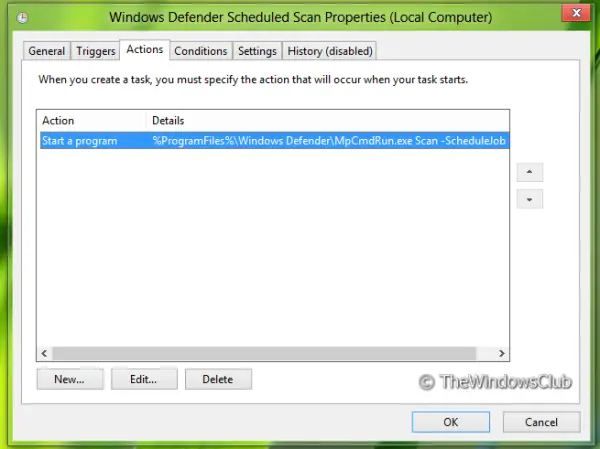
- Действия
Эта вкладка позволяет настроить действие которое будет выполнятся.
В этой вкладке мы видим что одно действие уже есть, — нажмем Изменить
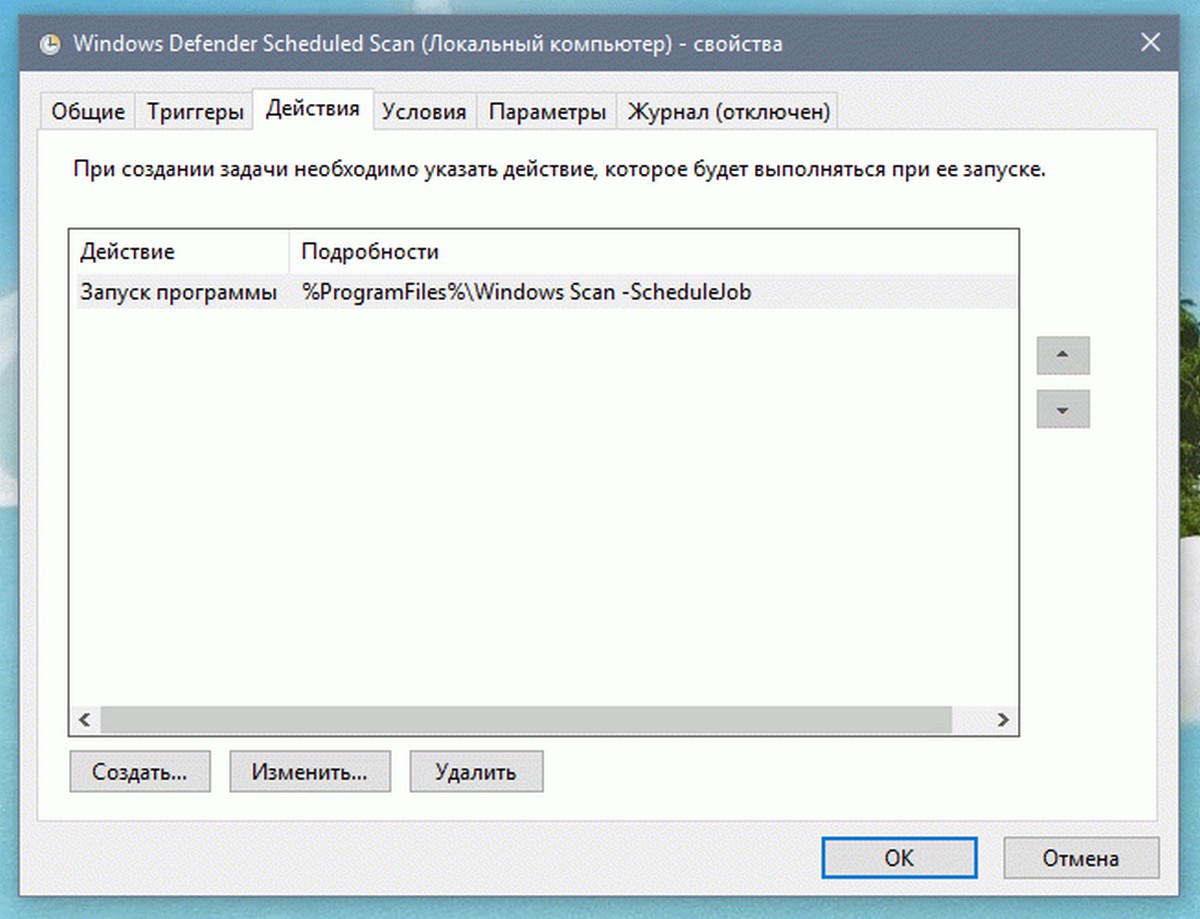
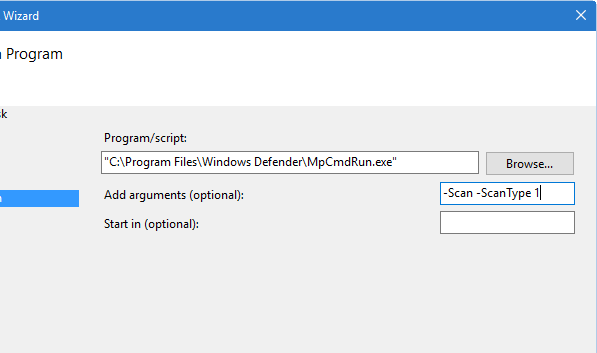
В поле Программа или сценарий скопируйте или наберите:
«%ProgramFiles%Windows DefenderMpCmdRun.exe»
В поле Добавить аргументы скопируйте или наберите:
Для быстрой проверки
-Scan -ScanType 1
Для полной проверки
-Scan -ScanType 2
Сохраняем настройки нажав на кнопку ОК
Вот и все вы успешно настроили Сканирование по расписанию Защитника Windows.
Windows Defender Antivirus is the security solution available on every installation of Windows 10 to protect your device and files from unwanted viruses, spyware, ransomware, and other types of malware and online threats.
The antimalware offers real-time protection functionality to detect and remove malware proactively, and you even get the option to start a scan manually. You can also schedule a Windows Defender Antivirus scan at your preferred day of the month and time to create an extra layer of security. However, it’s not an option that you can enable through the Windows Security app. Instead, it’s something that you have to configure manually using the Task Scheduler.
In this Windows 10 guide, we’ll walk you through the steps to schedule a manual scan of Windows Defender Antivirus on your computer.
- How to schedule a Windows Defender Antivirus scan using Task Scheduler
- How to schedule a Windows Defender Antivirus custom scan using Task Scheduler
How to schedule a Windows Defender Antivirus scan using Task Scheduler
To schedule a Windows Defender Antivirus scan manually on your device, use these steps:
- Open Start.
- Search for Task Scheduler, and click the top result to open the app.
- Browse the following path:
Task Scheduler Library > Microsoft > Windows > Windows Defender - Right-click the «Windows Defender Scheduled Scan» task, and select the Properties option.
- Click the Triggers tab.
- Click the New button.
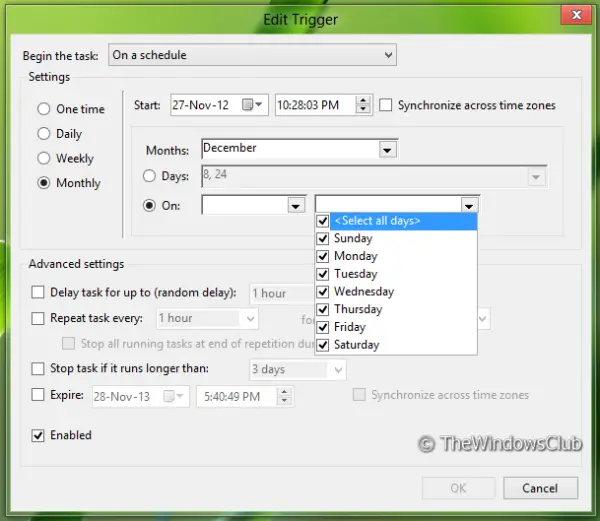
- Use the «Begin the task» drop-down menu to select one of the many triggers, including «On a schedule,» «At startup,» «On workstation unlock,» and many others. For this guide, select the On a schedule option.
- Select the Weekly option from the left side (or the option that best suits your situation).
- Using the «Start» settings, specify when the task should start running and the time (very important).
- Specify the number of weeks when to recur the task.
- Check the day of the week that you want the scan to take place.
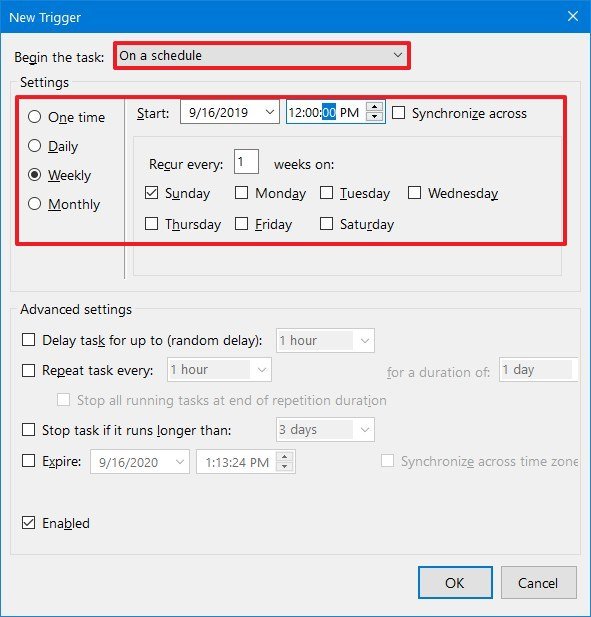
- Click the OK button.
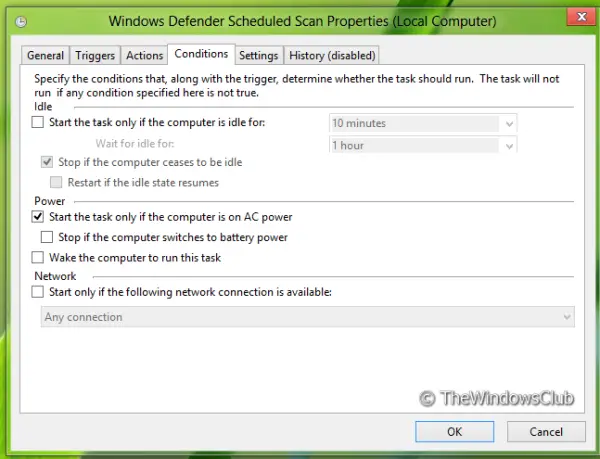
- (Optional) Click the Conditions tab.
- Under the «Power» section, check the Stop if the computer switches to battery power option to prevent affecting the battery life on your laptop.
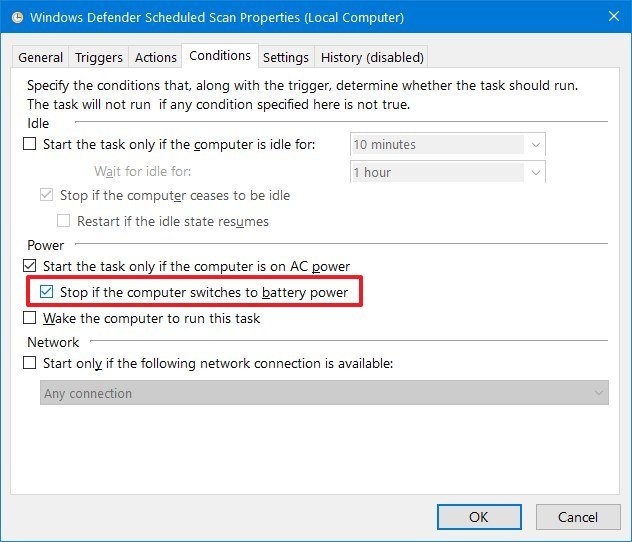
- Click the OK button.
Once you complete the steps, the built-in antivirus will run automatically using the schedule that you specified.
How to schedule a Windows Defender Antivirus custom scan using Task Scheduler
If using the built-in task doesn’t work, or you see the error 0x2, under the «Last Run Result» column, you can set up a custom schedule using a new task.
To create a custom malware scan using Task Scheduler, use these steps:
- Open Start.
- Search for Task Scheduler, click the top result to open the app.
- Right-click the «Task Scheduler Library» branch, and select the New Folder option.
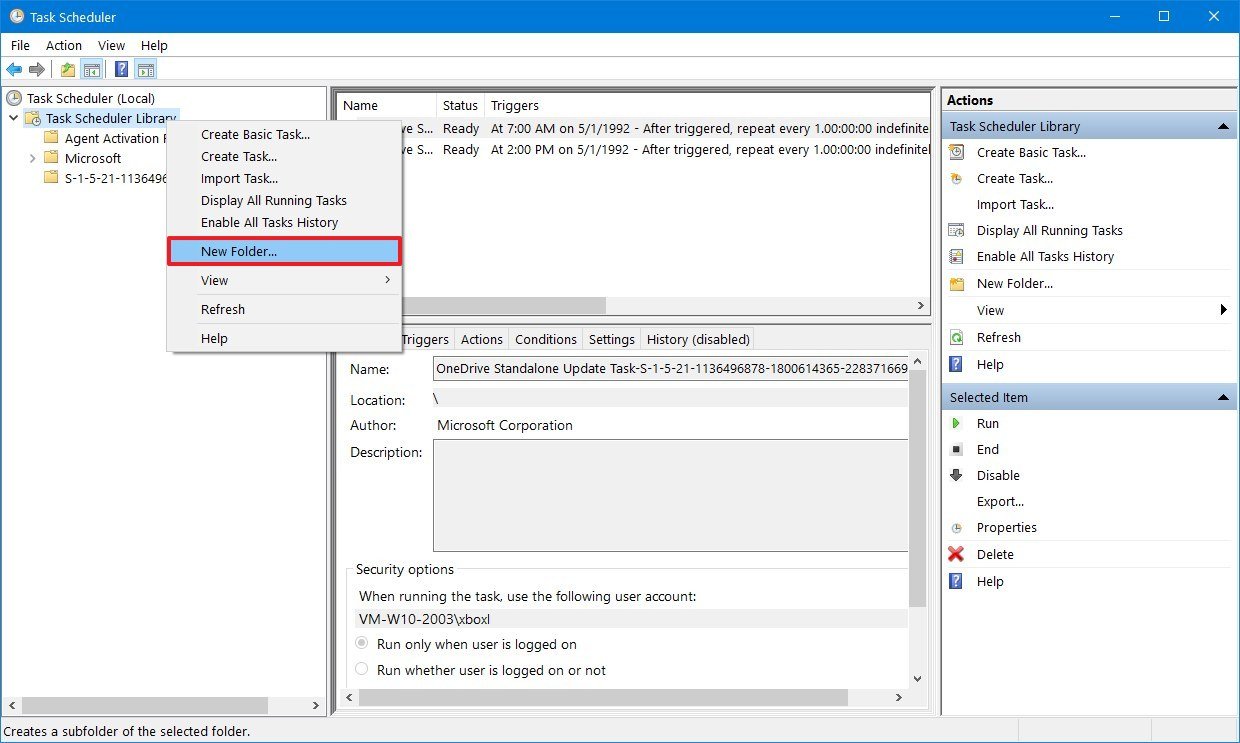
- Type a name for the folder. For example, MyTasks. (This step isn’t a requirement, but it’s a recommended step to keep your tasks separate from the system tasks.)
- Click the OK button.
- Expand the «Task Scheduler Library» branch, and select the MyTasks folder.
- Click the Action menu.
- Select the Create Task option.
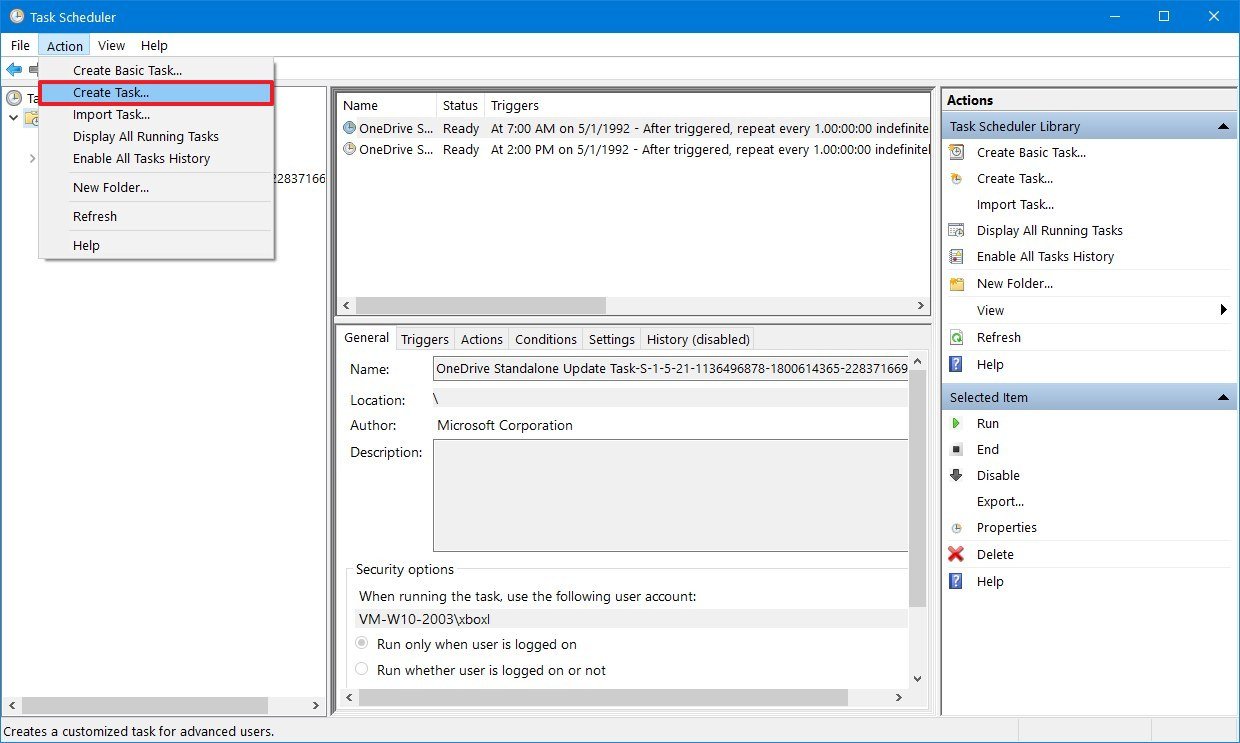
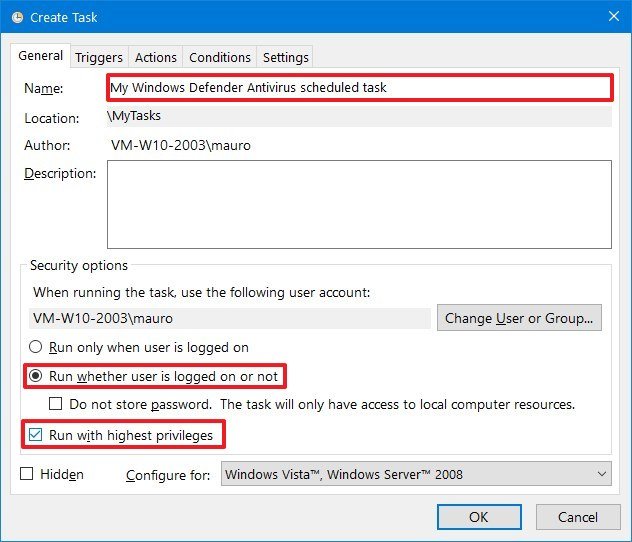
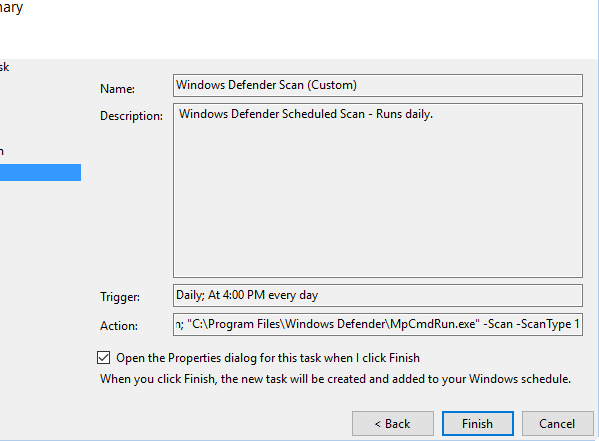
- In the «Name» field, type a descriptive name for the task. For example, My Windows Defender Antivirus scheduled task.
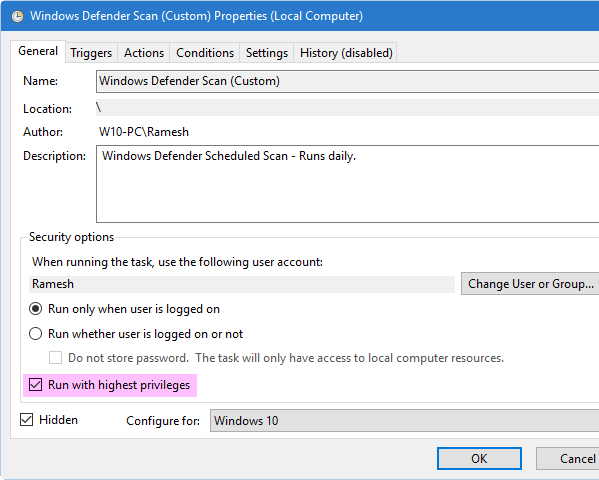
- In the «Security options» section, you can configure which administrator account can run the task.Quick tip: If you’re using an account with administrative privileges, the default user should be fine.
- Check the Run with highest privileges option.
- Click the Triggers tab.
- Click the New button.
- Use the «Begin the task» drop-down menu to select one of the many triggers, including «On a schedule,» «At startup,» «On workstation unlock,» and many others. For this guide, select the On a schedule option.
- Select the Weekly option from the left side (or the option that best suits your situation).
- Using the «Start» settings, specify when the task should start running and the time (very important).
- Specify the number of weeks when to recur the task.
- Check the day of the week that you want the scan to take place.
- (Optional) In the «Advanced settings» section, you can select options to delay, repeat, stop, and expire a task. Also, leave the Enabled option checked.
- Click the OK button.
- Click the Action tab
- Click the New button.
- Use the «Action» drop-down menu and select the Start a program option.
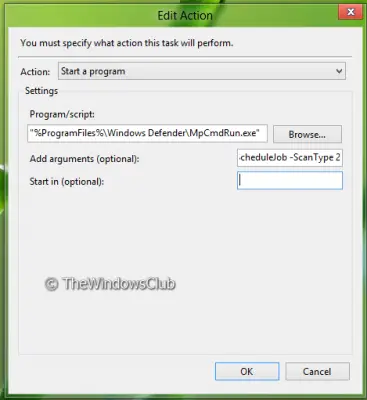
- Under the «Settings» section, in the «Program/script» field, specify the path for the Windows Defender Antivirus program:
"%ProgramFiles%Windows DefenderMpCmdRun.exe"
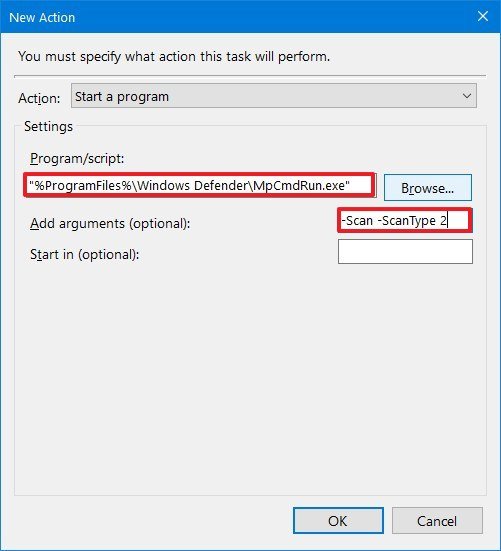
- In the «Add arguments» field, specify the type of scan you want to run:
-Scan -ScanType 2The above argument performs a full malware scan, but you can use the-Scan -ScanType 1argument to specify a quick scan, or you can use the-Scan -ScanType 3 -File PATH/TO/FILE/OR/FOLDERto scan a particular location or file. - Click the OK button.
- (Optional) Click the Conditions tab.
- Under the «Power» section, check the Stop if the computer switches to battery power option to prevent affecting the battery life on your laptop.
- Click the OK button.
After you complete the steps, authenticate with your account credentials, and then the Windows Defender Antivirus will run automatically on schedule.
Get the best of Windows Central in in your inbox, every day!
Mauro Huculak is technical writer for WindowsCentral.com. His primary focus is to write comprehensive how-tos to help users get the most out of Windows 10 and its many related technologies. He has an IT background with professional certifications from Microsoft, Cisco, and CompTIA, and he’s a recognized member of the Microsoft MVP community.
Статья обновлена: 07 июля 2022
ID: 13341
Как отключить запланированные проверки Защитника Windows на Windows 10
- В левом нижнем углу рабочего стола нажмите Пуск → Параметры.

- Выберите Обновление и безопасность.

- Перейдите в раздел Безопасность Windows и нажмите Открыть службу «Безопасность Windows».

- Перейдите в раздел Защита от вирусов и угроз, нажмите Параметры антивирусной программы «Защитника Windows» и установите переключатель Периодическое сканирование
в выключенное положение.

Запланированные проверки Защитника Windows будут отключены на Windows 10.
Как отключить запланированные проверки Защитника Windows на Windows 11
- Нажмите на значок поиска в панели задач Windows.
- Введите в поле поиска Планировщик заданий и выберите Планировщик заданий.

- Перейдите в папку Библиотека планировщика заданий → Microsoft → Windows.

- Перейдите в папку Windows Defender.
- Откройте контекcтное меню файла Windows Defender Scheduled Scan и выберите Отключить.

Запланированные проверки Защитника Windows будут отключены на Windows 11.
Как удалить Защитник Windows
Для Windows 10
Вы можете удалить программу стандартными средствами Microsoft Windows. Инструкция на сайте поддержки Microsoft.
Если стандартными средствами удалить программу не удалось, воспользуйтесь утилитой Microsoft для устранения проблем, препятствующих установке или удалению программ.
Если утилита не помогла, удалите программу с помощью файла mseremoval.bat:
- Скачайте и распакуйте архив mseremoval.zip.
- Нажмите правой кнопкой мыши на файл mseremoval.bat, выберите Запустить от имени администратора и введите данные учетной записи администратора.
Откроется окно командной строки. - Удалите файл mseremoval.bat, когда нужные действия будут выполнены и окно командной строки закроется.
Программа Защитник Windows будет удалена.
Для Windows 11
Вы можете отключить Защиту в режиме реального времени. Инструкция на сайте поддержки Microsoft.
Download PC Repair Tool to quickly find & fix Windows errors automatically
Microsoft has provided Windows 10/8 with built-in security software, Microsoft Defender. Microsoft Defender or Windows Defender is an anti-malware component of Windows Security. It’s free, easy to use, and has great features like other competitor antivirus software in its class. In this post, we will see how to schedule a full scan in Windows Defender
To schedule periodic full scans in Windows Defender that will run in the background and safeguard your Windows from malware, you have to make use of the built-in Task Scheduler.
1. Press Windows Key + R combination and put taskschd.msc in the Run dialog box. Click OK.
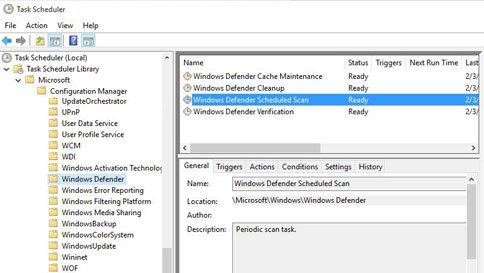
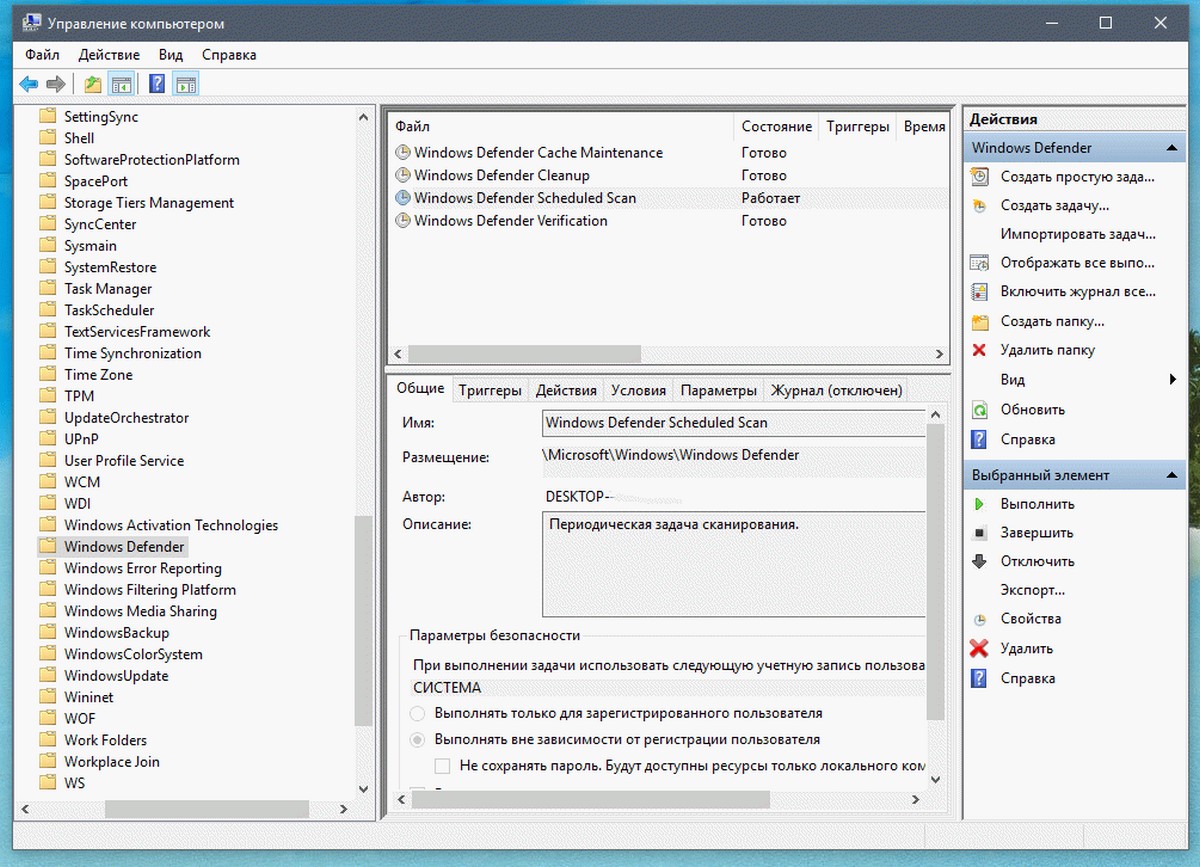
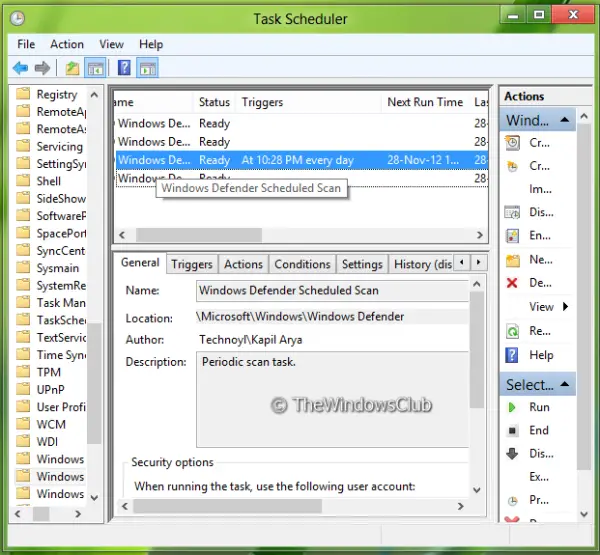
2. On the Task Scheduler window, in the left pane, navigate to Task Scheduler -> Microsoft -> Windows -> Windows Defender.
Now in the mid pane, select the third name that is for Windows Defender Scheduled Scan as shown below:

3. Now you’ll be taken to the following location, where you have to switch to the Triggers tab. Click New.
4. Now we’re going to schedule the scan, so configure it as shown in the window below. Firstly choose to Begin the task as On a schedule, then in the Settings section, select your priority to have scanned. Make sure you have checked Enabled at the left bottom corner of this window. Finally, click OK.
5. Next, switch to Actions tab and click Edit.
6. First of all, embed the Program Script within quotes as it is not there, by default.
And to this, you can add two types of arguments here, Scan -ScheduleJob for Quick Scan and Scan -ScheduleJob -ScanType 2 for Full Scan. Click OK.
7. Now come to Conditions tab and select the Power options according to your best-suited priority.
It will be beneficial to set your device to ON itself if it is not ON at the scheduled time. Here you can also configure the priority for the network.
8. Thus we’re done now as far as scheduling is concerned. You can confirm it by in the window, where the Next Run Time is shown as per your choices provided in step 4.
Windows Defender will automatically scan your computer at the scheduled time.
Hope you found the article useful.
Learn how to update Windows Defender even when Automatic Windows Updates is disabled.

An Electrical Engineer by profession, Kapil is a Microsoft MVP and a Windows Insider MVP. Please read the entire post & the comments first & create a system restore point before making any changes to your system.
Windows Defender’s command-line utility MpCmdrun.exe is used for scheduling scans or updating definition files or signature using command-line. This post tells you how to setup Windows Defender to scan the computer daily at a specified time using Task Scheduler and MpCmdrun.exe in Windows 10.
Note: Windows 8 and 10 already include the Automatic Maintenance feature which runs many scheduled tasks including Windows Defender daily scan, but the task runs only if the system is idle. Moreover, Automatic Maintenance stops running once it detects user activity in the system.
If you can leave the system idle for some time daily for Automatic Maintenance, you don’t have to schedule it manually. Creating a scheduled task manually surely runs the scan, regardless of whether your system is idle or not.
Method 1: Create Windows Defender Scan Task Using SchTasks.exe
To schedule a daily Windows Defender scan, create a scheduled task using SchTasks.exe console tool using the following steps:
- Open a elevated Command Prompt. To do so, right-click Start and click Command Prompt (Admin).
- Type in the following command and press
ENTER:schtasks /create /tn "Scan With Defender (Daily Quick Scan)" /sc DAILY /st 13:00 /ru SYSTEM /rl HIGHEST /tr "'C:Program FilesWindows DefenderMpCmdRun.exe' -Scan -ScanType 1"

This creates a Windows Defender Scan task that runs daily, at
13:00hours underSYSTEMuser account with highest privileges. If you running it underSYSTEMaccount you wouldn’t see the Command Prompt window that the task runs in. To see the Command Prompt window (interactive), changeSYSTEMto your user name (say,John, in place ofSYSTEM). - Type
EXITto close the Command Prompt window.

The above command was given as an example. You can alter the scan schedule time, frequency (DAILY, WEEKLY, MONTHLY) accordingly as per your requirements. For more information about Schtasks.exe command-line switches, see Schtasks.exe | Microsoft Docs article.
Method 2: Create Windows Defender Scan Task Using Task Scheduler
If you’d like to configure Windows Defender Scan schedule using Task Scheduler GUI, use these steps:
- Click Start, type Task Scheduler and click Task Scheduler from the list.
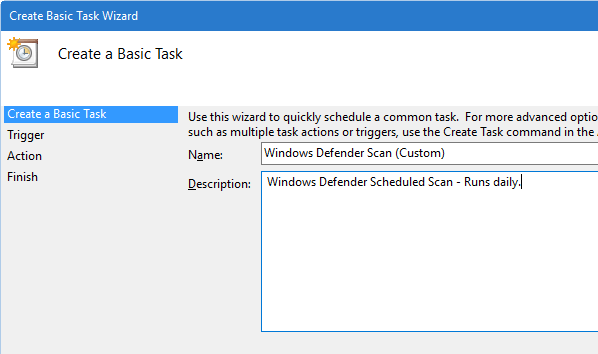
- From the Action menu, click Create Basic Task…

- Assign a name for the task, and give an apt description for the custom task.

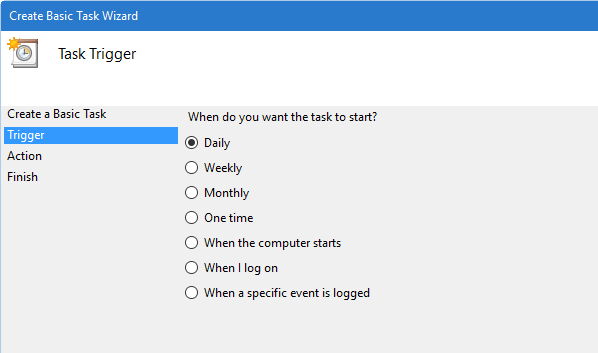
- If you want to run the task once daily, click Daily, and click Next.

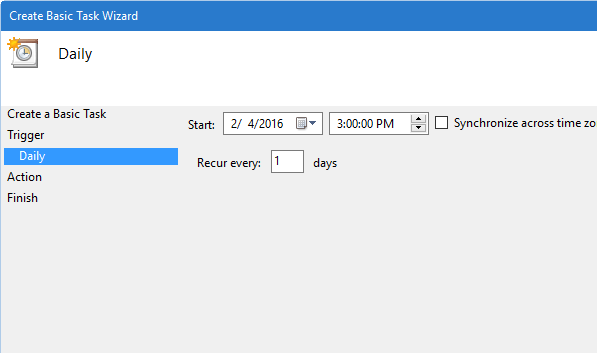
- Set the time when you want to task to run, and click Next.

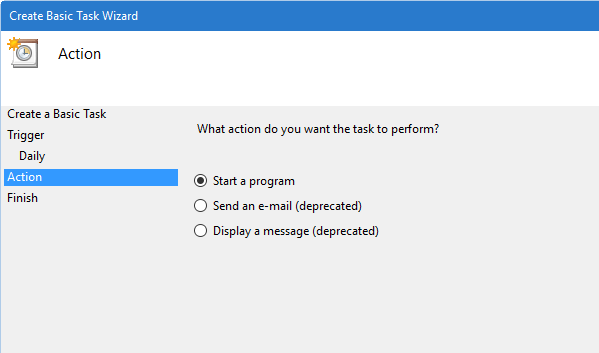
- In the Action dialog, click Start a program, and click Next.
- In the Program/Script text box, mention the full path of
MpCmdRun.exe. In the Add arguments text box, type one of the following:-Scan -ScanType 1 (for Quick Scan)
-Scan -ScanType 2 (for Full system Scan)
(or)
SignatureUpdateAndQuickScan
Editor’s Note:
SignatureUpdateAndQuickScanparameter does two things just as the name implies; Updates the signatures and then runs a Quick Scan. It is a hidden parameter not mentioned in the help or anywhere, which works in Windows 8 and 10. I’ve recently unveiled this hidden and useful parameter; check out my earlier posts Using MpCmdRun.exe to Update Windows Defender and Run a Quick Scan in One Go and Command-line Switches to Automate Windows Defender GUI for more information.
- Select the Open the Properties dialog for this task when I click Finish, and click Finish.

- Enable the check box for
Run with highest privileges. - Select Windows 10 in the Configure for: drop down list box.
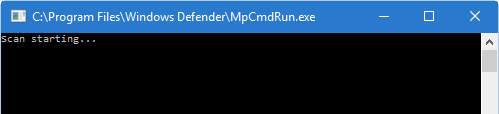
- Exit the Task Scheduler.That’s it! You’ve now created a task that launches Windows Defender Scan on schedule. The task duly runs as mentioned, at the specified time. The Command Prompt window can simply be minimized.
 If you used the
 SignatureUpdateAndQuickScanparameter, it updates the signatures and follows up with a Quick Scan.
Quick Tip! You can also automate a scan using Windows Defender GUI, instead of the command-line interface version.
 If you used the
Hope the guide helped you learn the two methods which can be used to run Windows Defender Scheduled Scan on your Windows computer. Let’s know your comments.
One small request: If you liked this post, please share this?
One «tiny» share from you would seriously help a lot with the growth of this blog.
Some great suggestions:
- Pin it!
- Share it to your favorite blog + Facebook, Reddit
- Tweet it!
So thank you so much for your support. It won’t take more than 10 seconds of your time. The share buttons are right below. 
Ramesh Srinivasan is passionate about Microsoft technologies and he has been a consecutive ten-time recipient of the Microsoft Most Valuable Professional award in the Windows Shell/Desktop Experience category, from 2003 to 2012. He loves to troubleshoot and write about Windows.
Ramesh founded Winhelponline.com in 2005.

Though Windows Defender tries to perform scans when it won’t have an impact on performance, it isn’t’ always successful. This has led to some turning it off entirely, which is naturally not recommended. However, you can use the task scheduler to run a scheduled Windows Defender scan at a time of your choosing.
Typically, Windows Maintenance runs a scan, which can include security, around 2 am. If you’re sleeping, it can wake up your PC to do so, but night owls may find that interferes with their usage. Though Windows security scans use fewer resources than many other solutions, it’s still heavy on the disk, which can mean slow loading or transferring.
Some have the opposite problem. As Windows Defender tries to schedule scans for when the PC isn’t in use, it can be several days before it gets a chance. If you’re the type of person who needs a guaranteed check every day, a Windows Defender scheduled scan is your only real choice.
Let’s jump into exactly how to do that so you can keep your system safe:
Scheduling a Windows Defender scan doesn’t take long, but it does require the use of Task Scheduler, a useful tool that some may be unfamiliar with.
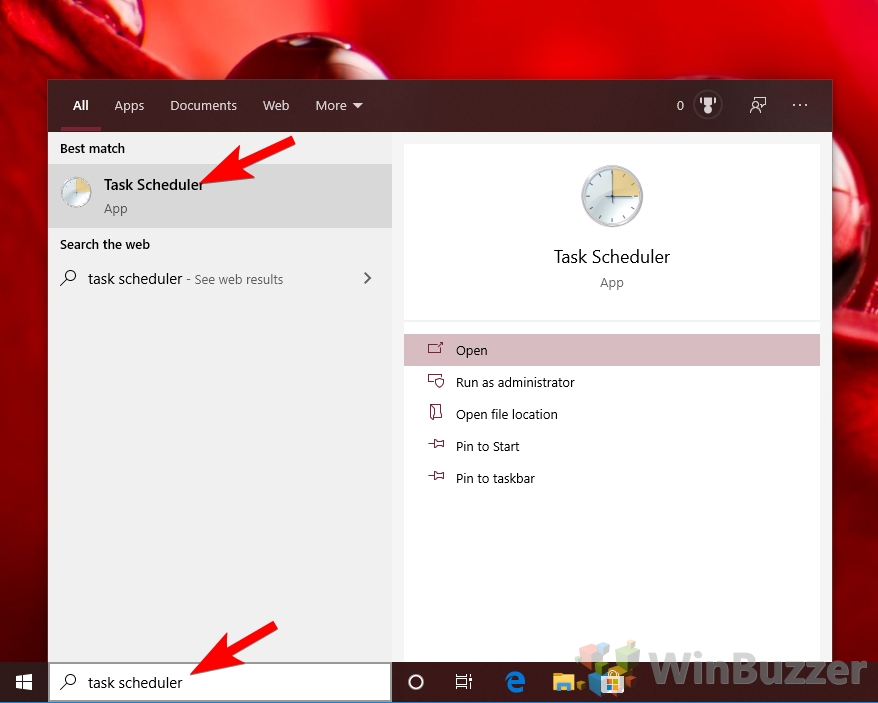
- Open Task Scheduler
Press the Windows key and type “Task Scheduler”. Click on the result under the “Best match” heading.

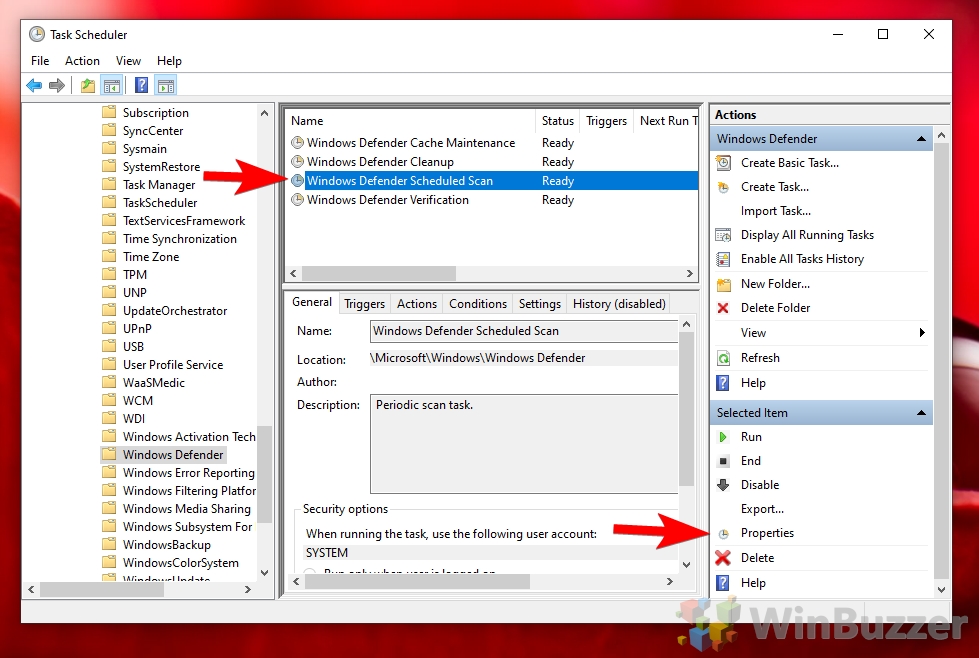
- Find Windows Defender Task options
In the Task Scheduler app, explore the sidebar until you find the folder named “Windows Defender”. It should be under “Task Scheduler Library > Microsoft > Windows”. Click on the folder to view the details.

- Open the Windows Defender Scheduled Scan Action pane
In the main window, click on “Windows Defender Scheduled Scan”. This will open an “Actions” pane, where you can click on “Properties”.

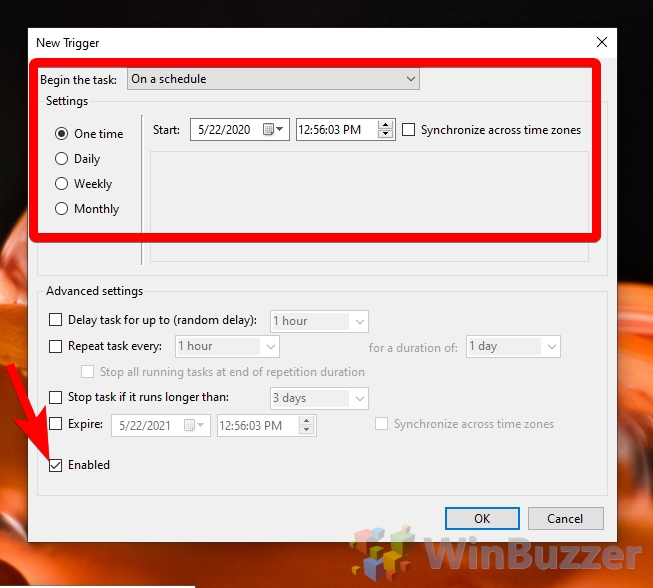
- Create a new Trigger
Switch to the “Triggers” tab and click “New…”.

- Set the time, date, and frequency of your scan
Here you can adjust your Windows defender scheduled scan settings. Make sure “Begin the task” is set to “On a schedule”, and choose a time, date, and frequency that works for you. Lastly, tick “Enabled” and press “OK”.

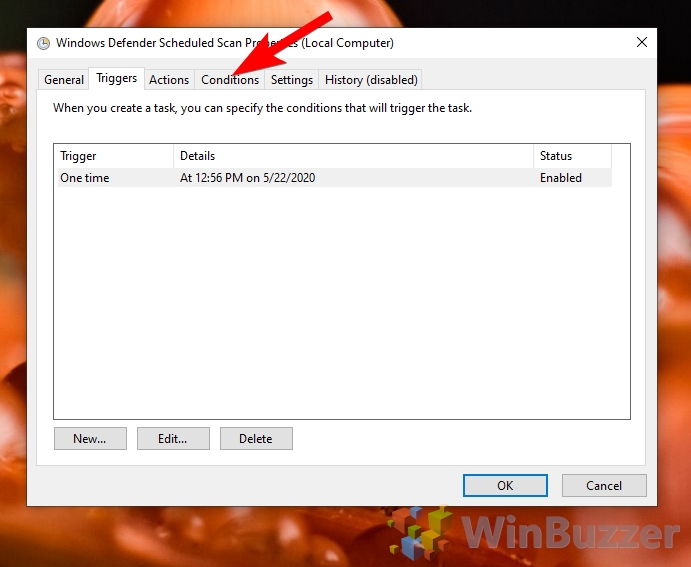
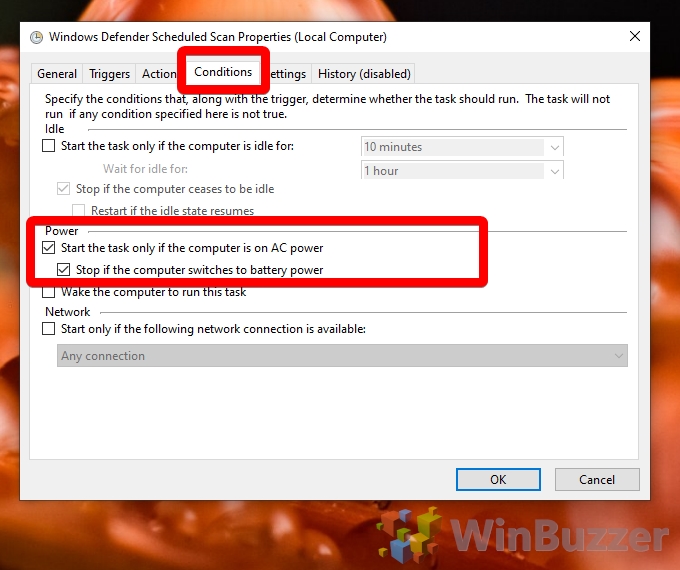
- Open the conditions menu
Back in the main scheduled scan view, use the top bar to switch to the “Conditions” tab.

- Adjust your power settings
Under the “Power” subheading, tick “Start the task only if the computer is on AC power” and “Stop if the computer switches to battery power”. This will ensure Windows Defender doesn’t drain your laptop’s battery while you’re out and about.

Press “OK” and close out of Task Scheduler. Make sure you’re around the first time it’s supposed to trigger to make sure it runs.