Пролог
Начиная с версии Windows 10 1607 корпорация Microsoft ввела обязательную сертификацию сторонних драйверов по программе Windows Hardware Compatibility Program (новость об этом в блоге msdn , пост на хабре ). Работает это нововведение на чистых установках Windows 10 соответствующей версии с включенным режимом Secure Boot .
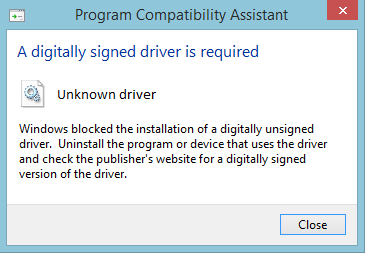
Несоблюдение этого условия в лучшем случае (при отключенном Secure Boot) приведет к появлению предупреждения:

В худшем — к запрету на установку драйвера:
Несмотря на наличие официальной документации по прохождению процедуры сертификации, этот процесс может быть сопровожден рядом неочевидных на первый взгляд сложностей. Ниже приводится поэтапный разбор всех подводных камней на примере прохождения сертификации драйвера веб-камеры для 32 и 64-битной версий Windows 10 с обновлением 1803.
Краткий обзор всей последовательности действий:
- Подготовка парка машин
- Развертывание тестового фреймворка Windows Hardware Lab Kit
- Создание и конфигурация тестового проекта
- Прохождение списка тестов
- Подготовка финального пакета с результатами
- Обработка результатов на серверах Microsoft и получение подписи
Дебют или этап подготовки
Очевидным предварительным условием для сертификации является наличие следующего:
- EV сертификата;
- Подготовленных компонентов драйвера (файлы .inf, .sys, .map, .pdb);
- Сгенерированного утилитой inf2cat (входит в состав Windows SDK ) cat-файла .
Файлы .sys и .cat должны быть подписаны EV сертификатом. Для этого используется утилита singtool из Windows SDK.
В нашем случае файлы .inf, .sys, .map, .pdb и .cat представлены в двух экземплярах для архитектур x86 и x64 соответственно.
Первым шагом к сертификации драйвера является прохождение серии тестов на совместимость оборудования для Windows. Для этих целей Microsoft предоставляет специализированный фреймворк Windows Hardware Lab Kit , ранее называвшийся Windows Hardware Certification Kit (HCK). А еще ранее этот же фреймворк носил имя Windows Hardware Logo Kit, что доставляет неудобство в поиске информации, так как по запросу HLK нередко выпадает устаревшая. С кратким обзором концепции тестирования можно ознакомиться по ссылке . В состав HLK входят серверная часть (включает в себя менеджер тестов HLK Controller и управляющую консоль HLK Studio ) и клиентская часть (HLK Client). Таким образом, HLK предполагает наличия тестового парка из как минимум двух машин.
Подготовка парка машин
Для серверной части HLK ограничением является необходимость развертывания на Windows Server 2012, Windows Server 2012 R2 или Windows Server 2016.
Начиная с релиза 1709 HLK поддерживает тестирование клиентов только соответствующей версии Windows 10 , предыдущие редакции кита предусматривали возможность работы с некоторым подмножеством обновлений этой операционной системы.
Табличка поддерживаемых версий:
| HLK version | Supported version | Accepted device/component | Accepted system |
|---|---|---|---|
| 1803 | 1803 – Client | 1803 Client Device/Component | 1803 Client Systems |
| 1709 | 1709 – Client | 1709 Client Device/Component | 1709 Client Systems |
| 1703 | 1703 – Client | 1703 Client Device/Component | 1703 Client Systems |
| 1607 — Client | 1607 Client Device/Component | ||
| 1607 | 1607 – Client | 1607 Client Device/Component | 1607 Server Systems |
| 1607 – Server, Azure Stack, SDDC | 1607 Server Device/Component | ||
| 1511 — Client | 1511 Client Device/Component |
Для организации тестирования нам понадобятся одна управляющая машина с серверной версией Windows и две тестовые машины с 32 и 64-битными версиями Windows 10 в одной сети. При наличии нескольких доступных клиентов одной битности их можно использовать совместно, проводя тестирование параллельно. Альтернативной конфигурацией, в случае тестирования драйвера для двух архитектур, может быть схема с одним контроллером и одним клиентом (предполагается смена ОС клиента между тестовыми сессиями). Однако в этом случае возможны проблемы с настройкой пулов тестовых машин и потерей результатов тестирования. Кто виноват и что делать в такой ситуации будет рассказано ниже.
Миттельшпиль или работа с HLK
Важно: рекомендуется использовать свежеустановленные версии Windows с английской локалью во избежание появления внезапных проблем с тестами. Вас предупреждали.
Дополнительно на всех машинах парка можно отключить энергосберегающий режим и приостановить установку обновлений Windows, дабы исключить прерывания процесса тестирования, который может продолжаться несколько часов.
Развертывание HLK
На контроллере устанавливаем свежескаченный HLK корректной версии. В нашем случае это HLK 1803, поскольку на клиентах будет установлена Windows 10 с обновлением 1803. Существует вариант установки одной HLK Studio, однако он полезен только для работы с финальными пакетами hlkx.
Так же на контроллере должен быть установлен EV сертификат, которым были подписаны .sys и .cat файлы. Он понадобится нам позже, на этапе подготовки пакета для сабмита в Microsoft.
Клиентская часть ставится на тестовые машины по сети с контроллера:
\контроллерHCKInstallClientsetup.exe
Установка драйвера
На каждую машину нужно установить наш подопытный драйвер. Для этих целей используется утилита hdwwiz (выполнить из Windows -> Run -> hdwwiz).
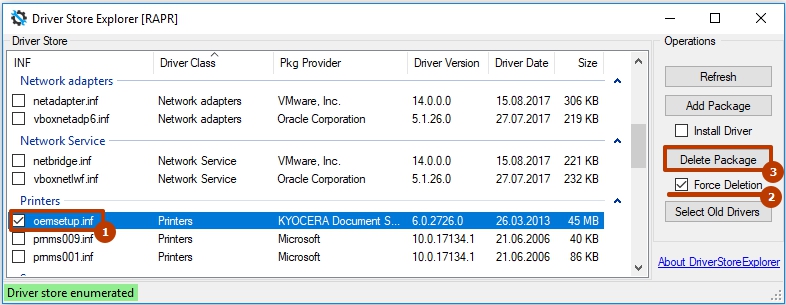
Стоит упомянуть о такой замечательной особенности Windows, как наличие кэша драйверов Driver Store. Если ранее в системе был установлен драйвера с версией, равной или новее той, которую вы пытаетесь поставить сейчас, существует вероятность, что Windows проигнорирует ваши попытки и возьмет копию из кэша. Для того, чтобы окончательно удалить предыдущий инстанс, можно воспользоваться приложением Driver Store Explorer .
Фильтры и плейлисты
Иногда с релизом нового обновления Windows или новой версии HLK часть тестов ломается. Результатом выполнения любого из них является ошибка, которая позже помешает нам подготовить финальный пакет hlkx. Для исключения сломанных тестов из общего списка тестирования, Microsoft выпускает специальные пакеты фильтров (HLK Filters). До начала процедуры тестирования необходимо скачать на контроллер архив самых свежих фильтров , распаковать их по пути
C:Program Files (x86)Windows Kits10Hardware Lab KitControllerи запустить приложение UpdateFilters.exe, расположенное там же.
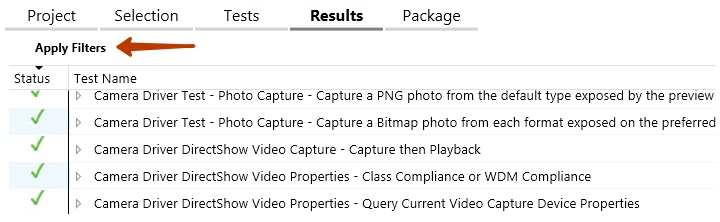
Важно: рекомендуется устанавливать фильтры до начала тестирования, так как их эффект применяется только к запущенным после установки тестам. Чтобы изменить результаты уже проведенных тестов, необходимо в проекте HLK Studio перейти на страницу Results и нажать кнопку Apply Filters.
Кроме фильтров Microsoft поставляет специализированные плейлисты (HLK Playlist), изменяющие состав базового списка тестов. Скачиваем архив с актуальными плейлистами и распаковываем его на контроллере.
Важно: плейлист может быть применен только к чистому проекту. Использовать его на серии пройденных тестов не удастся.
Информацию по выпуску новых фильтров и плейлистов можно найти в блоге Windows Hardware Certification
Подготовка пула тестовых машин
Пришло время подготовить пулы наших клиентских машин. Они нам понадобятся на этапе создания проекта. На вкладке Configuration все машины отобразятся в Default Pool. Нужно создать свои пулы (кнопка Create Machine Pool) и перетащить в них машины из пула по-умолчанию.
Важно: в одном пуле должны находиться машины с одинаковой битностью.
Поле Status у каждой машины будет Not Ready — нужно щелкнуть по ним правой кнопкой и изменить статус на Ready.
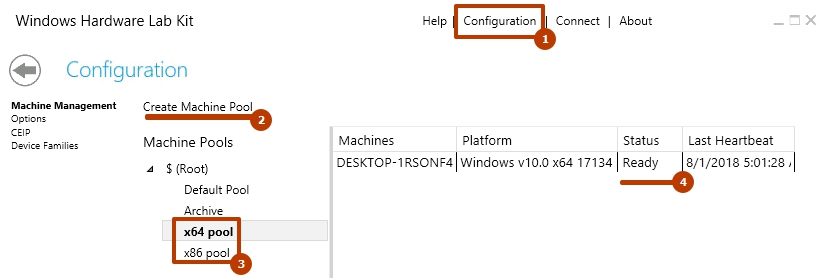
Важно: иногда студия выдает ошибку на попытку изменить статус машины.
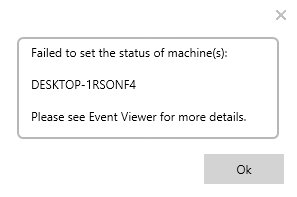
Кроме прочего, такая ситуация появляется, когда меняется ОС на тестовом клиенте, например, в схеме с одним контроллером и одним клиентом. Решается это удалением машины из пула (пункт Delete Machine в контекстном меню), что заставляет контроллер создать новый инстанс клиента с правильными характеристиками в Defaul Pool. Внимание, удаление машины приводит к удалению всех ассоциированных с ней результатов тестирования. Во избежание напрасной потери результатов нескольких часов работы, перед удалением машины следует подготовить финальный hlkx пакет, включающий все пройденные тесты. О подготовке файла hlkx будет рассказано далее.
Подготовка и запуск проекта
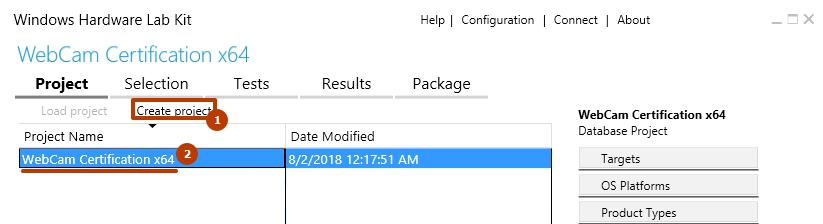
На странице Projects выбираем Create project и задаем проекту произвольное имя. Активируем проект двойным кликом по нему. Каждый проект может тестироваться только на машинах одной битности.
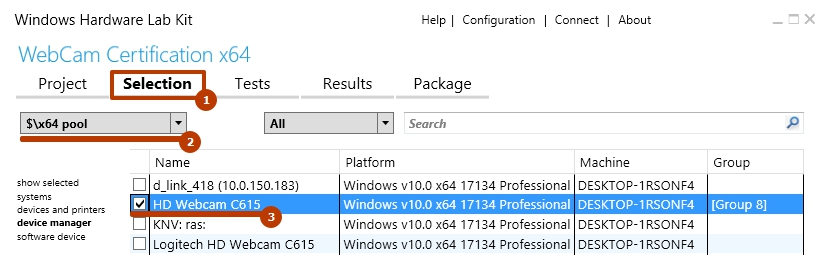
На странице Selection выбираем пул машин, на котором будет производиться тестирование. В списке отобразятся устройства, подключенные к машинам из этого пула. Отмечаем устройства, которые будут тестироваться.
Переходим на страницу Tests. Перед запуском тестов применяем плейлист нужной версии, распакованный из архива ранее. Отмечаем тесты, которые будут запущены для устройства. Следует обратить внимание, что некоторые тесты проходят в ручном режиме (обозначены иконкой человечка в столбце Type) и требуют некоторого пользовательского ввода на стороне клиентской машины. Их лучше отложить на потом и сначала отметить все автоматические.
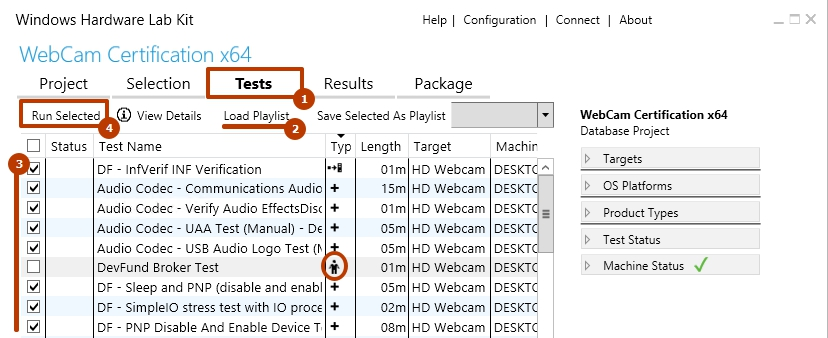
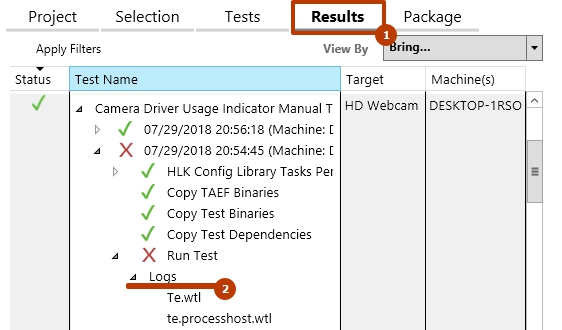
Несмотря на всю подготовительную работу, некоторые тесты все же могут завершаться с ошибками, несвязанными напрямую с качеством тестируемого драйвера. Некоторые из них успешно проходятся со второй попытки. Успех выполнения других, в том числе весьма продолжительные тесты Concurrent Hardware And Operating System , по результатам наблюдений может зависеть от аппаратной начинки клиента. Логи результатов тестирования — основной помощник выявления проблем. Посмотреть их можно на странице Results.
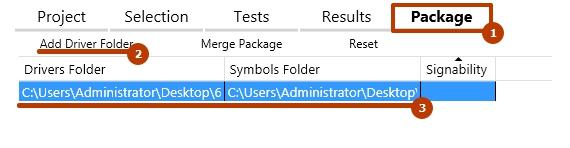
Финальный пакет — это файл с расширением .hlkx (zip-архив), который содержит результаты тестирования. Именно его нужно сабмитить в Microsoft через Partner Dashboard для получения цифровой подписи Microsoft Windows Hardware Compatibility Publisher.
При его создании необходимо указать:
- Путь к директории с драйвером (в директории должны находиться inf/sys/cat файлы);
- Путь к директории с отладочными символами (pdb/map).
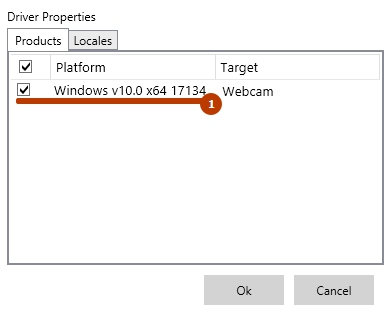
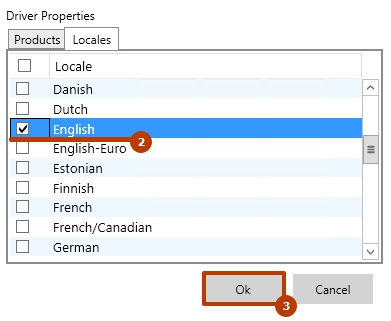
После нажатия на «Create Package» потребуется отметить:
- Целевые ОС;
- Locales (отмечаем English).
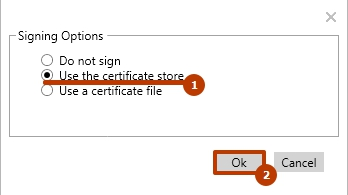
Создание финального пакета hlkx
Можно создавать неподписанные hlkx, например, просто для последующего открытия в студии. Для сабмита в Microsoft файл hlkx необходимо подписать EV сертификатом. Проще всего импортировать сертификат в систему и выбрать его в процессе создания пакета (кнопка Create Packageна странице Package). Получаем файл hlkx с результатами пройденных тестов.
Мерджинг пакетов hlkx
Этот этап выполняется, если вы проходите тестирование для нескольких платформ. В нашем случае, тестирование проводится для x86 и x64.
Для конфигурации с одним контроллером и одним клиентом меняем битность тестовой ОС, повторяем шаги по настройке клиента, переинициализируем машину под соответствующий пул.
Создаем проект для следующей платформы и повторяем весь процесс тестирования.
На шаге создания пакета hlkx дополнительно вызываем меню Merge Package и указываем подготовленный hlkx пакет для платформы другой битности.
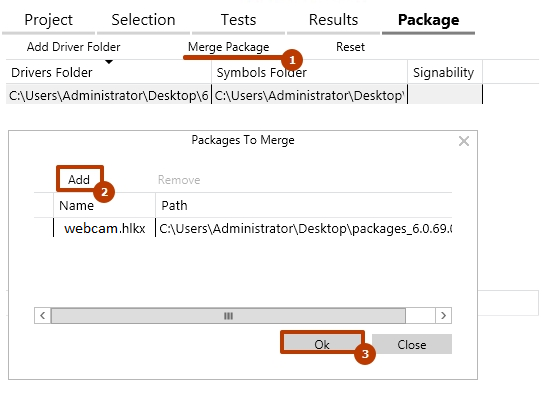
У нас готов hlkx пакет для отправки в Microsoft.
Эндшпиль или сабмит финального пакета hlkx в Microsoft
Заходим под своим аккаунтом на https://partner.microsoft.com/en-us/dashboard/.
На панели слева выбирвает Drivers. Нажимаем Submit new hardware.

Заполняем поле Product name и загружаем наш пакет hlkx.
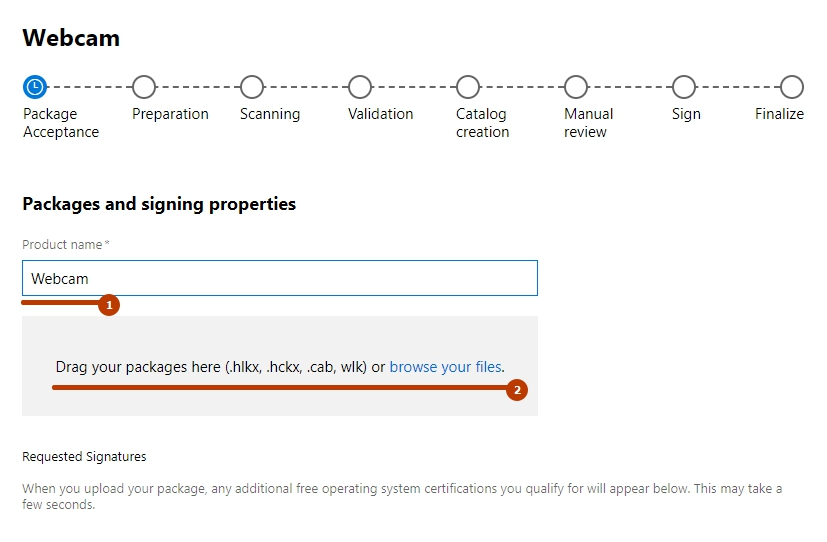
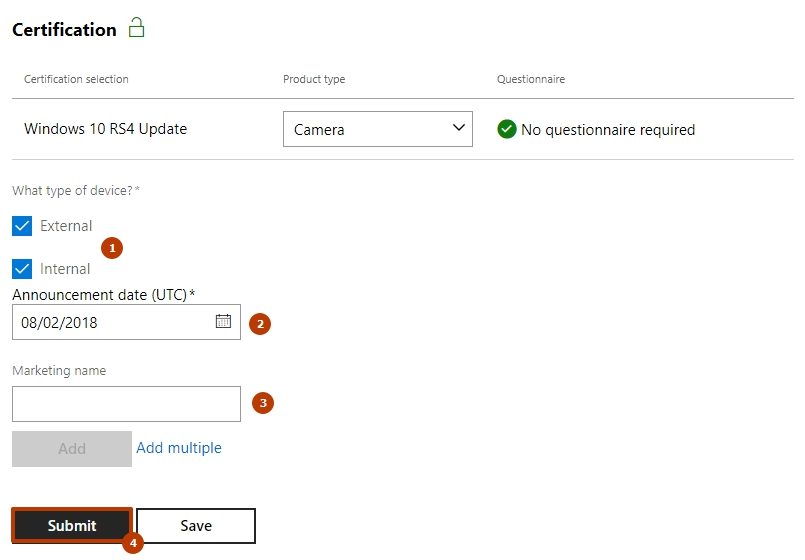
В разблокированной секции Certification заполняем поля тип устройства, дата анонса и опционально маркетинговое имя. Нажимаем Submit.
Через некоторое время получаем результаты сертификации. Подписанные компоненты драйвера можно скачать, нажав по кнопке Download signed files.
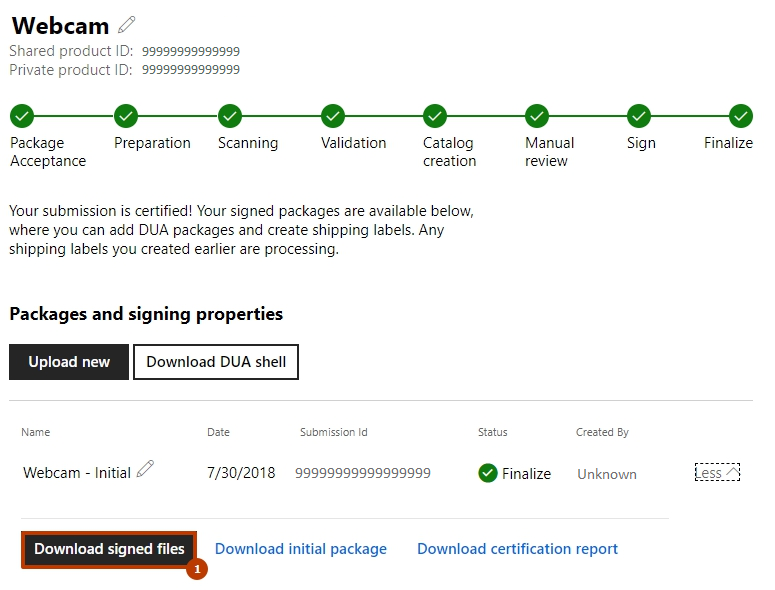
Конечный результат всех усилий:
На что следует обращать внимание
- Проверить соответствие версии HLK версиям Windows на клиентах;
- Настроить английскую локаль на клиентских машинах;
- Установить фильтры перед созданием проекта;
- Сохранить результаты тестирования в пакет hlkx перед удалением тестовой машины из пула;
- Применить плейлист нужной версии до запуска тестов;
- Смерджить пакеты hlkx, если тестирование проводится для нескольких платформ.
14 Декабря 2022 16:59
14 Дек 2022 16:59
|
Исследователи в области безопасности обнаружили серию кибератак с использованием вредоносных Windows-драйверов, подписанных корпорацией Microsoft – разработчиком операционной системы. На такие доверенные драйверы, которые позволяют злоумышленнику установить тотальный контроль над компьютером, не обращают внимание антивирусы.
Кибератаки через подписанные Microsoft драйверы
Специалисты по безопасности из компаний Mandiant, Sophos и SentinelOne зафиксировали кибератаки с использованием вредоносных драйверов устройств для Windows, подписанных Microsoft.
Антивирусным ПО такие драйверы воспринимаются как заведомо безопасные, что позволяет злоумышленникам внедрять на целевые машины вредоносы и устанавливать едва ли не полный контроль над системой, не вызывая при этом каких-либо подозрений.
Представители ИБ-компаний уведомили корпорацию о проблеме в октябре 2022 г. По итогам расследования, проведенного Microsoft, выяснилось, что с нескольких аккаунтов разработчиков в Microsoft Partner Center злоумышленники направляли запросы на получение цифровой подписи для собственных драйверов, содержащих вредоносный код. Соответствующие учетные записи были заблокированы.
Злоумышленники вновь атакуют Windows-системы с помощью подписанных Microsoft вредоносных драйверов
В 2021 г. Исследователи из компании G Data обнаружили подписанный Microsoft драйвер под названием Netfilter. В действительности он оказался ни чем иным, как руткитом, который передавал на удаленный на сервер в Китае содержимое зашифрованных каналов коммуникаций.
Как проходит аттестация драйверов Windows
В операционных системах Windows актуальных версий драйверы режима ядра (kernel-mode hardware drivers) при загрузке получают наивысший уровень привилегий в ОС. Оказавшись под контролем злоумышленника, такой драйвер способен на выполнение множества операций, недоступных программам, запущенным в пространстве пользователя. В числе таких операций – вывод из строя антивирусного ПО, удаление защищенных системой файлов, а также маскировать другие процессы в системе, ведя себя как руткит.
В 2015 г. Microsoft предупредила производителей «железа» о том, что с выходом Windows 10 все новые драйверы режима ядра должны будут в обязательном порядке получать цифровую подпись компании через Windows Hardware Developer Center (WHDC; центр разработки оборудования Windows).
Однако на деле соответствующие меры по обеспечению безопасности вступили в силу лишь в июле 2016 г., и с тех пор неподписанные драйверы Windows устанавливать отказывается.
Процедура аттестации драйвера Microsoft является многоступенчатой и довольно сложной. Так, разработчику для ее прохождения совершенно необходимо приобрести сертификат EV (Extended Validation; дополнительная проверка). Процедура его получения предусматривает подтверждение доверенным центром сертификации факта существования компании, на имя которой тот оформляется, и принадлежности этой компании сертифицированных доменных имен.
Затем разработчик должен привязать полученный EV-сертификат к учетной записи участника Windows Hardware Developer Program (WHDP; программа разработки оборудования Windows). После этого драйвер, нуждающийся в подписи, отправляется в Microsoft через партнерский портал для дальнейшей проверки на совместимость и наличие вредоносного содержимого. В случае ее успешного прохождения драйвер получает электронную подпись Microsoft (Microsoft Hardware Compatibility Publisher), поясняют в SentinelOne.
Разработчики многих ИБ-решений считают эту процедуру достаточно надежной и поэтому их продукты полностью доверяют ПО, подписанному Microsoft. Таким образом, для злоумышленника наличие возможности подписывать собственные драйверы уровня ядра с помощью сертификата Microsoft представляет огромную ценность.
Новый инструментарий для вывода из строя средств безопасности
Исследователи обнаружили новый хакерский инструментарий, состоящий из двух компонентов: загрузчика (STONESTOP) и драйвера режима ядра (POORTRY). Тулкит применяется для осуществления атаки типа BYOVD (Bring Your Own Vulnerable Driver), то есть за счет эксплуатации известных уязвимостей, как правило, в легитимном подписанном драйвере.
Как в VK создали корпоративный суперапп для 10 тысяч сотрудников
Цифровизация

По информации Mandian и SentinelOne, STONESTOP представляет собой приложение, выполняемое в пространстве пользователя, которое предназначено для поиска и принудительного завершения процессов, связанных с ПО для защиты системы. Другая известная ИБ-специалистам модификация наделена функциональностью перезаписи и удаления файлов.
Антивирусы и подобное ПО защищено от попыток воздействия на него со стороны приложениями, запущенными в пространстве пользователя. Поэтому STONESTOP пытается загрузить POORTRY (драйвер режима ядра, подписанный Microsoft), который имеет достаточно полномочий для того, чтобы «убить» создающие для оператора помехи процессы или службы. Таким образом, STONESTOP не только выступает в роли загрузчика вредоносного драйвера, но и управляет его поведением.
Впрочем, как выяснил специалист компании SafeBreach Labs Ор Яир (Or Yair), повлиять на поведение некоторых популярных антивирусов можно и без внедрения в Windows вредоносных драйверов. Ранее CNews сообщил о том, что ИБ-решения способны по воле злоумышленника удалять любые, в том числе и системные, файлы.
Связь с кибервымогателями
Sophos, Mandiant и SentinelOne зафиксировали применение нового инструментария целым рядом известных группировок хакеров-вымогателей. В их числе Cuba и Hive. Кроме того, похожий тулкит еще в августе 2022 г. использовали участники UNC3944, которая для получения первоначального доступа в сеть организаций использует технику подмены SIM-карт.
В настоящий момент достоверно неизвестно, каким образом упомянутые группировки сумели обзавестись подобными наборами инструментов, содержащими подписанные Microsoft компоненты. Однако Mandiant и SentinelOne считают, что инструментарием или услугой подписи вредоносных драйверов торгуют в Сети. Эксперты предполагают, что за разработкой разновидностей нового тулкита стоит один человек или организация. На это, по их мнению, указывает тот факт, что применяемые «разношерстными» киберпреступниками инструменты сходны по функциональности и по структуре, входящих в их состав, вредоносных драйверов.
Курс на цифровизацию в «Росатоме»: кто такие atomic ИТ-специалисты
ИТ в госсекторе

Специалисты Mandiant выяснили, что для подписи вредоносных драйверов использовались сертификаты, выданные китайским компаниям: Qi Lijun; Luck Bigger Technology Co., Ltd; XinSing Network Service Co., Ltd; Hangzhou Shunwang Technology Co., Ltd; Fuzhou Superman; Beijing Hongdao Changxing International Trade Co., Ltd; Fujian Altron Interactive Entertainment Technology Co., Ltd; Xiamen Hengxin Excellence Network Technology Co., Ltd; Dalian Zongmeng Network Technology Co., Ltd.
Реакция Microsoft
Microsoft выпустила обновления безопасности, с помощью которых отозвала сертификаты, использованные для подписи вредоносных файлов и заблокировала учетные записи, через которые были отправлены заявки на аттестацию соответствующих драйверов.
В компании также пообещали усовершенствовать процедуру проверку таким образом, чтобы избежать возникновения подобных инцидентов в будущем. Однако о том, как именно злоумышленникам удалось подписать драйверы, не вызвав подозрений у специалистов, Microsoft пока не сообщила.
- Лучший софт для обеспечения ИТ-безопасности компании ― на ИТ-маркетплейсе Market.CNews. С ценами.
- Remove From My Forums

Цифровые подписи
-
Вопрос
-
После эксперементов с FLASH дисками удалось выяснить что причина не установки драйверов, в отсутсвии цифровых подписей. Интересно что целый год устанавливались и распозновались флешки без проблем, но в какой то момент, что то случилось. С админскими правами устройство FLASH устанавливается, но в диспетчере пишет «Цифровая подпись отсутствует».
Для драйверов флешки используются файлы «System32DRIVERSdisk.sys и PartMgr.sys» как я понимаю это стандартные драйвера Microsoft. в информации об этих файлах тоже указано что нет цифровой подписи.
Собственно вопрос. как вернуть подписи? У нас есть компьютеры где подписи присутсвуют, но что копировать?
в теме http://social.technet.microsoft.com/Forums/ru-RU/xpru/thread/0e6a9dcc-b1a4-42bf-b377-6e53f4556a71
советуют копировать CatRoot и CatRoot2, но это не помогает.
И ещё очень интересно, каким образом могут слететь эти подписи.
p.s. возможно ли что на клиентах упала нужная служба отвечающая за подписи?
Ответы
-
Тестовым путем было установлено, что на «плохом компьютере» где все устройства НЕ имеют цифровых подписей, если установить драйвера NVidea, на устройстве видеоадаптера цифровая подпись появляется. На всех других устройствах попрежнему цифровой подписи нет.
Где хранятся сами цифровые подписи к драйверам? Они вшиты в сам файл либо лежат отдельно?ощущение, что у вас сертификаты из хранилища каким-то образом загадочным улетели… сравните список сертификатов в Trusted Root Certification Authorities на «здоровой» и «больной» машинах — нет ли явных отклонений? также посмотрите Intermediate Certification Authorities и Untrusted Certificates. Цифровая подпись — часть файла. У вас нарушен механизм проверки подписи, а не сами подписи.
-
Помечено в качестве ответа
24 декабря 2010 г. 7:20
-
Помечено в качестве ответа
12.08.2016, 21:32. Показов 36569. Ответов 41

Эта статья — быстрый онлайн-помощник для тех, кто переходит на новое
подписывание драйверов в Windows 10 (EV, WHDC-портал). Здесь я постараюсь
дать основные рекомендации, чтобы помочь избежать глупых ошибок и, не
теряя времени, скорее адаптировать свои проекты под новые требования.
Для того, чтобы начать подписывать драйверы по-новому, вам потребуется:
* EV-сертификат, приобретенный у Symantec, DigiCert, GlobalSign, WoSign
или Entrust. В тот момент, когда пишутся эти строки, поддерживаются только
сертификаты, приобретенные в перечисленных выше организациях. В будущем список,
вероятно, будет дополняться.
По тексту ниже подразумевается, что сертификат уже установлен на вашем компьютере.
* Аккаунт на Microsoft (LiveID). Регистрация там бесплатная и занимает несколько минут.
* Утилита signtool с поддержкой SHA256. Утилиту лучше взять из последних версий WDK
(8 и выше), так как старые версии не поддерживают SHA256 и некоторые другие возможности,
которые вам потребуются.
* Несколько часов свободного времени.
Первое, что вам нужно сделать — зарегистрировать свою компанию на портале WHDC.
Идем сюда:
Microsoft Hardware Dev Center
https://developer.microsoft.co… s/hardware
жмем ‘Dashboard’ и логинимся в свой аккаунт Microsoft.
Далее вам будет предложено скачать файл winqual.exe, подписать его своим сертификатом и
загрузить обратно. Так портал определяет валидность сертификата, а также сможет сопоставить
цифровую подпись с вашей компанией, если это будет необходимо. Команда подписи для
signtool.exe затруднений вызывать не должна:
Код
signtool.exe sign /n "My EV Certificate Name" /a /fd SHA256 /tr http://timestamp.globalsign.com/?signature=sha2 /td SHA256 winqual.exe
Для вашего сертификата опции могут быть немного другие. Обратите внимание на ключи /fd и /td —
они указывают, что и для цифровой подписи, и для timestamp-сервера следует использовать
SHA256, а не SHA1. EV-сертификаты используют только SHA2. Также обратите внимание,
что здесь и далее больше не будут использоваться никакие кросс-сертификаты (ключ /ac),
так как для ‘attestation signing’ (подписывание драйверов через веб-портал) это не требуется.
Точно такой же командой вы будете подписывать submission (архив с файлами для подписи).
Подписав и загрузив winqual.exe, вы попадете на страницу, где вам предложат указать
сведения о компании — название, юридический адрес, почтовый индекс, телефон, e-mail…
Судя по всему, эта информация не проверяется и нужна только «для галочки».
Но указывать откровенно «липовые» данные, разумеется, не стоит.
Вот и все, теперь вы успешно зарегистрированы на веб-портале WHDC.
Осталось немного — дать нужные разрешения (permissions), а также подписать несколько
соглашений, которые предлагает вам Microsoft (по поводу Anti-Malware, DRM и остальные в
таком же духе, всего штук 10). Я не буду подробно описывать нужные шаги, т.к. они
достаточно очевидны.
После этого вам необходимо перелогиниться на веб-портале (выйти и зайти снова), чтобы
изменения вступили в силу.
Подписывание драйвера.
Сначала вам нужно создать cab-архив с файлами для подписи внутри.
Если пакет драйверов только один, cab-файл должен иметь такую структуру:
Код
DriverPackage
    mydriver.sys
    mydriver.inf
Если пакетов драйверов несколько, тогда добавляется нумерация:
Код
DriverPackage1
    drv1.sys
    drv1.inf
DriverPackage2
    drv2.sys
    drv2.inf
...
DriverPackageN
    drvN.sys
    drvN.inf
INF-файл обязателен, даже если у вас legacy-драйвер, которому INF не нужен.
Так что если вы никогда не делали INF-файлов, придется этому научиться.
Для legacy-драйверов можно использовать следующую заглушку, поставив
только правильные названия:
Кликните здесь для просмотра всего текста
Код
;
; TODO: Add copyright info here.
;

[Version]
Signature                = "$Chicago$"
Provider                 = %Provider%
Class                    = "LegacyDriver"
ClassGuid                = {8ECC055D-047F-11D1-A537-0000F8753ED1}
DriverVer                = 07/24/2015,1.0.0.0
DriverPackageType        = KernelService
DriverPackageDisplayName = %PackageDisplayName%
CatalogFile              = setup.cat

[DefaultInstall]
CopyFiles = Setup.CopyFiles

[DefaultInstall.Services]
AddService = mydriver,,Setup.AddService

[SourceDisksFiles]
mydriver.sys = 1

[SourceDisksNames]
1 = "Disk"

[DestinationDirs]
DefaultDestDir = 12 ; "system32drivers" directory.

[Setup.CopyFiles]
mydriver.sys

[Setup.AddService]
ServiceName   = mydriver
DisplayName   = %DrvDisplayName%
Description   = %DrvDescription%
ServiceType   = 1 ; SERVICE_KERNEL_DRIVER
StartType     = 1 ; SERVICE_SYSTEM_START
ErrorControl  = 1 ; SERVICE_ERROR_NORMAL
ServiceBinary = %12%mydriver.sys ; 12 - "system32drivers" directory.

[Strings]
Provider           = "My Driver Provider Name"
PackageDisplayName = "My Driver Package Display Name"
DrvDisplayName     = "MyDriver"
DrvDescription     = "My Driver Description"
Я сразу советую проверять, валиден ли ваш INF-файл, используя утилиту inf2cat из WDK.
Например:
Код
inf2cat.exe /v /DRV:C:MyDriverPackage /OS:XP_X64
Для создания cab-архива можно использовать разные программы, но проще всего
задействовать штатную утилиту Windows под названием makecab:
Код
makecab.exe /f путь-к-файлу-ddf
В файле ddf описываются директивы для создания cab-архива.
Я использую примерно такой шаблон:
Код
.OPTION EXPLICIT
.Set CabinetFileCountThreshold=0
.Set FolderFileCountThreshold=0
.Set FolderSizeThreshold=0
.Set MaxCabinetSize=0
.Set MaxDiskFileCount=0
.Set MaxDiskSize=0
.Set CompressionType=MSZIP
.Set Cabinet=on
.Set Compress=on
.Set CabinetNameTemplate=submission-8.cab
.Set DestinationDir=DriverPackage1
C:SUBMISSIONSMyDriver164MyDriver1.sys
C:SUBMISSIONSMyDriver164setup.inf
.Set DestinationDir=DriverPackage2
C:SUBMISSIONSMyDriver264MyDriver2.sys
C:SUBMISSIONSMyDriver264setup.inf
Файл cat, который сгенерировала утилита inf2cat.exe, в архив класть не нужно,
он все равно будет проигнорирован и портал при подписи создаст новый.
Важный момент: все пакеты драйверов в архиве должны быть под какую-то одну
архитектуру — или x64, или x86. На MSDN пишут, что Driver Package может
быть под обе архитектуры, но как правильно их упаковать в cab-архив — я
так и не понял. Попытки добавить еще один уровень в дереве папок внутри
архива (32/64, x86/x64, i386/amd64) успехом не увенчались.
Видимо, самый простой путь — делать две submission, одну чисто под x64,
вторую чисто под x86.
Когда cab-архив будет готов, вам нужно подписать его своим сертификатом.
Далее на веб-портале идем в раздел ‘File signing services’ и выбираем
пункт ‘Create driver signing submission’. После этого все очень просто:
вы указываете название своей submission (произвольное, это нужно только
для информативных целей), является ли ваш драйвер универсальным (см. концепцию
‘Universal Driver’ в MSDN), а также платформы, под которые собран драйвер,
их в настоящий момент четыре:
Microsoft Windows 10 AU Client family, x86
Microsoft Windows 10 AU Client family, x64
Microsoft Windows 10 Client family, x86
Microsoft Windows 10 Client family, x64
C x64/x86 все понятно, а вот разницу между Client и AU Client я не нашел —
подпись в конечном итоге получается одинаковая.
После этого вы загружаете свой cab-архив и жмете ‘Submit’. Все.
Обработка submission (процесс называется review) занимает некоторое время, у
меня было где-то около 15 минут, иногда может затянуться, как пишут, на
часы или даже сутки. Но обычно слишком долгий процесс обработки submission —
признак того, что что-то пошло не так и процесс будет завершен с ошибкой.
По завершении вам придет письмо на почту и архив с подписанными файлами можно
будет скачать там же, на веб-портале.
Кстати, можно запостить сразу несколько submission — они обрабатываются
параллельно и в некоторых случаях можно сэкономить немного времени.
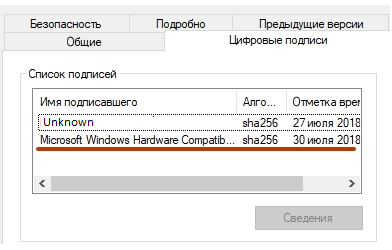
В сведениях о цифровой подписи файлов, которые вам вернет портал, вы с удивлением
(а кто-то, возможно, и с радостью) обнаружите, что вместо ‘OOO Vasya Pupkin’ будет
вписано безликое и ужасное ‘Microsoft Windows Hardware Compatibility Publisher’.
Теперь драйвер можно ставить и запускать на Windows 10 — 1607 и никакие
Secure Boot, Device Guard и т.п. не помеха.
———————————————————————————-
Теперь вопросы чисто практического плана.
Q: Как быть с предыдущими версиями Windows (Vista, Windows 7, Windows 8, Windows 8.1)?
A: К сожалению, здесь без вариантов: либо вам придется купить еще один сертификат SHA1 и
использовать его, либо попробуйте пройти HLK-тесты через веб-портал и тогда получите
подпись, которую понимают все указанные выше версии Windows.
Прохождение HLK-тестов — достаточно большой и серьезный «квест», затрагивать эту
тему здесь я не буду.
Q: Как быть с Windows Server 2016 (vNext)? Его ведь нету в списке при отправке
submission на веб-портале…
A: Для Windows Server 2016 прохождение HLK-тестов для драйвера — единственный
легальный способ поддержки, другие типы цифровых подписей система принимать
не будет. Так что ждите через некоторое время очередную статью от меня про HLK.
Q: Как обстоят дела с двойными сигнатурами?
A: Портал добавляет свою подпись, не затирая старую. Поэтому можно, например,
подписать .sys-файл сначала стандартным сертификатом с SHA1 старым способом с
кросс-сертификатом (cross-signing), а затем отправить его на веб-портал, где
ему будет добавлена вторая подпись SHA256 для Windows 10 (attestation signing).
Такой драйвер сможет запускаться на любых версиях Windows.
Однако в случае с cat-файлами это не сработает, потому что, как уже писалось выше,
портал генерирует свой cat-файл, игнорируя тот, что лежит внутри cab-архива.
Поэтому, если ваш драйвер ставится через INF-файл и вы хотите поддерживать
максимально возможный диапазон версий Windows, придется иметь несколько
пакетов драйвера, один для систем до Windows 10, второй для Windows 10 и выше.
Q: Что делать с модулями, которые собираются с ключом /INTEGRITYCHECK и,
согласно MSDN, должны подписываться с опцией /ph (generate page hashes)?
Например, драйвер, использующий Object Callbacks (ObRegisterCallbacks)?
A: Ничего не нужно. Система подписывания остается такой же, как и для
остальных драйверов Windows 10.
Q: EV-сертификат поставляется на USB-токене, это секьюрно, но неудобно.
У нас разработчики географически удалены друг от друга, а подписывать,
получается, может только один?
A: К сожалению, здесь действительно есть ряд неудобств.
Например, токен SafeNet не работает нормально в RDP-сессии и время
от времени начинает требовать ввод пароля (PIN).
Для решения этой проблемы можно настроить параметры, как написано здесь:
Automate Extended Validation (EV) code signing
http://stackoverflow.com/quest… de-signing
А также воспользоваться приведенным кодом и утилитой RemoteSignTool
(обертка над signtool.exe, работающая через интернет).
В настоящее время ведутся дебаты о том, чтобы оставить EV только для регистрации
на веб-портале, а для подписи submission использовать «обычные» сертификаты
(т.е. без USB-токенов и тому подобного):
EV Cert to be Requires for EVERY sysdev submission…
http://www.osronline.com/showt… ink=278314
10
Thanks for the help, Eugene.
Yes. I did sign two other driver packages before. One of them was modified version of WinUSB driver. I am using the same certificate I used when I signed those two driver packages a few months ago. It costs $250 per signing from Microsoft. I would think that Microsoft would complain about it during certification if the certificate is wrong. I use the following command to self sign the CAT file. I don’t have to specify the ceritificate name as there’s only one certificate in the directory —
Signtool sign /v /a /n CompanyName /t http://timestamp.verisign.com/scripts/timestamp.dll OurCatalogFile.cat
Below is the result from running Verify command on the Microsoft signed OutCatalogFile.cat
C:Program FilesMicrosoft SDKsWindowsv7.1Binx64>signtool verify /v «C:User
slogotestDocumentsserialdriversigningOurCatalogFile.cat»
Verifying: C:UserslogotestDocumentsserialdriversigningOurCatalogFile.cat»
Hash of file (sha1): BDDF39B1DD95881B462164129758A7FFD54F47D9
Signing Certificate Chain:
Issued to: Microsoft Root Certificate Authority
Issued by: Microsoft Root Certificate Authority
Expires: Sun May 09 18:28:13 2021
SHA1 hash: CDD4EEAE6000AC7F40C3802C171E30148030C072
    Issued to: Microsoft Windows Hardware Compatibility PCA
    Issued by: Microsoft Root Certificate Authority
    Expires:   Thu Jun 04 16:15:46 2020
    SHA1 hash: 8D42419D8B21E5CF9C3204D0060B19312B96EB78

        Issued to: Microsoft Windows Hardware Compatibility Publisher
        Issued by: Microsoft Windows Hardware Compatibility PCA
        Expires:   Wed Sep 18 18:20:55 2013
        SHA1 hash: D94345C032D23404231DD3902F22AB1C2100341E
The signature is timestamped: Tue Nov 06 11:26:48 2012
Timestamp Verified by:
Issued to: Microsoft Root Authority
Issued by: Microsoft Root Authority
Expires: Thu Dec 31 02:00:00 2020
SHA1 hash: A43489159A520F0D93D032CCAF37E7FE20A8B419
    Issued to: Microsoft Timestamping PCA
    Issued by: Microsoft Root Authority
    Expires:   Sun Sep 15 02:00:00 2019
    SHA1 hash: 3EA99A60058275E0ED83B892A909449F8C33B245

        Issued to: Microsoft Time-Stamp Service
        Issued by: Microsoft Timestamping PCA
        Expires:   Tue Apr 09 16:53:56 2013
        SHA1 hash: 1895C2C907E0D7E5C0292B92C6EA8D0E236F525E
Successfully verified: C:UserslogotestDocumentsserialdriversigningOurCatalogFile.cat»
Number of files successfully Verified: 1
Number of warnings: 0
Number of errors: 0
Thank you!
Answer
One of the files in my package was getting modified when I made the package. I replaced it with the one I used during signing the drivers and I got no error message. I found the following document useful — Digital Signatures For Windows® Drivers from Scott M. Johnson Program Manager Windows Hardware Quality Labs Microsoft Corporation
Introduction
This is my best effort to summarize the steps to attestation signing for Windows drivers (see Microsoft’s main page on this). I’m mostly a Linux guy with no connections inside Microsoft, so everything written below is based upon public sources, trial and (a lot of) error, some reverse engineering, and speculations. This couldn’t be further away from the horse’s mouth, and I may definitely be wrong occasionally (that is, more than usual).
Also, the whole topic of attestation signature seems to be changing all the time, so it’s important to keep in mind that this reflects the situation of May 10th 2021. Please comment below as things change or whenever I got things wrong to begin with.
Attestation signing replaces the method that was available until April 2021, which was signing the driver locally by its author, just like any code signing. With attestation signing, Microsoft’s own digital signature is used to sign the driver. To achieve that, the driver’s .inf and .sys files are packed in a .cab file, signed by the author, and submitted to Microsoft. Typically 10 minutes later, the driver is signed by Microsoft, and can be downloaded back by the author.
Unfortunately, the signature obtained this way is recognized by Windows 10 only. In order to obtain a signature that works with Windows 7 and 8, the driver needs to get through an HLK test.
Signing up to the Hardware Program
This seemingly simple first step can be quite confusing and daunting, so let’s begin with the most important point: The only piece of information that I found present in Microsoft’s output (i.e. their signature add-ons), which wasn’t about Microsoft itself, was the company’s name, as I stated during the enrollment. In other words, what happens during the sign-up process doesn’t matter so much, as long as it’s completed.
This is Microsoft’s general how-to page for attestation signing in general, and this one about joining the hardware program. It wasn’t clear to me from these what I was supposed to do, so I’ll try to offer some hints.
The subscription to the Hardware Program can begin when two conditions are met:
- You have the capability to sign a file with an Extended Validation (EV) code signing certificate.
- You have an Azure Active Directory Domain Services managed domain (“Azure AD”).
Obtaining an EV certificate is a bureaucratic process, and it’s not cheap. But at least the other side tells you what to do, once you’ve paid. I went for ssl.com as their price was lowest, and working with them I got the impression that the company has hired people who actually know what they do. In short, recommended. Actually, read this first if you plan working with them.
So what’s the Domain Services thing? Well, this is the explanation from inside the Partner web interface (once it has already been set up): “Partner Center uses Azure Active Directory for identity and access management”. That’s the best I managed to find on why this is necessary.
For a single user scenario, this boils down to obtaining a domain name like something.onmicrosoft.com from Microsoft. It doesn’t matter if the name turns out long and daunting: It doesn’t appear anywhere else, and you’re not going to type it manually.
So here’s what to do: First thing first, create a fresh Microsoft account. Not really necessary if you already have one, but there’s going to be quite some mail going its way (some of which is promotional, unless you’re good at opting out).
Being logged into that account, start off on Azure’s main page. Join the 12-month free trial. It’s free, and yet you’ll need to supply a valid credit card number in the process. As of writing this, I don’t know what happens after 12 months (but see “Emails from Azure calling for an upgrade” below on developments).
The next step is to create that domain service. I believe this is Microsoft’s page on the topic, and this is the moment one wonders why there’s talk about DNSes and virtual networks. Remember that the only goal is to obtain the domain name, not to actually use it.
And here comes the fuzzy part, where I’m not sure I didn’t waste time with useless operations. So you may try following this, as it worked for me. But I can’t say I understand why these seemingly pointless actions did any good. I suspect that the bullets in italics below can be skipped — maybe it’s just about creating an Azure account, and not necessarily allocate resources?
So here are the steps that got me going:
- Log in to your (new?) Azure account.
- Go to Azure’s Portal (or click the “Portal” link at the top bar on Azure’s main page)
Maybe skip these steps (?):
- Click “Create a resource” (at the top left) and pick Azure AD Domain Services.
- For Resource Group I created a new one, “the_resource_group”. I guess the name doesn’t matter.
- The DNS name doesn’t matter, apparently. yourcompany.onmicrosoft.com or something. It’s not going to appear anywhere.
- I set SKU set to Standard, as it appeared to be the least expensive one.
- After finishing the setup, it took about an hour for Azure to finish the configuration. Time for a long and well deserved coffee break.
- But then it complained that I need to set up DNSes or something. So I went along with the automatic fix.
(end of possibly useless steps)
- There’s this thing on the Register for the Hardware Program page saying that one should log in with the Global administrator account. This page defines Azure AD Global administrator as “This administrator role is automatically assigned to whomever created the Azure AD tenant”. So apparently for a fresh Azure account, it’s OK as is.
- At this point, you’re hopefully set to register to the Hardware Developer Program. After clicking “Next” on the landing page, you’ll be given the choice of “Sign in to Azure AD” or “Create a new directory for free”. The Azure AD is already set up, so log in with the account just created.
- A word about that “Create a new directory for free” option. To make things even more confusing, this appears to be a quick and painless shortcut, however in my case I got “This domain name is not available” for any domain name I tried with. Maybe I missed something, but this was a dead end for me. This is the page I didn’t manage to get through. Maybe your luck is better than mine. So this is why I created the Azure AD first, and then went for registration.
- Going on with the registration, you’re given a file to sign with your EV certificate. I got a .bin file, but in fact it had .exe or .sys format. So it can be renamed to .exe and used with cloud signature services (I used eSigner). BUT do this only if you’re going to sign the .cab files with the same machinery, or you’ll waste a few hours wondering what’s going on. Or read below (“When the signature isn’t validated”) why it was wrong in my case.
- And this is the really odd thing: Inside the Microsoft Partner Center, clicking the “your account” button (at the top right) it shows the default directory in use. At some point during the enrollment procedure, the link with the Azure AD I created was made (?), but for some reason, the default directory shown was something like microsoftazuremycompany.onmicrosoft.com instead of mycompany.onmicrosoft.com, which is the domain I created before. This didn’t stop me from signing a driver. So if another directory was used, why did I create one earlier?
After all this, I was set to submit drivers for signature: From this moment on, the entry point for signing drivers is the Microsoft Partner Center dashboard’s main page.
Emails from Azure calling for an upgrade
To make a long story short, quite a few emails arrived on behalf of Microsoft Azure, urging me to “upgrade” my account, i.e. to allow charging my credit card for Azure services. I ignored them all, and had no issues continuing to sign drivers.
And now to the details.
A day after signing up to Azure, I discovered that $20 had been reduced from my promotional free trial credit. Apparently, I had enabled stuff that would have cost real money. So I deleted the resources I had allocated in Azure. This includes deleting the mycompany.onmicrosoft.com domain, which was obviously ignored by the Partner Center. It was about deleting the the resource group (which contained 7 elements, with the domain included): Just clicking on the resource group in the main portal page, and then Delete Resource Group at the top. It took several minutes for Azure to digest that.
About a month later, I got a notification from Azure urging me to upgrade my account: It went
You’re receiving this email because your free credit has expired. Because of this, your Azure subscription and services have been disabled. To restore your services, upgrade to pay-as-you-go pricing.
Scary, heh? Does “services have been disabled” mean that I’m about to lose the ability to sign drivers?
Once again, “upgrade” is a cute expression for giving permission to charge the credit card that I had to give during submission. The details of which can’t be deleted from the account, unless I submit another, valid one, instead.
As a side note, it turned out that I had a Network Watcher group activated. Maybe I missed it earlier, and maybe it was somehow added. So I deleted it as well. But it’s not clear if this was related to the fact that the credits expired, whatever that means.
A few days on, another mail from Azure, basically the same, urging me to upgrade. One day after that, came an invoice. How come? I haven’t approved any payment. So it was an invoice on 0.00 USD. Zero. Why it was sent to me, is still unclear.
And finally, roughly two months after the initial subscription, I got a “We’re sorry to see you go” email from Azure, saying “Your free credit expired on (this and this date), and because of this we’ve deleted your subscription and any associated data and services”. Uhhm. What about driver signing? Well, I’ve spoiled the suspension above.
Two weeks after getting this last email, I deleted all cookies on my browser that were related to Microsoft, logged into my account at the Partner Center and submitted a driver for signature. The process went through smoothly.
Checking my Azure cloud account, it seemed to had been reset to its starting state, even with a suggestion to start another $200 free trial credit round. Detaching my credit card was however still impossible.
So apparently, there’s no problem just ignoring these emails, and continue signing forever. Emphasis on “apparently”.
Overview of the signature process
To make a long story short, you prepare a .cab file with the driver’s files, sign it with your EV Certificate, upload it to the Hardware Dashboard, and get it back after 10 minutes with Microsoft’s digital signatures all over the place.
So instead of signing the driver yourself, you pack the whole thing neatly, and send it to Microsoft for adding the .cat file and signing the drivers. And yet, you must sign the .cab file to prove that you’re the one taking responsibility for it. It’s Microsoft’s signature on the driver in the end, but they know who to bash if something goes wrong.
.cab files are exactly like .zip files, in the sense that they contain a directory tree, not just a bunch of files. Unfortunately, when looking at .cab files with Windows’ built-in utilities, the directory structure isn’t presented, and it looks like a heap of files. This holds true both when double clicking a .cab file and when using expand -D, from Windows XP all the way to Windows 10. Ironically enough, double-clicking a .cab file with Linux desktop GUI opens it correctly as a directory tree.
It’s important to consider .cab files like .zip, with hierarchy, because the way the driver is submitted is by organizing the files in directories exactly as they appear in the driver package for release, minus the .cat file. So what really happens is that Microsoft uncompresses the .cab file like a .zip, adds the .cat file and then performs the digital signing. It then compresses it all back into a .zip file and returns it back to you. The files remain in the same positions all through.
I guess the only reason .zip files aren’t uploaded instead of .cab, is that signtool doesn’t sign zips.
Some people out there, who missed this point, got the impression that the signing is done for each architecture separately. That’s possible, but there’s no reason to go that way. It’s just a matter of preparing the file hierarchy properly.
Preparing the .cab file
For reference, this is Microsoft’s short page on makecab and very long page on .cab files (which begins with cabarc, but goes on with makecab).
First, set up a .ddf file, looking something like this:
.Set CabinetFileCountThreshold=0
.Set FolderFileCountThreshold=0
.Set FolderSizeThreshold=0
.Set MaxCabinetSize=0
.Set MaxDiskFileCount=0
.Set MaxDiskSize=0
.Set CompressionType=MSZIP
.Set Cabinet=on
.Set Compress=on

;Specify file name for new cab file
.Set CabinetNameTemplate=thedriver.cab
.Set DiskDirectoryTemplate= ; Output .cab files into current directory

.Define pathtodriver=thedriver-dir

.Set DestinationDir=thedriver
%pathtodriver%thedriver.inf
.Set DestinationDir=thedriveri386
%pathtodriver%i386thedriver.sys
.Set DestinationDir=thedriveramd64
%pathtodriver%amd64thedriver.sys
The .cab file is then generated with something like
> makecab /f thedriver.ddf
“makecab” is in Window’s execution path by default.
In my case of transitioning from self-signed drivers to attestation signature, there was already a script that generated the directory ready for releasing the driver. So the change I made was not to copy the .cat file into that directory, and instead of signing the .cat file, create a .cab.
The .ddf file above relates to a driver released for Intel architecture, 32 and 64 bits. The subdirectories in the driver package are i386 and amd64, respectively, as defined in the .inf file.
Changes you should make to the .ddf file:
- Replace all “thedriver” with the name of your driver (i.e. the name of the .inf and .sys files).
- Set “pathtodriver” to where the driver package is. Note that makecab’s /d flag allows setting variables, so the Define directive can be removed, and instead go something like
> makecab /d pathtodriver=..driverpackage thedriver.ddf
- Then possibly modify the files to be included. Each DestinationDir assignment tells makecab the directory position to place the file(s) that appear after it. This should match the structure of your release package’s directory structure.
- If the line doesn’t start with a dot, it’s the path to a file to copy into the .cab file. The path can be absolute (yuck) or relative to the current directory.
All in all, the important thing is to form a directory tree of a driver for release in the .cab file.
The .ddf file shown above is a working example, and it includes only the .inf and .sys files. Including a .cat file is pointless, as Microsoft’s signature machinery generates one of its own.
As for .pdb files, it’s a bit more confusing: Microsoft’s main page includes .pdb files in the list of “typical CAB file submissions” (actually, .cat it listed too there), and then these files don’t appear in the .ddf file example on the same page. The graphics showing a tree for multiple package submissions is inconsistent with both.
A .pdb files contains the symbol map of the related .sys file, allowing the kernel debugger to display meaningful stack traces and disassemblies, in particular when analyzing a bugcheck. These files are not included in a driver release, not mentioned in the .inf file, not referenced in the .cat file and are therefore unrelated to the signature of the driver. Technically, Microsoft doesn’t need these files to complete an attestation signature.
Microsoft nevertheless encourages submitters of drivers to include .pdb files. When these file are missing in a driver submission, a popup shows up in the web interface saying “This submission does not include symbols. It is recommended to upload symbols within each driver folder”. This however doesn’t stop the process, and not even delay it, in case you’re slow on confirming it. So it’s up to you if you want to include .pdb’s.
Submitting the .cab file
The command for signing the .cab file is:
> signtool.exe sign /fd sha256 thedriver.cab
Note that timestamping is not required, but won’t hurt. The whole idea with timestamping is to make the signature valid after the certificates expire, but the .cab file is examined soon after the signature is made, and after that it has no more importance.
Note that ssl.com also offers an eSigner tool for signing the .cab file with a simple web interface. Just be sure to have registered with a signature made in eSigner as well, or things will go bad, see “When the signature isn’t validated” below. Or add eSigner’s certificate to the existing subscription.
November 2021 update: You probably don’t want to use eSigner at all. See this post.
Then the submission itself:
- In Microsoft Partner Center’s dashboard, click at “Drivers” on the left menubar. It might be necessary to click “Hardware” first to make this item appear.
- Click the “Submit new hardware” button at the top left to get started.
- Give the submission a name — it’s used just for your own reference, and surely won’t appear in the signed driver package.
- Drag the signed cab file to where it says to.
- The web interface requires selecting Windows releases in a lot of checkboxes. More on this just below.
- Click “Submit” to start the machinery. Once it finishes, successfully or not, it sends a notification mail (actually, three identical mails or so. Not clear why not only one).
- If and when the entire process is completed successfully, the driver can be downloaded: Under “Packages and signing properties”, there’s a “More” link. Click it, and a button saying “Download signed files” appears. So click it, obviously.
Now to the part about selecting Windows versions. It’s an array of checkboxes. This is a screenshot of this stage (click to enlarge):

First, the easy part: Don’t check the two at the top saying “Perform test-signing for X”. It says “Leave all checkboxes blank for Attestation Signing” in fine print above these.
Now we’re left with a whole lot of Windows 10 release numbers and architectures. From a pure technical point of view, there’s no need for this information to perform the signature, since the .inf file contains the information of which architectures are targeted.
Rather, this is the “attestation” part: Just above the “Submit” button, it says “You have completed quality testing of your driver for each of the Operating Systems selected above”. So this is where you testify which platforms you’ve tested the driver with. The deal is that instead of going through the via dolorosa of HLK tests, Microsoft signs the driver for you in exchange to this testimony. Or should I say, attestation.
Just to spell it out: The signature can’t and doesn’t limit itself to specific operating system builds, and it would be insane doing so, as it wouldn’t cover future Windows releases.
I have to admit that in the beginning I misunderstood this part, and tried to select as much as possible. And because my driver wasn’t compiled for arm64, and I had clicked versions saying “ARM64″, the submission was rejected with “thedriver.inf does not have NTARM64 decorated model sections” (in UniversalLog.txt). It was bit of a computer game to check the right boxes and avoid the wrong ones.
So no need to be greedy. Common sense is to test the driver on one operating system release for each architecture. In the example above, it’s for a driver released for Intel architecture, 32 and 64 bits. The checkbox selection reflects testing it with Windows 10 release 1607, 32- and 64-bit architecture. This is the proper way to go.
And yet, for the heck of it I tried submitting the same driver package with a single OS checked (1607 x64). To my surprise, the package was accepted and signed despite my declaration that it hadn’t been tested for the 32-bit version, even though a .sys file for that architecture was part of the package.
All in all, there must be a match between the architectures targeted by the driver (as listed in the .inf file) and those inferred by the selection of OSes. Nevertheless, it seems like Microsoft lets you get away with not testing all of them. In short, checking just one checkbox may be enough, even if the driver supports multiple architectures.
Looking at the signed zip
After receiving back the signed driver, I examined the files. My findings were:
- The .inf file is left completely intact (bytewise identical to the one in the .cab file).
- A signed .cat file was added.
- All .sys files were signed as well (contrary to what most of us do when releasing drivers). This makes the driver eligible for inclusion during boot.
Looking at the digital signatures with an ASN.1 dump utility, it’s appears like the only place there’s something not pointing at Microsoft, is an non-standard spcSpOpusInfo entry in the crypto blob, where the company’s name, appears in wide char format in the programName field (no, I’m not mistaken). This appears to be taken from the “Publisher display name” as it appears in the Account Settings in the Microsoft Partner Center dashboard.
So all in all, there are almost no traces to the fact that the driver’s origin isn’t Microsoft. Except for that entry in the crypto blob, which is most likely invisible unless the signature is analyzed as an ASN.1 file or string searched (with a tool that detects wide char strings). So it appears like all information, except for that “Publisher display name” remains between you and Microsoft.
When the signature isn’t validated
Sometimes, the process fails at the “Preparation” stage. As always on failures, the web interface suggest downloading a “full error report”. That report is a file named UniversalLog.txt file. If it says just “SignatureValidationFailed”, something went wrong with the signature validation.
The solution for this is to make sure that the certificate that was used for signing the .cab file is registered: Within Microsoft Partner Center, click the gear icon at the top right, select “Account Settings” and pick “Manage Certificates” at the left menu bar. That’s where the relevant certificate should be listed. The first time I got to this page, I saw the same certificate twice, and deleted one of those.
In my case the problem was that during the registration, I had made the signature with the cloud app (eSigner), but signed the driver with a local USB key dongle. As it turned out, these have different certificates.
So the solution was to delete the registered certificate from the account, and register the new one by signing a file with the local USB dongle. Doing this is a good idea in any case, because if something is wrong with the signature produced by signtool, it will fail the registration as well. So whether this renewed registration succeeds or fails, it brings you closer to the solution.
Sample certificate chains
For reference, these are examples of certificate chains: One properly signed .cab file and one for a the .cat file that has been attestation signed my Microsoft.
Note the /pa flag, meaning Default Authenticode Verification Policy is used. Or else verification may fail. Also note that the file isn’t timestamped, which is OK for submission of attestation signing.
> signtool verify /pa /v thefile.cab

Verifying: thefile.cab

Signature Index: 0 (Primary Signature)
Hash of file (sha256): 388D7AFB058FEAE3AEA48A2E712BCEFEB8F749F107C62ED7A41A131507891BD9

Signing Certificate Chain:
    Issued to: Certum Trusted Network CA
    Issued by: Certum Trusted Network CA
    Expires:   Mon Dec 31 05:07:37 2029
    SHA1 hash: 07E032E020B72C3F192F0628A2593A19A70F069E

        Issued to: SSL.com EV Root Certification Authority RSA R2
        Issued by: Certum Trusted Network CA
        Expires:   Mon Sep 11 02:28:20 2023
        SHA1 hash: 893E994B9C43100155AE310F34D8CC962096AE12

            Issued to: SSL.com EV Code Signing Intermediate CA RSA R3
            Issued by: SSL.com EV Root Certification Authority RSA R2
            Expires:   Wed Mar 22 10:44:23 2034
            SHA1 hash: D2953DBA95086FEB5805BEFC41283CA64C397DF5

                Issued to: THE COMPANY LTD
                Issued by: SSL.com EV Code Signing Intermediate CA RSA R3
                Expires:   Fri May 03 13:09:33 2024
                SHA1 hash: C15A6A7986AE67F1AE4B996C99F3A43F98029A54

File is not timestamped.

Successfully verified: thefile.cab

Number of files successfully Verified: 1
Number of warnings: 0
Number of errors: 0
One possibly confusing situation is to check if the root certificate exists before ever running this verification on a fresh Windows installation. It may not be there, but then the verification is successful, and the root certificate appears from nowhere. That rare situation is explained in this post.
Next up is the attestation signed .cat file:
> signtool.exe verify /kp /v thedriver.cat

Verifying: thedriver.cat

Signature Index: 0 (Primary Signature)
Hash of file (sha256): ED5231781724DEA1C8DE2B1C97AC55922F4F85736132B36660FE375B44C42370

Signing Certificate Chain:
    Issued to: Microsoft Root Certificate Authority 2010
    Issued by: Microsoft Root Certificate Authority 2010
    Expires:   Sat Jun 23 15:04:01 2035
    SHA1 hash: 3B1EFD3A66EA28B16697394703A72CA340A05BD5

        Issued to: Microsoft Windows Third Party Component CA 2014
        Issued by: Microsoft Root Certificate Authority 2010
        Expires:   Mon Oct 15 13:41:27 2029
        SHA1 hash: 1906DCF62629B563252C826FDD874EFCEB6856C6

            Issued to: Microsoft Windows Hardware Compatibility Publisher
            Issued by: Microsoft Windows Third Party Component CA 2014
            Expires:   Thu Dec 02 15:25:28 2021
            SHA1 hash: 984E03B613E8C2AE9C692F0DB2C031BF3EE3A0FA

The signature is timestamped: Mon May 10 03:10:15 2021
Timestamp Verified by:
    Issued to: Microsoft Root Certificate Authority 2010
    Issued by: Microsoft Root Certificate Authority 2010
    Expires:   Sat Jun 23 15:04:01 2035
    SHA1 hash: 3B1EFD3A66EA28B16697394703A72CA340A05BD5

        Issued to: Microsoft Time-Stamp PCA 2010
        Issued by: Microsoft Root Certificate Authority 2010
        Expires:   Tue Jul 01 14:46:55 2025
        SHA1 hash: 2AA752FE64C49ABE82913C463529CF10FF2F04EE

            Issued to: Microsoft Time-Stamp Service
            Issued by: Microsoft Time-Stamp PCA 2010
            Expires:   Wed Jan 12 10:28:27 2022
            SHA1 hash: AAE5BF29B50AAB88A1072BCE770BBE40F55A9503

Cross Certificate Chain:
    Issued to: Microsoft Root Certificate Authority 2010
    Issued by: Microsoft Root Certificate Authority 2010
    Expires:   Sat Jun 23 15:04:01 2035
    SHA1 hash: 3B1EFD3A66EA28B16697394703A72CA340A05BD5

        Issued to: Microsoft Windows Third Party Component CA 2014
        Issued by: Microsoft Root Certificate Authority 2010
        Expires:   Mon Oct 15 13:41:27 2029
        SHA1 hash: 1906DCF62629B563252C826FDD874EFCEB6856C6

            Issued to: Microsoft Windows Hardware Compatibility Publisher
            Issued by: Microsoft Windows Third Party Component CA 2014
            Expires:   Thu Dec 02 15:25:28 2021
            SHA1 hash: 984E03B613E8C2AE9C692F0DB2C031BF3EE3A0FA

Successfully verified: thedriver.cat

Number of files successfully Verified: 1
Number of warnings: 0
Number of errors: 0
Doing the same with the .sys file yields exactly the same result, with slight and meaningless differences in the timestamp.
Clearly, the certificate chain ends with “Microsoft Root Certificate Authority 2010″ rather than the well-known “Microsoft Code Verification Root”, which is the reason the attestation signature isn’t recognized by Windows 7 and 8.
Microsoft as a Certificate Authority, approving itself all through the chain. It’s quite odd this happened only now.