-
Главная -
Драйверы
-
Видеокарты
- Видеокарты Microsoft
Скачать DriverHub
Веб-версия DriverHub может содержать не все драверы Microsoft. Установите DriverHub, чтобы получить доступ к полной базе драйверов.
| Веб-версия | DriverHub для Windows | |
|---|---|---|
| Полный каталог драйверов | ||
| Автоматическая установка драйверов |
Скачать и обновить нужные драйверы автоматически
Версия: 1.3.7.1452 для Windows 7, 8, 10 и 11
Бесплатное ПО
В комплекте идет опциональное ПО
- Yandex Browser
- Opera Browser
- Avast Free Antivirus
- World of Tanks
- World of Warships
Базовый видеоадаптер (Майкрософт)
Установщик драйверов:
В случае, когда вы не хотите тратить время на поиск нужного драйвера для вашего ПК,
к вашим услугам представлен автоматический установщик, который самостоятельно подберет
нужные и самые актуальные драйвера для всех устройств вашей системы.
Скачать Outbyte Drivers Installer вы можете перейдя по этой ссылке
Установить драйвера автоматически
Список драйверов:
Найдено драйверов для устройства «Базовый видеоадаптер (Майкрософт)»: 5. Для загрузки необходимого драйвера, выберите его из списка ниже и перейдите по ссылке «Скачать». Пожалуйста, убедитесь в соответствии выбранной версии драйвера вашей операционной системе для обеспечения корректности его работы.
curl PHP extension is required to use this library! See http://php.net/manual/en/book.curl.php
Драйверы для Базовый видеоадаптер (Майкрософт)
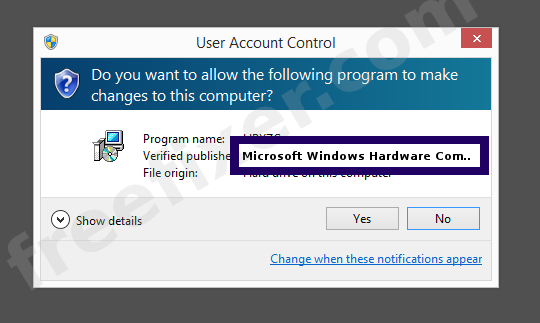
Microsoft Windows Hardware Compatibility Publisher — 0.074% Detection Rate *
Did you just find a download or a file on your computer that has been digitally signed by Microsoft Windows Hardware Compatibility Publisher? If that’s the case, please read on.
You’ll typically notice Microsoft Windows Hardware Compatibility Publisher when clicking to run the file. The publisher name is then displayed as the «Verified publisher» in the UAC dialog as the screenshot shows:
You can view additional details from the Microsoft Windows Hardware Compatibility Publisher certificate with the following procedure:
- Open Windows Explorer and locate the Microsoft Windows Hardware Compatibility Publisher file
- Right-click the file and select Properties
- Click on the Digital Signatures tab
- Click the View Certificate button
Here is a screenshot of a file signed by Microsoft Windows Hardware Compatibility Publisher:
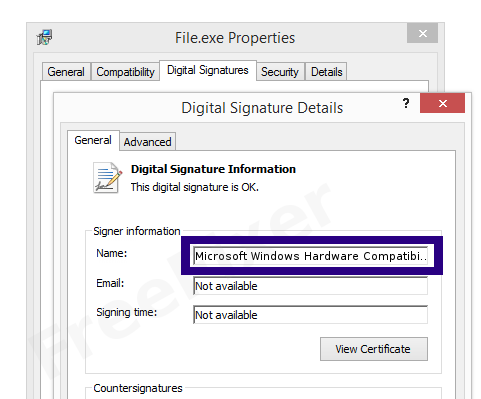
As you can see in the screenshot above, Windows states that «This digital signature is OK». This means that the file has been published by Microsoft Windows Hardware Compatibility Publisher and that the file has not been tampered with.
If you click the View Certificate button shown in the screenshot above, you can examine all the details of the certificate, such as when it was issued, who issued the certificate, how long it is valid, etc. You can also examine the address for Microsoft Windows Hardware Compatibility Publisher, such as the street name, city and country.
Microsoft Windows Hardware Compatibility PCA, Microsoft Windows Hardware Compatibility, Microsoft Windows Third Party Component CA 2012 and Microsoft Windows Third Party Component CA 2014 has issued the Microsoft Windows Hardware Compatibility Publisher certificates. You can also see the details of the issuer by clicking the View Certificate button shown in the screengrab above.
The following are the Microsoft Windows Hardware Compatibility Publisher files I have gathered, thanks to the FreeFixer users.
The FreeFixer tool treats files from Microsoft Windows Hardware Compatibility Publisher as safe, which means that the Microsoft Windows Hardware Compatibility Publisher files will appear with a green background and that there is no removal checkbox for the file. However, as you can see in the scan results below, a few of the anti-virus scanners detects the Microsoft Windows Hardware Compatibility Publisher file(s). I’m pretty sure those detections are false positives and that the files are safe. It’s unlikely that Microsoft Windows Hardware Compatibility Publisher would ship a malware file.
| Detection Ratio | File Name |
|---|---|
| 2/50 | smax4pnp.exe |
| 1/53 | igfxpers.exe |
| 1/47 | SkyTel.EXE |
| 1/48 | Ati2mdxx.exe |
| 2/51 | hasplms.exe |
| 1/49 | fasttx2k.sys |
| 1/53 | PAStiSvc.exe |
| 1/66 | TwDsUiLaunch.exe |
| 1/53 | Ati2evxx.exe |
| 1/52 | igfxpers.exe |
| 2/50 | aksfridge.sys |
| 1/51 | igfxpers.exe |
| 1/48 | hkcmd.exe |
| 2/49 | igfxpers.exe |
| 1/49 | igfxtray.exe |
| 1/50 | igfxpers.exe |
| 1/47 | Ati2evxx.exe |
| 1/49 | vsnpstd.exe |
| 1/51 | nvsvc32.exe |
| 1/49 | viprt.sys |
| 1/55 | Ati2evxx.exe |
| 1/48 | atiesrxx.exe |
| 1/48 | Ati2evxx.exe |
| 1/52 | igfxpers.exe |
| 1/48 | hasplms.exe |
| 1/55 | Ati2evxx.exe |
| 1/52 | stacsv.exe |
| 1/52 | vsnp2std.exe |
| 1/48 | hardlock.sys |
| 1/51 | nvsvc32.exe |
| 1/51 | hkcmd.exe |
| 1/51 | atiesrxx.exe |
| 1/50 | Ati2evxx.dll |
| 1/47 | SOUNDMAN.EXE |
| 1/46 | stacsv64.exe |
| 1/47 | aksfridge.sys |
| 2/55 | sm56hlpr.exe |
| 1/51 | hpowiav1.dll |
| 1/47 | ps2.exe |
| 1/47 | nv_agp.sys |
| 1/48 | NvMcTray.dll |
| 1/51 | ApntEx.exe |
| 1/52 | hkcmd.exe |
| 1/51 | zstatus.exe |
| 1/47 | iastor.sys |
| 1/51 | hkcmd.exe |
| 1/51 | vsnpstd.exe |
| 1/54 | viamraid.sys |
| 2/46 | CAP3RSK.EXE |
| 1/42 | sm56hlpr.exe |
| 1/46 | E_DMSG00.EXE |
| 1/55 | fspuip.exe |
| 1/50 | sm56hlpr.exe |
| 1/51 | atiesrxx.exe |
| 1/48 | atieclxx.exe |
| 1/68 | TwDsUiLaunch.exe |
| 1/54 | igfxpers.exe |
| 1/66 | atieclxx.exe |
| 1/40 | igfxrTRK.lrc |
| 1/48 | aksfridge.sys |
| 2/54 | igfxsrvc.exe |
| 1/48 | BrmfBAgS.exe |
| 1/49 | SynTPEnh.exe |
| 2/56 | hasplms.exe |
| 1/46 | aksdf.sys |
| 1/50 | E_FUICLBE.DLL |
| 1/55 | DptfPolicyLpmServiceHelper.exe |
| 1/66 | TmUmEvt.dll |
| 1/42 | essspk.exe |
| 1/50 | SynTPEnh.exe |
| 1/51 | sm56hlpr.exe |
| 2/55 | hasplms.exe |
| 1/48 | aksfridge.sys |
| 1/45 | hardlock.sys |
| 1/41 | stapo.dll |
| 1/52 | atiesrxx.exe |
| 1/55 | VIASysFx.dll |
| 1/50 | CTHELPER.EXE |
| 1/45 | SOUNDMAN.EXE |
| 1/42 | E_FATIABE.EXE |
| 1/49 | igfxtray.exe |
| 1/56 | sttray.exe |
| 1/52 | atiesrxx.exe |
| 1/43 | CAP3LAK.EXE |
| 1/50 | igfxpers.exe |
| 1/46 | hardlock.sys |
| 1/48 | SynToshiba.exe |
| 1/51 | escndv.exe |
| 1/53 | vspc1000.exe |
| 3/46 | jraid.sys |
| 1/57 | adgnetworktdidrv.sys |
| 1/68 | TwDsUiLaunch.exe |
| 1/72 | ene.sys |
| 1/45 | hardlock.sys |
| 2/49 | STacSV.exe |
| 4/47 | S3trayp.exe |
| 2/50 | ahcix86.sys |
| 1/48 | anodlwf.sys |
| 1/40 | hposwia_p01d.dll |
| 1/50 | E_IUICFCE.DLL |
| 1/54 | esxw2ud.dll |
| 1/54 | hkcmd.exe |
| 2/64 | adgnetworktdidrv.sys |
| 1/50 | atiesrxx.exe |
| 1/42 | E_FATIAEL.EXE |
| 1/51 | nvraid.sys |
| 1/50 | stacsv.exe |
| 1/43 | LEXBCES.EXE |
| 1/49 | sm56hlpr.exe |
| 1/33 | Ati2evxx.exe |
| 1/46 | CNMUI83.DLL |
| 1/49 | netaapl.sys |
| 1/51 | atiesrxx.exe |
| 1/54 | SynTPAPI.dll |
| 1/54 | atiesrxx.exe |
| 1/55 | hccutils.DLL |
| 1/54 | nvsvc32.exe |
| 1/53 | atieclxx.exe |
| 1/49 | CNC_AQL.dll |
| 1/55 | fpapli.exe |
| 1/56 | ati2evxx.exe |
| 1/51 | ubsbm.sys |
| 1/50 | sbavmon.dll |
| 1/54 | Ati2evxx.exe |
| 1/52 | aticfx32.dll |
| 1/57 | aksdf.sys |
| 1/54 | atiesrxx.exe |
| 1/56 | igfxtray.exe |
| 1/58 | OSD.exe |
| 1/58 | UIUCU.EXE |
| 1/65 | VM331_STI.EXE |
| 1/67 | StlFspAPI32.dll |
| 1/67 | TwDsUiLaunch.exe |
| 1/67 | TwDsUiLaunch.exe |
| 1/69 | TwDsUiLaunch.exe |
| 1/72 | ati2evxx.exe |
| 1/72 | TwDsUiLaunch.exe |
| 2/66 | sttray64.exe |
| 0/52 | igfxdev.dll |
| 0/48 | igfxsrvc.dll |
| 0/50 | mdmxsdk.sys |
| 0/52 | igfxdev.dll |
| 0/52 | ALCMTR.EXE |
| 0/51 | igfxsrvc.dll |
| 0/50 | tiltwheel%USERNAME%.exe |
| 0/52 | igfxdev.dll |
| 0/51 | mdmxsdk.sys |
| 0/48 | ALCXMNTR.EXE |
Scanner and Detection Names
Here’s the detection names for the Microsoft Windows Hardware Compatibility Publisher files. I have grouped the detection names by each scanner engine. Thanks to VirusTotal for the scan results.
As mentioned above, I think these detections are false positives since it is very unlikely that Microsoft Windows Hardware Compatibility Publisher would ship a malware file.
| Scanner | Detection Names |
|---|---|
| APEX | Malicious |
| AegisLab | Troj.W32.Gen.m2M2, AdWare.W32.BrainInst, W32.Virut |
| Agnitum | Trojan.Inject!lsJh8B2mO2g |
| Antiy-AVL | Trojan/Win32.Tgenic, Trojan/Win32.Menti, Worm/Win32.Otwycal, Trojan/Win32.SGeneric, Trojan[:HEUR]/Win32.Unknown, Worm/Win32.Otwycal.gen, Worm/Win32.Klez.gen, Worm/Win32.WhiteIce.gen, Backdoor/Win32.Bifrose.gen, Trojan/Win32.Agent |
| Avira | WORM/Conficker.Z.32 |
| Baidu | Win32.Trojan.WisdomEyes.16070401.9500.9504, Win32.Trojan.WisdomEyes.16070401.9500.9669 |
| Baidu-International | Hacktool.Win64.NetFilter.A |
| Bkav | HW32.CDB.9be0, HW32.CDB.8117, W32.Clodaed.Trojan.4969, W32.HfsAutoA.Ffc1, HW32.CDB.619b, W32.Clodbae.Trojan.b5af, HW32.CDB.3205, HW32.Laneul.jsmg, W32.Clodea0.Trojan.d774, HW32.CDB.Bbe4, HW32.Laneul.hykq, W32.HfsAutoA.B76C, HW32.Packed.ECC9, HW32.CDB.F961, HW32.Laneul.juio, W32.Clod861.Trojan.2fb2, HW32.Nonim.xuak, HW64.packed.9E7E, HW32.Nonim.wqsy, W32.HfsReno.8a5c, HW64.packed.A908 |
| ByteHero | Trojan.Exception.gen.101, Trojan-Dropper.win32.Agent.a |
| CMC | Heur.Win32.Obfuscated.1!O |
| ClamAV | Win.Trojan.7507983, Win.Trojan.Agent-564482, Win.Trojan.Rootkit-6573, Win.Trojan.6536826, Win.Trojan.Agent-343335, Win.Trojan.Agent-230945, PUA.Win32.Packer.Msvcpp-1, Win.Trojan.Agent-576433, Win.Trojan.Slugin-357 |
| Comodo | UnclassifiedMalware |
| Cybereason | malicious.dda988 |
| Cylance | Unsafe |
| DrWeb | DLOADER.Trojan, BackDoor.Siggen.41201 |
| Emsisoft | Gen:Trojan.Heur.LP.ay4@aCPH@bli (B), Trojan.Generic.KDV.530539 (B), Win32.Worm.AutoIt.Z (B), Android.Adware.Kuguo.A (B), JS:Trojan.Clicker.NBP (B), Gen:Variant.Graftor.127006 (B), Android.Trojan.FakeInst.DA (B) |
| Invincea | virus.win32.sality.at |
| Jiangmin | Trojan/Reconyc.fid, Trojan.Cosmu.i, Win32/Virut.bn, I-Worm/Polip.cl, Trojan.Generic.fnrd |
| Kingsoft | Win32.Troj.Agent2.cq.(kcloud) |
| McAfee-GW-Edition | Heuristic.BehavesLike.Win32.Suspicious-DTR.K, Heuristic.LooksLike.Win32.Suspicious.I, Heuristic.LooksLike.Win32.Suspicious.B, Heuristic.LooksLike.Win32.Suspicious.E, BehavesLike.Win32.PWSZbot.dh |
| NANO-Antivirus | Trojan.Win32.Cholera.ctdfbm, Trojan.Win32.Inject.cslkna, Trojan.Win32.Agent.derwez, Trojan.Win32.Warezov.daszf, Trojan.Win32.Graftor.cticpm, Trojan.Win32.IframeExec.cxhgiu, Trojan.Win32.Heuristic210.dfvtzs |
| Prevx | Medium Risk Malware |
| Rising | PE:Trojan.Barys!6.50A, PE:Malware.XPACK-HIE/Heur!1.9C48, PE:Adware.OneStep!6.161D, PE:Trojan.Symmi!6.804, PE:Malware.Viking!6.17A9, PE:Backdoor.Agent!6.13D4, PE:Worm.Chir!6.171E, PE:Rootkit.Agent!6.2332 |
| Symantec | Suspicious.Insight |
| TheHacker | Backdoor/IRCNite.arz, Trojan/VB.qdc, Trojan/Menti.mxvf, Trojan/Agent.sjtk, Trojan/VBKrypt.efmc, Backdoor/IRCNite.cei, Trojan/Menti.myha, Trojan/AutoRun.AntiAV.t, Backdoor/Bredavi.eks, Trojan/Small.nav |
| Trapmine | malicious.moderate.ml.score |
| TrendMicro-HouseCall | TROJ_GEN.R0CBH0AA314, TROJ_GEN.F47V0201, Suspicious_GEN.F47V0818 |
| VBA32 | Trojan.Menti, Trojan.Agent, Trojan.Agent.ashi, Virus.Win32.Virut.X6 |
| ViRobot | Trojan.Win32.A.ShipUp.1404928, Trojan.Win32.A.NSAnti.102400.X, Trojan.Win32.A.Menti.90112.EH |
| Webwasher-Gateway | BlockReason.0 |
| Yandex | Riskware.Agent!, Trojan.MulDrop!kaXunN8DGBI |
| Zillya | Trojan.Monder.Win32.49829, Trojan.Menti.Win32.35788 |
| eGambit | Unsafe.AI_Score_91%, Unsafe.AI_Score_97% |
| eSafe | Win32.TrojanHorse, Win32.Trojan |
| nProtect | Trojan/W32.Agent.405504.XW, Trojan/W32.Agent.544768.L, Trojan-Downloader/W32.Cekar.61512 |
* How the Detection Percentage is Calculated
The detection percentage is based on that I have gathered 210176 scan reports for the Microsoft Windows Hardware Compatibility Publisher files. 156 of these scan results came up with some sort of detection. You can review the full details of the scan results by examining the files listed above.
Analysis Details
The analysis has been done on certificates with the following serial numbers:
- 6106c1ac000000000007
- 61060e0c000000000008
- 610e27d7000000000009
- 61054a4f000000000006
- 330000001e258e7c4251c5d1fa00010000001e
- 612cae34000000000003
- 614c617700010000000d
- 610c2e31000200000014
- 6101a07f00010000000e
- 6108feff00000000000a
- 33000000085200a3244e119a5b000100000008
- 6a0b994fc000eeaa11d64e4bf1626be2
- 6a0b994fc000dfaa11d5198f3b257168
- 61269246000100000011
- 330000002a04b4165d018871e000010000002a
- 6102d0d7000200000016
- 3300000009b3a6bb556666748b000100000009
- 330000000719ac6c921d3c2aad000000000007
- 33000000317c61d46115ceba6a000100000031
- 330000000cd4840c29fd1712a000000000000c
- 33000000244d59538809906ea7000100000024
- 33000000253a2738690a3451c1000000000025
- 330000000b19302c31b264785d00010000000b
- 3300000012b05493eaddceeb4b000000000012
- 3300000010d1ebbcbe1c4c7c49000100000010
- 330000002bf5bccdf91e36d04600010000002b
Содержание
- Популярные Hardware drivers загрузки
- Дебют или этап подготовки
- Подготовка парка машин
- Миттельшпиль или работа с HLK
- Развертывание HLK
- Установка драйвера
- Фильтры и плейлисты
- Подготовка пула тестовых машин
- Подготовка и запуск проекта
- Создание финального пакета hlkx
- Мерджинг пакетов hlkx
- Эндшпиль или сабмит финального пакета hlkx в Microsoft
- На что следует обращать внимание
- Roman Meita
- Publish a driver to Windows Update
- Windows Hardware Compatibility Program Certification Process
- Step 1: Review Hardware Requirements
- Step 2: Register on Hardware Dashboard
- Step 3: Install the Windows Hardware Lab Kit
- Step 4: Submit Results
- Step 5: Manage and Update
- Troubleshooting
- Hardware submissions
- Drivers summary page
- Hardware submission page
- Packages and signing properties
- Certification
- Distribution
Популярные Hardware drivers загрузки
Скачайте драйвер Microsoft JDBC 6.4 для SQL Server — драйвер JDBC типа 4, который обеспечивает обмен данными с базами данных через стандартные API-интерфейсы JDBC, доступные на платформе Java Enterprise Edition.
Microsoft ODBC Driver for SQL Server имеет встроенную поддержку подключения из Windows и Linux к Microsoft SQL Server и базам данных SQL Microsoft Azure.
Скачайте драйвер Microsoft JDBC 8.2 для SQL Server — драйвер JDBC типа 4, который обеспечивает обмен данными с базами данных через стандартные API-интерфейсы JDBC, доступные на платформе Java Enterprise Edition.
Скачайте драйвер Microsoft JDBC 6.2 для SQL Server — драйвер JDBC типа 4, который обеспечивает обмен данными с базами данных через стандартные API-интерфейсы JDBC, доступные на платформе Java Enterprise Edition.
Скачайте драйвер Microsoft JDBC 6.0 для SQL Server — драйвер JDBC типа 4, который обеспечивает обмен данными с базами данных через стандартные API-интерфейсы JDBC, доступные на платформе Java Enterprise Edition.
Скачайте драйвер Microsoft JDBC 7.4 для SQL Server — драйвер JDBC типа 4, который обеспечивает обмен данными с базами данных через стандартные API-интерфейсы JDBC, доступные на платформе Java Enterprise Edition.
Скачайте драйвер Microsoft JDBC 4.2 для SQL Server — драйвер JDBC типа 4, который обеспечивает обмен данными с базами данных через стандартные API-интерфейсы JDBC, доступные на платформе Java Enterprise Edition.
Microsoft ODBC Driver for SQL Server имеет встроенную поддержку подключения из Windows, Linux и macOS к Microsoft SQL Server и базам данных SQL Microsoft Azure.
Скачайте драйвер Microsoft JDBC 7.0 для SQL Server — драйвер JDBC типа 4, который обеспечивает обмен данными с базами данных через стандартные API-интерфейсы JDBC, доступные на платформе Java Enterprise Edition.
Скачайте драйвер Microsoft JDBC 4.1 для SQL Server — драйвер JDBC типа 4, который обеспечивает обмен данными с базами данных через стандартные API-интерфейсы JDBC, доступные на платформе Java Enterprise Edition.
Источник
Несоблюдение этого условия в лучшем случае (при отключенном Secure Boot) приведет к появлению предупреждения:


Несмотря на наличие официальной документации по прохождению процедуры сертификации, этот процесс может быть сопровожден рядом неочевидных на первый взгляд сложностей. Ниже приводится поэтапный разбор всех подводных камней на примере прохождения сертификации драйвера веб-камеры для 32 и 64-битной версий Windows 10 с обновлением 1803.
Краткий обзор всей последовательности действий:
Дебют или этап подготовки
Очевидным предварительным условием для сертификации является наличие следующего:
Подготовка парка машин
Для серверной части HLK ограничением является необходимость развертывания на Windows Server 2012, Windows Server 2012 R2 или Windows Server 2016.
Табличка поддерживаемых версий:
Для организации тестирования нам понадобятся одна управляющая машина с серверной версией Windows и две тестовые машины с 32 и 64-битными версиями Windows 10 в одной сети. При наличии нескольких доступных клиентов одной битности их можно использовать совместно, проводя тестирование параллельно. Альтернативной конфигурацией, в случае тестирования драйвера для двух архитектур, может быть схема с одним контроллером и одним клиентом (предполагается смена ОС клиента между тестовыми сессиями). Однако в этом случае возможны проблемы с настройкой пулов тестовых машин и потерей результатов тестирования. Кто виноват и что делать в такой ситуации будет рассказано ниже.
Миттельшпиль или работа с HLK
Важно: рекомендуется использовать свежеустановленные версии Windows с английской локалью во избежание появления внезапных проблем с тестами. Вас предупреждали.
Дополнительно на всех машинах парка можно отключить энергосберегающий режим и приостановить установку обновлений Windows, дабы исключить прерывания процесса тестирования, который может продолжаться несколько часов.
Развертывание HLK
На контроллере устанавливаем свежескаченный HLK корректной версии. В нашем случае это HLK 1803, поскольку на клиентах будет установлена Windows 10 с обновлением 1803. Существует вариант установки одной HLK Studio, однако он полезен только для работы с финальными пакетами hlkx.

Клиентская часть ставится на тестовые машины по сети с контроллера:
Установка драйвера

Фильтры и плейлисты
и запустить приложение UpdateFilters.exe, расположенное там же.
Важно: рекомендуется устанавливать фильтры до начала тестирования, так как их эффект применяется только к запущенным после установки тестам. Чтобы изменить результаты уже проведенных тестов, необходимо в проекте HLK Studio перейти на страницу Results и нажать кнопку Apply Filters.

Кроме фильтров Microsoft поставляет специализированные плейлисты (HLK Playlist), изменяющие состав базового списка тестов. Скачиваем архив с актуальными плейлистами и распаковываем его на контроллере.
Важно: плейлист может быть применен только к чистому проекту. Использовать его на серии пройденных тестов не удастся.
Информацию по выпуску новых фильтров и плейлистов можно найти в блоге Windows Hardware Certification
Подготовка пула тестовых машин
Пришло время подготовить пулы наших клиентских машин. Они нам понадобятся на этапе создания проекта. На вкладке Configuration все машины отобразятся в Default Pool. Нужно создать свои пулы (кнопка Create Machine Pool) и перетащить в них машины из пула по-умолчанию.
Важно: в одном пуле должны находиться машины с одинаковой битностью.

Важно: иногда студия выдает ошибку на попытку изменить статус машины.

Кроме прочего, такая ситуация появляется, когда меняется ОС на тестовом клиенте, например, в схеме с одним контроллером и одним клиентом. Решается это удалением машины из пула (пункт Delete Machine в контекстном меню), что заставляет контроллер создать новый инстанс клиента с правильными характеристиками в Defaul Pool. Внимание, удаление машины приводит к удалению всех ассоциированных с ней результатов тестирования. Во избежание напрасной потери результатов нескольких часов работы, перед удалением машины следует подготовить финальный hlkx пакет, включающий все пройденные тесты. О подготовке файла hlkx будет рассказано далее.
Подготовка и запуск проекта
На странице Projects выбираем Create project и задаем проекту произвольное имя. Активируем проект двойным кликом по нему. Каждый проект может тестироваться только на машинах одной битности.

На странице Selection выбираем пул машин, на котором будет производиться тестирование. В списке отобразятся устройства, подключенные к машинам из этого пула. Отмечаем устройства, которые будут тестироваться.

Переходим на страницу Tests. Перед запуском тестов применяем плейлист нужной версии, распакованный из архива ранее. Отмечаем тесты, которые будут запущены для устройства. Следует обратить внимание, что некоторые тесты проходят в ручном режиме (обозначены иконкой человечка в столбце Type) и требуют некоторого пользовательского ввода на стороне клиентской машины. Их лучше отложить на потом и сначала отметить все автоматические.


При его создании необходимо указать:
После нажатия на «Create Package» потребуется отметить:
Создание финального пакета hlkx
Можно создавать неподписанные hlkx, например, просто для последующего открытия в студии. Для сабмита в Microsoft файл hlkx необходимо подписать EV сертификатом. Проще всего импортировать сертификат в систему и выбрать его в процессе создания пакета (кнопка Create Packageна странице Package). Получаем файл hlkx с результатами пройденных тестов.

Мерджинг пакетов hlkx
Этот этап выполняется, если вы проходите тестирование для нескольких платформ. В нашем случае, тестирование проводится для x86 и x64.
Для конфигурации с одним контроллером и одним клиентом меняем битность тестовой ОС, повторяем шаги по настройке клиента, переинициализируем машину под соответствующий пул.
Создаем проект для следующей платформы и повторяем весь процесс тестирования.
На шаге создания пакета hlkx дополнительно вызываем меню Merge Package и указываем подготовленный hlkx пакет для платформы другой битности.

У нас готов hlkx пакет для отправки в Microsoft.
Эндшпиль или сабмит финального пакета hlkx в Microsoft
На панели слева выбирвает Drivers. Нажимаем Submit new hardware.

Заполняем поле Product name и загружаем наш пакет hlkx.

В разблокированной секции Certification заполняем поля тип устройства, дата анонса и опционально маркетинговое имя. Нажимаем Submit.

Через некоторое время получаем результаты сертификации. Подписанные компоненты драйвера можно скачать, нажав по кнопке Download signed files.

Конечный результат всех усилий:

На что следует обращать внимание

Roman Meita
Read more posts by this author.
В последнее время мне часто приходилось переписывать много адаптеров для списков, и каждый раз я брался за голову — в адаптере находилась бизнес-логика, сетевые запросы и роутинг приложения и многое другое. Все это очень
Источник
Publish a driver to Windows Update
To publish a driver to Windows Update, create a hardware submission and then follow the steps below.
Find the hardware submission that contains the driver you want to distribute.
Go to the Distribution section of the hardware submission and select New shipping label.

On the shipping label page, go to the Details section and enter a name for the shipping label in the Shipping label name field. This name allows you to organize and search for your shipping labels.
In the Properties section, complete the following information:
| Field | Description |
|---|---|
| Destination | Select Publish to Windows Update to publish your driver to Windows Update. If you want to create a shared shipping label that allows you to share your driver with a partner, see Share a driver with a partner. Note Shared drivers can only be shared by the organization that originally created it. An organization that receives a shared driver cannot share it again. |
| Specify the partner (if any) that is allowed visibility into this request | Enter a partner that you want to have read-only permissions to your driver and shipping label. Use this field when you want a partner to be aware of this shipping label request, such as when you publish a driver on their behalf. For more information, see Publish a driver on behalf of a partner. |
| Driver Delivery Options | When the destination is Windows Update, the default is Automatic, which means that the driver is delivered automatically on upgrades and for every applicable system. If you select only the Automatically delivered during Windows Upgrades the driver is defined as a Dynamic Driver and is delivered only during OS upgrades. If you select only Automatically delivered to all applicable systems, Windows Update delivers the driver immediately to all applicable systems once it is released.
If you select Manual in Windows 10, version 1909 or earlier, the driver is automatically delivered only if the device does not have a driver installed already or only has a generic driver. Starting in Windows 10, version 2004, drivers with a Manual shipping label is not automatically delivered. To access the best matching Optional/Manual driver, the user must go to Settings > Update & Security > Windows Update > View optional updates > Driver updates. |

In the Targeting section, select the driver package that you want to publish.
After you select your driver package, Select PNPs becomes available. Select the hardware IDs you want to target. You can search for a specific hardware ID or operating system by using the search boxes above the list of hardware IDs.
To target all listed hardware IDs, select Publish All.
To target specific hardware IDs, find each desired hardware ID and select Publish.
If you targeted all hardware IDs and want to remove them, select Expire All.
To remove targeting for specific hardware IDs, find each hardware ID and select Expire.

If you want to add Computer Hardware IDs (CHIDs), enter each CHID into the text box and select Add CHID(s). To bulk add multiple CHIDs, ensure that each CHID is separated by a newline, select Add multiple CHIDs, and paste your CHIDs into the text box. You can view all added CHIDs in the list below the text box. To remove a CHID from the list, select Remove
CHIDs are not supported for the following versions of windows:
If your driver targets either of these operating systems, create two shipping labels: one for Windows 10 (where you can add CHIDs) and one for down-level operating systems (where no CHIDs will be added).
If you wish to limit public disclosure of your Shipping Label in the Windows Update Catalog and WSUS Catalog, check the Limit Public Disclosure of this Shipping Label information. box.

Your driver will still be published and downloadable from Windows Update but will not show up in either of the public catalog lists.
If your driver targets Windows 10 in S mode, you must select both boxes, confirming the following:

Select Publish to send your request to Windows Update. If you do not want to publish the shipping label right now, you can select Save. You can publish the shipping label later by either opening the shipping label and selecting Publish, or you can select Publish all pending from the hardware submission page. Note that selecting Publish all pending will publish all unpublished shipping labels.
Источник
Windows Hardware Compatibility Program Certification Process
The Windows Hardware Compatibility Program lets you show customers that your hardware is reliably compatible with Windows 10 and Windows 11. The program contains tools and processes that determine whether your hardware meets Windows 10 and Windows 11 quality standards.
Step 1: Review Hardware Requirements
Building a great Windows device starts with understanding the hardware requirements.
Step 2: Register on Hardware Dashboard
Before you start testing for Windows compatibility, you should register with the hardware dashboard. Later, you’ll use the dashboard to submit your hardware for the Hardware Compatibility Program.
Step 3: Install the Windows Hardware Lab Kit
Get ready to test your Windows hardware by installing the Windows Hardware Lab Kit (HLK) and configuring your test environment. The tests that are included in the Windows HLK help you validate compatibility with Windows 10 & Windows 11 and get your hardware listed on the certified product list. The HLK Getting Started Guide provides instructions on how to build a test environment, automate driver and system testing, and create the submission package required to participate in the Windows Hardware Compatibility Program.
Step 4: Submit Results
After testing your hardware and packaging the results with the HLK, you can submit the results to the hardware dashboard to qualify for the Windows Hardware Compatibility Program.
Step 5: Manage and Update
After you submit your test results, you can monitor and manage your submission in the dashboard.
Troubleshooting
The dashboard also provides additional services, including:
The Windows Hardware Lab Kit User’s Guide also provides the following guidance on interpreting test failures and bug submission:
Источник
Hardware submissions
The Windows Hardware Compatibility Program (for Windows 10) and the Windows Hardware Certification Program (for Windows 8/8.1 and older operating systems) enable you to design, create, and test your hardware and drivers before you submit the final version through the Partner Center. For more information, see the Windows hardware certification page. By certifying your hardware device, system, and drivers for Windows, you gain the support of Microsoft marketing resources in the form of compatibility and reliability listings, logo artwork, and promotional partnerships.
To develop your device, download the Windows Driver Kit (WDK).
To test your device, download the Windows Hardware Lab Kit (Windows HLK) for Windows 10.
After you develop and test your product, you can submit the results with a hardware submission.
To submit an HLK or HCK package, see Create a new hardware submission.
To submit a WLK package, see Create a new WLK device certification submission for more information.
Drivers summary page
The Drivers summary page contains a list of all hardware certification submissions that you have created or are shared with you. You can create a new hardware submission by selecting the Create new driver button.

The hardware certification submission list displays the following information about each submission:
The ID of the driver.
Name
The name specified in Driver name during the submission creation process.
State
The current state of the submission. Possible values are:
Certification type
The certification type for your submission. This can be either HLK or HCK.
Created date
The date the driver was added to your account, either by you or by someone sharing the driver with you.
Permission
Your permission for the submission. Possible values are:
Source
The author (shown as the organization name) of the submission.
The search box allows you to search for a specific submission or set of submissions. You can search for exact or partial matches for the values in the ID, Name, State, and Certification type columns.
Hardware submission page
A hardware submission page contains information about a specific hardware submission, including status, packages, certification info, and shipping labels. For information about how to create a hardware submission, see Create a new hardware submission.

The left side of the page contains a list of the 10 most recently viewed submissions.
You can monitor the progress of your submission with the progress tracker at the top of the page. Once all steps show a green check, the submission is complete and your company will receive a notification.
Packages and signing properties
This section shows you how to manage your packages.
Select Upload new to upload a new package.
Select Download DUA shell to download the DUA shell package. For information about how to update a submission using DUA, see Manage hardware submissions.
The uploaded package list displays your uploaded packages for this submission. Select the caret to expand a package. This shows you the submission ID and allows you to select Download package to download the package.
Additional certifications displays any chosen additional certifications.
Certification
This section displays certification information. Select See more info to expand this section. You can review the certification information you provided, which includes the following:
Indicates whether or not your driver was compiled with the Retpoline flag. A Check mark = True and an X = False. For more information about this change see our blog post.
Is this a Universal Windows driver?
Indicates whether or not your driver meets the Universal Windows Platform requirements. For more information, see Getting Started with Universal Windows drivers.
What type of device?
Indicates that your device is:
An internal component, if your device is part of a system and connects inside the PC.
An external component, if your device is an external device (peripheral) that connects to a PC.
Both, if your device can be connected internally (inside a PC) and externally (peripheral).
Select metadata category
The device metadata category you selected.
If needed, you can generate a Sysdev reference ID that allows you to link up Dev Center hardware submissions with Sysdev Device Metadata submissions.
The date when you want your product included on the Windows Server Catalog, the Windows Certified Product List, and the Universal Driver List. The default setting is Today.
Your marketing name(s). Marketing names allow you to provide aliases for your product. You can provide as many names as you want.
If you want to add or update your announcement date, use the Announcement date (UTC) field and select Submit.
You can also add or remove marketing names. To add a name, enter it in the Marketing name text box and select Add. To remove a name, select the red X button next to the marketing name you want to remove. You can also add multiple names at once by selecting Add multiple names. When you are finished, select Submit.
Distribution
This section displays shipping label information for this submission. For information about how to use shipping labels, see the Manage driver distribution with shipping labels section.
Select New shipping label to create a new shipping label.
Select Publish all pending to publish all shipping labels that are not yet published.
The shipping label list displays the shipping labels for this submission. This list includes shipping labels you created, and partner shipping labels for your shared driver. Select the shipping label name to see details for that shipping label. The shipping label list displays the following information about each label:
The shipping label name. Select this name to see details for the shipping label.
The Publisher display name of the shipping label creator. This allows you to easily keep track of which business partners sent you drivers.
For a Windows Update shipping label, the destination is «Windows Update».
For a shared driver, the destination is the Publisher display name of the company you selected for Who is publishing? when you created the shipping label. This allows you to easily see all companies that you have shared your driver with.
The creation date of the shipping label.
The release date of the shipping label.
If the shipping label was created by your company, you will see the details of the user who created the shipping label. This allows you to follow up if you have any questions about the creation. This field is not applicable if another company created the label.
If the shipping label was created by your company, you will see the details of the user who last modified the shipping label. This allows you to follow up if you have any questions about the changes. This field is not applicable if another company created the label.
The status graphic displays the publish status for each shipping label. A green check means the label has been published. A yellow circle means the label is not published yet.
Источник
Adblock
detector
| Column | Description |
|---|---|
![]()
Специальное предложение. См. дополнительную информацию о Outbyte и unistall инструкции. Пожалуйста, просмотрите Outbyte EULA и Политика Конфиденциальности
Microsoft Basic Display Driver
Windows XP, XP 64-bit, Vista, Vista 64-bit, 7, 7 64-bit, 11, 10, 8, 8.1
Microsoft Basic Display Driver Windows для устройств собирались с сайтов официальных производителей и доверенных источников. Это программное обеспечение позволит вам исправить ошибки Microsoft Basic Display Driver или Microsoft Basic Display Driver и заставить ваши устройства работать. Здесь вы можете скачать все последние версии Microsoft Basic Display Driver драйверов для Windows-устройств с Windows 11, 10, 8.1, 8 и 7 (32-бит/64-бит). Все драйверы можно скачать бесплатно. Мы проверяем все файлы и тестируем их с помощью антивирусного программного обеспечения, так что скачать их можно на 100% безопасно. Получите последние WHQL сертифицированные драйверы, которые хорошо работают.
Эта страница доступна на других языках:
English |
Deutsch |
Español |
Italiano |
Français |
Indonesia |
Nederlands |
Nynorsk |
Português |
Українська |
Türkçe |
Malay |
Dansk |
Polski |
Română |
Suomi |
Svenska |
Tiếng việt |
Čeština |
العربية |
ไทย |
日本語 |
简体中文 |
한국어
Список драйверов от Microsoft.
Выберите драйвер для своей операционной системы и ее разрядности. Рекомендуется устанавливать более позднюю версию драйвера (смотрите на дату выхода).
Для перехода к скачиванию файла нажмите на ссылку.
| Драйвер / Устройство | Операционная система |
Дата выхода Версия |
Ссылка на скачивание |
|
|---|---|---|---|---|
 |
Kinect for Windows Device Driver |
Windows 7, Windows 8, Windows 8.1, Windows 10 32-bit (x86), 64-bit (x64) |
2021-01-23 1.8.0.595 1.8.0.572 1.6.0.476 |
 |
|
VMware VMCI Bus Device Drivers |
Windows XP, Windows Vista, Windows 7, Windows 8 32-bit (x86), 64-bit (x64) |
2013-02-13 9.5.10.0 |
|
|
Acer / Palm Handheld USB Driver |
Windows XP, Windows Vista, Windows 7 32-bit (x86), 64-bit (x64) |
2011-04-04 6.0.1.0 6.0.2.0 |
|
|
Generic USB Hub Drivers |
Windows XP, Windows Vista, Windows 7 32-bit (x86), 64-bit (x64) |
2009-07-14 6.1.7600.16385 |
|
|
Microsoft USB Sync Driver |
Windows XP, Windows Vista, Windows 7, Windows 8, Windows 8.1, Windows 10 32-bit (x86), 64-bit (x64) |
2007-05-31 6.1.6965.0 |
|
|
ATI I/O Communications Processor USB 2.0 EHCI controller Drivers |
Windows XP, Windows Vista, Windows 7 32-bit (x86), 64-bit (x64) |
2006-06-21 6.1.7600.20589 |
|
|
ATI I/O Communications Processor LPC Controller Driver |
Windows XP, Windows Vista, Windows 7 32-bit (x86), 64-bit (x64) |
2006-06-21 6.1.7601.17514 |
|
|
Standard OpenHCD USB Host Controller |
Windows 7 64-bit (x64) |
2006-06-21 6.1.7600.20589 |
|
|
Generic USB Hub Drivers |
Windows XP, Windows Vista, Windows 7, Windows 8 64-bit (x64) |
2006-06-21 6.1.7601.17586 |
|
|
Intel SD Host Controller Drivers |
Windows XP, Windows Vista, Windows 7, Windows 8, Windows 8.1, Windows 10 32-bit (x86), 64-bit (x64) |
2006-06-21 10.0.14393.0 6.2.9200.16548 |
|
|
Microsoft USB Mass Storage Device Driver |
Windows XP, Windows Vista, Windows 7 32-bit (x86) |
2006-06-21 6.0.6000.16386 |
|
|
Microsoft MTP USB Device Driver |
Windows XP 32-bit (x86), 64-bit (x64) |
2006-06-21 10.0.14393.0 6.1.7600.16385 |
|
|
Microsoft UAA bus for HD audio Driver |
Windows XP 32-bit (x86) |
2006-02-03 6.0.5383.0 5.10.00.5010 |
|
|
Microsoft Mobile Pentium 4 Driver |
Windows XP 32-bit (x86) |
2003-03-17 5.1.2600.0 |
|
|
OHCI Compliant IEEE 1394 Host Controller |
Windows XP, Windows Vista, Windows 7, Windows 8, Windows 8.1, Windows 10 32-bit (x86), 64-bit (x64) |
2001-07-01 5.1.2535.0 |
|
|
National Semiconductor Cx5530/Cx5520 ACPI bridge Drivers |
Windows 95, Windows 98 32-bit (x86) |
0000-00-00 none |
|
Сайт не содержит материалов, защищенных авторскими правами. Все файлы взяты из открытых источников.
© 2012-2023 DriversLab | Каталог драйверов, новые драйвера для ПК, скачать бесплатно для Windows
kamtizis@mail.ru
Страница сгенерирована за 0.038495 секунд
![]()
 Иногда в разделе «Видеоадаптеры» диспетчера устройств Windows 11 и Windows 10 отображается «Базовый видеоадаптер (Майкрософт)», а при попытке обновить драйвер средствами системы пользователь видит сообщение о том, что «Наиболее подходящие драйверы для данного устройства уже установлены», но в действительности это совсем не так — например, игры вам запустить не удастся за исключением случаев наличия второй видеокарты, для которой драйвер установлен.
В этой инструкции подробно о том, как скачать и установить правильный драйвер для Базовый видеоадаптер Майкрософт, разобраться, какая именно видеокарта отображается таким образом и решить проблему.
Что такое Базовый видеоадаптер Майкрософт в диспетчере устройств

После установки Windows 11 и Windows 10 или при добавлении нового оборудования, система пытается найти подходящие драйверы для устройств в своих базах, а при наличии доступа — и в центре обновлений Windows, происходит это и для видеокарт.
Если Windows не находит драйвер, который специально предназначен для видеокарты, производится установка очень ограниченного по функциональности, но совместимого почти с любой видеокартой драйвера: в результате мы видим Базовый видеоадаптер (Майкрософт) вместо нужной видеокарты.
По этой же причине попытки обновить драйвер через диспетчер устройств сообщают нам о том, что «Система Windows определила, что наиболее подходящий драйвер для этого устройства уже установлен».
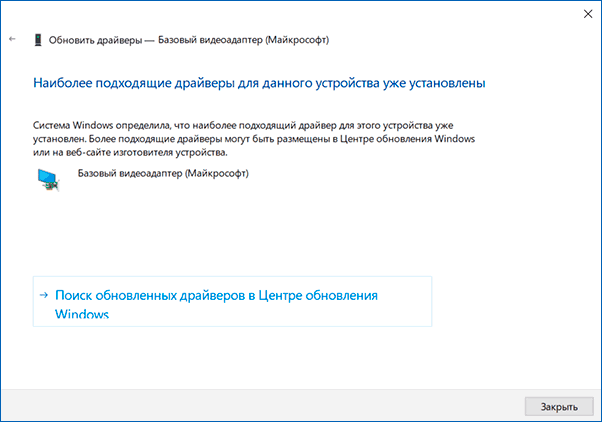
Эта информация говорит лишь о том, что в комплекте драйверов Windows 11/10 и в центре обновлений (при наличии доступа к нему) отсутствуют более подходящие драйверы, но это не означает, что их нет вообще. Наша задача — найти и установить нужный драйвер. Примечание: в случае если на вашем компьютере есть дискретная и интегрированная видеокарта, проблема может проявиться только для одной из них и иногда в этом случае всё работает полностью исправно — например, на ПК, когда монитор подключён к той видеокарте, драйверы на которую установились успешно: но драйвер лучше всё равно установить.
Как определить какой драйвер нужен и скачать его
Если вы точно знаете, что за видеокарта установлена, достаточно просто загрузить нужный драйвер с сайта NVIDIA, AMD или Intel в зависимости от её модели. Если это неизвестно, то для того, чтобы подобрать, скачать и установить нужный драйвер, нам требуется определить, какая видеокарта скрывается за обозначением Базовый видеоадаптер Майкрософт. Это можно сделать вручную или автоматически с помощью сторонних программ.
Как найти и скачать драйвер для Базовый видеоадаптер (Майкрософт) вручную
Для ручного определения необходимого драйвера можно выполнить следующие шаги:
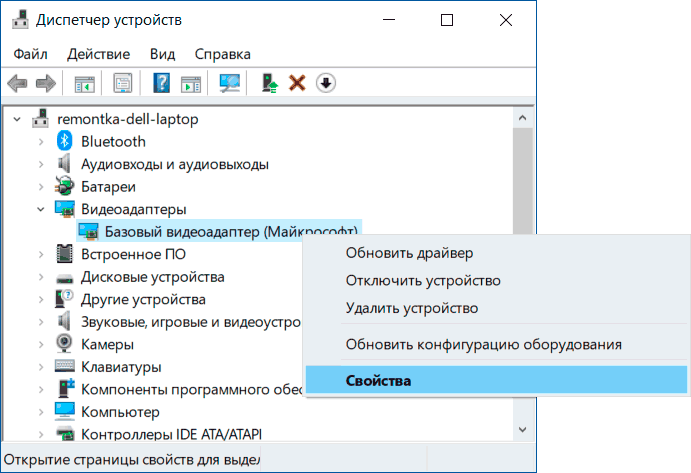
- В диспетчере устройств нажмите правой кнопкой мыши по Базовый видеоадаптер (Майкрософт) и выберите пункт «Свойства» в контекстном меню.

- Перейдите на вкладку «Сведения» и в поле «Свойства» выберите пункт ИД оборудования. Скопируйте идентификатор (правый клик — копировать). В нём нас интересуют параметры VEN и DEV — производитель и устройство соответственно. Например, для следующего шага нам вполне хватит текста (где буквы заменены цифрами) VEN_NNNN&DEV_MMMM.

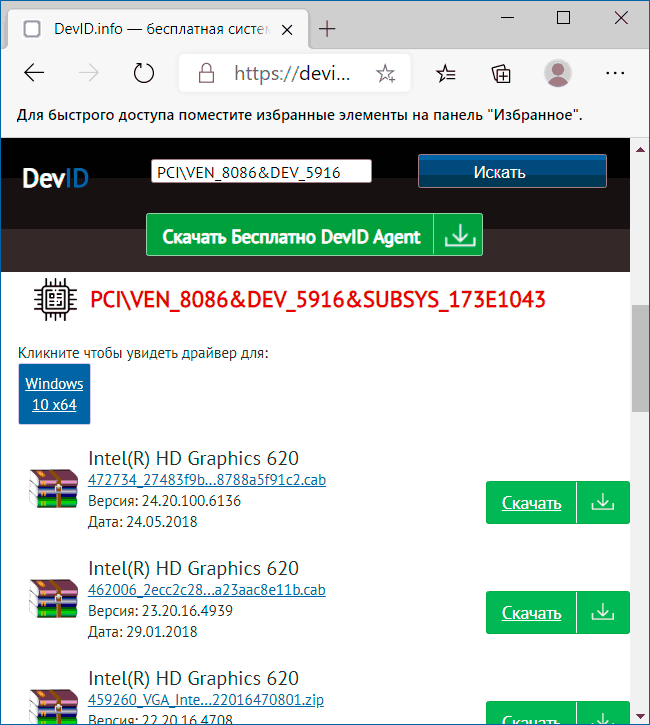
- Зайдите на сайт https://devid.info/ и в строке поиска сверху вставьте скопированный текст, нажмите «Искать».
- В результате в списке внизу отобразится, какому устройству соответствует этот ИД с возможностью сразу скачать драйверы этого устройства, но, возможно это будет не лучшей идеей — скачивать их именно с этого сайта (как и с других сторонних сайтов). Теперь, когда вы знаете, что это за видеокарта, я рекомендую перейти к следующему шагу. На всякий случай дополнительный материал: Как узнать, какая видеокарта стоит на компьютере или ноутбуке.

- Для видеокарт AMD и NVIDIA скачайте драйверы для вашей видеокарты с официальных сайтов https://www.amd.com/ru или https://www.nvidia.com/ru-ru/. Для видеокарт Intel драйверы можно попробовать найти на официальном сайте https://downloadcenter.intel.com/ru/product/80939/Graphics.
- Если драйверы с указанных официальных сайтов производителей видеокарт/чипов не устанавливаются, найдите в Интернете страницу поддержки вашей модели материнской платы или ноутбука с помощью запроса вида «модель_материнской_платы поддержка» (как узнать модель материнской платы) или «модель_ноутбука поддержка» и в разделе загрузки драйверов найдите драйвер для видеокарты (может называться не по модели видеокарты, а, например, просто «Видео» или «VGA»). Даже если драйвер не для Windows 10, а для предыдущих версий системы, смело скачиваем его и устанавливаем. Для некоторых ноутбуков и брендовых компьютеров на официальном сайте поддержки может быть доступна собственная фирменная утилита автоматической установки драйверов — можно использовать её.


Как правило, описанные шаги оказываются достаточными для того, чтобы решить проблему и установить нужный драйвер.
Автоматический поиск нужного драйвера для Базовый видеоадаптер и его установка
Существует большое количество программ для автоматического поиска и установки драйверов оборудования: Snappy Driver Installer, IOBit Driver Booster, Driver Pack Solution и другие.
Я выступаю за ручную установку драйверов, но, если вы решили прибегнуть к автоматической, рекомендую остановиться на первой из указанных программ — она полностью бесплатна, функциональна и имеет наименьшее количество дополнительных нюансов, которые нужно учитывать при использовании.
Порядок действий (один из вариантов подхода, призванный ускорить процесс установки драйвера базового видеоадаптера) будет следующим:
- На официальной странице https://sdi-tool.org/download/ скачайте версию SDI Lite и распакуйте загруженный архив.
- Запустите исполняемый файл SDI (в 64-разрядной системе — с x64 в имени).
- В окне приветствия Snappy Driver Installer нажмите «Загрузить только Индексы».

- Дождитесь загрузки индексов (может показаться, что она не идёт, но следует подождать).
- После завершения загрузки слева нажмите «Обновить». Если ничего не произошло, подождите 2-3 минуты и либо окно со списком предлагаемых драйверов обновится само, либо ещё раз нажмите «Обновить».
- Если видеокарта определилась и справа от её названия указано «Драйвер доступен для установки (Интернет)», отметьте этот пункт.

- Нажмите кнопку «Установить» вверху справа окна программы и дождитесь установки драйвера видеокарты.


На этом процесс установки драйвера для «Базовый видеоадаптер (Майкрософт)» будет завершён и, с большой вероятностью, графика компьютера заработает надлежащим образом.